

Page 1
840067800
Juice Extractor Safety................................ 2
Before First Use........................................ 3
Know Your Juice Extractor...................... 4
How to Assemble ...................................... 5
How to Use .............................................. 7
How to Disassemble ................................ 8
Care and Cleaning.................................. 10
Troubleshooting...................................... 11
Juicing Tips and Techniques................ 12
Customer Service .................................. 14
In USA: 1-800-851-8900
In Canada: 1-800-267-2826
Juice
Fountain
™
Us e
&
Care
GUIDE
®
Page 2

2
IMPORTANT SAFEGUARDS
SAVE THESE INSTRUCTIONS!
Juice Extractor Safety
When using electrical appliances, basic
safety precautions should be observed,
including the following:
1. Read all instructions before operating.
2. To protect against risk of electrical
shock, do not immerse cord, plug, or
motor base in water or other liquid.
3. This appliance is not intended for use
by children. Close supervision is necessary when this appliance is used near
children. Do not allow children to use this
appliance.
4. Always turn appliance OFF and unplug
cord from outlet when not in use, before
putting on or taking off parts, and
before cleaning.
5. Avoid contacting moving parts. Keep
fingers out of feed chute.
6. Never feed food by hand – always use
the food pusher.
7. Always make sure the juice extractor is
properly and completely assembled
before the motor is turned on. The unit
will not turn ON unless properly assembled. Do not release safety locking arm
while juice extractor is in operation.
8. Never operate without pulp container
in place.
9. Be sure to turn switch to OFF position
after each use of your juice extractor.
Make sure the motor stops completely
before disassembling.
10. Do not put fingers or other objects into
the juice extractor feed chute while it is
in operation. If food becomes lodged in
the opening, use food pusher to push it
down. When this method is not possible, turn the motor off, unplug the cord
from the outlet, and disassemble juicer
to remove the remaining food.
11. Do not operate any appliance with a
damaged cord or plug, or after the
appliance malfunctions or is dropped
or damaged in any manner. Call our
toll-free customer service number for
information on examination, repair or
adjustment.
12. The use of attachments not
recommended or sold by Hamilton
Beach/Proctor-Silex, Inc. may cause
fire, electric shock, or injury.
13. Do not use outdoors.
14. Do not let cord hang over edge of table
or counter, or touch hot surfaces,
including stove, or become knotted.
15. Do not leave juice extractor unattended
while it is operating.
16. Blades are sharp; handle carefully. Do
not touch the small cutting blades in the
base of the stainless steel filter basket.
17. Keep hair, clothing, and jewelry, as well
as spatulas and other utensils, away
from feed chute during operation to
prevent the possibility of severe injury
to persons and/or damage to the
appliance.
18. The filter basket is a very delicate
screen not covered under the
warranty. Do not wash in an automatic
dishwasher. If bent or damaged, do
not use, as it could break into small
pieces and cause personal injury and/
or damage the appliance. Call our
toll-free customer service number to
order a new filter basket. Replace
filter basket when it shows signs of
wear.
19. Always use the juice extractor on a dry,
level surface.
20. Any maintenance other than cleaning
should be performed by an authorized
service center.
21. To reduce the risk of personal injury
and/or damage to the appliance, do not
use bent, dented or otherwise damaged
filter basket.
Page 3
3
Consumer Safety Information
CAUTION: This appliance is not intended
for use by children.
This appliance is equipped with a polarized
plug. This type of plug has one blade wider
than the other. The plug will fit into an
electrical outlet only one way. This is a
safety feature intended to help reduce the
risk of electrical shock. If you are unable to
insert the plug into the outlet, try reversing
the plug. If the plug should still fail to fit,
contact a qualified electrician to replace the
obsolete outlet. Do not attempt to defeat
the safety purpose of the polarized plug by
modifying the plug in any way.
The length of the cord used on this appliance
was selected to reduce the hazards of
becoming tangled in or tripping over a
longer cord. If a longer cord is necessary,
only an approved extension cord may be
used. The electrical rating of the extension
cord must be equal to or greater than the
rating of the juice extractor. Care must be
taken to arrange the extension cord so that
it will not drape over the countertop or tabletop where it can be pulled on by children or
accidentally tripped over.
The electrical rating of this appliance is
listed on the bottom panel of the unit.
Before First Use
After unpacking the juice extractor, remove cardboard from filter basket and wash
everything except the base in warm, soapy water. Rinse and dry immediately.
Never immerse the base in water or other liquids; wipe it with a damp sponge.
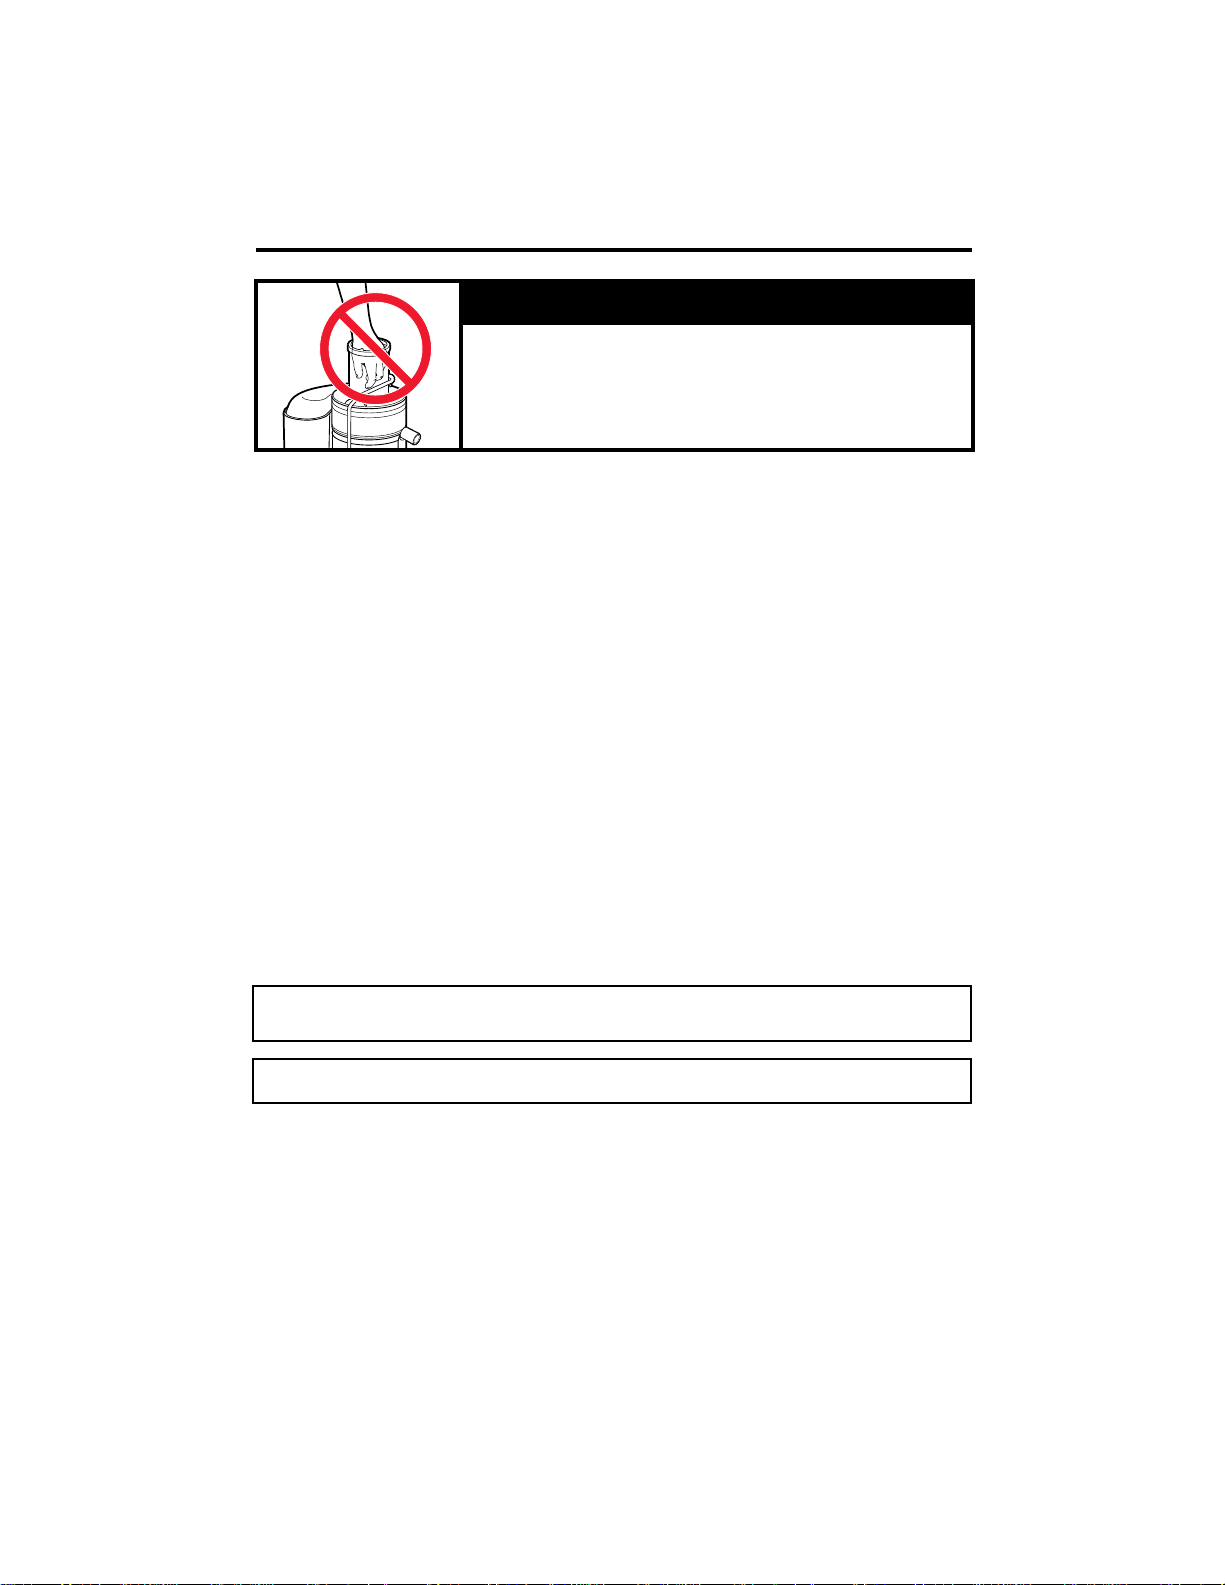
wCAUTION
Extra-wide feed chute. Do not place hands or foreign
objects down feed chute. Always use the food pusher.
This appliance is intended for household use only.
NOTE: When juicing oranges, always peel before placing in the juicer.
Page 4
4
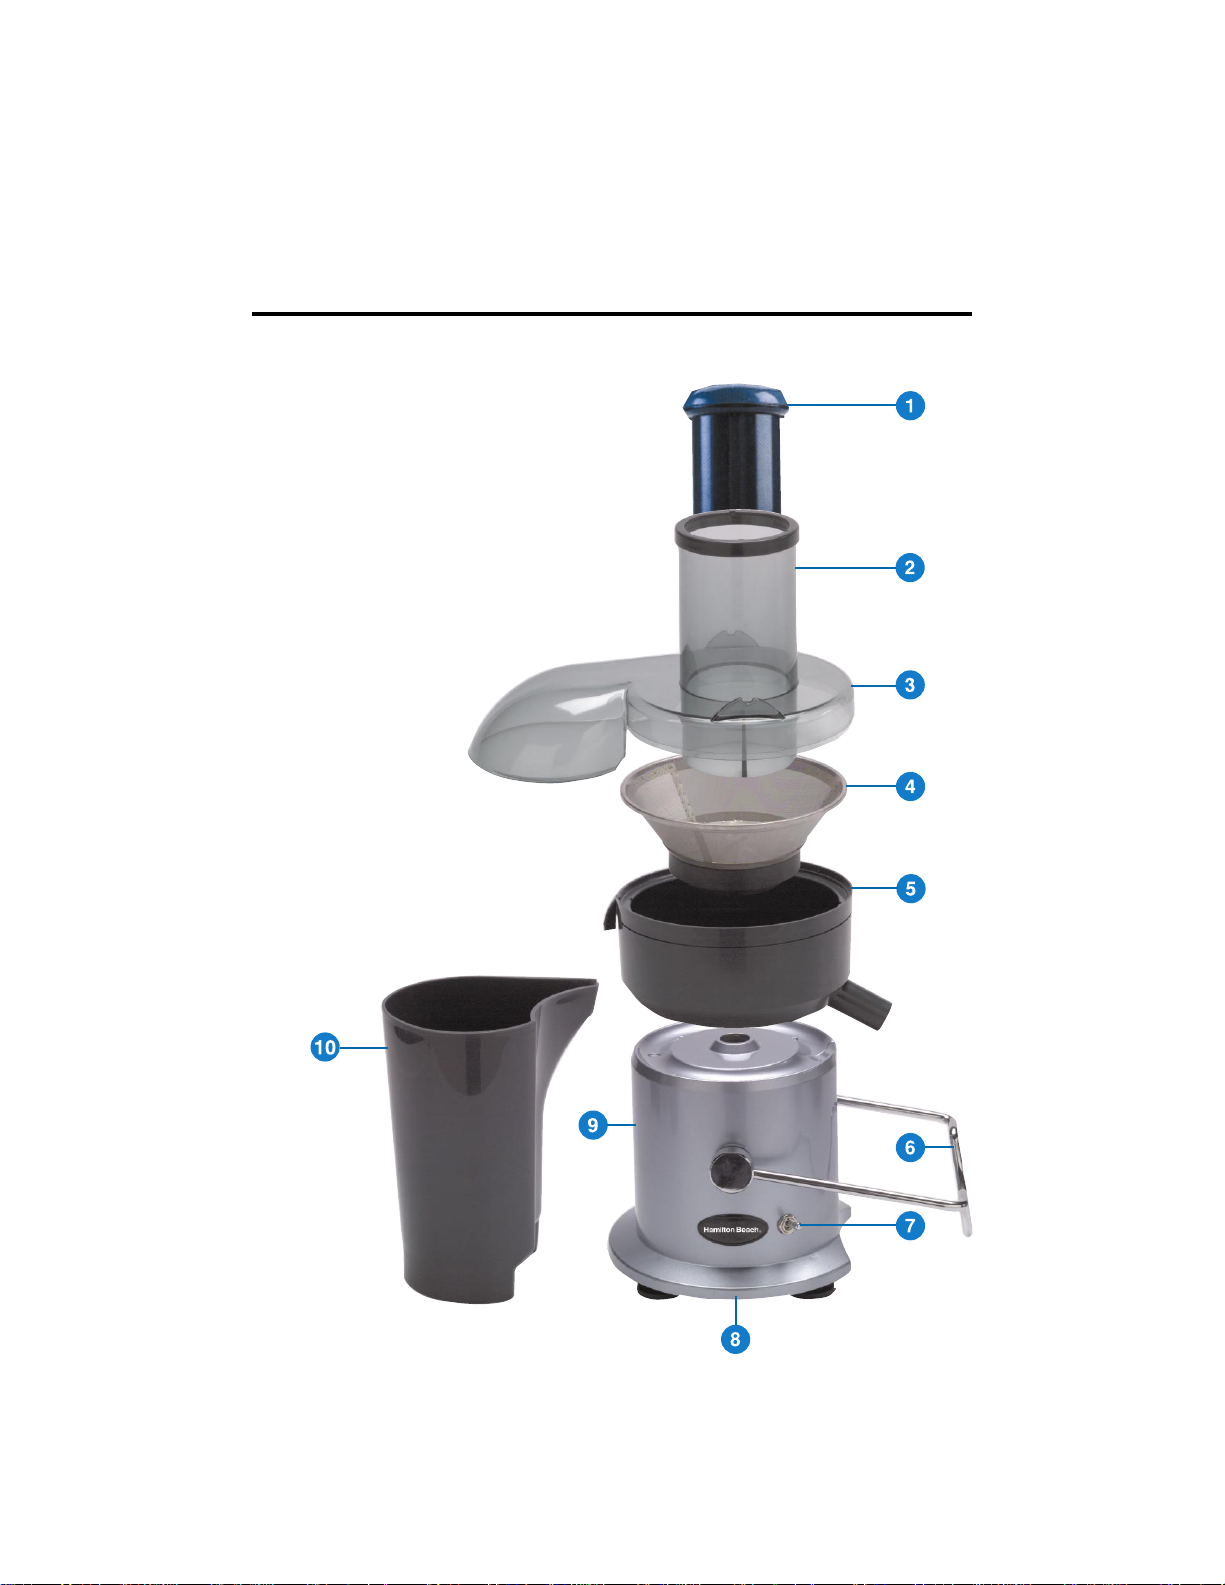
Know Your Juice Extractor
Parts and Features
1. Food Pusher for pushing whole
fruits and vegetables down the
patented extra-wide Feed Chute.
2. Extra-Wide Feed Chute fits
whole apples, carrots, tomatoes,
and peeled oranges. Makes
juicing fruits and vegetables
easy and fast.
3. Juicer Cover
4. Stainless Steel Micro Mesh
Filter Basket
5. Filter Bowl
6. Safety Locking Arm – Juicer
will not operate without
Juicer Cover in place
and Safety Locking
Arm in place in the
vertical operating
position.
7. On/Off Switch
8. Cord – wraps around feet and
clips into position under Base.
9. High Performance
Motor Base – 600 watt motor.
10. Large Pulp Container
Page 5
5
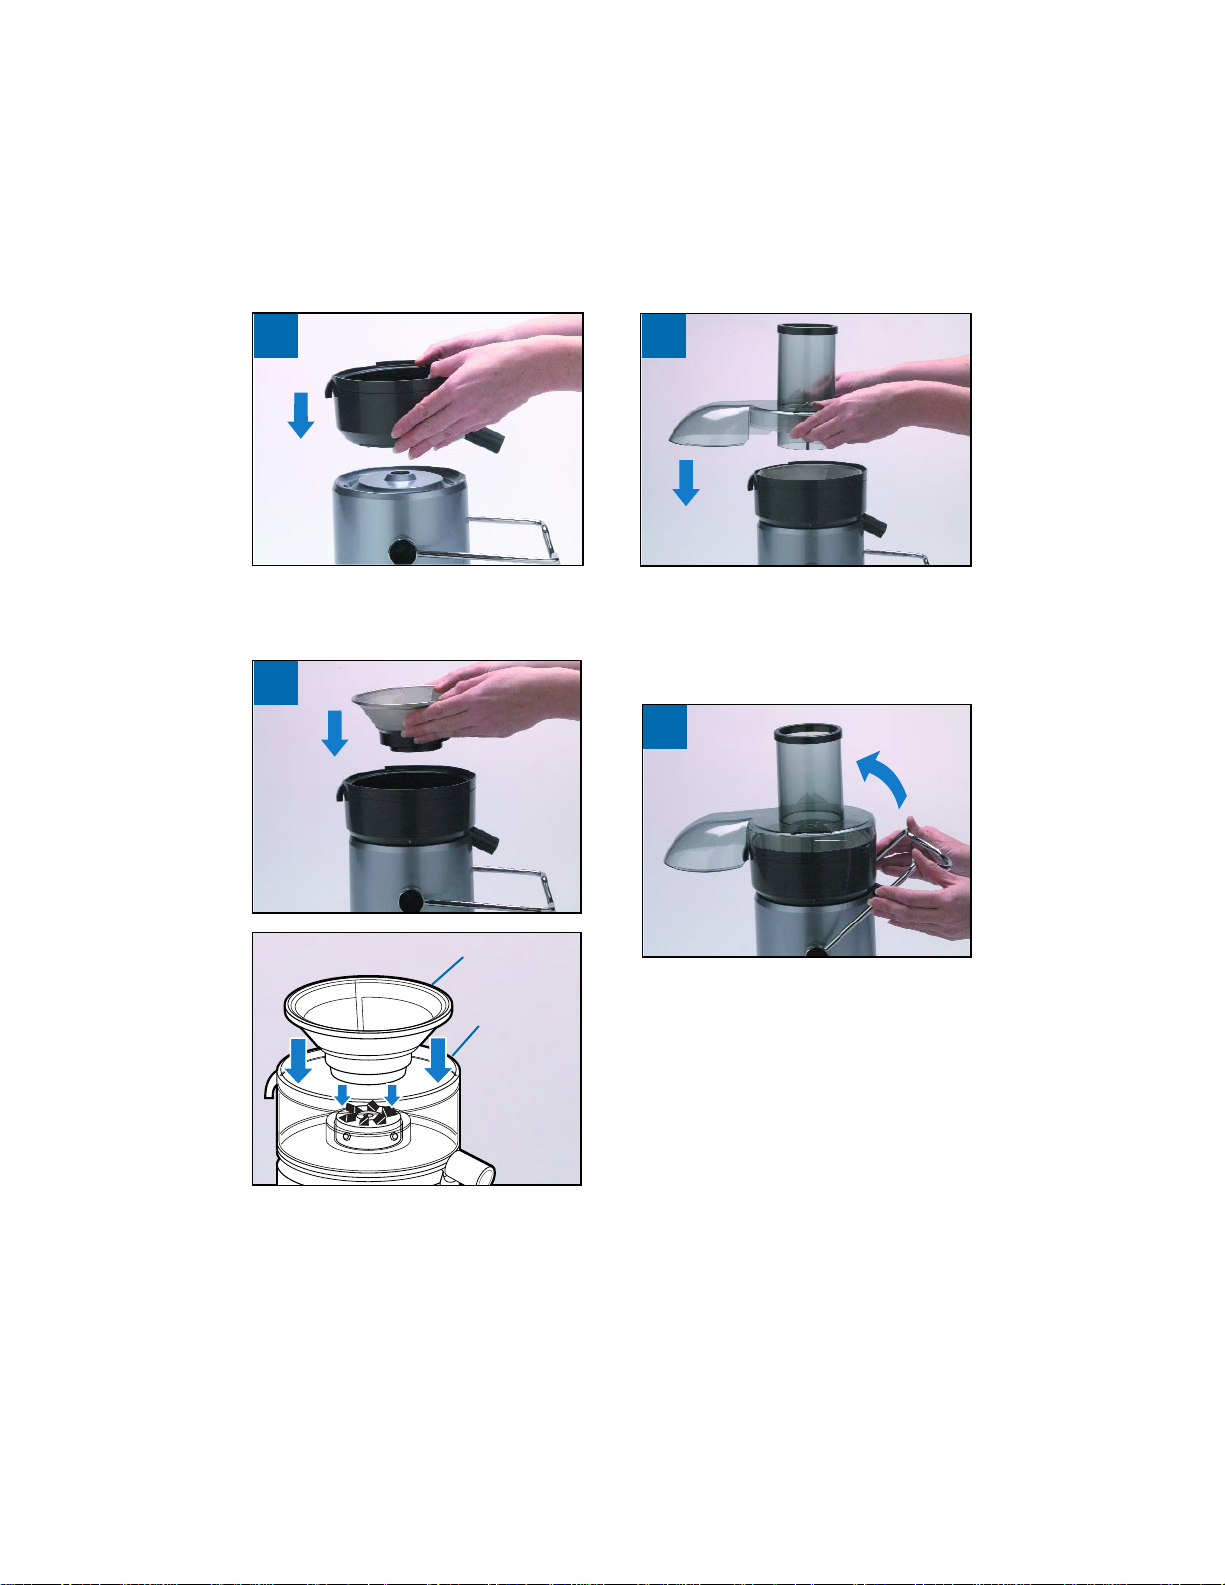
How to Assemble
Read and follow instructions in “Before First Use.”
Raise the Safety Locking Arm up
into the vertical operating position.
Place Filter Bowl on top of the
Motor Base.
Place the Stainless Steel Filter
Basket inside the Filter Bowl. With
hands on outer edge, press Filter
Basket down firmly to latch into
position.
Place the Juicer Cover over the Filter
Bowl, positioning the Feed Chute
over the Stainless Steel Filter Basket
and lower into position.
1
2
4
(continued on next page)
3
Filter Basket
Filter Bowl
Page 6

Continue to slide the Food Pusher
down the Food Chute.
Place the Pulp Container into position
by tilting the Container slightly.
Place a container or glass under the
spout on the right hand side of the
Juice Fountain
™
.
6
Slide the Food Pusher down the
Feed Chute by aligning the groove in
the Food Pusher with the small
ridge on the inside of the top of
the Feed Tube.
6
7
8
9
Next, position Locking Arm into the two
grooves on either side of Juice Cover.
NOTE: Juicer will not operate unless
Locking Arm is properly locked in
place.
5
Hint!
To minimize clean-up, place a plastic
grocery bag in the Pulp Container to
collect the pulp. (See page 7 for more
information.)
Food Pusher
Groove
Small Ridge
Inside Feed
Chute
Page 7

7
Wash fruits and vegetables.
NOTE: Most fruits and vegetables
such as apples, carrots, and cucumbers
will not need to be cut since they will fit
into the Feed Chute whole. If using fruits or
vegetables with hard or inedible skins such
as oranges, melons or mangoes, always
peel before placing in juice extractor.
Ensure that the Juice Fountain
™
is correctly assembled (see
pages 5 and 6) and place a glass
or container under the spout.
Plug cord into 120 volt AC outlet.
Turn the ON/OFF Switch to ON.
How to Use
Juice will flow into the glass
and the separated pulp will
accumulate in the Pulp Container.
NOTE: The Pulp Container can be
emptied during juicing by turning the
Juice Fountain™OFF and then carefully removing the Pulp Container.
(Replace empty Pulp Container
before continuing to juice.)
With the motor running, place food
down the Feed Chute. Using the Food
Pusher, gently guide food down the
Feed Chute. To extract the maximum
amount of juice, always push the
Food Pusher down slowly. Do not
force food down the Feed Chute. If
food is stuck, turn OFF juicer and
unplug. Remove food and cut food
into smaller pieces.
To minimize clean-up, place a plastic
grocery bag in the Pulp Container
to collect the pulp. When juicing is
completed, simply remove the
grocery bag containing the pulp.
NOTE: Do not allow the Pulp
Container to overfill as this may
prevent correct operation or
damage the unit.
1
2
3
4
5
6
wCAUTION
Never use fingers to push food down the Feed
Chute or to clear the Feed Chute. Always use the
Food Pusher provided.
Page 8

8
Turn Juice Fountain
™
OFF and
unplug. Allow Filter Basket to
stop turning.
How to Disassemble
Remove the Pulp Container by tilting
the Container slightly.
Place both hands on either side of
the Locking arm and pull back.
Move the Locking Arm down.
1
2
3
4
Lift off the Cover.
5
Page 9

9
CAUTION: The Stainless Steel
Filter Basket contains
small, sharp blades to
cut and process fruits
and vegetables. Do
not touch blades when
handling the Filter
Basket.
Lift off the Filter Bowl with the
Stainless Steel Filter Basket still in
place.
6
7
To remove the Stainless Steel Filter
Basket, turn the Filter Bowl upside
down and carefully remove the Filter
Basket. (It is recommended to
remove the Filter Basket over a sink.)
8
Filter Basket
CAUTION:
Sharp Blades
Page 10

10
Care and Cleaning
• After disassembling the unit (see
pages 8 and 9) all removable parts
may be washed in hot, soapy water.
• All plastic parts of the Juice Fountain
™
can be placed in the bottom or top
rack of the dishwasher. Do not place
Stainless Steel Filter Basket or Motor
Base in the dishwasher.
• Wipe the Motor Base with a damp
cloth.
WARNING: To reduce the risk of
electric shock do not
immerse the Motor
Base in water or any
other liquid.
• Discoloration of the plastic may occur
with some fruit and vegetables. To
help prevent this, wash all parts
immediately after use.
CAUTION: The center of the Filter
Basket contains small,
sharp blades to process
fruits and vegetables
during the juicing
function. Do not touch
blades when handling
the Filter Basket.
NOTES:
• To assist with cleaning, soak the
Stainless Steel Filter Basket in hot,
soapy water for approximately 10
minutes immediately after juicing is
completed. If pulp is left to dry on the
filter it may clog the fine pores of the
filter mesh thereby lessening the
effectiveness of the Juice Fountain™.
• For your convenience, a nylon
cleaning brush has been included
with your Juice Fountain™.
• A nylon brush is the most effective
when cleaning the Filter Basket.
Using a nylon brush, hold the Filter
Basket under running water and
brush from the inside of the basket
out. Always treat the Filter Basket
with care; it can be easily damaged.
Page 11

11
Troubleshooting
POSSIBLE PROBLEM
Machine will not work
when switched “ON.”
Motor appears to stall
when juicing.
Excess pulp building up
in the Micro Mesh
Filter Basket.
Pulp is too wet and
insufficient juice is
produced.
Juice leaks between the
rim of the Juicer Cover
and the Filter Bowl.
Juice sprays out of spout.
Juice drips out of spout
immediately after juicing.
Machine vibrates
excessively.
EASY SOLUTION
The Safety Locking Arm may not be correctly
engaged. Check to see if Safety Locking Arm
is properly positioned in the two grooves on
either side of the Juice Cover. Refer to pages
5 and 6, Steps 4 and 5.
Wet pulp can build up under the Juicer Cover
if the juicing action is too vigorous. Try slower
juicing action by pushing the Food Pusher
down more slowly. Refer to page 7, Step 4.
Turn OFF and unplug. Remove the Juicer
Cover, scrape off pulp. Reassemble and begin
juicing again. Try alternating vegetable and
fruit varieties.
Try a slower juicing action. Turn OFF and
unplug. Remove Filter Basket and clean mesh
walls with a fine brush. This will remove excess
fiber build-up which could be inhibiting the
juice flow. Refer to pages 7 and 10.
Try a slower juicing action by pushing the
Food Pusher down more slowly. Refer to
page 7, Step 4.
Try a slower juicing action by pushing the
Food Pusher down more slowly. Refer to
page 7, Step 4.
With motor ON, raise and lower Food Pusher in
Feed Chute several times. The pressure forces
remaining pulp and juice out of Filter Bowl.
Build up of pulp in mesh of FIlter Basket. Turn
unit OFF and unplug. Clean Filter Basket. Refer
to page 10.
Page 12

12
Juicing Tips and Techniques
Purchasing and Storing Your
Fruits & Vegetables
• Always wash fruits and vegetables
before juicing.
• Always use fresh fruits and vegetables
for juicing.
• To save money and obtain fresher
produce, purchase fruits or vegetables
that are in season.
• Keep your fruits and vegetables ready
for juicing by washing them before
storing.
• Most fruits and hardier type vegeta-
bles can be stored at cool room
temperature. The more delicate and
perishable items such as tomatoes,
berries, leafy greens, celery, cucumbers and herbs should be stored in
the refrigerator until required.
Preparing Fruits & Vegetables
• If using fruits with hard or inedible
skins such as oranges, melons,
mangoes and kiwi fruit, always peel
before placing in the Juicer.
• All fruits with pits and seeds or
stones such as nectarines, peaches,
apricots, plums and cherries MUST
be pitted before juicing.
The Right Technique
• When juicing a variety of different
ingredients of varying textures, best
results are gained by alternating
harder ingredients with softer ones.
For example, when juicing two hard
vegetables such as carrots and
parsnips and a softer type, such as
tomatoes, start with the parsnips, then
the tomato, finishing with the carrots.
Alternating between soft and hard
vegetables in this manner assists by
cleaning the stainless steel filter basket
between the vegetables. This enables
the Juicer to extract the maximum
amount of juice from each vegetable.
• If you are using herbs, sprouts or small
leafy greens it is a good idea to wrap
them in a large lettuce or spinach leaf
or place them through the Feed Chute
between pieces of firmer vegetable.
• All fruits and vegetables produce dif-
ferent amounts of liquids. This varies
within the same group, i.e. one batch
of tomatoes can produce more juice
than another batch. Since juice recipes
are not exact, and juicing is not a
science, the precise quantities of any
juice are not crucial to the success of
a particular drink recipe. Specific
amounts are important in other recipes,
such as baked goods or jellies.
Hint!
Your Juice Fountain™makes invigorating,
frothy orange juice. Simply peel the
oranges and juice. For best results,
refrigerate oranges before juicing.
Page 13

13
The Right Blend
• It is not difficult to create great tasting
juice. If you have been making your
own vegetable and fruit juices, then
you know how simple it is to invent
new combinations. Taste, color,
texture and ingredients are all personal
preferences. Just think of some of
your favorite flavors and foods;
would they work well together or
would they clash? Some strong
flavors could overpower the more
subtle flavors of others. It is, however,
a good rule of thumb to combine
starchy, pulpy ingredients with those
high in moisture.
• Experiment! Any fruit or vegetable
that you enjoy can go into your next
drink. You may choose to use one
fruit to give a predominant flavor and
accent it with a hint of another flavor.
The choices are limited only by your
imagination.
Using The Pulp
• The remaining pulp left after juicing
fruits or vegetables is mostly fiber
and cellulose which, like the juice,
contains vital nutrients necessary for
the daily diet and can be used in
many ways. However, like the juice,
pulp should be used that day to
avoid loss of vitamins.
• There are a number of recipes that
use pulp. You can also use pulp to
thicken casseroles or soups.
• Pulp is great used in the garden
for compost.
Page 14

14
Web site address: www.hamiltonbeach.com
HAMILTON BEACH PROCTOR-SILEX, INC.
P
ROCTOR-SILEX CANADA, INC.
263 Yadkin Road
Southern Pines, NC 28387
Picton, Ontario K0K 2T0
3/00
840067800
Customer Service
If you have a question about your Juice Fountain™, call our toll-free customer
service number. Before calling, please note the model, type, and series numbers
and fill in that information below. These numbers can be found on the bottom
of your Juice Fountain™. This information will help us answer your question much
more quickly.
MODEL: ______________ TYPE: _______________ SERIES: _________________
ONE YEAR LIMITED WARRANTY
Hamilton Beach/Proctor-Silex, Inc. warrants this appliance to be free from defects in
material and workmanship for a period of one (1) year from the date of original purchase,
except as noted. There is no warranty with respect to the following, which may be supplied
with this appliance: glass parts, glass containers, filter basket, blades and/or agitators.
This warranty extends only to the original consumer purchaser and does not cover damage
from abuse, neglect, use for commercial purposes, or any other use not found in the
printed directions. HAMILTON BEACH/PROCTOR-SILEX, INC. EXPRESSLY DISCLAIMS
ALL RESPONSIBILITY FOR CONSEQUENTIAL DAMAGES OR INCIDENTAL LOSSES
CAUSED BY USE OF THIS APPLIANCE. Some states or provinces do not allow this exclusion
or limitation of incidental or consequential losses, so the foregoing disclaimer may not
apply to you. If you have a claim under this warranty, DO NOT RETURN THE APPLIANCE
TO THE STORE! Please call our CUSTOMER SERVICE NUMBER. (For faster service
please have model, series, and type numbers ready for operator to assist you.)
CUSTOMER SERVICE NUMBERS
In the U.S. 1-800-851-8900
In Canada 1-800-267-2826
Web site address: www.hamiltonbeach.com
KEEP THESE NUMBERS FOR FUTURE REFERENCE!
This warranty gives you specific legal rights, and you may also have other legal rights
which vary from state to state, or province to province.
 Loading...