

Hamilton Beach 78217 User Manual
READ BEFORE USE
LIRE AVANT UTILISATION
LEA ANTES DE USAR
Visit www.hamiltonbeach.com for our
complete line of products and Use and
Care Guides – as well as delicious recipes,
tips, and to register your product online.
Rendez-vous sur www.hamiltonbeach.ca
pour notre liste complète de produits et de
nos manuels utilisateur – ainsi que nos
délicieuses recettes et nos conseils.
Visite www.hamiltonbeach.com (
EE. UU.)
o
www.hamiltonbeach.com.mx (México)
para ver otros productos de Hamilton Beach
o para contactarnos.
Questions
Please call us – our friendly
associates are ready to help.
USA: 1.800.851.8900
Preguntas
Por favor llámenos – nuestros
amables representantes están
listos para ayudar.
EE. UU.: 1.800.851.8900
MEX: 01 800 71 16 100
Le invitamos a leer cuidadosamente este
instructivo antes de usar su aparato.
Questions
N’hésitez pas à nous appeler –
nos associés s’empresseront
de vous aider.
CAN : 1.800.267.2826
English ....................... 2
Français ................... 12
Español .................... 22
Vacuum Sealer
Scelleuse
sous vide
Selladora
al Vacío

2
IMPORTANT SAFEGUARDS
When using electrical appliances, basic safety precautions should always be followed to reduce the risk of fire, electric shock, and/or injury to
persons, including the following:
1. Read all instructions.
2. This appliance is not intended for use by persons (including
children) with reduced physical, sensory, or mental capabilities,
or lack of experience and knowledge, unless they are closely
supervised and instructed concerning use of the appliance by a
person responsible for their safety.
3. Close supervision is necessary when any appliance is used by or
near children. Children should be supervised to ensure that they
do not play with the appliance.
4. Never let the vacuum sealer run unattended. Disconnect the
vacuum sealer from the power source before leaving the work
area.
5. To protect against risk of electric shock, do not immerse cord,
plug, or vacuum sealer in water or other liquid.
6. Unplug from outlet when not in use and before cleaning.
7. Do not operate any appliance with a damaged supply cord or
plug, or after the appliance malfunctions or has been dropped
or damaged in any manner. Supply cord replacement and
repairs must be conducted by the manufacturer, its service
agent, or similarly qualified persons in order to avoid a hazard.
Call the provided customer service number for information on
examination, repair, or adjustment.
8. The use of accessory attachments not recommended by the
appliance manufacturer may cause injuries.
9. Do not use outdoors.
10. Do not let cord hang over edge of table or counter, or touch hot
surfaces, including stove.
11. Do not disassemble this appliance. Doing so may result in
personal injury.
12. Do not place on or near a hot gas or electric burner, or in a
heated oven.
13. Do not use for other than intended purpose.
SAVE THESE INSTRUCTIONS
Other Consumer Safety Information
This appliance is intended for household use only.
w WARNING
Electrical Shock Hazard: This appliance is provided
with a polarized plug (one wide blade) to reduce the risk of electric
shock. The plug fits only one way into a polarized outlet. Do not
defeat the safety purpose of the plug by modifying the plug in any
way or by using an adapter. If the plug does not fit fully into the
outlet, reverse the plug. If it still does not fit, have an electrician
replace the outlet.
The length of the cord used on this appliance was selected to reduce
the hazards of becoming tangled in or tripping over a longer cord. If
a longer cord is necessary, an approved extension cord may be used.
The electrical rating of the extension cord must be equal to or greater
than the rating of the appliance. Care must be taken to arrange the
extension cord so that it will not drape over the countertop or tabletop
where it can be pulled on by children or accidentally tripped over.
3
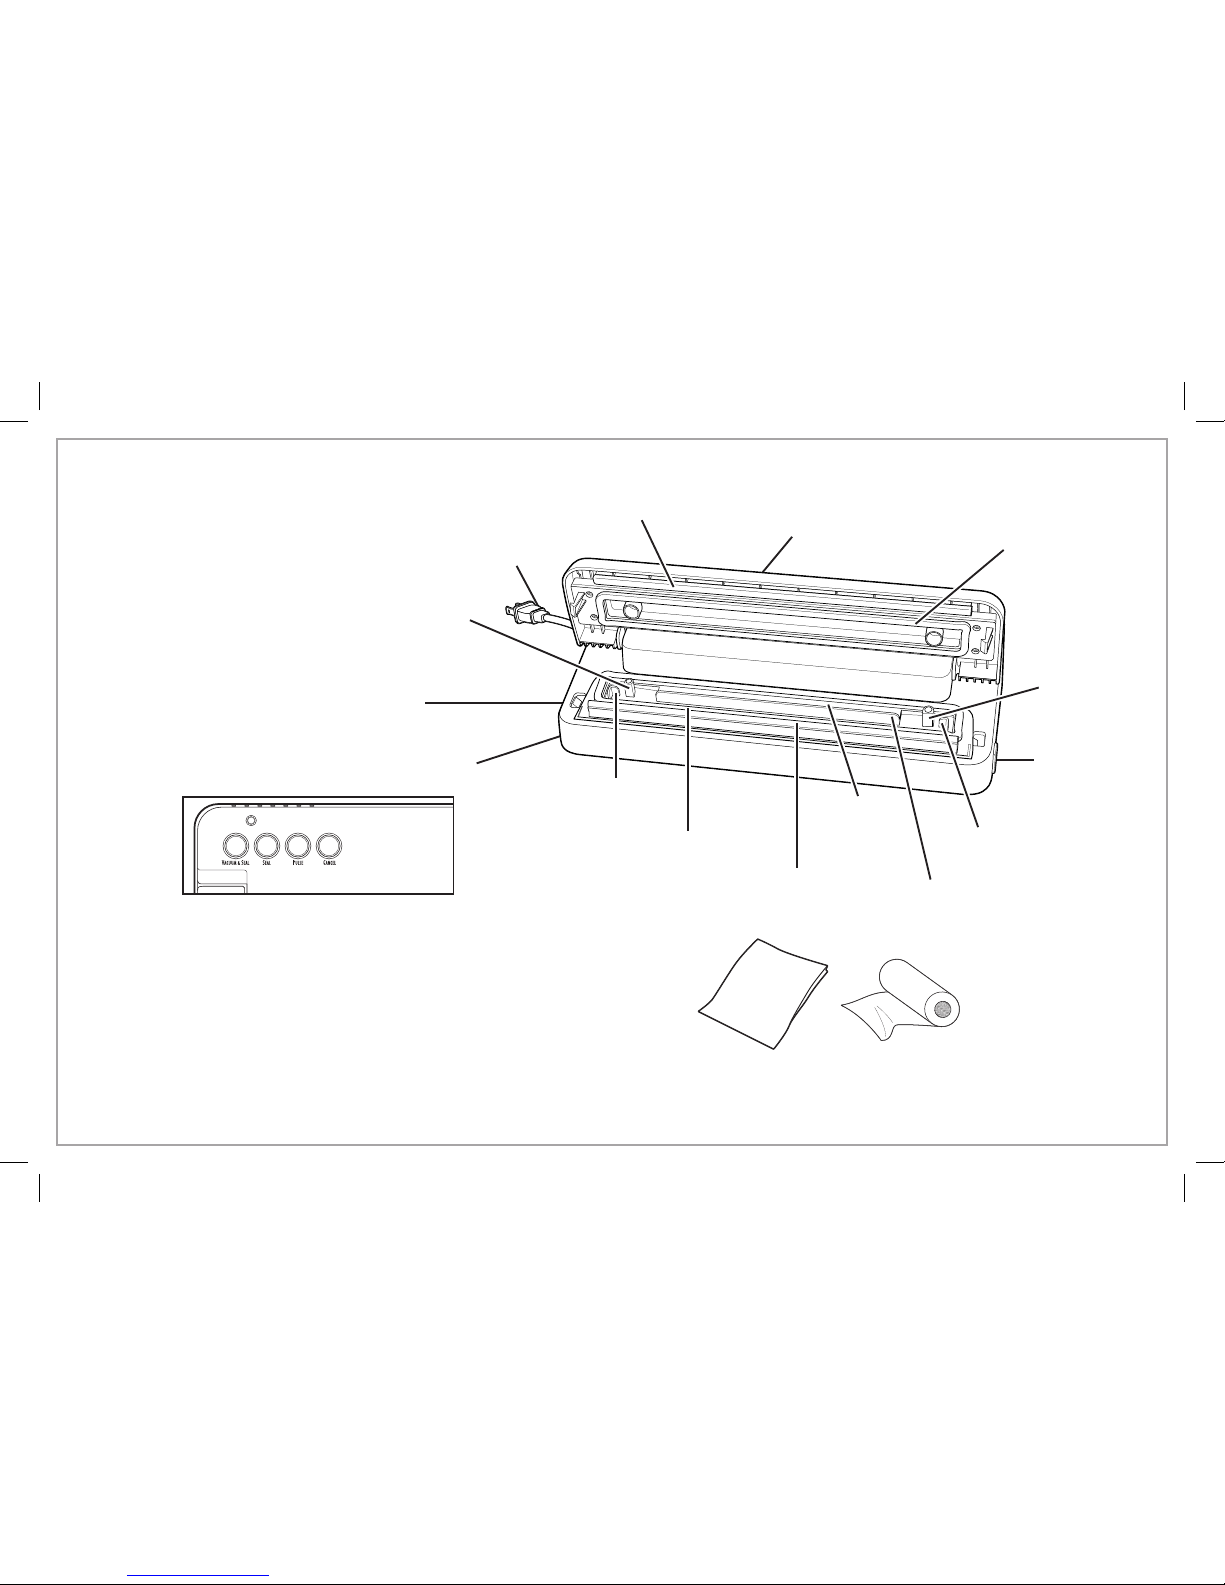
Lid
Power Cord
Base
Parts and Features
*To order parts:
US: 1.800.851.8900
www.hamiltonbeach.com
Canada: 1.800.267.2826
Mexico: 01 800 71 16 100
NOTE: Not all available
parts and accessories are
shown here. Please visit
our website or call for a
complete list.
Lower Chamber Seal*
Lock-Release
Button
Heat-Seal Bags or Roll*
(available with certain models
or purchased separately)
Bag Stop
Power Light: The power light is illuminated when the vacuum
sealer is plugged in. Power light is green when unit is ready
and red when operating.
Vacuum & Seal Button: Press button to start vacuum and seal
operation.
Seal Button: Press this button to start heat-sealing operation.
Use to make bags.
Pulse Button: Press, hold, and release to control air removal
for fragile items. Press Seal button when desired air is
removed.
Cancel Button: Press to stop at any time.
Seal Bar Insulator*
Upper
Chamber Seal*
Vacuum Port
Bag Alignment
Guide
Lock-Release
Button
Heat-Seal Strip
(do not remove tape)
Vacuum
Chamber
Bag Alignment
Guide
Vacuum Port
4
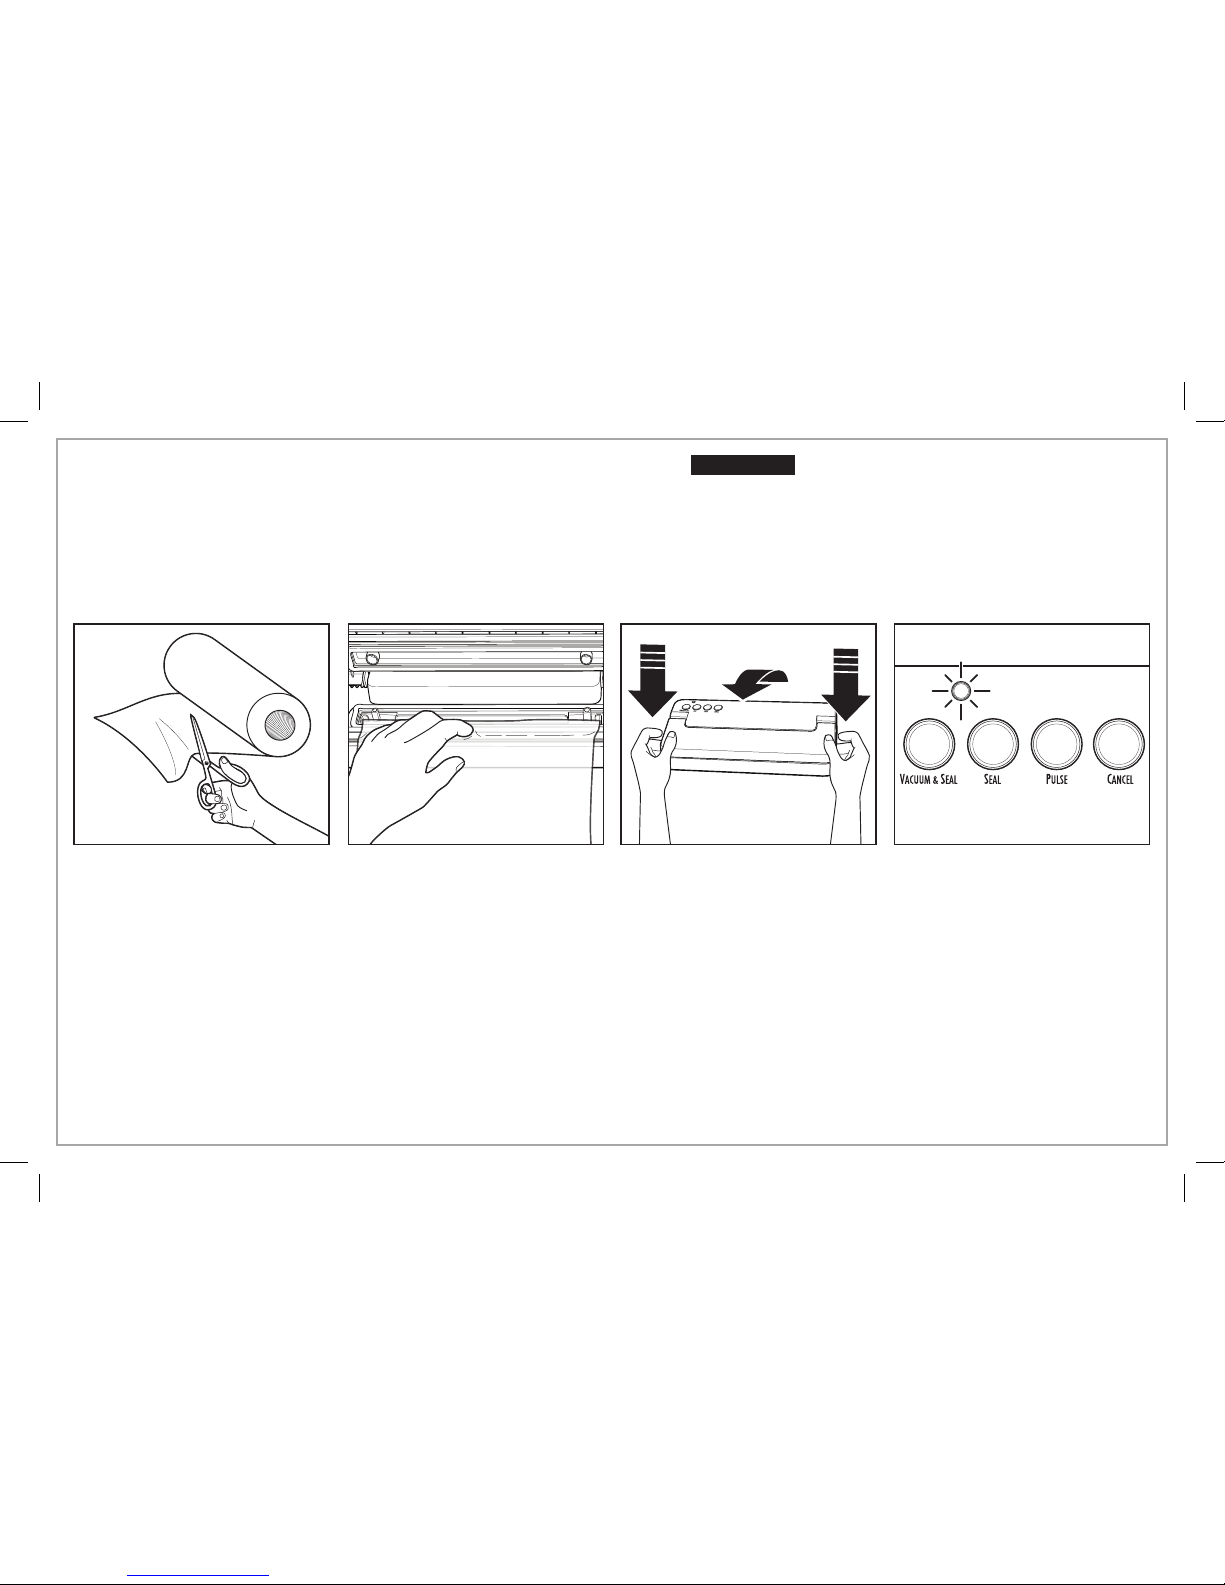
How to Vacuum-Seal
NOTICE: This vacuum sealer is intended to be used only with heat-seal bags. For best results, and to avoid damaging the vacuum sealer,
use only heat-seal bags. Do not use household plastic bags!
1. Determine size and cut bag
rolls to size needed. Allow
space for sealing top and
bottom of bag. If using
preformed bags, skip to
Step 5.
2. Plug into outlet. Place bag
inside vacuum chamber
using bag stop and alignment
guides.
3. Lower lid and press both
corners to latch; then press
Seal
button.
4. Wait until light turns green.
Press lock-release button to
open lid; remove bag.
w CAUTION
Burn Hazard. Seal bar is hot. Avoid touching it.
• Allow unit to cool 20 seconds before making or vacuumsealing another bag.
• Never open the lid during use.
• Do not let moisture into the vacuum chamber. This may
damage the motor.
5
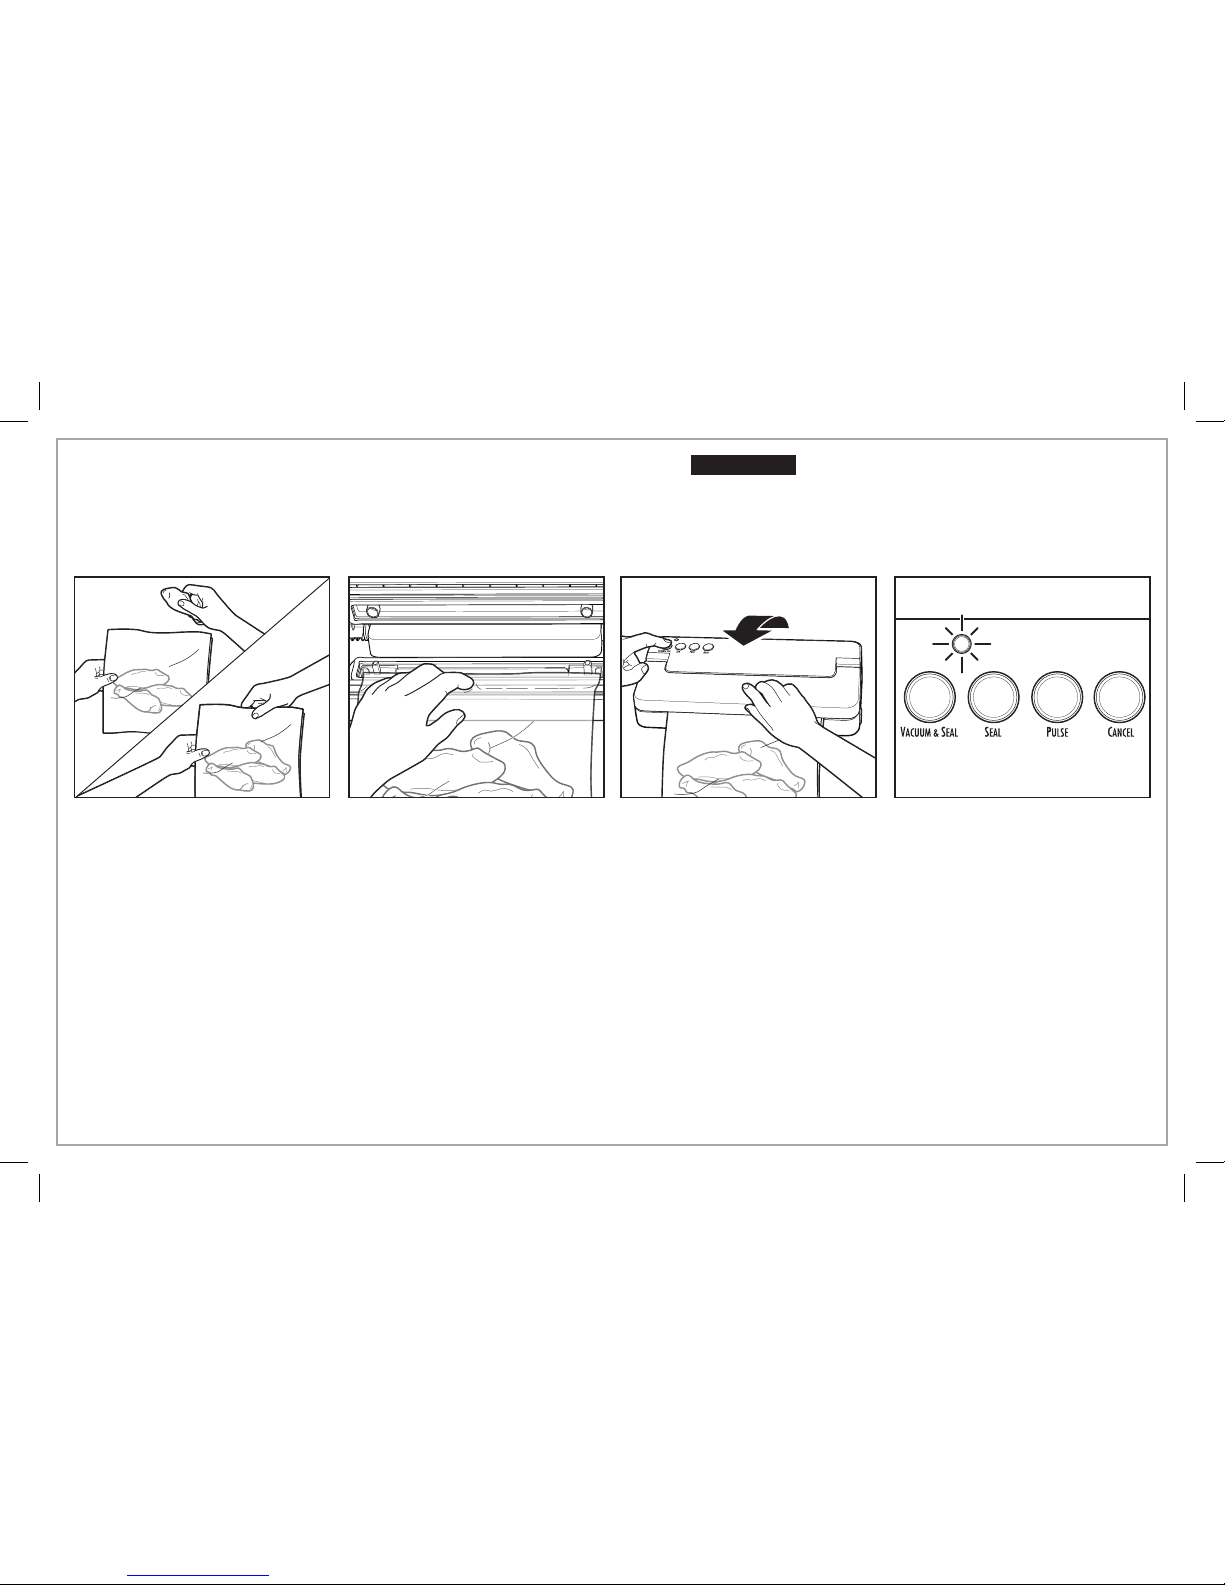
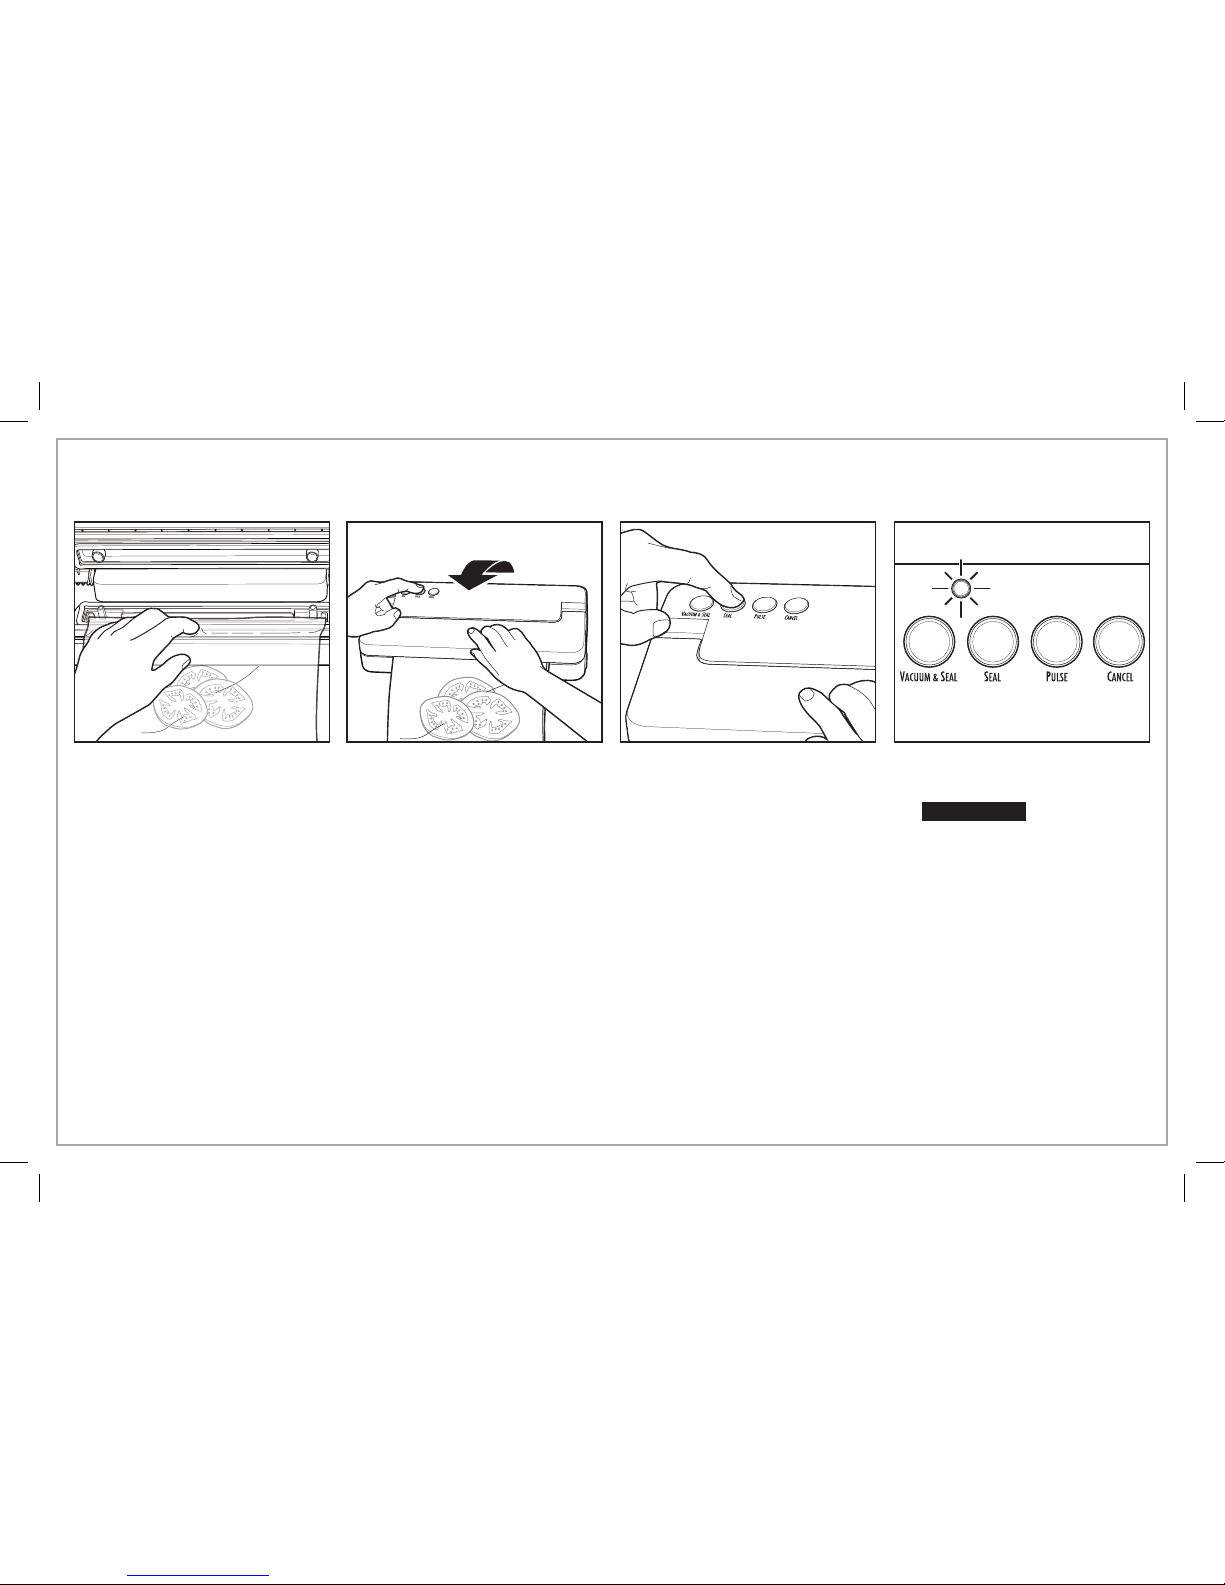
How to Vacuum-Seal (cont.)
5. Add food to heat-seal bag. 6. Center open edge of bag
within vacuum chamber. Place
bag inside vacuum chamber
using bag stop and alignment
guides.
7. Lower lid and press both
corners to latch; then press
Vacuum & Seal
button.
8. Wait until light turns green.
Press lock-release button to
open lid; remove bag.
w CAUTION
Burn Hazard. Seal bar is hot. Avoid touching it.
• Allow unit to cool 20 seconds before making or vacuumsealing another bag.
• Never open the lid during use.
• Do not let moisture into the vacuum chamber. This may
damage the motor.
6
How to Vacuum-Seal Fragile and Moist Foods or Nonfood Items
• Pour cooled liquids or moist food into freezer-safe containers and
freeze.
• Invert freezer container to remove frozen food. Place frozen food in
heat-seal bag. Immediately vacuum-seal. Follow directions on page 4
to vacuum-seal.
• The PULSE button can be held down or pressed and released
multiple times. If the button is pressed after a given vacuum limit is
reached, the red light will flash three times. Consumer can either seal
bag or cancel to release vacuum from bag.
1. Add fragile food or item to
heat-seal bag.
2. Place bag inside vacuum
chamber using bag stop and
alignment guides. Press
PulSe
and
hold
PulSe
button or press and
release the
PulSe
button several
times to remove the air from the
heat-seal bag. NOTE: If the red
power light flashes 3 times, the
unit has reached the vacuum
limit. Seal the heat-seal bag.
3. Press
Seal
button when
enough air is removed.
4. Wait until light turns green.
Press lock-release button to
open lid; remove bag.
w CAUTION
Burn Hazard.
Seal bar is hot. Avoid
touching it.
• Allow unit to cool 20
seconds before making or
vacuum-sealing another bag.
• Never open the lid during
use.
• Do not let moisture into the
vacuum chamber. This may
damage the motor.
Tips for Casseroles, Sauces, and Soups

7
Care and Cleaning
w WARNING
Electrical Shock Hazard.
Before cleaning, assembling, or disassembling the vacuum
sealer, make sure the vacuum sealer is unplugged.
1. Unplug.
2. Let unit cool completely before cleaning.
3. Wipe the outside of the vacuum sealer with a damp cloth or paper
towel.
4. Do not use the locks when storing.
• Avoid sharp items around heat-seal bags or rolls when vacuum-sealing. Punctured bags will not seal properly.
• Buy foods in bulk and vacuum-seal to save time and money.
• Wash and dry all fruit and vegetables before vacuum-sealing.
• Washed leafy vegetables can be quickly dried with salad spinners.
• To avoid crushing berries when vacuum-sealing, freeze them first. To freeze, wash, dry, and freeze on cookie sheets. Then vacuum-seal frozen berries.
• Vegetables such as broccoli, brussels sprouts, carrots, cabbage, cauliflower, green beans, kale, onions, peas, peppers, snap peas, and squash
need to be blanched and frozen before vacuum-sealing.
• After defrosting vacuum-sealed meats, poultry, and seafood, cook to a safe internal temperature.
• Always cook foods to a safe internal temperature. Foods vacuum-sealed in Hamilton Beach NutriFresh™ Bags can be used in sous vide
cooking and in water on the stovetop. Contact manufacturer for safety of other bags.
• For food safety information, visit http://www.foodsafety.gov/.
Vacuum-Sealing Tips
Sous Vide
• Sous vide is a no-fail method of cooking vacuum-sealed food in a precisely temperature-controlled water bath, ensuring that food is evenly
cooked throughout and reducing chance of over- or undercooking.
• Use only heat-seal bags made especially for sous vide cooking.
• Follow directions for vacuum-sealing moist foods when preparing meats, fish, and poultry for sous vide. Juices from meat cannot be drawn
into the vacuum port or the unit will no longer work.
• Follow recommended sous vide cooking times to ensure optimal results. Visit hamiltonbeach.com and search “sous vide” for more
information.

8
Nonfood Tips
• Nonfood items, such as batteries, boating licenses, matches, and passports, can be vacuum-sealed to keep safe when boating, camping, or
traveling.
• Keys, utensils, and other sharp or pointed objects can be vacuum-sealed. Make sure to wrap the item in paper towels or some type of cushion
before vacuum-sealing.
• For camping, boating, or hiking, be sure to take scissors to open your nonfood items.
Vacuum-Sealing Tips (cont.)
Food Storage Tips
• Always defrost frozen vacuum-sealed foods in the refrigerator.
• Store all vacuum-sealed cooked foods in the refrigerator or freezer.
• Vacuum-sealed bags of coffee beans, crackers, cereal, granola, and nuts can be stored at room temperature.

9
Troubleshooting
My vacuum sealer shut off and won’t turn on again.
• Check power at outlet and then call customer service.
The sealing bar melts through the bag.
• Only heat-seal bags should be used. DO NOT USE PLASTIC
HOUSEHOLD BAGS with the vacuum sealer.
• Bag cut at an angle does not seal. Ensure bag is cut perpendicular
to sides.
• Unit stored with the lid locked down, gaskets deformed, or
overcompressed. Do not store with lid locked.
• Check the condition of the seal bar tape strips. Replace if needed.
• Open lid and allow the sealing bar to cool for 5–10 minutes. Always
leave the lid open between bags, and allow at least 20 seconds
between cycles.
The bag seal pulls apart.
• The seal of the bag may be incomplete. If the seal has a crease in
it, or if a liquid or powder has been trapped between the layers of
the bag, the layers may not have been welded together properly.
Cut off the seal and wipe the inside of the bag clean. Then, try to
vacuum-seal the bag again.
The vacuum pump starts, but no air is being removed from the heatseal bag.
• For best results, use Hamilton Beach heat-seal bags.
• Be sure the bag is inserted properly. The open end of the bag
should align inside vacuum chamber using bag stop and alignment
guides. Be sure the vacuum ports are not blocked.
• The bag may have a leak. If there is a leak in the bag, air will be
pulled into the bag from the outside. Check for tears or punctures. If
you are using a bag that was made from a roll of material, doublecheck that the end of the bag is sealed.
• Bag cut at an angle does not seal. Ensure bag is cut perpendicular
to sides.
• Unit stored with the lid locked down, gaskets deformed, or
overcompressed. Do not store with the lid locked.
• Locks are not engaged. Press down firmly on both corners.
Locks will not engage.
• Be sure to push down firmly on both corners.
No seal was formed.
• If too many seals were made in rapid succession, the unit may be
too hot. Wait 2 minutes and retry.
The red power light flashed three times.
• The unit has reached the vacuum limit while using the PULSE
button. Press the SEAL button to finish the vacuum-sealing process.

10
Notes
 Loading...