

Hamilton Beach 76460, 76461 User Manual
Under-the-Cabinet Can Opener
Ouvre-boîtes sous armoire
English ..............................2
USA: 1-800-851-8900
Français ............................9
Canada : 1-800-267-2826
840105800
840105800 ENv05.qxd 12/4/02 9:47 AM Page 1
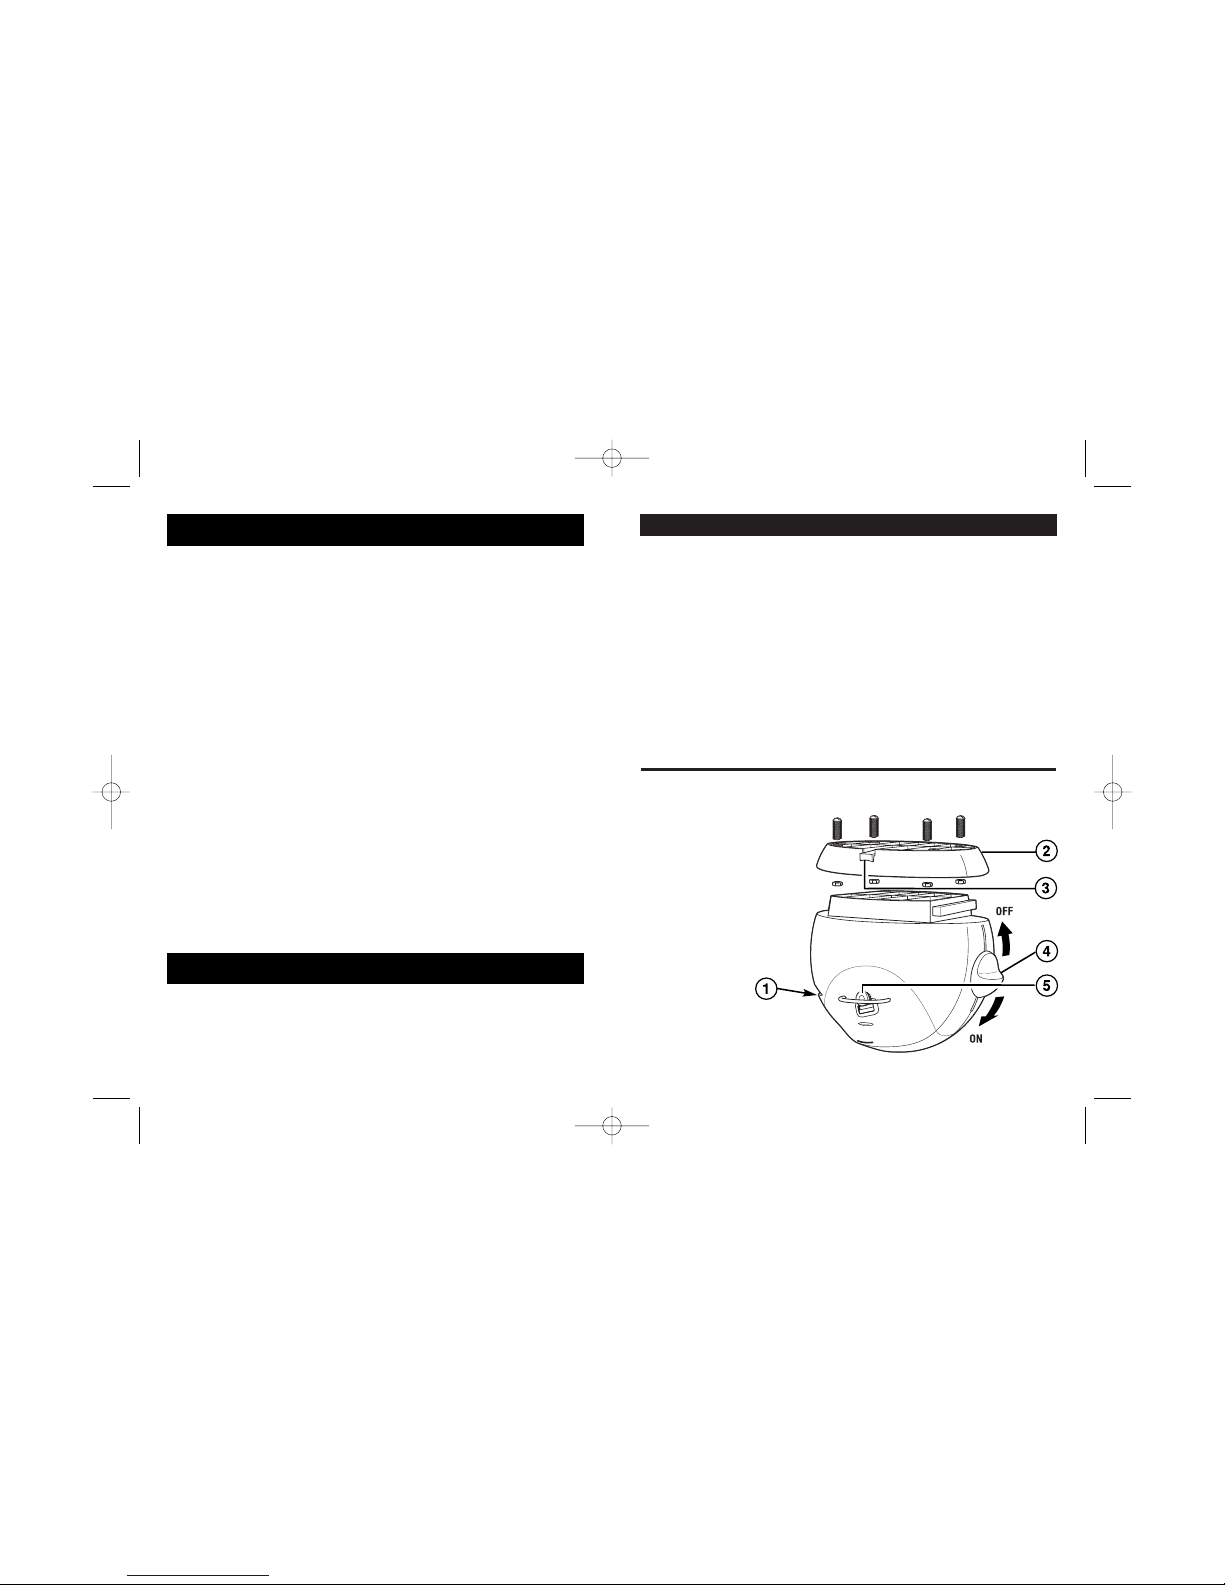
Parts and Features
1. Knife Sharpener
(on side of can opener)
2. Mounting Bracket
3. Opener Release Tab
4. ON/OFF Switch
5. Lid Opener
3
This appliance is intended for household use only.
This appliance is equipped with a polarized plug. This type of plug
has one blade wider than the other. The plug will fit into an electrical
outlet only one way. This is a safety feature intended to help reduce
the risk of electrical shock. If you are unable to insert the plug into
the outlet, try reversing the plug. If the plug should still fail to fit,
contact a qualified electrician to replace the obsolete outlet.
Do not attempt to defeat the safety purpose of the polarized plug
by modifying the plug in any way.
WARNING: To reduce the risk of personal injury, keep hair and loose
clothing away from lid opener and other moving parts of the can
opener while using.
CONSUMER SAFETY INFORMATION
2
IMPORTANT SAFEGUARDS
SAVE THESE INSTRUCTIONS
When using electrical appliances, basic safety precautions should
always be followed, including the following:
1. Read all instructions.
2. To protect against risk of electrical shock, do not put can opener
body, cord, or plug in water or other liquid.
3. Close supervision is necessary when any appliance is used by
or near children.
4. Unplug from outlet when not in use, before putting on or taking
off parts, and before cleaning.
5. Avoid contacting moving parts.
6. Do not operate any appliance with a damaged cord or plug, or
after the appliance malfunctions or is dropped or damaged in any
manner. Call our toll-free customer service number for information
on examination, electrical repair, mechanical repair, or adjustment.
No user serviceable parts inside.
7. The use of attachments not recommended or sold by Hamilton
Beach/Proctor-Silex, Inc. may cause fire, electric shock, or injury.
8. Do not use outdoors.
9. Do not let cord hang over edge of table or counter, or touch
hot surfaces.
10. Do not install the unit over or near any portion of a heating or
cooking appliance, a sink, or a basin.
11. Do not open pressurized (aerosol-type) cans.
12. Do not open cans of flammable liquids such as lighter fluids.
13. Do not use appliance for other than intended use.
14. To reduce the risk of fire or electric shock, do not operate any
heating appliance beneath the mounted unit.
840105800 ENv05.qxd 12/4/02 9:47 AM Page 2

5
How to Use Your Can Opener
This is new technology and does not need a magnet arm.
1. Plug cord into electrical outlet.
2. Move switch to OFF position. (See Figure 3.)
Center the rim of can BEHIND, UP and AGAINST lid opener.
(See Figure 4.)
3. Hold can against opener support. (See Figure 5.)
DO: DO NOT:
Figure 3
Figure 4
Figure 5
4
Installation
1. This can opener is designed to be
installed under a cabinet. When
selecting a location for installation,
please consider the following:
• An electrical outlet should be within
easy reach of the plug so that the
cord does not drape over a heating
or cooking appliance, a sink or
basin, or get in the way of your
normal work space.
• Do not install the can opener above
a cooking or heating unit, such as a
stove, or above a sink or basin.
2. Position the mounting bracket on
underside of cabinet, at least 4 inches from wall, and 1 inch from front of
cabinet edge. Use a sharp nail or drill
bit through bracket holes to mark
cabinet for drilling holes. (See Figure
1.) Drill holes through cabinet.
3. Place mounting bracket on under
side of cabinet. Hold nut in screw
hole with finger. Insert screw from
inside cabinet and tighten with
screwdriver. (See Figure 2.)
4. Repeat with remaining screws. Place
electrical cord through slot on back
of can opener. Slide can opener into
place from back of bracket. Slide forward until it snaps into place.
NOTE: Based on the variety of cabinet sizes, the enclosed
screws for mounting may not work. Longer or shorter screws
may be purchased at your local hardware store.
Figure 1
Figure 2
OFF
position
Lid
Opener
Support
840105800 ENv05.qxd 12/4/02 9:47 AM Page 4
 Loading...