

Page 1

READ BEFORE USE
LIRE AVANT UTILISATION
LEA ANTES DE USAR
Visit www.hamiltonbeach.com for our
complete line of products and Use and
Care Guides – as well as delicious recipes,
tips, and to register your product online!
Rendez-vous sur www.hamiltonbeach.ca
pour notre liste complète de produits et de
nos manuels utilisateur – ainsi que nos
délicieuses recettes et nos conseils !
¡Visite www.hamiltonbeach.com (
o
www.hamiltonbeach.com.mx (México)
para ver otros productos de Hamilton Beach
o para contactarnos!
EE. UU.)
Stack & Snap™
Food Processor
Questions?
Please call us – our friendly
associates are ready to help.
USA: 1.800.851.8900
Questions ?
N’hésitez pas à nous appeler –
nos associés s’empresseront
de vous aider.
CAN : 1.800.267.2826
¿Preguntas?
Por favor llámenos – nuestros
amables representantes están
listos para ayudar.
EE. UU.: 1.800.851.8900
MEX: 01 800 71 16 100
Le invitamos a leer cuidadosamente este
instructivo antes de usar su aparato.
Robot culinaire
Procesador de
Alimentos
English ....................... 2
Français .................... 15
Español .................... 29
Page 2

IMPORTANT SAFEGUARDS
When using electrical appliances, basic safety precautions should always be followed to reduce the risk of fire, electric shock, and/or injury to
persons, including the following:
1. Read all instructions.
2. This appliance is not intended for use by persons (including
children) with reduced physical, sensory, or mental capabilities,
or lack of experience and knowledge, unless they are closely
supervised and instructed concerning use of the appliance by a
person responsible for their safety.
3. Close supervision is necessary when any appliance is used by or
near children. Children should be supervised to ensure that they
do not play with the appliance.
4. To protect against risk of electrical shock, do not immerse base,
motor, cord, or plug in water or other liquid.
5. Unplug cord from outlet when not in use, before putting on or
taking off parts, and before cleaning.
6. Avoid contacting moving parts.
7. Do not operate any appliance with a damaged cord or plug,
or after the appliance malfunctions or has been dropped or
damaged in any manner. Call our toll-free customer service
number for information on examination, repair, or electrical or
mechanical adjustment.
8. The use of attachments not recommended or sold by the
appliance manufacturer may cause fire, electric shock, or injury.
9. Do not use your food processor if any part is broken.
10. Do not use appliance outdoors.
11. Do not let cord hang over edge of table or counter, or touch hot
surfaces.
12. Keep hands and utensils away from moving blade and disc while
processing food to reduce the risk of severe personal injury and/
or damage to the food processor. A rubber scraper may be used
but ONLY when the food processor is not running.
13. The blade and disc are sharp. Handle carefully. Store out of reach
of children.
14. To reduce the risk of injury, never place cutting blade or disc
on base without first putting bowl properly in place.
15. Be certain lid is securely locked in place before operating appliance.
16. Never feed food into food chute by hand. Always use the food
pushers.
17. Do not attempt to defeat the lid interlock mechanism.
18. Make sure the blade or disc has come to a full stop before
removing lid.
19. To reduce the risk of injury, be sure to insert or remove blade
and disc using hubs provided for this purpose. Use caution when
removing blade and disc from the bowl, when emptying the bowl,
and when cleaning.
20. Check that the control is OFF (O) before plugging cord into wall
outlet. To disconnect, turn the control to OFF (O); then remove
plug from wall outlet.
21. Be sure to turn switch to OFF (O) position after each use. Always
use the pushers to clear the food chute. When this method is not
possible, unplug cord from outlet and disassemble unit to remove
the remaining food.
22. The appliance is not intended for commercial, professional, or
industrial use. It is designed and built exclusively for household
use only.
23. Never use appliance for a longer period or with a larger amount
of ingredients other than that recommended by appliance
manufacturer.
24. The maximum rating of this unit is based on using the chopping/
mixing blade. Using the slicing/shredding disc may draw
significantly less power.
2
Page 3

25. Do not place on or near a hot gas or electric burner or in a heated
oven.
SAVE THESE INSTRUCTIONS!
Other Consumer Safety Information
This appliance is intended for household use only.
w WARNING
with a polarized plug (one wide blade) to reduce the risk of electric
shock. The plug fits only one way into a polarized outlet. Do not
defeat the safety purpose of the plug by modifying the plug in any
way or by using an adapter. If the plug does not fit fully into the
outlet, reverse the plug. If it still does not fit, have an electrician
replace the outlet.
Electrical Shock Hazard: This appliance is provided
26. Do not use appliance for other than intended use.
The length of the cord used on this appliance was selected to
reduce the hazards of becoming tangled in or tripping over a
longer cord. If a longer cord is necessary, an approved extension
cord may be used. The electrical rating of the extension cord must
be equal to or greater than the rating of the appliance. Care must
be taken to arrange the extension cord so that it will not drape
over the countertop or tabletop where it can be pulled on by
children or accidentally tripped over.
To avoid an electrical circuit overload, do not use another highwattage appliance on the same circuit with this appliance.
3
Page 4
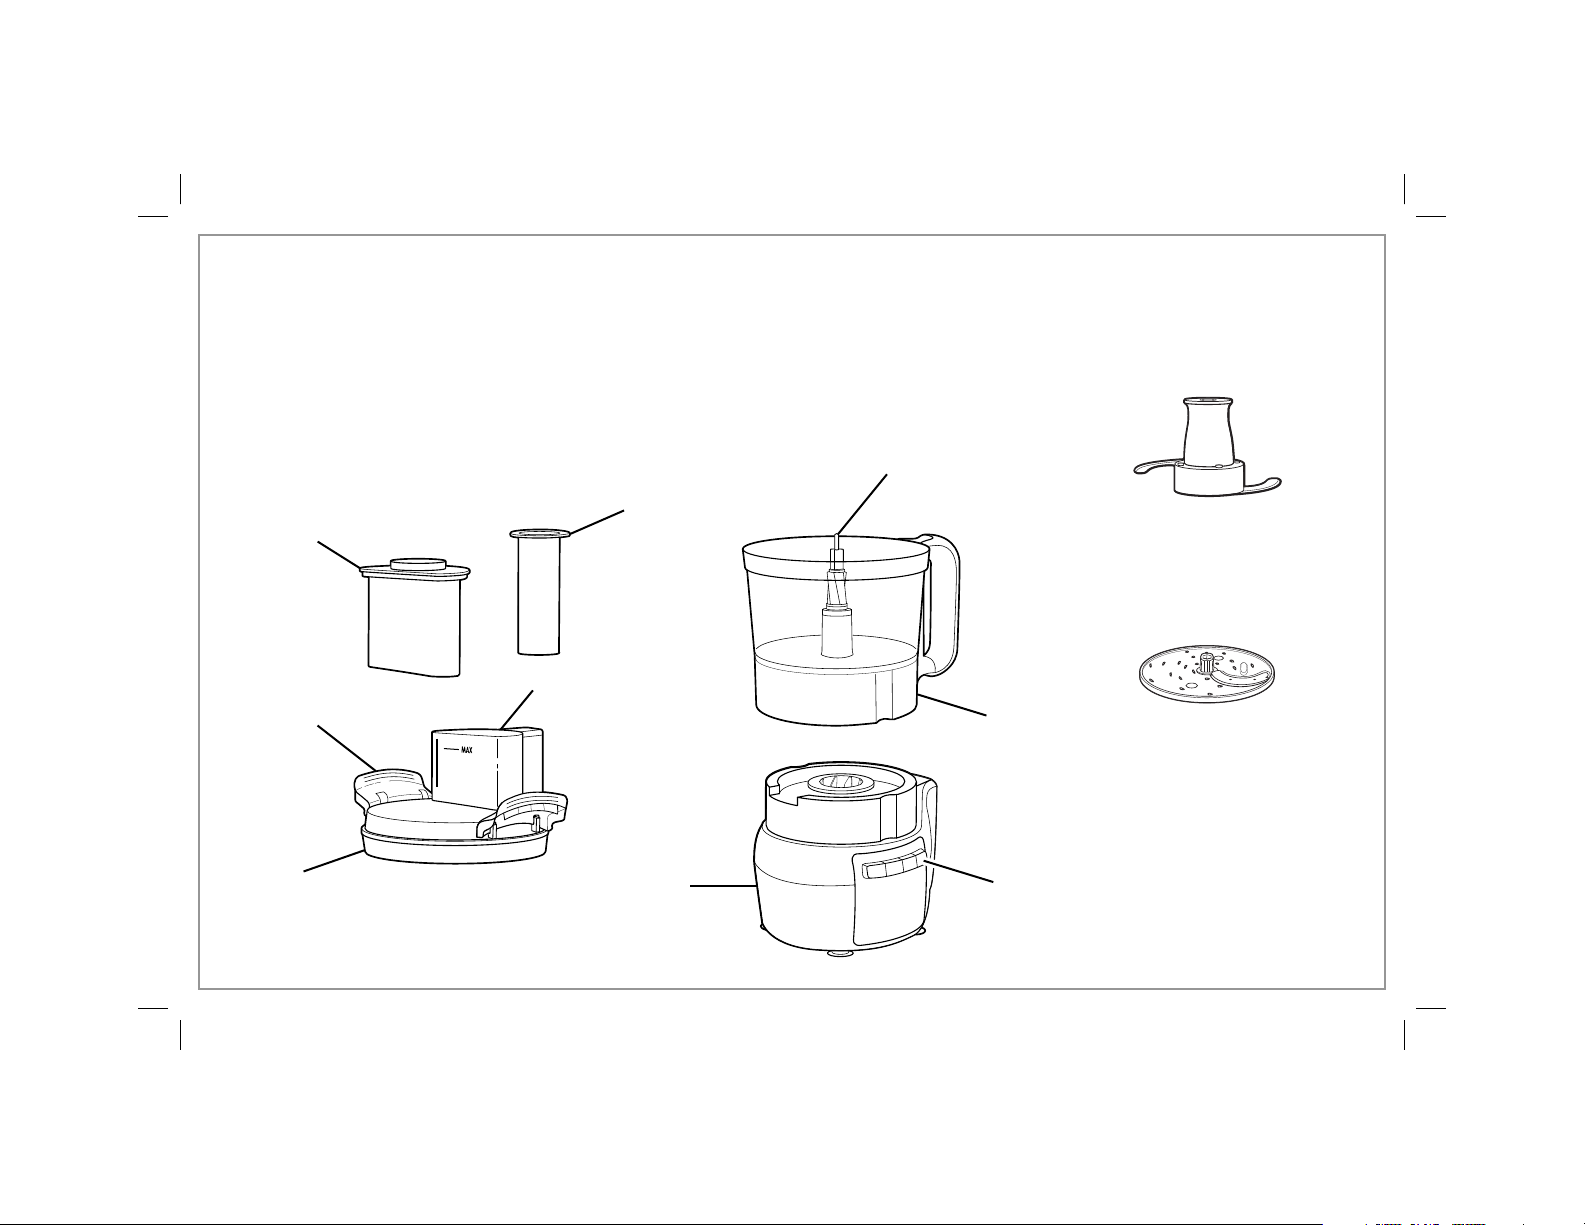
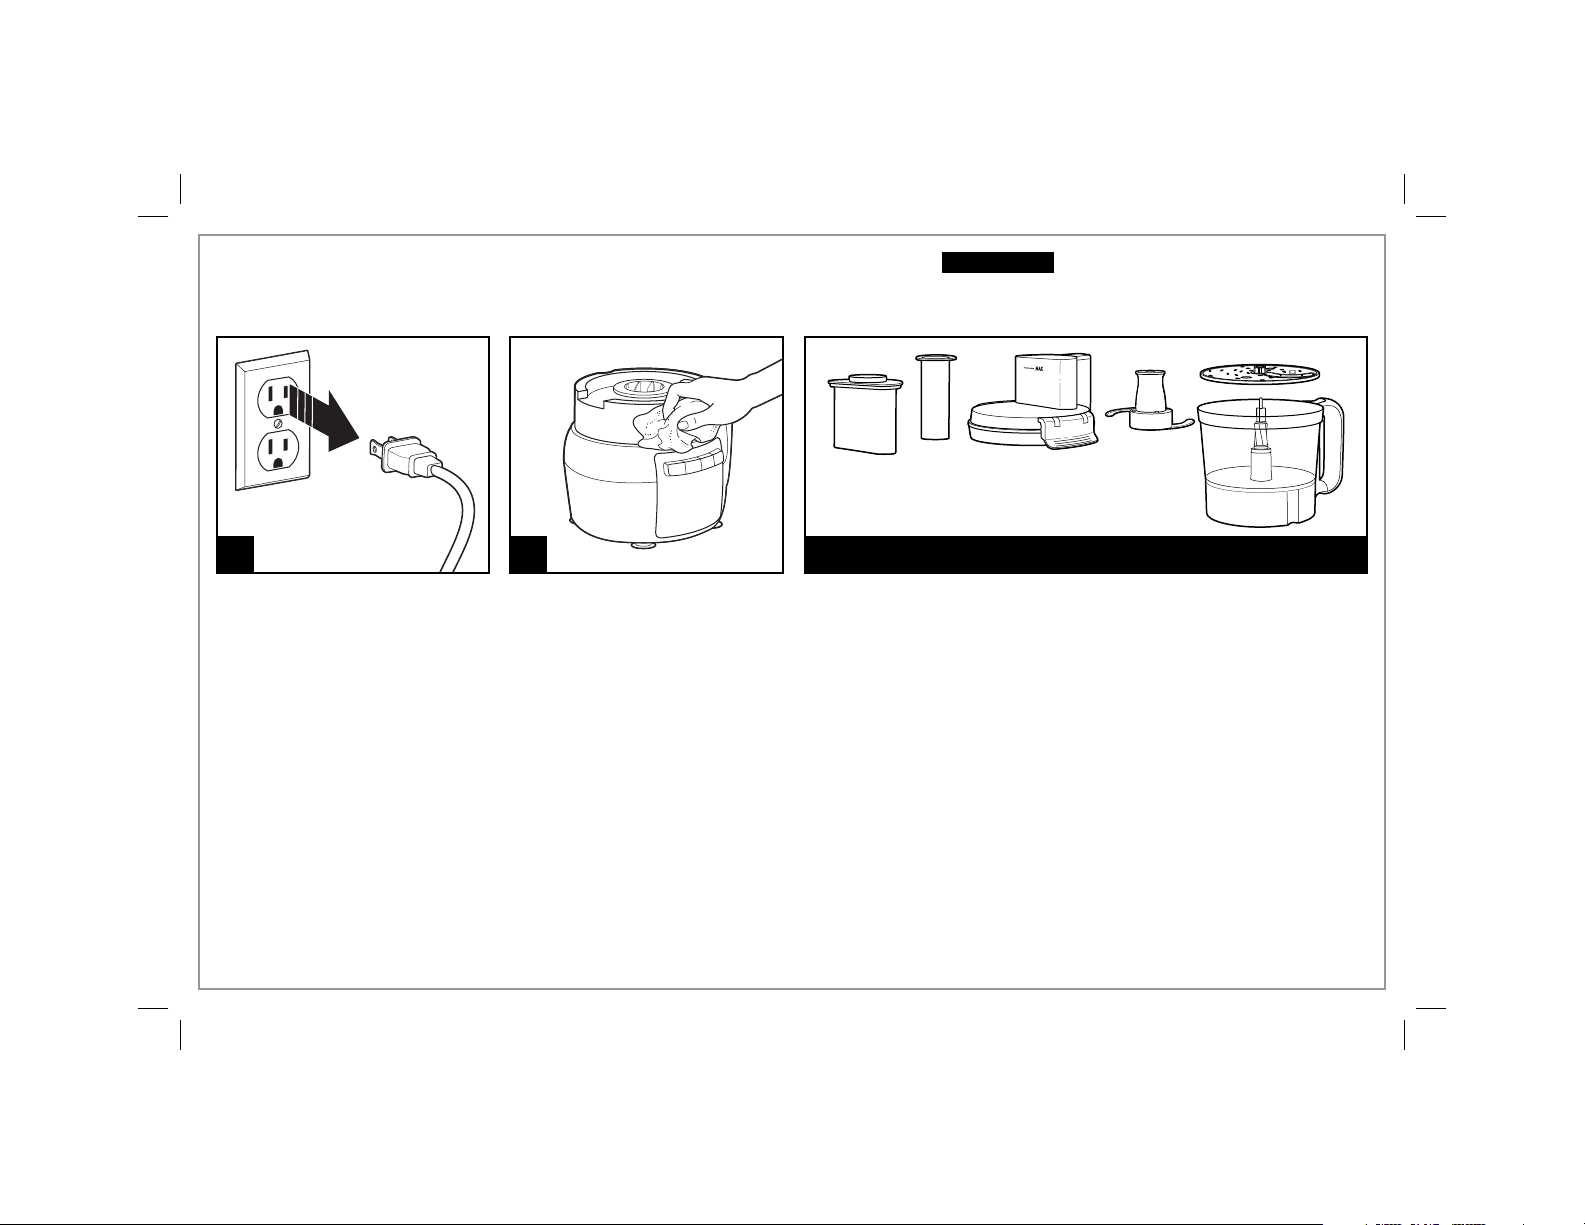
Parts and Features
*To order parts:
US: 1.800.851.8900
www.hamiltonbeach.com
Canada: 1.800.267.2826
Mexico:
01 800 71 16 100
BEFORE FIRST USE: Unpack processor. Handle blade and disc(s)
carefully; they are very sharp. Wash all parts except base in hot,
soapy water. Rinse; then dry.
Nonremovable
Motor Shaft
Large Food
Pusher*
Lid Latches
Lid*
4
Food Chute
Small Food
Pusher*
Base
Bowl*
Control
Panel
Chopping/Mixing Blade*
Use to coarsely chop, grate, mince,
mix, or puree food.
Reversible Slicing/Shredding Disc*
Use to shred or to slice a variety of
foods (such as cheese, carrots, onions,
tomatoes, peppers, and cucumbers).
Page 5
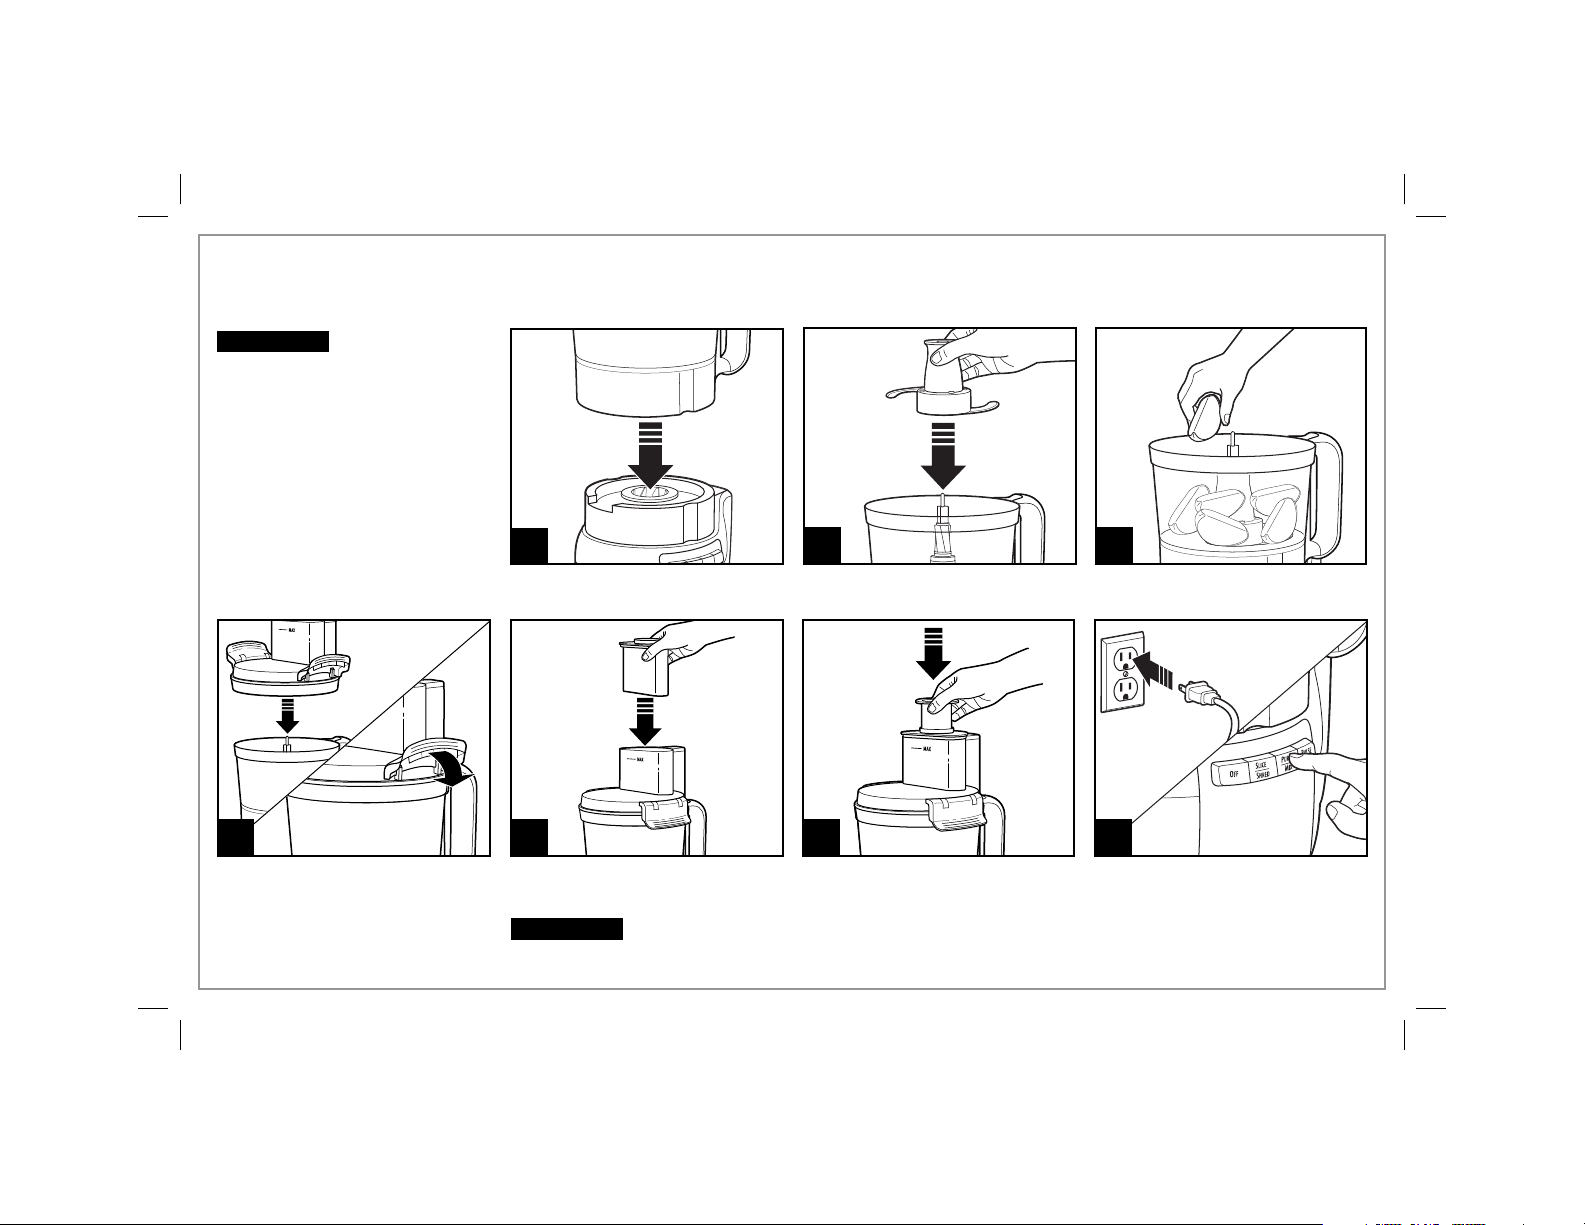
How to Use Chopping/Mixing Blade
w WARNING
Handle blade carefully; it is very
sharp. Make sure unit is turned OFF
(
O
) and is unplugged.
NOTE: Operate using only one
blade or disc at a time.
Laceration Hazard.
4
Place lid on bowl. NOTE: Unit
will not work unless latches on
bowl are locked.
1
Place bowl on base. Carefully slide blade straight
5
Place food pushers in food chute. NOTE: Unit will not operate until
large food pusher engages the protective interlock. Do not add food
above the MAX fill line.
w WARNING
food into the chute. NEVER PUSH FOOD THROUGH CHUTE WITH
HANDS OR OTHER OBJECTS.
Laceration Hazard: Always use food pusher to feed
2
down onto the motor shaft.
6
3
7
Press desired function button.
5
Page 6
How to Use Chopping/Mixing Blade (cont.)
When finished, press OFF (O) and
unplug.
w WARNING
Always unplug unit before
removing lid.
Laceration Hazard:
12
6
9
13
108
11
Carefully remove blade from
motor shaft.
Page 7

How to Use Reversible
Slicing/Shredding Disc
w WARNING
Handle disc carefully; it is very
sharp. Make sure unit is turned
OFF (
O
NOTE: Operate using only one
blade or disc at a time.
Laceration Hazard.
) and is unplugged.
4
Place bowl on base.
Cut food to fit food chute. Fill chute
with food.
NOTE: Soft cheese like mozzarella
should be placed in the freezer for
30 minutes prior to processing
to ensure it is firm enough for
shredding.
2 31
Carefully place disc onto motor
shaft with desired side facing UP.
(“SLICE” or “SHRED” is stamped
on each side of the blade.)
5
Place lid on bowl. NOTE: Unit
will not work unless latches on
bowl are locked.
Place food pushers in food chute.
NOTE: Unit will not operate until
large food pusher engages the
protective interlock. Do not add
food above the MAX fill line.
w WARNING
Always use food pusher to feed
food into the chute. NEVER
PUSH FOOD THROUGH CHUTE
WITH HANDS OR OTHER
OBJECTS.
Laceration Hazard:
7
Page 8
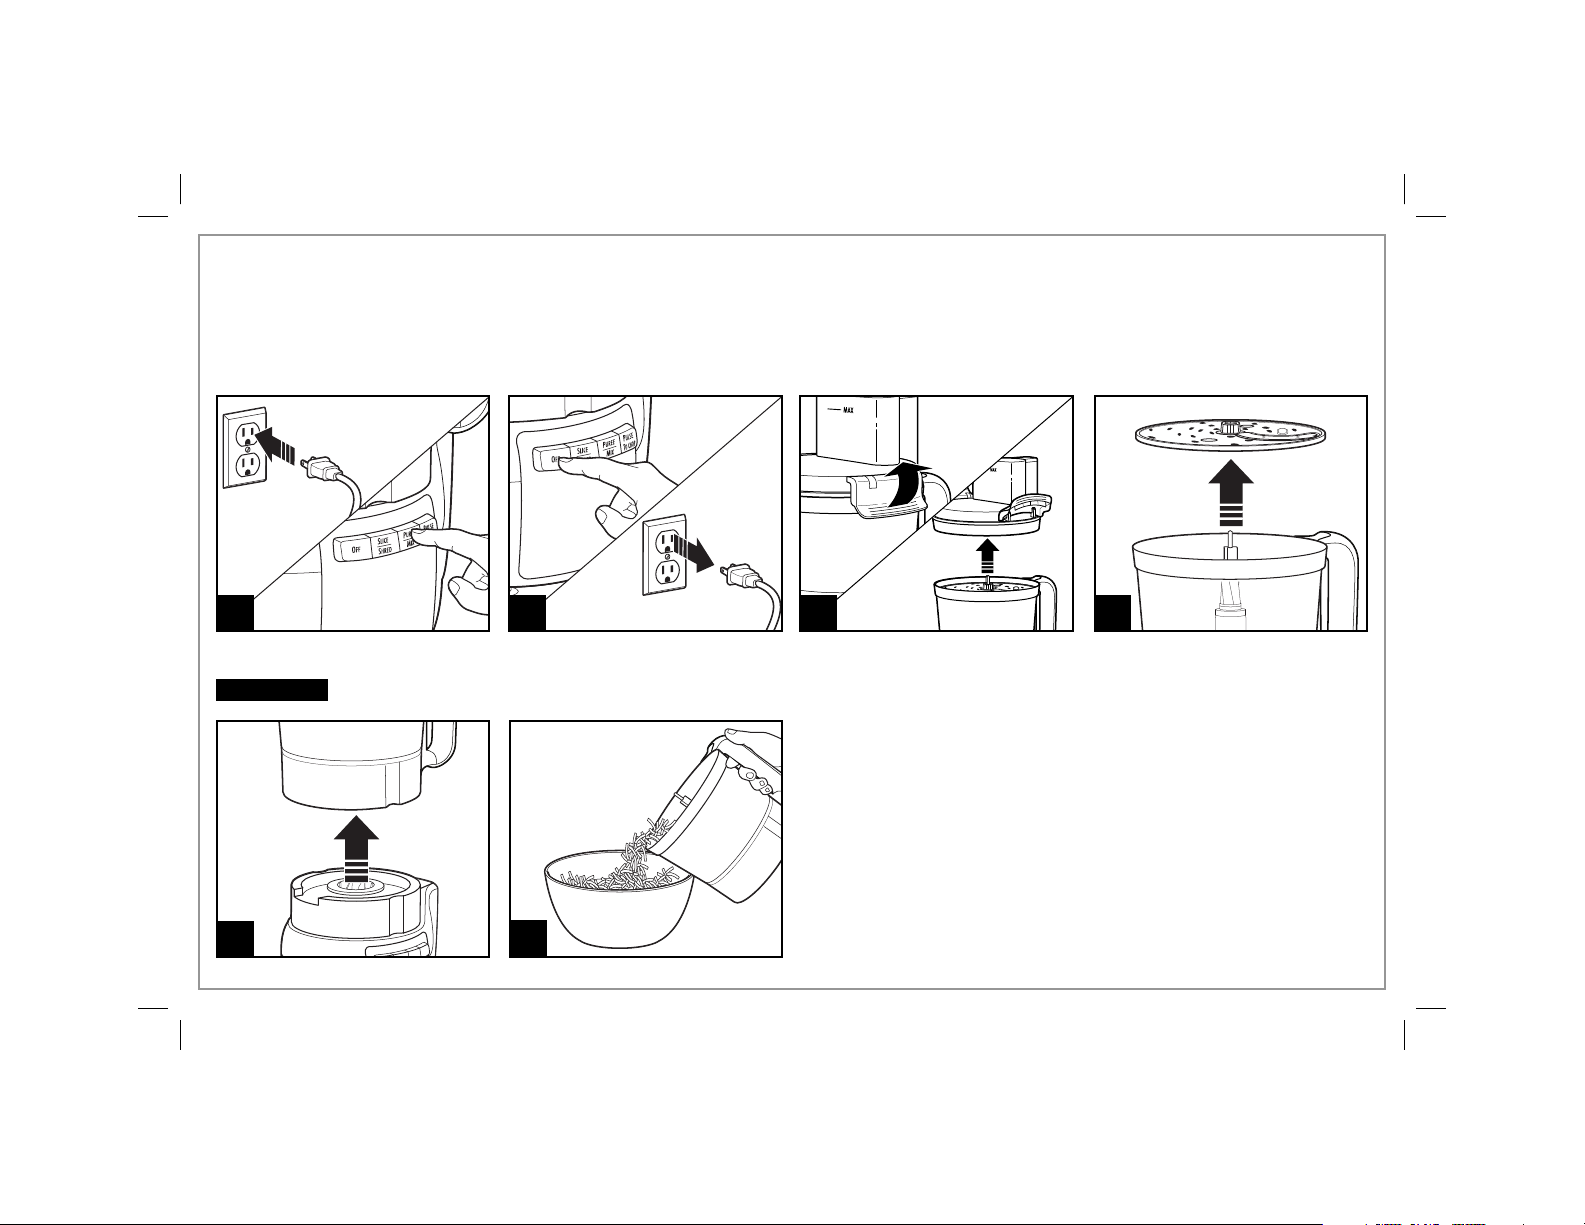
How to Use Reversible
Slicing/Shredding Disc (cont.)
6
Press desired function button. When finished, press OFF (O) and
unplug.
w WARNING
removing lid.
10
8
Laceration Hazard: Always unplug unit before
7
11
8
Always remove lid before
removing bowl to avoid possible
damage to the appliance.
9
Carefully remove disc from
motor shaft.
Page 9

Tips and Techniques
Processing Charts
• For a more uniform consistency,
start with pieces of food that
are similar in size. Cut food
into 1-inch (2.5-cm) pieces
before processing with
chopping/mixing blade and
leave room in bowl for the
food to be tossed around.
• This food processor is
excellent to chop, mix, slice,
or shred most foods. However,
to maintain peak performance,
do not use your food
processor for the following:
grinding grain, coffee beans,
or spices; slicing frozen meats;
kneading dough; or crushing
ice.
• When chopping foods, pulsing
on and off will produce the
best results.
• Operating time will depend
on quantity of food being
processed. Most foods
can be sliced, chopped, or
shredded in seconds. If unit is
operated continuously for an
extended period of time, let the
processor rest about 4 minutes
before continuing.
• Do not puree or mash starchy
vegetables like potatoes as
they are easily overprocessed
and will become gummy.
• To slice or shred cheese, use
only firm cheese like Cheddar
or Swiss that has been chilled
for at least 30 minutes.
Cheese should be processed
immediately after being
removed from the refrigerator.
Soft cheese like mozzarella
should be placed in the
freezer for 30 minutes prior to
processing to ensure it is firm
enough for shredding.
• The reversible slicing/shredding
disc has a slicing blade on one
side and shredding teeth on
the other. The name stamped
on the blade, facing up, is the
function selected. Place on
motor shaft with desired
cutting edge facing up.
• To julienne vegetables, slice
and then remove from bowl.
Restack the vegetables. Pack
into food chute with slices
vertical. Slice again to make
matchstick-cut vegetables.
Disc attachments are reversible and labeled. The label should face
up for the desired function. When using disc attachments, do not
process past the MAX LEVEL on the bowl.
ATTACHMENT FOODS
Chopping/Mixing Blade Chop: nuts, meat, garlic, onions, peppers,
Slicing Disc
(slicing side facing UP)
Shredding Disc
(shredding side facing UP)
For best results do not exceed the following amounts when
chopping, mincing, or pureeing with the chopping/mixing blade.
Leave some space in the bowl to allow ingredients to move for
pulsing or blending.
celery, herbs, bread (for crumbs), crackers
Mince/Puree: vegetables, fruit
Mix: salad dressings
Puree: soups, sauces
Grate: cheese, such as Parmesan (chilled)
Cucumbers, apples, mushrooms, carrots,
potatoes, cabbage, tomatoes, pepperoni,
peppers, radishes, firm cheeses (chilled)
Cabbage, potatoes, carrots, cheese (chilled)
FOOD MAXIMUM AMOUNT
Dry ingredients such as crackers or nuts 8 to 10 cups (1.9–2.4 L)
Vegetables or fruits, quartered 6 to 8 cups (1.4–1.9 L)
Grated cheese such as Parmesan or Cheddar,
cubed
Thick sauces or dips 6 to 8 cups (1.4–1.9 L)
Liquids such as marinades or soups 4 to 6 cups (0.9–1.4 L)
5 to 10 ounces (141–283 g)
9
Page 10
Care and Cleaning
w WARNING
Disconnect power before cleaning. Do not immerse
cord, plug, or base in any liquid.
Electrical Shock Hazard.
10
21
Wipe base, control panel, and
cord with a damp cloth or
sponge. If necessary, use a mild
nonabrasive cleanser.
DO NOT use the “SANI” setting when washing in the dishwasher.
“SANI” cycle temperatures could damage your product. All removable
parts may also be cleaned in the sink with hot, soapy water. Use
caution when washing chopping/mixing blade and slicing/shredding
disc.
DISHWASHER-SAFE
Visit www.hamiltonbeach.com for our complete line
of products and Use and Care Guides –
as well as delicious recipes, tips, and
to register your product online!
Page 11

Troubleshooting
PROBLEM PROBABLE CAUSE
Unit does not operate
on any speed or Pulse.
Food is not sliced or
shredded uniformly.
Unit stops and will
not come back on.
Unit has a burning smell. • There may be a residue left on the motor from the manufacturing process, causing a slight odor
Motor seems weak. • Are you using the recommended food size and quantity to be processed? Refer to the Food Processing
Cheese is not shredding well. • Cheese should be processed immediately after being removed from the refrigerator. Soft cheese like
Vegetables are not
shredding or slicing.
• Is the unit plugged in? Does the outlet work?
• Is the lid locked in place? See “How to Use” sections.
• Packing too much food in the food chute or pushing too hard on the food pusher may cause the
processed food to be irregulary sliced or shredded. Refer to the Food Processing Charts for
recommended sizes and quantities.
• Is the lid locked in place? See “How to Use” sections.
• Is the outlet still working? Check it by plugging in a working lamp or other appliance. You may have
overloaded the circuit and blown a fuse or tripped the circuit breaker.
• Turn unit OFF, allow to stand for 3 to 4 minutes, and then turn back ON.
• If none of these suggestions correct the problem, DO NOT attempt to repair the unit. Call the Customer
Service number.
during initial use. This will go away. If a strong odor or any visible smoke appears, unplug unit
IMMEDIATELY and call the Customer Service number.
Charts for recommended food sizes and speeds.
mozzarella should be placed in the freezer for 30 minutes prior to processing to ensure it is firm enough
for shredding.
• Store vegetables with high water content in the refrigerator prior to processing. Room-temperature
vegetables are less firm and do not perform as well.
11
Page 12

Recipes
Roasted Red Pepper Hummus
2 cloves garlic
2 green onions, white
portion and half of green
tops
1 can (15 oz./425 g) garbanzo
beans (chickpeas), drained
1 jar (14 oz./397 g) roasted red
peppers, drained
1/4 cup (59 ml) tahini
(sesame paste), stirred
Directions
1. Using S-blade and with processor running, drop garlic cloves
and onion into food chute.
2. Add garbanzo beans, roasted red peppers, tahini, lemon juice,
olive oil, cumin, cayenne, salt and pepper. Continue to process
until smooth.
3. Place in serving bowl and garnish with paprika.
4. Serve with pita chips and/or vegetables. Refrigerate to store.
Serves: 4 to 6
2 tablespoons (30 ml) lemon
juice
2 teaspoons (10 ml) olive oil
1/4 teaspoon (1.3 ml) ground
cumin
Dash cayenne pepper
Salt and pepper to taste
Dash paprika
Pita chips or cut vegetables
Fresh and Spicy Salsa
1 onion, peeled
1 clove garlic
1 hot pepper (jalapeno or
finger hot), cored, seeded,
and quartered
4 tomatoes, quartered
Directions
1. Using S-blade and with processor running, drop onion, garlic
clove and hot pepper through the food chute and chop until finely
minced. Scrape bowl as needed.
2. Add tomatoes, cilantro, cumin, lime juice, salt and pepper. Pulse
until desired texture, scraping bowl as needed. Add hot sauce if
desired.
Serves: 6 to 8
1/4 cup (59 ml) cilantro, packed
1/2 teaspoon (2.5 ml) cumin
1 tablespoon (15 ml) lime juice
Salt and pepper to taste
Hot sauce, optional
Cilantro Butter
1 bunch cilantro
1 cup (237 ml) unsalted butter, softened
Juice from one lemon
Salt and pepper to taste
Directions
1. Wash cilantro and separate leaves from stems. Combine butter
and cilantro leaves in food processor. Blend until light and fluffy.
2. Add lemon juice, salt, and pepper to taste. Process to blend.
3. Use for grilled dishes. Delicious with grilled salmon, swordfish or
tuna. Refrigerate to store.
Serves: 4 to 6
12
Page 13

Recipes (cont.)
Cajun Veggie Gratin
3 medium zucchini, sliced
in food processor
1 red onion, sliced in food
processor
6 plum tomatoes, sliced in
food processor
2 teaspoons (10 ml) extra
virgin olive oil
1 1/2 teaspoons (7.5 ml)
Cajun seasoning
1 teaspoon (5 ml) salt
Directions
1. Heat oven to 425°F (218°C). Spray 8-in. (20-cm) square baking
pan with cooking spray.
2. Heat oil in large sauté pan over medium heat.
3. Add sliced zucchini and onion and sauté for 3 to 4 minutes until
beginning to soften.
4. Add sliced tomatoes, Cajun seasoning, salt, and pepper to pan.
5. Sauté mixture, stirring gently, for 8 to 10 minutes until all
vegetables are softened and heated through. Place vegetable
mixture in prepared pan.
6. Combine bread crumbs, Parmesan cheese and Cajun seasoning.
Sprinkle evenly over top of vegetables.
7. Bake 15 to 20 minutes or until topping is brown and crispy.
Serves: 8
1 teaspoon (5 ml) freshly ground
pepper
Cooking spray
Topping:
1 cup (237 ml) bread crumbs
1/2 cup (118 ml) parmesan
cheese, chopped finely in
food processor
1/2 teaspoon (2.5 ml) Cajun
seasoning
Blue Cheese Dressing
2 cloves garlic
4 ounces (113 g) blue cheese
2 cups (473 ml) mayonnaise
Directions
1. Using S-blade and with processor running, drop garlic cloves into
the food chute and mince.
2. Add blue cheese and process for 10 seconds.
3. Add mayonnaise, sour cream, lemon juice and sugar. Process until
smooth. Refrigerate to store.
Serves: 8 to 10
1/2 cup (118 ml) sour cream
1/4 cup (59 ml) fresh lemon juice
2 tablespoons (30 ml) sugar
Cranberry Orange Relish
12 oz. (340 g) cranberries (fresh
with stems removed, or frozen)
1 cup (237 ml) sugar
1 small navel orange, washed,
cut into wedges
Directions
1. Using S-blade, place cranberries, sugar, orange, Grand Marnier
orange juice and cloves into the work bowl.
2. Process until cranberries are almost smooth, yet a bit chunky.
3. Cover and refrigerate overnight.
Serves: 8 to 10
3 tablespoons (44 ml) Grand
Marnier
juice
Dash of ground cloves
®
liqueur or orange
®
or
13
Page 14

Limited Warranty
This warranty applies to products purchased and used in the U.S. and Canada. This is the only express warranty for this product and
is in lieu of any other warranty or condition.
This product is warranted to be free from defects in material and workmanship for a period of five (5) years from the date of original
purchase in Canada and one (1) year from the date of original purchase in the U.S. During this period, your exclusive remedy is repair
or replacement of this product or any component found to be defective, at our option; however, you are responsible for all costs
associated with returning the product to us and our returning a product or component under this warranty to you. If the product or
component is no longer available, we will replace with a similar one of equal or greater value.
This warranty does not cover glass, filters, wear from normal use, use not in conformity with the printed directions, or damage to
the product resulting from accident, alteration, abuse, or misuse. This warranty extends only to the original consumer purchaser or
gift recipient. Keep the original sales receipt, as proof of purchase is required to make a warranty claim. This warranty is void if the
product is used for other than single-family household use or subjected to any voltage and waveform other than as specified on the
rating label (e.g., 120V ~ 60 Hz).
We exclude all claims for special, incidental, and consequential damages caused by breach of express or implied warranty. All
liability is limited to the amount of the purchase price. Every implied warranty, including any statutory warranty or condition
of merchantability or fitness for a particular purpose, is disclaimed except to the extent prohibited by law, in which case such
warranty or condition is limited to the duration of this written warranty. This warranty gives you specific legal rights. You may have
other legal rights that vary depending on where you live. Some states or provinces do not allow limitations on implied warranties or
special, incidental, or consequential damages, so the foregoing limitations may not apply to you.
To make a warranty claim, do not return this appliance to the store. Please call 1.800.851.8900 in the U.S. or 1.800.267.2826 in Canada
or visit hamiltonbeach.com in the U.S. or hamiltonbeach.ca in Canada. For faster service, locate the model, type, and series numbers
on your appliance.
14
Page 15

PRÉCAUTIONS IMPORTANTES
Pour utiliser un appareil électroménager, vous devez toujours prendre des mesures élémentaires de sécurité pour réduire le risque d’incendie,
d’électrocution et/ou de blessure corporelle, en particulier les mesures suivantes :
1. Lire toutes les instructions.
2. Cet appareil n’est pas destiné à être utilisé par des personnes
(y compris les enfants) dont les capacités physiques,
sensorielles ou mentales sont réduites, ou manquant
d’expérience et de connaissance, sauf si elles sont étroitement
surveillées et instruites sur l’utilisation de l’appareil par une
personne responsable de leur sécurité.
3. Une surveillance étroite est requise pour tout appareil utilisé
par ou près des enfants. Surveiller que les enfants ne jouent
pas avec l’appareil.
4. Pour éviter les risques d’électrocution, ne pas immerger la
base, le moteur, le cordon et la fiche dans l’eau ou tout autre
liquide.
5. Débrancher le cordon de la prise dès la fin de l’utilisation,
avant d’installer ou de retirer des pièces et avant le nettoyage.
6. Éviter de toucher des pièces mobiles.
7. Ne pas faire fonctionner un appareil électroménager avec un
cordon ou une fiche endommagée, ou lorsque l’appareil ne
fonctionne pas bien ou a été échappé ou endommagé d’une
manière quelconque. Appeler notre numéro sans frais de
service à la clientèle pour des renseignements concernant
l’examen, la réparation ou l’ajustement électrique ou
mécanique.
8. L’utilisation d’accessoires non recommandés par le fabricant
ou vendus par le fabricant de l’appareil peut provoquer un
incendie, une électrocution ou des blessures.
9. Ne pas utiliser votre robot culinaire si des pièces sont brisées.
10. Ne pas utiliser cet appareil à l’extérieur.
11. Ne pas laisser pendre le cordon de la table ou du comptoir et
éviter tout contact entre le cordon et les surfaces chaudes.
12. Tenir les mains et les ustensiles éloignés de la lame et du
disque en mouvement pendant la transformation des aliments
pour éviter les blessures graves et les dommages au robot
culinaire. Un racloir en plastique peut être utilisé, mais
UNIQUEMENT pendant l’arrêt du robot culinaire.
13. La lame et le disque sont coupants. Manipuler avec soin.
Ranger hors de la portée des enfants.
14. Pour éviter les risques de blessures, ne jamais placer la lame
de coupe ou un disque sur le socle sans avoir préalablement
installé le récipient correctement.
15. S’assurer que le couvercle est en place et bien verrouillé avant
de faire fonctionner l’appareil.
16. Ne jamais introduire d’aliments dans l’entonnoir avec les
mains. Toujours utiliser les poussoirs.
17. Ne pas tenter de démonter le mécanisme de verrouillage.
18. S’assurer que la lame ou le disque cesse de fonctionner avant
de retirer le couvercle.
19. Pour éviter les risques de blessures, s’assurer d’installer ou
de retirer la lame et le disque en utilisant les embouts fournis
à cet effet. Faire preuve de prudence au moment de retirer la
lame ou le disque du récipient, pendant le vidage du récipient
et lors du nettoyage.
20. S’assurer que le bouton de commande est à OFF (O/arrêt)
avant de débrancher la fiche de la prise. Pour débrancher,
tourner le bouton de commande à OFF (O/arrêt) puis
débrancher la fiche de la prise murale.
15
Page 16

21. S’assurer que le commutateur est en position OFF
(O/arrêt) après chaque utilisation. Toujours utiliser les
poussoirs pour désobstruer l’entonnoir. Lorsque cette
méthode est impossible, débrancher le cordon de la prise
et démonter le récipient pour retirer les aliments coincés.
22. Cet appareil n’est pas conçu pour une utilisation
commerciale,
conçu uniquement
professionnelle ou industrielle. Cet appareil est
pour une utilisation domestique.
CONSERVER CES INSTRUCTIONS !
Autres consignes de sécurité pour le consommateur
Cet appareil est destiné à un usage domestique uniquement.
w AVERTISSEMENT
fourni avec une fiche polarisée (une broche large) pour réduire
le risque d’électrocution. Cette fiche n’entre que dans un seul
sens dans une prise polarisée. Ne contrecarrez pas l’objectif
sécuritaire de cette fiche en la modifiant de quelque manière
que ce soit ou en utilisant un adaptateur. Si vous ne pouvez pas
insérer complètement la fiche dans la prise, inversez la fiche. Si
elle refuse toujours de s’insérer, faire remplacer la prise par un
électricien.
Risque de choc électrique : Cet appareil est
23. Ne jamais prolonger le temps de fonctionnement de cet
appareil ou utiliser des quantités d’aliments supérieures aux
recommandations du fabricant.
24. La valeur nominale de cet appareil repose uniquement sur
l’utilisation de la lame à hacher/mélanger. L’utilisation du
disque à trancher/râper exige est moins énergivore.
25. Ne pas placer sur une cuisinière électrique ou à gaz chaud ou
dans un four chaud ou à proximité de ces appareils.
26. N’utiliser cet appareil que pour les fonctions auxquelles il est
destiné.
La longueur du cordon installé sur cet appareil a été sélectionnée
afin de réduire les risques d’enchevêtrement ou de faux pas
causés par un fil trop long. L’utilisation d’une rallonge approuvée
est permise si le cordon est trop court. Les caractéristiques
électriques de la rallonge doivent être équivalentes ou
supérieures aux caractéristiques de l’appareil. Prendre toutes les
précautions nécessaires pour installer la rallonge de manière à
ne pas la faire courir sur le comptoir ou sur une table pour éviter
qu’un enfant ne tire sur le cordon ou trébuche accidentellement.
Pour éviter la surcharge du circuit électrique, ne pas utiliser un
autre appareil à haute puissance sur le même circuit que cet
appareil.
16
Page 17

Pièces et caractéristiques
*Pour commander des pièces :
Canada : 1.800.267.2826
AVANT LA PREMIÈRE UTILISATION : Déballage du
robot culinaire. Manipuler la lame et les disques
avec soin; elles sont très coupantes. Laver
toutes les pièces, sauf le socle, à l’eau chaude
savonneuse. Rincer et sécher.
Poussoir
grand*
Verrouillage
du couvercle
Couvercle*
Entonnoir
Base
Poussoir
petit*
Inamovible à arbre
du moteur
Bol*
Panneau de
commande
Lame à hacher/mélanger*
Utiliser pour hacher grossièrement les
aliments, pour les effilocher, pour les ciseler,
pour les mélanger ou pour les purer.
Disque réversible à trancher/râper*
Utiliser pour râper ou trancher des aliments
variés (comme le fromage,
les carottes, oignons, tomates, piments
et concombres).
17
Page 18

Utilisation de la lame à hacher/mélanger
w AVERTISSEMENT
Risque de déchirures.
Tenir la lame avec soins; elle
est très coupante. S’assurer que
l’appareil est hors tension (OFF/
et débranché.
NOTE : N’utiliser qu’une seule lame
ou un seul disque à la fois.
O
)
18
1
Mettre le bol sur la base. Glisser soigneusement la lame sur
Mettre le couvercle sur le bol.
REMARQUE : L’appareil ne se
mettra pas en marche tant que
4
les loquets du bol ne sont pas
verrouillés.
2 3
l’arbre du moteur.
5
Insérer les poussoirs dans
l’entonnoir.
w AVERTISSEMENT
de déchirures : Utiliser
toujours le poussoir pour
charger les aliments dans
l’entonnoir. NE JAMAIS
INTRODUIRE D’ALIMENTS
DANS L’ENTONNOIR AVEC LES
MAINS OU D’AUTRES OBJETS.
Risque
Page 19

Utilisation de la lame à hacher/mélanger (suite)
7
Appuyer sur le bouton de fonction
désiré.
11
Retirer soigneusement la lame de
l’arbre du moteur.
Une fois le travail terminé,
appuyer (OFF/O) l’appareil et
débrancher la base.
w AVERTISSEMENT
de déchirures : Toujours
débrancher l’appareil avant
de retirer le couvercle.
Risque
9
12
108
13
19
Page 20

Utilisation du disque réversible pour trancher/râper
w AVERTISSEMENT
Risque de déchirures.
Tenir la lame avec soins; elle
est très coupante. S’assurer que
l’appareil est hors tension (OFF/
et débranché.
NOTE : N’utiliser qu’une seule lame
ou un seul disque à la fois.
4
20
O
)
2 31
Mettre le bol sur la base.
du moteur en plaçant la face désirée vers le HAUT.
des mots « SLICE » [trancher] ou « SHRED » [râper] de chaque côté
de la lame).
Tailler les aliments pour qu’ils
s’insèrent dans l’entonnoir.
Remplir l’entonnoir d’aliments.
REMARQUE : Les fromages mous
comme la mozzarelle devrait être
placés au congélateur pendant 30
minutes avant sa transformation
pour assurer une fermeté
suffisante avant de le râper.
Placer soigneusement le disque sur l’arbre
(La lame est gravée
5
Mettre le couvercle sur le bol.
REMARQUE : L’appareil ne se mettra
pas en marche tant que les loquets
du bol ne sont pas verrouillés.
Insérer les poussoirs dans
l’entonnoir.
NOTE : L’appareil ne fonctionnera
pas tant que le grand poussoir
ne sera pas introduit dans le
verrouillage de protection. Ne pas
remplir d’aliments au-dessus de
la ligne de remplissage maximale
(MAX).
w AVERTISSEMENT
de déchirures : Utiliser toujours
le poussoir pour charger les
aliments dans l’entonnoir.
NE JAMAIS INTRODUIRE
D’ALIMENTS DANS
L’ENTONNOIR AVEC LES MAINS
OU D’AUTRES OBJETS.
Risque
Page 21

Utilisation du disque réversible
pour trancher/râper (suite)
6
Appuyer sur le bouton de fonction
désiré.
10
7
Une fois le travail terminé,
appuyer (OFF/O) l’appareil et
débrancher la base.
w AVERTISSEMENT
de déchirures : Toujours
débrancher l’appareil avant
de retirer le couvercle.
Risque
8
Pour éviter tout risque de
dommage à l’appareil, toujours
retirer le couvercle avant de
retirer le bol.
11
9
Retirer soigneusement le disque
de l’arbre du moteur.
21
Page 22

Conseils et méthodes
Tableaux de transformation
• Pour obtenir une consistance
uniforme, commencer par les
morceaux d’aliments de même taille.
Couper les aliments en morceaux de
1 pouce (2,5 cm) avant de les passer
à la lame à hacher/mélanger; laisser
suffisamment d’espace dans bol pour
que les aliments circulent.
• Ce robot culinaire est idéal pour
hacher, mélanger, trancher ou râper
la plupart des aliments. Toutefois,
pour assurer un rendement optimal,
ne pas utiliser le robot culiaire pour
les tâches suivantes : mouler le
grain, moudre les grains de café ou
les épices ; trancher de la viande
congelée, pétrir la pâte ou concasser
de la glace.
• Pour hacher les aliments et obtenir
des résultats optimaux, utiliser le
mode d’impulsion en alternant la
marche/arrêt.
• Le temps de fonctionnement
dépend de la quantité d’aliments à
transformer. La plupart des aliments
peuvent être tranchés, hachés ou
déchiquetés en quelques secondes.
Si l’appareil est utilisé pour une
période de temps prolongée, laisser
reposer le robot culinaire pendant
4 minutes approximativement avant
de poursuivre.
22
• Ne pas mettre en purée ou piler des
légumes tels que les pommes de
terre, car leur surtransformation est
rapide et la texture sera collante.
• Pour trancher ou râper du fromage,
utiliser seulement un fromage ferme
comme le cheddar ou suisse ayant été
refroidi pendant au moins 30 minutes.
Le fromage doit être transformé
dès sa sortie du réfrigérateur. Les
fromages mous comme la mozzarelle
devrait être placés au congélateur
pendant 30 minutes avant sa
transformation pour assurer une
fermeté suffisante avant de le râper.
• Le disque réversible à trancher/râper
possède une face avec une lame pour
trancher et une autre avec des dents
pour déchiqueter. Le nom gravé sur la
lame, face vers le haut, est la fonction
choisie. Placer la lame sur l’arbre du
moteur en plaçant la face de coupe
désirée vers le haut.
• Pour tailler les légumes en julienne,
les trancher et ensuite les retirer du
bol. Les empiler à nouveau. Remettre
les légumes tranchés dans l’entonnoir
en plaçant les tranches à la verticale.
Trancher à nouveau pour obtenir des
légumes taillés en julienne fine.
Les disques accessoires sont réversibles et identifiés. Cette étiquette doit se
retrouver vers le HAUT pour obtenir la fonction désirée. Ne pas dépasser le niveau
de remplissage maximal (MAX LEVEL) indiqué sur le récipient lors de l’utilisation
des disques accessoires.
ACCESSOIRES ALIMENTS
Lame à hacher/mélanger Couper en morceaux : les noix, la viande, l’ail, les
Disque à tranche (face à
trancher vers le HAUT)
Disque à râper (face à
râper vers le HAUT)
Pour des résultats optimaux, ne pas excéder les quantités suivantes pour hacher,
émincer ou mettre en purée à l’aide de la lame à hacher/mélanger. Laisser un
peu d’espace dans le bol pour permettre le déplacement des ingrédients lors de
l’impulsion ou du mélange.
oignons, les poivrons, le céleri, les fines herbes, le
pain (pour des miettes) et des craquelins
Émincer/passer en purée : les légumes et les fruits
Mélanger : les vinaigrettes
Passer en purée : les soupes et les sauces
Râper : le fromage tel que le Parmesan (refroidi)
Les concombres, les pommes, les champignons, les
carottes, les pommes de terre, le choi, lestomates,
les saucissons, les poivrons, les radis, les fromages à
pâte ferme (refroidis)
Le choi, les pommes de terre, les carottes, le fromage
(refroidi)
ALIMENT QUANTITÉ MAXIMALE
Aliments secs comme des craquelins ou des noix 8 à 10 tasses (1,9 à 2,4 L)
Légumes ou fruits, en quartier 6 à 8 tasses (1,4 à 1,9 L)
Fromage râpé comme du parmesan ou du
cheddar, coupé en cubes
Sauces épaisses ou trempettes 6 à 8 tasses (1,4 à 1,9 L)
Liquides comme des marinades ou des soupes 4 à 6 tasses (0,9 à 1,4 L)
5 à 10 onces (141 à 283 g)
Page 23

Nettoyage et entretien
w AVERTISSEMENT
Débrancher l’appareil avant le nettoyage. Ne pas immerger
le cordon, la fiche ou la base dans tout autre liquide.
Risque d’électrocution.
21
Essuyer le socle, le panneau de
commande et le cordon avec un
linge humide ou une éponge.
Pour enlever les taches rebelles,
utiliser un nettoyant doux et non
abrasif.
NE PAS utiliser le réglage “SANI” du lave-vaisselle. Les
températures du cycle “SANI” peuvent endommager le produit.
Toutes les pièces amovibles peuvent être lavées dans l’évier et de
l’eau chaude savonneuse. Laver la lame de hacher/mélanger et le
disque de trancher/râper avec prudence.
LAVABLE AU LAVE-VAISSELLE
Rendez-vous sur www.hamiltonbeach.ca pour notre
liste complète de produits et de nos manuels
utilisateur – ainsi que nos délicieuses
recettes et nos conseils !
23
Page 24

Dépannage
PROBLÈME CAUSE POSSIBLE
Les vitesses et le mode
d’impulsion de l’appareil
ne fonctionnent pas.
Les aliments ne sont pas
tranchés ou râpés
uniformément.
L’appareil s’arrête et
refuse de fonctionner.
L’appareil dégage une
odeur de brûlé.
Le régime du moteur
semble faible.
Le fromage ne se râpe pas
bien.
Les légumes ne se
tranchent pas ou ne se
râpent pas.
• L’appareil est-il branché ? La prise fonctionne-t-elle ?
• Le couvercle est-il verrouillé correctement ? Voir les chapitres « Utilisation ».
• Le bourrage excessif d’aliments dans l’entonnoir ou l’enfonçage trop fort des poussoirs risque de produire
des aliments tranchés ou déchiquetés irrégulièrement. Consultez les tableaux de transformation des
aliments qui indiquent les grosseurs et quantités suggérées.
• Le couvercle est-il verrouillé correctement ? Voir les chapitres « Utilisation ».
• Est-ce que la prise est fonctionnelle ? Vérifier son fonctionnement avec une lampe ou un autre appareil.
Le circuit a probablement été surchargé et fait sauter un fusible ou déclenché un disjoncteur.
• Mettre l’appareil hors tension (OFF) ; attendre 3 à 4 minutes, puis remettre sous tension.
• Si aucune de ces solutions ne corrige le problème, NE PAS tenter de réparer l’appareil. Composer le
numéro sans frais du service à la clientèle.
• Un résidu de fabrication peut se trouver sur le moteur et peut occasionner une légère odeur de brûlé au
cours de la première utilisation. Ceci ne se reproduira plus. Si une forte odeur et une fumée se dégagent
de l’appareil, débrancher l’appareil IMMÉDIATEMENT et appeler le numéro sans frais du service à la
clientèle.
• Est-ce que la grosseur et la quantité d’aliments transformés sont respectées ? Consulter les
tableaux de transformation pour obtenir les grosseurs d’aliments et les vitesses recommandées.
• Le fromage doit être transformé dès sa sortie du réfrigérateur. Les fromages mous comme la mozzarelle
devrait être placés au congélateur pendant 30 minutes avant sa transformation pour assurer une fermeté
suffisante avant de le râper.
• Réfrigérer les légumes à haute teneur en eau avant de les transformer. Les légumes laissés à la
température ambiante sont moins fermes et ne se transforment pas aussi bien.
24
Page 25

Recettes
Humus au poivron rouge rôti
2 gousses d’ail
2 oignons verts, partie
blanche et la moitie de
la partie verte
1 boite de 15 oz (425 g) de
pois chiches, égouttés
1 pot de 14 oz (397 g) de
poivrons rouges rôtis,
égouttés
1/4 de tasse (59 ml) de beurre
de sésame, mélangé
Instructions
1. En utilisant la lame en S, mettre le robot culinaire en marche,
introduire les gousses d’ail et les oignons verts dans l’entonnoir.
2. Ajouter les pois chiches, les poivrons rouges rôtis, le beurre de
sésame, le jus de citron, l’huile d’olive, le cumin, le poivre de
cayenne, le sel et le poivre. Continuer la transformation jusqu’à ce
que le mélange soit lisse.
3. Verser dans un bol de service et garnir de paprika.
4. Servir avec des croustilles pita et/ou des légumes. Réfrigérer.
Servir : 4 à 6
2 c. à soupe (30 ml) de jus
de citron
2 c. à thé (10 ml) d’huile d’olive
1/4 c. à thé (1,3 ml) de cumin
moulu
Pincée de poivre de cayenne
Sel et poivre, au goût
Pincée de paprika
Croustilles pita ou légumes
coupés
Salsa épicée aux légumes frais
1 oignon, pelé
1 gousse d’ail
1 piment fort (jalapeno ou
« Finger Hot »), évidé, épépiné,
coupé en quartier
4 tomates, coupées en quartier
Instructions
1. En utilisant la lame en S, mettre le robot culinaire en marche,
introduire l’oignon, la gousse d’air et le piment fort dans
l’entonnoir et haché finement. Racler le bol au besoin.
2. Ajouter les tomates, la coriandre, le cumin, le jus de limette, le sel
et le poivre. Utiliser le mode d’impulsion jusqu’à la consistance
désirée, en raclant le bol au besoin. Ajouter de la sauce piquante,
si désiré.
Servir : 6 à 8
1/4 de tasse (59 ml) de coriandre,
tassée
1/2 c. à thé (2,5 ml) de cumin
1 c. à soupe (15 ml) de jus
de limette
Sel et poivre, au goût
Sauce piquante, facultative
Beurre à la coriandre
1 bouquet de coriandre
1 tasse (237 ml) de beurre non salé, ramolli
Jus d’un citron
Sel et poivre, au goût
Instructions
1. Laver la coriandre et séparer les feuilles des tiges. Combiner le
beurre et les feuilles de coriandre dans le robot culinaire. Mélanger
jusqu’à ce que la texture soit légère et duveteuse.
2. Ajouter le jus du citron, sel et poivre au goût. Mélanger à nouveau
dans le robot.
3. Utiliser avec les mets grillés. Délicieux sur le saumon, l’espadon et
le thon grillé. Réfrigérer.
Servir : 4 à 6
25
Page 26

Recettes (suite)
Légumes à la cajun gratinés
3 courgettes moyennes,
tranchés à l’aide du robot
culinaire
1 oignon rouge, tranché à
l’aide du robot culinaire
6 tomates juteuses, tranchées
à l’aide du robot culinaire
2 c. à thé (10 ml) d’huile
d’olive extra-vierge
1 1/2 c. à thé (7,5 ml)
d’assaisonnement à la cajun
Instructions
1. Chauffer le four à 218 °C (425 °F). Vaporiser l’enduit de cuisson sur
un moule de cuisson carré de 8 po (20 cm).
2. Chauffer l’huile dans un grand poêlon à feu moyen.
3. Ajouter les courgettes et l’oignon tranchés et faire sauter pendant
3 à 4 minutes jusqu’à ce que les légumes commencent à ramollir.
4. Ajouter les tomates tranchées, l’assaisonnement à la cajun, le sel
et le poivre dans le poêlon.
5. Faire sauter le mélange et remuer délicatement pendant 8 à 10
minutes jusqu’à ce que tous les légumes soient tendres et bien
chauds. Déposer le mélange de légumes dans le moule préparé.
6. Combiner la chapelure, le parmesan et l’assaisonnement à la
cajun. Saupoudrer uniformément sur les légumes.
7. Cuire pendant 15 à 20 minutes ou jusqu’à ce que la garniture soit
grillée et croustillante.
Servir : 8
1 c. à thé (5 ml) de sel
1 c. à thé (5 ml) de poivre
fraîchement moulu
Enduit pour cuisson
Garniture :
1 tasse (237 ml) de chapelure
1/2 tasse (118 ml) de parmesan,
râpé à l’aide du robot
culinaire
1/2 c. à thé (2,5 ml)
d’assaisonnement à la cajun
Vinaigrette au fromage bleu
2 gousses d’ail
4 oz (113 g) de fromage bleu
2 tasses (473 ml) de mayonnaise
Instructions
1. En utilisant la lame en S, mettre le robot culinaire en marche et
introduire les gousses d’ail dans l’entonnoir et hacher.
2. Ajouter le fromage bleu et transformer pendant 10 secondes.
3. Ajouter la mayonnaise, la crème sure, le jus de citron et le sucre.
Transformer jusqu’à ce que le mélange soit lisse. Réfrigérer.
Servir : 8 à 10
1/2 tasse (118 ml) de crème sure
1/4 tasse (59 ml) de jus de citron
frais
2 c. à soupe (30 ml) de sucre
Relish à l’orange et aux canneberges
12 oz (340 g) de canneberges
(fraîches sans queue ou
surgelées)
1 tasse (237 ml) de sucre
1 petite orange navel, lavée,
coupées en quartiers
Instructions
1. En utilisant la lame en S, déposer les canneberges, le sucre,
l’orange, la liqueur Grand Marnier
girofle moulu dans le bol.
2. Transformer les ingrédients jusqu’à ce que les canneberges soient
presque lisses et légèrement croquantes.
3. Couvrir et réfrigérer toute la nuit.
Servir : 8 à 10
3 c. à soupe (44 ml) de liqueur
Grand Marnier
d’orange
Pincée de clou de girofle moulu
MD
ou le jus d’orange et le clou de
MD
ou de jus
26
Page 27

Notes
27
Page 28

Garantie limitée
Cette garantie s’applique aux produits achetés et utilisées aux É.-U. et au Canada. C’est la seule garantie expresse pour ce
produit et est en lieu et place de tout autre garantie ou condition.
Ce produit est garanti contre tout défaut de matériaux et de main-d’oeuvre pour une période des cinq (5) ans à compter de
la date d’achat d’origine au Canada et un (1) an à compter de la date d’achat d’origine aux É.-U. Au cours de cette période,
votre seul recours est la réparation ou le remplacement de ce produit ou tout composant s’avérant défectueux, à notre gré,
mais vous êtes responsable de tous les coûts liés à l’expédition du produit et le retour d’un produit ou d’un composant dans
le cadre de cette garantie. Si le produit ou un composant n’est plus offert, nous le remplacerons par un produit similaire de
valeur égale ou supérieure.
Cette garantie ne couvre pas le verre, les filtres, l’usure d’un usage normal, l’utilisation non conforme aux directives imprimées,
ou des dommages au produit résultant d’un accident, modification, utilisation abusive ou incorrecte. Cette garantie s’applique
seulement à l’acheteur original ou à la personne l’ayant reçu en cadeau. La présentation du reçu de vente d’origine comme
preuve d’achat est nécessaire pour faire une réclamation au titre de cette garantie. Cette garantie s’annule si le produit est
utilisé autrement que par une famille ou si l’appareil est soumis à toute tension ou forme d’onde différente des caractéristiques
nominales précisées sur l’étiquette (par ex. : 120 V ~ 60 Hz).
Nous excluons toutes les réclamations au titre de cette garantie pour les dommages spéciaux, consécutifs et indirects causés
par la violation de garantie expresse ou implicite. Toute responsabilité est limitée au prix d’achat. Chaque garantie implicite,
y compris toute garantie ou condition de qualité marchande ou d’adéquation à un usage particulier, est exonérée, sauf
dans la mesure interdite par la loi, auquel cas la garantie ou condition est limitée à la durée de cette garantie écrite. Cette
garantie vous donne des droits légaux précis. Vous pouvez avoir d’autres droits qui varient selon l’endroit où vous habitez.
Certaines provinces ne permettent pas les limitations sur les garanties implicites ou les dommages spéciaux ou indirects de
telle sorte que les limitations ci-dessus ne s’appliquent peut-être pas à votre cas.
Ne pas retourner cet appareil au magasin lors d’une réclamation au titre de cette garantie. Téléphoner au 1.800.851.8900 aux
É.-U. ou au 1.800.267.2826 au Canada ou visiter le site internet www.hamiltonbeach.com aux É.-U. ou www.hamiltonbeach.ca
au Canada. Pour un service plus rapide, trouvez le numéro de modèle, le type d’appareil et les numéros de série sur votre
appareil.
28
Page 29

SALVAGUARDIAS IMPORTANTES
Cuando utilice artefactos eléctricos, siempre deben seguirse precauciones de seguridad básicas a fin de reducir el riesgo de incendio,
descarga eléctrica, y/o lesiones a personas, incluyendo las siguientes:
1. Lea todas las instrucciones.
2. Este aparato no se destina para utilizarse por personas
(incluyendo niños) cuyas capacidades físicas, sensoriales o
mentales sean diferentes o estén reducidas, o carezcan de
experiencia o conocimiento, a menos que dichas personas
reciban una supervisión o capacitación para el funcionamiento
del aparato por una persona responsable de su seguridad.
3. Se requiere de una estrecha supervisión cuando el aparato
se use cerca de niños. Los niños deben supervisarse para
asegurar que ellos no empleen los aparatos como juguete.
4. Verifique que el voltaje de su instalación corresponda con el
del producto.
5. Para protegerse contra riesgos de descarga eléctrica, no
sumerja la base, motor, cable o enchufe en agua u otro
líquido.
6. Desconecte el cable de la toma cuando no esté en uso, antes
de poner o quitar partes y antes de limpiar.
7. Evite contactar partes móviles.
8. No opere ningún aparato con cables o enchufe dañados o
después de que el aparato funcione mal o se caiga o dañe
de cualquier manera. Llame a nuestro número gratuito de
servicio al cliente para información sobre examinación,
reparación o ajuste eléctrico o mecánico.
9. El uso de aditamentos no recomendados o vendidos por el
fabricante del aparato, puede causar fuego, descarga eléctrica
o lesión.
10. No use su procesador de alimentos si alguna pieza está
quebrada.
11. No use el aparato en exteriores.
12. No deje que el cable cuelgue sobre el borde de una mesa o
barra, o toque superficies calientes.
13. Mantenga las manos y utensilios lejos de la cuchilla móvil
y del disco mientras se procesa alimento para reducir el
riesgo de lesiones personales severas y/o daño al procesador
de alimentos. Se puede usar un raspador de plástico
SOLAMENTE cuando el procesador de alimento no funcione.
14. La cuchilla y el disco están afilados. Manéjelo con cuidado.
Almacene lejos del alcance de los niños.
15. Para reducir el riesgo de lesiones, nunca coloque la cuchilla
cortante o disco en la base sin primero poner el tazón
adecuadamente en su lugar.
16. Asegúrese de que la tapa esté abrochada de manera segura
en su lugar antes de usar el aparato.
17. Nunca meta el alimento en el ducto con la mano. Siempre use
los empujadores de alimento.
18. No intente eliminar el mecanismo de entrebloqueo de la tapa.
19. Asegúrese que la cuchilla o disco se hayan detenido
completamente antes de remover la tapa.
20. Para reducir el riesgo de una lesión, asegúrese de insertar
o remover la cuchilla y disco usando los concentradores
provisto para tal propósito. Tenga cuidado cuando remueva
la cuchilla y disco del tazón, cuando vacíe el tazón y cuando
limpie.
29
Page 30

21. Verifique que el control esté OFF (O/apagado) antes de
enchufar el cable en el tomacorriente. Para desconectar,
en
ponga los controles
enchufe de la toma de pared.
22. Asegúrese de poner el interruptor en posición de OFF
(O/apagado) después de cada uso. Siempre use los
empujadores para vaciar el ducto de alimentos. Cuando este
método no sea posible, desconecte el cable de la toma y
desensamble la unidad para remover el resto del alimento.
23. El aparato no fue hecho para uso comercial, profesional o
industrial. Fue diseñado y construido exclusivamente para
uso casero solamente.
OFF (O/apagado
), luego remueva el
¡GUARDE ESTAS INSTRUCCIONES!
Otra Información de Seguridad para el Cliente
Este aparato ha sido diseñado solamente para uso doméstico.
w ADVERTENCIA
provisto con un enchufe polarizado (una pata más ancha) para
reducir el riesgo de una descarga eléctrica. El enchufe embona
únicamente en una dirección dentro de un tomacorriente
polarizado. No trate de obviar el propósito de seguridad del
enchufe modificándolo de alguna manera o utilizando un
adaptador. Si el enchufe no entra completamente en la toma,
invierta el enchufe. Si aún no entra, haga que un electricista
reemplace la toma.
Peligro de Descarga Eléctrica: Este aparato es
24. Nunca use el aparato por un periodo más largo o con una
cantidad mayor de ingredientes de los recomendados por
el fabricante del aparato.
25. La clasificación máxima de esta unidad está basada en el uso
de la cuchilla picadora/mezcladora. Usando el disco para
rebanar/rallar puede requerir menos energía.
26. No coloque sobre o cerca de un quemador de gas o eléctrico
caliente o en un horno caliente.
27. No use el aparato para otros usos mas que para el que fue
planeado.
El largo del cable que se usa en este aparato fue seleccionado
para reducir el peligro de que alguien se enganche o tropiece
con un cable más largo. Si es necesario usar un cable más largo,
se podrá usar un cable de extensión aprobado. La clasificación
eléctrica nominal del cable de extensión debe ser igual o mayor
que la clasificación nominal del aparato. Es importante tener
cuidado de colocar el cable de extensión para que no se pliegue
sobre el mostrador o la mesera en donde niños puedan tirar del
mismo o tropezarse accidentalmente.
Para evitar una sobrecarga eléctrica del circuito, no use otro
aparato de alto voltaje en el mismo circuito con este aparato.
30
Page 31

Piezas y Características
*Para ordenar partes:
EE. UU.:
www.hamiltonbeach.com
México:
Empujador de
Alimentos Grandes*
Traba de Tapa
Tapa*
1.800.851.8900
01 800 71 16 100
Empujador de
Alimentos Pequeños*
Ducto de Alimentos
ANTES DE USAR POR PRIMERA VEZ: Desempaque el
procesador. Maneje la cuchilla y el(los) disco(s)
cuidadosamente; están muy afilados. Lave todas las
partes excepto la base en agua caliente y jabonosa.
Enjuague, luego seque.
Eje del Motor
Inmovible
Tazón*
Cuchilla Picadora/Mezcladora*
Use para cortar, rallar, picar, mezclar
o hacer puré el alimento.
Disco para Rebanar/Rallador Reversible*
Utilícelo para rallar o rebanar una
variedad de alimentos (tales como queso,
zanahorias, cebollas, tomates, pimientos
y pepinos).
Base
Panel de
Control
31
Page 32

Cómo Usar la Cuchilla Picadora/Mezcladora
w ADVERTENCIA
Peligro de Laceración.
Maneje la cuchilla cuidadosamente;
está muy afilada. Asegúrese de que
la unidad esté apagada (OFF/
y desenchufada.
NOTA: Use sólo con una cuchilla o
disco a la vez.
O
)
4
Coloque la tapa sobre el tazón.
NOTA: La unidad no funcionará
a menos que las trabas del tazón
se hallen activadas.
32
1
Alinee el tazón y la base. Con cuidado deslice la cuchilla hacia abajo
sobre el eje del motor.
5
Coloque los empujadores de alimento en el ducto de alimento.
w ADVERTENCIA
empujador de alimento para ingresar alimento en el ducto.
NUNCA EMPUJE EL ALIMENTO POR EL DUCTO USANDO LAS
MANOS O OBJETOS OTROS.
Peligro de Laceración: Siempre use el
2
6
3
7
Presione el botón de la función
deseada.
Page 33

Cómo Usar la Cuchilla Picadora/Mezcladora
(cont.)
Cuando termine, apague
y desconecte.
w ADVERTENCIA
de Laceración: Siempre
desenchufe la unidad antes de
quitar la tapa.
(OFF/O)
Peligro
12
9
13
108
11
Quite con cuidado la cuchilla del
eje del motor.
33
Page 34

Cómo Utilizar el Disco
Rebanador/Rallador Reversible
w ADVERTENCIA
Peligro de Laceración.
Maneje la cuchilla cuidadosamente;
está muy afilada. Asegúrese de que
la unidad esté apagada (OFF/
y desenchufada.
NOTA: Use sólo con una cuchilla o
disco a la vez.
4
34
O
)
2 31
Alinee el tazón y la base.
eje del motor con el lado deseado viendo hacia ARRIBA. (“SLICE”
[rebanar] o “SHRED” [rallar] se encuentran indicados en cada lado de
la cuchilla).
Corte el alimento para que quepa
en el ducto de alimentos. Llene el
ducto con alimento.
NOTA: Los quesos blandos
como el mozzarella debe pueden
colocarse en el congelador por
30 minutos antes de procesarse
para garantizar que estén lo
suficientemente firmes para
poder rallarlos.
Coloque cuidadosamente el disco en el
5
Coloque la tapa sobre el tazón.
NOTA: La unidad no funcionará
a menos que las trabas del tazón
se hallen activadas.
Coloque los empujadores de alimento
en el ducto de alimento.
NOTA: La unidad no funcionará hasta
que el empujador de alimentos grande
se enganche con el bloqueo de
protección. No coloque alimentos por
encima de la línea MAX de llenado.
w ADVERTENCIA
de Laceración: Siempre use el
empujador de alimento para ingresar
alimento en el ducto. NUNCA
EMPUJE EL ALIMENTO POR EL
DUCTO USANDO LAS MANOS O
OBJETOS OTROS.
Peligro
Page 35

Cómo Utilizar el Disco Rebanador/
Rallador Reversible (cont.)
6
Presione el botón de la función deseada.
(OFF/O)
unidad antes de quitar la tapa.
y desconecte.
w ADVERTENCIA
Peligro de Laceración: Siempre desenchufe la
10
7
11
Cuando termine, apague
8
Siempre remueva la tapa antes
de remover el tazón para evitar
posibles daños al aparato.
9
Remueva cuidadosamente el
disco del eje del motor.
35
Page 36

Consejos y Técnicas
Tablas de Procesamiento
• Para una consistencia más uniforme,
comience con pedazos de alimento
que sean similares en tamaño. Corte
el alimento en pedazos de 1 pulgada
(2.5 cm) antes de procesar con la
cuchilla de picado/mezclado y deje
espacio en el tazón para que se
mueva el alimento.
• Este procesador de alimentos es
excelente para cortar, mezclar,
rebanar o rallar la mayoría de
los alimentos. Sin embargo, para
mantener un desempeño máximo,
no use su procesador de alimentos
para lo siguiente: moler granos,
granos de café o especias; rebanar
carne congelada; amasar masa; o
triturar hielo.
• Cuando corte alimentos, empujando
poco a poco producirá mejores
resultados.
• El tiempo de funcionamiento
dependerá de la cantidad de alimento
a ser procesada. La mayoría de los
alimentos pueden ser rebanados,
picados o rallados en segundos.
Si la unidad es usada por un período
de tiempo prolongado, deje que el
procesador descanse por unos
4 minutos antes de continuar.
•
36
• No haga puré o masa vegetales
almidonados como papas ya
que pueden ser fácilmente
sobre-procesadas y se volverán
gomosas.
• Para rebanar o rallar queso, use sólo
quesos duros como Cheddar o suizo
que haya sido enfriado durante por
lo menos 30 minutos. El queso debe
procesarse inmediatamente después
de retirarse del refrigerador. Los
quesos blandos como el mozzarella
debe pueden colocarse en el
congelador por 30 minutos antes
de procesarse para garantizar que
estén lo suficientemente firmes para
poder rallarlos.
• El disco para rebanar/rallar reversible
tiene una cuchilla rebanadora en un
lado y dientes para deshebrar en el
otr. El nombre grabado en la cuchilla,
viendo hacia arriba, es la función
seleccionada. Colóquelo en el eje del
motor con el borde de corte deseado
viendo hacia arriba.
• Para cortar alimentos en juliana,
rebánelos y luego quítelos del
tazón. Vuelva a apilar los vegetales.
Coloque en el ducto de alimentos
con las rebanadas en forma vertical.
Rebane de nuevo para obtener
vegetales con forma de palitos.
Los aditamentos de disco son reversibles y marcados. Esta marca debe ver hacia
arriba para la función deseada. Cuando use aditamentos de disco, no procese
más allá del NIVEL MÁX. en el Tazón.
ADITAMENTO FOODS
Cuchilla Picadora/Mezcladora Cortar: Nueces, carne, ajo, cebollas, pimientos,
Disco Rebanar (lado de
rebanado viendo hacia ARRIBA)
Disco para Rallar (lado de ralla
viendo hacia ARRIBA)
Para mejores resultados no exceda las cantidades siguientes cuando corte, pique, o
haga puré con la cuchilla picadora/mezcladora. Deje algo de espacio en el tazón para
permitir que los ingredientes se desplacen durante el pulsado o el licuado.
apio, hierbas, pan (para migajas), galletas
Picar/Puré: Verduras, frutas
Mezclar: Aderezos de ensalada
Puré: Sopas, salsas
Rallar: Queso como el parmesano (refrigerado)
Pepinos, manzanas, champiñones, zanahorias,
papas, repollo, tomates, peperoni, pimientos,
rábanos, quesos duros (refrigerados)
Repollo, papas, zanahorias, queso (refrigerado)
ALIMENTO MAXIMUM AMOUNT
Ingredientes secos como galletas o nueces 8 a 10 tazas (1.9 a 2.4 L)
Vegetales o frutas cortados en cuartos 6 a 8 tazas (1.4 a 1.9 L)
Queso rallado como Parmesano o Cheddar en
cubos
Salsas o dips espesos 6 a 8 tazas (1.4 a 1.9 L)
Líquidos como adobos o sopas 4 a 6 tazas (0.9 a 1.4 L)
5 a 10 oz (141 a 283 g)
Page 37

Limpieza y Cuidado
w ADVERTENCIA
Desconecte la electricidad antes de limpiar. No sumerja
el cable, enchufe o base en ningún líquido.
Peligro de Descarga Eléctrica.
21
Limpie la base, perilla de control,
y cable con un trapo o esponja
húmeda. Si fuera necesario, use
un limpiador suave no abrasivo.
¡Visite www.hamiltonbeach.com.mx para
ver otros productos de Hamilton Beach
o para contactarnos!
RESISTENTE AL LAVAVAJILLAS
No utilice la configuración “SANI” cuando la lave en el lavavajillas.
Las temperaturas del ciclo “SANI” pueden dañar su producto. Todas
las piezas desmontables también pueden lavarse en el fregadero con
agua caliente jabonosa. Tenga cuidado al lavar la cuchilla picadora/
mezcladora y el disco para rebanar/rallar de corte.
37
Page 38

Resolviendo Problemas
PROBLEMA PROBABLE CAUSE
La unidad no funciona
a ninguna velocidad
o Pulso.
El alimento no es
rebanado o deshebrado
uniformemente.
La unidad se detiene y
no se vuelve a encender.
La unidad huele
a quemado.
El motor parece débil. • ¿Está usando el tamaño y cantidad de alimento recomendado a ser procesado? Consulte las tablas
El queso no queda bien
rallado.
Los vegetales no quedan
bien rallados o rebanados.
• ¿Está conectada la unidad? ¿Funciona la toma?
• ¿La tapa se halla trabada en su lugar? Vea las secciones de Cómo Usar.
• El empacar mucho alimento en el ducto de alimentos o empujar demasiado duro con el empujador
de alimentos puede causar que el alimento procesado sea rebanado o deshebrado irregularmente.
Consulte las tablas de procesamiento por tamaños y cantidades recomendadas.
• ¿La tapa se halla trabada en su lugar? Vea las secciónes de Cómo Usar.
• ¿Está aún funcionando la toma? Revísela conectando una lámpara u otro aparato que funcione.
Puede que haya sobrecargado el circuito y volado un fusible o botado el interruptor de circuito.
• APAGUE (OFF) la unidad, déjela descansar por 3 a 4 minutos, luego vuelva a ENCENDERLA.
• Si ninguna de estas sugerencias corrigen el problema, NO intente reparar la unidad. Llame al número de
Servicio al Cliente.
• Puede haber un residuo del proceso de fabricación aún en el motor, causando un ligero olor durante
el uso inicial. Esto desaparecerá. Si aparece un fuerte olor o un humo visible, desconecte la unidad
INMEDIATAMENTE y llame al número de Servicio al Cliente.
de procesamiento para tamaños de alimento y velocidades recomendados.
• El queso debe procesarse inmediatamente después de retirarse del refrigerador. Los quesos blandos
como el mozzarella debe pueden colocarse en el congelador por 30 minutos antes de procesarse para
garantizar que estén lo suficientemente firmes para poder rallarlos.
• Guarde los vegetales con un contenido elevado de agua en el refrigerador antes de procesarlos.
Los vegetales que se encuentran a temperatura ambiente no son tan firmes y no pueden procesarse
tan bien.
38
Page 39

Recetas
Hummus de Pimientos Rojos Asados
2 dientes de ajo
2 cebolletas, la parte blanca
y la mitad de la parte verde
1 lata (15 oz./425 g) de garbanzos
escurridos
1 frasco (14 oz./397 g) de
pimientos rojos asados
escurridos
1/4 taza (59 ml) de tahini
(pasta de sésamo)
mezclada
Instrucciones
1. Utilizando la cuchilla en S y con el procesador de alimentos en
funcionamiento, coloque los dientes de ajo y la cebolleta en el
ducto de alimentos.
2. Agregue los garbanzos, los pimientos rojos asados, el tahini, el
jugo de limón, el aceite de oliva, el comino, la pimienta de Cayena,
sal y pimienta. Siga procesando hasta que quede homogéneo.
3. Coloque en un tazón y decore con páprika.
4. Sirva con panes pita y/o vegetales. Refrigere para conservar.
Rendimiento: 4 a 6
2 cucharadas (30 ml) de jugo
de limón
2 cucharaditas (10 ml) de aceite
de oliva
1/4 de cucharadita (1.3 ml) de
comino molido
Una pizca de pimienta de Cayena
Sal y pimienta a gusto
Una pizca de páprika
Panes pita o vegetales cortados
Salsa Fresca y Picante
1 cebolla pelada
1 diente de ajo
1 pimiento picante (jalapeño o
serrano), sin centro, sin
semillas y en cuartos
4 tomates en cuartos
Instrucciones
1. Utilizando la cuchilla en S y con el procesador de alimentos en
funcionamiento, coloque la cebolla, el diente de ajo y el pimiento
picante a través del ducto de alimentos y píquelos hasta que
queden bien picados. Raspe los lados del tazón si fuera necesario.
2. Agregue los tomates, el cilantro, el comino, el jugo de lima, sal
y pimienta. Pulse hasta alcanzar la textura deseada, raspando el
tazón según sea necesario. Agregue salsa picante si lo desea.
Rendimiento: 6 a 8
1/4 taza (59 ml) de cilantro
1/2 cucharadita (2.5 ml) de
comino
1 cucharada (15 ml) de jugo de
lima
Sal y pimienta a gusto
Salsa picante opcional
Mantequilla de Cilantro
1 atado de cilantro
1 taza (237 ml) de mantequilla sin sal ablandada
Jugo de un limón
Sal y pimienta a gusto
Instrucciones
1. Lave el cilantro y separe las hojas de los tallos. Mezcle la mantequilla
con las hojas de cilantro en el procesador de alimentos. Mezcle hasta
que quede suave y esponjosa.
2. Agregue el jugo de limón, sal y pimienta a gusto. Procese para
mezclar.
3. Utilícela en platos asados. Deliciosa con salmón, pez espada o
atún asados. Refrigere para conservar.
Rendimiento: 4 a 6
39
Page 40

Recetas (cont.)
Vegetales al Gratén Cajun
3 zucchinis medianos
rebanados en el
procesador de alimentos
1 cebolla roja rebanada en
el procesador de alimentos
6 tomates perita rebanados en
el procesador de alimentos
2 cucharaditas (10 ml) de aceite
de oliva extra virgen
1 1/2 cucharaditas (7.5 ml) de
condimento Cajun
1 cucharadita (5 ml) de sal
Instrucciones
1. Caliente el horno a 425°F (218°C). Rocíe con spray para cocción
una bandeja para hornear cuadrada de 8 pulg. (20 cm).
2. Caliente el aceite en una sartén grande a fuego mediano.
3. Agregue la cebolla y el zucchini rebanados y saltee de 3 a 4
minutos hasta que comiencen a ablandarse.
4. Agregue a la sartén los tomates rebanados, el condimento
Cajun, la sal y pimienta.
5. Saltee la mezcla, revolviendo lentamente, de 8 a 10 minutos hasta
que todos los vegetales queden blandos y bien calientes. Coloque
la mezcla de vegetales en la bandeja preparada.
6. Mezcle el pan rallado, el queso Parmesano y el condimento Cajun.
Espolvoree en forma pareja sobre los vegetales.
7. Hornee de 15 a 20 minutos o hasta que la cobertura quede dorada
y crocante.
Rendimiento: 8
1 cucharadita (5 ml) de pimienta
recién molida
Spray para cocción
Cobertura:
1 taza (237 ml) de pan rallado
1/2 taza (118 ml) de queso
parmesano rallado en el
procesador de alimentos
1/2 cucharadita (2.5 ml) de
condimento Cajun
Aderezo de Queso Azul
2 dientes de ajo
4 onzas (113 g) de queso azul
2 tazas (473 ml) de mayonesa
Instrucciones
1. Utilizando la cuchilla en S y con el procesador de alimentos
en funcionamiento, coloque los dientes de ajo en el ducto de
alimentos y pique.
2. Agregue el queso azul y procese durante 10 segundos.
3. Agregue la mayonesa, la crema agria, el jugo de limón y el azúcar.
Procese hasta lograr una consistencia suave. Refrigere para
conservar.
Rendimiento: 8 a 10
1/2 taza (118) de crema agria
1/4 taza (59 ml) de jugo de limón
fresco
2 cucharadas (30 ml) de azúcar
Guarnición de Arándanos y Naranja
12 onzas (340 g) de arándanos
(frescos sin tallos o congelados)
1 taza (237 ml) de azúcar
1 naranja de ombligo pequeña,
lavada, cortada en trozos
Instrucciones
1. Utilizando la cuchilla en S, coloque los arándanos, el azúcar, el
Grand Marnier
2. Procese hasta que los arándanos estén casi homogéneos, aunque
con pequeños trozos.
3. Cubra y refrigere durante la noche.
Rendimiento: 8 a 10
®
o jugo de naranja y el clavo en el tazón de trabajo.
3 cucharadas (44 ml) de licor
Grand Marnier
naranja
Una pizca de clavo molido
®
o jugo de
40
Page 41

Notas
41
Page 42

Grupo HB PS, S.A. de C.V.
Monte Elbruz 124-301
Colonia Palmitas, Delegación Miguel Hidalgo
C.P. 11560, México, Distrito Federal
01 800 71 16 100
PÓLIZA DE GARANTÍA
PRODUCTO:
MARCA:
Grupo HB PS, S.A. de C.V. cuenta con una Red de Centros de Servicio Autorizada, por favor consulte en la lista anexa el nombre y dirección de los establecimientos en la
República Mexicana en donde usted podrá hacer efectiva la garantía, obtener partes, componentes, consumibles y accesorios; así como también obtener servicio para
productos fuera de garantía. Para mayor información llame sin costo: Centro de Atención al consumidor: 01 800 71 16 100
Grupo HB PS, S.A. de C.V. le otorga a partir de la fecha de compra:
GARANTÍA DE 1 AÑO.
COBERTURA
• Esta garantía ampara, todas las piezas y componentes del producto que resulten con defecto de fabricación incluyendo la mano de obra.
Grupo HB PS,
•
todo lo anterior sin costo adicional para el consumidor.
• Esta garantía incluye los gastos de transportación del producto que deriven de su cumplimiento dentro de su red de servicio.
S.A. de C.V. se obliga a reemplazar, reparar o reponer, cualquier pieza o componente defectuoso; proporcionar la mano de obra necesaria para su diagnóstico y reparación,
LIMITACIONES
• Esta garantía no ampara el reemplazo de piezas deterioradas por uso o por desgaste normal, como son: cuchillas, vasos, jarras, filtros, etc.
• Grupo HB PS, S.A. de C.V. no se hace responsable por los accidentes producidos a consecuencia de una instalación eléctrica defectuosa, ausencia de toma de tierra, clavija de enchufe
en mal estado, etc.
EXCEPCIONES
Esta garantía no será efectiva en los siguientes casos:
a) Cuando el producto se hubiese utlizado en condiciones distintas a las normales. (Uso industrial, semi-industrial o comercial.)
b) Cuando el producto no hubiese sido operado de acuerdo con el instructivo de uso.
c) Cuando el producto hubiese sido alterado o reparado por personas no autorizadas por Grupo HB PS, S.A. de C.V. el fabricante nacional, importador o comercializador responsable
respectivo.
El consumidor puede solicitar que se haga efectiva la garantía ante la propia casa comercial donde adquirió su producto, siempre y cuando Grupo HB PS, S.A. de C.V. no cuente con talleres de
servicio.
MODELO:
42
Page 43

PROCEDIMIENTO PARA HACER EFECTIVA LA GARANTÍA
• Para hacer efectiva la garantía no deben exigirse mayores requisitos que la presentación del producto y la póliza correspondiente, debidamente sellada por el establecimiento que lo vendió.
• Para hacer efectiva la garantía, lleve su aparato al Centro de Servicio Autorizado más cercano a su domicilio (consulte la lista anexa).
• Si no existe Centro de Servicio Autorizado en su localidad llame a nuestro Centro de Atención al Consumidor para recibir instrucciones de como hacer efectiva su garantía.
• El tiempo de reparación, en ningún caso será mayor de 30 días naturales contados a partir de la fecha de recepción del producto en nuestros Centros de Servicio Autorizados.
• En caso de que el producto haya sido reparado o sometido a mantenimiento y el mismo presente deficiencias imputables al autor de la reparación o del mantenimiento dentro de los treinta
días naturales posteriores a la entrega del producto al consumidor, éste tendrá derecho a que sea reparado o mantenido de nuevo sin costo alguno. Si el plazo de la garantía es superior a
los treinta días naturales, se estará a dicho plazo.
• El tiempo que duren las reparaciones efectuadas al amparo de la garantía no es computable dentro del plazo de la misma. Cuando el bien haya sido reparado se iniciará la garantía respecto
de las piezas repuestas y continuará con relación al resto. En el caso de reposición del bien deberá renovarse el plazo de la garantía.
SELLO DEL VENDEDOR QUEJAS Y SUGERENCIASFECHA DE ENTREGA
DÍA___ MES___ AÑO___
Si desea hacer comentarios o sugerencias con respecto a nuestro servicio o tiene alguna queja derivada de la atención recibida en
alguno de nuestros Centros de Servicio Autorizados, por favor dirigirse a:
GERENCIA INTERNACIONAL DE SERVICIO
Email: mexico.service@hamiltonbeach.com.mx
01 800 71 16 100
RED DE CENTROS DE SERVICIO AUTORIZADA GRUPO HB PS, S.A. DE C.V.
Distrito Federal
ELECTRODOMÉSTICOS
Av. Plutarco Elias Cailes No. 1499
Zacahuitzco MEXICO 09490 D.F.
Tel: 01 55 5235 2323 • Fax: 01 55 5243 1397
CASA GARCIA
Av. Patriotismo No. 875-B
Mixcoac MEXICO 03910 D.F.
Tel: 01 55 5563 8723 • Fax: 01 55 5615 1856
Nuevo Leon
FERNANDO SEPULVEDA REFACCIONES
Ruperto Martínez No. 238 Ote.
Centro MONTERREY, 64000 N.L.
Tel: 01 81 8343 6700 • Fax: 01 81 8344 0486
Jalisco
SERVICIOS DE MANTENIMIENTO CASTILLO
Garibaldi No. 1450
Ladrón de Guevara
GUADALAJARA 44660 Jal.
Tel: 01 33 3825 3480 • Fax: 01 33 3826 1914
Chihuahua
DISTRIBUIDORA TURMIX
Av. Paseo Triunfo de la Rep. No. 5289 Local 2 A.
Int. Hipermart
Alamos de San Lorenzo
CD. JUAREZ 32340 Chih.
Tel: 01 656 617 8030 • Fax: 01 656 617 8030
43
Page 44

Modelos:
70720, 70720C
Tipo:
FP25
Características Eléctricas:
120 V~ 60 Hz 450 W
Los modelos incluídos en el instructivo de Uso y Cuidado pueden ir seguidos o no por un sufijo correspondiente a una
o varias letras del alfabeto y sus combinaciones, separadas o no por un espacio, coma, diagonal, o guión. Como ejemplos
los sufijos pueden ser: “Y” y/o “MX” y/o “MXY” y/o “Z”.
840221601
7/15
 Loading...