

Page 1
Food Processor
840129200
READ BEFORE USE
LIRE AVANT L’UTILISATION
LEA ANTES DE USAR
English ................................................ 2
USA: 1-800-851-8900
Français ............................................ 18
Canada : 1-800-267-2826
Español .............................................. 34
México: 01 800 71 16 100
Le invitamos a leer cuidadosamente este
instructivo antes de usar su aparato.
Robot culinaire
Procesador de alimentos
840129200 Ev01.qxd 7/6/04 9:06 AM Page 1
Page 2

IMPORTANT SAFEGUARDS
SAVE THESE INSTRUCTIONS!
In order to prevent the risk of fire, electric
shock, burns or other injury or damage,
follow these instructions carefully. When
using electrical appliances, basic safety
precautions should always be followed,
including the following:
1. Read and save all instructions.
2. To protect against risk of electrical
shock, do not immerse base, motor,
cord, or plug in water or other liquid.
3. Close supervision is necessary when any
appliance is used by or near children.
4. This appliance should not be used by
children.
5. Unplug cord from outlet when not in
use, before putting on or taking off
parts, and before cleaning.
6. Avoid contacting moving parts. Keep
fingers out of discharge opening.
7. Do not operate any appliance with a
damaged cord or plug or after the
appliance malfunctions or is dropped
or damaged in any manner. Call our
toll-free customer service number for
information on examination, repair or
electrical or mechanical adjustment.
All repairs must be completed by the
manufacturer, its service agent, or
similarly qualified persons in order
to avoid a hazard.
8. The use of attachments not
recommended or sold by Hamilton
Beach/Proctor-Silex, Inc. may cause
fire, electric shock, or injury.
9. Do not use your food processor if any
part is broken.
10. Do not use appliance outdoors.
11. Do not let cord hang over edge of table
or counter, or touch hot surfaces.
12. Keep hands and utensils away from
moving blade and disc while processing
food to reduce the risk of severe
personal injury and/or damage to the
food processor. A rubber scraper may
be used but ONLY when the food
processor is not running.
13. The blade and disc are sharp. Handle
carefully. Store out of reach of children.
14. To reduce the risk of injury, never place
cutting blade or disc on base without
first putting bowl properly in place.
15. Be certain cover is securely locked in
place before operating appliance.
16. Never feed food into food chute by
hand when slicing or shredding food.
Always use food pusher.
17. Do not attempt to defeat the cover
interlock mechanism.
18. Make sure the blade or disc has come
to a full stop before removing cover.
19. To reduce the risk of injury, be sure to
insert or remove blade and disc using
hubs provided for this purpose. Use
caution when removing blade and disc
from the bowl, when emptying the bowl,
and when cleaning.
20. Be sure to turn switch to OFF ( O )
position after each use. Always use the
pusher to clear the food chute. When
this method is not possible, turn the
motor off and disassemble unit to
remove the remaining food.
21. The appliance is not intended for commercial, professional or industrial use. It
is designed and built exclusively for
domestic use only.
22. Never use appliance for a longer period
or with a larger amount of ingredients
other than that recommended by
Hamilton Beach/Proctor-Silex, Inc.
23. The maximum rating of this unit is
based on using the Chopping/Mixing
Blade. Using the Slicing/Shredding Disc
may draw significantly less power.
24. Do not place on or near a hot gas or
electric burner or in a heated oven.
25. Do not use appliance for other than
intended use.
2
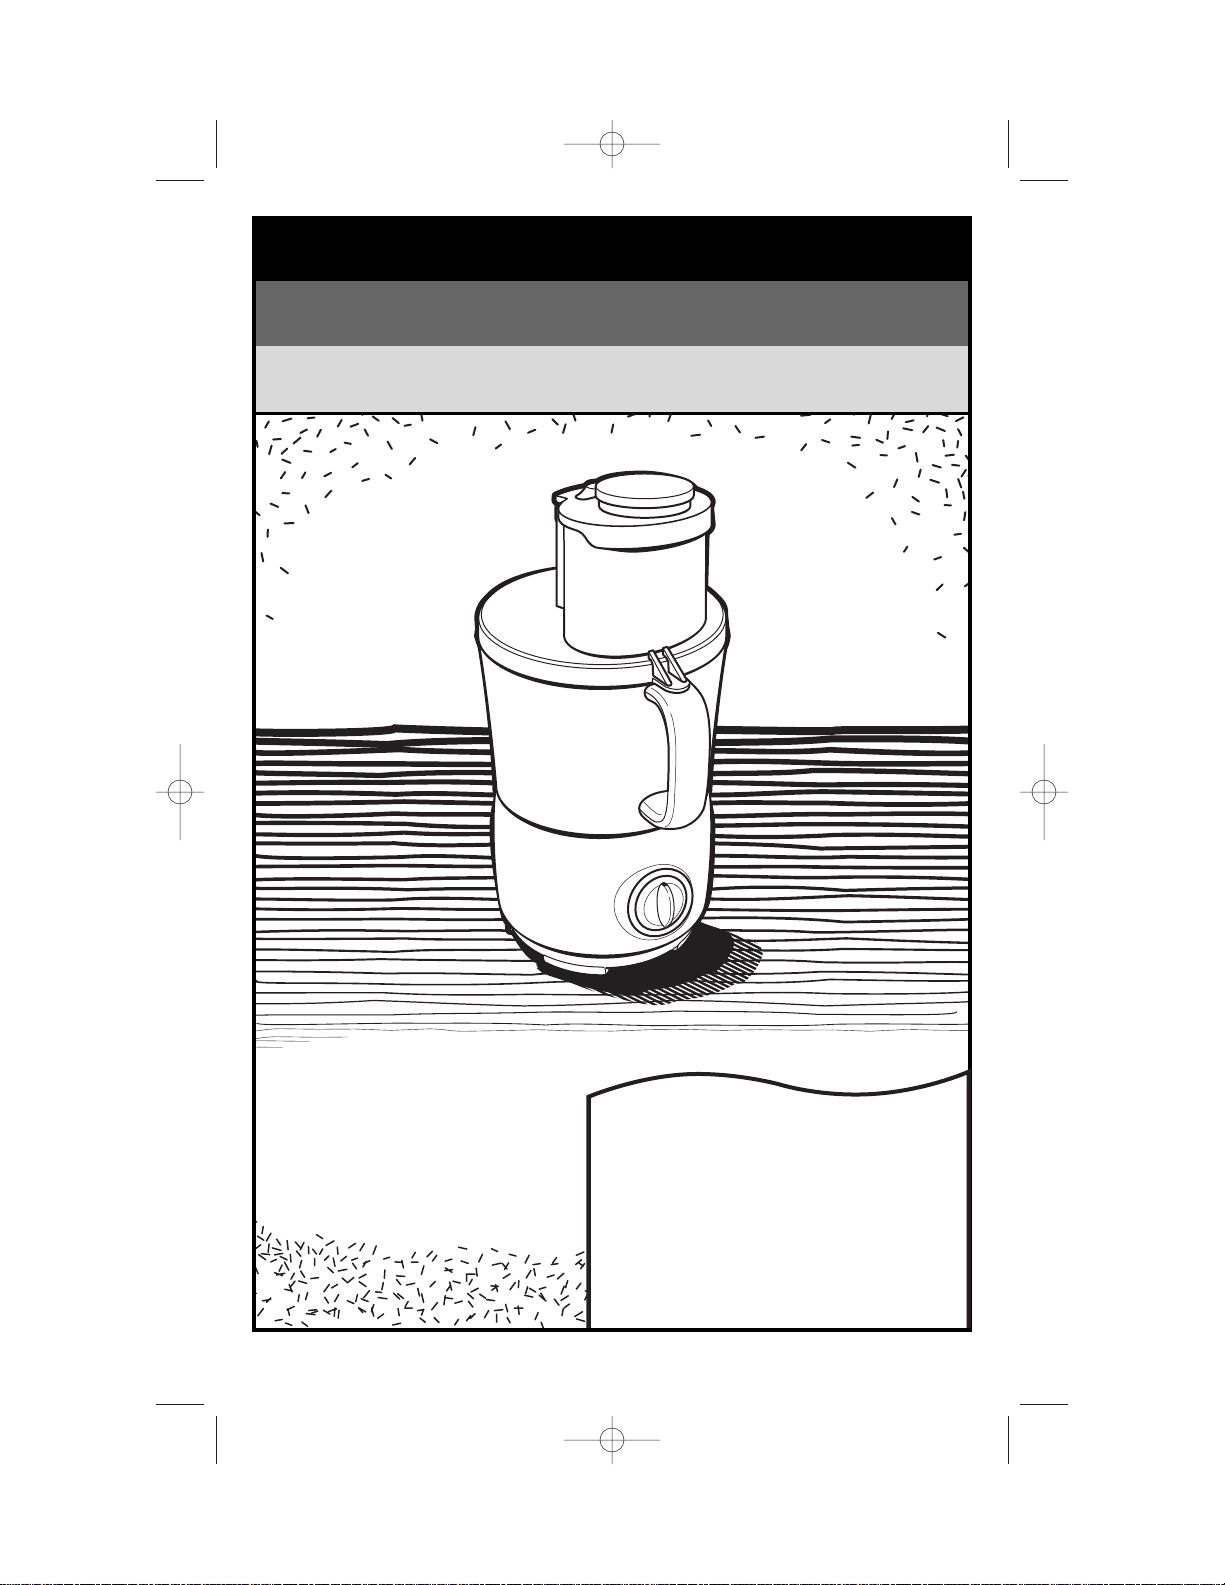
BEFORE FIRST USE: Unpack processor. Handle Chopping/Mixing Blade and Slicing/Shredding
Disc carefully; they are very sharp. Wash all parts except base in hot, soapy water. Rinse then
dry.
840129200 Ev01.qxd 7/6/04 9:06 AM Page 2
Page 3

3
Other Consumer Safety Information
This appliance is intended for household
use only.
This appliance is equipped with a polarized
plug. This type of plug has one blade wider
than the other. The plug will fit into an
electrical outlet only one way. This is a
safety feature intended to help reduce the
risk of electrical shock. If you are unable to
insert the plug into the outlet, try reversing
the plug. If the plug should still fail to fit,
contact a qualified electrician to replace the
obsolete outlet. Do not attempt to defeat
the safety purpose of the polarized plug by
modifying the plug in any way.
To avoid an electrical circuit overload, do
not use another high wattage appliance on
the same circuit with your food processor.
The length of the cord used on this appliance
was selected to reduce the hazards of
becoming tangled in, or tripping over a
longer cord. If a longer cord is necessary,
an approved extension cord may be used.
The electrical rating of the extension cord
must be equal to or greater than the rating
of the food processor. Care must be taken
to arrange the extension cord so that it will
not drape over the countertop or tabletop
where it can be pulled on by children or
accidentally tripped over.
840129200 Ev01.qxd 7/6/04 9:06 AM Page 3
Page 4
4
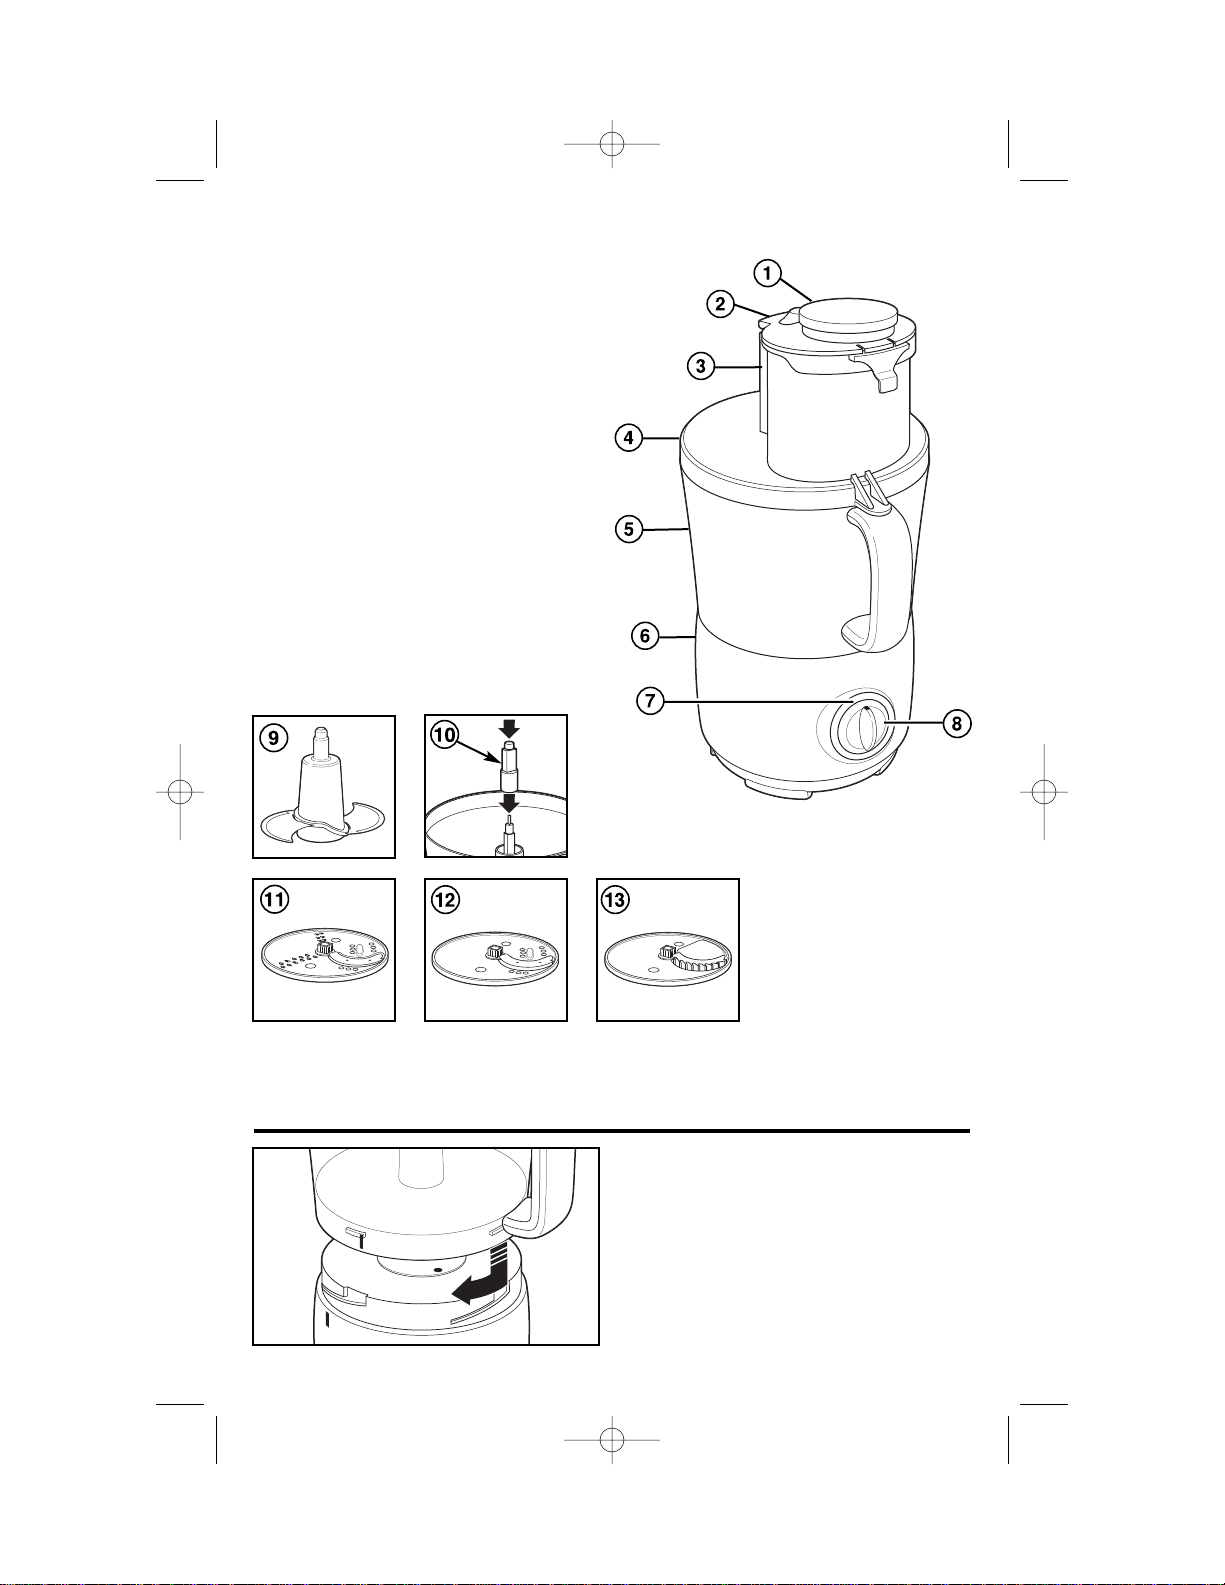
1. Food Pusher
2. Food Chute Lid
3. Food Chute
4. Bowl Lid
5. Bowl
6. Base
7. Ready Light
8. Control Dial
9. Chopping/Mixing Blade
10. Removable Drive Sleeve
11. 3.0mm Slicing Blade (Medium Shredding)
12. 6.0mm Slicing Blade*
13. French Fry Blade*
Parts and Features
Using Your Food Processor
How to Lock the Bowl
Align base and bowl as illustrated.
Turn bowl clockwise until it locks
into place. The bowl will lock onto
the base in 4 different positions for
user convenience.
NOTE: The food processor will not
work unless the bowl is locked into
position.
* Optional Feature Some units may include
an additional 6.0mm slicing disc and/or
French Fry Blade.
840129200 Ev01.qxd 7/6/04 9:07 AM Page 4
Page 5

5
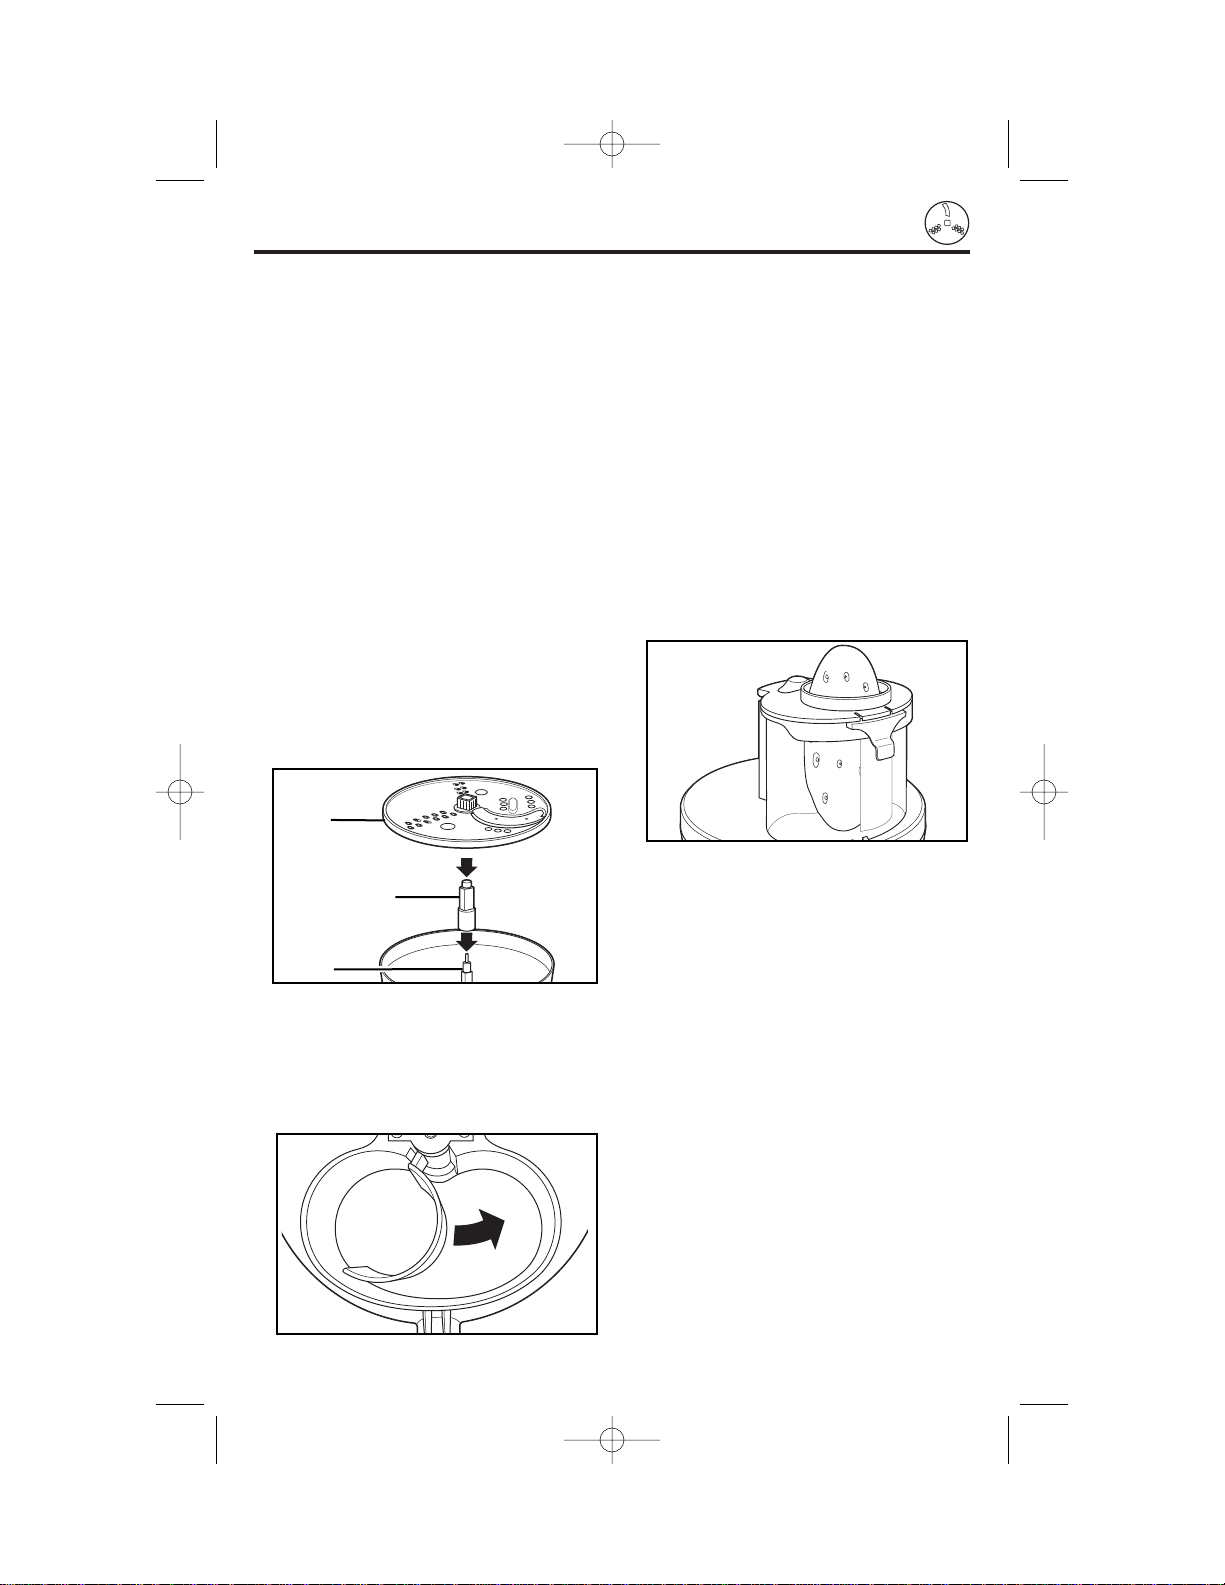
How to Assemble and Lock the Cover
Align cover as illustrated by placing
thumb on cover tab and twisting cover
clockwise. Four visual alignment markers
are provided (see illustration), one on
bowl, one on handle and two on bowl lid.
NOTE: The food processor will not
work unless the cover is locked into
position.
Food chute lid hinges onto back of
food chute. Push down lid to latch onto
food chute.
Before removing lid, switch to OFF (O)
position and wait until blade stops
rotating.
To remove food chute lid for cleaning,
place one hand in food pusher opening
and the other on food chute. Rotate
hand from left to right and lift up. This
will disengage left notch from slot and
then right notch from slot. Reverse the
directions to place food chute lid
back on food chute.
How to Operate the Controls
The control dial is conveniently located
on the front of the base. Rotate the
knob clockwise to select a speed:
1 and 2 for Low
3 and 4 for High
The processor will run continuously.
For instant on and off control, use the
PULSE (P) button by rotating knob
counterclockwise. The blue dial around
the control knob will illuminate when
bowl, lid and food chute lid are all
securely locked in place. This indicates
that the unit is ready to be used.
840129200 Ev01.qxd 7/6/04 9:07 AM Page 5
Page 6

6
Processing Using Chopping/Mixing Blade
The Chopping/Mixing Blade can be
used to coarsely chop, finely mince,
mix, or puree food to a smooth consistency.
1. Make sure the Control Switch is turned
to OFF (O) and the unit is unplugged.
2. Lock the bowl onto base. (See “How
to Lock the Bowl” on page 4.)
3. Place the Chopping/Mixing Blade
onto motor shaft of food processor in
center of bowl. Turn slowly until blade
drops into place. Handle carefully;
the blade is sharp.
4. Lock cover onto bowl. Insert food
pusher into food chute.
5. Plug in unit and observe dial. Ready
light should glow blue. Process food.
The processing speed and time will
determine the finished consistency
of the food. The Pulse button can
help you avoid overprocessing.
Reference the food processing chart
for recommended processing times
and speeds.
6. When finished processing, select
OFF (O) or release from PULSE position. Wait until blade has stopped
rotating before removing cover.
Chopping/
Mixing Blade
Motor Shaft
• For a more uniform consistency, start
with pieces of food that are
similar in size. Carrots, for example,
should all be cut in 1-inch (2.5 cm)
chunks. Do not process 4-inch (10
cm) pieces with 1⁄2-inch (1 cm) pieces.
• Do not puree or mash starchy
vegetables like potatoes. They will
be over-processed in a second and
turn gummy.
Processing Tips and Techniques
• This food processor is excellent to
chop, mix, slice, or shred most
foods. However, to maintain peak
performance, do not use your food
processor for the following: grinding
grain, coffee beans or spices; slicing
frozen meat; or crushing ice.
• To achieve maximum capacity, use
Chopping/Mixing blade of Big Mouth
and add food no higher than the maximum fill line on food chute. See Food
Processing Charts for more information.
• Operating time will depend on quantity
of food being processed. Most foods
can be sliced, chopped, or shredded
in seconds. If unit is operated for 2
minutes continuously, let the
processor rest about 4 minutes
before continuing.
840129200 Ev01.qxd 7/6/04 9:07 AM Page 6
Page 7
7
Processing Using Slicer/Shredder
• To slice or shred cheese, select firm
cheese like Cheddar, Monterey Jack,
or Swiss. Place cheese in freezer for
30 minutes before processing.
• The Reversible Slicer/Shredder Disc
has a slicing blade on one side and
shredding teeth on the other. Place
on motor shaft with desired cutting
edge facing up.
• To julienne vegetables, slice then
remove from bowl and restack the
vegetables. Pack into food chute with
slices vertical. Slice again to make
match-stick cut vegetables.
1. Make sure the Control Switch is turned
to OFF (O) and the unit is unplugged.
2. Lock the bowl onto base. (See “How
to Lock the Bowl” on page 4.)
3. Place Removable Drive Sleeve on
Motor Shaft. Put Slicer/Shredder
Disc on Removable Drive Sleeve
with the desired side facing up for
either slicing or shredding. Lock
cover onto bowl. (See “How to
Assemble and Lock the Cover” on
page 5.)
4. To slice/shred large foods (such as
chunk of cabbage, green pepper,
whole tomato) open food chute
cover by lifting latch. Depress food
holder to the right. Insert food and
lock cover.
To slice/shred long, thin foods
(such as potato, pepperoni, carrots,
celery). Lock cover.
Long foods can be inserted into the
chute opening and processed as
long as the food chute lid is closed.
5. Insert food pusher in chute. Always
use the food pusher to feed food
into the chute. NEVER PUSH
FOOD THROUGH CHUTE WITH
HANDS.
6. Plug in unit and observe dial. Ready
light should glow blue.
7. Select speed. While pressing on food
pusher, select 1 or 2 for optimum
slicing and shredding performance or
PULSE to process food. Reference
the food processing chart for
recommended processing times
and speeds.
NOTE: The food chute lid is
designed to pivot towards the right
when processing food that fills the
whole food chute capacity.
8. When food chute is empty, select
OFF (O) or release from PULSE
position. Wait until blade has
stopped rotating before removing
cover.
Slicer/
Shredder
Disc
Motor
Shaft
Removable
Drive Sleeve
840129200 Ev01.qxd 7/6/04 9:07 AM Page 7
Page 8

8
Food Processing Charts
MINIMUM AMOUNT RECOMMENDED
1 medium peeled or unpeeled, cored
and cut into wedges
2 slices, cut into squares
1
⁄2medium head, cored and cut into
1-inch (2.5 cm) chunks
1 medium, peeled, cut into
1-inch (2.5 cm) pieces
2 firm ribs, strings removed, cut into
1-inch (2.5 cm) pieces
5 ounces, (140 g) cut into
1-inch (2.5 cm) pieces
11 squares
1 hard cooked, chilled and shelled; dry
well
1 large clove, peeled
9 medium
1 cup (250 ml)
1 cup (250 ml) nuts
1 medium, cut in quarters
1
⁄2cup (125 ml) packed; dry;
remove stems
1 medium; remove seeds
FOOD
Apple
Bread
Cabbage
Carrot
Celery
Cheese,
Parmesan
Graham Crackers
Eggs
Garlic
Mushrooms
Nuts
(hard and soft)
Nut Butter
Onions
Parsley
Peppers, Green
YIELD
1 cup
(250 ml)
1 cup (250 ml)
2 to 21⁄
2
cups
(500 to 625 ml)
1
⁄
2
cup
(125 ml)
1
⁄2cup
(125 ml)
1 cup
(250 ml)
3
⁄4cup (175 ml)
1
⁄
3
cup
(80 ml)
1
⁄
2
tsp. (2.5 ml)
2 cups
(500 ml)
3
⁄4to 1 cup
(175 to 250 ml)
1
⁄2cup (125 ml)
3
⁄4cup
(175 ml)
1
⁄4cup
(60 ml)
3
⁄4to 1 cup
(175 to 250 ml)
Chopping/Mixing Blade
TIME
5 sec. coarse
7 sec. fine
5 sec coarse
10 sec. fine
5 sec coarse
10 sec. fine
3 sec coarse
5 sec. fine
1 sec. coarse
3 sec. fine
10 sec.
3 sec. coarse
5 sec. fine
2 to 21⁄2min
3 sec coarse
5 sec. medium
7 sec. fine
5 sec coarse
10 sec. fine
SPEED
1-2
PULSE
3-4
3-4
3-4
PULSE
PULSE
1-2
3-4
1-2
PULSE
3-4
1-2
3-4
PULSE
NOTE: Maximum recommended food quantities:
Fruit = 14 cups (3.5 L)
Vegetables = 9 cups (2.25 L)
Cheese, Parmesan = 32 ounces (914 g)
Whole Nuts = 8 cups (2 L)
840129200 Ev01.qxd 7/6/04 9:07 AM Page 8
Page 9

9
MINIMUM AMOUNT RECOMMENDED
1 medium peeled or unpeeled
1
⁄2medium head, cut to fit in chute
2 medium
2 firm ribs, strings removed
4-ounce piece (115 g), chilled
1 large, peeled or unpeeled
9 medium, arranged on sides in chute
1 medium
1 medium, remove seeds
1 medium
FOOD
Apple
Cabbage/Lettuce
Carrots
Celery
Cheese
Cucumber
Mushrooms
Onions
Peppers, Green
Potatoes
YIELD
2 cups (500 ml)
11⁄
2
to 2
1
⁄
2
cups
(375 to 625 ml)
1 cup (250 ml)
1
⁄
2
to
3
⁄
4
cup
(125 to 175 ml)
2 cups (500 ml)
21⁄2cups (625 ml)
11⁄2to 13⁄4cups
(375 to 425 ml)
1
⁄2cup (125 ml)
11⁄2cups (375 ml)
2 cups (500 ml)
Slicer Disc
SPEED
1-2
1-2
1-2
1-2
1-2
1-2
1-2
1-2
1-2
1-2
MINIMUM AMOUNT RECOMMENDED
1
⁄2medium head, cut to fit in chute
1 medium, cut to fit horizontally in the chute
2-ounce (55 g) piece, chilled
2-ounce (55 g) piece, chilled
1-ounce (30 g) square
4-ounce (115 g) bar
1 small coconut, peeled, cut in chunks
1 medium (place in cold water to
prevent darkness)
FOOD
Cabbage
Carrots
Soft Mozarella
Semi-Soft Cheese
(Cheddar, Swiss)
Chocolate
Coconut
Potatoes
YIELD
11⁄
2
to 2
1
⁄
2
cups
(375 to 625 ml)
1
⁄
2
to
3
⁄
4
cup
(125 to 175 ml)
1
⁄
2
cup (125 ml)
1
⁄2cup (125 ml)
1
⁄2cup (125 ml) fine
1 cup (250 ml) fine
21⁄2cups (625 ml)
1 cup (250 ml)
Shredder Disc
SPEED
1-2
1-2
1-2
1-2
1-2
1-2
1-2
NOTE: Maximum capacity is when the bowl is filled to the slicer/shredder disc.
NOTE: Maximum capacity is when the bowl is filled to the slicer/shredder disc.
840129200 Ev01.qxd 7/6/04 9:07 AM Page 9
Page 10

10
Troubleshooting Guide
Before calling the Hamilton Beach/Proctor Silex, Inc. Customer Service Number,
carefully check the list below for a possible solution to your question.
POTENTIAL PROBLEM
Unit does not operate
on any speed or Pulse.
Ready Light does
not come on.
Food is not chopped,
sliced or shredded
uniformly.
Unit stops and will
not come back on.
Unit has a burning smell.
Motor seems weak.
PROBABLE CAUSE/SOLUTION
• Is the unit plugged in? Does the outlet work?
• Are the bowl, bowl lid, and food chute lid all
locked in place? See pp. 4-5 “How to
Assemble.”
• Packing too much food in the food chute, or
pushing too hard on the food pusher may cause
the processed food to be irregulary sliced or
shredded. Refer to the food processing charts
for recommended sizes and quantities.
• Are you using the recommended speed? See
pp. 8-9 “Food Processing Charts.”
• Are the bowl, bowl lid, and food chute lid all
locked in place? They may have moved slighty
during processing. See pp. 4-5 “How to
Assemble.”
• Is the outlet still working? Check it by plugging
in a working lamp or other appliance. You may
have overloaded the circuit and blown a fuse or
tripped the circuit breaker.
• Turn unit OFF, allow to stand for 3 to 4 minutes,
then turn back ON.
If none of these suggestions correct the problem, DO NOT attempt to repair the unit. Call the
Hamilton Beach/Proctor-Silex Customer Service
number to get the name of your nearest
Authorized Service Center.
• There may be a residue left on the motor from
the manufacturing process, causing a slight odor
during initial use. This will go away. If a strong
odor or any visible smoke appears, unplug the
unit IMMEDIATELY and call the Hamilton
Beach/Proctor-Silex Customer Service number.
• Are you using the recommended speed for the
item you are processing? See pp. 8-9 “Food
Processing Charts.”
• Are you using the recommended food size and
quantity to be processed? Refer to the food
processing charts for recommended food sizes
and speeds. See pp. 8-9 “Food Processing
Charts.”
840129200 Ev01.qxd 7/6/04 9:07 AM Page 10
Page 11

11
Cleaning, Storage and Maintenance
1. Wash bowl, cover, blade, discs,
removable drive sleeve, food gate,
and food pusher in hot, soapy water.
Rinse and dry thoroughly. See page
5 for information on how to remove
food chute lid for cleaning.
NOTE: Do not store unit with cover
in locked position; this may put
strain on interlock tab.
2. Wipe base, control panel, and cord
with a damp cloth or sponge.
To remove stubborn soil, use a mild
non-abrasive cleanser.
NEVER IMMERSE THE BASE IN
WATER OR OTHER LIQUID.
3. To store, place bowl on base. Then
place Chopping/Mixing Blade on
motor shaft and Slicing/Shredding
Disc on Chopping/Mixing Blade.
The Removable Drive Sleeve may be
stored in the bowl. Place cover on
bowl but do not lock.
4. Monthly place a drop of vegetable oil
on each screw in the food chute.
The suction cup feet on the bottom of
your Big Mouth™Food Processor are
designed to keep the unit stationary
during use. To maximize the life of your
Big Mouth™please review the following
directions:
OR
With Big Mouth™fully assembled: lift it
from counter by
placing hands
under unit as
shown and lifting
to one side.
With Big Mouth™fully assembled: lift it
from counter by
grabbing the handle as shown and
lifting from same
side as handle.
With bowl and lid removed from Big
Mouth™: lift it
from counter by
placing hands
under unit as
shown and lifting
to one side
OR
How to Release Suction Cup Feet
After Use
840129200 Ev01.qxd 7/6/04 9:07 AM Page 11
Page 12

12
Recipes
Salsa
1 onion, peeled
1 clove garlic
1 hot pepper (jalapeno or finger hot),
cored and seeded
4 tomatoes
Using Chopping/Mixing Blade and with processor running, drop onion, garlic
cloves, and hot pepper through the food chute and chop until finely minced. Stop
processor. Add tomatoes, cilantro, cumin, lime juice, salt, and pepper. Pulse until
desired texture. Add hot sauce if desired. Makes 2 to 3 cups (500 to 750 ml).
Cucumber Salad
4 medium cucumbers, unpeeled
3 teaspoons (15 ml) salt, divided
1
⁄
2 cup (125 ml) white vinegar
1
⁄
4 cup (60 ml) sugar
Slice cucumbers in the Big Mouth food processor using the slicer/shredder disc,
slicing side up. Sprinkle 2 teaspoons (10 ml) salt over cucumbers and let stand
one hour. Drain. Stir in white vinegar, sugar, dill, white pepper, and garlic.
Refrigerate 3 hours before serving. Makes 8 servings.
Au Gratin Potatoes
1 small onion, sliced
4 cups (1 L) potatoes, sliced
3 tablespoons (45 ml) margarine
4-5 tablespoons (60-75 ml) flour
Grease a 2 quart (2 L) casserole dish. Slice whole potatoes and onion crosswise in
the Big Mouth food processor using the slicer/shredder disc, slicing side up.
Shred cheese. In a saucepan, melt margarine then stir in flour, salt, and pepper.
Add milk. Cook while stirring over medium heat until sauce has thickened. Layer
onion, potato, cheese, and sauce in casserole dish. Bake at 350ºF for 50 to 60
minutes or until potatoes are tender. Makes 6 servings.
1
⁄4 cup (60 ml) cilantro, packed
1
⁄2 teaspoon (2.5 ml) cumin
1 tablespoon (15 ml) lime juice
Salt and pepper to taste
Hot sauce, optional
1 tablespoon (15 ml) dill
1
⁄4 teaspoon (1.25 ml) white pepper
1 clove garlic
1 teaspoon (5 ml) salt
1
⁄4 teaspoon (1.25 ml) pepper
3 cups (750 ml) milk
1 cup (250 ml) cheddar cheese, shredded
840129200 Ev01.qxd 7/6/04 9:07 AM Page 12
Page 13

13
1
1
⁄2 teaspoons (7.5 ml) salt
1
⁄4 teaspoon (1.25 ml) pepper
4 tablespoons (60 ml) butter, melted
Creamed Potatoes
4 pounds (1.8 kg) all-purpose
white potatoes, about 15 medium
3 cups (750 ml) half ’n half cream
3 tablespoons (45 ml) finely minced onion
Scrub the potatoes but do not peel. Place in a large pot and cover with water.
Bring to boil then reduce heat and simmer for 45 minutes or until done. Refrigerate
overnight. Using slicer/shredder disc, shredding side up, grate the potatoes. It is
not necessary to peel them. Place grated potatoes, half ’n half, onion, salt, and
pepper in a large bowl and stir to mix. Put butter in a 9x13-inch (23x33 cm) baking
dish and rotate dish to coat. Spoon in potato mixture. Bake at 375ºF (190ºC) for
1 hour. Makes 10 servings.
Sweet Potato Pudding
1 to 11⁄4 pounds (675 g) sweet potatoes
scrubbed but not peeled,
(3 cups [750 ml] grated)
1
⁄2 cup (125 ml) sugar
1
⁄
4 cup (60 ml) maple syrup
Using slicer/shredder disc, shredding side up, grate sweet potatoes. Remove from
work bowl and place in medium mixing bowl. Set aside. Using Chopping/Mixing
Blade, place sugar, syrup, milk, egg, butter, and vanilla into work bowl. Process until
smooth. Pour over shredded sweet potatoes. Mix thoroughly. Pour into greased
1
1
⁄
2 quart (1
1
⁄
2 L) casserole dish. Place casserole dish into a larger pan or dish. Add
hot water to larger pan, so water will be 1 to 2 inches (2.5 to 5 cm) up side of casserole dish. This will prevent the edges from burning. Bake at 350°F (180ºC) for
1
1
⁄
2 hours. Makes 6 servings.
Cheddar Onion Cornbread
4 ounces (115 g) cheddar cheese
(1 cup [250 ml] grated)
1 small onion, peeled
1 tablespoon (15 ml) butter
1 egg
Using slicer/shredder disc, shredding side up, shred cheddar and set aside. Using
Chopping/Mixing Blade, place onion in work bowl and process until finely chopped.
Place chopped onion and butter in a skillet and cook over medium high heat until
onions are soft. Set aside and cool. Do not wash work bowl. Using Chopping/Mixing
Blade, place egg, milk, muffin mix, and corn into work bowl. Pulse until JUST mixed.
Pour batter into greased 8-inch (20 cm) square baking pan. Combine onions, cheese,
and sour cream. Place small spoonfuls of sour cream mixture on top of batter. Bake
at 425ºF (220ºC) for 30 to 35 minutes. Makes 6-8 servings.
1 cup (250 ml) milk
1 egg
1
⁄4 cup (60 ml) butter
1 teaspoon (5 ml) vanilla
1
⁄2 cup (125ml) milk
8-ounce (225 g) package corn muffin mix
8-ounce (225 g) can cream style corn
8-ounce (225 g) container sour cream
840129200 Ev01.qxd 7/6/04 9:07 AM Page 13
Page 14

14
8-ounce (225 g) package light cream
cheese
3
⁄4 cup (175 ml) skim milk ricotta cheese
1
⁄2 cup (125 ml) light sour cream
1 egg
2 teaspoons (10 ml) dried Italian
seasoning
26-ounce (735 g) can spaghetti sauce
6 lasagna noodles, cooked
Basic White Bread
1 package active dry yeast
1 cup (250 ml) warm water
11⁄2
tablespoons (20 ml) butter or
margarine, melted
In a large mixing bowl combine yeast and
1
⁄4
cup (60 ml) of warm water. Stir until
dissolved. Add remaining warm water, butter, sugar, and salt. Add 3 cups (750 ml)
of flour to food processor bowl. Start food processor and gradually add liquid mixture. Add enough of remaining flour and continue to mix until dough forms a
smooth ball that is slightly sticky to the touch. Place dough in large, greased bowl.
Cover and let rise until double in size, about 1 hour. Punch dough down and shape
into loaf. Place loaf into 9x5-inch (23x13x6 cm) greased loaf pan and let rise until
double in size, about 1 hour. Bake at 350°F (180ºC) for 40 minutes.
Vegetable Lasagna
8 ounces (250 ml) reduced-fat
mozzarella cheese
1 medium onion, peeled
4 garlic cloves
4-6 ounces (115-170 g)
fresh mushrooms
1 teaspoon (5 ml) vegetable oil
2 zucchini, approximately 6 inches
(15 cm) each
2 ounces (60 ml) Parmesan cheese,
Using slicer/shredder disc, shredding side up, shred mozzarella. Place in a small
bowl and set aside. Using Chopping/Mixing Blade, place onion and garlic cloves
into work bowl. Pulse until coarsely chopped. Add mushrooms to bowl. Continue
to pulse until mushrooms are coarsely chopped. Place chopped vegetables in a
large skillet with oil, over medium heat. Using Chopping/Mixing Blade, place
zucchini in work bowl. Pulse until coarsely chopped. Add zucchini to skillet. Cook
until tender, about 10 minutes; set aside. Without washing the work bowl, using
Chopping/Mixing Blade, place Parmesan cheese chunks in bowl and process on
High until coarsely chopped. Add the cream cheese, ricotta cheese, sour cream,
egg, and Italian seasonings and process until creamy, about 30 to 40 seconds.
Grease a 9x13-inch (23x33 cm) baking dish. Layer half each of noodles, cream
cheese mixture, chopped vegetable mixture, and spaghetti sauce. Repeat layers
once. Sprinkle with mozzarella. Bake, covered, at 350ºF (180ºC) for 25 minutes.
Uncover and cook an additional 10 minutes. Let stand 10 minutes before serving.
Makes 8 servings.
NOTE: Mozzarella cheese will shred easier if placed in freezer for one hour before
shredding.
11⁄2 tablespoons (20 ml) sugar
1 teaspoon (5 ml) salt
3 to 31⁄2
cups (750 to 875 ml)
all-purpose flour
840129200 Ev01.qxd 7/6/04 9:07 AM Page 14
Page 15

15
Topping:
1
⁄2 cup (125 ml) butter, melted
1 cup (250 ml) flour
1 cup (250 ml) sugar
1 teaspoon (5 ml) cinnamon
Crispy Catfish Fillets
21⁄2 ounces (75 g) Parmesan cheese
(1⁄2 cup [125 ml] grated)
20 buttery crackers, like Ritz
or Townhouse
Cut cheese into 1⁄2
-inch (1 cm) cubes. Using Chopping/Mixing Blade, place cheese
cubes, crackers and parsley in work bowl. Process until finely ground. Place cracker mixture in large shallow bowl. Dip fillets in butter then place in cracker mixture to
coat. Lay fillets on nonstick or aluminum foil-lined baking sheet. Bake at 400ºF
(205ºC) for 15-20 minutes. Makes 4 servings.
Apple Crisp
6 large Golden Delicious apples,
peeled and cored
(6 cups [1.5 L] sliced)
1 tablespoon (15 ml) lemon juice
1
⁄
2 cup (125 ml) sugar
1 tablespoon (15 ml) flour
1 teaspoon (5 ml) cinnamon
1
⁄
4 teaspoon (1.25 ml) nutmeg
Using slicer/shredder disc, slicing side up, slice apples. Put apples in a large bowl.
Drizzle lemon juice over apples. Sprinkle apples with sugar, flour, cinnamon, and
nutmeg. Stir to mix, then put apples in ungreased 2-quart (2 L) baking dish. Using
Chopping/Mixing Blade, place topping ingredients in work bowl and pulse until
mixed. Crumble topping over apples. Bake at 375ºF (190ºC) for 30 minutes. Serve
topped with vanilla ice cream. Makes 6 servings.
Baked Pineapple Bread Pudding
12 slices of white bread, torn into
strips to fit food chute
20-ounce (565 g) can pineapple
chunks, drained
2 eggs
1 cup (250 ml) half ’n half cream
Insert Chopping/Mixing Blade into food processor bowl and, with processor running, drop bread through food chute to make soft breadcrumbs. Pour into a
greased 2-quart (2 L) casserole dish. Place pineapple chunks in food processor
bowl with Chopping/Mixing Blade. Process pineapple for 20 seconds. Add eggs,
cream, vanilla, melted butter or margarine, and sugar. Process until mixed. Pour
pineapple mixture over soft breadcrumbs. Garnish with three pineapple rings
overlapping in center. Bake at 350ºF (180ºC) for 1 hour or until golden.
Makes 8 servings.
1
⁄3 cup (80 ml) fresh parsley sprigs
1
⁄4
cup (60 ml) melted butter
4 catfish fillets, about 8 ounces
(225 g) each
1 teaspoon (5 ml) vanilla
1 tablespoon (15 ml) melted butter or
margarine
1
1
⁄2 cups (375 ml) sugar
3 pineapple slices, drained
840129200 Ev01.qxd 7/6/04 9:07 AM Page 15
Page 16

16
4 cups (1 L) flour
1
⁄2 teaspoon (2.5 ml) salt
1 teaspoon (5 ml) baking soda
1 teaspoon (5 ml) baking powder
1 teaspoon (5 ml) nutmeg
2 tablespoons (30 ml) sugar
Chocolate Chip Cheesecake
Filling:
3 8-ounce (675 g) packages
cream cheese, cut into chunks
1 cup (250 ml) sugar
2 tablespoons (30 ml) flour
4 eggs
1
⁄4
cup (60 ml) milk
1 teaspoon (5 ml) vanilla
1
⁄2
cup (125 ml) chocolate chips
Crust: Use 1 teaspoon (5 ml) butter to grease a 9 to 9
1
⁄2
-inch (23 cm) springform
pan and set aside. Using Chopping/Mixing Blade and with processor running, drop
cookies through food chute and process until an even crumb is formed. Continue
processing, adding melted butter through the food chute until mixed. Pour crumbs
into prepared springform pan and press crumbs evenly on bottom of pan. Bake at
425ºF (220ºC) for 10 minutes. Remove from the oven and cool on rack.
Filling: Using Chopping/Mixing Blade, add cream cheese, sugar, flour, eggs, milk,
and vanilla to work bowl. Process until smooth. Pour filling over cooled crust and
sprinkle with chocolate chips. Bake 15 minutes at 425°F (220ºC). Reduce heat to
250°F (120ºC) and continue to bake (without opening the oven door) for 45 minutes more or until cheesecake is set. When cooled, cover and refrigerate several
hours or overnight. Makes 16 servings.
Cooking Tip: For a creamy smooth-textured cheesecake, bake it in a water bath.
Tear off a sheet of aluminum foil that extends about 6 inches (15 cm) larger than
the springform pan. Place springform pan in center of foil and form foil up around
the sides. This prevents water from leaking into the pan. Place the springform pan
in a larger pan and fill larger pan with about 1
1
⁄
2 inches (3.5 cm) of hot tap water.
Bake as directed.
Soft Sugar Cookies
2
⁄3 cup (150 ml) shortening
1
⁄3 cup (80 ml) margarine
11⁄2 cups (375 ml) sugar
1 teaspoon (5 ml) vanilla
1 cup (250 ml) sour cream*
2 eggs
Using Chopping/Mixing blade, cream shortening, margarine, and 11⁄2 cups (375
ml) sugar. Add vanilla, sour cream, and eggs. Mix until smooth. Add flour, salt,
baking soda, baking powder, and nutmeg. Process on highest speed until
smooth. Refrigerate dough for 15 minutes or overnight. On a floured surface, roll
out dough to 1⁄2-inch (1 cm) thick. Cut into desired shapes. Top cookies with 2
tablespoons (30 ml) sugar and 1 teaspoon (5 ml) nutmeg mixture. Bake on
greased cookie sheet at 450ºF (230ºC) for 8 to 10 minutes. Makes 36 cookies.
*You can replace the sour cream with nonfat plain yogurt for a lower fat version.
Crust:
1 teaspoon (5 ml) butter, softened
22 chocolate chip cookies
3 to 4 tablespoons (45 to 60 ml)
unsalted butter, melted
840129200 Ev01.qxd 7/6/04 9:07 AM Page 16
Page 17

17
Customer Service
If you have a question about your food processor, call our toll-free customer service
number. Before calling, please note the model, type, and series numbers and fill in
that information below. These numbers can be found on the bottom of your food
processor. This information will help us answer your question much more quickly.
MODEL: ______________ TYPE: ________________ SERIES: _______________
This warranty applies to products purchased in the U.S. or Canada.
LIMITED WARRANTY
This product is warranted to be free from defects in material and workmanship for a period
of two (2) years for Hamilton Beach Portfolio products, one (1) year for Hamilton Beach
products or one hundred eighty (180) days for Proctor-Silex products from the date of
original purchase, except as noted below. During this period, we will repair or replace this
product, at our option, at no cost. THE FOREGOING WARRANTY IS IN LIEU OF ANY
OTHER WARRANTY, WHETHER EXPRESS OR IMPLIED, WRITTEN OR ORAL
INCLUDING ANY WARRANTY OF MERCHANTABILITY OR FITNESS FOR A
PARTICULAR PURPOSE. ANY LIABILITY IS EXPRESSLY LIMITED TO AN AMOUNT
EQUAL TO THE PURCHASE PRICE PAID, AND ALL CLAIMS FOR SPECIAL, INCIDENTAL
AND CONSEQUENTIAL DAMAGES ARE HEREBY EXCLUDED. There is no warranty with
respect to the following, which may be supplied with this product: glass parts, glass
containers, cutter/strainer, blades, and/or agitators. This warranty extends only to the
original consumer purchaser and does not cover a defect resulting from abuse, misuse,
neglect, use for commercial purposes, or any use not in conformity with the printed
directions. This warranty gives you specific legal rights, and you may also have other legal
rights which vary from state to state, or province to province. Some states or provinces do
not allow limitations on implied warranties or special, incidental or consequential damages,
so the foregoing limitations may not apply to you.
If you have a claim under this warranty, DO NOT RETURN THE APPLIANCE TO THE
STORE! Please call our CUSTOMER SERVICE NUMBER. (For faster service please have
model, series, and type numbers ready for operator to assist you.)
CUSTOMER SERVICE NUMBERS
In the U.S. 1-800-851-8900
In Canada 1-800-267-2826
hamiltonbeach.com or proctorsilex.com
KEEP THESE NUMBERS FOR FUTURE REFERENCE!
840129200 Ev01.qxd 7/6/04 9:07 AM Page 17
Page 18

18
Pour éviter les risques d’incendie, de choc
électrique, de brûlures ou autres blessures ou
dommages, suivre attentivement ces instructions. Lors de l’utilisation d’appareils
électroménagers, des précautions fondamentales de sécurité doivent toujours être
observées, y compris ce qui suit :
1. Lire et conserver toutes les instructions.
2. Pour protéger contre le risque de choc
électrique, ne pas immerger la base, le
moteur, le cordon ou la fiche dans l’eau
ou tout autre liquide.
3. Une bonne surveillance est nécessaire
pour tout appareil utilisé pas des enfants
ou près d’eux.
4. Cet appareil ne doit pas être utilisé par
des enfants.
5. Débrancher l’appareil de la prise de
courant électrique lorsqu’il n’est pas
utilisé, avant d’y placer ou d’en enlever
des pièces, ou avant un nettoyage.
6. Éviter le contact avec les pièces en
mouvement. Garder les doigts hors de
l’ouverture de décharge.
7. Ne pas faire fonctionner un appareil
électroménager avec une fiche ou un
cordon endommagé, ou lorsque l’appareil
ne fonctionne pas bien ou a été échappé
ou endommagé d’une manière quelconque. Composer notre numéro de
service à la clientèle sans frais d’interurbain pour des renseignements concernant
l’examen, la réparation ou l’ajustement
électrique ou mécanique. Toutes les réparations doivent être effectuées par le
fabricant, son agent de service ou des
personnes similairement qualifiées pour
éviter tout danger.
8. L’utilisation d’accessoires non recom-
mandés ni vendus par Hamilton Beach/
Proctor-Silex, Inc. peut causer un incendie,
un choc électrique ou des blessures.
9. Ne pas utiliser votre robot culinaire si une
pièce quelconque est brisée.
10. Ne pas utiliser l’appareil à l’extérieur.
11. Ne pas laisser le cordon pendre au bord
d’une table ou d’un comptoir, ni entrer en
contact avec des surfaces chaudes.
12. Le couteau et le disque sont coupants.
Les manipuler avec soin. Les ranger hors
de portée des enfants.
13. S’assurer que le couvercle est bien
verrouillé en place avant de mettre
l’appareil en marche.
14. Pour réduire le risque de blessures, ne
jamais mettre le couteau ou le disque
tranchants sur la base avant d’avoir
d’abord bien mis le bol en place.
15. Garder les mains et ustensiles à l’écart du
couteau et du disque mobiles durant le
traitement des aliments, pour réduire le
risque de blessure corporelle grave et/ou
d’endommagement du robot culinaire. Un
racloir en caoutchouc peut être utilisé,
mais SEULEMENT lorsque le robot
culinaire ne fonctionne pas.
16. Ne jamais introduire d’aliments dans la
trémie à la main pour les couper ou les
raper. Toujours utiliser le poussoir.
17. Ne pas essayer de contourner le
mécanisme de verrouillage du couvercle.
18. S’assurer que le couteau ou le disque
sont complètement arrêtés avant
d’enlever le couvercle.
19. Pour réduire le risque de blessure, veiller à
insérer et retirer le couteau et le disque en
se servant des moyeux prévus à cette fin.
Faire attention en enlevent le couteau et le
disque du bol, en vidant le bol et durant le
nettoyage.
20. S’assurer de régler le commutateur à la
position OFF ( O ) (arrêt) après chaque
utilisation. Toujours utiliser le poussoir
pour dégager les aliments de la trémie.
Lorsque cette méthode n’est pas
possible, arrêter le moteur et démonter
l’appareil pour enlever le reste d’aliments.
21. L’appareil n’est pas destiné à l’usage
commercial, professionnel ou industriel.
Il est conçu et construit seulement pour
l’utilisation domestique exclusivement.
22. Ne jamais utiliser cet appareil ménager
pendant une période plus longue ou avec
une plus grande quantité d’ingrédients
que celles recommandées par Hamilton
Beach/Proctor-Silex, Inc.
23. L’évaluation maximale de cet appareil est
basée sur l’utilisation d’un couteau à
couper/mélanger. L’utilisation du disque
pour trancher/râper peut exiger beaucoup
moins d’énergie.
24. Ne pas placer sur ou près d’un brûleur à
gaz ou électrique ou dans un four chauffé.
25. Ne pas utiliser cet appareil pour d’autres
fins que celle prévue.
PRÉCAUTIONS IMPORTANTES
CONSERVEZ CES INSTRUCTIONS !
840129200 Fv01.qxd 7/6/04 9:02 AM Page 18
Page 19

19
Renseignements de sécurité pour les consommateurs
Cet appareil est destiné à l’utilisation
domestique seulement.
Cet appareil est muni d’une fiche polarisée.
Ce type de fiche présente une broche plus
large que l’autre. La fiche peut être introduite dans une prise dans un sens
seulement. Il s’agit d’une caractéristique de
sécurité visant à réduire le risque de choc
électrique. Si la fiche ne peut pas être
insérée dans la prise, la tourner dans l’autre
sens. Si elle ne peut toujours pas être
insérée dans la prise, contacter un électricien qualifié pour qu’il remplace la prise
désuète. Ne pas essayer de contourner
l’objectif de sécurité de la fiche polarisée en
la modifiant de quelque manière que ce
soit.
Pour éviter une surcharge du circuit
électrique, ne pas utiliser un autre appareil
électroménager à forte consommation sur
le même circuit que le robot culinaire.
La longueur du cordon de cet appareil a été
choisie de façon à ce que l’on ne risque pas
de trébucher dessus ou de s'y accrocher. Si
un cordon plus long est nécessaire, utiliser
une rallonge homologuée. Le calibre de la
rallonge doit être le même que celui du
robot culinaire ou supérieur. Lorsqu’on
utilise une rallonge, elle doit être disposée
de manière à ne pas pendre du comptoir ou
du bord de la table de travail, où elle pourrait faire trébucher quelqu'un ou être tirée
par des enfants par inadvertance.
Avant la première utilisation : Retirer le
robot culinaire de l’emballage. Manipuler
soigneusement le couteau à couper/
mélanger et le disque pour trancher/râper;
ces articles sont très coupants. Laver toutes
les pièces sauf la base dans de l’eau
chaude savonneuse. Bien rincer et sécher.
840129200 Fv01.qxd 7/6/04 9:02 AM Page 19
Page 20

20
1. Poussoir d’aliments
2. Couvercle de la trémie
3. Trémie
4. Couvercle du bol
5. Bol
6. Base
7. Témoin lumineux d’action prête
8. Cadran de commande
9. Couteau à couper/mélanger
10. Manchon d'entraînement amovible
11. Couteau de 3 mm pour trancher
(Râpage moyen)
12. Couteau de 6 mm pour trancher*
13. Couteau à frites*
Pièces et caractéristiques
* Caractéristique facultative Certains
appareils peuvent comprendre un disque à
trancher supplémentaire de 6 mm ou un
couteau à frites ou les deux.
Utilisation du robot culinaire
Verrouillage du bol
Aligner la base et le bol tel qu’illustré.
Tourner le bol dans le sens horaire
jusqu’à ce qu’il se verrouille en place.
Le bol se verrouillera dans la base
dans 4 positions différentes pour
accommoder l’utilisateur.
REMARQUE : Le robot culinaire ne
fonctionnera pas si le bol n’est pas
verrouillé en place.
840129200 Fv01.qxd 7/6/04 9:02 AM Page 20
Page 21

21
Comment assembler et verrouiller le couvercle
Aligner le couvercle tel qu’illustré en
plaçant le pouce sur la languette du
couvercle et en tournant le couvercle
dans le sens horaire. Quatre indices
d'alignement visuel sont fournis (voir
illustration), l'un sur le bol, un autre sur
la poignée et deux sur le couvercle du
bol.
REMARQUE : Le robot culinaire ne
fonctionnera pas si le couvercle n’est
pas verrouillé en place.
Les charnières du couvercle de la
trémie se situent à l’arrière de la trémie.
Abaisser le couvercle pour le verrouiller
sur la trémie.
Avant d’enlever le couvercle, placer
l’interrupteur à la position d’arrêt
OFF (O) et attendre que le couteau
cesse de tourner.
Pour enlever le couvercle de la trémie
pour le nettoyage, placer une main
dans l’ouverture du poussoir d’aliments
et l’autre main sur la trémie. Tourner la
main de gauche à droite et soulever.
Ceci dégagera l’encoche à gauche de
la fente, et ensuite l’encoche à droite
de la fente. Inverser les directions pour
replacer le couvercle de la trémie sur
cette dernière.
Comment utiliser les commandes
Le cadran de commandes est bien
situé en avant de la base. Tourner le
bouton dans le sens horaire pour
choisir une vitesse :
1 et 2 pour Basse
3 et 4 pour Haute
Le robot fonctionnera sans interruption.
Pour une commande de marche/arrêt
instantanée, utiliser le bouton PULSE
(P) en tournant le bouton dans le sens
antihoraire. Le cadran bleu autour du
bouton de commande s’allume lorsque
le bol, le couvercle et le couvercle de la
trémie sont tous bien verrouillés en
place. Ceci indique que le robot culinaire est prêt à être utilisé.
840129200 Fv01.qxd 7/6/04 9:02 AM Page 21
Page 22

22
Utiliser le couteau à couper/mélanger
pour hacher grossièrement ou émincer,
pour mélanger les ingrédients ou pour
transformer un mélange en purée lisse.
1. Vérifier que l’appareil est débranché,
et que le bouton de commande est à
la position d’arrêt (OFF).
2. Bloquer le bol sur la base (voir
« Verrouillage du bol », page 20).
3. Placer le couteau à couper/mélanger
sur l’arbre moteur du robot culinaire
au centre du bol. Le tourner lentement jusqu’à ce que le couteau
tombe en place. Le manipuler
prudemment; le couteau est
coupant.
4. Bloquer le couvercle sur le bol.
Insérer le poussoir dans la trémie.
5. Brancher l’appareil et observer le
cadran. Le voyant lumineux bleu doit
être allumé. . Traiter les aliments. La
vitesse et le temps de traitement
détermineront la consistance finale
des aliments. Le bouton Pulse
(impulsions) peut vous aider à éviter
le traitement excessif. Se référer au
tableau de traitement des aliments
pour les temps et les vitesses de
traitement recommandés.
6. Lorsque les aliments ont été traités,
sélectionner OFF (O) (arrêt) ou dégager
l’appareil de la position PULSE.
Attendre que la lame s’arrête de
tourner avant d’enlever le couvercle.
Opération avec le couteau à couper/mélanger
Couteau à
couper/
mélanger
Arbre
moteur
Conseils et techniques d’opération
• Ce robot alimentaire est excellent pour
hacher, mélanger, trancher ou râper la
plupart des aliments. Toutefois, pour
maintenir un rendement élevé, ne pas
utiliser le robot culinaire pour les
opérations suivantes : moudre des
grains, fèves de café ou des épices;
trancher des viandes surgelées ou
broyer des glaçons.
• Pour atteindre la capacité maximale,
utiliser le couteau pour couper/
mélanger de "Big Mouth" et ne pas
ajouter les aliments au-delà de la ligne
de remplissage maximal sur la trémie.
Voir les tableaux de traitement des aliments pour plus de renseignements.
• Le temps de traitement dépendra de
la quantité d’aliments à traiter. La
plupart des aliments peuvent être
tranchés, hachés ou râpés en
quelques secondes. Si l’appareil est
utilisé pendant 2 minutes sans interruption, le laisser reposer environ 4
minute avant de continuer à l’utiliser.
• Pour une consistance plus uniforme,
commencer avec des morceaux d’aliments de grosseur semblable. Les
carottes, par exemple, doivent toutes
être coupées en morceaux de 1 po
(2,5 cm). Ne pas traiter des morceaux
de 4 po avec des morceaux de
1
⁄2 po
(1 cm).
• Ne pas préparer des purées ou
écraser des légumes à amidon
comme des pommes de terre. Ces
aliments seront trop traités en une
seconde et deviendront gommeux.
840129200 Fv01.qxd 7/6/04 9:02 AM Page 22
Page 23

23
1. Vérifier que l’appareil est débranché,
et que le bouton de commande est à
la position d’arrêt (OFF).
2. Bloquer le bol sur la base (voir
« Verrouillage du bol », page 20).
3. Placer le manchon d'entraînement
amovible sur l'arbre du moteur.
Placer le disque pour trancher/râper
sur le manchon d'entraînement
amovible avec le côté désiré vers le
haut soit pour trancher soit pour
râper. Verrouiller le couvercle sur le
bol. (Voir « Assemblage et verrouillage du couvercle », page 20.)
4. Pour trancher/râper des aliments
volumineux (tels que chou, poivron
vert, tomate entière), ouvrir le couvercle de la trémie en levant le
loquet. Pousser la retenue des aliments vers la droite. Insérer les
aliments et verrouiller le couvercle.
Pour trancher/râper les aliments
longs et minces (tels que pommes
de terre, pepperoni, carottes, céleri).
Verrouiller le couvercle.
Les aliments longs peuvent être
insérés dans l’ouverture de la trémie
et être traités dès lors que le couvercle de la trémie est fermé.
5. Insérer le poussoir dans la trémie.
Toujours utiliser le poussoir pour
faire passer les aliments dans la
trémie. NE JAMAIS POUSSER LES
ALIMENTS DANS LA TRÉMIE
AVEC LES MAINS.
6. Brancher l’appareil et observer le
cadran. Le voyant lumineux bleu doit
être allumé.
7. Choisir la vitesse. Tout en appuyant
sur le poussoir, choisir 1 ou 2 pour
un tranchage et un râpage idéals ou
PULSE (impulsions) pour traiter les
aliments. Se reporter au tableau de
traitement des aliments pour les
temps et les vitesses d'utilisation
recommandés.
REMARQUE : Le couvercle de la
trémie est conçu pour pivoter vers la
droite lors du traitement des aliments
qui remplissent la trémie à pleine
capacité.
8. Lorsque la trémie est vide, appuyer
sur le bouton O (arrêt) ou lâcher le
bouton PULSE. Attendre jusqu’à la
fin de la rotation du couteau avant
d’enlever le couvercle.
Disque pour
trancher/
râper
Arbre
moteur
• Pour trancher ou râper du fromage,
choisir un fromage ferme comme le
cheddar, le monterey jack ou le gruyère.
Placer le fromage au congélateur pendant
30 minutes avant d’effectuer l’opération.
• Le disque pour trancher/râper comporte
une lame de tranchage d’un côté, et des
dents à râper de l’autre. Placer le disque
sur l’arbre moteur en l’orientant correctement, selon l’opération désirée.
• Pour trancher des légumes en julienne,
effectuer un premier tranchage des
légumes; placer ensuite les tranches
obtenues dans la trémie, verticalement et
effectuer un deuxième tranchage pour
obtenir des légumes coupés en
allumettes.
Opération utilisant le disque pour trancher/râper
Manchon
d'entraînement
amovible
840129200 Fv01.qxd 7/6/04 9:02 AM Page 23
Page 24

24
Tableaux de traitement
des aliments
Couteau à couper/mélanger
QUANTITÉ MINIMALE RECOMMANDÉE
1 moyenne, épluchée ou non, évidée
et coupée en tranches
2 tranches, coupées en carrés
1
⁄2tête moyenne, le cœur enlevé,
coupé en morceaux de 1 po
(2,5 cm)
1 moyenne, grattée, coupée en
morceaux de 1 po (2,5 cm)
2 côtes fermes, les fils enlevés,
coupées en morceaux de 1 po
(2,5 cm)
5 oz (140g) coupé en morceaux de
1 po (2,5 cm)
11 carrés
1 œuf dur, refroidi et sans coquille;
bien le sécher
1 grosse gousse, épluchée
9 moyens
1 tasse (250 ml)
1 tasse (250 ml) noix
1 moyen, coupé en quartiers
1
⁄2tasse (125 ml) bien tassé; sec;
enlever les tiges
1 moyen; enlever les graines
ALIMENTS
Pomme
Pain
Chou
Carotte
Céleri
Fromage
(parmesan)
Craquelins de
farine graham
Œufs
Ail
Champignons
Noix
(durs et tendres)
Beurre de noix
Oignons
Persil
Poivron vert
PORTION
1 tasse
(250 ml)
1 tasse (250 ml)
2 à 21⁄2tasses
(500 à 625 ml)
1
⁄2tasse
(125 ml)
1
⁄
2
tasse
(125 ml)
1 tasse
(250 ml)
3
⁄
4
tasse
(175 ml)
1
⁄
3
tasse
(80 ml)
1
⁄
2
c. à thé (2,5 ml)
2 tasses
(500 ml)
3
⁄4à 1 tasse
(175 à 250 ml)
1
⁄2tasse (125 ml)
3
⁄4tasse
(175 ml)
1
⁄
4
tasse
(60 ml)
3
⁄
4
à 1 tasse
(175 à 250 ml)
TEMPS
5 s grossier
7 s fin
5 s grossier
10 s fin
5 s grossier
10 s fin
3 s grossier
5 s fin
1 s grossier
3 s fin
10 s
3 s grossier
5 s fin
2 à 21⁄2min
3 s grossier
5 s moyenne
7 s fin
5 s grossier
10 s fin
VITESSE
1-2
PULSE
3-4
3-4
3-4
PULSE
PULSE
1-2
3-4
1-2
PULSE
3-4
1-2
3-4
PULSE
REMARQUE : Quantités maximales d'aliments recommandées :
Fruits = 14 tasses (3,5 L)
Légumes = 9 tasses (2,25 L)
Fromage parmesan = 32 oz (914 g)
Noix entières = 8 tasses (2 L)
840129200 Fv01.qxd 7/6/04 9:02 AM Page 24
Page 25

25
Disque à trancher
QUANTITÉ
1 moyenne, épluchée ou non
1
⁄2moyen, coupé pour convenir à la trémie
2 moyenne
2 côtes fermes, les fils enlevés
Morceau de 4 oz (115g), refroidi
1 gros, épluché ou non
9 moyens, arrangés sur les côtés dans la
trémie
1 moyen
1 moyen, enlever les graines
1 moyenne
ALIMENT
Pomme
Chou/laitue
Carottes
Céleri
Fromage
Concombre
Champignons
Oignons
Poivron vert
Pommes de terre
PORTION
2 tasses (500 ml)
11⁄2à 21⁄2tasses
(375 à 625 ml)
1 tasse (250 ml)
1
⁄2`a 3⁄4tasse
(125 à 175 ml)
2 tasses (500 ml)
21⁄2tasses (625 ml)
11⁄2à 13⁄4tasses
(375 à 425 ml)
1
⁄2tasse (125 ml)
11⁄
2
tasses (375 ml)
2 tasses (500 ml)
VITESSE
1-2
1-2
1-2
1-2
1-2
1-2
1-2
1-2
1-2
1-2
QUANTITÉ
1
⁄2moyen, coupé pour tenir dans la trémie
1 moyenne, coupée pour tenir horizontalement
dana la trémie
Morceau de 2 oz (55g), refroidi
Morceau de 2 oz (55g), refroidi
Carré de 1 oz (30g)
Barre de 4 oz (115g)
1 petite noix de coco, épluchée, coupée en
morceaux
1 moyenne (la placer dans l’eau froide pour
empêcher de noircir)
ALIMENTS
Chou
Carottes
Mozarella doux
Fromage semi-mou
(Cheddar, Suisse)
Chocolat
Noix de coco
Pommes de terre
PORTION
11⁄2à 21⁄2tasses
(375 à 625 ml)
1
⁄2à 3⁄4tasse
(125 à 175 ml)
1
⁄2tasse (125 ml)
1
⁄2tasse (125 ml)
1
⁄2tasse (125 ml) fin
1 tasse (250 ml) fin
21⁄2tasses (625 ml)
1 tasse (250 ml)
Disque à râper
VITESSE
1-2
1-2
1-2
1-2
1-2
1-2
1-2
REMARQUE : La capacité maximale est atteinte lorsque le bol est rempli jusqu'au disque à trancher/râper.
REMARQUE : La capacité maximale est atteinte lorsque le bol est rempli jusqu'au disque à trancher/râper.
840129200 Fv01.qxd 7/6/04 9:02 AM Page 25
Page 26

26
Petites pannes et solutions
Avant de téléphoner au numéro de service à la clientèle de Hamilton Beach/
Proctor Silex, Inc., vérifier soigneusement la liste ci-dessous pour une solution
possible à votre question.
PROBLÈME POTENTIEL
L'appareil ne fonctionne sur
aucune vitesse ni sur Pulse.
Le voyant lumineux de
marche ne s'allume pas.
L’aliment n’est pas haché,
tranché ou râpé uniformément.
L’appareil s’arrête et ne
se remet pas en marche.
L’appareil dégage une
odeur de brûlé.
Le moteur semble faible.
CAUSE/SOLUTION PROBABLE
• L’appareil est-il branché sur une prise de courant?
La prise fonctionne-t-elle?
• Est-ce que le bol, le couvercle du bol et le couvercle de la
trémie sont bien verrouillés en place? Voir « Assemblage »
p. 19-20.
• L’empilement excessif des aliments dans la trémie ou une
appui trop fort sur le poussoir peut causer aux aliments
traités d’être tranchés ou râpes irrégulièrement. Se référer
au tableau de traitement des aliments pour les grosseurs et
quantités recommandées.
• Utilisez-vous la vitesse recommandée? Voir « Tableau de
traitement des aliments » p. 24-25.
• Est-ce que le bol, le couvercle du bol et le couvercle de la
trémie sont tous en place? Ils peuvent avoir bougé légèrement durant l’opération. Voir « Assemblage » p. 20-21.
• La prise de courant fonctionne-t-elle encore? La vérifier en
branchant une lampe ou un autre appareil ménager. Vous
pouvez avoir surchargé le circuit et grillé le fusible ou
déclenché le disjoncteur.
• Régler l’appareil sur OFF (arrêt) et laisser reposer pendant 3
à 4 minutes, ensuite le remettre sur ON (remise en marche).
Si aucune de ces suggestions ne corrige le problème, NE
PAS essayer de réparer l’appareil. Téléphoner au numéro
de service à la clientèle de Hamilton Beach/Proctor-Silex
pour obtenir le nom de votre centre de service autorisé le
plus proche.
• Il peut rester un résidu sur le moteur provenant de sa
fabrication, ce qui cause une légère odeur au cours de
l’utilisation initiale. Cette odeur disparaîtra. Si une odeur
forte ou toute fumée visible apparaît, débrancher l’appareil
IMMÉDIATEMENT et composer le numéro de service à la
clientèle de Hamilton Beach/Proctor-Silex.
• Utilisez-vous la vitesse recommandée pour l’aliment que
vous traitez? Voir « Tableau de traitement des aliments »
p. 23-24.
• Utilisez-vous la grosseur et la quantité d’aliments recommandées pour le traitement? Se référer au tableau des
opérations pour les grosseurs et vitesses recommandées
des aliments. Voir « Tableau de traitement des aliments »
p. 24-25.
840129200 Fv01.qxd 7/6/04 9:02 AM Page 26
Page 27

27
Nettoyage, remisage et entretien
1. Laver le bol, le couvercle, le couteau,
les disques, le manchon d'entraînement amovible, le volet de fermeture
et le poussoir dans de l’eau chaude
et savonneuse. Rincer parfaitement
et laisser sécher. Voir comment
enlever le couvercle de la trémie, p.
21.
REMARQUE : Ne pas remiser le
robot culinaire alors que le couvercle
est à la position de verrouillage; ceci
peut forcer la languette de verrouillage et l’abîmer.
2. Essuyer la base, le tableau de com-
mande et le cordon d’alimentation
avec un linge humide ou une éponge.
Pour éliminer des souillures tenaces,
utiliser un produit de nettoyage doux,
non abrasif. NE JAMAIS IMMERGER
LA BASE DANS DE L’EAU OU UN
AUTRE LIQUIDE.
3. Pour remiser l'appareil, placer le bol
sur la base. Puis placer le couteau à
couper/mélanger sur l'arbre du
moteur et le disque à trancher/râper
sur le couteau à couper/mélanger.
Le manchon d'entraînement amovible peut être stocké dans le bol.
Placer le couvercle sur le bol sans le
verrouiller.
4. Placer chaque mois une goutte d’huile
végétale sur chaque vis dans la trémie.
Les pieds à ventouse du robot culinaire
Big Mouth™sont conçus pour maintenir
l'appareil stationnaire pendant l'emploi.
Pour maximiser la vie du Big Mouth™,
vérifier les instructions suivantes :
OU
Avec le Big Mouth™entièrement assem-
blé : le soulever
du comptoir en
plaçant les mains
sous l'appareil
comme illustré et
en le soulevant
d'un côté.
Avec le Big Mouth™entièrement assem-
blé : le soulever
du comptoir en
saisissant la
poignée comme
illustré et en
soulevant le robot
du même côté
que la poignée.
Avec le bol et le couvercle retirés du
Big Mouth™: le
soulever du
comptoir en
plaçant les mains
sous l'appareil
comme illustré et
en soulevant
d'un côté.
OU
Comment dégager les pieds à ventouse après l'emploi
840129200 Fv01.qxd 7/6/04 9:02 AM Page 27
Page 28

28
Recettes
Salsa
1 oignon, pelé
1 gousse d’ail
1 piment (jalapeno ou autre piment fort)
vidé
4 tomates
Avec le couteau à couper/mélanger en place et le robot en marche, mettre l’oignon,
l’ail et le piment dans la trémie et émincer finement. Arrêter le robot, ajouter les
tomates, la coriandre, le cumin, le jus de lime, le sel et le poivre. Faire fonctionner par
impulsions (Pulse) jusqu'à obtenir la consistance désirée. Ajouter de la sauce piquante,
si désiré. Quantité : 2 à 3 tasses (500 à 750 ml).
Salade de concombre
4 concombres de taille moyenne,
non pelés
3 c. à thé (15 ml) de sel, divisées
1
⁄2 tasse (125 ml) de vinaigre blanc
1
⁄4 tasse (60 ml) de sucre
Couper les concombres dans le robot culinaire « Big Mouth » à l’aide du disque à
trancher/râper, le côté trancheur sur le dessus. Saupoudrer les concombres de
2 c. à thé (10 ml) de sel et mettre de côté pendant une heure. Égoutter. Ajouter le
vinaigre blanc, le sucre, l’aneth, le poivre blanc et l’ail. Mettre au réfrigérateur pendant 3 heures avant de servir. Quantité : 8 portions.
1
⁄4 tasse (60 ml) de coriandre, tassé
1
⁄2 c. à thé (2,5 ml) de cumin
1 c. à soupe (15 ml) de jus de lime
Sel et poivre au goût
Sauce piquante, facultatif
1 c. à soupe (15 ml) d’aneth
1
⁄4 c. à thé (1,25 ml) de poivre blanc
1 gousse d’ail
840129200 Fv01.qxd 7/6/04 9:02 AM Page 28
Page 29

29
1 c. à thé (5 ml) de sel
1
⁄4 c. à thé (1,25 ml) de poivre
3 tasses (750 ml) de lait
1 tasse (250 ml) de fromage cheddar
râpé
Pommes de terre au gratin
1 petit oignon, tranché
4 tasses (1 L) de pommes de terre,
tranchées
3 c. à soupe (45 ml) de margarine
4-5 c. à soupe (60-75 ml) de farine
Beurrer un plat de 2 pintes (2 L) allant au four. Trancher les pommes de terre
entières et les oignons dans le sens de la longueur dans le robot culinaire « Big
Mouth » à l’aide du disque à trancher/râper, le côté trancheur sur le dessus. Râper
le fromage. Dans une casserole, faire fondre la margarine puis y ajouter la farine,
le sel et le poivre. Verser le lait. Faire cuire en remuant sans arrêt sur feu moyen
jusqu’à épaississement de la sauce. Dans le plat allant au four, faire des couches
d’oignons, de pommes de terre, de fromage et de sauce. Faire cuire à 350ºF
(180ºC) de 50 à 60 minutes ou jusqu’à ce que les pommes de terre soient tendres.
Quantité : 6 portions.
Pommes de terre à la crème
4 lb (1,8 kg) de pommes de terre
blanches, environ 15 moyennes
3 tasses (750 ml) de crème moitié-moitié
3 c. à soupe (45 ml) d’oignons
finement émincés
Frotter les pommes de terre. Ne pas les peler. Les mettre dans une grande casse-
role et les recouvrir d’eau. Porter à ébullition, puis baisser le feu et laisser mijoter
pendant 45 minutes ou jusqu’à ce qu’elles soient cuites. Mettre au réfrigérateur
pour la nuit. Avec le disque pour trancher/râper, côté pour râper vers le haut, râper
les pommes de terre. Il n’est pas nécessaire de les peler. Verser les pommes de
terre râpées, la crème moitié-moitié, l’oignon, le sel et le poivre dans un grand bol
et mélanger. Mettre le beurre dans un plat de cuisson de 9 x 13 po (23 x 33 cm) et
bien en recouvrir le fond. Avec une cuillère, ajouter le mélange de pommes de
terre. Cuire à 375ºF (190ºC) pendant 1 heure. Quantité : 10 portions.
Pouding aux patates douces
1 à 11⁄4 lb (675 g) de patates douces,
frottées mais pas pelées,
(3 tasses [750 ml] râpées)
1
⁄2 tasse (125 ml) de sucre
1
⁄4 tasse (60 ml) de sirop d’érable
Avec le disque pour trancher/râper, côté pour râper vers le haut, râper les patates
douces. Les sortir du bol et les verser dans un bol mélangeur moyen. Mettre de
côté. Avec le couteau à couper/mélanger en place, mettre le sucre, le sirop, le lait,
l’oeuf, le beurre et la vanille dans le bol. Mélanger jusqu’à obtenir une consistance
lisse. Verser sur les patates douces râpées. Bien mélanger. Verser dans un plat
allant au four de 11⁄2 pinte (1,5 L), graissé. Mettre le plat dans un plat plus grand.
Ajouter de l’eau chaude dans le grand plat, de façon à ce que le plat allant au four
trempe dans 1 à 2 po (2,5 à 5 cm) d’eau. Ceci empêchera que les bords ne brûlent. Cuire à 350ºF (180ºC) pendant 11⁄2 heure. Quantité : 6 portions.
1 tasse (250 ml) de lait
1 oeuf
1
⁄4 tasse (60 ml) de beurre
1 c. à thé (5 ml) de vanille
1
1
⁄2 c. à thé (7,5 ml) de sel
1
⁄4 c. à thé (1,25 ml) de poivre
4 c. à soupe (60 ml) de beurre, fondu
840129200 Fv01.qxd 7/6/04 9:02 AM Page 29
Page 30

30
Pain de maïs au cheddar et à l’oignon
4 oz (115 g) de cheddar
(1 tasse [250 ml]râpé)
1 petit oignon, pelé
1 c. à soupe (15 ml) de beurre
1 oeuf
1
⁄2 tasse (125 ml) de lait
Avec le disque pour trancher/râper, côté pour râper vers le haut, râper le cheddar et
le mettre de côté. Avec le couteau à couper/mélanger en place, mettre l’oignon
dans le bol et le hacher finement. Mettre l’oignon haché et le beurre dans un poêlon
et cuire à feu moyen à élevé jusqu’à ce que les oignons soient mous. Mettre de côté
et laisser refroidir. Ne pas laver le bol. Avec le couteau à couper/mélanger en place,
mettre l’oeuf, le lait, le mélange à muffins et le maïs dans le bol. Régler au fonctionnement par impulsions et mélanger À PEINE. Verser le mélange dans un plat carré et
beurré allant au four de 8 po (20 cm). Mélanger l’oignon, le fromage et la crème sure.
Garnir le mélange de petites cuillères pleines de mélange à la crème sure. Cuire à
425ºF (220ºC) pendant 30 à 35 minutes. Quantité : 6 à 8 portions.
Pain blanc ordinaire
1 sachet de levure sèche active
1 tasse (250 ml) d’eau tiède
11⁄2
c. à soupe (20 ml) de beurre ou
de margarine, fondu(e)
Dans un grand bol, mélanger la levure et
1
⁄4
tasse (60 ml) d’eau tiède. Mélanger
jusqu’à dissolution de la levure. Ajouter le reste de l’eau tiède, le beurre, le sucre et
le sel. Ajouter 3 tasses (750 ml) de farine dans le bol du robot culinaire. Mettre le
robot en marche et ajouter graduellement le mélange liquide. Verser la farine
restante et continuer à mélanger jusqu’à ce que la pâte forme une boule homogène
légèrement collante au toucher. Mettre cette pâte dans un grand bol beurré.
Couvrir et laisser lever jusqu’à ce que le volume de la pâte ait doublé, environ 1
heure. Faire dégonfler la pâte en la frappant du poing. Façonner la boule en pain.
Placer ce pain dans un moule beurré de 9x5 po (23x13x6 cm) et laisser lever
jusqu’à ce qu’il double en volume, à peu près 1 heure. Faire cuire à 350°F (180ºC)
pendant 40 minutes.
Filets de barbotte croustillants
21⁄2 oz (75 g) de parmesan
(1⁄2 tasse [125 ml] râpé)
20 craquelins (Ritz ou Townhouse)
1
⁄3 tasse (80 ml) de persil frais
Couper le fromage en cubes de 1⁄2 po (1 cm). Avec le couteau à couper/mélanger
en place, mettre les cubes de fromage, les craquelins et le persil dans le bol.
Hacher le tout finement. Mettre le mélange de craquelins dans un gros plat peu
profond. Tremper les filets dans le beurre puis dans le mélange de craquelins pour
les recouvrir. Déposer les filets sur une tôle à biscuits non adhésive ou recouverte
de papier d’aluminium. Cuire à 400ºF (205ºC) pendant 15 à 20 minutes. Quantité :
4 portions.
30
1 paquet de 8 oz (225 g) de mélange à
muffins au maïs
1 boîte de 8 oz (225 g) de maïs en
crème
1 récipient de 8 oz (225 g) de crème
sure
1
1
⁄2 c. à soupe (20 ml) de sucre
1 c. à thé (5 ml) de sel
3 à 31⁄2 tasses (750 to 875 ml) de farine
tout-usage
1
⁄4 tasse (60 ml) de beurre fondu
4 filets de barbotte, d’environ 8 oz
(225 g) chaque
840129200 Fv01.qxd 7/6/04 9:02 AM Page 30
Page 31

31
Lasagne aux légumes
8 oz (250 ml) de mozzarella allégée
1 oignon moyen, pelé
4 gousses d’ail
4 à 6 oz (115 à 170 g) de champignons
frais
1 c. à thé (5 ml) d’huile végétale
2 courgettes, d’environ 6 po (15 cm)
de long
2 oz (60 ml) de parmesan
1 paquet de 8 oz (250 ml) de fromage
à la crème
Avec le disque pour trancher/râper, côté pour râper vers le haut, râper la mozzarella.
Déposer dans un petit bol et mettre de côté. Avec le couteau à couper/mélanger en
place, mettre l’oignon et les gousses d’ail dans le bol. Couper grossièrement le
mélange au réglage par impulsions (PULSE). Ajouter les champignons. Continuer avec
le robot au réglage par impulsions jusqu’à ce que les champignons soient grossièrement coupés. Verser les légumes coupés dans un gros poêlon avec l’huile, à feu
moyen. Avec le couteau à couper/mélanger en place, mettre les courgettes dans le
bol. Les faire cuire grossièrement au réglage par impulsions. Verser les courgettes
dans le poêlon. Cuire jusqu’à ce qu’elles soient tendres, soit environ 10 minutes, puis
mettre de côté. Sans laver le bol, avec le couteau à couper/mélanger en place, mettre
les morceaux de parmesan dans le bol et couper grossièrement au réglage élevé.
Ajouter le fromage à la crème, le ricotta, la crème sure, l’oeuf et les assaisonnements
et mélanger jusqu’à consistance crémeuse, soit environ 30 à 40 secondes. Graisser
un plat de cuisson de 9 x 13 po (23 x 33 cm). Mettre en couches la moitié des pâtes,
mélange de fromage en crème, mélange de légumes hachés et sauce spaghetti.
Répéter une fois. Saupoudrer de mozzarella. Cuire, couvert, à 350ºF (180ºC) pendant
25 minutes. Découvrir et cuire 10 minutes de plus. Laisser reposer pendant 10 minutes avant de servir. Quantité : 8 portions.
REMARQUE : La mozzarella est plus facile à râper si on la met au congélateur
pendant une heure avant de la râper.
Croustade aux pommes
6 grosses pommes Golden Delicious,
pelées et évidées (6 tasses [1,5 L]
tranchées)
1 c. à soupe (15 ml) de jus de citron
1
⁄2 tasse (125 ml) de sucre
1 c. à soupe (15 ml) de farine
1 c. à thé (5 ml) de cannelle
1
⁄4 c. à thé (1,25 ml) de noix de muscade
Avec le disque pour trancher/râper, côté pour trancher vers le haut, trancher les
pommes. Mettre les pommes dans un grand bol. Les arroser de jus de citron. Les
saupoudrer de sucre, farine, cannelle et noix de muscade. Bien mélanger, puis
mettre les pommes dans un plat de cuisson de 2 pintes (2 L) non graissé. Avec le
couteau à couper/mélanger en place, verser les ingrédients de la garniture dans le
bol et régler le robot au fonctionnement par impulsions jusqu’à ce que le tout soit
bien mélangé. Saupoudrer la garniture sur les pommes. Cuire à 375ºF (190ºC)
pendant 30 minutes. Servir accompagné de crème glacée à la vanille.
Quantité : 6 portions.
3
⁄4 tasse (175 ml) de fromage ricotta au
lait écrémé
1
⁄2 tasse (125 ml) de crème sure légère
1 oeuf
2 c. à thé (10 ml) d’assaisonnement
italien séché
Boîte de 26 oz (735 g) de sauce à
spaghetti
6 pâtes à lasagne, cuites
Garniture :
1
⁄2 tasse (125 ml) de beurre fondu
1 tasse (250 ml) de farine
1 tasse (250 ml) de sucre
1 c. à thé (5 ml) de cannelle
840129200 Fv01.qxd 7/6/04 9:02 AM Page 31
Page 32

32
Pouding au pain à l’ananas au four
12 tranches de pain blanc, coupé en
lamelles pour passer dans la trémie
1 boîte de 20 oz (565 g) de morceaux
d’ananas, égouttés
2 oeufs
1 tasse (250 ml) de crème moitié-moitié
Insérer le couteau à couper/mélanger dans le bol du robot culinaire et, robot en
marche, laisser tomber le pain dans la trémie pour l’émietter. Le mettre dans un
plat de 2 pintes, graissé, allant au four. Mettre les morceaux d’ananas dans le bol
du robot avec le couteau à couper/mélanger en place. Hacher les ananas pendant
20 secondes. Ajouter les oeufs, la crème, la vanille, le beurre fondu ou la margarine
et le sucre. Bien mélanger. Verser le mélange sur le pain mou émietté. Garnir des
trois rondelles d’ananas en les faisant se chevaucher au centre. Cuire à 350ºF
(180ºC) au four pendant 1 heure ou jusqu’à ce que le dessus soit doré.
Quantité : 8 portions.
Gâteau au fromage aux copeaux de chocolat
Garniture :
3 paquets de 8 oz (675 ml) de fromage
à la crème, coupé en morceaux
1 tasse (250 ml) de sucre
2 c. à soupe (30 ml) de farine
4 oeufs
1
⁄4 tasse (60 ml) de lait
1 c. à thé (5 ml) de vanille
1
⁄2
tasse (125 ml) de copeaux de chocolat
Croûte : Utiliser 1 c. à thé (5 ml) de beurre pour graisser un moule à charnière de
9 po ou 9
1
⁄2 po (23 cm) et mettre de côté. Avec le couteau à couper/mélanger en
place et le robot en marche, verser les biscuits dans la trémie et mélanger jusqu’à
ce qu’ils soient tous bien émiettés. Ajouter le beurre fondu dans la trémie et bien
mélanger. Verser les miettes dans le moule à charnière graissé et les tasser uniformément contre le fond du moule. Cuire à 425ºF (220ºC) pendant 10 minutes.
Sortir du four et laisser refroidir sur une grille.
Garniture : Avec le couteau à couper/mélanger en place, verser le fromage à la
crème, le sucre, la farine, les oeufs, le lait et la vanille dans le bol. Mélanger
jusqu’à consistance lisse. Verser la garniture sur la croûte refroidie et saupoudrer
de copeaux de chocolat. Cuire pendant 15 minutes à 425ºF (220ºC). Réduire la
chaleur à 250ºF (120ºC) et continuer la cuisson (sans ouvrir la porte du four) pendant 45 minutes de plus ou jusqu’à ce que le gâteau au fromage soit pris. Une
fois refroidi, couvrir et réfrigérer plusieurs heures ou toute la nuit. Quantité : 16
portions.
Conseil de cuisson : Pour obtenir un gâteau au fromage plus crémeux, le cuire
au bain-marie. Couper une feuille de papier d’aluminium qui dépasse d’environ 6
po (15 cm) du moule à charnière. Déposer le moule au centre de la feuille d’aluminium et en envelopper les parois, pour éviter que l’eau ne s’infiltre dans le moule.
Placer ensuite le moule à charnière dans une plaque plus grande contenant environ
11⁄2 po (3,5 cm) d’eau chaude du robinet. Cuire tel qu’indiqué.
1 c. à thé (5 ml) de vanille
1 c. à soupe (15 ml) de beurre fondu
ou de margarine
11⁄2 tasse (375 ml) de sucre
3 tranches d’ananas, égouttées
Croûte :
1 c. à thé (5 ml) de beurre, ramolli
22 biscuits aux copeaux de chocolat
3 à 4 c. à soupe (45 à 60 ml) de beurre
non salé, fondu
840129200 Fv01.qxd 7/6/04 9:02 AM Page 32
Page 33

33
Biscuits tendres au sucre
2
⁄3 tasse (150 ml) de shortening
1
⁄3 tasse (80 ml) de margarine
11⁄2 tasse (375 ml) de sucre
1 c. à thé (5 ml) de vanille
1 tasse (250 ml) de crème sure*
2 œufs
4 tasses (1 L) de farine
Avec la lame pour couper/mélanger, traiter le shortening, la margarine, et 11⁄2 tasse
(375 ml) de sucre. Ajouter la vanille, la crème sure et les œufs. Mélanger jusqu’à consistance lisse. Ajouter la farine, le sel, le bicarbonate de soude, la levure chimique, et la
muscade. Traiter à la vitesse maximale jusqu'à obtenir une consistance lisse. Mettre la
pâte au réfrigérateur pendant 15 minutes ou toute une nuit. Sur un plan de travail fariné, rouler la pâte sur une épaisseur de 1⁄2 po (1 cm). Couper selon les formes désirées.
Saupoudrer les biscuits d’un mélange de 2 c. à soupe (30 ml) de sucre et 1 c. à thé (5
ml) de muscade. Faire cuire sur une tôle à biscuits beurrée pendant 8 a 10 minutes
dans un four à 450ºF (230ºC). Quantité : 36 biscuits. *On peut remplacer la crème
sure par du yaourt allégé pour une recette faible en matières grasses.
1
⁄2 c. à thé (2,5 ml) de sel
1 c. à thé (5 ml) de bicarbonate de
soude
1 c. à thé (5 ml) de levure chimique
1 c. à thé (5 ml) de muscade
2 c. à soupe (30 ml) de sucre
Service à la clientèle
Si vous avez une question au sujet du robot culinaire, composer notre numéro sans frais
d’interurbain de service à la clientèle. Avant de faire un appel, veuillez noter les numéros de
modèle, de type et de série ci-dessous. Ces numéros se trouvent sous le robot culinaire.
Ces renseignements nous aideront à répondre beaucoup plus vite à toute question.
MODÈLE : ______________ TYPE : _______________ SÉRIE :__________________
GARANTIE LIMITÉE
Ce produit est garanti être exempt de vices de matériau et de fabrication pendant une période de deux (2) ans pour les produits Portfolio de Hamilton Beach, de un (1) an pour les
produits Hamilton Beach ou cent quatre-vingts (180) jours pour les produits Proctor-Silex à
partir de la date de l'achat original, excepté ce qui est noté ci-dessous. Au cours de cette
période, nous réparerons ou remplacerons ce produit sans frais, à notre discrétion. LA
GARANTIE CI-DESSUS REMPLACE TOUTE AUTRE GARANTIE EXPRESSE OU IMPLICITE,
ÉCRITE OU ORALE, Y COMPRIS TOUTE GARANTIE DE QUALITÉ MARCHANDE OU DE
CONFORMITÉ À UNE FIN PARTICU-LIÈRE. TOUTE RESPONSABILITÉ EST EXPRESSÉMENT
LIMITÉE À UN MONTANT ÉGAL AU PRIX D’ACHAT PAYÉ ET TOUTES LES RÉCLAMATIONS
POUR DOMMAGES SPÉCIAUX ET INDIRECTS SONT PAR LES PRÉSENTES EXCLUES. La
garantie ne s’applique pas aux accessoires suivants qui pourraient être vendus avec ce
produit : pièces en verre, récipients en verre, couteau/tamis, lames et/ou agitateurs. Cette
garantie ne s’applique qu’à l’acheteur d’origine et ne couvre pas un vice causé par l’abus,
le mésusage, la négligence, l’usage à des fins commerciales ou tout autre usage non prescrit dans le mode d’emploi. Cette garantie vous confère des droits juridiques spécifiques
et vous pouvez aussi jouir d’autres droits juridiques qui peuvent varier d’un État à un autre
ou d’une province à une autre. Certains États ou provinces ne permettent pas les limitations sur les garanties implicites ou les dommages spéciaux ou indirects de telle sorte que
les limitations ci-dessus ne s’appliquent peut-être pas dans votre cas.
Si vous désirez procéder à une réclamation en vertu de cette garantie, NE RETOURNEZ
PAS L’APPAREIL AU MAGASIN! Veuillez téléphoner au NUMÉRO DU SERVICE À LA
CLIENTÈLE. (Pour un service plus rapide, ayez à portée de la main les numéros de série et
de modèle et de type de votre appareil lorsque vous communiquez avec un représentant.)
NUMÉROS DU SERVICE À LA CLIENTÈLE
Aux États-Unis 1-800-851-8900
Au Canada 1-800-267-2826
www.hamiltonbeach.com ou www.proctorsilex.com
CONSERVEZ CES NUMÉROS POUR CONSULTATION ULTÉRIEURE!
Cette garantie s’applique aux produits achetés aux É.-U. ou au Canada.
840129200 Fv01.qxd 7/6/04 9:02 AM Page 33
Page 34

34
SALVAGUARDIAS IMPORTANTES
Para prevenir el riesgo de incendio, choque
eléctrico, quemaduras u otras lesiones o
daños, siga con cuidado estas instrucciones.
Cuando se están utilizando artefactos
eléctricos deben seguirse ciertas precauciones básicas, entre las que se incluyen las
siguientes:
1. Lea y guarde todas las instrucciones.
2. Verifique que el voltaje de su instalación
corresponda con el del producto.
3. Si el cable de suministro de energía está
dañado, debe ser reemplazado por el
fabricante, su agente de servicio u otra
persona similarmente calificada para evitar un peligro.
4. Para protegerse de los choques eléctri-
cos, nunca sumerja la base, el motor, el
cable o el enchufe en agua o en algún
otro líquido.
5. Cuando los niños estén cerca de
cualquier artefacto eléctrico o lo estén
usando, es necesario una supervisión
muy estricta.
6. Este aparato no debe ser usado por niños.
7. Desconecte el cable del tomacorriente
cuando no lo esté usando, antes de
agregar o quitar componentes y antes
de limpiarlo.
8. Evite el contacto con los componentes
móviles. Mantenga los dedos fuera del
alcance de la abertura de vaciado.
9. No opere ningún artefacto eléctrico que
tenga el cable o el enchufe dañado o
después de que el artefacto ha fallado o
se ha caído o dañado de alguna manera.
Llame a nuestro número gratuito de asistencia al cliente para obtener información
o un examen, reparación o ajuste de tipo
eléctrico o mecánico. Todas las reparaciones deben de ser realizadas por el
fabricante, su agente de servicio o personas igualmente calificadas para evitar
riesgos.
10. El uso de accesorios no recomendados
ni vendidos por Hamilton Beach/ProctorSilex, Inc. puede causar incendio,
choque eléctrico o lesiones.
11. No use su procesador de alimentos si
tiene partes rotas.
12. No use este aparato al aire libre.
13. No permita que el cable cuelgue por
fuera del borde de una mesa o de un
mostrador o que esté en contacto con
superficies calientes.
14. Mientras esté procesando los alimentos,
mantenga las manos y utensilios fuera
del alcance de la cuchilla y del disco
para reducir el riesgo de lesiones personales severas y/o daños a su
procesador. Se puede utilizar una espátula de hule pero SOLAMENTE cuando
no esté funcionando el procesador.
15. La cuchilla y el disco están muy afilados.
Manéjelos con cuidado. Guárdelos fuera
del alcance de los niños.
16. Para reducir el riesgo de lesiones, nunca
coloque la cuchilla o el disco en la base
sin que el tazón esté firmemente colocado en su sitio.
17. Cerciórese que la tapa esté asegurada
firmemente en su sitio antes de poner a
funcionar el artefacto eléctrico.
18. Cuando rebane o ralle alimentos, nunca
coloque comida por la tolva de alimentos
con la mano. Siempre use el empujador
de alimentos.
19. No intente interferir con el mecanísmo de
seguridad de cierre de la tapa.
20. Antes de quitar la tapa, cerciórese que el
disco o la cuchilla se han detenido totalmente.
21. Para reducir el riesgo de lesiones, cer-
ciórese de insertar o quitar la cuchilla y el
disco utilizando las ranuras para los
dedos que se han provisto con este
objeto. Siempre tenga mucho cuidado
cuando quite la cuchilla y el disco del
tazón, cuando esté vaciando el tazón y
cuando lo esté lavando.
22. Asegúrese de colocar el interruptor en la
posición apagado (OFF/O) después de
cada uso. Siempre use el empujador
para despejar los restos de comida que
hayan quedado en la tolva. Cuando no
sea posible limpiarlos de esta forma,
apague el motor y desarme la unidad
para retirar todos los restos de comida.
23. Este aparato no ha sido diseñado para
aplicaciones comerciales, profesionales
o industriales. Ha sido diseñado y construido exclusivamente para uso
doméstico.
24. Nunca use el aparato por un período
más largo o con mayores cantidades de
ingredientes de las recomendadas por
Hamilton Beach/Proctor-Silex, Inc.
840129200 Sv01.qxd 7/6/04 9:00 AM Page 34
Page 35

35
Información adicional para la seguridad del consumidor
Este artefacto debe utilizarse únicamente en un entorno doméstico.
Este electrodoméstico puede estar equipado
con un enchufe polarizado. Este tipo de
enchufe tiene una cuchilla más ancha que la
otra. El enchufe encajará en el tomacorriente
en una sola dirección. Esta es una medida
de seguridad con la intención de ayudar a
reducir el riesgo de choque eléctrico. Si no
puede insertar el enchufe en el tomacorriente, pruebe a darle vuelta al enchufe. Si,
aún así, no encaja, haga que un electricista
calificado reponga el tomacorriente obsoleto. No intente invalidar la medida de
seguridad del enchufe polarizado modificando el enchufe de alguna forma.
Para evitar una sobrecarga en los circuitos
eléctricos, no utilice algún otro artefacto
eléctrico de potencia elevada en el mismo
circuito que su procesador de alimentos.
El largo del cable que se utiliza con este
artefacto fue elegido para reducir los riesgos
de enredarse o de tropezarse con un cable
más largo. Si se necesita un cable más
largo, se puede usar una extensión eléctrica
siempre que esté clasificada a una capacidad igual o mayor que su procesador de
alimentos. Se debe tener cuidado de
arreglar el cable de extensión para que no
cuelgue de la mesa o mostrador donde
puede ser jalado por los niños o se pueda
tropezar con él accidentalmente.
Antes del primer uso: Saque el procesador
de su envoltura. Tenga cuidado con la
cuchilla para picar/ mezclar y el disco
rebanador/rallador ya que están muy afilados.
Lave todas las piezas, excepto la base, en
agua jabonosa caliente. Enjuague y luego
seque.
¡
GUARDE ESTAS INSTRUCCIONES!
25. La clasificación nominal máxima de esta
unidad se basa en el uso de una cuchilla
para picar/mezclar. El uso del disco
rebanador/rallador puede acarrear bastante menos potencia.
26. No lo coloque sobre o cerca de un que-
mador caliente a gas o eléctrico o en un
horno caliente.
27. No use este aparato en ninguna otra
aplicación que no sea la designada.
Modelo:
70590
70595
Características Eléctricas:
120 V~ 60 Hz 450 W
120 V~ 60 Hz 450 W
Tipo:
FP11
FP11
840129200 Sv01.qxd 7/6/04 9:00 AM Page 35
Page 36

36
1. Empujador de alimentos
2. Tapa de la tolva de alimentos
3. Tolva de alimentos
4. Tapa del tazón
5. Tazón
6. Base
7. Luz de listo
8. Disco de control
9. Cuchilla para picar/mezclar
10. Manga de impulso removible
11. Cuchilla para rebanar de 3,0 mm
(rebanadas medianas)
12. Cuchilla para rebanar de 6,0 mm*
13. Cuchilla para papas fritas*
Piezas y características
Uso de su procesador de alimentos
Cómo trabar el tazón
Alinee la base y el tazón como se
muestra. Gire el tazón en sentido de
las manecillas del reloj hasta que trabe
en su lugar. El tazón se trabará en la
base en 4 posiciones diferentes para
conveniencia del usuario.
NOTA: El procesador de alimentos no
funcionará si el tazón no está trabado
en su lugar.
* Característica opcional: Algunas
unidades pueden incluir un disco adicional
grueso de 6,0 mm para rebanar y/o cuchilla
para papas fritas.
840129200 Sv01.qxd 7/6/04 9:00 AM Page 36
Page 37

Cómo ensamblar y trabar la tapa
Alinee la tapa como se muestra, colocando el pulgar en la lengüeta de la
tapa y girándola en sentido de las
manecillas del reloj. Se proveen cuatro
marcas visuales para alinear (vea la
ilustración); una en el tazón, otra en la
manija y dos en la tapa del tazón.
NOTA: El procesador de alimentos no
funcionará si la tapa no está trabada
en su lugar.
La tapa de la tolva de alimentos gira
sobre la parte trasera de la tolva de
alimentos. Empuje la tapa hacia abajo
para cerrarla en la tolva de alimentos.
Antes de quitar la tapa, ponga el
interruptor en la posición de apagado (OFF/ O) y espere hasta que la
cuchilla se detenga.
Para sacar la tapa de la tolva de alimentos para la limpieza, coloque una
mano en la abertura del empujador de
alimentos y la otra en la tolva de alimentos. Rote la mano de izquierda a
derecha y levante. Esto liberará la
ranura izquierda del canal y luego la
ranura derecha del canal. Invierta las
instrucciones para colocar la tapa de la
tolva de alimentos de regreso en la
tolva de alimentos.
Cómo operar los controles
El disco de control está ubicado convenientemente en la parte frontal de la
base. Gire la perilla en sentido de las
manecillas del reloj para seleccionar
una velocidad:
1 y 2 para baja
3 y 4 para alta
El procesador operará continuamente.
Para un control instantáneo de encendido y apagado, use el botón de
PULSO (P) al girar la perilla en sentido
contrario a las manecillas del reloj. El
disco azul alrededor de la perilla de
control se iluminará cuando el tazón,
tapa y tapa de la tolva de alimentos
estén seguras en su lugar. Esto indicará que el procesador de alimentos
está listo para usarse.
37
840129200 Sv01.qxd 7/6/04 9:00 AM Page 37
Page 38

38
Cómo procesar con la cuchilla para picar/mezclar
Consejos y técnicas para el procesamiento
• Este procesador de alimentos es
excelente para picar, mezclar,
rebanar o rallar la mayoría de los alimentos. Sin embargo, para permitir
que se desempeñe de la mejor forma
posible, recomendamos no usar su
procesador para moler granos, granos de café o especias; no cortar
carne congelada ni triturar hielo.
• Para lograr una capacidad máxima,
use la cuchilla para picar/mezclar de
boca grande y agregue alimentos sin
sobrepasar la línea máxima de llenado
en la tolva de alimentos. Vea los
Cuadros de Procesamiento de
Alimentos para mayor información.
• El tiempo de operación dependerá de
la cantidad de alimento que se esté
procesando. La mayoría de los alimentos se pueden rebanar, picar o
rallar en unos segundos. Si la unidad
se pone en marcha continuamente
por 2 minutos, deje que el procesador descanse unos 4 minutos
antes de continuar.
• Para una consistencia más uniforme,
comience con trozos de comida que
tengan un tamaño similar. Las zanahorias, por ejemplo, se deben cortar
todas en trozos de 1 pulgada (2,5 cm).
No procese pedazos de 4 pulgadas
(10 cm) con trozos de 1⁄2
pulgada (1 cm).
• No haga puré ni machaque verduras
con almidón como papas. Se procesarán demasiado en un instante y se
volverán chiclosas.
La cuchilla para picar/mezclar se puede
usar para picar gruesa o finamente,
mezclar o hacer puré los alimentos hasta
dejarlos con una consistencia suave.
1. Asegúrese de que el interruptor del
control está colocado en APAGADO
(OFF / O) y de que la unidad esté
desenchufada.
2. Trabe el tazón en la base (vea “Cómo
trabar el tazón” en la página 36.)
3. Coloque la cuchilla para picar/mezclar
en el eje motriz del procesador de
alimentos en el centro del tazón. Gire
despacio hasta que la cuchilla caiga
en su lugar. Mánejela con cuidado,
la cuchilla es muy filosa.
4. Trabe la tapa en el tazón. Inserte el
empujador de alimentos en la tolva
de alimentos.
5. Enchufe la unidad y observe el disco.
La luz de listo se iluminará de azul.
Procese los alimentos. La velocidad
y el tiempo de procesamiento determinarán la consistencia final de los
alimentos. El botón de Pulso le
puede ayudar a evitar procesar
demasiado. Refiérase al cuadro de
procesamiento para consultar tiempos y velocidades de procesamiento
recomendados.
6. Cuando se haya procesado el ali-
mento, seleccione APAGADO (OFF/
O) o libere el botón de PULSO.
Espere hasta que la cuchilla se
haya detenido antes de quitar la
tapa.
Cuchilla para
picar/mezclar
Eje motriz
840129200 Sv01.qxd 7/6/04 9:00 AM Page 38
Page 39

39
Procesamiento con el disco rebanador/rallador
• Para rebanar o rallar queso, seleccione un queso firme como cheddar,
Monterrey Jack o suizo. Coloque el
queso en el congelador 30 minutos
antes de procesar.
• El disco reversible rebanador/
rallador tiene una cuchilla
rebanadora de un lado y dientes
ralladores del otro. Colóquelo en el
eje motriz con el lado cortante que
desee mirando hacia arriba.
• Para preparar verduras cortadas estilo juliana, córtelas y luego sáquelas
del tazón y vuelva a agregar las verduras. Colóquelas en la tolva de
alimentos en posición vertical. Corte
nuevamente para que queden
rebanadas del grosor de un fósforo.
1. Asegúrese de que el interruptor del control
está colocado en APAGADO (OFF / O) y
de que la unidad esté desenchufada.
2. Trabe el tazón en la base (vea “Cómo
trabar el tazón” en la página 36.)
3. Coloque la manga de impulso removi-
ble en el eje motriz. Coloque el disco
rebanador/rallador en la manga de
impulso removible con el lado deseado
hacia arriba ya sea para rebanar o rallar. Trabe la tapa en el tazón. (Vea
“Cómo ensamblar y trabar la tapa” en
la página 37.)
4. Para rebanar/rallar alimentos
grandes (como un pedazo de col,
pimiento verde, un jitomate entero)
abra la tapa de la tolva de alimentos
levantando el cerrojo. Libere la agarradera de alimentos hacia la derecha.
Inserte la comida y trabe la tapa.
Para rebanar/rallar alimentos largos
y delgados (como papas, pepperoni,
zanahorias, apio). Trabe la tapa.
Los alimentos largos se pueden inser-
tar en la abertura de la tolva y procesar
siempre y cuando la tapa de la tolva
esté cerrada.
5. Inserte el empujador de alimentos en
la tolva. Siempre use el empujador
de alimentos para colocar los alimentos en la tolva. NUNCA EMPUJE
LOS ALIMENTOS POR LA TOLVA
CON LA MANO.
6. Enchufe la unidad y observe el disco.
La luz de listo se iluminará de azul.
7. Seleccione la velocidad. Mientras presiona el empujador de alimentos,
seleccione 1 ó 2 para un desempeño
óptimo en el rebanado o rallado o
PULSO para procesar los alimentos.
Refiérase al cuadro de procesamiento
para consultar tiempos y velocidades
de procesamiento recomendados.
NOTA: La tapa de la tolva de alimentos está diseñada para girar hacia la
derecha al procesar alimentos que
llenen toda la capacidad de la tolva.
8. Cuando la tolva de alimentos esté
vacía, seleccione APAGADO (OFF/ O)
o libere el botón de PULSO. Espere
hasta que la cuchilla se haya
detenido antes de quitar la tapa.
Disco
rebanador/
rallador
Eje
motriz
Manga de
impulso
removible
840129200 Sv01.qxd 7/6/04 9:00 AM Page 39
Page 40

40
Cuadros de procesamiento de alimentos
CANTIDAD MÍNIMA RECOMENDADA
1 mediana, pelada o sin pelar, sin
centro y cortada en gajos
2 rebanadas cortadas en cuadros
1
⁄2cabeza mediana, sin centro y cortada
en trozos de 1 pulgada (2,5 cm)
1 mediana, pelada, cortada en piezas
de 1 pulgada (2,5 cm)
2 tiras firmes, sin fibra, cortado en
piezas de 1 pulgada (2,5 cm)
5 onzas (140 g) cortado en piezas de
1 pulgada (2,5 cm)
11 cuadros
1 cocido, enfriado y sin cáscara; bien
seco
1 diente grande, pelado
9 medianos
1 taza (250 g)
1 taza (250 ml) de nueces
1 mediana, cortada en cuartos
1
⁄2taza (125 ml) apretado; seco;
sin tallo
1 mediano, sin semillas
ALIMENTOS
Manzana
Pan
Col
Zanahoria
Apio
Queso
parmesano
Galletas Graham
Huevos
Ajo
Champiñones
Nueces (duras y
blandas)
Mantequilla de
nueces
Cebolla
Perejil
Pimientos verdes
RINDE
1 taza
(250 ml)
1 taza (250 ml)
2 a 21⁄2tazas
(500 a 625 ml)
1
⁄2taza
(125 ml)
1
⁄2taza
(125 ml)
1 taza
(250 ml)
3
⁄
4
taza (175 ml)
1
⁄
3
taza
(80 ml)
2.5 ml
2 tazas
(500 ml)
3
⁄4a 1 taza
(175 a 250 ml)
1
⁄
2
taza (125 ml)
3
⁄4taza
(175 ml)
1
⁄4taza
(60 ml)
3
⁄4a 1 taza
(175 a 250 ml)
Cuchilla para picar/mezclar
TIEMPO
5 seg. gruesa
7 seg. fina
5 seg. gruesa
10 seg. fina
5 seg. gruesa
10 seg. fina
3 seg. grueso
5 seg. fino
1 segundo grueso
3 seg. fino
10 seg.
3 seg. grueso
5 seg. fino
2 a 21⁄2minutos
3 seg. gruesa
5 seg. media
7 seg. fina
5 seg. grueso
10 seg. fino
VELOCIDAD
1-2
PULSE
3-4
3-4
3-4
PULSE
PULSE
1-2
3-4
1-2
PULSE
3-4
1-2
3-4
PULSE
NOTA: Cantidades máximas de alimentos recomendadas:
Frutas = 14 tazas (3,5 L)
Vegetales = 9 tazas (2,25 L)
Queso parmesano = 32 onzas (914 g)
Frutos secos enteros = 8 tazas (2 L)
840129200 Sv01.qxd 7/6/04 9:00 AM Page 40
Page 41

41
CANTIDAD MÍNIMA RECOMENDADA
1 mediana, pelada o sin pelar
1
⁄2cabeza mediana, cortada para que quepa
en la tolva
2 medianas
2 tiras firmes, sin fibra
1 pieza de 4 onzas (115 g), frío
1 grande, pelado o sin pelar
9 medianos, colocados en los costados de la
tolva
1 mediana
1 mediano, sin semillas
1 mediana
ALIMENTOS
Manzana
Col/lechuga
Zanahorias
Apio
Queso
Pepino
Champiñones
Cebollas
Pimientos verdes
Papas
RINDE
2 tazas (500 ml)
11⁄2a 21⁄2tazas
(375 a 625 ml)
1 taza (250 ml)
1
⁄2a 3⁄4taza
(125 a 175 ml)
2 tazas (500 ml)
21⁄2tazas (625 ml)
11⁄2a 13⁄4tazas
(375 a 425 ml)
1
⁄
2
taza (125 ml)
11⁄2tazas (375 ml)
2 tazas (500 ml)
Disco rebanador
VELOCIDAD
1-2
1-2
1-2
1-2
1-2
1-2
1-2
1-2
1-2
1-2
CANTIDAD MÍNIMA RECOMENDADA
1
⁄2cabeza mediana, cortada para que quepa en
la tolva
1 mediana, cortada para que quepa horizontalmente en la tolva
1 pieza de 2 onzas (55 g), frío
1 pieza de 2 onzas (55 g), frío
1 cuadrado de 1 onza (30 g)
1 barra de 4 onzas (115 g)
1 coco pequeño, pelado, cortado en trozos
1 mediana (colóquela en agua fría para evitar
que se ponga oscura)
ALIMENTOS
Col
Zanahorias
Mozzarella suave
Queso semi suave
(Cheddar, suizo)
Chocolate
Coco
Papas
RINDE
11⁄2a 21⁄2tazas
(375 a 625 ml)
1
⁄2a 3⁄4taza
(125 a 175 ml)
1
⁄2taza (125 ml)
1
⁄2taza (125 ml)
1
⁄2taza (125 ml) fino
1 taza (250 ml) fino
21⁄2tazas (625 ml)
1 taza (250 ml)
Disco rallador
VELOCIDAD
1-2
1-2
1-2
1-2
1-2
1-2
1-2
NOTA: Se alcanza la capacidad máxima cuando el tazón está lleno hasta el disco rebanador/rallador.
NOTA: Se alcanza la capacidad máxima cuando el tazón está lleno hasta el disco rebanador/rallador.
840129200 Sv01.qxd 7/6/04 9:00 AM Page 41
Page 42

42
Guía para solucionar problemas
Antes de llamar al número de servicio al cliente de Hamilton Beach/Proctor-Silex, Inc.
revise con cuidado la lista siguiente para encontrar una posible solución a su pregunta.
PROBLEMA POTENCIAL
La unidad no funciona en
ninguna velocidad ni posición
de pulso (Pulse).
La luz de listo no se enciende.
Los alimentos no están
picados, rebanados o
rallados de manera
homogénea.
La unidad se detiene
y no se vuelve a poner en
marcha.
La unidad tiene olor a
quemado.
Parece que el motor
esta débil.
CAUSA PROBABLE/SOLUCIÓN
• ¿Está conectada la unidad? ¿Funciona el tomacorriente?
• ¿Están trabados en su lugar el tazón, la tapa del tazón y la tapa
de la tolva de alimentos? Vea las páginas 36-37 “Cómo
ensamblar”.
• Amontonar demasiada comida en la tolva de alimentos o
empujar muy fuerte con el empujador de alimentos puede
provocar que la comida procesada esté irregularmente
rebanada o rallada. Consulte los cuadros de procesamiento
de alimentos para tamaños y cantidades recomendados.
• ¿Está usando la velocidad recomendada? Vea las páginas
40-41 “Cuadros de procesamiento de alimentos”.
• ¿Están el tazón, tapa del tazón y tapa de la tolva de alimentos seguros en su lugar? Es posible que se hayan movido
ligeramente durante el procesamiento. Vea las páginas
36-37 “Cómo ensamblar”.
• ¿Todavía funciona el tomacorriente? Revise conectando una
lámpara que funcione o cualquier otro electrodoméstico. Es
posible que haya sobrecargado el circuito y quemado un
fusible o disparado el cortacircuitos.
• Apague (OFF/O) la unidad, deje descansar por 3 a 4 minu-
tos, luego encienda (ON) de nuevo.
Si ninguna de estas sugerencias soluciona el problema,
NO INTENTE reparar la unidad. Llame al número de servicio
al cliente de Hamilton Beach/Proctor-Silex para obtener el
nombre del centro de servicio autorizado más cercano
• Es posible que haya un residuo en el motor del proceso de
fabricación que provoca un leve olor durante el uso inicial.
Esto desaparecerá. Si aparece un olor fuerte o cualquier
señal visible de humo, desenchufe la unidad INMEDIATAMENTE y llame al número de servicio al cliente de Hamilton
Beach/Proctor-Silex.
• ¿Está usando la velocidad recomendada para el alimento
que está procesando? Vea las páginas 40-41 “Cuadros de
procesamiento de alimentos”.
• ¿Está usando el tamaño de comida recomendado y la
cantidad a ser procesada? Consulte los cuadros de procesamiento de alimentos para tamaños de comida y
velocidades recomendados. Vea las páginas 40-41
“Cuadros de procesamiento de alimentos”.
840129200 Sv01.qxd 7/6/04 9:00 AM Page 42
Page 43

43
Limpieza, almacenaje y mantenimiento
1. Lave el tazón, la tapa, la cuchilla, los
discos, la manga de impulso removible, la entrada de alimentos y el
empujador de alimentos en agua
caliente con jabón. Enjuague y
seque a fondo. Consulte la página
37 para información sobre cómo
desmontar la tapa de la tolva de alimentos para limpieza.
NOTA: No almacene el procesador
de alimentos con la tapa en la posición de traba ya que el hacerlo
puede poner tensión en la lengüeta
de trabado.
2. Limpie la base, el panel de control y
el cable con una esponja o un trapo
húmedo. Si necesita eliminar man-
chas persistentes, use un limpiador
suave y no abrasivo.
NUNCA SUMERJA LA BASE EN
AGUA O EN CUALQUIER OTRO
LÍQUIDO.
3. Para almacenar, coloque el tazón en
la base. Luego, coloque la cuchilla
para picar/ mezclar en el eje motriz y
el disco rebanador/ rallador en la
cuchilla para picar/ mezclar. La
manga de impulso removible puede
almacenarse en el tazón. Coloque la
tapa en el tazón pero no la trabe.
4. Coloque cada mes una gota de aceite
vegetal en cada tornillo de la tolva de
alimentos.
Las patas de la taza de succión en la parte inferior del procesador de alimentos
Big Mouth™están diseñadas para mantener la unidad estacionaria durante el uso.
Para maximizar la duración de su equipo Big Mouth™ repase las siguientes
instrucciones:
O BIEN
Con el equipo Big Mouth™completa-
mente armado:
levante del
mesón colocando las manos
debajo de la
unidad como se
muestra y levantando de un lado.
Con el equipo Big Mouth™completa-
mente armado:
levante del
mesón tomando
la manija como
se muestra y levantando del
mismo lado que
la manija.
Habiendo retirado el tazón y la tapa del
equipo Big
Mouth™: levante
del mesón colocando ambas
manos debajo de
la unidad como
se muestra y levantando hacia un
lado.
O BIEN
Cómo liberar las patas de la taza de
succión después del uso
840129200 Sv01.qxd 7/6/04 9:00 AM Page 43
Page 44

44
Salsa
1 cebolla, pelada y cortada en cuartos
1 diente de ajo
1 chile picante (tipo jalapeño o serrano),
sin centro, sin semillas y cortado
en cuartos
4 tomates
Usando la cuchilla para picar/mezclar y con el procesador en marcha, deje caer la
cebolla, los dientes de ajo y el chile picante por la tolva de alimentos y corte hasta
que queden bien picados. Detenga el procesador y agregue tomates, cilantro, comino, jugo de lima, sal y pimienta. Pulse hasta obtener la textura deseada. Agregue
salsa picante si así lo desea. Se obtienen entre 2 a 3 tazas (500 a 750 ml).
Ensalada de pepino
4 pepinos medianos, sin pelar
3 cucharaditas (15 ml) de sal, dividida
1
⁄2 taza (125 ml) de vinagre blanco
1
⁄4 taza (60 ml) de azúcar
Rebane los pepinos en la boca grande del procesador de alimentos con el disco
rebanador/rallador con el lado para rebanar hacia arriba. Espolvoree 2 cucharaditas (10 ml) de sal sobre los pepinos y deje reposar por una hora. Escurra. Agregue
y revuelva el vinagre blanco, azúcar, eneldo, pimienta blanca y ajo. Refrigere por 3
horas antes de servir. Rinde 8 porciones.
Recetas
1
⁄4 taza (60 ml) de cilantro, apretado
1
⁄2 cucharadita (2,5 ml) de comino
1 cucharada (15 ml) de jugo de lima
Sal y pimienta a gusto
Salsa picante, opcional
1 cucharada (15 ml) de eneldo
1
⁄4 cucharadita (1,25 ml) de pimienta
blanca
1 diente de ajo
840129200 Sv01.qxd 7/6/04 9:00 AM Page 44
Page 45

45
Papas gratinadas
1 cebolla pequeña, rebanada
4 tazas (1 L) de papas, rebanadas
3 cucharadas (45 ml) de margarina
4-5 cucharadas (60-75 ml) de harina
Engrase una platón de 2 cuartos (2 L). Rebane todas las papas y cebolla al través
en la boca grande del procesador de alimentos con el disco rebanador/rallador
con el lado para rebanar hacia arriba. Ralle el queso. En un sartén, derrita la margarina, luego agregue y mezcle el harina, sal y pimienta. Añada la leche. Cueza a
temperatura media mientras revuelve hasta que la salsa esté espesa. Ponga una
capa de cebolla, otra de papas, queso, y de salsa en el platón. Hornee a 350ºF
durante 50 a 60 minutos o hasta que las papas estén tiernas. Rinde 6 porciones.
Papas a la crema
4 libras (1,8 kg) de papas blancas
para uso general, unas 15 de
tamaño mediano
3 tazas (750 ml) de crema de leche
“medio y medio”
3cucharadas (45 ml) de cebolla
finamente picada
Lave las papas pero no las pele. Colóquelas en una cazuela grande y cubra con
agua. Haga hervir y luego reduzca el calor y hierva a fuego lento por 45 minutos
o hasta que estén listas. Refrigere hasta el otro día. Usando el disco rebanador/
rallador, con el lado rallador hacia arriba, ralle las papas. No es necesario pelarlas.
Coloque las papas ralladas, la crema, la cebolla, la sal y pimienta en un tazón
grande y mezcle. Cubra una fuente de hornear de 9x13 pulgadas con mantequilla.
Vierta la mezcla de papas con una cuchara. Hornee a 375°F (190ºC) por una hora.
Se obtienen 10 porciones.
Budín de camotes (boniatos)
1 a 11⁄4
libras (675 g) de camotes,
lavados pero no pelados
(3 tazas [750 ml] ralladas)
1
⁄2 taza (125 ml) de azúcar
1
⁄4 taza (60 ml) de jarabe de arce
Usando el disco rebanador/rallador, con el lado rallador hacia arriba, ralle los
camotes. Sáquelos del tazón de procesamiento y colóquelos en un tazón para
mezclar de tamaño mediano. Colóquelo a un lado. Usando la cuchilla para
picar/mezclar, coloque el azúcar, el jarabe, la leche, el huevo, la mantequilla y la
vainilla en el tazón de procesamiento. Procese hasta que la mezcla quede uniforme.
Vierta sobre los camotes rallados. Mezcle bien. Vierta en una cazuela engrasada de
1
1
⁄
2 cuarto de galón (1,5 L). Coloque la cazuela en una fuente o cacerola más
grande. Agregue agua caliente a la fuente más grande de manera que el agua esté
entre 1 y 2 pulgadas (2,5 a 5 cm) de altura por los costados de la cazuela. Ésto evitará que se quemen los bordes. Hornee a 350°F (180ºC) durante 1
1
⁄
2 horas. Se
obtienen 6 porciones.
1 cucharadita (5 ml) de sal
1
⁄4 cucharadita (1,25 ml) de pimienta
3 tazas (750 ml) de leche
1 taza (250 ml) queso cheddar, rallado
11⁄2 cucharaditas (7,5 ml) de sal
1
⁄4 cucharadita (1,25 ml) de pimienta
4 cucharadas (60 ml) de mantequilla,
derretida
1 taza (250 ml) de leche
1 huevo
1
⁄4 taza (60 ml) de mantequilla
1 cucharadita (5 ml) de vainilla
840129200 Sv01.qxd 7/6/04 9:00 AM Page 45
Page 46

46
1 paquete de 8 onzas (225 g) de mez-
cla para molletes de maíz
1 lata de 8 onzas (225 g) de maíz
cremoso
1 recipiente de 8 onzas (225 g) de
crema agria
Pan de maíz con queso y cebolla
4 onzas (115 g) de queso cheddar
(1 taza [250 ml] rallado)
1 cebolla pequeña, pelada y cortada en
cuartos
1 cucharada (15 ml) de mantequilla
1 huevo
1
⁄2 taza (125 ml) de leche
Usando el disco rebanador/rallador, con el lado rallador hacia arriba, ralle el queso
cheddar y déjelo a un lado. Usando la cuchilla para picar/mezclar, coloque la
cebolla en el tazón de procesamiento y procese hasta que esté bien picada.
Coloque la cebolla picada y la mantequilla en una sartén y cocine a fuego medio
alto hasta que las cebollas estén blandas. Deje enfriar a un lado. No lave el tazón de
procesamiento. Usando la cuchilla para picar/mezclar, coloque el huevo, la leche, la
mezcla para molletes y el maíz en el tazón de procesamiento. Pulse JUSTO hasta
que queden mezclados. Vierta la masa en una asadera cuadrada de 8 pulgadas (20
cm) engrasada. Combine las cebollas, el queso y la crema agria. Coloque
cucharadas pequeñas de la mezcla de crema agria sobre la masa. Hornee a 425°F
(220ºC) entre 30 y 35 minutos. Se obtienen entre 6 y 8 porciones.
Pan blanco básico
1 paquete de levadura seca activa
1 taza (250 ml) de agua tibia
11⁄2
cucharada (20 ml) de mantequilla
o margarina, derretida
En un tazón para mezclar grande combine la levadura y
1
⁄4 de taza (60 ml) de agua
tibia. Mezcle hasta que se disuelva. Agregue el resto del agua tibia, mantequilla,
azúcar y sal. Añada 3 tazas (750 ml) de harina al tazón de procesamiento. Ponga
en marcha el procesador de alimentos y añada gradualmente la mezcla de líquidos. Agregue lo suficiente del resto de la harina y continúe mezclando hasta que la
masa forme una bola sin grumos que sea un poco pegajosa al tocarla. Coloque la
masa en un tazón engrasado grande. Cubra y deje que se expanda al doble de su
tamaño, cerca de 1 hora. Punce la maza y dele forma de hogaza de pan. Coloque
la hogaza en un molde engrasado para hogaza de 9x5 pulgadas (23x13x6 cm) y
deje que se expanda hasta que se duplique su tamaño, cerca de 1 hora. Hornee a
350ºF (180ºC) por 40 minutos.
1
1
⁄2 cucharada (20 ml) de azúcar
1 cucharadita (5 ml) de sal
3 a 31⁄2 tazas (750 a 875 ml) de harina
para uso general
840129200 Sv01.qxd 7/6/04 9:00 AM Page 46
Page 47

47
Lasaña de verduras
8 onzas (225 g) de queso mozzarella
magro
1 cebolla mediana, pelada
4 dientes de ajo
4 a 6 onzas (115 a 170 g) de
champiñones frescos
1 cucharadita (5 ml) de aceite vegetal
2 calabacitas de unas 6 pulgadas
(15 cm) cada una
2 onzas (50 g) de queso parmesano
Usando el disco rebanador/rallador, con el lado rallador hacia arriba, ralle la mozzarella.
Colóquela en un tazón pequeño y déjela a un lado. Usando la cuchilla para picar/
mezclar, coloque la cebolla y los dientes de ajo en el tazón de procesamiento. Pulse
hasta que queden picados en trozos no muy pequeños. Agregue los champiñones al
tazón. Continúe pulsando hasta que los champiñones estén picados en trozos no muy
pequeños. Coloque las verduras picadas en una sartén grande con aceite sobre fuego
mediano. Usando la cuchilla para picar/mezclar, coloque la calabacita en el tazón de
procesamiento. Pulse hasta que esté picada en trozos no muy pequeños. Agregue la
calabacita a la sartén. Cocine hasta que se ablande, unos 10 minutos; y déjela a un
lado. Sin lavar el tazón de procesamiento y usando la cuchilla para picar/mezclar,
coloque los trozos de queso parmesano en el tazón y procese a graduación Alta hasta
que quede picado en trozos no muy pequeños. Agregue el queso crema, la ricota, la
crema agria, el huevo y los condimentos italianos y procese hasta que la mezcla esté
cremosa, entre 30 y 40 segundos. Engrase una fuente de hornear de 9x13 pulgadas
(33x23 cm). Coloque una capa con la mitad de los fideos, de la mezcla de queso
crema, de la mezcla de verduras picadas y de salsa para espagueti. Repita las capas
una vez. Espolvoree con mozzarella. Hornee, cubierto a 350° F (180ºC) durante 25 minutos. Destape y cocine 10 minutos más. Deje reposar por 10 minutos antes de servir.
Se obtienen 8 porciones.
NOTA: La mozzarella se ralla con mayor facilidad si se coloca en el congelador por
una hora antes de rallar.
Filetes crujientes de bagre
21⁄2 onzas (75 ml) de queso parmesano
(1⁄2 taza [125 ml], rallado)
20 galletitas de manteca tipo Ritz o
Townhouse
Corte el queso en cubitos de 1⁄2 pulgada (1 cm). Usando la cuchilla para picar/
mezclar, coloque los cubitos de queso, las galletitas y el perejil en el tazón de
procesamiento. Procese hasta que queden bien molidos. Coloque la mezcla de
galletitas en una fuente grande. Sumerja los filetes en la mantequilla y luego en
la mezcla de galletitas para cubrirlos. Coloque los filetes en una asadera
antiadherente o revestida con papel de aluminio. Hornee a 400°F (205ºC) entre
15 y 20 minutos. Se obtienen 4 porciones.
1 paquete de 8 onzas (225 g) de queso
crema magro
3
⁄4 taza (175 ml) de queso ricota magro
1
⁄2 taza (125 ml) de crema agria magra
1 huevo
2 cucharaditas (10 ml) de condimento
italiano deshidratado
1 lata de 26 onzas (735 g) de salsa
para espagueti
6 fideos para lasaña, cocidos
1
⁄3 taza (80 ml) de ramitos de perejil fresco
1
⁄4 taza (60 ml) de mantequilla derretida
4 filetes de bagre de unas 8 onzas (225 g)
cada uno
840129200 Sv01.qxd 7/6/04 9:00 AM Page 47
Page 48

48
Cobertura:
1
⁄2 taza (125 ml) de mantequilla derretida
1 taza (250 ml) de harina
1 taza (250 ml) de azúcar
1 cucharadita (5 ml) de canela
1 cucharadita (5 ml) de vainilla
1 cucharada (15 ml) de mantequilla o
margarina derretida
1
1
⁄2 tazas (375 ml) de azúcar
3 rodajas de piña, escurridas
Manzanas crujientes
6 manzanas doradas deliciosas
grandes peladas y sin corazón
(6 tazas [1,5 L] de rebanadas)
1 cucharada (15 ml) jugo de limón
1
⁄2 taza (125 ml) de azúcar
1 cucharada (15 ml) de harina
1 cucharadita (5 ml) de canela
1
⁄4 cucharadita (1,25 ml) de nuez moscada
Usando el disco rebanador/rallador con el lado rebanador hacia arriba, rebane las
manzanas. Coloque las manzanas en un tazón grande. Rocíe el jugo de limón sobre
las manzanas. Espolvoree las manzanas con el azúcar, harina, canela y nuez moscada. Revuelva para mezclar, luego coloque las manzanas en un plato para hornear de 2
cuartos de galón (2 L) sin engrasar. Usando la cuchilla para picar/mezclar, coloque los
ingredientes de cobertura en el tazón de preparación y pulse hasta que se mezcle.
Desmenuce la cobertura sobre las manzanas. Hornee a 375°F (190°C) por 30 minutos.
Sírvalo cubierto con helado de vainilla. Se obtienen 6 porciones.
Budín de pan horneado con piñas
12 rebanadas de pan blanco,
en tiras para que pasen por
la tolva de alimentos
1 lata de 20 onzas (565 g) de trozos
de piña, escurridos
2 huevos
1 taza (250 ml) de crema
“medio y medio”
Introduzca la cuchilla para picar/mezclar en el tazón del procesador de alimentos.
Luego, con el procesador en marcha, deje caer el pan por la tolva de alimentos
para hacer pan molido blando. Vierta en una cacerola engrasada de 2 cuartos (2 L)
de galón. Coloque los trozos de piña en el tazón del procesador de alimentos con
la cuchilla para picar/mezclar. Procese la piña unos 20 segundos. Agregue huevos,
crema, vainilla, mantequilla o margarina derretida y azúcar. Procese hasta que
estén mezclados. Vierta la mezcla de piña sobre el pan molido blando. Adorne con
los tres anillos de piña superpuestos en el centro. Hornee a 350°F (180ºC) por 1
hora o hasta que esté dorado. Se obtienen 8 porciones.
840129200 Sv01.qxd 7/6/04 9:00 AM Page 48
Page 49

49
Pastel de queso con chispas de chocolate
Relleno:
3 paquetes de 8 onzas (750 ml) de
queso crema cortado en trozos
1 taza (250 ml) de azúcar
2 cucharadas (30 ml) de harina
4 huevos
1
⁄4 taza de (60 ml) leche
1 cucharadita (5 ml) de vainilla
1
⁄2 taza (125 ml) de chispas de chocolate
Pasta: Use 1 cucharadita (5 ml) de mantequilla para engrasar un molde desmoldable
de 9 a 91⁄2 pulgadas (23 cm) y póngalo a un lado. Con la cuchilla para picar/mezclar y
con el procesador en marcha, deje caer las galletas por la tolva de alimentos y procese
hasta que se muelan homogéneamente. Continúe procesando y agregue la mantequilla
derretida por la tolva de alimentos hasta mezclar. Vierta las galletas molidas en el molde
desmoldable preparado y presione de forma homogénea en el fondo del molde.
Hornee a 425ºF (220ºC) por 10 minutos. Saque del horno y deje enfriar en una rejilla.
Relleno: Con la cuchilla para picar/mezclar, agregue el queso crema, azúcar, harina,
huevos, leche y vainilla en el tazón para procesar. Procese hasta que no haya grumos.
Vierta el relleno sobre la pasta fría y espolvoree con chispas de chocolate. Hornee 15
minutos a 425ºF (220ºC). Reduzca la temperatura a 250ºF (120ºC) y continúe horneando (sin abrir la puerta del horno) por 45 minutos más o hasta que el pastel de queso
esté listo. Cuando esté frío, tape y refrigere por varias horas o durante la noche. Rinde
16 porciones.
Consejo de cocina: Para un pastel de queso con textura cremosa y suave, hornee a
baño maría. Corte una hoja de papel aluminio que se extienda unas 6 pulgadas (15
cm) más que el molde desmoldable. Coloque el molde desmoldable en el centro del
papel aluminio y moldee hacia arriba las orillas del papel aluminio. Esto evita que el
agua llegue al molde. Coloque el molde desmoldable en un molde más grande y llene
este último con unas 11⁄2 pulgadas (3,5 cm) de agua caliente del grifo. Hornee según
las instrucciones.
Galletas azucaradas suaves
2
⁄3
taza (150 ml) de manteca
1
⁄3 taza (80 ml) de margarina
11⁄2 tazas (375 ml) de azúcar
1 cucharadita (5 ml) de vainilla
1 taza (250 ml) de crema agria*
2 huevos
Con la cuchilla para picar/mezclar, haga cremosa la manteca, margarina y
11⁄2 taza (375 ml) de azúcar. Agregue la vainilla, crema agria y huevos. Mezcle
hasta que no haya grumos. Añada el harina, sal, bicarbonato de soda, polvo para
hornear y nuez moscada. Procese a la velocidad más alta hasta que no haya
grumos. Refrigere la masa por 15 minutos o durante la noche. En una superficie
enharinada, pase el rodillo por la masa hasta que tenga 1⁄2 pulgada (1 cm) de
grosor. Corte en las formas deseadas. Espolvoree las galletas con la mezcla de
2 cucharadas (30 ml) de azúcar y 1 cucharadita (5 ml) de nuez moscada. Hornee
en un molde para galletas engrasado a 450ºF (230ºC) por 8 a 10 minutos. Rinde
36 galletas.
*Puede sustituir la crema agria por yogur natural magro para una versión reducida
en grasa.
Pasta:
1 cucharadita (5 ml) de mantequilla,
ablandada
22 galletas con chispas de chocolate
3 a 4 cucharadas (45 a 60 ml) de man-
tequilla sin sal, derretida
4 tazas (1 L) de harina
1
⁄2 cucharadita (2,5 ml) de sal
1 cucharadita (5 ml) bicarbonato de soda
1 cucharadita (5 ml) de polvo para hornear
1 cucharadita (5 ml) de nuez moscada
2 cucharadas (30 ml) de azúcar
840129200 Sv01.qxd 7/6/04 9:00 AM Page 49
Page 50

50
Grupo HB PS, S.A. de C.V.
Monte Elbruz No. 124 Int. 601
Col. Palmitas Polanco
México, D.F. C.P. 11560
Tel. 52 82 31 05 y 52 82 31 06
Fax. 52 82 3167
PRODUCTO:
MARCA:
Hamilton Beach: ❏
Proctor-Silex: ❏
MODELO:
Hamilton Beach/Proctor-Silex cuenta con una Red de Centros de Servicio Autorizada, por favor consulte en la
lista anexa el nombre y dirección de los establecimientos en la República Mexicana en donde usted podrá hacer
efectiva la garantía, obtener partes, componentes, consumibles y accesorios; así como también obtener servicio
para productos fuera de garantía.
Para mayor información llame sin costo:
Centro de Atención al consumidor: 01 800 71 16 100
Grupo HB PS, S.A. de C.V. le otorga a partir de la fecha de compra:
GARANTÍA DE 1 AÑO.
• Esta garantía ampara, todas las piezas y componentes del producto que resulten con defecto de fabricación incluyendo la
mano de obra.
•
Grupo HB PS, S.A. de C.V. se obliga a reemplazar, reparar o reponer, cualquier pieza o componente defectuoso;
proporcionar la mano de obra necesaria para su diagnóstico y reparación, todo lo anterior sin costo adicional para el
consumidor.
• Esta garantía incluye los gastos de transportación del producto que deriven de su cumplimiento dentro de su red de servicio.
LIMITACIONES
• Esta garantía no ampara el reemplazo de piezas deterioradas por uso o por desgaste normal, como son: cuchillas, vasos,
jarras, filtros, etc.
• Grupo HB PS, S.A. de C.V. no se hace responsable por los accidentes producidos a consecuencia de una instalación
eléctrica defectuosa, ausencia de toma de tierra, clavija de enchufe en mal estado, etc.
COBERTURA
PÓLIZA DE GARANTÍA
EXCEPCIONES
Esta garantía no será efectiva en los siguientes casos:
a) Cuando el producto se hubiese utlizado en condiciones distintas a las normales. (Uso industrial, semi-industrial o
comercial.)
b) Cuando el producto no hubiese sido operado de acuerdo con el instructivo de uso.
c) Cuando el producto hubiese sido alterado o reparado por personas no autorizadas por Grupo HB PS, S.A. de C.V.
el fabricante nacional, importador o comercializador responsable respectivo.
El consumidor puede solicitar que se haga efectiva la garantía ante la propia casa comercial donde adquirió su producto,
siempre y cuando Grupo HB PS, S.A. de C.V. no cuente con talleres de servicio.
PROCEDIMIENTO PARA HACER EFECTIVA LA GARANTÍA
• Para hacer efectiva la garantía no deben exigirse mayores requisitos que la presentación del producto y la póliza
correspondiente, debidamente sellada por el establecimiento que lo vendió.
• Para hacer efectiva la garantía, lleve su aparato al Centro de Servicio Autorizado más cercano a su domicilio (consulte la
lista anexa).
• Si no existe Centro de Servicio Autorizado en su localidad siga las siguientes instrucciones:
1. Empaque su producto adecuadamente para que no se dañe durante el translado.
2. Anote claramente sus datos y los del Centro de Servicio al que está enviando el producto.
3. No incluya partes sueltas ni accesorios para evitar su pérdida.
• El tiempo de reparación, en ningún caso será mayor de 30 días naturales contados a partir de la fecha de recepción del
producto en nuestros Centros de Servicio Autorizados.
• En caso de que el producto haya sido reparado o sometido a mantenimiento y el mismo presente deficiencias imputables
al autor de la reparación o del mantenimiento dentro de los treinta días naturales posteriores a la entrega del producto al
consumidor, éste tendrá derecho a que sea reparado o mantenido de nuevo sin costo alguno. Si el plazo de la garantía es
superior a los treinta días naturales, se estará a dicho plazo.
• El tiempo que duren las reparaciones efectuadas al amparo de la garantía no es computable dentro del plazo de la
misma. Cuando el bien haya sido reparado se iniciará la garantía respecto de las piezas repuestas y continuará con
relación al resto. En el caso de reposición del bien deberá renovarse el plazo de la garantía.
840129200 Sv01.qxd 7/6/04 9:00 AM Page 50
Page 51

51
RED DE CENTROS DE SERVICIO AUTORIZADA
GRUPO HB PS, S.A. DE C.V.
Distrito Federal
ELECTRODOMÉSTICOS
Av. Plutarco Elias Cailes No. 1499
Zacahuitzco MEXICO 09490 D.F.
Tel: 01 55 5235 2323
Fax: 01 55 5243 1397
CASA GARCIA
Av. Patriotismo No. 875-B
Mixcoac MEXICO 03910 D.F.
Tel: 01 55 5563 8723
Fax: 01 55 5615 1856
Nuevo Leon
FERNANDO SEPULVEDA REFACCIONES
Ruperto Martínez No. 238 Ote.
Centro MONTERREY, 64000 N.L.
Tel: 01 81 8343 6700
Fax: 01 81 8344 0486
Jalisco
REF. ECONÓMICAS DE OCCIDENTE,
S.A. DE C.V.
Garibaldi No. 1450
Ladrón de Guevara
GUADALAJARA 44660 Jal.
Tel: 01 33 3825 3480
Fax: 01 33 3826 1914
Chihuahua
DISTRIBUIDORA TURMIX
Av. Paseo Triunfo de la Rep. No. 5289 Local 2 A.
Int. Hipermart
Alamos de San Lorenzo
CD. JUAREZ 32340 Chih.
Tel: 01 656 617 8030
Fax: 01 656 617 8030
DÍA___ MES___ AÑO___
Si desea hacer comentarios o sugerencias con respecto a nuestro servicio o tiene
alguna queja derivada de la atención recibida en alguno de nuestros Centros de
Servicio Autorizados, por favor dirigirse a:
GERENCIA INTERNACIONAL DE SERVICIO
(DIMALSA)
Prol. Av. La Joya s/n. Esq. Av. San Antonio
Col. El Infiernillo C.P. 54878
Cuautitlán, Edo de México
Tel. (55) 58 99 62 42 • Fax. (55) 58 70 64 42
Centro de Atención al consumidor: 01 800 71 16 100
840129200 Sv01.qxd 7/6/04 9:00 AM Page 51
Page 52

52
7/04
840129200
HAMILTON BEACH PROCTOR-SILEX,INC.
P
ROCTOR-SILEX CANADA,INC.
263 Yadkin Road, Southern Pines, NC 28387
Picton, Ontario K0K 2T0
hamiltonbeach.com • proctorsilex.com
hamiltonbeach.com.mx • proctorsilex.com.mx
840129200 Sv01.qxd 7/6/04 9:00 AM Page 52
 Loading...