

Hamilton Beach 70450 Use & Care Manual

Food Processor
Robot culinaire
Procesador de alimentos
840122301
English............................................ 2
USA: 1-800-851-8900
Français........................................ 1 4
Canada : 1-800-267-2826
Español ........................................ 26
México: 01 800 71 16 100
Le invitamos a leer cuidadosam
ente este instructivo antes de
usar su aparato.
840122301 ENv02.qxd:840122300 Ev03.qxd 1/19/10 3:58 PM Page 1

IMPORTANT SAFEGUARDS
SAVE THESE INSTRUCTIONS!
When using electrical appliances, basic
safety precautions should always be
followed, including the following:
1. Read and save all instructions.
2. To protect against risk of electrical
shock, do not immerse base, motor,
cord, or plug in water or other liquid.
3. Close supervision is necessary when any
appliance is used by or near children.
4. This appliance should not be used by
children.
5. Unplug cord from outlet when not in
use, before putting on or taking off
parts, and before cleaning.
6. Avoid contacting moving parts.
7. Do not operate any appliance with
a damaged cord or plug or after the
appliance malfunctions or is dropped
or damaged in any manner. Call our
toll-free customer service number for
information on examination, repair, or
electrical or mechanical adjustment.
8. The use of attachments not recom-
mended or sold by the appliance
manufacturer may cause fire, electric
shock, or injury.
9. Do not use your food processor if any
part is broken.
10. Do not use the appliance outdoors.
11. Do not let cord hang over edge of table
or counter, or touch hot surfaces.
12. Never feed food into food chute by
hand when slicing or shredding food.
Always use food pusher.
13. The blade and disc are sharp. Handle
carefully. Store out of reach of children.
14. Make sure the blade or disc has come
to a full stop before removing cover.
15. Be certain cover is securely locked in
place before operating appliance.
16. To reduce the risk of injury, never place
cutting blade or disc on base without
first putting bowl properly in place.
17. Keep hands and utensils away from
moving blade and disc while processing
food to reduce the risk of severe
personal injury and/or damage to the
food processor. A rubber scraper may
be used but ONLY when the food
processor is not running.
18. Do not attempt to defeat the cover
interlock mechanism.
19. To reduce the risk of injury, be sure to
insert or remove blade and disc using
hubs provided for this purpose. Use
caution when removing blade and disc
from the bowl, when emptying the bowl,
and when cleaning.
20. Be sure to turn switch to the OFF (O)
position after each use. Always use the
pusher to clear the food chute. When
this method is not possible, turn the
motor off and disassemble unit to
remove the remaining food.
21. The appliance is not intended for com-
mercial, professional, or industrial use.
It is designed and built exclusively for
domestic use only.
22. Never use appliance for a longer period
or with a larger amount of ingredients
than that recommended by the appliance manufacturer.
23. The maximum rating of this unit is
based on using the chopping/mixing
blade. Using the slicing/shredding disc
may draw significantly less power.
24. Do not place on or near a hot gas or
electric burner or in a heated oven.
25. Do not use appliance for other than
intended use.
2
840122301 ENv02.qxd:840122300 Ev03.qxd 1/19/10 3:58 PM Page 2

3
Consumer Safety Information
This appliance is intended for household
use only.
WARNING! Shock Hazard: This appliance
has a polarized plug (one wide blade) that
reduces the risk of electric shock. The plug
fits only one way into a polarized outlet. Do
not defeat the safety purpose of the plug by
modifying the plug in any way or by using
an adapter. If the plug does not fit, reverse
the plug. If it still does not fit, have an electrician replace the outlet.
The length of the cord used on this appliance
was selected to reduce the hazards of
becoming tangled in or tripping over a
longer cord. If a longer cord is necessary,
an approved extension cord may be used.
The electrical rating of the extension cord
must be equal to or greater than the rating
of the appliance. Care must be taken to
arrange the extension cord so that it will not
drape over the countertop or tabletop
where it can be pulled on by children or
accidentally tripped over.
WATTAGE/PEAK POWER INFORMATION
The marked rating of the food processor is
determined by Underwriters Laboratories as
the maximum stabilized power consumption
of the food processor at high speed under a
loaded condition.
Peak power is an average of the maximum
wattage a food processor may consume
during initial operation at high speed.
Before First Use
Unpack food processor. Handle chopping/
mixing blade and slicing/shredding disc
carefully; they are very sharp. Wash all parts
except base in hot, soapy water. Rinse;
then dry. These parts may also be washed
in a dishwasher.
840122301 ENv02.qxd:840122300 Ev03.qxd 1/19/10 3:58 PM Page 3
Hints!
• The bowl will hold 8 cups (1.9 L) of dry
ingredients or 2 cups (500 ml) of liquid.
Do not overfill.
• Do not use your food processor to crush ice.
• For consistent texture, foods should be cut
into 1-inch (2.5-cm) cubes before mincing or
chopping with the chopping/mixing blade.
• Do not use your food processor to make
bread or cookie dough.
4
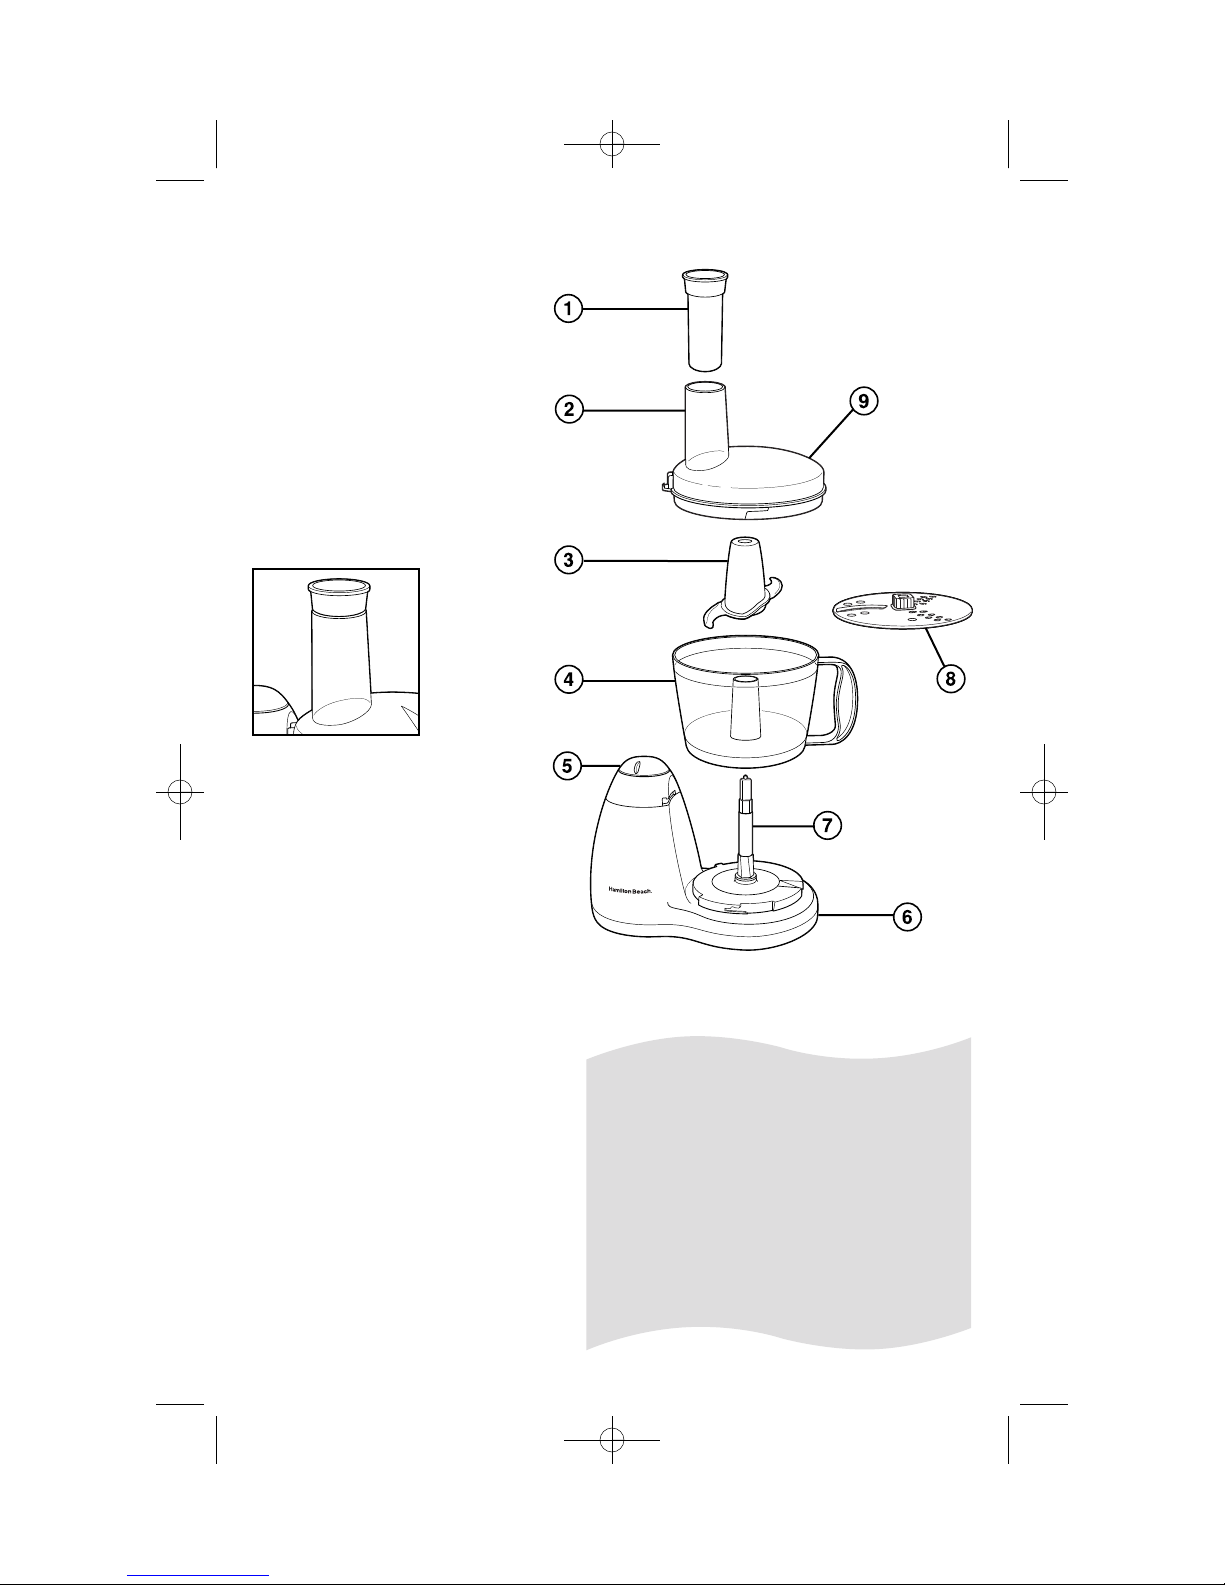
1. Food Pusher
2. Food Chute
3. Chopping/Mixing Blade
4. Bowl
5. Rotary Switch
6. Base
7. Motor Shaft
8. Reversible Slicing/Shredding Disc
9. Lid
Parts and Features
Food Pusher in
Food Chute
840122301 ENv02.qxd:840122300 Ev03.qxd 1/19/10 3:58 PM Page 4
5
Using Your Food Processor
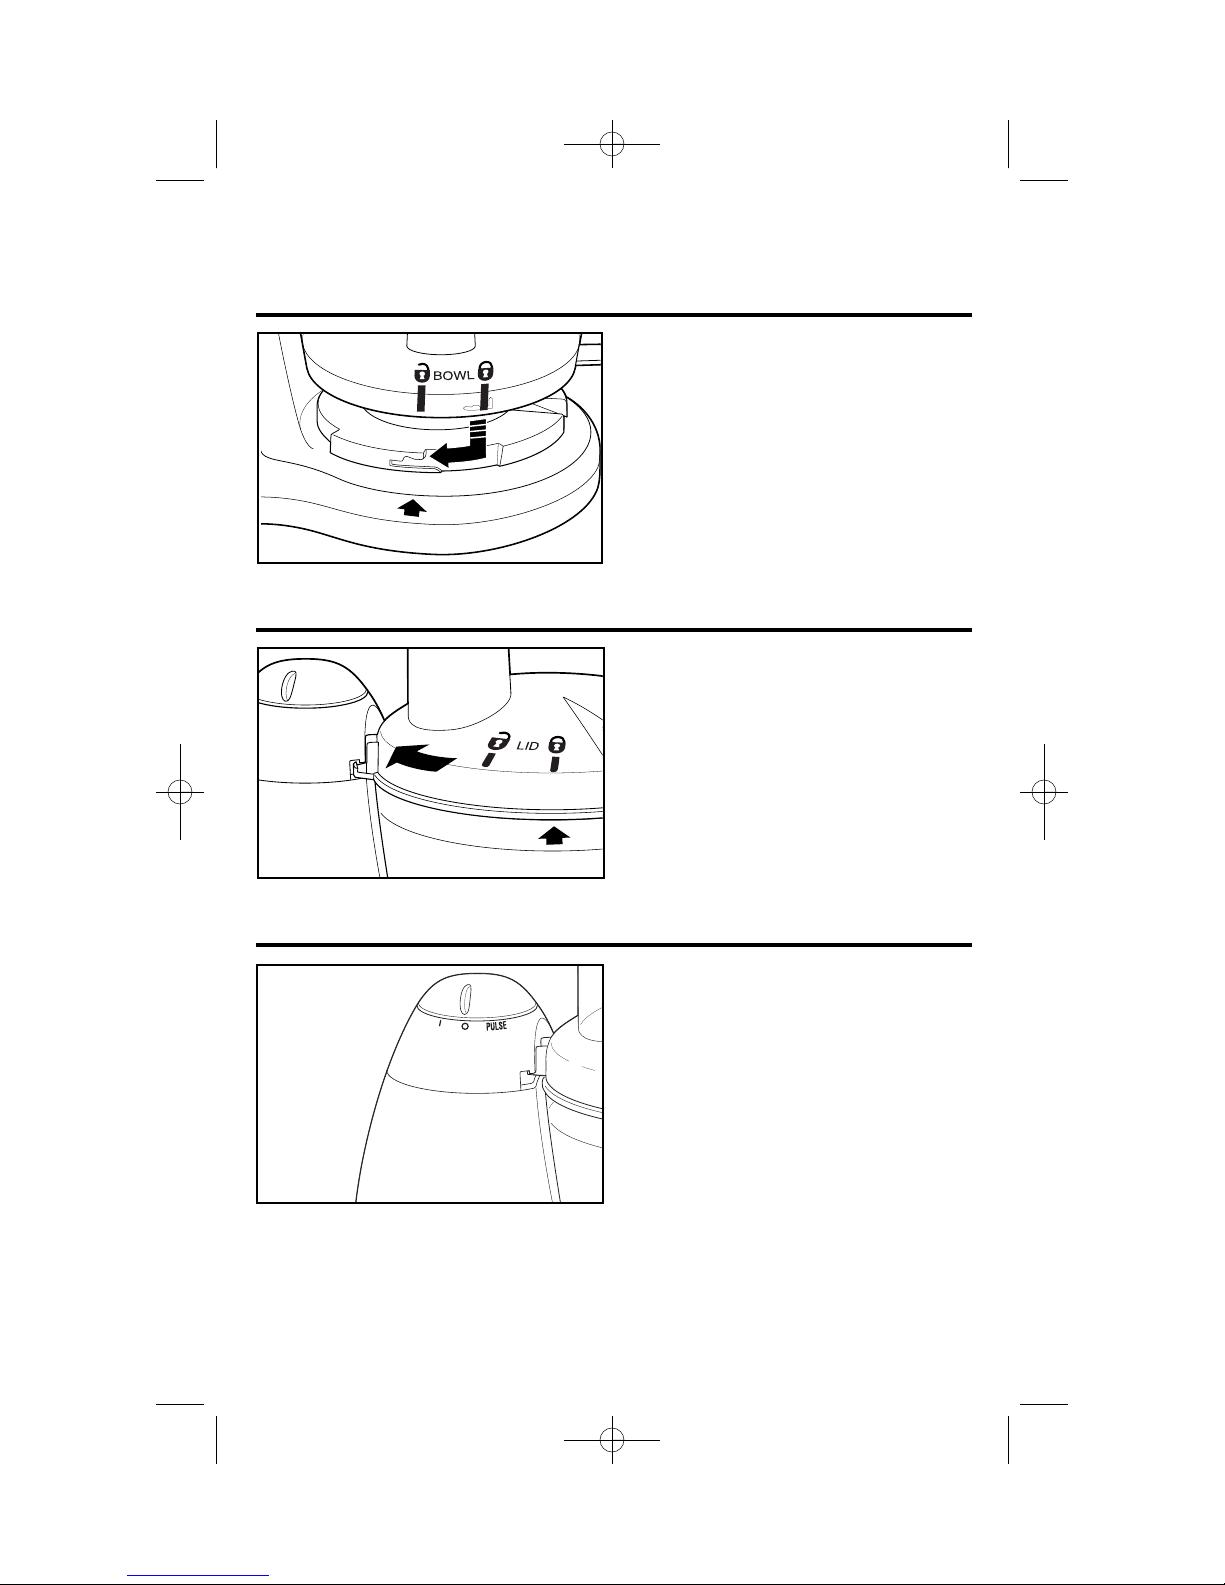
How to Lock the Bowl
Align base and bowl as illustrated. Turn
bowl clockwise until it locks into place.
NOTE: The food processor will not
work unless the bowl is locked into
position.
How to Operate the Controls
The control is conveniently located on
top of the base. Rotate the knob to
select PULSE or ON (I). The processor
will run continuously when set to ON.
For instant on and off control, use the
PULSE setting.
How to Lock the Cover
Align cover as illustrated. Place cover
on bowl and turn clockwise until it
locks into place.
NOTE: The food processor will not
work unless the cover is locked into
position.
840122301 ENv02.qxd:840122300 Ev03.qxd 1/19/10 3:58 PM Page 5

Processing Using Chopping/Mixing Blade
The chopping/mixing blade can be
used to coarsely chop, finely mince,
mix, or puree food to a smooth
consistency.
1. Make sure the control switch is turned
to OFF (O) and the unit is unplugged.
2. Lock the bowl onto base. (See “How
to Lock the Bowl” on page 5.)
3. Place the chopping/mixing blade
onto motor shaft of food processor in
center of bowl. Turn slowly until blade
drops into place. Handle carefully:
the blade is sharp.
4. Lock cover onto bowl. (See “How to
Lock the Cover” on page 5.) Insert
food pusher into food chute.
5. Plug in unit and process food.
The processing time will determine
the finished consistency of the food.
The Pulse setting can help you avoid
overprocessing.
WARNING! Cut Hazard: Always use
food pusher to feed food into the chute.
Never push food through chute with
hands or fingers. Wait until blade has
stopped spinning before removing
cover.
Chopping/
Mixing Blade
Motor
Shaft
6
840122301 ENv02.qxd:840122300 Ev03.qxd 1/19/10 3:58 PM Page 6

7
Processing Using Slicer/Shredder Disc
• To slice or shred cheese, select firm
cheese like cheddar, Monterey Jack,
or Swiss. Place cheese in freezer for
30 minutes before processing.
• The reversible slicer/shredder disc
has a slicing blade on one side and
shredding teeth on the other. Place
on motor shaft with desired cutting
edge facing up.
• To julienne vegetables, slice, remove
from bowl, and restack the vegetables.
Pack into food chute with slices vertical.
Slice again to make matchstick-cut
vegetables.
1. Make sure the control switch is turned
to OFF (O) and the unit is unplugged.
2. Lock the bowl onto base. (See “How
to Lock the Bowl” on page 5.)
3. Put slicer/shredder disc on motor
shaft with the desired side facing up
for either slicing or shredding. Handle
carefully: the blade is sharp. Lock
cover onto bowl. (See “How to Lock
the Cover” on page 5.)
4. Cut food to fit food chute. Pack food
chute tightly with food. Insert food
pusher in chute.
WARNING! Cut Hazard: Always use
food pusher to feed food into the
chute. Never push food through
chute with hands or fingers.
5. Plug in unit and process food.
6. While pressing on food pusher, select
ON (I) or PULSE to process food.
7. When food chute is empty, select
OFF (O) or release from PULSE
position.
WARNING! Cut Hazard: Wait until
blade has stopped spinning before
removing cover.
Slicer/Shredder
Disc
Motor
Shaft
840122301 ENv02.qxd:840122300 Ev03.qxd 1/19/10 3:58 PM Page 7
8
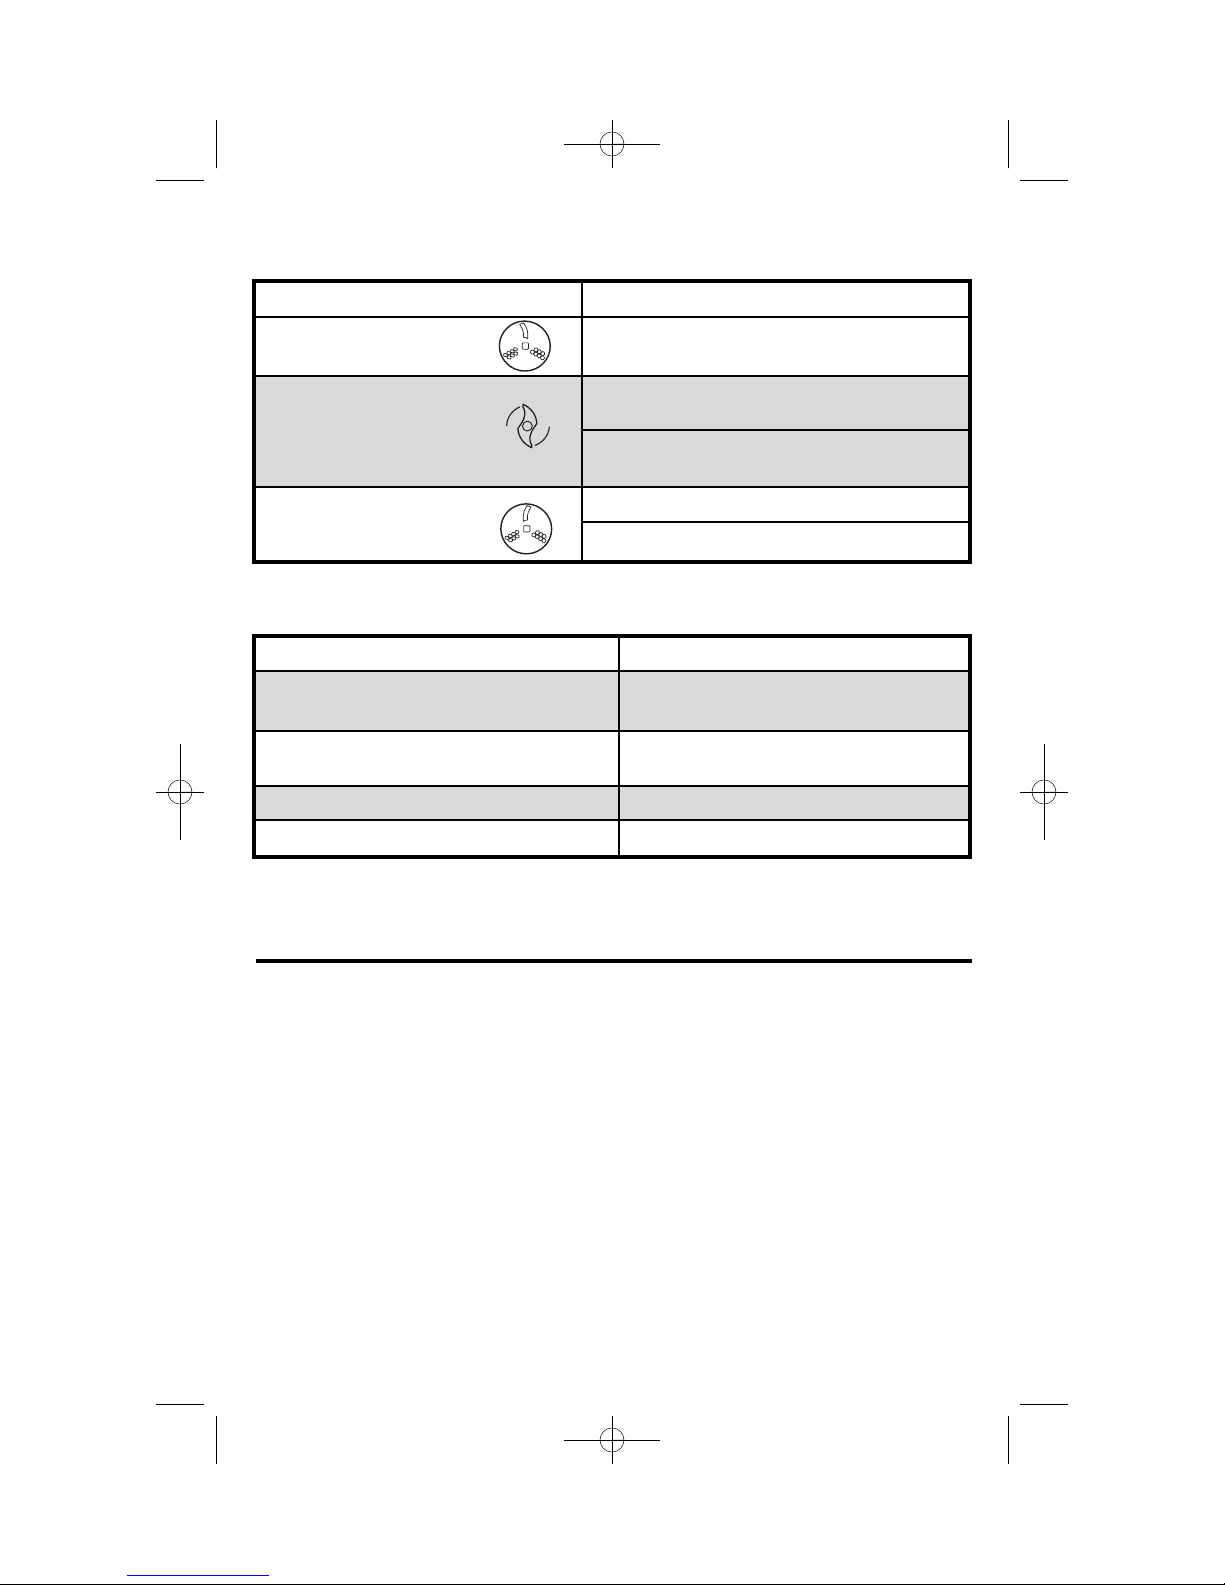
Food Processing Charts
ATTACHMENT FOODS
Slicer Disc
Cucumbers, apples, mushrooms,
vegetables, potatoes, cabbage
Chopping/Mixing Blade Chop nuts; mince vegetables, fruit,
mushrooms, carrots
Chop cooked meat, puree food,
grate cheese
S
hredder Disc
Vegetables, cabbage
Firm cheeses
(slicing blade facing up)
(shredding teeth facing up)
FOOD MAXIMUM AMOUNT
Fruits and vegetables
1 pound or 2 to 3 cups
(450 g or 500 to 750 ml)
Meats (cooked) 12 ounces or 11⁄2 cups, cubed
(350 g or 375 ml)
Parmesan or Romano cheese 5 ounces (140 g), cubed
Cheddar, Jack, or Mozzarella cheese 8 ounces (225 g), cubed
For best results do not exceed the following amounts when chopping, mincing,
or pureeing with the Chopping/Mixing Blade.
Processing Tips and Techniques
• For a uniform consistency when
chopping, leave room in the bowl for
the food to be tossed around.
• Also for a more uniform consistency,
start with pieces of food that are
similar in size. Carrots, for example,
should all be cut in 1-inch (2.5-cm)
chunks. Do not process 4-inch (10cm) pieces with
1
⁄2-inch (1-cm) pieces.
• This food processor is excellent to
chop, mix, slice, or shred most
foods. However, to maintain peak
performance, do not use your food
processor for the following: grinding
grain, coffee beans, or spices; slicing
frozen meat; or crushing ice.
• Do not puree or mash starchy
vegetables like potatoes. They will
be overprocessed in a second and
turn gummy.
• Operating time will depend on quantity
of food being processed. Most foods
can be sliced, chopped, or shredded
in seconds. Do not operate processor
for more than 1 minute at a time. If
processing large quantities, let the
processor rest about 1 minute before
continuing.
• Do not make bread dough or cookie
dough in this food processor. It may
damage the unit.
840122301 ENv02.qxd:840122300 Ev03.qxd 1/19/10 3:58 PM Page 8

9
Hummus
2 cloves garlic
2 green onions, white portion and
half of green top
15-ounce (425-g) can garbanzo beans
(chick peas), drained
1
⁄4 cup (60 ml) tahini (sesame paste),
stirred
3 to 4 tablespoons (45 to 60 ml) lemon
or lime juice
Using chopping/mixing blade and with processor running, drop garlic cloves and
onion into food chute. Then add garbanzo beans, tahini, lemon or lime juice, olive
oil, cumin, cayenne, salt, and pepper. Continue to process until smooth, scraping
bowl as needed. Place into serving bowl and garnish with paprika. Serve with pita
bread and/or vegetables. To store, refrigerate. Makes about 2 cups (500 ml).
Salsa
1 onion, peeled and quartered
1 clove garlic
1 hot pepper (jalapeno or finger hot),
cored, seeded, and quartered
4 tomatoes, quartered
Using chopping/mixing blade and with processor running, drop onion, garlic
clove, and hot pepper through the food chute and chop until finely minced. Stop
processor. Add tomatoes, cilantro, cumin, lime juice, salt, and pepper. Pulse until
desired texture. Add hot sauce if desired. Makes 2 to 3 cups (500 to 750 ml).
Recipes
2 teaspoons (10 ml) olive oil
1
⁄4 teaspoon (1.25 ml) cumin
Dash cayenne
Salt and pepper to taste
Dash paprika
Pita bread or cut-up vegetables, optional
1
⁄4 cup (60 ml) cilantro, packed
1
⁄2 teaspoon (2.5 ml) cumin
1 tablespoon (15 ml) lime juice
Salt and pepper to taste
Hot sauce, optional
Cleaning
1. Wash the bowl, lid, chopping/mixing
blade, slicing/shredding disc, and
food pusher in hot, soapy water.
Rinse and dry thoroughly. These
parts may also be washed in a
dishwasher.
NOTE: Do not store the food
processor with the lid on the locked
position, since this may put strain on
the interlock tab.
2. Wipe the base, controls, and cord
with a damp cloth or sponge. To
remove stubborn soil, use a mild
nonabrasive cleanser.
3. To store, place bowl on base. Then
place the chopping/mixing blade
or slicing/shredding disc onto the
motor shaft. Place lid on bowl but
do not lock.
Electrical Shock Hazard. Disconnect power before cleaning.
Do not immerse cord, plug, or base in any liquid. Failure to
follow these instructions can result in death or electrical shock.
w WARNING
840122301 ENv02.qxd:840122300 Ev03.qxd 1/19/10 3:58 PM Page 9

10
Potato Leek Soup
3 pounds (1.35 kg) potatoes, peeled
3 to 4 leeks, both root and
leaf ends trimmed
8 ounces (225 g) bacon
2 quarts (2 L) water
Using slicer/shredder disc, slicing side up, slice potatoes. Remove to large mixing
bowl and cover with cold water. Set aside. Slice leeks. To clean leeks, place in a
colander and toss gently under running water. In a soup pot or Dutch oven, cook
bacon until crisp. Remove bacon and set aside. Add the leeks to the bacon grease
in the pot. Cook and stir occasionally over medium heat for about 10 minutes.
Increase heat to high and add water, potatoes, salt, and pepper. Bring soup to a
boil; then reduce heat and simmer, uncovered, for 15 to 20 minutes. In a small bowl,
whisk together milk with flour. Slowly stir milk mixture into simmering soup and
simmer for 5 minutes. Garnish with crumbled bacon bits. Makes 6 to 8 servings.
Lentil Soup
1
⁄2 pound (225 g) bacon
1 large onion
6 parsnips, peeled, ends removed,
cut into 1-inch (2.5-cm) pieces
8 celery ribs with leaves
6 carrots, ends removed
In a soup pot or Dutch oven, cook bacon until crisp. Remove and reserve 4 slices
of bacon to be used as garnish. Leave bacon drippings in pot. Using chopping/
mixing blade, chop onions and parsnips. Add chopped onions and parsnips to
bacon drippings in pot and cook over medium heat until softened, about 7 minutes.
Using slicer/shredder disc, slicing side up, slice celery and carrots. Add the celery,
carrots, lentils, water, bay leaf, and salt to onion mixture. Bring to boil; then reduce
heat and simmer, covered, for 40 minutes. At serving time, garnish with sour
cream and crumbled bacon. Makes 8 servings.
NOTE: Lentils do not need to be soaked overnight.
11⁄2 teaspoons (7.5 ml) salt
1
⁄4 teaspoon (1.25 ml) pepper
1
⁄2 cup (125 ml) milk
3 tablespoons (45 ml) flour
16-ounce (450-g) bag lentils
2 quarts (2 L ) water
1 bay leaf
1 teaspoon (5 ml) salt
Sour cream, optional
840122301 ENv02.qxd:840122300 Ev03.qxd 1/19/10 3:58 PM Page 10

11
Vegetable Lasagna
8 ounces (225 g) reduced-fat
mozzarella cheese
1 medium onion, peeled, cut into chunks
4 garlic cloves
4–6 ounces (115 to 170 g) fresh
mushrooms
1 teaspoon (5 ml) vegetable oil
2 zucchini, approximately 6 inches
(15 cm) each, cut into chunks
2 ounces (50 g) Parmesan cheese,
cut into 1⁄2-inch (1-cm) chunks
(about 1⁄3 cup [80 ml] grated)
Using slicer/shredder disc, shredding side up, shred mozzarella. Place in a small
bowl and set aside. Using chopping/mixing blade, place onion and garlic cloves
into work bowl. Pulse until coarsely chopped. Add mushrooms to bowl. Continue
to pulse until mushrooms are coarsely chopped. Place chopped vegetables in a
large skillet with oil, over medium heat. Using chopping/mixing blade, place zucchini in work bowl. Pulse until coarsely chopped. Add zucchini to skillet. Cook
until tender, about 10 minutes; set aside. Without washing the work bowl, using
chopping/mixing blade, place Parmesan cheese chunks in bowl and process until
coarsely chopped. Add the cream cheese, ricotta cheese, sour cream, egg, and
Italian seasonings and process until creamy, about 30 to 40 seconds. Grease a
9- x 13-inch (23- x 33-cm) baking dish. Layer half each of noodles, cream cheese
mixture, chopped vegetable mixture, and spaghetti sauce. Repeat layers once.
Sprinkle with mozzarella. Bake, covered, at 350ºF (180ºC) for 25 minutes. Uncover
and cook an additional 10 minutes. Let stand 10 minutes before serving. Makes 8
servings.
NOTE: Mozzarella cheese will shred easier if placed in freezer for one hour before
shredding.
8-ounce (225-g) package light cream
cheese, cut into chunks
3
⁄4 cup (175 ml) skim milk ricotta cheese
1
⁄2 cup (125 ml) light sour cream
1 egg
2 teaspoons (10 ml) dried Italian
seasoning
26-ounce (735-g) can spaghetti sauce
6 lasagna noodles, cooked
840122301 ENv02.qxd:840122300 Ev03.qxd 1/19/10 3:58 PM Page 11

12
Baked Pineapple Bread Pudding
12 slices of white bread, torn into
strips to fit food chute
20-ounce (565-g) can pineapple chunks,
drained
2 eggs
1 cup (250 ml) half ’n half cream
Insert chopping/mixing blade into food processor bowl and, with processor
running, drop bread through food chute to make soft breadcrumbs. Pour into a
greased 2-quart (2-L) casserole dish. Place pineapple chunks in food processor
bowl with chopping/mixing blade. Process pineapple for 20 seconds. Add eggs,
cream, vanilla, melted butter or margarine, and sugar. Process until mixed. Pour
pineapple mixture over soft breadcrumbs. Garnish with three pineapple rings
overlapping in center. Bake at 350ºF (180ºC) for 1 hour or until golden. Makes
8 servings.
Apple Crisp
6 large Golden Delicious apples,
peeled and cored and cut to fit in
food chute (6 cups [1.5 L] sliced)
1 tablespoon (15 ml) lemon juice
1
⁄2 cup (125 ml) sugar
1 tablespoon (15 ml) flour
1 teaspoon (5 ml) cinnamon
1
⁄4 teaspoon (1.25 ml) nutmeg
Using slicer/shredder disc, slicing side up, slice apples. Put apples in a large bowl.
Drizzle lemon juice over apples. Sprinkle apples with sugar, flour, cinnamon, and
nutmeg. Stir to mix; then put apples in ungreased 2-quart (2-L) baking dish. Using
chopping/mixing blade, place topping ingredients in work bowl and pulse until
mixed. Crumble topping over apples. Bake at 375ºF (190ºC) for 30 minutes. Serve
topped with vanilla ice cream. Makes 6 servings.
Topping:
1
⁄2 cup (125 ml) butter, melted
1 cup (250 ml) flour
1 cup (250 ml) sugar
1 teaspoon (5 ml) cinnamon
1 teaspoon (5 ml) vanilla
1 tablespoon (15 ml) melted butter or
margarine
11⁄2 cups (375 ml) sugar
3 pineapple slices, drained
840122301 ENv02.qxd:840122300 Ev03.qxd 1/19/10 3:58 PM Page 12
 Loading...