

Page 1

Micro Food Processor
840098500
Important Safeguards ...................... 2
Parts and Features............................ 3
Operating Instructions .................... 3
Cleaning.............................................. 9
Recipes.............................................. 9
Customer Service.............................. 12
In USA: 1-800-851-8900
In Canada: 1-800-267-2826
840098500 Ev00.qxd 3/8/02 11:50 AM Page 1
Digitally signed by A. Creery
cn=A. Creery, c=US
Date: 2002.03.21 14:32:55 -05'00'
Reason: I am approving this document
5 1/2 X 8 1/2": 24 pgs: english; french: black ink: no bleed: saddle; flip
Page 2

2
Consumer Safety Information
IMPORTANT SAFEGUARDS
SAVE THESE INSTRUCTIONS!
When using electrical appliances, basic safety precautions should always be followed,
including the following:
1. Read all instructions.
2. To protect against risk of electrical
shock, do not immerse base, motor,
cord, or plug in water or other liquid.
3. Close supervision is necessary when
any appliance used by or near children.
4. Unplug cord from outlet when not in
use, before putting on or taking off
parts, and before cleaning.
5. Avoid contacting moving parts. Keep
fingers out of discharge opening.
6. Do not operate any appliance with a
damaged cord or plug or after the
appliance malfunctions or is dropped
or damaged in any manner. Call our
toll-free customer service number for
information on examination, repair or
electrical or mechanical adjustment.
7. The use of attachments not recommended or sold by Hamilton Beach/
Proctor-Silex, Inc. may cause fire,
electric shock, or injury.
8. Do not use outdoors.
9. Do not let cord hang over edge of table
or counter, or touch hot surfaces.
10. Never feed food into food chute by
hand. Always use food pusher.
11. The blades and discs are sharp. Handle
carefully. Store out of reach of children.
12. Make sure the blade or disc has come
to a full stop before removing cover.
13. Keep hands and utensils away from
moving blades and discs while processing food to reduce the risk of
severe personal injury and/or damage
to the food processor. A rubber scraper
may be used but ONLY when the food
processor is not running.
14. To reduce the risk of injury, never place
cutting blade or discs on base without
first putting bowl properly in place.
15. Be certain cover is securely locked in
place before operating appliance.
16. Do not attempt to defeat the cover
interlock mechanism.
17. To reduce the risk of injury, be sure to
insert or remove blades and discs using
finger holes provided for this purpose.
This appliance is intended for household
use only.
This appliance is equipped with a polarized
plug. This type of plug has one blade wider
than the other. The plug will fit into an electrical outlet only one way. This is a safety
feature intended to help reduce the risk of
electrical shock. If you are unable to insert
the plug into the outlet, try reversing the
plug. If the plug should still fail to fit,
contact a qualified electrician to replace the
obsolete outlet. Do not attempt to defeat
the safety purpose of the polarized plug by
modifying the plug in any way.
The length of the cord used on this appliance was selected to reduce the hazards
of becoming tangled in, or tripping over a
longer cord. If a longer cord is necessary an
approved extension cord may be used.
The electrical rating of the extension cord
must be equal to or greater than the rating
of the food processor. Care must be taken
to arrange the extension cord so that it will
not drape over the countertop or tabletop
where it can be pulled on by children or
accidentally tripped over.
840098500 Ev00.qxd 3/8/02 11:50 AM Page 2
Page 3
3
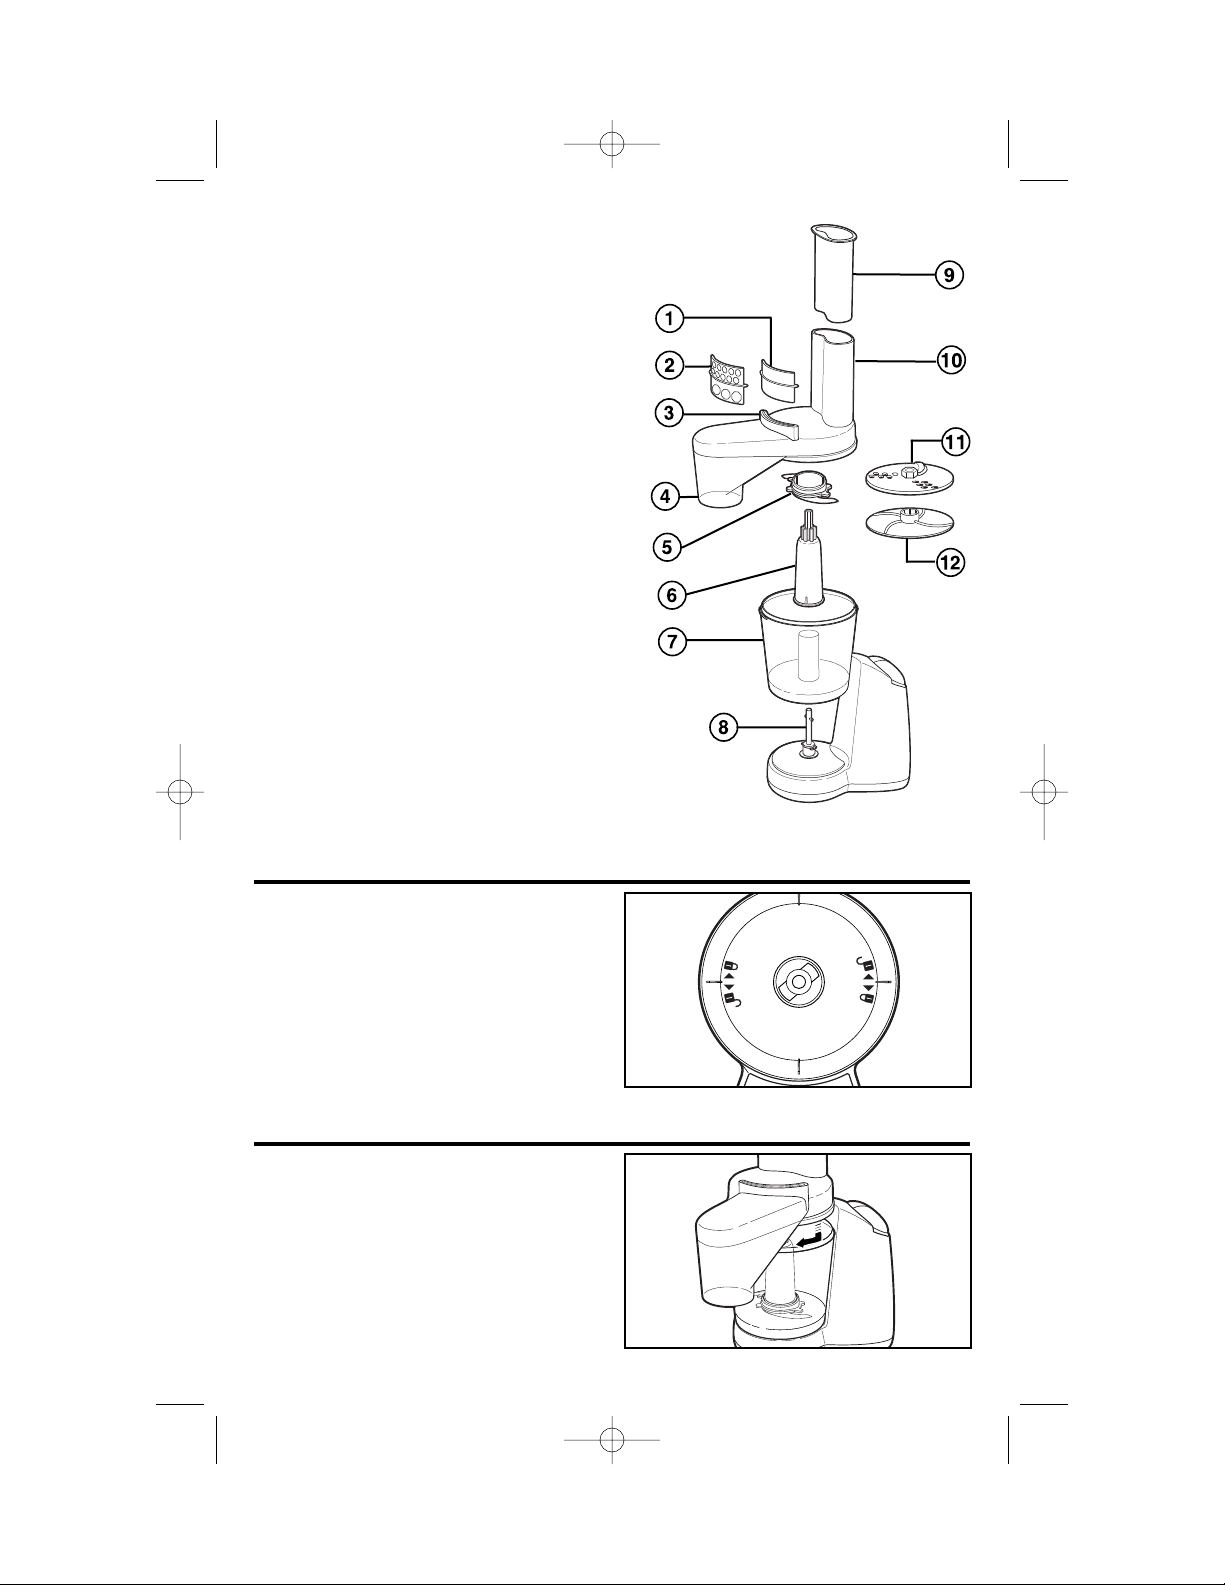
1. Food Gate/Chopping Gate Insert
2. Dry Food Gate Insert
3. Food Gate
4. Continuous Feed Chute
5. S-Blade
6. Extender Shaft
7. Bowl
8. Center Column
9. Food Pusher
10. Food Chute
11. Reversible Slicer/ Shredder Disc
12. Slinging Disc
Parts and Features
Operating Instructions
How to Assemble Bowl on Base
1. Make sure unit is off and unplugged.
2. Place the Bowl onto Base and turn
in the direction of arrow to lock.
How to Assemble Cover on Bowl
1. Make sure unit is off and unplugged.
2. Make sure the groove inside the lid
(that fits on rim of bowl) is clean and
free of food particles.
3. Place the Cover onto the Bowl and
turn Cover clockwise to lock.
NOTE: Food to be processed may
be placed in the Bowl before locking
the Cover or it may be added
through the Food Chute.
840098500 Ev00.qxd 3/8/02 11:50 AM Page 3
Page 4
4
How to Chop in Bowl
1. Hold Extender Shaft with one hand.
Using the
other hand,
place your
thumb and
forefinger
between tabs
on S-Blade
and push to
lock.
2. Place Food Gate Insert into the
Continuous
Feed Chute.
This blocks
any food
from going
through the
Continuous
Feed Chute.
3. Put food in Bowl. Place the Cover on
the Bowl and
turn the
Cover clockwise to lock.
Place Food
Pusher into
Food Chute
while chopping.
4. When finished, turn off and unplug
unit. Hold
Extender
Shaft with
one hand.
Using the
other hand,
place your
thumb and
forefinger
between the
tabs on S-Blade and push to unlock.
NOTE: Use caution. The disc is
slippery after use.
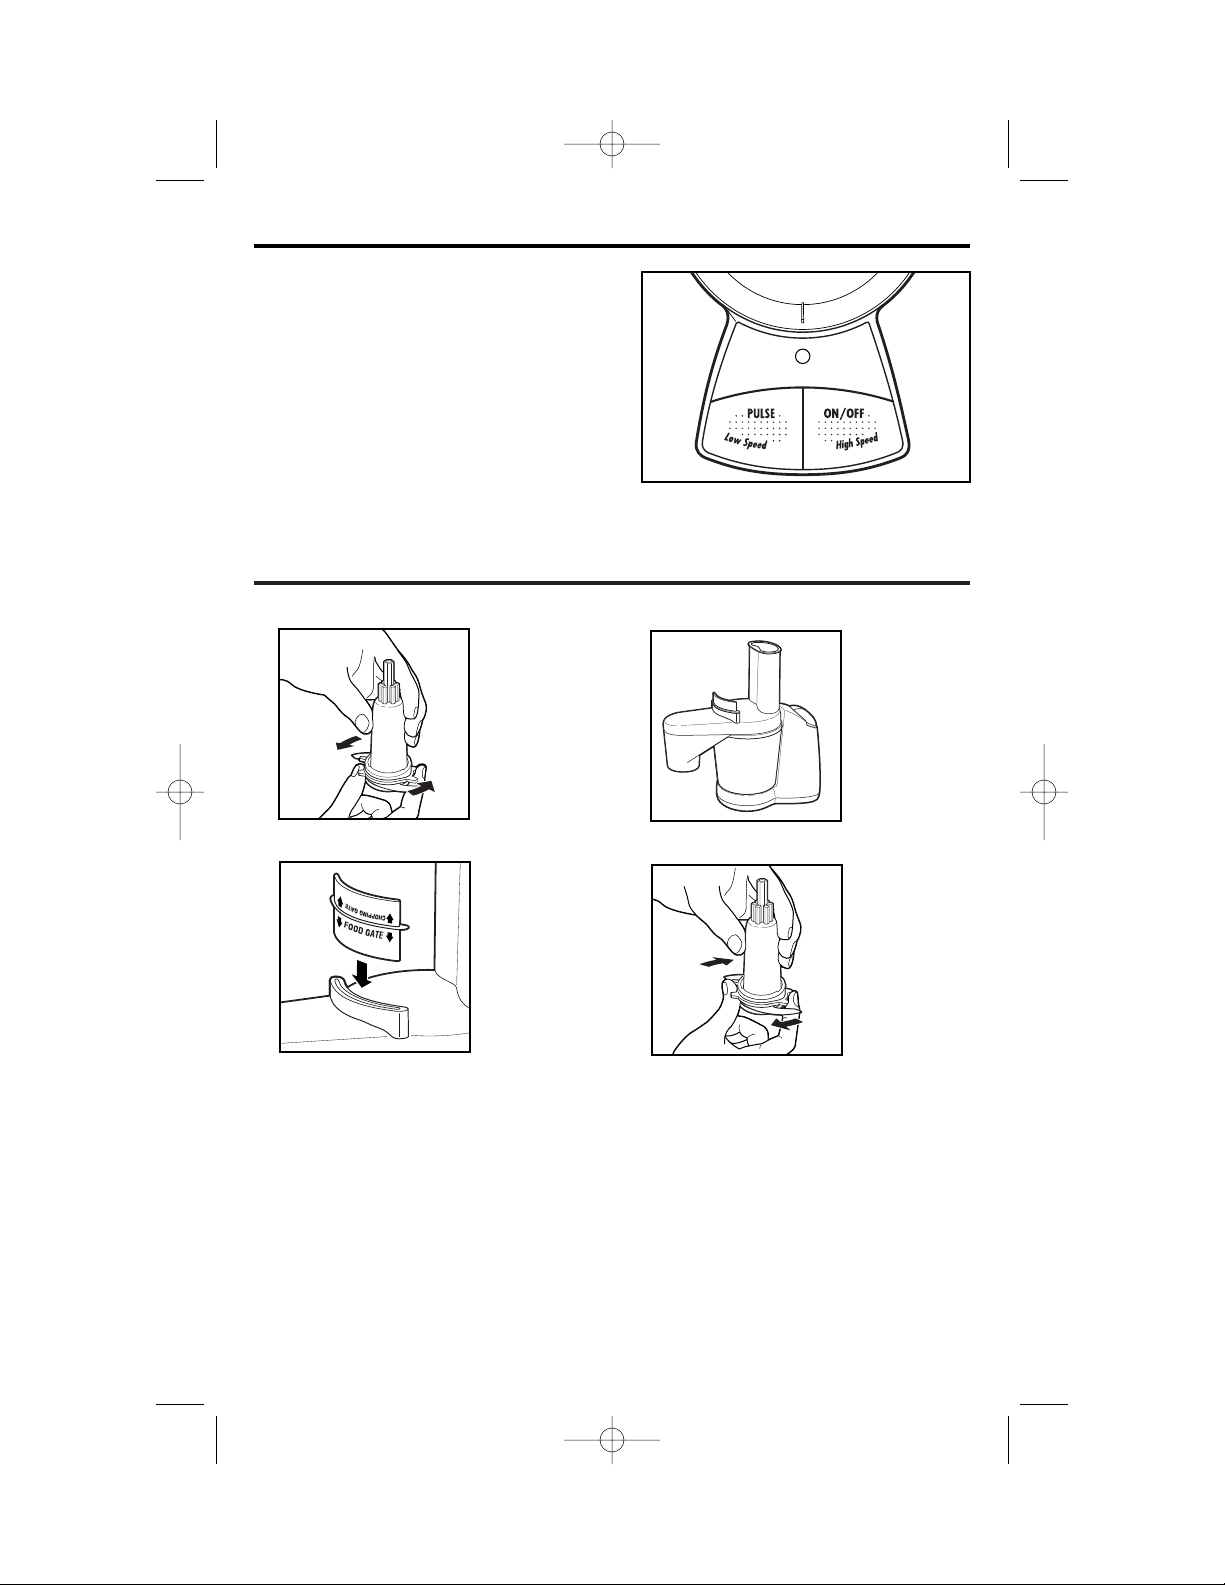
Controls
The High Speed button is a continuous
ON button that will run until it is pushed
again to turn OFF.
The Low Speed button operates in a
pulse mode that will run only while the
button is held down.
840098500 Ev00.qxd 3/8/02 11:50 AM Page 4
Page 5

5
Tips for In-Bowl Chopping
• The bowl has a capacity of 3 cups. For liquid ingredients, do not exceed 1
3
⁄4
cups (MAX LIQUID FILL line on bowl).
•
For more control, process by pressing the LO or HI Pulse button briefly then
releasing. Check consistency and continue if desired.
• Tear bread into pieces, then process to make bread crumbs. Break crackers or
cookies into pieces, then process into crumbs for use as recipe ingredients or
pie crusts.
• To chop carrots, celery, mushrooms, green pepper, or onion, cut into 1-inch
chunks and place in bowl. This will result in more uniform consistency.
• Chop nuts; mince parsley, basil, chives, or garlic.
• Puree small amounts of cooked fruit or vegetables for baby food or use as a
base for sauces or soups.
• Do not process raw meat, coffee beans, baking chocolate, or whole, hard spices
in the food chopper. This could damage the chopper.
Processing Guide for In-Bowl Chopping
TO PROCESS
Bread Crumbs
Parmesan Cheese
Cookie Crumbs
Chopped Fruit
Minced Garlic
Graham Cracker
Crumbs
Chopped Herbs
(basil, sage, etc.)
Chopped Nuts
Chopped or Minced
Parsley
Chopped or Minced
Vegetables
INSTRUCTIONS
Tear bread slices (up to 3) into 6 pieces.
Cut in 1⁄2-inch cubes. Process 1⁄2 cup of cubes at a time.
Break into pieces. Use up to 2 cups of pieces.
Cut fruit into large chunks. Place up to 2 cups pieces
into chopper.
Peel then process 1 or more cloves at a time.
Break into 4 pieces. Place up to 6 crackers in chopper
at a time.
Place up to 1 cup in chopper.
Place up to 1 cup in chopper.
Pinch off sprigs from bunch.
Cut vegetables into 1-inch chunks. Place up to 2 cups
in chopper at a time.
840098500 Ev00.qxd 3/8/02 11:50 AM Page 5
Page 6

How to Chop Continuously
6
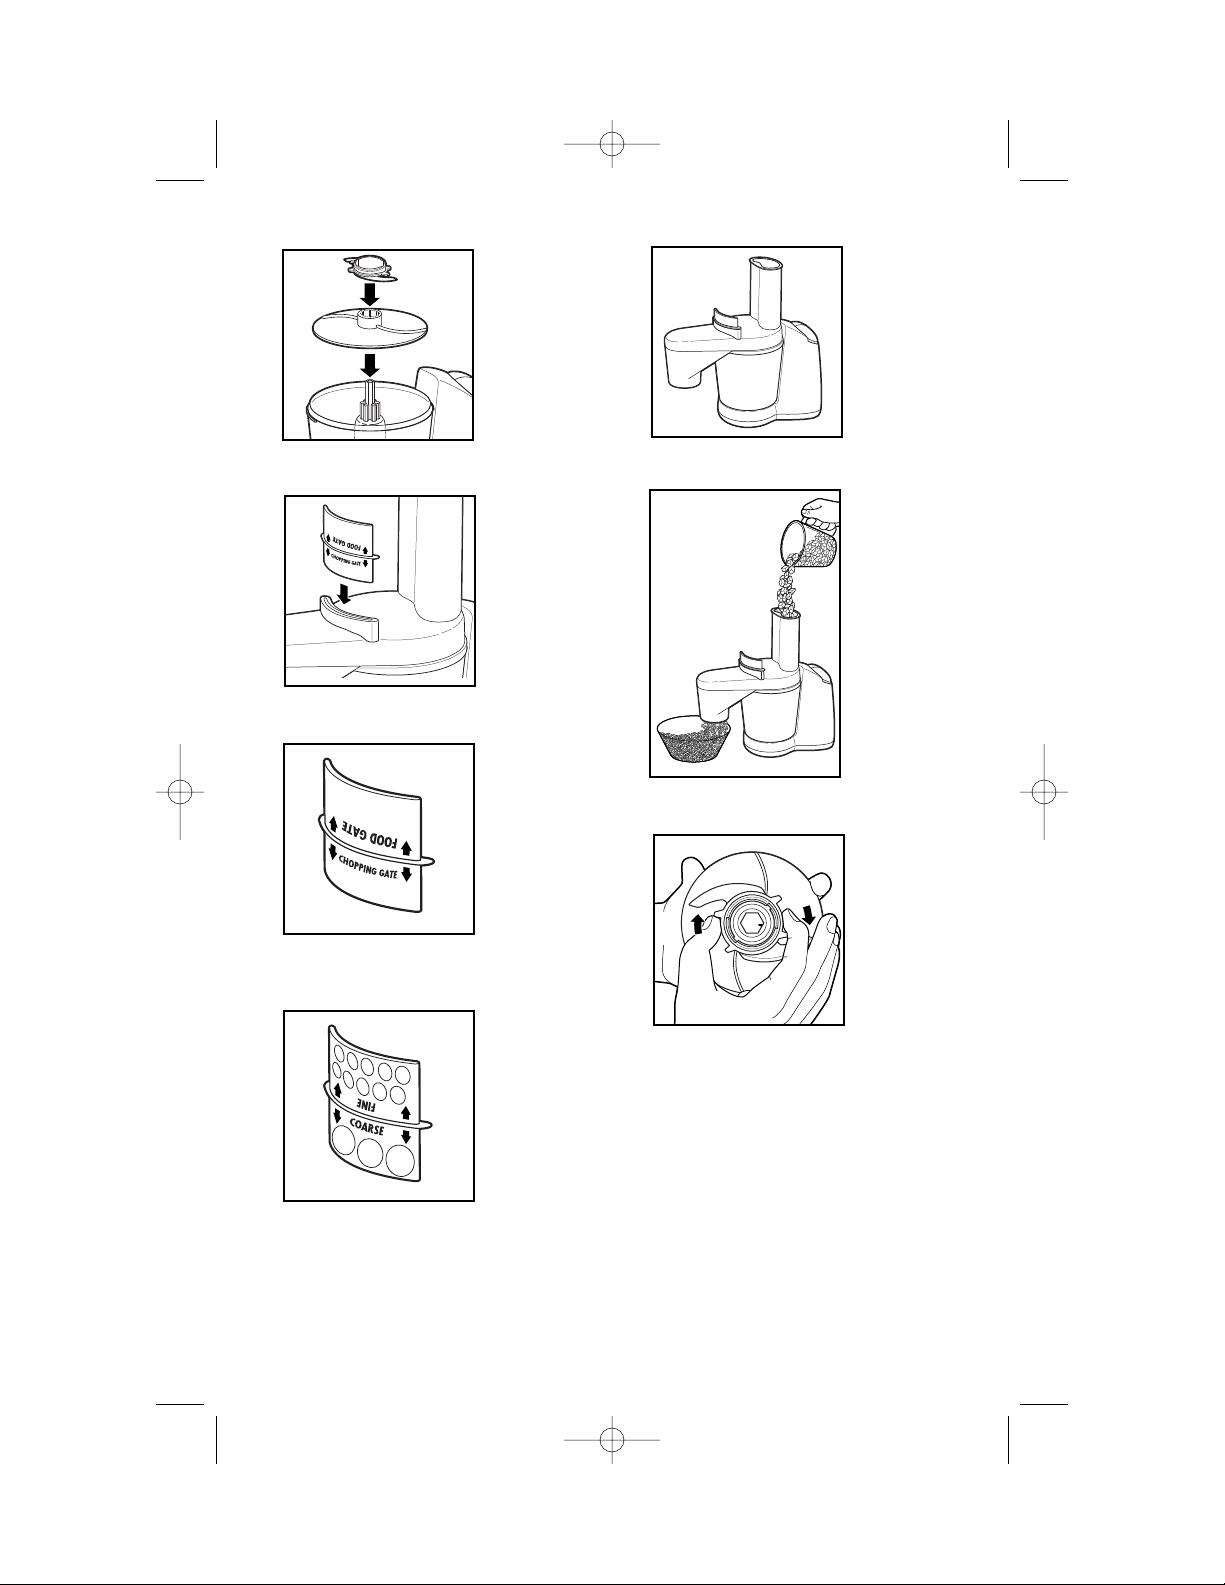
How to Slice or Shred in Bowl
1. Place Extender Shaft into Bowl.
2. Place Slicer/Shredder Disc onto
Shaft with
desired side
facing up.
3. Place Food Gate Insert into the
Continuous
Feed Chute.
This blocks
any food
from going
through the
Continuous
Feed Chute.
4. Place the Cover on Bowl and turn
the Cover
clockwise to
lock.
NOTE: The micro food processor
should not be used to process meats.
1. Place Extender Shaft in Bowl.
2. Hold Slinging Disc with one hand with
continuous
chopping
side up.
Using the
other hand,
place thumb
and forefinger
between tabs
on S-Blade
and push to
lock.
840098500 Ev00.qxd 3/8/02 11:50 AM Page 6
Page 7
7
3. Place Slinging Disc onto Shaft with
continuous
chopping
side and
S-Blade
facing up.
4. Place desired Gate Insert into the
Continuous
Feed Chute.
Chopping Gate Insert: for chopping
vegetables
or cheese.
Dry Food Gate Insert: for chopping
coarse or
fine for nuts,
crackers, or
cookies.
5. Place the Cover on Bowl and
turn Cover
clockwise to
lock.
6. For best results, food should be cut
into 1⁄2-inch
pieces and
slowly added
to the food
chute.
7. When finished, turn off and unplug
unit. Hold
Slinging Disc
with one
hand. Using
the other
hand, place
thumb and
forefinger
between tabs
on S-Blade and push to unlock.
NOTE: Use caution. The disc is
slippery after use.
840098500 Ev00.qxd 3/8/02 11:51 AM Page 7
Page 8

8
How to Slice or Shred Continuously
1. Place Extender Shaft in Bowl.
2. Place Slinging Disc onto Shaft with
slicing/shredding side up.
3. Place Slicer/Shredder Disc onto
Shaft with
desired side
facing up.
4. Place the Cover on Bowl and turn
Cover clockwise to lock.
There should
be NO gate
in the
Continuous
Feed Chute.
5. Place a container under Continuous
Feed Chute.
6. For best results, food should be cut
to fit inside
the food
chute (if necessary) and
pushed firmly
with the food
pusher.
NOTE: The micro food processor
should not be used to process meats.
Processing Guide for Continuous Chopping
TO PROCESS
Carrot (1⁄2 to 1" pieces)
Celery (1⁄2 to 1" pieces)
Potato (1⁄2 to 1" pieces)
Onion (1⁄2 to 1" pieces)
Crackers (whole)
Pecans, Walnuts (whole)
Almonds, Cashews,
Peanuts (whole)
GATE INSERT
Chopping Gate Insert
Chopping Gate Insert
Chopping Gate Insert
Chopping Gate Insert
Dry Food Gate Insert (Fine or Coarse)
Dry Food Gate Insert (Fine or Coarse)
Dry Food Gate Insert (Fine)
SPEED
HIGH
HIGH
HIGH
HIGH
LOW
LOW
HIGH
840098500 Ev00.qxd 3/8/02 11:51 AM Page 8
Page 9

9
Recipes
Cleaning
1. Turn off and unplug unit.
2. Handle blades carefully. Blades are
sharp. Wash the bowl, cover, blades,
discs, food gates and extender shaft
in hot, soapy water. Rinse and dry.
3. Wipe body with a damp cloth.
Salsa
Half of small onion
2 cloves garlic
1
⁄4 cup cilantro leaves
1 mild banana pepper, seeded
Combine onion and garlic in the chopper bowl. Pulse on HI until minced. Place in
microwave-safe bowl and microwave on High 1 minute. Place cilantro and peppers
in chopper bowl. Pulse on HI until minced. Add to onion mixture. Place tomatoes
into chopper bowl and pulse on LO until coarsely chopped. Add to onion mixture.
Add lemon juice and mix thoroughly. Refrigerate for an hour or more before serving.
Brie with Apple Chutney
1
⁄4 cup pecans
2 Winesap or Granny Smith apples,
peeled, cored, and cut in chunks
2 tablespoons butter
Chop pecans and set aside. Place chunks of apple in chopper and pulse on HI until
coarsely chopped. In a skillet over medium heat, melt butter then add apples. Cook
about 5 minutes. Add the raisins, brown sugar, and vinegar to the apples in the skillet.
Stir to mix then cook 5 minutes longer. Place the round of Brie on a lightly greased
ovenproof plate. Bake at 350ºF for 8 minutes or until soft. Remove from oven. Spoon
apple chutney over Brie then sprinkle with pecans. Serve with crackers.
NOTE: Brie is covered with a flour-based rind. This should be left on the Brie to
bake and is edible.
Crispy Catfish Fillets
21⁄2 ounces parmesan cheese
(1⁄2 cup, grated)
20 buttery crackers, like Ritz or Townhouse
Cut cheese into
1
⁄2-inch cubes. Place cheese cubes in chopper and pulse on HI until
finely grated. Put grated cheese in a shallow bowl. Place crackers and parsley in
chopper. Process until finely ground. Mix cracker mixture with cheese. Dip fillets in
butter then place in cracker mixture to coat. Lay fillets on nonstick or aluminum foillined baking sheet. Bake at 400ºF for 15 to 20 minutes. Makes: 4 servings.
1 chili or jalapeno pepper, seeded
2 tomatoes, peeled
1 tablespoon lemon juice
1
⁄4 cup golden raisins
2 tablespoons brown sugar
1 tablespoon cider vinegar
13-ounce round of Brie
1
⁄3 cup fresh parsley sprigs
1
⁄4 cup butter, melted
4 catfish fillets, about 8 ounces each
840098500 Ev00.qxd 3/8/02 11:51 AM Page 9
Page 10

10
Fresh Herb Linguine
21⁄2 ounces fresh parmesan cheese
(1⁄2 cup grated)
1
⁄4 cup fresh basil leaves
2 tablespoons fresh oregano
2 garlic cloves
1 carrot
1 small onion
Cut cheese into 1⁄2-inch cubes. Place in chopper and pulse on HI until grated. Set
aside. Place basil and oregano in chopper and pulse on LO until chopped. Set
aside. Place garlic in chopper and pulse on HI until minced. Cut carrot and onion
into 1-inch chunks. Place in chopper with garlic and pulse until coarsely chopped.
Place oil in large skillet and heat over medium heat until hot. Add carrots, onion,
and garlic. Cook 2 minutes or until onion is soft. Add tomatoes and cook an additional 5 minutes. In a saucepan, cook linguine to desired doneness, then drain. Add
linguine, basil, oregano, salt, and pepper to skillet. Toss gently to mix. Arrange on
serving platter and sprinkle with parmesan cheese. Makes 4 servings.
Hot Chicken Salad
1 slice bread
1 pound cooked chicken (about 3 cups chopped)
1 rib celery, cut into 1-inch chunks
1 small green pepper, cored seeded, cut in chunks
3 hard cooked eggs, peeled, cut in fourths
3
⁄4 cup almonds
1
⁄2 cup mayonnaise
103⁄4 ounce can cream of chicken soup, undiluted
Tear bread into 6 pieces. Place in chopper and process into crumbs; set aside.
Place half of cooked chicken in chopper bowl. Pulse until coarsely chopped. Place
in mixing bowl. Repeat with remaining chicken. Place celery and green pepper in
chopper and pulse on HI. Add to mixing bowl. Place eggs in chopper and pulse on
LO until chopped. Add to mixing bowl. Place almonds, mayonnaise, and chicken
soup in chopper. Process on LO until mixed. Add to mixing bowl and mix well.
Place in a greased 21⁄2-quart casserole dish. Top with breadcrumbs. Bake at 350ºF
for 25 minutes. Makes 6 servings.
Blue Cheese Dressing
1 clove garlic
2 ounces blue cheese
1 cup mayonnaise
Place garlic clove in the chopper bowl and Pulse on HI. Add cheese and process
for 10 seconds. Add mayonnaise, sour cream, lemon juice, and sugar. Process until
smooth. Keep refrigerated. Makes: 11⁄2
cups.
1
⁄4 cup sour cream
2 tablespoons fresh lemon juice
1 tablespoon sugar
1 tablespoon olive oil
28-ounce can diced tomatoes, undrained
8 ounces uncooked linguine
1
⁄2 teaspoon salt
1
⁄4 teaspoon pepper
2 teaspoons extra-virgin olive oil
840098500 Ev00.qxd 3/8/02 11:51 AM Page 10
Page 11

11
Fettuccine with Spinach & Prosciutto
21⁄2 ounces parmesan cheese
(1⁄2 cup grated)
8 ounces uncooked fettuccine
1 clove garlic
1 tablespoon olive oil
Cut cheese into 1⁄2-inch cubes. Process on HI until grated; set aside. Cook pasta
according to package directions, omitting any salt. Drain pasta in a colander over
a bowl, reserving 1⁄2 cup of cooking liquid. Place garlic in chopper and pulse on HI
until minced. Heat olive oil in a large skillet over medium-high heat. Add garlic and
cook for 15 seconds. Place prosciutto into chopper and process until coarsely
chopped. Add prosciutto and spinach to skillet. Cook over medium-high heat for
3 minutes or until spinach has wilted. Combine reserved 1⁄2 cup of cooking liquid
and egg in chopper and process until completely mixed. Add pasta and egg mixture to skillet and stir well to mix. Cook and stir over low heat for about 4 minutes
or until egg mixture is slightly thick. Stir in 1⁄4 cup cheese and pepper. Serve
immediately, sprinkling with remaining cheese. Makes 4 servings.
Vegetarian Chili
2 teaspoons vegetable oil
1 large onion, cut in chunks
1 red bell pepper, seeded and cut
into chunks
1 green bell pepper, seeded and cut
into chunks
1 clove garlic, peeled
1 tablespoon chili powder
Place a large saucepan over medium-high heat. Add the oil. Place onions into the
chopper and pulse on HI until completely chopped. Put chopped onion into
saucepan and let cook while chopping peppers. Repeat process with peppers.
Place garlic clove in chopper and process until minced. Add garlic to onion and
peppers and cook 1 minute. Add chili powder, Italian seasonings, beans, tomato
sauce, diced tomatoes, and vegetable broth. Bring to a boil. Cover, reduce heat to
low and simmer for 1 hour. Makes about 31⁄2 quarts.
4 to 6 ounces thinly sliced prosciutto,
chopped
10 ounce package fresh spinach
1 egg
1
⁄8 teaspoon black pepper
1 teaspoon Italian seasoning
16-ounce can Great Northern beans
15-ounce can kidney beans
15-ounce can black beans
15-ounce can tomato sauce
14.5-ounce can diced tomatoes
15-ounce can vegetable broth
840098500 Ev00.qxd 3/8/02 11:51 AM Page 11
Page 12

12
Customer Service
If you have a question about your micro food processor, call our toll-free customer
service number. Before calling, please note the model, type, and series numbers
and fill in that information below. These numbers can be found on the bottom of
your food processor. This information will help us answer your question much
more quickly.
MODEL: ______________ TYPE: _______________ SERIES: _________________
LIMITED WARRANTY
This product is warranted to be free from defects in material and workmanship for a period
of two (2) years for Hamilton Beach Portfolio products or one (1) year for Hamilton Beach
products from the date of original purchase, except as noted below. During this period, we
will repair or replace this product, at our option, at no cost. THE FOREGOING WARRANTY
IS IN LIEU OF ANY OTHER WARRANTY, WHETHER EXPRESS OR IMPLIED, WRITTEN
OR ORAL INCLUDING ANY WARRANTY OF MERCHANTABILITY OR FITNESS FOR A
PARTICULAR PURPOSE. ANY LIABILITY IS EXPRESSLY LIMITED TO AN AMOUNT
EQUAL TO THE PURCHASE PRICE PAID, AND ALL CLAIMS FOR SPECIAL, INCIDENTAL
AND CONSEQUENTIAL DAMAGES ARE HEREBY EXCLUDED. There is no warranty with
respect to the following, which may be supplied with this product: glass parts, glass
containers, cutter/strainer, blades, and/or agitators. This warranty extends only to the
original consumer purchaser and does not cover a defect resulting from abuse, misuse,
neglect, use for commercial purposes, or any use not in conformity with the printed
directions. This warranty gives you specific legal rights, and you may also have other legal
rights which vary from state to state, or province to province. Some states or provinces do
not allow limitations on implied warranties or special, incidental or consequential damages,
so the foregoing limitations may not apply to you.
If you have a claim under this warranty, DO NOT RETURN THE APPLIANCE TO THE
STORE! Please call our CUSTOMER SERVICE NUMBER. (For faster service please have
model, series, and type numbers ready for operator to assist you.)
CUSTOMER SERVICE NUMBERS
In the U.S. 1-800-851-8900
In Canada 1-800-267-2826
Web site address: www.hamiltonbeach.com
KEEP THESE NUMBERS FOR FUTURE REFERENCE!
Web site address: www.hamiltonbeach.com
HAMILTON BEACH PROCTOR-SILEX,INC.
P
ROCTOR-SILEX CANADA,INC.
263 Yadkin Road Southern Pines, North Carolina 28387
Picton, Ontario K0K 2T0
3/02
840098500
840098500 Ev00.qxd 3/8/02 11:51 AM Page 12
Page 13

Micro-robot culinaire
840098500
Précautions importantes.................. 2
Pièces et caractéristiques................ 3
Instructions d’utilisation.................. 3
Nettoyage .......................................... 9
Recettes............................................ 9
Service à la clientèle ........................ 12
Aux É.-U. : 1-800-851-8900
Au Canada : 1-800-267-2826
840098500 Fv00.qxd 3/8/02 1:23 PM Page 1
Page 14

2
Renseignements de sécurité pour les consommateurs
PRÉCAUTIONS IMPORTANTES
CONSERVEZ CES INSTRUCTIONS!
Lors de l’utilisation d’appareils électroménagers, des précautions fondamentales de sécurité
doivent toujours être observées, y compris ce qui suit :
1. Lire toutes les instructions.
2. Pour réduire le risque de choc électrique,
ne pas immerger la base, le moteur, le cordon ou la fiche dans l’eau ou autre liquide.
3.
Une bonne surveillance est nécessaire
pour tout appareil utilisé par des enfants
ou près d’eux.
4. Débrancher l’appareil de la prise de
courant électrique lorsqu’il n’est pas utilisé,
avant d’y placer ou d’en enlever des
pièces, et avant un nettoyage.
5. Éviter le contact avec les pièces en
mouvement. Garder les doigts hors de
l’ouverture de décharge.
6. Ne pas faire fonctionner un appareil élec-
troménager avec une fiche ou un cordon
endommagé, ou lorsque l’appareil ne
fonctionne pas bien ou a été échappé ou
endommagé d’une manière quelconque.
Composer notre numéro de service à la
clientèle sans frais d’interurbain pour
renseignements concernant l’examen,
la réparation ou l’ajustement électrique
ou mécanique.
7. L’utilisation d’accessoires non recom-
mandés ni vendus par Hamilton Beach/
Proctor-Silex, Inc. peut causer un incendie,
un choc électrique ou des blessures.
8. Ne pas utiliser à l’extérieur.
9. Ne pas laisser le cordon pendre au bord
d’une table ou d’un comptoir, ni venir en
contact avec des surfaces chaudes.
10. Ne jamais introduire d’aliments dans
l’entonnoir à la main pour les couper ou
les hacher. Toujours utiliser le poussoir.
11. Les couteaux et les disques sont
coupants. Les manipuler avec soin.
Les ranger hors de portée des enfants.
12. S’assurer que le couteau ou le disque
s’est arrêté complètement avant d’enlever
le couvercle.
13. Garder les mains et ustensiles à l’écart du
couteau et du disque mobiles durant le
traitement des aliments, pour réduire le
risque de blessure corporelle grave et/ou
d’endommagement du robot culinaire. On
peut se servir d’un racloir en caoutchouc,
mais SEULEMENT lorsque le robot culinaire ne fonctionne pas.
14. Pour réduire le risque de blessures, ne
jamais mettre le couteau ou le disque
tranchant sur la base avant d’avoir
d’abord bien mis le bol en place.
15. S’assurer que le couvercle est bien ver-
rouillé en place avant de mettre l’appareil
en marche.
16. Ne pas essayer de défaire le mécanisme
de verrouillage du couvercle.
17.
Pour réduire le risque de blessures,
veiller à insérer et retirer les couteaux et
les disques en se servant des trous
pour les doigts prévus à cette fin.
Cet appareil est destiné à l’utilisation
domestique seulement.
Cet appareil est muni d’une fiche polarisée. Ce
type de fiche présente une broche plus large
que l’autre. La fiche peut être introduite dans
une prise dans un sens seulement. Il s’agit
d’une caractéristique de sécurité visant à
réduire le risque de choc électrique. Si la fiche
ne peut pas être insérée dans la prise, la tourner dans l’autre sens. Si elle ne peut toujours
pas être insérée dans la prise, contacter un
électricien qualifé pour qu’il remplace la prise
désuète. Ne pas essayer de contourner
l’objectif de sécurité de la fiche polarisée en la
modifiant de quelque manière que ce soit.
La longueur du cordon de cet appareil a été
choisie de façon à ce que l’on ne risque
pas de trébucher dessus. Si un cordon plus
long est nécessaire, utiliser une rallonge
appropriée. Le calibrage de la rallonge doit
être le même que celui de l’appareil ou
supérieur. Lorsqu’on utilise une rallonge,
s’assurer qu’elle ne traverse pas la zone de
travail, que des enfants ne puissent pas
tirer dessus par inadvertance et qu’on ne
puisse pas trébucher dessus.
840098500 Fv00.qxd 3/8/02 1:23 PM Page 2
Page 15

3
1. Volet de fermeture/
volet de hachage
2. Volet pour aliments secs
3. Volet de fermeture
4. Goulotte d’éjection continue
5. Couteau en S
6. Arbre-rallonge
7. Bol
8. Arbre central
9. Poussoir
10. Trémie
11. Disque réversible pour
trancher/déchiqueter
12. Disque d’éjection
Pièces et caractéristiques
Instructions d’utilisation
Mode d’installation du bol sur le socle
1. S’assurer que le robot est à off (arrêt)
et débranché.
2. Placer le bol sur le socle et le tourner
dans le sens de la flèche pour le
verrouiller.
Mode d’installation du couvercle sur le bol
1. S’assurer que le robot est à off (arrêt) et
débranché.
2. S’assurer que la rainure à l’intérieur du
couvercle (qui s’emboîte sur le bord du
bol) est propre et exempte de particules
alimentaires.
3. Placer le couvercle sur le dessus du
bol et le tourner dans le sens horaire
pour le verrouiller.
REMARQUE : La nourriture à traiter peut être mise dans le bol avant de bloquer le
couvercle ou elle peut être introduite par la trémie.
840098500 Fv00.qxd 3/8/02 1:23 PM Page 3
Page 16

4
Mode de déchiquetage dans le bol
1. Tenir l’arbre-rallonge d’une main. De
l’autre main,
placer le
pouce et
l’index entre
les onglets
sur le couteau
en S et
pousser pour
verrouiller.
2. Placer le volet de fermeture dans la
goulotte
d’éjection
continue.
Ceci
empêche le
passage
d’aliments
dans la
goulotte
d’éjection
continue.
3. Mettre la nourriture dans le bol. Placer
le couvercle
sur le bol et
tourner le
couvercle
dans le sens
horaire pour
le verrouiller.
Placer le
poussoir dans
la trémie
durant le hachage.
4. Lorsque vous avez terminé, arrêter
l’appareil et
le débrancher.
Tenir l’arbrerallonge d’une
main. De
l’autre main,
placer le
pouce et
l’index entre
les onglets
sur le couteau en S et pousser pour
déverrouiller.
REMARQUE : Manipuler avec soin.
Le disque est glissant après utilisation.
Commandes
Le bouton High Speed (haute vitesse)
fait fonctionner le robot en continu
jusqu’à ce que l’on appuie dessus de
nouveau pour arrêter le robot.
Le bouton Low Speed (basse vitesse)
fait fonctionner le robot par impulsions
et ce mode n’est activé que pendant que
l’on appuie sur le bouton.
840098500 Fv00.qxd 3/8/02 1:23 PM Page 4
Page 17

5
Conseils pour hachage dans le bol
• Le bol a une capacité de 3 tasses. Pour les ingrédients liquides, ne pas
dépasser 13⁄4 tasse (ligne MAX LIQUID FILL sur le bol).
•
Pour plus de contrôle, traiter en appuyant brièvement sur le bouton d’impulsions
LO ou HI et en le relâchant. Vérifier la consistance et continuer au besoin.
• Déchirer le pain en morceaux, puis les traiter pour obtenir de la chapelure. Briser
les craquelins ou biscuits en morceaux, puis les émietter pour utilisation
comme ingrédients dans les recettes ou croûtes de tarte.
• Pour hacher carottes, céleri, champignons, poivron vert ou oignon, couper en
morceaux de 1 pouce et les mettre dans le bol. On obtiendra ainsi une
consistance uniforme.
• Hacher les noix; émincer le persil, le basilic, la ciboulette ou l’ail.
• Mettre en purée de petites quantités de fruits ou de légumes cuits pour les ali-
ments de bébé ou pour utilisation dans les sauces ou soupes.
• Ne pas traiter de viande crue, graines de café, chocolat pour la cuisson ou
épices entières et dures dans le hachoir. On risque d’endommager le hachoir.
Guide de traitement pour hachage dans le bol
POUR TRAITER
Chapelure
Fromage parmesan
Miettes de biscuits
Fruit haché
Ail émincé
Miettes de
craquelins Graham
Herbes hachées
(basilic, sauge, etc.)
Noix hachées
Persil haché ou
émincé
Légumes hachés
ou émincés
INSTRUCTIONS
Déchirer les tranches de pain (jusqu’à 3) en 6 morceaux.
Couper en cubes de 1⁄2 po. Traiter 1⁄2 tasse de cubes à la fois.
Briser en morceaux. Utiliser jusqu’à 2 tasses de morceaux.
Couper le fruit en gros morceaux. Mettre jusqu’à 2 tasses
dans le hachoir.
Peler puis traiter 1 gousse ou plus à la fois.
Briser en 4 morceaux. Mettre jusqu’à 6 craquelins à la fois
dans le hachoir.
Mettre jusqu’à 1 tasse dans le hachoir.
Mettre jusqu’à 1 tasse dans le hachoir.
Prélever des brins d’un bouquet.
Couper les légumes en morceaux de 1 pouce. Mettre
jusqu’à 2 tasses dans le hachoir.
840098500 Fv00.qxd 3/8/02 1:23 PM Page 5
Page 18

6
Mode de hachage continu
Mode de tranchage ou de déchiquetage dans le bol
1. Placer l’arbre-rallonge dans le bol.
2. Placer le disque à trancher/déchi-
queter côté
désiré vers
le haut.
3. Placer le volet de fermeture dans la
goulotte
d’éjection
continue. Il
empêchera
tout aliment
de pénétrer
dans la
goulotte.
4. Placer le couvercle sur le bol et
tourner le
couvercle
dans le sens
horaire pour
le verrouiller.
REMARQUE : Le micro-robot culinaire
ne devrait pas être utilisé pour traiter
les viandes.
1. Placer l’arbre-rallonge dans le bol.
2. Tenir le disque d’éjection d’une main
avec le côté
de hachage
continu vers le
haut. De l’autre
main, placer
le pouce et
l’index entre
les onglets sur
le couteau en
S et pousser
pour verrouiller.
840098500 Fv00.qxd 3/8/02 1:23 PM Page 6
Page 19

7
3. Placer le disque d’éjection sur l’arbre,
côté de
hachage
continu et
couteau en
S vers le
haut.
4. Placer le volet désiré dans la
goulotte
d’éjection
continue.
Volet de hachage : pour le
hachage des
légumes ou
du fromage.
Volet pour aliments secs : pour le
hachage
grossier ou
fin des noix,
craquelins ou
biscuits.
5. Placer le couvercle sur le bol et
tourner le
couvercle
dans le sens
horaire pour
le verrouiller.
6. Pour les meilleurs résultats, la nourrit-
ure devrait
être coupée
en morceaux
de 1⁄2 pouce
et versée
lentement
dans la
trémie.
7. Lorsque vous avez terminé, arrêter
l’appareil et le
débrancher.
Tenir le disque
d’éjection
d’une main.
De l’autre
main, placer
le pouce et
l’index entre
les onglets sur le couteau en S et
pousser pour déverrouiller.
REMARQUE : Manipuler avec soin.
Le disque est glissant après utilisation.
840098500 Fv00.qxd 3/8/02 1:23 PM Page 7
Page 20

8
Mode de tranchage ou de déchiquetage continu
1. Placer l’arbre-rallonge dans le bol.
2. Placer le disque d’éjection sur l’arbre
côté à
trancher/
déchiqueter
vers le haut.
3. Placer le disque à trancher/
déchiqueter
côté désiré
vers le haut.
4. Placer le couvercle sur le bol et tourner
le couvercle
dans le sens
horaire pour le
verrouiller. Il ne
doit pas y avoir
de volet dans
la goulotte
d’éjection
continue.
5. Placer un contenant sous la goulotte
d’éjection
continue.
6. Pour les meilleurs résultats, la nourri-
ture devrait
être coupée
pour pouvoir
entrer dans la
trémie (si
nécessaire) et
poussée fer-
mement avec
le poussoir.
REMARQUE : Le micro-robot culinaire
ne devrait pas être utilisé pour traiter les
viandes.
Guide de traitement pour hachage continu
POUR HACHER
Carotte (1⁄2à 1 po)
Céleri (
1
⁄2à 1 po)
Pomme de terre (
1
⁄2à 1 po)
Oignon (
1
⁄2à 1 po)
Craquelins (entièrs)
Pacanes, noix (entières)
Amandes, noix d’acajou,
arachides (entières)
ACCESSOIRE À UTILISER
Volet de hachage
Volet de hachage
Volet de hachage
Volet de hachage
Volet pour aliments secs (fin ou grossier)
Volet pour aliments secs (fin ou grossier)
Volet pour aliments secs (fin)
VITESSE
HAUTE
HAUTE
HAUTE
HAUTE
BASSE
BASSE
HAUTE
840098500 Fv00.qxd 3/8/02 1:23 PM Page 8
Page 21

9
Recettes
Nettoyage
1. Mettre le robot à off (arrêt) et le
débrancher.
2. Manipuler les lames avec précaution.
Elles sont coupantes. Laver le bol,
le couvercle, les lames, disques et
arbre-rallonge à l’eau chaude
savonneuse. Rincer et sécher.
3. Essuyer le socle avec un chiffon
humide.
Salsa
La moitié d’un petit oignon
2 gousses d’ail
1
⁄4 tasse de feuilles de coriandre
1 piment banane doux, égrainé
Combiner l’oignon et l’ail dans le hachoir. Hacher au réglage Pulse, à HI. Mettre
dans un bol allant au micro-ondes et chauffer à High pendant 1 minute. Mettre les
feuilles de coriandre et les piments dans le hachoir. Hacher au réglage Pulse, à HI.
Ajouter au mélange d’oignon. Mettre les tomates dans le hachoir. Hacher au
réglage Pulse, à LO jusqu’à consistance grossière. Ajouter au mélange d’oignon.
Ajouter le jus de citron et bien mélanger. Réfrigérer pendant une heure ou plus
avant de servir.
Brie garni de chutney aux pommes
1
⁄4 tasse de noix de pacane
2 pommes Winesap ou
Granny Smith, pelées,
évidées et coupées
en gros morceaux
Hacher les pacanes et les mettre de côté. Vider les pommes dans le hachoir et
hacher grossièrement au réglage Pulse, sur HI. Dans une poêle, à feu moyen, faire
fondre le beurre, puis ajouter les pommes. Cuire pendant environ 5 minutes. Ajouter
les raisins secs, le sucre brun et le vinaigre dans la poêle. Mélanger, puis cuire
encore 5 minutes. Déposer la roue de Brie sur une assiette légèrement graissée
allant au four. Cuire à 350°F pendant 8 minutes ou jusqu’à consistance molle.
Sortir du four. Verser le chutney aux pommes sur le brie avec une cuillère et
saupoudrer de pacanes. Servir accompagné de craquelins.
REMARQUE : Le Brie est recouvert d’une croûte à la farine. Elle est comestible et
devrait donc être laissée sur le fromage.
Filets de poisson-chat croustillants
21⁄
2 oz de fromage parmesan (
1
⁄
2 tasse râpé)
20 craquelins au beurre (Ritz ou Townhouse)
1
⁄3 tasse de bouquets de persil frais
Couper le fromage en cubes de 1⁄2 po. Verser les cubes de fromage dans le hachoir
et râper finement au réglage Pulse, sur HI. Verser le fromage râpé dans un plat peu
profond. Mettre les craquelins et le persil dans le hachoir. Moudre jusqu’à consistance fine et mélanger avec le fromage. Tremper les filets dans le beurre, puis dans le
mélange de craquelins. Déposer les filets sur une plaque à pâtisserie à revêtement
non adhésif ou recouverte de papier d’aluminium. Cuire à 400°F pendant 15 à 20
minutes. Quantité : 4 portions.
1 piment (jalapeño ou autre piment
fort), égrainé
2 tomates, pelées
1 c. à soupe de jus de citron
2 c. à soupe de beurre
1
⁄4 tasse de raisins secs jaunes
2 c. à soupe de sucre brun
1 c. à soupe de vinaigre de cidre
Roue de brie de 13 oz
1
⁄4 tasse de beurre, fondu
4 filets de poisson-chat d’environ
8 oz chaque
840098500 Fv00.qxd 3/8/02 1:23 PM Page 9
Page 22

10
Linguini aux fines herbes
21⁄2 oz de fromage parmesan frais
(1⁄2
tasse râpé)
1
⁄4 tasse de feuilles de basilic frais
2 c. à soupe d’origan frais
2 gousses d’ail
1 carotte
1 petit oignon
Couper le fromage en cubes de 1⁄2 po. Verser dans le hachoir et râper entièrement
au réglage Pulse, sur HI. Mettre de côté. Mettre le basilic et l’origan dans le
hachoir et émincer au réglage Pulse, sur LO. Mettre de côté. Mettre l’ail dans le
hachoir et émincer au réglage Pulse, sur HI. Couper la carotte et l’oignon en
morceaux de 1 po. Mettre dans le hachoir avec l’ail et hacher sur Pulse jusqu’à
consistance grossière. Verser l’huile dans une grosse poêle et chauffer à feu
moyen. Ajouter les carottes, l’oignon et l’ail. Cuire pendant 2 minutes ou jusqu’à
ce que l’oignon soit mou. Ajouter les tomates et cuire 5 autres minutes. Dans une
casserole, cuire les linguini jusqu’à la consistance désirée et les égoutter. Ajouter
les linguini, le basilic, l’origan, le sel et le poivre dans la poêle. Remuer délicatement pour mélanger. Verser dans le plat de service et saupoudrer de parmesan.
Quantité : 4 portions.
Salade au poulet chaud
1 tranche de pain
1 lb de poulet cuit
(environ 3 tasses haché)
1 branche de céleri, coupé en
morceaux de 1 po
1 petit poivron vert, vidé, égrainé et
coupé en morceaux
Couper le pain en 6 morceaux. Mettre dans le hachoir et émietter. Mettre de côté.
Verser la moitié du poulet cuit dans le récipient du hachoir. Hacher grossièrement
au réglage Pulse. Verser dans le bol à mélanger. Répéter avec le restant du
poulet. Mettre le céleri et le poivron vert dans le hachoir et hacher au réglage
Pulse, sur HI. Ajouter dans le bol à mélanger. Mettre les oeufs dans le hachoir et
hacher au réglage Pulse, sur LO. Ajouter dans le bol à mélanger. Mettre les amandes, la mayonnaise et la soupe au poulet dans le hachoir. Régler à LO et bien
mélanger. Verser dans le bol à mélanger et bien mélanger. Verser le tout dans une
cocotte graissée de 21⁄2 pintes. Garnir de chapelure. Cuire à 350°F pendant 25
minutes. Quantité : 6 portions.
Vinaigrette au fromage bleu
1 gousse d’ail
2 oz de fromage bleu
1 tasse de mayonnaise
Mettre la gousse d’ail dans le récipient du hachoir et émincer au réglage Pulse,
sur HI. Ajouter le fromage et laisser tourner pendant 10 secondes. Ajouter la
mayonnaise, la crème sure, le jus de citron et le sucre. Mélanger jusqu’à
consistance lisse. Garder au réfrigérateur. Quantité : 11⁄2 tasse.
1
⁄4 tasse de crème sure
2 c. à soupe de jus de citron frais
1 c. à soupe de sucre
1 c. à soupe d’huile d’olive
1 boîte de 28 oz de tomates en dés,
non égouttées
8 oz de linguini secs
1
⁄2 c. à thé de sel
1
⁄4 c. à thé de poivre
2 c. à thé d’huile d’olive extra-vierge
3 oeufs durs, pelés et coupés en
quartiers
3
⁄4 tasse d’amandes
1
⁄2 tasse de mayonnaise
1 boîte de 103⁄4 oz de soupe au poulet,
non diluée
840098500 Fv00.qxd 3/8/02 1:23 PM Page 10
Page 23

11
Fettuccini aux épinards et prosciutto
21⁄2 oz de fromage parmesan
(1⁄2
tasse râpé)
8 oz de fettuccini secs
1 gousse d’ail
1 c. à soupe d’huile d’olive
Couper le fromage en cubes de
1
⁄2 po. Râper sur HI. Mettre de côté. Cuire les
pâtes tel qu’indiqué sur l’emballage, en omettant le sel. Égoutter les pâtes dans
une passoire, sur un plat, et réserver 1⁄2 tasse du liquide de cuisson. Mettre l’ail
dans le hachoir et hacher finement au réglage Pulse, sur HI. Réchauffer l’huile
d’olive dans une grosse poêle à feu moyen à élevé. Ajouter l’ail et cuire pendant
15 secondes. Mettre le prosciutto dans le hachoir et hacher grossièrement.
Ajouter le prosciutto et les épinards dans la poêle. Cuire à feu moyen à élevé
pendant 3 minutes, ou jusqu’à ce que les épinards soient ramollis. Bien mélanger la
1
⁄2 tasse du liquide de cuisson et l’oeuf dans le hachoir. Verser les pâtes et le mélange
d’oeuf dans la poêle et bien mélanger. Cuire et brasser à feu doux pendant environ
4 minutes ou jusqu’à ce que le mélange contenant l’oeuf ait légèrement épaissi.
Incorporer 1⁄4 tasse du fromage et le poivre. Servir immédiatement après avoir
saupoudré du reste du fromage. Quantité : 4 portions.
Chili végétarien
2 c. à thé d’huile végétale
1 gros oignon, coupé en morceaux
1 poivron rouge, égrainé et coupé
en morceaux
1 poivron vert, égrainé et coupé
en morceaux
1 gousse d’ail, pelée
1 c. à soupe de poudre de chili
Dans une grosse casserole à feu moyen à vif, verser l’huile. Mettre les oignons
dans le hachoir et hacher entièrement au réglage Pulse, sur HI. Verser les oignons
dans la casserole et laisser cuire pendant qu’on hache les poivrons. Verser les
poivrons dans la casserole. Pendant qu’ils cuisent, mettre l’ail dans le hachoir et
l’émincer. Ajouter l’ail dans la casserole et cuire pendant 1 minute. Ajouter la
poudre de chili, l’assaisonnement à l’italienne, les haricots, la sauce tomate, les
tomates en dés et le bouillon de légumes. Porter à ébullition. Couvrir, réduire à feu
doux et laisser mijoter pendant 1 heure. Quantité : environ 31⁄2 pintes.
4 à 6 oz de prosciutto finement
tranché, haché
1 sac de 10 oz d’épinards frais
1 oeuf
1
⁄8 c. à thé de poivre noir
1 c. à thé d’assaisonnement à l’italienne
1 boîte de 16 oz de haricots
Great Northern
1 boîte de 15 oz de haricots rouges
1 boîte de 15 oz de haricots noirs
1 boîte de 15 oz de sauce tomate
1 boîte de 14,5 oz de tomates en dés
1 boîte de 15 oz de bouillon de légumes
840098500 Fv00.qxd 3/8/02 1:23 PM Page 11
Page 24

12
Service à la clientèle
Si vous avez une question au sujet de votre micro-robot culinaire, composer notre
numéro sans frais d’interurbain de service aux clients. Avant de faire un appel,
veuillez noter les numéros de modèle, de type et de série, et fournir ces
renseignements ci-dessus. Ces numéros se trouvent à la base du votre
micro-robot culinaire. Ces renseignements nous aideront à répondre beaucoup
plus vite à toute question.
MODÈLE : ______________ TYPE : _______________ SÉRIE :__________________
Adresse du site Web : www.hamiltonbeach.com
HAMILTON BEACH PROCTOR-SILEX,INC.
P
ROCTOR-SILEX CANADA,INC.
263 Yadkin Road Southern Pines, North Carolina 28387
Picton, Ontario K0K 2T0
3/02
840098500
GARANTIE LIMITÉE
Ce produit est garanti exempt de vices de matériau et de fabrication pendant une
période de deux (2) ans pour les produits Hamilton Beach Portfolio ou pendant un (1)
an pour les produits Hamilton Beach à partir de la date de l'achat original, excepté ce
qui est noté ci-dessous. Au cours de cette période, nous réparerons ou remplacerons
ce produit sans frais, à notre discrétion. LA GARANTIE CI-DESSUS REMPLACE TOUTE
AUTRE GARANTIE EXPRESSE OU IMPLICITE, ÉCRITE OU ORALE, Y COMPRIS TOUTE
GARANTIE DE QUALITÉ MARCHANDE OU DE CONFORMITÉ À UNE FIN
PARTICULIÈRE. TOUTE RESPONSABILITÉ EST EXPRESSÉMENT LIMITÉE À UN
MONTANT ÉGAL AU PRIX D’ACHAT PAYÉ ET TOUTES LES RÉCLAMATIONS POUR
DOMMAGES SPÉCIAUX ET INDIRECTS SONT PAR LES PRÉSENTES EXCLUES.
La garantie ne s’applique pas aux accessoires suivants qui pourraient être vendus avec
ce produit : pièces en verre, récipients en verre, couteau/tamis, lames et/ou agitateurs.
Cette garantie ne s’applique qu’à l’acheteur d’origine et ne couvre pas un vice causé par
l’abus, le mésusage, la négligence, l’usage à des fins commerciales ou tout autre usage
non prescrit dans le mode d’emploi. Cette garantie vous confère des droits juridiques
spécifiques et vous pouvez aussi jouir d’autres droits juridiques qui peuvent varier d’un
État à un autre ou d’une province à une autre. Certains États ou provinces ne permettent
pas les limitations sur les garanties implicites ou les dommages spéciaux ou indirects de
telle sorte que les limitations ci-dessus ne s’appliquent peut-être pas dans votre cas.
Si vous désirez procéder à une réclamation en vertu de cette garantie, NE RETOURNEZ
PAS L’APPAREIL AU MAGASIN! Veuillez téléphoner au NUMÉRO DU SERVICE À LA
CLIENTÈLE. (Pour un service plus rapide, ayez à portée de la main les numéros de série,
de modèle et de type de votre appareil lorsque vous communiquez avec un représentant.)
NUMÉROS DU SERVICE À LA CLIENTÈLE
Aux États-Unis 1-800-851-8900
Au Canada 1-800-267-2826
Adresse du site Web : www.hamiltonbeach.com
CONSERVEZ CES NUMÉROS POUR RÉFÉRENCE ULTÉRIEURE!
840098500 Fv00.qxd 3/8/02 1:23 PM Page 12
 Loading...