

Page 1

READ BEFORE USE
LIRE AVANT UTILISATION
LEA ANTES DE USAR
Questions?
Please call us – our friendly
associates are ready to help.
USA: 1.800.851.8900
¿Preguntas?
Por favor llámenos – nuestros
amables representantes están
listos para ayudar.
MEX: 01 800 71 16 100
Le invitamos a leer cuidadosamente
este instructivo antes de usar su
aparato.
Visit www.hamiltonbeach.com for our
complete line of products and Use and
Care Guides – as well as
delicious recipes, tips, and
to register your product online!
Rendez-vous sur www.hamiltonbeach.ca
pour notre liste complète de produits et de
nos manuels utilisateur – ainsi que nos
délicieuses recettes, nos conseils et pour
enregistrer votre produit en ligne !
¡Visite www.hamiltonbeach.com.mx para
obtener nuestra línea completa de productos
y las Guías de Uso y Cuidado, además de
deliciosas recetas, consejos y para registrar
su producto en línea!
Questions ?
N’hésitez pas à nous appeler –
nos associés s’empresseront
de vous aider.
CAN : 1.800.267.2826
English ...................... 2
Français .................. 15
Español .................. 29
Half-Pint Soft-Serve
Ice Cream Maker
Sorbetière crème
glacée molle
Heladora Cremosa
de Media Pinta
840199700 ENv03.qxd:Layout 1 2/1/11 10:30 AM Page 1
Page 2

2
IMPORTANT SAFEGUARDS
1. Read all instructions.
2. Close supervision is necessary when any appliance is used
by or near children. This is not a toy or children’s product.
This product is not designed or intended for use by children
age 12 or younger.
3. Avoid contacting moving parts.
4. Keep hands and utensils out of freezer bowl while in use to reduce
the risk of injury to persons or to the appliance itself.
5. Do not place on or near hot surfaces such as a hot gas or electric
burner. Do not use this unit near oven, heater, or fireplace.
6. Do not use appliance for other than intended purpose.
When using this appliance, basic safety precautions should always be followed to reduce the risk of injury to persons, including the following:
SAVE THESE INSTRUCTIONS!
840199700 ENv03.qxd:Layout 1 2/1/11 10:30 AM Page 2
Page 3

3
Parts and Features
Freezer Bowl(s)
(NOTE: Liquid contained in
freezer bowl is nontoxic)
Motor On/Off
Switch
Mixing Paddle
Motor Housing
BEFORE FIRST USE: Remove all literature, packing material, and 2 AA batteries
from inside the ice cream maker. Clean freezer bowl(s), mixing paddle, and lid
in warm, soapy water. Thoroughly rinse and dry all parts. DO NOT immerse
motor in water. To clean, wipe with a damp cloth.
Lid
840199700 ENv03.qxd:Layout 1 2/1/11 10:30 AM Page 3
Page 4

4
How to Install and Replace the Batteries
2
4
Using a Phillips-head screwdriver,
remove the battery cover from
the motor housing.
3
Remove old batteries and
discard. Insert two new AA
batteries as shown above.
Replace battery cover.
NOTE: Batteries should last up
to 25 churning cycles.
Replace lid.
1
Squeeze locking tabs and remove
motor housing from lid.
NOTE: This step is necessary
only when replacing batteries.
The motor housing will not be
attached to the motor before
first use.
BEFORE FIRST USE: Install batteries BEFORE attaching lid to motor housing.
840199700 ENv03.qxd:Layout 1 2/1/11 10:30 AM Page 4
Page 5
5
How to Make Ice Cream
2
1 3
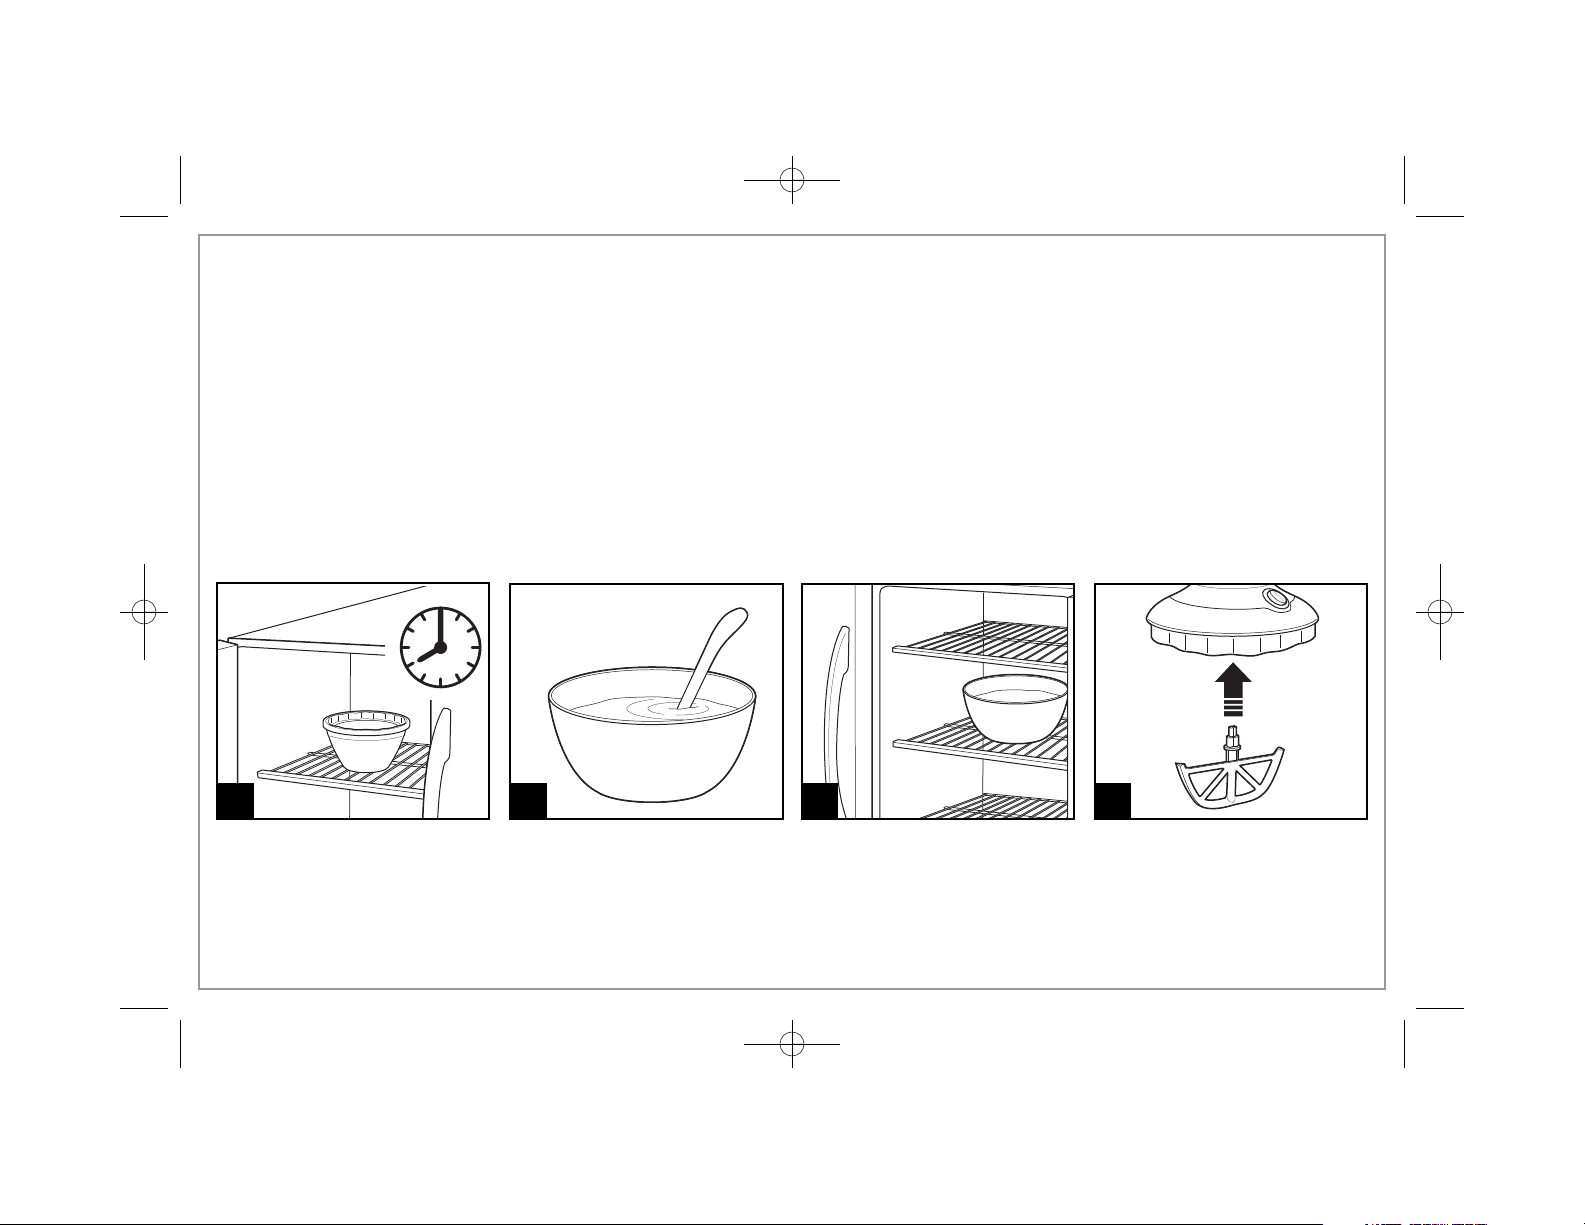
4
Allow freezer bowl(s) to freeze
completely. NOTE: Liquid contained in freezer bowl(s) is
nontoxic.
Prepare ice cream mixture.
NOTE: Use between 6–12 oz. of
mixture. Do not exceed 12 oz.
Chill mixture in refrigerator. Insert mixing paddle into motor
housing.
FOR BEST RESULTS:
• Before churning, thoroughly chill ice cream
mixture in the refrigerator and the freezer bowl(s)
in freezer. Freezer bowl(s) should remain in the
freezer for at least 8 hours before use. Freezer
temperature should be set to the coldest setting
and bowls should be placed towards the back
wall.
• This unit produces soft serve ice cream—the
consistency will not be the same as hard, storebought ice cream.
• If ice cream is not made after running the unit for
15 minutes maximum, your bowls have not been
frozen long enough OR your freezer is not cold
enough. See Troubleshooting section.
• If you wish to store any leftover ice cream in the
freezer bowl, simply place it inside a large plastic
zippered storage bag and put it back into the
freezer.
840199700 ENv03.qxd:Layout 1 2/1/11 10:30 AM Page 5
Page 6

8
Allow paddle to churn in mixture
for approximately 5–15 minutes.
If needed, press down lightly on
lid during the first few minutes of
churning. This may be needed
from time to time on lower-fat/
lower-sugar recipes.
NOTE: Pushing too hard will
result in the paddle reversing
back and forth.
How to Make Ice Cream (cont.)
6
Ensure lid with motor housing is securely placed on freezer bowl.
Press switch to ON (I).
IMPORTANT: Place lid on bowl quickly after pouring ingredients into
bowl, within a few seconds if possible. This will yield better results.
7
5
Pour chilled mixture into freezer
bowl. Do not exceed 12 oz.
(360 ml) of chilled mixture. Make
ice cream one bowl at a time.
6
840199700 ENv03.qxd:Layout 1 2/1/11 10:30 AM Page 6
Page 7

How to Make Ice Cream (cont.)
10
Unit will not turn OFF automatically.
You must press switch to OFF (O)
to stop churning.
11
Remove lid. Frozen mixture may
be eaten directly out of the freezer
bowl. To prevent surface scratching, using plastic utensils is
recommended when eating
directly from freezer bowls.
TO MAKE:
6 ounces (180 ml)
12 ounces (360 ml)
CHURN APPROXIMATELY:
5–6 minutes
8–9 minutes
After turning unit off, let it sit with the paddle and lid still attached
for approximately 2 minutes (see Step 10).
NOTE: If the ice cream mixture is too thick, or sat in freezer bowl
too long before churning, the paddle may struggle and/or reverse
directions. Turn unit OFF (O), break up the mixture in the bowl
with a spoon, replace the paddle, and turn back ON (I).
9
Ice cream is done when it looks
like “soft serve.” A thin layer of
ice cream may stick to the outside of bowl; this is normal. Turn
OFF (O); then let sit with mixing
paddle/lid still attached for about
2 minutes, allowing the ice cream
to freeze further.
7
840199700 ENv03.qxd:Layout 1 2/1/11 10:30 AM Page 7
Page 8

Tips for Best Results
• The machine will run until turned off. See Troubleshooting
if your unit did not make ice cream in 15 minutes.
• Add mix-ins, such as chocolate chips or chopped nuts,
after ice cream has churned for at least 5 minutes or
when mixture is thick and has started to freeze. Make sure
the mixing paddle is firmly pressed down to the bottom of
the freezer bowl when replacing lid (after adding mix-ins).
The mixing paddle should continue scraping the freezer
bowl and not sit on top of the mix-in ingredients.
• The finished result is a soft, spoonable ice cream.
Homemade ice cream will not be the same consistency
as hard, store-bought ice cream.
• Ice cream tastes best when fresh. It will begin to lose its
fresh taste after several days in the freezer.
• Using metal utensils may scratch the surface of the freezer
bowls, but this will not harm the unit. Plastic utensils are
recommended when eating directly from the freezer bowls
to extend the life of your unit.
• Placing hand on lid and pressing down lightly will help
churning and prevent as much ice cream from sticking to
the side of the bowl. A thin layer of ice cream will always
stick to the outside of the bowl; this is normal.
• Keep the freezer bowl(s) in the freezer so that you can make
ice cream at any time.
• For best results, the freezer bowl must be frozen thoroughly.
Make sure to set your freezer at the coldest setting
(temperature should not be more than 0°F [-18°C]).
• Firmness of ice cream depends on variables such as the recipe
used, room temperature, and temperature of ingredients
before churning.
• Some recipes require the mixture to be precooked. Make
the recipe at least one day ahead. This will allow the mixture
to cool completely and increase volume. Base mixture may
not freeze if it is not thoroughly chilled.
• Do not remove freezer bowl from the freezer until ready
to use.
• Do not puncture or heat the freezer bowl.
8
840199700 ENv03.qxd:Layout 1 2/1/11 10:30 AM Page 8
Page 9

Cleaning
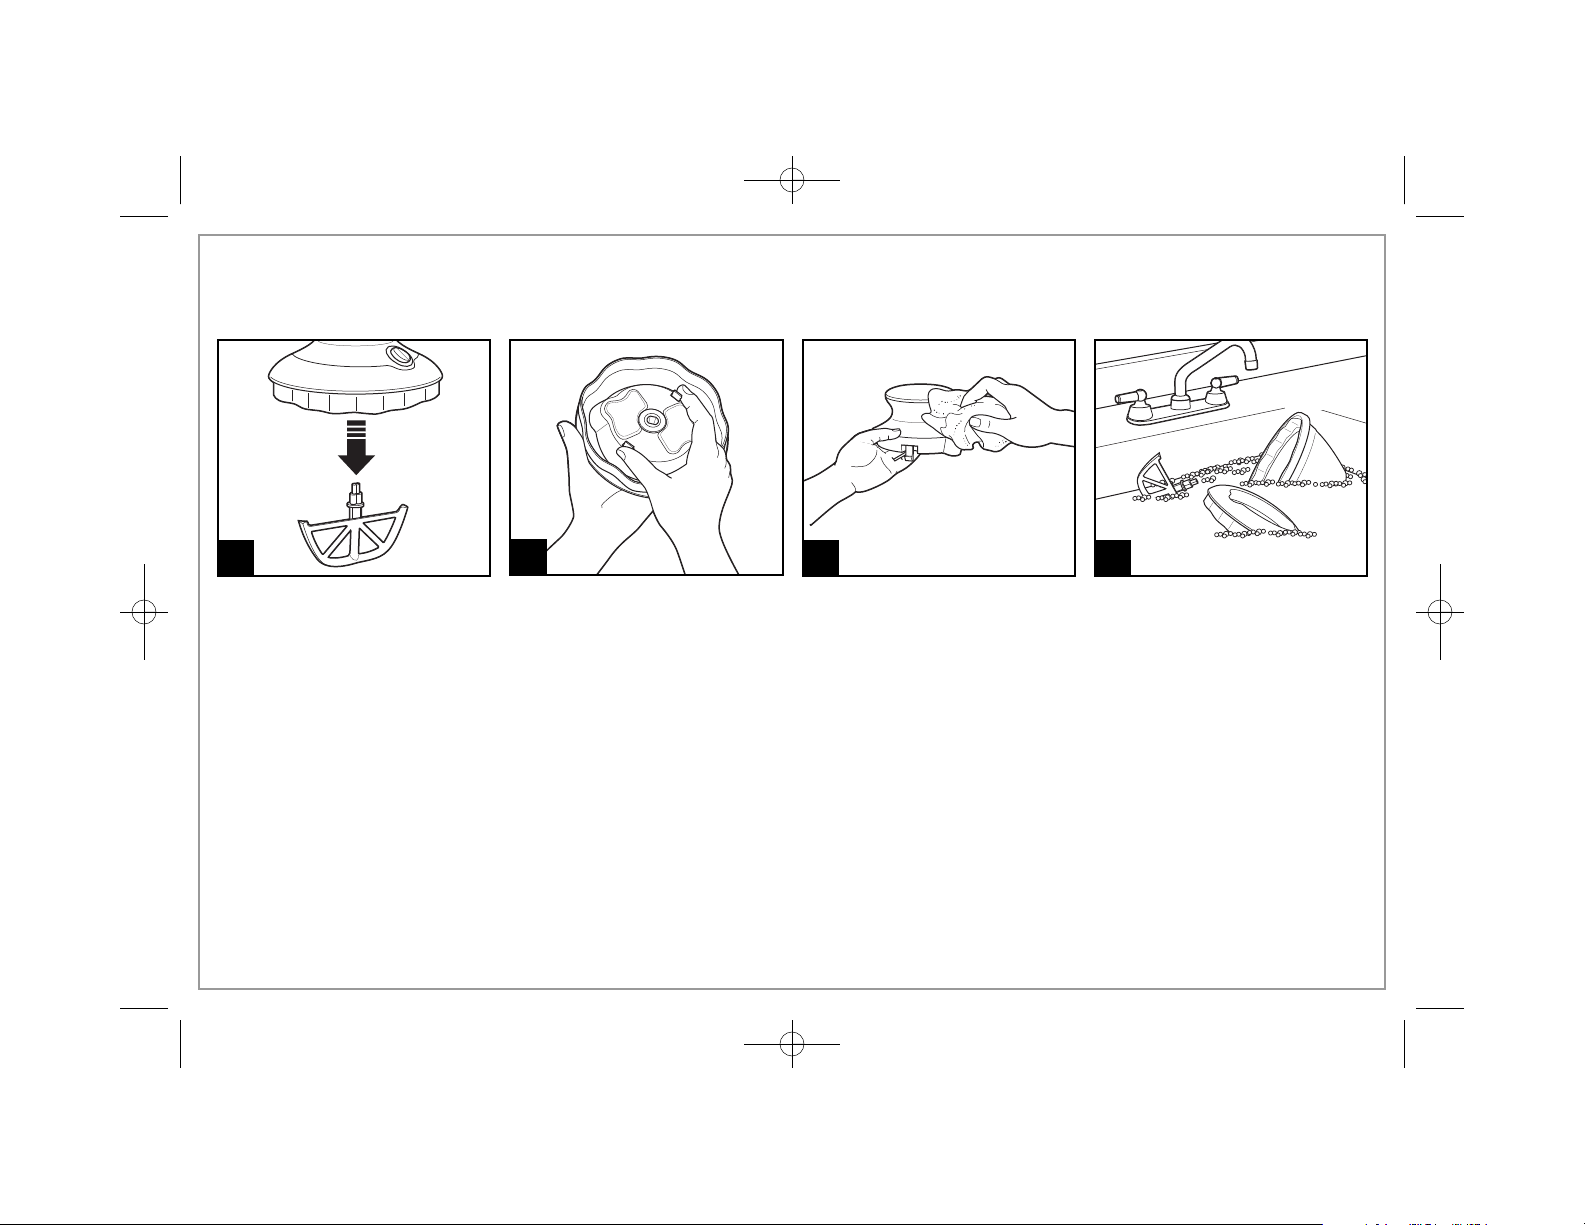
1
3
Wipe motor housing with a damp
cloth. Do not immerse in water or
other liquid.
4
Wash lid, mixing paddle, and
freezer bowl in sink. The lid and
mixing paddle may be placed in
the top rack of the dishwasher.
2
Squeeze locking tabs and remove
motor housing from lid.
Mixing
Paddle
Lid
Freezer
Bowl
9
840199700 ENv03.qxd:Layout 1 2/1/11 10:30 AM Page 9
Page 10

Troubleshooting
PROBLEM
Ice cream is not firm enough
or ice cream maker is still
running after 15 minutes.
Ice cream maker stops
churning before ice cream
is ready.
PROBABLE CAUSE
• The freezer bowl was not in the freezer long enough (for best results, at least 8 hours or
preferably overnight).
• The freezer is not cold enough. Ice cream sets at 10° to 14°F (-12° to -10°C). If the freezer
is not at 0°F (-18°C), the ice cream will not set.
• Too much mixture was put in freezer bowl. Maximum fill is 12 oz. (360 ml).
• Ingredients are warm or at room temperature.
• The freezer bowl was left at room temperature for more than 5 minutes before use.
• The freezer door was opened and closed too many times during the freezing process.
• The freezer bowl has a thick coating of ice on the walls. After washing, dry completely prior
to placing back in freezer.
• Mix-in ingredients, such as chocolate chips or chopped nuts, were added too soon. Wait until
ice cream has churned for at least 5 minutes or until mixture is thick and has started to freeze
before adding.
• The mix-in ingredients are too large, causing the paddle to jam. Chop nuts or other ingredients
before adding.
• Too large a quantity of mix-in ingredients has been added. Add one cup or less of mix-in
ingredients.
• Batteries are weak or dead and need to be replaced.
10
840199700 ENv03.qxd:Layout 1 2/1/11 10:30 AM Page 10
Page 11

11
Troubleshooting (cont.)
PROBLEM
Surface of bowl(s) scratched.
Ice cream too firm.
Thick layer of ice cream
sticking to sides of bowl(s).
PROBABLE CAUSE
• Using metal utensils may scratch the surface of the freezer bowls, but this will not harm the
unit. Plastic utensils are recommended when eating directly from the freezer bowls to extend
the life of your unit.
• To order replacement bowls, call the customer service number located on the front cover of
this Use and Care guide.
• Letting the ice cream sit in the freezer bowls for some time after churning will make the mixture
very firm and difficult to scoop. Simply allow the churned mixture to sit for a few additional
minutes and it will begin to soften again.
• A thin layer of ice cream on the sides of bowl is normal. Greater sticking tends to be present in
lower-fat/lower-sugar recipes. When churning, place hand lightly on lid for the first few minutes
to help these recipes begin to freeze.
840199700 ENv03.qxd:Layout 1 2/1/11 10:30 AM Page 11
Page 12
Vanilla Ice Cream Base
(makes approximately 3 cups [710 ml],
or (6) 1/2 cup [125 ml] servings)
2 cup (500 ml) half-and-half
1 cup (250 ml) heavy cream
1/2 cup (125 ml) sugar
1 1/2 teaspoons (7.5 ml) vanilla extract
Combine ingredients in a 1-quart container with a tight-fitting
lid. Shake until sugar is dissolved. Keep refrigerated.
Add-ins:
Fruit
Candy
Cookies
Nuts
Place 6–12 ounces (180–360 ml) of ice cream base into freezer
bowl. Turn motor ON (I). Once mixture starts to thicken, turn
motor OFF (O), remove lid, and add 3 tablespoons of your favorite
mix-in. Replace lid; then restart motor. Hold down lid until mixing
paddle starts to rotate smoothly.
Low Fat Vanilla Ice Cream Base
(makes approximately 3 cups [710 ml],
or (6) 1/2 cup [125 ml] servings)
1 cup (25 ml) fat-free half-and-half
1/2 cup (125 ml) evaporated milk
1/2 cup (125 ml) whole milk
3/4 cup (190 ml) sugar
1 teaspoon (15 ml) vanilla extract
Combine ingredients in a 1-quart container with a tight-fitting
lid. Shake until sugar is dissolved. Keep refrigerated.
Recipes
NOTE: For an easy treat, try making “frozen yogurt.” Simply put one 6-oz. (180 ml) container
of yogurt into a freezer bowl and follow instructions in “How to Make Ice Cream.”
Visit www.hamiltonbeach.com for our
complete line of products and Use and Care
Guides – as well as delicious
recipes, tips, and to register
your product online!
12
Nutritional Information
Amount Per Serving (approx. 1/2 cup [125 ml])
Calories 189.08
Calories from Fat (6%) 11.89
% Daily Value
Total Fat 1.32 g 2%
Saturated Fat 0.76 g 4%
Cholesterol 4.07 mg 1%
Sodium 18 mg <1%
Potassium 56.07 mg 2%
Total Carbohydrates 43.74 g 15%
Fiber 0 g 0%
Sugar 43.77 g
Protein 1.28 g 3%
840199700 ENv03.qxd:Layout 1 2/1/11 10:30 AM Page 12
Page 13

Individual Recipes (6 ounces [180 ml] each)
Chocolate Ice Cream
4 teaspoons (20 ml) unsweetened baking cocoa
2 tablespoons (30 ml) sugar
1/2 cup (125 ml) half-and-half
1/4 teaspoon (1.25 ml) vanilla extract
Combine cocoa and sugar and stir to mix. Add a small amount
of half-and-half and mix. Add remaining half-and-half and vanilla.
Stir until well-mixed.
Cappuccino Ice Cream
1 teaspoon (5 ml) instant coffee powder
1/4 teaspoon (1.25 ml) unsweetened baking cocoa
2 tablespoons (30 ml) sugar
1/2 cup (125 ml) half-and-half
Combine all ingredients and stir for 30 seconds to dissolve sugar
and coffee.
Recipes (cont.)
Frozen Strawberry Yogurt
May use strawberry, blueberry, raspberry, or any combination.
1/3 cup (80 ml) berry yogurt
2 tablespoons (30 ml) finely chopped or mashed strawberries
2 tablespoons (30 ml) sugar
3 tablespoons (45 ml) low-fat milk
Combine all ingredients and stir well to mix.
NOTE: Any other type of berries may be substituted for strawberries
in this recipe.
Pomegranate-Berry Sorbet
1/4 cup (60 ml) raspberries
1/2 cup (125 ml) pomegranate juice
2 tablespoons (30 ml) sugar
Mash berries. Combine with other ingredients and stir well to mix.
Citrus Cooler Sorbet
2/3 cup (160 ml) orange juice
Grated zest of 1/4 of a lemon
2 tablespoons (30 ml) sugar
Combine all ingredients and stir well to mix.
13
840199700 ENv03.qxd:Layout 1 2/1/11 10:30 AM Page 13
Page 14

14
Limited Warranty
This warranty applies to products purchased in the U.S. and Canada. This is the only express warranty for this product and is in lieu of
any other warranty or condition.
This product is warranted to be free from defects in material and workmanship for a period of one (1) year from the date of original
purchase. During this period, your exclusive remedy is repair or replacement of this product or any component found to be defective,
at our option; however, you are responsible for all costs associated with returning the product to us and our returning a product or
component under this warranty to you. If the product or component is no longer available, we will replace with a similar one of equal
or greater value.
This warranty does not cover glass, filters, wear from normal use, use not in conformity with the printed directions, or damage to the
product resulting from accident, alteration, abuse, or misuse. This warranty extends only to the original consumer purchaser or gift
recipient. Keep the original sales receipt, as proof of purchase is required to make a warranty claim. This warranty is void if the product
is used for other than single-family household use or subjected to any voltage and waveform other than as specified on the rating label
(e.g., 120V ~ 60 Hz).
We exclude all claims for special, incidental, and consequential damages caused by breach of express or implied warranty. All liability is
limited to the amount of the purchase price. Every implied warranty, including any statutory warranty or condition of merchantability
or fitness for a particular purpose, is disclaimed except to the extent prohibited by law, in which case such warranty or condition is
limited to the duration of this written warranty. This warranty gives you specific legal rights. You may have other legal rights that vary
depending on where you live. Some states or provinces do not allow limitations on implied warranties or special, incidental, or
consequential damages, so the foregoing limitations may not apply to you.
To make a warranty claim, do not return this appliance to the store. Please call 1.800.851.8900 in the U.S. or 1.800.267.2826 in Canada
or visit hamiltonbeach.com in the U.S. or hamiltonbeach.ca in Canada. For faster service, locate the model, type, and series numbers
on your appliance.
840199700 ENv03.qxd:Layout 1 2/1/11 10:30 AM Page 14
Page 15

15
IMPORTANTS CONSEILS DE SÉCURITÉ
1. Lire toutes les instructions.
2. L’utilisation de tout appareil par ou près des enfants requiert
une surveillance accrue. Cet appareil n’est pas un jouet ou un
produit destiné aux enfants. Cet appareil n’est pas conçu ou
prévu pour l’utilisation par un enfant de moins de 12 ans.
3. Éviter de toucher des pièces mobiles.
4. Tenir les mains et les ustensiles hors du bol isotherme pendant
le fonctionnement pour réduire les risques de blessures ou de
dommages à l’appareil.
5. Ne pas placer sur ou près de surfaces chaudes comme un brûleur
électrique ou à gaz. Ne pas utiliser cet appareil près d’un four,
réchaud ou foyer.
6. N’utiliser cet appareil que pour les fonctions auxquelles il est
destiné.
Pendant l’utilisation de cet appareil, vous devez toujours prendre des mesures élémentaires de sécurité pour réduire de blessure corporelle,
en particulier les mesures suivantes :
CONSERVEZ CES INSTRUCTIONS !
840199700 FRv03.qxd:Layout 1 2/1/11 10:31 AM Page 15
Page 16

16
Pièces et caractéristiques
AVANT LA PREMIÈRE UTILISATION : Enlever toute la
documentation, tous les matériaux d’emballage, et deux
piles AA à l’intérieur de la sorbetière. Nettoyer le bol(s)
isotherme, la palette et le couvercle avec de l’eau chaude
savonneuse. Rincer entièrement et laisser sécher les
pièces. NE PAS immerger le moteur dans l’eau. Pour
le nettoyer, essuyer avec un linge humide.
Bol(s) isotherme
(REMARQUE : Le liquide
contenu dans le bol isotherme
est non-toxique)
Moteur interrupteur
« MARCHE/ARRÊT »
Palette
Logement du moteur
Couvercle
840199700 FRv03.qxd:Layout 1 2/1/11 10:31 AM Page 16
Page 17

17
Comment installer et remplacer les piles
2
4
Pour remplacer les piles, utiliser
un tournevis à tête cruciforme
pour retirer le couvercle du
logement de moteur.
3
Retirer les piles usagées et
les jeter. Insérer deux piles AA
neuves comme illustré ci-dessus.
Installer le couvercle du logement
de moteur.
REMARQUE : La durée de vie
des piles permet jusqu’à 25
cycles de barattage.
Replacer le couvercle.
1
Presser les languettes de
verrouillage et retirer le moteur
du couvercle.
REMARQUE : Cette étape
est nécessaire seulement en
remplaçant des piles. Le logement
du moteur ne sera pas attaché
au moteur avant le premier
usage.
AVANT LA PREMIÈRE UTILISATION : Installer les piles AVANT de fixer le couvercle au logement du moteur.
840199700 FRv03.qxd:Layout 1 2/1/11 10:31 AM Page 17
Page 18

18
Confection de crème glacée
21
Congeler entièrement les bols
isothermes. REMARQUE : Le
liquide contenu dans le bol
isotherme est non-toxique.
Préparer le mélange de crème
glacée.
REMARQUE : Utiliser une quantité
de mélange de 180 à 360 ml (6 à
12 oz.). Ne pas utiliser plus de
360 ml (12 oz.).
POUR DES RÉSULTATS OPTIMAUX :
• Avant le barattage, refroidir complètement le
mélange de crème glacée au réfrigérateur et
les bols isothermes au congélateur. Les bols
isothermes doivent demeurer au congélateur
pendant au moins 8 heures avant leur utilisation.
La température du congélateur doit être réglée
au plus froid et les bols doivent être placés
contre la paroi arrière.
• Cet appareil produit une crème glacée molle—la
consistance ne sera pas aussi ferme que la crème
glacée commerciale.
• Une crème glacée qui n’est pas prête au bout de
15 minutes maximum signifie que les bols n’ont
pas été congelés suffisamment longtemps OU
que le congélateur n’est pas suffisamment froid.
Voir la section Dépannage.
• Si l’on souhaite conserver la crème glacée
restante dans le bol isotherme, simplement
placer celui-ci dans un sac à fermeture à glissière
grand format puis le replacer au congélateur.
3 4
Faire refroidir le mélange au
réfrigérateur.
Fixer la palette au bloc-moteur.
840199700 FRv03.qxd:Layout 1 2/1/11 10:31 AM Page 18
Page 19

19
6
S’assurer que le couvercle avec le logement du moteur est fermement
mis en place sur le bol isotherme. Appuyer sur la touche de mise en
marche (I).
IMPORTANT : Placer rapidement le couvercle sur le bol après avoir
versé les ingrédients dans le bol, quelques secondes après si
possible. Ceci donnera de meilleurs résultats.
Confection de crème glacée (suite)
8
Laisser la palette baratter le
mélange pendant environ 5 à
15 minutes. Si besoin, appuyer
légèrement sur le couvercle
pendant les premières minutes
du barattage. Ceci peut être
nécessaire de temps en temps
pour les recettes à faible teneur
en sucre/matières grasses.
REMARQUE : Appuyer trop fort
inverse le sens de fonctionnement de la palette en va-et-vient.
75
Verser le mélange dans le bol
isotherme. Ne pas utiliser plus
de 360 ml (12 oz.) de mélange
refroidi. Fabriquer la crème glacée
un bol à la fois.
840199700 FRv03.qxd:Layout 1 2/1/11 10:31 AM Page 19
Page 20

20
11
10
L’appareil ne s’éteint pas automatiquement. Appuyer sur la touche
OFF (O) pour ârreter le barattage.
Enlever le couvercle. Le mélange
congelé peut être mangé directement depuis le bol isotherme.
Pour éviter de rayer les surfaces,
l’utilisation d’ustensiles en plastique est recommandée lorsque
l’on mange directement depuis
les bols isothermes.
Confection de crème glacée (suite)
9
La crème glacée est prête
lorsqu’elle semble molle. Une fine
couche de crème glacée peut
adhérer à l’extérieur du bol, c’est
normal. Mettre hors tension (O),
puis laisser reposer avec le couvercle/ la palette encore en place
pendant environ 2 minutes, en
laissant la crème glacée congeler
davantage.
POUR PRÉPARER :
180 ml (6 onces)
360 ml (12 onces)
BARATTER ENVIRON :
5 à 6 minutes
8 à 9 minutes
Une fois l’appareil éteint, laisser reposer avec la palette et le couvercle toujours fixés
pendant environ 2 minutes (voir l’Étape 10).
REMARQUE : Si le mélange de crème glacée est trop épais, ou est resté trop longtemps
dans le bol isotherme avant le barattage, la palette peut patiner ou changer de sens de
fonctionnement. Mettre l’appareil hors tension, séparer le mélange dans le bol à la
cuiller, remettre la palette en place et remettre l’appareil sous tension.
840199700 FRv03.qxd:Layout 1 2/1/11 10:31 AM Page 20
Page 21

21
Conseils pour des résultats optimaux
• L’appareil fonctionnera jusqu’à ce qu’il soit éteint. Voir le
guide de dépannage si la durée de confection de la crème
glacée est supérieure à 15 minutes.
• Ajouter des pépites de chocolat ou des noix hachées après
un barattage d’au moins 5 minutes ou jusqu’à épaississement du mélange et le début de la congélation. S’assurer
que la palette est complètement appuyée au fond du bol
isotherme au moment de replacer le couvercle (après ajout
des ingrédients). La palette doit continuer de racler le bol
isotherme et ne pas se trouver sur le dessus des ingrédients.
• Le produit fini produira une crème glacée molle et épaisse.
La crème glacée maison ne possède pas les caractéristiques
de fermeté de la crème glacée commerciale.
• Une crème glacée fraîche a bien meilleur goût. Le mélange
perdra de sa fraîcheur après plusieurs jours au congélateur.
• L’utilisation d’ustensiles métalliques peut rayer la surface
des bols isothermes, mais non l’appareil. Les ustensiles en
plastique sont recommandés si l’on mange directement
depuis les bols et ce, afin de prolonger la durée de vie de
l’appareil.
• Placer la main sur le couvercle et appuyer légèrement aide le
barattage et évite l’adhésion de crème glacée sur les parois du
bol. Une fine couche de crème glacée peut toujours adhérer à
l’extérieur du bol, c’est normal.
• Le stockage continu du bol(s) isotherme au congélateur
permettra la confection ultérieure de crème glacée en
tout temps.
• Pour des résultats optimaux, le bol isotherme doit être
entièrement congelé. S’assurer de régler le thermostat du
congélateur à la température la plus froide (la température
ne devrait pas être supérieure à -18 °C [0 °F]).
• La fermeté de la crème glacée varie selon la recette utilisée,
la température de la pièce et la température des ingrédients
avant le barattage.
• Quelques recettes nécessitent un mélange précuit. Préparer
le mélange au moins 1 journée à l’avance. Ceci permettra
le refroidissement complet du mélange et son gonflement.
Un refroidissement inadéquat du mélange nuira à la
congélation.
• Stocker le bol isotherme au congélateur jusqu’à son
utilisation.
• Ne pas perforer ou chauffer le bol isotherme.
840199700 FRv03.qxd:Layout 1 2/1/11 10:31 AM Page 21
Page 22

22
Nettoyage
1 3
Essuyer le moteur avec un linge
humide. Ne pas immerger dans
l’eau ou tout autre liquide.
4
Laver le couvercle, la palette
et le bol isotherme dans l’évier.
Le couvercle et la palette sont
lavables dans le panier supérieur
du lave-vaisselle.
2
Presser les languettes de
verrouillage et retirer le moteur
du couvercle.
Palette
Couvercle
Bol
isotherme
840199700 FRv03.qxd:Layout 1 2/1/11 10:31 AM Page 22
Page 23

23
Dépannage
PROBLÈME
La crème glacée n’est pas
assez ferme ou le barattage se
poursuit après 15 minutes.
La sorbetière interrompt le
cycle de barattage avant que
la crème glacée ne soit prête.
CAUSE POSSIBLE
• Le bol isotherme n’a pas été suffisamment longtemps au congélateur (au moins 8 heures ou
toute la nuit pour des résultats optimaux).
• La température du congélateur est trop élevée. La congélation de la crème glacée s’effectue
à une température de -12 ° à -10 °C (10 ° à 14 °F). La formation de la crème glacée ne peut se
produire si la température du congélateur n’est pas à -18 °C (0 °F).
• Trop grande quantité de mélange dans le bol isotherme. Remplissage maximal : 360 ml (12 oz.).
• Ingrédients chauds ou à la température de la pièce.
• Lebol isotherme a été exposé à la température de la pièce plus de 5 minutes avant son
utilisation.
• Ouvertures et fermetures de porte du congélateur trop fréquentes pendant le processus de
congélation.
• Une importante couche de glace recouvre les parois du bol isotherme. Après le nettoyage,
assécher complètement avant de remettre au congélateur.
• Les ingrédients comme les pépites de chocolat ou les noix hachées ont été ajoutés
prématurément. Attendre 5 minutes après le début du barattage de la crème glacée ou
jusqu’à épaississement du mélange et le début de la congélation avant d’ajouter d’autres
ingrédients.
• Le coincement de la palette est provoqué par l’ajout d’ingrédients trop gros. Hacher les noix
et autres ingrédients avant de les ajouter.
• Ajout d’une trop grande quantité d’ingrédients. Ajouter une tasse ou moins d’ingrédients.
• Les piles sont faibles ou mortes et doivent être remplacées.
840199700 FRv03.qxd:Layout 1 2/1/11 10:31 AM Page 23
Page 24
24
Dépannage (suite)
PROBLÈME
Surface de bol rayée.
Crème glacée trop ferme.
Couche épaisse de crème
glacée collant aux parois des
bols.
CAUSE POSSIBLE
• L’utilisation d’ustensiles métalliques peut rayer la surface des bols isothermes, mais non
l’appareil. Les ustensiles en plastique sont recommandés si l’on mange directement dans
les bols isothermes et ce, afin de prolonger la durée de vie de l’appareil.
• Pour commander des bols de rechange, composer le numéro du service à la clientèle situé
sur la page de couverture de ce Mode d’emploi et d’entretien.
• Laisser la crème glacée reposer dans les bols isothermes pendant une certaine période après
le barattage rendra le mélange très ferme et difficile à extraire à la cuillère. Il faut simplement
laisser ramollir le mélange baratté quelques minutes de plus.
• La présence d’une fine couche de crème glacée sur les parois du bol est normale. L’adhésion
est généralement plus importante pour les recettes à faible teneur en sucre/matières grasses.
Pendant le barattage, placer légèrement la main sur le couvercle pendant quelques minutes
pour aider ces recettes à commencer à congeler.
840199700 FRv03.qxd:Layout 1 2/1/11 10:31 AM Page 24
Page 25

25
Base pour crème glacée à la vanille
(pour environ 710 ml [3 tasses] ou 6 portions
de 125 ml [1/2 tasse])
500 ml (2 tasses) de crème simple
250 ml (1 tasse) de crème riche en matière grasse
125 ml (1/2 tasse) de sucre
7,5 ml (1 1/2 c. à café) d’extrait de vanille
Combiner les ingrédients dans un récipient de 1 litre avec
couvercle hermétique. Secouer jusqu’à dissolution complète
du sucre. Garder réfrigéré.
Ingrédients :
Fruit, bonbon, biscuits, noix
Verser 180 à 360 ml (6 à 12 oz.) de base pour crème glacée
dans le bol isotherme. Mettre le moteur en marche (ON/I).
Dès que le mélange commence à épaissir, éteindre le moteur
(OFF/O), retirer le couvercle et ajouter 45 ml (3 c. à soupe)
d’ingrédients préférés. Refermer le couvercle puis remettre
le moteur en marche. Maintenir le couvercle fermé jusqu’à
ce que la palette tourne doucement.
Base pour crème glacée à la vanille faible en gras
(pour environ 710 ml [3 tasses] ou 6 portions de
125 ml [1/2 tasse])
250 ml (1 tasse) de moitié-moitié sans gras
125 ml (1/2 tasse) de lait évaporé
125 ml (1/2 tasse) de lait entier
190 ml (3/4 tasse) de sucre
15 ml (1 c. à café) d’extrait de vanille
Combiner les ingrédients dans un récipient de 1 litre avec
couvercle hermétique. Secouer jusqu’à dissolution complète
du sucre. Garder réfrigéré.
Recettes
NOTE : Pour un régal instantané, essayer le yogourt « glacé ». Mettre simplement un contenant de
180 ml (6 oz.) de yogourt dans un bol isotherme et suivre les instructions de la section « Confection
de crème glacée ».
Rendez-vous sur www.hamiltonbeach.ca pour notre
liste complète de produits et de nos manuels
utilisateur – ainsi que nos délicieuses
recettes, nos conseils et pour
enregistrer votre produit en ligne !
Information nutritionnelle
Quantité par portion (environ 125 ml [1/2 tasse])
Calories 189,08
Calories provenant du gras (6 %) : 11,89
% Valeur quotidienne
Total de gras 1,32 g : 2 %
Gras saturé 0,76 g : 4 %
Cholestérol 4,07 mg : 1 %
Sel 18 mg : < 1 %
Potassium 56,07 mg : 2 %
Total des glucides 43,74 g : 15 %
Fibres 0 g : 0 %
Sucre 43,77 g
Protéines 1,28 g : 3 %
840199700 FRv03.qxd:Layout 1 2/1/11 10:31 AM Page 25
Page 26

26
Recettes (suite)
Recettes individuelles
(portion de 180 ml [6 oz.] ch.)
Crème glacée au chocolat
20 ml (4 c. à café) de cacao
30 ml (2 c. à soupe) de sucre
1/2 tasse (125 ml) de crème simple
1,25 ml (1/4 c. à café) d’extrait de vanille
Combiner le cacao et le sucre puis mélanger. Ajouter une petite
quantité de crème simple au mélange. Ajouter le reste de crème
simple et la vanille. Bien mélanger le tout.
Crème glacée cappuccino
5 ml (1 c. à café) de café en poudre
1,25 (1/4 c. à café) de cacao
30 ml (2 c. à soupe) de sucre
1/2 tasse (125 ml) de crème simple
Combiner tous les ingrédients et mélanger pendant 30 secondes
pour dissoudre le sucre et le café en poudre.
Yogourt glacé à la fraise
Utiliser des fraises, bleuets, framboises ou toute autre combinaison.
80 ml (1/3 de tasse) de yogourt aux baies
30 ml (2 c. à soupe) de fraises en purée ou hachées
30 ml (2 c. à soupe) de sucre
45 ml (3 c. à soupe) de lait à faible teneur en matière grasse
Combiner tous les ingrédients et bien mélanger le tout.
REMARQUE : Tout autre type de petit fruit peut être substitué aux
fraises dans cette recette.
Sorbet à la grenade et aux baies
60 ml (1/4 de tasse) de framboises
125 ml (1/2 tasse) de jus de grenade
30 ml (2 c. à soupe) de sucre
Baies broyées. Combiner tous les ingrédients et bien mélanger
le tout.
Sorbet panaché aux agrumes
160 ml (2/3 de tasse) de jus d’orange
Zeste de 1/4 de citron
30 ml (2 c. à soupe) de sucre
Combiner tous les ingrédients et bien mélanger le tout.
840199700 FRv03.qxd:Layout 1 2/1/11 10:31 AM Page 26
Page 27

27
Notes
840199700 FRv03.qxd:Layout 1 2/1/11 10:31 AM Page 27
Page 28

28
Garantie limitée
Cette garantie s’applique aux produits achetés aux É.-U. et au Canada. C’est la seule garantie expresse pour ce produit et est
en lieu et place de tout autre garantie ou condition.
Ce produit est garanti contre tout défaut de matériaux et de main-d’oeuvre pour une période de un (1) an à compter de la
date d’achat d’origine. Au cours de cette période, votre seul recours est la réparation ou le remplacement de ce produit ou
tout composant s’avérant défectueux, à notre gré, mais vous êtes responsable de tous les coûts liés à l’expédition du produit
et le retour d’un produit ou d’un composant dans le cadre de cette garantie. Si le produit ou un composant n’est plus offert,
nous le remplacerons par un produit similaire de valeur égale ou supérieure.
Cette garantie ne couvre pas le verre, les filtres, l’usure d’un usage normal, l’utilisation non conforme aux directives imprimées,
ou des dommages au produit résultant d’un accident, modification, utilisation abusive ou incorrecte. Cette garantie s’applique
seulement à l’acheteur original ou à la personne l’ayant reçu en cadeau. La présentation du reçu de vente d’origine comme
preuve d’achat est nécessaire pour faire une réclamation au titre de cette garantie. Cette garantie s’annule si le produit est u
tilisé autrement que par une famille ou si l’appareil est soumis à toute tension ou forme d’onde différente des caractéristiques
nominales précisées sur l’étiquette (par ex. : 120 V ~ 60 Hz).
Nous excluons toutes les réclamations au titre de cette garantie pour les dommages spéciaux, consécutifs et indirects causés
par la violation de garantie expresse ou implicite. Toute responsabilité est limitée au prix d’achat. Chaque garantie implicite,
y compris toute garantie ou condition de qualité marchande ou d’adéquation à un usage particulier, est exonérée, sauf
dans la mesure interdite par la loi, auquel cas la garantie ou condition est limitée à la durée de cette garantie écrite. Cette
garantie vous donne des droits légaux précis. Vous pouvez avoir d’autres droits qui varient selon l’endroit où vous habitez.
Certaines provinces ne permettent pas les limitations sur les garanties implicites ou les dommages spéciaux ou indirects de
telle sorte que les limitations ci-dessus ne s’appliquent peut-être pas à votre cas.
Ne pas retourner cet appareil au magasin lors d’une réclamation au titre de cette garantie. Téléphoner au 1.800.851.8900 aux
É.-U. ou au 1.800.267.2826 au Canada ou visiter le site internet www.hamiltonbeach.com aux É.-U. ou www.hamiltonbeach.ca
au Canada. Pour un service plus rapide, trouvez le numéro de modèle, le type d’appareil et les numéros de série sur votre
appareil.
840199700 FRv03.qxd:Layout 1 2/1/11 10:31 AM Page 28
Page 29

29
SALVAGUARDIAS IMPORTANTES
1. Lea todas las instrucciones.
2. Se requiere de una estrecha supervisión cuando cualquier
aparato esté siendo usado por o cerca de niños.
Este no es
un juguete o un producto para niños. Este producto no está
diseñado ni tiene el propósito para ser usado por niños de
12 o menos años de edad.
3. Evite el contacto con partes móviles.
4. Mantenga manos y utensilios fuera del tazón congelador
mientras que esté en uso para reducir el riesgo de lesión
a personas o al aparato mismo.
5. No coloque sobre o cerca de superficies calientes tales como
quemadores calientes de gas o eléctricos. No use esta unidad
cerca de la estufa, calentador o chimenea.
6. No use el aparato con otro propósito que no sea para el que
fue hecho.
Cuanto utilice este aparato, siempre deben seguirse precauciones de seguridad básicas a fin de reducir el lesiones a personas,
incluyendo las siguientes:
¡GUARDE ESTAS INSTRUCCIONES!
840199700 SPv03.qxd:Layout 1 2/1/11 10:48 AM Page 29
Page 30

30
Partes y Características
ANTES DE USAR POR PRIMERA VEZ: Remueva toda la literatura,
material del empaque, y 2 baterías AA del interior de la máquina de
hacer helados. Limpie el tazón(s) congelador, paleta de mezclado y
tapa en agua jabonosa caliente. Enjuague a fondo y seque todas
las partes. NO sumerja el motor en agua. Para limpiarlo, use un
trapo húmedo.
Tazón(s) Congelador
(NOTA: El líquido contenido
en el tazón para congelador
es no tóxico)
Motor de Interruptor
ENCENDIDO/APAGADO
Paleta de
Mezclado
Carcasa del Motor
Ta pa
840199700 SPv03.qxd:Layout 1 2/1/11 10:48 AM Page 30
Page 31

31
Cómo Instalar y Cambiar las Baterías
2
4
Con un destornillador de estrella,
quite la tapa de las baterías de la
carcasa del motor.
3
Quite las baterías gastadas
y elimínelas. Introduzca dos
baterías AA nuevas como se
indica arriba.
Vuelva a colocar la tapa de las
baterías.
NOTA: Las baterías deben durar
hasta 25 ciclos de preparación.
Vuelva a colocar la tapa.
1
Apriete las lengüetas de bloqueo
y remueva el motor de la tapa.
NOTA: Este paso es necesario
sólo cuando se reemplazan las
baterías. La carcasa del motor
no estará sujeta al motor antes
del primer uso.
ANTES DE USAR POR PRIMERA VEZ: Instale las baterías ANTES de colocar la tapa en la carcasa del motor.
840199700 SPv03.qxd:Layout 1 2/1/11 10:48 AM Page 31
Page 32

32
Como Hacer Helado
21 3 4
Deje que el(los) tazón(es)
para congelador se congelen
com-pletamente. NOTA: El
líquido contenido en el tazón
para congelador es no tóxico.
Prepare la mezcla de la nieve.
NOTA: Use entre 6 a 12 onzas
(180 a 360 ml) de mezcla. No
se exceda de 12 onzas (360 ml).
Enfríe la mezcla en el refrigerador. Inserte la paleta mezcladora en el
ensamble del motor.
PARA MEJORES RESULTADOS:
• Antes de la preparación, congele totalmente
la mezcla de helado en el refrigerador y el
recipiente(s) para freezer en el freezer. Los
tazones para congelador deben permanecer
en el congelador por al menos 8 horas antes
de su uso. La temperatura del congelador debe
ajustarse en lo más frío y los tazones deben
colocarse hacia el fondo.
• Esta unidad produce helado en crema—la
consistencia no será igual de dura a la comprada
en heladerías.
• Si el helado no se prepara luego de hacer
funcionar la unidad durante un máximo de
15 minutos, los recipientes no estarán lo
suficientemente congelados O su freezer no
estará lo suficientemente frío. Consulte la
sección de Resolviendo Problemas.
• Si desea guardar restos de helado en el
recipiente del freezer, simplemente coloque
el mismo dentro de una bolsa plástica con
cierre de tamaño grande y vuelva a guardar
el helado en el freezer.
840199700 SPv03.qxd:Layout 1 2/1/11 10:48 AM Page 32
Page 33

33
Como Hacer Helado
(cont.)
6
Asegúrese de que la tapa con el ensamble del motor esté colocada
de manera segura en el tazón para congelador. Presione el interruptor
a ENCENDIDO (I).
IMPORTANTE: Coloque la tapa sobre el tazón rápidamente luego de
verter los ingredientes en el tazón; dentro de unos pocos segundos si
es posible. Esto producirá mejores resultados.
8
Deje que la paleta revuelva la
mezcla durante entre 5 y 15
minutos aproximadamente. De ser
necesario, presione suavemente
la tapa durante los primeros
minutos mientras se revuelve.
Esto puede ser necesario de
tanto en tanto con recetas bajas
en grasas/bajas en azúcar.
NOTA: Si se presiona con
demasiada fuerte, esto hará que
la paleta cambie de dirección
hacia atrás y adelante.
75
Vacíe la mezcla refrigerada en el
tazón para congelador. No exceda
de 12 onzas (360 ml) de mezcla
enfriada. Haga un recipiente de
helado por vez.
840199700 SPv03.qxd:Layout 1 2/1/11 10:48 AM Page 33
Page 34

34
11
10
La unidad no estará en APAGADO
de forma automática. Se deberá
presionar el interruptor en la
posición APAGADO (O) para
que deje de revolver.
Remueva la tapa. La mezcla
congelada puede comerse
directamente del tazón para
congelador. Para evitar ralladuras
sobre la superficie, se recomienda
el uso de utensilios de plástico al
comer directamente de recipientes
congelados.
Como Hacer Helado
(cont.)
9
El helado estará hecho cuando se
vea “cremoso”. Una capa fina de
helado se podrá adherir a la parte
exterior del tazón; esto es normal.
Presione APAGADO (O); luego
deje reposar con la paleta de
mezclado/ tapa aún colocadas
por unos 2 minutos, permitiendo
que el helado se siga congelando.
PARA PREPARAR:
6 onzas (180 ml)
12 onzas (360 ml)
PREPARE APROXIMADAMENTE:
5 a 6 minutos
8 a 9 minutos
Luego de apagar la unidad, deje reposar con el utensilio para mezclar y la
tapa aún colocada por aproximadamente 2 minutos (consulte el Paso 10).
NOTA: Si la mezcla de helado es demasiado espesa, o se deja en el tazón
para congelador demasiado tiempo antes de revolver, es posible que
la paleta se mueva con dificultad y/o cambie de dirección. Presione
APAGADO (O) para apagar la unidad, separe la mezcla en el tazón con
una cuchara, reemplace la paleta, y vuelva a presionar ENCENDIDO (I).
840199700 SPv03.qxd:Layout 1 2/1/11 10:49 AM Page 34
Page 35

35
Consejos para Mejores Resultados
• La máquina funcionará hasta que se apague. Vea Resolviendo
Problemas si su unidad no hizo helado en 15 minutos.
• Agregue los complementos, tales como chispas de chocolate,
o nueces cortadas, después de batida la nieve por al menos 5
minutos o hasta que la mezcla esté espesa y haya comenzado
a congelarse. Asegúrese que la paleta de mezclado esté firmemente presionada hacia el fondo del tazón para congelador
cuando vuelva a colocar la tapa (después de incorporar los
agregados). La paleta de mezclado debe continuar tallando el
tazón para congelador y no asentarse sobre los ingredientes
agregados.
• El resultado final es una helado suave y manejable con cuchara.
El helado hecho en casa no tendrá la misma consistencia que el
helado duro comprado en tienda.
• El helado sabe mejor cuando es fresco. Comenzará a perder su
sabor fresco después de varios días en el congelador.
• Si se usan utensilios metálicos, se podrá rayar la superficie de los
recipientes del freezer, pero esto no dañará la unidad. Se
recomiendan utensilios de plástico al comer directamente de los
recipientes del freezer para extender la vida útil de la unidad.
• Colocar la mano y presionar suavemente ayudará a revolver y
evitará que gran cantidad de helado se adhiera a los costados
del tazón. Una capa fina de helado siempre se adherirá a la parte
exterior del tazón; esto es normal.
• Mantenga el tazón(s) congelador en el congelador de manera
que pueda hacer helado en cualquier momento.
• Para mejores resultados, el tazón congelador debe estar completamente congelado. Asegúrese de ajustar la temperatura del
congelador a lo mas frío (la temperatura no debe ser mayor a
0°F [-18°C]).
• La firmeza del helado depende en variables tales como la receta
usada, la temperatura de la habitación y la temperatura de los
ingredientes antes de batir.
• Algunas recetas requieren que la mezcla sea precocida. Haga
la receta al menos un día antes. Esto permitirá que la mezcla se
enfríe completamente y aumente el volumen. La mezcla base
puede no congelarse si no es enfriada completamente.
• No remueva el tazón congelador del congelador hasta que esté
listo para usarse.
• No perfore o caliente el tazón congelador.
840199700 SPv03.qxd:Layout 1 2/1/11 10:49 AM Page 35
Page 36
36
Limpieza
1 3
Limpie el motor con un trapo
húmedo. No sumerja en agua
ni otros líquidos.
4
Lave la tapa, paleta de mezclado y
tazón congelador en el lavadero.
La tapa y la paleta de mezclado
pueden colocarse en el estante
superior del lavavajillas.
2
Apriete las lengüetas de bloqueo
y remueva el motor de la tapa.
Paleta de
Mezclado
Ta pa
Ta zó n
Congelador
840199700 SPv03.qxd:Layout 1 2/1/11 10:49 AM Page 36
Page 37

37
Detección de Problemas
PROBLEMA
El helado no es lo
suficientemente firme
o la máquina sigue
funcionando después
de 15 minutos.
La máquina para hacer
nieve deja de batir antes
de que la nieve esté lista.
CAUSA PROBABLE
• El tazón para congelador no estuvo lo suficiente en el congelador (para mejores resultados,
por lo menos 8 horas o preferentemente toda la noche).
• El congelador no está lo suficientemente frío. El helado se endurece a los 10° a 14°F (-12° a
-10°C). Si el congelador no está a 0°F (-18°C) el helado no se endurecerá.
• Se puso mucha mezcla en el tazón congelador. El llenado máximo es de 12 onzas (360 ml).
• Los ingredientes estaban calientes o a temperatura de habitación.
• El tazón congelador se dejó a temperatura de habitación por más de 5 minutos antes de
usarse.
• Se abrió y se cerró la puerta del congelador demasiadas veces durante el proceso de
congelado del tazón congelador.
• El tazón congelador tiene una capa gruesa de hielo en las paredes. Después de lavar, seque
completamente antes de colocarlo de nuevo en el congelador.
• Los ingredientes de complemento tales como las chispas de chocolate o nueces cortadas
se agregaron muy pronto. Espere a que la nieve se haya batido por al menos 5 minutos
o hasta que la mezcla esté espesa y haya comenzado a congelarse antes de agregarlos.
• Los ingredientes de complemento son demasiado grandes causando que la paleta se atore.
Parta las nueces u otros ingredientes antes de agregarlos.
• Se ha agregado una cantidad de ingredientes de complemento muy grande. Agregue una
taza o menos de ingredientes de complemento.
• Las baterías tienen poca carga o se han gastado y deben reemplazarse.
840199700 SPv03.qxd:Layout 1 2/1/11 10:49 AM Page 37
Page 38

38
Detección de Problemas (cont.)
PROBLEMA
Superficie del recipiente(s)
rayada.
Helado demasiado firme.
Capa gruesa de helado que
se adhiere a los lados del
recipiente(s).
CAUSA PROBABLE
• El uso de utensilios de metal podrá rayar la superficie de los recipientes del freezer, pero esto
no dañará la unidad. Se recomienda el uso de utensilios de plástico al comer directamente de
los recipientes del freezer, a fin de extender la vida útil de la unidad.
• Para ordenar la compra de recipientes, llame al número de servicio al cliente ubicado en la
tapa de esta guía de Uso y Cuidado.
• Dejar que el helado repose en los recipientes del freezer por cierto tiempo luego de la
preparación hará que la mezcla quede muy firme y que sea difícil dar cucharadas.
Simplemente permita que la mezcla preparada se asiente por algunos minutos adicionales
y la misma se comenzará a ablandar nuevamente.
• Es normal que haya una capa fina de helado a ambos lados del recipiente. Puede haber
mayor adherencia con recetas bajas en grasa/bajas en azúcar. Al revolver, coloque la mano
suavemente sobre la tapa durante los primeros minutos para ayudar a que estas recetas
comiencen a congelarse.
840199700 SPv03.qxd:Layout 1 2/1/11 10:49 AM Page 38
Page 39

39
Base para Nieve de Vainilla
(alcanza para preparar aproximadamente 3 tazas
[710 ml], o 6 porciones de 1/2 taza [125 ml])
2 tazas (500 ml) media crema
1 taza (250 ml) crema espesa
1/2 taza (125 ml) de azúcar
1 1/2 cucharaditas (7.5 ml) de extracto de vainilla
Combine los ingredientes en un contenedor de 1 cuarto (1 L) con
una tapa que ajuste bien. Agite hasta que el azúcar se disuelva.
Mantenga refrigerado.
Agregados:
Fruta
Dulces
Galletas
Nueces
Coloque 6 a 12 onzas (180 a 360 ml) de base para nieve en el tazón
del congelador. ENCIENDA (I) el motor. Una vez que comience a
espesar la mezcla, APAGUE (O) el motor, remueva la tapa, y agregue
3 cucharadas de su agregado favorito. Vuelva a colocar la tapa;
luego reinicie el motor. Mantenga la tapa hasta que la paleta de
mezclado comience a girar suavemente.
Recetas
Base de helado cremoso de vainilla bajo en grasas
(alcanza para preparar aproximadamente 3 tazas
[710 ml], o 6 porciones de 1/2 taza [125 ml])
1 taza (25 ml) de “half and half” libre de grasas
1/2 taza (125 ml) de leche evaporada
1/2 taza (125 ml) de leche entera
3/4 taza (190 ml) de azúcar
1 cucharadita (15 ml) de extracto de vainilla
Combine los ingredientes en un contenedor de 1 cuarto (1 L)
con una tapa que ajuste bien. Agite hasta que el azúcar se disuelva.
Mantenga refrigerado.
NOTA: Para hacer una delicia en forma fácil, intente hacer “yogurt congelado”. Simplemente coloque un envase de
yogurt de 6 oz. (180 ml) en un recipiente para freezer y siga las instrucciones sobre “Cómo Hacer Helado”.
¡Visite www.hamiltonbeach.com.mx para
obtener nuestra línea completa de productos
y las Guías de Uso y Cuidado, además de
deliciosas recetas, consejos y para
registrar su producto en línea!
Información Nutricional
Cantidad por porción (aprox. 1/2 taza [125 ml])
Calorías 189.08
Calorías de grasa (6%) 11.89
% Valor diario
Grasa total 1.32 g 2%
Grasa saturada 0.76 g 4%
Colesterol 4.07 mg 1%
Sodio 18 mg <1%
Potasio 56.07 mg 2%
Carbohidratos totales 43.74 g 15%
Fibra 0 g 0%
Azúcar 43.77 g
Proteína 1.28 g 3%
840199700 SPv03.qxd:Layout 1 2/1/11 10:49 AM Page 39
Page 40

40
Recetas Individuales (6 onzas [180 ml] cada una)
Nieve de Chocolate
4 cucharaditas (20 ml) de cacao sin endulzar
2 cucharadas (30 ml) de azúcar
1/2 tazas (125 ml) de media crema
1/4 cucharadita (1.25 ml) de extracto de vainilla
Combine la cacao y azúcar y menee para mezclar. Agregue una
pequeña cantidad de media crema y mezcla. Agregue la media
crema restante y vainilla. Menee hasta que se mezcle bien.
Nieve Capuchino
1 cucharadita (5 ml) de café instantáneo
1/4 cucharadita (1.25 ml) de cacao sin endulzar
2 cucharadas (30 ml) de azúcar
1/2 tazas (125 ml) de media crema
Combine todos los ingredientes y menee por 30 segundos para
disolver el azúcar y el café.
Recetas (cont.)
Yogur de Frutilla Congelado
Puede usar fresas, arándano, frambuesas o cualquier combinación.
1/3 de taza (80 ml) de yogurt de bayas
2 cucharadas (30 ml) de frutillas cortadas bien finas o pisadas
2 cucharadas (30 ml) de azúcar
3 cucharadas (45 ml) de leche baja en grasa
Combine todos los ingredientes y menee bien para mezclar.
NOTA: Cualquier otro tipo de bayas podrán ser sustituidas por
frutillas en esta receta.
Sorbete Granadas-Bayas
1/4 taza (60 ml) de frambuesas
1/2 taza (125 ml) de jugo de granada
2 cucharadas (30 ml) de azúcar
Machaque las bayas. Combine con los otros ingredientes y menee
bien para mezclar.
Sorbete Citrus Cooler
2/3 taza (160 ml) de jugo de naranja
Corteza rayada de 1/4 de limón
2 cucharadas (30 ml) de azúcar
Combine todos los ingredientes y menee bien para mezclar.
840199700 SPv03.qxd:Layout 1 2/1/11 10:49 AM Page 40
Page 41

41
Notas
840199700 SPv03.qxd:Layout 1 2/1/11 10:49 AM Page 41
Page 42

42
Grupo HB PS, S.A. de C.V.
Monte Elbruz No. 124 Int. 601
Col. Palmitas Polanco
México, D.F. C.P. 11560
01-800-71-16-100
PRODUCTO:
MARCA:
MODELO:
Grupo HB PS, S.A. de C.V. cuenta con una Red de Centros de Servicio Autorizada, por favor consulte en la lista anexa el nombre y dirección de los establecimientos en la
República Mexicana en donde usted podrá hacer efectiva la garantía, obtener partes, componentes, consumibles y accesorios; así como también obtener servicio para
productos fuera de garantía. Para mayor información llame sin costo: Centro de Atención al consumidor: 01 800 71 16 100
Grupo HB PS, S.A. de C.V. le otorga a partir de la fecha de compra:
GARANTÍA DE 1 AÑO.
• Esta garantía ampara, todas las piezas y componentes del producto que resulten con defecto de fabricación incluyendo la mano de obra.
•
Grupo HB PS,
S.A. de C.V. se obliga a reemplazar, reparar o reponer, cualquier pieza o componente defectuoso; proporcionar la mano de obra necesaria para su diagnóstico y reparación,
todo lo anterior sin costo adicional para el consumidor.
• Esta garantía incluye los gastos de transportación del producto que deriven de su cumplimiento dentro de su red de servicio.
LIMITACIONES
• Esta garantía no ampara el reemplazo de piezas deterioradas por uso o por desgaste normal, como son: cuchillas, vasos, jarras, filtros, etc.
• Grupo HB PS, S.A. de C.V. no se hace responsable por los accidentes producidos a consecuencia de una instalación eléctrica defectuosa, ausencia de toma de tierra, clavija de enchufe en mal
estado, etc.
COBERTURA
PÓLIZA DE GARANTÍA
EXCEPCIONES
Esta garantía no será efectiva en los siguientes casos:
a) Cuando el producto se hubiese utlizado en condiciones distintas a las normales. (Uso industrial, semi-industrial o comercial.)
b) Cuando el producto no hubiese sido operado de acuerdo con el instructivo de uso.
c) Cuando el producto hubiese sido alterado o reparado por personas no autorizadas por Grupo HB PS, S.A. de C.V. el fabricante nacional, importador o comercializador responsable
respectivo.
d) Esta garantía pierde su validez si el producto es utilizado en un medio diferente a una vivienda unifamiliar o se somete a cualquier voltaje o forma de onda diferente a la especificada
en la etiqueta de clasificación (ej., 120V ~ 60 Hz).
El consumidor puede solicitar que se haga efectiva la garantía ante la propia casa comercial donde adquirió su producto, siempre y cuando Grupo HB PS, S.A. de C.V. no cuente con talleres de
servicio.
840199700 SPv03.qxd:Layout 1 2/1/11 10:49 AM Page 42
Page 43

43
PROCEDIMIENTO PARA HACER EFECTIVA LA GARANTÍA
• Para hacer efectiva la garantía no deben exigirse mayores requisitos que la presentación del producto y la póliza correspondiente, debidamente sellada por el establecimiento que lo vendió.
• Para hacer efectiva la garantía, lleve su aparato al Centro de Servicio Autorizado más cercano a su domicilio (consulte la lista anexa).
• Si no existe Centro de Servicio Autorizado en su localidad llame a nuestro Centro de Atención al Consumidor para recibir instrucciones de como hacer efectiva su garantía.
• El tiempo de reparación, en ningún caso será mayor de 30 días naturales contados a partir de la fecha de recepción del producto en nuestros Centros de Servicio Autorizados.
• En caso de que el producto haya sido reparado o sometido a mantenimiento y el mismo presente deficiencias imputables al autor de la reparación o del mantenimiento dentro de los treinta
días naturales posteriores a la entrega del producto al consumidor, éste tendrá derecho a que sea reparado o mantenido de nuevo sin costo alguno. Si el plazo de la garantía es superior a los
treinta días naturales, se estará a dicho plazo.
• El tiempo que duren las reparaciones efectuadas al amparo de la garantía no es computable dentro del plazo de la misma. Cuando el bien haya sido reparado se iniciará la garantía respecto
de las piezas repuestas y continuará con relación al resto. En el caso de reposición del bien deberá renovarse el plazo de la garantía.
DÍA___ MES___ AÑO___
Si desea hacer comentarios o sugerencias con respecto a nuestro servicio o tiene alguna queja derivada de la atención recibida en
alguno de nuestros Centros de Servicio Autorizados, por favor dirigirse a:
GERENCIA INTERNACIONAL DE SERVICIO
01 800 71 16 100
Email: mexico.service@hamiltonbeach.com.mx
RED DE CENTROS DE SERVICIO AUTORIZADA GRUPO HB PS, S.A. DE C.V.
Distrito Federal
ELECTRODOMÉSTICOS
Av. Plutarco Elias Cailes No. 1499
Zacahuitzco MEXICO 09490 D.F.
Tel: 01 55 5235 2323 • Fax: 01 55 5243 1397
CASA GARCIA
Av. Patriotismo No. 875-B
Mixcoac MEXICO 03910 D.F.
Tel: 01 55 5563 8723 • Fax: 01 55 5615 1856
Nuevo Leon
FERNANDO SEPULVEDA REFACCIONES
Ruperto Martínez No. 238 Ote.
Centro MONTERREY, 64000 N.L.
Tel: 01 81 8343 6700 • Fax: 01 81 8344 0486
Jalisco
SERVICIOS DE MANTENIMIENTO CASTILLO
Garibaldi No. 1450
Ladrón de Guevara
GUADALAJARA 44660 Jal.
Tel: 01 33 3825 3480 • Fax: 01 33 3826 1914
Chihuahua
DISTRIBUIDORA TURMIX
Av. Paseo Triunfo de la Rep. No. 5289 Local 2 A.
Int. Hipermart
Alamos de San Lorenzo
CD. JUAREZ 32340 Chih.
Tel: 01 656 617 8030 • Fax: 01 656 617 8030
840199700 SPv03.qxd:Layout 1 2/1/11 10:49 AM Page 43
Page 44

Los modelos incluídos en el instructivo de Uso y Cuidado pueden ir seguidos o no por un sufijo correspondiente a una o
varias letras del alfabeto y sus combinaciones, separadas o no por un espacio, coma, diagonal, o guión. Como ejemplos
los sufijos pueden ser: “Y” y/o “MX” y/o “MXY” y/o “Z”.
2/11
840199700
Modelo:
68660
Tipo:
IC06
840199700 SPv03.qxd:Layout 1 2/1/11 10:49 AM Page 44
 Loading...