

Hamilton Beach 68550C, 68551E, 68552E User Manual

READ BEFORE USE
LIRE AVANT UTILISATION
LEA ANTES DE USAR
Questions?
Please call us – our friendly
associates are ready to help.
USA: 1.800.851.8900
¿Preguntas?
Por favor llámenos – nuestros
amables representantes están
listos para ayudar.
MEX: 01 800 71 16 100
Le invitamos a leer cuidadosamente
este instructivo antes de usar su
aparato.
Visit www.hamiltonbeach.com for our
complete line of products and Use and
Care Guides – as well as
delicious recipes, tips, and
to register your product online!
Rendez-vous sur www.hamiltonbeach.ca
pour notre liste complète de produits et de
nos manuels utilisateur – ainsi que nos
délicieuses recettes, nos conseils et pour
enregistrer votre produit en ligne !
¡Visite www.hamiltonbeach.com.mx para
obtener nuestra línea completa de productos
y las Guías de Uso y Cuidado, además de
deliciosas recetas, consejos y para registrar
su producto en línea!
Questions ?
N’hésitez pas à nous appeler –
nos associés s’empresseront
de vous aider.
CAN : 1.800.267.2826
English ...................... 2
Français .................. 12
Español .................. 22
Half-Pint Soft Serve
Ice Cream Maker
Sorbetière crème
glacée molle
Heladora Cremosa
de Media Pinta
840189402 ENv02.qxd:Layout 1 8/11/10 11:11 AM Page 1

2
IMPORTANT SAFEGUARDS
1. Read all instructions.
2. Check voltage to be sure that the voltage indicated on the
nameplate agrees with your voltage.
3. To protect against risk of electrical shock, do not put motor
housing of appliance in water or other liquid.
4. Close supervision is necessary when any appliance is used
by or near children. This is not a toy or children’s product.
This product is not designed or intended for use by children
age 12 or younger.
5. Unplug from outlet when not in use, before putting on or taking
off parts, and before cleaning.
6. Avoid contacting moving parts.
7. Do not operate any appliance with a damaged cord or plug or
after the appliance malfunctions, or is dropped or damaged in any
manner. Call our toll-free customer service number for information
on examination, repair, or electrical or mechanical adjustment.
8. The use of attachments not recommended or sold by the
appliance manufacturer may cause fire, electric shock, or injury.
9. Do not use outdoors.
10. Do not let cord hang over edge of table or counter or touch hot
surfaces.
11. Keep hands and utensils out of freezer bowl while in use to reduce
the risk of injury to persons or to the appliance itself.
12. Do not place on or near hot surfaces such as a hot gas or electric
burner. Do not use this unit near oven, heater, or fireplace.
13. Do not operate dry. Always have mixture in freezer bowl.
14. Do not use appliance for other than intended purpose.
When using electrical appliances, basic safety precautions should always be followed to reduce the risk of fire, electric shock, and/or injury to
persons, including the following:
SAVE THESE INSTRUCTIONS!
OTHER CONSUMER SAFETY INFORMATION
This appliance is intended for household use only.
WARNING! Shock Hazard: This appliance has a polarized plug (one
wide blade) that reduces the risk of electric shock. The plug fits only
one way into a polarized outlet. Do not defeat the safety purpose of
the plug by modifying the plug in any way or by using an adapter. If
the plug does not fit, reverse the plug. If it still does not fit, have an
electrician replace the outlet.
The length of the cord used on this appliance was selected to reduce
the hazards of becoming tangled in or tripping over a longer cord. If
a longer cord is necessary, an approved extension cord may be
used. The electrical rating of the extension cord must be equal to or
greater than the rating of the appliance. Care must be taken to
arrange the extension cord so that it will not drape over the countertop or tabletop where it can be pulled on by children or accidentally
tripped over.
840189402 ENv02.qxd:Layout 1 8/11/10 11:11 AM Page 2
3
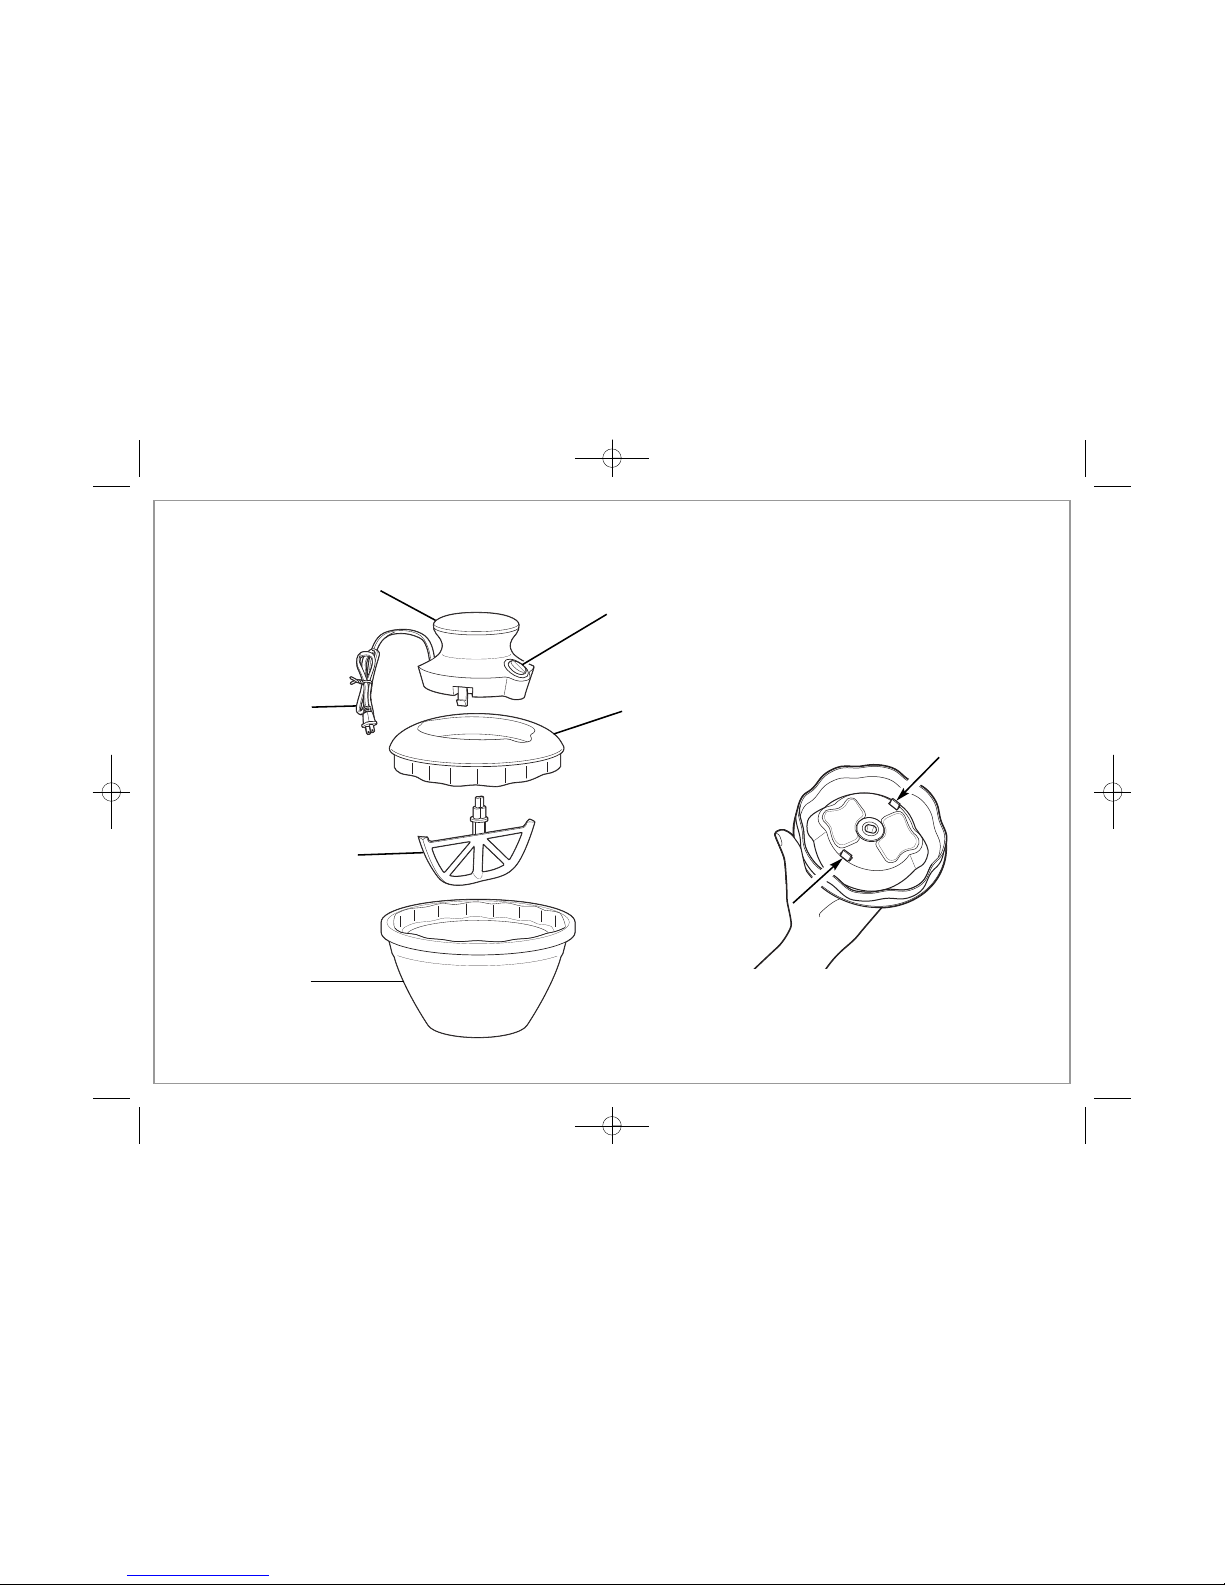
Parts and Features
Freezer Bowl(s)
(NOTE: Liquid contained in
freezer bowl is nontoxic)
Motor On/Off
Switch
Mixing Paddle
Motor Housing
Power Cord
BEFORE FIRST USE: Remove all literature and packing material from inside the ice
cream maker. Clean freezer bowl(s), mixing paddle, and lid in warm, soapy water.
Thoroughly rinse and dry all parts. DO NOT immerse motor in water. To clean, wipe
with a damp cloth.
Locking Tabs
Lid
840189402 ENv02.qxd:Layout 1 8/11/10 11:11 AM Page 3
4
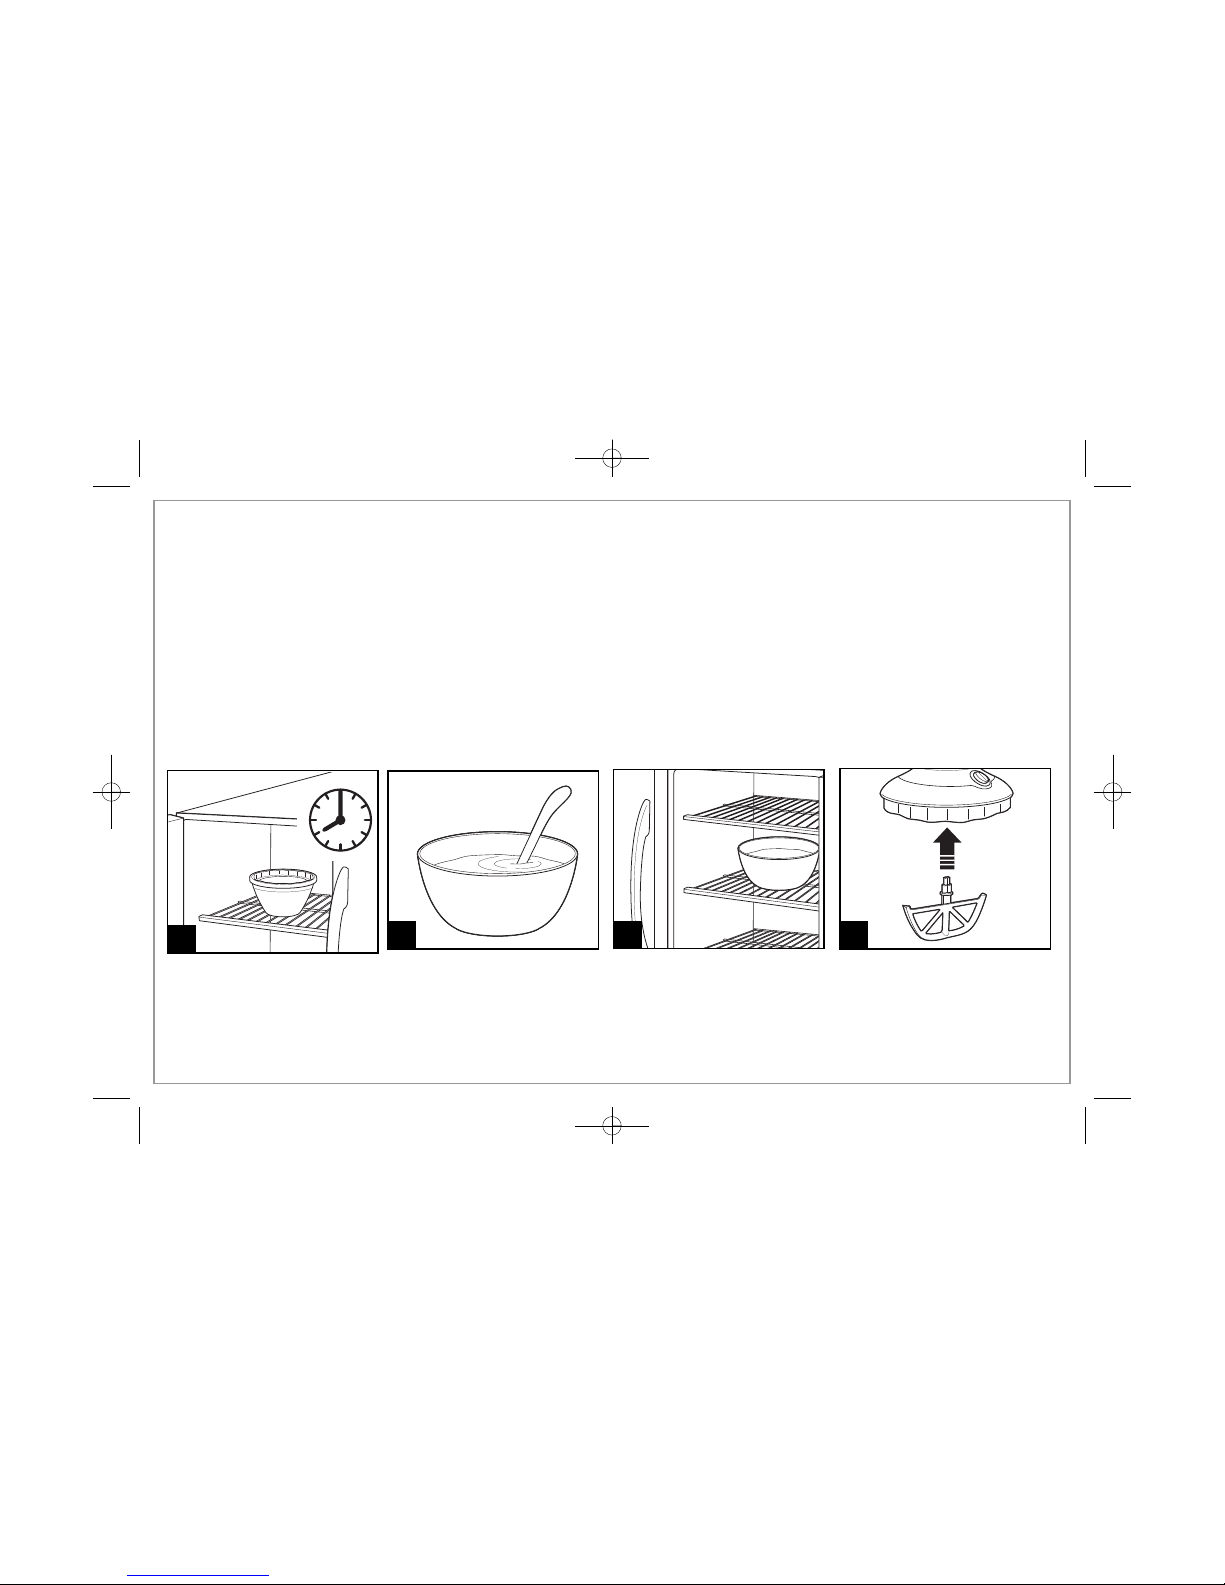
How to Make Ice Cream
2
1
3
4
Allow freezer bowl(s) to freeze
completely. NOTE: Liquid contained in freezer bowl(s) is
nontoxic.
Prepare ice cream mixture.
NOTE: Use between 6–12 oz. of
mixture. Do not exceed 12 oz.
Chill mixture in refrigerator.
Insert mixing paddle into motor
housing.
FOR BEST RESULTS:
• Before churning, thoroughly chill ice cream
mixture in the refrigerator and the freezer bowl(s)
in freezer. Freezer bowl(s) should remain in the
freezer for at least 8 hours before use. Freezer
temperature should be set to the coldest setting
and bowls should be placed towards the back
wall.
• This unit produces soft serve ice cream—the
consistency will not be the same as hard, storebought ice cream.
• If ice cream is not made after running the unit for
15 minutes maximum, your bowls have not been
frozen long enough OR your freezer is not cold
enough. See Troubleshooting section.
• If you wish to store any leftover ice cream in the
freezer bowl, simply place it inside a large plastic
zippered storage bag and put it back into the
freezer.
840189402 ENv02.qxd:Layout 1 8/11/10 11:11 AM Page 4
5
8
Allow paddle to churn in mixture
for approximately 5–15 minutes.
If needed, press down lightly on
lid during the first few minutes of
churning. This may be needed
from time to time on lower-fat/
lower-sugar recipes.
NOTE: Pushing too hard will
result in the paddle reversing
back and forth.
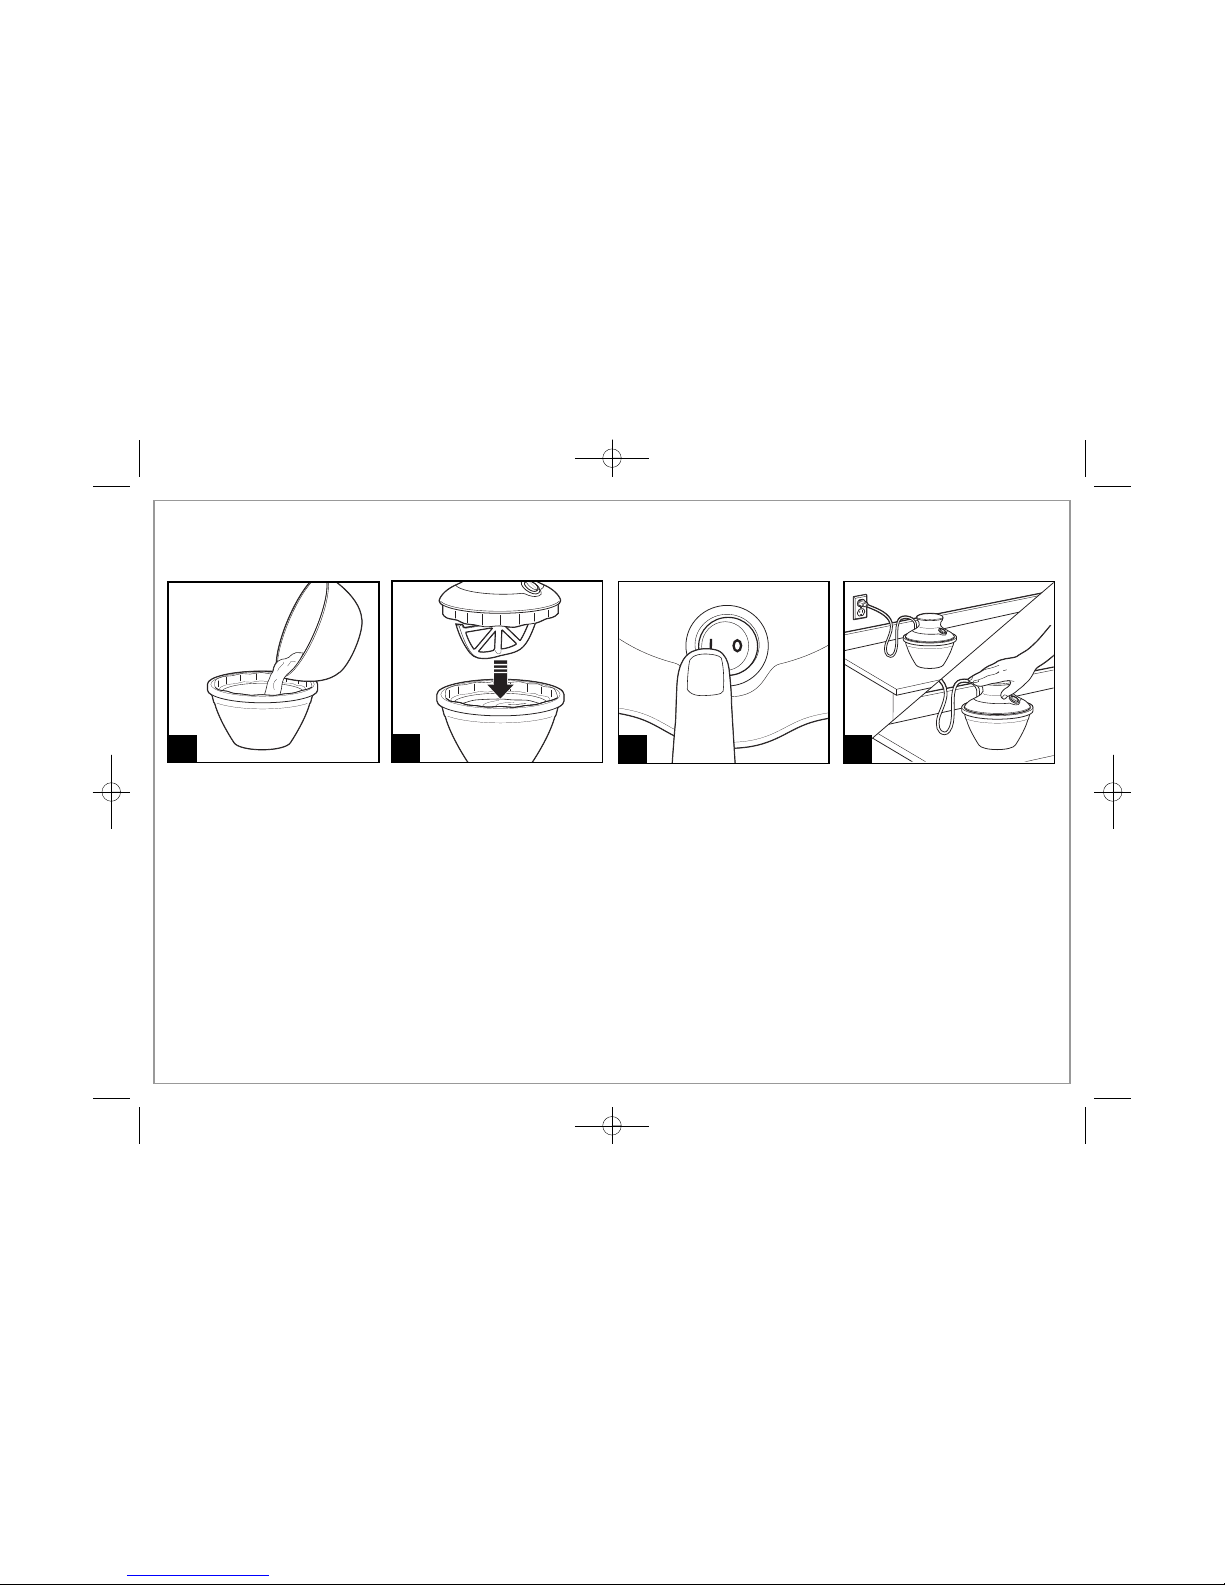
How to Make Ice Cream (cont.)
6
Ensure lid with motor housing is securely placed on freezer bowl.
Plug into outlet. Press switch to ON (I).
IMPORTANT: Place lid on bowl quickly after pouring ingredients into
bowl, within a few seconds if possible. This will yield better results.
7
5
Pour chilled mixture into freezer
bowl. Do not exceed 12 oz.
(360 ml) of chilled mixture. Make
ice cream one bowl at a time.
840189402 ENv02.qxd:Layout 1 8/11/10 11:11 AM Page 5
6
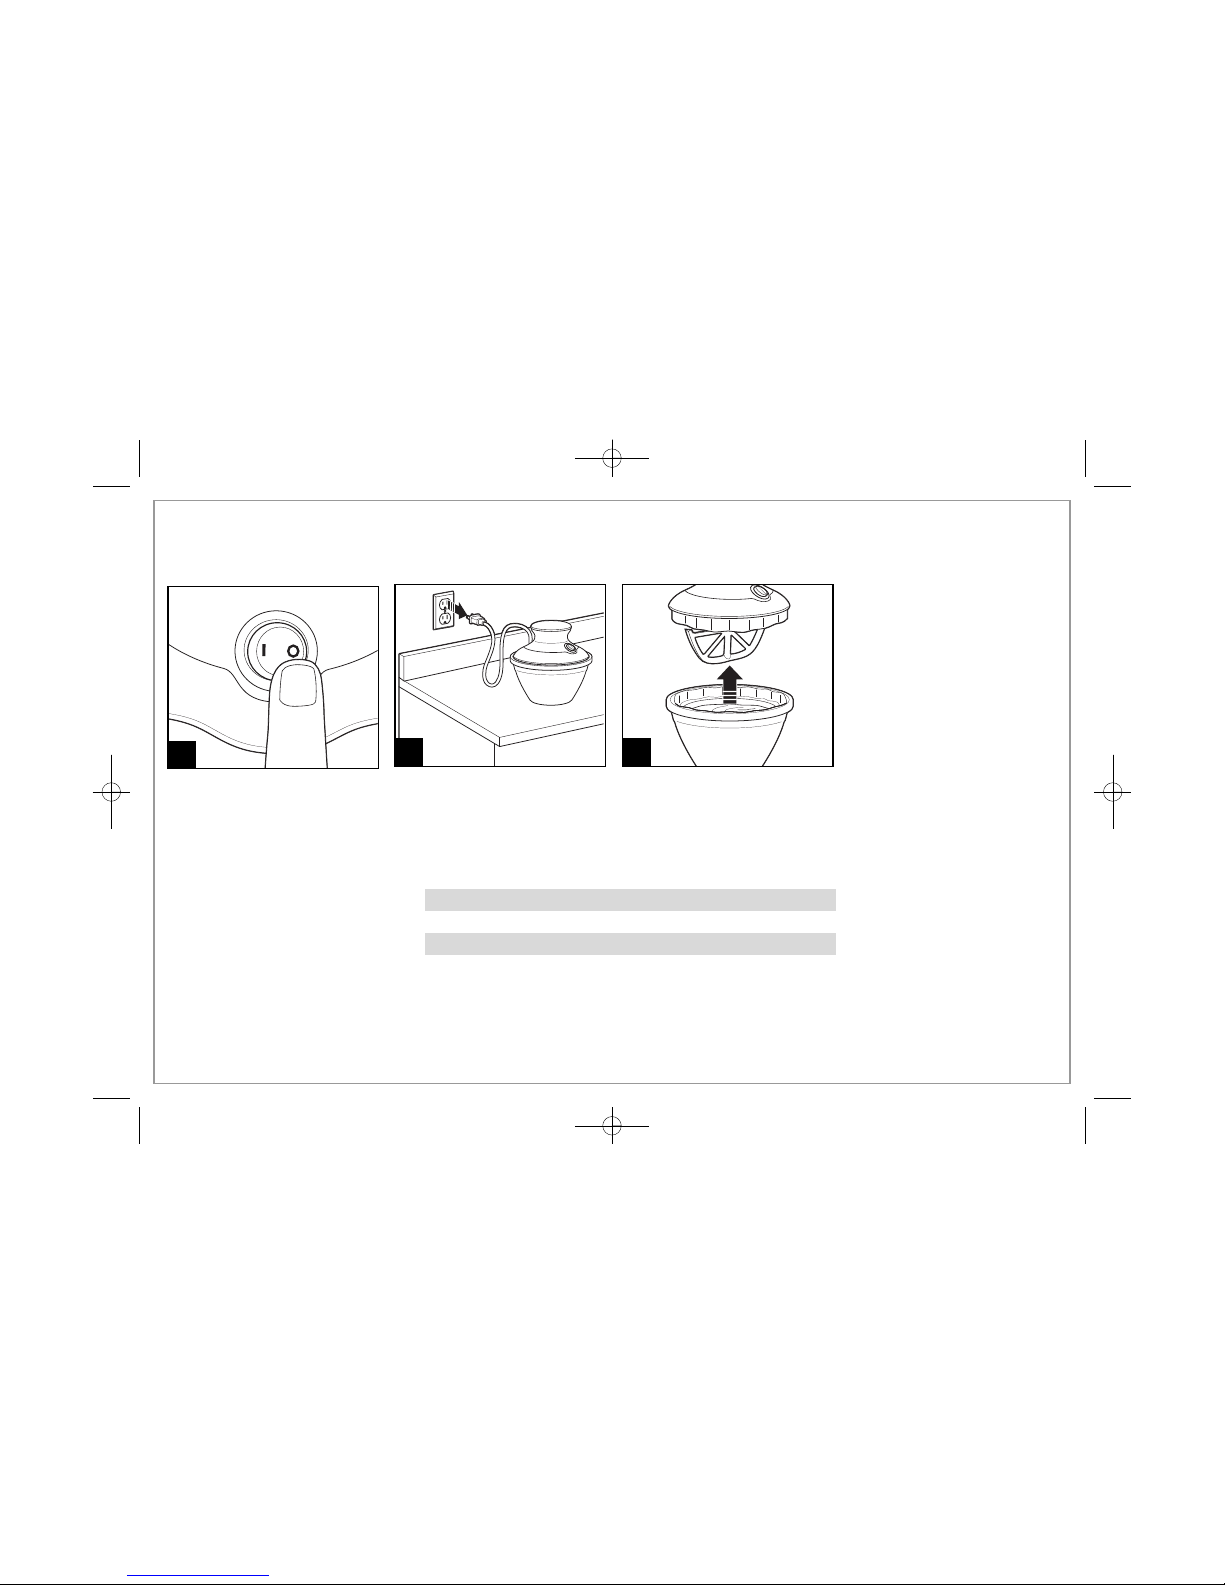
How to Make Ice Cream (cont.)
10
Unit will not turn OFF automatically.
You must press switch to OFF (O)
to stop churning. Unplug from
outlet.
11
Remove lid. Frozen mixture may
be eaten directly out of the freezer
bowl. To prevent surface scratching, using plastic utensils is recommended when eating directly from
freezer bowls.
TO MAKE:
6 ounces (180 ml)
12 ounces (360 ml)
CHURN APPROXIMATELY:
5–6 minutes
8–9 minutes
After turning unit off, let it sit with the paddle and lid still attached
for approximately 2 minutes (see Step 10).
NOTE: If the ice cream mixture is too thick, or sat in freezer bowl
too long before churning, the paddle may struggle and/or reverse
directions. Turn unit OFF (O), break up the mixture in the bowl
with a spoon, replace the paddle, and turn back ON (I).
9
Ice cream is done when it looks
like “soft serve.” A thin layer of
ice cream may stick to the outside of bowl; this is normal. Turn
OFF (O); then let sit with mixing
paddle/lid still attached for about
2 minutes, allowing the ice cream
to freeze further.
840189402 ENv02.qxd:Layout 1 8/11/10 11:11 AM Page 6

7
Tips for Best Results
• The machine will run until turned off. See Troubleshooting
if your unit did not make ice cream in 15 minutes.
• Add mix-ins, such as chocolate chips or chopped nuts,
after ice cream has churned for at least 5 minutes or
when mixture is thick and has started to freeze. Make sure
the mixing paddle is firmly pressed down to the bottom of
the freezer bowl when replacing lid (after adding mix-ins).
The mixing paddle should continue scraping the freezer
bowl and not sit on top of the mix-in ingredients.
• The finished result is a soft, spoonable ice cream.
Homemade ice cream will not be the same consistency
as hard, store-bought ice cream.
• Ice cream tastes best when fresh. It will begin to lose its
fresh taste after several days in the freezer.
• Using metal utensils may scratch the surface of the freezer
bowls, but this will not harm the unit. Plastic utensils are
recommended when eating directly from the freezer bowls
to extend the life of your unit.
• Placing hand on lid and pressing down lightly will help
churning and prevent as much ice cream from sticking to the
side of the bowl. A thin layer of ice cream will always stick to
the outside of the bowl; this is normal.
• Keep the freezer bowl(s) in the freezer so that you can make
ice cream at any time.
• For best results, the freezer bowl must be frozen thoroughly.
Make sure to set your freezer at the coldest setting
(temperature should not be more than 0°F [-18°C]).
• Firmness of ice cream depends on variables such as the recipe
used, room temperature, and temperature of ingredients
before churning.
• Some recipes require the mixture to be precooked. Make the
recipe at least one day ahead. This will allow the mixture to
cool completely and increase volume. Base mixture may not
freeze if it is not thoroughly chilled.
• Do not remove freezer bowl from the freezer until ready
to use.
• Do not puncture or heat the freezer bowl.
840189402 ENv02.qxd:Layout 1 8/11/10 11:11 AM Page 7
8
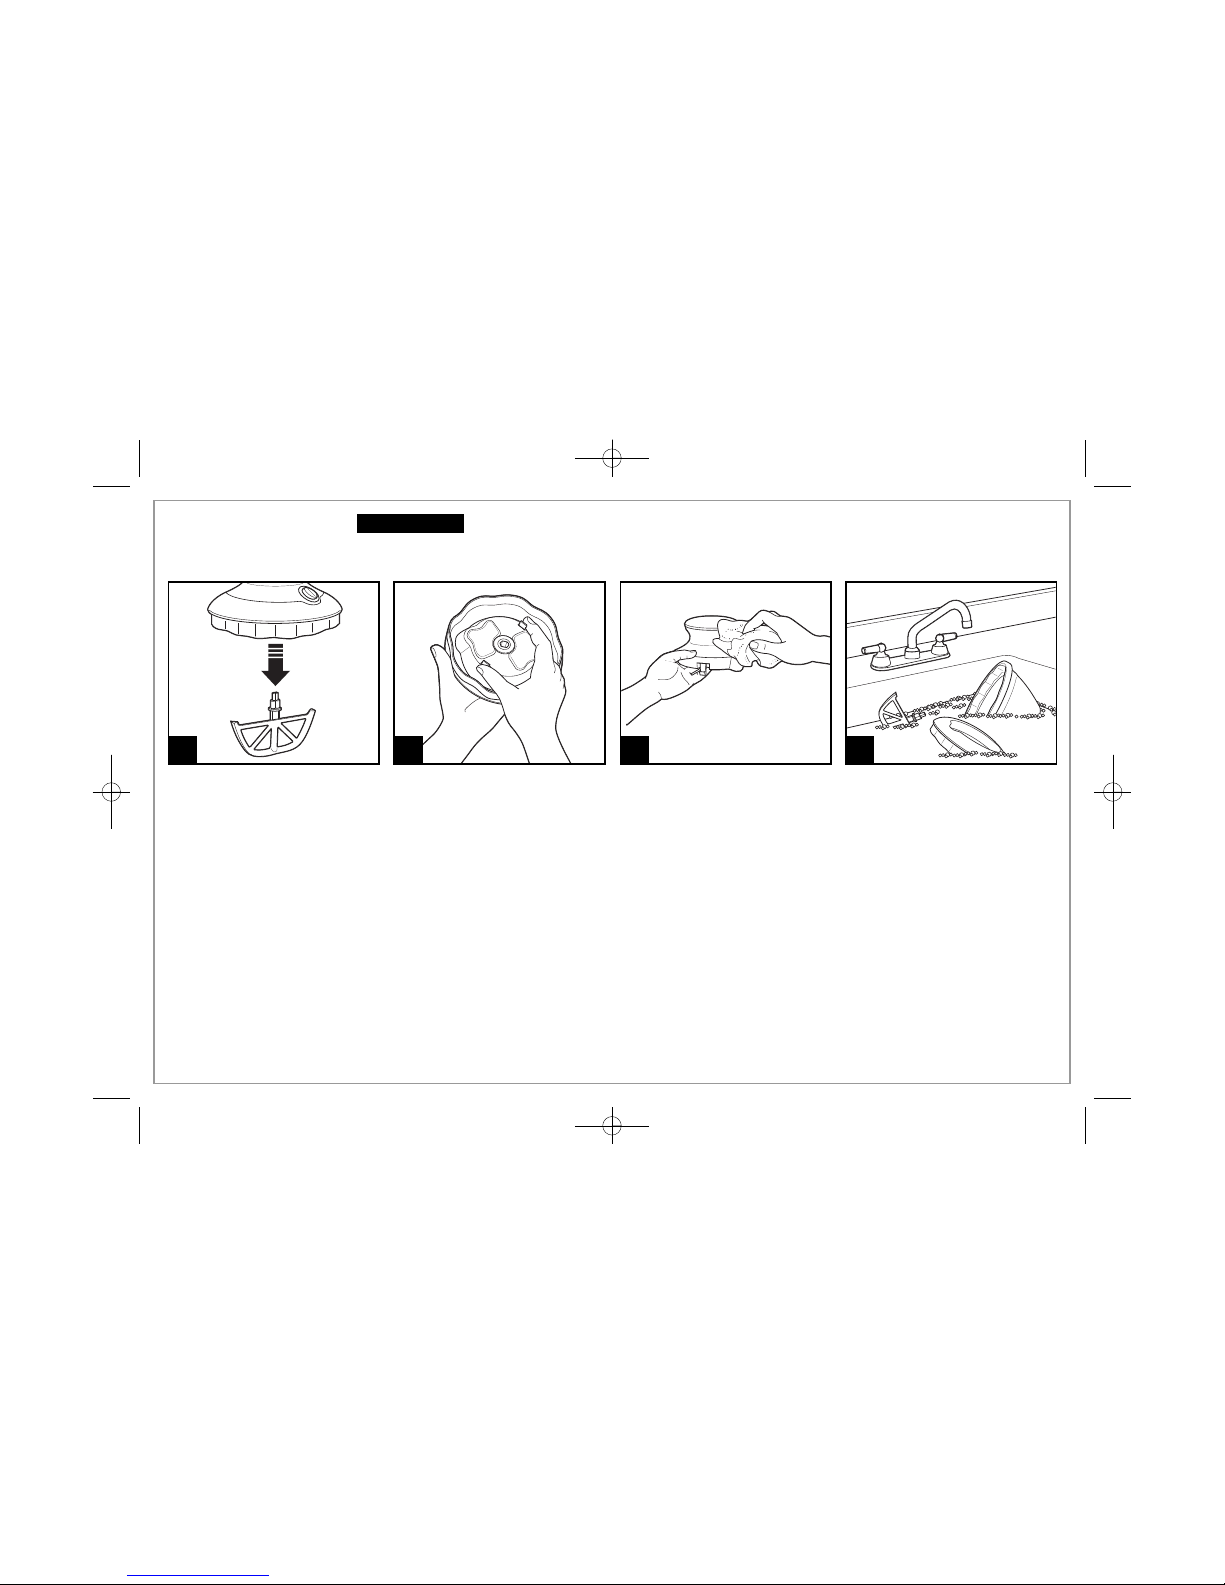
Cleaning
1
3
Wipe motor housing with a damp
cloth. Do not immerse in water or
other liquid.
4
Wash lid, mixing paddle, and
freezer bowl in sink. The lid and
mixing paddle may be placed in
the top rack of the dishwasher.
Electrical Shock Hazard.
Disconnect power before cleaning.
Do not immerse motor housing or cord in any liquid.
w WARNING
2
Squeeze locking tabs and remove
motor housing from lid.
840189402 ENv02.qxd:Layout 1 8/11/10 11:11 AM Page 8
9
Troubleshooting
PROBLEM
Ice cream is not firm enough or
ice cream maker is still running
after 15 minutes.
Ice cream maker stops churning
before ice cream is ready.
Surface of bowl(s) scratched.
Ice cream too firm.
Thick layer of ice cream sticking
to sides of bowl(s).
PROBABLE CAUSE
• The freezer bowl was not in the freezer long enough (for best results, at least 8 hours or
preferably overnight).
• The freezer is not cold enough. Ice cream sets at 10° to 14°F (-12° to -10°C). If the freezer
is not at 0°F (-18°C), the ice cream will not set.
• Too much mixture was put in freezer bowl. Maximum fill is 12 oz. (360 ml).
• Ingredients are warm or at room temperature.
• The freezer bowl was left at room temperature for more than 5 minutes before use.
• The freezer door was opened and closed too many times during the freezing process.
• The freezer bowl has a thick coating of ice on the walls. After washing, dry completely prior to
placing back in freezer.
• Mix-in ingredients, such as chocolate chips or chopped nuts, were added too soon. Wait until ice
cream has churned for at least 15 minutes or until mixture is thick and has started to freeze before
adding.
• The mix-in ingredients are too large, causing the paddle to jam. Chop nuts or other ingredients
before adding.
• Too large a quantity of mix-in ingredients has been added. Add one cup or less of mix-in ingredients.
• Using metal utensils may scratch the surface of the freezer bowls, but this will not harm the unit.
Plastic utensils are recommended when eating directly from the freezer bowls to extend the life of
your unit.
• To order replacement bowls, call the customer service number located on the front cover of this
Use and Care guide.
• Letting the ice cream sit in the freezer bowls for some time after churning will make the mixture
very firm and difficult to scoop. Simply allow the churned mixture to sit for a few additional minutes
and it will begin to soften again.
• A thin layer of ice cream on the sides of bowl is normal. Greater sticking tends to be present in
lower-fat/lower-sugar recipes. When churning, place hand lightly on lid for the first few minutes to
help these recipes begin to freeze.
840189402 ENv02.qxd:Layout 1 8/11/10 11:11 AM Page 9

10
Vanilla Ice Cream Base (makes 24 ounces [720 ml])
2 cup (500 ml) half-and-half
1 cup (250 ml) heavy cream
1/2 cup (125 ml) sugar
1 1/2 teaspoons (7.5 ml) vanilla extract
Combine ingredients in a 1-quart container with a tight-fitting lid. Shake until sugar
is dissolved. Keep refrigerated.
Add-ins:
Fruit
Candy
Cookies
Nuts
Place 6–12 ounces (180–360 ml) of ice cream base into freezer bowl. Turn motor
ON (I). Once mixture starts to thicken, turn motor OFF (O), remove lid, and add
3 tablespoons of your favorite mix-in. Replace lid; then restart motor. Hold down
lid until mixing paddle starts to rotate smoothly.
Individual Recipes (6 ounces each)
Chocolate Ice Cream
4 teaspoons (20 ml) unsweetened baking cocoa
2 tablespoons (30 ml) sugar
1/2 cup (125 ml) half-and-half
1/4 teaspoon (1.25 ml) vanilla extract
Combine cocoa and sugar and stir to mix. Add a small amount of half-and-half and
mix. Add remaining half-and-half and vanilla. Stir until well-mixed.
Cappuccino Ice Cream
1 teaspoon (5 ml) instant coffee powder
1/4 teaspoon (1.25 ml) unsweetened baking cocoa
2 tablespoons (30 ml) sugar
1/2 cup (125 ml) half-and-half
Combine all ingredients and stir for 30 seconds to dissolve sugar and coffee.
Recipes
Frozen Strawberry Yogurt
May use strawberry, blueberry, raspberry, or any combination.
1/3 cup (80 ml) berry yogurt
2 tablespoons (30 ml) finely chopped or mashed strawberries
2 tablespoons (30 ml) sugar
3 tablespoons (45 ml) low-fat milk
Combine all ingredients and stir well to mix.
NOTE: Any other type of berries may be substituted for strawberries in this recipe.
Pomegranate-Berry Sorbet
1/4 cup (60 ml) raspberries
1/2 cup (125 ml) pomegranate juice
2 tablespoons (30 ml) sugar
Mash berries. Combine with other ingredients and stir well to mix.
Citrus Cooler Sorbet
2/3 cup (160 ml) orange juice
Grated zest of 1/4 of a lemon
2 tablespoons (30 ml) sugar
Combine all ingredients and stir well to mix.
NOTE: For an easy treat, try making “frozen yogurt.” Simply put one 6-oz. (180 ml) container of yogurt into a freezer bowl and follow
instructions in “How to Make Ice Cream.”
Visit www.hamiltonbeach.com for our
complete line of products and Use and Care
Guides – as well as delicious
recipes, tips, and to register
your product online!
840189402 ENv02.qxd:Layout 1 8/11/10 12:00 PM Page 10
 Loading...