

Hamilton Beach 67950C User Manual
READ BEFORE USE
LIRE AVANT UTILISATION
LEA ANTES DE USAR
Visit www.hamiltonbeach.com for our
complete line of products and Use and
Care Guides – as well as delicious recipes,
tips, and to register your product online!
Rendez-vous sur www.hamiltonbeach.ca
pour notre liste complète de produits et de
nos manuels utilisateur – ainsi que nos
délicieuses recettes et nos conseils !
¡Visite www.hamiltonbeach.com (
EE. UU.)
o
www.hamiltonbeach.com.mx (México)
para ver otros productos de Hamilton Beach
o para contactarnos!
Questions?
Please call us – our friendly
associates are ready to help.
USA: 1.800.851.8900
¿Preguntas?
Por favor llámenos – nuestros
amables representantes están
listos para ayudar.
EE. UU.: 1.800.851.8900
MEX: 01 800 71 16 100
Le invitamos a leer cuidadosamente este
instructivo antes de usar su aparato.
Questions ?
N’hésitez pas à nous appeler –
nos associés s’empresseront
de vous aider.
CAN : 1.800.267.2826
English ...................... 2
Français ................... 15
Español ................... 29
Slow Juicer
Extracteur à jus
basse vitesse
Juguera Lenta
840243102 ENv01.indd 1840243102 ENv01.indd 1 11/18/14 4:36 PM11/18/14 4:36 PM

2
IMPORTANT SAFEGUARDS
1. Read all instructions.
2. This appliance is not intended for use by persons (including
children) with reduced physical, sensory, or mental capabilities,
or lack of experience and knowledge, unless they are closely
supervised and instructed concerning use of the appliance by a
person responsible for their safety.
3. Close supervision is necessary when any appliance is used by
or near children. Children should be supervised to ensure that
they do not play with the appliance.
4. To protect against risk of electric shock, do not immerse cord,
plug, or motor base in water or other liquid.
5. Always unplug cord from outlet when not in use, before putting
on or taking off parts, and before cleaning.
6. Avoid contacting moving parts. Keep fingers out of feed chute.
7. Never feed food by hand—always use the food pusher.
8. Always make sure the juice extractor is properly and completely
assembled before the motor is turned ON.
9. Never operate without pulp container in place.
10. Do not put fingers or other objects into the juice extractor feed
chute while it is in operation. If food becomes lodged in the
opening, use food pusher to push it down. When this method is
not possible, unplug the cord from the outlet, and disassemble
juicer to remove the remaining food.
11. Do not operate any appliance with a damaged cord or plug,
or after the appliance malfunctions or is dropped or damaged
in any manner. Call our toll-free customer service number for
information on examination, repair or electrical or mechanical
adjustment.
12. The use of attachments not recommended or sold by the
appliance manufacturer may cause fire, electric shock, or injury.
13. Do not use outdoors.
14. Do not let cord hang over edge of table or counter, or touch hot
surfaces, including stove.
15. Do not place on or near a hot gas or electric burner, or in a
heated oven.
16. Do not leave juice extractor unattended while it is operating.
17. Keep hair, clothing, and jewelry, as well as spatulas and other
utensils, away from feed chute during operation to prevent the
possibility of severe injury to persons and/or damage to the
appliance.
18. Do not use the appliance if the auger or strainer is damaged.
19. Always use the juice extractor on a dry, level surface.
20. Any maintenance other than cleaning should be performed
by an authorized service center.
21. To reduce the risk of personal injury and/or damage to the
appliance, do not use bent, dented, or otherwise damaged
strainer.
22. Be sure to turn motor off after each use by pressing the
ON button. Make sure the motor stops completely before
disassembling.
When using electrical appliances, basic safety precautions should always be followed to reduce the risk of fire, electric shock, and/or injury to
persons, including the following:
SAVE THESE INSTRUCTIONS!
840243102 ENv01.indd 2840243102 ENv01.indd 2 11/18/14 4:36 PM11/18/14 4:36 PM

3
Other Consumer Safety Information
This product is intended for household use only.
w WARNING
Electrical Shock Hazard: This product is provided
with a polarized plug (one wide blade) to reduce the risk of electric
shock. The plug fits only one way into a polarized outlet. Do not
defeat the safety purpose of the plug by modifying the plug in any
way or by using an adapter. If the plug does not fit fully into the
outlet, reverse the plug. If it still does not fit, have an electrician
replace the outlet.
The length of the cord used on this appliance was selected to
reduce the hazards of becoming tangled in or tripping over a longer
cord. If a longer cord is necessary, an approved extension cord
may be used. The electrical rating of the extension cord must be
equal to or greater than the rating of the appliance. Care must be
taken to arrange the extension cord so that it will not drape over
the countertop or tabletop where it can be pulled on by children or
accidentally tripped over.
w WARNING
Crush Hazard.
Do not place hands or fingers down feed chute. Always use the food
pusher.
Failure to follow this instruction can result in serious personal injury.
The strainer is a delicate screen. If bent or damaged, do not use,
as it could break into small pieces and cause personal injury and/or
damage the appliance. Call our toll-free customer service number to
order a new strainer. Replace strainer when it shows signs of wear.
840243102 ENv01.indd 3840243102 ENv01.indd 3 11/18/14 4:36 PM11/18/14 4:36 PM
4
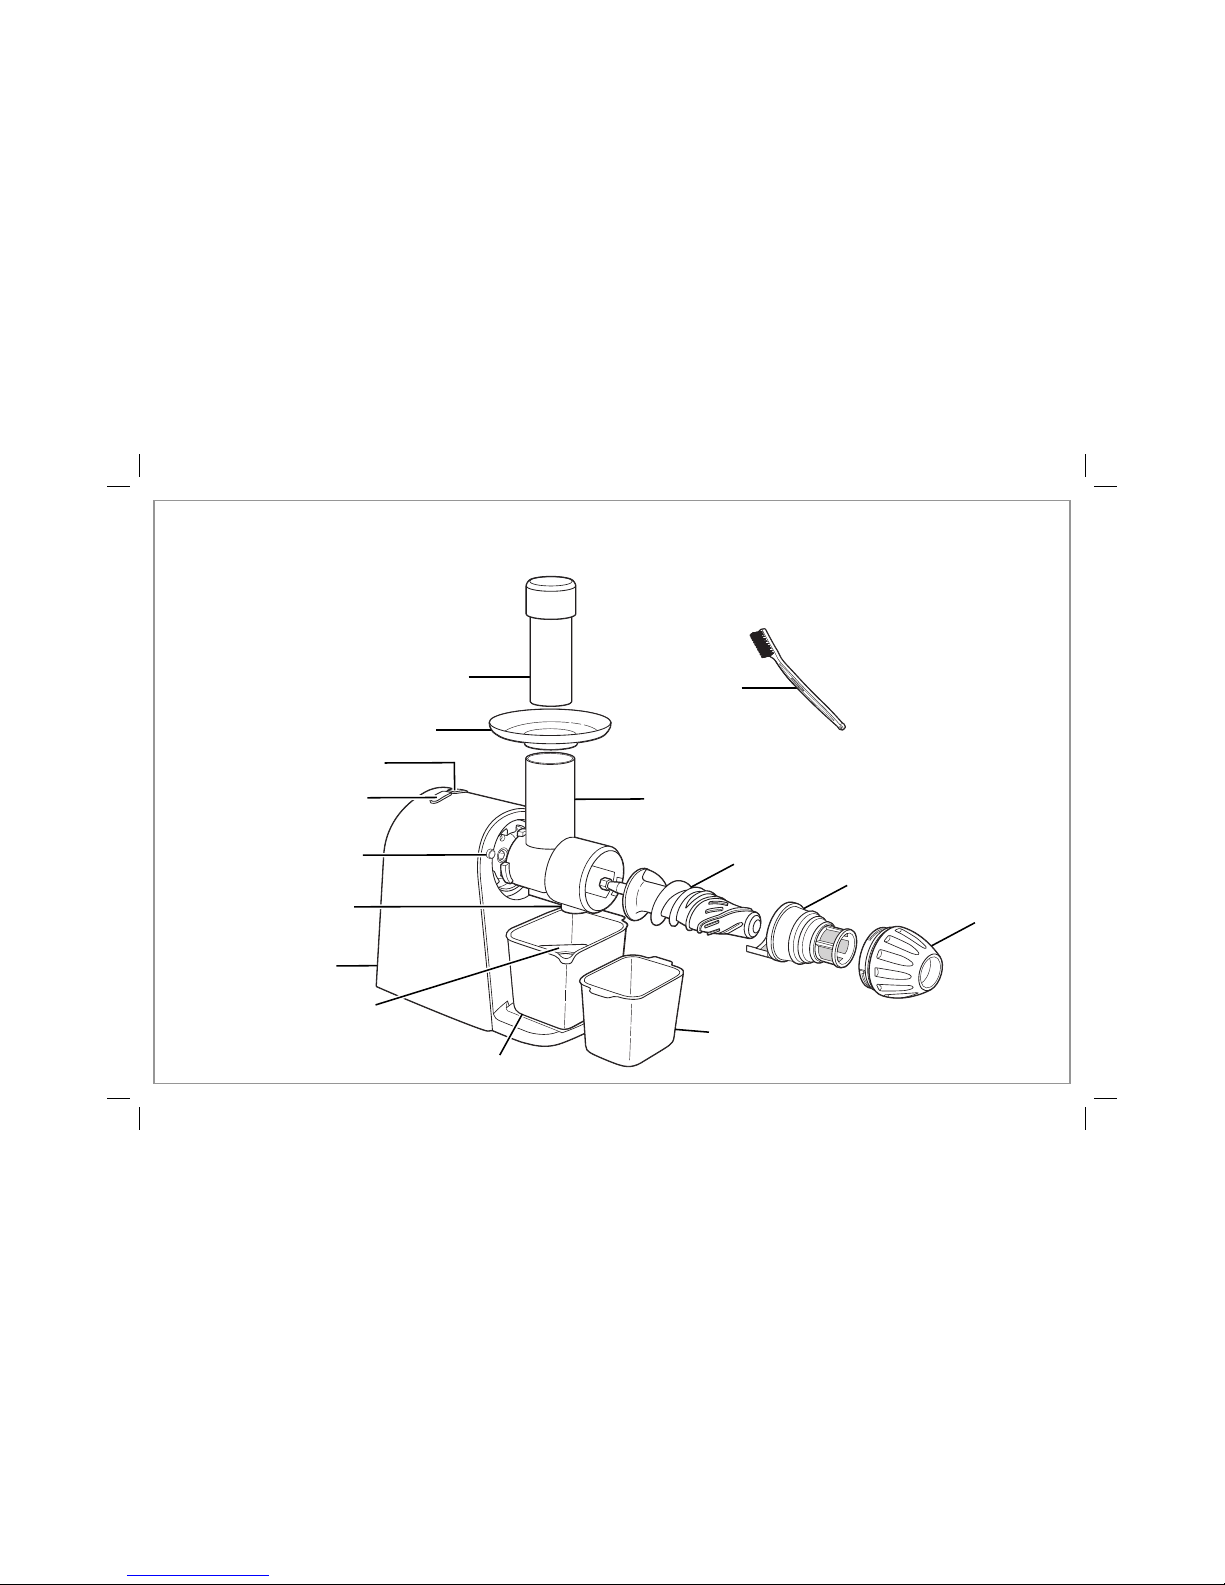
Parts and Features
Food Pusher*
Funnel*
Base
*To order parts:
US: 1.800.851.8900
www.hamiltonbeach.com
Canada: 1.800.267.2826
Mexico:
01 800 71 16 100
Juice Container*
Pulp
Container*
REVERSE Button
Juicer Chute
Auger*
Juicer Cap*
Strainer* (with
micro-mesh screen)
ON/OFF Button
Juice Spout
Froth Separator*
Cleaning
Brush*
RELEASE Button
840243102 ENv01.indd 4840243102 ENv01.indd 4 11/18/14 4:36 PM11/18/14 4:36 PM
5
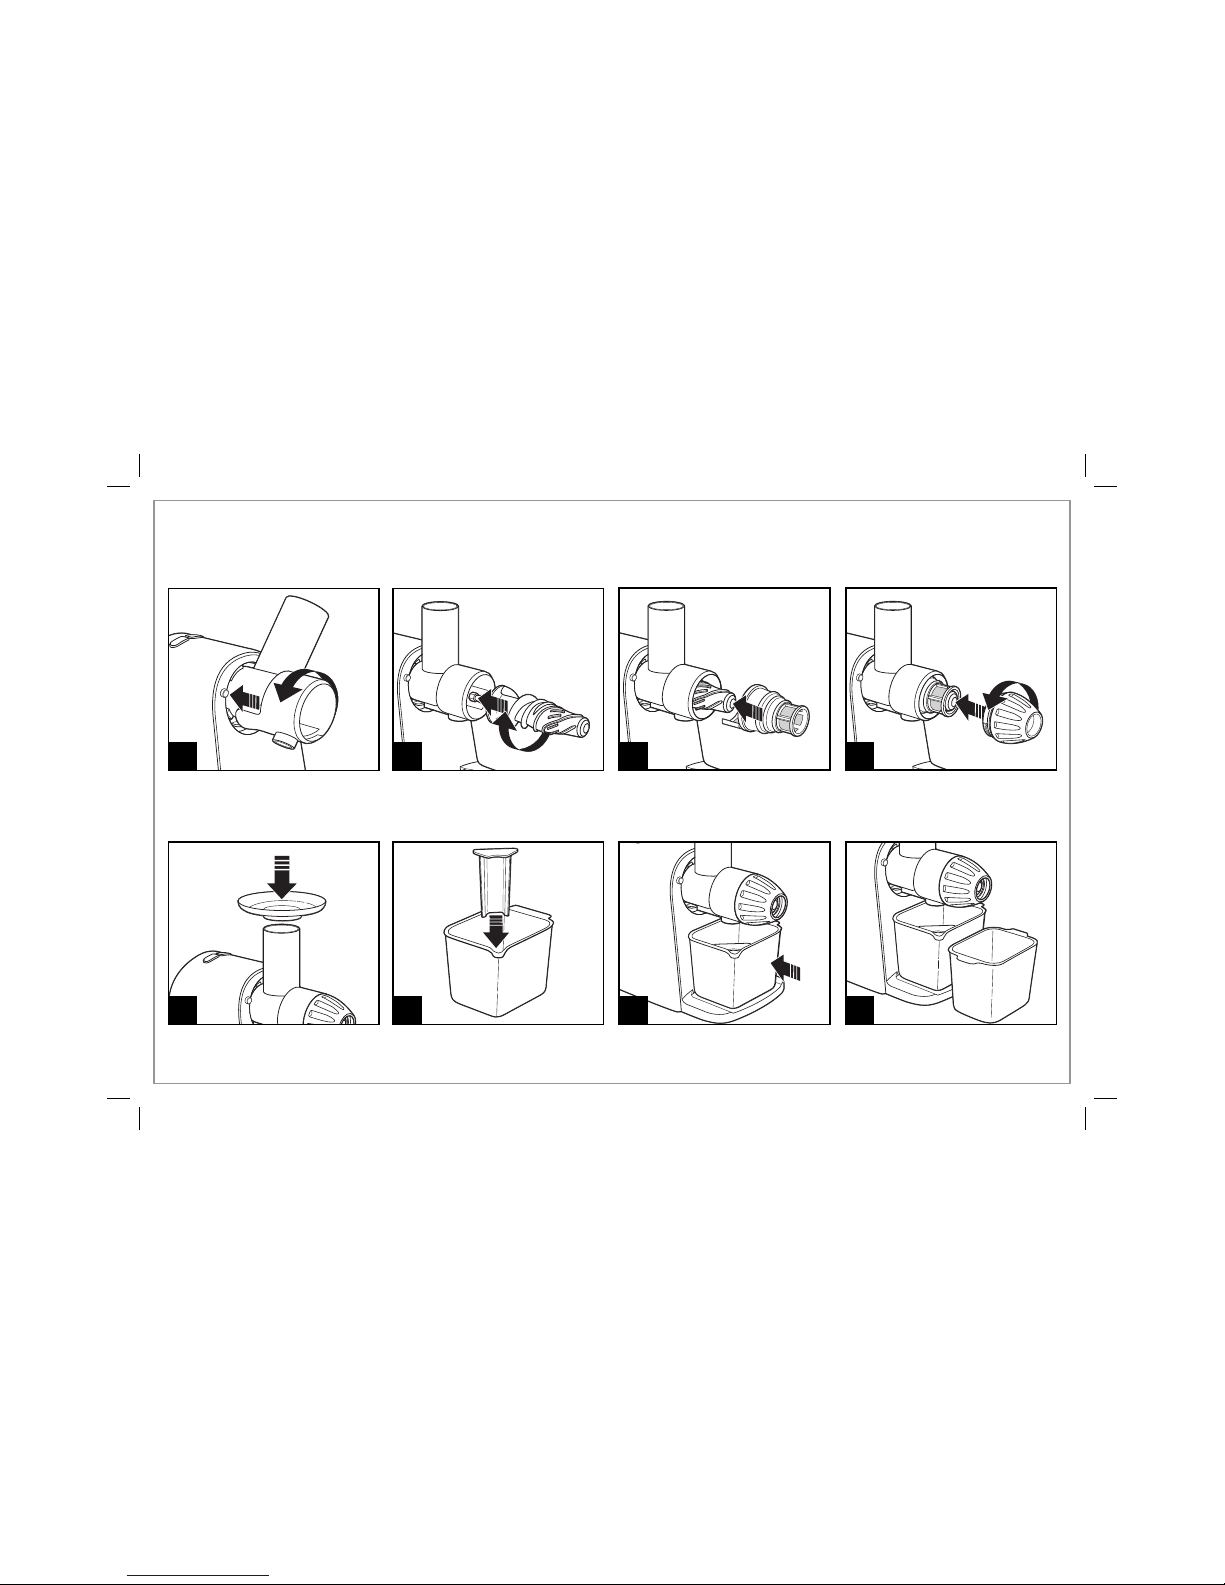
How to Assemble
2
5 7
1
3
Make sure that this unit is unplugged before assembling. While
pressing the RELEASE button, place the juicer chute onto the base by
twisting counterclockwise.
Twist the auger clockwise into position
inside the juicer chute.
Place the juicer cap over
the strainer by twisting
counterclockwise.
BEFORE FIRST USE: After unpacking the juice extractor, remove
cardboard from strainer and wash everything except the base in warm,
soapy water. Rinse and dry immediately. Never immerse the base in
water or other liquids; wipe it with a damp sponge.
Place the juice container onto the
base ledge.
Place the pulp container on
the counter next to the juice
container.
8
Place the funnel on top of the
juicer chute.
4
Slide the strainer over the auger.
6
Slide froth separator into corner of
juice container. This prevents any
foam from pouring into the juice.
840243102 ENv01.indd 5840243102 ENv01.indd 5 11/18/14 4:36 PM11/18/14 4:36 PM
6
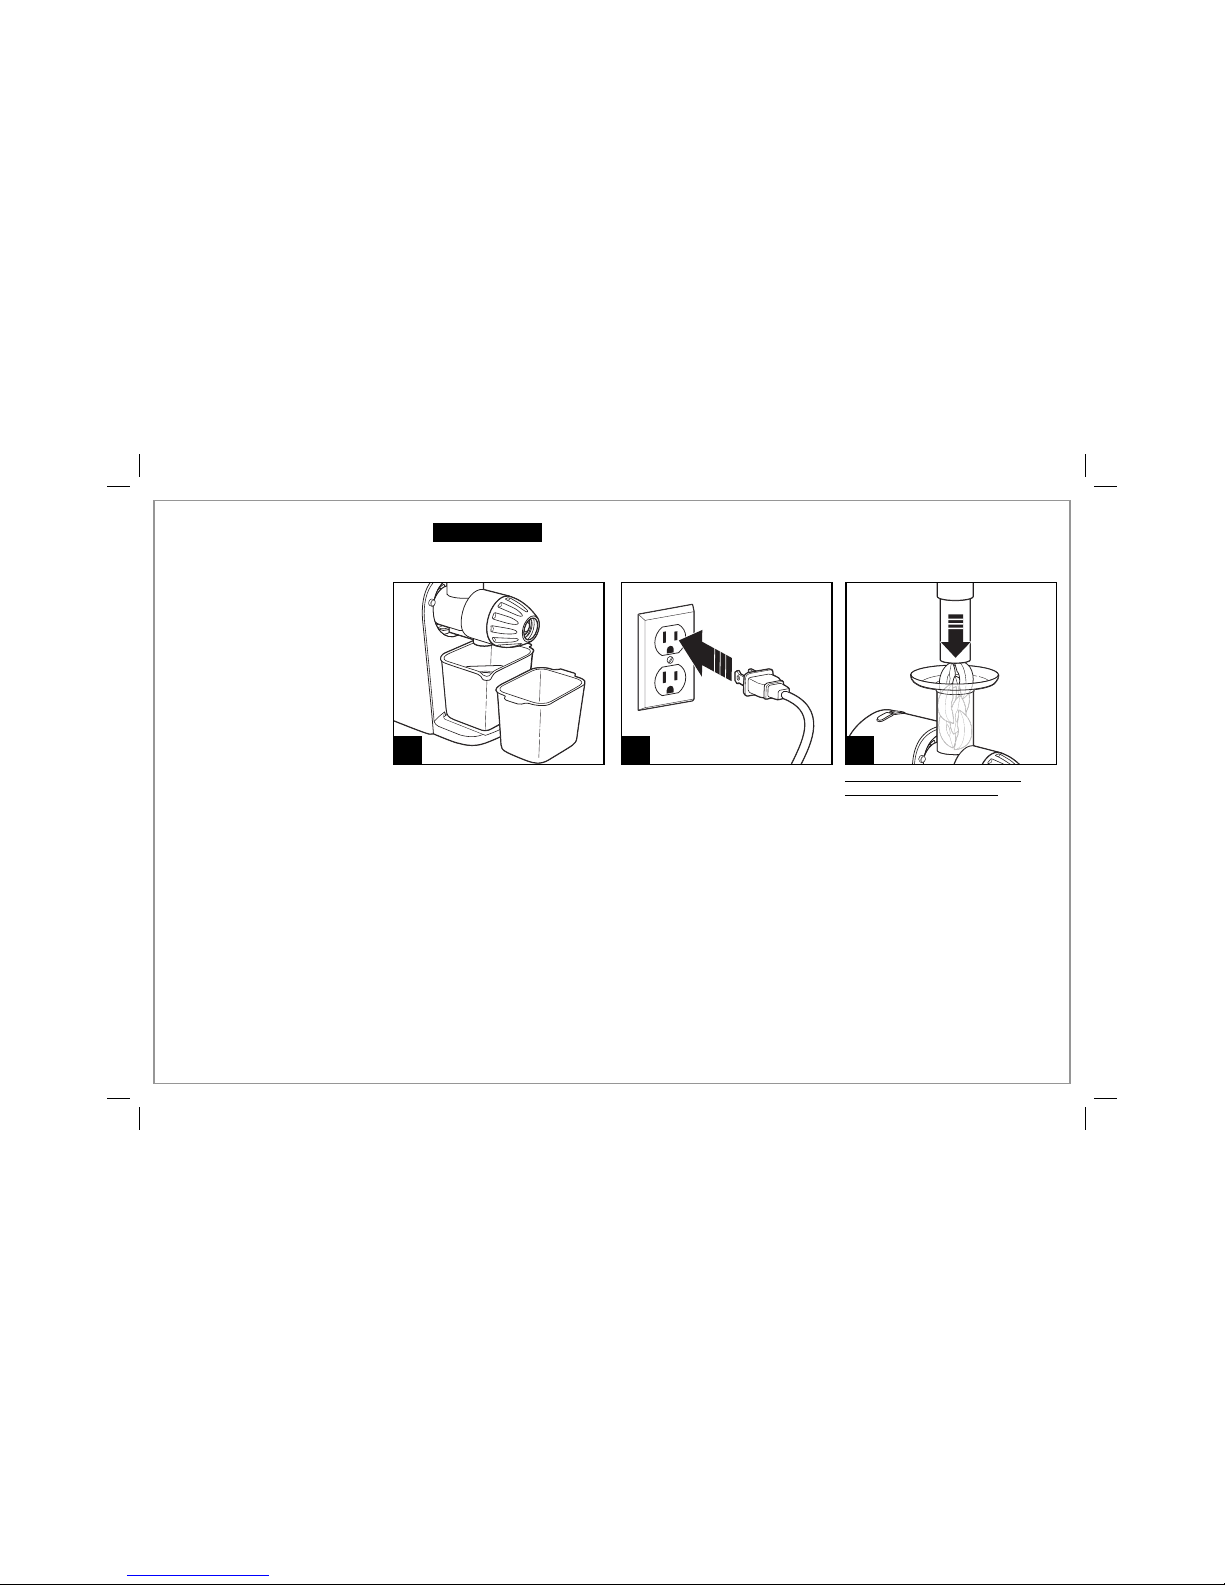
How to Use
Wash fruits and vegetables.
NOTE: Most fruits and
vegetables will need to be cut.
It is recommended that fruits
or vegetables such as oranges,
melons, or mangoes are peeled
before placing in unit to minimize
impact on juice flavor.
w WARNING
Pinch Hazard.
Never use fingers to push food down the feed chute or to clear
the feed chute. Always use the food pusher provided.
1 2 3
Ensure that unit is correctly
assembled (see page 5). Place the
juice container under the juice spout
and the pulp container next to the
juice container.
Plug in juice extractor. Press ON
button.
With the motor running, place
food down the juicer chute. Using
food pusher, gently guide food
down juicer chute. To extract the
maximum amount of juice, always
push food pusher down slowly.
Juice will flow into juice container
and separated pulp will accumulate
in pulp container.
NOTE: Pulp container can be
emptied during juicing by pressing
the ON button and then removing
the pulp container. (Replace empty
pulp container before continuing
to juice.)
This juicer will automatically shut
off after 30 minutes of continuous
operation or if overloaded. To
reset, push the ON button.
NOTE: A rubbing noise may be
noticeable when product is first
turned on. This is normal and does
not indicate a problem with the
product. Noise will be reduced
once juicing begins.
840243102 ENv01.indd 6840243102 ENv01.indd 6 11/18/14 4:36 PM11/18/14 4:36 PM

7
Juicing Tips, Techniques, and Recipes
PURCHASING AND STORING FRUITS AND VEGETABLES:
• Always wash fruits and vegetables before juicing.
• Always use fresh fruits and vegetables for juicing.
• To save money and obtain fresher produce, purchase fruits or
vegetables that are in season.
• Keep your fruits and vegetables ready for juicing by washing
them before storing.
• Most fruits and hardier-type vegetables can be stored at cool
room temperature. More delicate and perishable items such as
tomatoes, berries, leafy greens, celery, cucumbers, and herbs
should be stored in the refrigerator until required.
PREPARING FRUITS AND VEGETABLES:
• It is recommended that fruits or vegetables such as oranges,
melons, or mangoes are peeled before placing in juice extractor
to minimize impact on juice flavor.
• All fruits with pits and large seeds such as nectarines, peaches,
apricots, plums, and cherries MUST be pitted before juicing.
USING THE PULP:
• The remaining pulp left after juicing fruits or vegetables is mostly
fiber and cellulose which, like the juice, contain vital nutrients
necessary for the daily diet and can be used in many ways.
However, pulp should be used that day or else frozen for later use.
• There are a number of recipes that use pulp. You can also use pulp
to thicken casseroles or soups.
• Pulp is great used in the garden for compost.
SOY MILK, ALMOND MILK, AND RICE MILK:
Your juice extractor may be used to make soy milk, almond milk,
and rice milk. One cup of soybeans, almonds, or rice must be soaked
in four cups (946 ml) of water for 24 to 48 hours in the refrigerator.
Slowly pour one cup of the soaked mixture at a time into the food
chute.The liquid extracted from the soaked mixture is the “milk.”
NOTES:
• Almonds must be soaked 24 to 48 hours before juicing.
• Soy milk should be boiled to improve the flavor.
• Vanilla, honey, and sugar may be added to enhance the flavor of
each milk type.
840243102 ENv01.indd 7840243102 ENv01.indd 7 11/18/14 4:36 PM11/18/14 4:36 PM

8
Recipes
Apple, Beet, and Lemon Juice
1 medium Granny Smith apple
1 large beet, trimmed
1 medium lemon, peeled
Directions:
1. Cut apple and beet as needed to fit through the chute of the juice
extractor.
2. Juice the ingredients in the order listed.
3. Stir and serve immediately.
Serves: 1–2
Blueberry, Raspberry, Strawberry, and Apple Juice
1 cup (237 ml) blueberries
1 cup (237 ml) raspberries
4 large strawberries, hulled
1/4 of a Granny Smith apple
Directions:
1. Juice the ingredients in the order listed.
2. Stir and serve immediately.
Serves: 1–2
Carrot, Apple, and Orange Juice
2 large carrots
1 large apple
1 large orange, peeled
Directions:
1. Cut carrots, apple, and orange as needed to fit through the chute
of the juice extractor.
2. Juice the ingredients in the order listed.
3. Stir and serve immediately.
Serves: 1–2
Dawn Delight Red Juice
3 large celery ribs with leaves
1 large beet, peeled
1 large Granny Smith apple
Directions:
1. Cut beet and apple as needed to fit through the chute of the juice
extractor.
2. Juice the ingredients in the order listed.
3. Stir and serve immediately.
Serves: 1–2
840243102 ENv01.indd 8840243102 ENv01.indd 8 11/18/14 4:36 PM11/18/14 4:36 PM

9
Recipes (cont.)
Kale, Cucumber, and Cilantro Green Juice
6 large leaves kale
1 large cucumber
1 celery rib with leaves
1 medium lime, peeled
2 small handfuls cilantro
1 medium Granny Smith apple
Directions:
1. Cut cucumber and apple as needed to fit through the chute
of the juice extractor.
2. Juice the ingredients in the order listed.
3. Stir and serve immediately.
Serves: 1–2
Squashed Pear Juice
2 large carrots
1 large pear
1/2 medium yellow squash
Directions:
1. Cut carrots, pear, and squash as needed to fit through the chute
of the juice extractor.
2. Juice the ingredients in the order listed.
3. Stir and serve immediately.
Serves: 1–2
Pomegranate Blueberry Juice
2 cups (473 ml) pomegranate seeds
1 cup (237 ml) blueberries
Directions:
1. Juice the ingredients in the order listed.
2. Stir and serve immediately.
Serves: 1–2
Test Kitchen Tip: Use just the seeds of a pomegranate for juicing
as the membranes will make the juice bitter. To deseed the
pomegranate, start by making a thin slice from the bottom to make
it stable for cutting. Cut out the core at the top. Make shallow cuts
to section into 6 wedges. Gently break the pomegranate apart and
pry the seeds out with your fingers. Pomegranate juice can stain, so
we suggest wearing gloves and something like an old T-shirt. Work
over a bowl to catch the seeds and drips before placing in the juice
extractor.
Strawberry Lemon Sparkle
10 large strawberries, hulled
1 large lemon, peeled
Sparkling water
Directions:
1. Cut lemon as needed to fit through the chute of the juice extractor.
2. Juice the strawberries and lemon in the order listed.
3. Stir. Place 1/4 cup (59 ml) mixture in a tall glass with ice.
4. Add 1 cup (237 ml) sparkling water and serve immediately.
Serves: 3–4
840243102 ENv01.indd 9840243102 ENv01.indd 9 11/18/14 4:36 PM11/18/14 4:36 PM

10
Recipes (cont.)
Kale, Pineapple, and Mint Green Juice
6 large leaves kale
1 large cucumber
1 medium lime, peeled
2 small handfuls fresh mint leaves
1-inch-thick slice fresh cored pineapple
1 large Granny Smith apple
Directions:
1. Cut pineapple and apple as needed to fit through the chute
of the juice extractor.
2. Juice the ingredients in the order listed.
3. Stir and serve immediately.
Serves: 2
Strawberry, Banana, and Pineapple Juice
8 large strawberries, hulled
1 large banana, peeled
1 slice fresh cored pineapple, about 1-inch thick
Directions:
1. Cut pineapple as needed to fit through the chute of the juice
extractor.
2. Juice the ingredients in the order listed.
3. Stir and serve immediately.
Serves: 1–2
Test Kitchen Tip: Bananas add sweetness and flavor to juice
extractor drinks; however, the result of juicing bananas is more of
a puree than a juice.
840243102 ENv01.indd 10840243102 ENv01.indd 10 11/18/14 4:36 PM11/18/14 4:36 PM
11
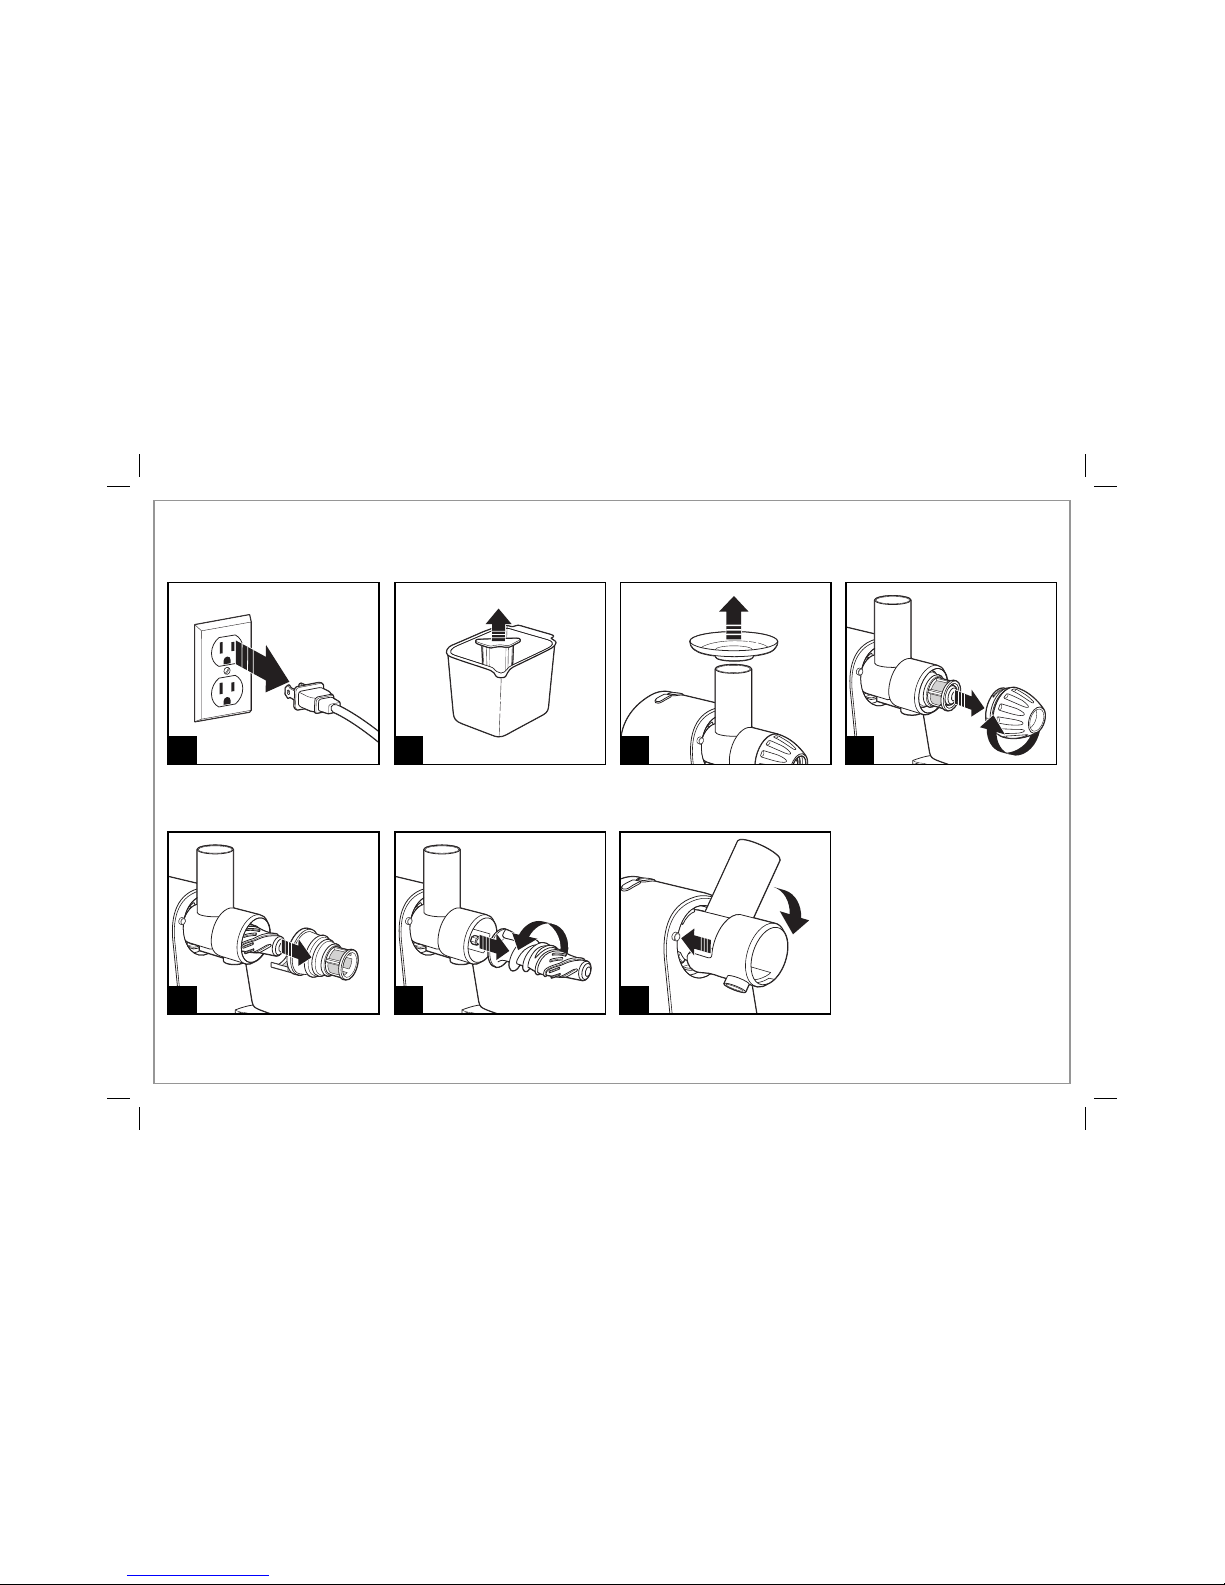
How to Disassemble
1
6
3
7
4
Unplug juice extractor and allow
unit to stop turning.
Remove the auger by twisting it
counterclockwise.
While pressing the RELEASE
button, remove the juicer chute
by twisting clockwise.
Remove the juicer cap by twisting
clockwise.
Remove funnel from on top of the
juicer chute.
5
Slide out the strainer.
2
Slide froth separator out of juice
container.
840243102 ENv01.indd 11840243102 ENv01.indd 11 11/18/14 4:36 PM11/18/14 4:36 PM
12
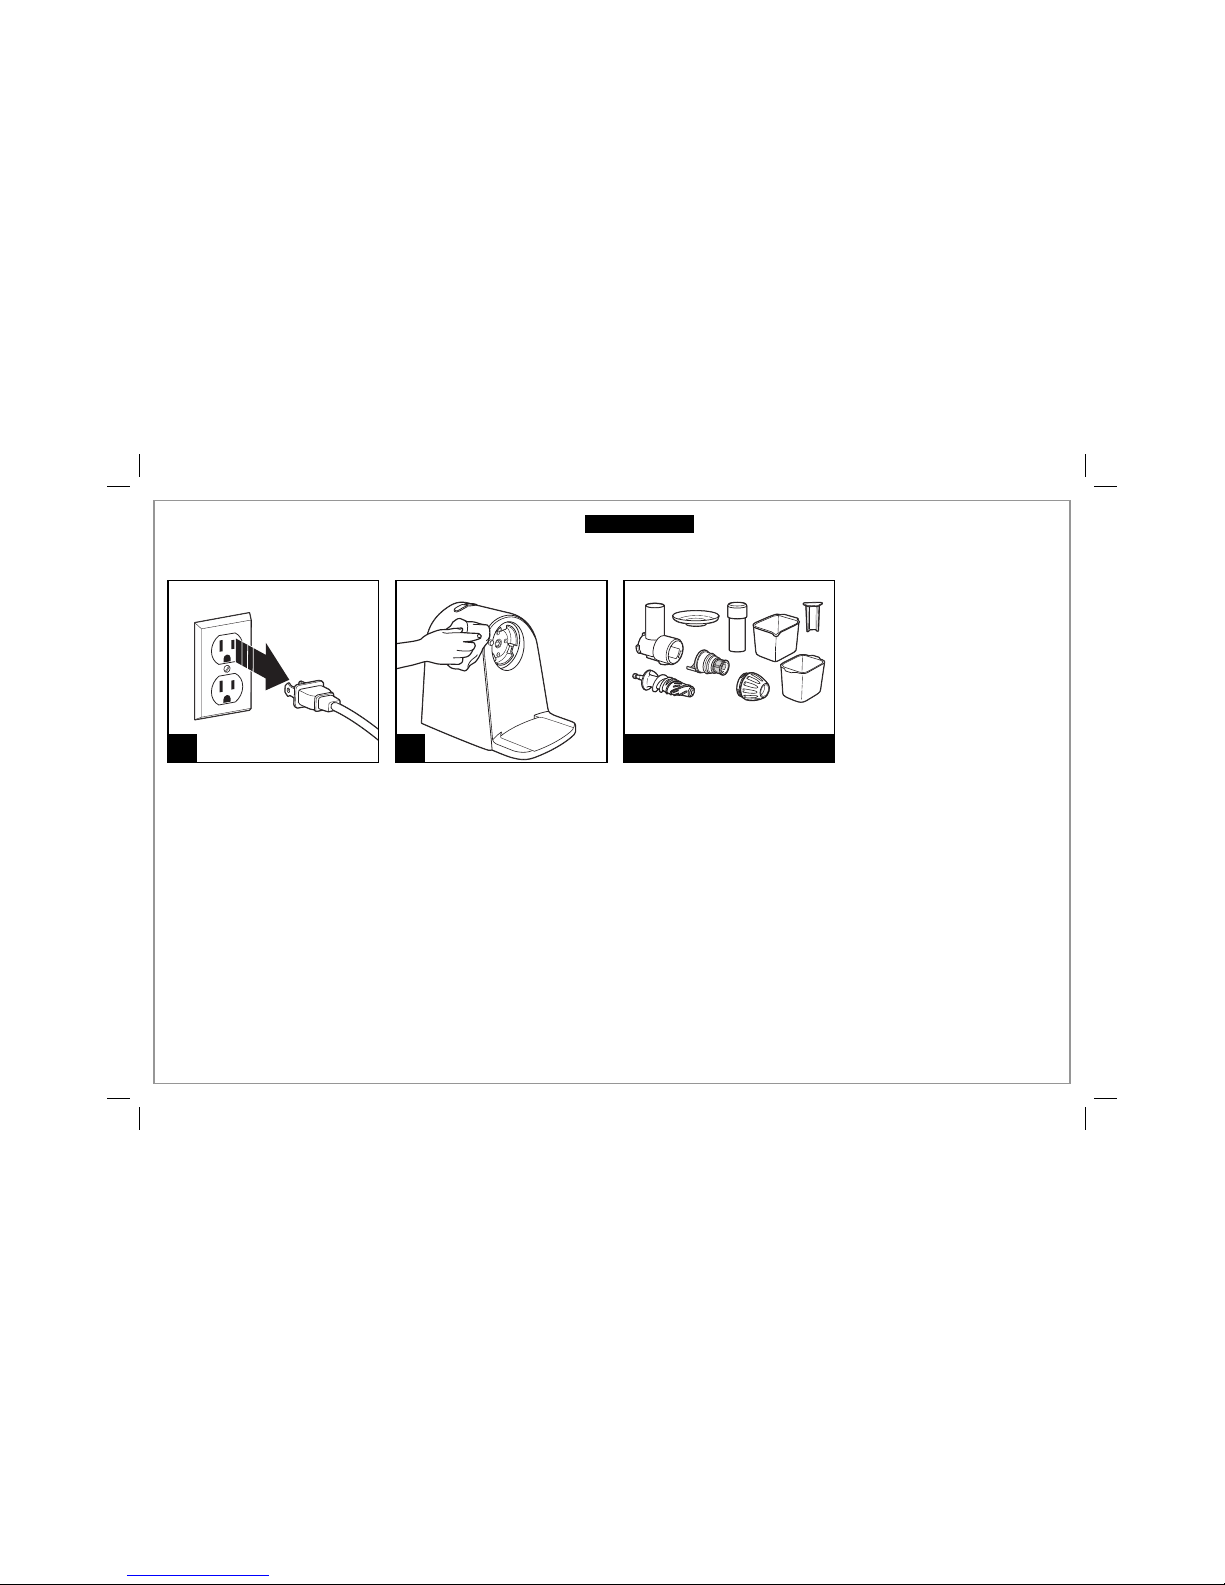
Care and Cleaning
w WARNING
Shock Hazard.
Do not immerse motor base in water or any other liquid.
1 2 DISHWASHER-SAFE
DO NOT use the “SANI” setting
when washing in the dishwasher.
“SANI” cycle temperatures could
damage your product. Do not
place the motor base in the
dishwasher. Some part distortion
may occur if your household
dishwasher’s temperature is
higher than normal or if the
parts are placed too close to
the heating element.
Wipe down the exterior of the
juice extractor base.
840243102 ENv01.indd 12840243102 ENv01.indd 12 11/18/14 4:36 PM11/18/14 4:36 PM

13
Troubleshooting
PROBLEM PROBABLE CAUSE/SOLUTION
Motor appears to stall
when juicing.
• The juicing action may be too vigorous. Try slower juicing action by pushing the food pusher down more
slowly. Refer to page 6, Step 3 or press REVERSE button to dislodge food.
Excess pulp building up
in the micro-mesh
strainer.
• Juicer never taken apart and cleaned.
• Too much food juiced before cleaning with brush.
• Unplug. Remove strainer and clean mesh walls with a fine brush. This will remove excess fiber buildup
which could be inhibiting the juice flow.
Pulp is too wet and
insufficient juice is
produced.
• Try a slower juicing action.
• Unplug. Remove strainer and clean mesh walls with a fine brush. This will remove excess fiber buildup
which could be inhibiting the juice flow.
Juice sprays out of spout. • Try a slower juicing action by pushing the food pusher down more slowly. Refer to page 6, Step 3.
Juice drips out of spout
immediately after juicing.
• With motor ON, raise and lower food pusher in feed chute several times. The action forces remaining pulp
and juice out of the strainer.
Food won’t move in food
chute.
• Food is stuck in the juicer chute. Press REVERSE button to allow food to move in juicer chute.
Juicer will not work. • Juicer has been operating for 30 minutes or more. Press ON button to reset and begin juicing.
840243102 ENv01.indd 13840243102 ENv01.indd 13 11/18/14 4:36 PM11/18/14 4:36 PM

14
This warranty applies to products purchased and used in the U.S. and Canada. This is the only express warranty for this product and
is in lieu of any other warranty or condition.
This product is warranted to be free from defects in material and workmanship for a period of five (5) years from the date of original
purchase in Canada and three (3) years from the date of original purchase in the U.S. During this period, your exclusive remedy is
repair or replacement of this product or any component found to be defective, at our option; however, you are responsible for all
costs associated with returning the product to us and our returning a product or component under this warranty to you. If the product
or component is no longer available, we will replace with a similar one of equal or greater value.
This warranty does not cover glass, filters, wear from normal use, use not in conformity with the printed directions, or damage to
the product resulting from accident, alteration, abuse, or misuse. This warranty extends only to the original consumer purchaser or
gift recipient. Keep the original sales receipt, as proof of purchase is required to make a warranty claim. This warranty is void if the
product is used for other than single-family household use or subjected to any voltage and waveform other than as specified on the
rating label (e.g., 120V ~ 60 Hz).
We exclude all claims for special, incidental, and consequential damages caused by breach of express or implied warranty. All
liability is limited to the amount of the purchase price. Every implied warranty, including any statutory warranty or condition
of merchantability or fitness for a particular purpose, is disclaimed except to the extent prohibited by law, in which case such
warranty or condition is limited to the duration of this written warranty. This warranty gives you specific legal rights. You may have
other legal rights that vary depending on where you live. Some states or provinces do not allow limitations on implied warranties or
special, incidental, or consequential damages, so the foregoing limitations may not apply to you.
To make a warranty claim, do not return this appliance to the store. Please call 1.800.851.8900 in the U.S. or 1.800.267.2826 in Canada
or visit hamiltonbeach.com in the U.S. or hamiltonbeach.ca in Canada. For faster service, locate the model, type, and series numbers
on your appliance.
Limited Warranty
840243102 ENv01.indd 14840243102 ENv01.indd 14 11/18/14 4:36 PM11/18/14 4:36 PM
 Loading...