

Page 1
READ BEFORE USE
LIRE AVANT UTILISATION
LEA ANTES DE USAR
Visit www.hamiltonbeach.com for our
complete line of products and Use and
Care Guides – as well as delicious recipes,
tips, and to register your product online!
Rendez-vous sur www.hamiltonbeach.ca
pour notre liste complète de produits et de
nos manuels utilisateur – ainsi que nos
délicieuses recettes et nos conseils !
¡Visite www.hamiltonbeach.com (
o
www.hamiltonbeach.com.mx (México)
para ver otros productos de Hamilton Beach
o para contactarnos!
Questions?
Please call us – our friendly
associates are ready to help.
USA: 1.800.851.8900
Questions ?
N’hésitez pas à nous appeler –
nos associés s’empresseront
de vous aider.
CAN : 1.800.267.2826
¿Preguntas?
Por favor llámenos – nuestros
amables representantes están
listos para ayudar.
EE. UU.: 1.800.851.8900
MEX: 01 800 71 16 100
Le invitamos a leer cuidadosamente este
instructivo antes de usar su aparato.
EE. UU.)
Big Mouth™ Plus Juice Extractor
Centrifugeuse
Big MouthMC plus
Extractor de Jugo
Big Mouth™ Plus
English ...................... 2
Français ................... 15
Español ................... 29
840250600 ENv10.indd 1 9/12/14 8:38 AM
Page 2

IMPORTANT SAFEGUARDS
When using electrical appliances, basic safety precautions should always be followed to reduce the risk of fire, electric shock, and/or injury to
persons, including the following:
1. Read all instructions.
2. This appliance is not intended for use by persons (including
children) with reduced physical, sensory, or mental capabilities,
or lack of experience and knowledge, unless they are closely
supervised and instructed concerning use of the appliance by a
person responsible for their safety.
3. Close supervision is necessary when any appliance is used by or
near children. Children should be supervised to ensure that they
do not play with the appliance.
4. To protect against risk of electric shock, do not immerse cord,
plug, or motor base in water or other liquid.
5. Always turn appliance OFF (O) and unplug cord from outlet
when not in use, before putting on or taking off parts, and before
cleaning.
6. Avoid contacting moving parts. Keep fingers out of feed chute.
7. Never feed food by hand—always use the food pusher.
8. Always make sure the juice extractor is properly and completely
assembled before the motor is turned ON. The unit will not turn
ON unless properly assembled. Do not release safety locking
latches while juice extractor is in operation.
9. Never operate without pulp container in place.
10. Be sure to turn switch to OFF (O) position after each use of your
juice extractor. Make sure the motor stops completely before
disassembling.
11. Do not put fingers or other objects into the juice extractor feed
chute while it is in operation. If food becomes lodged in the
opening, use food pusher to push it down. When this method is
not possible, turn the motor OFF (O), unplug the cord from the
outlet, and disassemble juicer to remove the remaining food.
12. Do not operate any appliance with a damaged cord or plug,
or after the appliance malfunctions or is dropped or damaged
in any manner. Call our toll-free customer service number for
information on examination, repair, or electrical or mechanical
adjustment.
13. The use of attachments not recommended or sold by the
appliance manufacturer may cause fire, electric shock, or injury.
14. Do not use outdoors.
15. Do not let cord hang over edge of table or counter, or touch hot
surfaces, including stove.
16. Do not leave juice extractor unattended while it is operating.
17. Blades are sharp; handle carefully. Do not touch the small cutting
blades in the base of the stainless steel strainer basket.
18. Keep hair, clothing, and jewelry, as well as spatulas and other
utensils, away from feed chute during operation to prevent the
possibility of severe injury to persons and/or damage to the
appliance.
19. Do not use the appliance if the rotating strainer basket is
damaged.
20. Always use the juice extractor on a dry, level surface.
21. Any maintenance other than cleaning should be performed
by an authorized service center.
22. To reduce the risk of personal injury and/or damage to the
appliance, do not use bent, dented, or otherwise damaged
strainer basket.
23. Do not operate without the pulp container in place.
24. Do not place on or near a hot gas or electric burner or in a
heated oven.
25. Check that the control is OFF (O) before plugging cord into
outlet. To disconnect, turn control to OFF (O) and then remove
plug from wall outlet.
SAVE THESE INSTRUCTIONS!
2
840250600 ENv10.indd 2 9/12/14 8:38 AM
Page 3

Other Consumer Safety Information
This product is intended for household use only.
WARNING! Shock Hazard: This appliance has a polarized plug (one
wide blade) that reduces the risk of electric shock. The plug fits only
one way into a polarized outlet. Do not defeat the safety purpose of
the plug by modifying the plug in any way or by using an adapter.
If the plug does not fit fully into the outlet, reverse the plug. If it still
does not fit, have an electrician replace the outlet.
The length of the cord used on this appliance was selected to reduce
the hazards of becoming tangled in or tripping over a longer cord.
If a longer cord is necessary, an approved extension cord may be
used. The electrical rating of the extension cord must be equal to
or greater than the rating of the appliance. Care must be taken to
arrange the extension cord so that it will not drape over the countertop or tabletop where it can be pulled on by children or accidentally
tripped over.
The electrical rating of this appliance is listed on the bottom panel
of the unit.
The strainer basket is a delicate screen. If bent or damaged, do not
use, as it could break into small pieces and cause personal injury
and/or damage the appliance. Call our toll-free customer service
number to order a new basket. Replace basket when it shows signs
of wear.
This machine is equipped with motor overload protection. If the
motor stops during operation due to overheating, unplug and allow
it to cool down for 15 minutes. Plug machine back in to resume
normal operation.
w WARNING
Laceration Hazard.
Extra-wide feed chute. Do not place hands or fingers down feed
chute. Always use the food pusher.
3
840250600 ENv10.indd 3 9/12/14 8:38 AM
Page 4
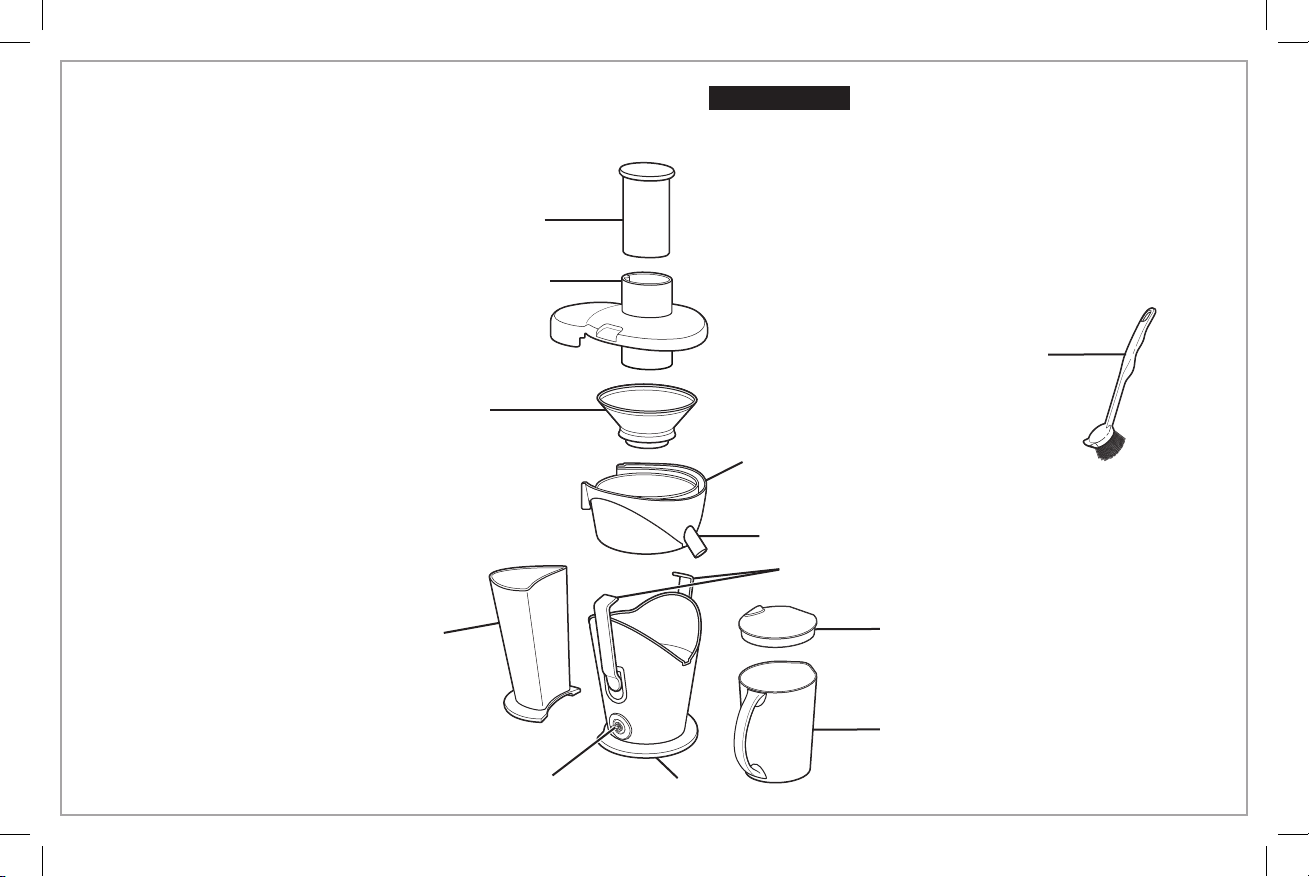
Parts and Features
*To order parts:
US: 1.800.851.8900
www.hamiltonbeach.com
Canada: 1.800.267.2826
Mexico:
01 800 71 16 100
Extra-Wide Feed Chute*
Stainless Steel
Micro-Mesh Strainer
Basket*
Food Pusher*
w WARNING
Micro-mesh strainer basket may fly apart during use if it is
damaged, resulting in the risk of cuts and bruises. To reduce
the risk of personal injury:
• Always inspect micro-mesh strainer basket before each use.
• Never use a cracked, bent, or damaged micro-mesh strainer
basket.
Strainer Bowl*
Juice Spout
Locking Latch
Laceration Hazard.
Cleaning Brush*
Large Pulp
Container*
HI/LO/OFF Switch
4
840250600 ENv10.indd 4 9/12/14 8:38 AM
Motor Base
Pitcher Lid*
Pitcher*
Page 5
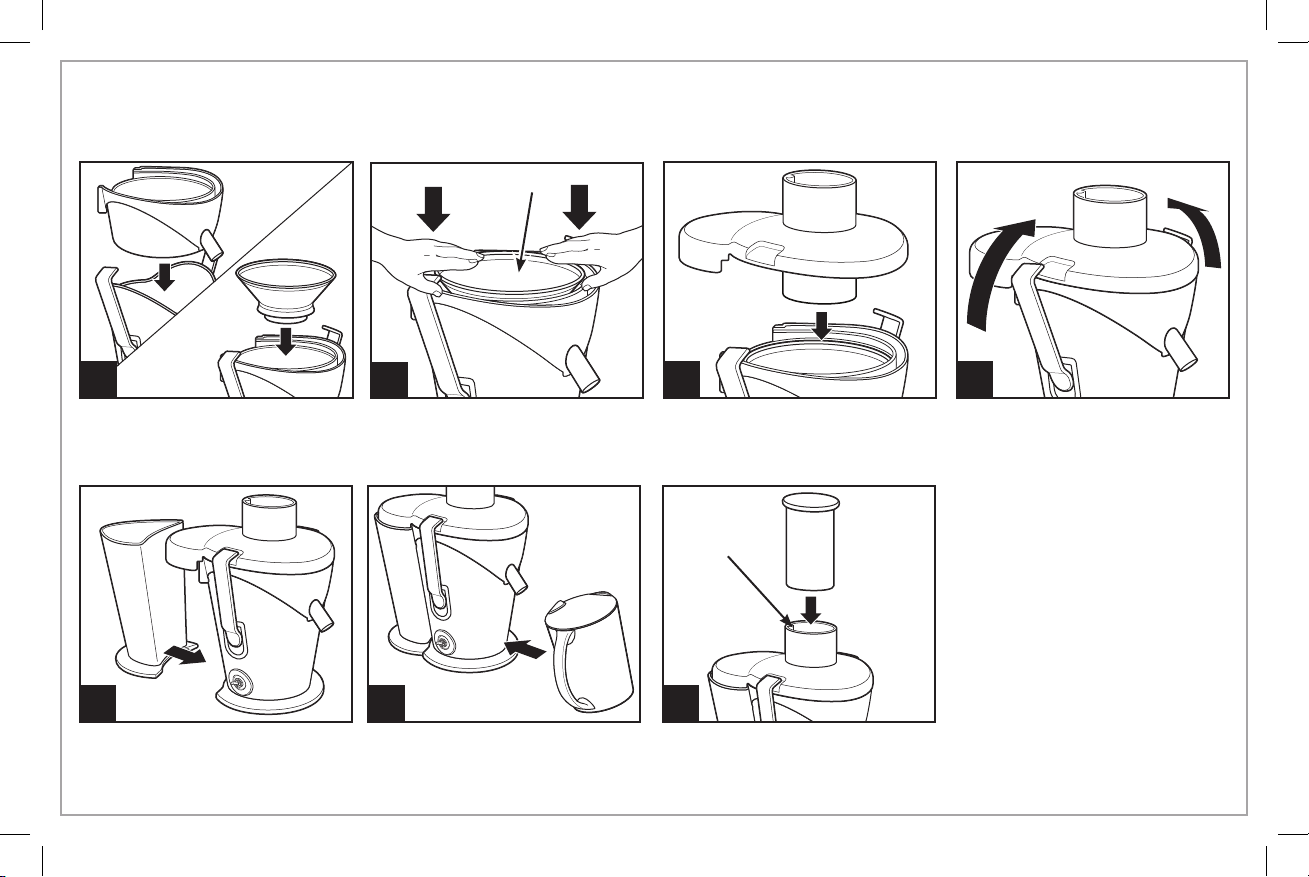
How to Assemble
Strainer Basket
BEFORE FIRST USE: After unpacking the juice extractor, remove
cardboard from filter basket and wash everything except the base in
warm, soapy water. Rinse and dry immediately. Never immerse the
base in water or other liquids; wipe it with a damp sponge.
1
Place strainer bowl on top of the
motor base. Then place the
stainless steel strainer basket
inside the strainer bowl.
2
With hands on outer edge, press
strainer basket down firmly to
latch into position.
5 6
Place the pulp container into
position by tilting the container
slightly.
840250600 ENv10.indd 5 9/12/14 8:38 AM
Place pitcher with lid under the juice spout. Slide the food pusher
down the feed chute by aligning the groove in the food pusher with
the small ridge on the inside of the top of the feed tube.
3
Place the juicer cover over the
strainer bowl, positioning the
feed chute over the strainer
basket, and lower into position.
Small Ridge
Inside Feed
Chute
7
4
Raise the locking latches up to
lock into place.
To minimize cleanup, place
HINT:
a plastic grocery bag in the pulp
container to collect the pulp. (See
page 6 for more information.)
5
Page 6
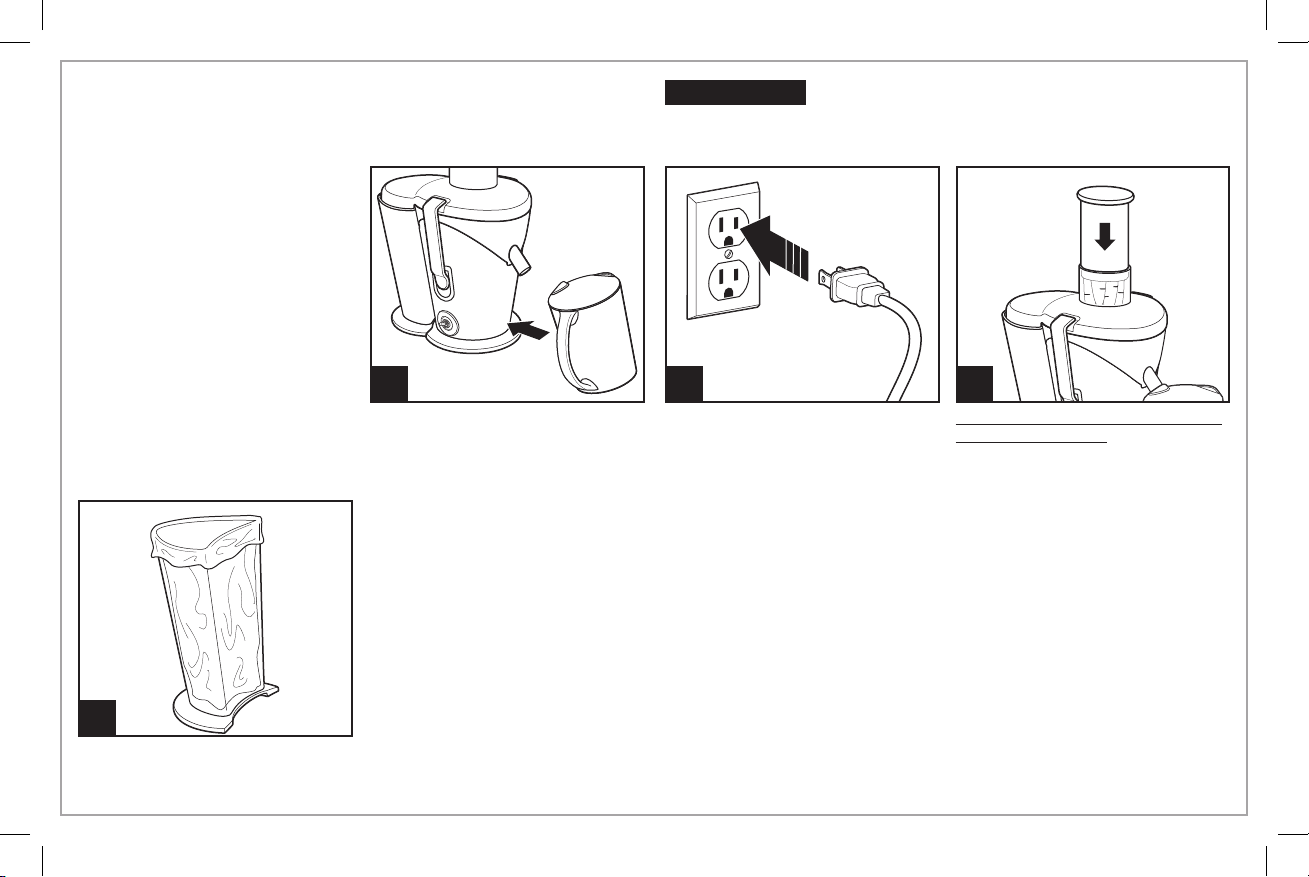
How to Use
Wash fruits and vegetables.
NOTE: Most fruits and vegetables
such as apples, carrots, and
cucumbers will not need to be
cut since they will fit into feed
chute whole. It is recommended
that fruits or vegetables such as
oranges, melons, or mangoes are
peeled before placing in unit for
best juice flavor.
w WARNING
Never use fingers to push food down the feed chute or to clear the
feed chute. Always use the food pusher provided.
Laceration Hazard.
1
Ensure that unit is correctly
assembled (see page 5) and place
pitcher with lid under spout.
To minimize cleanup, place a
plastic grocery bag in pulp
container to collect pulp. When
juicing is completed, simply
remove grocery bag containing
pulp.
NOTE: Do not allow pulp container
to overfill since this may prevent
4
6
840250600 ENv10.indd 6 9/12/14 8:38 AM
correct operation or damage the
unit.
2 3
Turn switch to OFF (O) position.
Plug cord into 120-volt outlet.
With the motor running, place food
down the feed chute. Using food
pusher, gently guide food down
feed chute. To extract the maximum
amount of juice, always push food
pusher down slowly.
Juice will flow into pitcher and
separated pulp will accumulate
in pulp container.
NOTE: Pulp container can be
emptied during juicing by turning
juice extractor OFF (O) and then
carefully removing pulp container.
(Replace empty pulp container
before continuing to juice.)
Page 7

How to Disassemble
1
Turn juice extractor OFF (O) and
unplug. Allow strainer basket
to stop turning.
5
Remove the pulp container by
sliding away from motor base.
840250600 ENv10.indd 7 9/12/14 8:38 AM
2
Release locking latches.
6
Lift off the strainer bowl with the
strainer basket still in place.
3
Move the locking latches down.
4
Lift off the cover.
7
To remove the strainer basket, turn the strainer bowl upside down
and carefully remove the strainer basket. (It is recommended to
remove the strainer basket over a sink.)
7
Page 8

Care and Cleaning
1
2 DISHWASHER-SAFE
Discoloration of the plastic may occur with some fruit and vegetables.
To help prevent this, wash all parts immediately after use.
w WARNING
Do not immerse motor base in water or any other liquid.
Shock Hazard.
DO NOT use the “SANI” setting
when washing in the dishwasher.
“SANI” cycle temperatures could
damage your product. Do not
place the motor base in the
dishwasher. Some part distortion
may occur if your household
dishwasher’s temperature is
higher than normal or if the
parts are placed too close to
the heating element.
w CAUTION
The center of the strainer basket contains small, sharp blades to
process fruits and vegetables during the juicing function. Do not
touch blades when handling the strainer basket.
Always treat the strainer basket with care; it can be damaged easily.
To assist with cleaning, soak the strainer basket in hot, soapy water
for approximately 10 minutes immediately after juicing is completed.
If pulp is left to dry on the basket it may clog the fine pores of the filter
mesh, thereby lessening the effectiveness of the juice extractor.
Laceration Hazard.
STRAINER BASKET
The cleaning brush included with
the unit is the most effective way to
clean the strainer basket. Using the
brush, hold the strainer basket under
running water and brush inside and
8
840250600 ENv10.indd 8 9/12/14 8:38 AM
outside of the basket.
Page 9

Juicing Tips, Techniques, and Recipes
PURCHASING AND STORING FRUITS AND VEGETABLES:
• Always wash fruits and vegetables before juicing.
• Always use fresh fruits and vegetables for juicing.
• To save money and obtain fresher produce, purchase fruits or
vegetables that are in season.
• Keep your fruits and vegetables ready for juicing by washing
them before storing.
• Most fruits and hardier-type vegetables can be stored at cool
room temperature. More delicate and perishable items such as
berries, leafy greens, celery, cucumbers, and herbs should be
stored in the refrigerator until required.
PREPARING FRUITS AND VEGETABLES:
• It is recommended that fruits or vegetables such as oranges,
melons, or mangoes are peeled before placing in juice extractor
for best juice flavor.
• All fruits with pits and large seeds such as nectarines, peaches,
apricots, plums, and cherries MUST be pitted before juicing.
USING THE PULP:
• The remaining pulp left after juicing fruits or vegetables is mostly
fiber and cellulose which, like the juice, contain vital nutrients
necessary for the daily diet and can be used in many ways. Pulp
can be frozen for later use.
• There are a number of recipes that use pulp. You can also use
pulp to thicken casseroles or soups.
• Pulp is great used in the garden for compost.
SOY MILK, ALMOND MILK, AND RICE MILK:
This juice extractor may be used to make soy milk, almond milk,
and rice milk. Follow these steps:
1. Soak 1 cup (237 ml) of soybeans, almonds, or rice in 4 cups
(946 ml) of water for 8 to 12 hours covered in the refrigerator.
2. Drain nuts and discard water. Cover nuts, beans, or rice with
1 1/2 cups (355 ml) fresh water.
3. Slowly ladle the nuts, beans, or rice with the water into the food
chute.
4. Place cheesecloth in a container. Pour mixture into a tight woven
cheesecloth and let stand until completely drained. Squeeze
cheesecloth, if necessary. Refrigerate milk immediately.
NOTES:
• Almonds must be soaked 8 to 12 hours before juicing.
• Soy milk should be boiled to improve the flavor.
• Vanilla, honey, and sugar may be added to enhance the flavor of
each milk type.
9
840250600 ENv10.indd 9 9/12/14 8:38 AM
Page 10

Juicing Chart
Fruit or Vegetables Examples Speed
Firm Fruits and Vegetables Apples, Peeled Oranges, Carrots, Beets, Cucumbers, Ginger HIGH
Soft Fruits and Vegetables Strawberries, Pitted Peaches, Watermelons, Grapes, Tomatoes LOW
Leafy Greens Spinach, Kale, Beet Greens LOW
10
840250600 ENv10.indd 10 9/12/14 8:38 AM
Page 11

Recipes
Carrot, Ginger, and Apple Juice
6 medium carrots
1/4-inch-thick (0.6 cm) slice fresh ginger (about 1-inch [2.5-cm]
diameter)
1 large Granny Smith apple
Directions:
1. Cut apple as needed to fit through the chute of the juice extractor.
2. Juice the ingredients in the order listed.
3. Stir and serve immediately.
Serves: 2
Beet, Orange, Ginger, and Carrot Juice
1 large beet, trimmed
1 medium orange, peeled
3 medium carrots
1/4-inch-thick (0.6 cm) slice fresh ginger (about 1-inch [2.5-cm]
diameter)
Directions:
1. Cut beet, orange, and carrots as needed to fit through the chute of
the juice extractor.
2. Juice the ingredients in the order listed.
3. Stir and serve immediately.
Serves: 1–2
Blueberry, Raspberry, Strawberry, and Apple Juice
1 cup (237 ml) blueberries
1 cup (237 ml) raspberries
4 large strawberries, hulled
1/4 of a Granny Smith apple
Directions:
1. Juice the ingredients in the order listed.
2. Stir and serve immediately
Serves: 1–2
Go-Getter Green Juice
4 medium kale leaves
2 medium carrots, trimmed
1/2 lemon, peeled
1-inch (2.5-cm) piece fresh ginger
1 cup (237 ml) baby spinach leaves
1 medium Granny Smith apple
Directions:
1. Cut carrots, apple, and lemon as needed to fit through the chute of
the juice extractor.
2. Juice the ingredients in the order listed.
3. Stir and serve immediately
Serves: 1–2
11
840250600 ENv10.indd 11 9/12/14 8:38 AM
Page 12

Recipes (cont.)
Veggie Cocktail
8 medium tomatoes
1 small lemon, peeled
1 large rib celery
1 medium carrot
1 onion slice
1 teaspoon (5 ml) Worcestershire sauce
1/2 teaspoon (2.5 ml) salt, if desired
Directions:
1. Cut tomatoes, lemon, and carrot as needed to fit through the chute
of the juice extractor.
2. Juice the ingredients in the order listed except Worcestershire
sauce and salt.
3. Stir in Worcestershire sauce and salt. Serve immediately.
Serves: 2–3
Kale, Cucumber, and Cilantro Green Juice
6 large leaves kale
1 large cucumber
1 rib celery with leaves
1 medium lime, peeled
2 small handfuls cilantro
1 medium Granny Smith apple
Directions:
1. Cut cucumber and apple as needed to fit through the chute of the
juice extractor.
2. Juice the ingredients in the order listed.
3. Stir and serve immediately
Serves: 1–2
Pomegranate Blueberry Juice
2 cups (473 ml) pomegranate seeds
1 cup (237 ml) blueberries
Directions:
1. Juice the ingredients in the order listed.
2. Stir and serve immediately.
Serves: 1–2
Test Kitchen Tip: Use just the seeds of a pomegranate for juicing
since the membranes will make the juice bitter. To deseed the
pomegranate, start by making a thin slice from the bottom to make
it stable for cutting. Cut out the core at the top. Make shallow cuts
to section into 6 wedges. Gently break the pomegranate apart and
pry the seeds out with your fingers. Pomegranate juice can stain, so
we suggest wearing gloves and something like an old T-shirt. Work
over a bowl to catch the seeds and drips before placing in the juice
extractor.
12
840250600 ENv10.indd 12 9/12/14 8:38 AM
Page 13

Troubleshooting
PROBLEM PROBABLE CAUSE/SOLUTION
Machine will not work
when switched ON.
Motor appears to stall
when juicing.
Excess pulp building up
in the micro-mesh
strainer basket.
Pulp is too wet and
insufficient juice is
produced.
Juice sprays out of spout. • Try slower juicing action by pushing the food pusher down more slowly. Refer to page 6, Step 3.
Juice drips out of spout
immediately after juicing.
Machine vibrates
excessively.
• The locking latches may not be correctly engaged. Check to see if the locking latches are properly
positioned in the two grooves on either side of the juice cover. Refer to page 5, Steps 3 and 4.
• This machine is equipped with motor overload protection. If the motor stops during operation due
to overheating, unplug and allow it to cool down for 15 minutes. Plug machine back in to resume
normal operation.
• The juicing action may be too vigorous. Try slower juicing action by pushing the food pusher down more
slowly. Refer to page 6, Step 3.
• Wet pulp can build up under the juicer cover or pulp container. Turn unit OFF (O) and unplug. Empty the
pulp bin; then clean juice cover and strainer basket.
• Turn OFF (O) and unplug. Remove strainer basket and clean mesh walls with a fine brush. This will remove
excess fiber buildup which could be inhibiting the juice flow. Refer to pages 7 and 8.
• Try a slower juicing action.
• Turn OFF (O) and unplug. Remove strainer basket and clean mesh walls with a fine brush. This will remove
excess fiber buildup which could be inhibiting the juice flow. Refer to pages 7 and 8.
• With motor ON, raise and lower food pusher in feed chute several times. The action forces remaining pulp
and juice out of strainer bowl.
• Buildup of pulp in mesh of strainer basket. Turn unit OFF (O) and unplug. Clean strainer basket. Refer to
page 8. If machine vibration continues after cleaning, this could be a sign of a damaged strainer basket.
Call our toll-free customer service number to order a new strainer basket.
13
840250600 ENv10.indd 13 9/12/14 8:38 AM
Page 14

Limited Warranty
This warranty applies to products purchased and used in the U.S. and Canada. This is the only express warranty for this product and
is in lieu of any other warranty or condition.
This product is warranted to be free from defects in material and workmanship for a period of five (5) years from the date of original
purchase in Canada and three (3) years from the date of original purchase in the U.S. During this period, your exclusive remedy is
repair or replacement of this product or any component found to be defective, at our option; however, you are responsible for all
costs associated with returning the product to us and our returning a product or component under this warranty to you. If the product
or component is no longer available, we will replace with a similar one of equal or greater value.
This warranty does not cover glass, filters, wear from normal use, use not in conformity with the printed directions, or damage to
the product resulting from accident, alteration, abuse, or misuse. This warranty extends only to the original consumer purchaser or
gift recipient. Keep the original sales receipt, as proof of purchase is required to make a warranty claim. This warranty is void if the
product is used for other than single-family household use or subjected to any voltage and waveform other than as specified on the
rating label (e.g., 120V ~ 60 Hz).
We exclude all claims for special, incidental, and consequential damages caused by breach of express or implied warranty. All
liability is limited to the amount of the purchase price. Every implied warranty, including any statutory warranty or condition
of merchantability or fitness for a particular purpose, is disclaimed except to the extent prohibited by law, in which case such
warranty or condition is limited to the duration of this written warranty. This warranty gives you specific legal rights. You may have
other legal rights that vary depending on where you live. Some states or provinces do not allow limitations on implied warranties or
special, incidental, or consequential damages, so the foregoing limitations may not apply to you.
To make a warranty claim, do not return this appliance to the store. Please call 1.800.851.8900 in the U.S. or 1.800.267.2826 in Canada
or visit hamiltonbeach.com in the U.S. or hamiltonbeach.ca in Canada. For faster service, locate the model, type, and series numbers
on your appliance.
14
840250600 ENv10.indd 14 9/12/14 8:38 AM
Page 15

IMPORTANTES INSTRUCTIONS
Pour utiliser un appareil électroménager, vous devez toujours prendre des mesures élémentaires de sécurité pour réduire le risque d’incendie,
d’électrocution et/ou de blessure corporelle, en particulier les mesures suivantes :
1. Lire toutes les instructions.
2. Cet appareil n’est pas destiné à être utilisé par des personnes (y compris
les enfants) dont les capacités physiques, sensorielles ou mentales sont
réduites, ou manquant d’expérience et de connaissance, sauf si elles
sont étroitement surveillées et instruites sur l’utilisation de l’appareil par
une personne responsable de leur sécurité.
3. Une surveillance étroite est requise pour tout appareil utilisé par ou près
des enfants. Surveiller que les enfants ne jouent pas avec l’appareil.
4. Pour protéger contre le risque de choc électrique, ne pas immerger le
cordon, la fiche ou la base de moteur dans l’eau ou autre liquide.
5. Toujours ÉTEINDRE (O) l’appareil et le débrancher de la prise de courant
électrique lorsqu’il n’est pas utilisé, avant d’y placer ou d’en enlever des
pièces ou avant un nettoyage.
6. Éviter le contact avec les pièces en mouvement. Veiller à ne pas mettre
les doigts dans la trémie.
7. Ne jamais introduire d’aliments à la main — se servir toujours du
poussoir.
8. Toujours s’assurer que la centrifugeuse est correctement et
complètement assemblée avant de mettre le moteur en marche.
L’appareil ne s’allumera pas s’il n’est pas correctement assemblé.
Laisser les verrous de sécurité fermés pendant que la centrifugeuse est
en fonctionnement.
9. Ne jamais utiliser l’appareil sans bac à pulpe.
10. S’assurer de mettre la centrifugeuse sur la position OFF (O/arrêt)
après chaque utilisation. S’assurer que le moteur est complètement
arrêté avant de démonter l’appareil.
11. Ne mettre ni les doigts ni aucun objet dans la trémie de la centrifugeuse
lorsque celle-ci est en marche. Si des aliments se coincent dans
l’ouverture, se servir du poussoir pour les enfoncer. Lorsque cela n’est
pas possible, ÉTEINDRE (O) le moteur, débrancher le cordon de la prise
et démonter la centrifugeuse pour procéder au retrait des aliments
coincés.
12. Ne faire fonctionner un appareil électroménager avec une fiche ou un
cordon endommagé, ou lorsque l’appareil ne fonctionne pas bien ou a
été échappé ou endommagé d’une manière quelconque. Appeler notre
numéro sans frais de service à
la clientèle pour des renseignements concernant l’examen,
la réparation ou l’ajustement électrique ou mécanique.
13. L’utilisation d’accessoires non recommandés ni vendus par le fabricant
d’appareil peut causer un incendie, un choc électrique ou des blessures.
14. Ne pas utiliser l’appareil à l’extérieur.
15. Ne pas laisser le cordon pendre au bord d’une table ou d’un comptoir,
ni venir en contact avec des surfaces chaudes, y compris la cuisinière.
16. Ne pas vous éloigner de la centrifugeuse lorsque celle-ci est en marche.
17. Les lames du couteau sont coupantes. Les manipuler avec soin. Ne
pas toucher aux petites lames dans le socle du panier-filtre en acier
inoxydable.
18. Ne pas approcher de la trémie, cheveux, vêtements, bijoux, spatules ou
ustensiles pendant la marche de l’appareil, afin d’éviter tout risque de
blessure grave ou d’endommagement de la machine.
19. Ne jamais utiliser la centrifugeuse si le panier-filtre tournant est
endommagé.
20. Toujours utiliser la centrifugeuse sur une surface sèche et plane.
21. Tout entretien autre que le nettoyage devrait être effectué par un centre
de service autorisé.
22. Pour réduire le risque de blessures personnelles et/ou
d’endommagement de l’appareil, ne pas utiliser un panier-filtre déformé,
bosselé ou autrement endommagé.
23. Ne pas faire fonctionner sans installer le récipient à pulpe.
24. Ne pas placer l’appareil sur ou près d’un brûleur à gaz ou électrique
chaud ou dans un four chauffé.
25. Vérifier que le commutateur est sur OFF (O/arrêt) avant de brancher
l’appareil. Avant de débrancher l’appareil de la prise murale, basculer le
commutateur sur OFF (O/arrêt).
CONSERVER CES INSTRUCTIONS !
15
840250600 FRv08.indd 15 9/12/14 8:43 AM
Page 16

Autres renseignements de sécurité pour les consommateurs
Cet appareil est destiné à un usage domestique uniquement.
AVERTISSEMENT ! Risque d’électrocution : Cet appareil
électroménager possède une fiche polarisée (une broche large)
qui réduit le risque d’électrocution. Cette fiche n’entre que dans un
seul sens dans une prise polarisée. Ne contrecarrez pas l’objectif
sécuritaire de cette fiche en la modifiant de quelque manière que
ce soit ou en utilisant un adaptateur. Si vous ne pouvez pas insérer
complètement la fiche dans la prise, inversez la fiche. Si elle refuse
toujours de s’insérer, faire remplacer la prise par un électricien.
La longueur du cordon installé sur cet appareil a été sélectionnée
afin de réduire les risques d’enchevêtrement ou de faux pas
causés par un fil trop long. L’utilisation d’une rallonge approuvée
est permise si le cordon est trop court. Les caractéristiques
électriques de la rallonge doivent être équivalentes ou supérieures
aux caractéristiques de l’appareil. Prendre toutes les précautions
nécessaires pour installer la rallonge de manière à ne pas la faire
courir sur le comptoir ou sur une table pour éviter qu’un enfant ne
tire sur le cordon ou trébuche accidentellement.
L’ampérage de cet appareil est indiqué sur la plaque signalétique
sous la base.
Le panier-filtre est délicat. Ne pas l’utiliser si’l est tordu ou
endommagé, car il pourrait se briser en petits morceaux et
occasionner des blessures ou endommager l’appareil. Composer
notre numéro d’appel sans frais de service aux clients afin de
commander un nouveau panier-filtre. Remplacer le panier-filtre quand
il montre des signes d’usure.
Cet appareil est équipé d’un dispositif contre les surcharges.
Si le moteur s’arrête pendant qu’il est en marche à cause d’une
surchauffe, débrancher et laisser refroidir l’appareil pendant
15 minutes. Rebrancher l’appareil et continuer l’opération.
w AVERTISSEMENT
Risque de déchirures.
Trémie extra-large. Ne pas introduire les mains ou les doigts
dans la trémie. Toujours utiliser le poussoir.
16
840250600 FRv08.indd 16 9/12/14 8:43 AM
Page 17

Pièces et caractéristiques
*Pour commander des pièces :
Canada : 1.800.267.2826
Pousseur d’aliments*
Dispositif d’alimentation
extra-large*
Panier-filtre
micromèches en
acier inoxydable*
Bol de centrifugeuse*
Distributeur de jus
Mécanisme de verrouillage
w AVERTISSEMENT
Le panier-filtre micromèches risque de s’envoler
s’il est endommagé et occasionner des risques de
coupures ou des ecchymoses. Pour diminuer le risque
de blessure :
• Toujours examiner le panier-filtre micromèches
avant chaque utilisation.
• Ne jamais utiliser un panier-filtre fissuré, tordu ou
endommagé.
Brosse de nettoyage*
Risque de déchirures.
Grand récipient
à pulpe*
Commutateur HI/LO/OFF
Base de moteur
840250600 FRv08.indd 17 9/12/14 8:43 AM
Couvercle du pichet*
Pichet*
17
Page 18

Assemblage
AVANT LA PREMIÈRE UTILISATION : Une fois la centrifugeuse sortie de l’emballage,
ôter le carton du panier-filtre et laver tous les éléments à l’exception du socle, à l’eau
savonneuse tiède, puis les rincer et les essuyer immédiatement. Ne jamais immerger le
socle dans l’eau ou autre liquides. La nettoyer à l’aide d’une éponge humide.
Panier-filtre
1
Placer le bol de la centrifugeuse
au-dessus de la base du moteur. Placer
le panier-filtre en acier inoxydable dans
le bol de la centrifugeuse.
2
Avec les mains sur le bord
extérieur, appuyer fermement sur
le panier-filtre vers le bas, afin
de le verrouiller en position.
5 6
Placer le récipient à pulpe en
position en faisant légèrement
basculer ce récipient.
18
840250600 FRv08.indd 18 9/12/14 8:43 AM
Placer un pichet à couvercle sous le bec verseur. Faire descendre le
pousseur d’aliments dans le dispositif d’alimentation en alignant la rainure
du pousseur avec la petite arête située dans la partie supérieure du dispositif
d’alimentation.
3
Placer le couvercle de la centrifugeuse
sur le bol de centrifugeuse, en plaçant
le dispositif d’alimentation sur le
panier-filtre et abaisser en position.
Petite arête
à l’intérieur
du dispositif
d’alimentation
7
4
Soulever les mécanismes de
verrouillage afin de les verrouiller
en place.
CONSEIL:
nettoyage, placer un sac d’épicerie
dans le récipient à pulpe pour
recueillir la pulpe. (Voir page 17
davantage de renseignements.)
Pour minimiser le
Page 19

Utilisation
Laver les fruits et les légumes.
NOTE : Il est inutile de couper la
plupart des fruits et des légumes,
comme les pommes, les carottes
et les concombres, car ils
entrent entiers dans le dispositif
d’alimentation.
d’éplucher les fruits et légumes tels
qu’oranges, melons ou mangues
avant de les placer dans l’appareil
pour obtenir un jus de meilleure
qualité.
4
Il est recommandé
w AVERTISSEMENT
Ne jamais utiliser les doigts pour pousser les aliments dans le dispositif
d’alimentation ou pour le nettoyer. Toujours utiliser le pousseur d’aliments fourni.
1
S’assurer que l’appareil est
correctement assemblé (voir
page 16) puis placer un pichet à
couvercle sous le bec verseur.
Pour minimiser les nettoyages,
placer un sac d’épicerie en
matière plastique dans le
récipient à pulpe pour recueillir
la pulpe. Quand la centrifugeuse
a terminé d’extraire le jus, enlever
simplement le sac d’épicerie qui
contient la pulpe.
NOTE : Ne jamais permettre
au récipient à pulpe de trop se
remplir, car cela peut empêcher
un bon fonctionnement et
endommager la centrifugeuse.
Risque de déchirures.
2 3
Mettre le commutateur sur la
position OFF (O/arrêt). Brancher
le cordon d’alimentation dans une
prise à 120 volts.
Avec le moteur en marche, mettre
les aliments dans le dispositif
d’alimentation. À l’aide du pousseur
d’aliments, faites doucement
descendre les aliments dans le
dispositif d’alimentation. Pour
extraire une quantité maximum de
jus, pousser toujours doucement
vers le bas le pousseur d’aliments.
Le jus s’écoulera dans le pichet
et la pulpe produite s’accumulera
dans le récipient à pulpe.
NOTE : On peut vider le récipient
à pulpe pendant la centrifugation
en mettant la centrifugeuse en
position OFF (O
en enlevant soigneusement le
récipient à pulpe (remettre en
place le récipient à pulpe vide
avant de continuer à centrifuger).
/arrêt
) et ensuite
19
840250600 FRv08.indd 19 9/12/14 8:43 AM
Page 20

Désassemblage
1
Mettre la centrifugeuse en position
OFF (O
/arrêt) et débrancher le
cordon de la prise. Laisser le
panier-filtre s’arrêter de tourner.
5
Enlever le récipient à pulpe en le
faisant glisser de la base du
moteur.
20
840250600 FRv08.indd 20 9/12/14 8:43 AM
2
verrouillage.
6
Soulever le bol de centrifugeuse
avec le panier-filtre toujours en
place.
3
Amener vers le bas les
mécanismes de verrouillage.
4
Soulever le couvercle.Défaire les mécanismes de
7
Pour enlever le panier-filtre, renverser le bol de centrifugeuse et
enlever soigneusement le panier-filtre (on recommande d’enlever
le panier-filtre au-dessus d’un évier).
Page 21

Soins et nettoyage
1
PANIER-FILTRE
2
Il peut se produire une décoloration de la matière plastique avec
certains fruits et légumes. Pour aider à prévenir cette décoloration,
laver toutes les pièces immédiatement après usage.
w MISE EN GARDE
Le centre du panier-filtre contient des petites lames aiguisées qui
traitent les fruits et les légumes pendant l’extraction de jus. Ne jamais
toucher ces lames en manipulant le panier-filtre.
Faire toujours attention pour nettoyer le panier. Il peut être facilement
endommagé.
Pour faciliter le nettoyage, tremper le panier-filtre dans de l’eau
savonneuse chaude pendant environ 10 minutes immédiatement
après avoir terminé l’extraction de jus. S’il reste de la pulpe séchée
sur le panier, elle peut boucher les pores du filtre et ainsi diminuer
l’efficacité de la centrifugeuse.
Risque de déchirures.
w AVERTISSEMENT
Ne jamais immerger la base de moteur dans de
l’eau ou dans un autre liquide.
LAVABLE AU
LAVE-VAISSELLE
La brosse de nettoyage livrée avec la centrifugeuse
constitue le moyen le plus efficace pour nettoyer le
panier-filtre. Pour utiliser la brosse, tenir le panierfiltre sous l’eau courante et brosser à l’intérieur et à
l’extérieur du panier.
Risque d’électrocution.
NE PAS utiliser le réglage
“SANI” du lave-vaisselle. Les
températures du cycle “SANI”
peuvent endommager le produit.
Ne jamais mettre la base de
moteur dans le lave-vaisselle. Il
peut se produire une déformation
si la température du lave-vaisselle
est plus élevée que normale ou si
les pièces sont placées trop près
de l’élément de chauffage.
21
840250600 FRv08.indd 21 9/12/14 8:43 AM
Page 22

Conseils, techniques de préparation de jus et recettes
ACHAT ET ENTREPOSAGE DES FRUITS ET LÉGUMES :
• Toujours laver les fruits et légumes avant la préparation de jus.
• Toujours utiliser des fruits et légumes frais pour la préparation
de jus.
• Pour économiser et obtenir un produit plus frais, acheter des
fruits ou légumes en saison.
• Garder les fruits et légumes prêts pour la préparation de jus en
les lavant avant de les entreposer.
• La plupart des fruits et légumes de type plus résistant peuvent
être entreposés à une température ambiante fraîche. Les articles
plus délicats et périssables tels que les baies, légumes-feuilles,
celéri, concombres et herbes devraient être rangés dans le
réfrigérateur jusqu’à leur utilisation.
PRÉPARATION DES FRUITS ET LÉGUMES :
• Il est recommandé d’éplucher les fruits et légumes tels
qu’oranges, melons ou mangues avant de les placer dans
l’appareil pour obtenir un jus de meilleure qualité.
• Tous les fruits à noyau ou à grosse graine comme les nectarines,
les pèches, les abricots, les prunes et les cerises DOIVENT être
dénoyautés avant d’être centrifugés.
UTILISATION DE LA PULPE :
• La pulpe obtenue après la préparation de jus de fruits ou de
légumes est surtout constituée de fibre et de cellulose qui,
comme le jus, contient des éléments nutritifs vitaux nécessaires à
un régime quotidien et peut être utilisée de diverses manières. La
pulpe peut être congelée pour utilisation future.
• La pulpe peut servir dans différentes recettes. On peut aussi
utiliser la pulpe pour épaissir les plats en sauce ou les potages.
• La pulpe est également excellente comme compost dans le
jardin.
LAIT DE SOYA, LAIT D’AMANDES ET LAIT DE RIZ :
La centrifugeuse peut être utilisée pour faire des laits de soya,
d’amande et de riz. Suivre les étapes suivantes :
1. Faire tremper 1 tasse (237 ml) de fèves de soya, d’amandes ou
de riz dans 4 tasses (946 ml) d’eau pendant 8 à 12 heures au
réfrigérateur dans un plat recouvert.
2. Égoutter les noix et jeter l’eau. Couvrir les noix, les fèves ou le
riz avec 1 1/2 tasse (355 ml) d’eau fraîche.
3. Verser lentement les noix, les fèves ou le riz avec l’eau dans le
dispositif d’alimentation.
4. Placer une étamine dans le contenant. Verser le mélange puis
serrer fermement l’étamine et laisser reposer jusqu’à la fin de
l’égouttement.
REMARQUES :
• Il faut laisser les amandes tremper de 8 à 12 heures avant de
centrifuger.
• Il faut bouillir le lait de soya pour améliorer la saveur.
• On peut ajouter de la vanille, du miel et du sucre pour améliorer
la saveur de chaque catégorie de lait.
22
840250600 FRv08.indd 22 9/12/14 8:43 AM
Page 23

Tableau d’extraction
Fruits ou légumes Exemples Vitesse
Fruits et légumes fermes Pommes, oranges pelées, carottes, betteraves, concombres, gingembre ÉLEVÉE
Fruits et légumes tendres Fraises, pêches dénoyautées, melons, raisins, tomates BASSE
Légumes-feuilles Chou frisé, épinard, feuilles de betterave BASSE
23
840250600 FRv08.indd 23 9/12/14 8:43 AM
Page 24

Recettes
Jus de carotte, gingembre et pomme
6 carottes moyennes
Morceau de 6 x 25 mm (1/4 x 1 po) de gingembre frais, tranché
1 grosse pomme Granny Smith
Instructions :
1. Couper la pomme de manière à pouvoir l’insérer dans le dispositif
de la centrifugeuse.
2. Extraire le jus des ingrédients dans l’ordre indiqué.
3. Remuer et servir immédiatement.
Servir : 2
Jus de bleuet, framboise, fraise et pomme
1 tasse (237 ml) de bleuets
1 tasse (237 ml) de framboises
4 grosses fraises, équeutées
1/4 pomme Granny Smith
Instructions :
1. Extraire le jus des ingrédients dans l’ordre indiqué.
2. Remuer et servir immédiatement.
Servir : 1 à 2
Jus de betterave, orange, gingembre et carotte
1 grosse betterave, sans la pelure
1 orange moyenne, pelée
3 carottes moyennes
Morceau de 6 x 25 mm (1/4 x 1 po) de gingembre frais, tranché
Instructions :
1. Couper la betterave, l’orange et les carottes de manière à pouvoir
les insérer dans le dispositif de la centrifugeuse.
2. Extraire le jus des ingrédients dans l’ordre indiqué.
3. Remuer et servir immédiatement.
Servir : 1 à 2
24
840250600 FRv08.indd 24 9/12/14 8:43 AM
Jus vert abracadabrant
4 feuilles moyennes de chou frisé
2 carottes moyennes, parées
1/2 citron, pelé
Morceau de 1 po (2,5 cm) de gingembre frais
1 tasse (237 ml) de bébé épinard
1 pomme Granny Smith, moyenne
Instructions :
1. Couper les carottes, la pomme et le citron de manière à pouvoir
les insérer dans le dispositif de la centrifugeuse.
2. Extraire le jus des ingrédients dans l’ordre indiqué.
3. Remuer et servir immédiatement.
Servir : 1 à 2
Page 25

Recettes (suite)
Boisson végétarienne
8 tomates moyennes
1 petit citron, pelé
1 grosse branche de céleri
1 carotte moyenne
1 tranche d’oignon
1 c. à thé (5 ml) de sauce Worcestershire
1/2 c. à thé (2,5 ml) de sel, si désiré
Instructions :
1. Couper les tomates, le citron et la carotte de manière à pouvoir les
insérer dans le dispositif de la centrifugeuse.
2. Insérer les ingrédients dans l’ordre, sauf la sauce Worcestershire
et le sel et extraire le jus.
3. Incorporer la sauce Worcestershire et le sel. Servir
immédiatement.
Servir : 2 à 3
Jus de chou frisé, concombre et coriandre verte
6 grandes feuilles de chou frisé
1 gros concombre
1 branche de céleri, avec les feuilles
1 limette moyenne, pelée
2 petites poignées de coriandre
1 pomme Granny Smith, moyenne
Instructions :
1. Couper le concombre et la pomme de manière à pouvoir les
insérer dans le dispositif de la centrifugeuse.
2. Extraire le jus des ingrédients dans l’ordre indiqué.
3. Remuer et servir immédiatement.
Servir : 1 à 2
Jus de grenade et bleuet
2 tasses (473 ml) de graines de grenade
1 tasse (237 ml) de bleuets
Instructions :
1. Extraire le jus des ingrédients dans l’ordre indiqué.
2. Remuer et servir immédiatement.
Servir : 1 à 2
CONSEIL : Utiliser uniquement les graines de la grenade pour en
extraire le jus parce que les pelures donneront un goût amer au jus.
Pour enlever les graines de la grenade, commencer par couper une
tranche mince au bas du fruit afin de le rendre plus stable pendant la
coupe. Enlever le coeur sur le dessus. Faire des coupes superficielles
pour obtenir 6 quartiers. Briser et séparer doucement la grenade
et presser les graines vers l’extérieur avec les doigts. Le jus de la
grenade peut tacher, c’est pourquoi nous suggérons de porter des
gants pour recueillir les graines et les gouttes lorsqu’elles seront
introduites dans la centrifugeuse.
25
840250600 FRv08.indd 25 9/12/14 8:43 AM
Page 26

Dépannage
PROBLÈME CAUSE PROBABLE/SOLUTION
La centrifugeuse ne
fonctionne pas quand
elle est en position
ON (marche).
Le moteur semble s’arrêter
quand il extrait le jus.
Il se concentre trop de pulpe
dans le panier-filtre.
La pulpe est trop mouillée
et il n’y a pas assez de jus
extrait.
Le jus se vaporise en dehors
du distributeur de jus.
Le jus continue à couler du
distributeur immédiatement
après l’extraction.
La centrifugeuse vibre trop.
26
• Les mécanismes de verrouillage sont peut-être mal engagé. Vérifier que les mécanismes de verrouillage
sont bien engage dans les deux creux des deux côtés du couvercle de la centrifugeuse. Consulter le page
16, étapes 3 et 4.
• Cet appareil est équipé d’un dispositif contre les surcharges. Si le moteur s’arrête pendant qu’il est en
marche à cause d’une surchauffe, débrancher et laisser refroidir l’appareil pendant 15 minutes. Rebrancher
l’appareil et continuer l’opération.
• L’action centrifuge peut être trop vigoureuse. Essayer de ralentir l’extraction de jus en poussant plus
lentement le pousseur d’aliments. Consulter la page 17, étape 3.
• De la pulpe mouillée peut s’accumuler sous le couvercle de la centrifugeuse ou sous le récipient à pulpe. Mettre la centrifugeuse
en position OFF (O/arrêt) et débrancher. Vider le récipient à pulpe puis nettoyer le couvercle de jus et le panier-filtre.
• Mettre la centrifugeuse en position OFF (O/arrêt) et débrancher. Enlever le panier-filtre et nettoyer
les parois du filtre avec une brosse fine. Cela enlèvera l’accumulation de fibres excédentaire qui peut
empêcher la bonne circulation de jus. Consulter les pages 18 et 19.
• Essayer une action de centrifugation plus lente.
• Mettre la centrifugeuse en position OFF (O/arrêt) et débrancher. Enlever le panier-filtre et nettoyer
les parois du filtre avec une brosse fine. Cela enlèvera l’accumulation de fibres excédentaire qui peut
empêcher la bonne circulation de jus. Consulter les pages 18 et 19.
• Essayer de ralentir l’extraction de jus en poussant plus lentement le pousseur d’aliments. Consulter la page
17, étape 3.
• Le moteur en marche, soulever et abaisser le pousseur d’aliments plusieurs fois dans le mécanisme
d’alimentation. Cette action pousse la pulpe et le jus restants en dehors du bol de centrifugeuse.
• Accumulation de pulpe dans le panier-filtre. Mettre la centrifugeuse en position OFF (O/arrêt) et
la débrancher de sa prise. Nettoyer le panier-filtre. Consulter la page 19. Après avoir nettoyé, si la
centrifugeuse continue à vibrer, cela signifie que le panier-filtre est peut-être endommagé. Appeler
notre numéro gratuit de service à la clientèle pour commander un nouveau panier-filtre.
840250600 FRv08.indd 26 9/12/14 8:43 AM
Page 27

Notes
27
840250600 FRv08.indd 27 9/12/14 8:43 AM
Page 28

Garantie limitée
Cette garantie s’applique aux produits achetés et utilisées aux É.-U. et au Canada. C’est la seule garantie expresse pour ce
produit et est en lieu et place de tout autre garantie ou condition.
Ce produit est garanti contre tout défaut de matériaux et de main-d’oeuvre pour une période des cinq (5) ans à compter de la
date d’achat d’origine au Canada et trois (3) ans à compter de la date d’achat d’origine aux É.-U. Au cours de cette période,
votre seul recours est la réparation ou le remplacement de ce produit ou tout composant s’avérant défectueux, à notre gré,
mais vous êtes responsable de tous les coûts liés à l’expédition du produit et le retour d’un produit ou d’un composant dans
le cadre de cette garantie. Si le produit ou un composant n’est plus offert, nous le remplacerons par un produit similaire de
valeur égale ou supérieure.
Cette garantie ne couvre pas le verre, les filtres, l’usure d’un usage normal, l’utilisation non conforme aux directives imprimées,
ou des dommages au produit résultant d’un accident, modification, utilisation abusive ou incorrecte. Cette garantie s’applique
seulement à l’acheteur original ou à la personne l’ayant reçu en cadeau. La présentation du reçu de vente d’origine comme
preuve d’achat est nécessaire pour faire une réclamation au titre de cette garantie. Cette garantie s’annule si le produit est
utilisé autrement que par une famille ou si l’appareil est soumis à toute tension ou forme d’onde différente des caractéristiques
nominales précisées sur l’étiquette (par ex. : 120 V ~ 60 Hz).
Nous excluons toutes les réclamations au titre de cette garantie pour les dommages spéciaux, consécutifs et indirects causés
par la violation de garantie expresse ou implicite. Toute responsabilité est limitée au prix d’achat. Chaque garantie implicite,
y compris toute garantie ou condition de qualité marchande ou d’adéquation à un usage particulier, est exonérée, sauf
dans la mesure interdite par la loi, auquel cas la garantie ou condition est limitée à la durée de cette garantie écrite. Cette
garantie vous donne des droits légaux précis. Vous pouvez avoir d’autres droits qui varient selon l’endroit où vous habitez.
Certaines provinces ne permettent pas les limitations sur les garanties implicites ou les dommages spéciaux ou indirects de
telle sorte que les limitations ci-dessus ne s’appliquent peut-être pas à votre cas.
Ne pas retourner cet appareil au magasin lors d’une réclamation au titre de cette garantie. Téléphoner au 1.800.851.8900 aux
É.-U. ou au 1.800.267.2826 au Canada ou visiter le site internet www.hamiltonbeach.com aux É.-U. ou www.hamiltonbeach.ca
au Canada. Pour un service plus rapide, trouvez le numéro de modèle, le type d’appareil et les numéros de série sur votre
appareil.
28
840250600 FRv08.indd 28 9/12/14 8:43 AM
Page 29

SALVAGUARDIAS IMPORTANTES
Cuando utilice artefactos eléctricos, siempre deben seguirse precauciones de seguridad básicas a fin de reducir el riesgo de incendio,
descarga eléctrica, y/o lesiones a personas, incluyendo las siguientes:
1. Lea todas las instrucciones.
2. Este aparato no se destina para utilizarse por personas (incluyendo niños)
cuyas capacidades físicas, sensoriales o mentales sean diferentes o estén
reducidas, o carezcan de experiencia o conocimiento, a menos que dichas
personas reciban una supervisión o capacitación para el funcionamiento
del aparato por una persona responsable de su seguridad.
3. Se requiere de una estrecha supervisión cuando el aparato se use cerca
de niños. Los niños deben supervisarse para asegurar que ellos no
empleen los aparatos como juguete.
4. Verifique que el voltaje de su instalación corresponda con el del producto.
5. Para protegerse contra riesgos de choques eléctricos, no coloque el cable,
el enchufe o la base del motor en agua u otro líquido.
6. Siempre APAGUE (O) el aparato y desenchúfelo del tomacorriente cuando
no lo esté utilizando, antes de colocar o quitar piezas y de limpiarlo.
7. Evite el contacto con las partes en movimiento. Mantenga los dedos fuera
de la tolva de alimentación.
8. Nunca introduzca los alimentos con las manos: siempre utilice el
empujador de alimentos.
9. Siempre asegúrese de que el extractor de jugo esté montado en
forma adecuada y completa antes de activar el motor. La unidad no se
encenderá a menos que se encuentre montada en forma adecuada. No
destrabe las trabas de bloqueo de seguridad mientras el extractor de jugo
se encuentre en funcionamiento.
10. Nunca utilice el aparato sin el contenedor de pulpa en su lugar.
11. Asegúrese de volver el interruptor a la posición OFF (O/apagado) después
de cada uso del extractor de jugo. Verifique que el motor se haya
detenido por completo antes de comenzar a desensamblar.
12. No coloque los dedos u otros objetos dentro de la tolva de alimentación
del extractor mientras está en funcionamiento. Si un trozo de alimento
queda trabado en la apertura, utilice el empujador para destrabarlo.
Cuando no pueda utilizar este método, apague el motor, desenchufe el
cable del tomacorriente y desarme la juguera para retirar el alimento.
13. No haga funcionar ningún artefacto si tiene un cable o enchufe
dañado, o después de que el artefacto haya tenido un funcionamiento
defectuoso o haya sufrido alguna caída o avería. Llame a nuestro número
gratuito de servicio al cliente para información sobre examinación,
reparación o ajuste électrico o mécanico.
14. El uso de accesorios no recomendados o vendidos por fabricante de
electrodomésticos puede provocar incendios, choques eléctricos o
lesiones.
15. No lo utilice al aire libre.
16. No permita que el cable cuelgue sobre el borde de la mesa o mesada, o
que toque superficies calientes, como la cocina.
17. No deje la juguera sin atención mientras está en funcionamiento.
18. Las cuchillas son filosas; manéjelas con cuidado. No toque las cuchillas
de corte pequeñas ubicadas en la base de la canasta coladora de acero
inoxidable.
19. Mantenga el cabello, la ropa y las joyas, al igual que las espátulas y otros
utensilios, lejos de la tolva de alimentación durante el funcionamiento para
prevenir la posibilidad de graves lesiones y/o daños al artefacto.
20. No utilice el aparato si la canasta coladora giratoria está dañada.
21. Siempre use el extractor de jugo sobre una superficie seca y plana.
22. Cualquier clase de mantenimiento que no sea la limpieza debe ser llevada
a cabo por un centro autorizado de servicio.
23. Para reducir el riesgo de lesiones personales y/o daños al artefacto, no
utilice la canasta coladora si se encuentra doblada, abollada o dañada de
alguna manera.
24. No lo utilice sin el recipiente para pulpa en su lugar.
25. No coloque sobre o cerca de un quemador de gas o eléctrico caliente o
en un horno caliente.
26. Verifique que el control esté apagado OFF (O/apagado) antes de enchufar
el cable en el tomacorriente. Para desconectar, gire el control a OFF
(O/apagado) y luego quite el enchufe del tomacorriente.
¡GUARDE ESTAS INSTRUCCIONES!
29
840250600 SPv10.indd 29 9/12/14 8:48 AM
Page 30

Información para Seguidad del Consumidor
Este aparato ha sido diseñado solamente para uso doméstico.
¡ADVERTENCIA! Peligro de Descarga Eléctrica: Este aparato cuenta
con un enchufe polarizado (una pata más ancha) que reduce el
riesgo de una descarga eléctrica. El enchufe embona únicamente
en una dirección dentro de un tomacorriente polarizado. No trate
de obviar el propósito de seguridad del enchufe modificándolo de
alguna manera o utilizando un adaptador. Si el enchufe no entra
completamente en la toma, invierta el enchufe. Si aún no entra,
haga que un electricista reemplace la toma.
El largo del cable que se usa en este aparato fue seleccionado
para reducir el peligro de que alguien se enganche o tropiece con
un cable más largo. Si es necesario usar un cable más largo, se
podrá usar un cable de extensión aprobado. La clasificación eléctrica
nominal del cable de extensión debe ser igual o mayor que la
clasificación nominal del aparato. Es importante tener cuidado
de colocar el cable de extensión para que no se pliegue sobre el
mostrador o la mesera en donde niños puedan tirar del mismo o
tropezarse accidentalmente.
La clasificación eléctrica de este aparato se encuentra en el panel
inferior de la unidad.
La canasta coladora es un filtro delicado. Si se dobla o daña, no
la use, ya que podría romperse en pedacitos y provocar lesiones
personales y/o daños al artefacto. Llame a nuestro número gratuito
de atención al cliente para solicitar una nueva canasta. Reemplace
la canasta cuando dé señales de desgaste.
Esta máquina está equipada con una protección de sobrecarga del
motor. Si el motor se detiene durante el funcionamiento debido
al sobrecalentamiento, desenchufe la unidad y déjela enfriar
durante 15 minutos. Vuelva a enchufar la máquina para reanudar el
funcionamiento normal.
w ADVERTENCIA
Peligro de Laceración.
Tolva de alimentación extra ancha. No coloque las manos o dedos
dentro de la tolva de alimentación. Siempre utilice el empujador
de alimentos.
30
840250600 SPv10.indd 30 9/12/14 8:48 AM
Page 31

Partes y Características
*Para ordenar partes:
US: 1.800.851.8900
www.hamiltonbeach.com
México:
01 800 71 16 100
Tolva de Alimentación
Extra Ancha*
Canasta Coladora
con Micromalla de
Acero Inoxidable*
Empujador de
Alimentos*
w ADVERTENCIA
La canasta coladora de micro parrilla puede salir volando
durante el uso si es dañada, resultando en un riesgo de cortes
o lesiones. Para reducir el riesgo de lesiones personales:
• Simpre inspeccione la canasta coladora de micro parrilla
antes de cada uso.
• Nunca use una canasta coladora de micro parrilla rajada,
doblada o dañada.
Recipiente Colador*
Pico para Jugo
Sujetadores de Bloqueo
Peligro de Laceración.
Cepillo de Limpieza*
Recipiente Grande
para Pulpa*
Interruptor HI/LO/OFF (alta/baja/apagado)
Base del Motor
840250600 SPv10.indd 31 9/12/14 8:48 AM
Tapa de la Jarra*
Jarra*
31
Page 32

Cómo Ensamblar
Canasta Coladora
ANTES DEL PRIMER USO: Después de desempacar el extractor de jugo,
quite el cartón de la canasta del filtro y lave todo con agua jabonosa tibia,
excepto la base. Enjuague y seque de inmediato. Nunca sumerja la base en
agua u otro líquido; límpiela con una esponja húmeda.
1
Coloque el recipiente colador sobre
la base del motor. Coloque la
canasta coladora de acero inoxidable
dentro del recipiente colador.
2
Con las manos sobre el lado
exterior, presione la canasta
coladora con firmeza hacia abajo
para que se ajuste en su posición.
5 6
Coloque el recipiente para pulpa
en su lugar inclinándolo un poco.
32
840250600 SPv10.indd 32 9/12/14 8:48 AM
Coloque una jarra con tapa debajo del pico para jugo. Deslice el
empujador de alimentos dentro de la tolva de alimentación alineando la
ranura del empujador con el pequeño reborde dentro de la parte superior
del tubo de alimentación.
3
Coloque la cubierta del extractor sobre
el recipiente colador, ubicando la
tolva de alimentación sobre la canasta
coladora y baje hasta su posición.
Pequeño
Reborde Dentro
de la Tolva de
Alimentación
7
4
Eleve los sujetadores de bloqueo
hasta que enganchen en su lugar.
CONSEJO:
limpieza, coloque una bolsa de
plástico en el recipiente para
pulpa con el propósito de poder
recogerla. (Ver página 27 para
más información.)
Para minimizar la
Page 33

Cómo Utilizar
Lave las frutas y vegetales.
NOTA: La mayor parte de las
frutas y vegetales, tales como
manzanas, zanahorias y pepinos
no necesitan cortarse ya que
caben enteros dentro de la tolva
de alimentación.
que ciertas frutas y vegetales tales
como naranjas, melones y mangos
se pelen antes de colocarlos en la
unidad para garantizar un mejor
sabor.
4
Se recomienda
1
Verifique que la unidad se encuentre
bien montada (ver página 26) y
coloque la jarra con la tapa debajo
del pico.
Para minimizar la limpieza,
coloque una bolsa de plástico
dentro del recipiente para jugo con
el propósito de recoger la pulpa.
Cuando se finalice la extracción de
jugo, simplemente retire la bolsa
con la pulpa.
NOTA: No permita que el
recipiente para pulpa se
desborde, ya que esto puede
provocar un mal funcionamiento
o daños a la unidad.
w ADVERTENCIA
Nunca use los dedos para ingresar alimentos en la tolva para
alimentos o para despejarla. Siempre use el empujador de alimentos
incluido.
Peligro de Laceración.
2 3
Coloque el interruptor en la
posición de
Enchufe el cable en un
tomacorriente de 120 voltios.
OFF (O/apagado)
.
Con el motor encendido, coloque
los alimentos dentro de la tolva
de alimentación. Con cuidado use
el empujador de alimentos para
enviarlos hacia abajo por la tolva
de alimentación. Para extraer la
mayor cantidad de jugo, siempre
ejerza presión con el empujador
de alimentos lentamente.
El jugo caerá dentro de la jarra y la
pulpa separada se acumulará en el
recipiente para pulpa.
NOTA: El recipiente para pulpa
puede vaciarse durante el
funcionamiento
el extractor de jugo y luego
retirando el recipiente para pulpa.
(Vuelva a colocar el recipiente
para jugo antes de continuar con
la extracción.)
OFF (O/apagado)
33
840250600 SPv10.indd 33 9/12/14 8:48 AM
Page 34

Cómo Desensamblar
1
Coloque el interruptor en la
posición APAGADO (OFF/O) y
desenchufe la unidad. Permita que
la canasta coladora deje de girar.
5
Retire el recipiente para pulpa
deslizándolo en sentido contrario
a la base del motor.
34
840250600 SPv10.indd 34 9/12/14 8:48 AM
2
Libere los sujetadores de
bloqueo.
6
Levante el recipiente colador con
la canasta coladora todavía en su
lugar.
3
Mueva los sujetadores de
bloqueo hacia abajo.
4
Quite la cubierta.
7
Para quitar la canasta coladora, gire el recipiente colador hacia abajo
y con cuidado retire la canasta. (Es recomendable quitar la canasta
coladora sobre un lavabo).
Page 35

Cuidado y Limpieza
1
CANASTA COLADORA
2
Algunas frutas y vegetales pueden provocar una decoloración
del plástico. Para que esto no suceda, lave todas las partes
inmediatamente después del uso.
w PRECAUCIÓN
El centro de la canasta coladora contiene cuchillas pequeñas y filosas
para procesar frutas y vegetales durante le función de extracción de
jugo. No toque las cuchillas cuando manipule la canasta coladora.
Siempre maneje la canasta coladora con cuidado, ya que puede
dañarse con mucha facilidad.
Para facilitar el lavado, sumerja la canasta coladora en agua jabonosa
caliente durante aproximadamente 10 minutos después de acubar la
extracción de jugo. Si la pulpa se seca en la canasta, ésta puede tapar
los pequeños poros de la malla de filtro y así se verá disminuida la
eficacia del extractor de jugo.
Peligro de Laceración.
w ADVERTENCIA
No sumerja la base del motor en agua o en cualquier otro líquido.
RESISTENTE AL
LAVAVAJILLAS
Peligro de Descarga.
No utilice la configuración “SANI”
cuando la lave en el lavavajillas.
Las temperaturas del ciclo “SANI”
pueden dañar su producto. No
coloque la base del motor en el
lavavajillas. Las piezas pueden
sufrir una deformación si la
temperatura de su lavavajillas
es mayor que la normal o si las
piezas están colocadas muy cerca
del elemento calentador.
El cepillo de limpieza incluido con la
unidad es la manera más efectiva de
limpiar la canasta coladora. Utilizando el
cepillo, sostenga la canasta coladora bajo
agua corriente y cepille dentro y fuera de
la canasta.
35
840250600 SPv10.indd 35 9/12/14 8:48 AM
Page 36

Consejos, Técnicas y Recettas
COMPRA Y ALMACENAMIENTO DE FRUTAS Y VEGETALES:
• Siempre lave las frutas y vegetales antes de extraer jugo.
• Siempre use frutas y vegetales frescos para extraer jugo.
• Para ahorrar dinero y obtener productos más frescos, compre
frutas y vegetales que estén en temporada.
• Mantenga sus frutas y vegetales listos para la extracción
lavándolos antes del almacenamiento.
• La mayoría de las frutas y los vegetales más duros pueden
almacenarse a temperatura ambiente fresca. Los elementos
más delicados y perecederos, como tomates, fresas, verduras
de hoja, apio, pepinos y hierbas deben almacenarse en el
refrigerador hasta que se necesiten.
PREPARACIÓN DE FRUTAS Y VEGETALES:
• Se recomienda que ciertas frutas y vegetales tales como
naranjas, melones y mangos se pelen antes de colocarlos en el
extractor de jugo para garantizar un mejor sabor.
• Todas las frutas de carozo y semillas grandes como pelones,
duraznos, damascos, ciruelas y cerezas DEBEN descarozarse
antes de la extracción.
CÓMO USAR LA PULPA:
• La pulpa sobrante de la extracción de frutas y vegetales está
conformada mayormente por fibras y celulosa, las que, al igual
que el jugo, contienen nutrientes necesarios para la dieta diaria
y pueden utilizarse de diferentes maneras. La pulpa puede
congelarse para uso posterior.
• Existe una serie de recetas que utilizan pulpa. También puede
usarse para espesar guisos y sopas.
• La pulpa es muy buena para utilizar en el jardín como abono.
LECHE DE SOYA, LECHE DE ALMENDRAS Y LECHE DE ARROZ:
Este extractor de jugo puede utilizarse para preparar leche de soya,
leche de almendras y leche de arroz. Siga estos pasos:
1. En un recipiente cubierto coloque 1 taza (237 ml) de frijoles de
soya, almendras o arroz con 4 tazas (946 ml) de agua durante
8 a 12 horas en el refrigerador.
2. Escurra y descarte el agua. Cubra las almendras, los frijoles o
el arroz con 1 1/2 taza (355 ml) de agua fresca.
3. Lentamente coloque las almendras, los frijoles o el arroz con
una cuchara en la tolva de alimentación.
4. Coloque estopilla en un recipiente. Vierta la mezcla dentro de
una estopilla de tejido bien ajustado y deje reposar hasta que
escurra por completo. Retuerza la estopilla si fuera necesario.
Refrigere la leche de inmediato.
NOTAS:
• Las almendras deben dejarse en remojo 8 a 12 horas antes de
realizar la extracción.
• La leche de soya debe hervirse para mejorar el sabor.
• Puede agregarse vainilla, miel y azúcar para mejorar el sabor de
cada tipo de leche.
36
840250600 SPv10.indd 36 9/12/14 8:48 AM
Page 37

Tabla para Preparar Jugos
Frutas o Vegetales Ejemplos Velocidad
Frutas y vegetales firmes Manzanas, naranjas peladas, zanahorias, remolachas, pepinos, genjibre ALTA
Frutas y vegetales tiernos Frutillas, duraznos sin carozo, sandías, uvas, tomates BAJA
Vegetales de hoja Col rizado, espinaca, hojas de remolacha BAJA
37
840250600 SPv10.indd 37 9/12/14 8:48 AM
Page 38

Recetas
Jugo de zanahoria, jengibre y manzana
6 zanahorias medianas
1 rebanada de 1/4 de pulg. (0.6 cm) de jengibre fresco (diámetro
de 1 pulg. [2.5 cm])
1 manzana Granny Smith grande
Instrucciones:
1. Corte la manzana según sea necesario para que quepa en el ducto
del extractor de jugo.
2. Exprima los ingredientes en el orden indicado.
3. Mezcle y sirva inmediatamente.
Rendimiento: 2
Jugo de arándanos, frambuesas, frutillas y manzana
1 taza (237 ml) de arándanos
1 taza (237 ml) de frambuesas
4 frutillas grandes, sin cabito
1/4 de una manzana Granny Smith
Instrucciones:
1. Exprima los ingredientes en el orden indicado.
2. Mezcle y sirva inmediatamente.
Rendimiento: 1–2
Jugo de remolacha, jengibre y zanahoria
1 remolacha grande recortada
1 naranja mediana pelada
3 zanahorias medianas
1 rebanada de 1/4 de pulg. (0.6 cm) de jengibre fresco (diámetro
de 1 pulg. [2.5 cm])
Instrucciones:
1. Corte la remolacha, la naranja y las zanahorias según sea
necesario para que quepan en el ducto del extractor de jugo.
2. Exprima los ingredientes en el orden indicado.
3. Mezcle y sirva inmediatamente.
Rendimiento: 1–2
38
840250600 SPv10.indd 38 9/12/14 8:48 AM
Jugo verde Go Getter
4 hojas medianas de col rizada
2 zanahorias medianas recortadas
1/2 limón pelado
1 trozo de jengibre fresco de 1 pulg. (2.5 cm)
1 taza (237 ml) de hojas de espinaca bebé
1 manzana Granny Smith mediana
Instrucciones:
1. Corte las zanahorias, la manzana y el limón según sea necesario
para que quepan en el ducto del extractor de jugo.
2. Exprima los ingredientes en el orden indicado.
3. Mezcle y sirva inmediatamente.
Rendimiento: 1–2
Page 39

Recetas (cont.)
Cóctel vegetariano
8 tomates medianos
1 limón pequeño pelado
1 rama grande de apio
1 zanahoria mediana
1 rebanadas de cebolla
1 cucharadita de salsa Worcestershire
1/2 cucharadita de sal, si así lo desea
Instrucciones:
1. Corte los tomates, el limón y la zanahoria según sea necesario
para que quepan en la tolva del extractor de jugo.
2. Haga jugo con los ingredientes en el orden listado con excepción
de la salsa Worcestershire y la sal.
3. Agregue la salsa Worcestershire y la sal. Sirva de inmediato.
Rendimiento: 2–3
Jugo verde de col rizada, pepino y cilantro
6 hojas grandes de col rizada
1 pepino grande
1 rama de apio con hojas
1 lima mediana, pelada
2 puñados pequeños de cilantro
1 manzana Granny Smith mediana
Instrucciones:
1. Corte el pepino y la manzana según sea necesario para que
quepan en la tolva del extractor de jugo.
2. Exprima los ingredientes en el orden indicado.
3. Mezcle y sirva inmediatamente.
Rendimiento: 1–2
Jugo de granadas y arándanos
2 tazas (473 ml) de semillas de granada
1 taza (237 ml) de arándanos
Instrucciones:
4. Exprima los ingredientes en el orden indicado.
5. Mezcle y sirva inmediatamente.
Rendimiento: 1–2
Consejo de Cocina: Use sólo las semillas de la granada porque las
membranas harán que el sabor del jugo sea amargo. Para quitar las
semillas de la granada, comience realizando una fina rebanada desde
la base para que sea más estable para cortarla. Corte el centro desde
la parte superior. Realice cortes poco profundos para separarla en 6
secciones. Quiebre suavemente la granada y quite las semillas con
los dedos. El jugo de las granadas mancha, por lo que le sugerimos
que use guantes y vista algo como una remera vieja. Trabaje sobre
un tazón para retener las semillas y salpicaduras antes de colocarlas
en el extractor de jugo.
39
840250600 SPv10.indd 39 9/12/14 8:48 AM
Page 40

Resolviendo Problemas
PROBLEMA
La máquina no funciona
cuando se presiona el
interruptor de “Encendido”.
El motor parece ahogarse
cuando se está extrayendo
jugo.
Se acumula una cantidad
excesiva de pulpa en la
micromalla de la canasta
coladora.
La pulpa está muy húmeda
y se produce muy poco
jugo.
El jugo salpica fuera del pico. • Intente una extracción de jugo más lenta utilizando el empujador de alimentos más despacio. Ver página
El jugo chorrea fuera del
pico inmediatamente
después de la extracción.
La máquina vibra de
manera excesiva.
40
CAUSA PROBABLE/SOLUCION
• Los sujetadores de bloqueo pueden estar mal enganchados. Verifique que se encuentren bien colocados
en las dos ranuras sobre ambos lados de la cubierta de la juguera. Ver página 26, pasos 3 y 4.
• Esta máquina está equipada con una protección de sobrecarga del motor. Si el motor se detiene durante
el funcionamiento debido al sobrecalentamiento, desenchufe la unidad y déjela enfriar durante 15 minutos.
Vuelva a enchufar la máquina para reanudar el funcionamiento normal.
• La extracción puede ser demasiado potente. Intente una extracción de jugo más lenta utilizando el
empujador de alimentos más despacio. Ver página 27, paso 3.
• Puede acumularse pulpa húmeda bajo la cubierta de la juguera o el recipiente para pulpa. Apague
unidad y desenchúfela. Vacíe el recipiente para pulpa, luego limpie la cubierta y la canasta coladora.
• Apague (OFF/O) la unidad y desenchúfela. Quite la canasta coladora y limpie las paredes de la malla con
un cepillo fino. Esto quitará la acumulación de exceso de fibra que podría estar frenando el flujo de jugo.
Ver páginas 28 y 29.
• Intente una extracción de jugo más lenta.
• Apague (OFF/O) la unidad y desenchúfela. Quite la canasta coladora y limpie las paredes de la malla con
un cepillo fino. Esto quitará la acumulación de exceso de fibra que podría estar frenando el flujo de jugo.
Ver páginas 28 y 29.
27, paso 3.
• Con el motor ENCENDIDO, suba y baje el empujador de alimentos en la tolva de alimentos varias veces.
Esta acción elimina la pulpa y el jugo restantes fuera del recipiente colador.
• Acumulación de pulpa en la malla de la canasta coladora. Apague (OFF/O) la unidad y desenchúfela.
Limpie la canasta coladora. Ver página 29. Después de la limpieza, si la vibración continúa podría ser
una señal de una canasta coladora dañada. Llame a nuestro número gratuito de atención al cliente para
solicitar una nueva canasta coladora.
(OFF/O)
la
840250600 SPv10.indd 40 9/12/14 8:48 AM
Page 41

Grupo HB PS, S.A. de C.V.
Monte Elbruz 124-301
Colonia Palmitas, Delegación Miguel Hidalgo
C.P. 11560, México, Distrito Federal
01 800 71 16 100
PÓLIZA DE GARANTÍA
PRODUCTO: MARCA: MODELO:
Grupo HB PS, S.A. de C.V. cuenta con una Red de Centros de Servicio Autorizada, por favor consulte en la lista anexa el nombre y dirección de los establecimientos en la
República Mexicana en donde usted podrá hacer efectiva la garantía, obtener partes, componentes, consumibles y accesorios; así como también obtener servicio para
productos fuera de garantía. Para mayor información llame sin costo: Centro de Atención al consumidor: 01 800 71 16 100
Grupo HB PS, S.A. de C.V. le otorga a partir de la fecha de compra:
• Esta garantía ampara, todas las piezas y componentes del producto que resulten con defecto de fabricación incluyendo la mano de obra.
• Grupo HB PS, S.A. de C.V. se obliga a reemplazar, reparar o reponer, cualquier pieza o componente defectuoso; proporcionar la mano de obra necesaria para su diagnóstico y reparación,
todo lo anterior sin costo adicional para el consumidor.
• Esta garantía incluye los gastos de transportación del producto que deriven de su cumplimiento dentro de su red de servicio.
• Esta garantía no ampara el reemplazo de piezas deterioradas por uso o por desgaste normal, como son: cuchillas, vasos, jarras, filtros, etc.
• Grupo HB PS, S.A. de C.V. no se hace responsable por los accidentes producidos a consecuencia de una instalación eléctrica defectuosa, ausencia de toma de tierra, clavija de enchufe
en mal estado, etc.
Esta garantía no será efectiva en los siguientes casos:
a) Cuando el producto se hubiese utlizado en condiciones distintas a las normales. (Uso industrial, semi-industrial o comercial.)
b) Cuando el producto no hubiese sido operado de acuerdo con el instructivo de uso.
c) Cuando el producto hubiese sido alterado o reparado por personas no autorizadas por Grupo HB PS, S.A. de C.V. el fabricante nacional, importador o comercializador responsable
respectivo.
El consumidor puede solicitar que se haga efectiva la garantía ante la propia casa comercial donde adquirió su producto, siempre y cuando Grupo HB PS, S.A. de C.V. no cuente con talleres de
servicio.
GARANTÍA DE 3 AÑOS.
COBERTURA
LIMITACIONES
EXCEPCIONES
41
840250600 SPv10.indd 41 9/12/14 8:48 AM
Page 42

PROCEDIMIENTO PARA HACER EFECTIVA LA GARANTÍA
• Para hacer efectiva la garantía no deben exigirse mayores requisitos que la presentación del producto y la póliza correspondiente, debidamente sellada por el establecimiento que lo vendió.
• Para hacer efectiva la garantía, lleve su aparato al Centro de Servicio Autorizado más cercano a su domicilio (consulte la lista anexa).
• Si no existe Centro de Servicio Autorizado en su localidad llame a nuestro Centro de Atención al Consumidor para recibir instrucciones de como hacer efectiva su garantía.
• El tiempo de reparación, en ningún caso será mayor de 30 días naturales contados a partir de la fecha de recepción del producto en nuestros Centros de Servicio Autorizados.
• En caso de que el producto haya sido reparado o sometido a mantenimiento y el mismo presente deficiencias imputables al autor de la reparación o del mantenimiento dentro de los treinta
días naturales posteriores a la entrega del producto al consumidor, éste tendrá derecho a que sea reparado o mantenido de nuevo sin costo alguno. Si el plazo de la garantía es superior a
los treinta días naturales, se estará a dicho plazo.
• El tiempo que duren las reparaciones efectuadas al amparo de la garantía no es computable dentro del plazo de la misma. Cuando el bien haya sido reparado se iniciará la garantía respecto
de las piezas repuestas y continuará con relación al resto. En el caso de reposición del bien deberá renovarse el plazo de la garantía.
SELLO DEL VENDEDOR QUEJAS Y SUGERENCIASFECHA DE ENTREGA
Si desea hacer comentarios o sugerencias con respecto a nuestro servicio o tiene alguna queja derivada de la atención recibida en
DÍA___ MES___ AÑO___
alguno de nuestros Centros de Servicio Autorizados, por favor dirigirse a:
GERENCIA INTERNACIONAL DE SERVICIO
Email: mexico.service@hamiltonbeach.com.mx
01 800 71 16 100
42
840250600 SPv10.indd 42 9/12/14 8:48 AM
Page 43

RED DE CENTROS DE SERVICIO AUTORIZADA GRUPO HB PS, S.A. DE C.V.
Distrito Federal
ELECTRODOMÉSTICOS
Av. Plutarco Elias Cailes No. 1499
Zacahuitzco MEXICO 09490 D.F.
Tel: 01 55 5235 2323 • Fax: 01 55 5243 1397
CASA GARCIA
Av. Patriotismo No. 875-B
Mixcoac MEXICO 03910 D .F.
Tel: 01 55 5563 8723 • Fax: 01 55 5615 1856
Nuevo Leon
FERNANDO SEPULVEDA REFACCIONES
Ruperto Martínez No. 238 Ote.
Centro MONTERREY, 64000 N.L.
Tel: 01 81 8343 6700 • Fax: 01 81 8344 0486
Jalisco
SERVICIOS DE MANTENIMIENTO CASTILLO
Garibaldi No. 1450
Ladrón de Guevara
GUADALAJARA 44660 Jal.
Tel: 01 33 3825 3480 • Fax: 01 33 3826 1914
Chihuahua
DISTRIBUIDORA TURMIX
Av. Paseo Triunfo de la Rep. No. 5289 Local 2 A.
Int. Hipermart
Alamos de San Lorenzo
CD. JUAREZ 32340 Chih.
Tel: 01 656 617 8030 • Fax: 01 656 617 8030
43
840250600 SPv10.indd 43 9/12/14 8:48 AM
Page 44

Modelos:
67750
Tipo:
CJ19
Características Eléctricas:
120 V~ 60 Hz 800 W
Los modelos incluídos en el instructivo de Uso y Cuidado pueden ir seguidos o no por un sufijo correspondiente a una
o varias letras del alfabeto y sus combinaciones, separadas o no por un espacio, coma, diagonal, o guión. Como ejemplos
los sufijos pueden ser: “Y” y/o “MX” y/o “MXY” y/o “Z”.
840250600
840250600 SPv10.indd 44 9/12/14 8:48 AM
9/14
 Loading...