

Page 1
ALL-METAL STAND MIXER
RECIPES
AND USER
GUIDE
USA: 1-800-851-8900 Canada: 1-800-267-2826
840127800
840127800 ENv01.qxd 6/29/04 9:30 AM Page 1
Page 2

2
Dear Stand Mixer Owner,
Congratulations on your purchase. The Hamilton Beach
®
Eclectrics
™
Collection adds a modern twist to those dependable, all-metal
appliances you remember from yesteryear.
Owning a Hamilton Beach
®
is like owning a piece of history. In 1904,
Louis Hamilton and Chester Beach teamed up to bring motorized
appliances like vacuums, sewing machines, and mixers into American
households. In honor of their 100-year legacy, we’ve combined the
“built to last” metal construction of the past with the styling of today
to bring lasting quality and style to your kitchen.
As you use your all-metal appliance, think about the history that came
before it. Enjoy the confidence you have in a product backed by years
of experience and a 3-year warranty. But most of all, fill your home
with the delicious aroma of homemade recipes that your appliance
helps you create!
I hope you enjoy your Hamilton Beach
®
Eclectrics™appliance for many
years to come.
Sincerely,
Michael J. Morecroft
President and Chief Executive Officer
Hamilton Beach/Proctor-Silex, Inc.
840127800 ENv01.qxd 6/29/04 9:30 AM Page 2
Page 3

3
Warranty Information ...................... 3
Important Safeguards ...................... 4
Assistance and Service
Information ........................................ 5
Parts and Features............................ 6
How to Assemble Your Mixer............7
How to Use Your Mixer .................... 9
Stand Mixer Tips ............................ 10
How to Clean Your Mixer .............. 12
Troubleshooting .............................. 12
Recipes ...................................... 13-28
Appetizers .................................... 13
Entrees.......................................... 15
Cakes and Frostings.................... 17
Pies and Other Desserts ............ 21
Breakfast Favorites...................... 25
Candies ........................................ 26
Dinner Rolls .................................. 27
Table of Contents
Warranty Information
Standard Three Year Warranty
Congratulations! You now own one of the finest stand mixers. We’re so confident
in the quality and craftsmanship of your new stand mixer that we’re backing your purchase with a No-Hassle 3-Year Replacement Warranty. If your stand mixer malfunctions
within 3 years of purchase, we will deliver a brand new replacement mixer to your door
and remove the old unit at no cost to you. Here’s how it works:
Warranty To fulfill Hamilton Hamilton Beach
®
Term the warranty: Beach®will will not pay for
Three years from
date of original
purchase for
stand mixers
operated in the
continental
United States,
Alaska, Hawaii
and Canada.
This warranty
applies only to
the original
consumer
purchaser.
1. Follow the instructions
in this Manual. Refer to
Tips & Troubleshooting
sections if you have any
problems operating the
unit. If you have any
questions, call one of
the Customer Service
numbers on page 5.
2. Keep your proof of purchase. If the unit malfunctions within 3 years
of purchase, call one of
the Customer Service
numbers on page 5.
1. Send a pre-paid
shipping label
so you can send
us the unit.
2. Ship a brand
new replacement unit to
your address.
Product failures arising
from abuse, misuse,
neglect, use for commercial purposes, or use
contrary to this Manual.
THIS WARRANTY IS IN
LIEU OF ANY OTHER
WARRANTY, EXPRESS
OR IMPLIED, WRITTEN
OR ORAL, INCLUDING
ANY WARRANTY OF
MERCHANTABILITY OR
FITNESS FOR A PARTICULAR PURPOSE.
ANY LIABILITY IS
EXPRESSLY LIMITED
TO THE PURCHASE
PRICE PAID. ALL
CLAIMS FOR SPECIAL,
INCIDENTAL OR
CONSEQUENTIAL
DAMAGES ARE
EXPRESSLY EXCLUDED.
840127800 ENv01.qxd 6/29/04 9:30 AM Page 3
Page 4

44
Consumer Safety Information
IMPORTANT SAFEGUARDS
When using electric appliances, basic
safety precautions should always be
followed, including the following:
1. Read all instructions.
2. To protect against risk of electrical
shock, do not put cord, plug, or any
portion of the mixer in water or other
liquid.
3. Close supervision is necessary when
any appliance is used by or near
children.
4. Unplug from outlet when not in use,
before putting on or taking off parts,
and before cleaning.
5. Avoid contacting moving parts. Keep
hands, hair, and clothing, as well as
spatulas and other utensils, away from
beater during operation to reduce risk
of injury to persons, and/or damage to
mixer.
6. Remove beaters from mixer before
washing.
7. Do not let cord hang over edge of
table or counter, or touch hot surfaces,
including stove.
8. Do not operate any appliance with
a damaged cord or plug, or after the
appliance malfunctions or is dropped
or damaged in any manner. Call our
toll-free customer service number for
information on examination, repair, or
electrical or mechanical adjustment.
9. The use of attachments not
recommended or sold by Hamilton
Beach/Proctor-Silex, Inc. for use with
this model may cause fire, electric
shock or injury.
10. Do not use outdoors.
11. Do not place on or near a hot gas or
electric burner, or in a heated oven.
12. Check that control is off before plugging cord into wall outlet. To disconnect, turn control to OFF, then remove
plug from wall outlet.
13. Do not use appliance for other than
intended purpose.
SAVE THESE INSTRUCTIONS
This appliance is intended for
household use only.
This appliance is equipped with a groundedtype 3-wire cord (3-prong plug). This type
of plug will only fit into an electrical outlet
made for a 3-prong plug. This is a safety
feature intended to help reduce the risk of
electrical shock. If the plug should fail to fit
contact a qualified electrician to replace the
obsolete outlet. Do not attempt to defeat
the safety purpose of the grounding pin by
modifying the plug in any way.
The length of the cord used on this appliance was selected to reduce the hazards
of becoming tangled in, or tripping over a
longer cord. If a longer cord is necessary
an approved extension cord may be used.
The electrical rating of the extension cord
must be equal to or greater than the rating
of the mixer. Care must be taken to
arrange the extension cord so that it will
not drape over the countertop or tabletop
where it can be pulled on by children or
accidentally tripped over.
An extension cord should be connected to
the appliance first, before it is plugged into
the outlet.
To avoid an electrical circuit overload do
not use another high wattage appliance on
the same circuit with the mixer.
WARNING: To reduce risk of personal
injury, always unplug mixer before inserting
or removing beaters.
BEFORE FIRST USE: Wash the bowl,
two-piece pouring shield, and all mixing
attachments in hot, soapy water. Rinse
and dry.
840127800 ENv01.qxd 6/29/04 9:30 AM Page 4
Page 5

55
Customer Service Information
Before Calling for Assistance
Please read before calling:
• The mixer may warm up during
use. Under heavy loads with
extended mixing time periods, the
top of the unit may feel warm to
the touch. This is normal.
• The mixer may emit an odor, especially when new. This is common
with electric motors.
• If the flat beater hits the bowl, stop
the mixer. See page 3 for more
information.
If your mixer should malfunction or fail to operate, please
check the following:
• Is the mixer plugged in?
• Is the fuse in the circuit to the
mixer in working order? If you have
a circuit breaker box, be sure the
circuit is closed.
• Turn the mixer off for 10 to 15 seconds, then turn the mixer back on.
• If the problem is not due to one of
the items mentioned above, see
Customer Service Information.
• DO NOT return the mixer to the
retailer as they do not provide
service.
If you have a question about your mixer, call our toll-free customer service
number. Before calling, please note the model, type, and series numbers and fill
in that information below. These numbers can be found on the bottom of your
mixer. This information will help us answer your question much more quickly.
MODEL:___________________ TYPE :___________________ SERIES: __________________
CUSTOMER SERVICE NUMBERS
In the U.S. 1-800-851-8900
In Canada 1-800-267-2826
hamiltonbeach.com
KEEP THESE NUMBERS FOR FUTURE REFERENCE!
Assistance and Service
Information
840127800 ENv01.qxd 6/29/04 9:30 AM Page 5
Page 6

6
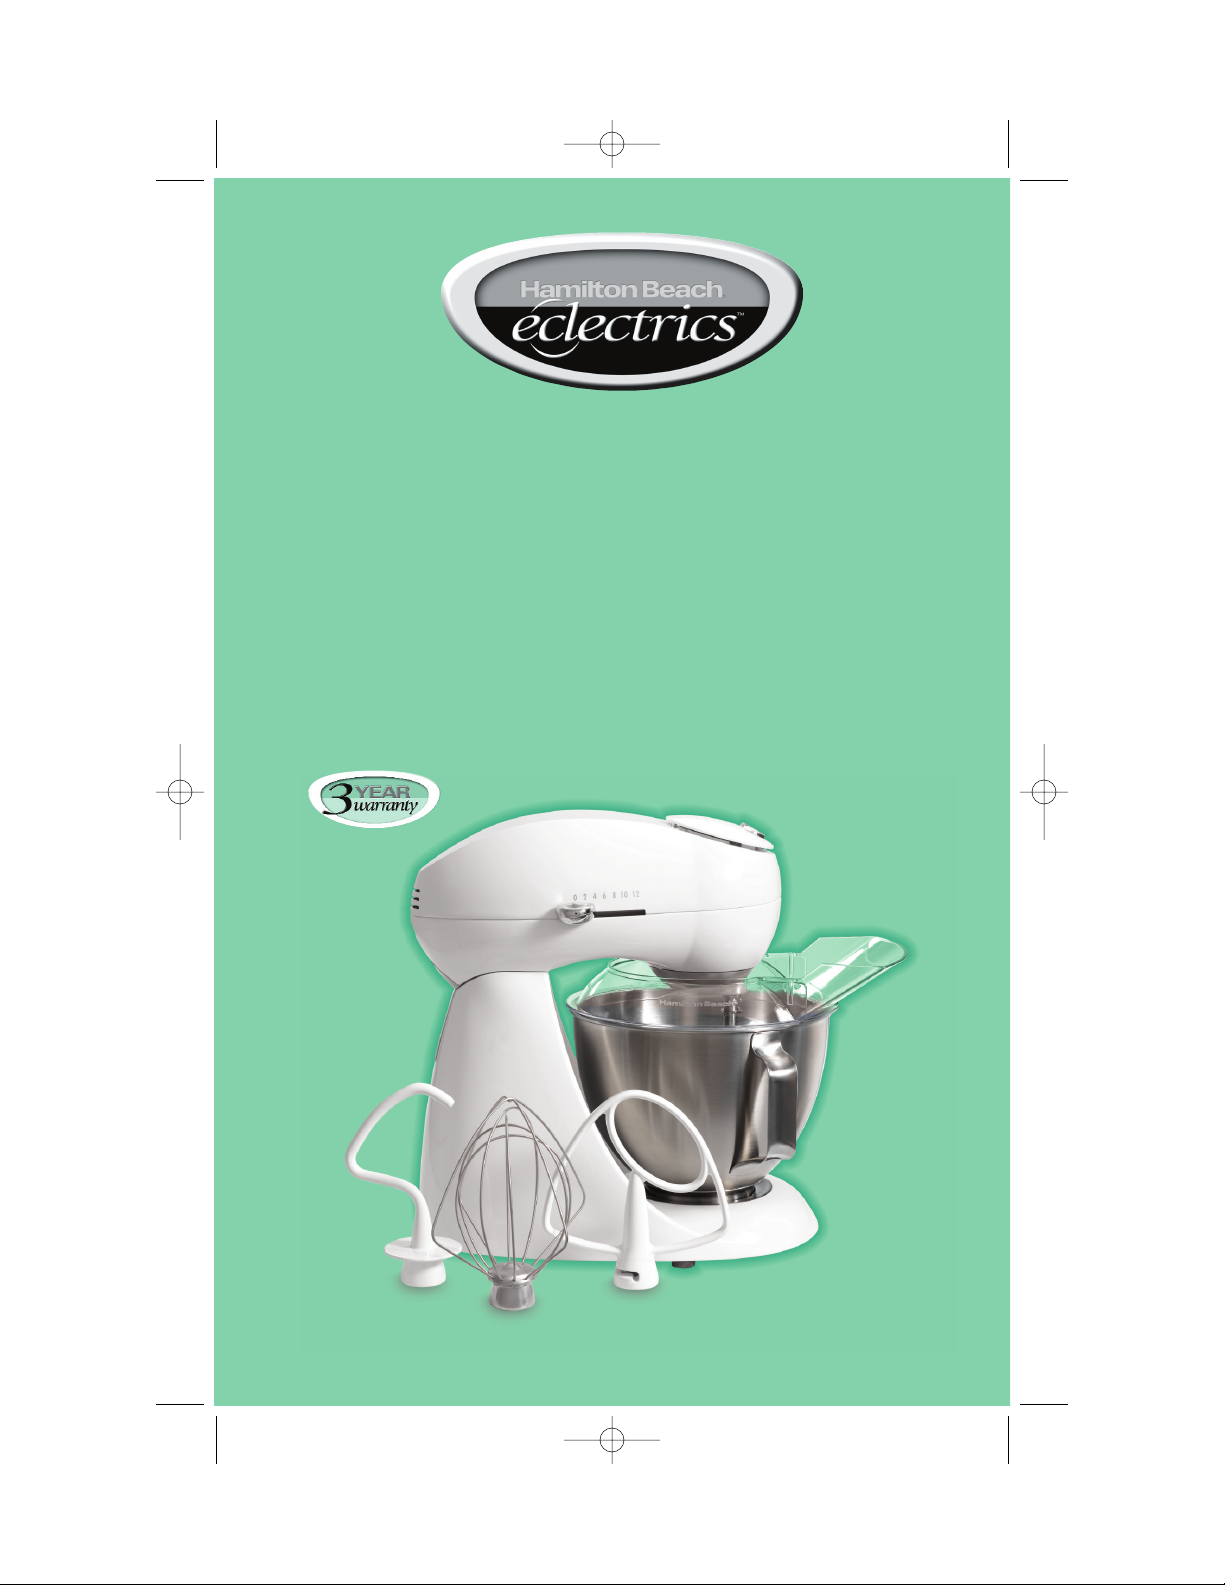
Parts and Features
1. Mixer Head
2. Attachment Shaft
3. Bowl
4. Attachments
Mixer attachments include a flat
beater, a wire whisk, and a dough
hook.
5. Bowl Lock
6. Pouring Shield (see page 8 for
more information).
7. Mixer Release Button
This button locks
the Mixer Head
down to ensure
thorough mixing.
When the Mixer
Head is raised,
it locks in the
upright position.
Hold the Mixer
Head when lowering
it into the bowl.
Press up on the
button to release
the Mixer Head.
8. Setting Control
Select a setting
from 2 to 12.
The setting of the
mixer increases with
the numbers.
840127800 ENv01.qxd 6/29/04 9:30 AM Page 6
Page 7

7
How to Assemble Your Mixer
1. Make sure Setting Control is set to
O and Mixer is unplugged.
2. Press up on Mixer Release Button
and tilt Mixer Head up.
3. Place Bowl in bowl lock and turn
clockwise until Bowl locks into place.
4. Press up on Mixer Release Button
and tilt Mixer Head down.
5. Plug Mixer into electrical outlet.
To Remove:
1. Make sure Setting Control is set to
O and Mixer is unplugged.
2. Press up on Mixer Release Button
and tilt Mixer Head up.
3. Turn Bowl counterclockwise to unlock.
To Attach the Bowl
wWARNING
Injury Hazard
Unplug mixer before inserting or removing beaters.
Unplug mixer before cleaning. Failure to do so can result in broken
bones or cuts.
1. Make sure Setting Control is set to
O and Mixer is unplugged.
2. Press up on the Mixer Release
Button and tilt the Mixer Head up.
3. Insert Attachment onto Beater Shaft
and press upward as far as possible.
4. Turn the Attachment to the right,
hooking beater over pin on shaft.
5. Press up on Mixer Release Button
and tilt the Mixer Head down.
6. Plug Mixer into electrical outlet.
To Attach the Beater, Wire Whisk, or Dough Hook
840127800 ENv01.qxd 6/29/04 9:31 AM Page 7
Page 8

8
1. Make sure Setting Control is set to
O and Mixer is unplugged.
2. Press up on Mixer Release Button
and tilt Mixer Head up.
3. Attach Bowl and desired Mixer
attachment. See page 7 for more
information.
4. Slide the narrow section of
Pouring Shield under Mixer
attachment. See Illustration 1.
5. Place Pouring Shield on bowl.
See Illustrations 2 and 3.
6. Align the narrow section of collar
on Pouring Shield with indent on
beater shaft. See Illustration 4.
7. Press up on Mixer Release Button
and tilt Mixer Head down.
8. Turn opening of Pouring Shield
to desired position.
9. Insert Pouring Shield tabs in slots
on collar. See Illustration 5.
10. To remove the Pouring Shield,
reverse the order of directions.
To Attach the Pouring Shield
840127800 ENv01.qxd 6/29/04 9:31 AM Page 8
Page 9

9
Using Your Stand Mixer Attachments
The following mixing guide is a suggestion for selecting mixing settings. Begin on
setting 2 and increase to desired setting depending on the recipe consistency.
FOOD ATTACHMENT SETTING
Cakes (mixes and from scratch) Flat Beater 4-6
Cookie Dough Flat Beater 4-6
Mashed Potatoes Flat Beater 6-8
Frosting Flat Beater 6-8
Egg Whites (for meringues, etc.) Whisk 10-12
Whipped Cream Whisk 12
Instant Pudding Whisk 2
Bread Dough Hook 2-4
1. Before first use, wash the Bowl,
two-piece Pouring Shield and
attachments in hot, soapy water.
Rinse and dry.
2. Make sure Setting Control is set to
O and Mixer is unplugged.
3. Press up on Mixer Release Button
and tilt Mixer Head up. Insert an
attachment.
4. Lock Bowl onto base using the
“Bowl Lock” feature.
5. Press up on Mixer Release Button
and tilt Mixer Head down.
6. Plug Mixer into electrical outlet.
Select desired setting. Prepare
recipe according to instructions.
7. When finished, turn Setting Control
to O. Unplug from outlet.
8. Press up on Mixer Release Button
and tilt Mixer Head up.
9. Remove Attachment.
How to Use Your Mixer
How to Set the Speed Control
Plug mixer into a properly-grounded
electrical outlet.
Speed Control should
always be set on lowest speed for starting,
then gradually moved
to desired higher
speed to avoid
splashing ingredients out of bowl.
See the chart below for suggested
speed control settings.
Electronic Speed Sensor Control
The Mixer has an Electronic Speed
Sensor Control that is designed to
maintain the same speed under different load conditions (such as when
flour is added to a batter). You might
hear slight speed variations as the
Mixer electronically adjusts to the
speed at which it is set.
840127800 ENv01.qxd 6/29/04 9:31 AM Page 9
Page 10

10
• The Mixer Head locks down for
thorough mixing.
• When mixing thin batters use medium speeds and frequently stop the
mixer to scrape the sides of the
bowl with a spatula. Place liquid
ingredients in the bowl first and then
add dry ingredients.
• Always stay near Mixer during use.
• If a spoon is accidentally caught in
an attachment or the motor stalls,
slide the Setting Control to O then
unplug. Clear the obstruction or
reduce the amount of mixture in the
bowl. Let the motor cool for 5 minutes before continuing.
Dough Hook Tips
Flat Beater Tips
• Use the flat beater attachment to
mix:
CAKES
COOKIE DOUGH
FUDGE
POTATOES
• Cookie dough is one of the thickest
doughs to mix. Make it easier by
following these tips:
✔ Have butter or margarine at room
temperature.
✔ Add ingredients one at a time,
thoroughly mixing after each
addition.
✔ Add flour one cup at a time.
✔ If the mixer seems to struggle,
increase the speed setting.
General Mixing Tips
Place liquid ingredients in bowl first
and then add dry ingredients.
Always stay near Mixer during use.
To begin mixing, use the low setting
until the ingredients are thoroughly
combined. This will reduce spattering.
Adding Ingredients
Always add ingredients as close to the
sides of the bowl as possible, not
directly into the moving beater. The
Pouring Shield can be used to help
add ingredients.
Cake Mixes
When preparing package cake mixes,
use Speed 2 for low speed, Speed 4
for medium speed, and Speed 6 for
high speed. For best results, mix for
the time stated on the package directions.
Liquid Mixtures
Mixtures containing large amounts of
liquid ingredients should be mixed at
lower speeds to avoid splashing.
Increase speed only after the mixture
has thickened.
Thin Batters
When mixing thin batters use medium
speeds and frequently stop the mixer
to scrape the sides of bowl with a
spatula.
Stand Mixer Tips
840127800 ENv01.qxd 6/29/04 9:31 AM Page 10
Page 11

11
Wire Whisk Tips
• A whisk is designed to whip liquids,
such as egg whites and cream. Do
not use the whisk for mixing thick
mixtures such as dough, fudge, or
mashed potatoes
• Your mixer is designed to whisk a
minimum of 2 large egg whites or 1
cup of cream. Mixer performance is
enhanced as the tip of the whisk is
immersed into the liquid. If smaller
quantities are needed, a hand mixer
is recommended.
Egg Whites
Place egg whites in clean, dry mixing
bowl. Attach bowl and wire whisk. To
avoid splashing, gradually turn Speed
Control to desired speed. See chart
below.
AMOUNT SPEED
2 to 4 egg whites to 10
6 or more egg whites to 8
Your Hamilton Beach®Stand MIxer
whips egg whites quickly. Watch
carefully to avoid overwhipping.
Here’s what to expect:
Frothy
Large, uneven air bubbles.
Begins to Hold Shape
Air bubbles are fine and compact;
product is white.
Soft Peak
Tips of peaks fall over when whisk is
removed.
Almost Stiff
Sharp peaks form when whisk is
removed, but whites are still soft.
Stiff but not Dry
Sharp, stiff peaks form when whisk is
removed. Whites are uniform in color
and glisten.
Stiff and Dry
Sharp, stiff peaks form when whisk is
removed. Whites are speckled and
dull in appearance.
Whipped Cream
Pour cold whipping cream into chilled
bowl. Attach bowl and wire whip. To
avoid splashing, gradually turn to
designated speed and whip to
desired stage. See chart below.
AMOUNT SPEED
1 cup to 10
1 pint to 8
Your Hamilton Beach®Stand MIxer
whips cream very quickly. Watch
cream closely during whipping
because there are just a few seconds
between whipping stages. Look for
these characteristics:
Begins to Thicken
Cream is thick and custard-like.
Holds its Shape
Cream forms soft peaks when whisk
is removed. Can be folded into other
ingredients when making desserts
and sauces.
Stiff
Cream stands in stiff, sharp peaks
when whisk is removed. Use for topping on cakes or desserts, or filling for
cream puffs.
840127800 ENv01.qxd 6/29/04 9:31 AM Page 11
Page 12

12
1. Turn Setting Control to O. Unplug
cord from outlet.
2. Press up on Mixer Release Button
and tilt Mixer Head up.
3. To remove Attachment, press the
Attachment up as far as possible
and then turn to the left. Pull the
Attachment off shaft.
4. The Bowl, Pouring Shield, and
Attachments can be washed in hot,
soapy water or in a dishwasher.
5. Wipe Mixer Head and Base with a
damp cloth.
How to Clean Your Mixer
Troubleshooting
PROBLEM
Food is not
mixed.
Food splatters
during mixing.
Mixer “walks” on
counter during
mixing.
Things TO CHECK
• Place liquid ingredients in bowl before adding dry
ingredients.
• Stop Mixer and scrape sides of bowl.
• Increase Control Setting speed.
• Use the Pouring Shield to reduce splatters during
mixing.
• Reduce Control Setting speed.
• Reduce quantity of ingredients in bowl.
• Make sure countertop is clean. This allows mixer
feet to grip countertop and reduce mixer movement.
840127800 ENv01.qxd 6/29/04 9:31 AM Page 12
Page 13

13
Appetizers Check our Web site for more recipes.
Cheddar Rounds
1
⁄
2 cup (125 ml) butter
2 cups (225 g) Cheddar cheese, grated
1
⁄
2 cup (125 ml) flour
Preheat oven to 350ºF (180ºC). Using the flat beater attachment, beat butter and
cheese on setting 4 until mixed. Reduce speed to setting 2; add flour and seasonings. Mix for 1 minute. Turn off mixer and scrape sides and bottom of bowl.
Continue mixing on setting 4 until mixture blends and leaves sides of bowl.
Shape into balls the size of large marbles and place on baking sheet. Bake 15 to
20 minutes. Serve warm or at room temperature. Makes about 48 rounds.
Parmesan Puffs
4 ounces (115 g) cream cheese
1 cup (250 ml) mayonnaise
2
⁄3
cup (150 ml) Parmesan cheese, grated
Preheat oven to 325ºF (160ºC). Using the flat beater attachment, beat cream
cheese and mayonnaise on setting 4 until mixed. Turn off mixer and scrape
sides and bottom of bowl. Add cheese and seasonings and continue to mix
on setting 6 until blended. Spoon mixture into a plastic storage bag then snip
off a corner to make a pastry bag. Fill a baking sheet with crackers then
squeeze the cheese mixture onto crackers. Bake 8 to 10 minutes until cheese
mixture is slightly browned. Best served hot. Makes 1
1
⁄2
cups (375 ml).
Classic Cheese Ball
2 8-ounce (225 g) packages cream
cheese, softened
1 8-ounce (225 g) package shredded
sharp cheddar cheese
1 tablespoon (15 ml) finely chopped
onion
Using wire whisk attachment beat cream cheese and Cheddar cheese on
medium speed until well blended. Mix in all remaining ingredients except for
pecans and place in a covered container. Refrigerate several hours or
overnight. Just before serving, shape into ball and roll in pecans. Makes 24
servings.
Hot Crab Dip
1 8-ounce (225 g) package cream
cheese, softened
1 small onion, finely chopped
5 tablespoons (75 ml) mayonnaise
Preheat oven to 350ºF (180ºC). Using flat paddle attachment, beat cream
cheese, onion, mayonnaise, crabmeat, garlic powder, salt, and pepper. On
medium speed until well blended. Spread mixture into a 1-quart (1 L) baking
dish. Bake for 20 minutes in the preheated oven. Best serve warm with bread
or crackers. Makes 16 servings.
1
⁄4 teaspoon (1.25 ml) paprika
1
⁄2 teaspoon (2.5 ml) chili powder
1
⁄8 teaspoon (.60 ml) salt
1
⁄8 teaspoon (.60 ml ) cayenne pepper
1
⁄8 teaspoon (.60 ml ) chili powder
Crackers
1 teaspoon (5 ml) Worcestershire
sauce
1 teaspoon (5 ml) lemon juice
Dash ground red pepper (optional)
Dash salt
1 cup (250 ml) chopped pecans
2 6-ounce (170 g) cans crabmeat,
drained and flaked
1
⁄4 teaspoon (1.25 ml) garlic powder
Salt and pepper to taste
840127800 ENv01.qxd 6/29/04 9:31 AM Page 13
Page 14

14
1
⁄2
cup (125 ml) green pepper, finely
minced
2.25-ounce (64 g) jar dried, chipped
beef, finely chopped
1 cup (250 ml) chopped pecans
Italian Butter
1 cup (250 ml) unsalted butter,
softened
1 tablespoon (15 ml) garlic, minced
1
⁄4 cup (60 ml) Parmesan cheese, grated
1 teaspoon (5 ml) garlic salt
Using wire whisk attachment beat softened butter on medium speed until light
and fluffy. Combine garlic, Parmesan cheese, garlic salt, Italian seasoning,
pepper and paprika. Mix on low setting until smooth. Spread on bread or
crackers. Store covered in the refrigerator. Makes 8 servings.
Pizza Butter
1 cup (250 ml) unsalted butter,
softened
1 6 ounce (170 g) can tomato paste
1 cup (250 ml) Parmesan cheese, grated
Using wire whisk attachment beat butter until light and fluffy. Add tomato
paste, Parmesan cheese, garlic salt, oregano, and parsley; mix on medium
speed until smooth. Spread on bread or crackers. Store covered in the refrigerator. Makes 8 servings.
Baked Southern Mex Dip
8 ounces (225 g) cream cheese
2 cups (225 ml) pepper jack cheese,
shredded
1 cup (250 ml) sour cream
1
⁄4
cup (60 ml) onion, finely minced
Preheat oven to 350ºF (180ºC). Using the flat beater attachment, beat cream
cheese and pepper jack cheese on setting 4 until blended. Add sour cream
and continue to mix. Turn off mixer and scrape sides and bottom of bowl.
Add onion, green pepper, chipped beef and half of the pecans. Mix on setting
4 until blended. Pour into greased 1
1
⁄2-quart (11⁄2 L) casserole dish and sprin-
kle remaining pecans on top. Bake 20 minutes. Serve with crackers. Makes 4
cups (1 L).
Artichoke Cheese Dip
12-ounce (350 g) jar marinated
artichoke hearts, drained
3
⁄4 cup (175 ml) mayonnaise
1
⁄2 cup (125 ml) Parmesan cheese,
grated
Place all ingredients in mixing bowl. Using flat beater attachment, mix on
speed 4 until blended. Refrigerate for at least 2 hours to let flavors blend.
Serve with crackers. Makes about 3 cups (750 ml).
1 teaspoon (5 ml) Italian seasoning
1
⁄2 teaspoon (2.5 ml) pepper
1
⁄4 teaspoon (1.25 ml) paprika
1
1
⁄2
teaspoon (7.5 ml) garlic salt
1
⁄2
teaspoon (2.5 ml) oregano
1 tablespoon (15 ml) parsley
Appetizers Check our Web site for more recipes.
1
⁄
2 cup (125 ml) Monterey Jack cheese,
shredded
1 teaspoon (5 ml) garlic salt
1 teaspoon (5 ml) soy sauce
1
⁄2 teaspoon (2.5 ml) hot pepper sauce
840127800 ENv01.qxd 6/29/04 9:31 AM Page 14
Page 15

15
Italian Noodle Casserole
1 pound (450 g) lean ground beef
1
⁄2 cup (125 ml) onion, chopped
1
⁄2 cup (125 ml) green pepper, chopped
1 teaspoon (5 ml) vegetable oil
26-ounce (650 g) jar spaghetti sauce
8-ounces (225 g) egg noodles
Preheat oven to 375ºF (190ºC). In a large skillet over medium-high heat, cook
ground beef, onions, and green pepper in oil, until ground beef is done. Stir in
spaghetti sauce and set aside. Cook egg noodles according to package
directions. Drain noodles. Using flat beater attachment, mix egg, sour cream
and mozzarella cheese on speed 4 until blended. Add noodles and mix on
speed 2 until noodles are coated. In a 4-quart (1 L) casserole dish, spoon
one-half of the meat sauce over bottom. Pour noodle mixture onto meat sauce
and spread out evenly. Then top with remaining meat sauce. Sprinkle with the
Parmesan cheese and bake for 35 to 40 minutes or until bubbling around
edges. Makes 6 servings
Classic Meatloaf
1 tablespoon (15 ml) vegetable oil
1 cup (250 ml) chopped onion
20 saltine crackers
1
⁄2
cup (125 ml) milk
2 eggs
2 tablespoons (30 ml) Worcestershire
Preheat oven to 350ºF (180ºC). Place oil and onion in a microwave-safe bowl.
Microwave on High about 5 minutes or until onion is soft. Place onion in the
mixing bowl. Crumble the crackers into the bowl. Add remaining ingredients in
the order listed. Using the dough hook attachment, mix on setting 4 until well
mixed, about 1 minute. Remove mixture from the bowl and place in a 9x13inch (33x23x5 cm) casserole dish. Shape into a flattened oval or egg shape.
Bake 50 to 60 minutes or until internal temperature is 160ºF (71ºC). Makes 6 to
8 servings.
Parmesan Shrimp Puff
1 tablespoon (15 ml) butter
1
⁄4 cup (60 ml) finely chopped onion
1 teaspoon (5 ml) garlic
1 tablespoon (15 ml) flour
1
⁄2 cup (125 ml) beer or chicken broth
Preheat oven to 400ºF (200ºC). In a skillet over medium-high heat, sauté onion in
butter until soft, about 5 minutes. Add garlic and cook another minute. Sprinkle
with flour then cook and stir another minute. Stir egg yolk into beer or broth. Add
to skillet and cook and stir until slightly thickened, about 2 minutes. Remove from
heat. Stir shrimp into cooked onion mixture. Set aside. Using whisk attachment,
beat egg whites on setting 12 until stiff, about 3 minutes. Remove bowl from
stand. Add Parmesan cheese and shrimp mixture to beaten egg whites. Stir gently
to mix. Spoon into greased 2-quart (2 L) casserole dish. Bake 15 minutes. Makes
4 servings.
1 egg
1 cup (250 ml) sour cream
2
⁄3 cup (150 ml) mozzarella cheese,
shredded
2 tablespoons (30 ml) Parmesan
cheese, grated
Entrees Check our Web site for more recipes.
1 egg yolk
1 pound (450 g) small to medium
shrimp, peeled and cooked
3 egg whites
1
⁄4 cup (60 ml) grated Parmesan cheese
2 tablespoons (30 ml) prepared mustard
1 teaspoon (5 ml) salt
1
⁄2
teaspoon (2.5 ml) pepper
1
⁄2
teaspoon (2.5 ml) basil
1
⁄2 teaspoon (2.5 ml) thyme
2 pounds (900 g) lean ground beef
840127800 ENv01.qxd 6/29/04 9:31 AM Page 15
Page 16

16
1
⁄4 teaspoon (1.25 ml) salt
2 tablespoons (30 ml) flour
1 egg
1
⁄2 cup (125 ml) milk
8-ounce (225 g) package corn
muffin mix
2 tablespoons (30 ml) canned diced
green chili peppers
South Of The Border Tamale Casserole
1 cup (250 ml) onion, chopped
1 cup (250 ml) green pepper, chopped
1 pound (450 g) lean ground beef
1 teaspoon (5 ml) vegetable oil
15-ounce (425 g) can corn, drained
8-ounce (225 ml) can tomato sauce
1 teaspoon (5 ml) chili powder
1 teaspoon (5 ml) cumin
Preheat oven to 375ºF (190ºC). In a large skillet over medium-high heat, cook
onion, green pepper and ground beef in oil until done. Add corn, tomato sauce,
chili powder, cumin and salt. Stir to mix then reduce heat to low. Place egg,
milk, muffin mix and green chili peppers in mixing bowl. Using whisk attachment, mix at setting 2 until combined. Stop mixer and scrape sides and bottom
of bowl. Continue to mix on setting 4 until well blended. Remove ground beef
mixture from heat and pour into a greased 21⁄2
quart (2
1
⁄2
L) casserole dish. Pour
muffin mixture evenly over top. Bake 25 to 30 minutes until top is slightly
browned around edges. Makes 6 servings.
Chicken and Vegetable Cobbler
3 tablespoons (45 ml) butter
1
⁄3 cup (80 ml) onion, chopped
1
⁄3 cup (80 ml) celery, finely chopped
1
⁄3
cup (80 ml) flour
3 cups (750 ml) chicken broth
1
⁄2 teaspoon (2.5 ml) salt
1
⁄2
teaspoon (2.5 ml) dried basil
1
⁄4 teaspoon (1.25 ml) pepper
Preheat oven to 400ºF (200ºC). In a large skillet over medium-high heat, sauté
onion and celery in butter until soft, about 5 minutes. Sprinkle flour over onion
and celery in the skillet. Stir and cook about 1 minute. Add chicken broth to the
skillet and stir to mix. Add sugar, salt, basil, and pepper. Cook and stir occasionally until thickened, about 5 to 8 minutes. Remove from heat. In a greased
9x13-inch (33x23x5 cm) casserole dish layer chicken, peas, and carrots. Pour
thickened sauce over all. Using the whisk attachment, mix buttermilk and eggs
on setting 8 for about 1 minute. Add self-rising flour and mix on setting 6. Turn
off mixer and scrape the sides and bottom of the bowl. Continue to mix on setting 6 about 30 seconds. Pour mixture evenly over the top of the layered chicken and vegetables. Bake 35 minutes or until top is lightly browned and casserole is bubbling. Makes 6 to 8 servings.
Entrees Check our Web site for more recipes.
3 cups (750 ml) cooked cubed chicken
15-ounce (425 g) can green peas,
drained
15-ounce (425 g) can sliced carrots,
drained
3
⁄4
cup (175 ml) buttermilk
3 eggs
1
1
⁄4 cup (310 ml) self-rising flour
840127800 ENv01.qxd 6/29/04 9:31 AM Page 16
Page 17

17
1
⁄4 teaspoon (1.25 ml) salt
2
⁄3 cup (150 ml) buttermilk
1 cup (250 ml) coconut
8-ounce (225 ml) can crushed pineapple,
drained
Pound Layer Cake
4 eggs, separated
1 cup (250 ml) butter
2 cups (500 ml) sugar
2 cups (500 ml) cake flour
Preheat oven to 325ºF (160ºC). Using the whisk attachment beat egg whites on
setting 12 until stiff, about 3 minutes. Remove beaten egg whites and set
aside. In same bowl (no need to wash) using flat beater attachment, cream
together butter and sugar on setting 4. Increase speed to setting 6 and add
egg yolks one at a time, beating well after each addition. Add vanilla. In a small
bowl stir together cake flour and baking soda. Reduce speed to setting 2 then
add half of the flour mixture. Add the sour cream, then the remaining flour and
continue mixing until well blended. Add the beaten egg whites and continue to
mix on setting 2 about 1 minute. Stop mixer and scrape sides and bottom of
bowl. Then continue to mix another 15 seconds. Divide batter between 2
greased and wax paper lined 9-inch (23x3 cm) round cake pans. Bake 40 to 45
minutes or until tests done with a toothpick. Cool in pan 5 minutes then
remove from pans and cool on racks. Frost or serve plain with fruit and
whipped topping. Makes 2 layers.
Hawaiian Pineapple-Coconut Cake
1
⁄2 cup (125 ml) butter
2 cups (500 ml) sugar
2 eggs
1 teaspoon (5 ml) vanilla
21⁄3 cups (580 ml) cake flour
1 teaspoon (5 ml) baking soda
Preheat oven to 350ºF (180ºC). Using the flat beater attachment, beat together
the butter, sugar, and eggs on setting 4 until blended. In a small bowl stir to mix
the cake flour, baking soda, and salt. On setting 2 add half of the flour mixture
then slowly add the buttermilk. Add the remaining flour mixture. Add the
coconut and pineapple and mix until just blended. Pour batter into 2 greased
and wax paper lined 9-inch (23x3 cm) round cake pans. Bake 40 minutes or
until tests done with a toothpick. Cool in pans 5 minutes then remove from pans
and cool on racks. Frost with Coconut Cream Cheese Frosting.
Makes one 2-layer cake.
Coconut Cream Cheese Frosting
8-ounces (225 g) cream cheese
1
⁄4 cup (60 ml) butter, room temperature
3 cups (750 ml) confectioners sugar
1 teaspoon (5 ml) vanilla
3
⁄4 cup (175 ml) coconut
Using flat beater attachment, mix cream cheese and butter on setting 4 until
smooth. Add confectioners sugar and vanilla and beat until smooth and fluffy.
Add coconut and beat until mixed.
1
⁄4 teaspoon (1.25 ml) baking powder
2
⁄3 cup (150 ml) sour cream
2 teaspoons (10 ml) vanilla
Cakes and Frostings
Check our Web site
for more recipes.
840127800 ENv01.qxd 6/29/04 9:31 AM Page 17
Page 18

18
Chocolate Velvet Layer Cake
2 cups (500 ml) cake flour
1
⁄2 cup (125 ml) unsweetened
baking cocoa
2 teaspoons (10 ml) baking soda
1
⁄4 teaspoon (1.25 ml) salt
10 tablespoons (185 ml) butter,
room temperature
Preheat oven to 350ºF (180ºC). In a small bowl stir together flour, cocoa, baking
soda, and salt. Set aside. Using flat beater attachment, cream butter and sugar
on setting 4. Add eggs 1 at a time beating well after each addition. Add vanilla.
Reduce speed to setting 2. Add half of flour mixture, then all of sour cream. Add
remaining flour mixture. Then slowly pour in coffee. Mix on setting 2 about 30
seconds. Turn off mixer and scrape sides and bottom of bowl. Turn mixer on to
setting 4 and mix until thoroughly blended. Divide batter between 2 greased and
wax paper lined 9-inch (23x3 cm) round cake pans. Bake 30 to 35 minutes or
until tests done. Cool in pan for 5 minutes then remove from pans and cool on
racks. Frost with Bittersweet Chocolate Frosting. Makes one 2-layer cake.
Bittersweet Chocolate Frosting
1
⁄3
cup (80 ml) butter, room temperature
2
1
⁄2
cups (625 ml) confectioners sugar
3
⁄4
cup (175 ml) unsweetened
baking cocoa
Using flat beater attachment, beat butter on setting 4 until smooth. Add confectioners sugar and cocoa alternately with milk and continue beating until smooth.
Add vanilla and beat until smooth and blended.
Danish Apple Cake
2 eggs, separated
1
⁄4 cup (60 ml) butter, room temperature
1
⁄2 cup (125 ml) sugar
1
⁄
2 cup (125 ml) light brown sugar,
packed
1 teaspoon (5 ml) vanilla
Preheat oven to 325ºF (160ºC). Using whisk attachment, beat 2 egg whites on
setting 12 until stiff. Remove from bowl and set aside. Using same bowl (not
necessary to wash) and flat beater, beat egg yolks, sugars, and vanilla on setting 4 until mixed. Add flour, baking powder, and cinnamon. Mix on setting 2
until blended. Add apples and beaten egg whites and stir on setting 2 just until
mixed. Pour into a greased 9-inch (23 cm) pie plate and bake for 45 minutes or
until browned. Serve topped with vanilla ice cream. Makes 6 to 8 servings.
2 cups (500 ml) light brown sugar,
packed
2 eggs
1 teaspoon (5 ml) vanilla
3
⁄4 cup (175 ml) sour cream
3
⁄4 cup (175 ml) cold brewed coffee
1
⁄4 cup (60 ml) milk
1 to 2 tablespoons (15 to 30 ml) cold
brewed coffee
1 teaspoon (5 ml) vanilla
1 cup (250 ml) flour
2 teaspoons (10 ml) baking powder
1
⁄2 teaspoon (2.5 ml) cinnamon
2 cups (750 ml) apple, peeled and finely
chopped
Cakes and Frostings
Check our Web site
for more recipes.
840127800 ENv01.qxd 6/29/04 9:31 AM Page 18
Page 19

19
Lemon Cake
21⁄3 cups (580 ml) all-purpose flour
11⁄2 teaspoons (7.5 ml) baking powder
1
⁄2 teaspoon (2.5 ml) baking soda
1
⁄4 teaspoon (1.25 ml) salt
1 cup (250 ml) butter, softened
2 cups (500 ml) sugar
Preheat oven to 350ºF (180ºC). Grease and flour three 9x11⁄2-inch (23x3 cm)
round cake pans; set aside.
In a medium bowl, combine flour, baking powder, baking soda, and salt. Set aside.
Using flat paddle attachment, cream together the butter and sugar on medium
speed until light and fluffy. Reduce speed to low and beat in the eggs one at a time.
Add flour mixture and buttermilk alternately mixing on low just until combined. Add
lemon peel and lemon juice and mix until well combined.
Pour batter into prepared pans. Bake for 25 to 30 minutes or a toothpick inserted into the center of the cake comes out clean. Cool in pans on wire racks for
10 minutes. Invert onto wire racks to cool completely. When cool frost with
Lemon Butter Frosting. Makes one 3-layer cake.
Lemon Butter Frosting
6 cups (1,500 ml) confectioners sugar
1 cup (250 ml) butter, softened
1
⁄4 cup (60 ml) fresh lemon juice
Using flat paddle attachment, cream sugar and butter on low setting until com-
bined. Add lemon juice and lemon zest, beat until smooth. Beat in milk then
increase speed and continue to beat until light and fluffy. Spread frosting over
cooled cake.
4 eggs
1 cup (250 ml) buttermilk
2 teaspoon (10 ml) finally shredded
lemon peel
2 tablespoons (30 ml) lemon juice
Cakes and Frostings
Check our Web site
for more recipes.
2 teaspoon (10 ml) grated lemon zest
1
⁄4
cup (60 ml) milk
840127800 ENv01.qxd 6/29/04 9:31 AM Page 19
Page 20

20
Italian Cream Cake
1 cup (250 ml) buttermilk
1 teaspoon (5 ml) baking soda
1
⁄2 cup (125 ml) butter
1
⁄2 cup (125 ml) shortening
2 cups (500 ml) sugar
Preheat oven to 350ºF (180ºC). Grease and flour three 9x11⁄2-inch (23x3 cm)
round cake pans; set aside.
In a small bowl, dissolve the baking soda in the buttermilk; set aside.
Using flat paddle attachment, cream together butter, shortening, and sugar on
medium speed until light and fluffy. Mix in eggs one at a time. Add buttermilk
mixture, vanilla extract, coconut, and baking powder. Reduce speed to low and
gradually add flour. Mix until just combined.
Bake in the preheated oven for 30 to 35 minutes or a toothpick inserted into the
center of the cake comes out clean. Cool in pans on wire racks for 10 minutes.
Invert onto wire racks to cool completely. When cool frost with Cream Cheese
Frosting. Makes one 3-layer cake.
Cream Cheese Frosting
2 8-ounce (225 g) packages
cream cheese, softened
1
⁄2
cup (125 ml) butter, softened
Using flat paddle, beat cream cheese, butter, and vanilla on medium speed until
light and fluffy. On the lowest speed, gradually add confectioners sugar until well
blended. Turn mixer on high and beat until frosting is light and fluffy. Spread
frosting over the cooled cake.
Country Carrot Cake
2 teaspoons (10 ml) baking powder
2 teaspoons (10 ml) baking soda
1
⁄2
teaspoon (2.5 ml) salt
2 teaspoons (10 ml) ground cinnamon
1 teaspoon (5 ml) ground nutmeg
1
⁄2 teaspoon (2.5 ml) ground cloves
1
⁄4 cup (60 ml) vegetable oil
11⁄2 (375 ml) cups sugar
1
⁄2 cup (125 ml) brown sugar
2 teaspoons (10 ml) vanilla
Preheat oven 350ºF (180ºC). Grease and flour a 13x9x2-inch (33x25x5 cm) pan;
set aside.
In a medium bowl, mix together flour, baking powder, baking soda, salt, cinnamon,
nutmeg, and cloves; set aside. Using flat paddle, mix oil, sugar, brown sugar, vanilla,
and eggs on medium speed until smooth. Reduce speed to low, add pineapple,
walnuts, coconut, carrots, and raisins until well blended. Gradually add flour mixture. Mix until well combined. Pour batter into prepared pan and bake for about 40
to 50 minutes or a toothpick inserted into the center of the cake comes out clean.
Cool on wire rack until completely cool. Frost with Cream Cheese Frosting (see
recipe above). Makes one 13 x 9-inch sheet cake.
5 eggs
1 teaspoon (5 ml) vanilla extract
1 cup (250 ml) flaked coconut
1 teaspoon (5 ml) baking powder
2 cups (500 ml) all-purpose flour
3 eggs
1 cup (250 ml) crushed pineapple with
juice
1
1
⁄2 cups (375 ml) chopped toasted
pecans or English walnuts
1
⁄2 (125 ml) cup shredded coconut
2 cups (500 ml) shredded carrots
1 cup (250 ml) raisins
3 cups (750 ml) flour
1 tablespoon (15 ml) vanilla extract
2 pounds (900 g) confectioners sugar
Cakes and Frostings
Check our Web site
for more recipes.
840127800 ENv01.qxd 6/29/04 9:31 AM Page 20
Page 21

21
White Chocolate Cheesecake
11⁄2 cups (375 ml) graham
cracker crumbs
1 tablespoon (15 ml) sugar
1
⁄3 cup (80 ml) butter, melted
4 8-ounce (900 g) packages
cream cheese
Preheat oven to 325ºF (160ºC). In a medium bowl mix graham cracker crumbs,
1 tablespoon sugar, and butter. Butter a 9-inch (23 cm) spring form pan. Press
crumbs onto bottom and 1⁄2
-inch (1 cm) up the sides. Set aside. Using flat beater attachment, beat cream cheese on setting 4 until smooth. Add 1 cup sugar
and continue to beat. Add one egg and beat until mixed. Turn off mixer and
scrape sides and bottom of bowl. Add remaining eggs one at a time beating
after each addition. Reduce speed to setting 2 then add lemon and vanilla.
With mixer running on setting 2 slowly pour in melted white chocolate. Mix just
until blended. Pour mixture into prepared crust and bake 1 hour and 15 minutes or until cheesecake is slightly browned around the edges. The center may
still look “wet.” Let cool completely before serving. Makes 16 servings.
Fluffy Sweet Potato Pie
2 eggs, separated
15-ounce (425 g) can sweet potatoes,
drained OR 1 cup (250 ml) mashed
3
⁄4 cup (175 ml) light brown sugar,
packed
1 tablespoon (15 ml) flour
1
⁄4 teaspoon (1.25 ml) salt
Preheat oven to 375ºF (190ºC). Using whisk attachment on setting 12, beat egg
whites until stiff but not dry. Set aside. Using flat beater and the same bowl (not
necessary to wash) beat egg yolks and sweet potatoes on setting 6. Blend until
smooth. Add brown sugar, flour, salt, cinnamon, and nutmeg. Blend until mixed.
Reduce speed to setting 2 and add milk and vanilla. Stir. Turn off mixer and
scrape sides and bottom of bowl. Add the beaten whites and mix on setting 4
until incorporated. Pour into pie shell. Bake 40 minutes or until filling is set.
Makes 6 to 8 servings.
1 cup (250 ml) sugar
3 eggs
1 tablespoon (15 ml) lemon juice
1 teaspoon (5 ml) vanilla
6-ounces (170 g) white chocolate,
melted
1
⁄4
teaspoon (1.25 ml) cinnamon
1
⁄2 teaspoon (2.5 ml) nutmeg
3
⁄4
cup (175 ml) evaporated milk or
whipping cream
1 teaspoon vanilla
9-inch (23 cm) deep dish unbaked pie
shell
Pies and Other Desserts
Check our Web site for more recipes.
840127800 ENv01.qxd 6/29/04 9:31 AM Page 21
Page 22

22
9-inch (23 cm) chocolate graham
cracker or cookie crumb crust
1-ounce (25 g) semi-sweet baking
chocolate, grated
Pies and Other Desserts
Check our Web site for more recipes.
Cool Cappuccino Pie
1 cup (250 ml) whipping cream
4 ounces (115 mg) cream cheese
3 tablespoons (45 ml) instant coffee
1 cup (250 ml) milk
3.5-ounce (100 g) box instant
vanilla pudding
Using whisk attachment, whip cream on setting 12 until stiff. Remove from bowl
and set aside. Using same whisk and bowl (not necessary to wash) beat cream
cheese, instant coffee, and 2 tablespoons (30 ml) of the milk on setting 6 until
smooth. Add pudding and remaining milk and beat on setting 6 about 1 minute.
Turn off mixer and scrape sides and bottom of bowl. Add whipped cream and
mix on speed 4 until blended. Pour into pie shell and sprinkle grated chocolate
on top. Refrigerate at least 4 hours before serving. Makes 6 to 8 servings.
Tiramisu
11⁄2 cups (375 ml) whipping cream,
divided
1 cup (250 ml) sugar
2 eggs
8-ounces (225 g) cream cheese,
room temperature
1 teaspoon (5 ml) vanilla
*If you do not want to use the liqueur, substitute 2⁄3 cup (150 ml) brewed coffee
with 2 tablespoons (30 ml) sugar for the liqueur and coffee.
Best if made a day before serving.
In a medium saucepan combine 1⁄2 cup (125 ml) whipping cream, 1⁄2 cup (125 ml)
sugar, and eggs. Cook and whisk constantly over medium-high heat until thickened, about 6 minutes. Pour custard into a small bowl and set in freezer to cool.
Using whisk attachment, beat 1 cup (250 ml) whipping cream on setting 12 until
stiff. Set aside. Using same whisk and bowl (not necessary to wash) beat cream
cheese and 1⁄
2 cup (125 ml) sugar on setting 6 until blended. Add cooled custard
and beat on setting 6 until smooth. Turn off mixer and scrape sides and bottom of
bowl. Add vanilla and the whipped cream and mix on setting 4 until smooth and
incorporated. Cut pound cake into
1
⁄
2
-inch (1 cm) slices. Mix coffee liqueur with
coffee. Reserve 2 tablespoons (30 ml) chopped chocolate. Assemble in a deep
bowl. Make a layer of pound cake then drizzle with liqueur-coffee mixture. Sprinkle
with chopped chocolate. Spoon on cream mixture. Repeat layering cake, coffee,
chocolate then cream mixture. Sprinkle reserved chocolate on top. Cover and
refrigerate. Makes 8 to 10 servings.
10-ounce prepared pound cake, bakery
or freezer section
1
⁄3 cup (80 ml) coffee liqueur*
1
⁄3 cup (80 ml) brewed coffee,
room temperature
6-ounces (170 g) semi-sweet baking
chocolate, finely chopped
840127800 ENv01.qxd 6/29/04 9:31 AM Page 22
Page 23

23
Best Ever Sugar Cookies
21⁄2 cups (625 ml) all purpose flour
1 teaspoon (5 ml) baking powder
1
⁄2 teaspoon (2.5 ml) baking soda
1
⁄4 teaspoon (1.25 ml) salt
1
⁄4 teaspoon (1.25 ml) nutmeg
Preheat oven to 375ºF (190ºC).
Mix together flour, baking powder, baking soda, salt, and nutmeg and set aside.
Using flat paddle, cream butter on high speed until light and fluffy. Reduce speed
to lowest setting. Add sugar, egg, and vanilla, mixing thoroughly. Gradually add dry
ingredients and milk; continue mixing until thoroughly mixed. Form cookie dough
into 11⁄2-inch (2.5 cm) diameter balls and arrange balls on ungreased baking
sheets. Flatten balls slightly with the bottom of a drinking glass.
Bake in oven for 6 to 7 minutes or until lightly golden around edges. Cool on
wire racks. Makes about 4 dozen.
Quick ’n Easy Banana Pudding
1 8-ounce (225 g) package cream
cheese, softened
1 14-ounce (400 g) can sweetened
condensed milk
1 3.4-ounce (95 g) package instant
vanilla pudding mix
2 cups (500 ml) cold milk
Using wire whisk attachment beat cream cheese on high setting until light and
fluffy. Reduce speed to low setting. Add condensed milk, pudding mix, milk, and
vanilla. Continue to mix until smooth. Turn off mixer and fold in 1⁄2 of the whipped
topping.
Line the bottom of a 13x9x2-inch (33x25x5 cm) dish with vanilla wafers. Arrange
sliced bananas evenly over wafers. Spread with pudding mixture. Top with
remaining whipped topping. Chill. Makes 8 servings.
Light and Tart Lemon Pie
2 eggs separated
3 tablespoons (45 ml) butter
1 cup (250 ml) sugar
3 tablespoons (45 ml) flour
Preheat oven to 350ºF (180ºC). Using whisk attachment on setting 12 beat egg
whites until stiff but not dry. Set aside. Using flat beater and the same bowl (not
necessary to wash) beat butter, sugar, and flour on setting 4. Add egg yolks and
mix until blended. Add milk, lemon juice, and zest. Mix until blended. Reduce
speed to setting 2 and add beaten egg whites. Mix until whites are incorporated.
Pour into pie shell and bake 45 to 50 minutes or until top is browned and filling is
set. Let pie cool completely before serving. Makes 6 to 8 servings.
Pies and Other Desserts
Check our Web site for more recipes.
3
⁄4 cup (175 ml) butter, softened
3
⁄4 cup (175 ml) sugar
1 egg
1 teaspoon (5 ml) vanilla
1
⁄4 cup (60 ml) milk
1 teaspoon (5 ml) vanilla
1 8-ounce (225 g) container frozen
whipped topping, thawed
1
⁄2 of a 12-ounce (350 g) package
vanilla wafers
3 medium ripe bananas, sliced
1
⁄2 cup (125 ml) milk
1
⁄2 cup (60 ml) lemon juice
Grated zest of 1 lemon (yellow part only)
9-inch (23 cm) unbaked pie shell
840127800 ENv01.qxd 6/29/04 9:31 AM Page 23
Page 24

24
Pies and Other Desserts
Check our Web site for more recipes.
Magic Cookies
1 cup (250 ml) butter
1 cup (250 ml) sugar
1 cup (250 ml) light brown sugar
2 eggs
2 cups (500 ml) flour
1 teaspoon (5 ml) baking soda
Preheat oven to 350ºF (180ºC). With flat beater attachment, cream together
butter, sugar, and brown sugar at a medium setting until well blended. Mix in
vanilla and eggs. Reduce speed and gradually add flour, baking soda, baking
powder, and salt mix until smooth. On a low setting, mix in oatmeal, chocolate chips, and coconut until well mixed. Drop rounded spoon full onto
ungreased cookie sheet. Bake on middle rack of oven for 12 to 14 minutes.
Makes 3 dozen cookies.
Brownie Cookies
2
⁄3
cup (160 ml) shortening
1
1
⁄2
cups (375 ml) brown sugar, packed
1 tablespoon (15 ml) water
1 teaspoon (5 ml) vanilla
2 eggs
1
1
⁄2 cups (375 ml) flour
Preaheat oven to 375ºF (190ºC). With flat beater, cream shortening and brown
sugar on medium setting until blended. Add water, vanilla, and eggs and mix.
Add flour, cocoa, baking soda, and salt and beat at a medium setting until thoroughly mixed. Stir in chocolate chips on low setting. Drop tablespoons of
dough on ungreased baking sheets. Bake 7 to 9 minutes. Do not overcook.
Makes 36 cookies.
“Soft” Peanut Butter Cookies
1
⁄2 cup (125 ml) vegetable shorting
1
⁄2 cup (125 ml) peanut butter
11⁄4 cup (310 ml) light brown sugar
1 egg
Preheat oven to 275ºF (140ºC). Using the flat beater attachment, beat shortening, peanut butter, brown sugar, egg, and vanilla at a medium setting until well
blended. Reduce speed to low and gradually add dry ingredients until blended.
Dough will be crumbly. Roll 3 tablespoon-size portions of the dough into a ball.
Place on ungreased cookie sheet. Press to 1⁄2-inch (1 cm) thick. Bake 18 to 20
minutes. Do not overcook. Makes 16 cookies.
1
⁄2 teaspoon (2.5 ml) baking powder
1
⁄2 teaspoon (2.5 ml) salt
2 cups (500 ml) oatmeal
1 tablespoon (15 ml) vanilla
12 ounces (350 g) chocolate chips
11⁄2 cups (375 ml) coconut
1
⁄3
cup (80 ml) unsweetened baking
cocoa
1
⁄4
teaspoon (1.25 ml) baking soda
1
⁄2
teaspoon (2.5 ml) salt
12 ounces (350 g) semi-sweet
chocolate chips
1 teaspoon (5 ml) vanilla
3
⁄4 teaspoon (3.75 ml) salt
11⁄2 cups (375 ml) flour
1 teaspoon (5 ml) baking soda
840127800 ENv01.qxd 6/29/04 9:31 AM Page 24
Page 25

25
Breakfast Fa vorites
Check our Web site for more recipes.
Sour Cream Coffee Cake
Crumb topping
11⁄2 cups (375 ml) all-purpose flour
11⁄2 sticks (3⁄4 cup) [175 ml] unsalted
butter, softened
1
⁄3 cup (80 ml) packed light
brown sugar
1
⁄3 cup (80 ml) sugar
11⁄4 teaspoon (6.25 ml) ground
cinnamon
1 cup (250 ml) pecans, chopped
Struesel
1
⁄3 cup (80 ml) all-purpose flour
1
⁄2 cup (125 ml) packed light brown
sugar, divided
3
⁄4 teaspoon (3.75 ml) ground cinnamon
3 tablespoons (45 ml) cold butter
Crumb topping: In a small bowl, combine flour, butter, brown sugar, gradulated sugar and cinnamon mix with fork until large crumbs are formed. Add
pecans and mix to incorporate.
Streusel: In another small bowl, combine flour, brown sugar, cinnamon and
butter. Mix with fork until large crumbs are formed.
Cake: Lower oven rack to lowest position. Preheat oven 350ºF (180ºC).
Grease 10-inch bundt ban with butter.
Using the flat paddle attachment, cream butter on medium speed until
smooth. Add sugar, baking powder, baking soda and salt. Beat on medium
speed for 3 minutes. With mixer on low speed, add in eggs 1 at a time until
well-blended, mix in vanilla and sour cream. Gradually add flour. Continue to
mix until well blended.
Spread about 2 cups (500 ml) of batter into the bottom of prepared pan,
Sprinkle evenly with 1⁄2 of streusel mixture. Repeat. Spread remaining batter
over and top with crumb topping.
Bake 50 to 60 minutes or a toothpick inserted into the center of the cake
comes out clean. Cool on wire rack 30 minutes. Invert cake onto plate and
then flip on wire rack with topping side up. Cool completely. Makes one cake.
Cake
12 tablespoons (180 ml) unsalted
butter, softened
1
1
⁄4 cup (310 ml) sugar
1 tablespoon (15 ml) baking powder
3
⁄4 teaspoon (3.75 ml) baking soda
3
⁄4 teaspoon (3.75 ml) salt
4 large eggs
1 tablespoon (15 ml) vanilla
11⁄2
cups (375 ml) sour cream
2
1
⁄4
cups (560 ml) all-purpose flour
840127800 ENv01.qxd 6/29/04 9:31 AM Page 25
Page 26

26
No Cook Fudge Truffles
8-ounce (225 g) package cream
cheese, room temperature
1
⁄4
cup (60 ml) butter, room temperature
1 teaspoon (5 ml) vanilla
2
⁄3
teaspoon (1.25 ml) salt
Using the flat beater attachment, beat cream cheese and butter on setting 6
until smooth. Add vanilla, salt and cocoa and mix on setting 4. Add confectioners sugar 1 cup (250 ml) at a time and beat until smooth. Shape into 1-inch (2.5
cm) balls then place in freezer for 1 hour. Remove from freezer and roll in nuts.
Refrigerate. Makes about 3 dozen.
Mini Meringue Morsels
2 egg whites
2
⁄3 teaspoon (1.25 ml) cream of tartar
1
⁄2 cup (125 ml) sugar
2 tablespoons (30 ml) unsweetened baking cocoa
Preheat oven to 275ºF (140ºC). Using the whisk attachment, beat egg whites
and cream of tartar on setting 12 until soft peaks form. Reduce speed to setting 10 and slowly add sugar. Beat until stiff peaks form. Remove from stand
and fold in cocoa. Place mixture in pastry bag. (Or spoon into a plastic storage
bag with a small corner snipped off.) Place parchment paper on cookie sheet.
Pipe out small mounds of meringue (slightly less than one tablespoon). Place in
oven and bake for 15 minutes. Turn off oven but leave meringues in oven
another hour. Remove and let cool. Makes about 6 dozen meringues.
Candies Check our Web site for more recipes.
Breakfast Fa vorites
Check our Web site for more recipes.
2
⁄3
cup (150 ml) unsweetened
baking cocoa
3
1
⁄2 cups (875 ml) confectioners sugar
1
⁄2 cup (125 ml) finely chopped pecans
or walnuts
Cinnamon Butter
1 cup (250ml) unsalted butter, softened
2 tablespoons (30 ml) confectioners sugar
Using whisk attachment beat butter on high speed until light and fluffy.
Reduce mixer to low speed, add sugar, cinnamon, and nutmeg and whip
until smooth and creamy. The perfect addition to pancakes, toast, or biscuits. Store covered in the refrigerator. Makes 8 servings.
Honey Butter
1 cup (250 ml) unsalted butter, softened
1
⁄2
cup (125 ml) honey
Using whisk attachment beat butter on high speed until light and fluffy.
Reduce mixer to low speed, add honey and whip until smooth. The perfect
addition to pancakes, toast, or biscuits. Store covered in the refrigerator.
Makes 8 servings.
1 teaspoon (5ml) ground cinnamon
1 dash ground nutmeg
840127800 ENv01.qxd 6/29/04 9:31 AM Page 26
Page 27

90 Minute Pan Bread
1
⁄2 cup (125 ml) warm water,
100 to 110ºF (38 to 43ºC)
2 .25-ounce (8 g each) packages
active dry yeast
2
⁄3 cup (150 ml) warm milk
1
⁄4 cup (60 ml) sugar
Pour water into mixing bowl. Add yeast and let dissolve for 5 minutes. Add
milk, sugar, butter salt, and egg. Using dough hook attachment mix ingredients
on setting 2, then add 3 cups (750 ml) flour. Add additional flour if necessary to
make a sticky soft dough. Knead on setting 4 for 3 minutes. Cover and let rise
in a warm place for 30 minutes.
Preheat oven to 400ºF (200ºC). Stir dough then place in a greased 9x13-inch
(33x23x5 cm) baking pan. Push dough to edges of pan. Let rise in warm place
30 minutes. Bake for 15 to 20 minutes until golden brown. Remove from oven
and brush top with melted butter. Makes 20 servings.
Simple Yeast Rolls
1 cup (250 ml) warm water,
100 to 110ºF (38 to 43ºC)
.25-ounce (8 g) package active dry yeast
1
⁄4
cup (60 ml) butter, melted and cooled
Pour water into mixing bowl. Add yeast and let dissolve for 5 minutes. Add butter,
sugar, salt and egg. Using dough hook mix on speed 2 for about 30 seconds. Add 3
cups (750 ml) of the flour and mix on speed 4 about 2 minutes. Add additional flour if
necessary to make a soft dough. Cover and let rise in warm place about 1 hour.
Preheat the oven to 350ºF (180ºC). Stir down the dough and dump onto lightly
floured surface. Divide the dough into 4 equal portions, then divide each portion
into 4 golf ball sized balls. Place the 16 balls in a greased 9x13-inch (33x23x5
cm) baking pan. Let rise in a warm place about 30 minutes. Bake 25 to 30 minutes. Makes 16 rolls.
Soft Yeast Biscuit Rolls
.25-ounce (8 g) package active dry yeast
1
⁄
4 cup (60 ml) warm water,
100 to 110ºF (38 to 43ºC)
4 cups (1 L) flour
3 tablespoons (45 ml) sugar
Preheat oven to 400ºF (200ºC). Dissolve yeast in water and set aside. Place flour,
sugar, baking powder, baking soda and salt in mixing bowl. Using dough hook
attachment, stir dry ingredients on setting 2. Add shortening and increase speed to
setting 4. Mix about 1 minute. Add dissolved yeast and continue to mix. Slowly add
buttermilk. Mix on setting 4 about 1 minute. Dump the dough onto lightly floured
surface and sprinkle dough with additional flour. Gently roll dough to
1
⁄2-inch (1 cm)
thickness. Cut with round biscuit cutter. Place dough with sides touching on baking
sheet. Bake 15 to 20 minutes. Makes 16 to 20 biscuits.
1
⁄4 cup (60 ml) butter, room temperature
1 teaspoon (5 ml) salt
1 egg
31⁄2 to 4 cups (875 ml to 1 L) flour
1 tablespoon (15 ml) butter, melted
3 tablespoon (45 ml) sugar
1 teaspoon (5 ml) salt
1 egg
3 to 3
1
⁄2
cups (750 to 875 ml) flour
2 teaspoons (10 ml) baking powder
1 teaspoon (5 ml) baking soda
1 teaspoon (5 ml) salt
2
⁄3 cup (150 ml) vegetable shortening
11⁄4 cups (310 ml) buttermilk
Dinner Rolls Check our Web site for more recipes.
27
840127800 ENv01.qxd 6/29/04 9:31 AM Page 27
Page 28

HAMILTON BEACH PROCTOR-SILEX,INC.
P
ROCTOR-S
ILEX CANADA,INC.
263 Yadkin Road. Southern Pines, North Carolina 28387
Picton, Ontario K0K 2T0
6/04
840127800
hamiltonbeach.com
840127800 ENv01.qxd 6/29/04 9:31 AM Page 28
 Loading...