

Page 1

ALL-METAL STAND MIXER
RECIPES
AND USER
GUIDE
USA: 1-800-851-8900 Canada: 1-800-267-2826
840115400
840115400 ENv05.qxd 7/2/03 1:36 PM Page 1
Page 2

2
Dear Stand Mixer Owner,
Congratulations on your stand mixer purchase. The Hamilton Beach
®
Eclectrics™stand mixer adds a modern twist to those dependable,
all-metal appliances you remember from yesteryear.
Owning a Hamilton Beach
®
is like owning a piece of history. In 1904,
Louis Hamilton and Chester Beach teamed up to bring motorized
appliances like vacuums, sewing machines, and mixers into American
households. In honor of their 100-year legacy, we’ve combined the
“built to last” metal construction of the past with the styling of today
to bring lasting quality and style to your kitchen.
As you use your all-metal stand mixer, think about the history that
came before it. Enjoy the confidence you have in an appliance backed
by years of experience and a 3-year warranty. But most of all, fill your
home with the delicious aroma of cakes, cookies, and breads that
your stand mixer helped create!
I hope you enjoy your Hamilton Beach
®
Eclectrics™stand mixer for
many years to come.
Sincerely,
Michael J. Morecroft
President and Chief Executive Officer of
Hamilton Beach/Proctor-Silex, Inc.
840115400 ENv05.qxd 7/2/03 1:36 PM Page 2
Page 3

3
Warranty Information ...................... 3
Important Safeguards ...................... 4
Assistance and Service
Information ........................................ 5
Parts and Features............................ 6
How to Assemble Your Mixer............7
How to Use Your Mixer .................... 9
Stand Mixer Tips ............................ 10
How to Clean Your Mixer .............. 12
Troubleshooting .............................. 12
Recipes ...................................... 13-29
Appetizers .................................... 13
Entrees.......................................... 15
Cakes and Frostings.................... 17
Pies and Other Desserts ............ 21
Breakfast Favorites...................... 25
Candies ........................................ 26
Dinner Rolls .................................. 27
Table of Contents
Warranty Information
Standard Three Year Warranty
Congratulations! You now own one of the finest stand mixers. We’re so confident
in the quality and craftsmanship of your new stand mixer that we’re backing your purchase with a No-Hassle 3-Year Replacement Warranty. If your stand mixer malfunctions
within 3 years of purchase, we will deliver a brand new replacement mixer to your door
and remove the old unit at no cost to you. Here’s how it works:
Warranty To fulfill Hamilton Hamilton Beach
®
Term the warranty: Beach®will will not pay for
Three years from
date of original
purchase for
stand mixers
operated in the
continental
United States,
Alaska, Hawaii
and Canada.
This warranty
applies only to
the original
consumer
purchaser.
1. Follow the instructions
in this Manual. Refer to
Tips & Troubleshooting
sections if you have any
problems operating the
unit. If you have any
questions, call one of
the Customer Service
numbers on page 5.
2. Keep your proof of purchase. If the unit malfunctions within 3 years
of purchase, call one of
the Customer Service
numbers on page 5.
1. Send a pre-paid
shipping label
so you can send
us the unit.
2. Ship a brand
new replacement unit to
your address.
Product failures arising
from abuse, misuse,
neglect, use for commercial purposes, or use
contrary to this Manual.
THIS WARRANTY IS IN
LIEU OF ANY OTHER
WARRANTY, EXPRESS
OR IMPLIED, WRITTEN
OR ORAL, INCLUDING
ANY WARRANTY OF
MERCHANTABILITY OR
FITNESS FOR A PARTICULAR PURPOSE.
ANY LIABILITY IS
EXPRESSLY LIMITED
TO THE PURCHASE
PRICE PAID. ALL
CLAIMS FOR SPECIAL,
INCIDENTAL OR
CONSEQUENTIAL
DAMAGES ARE
EXPRESSLY EXCLUDED.
840115400 ENv05.qxd 7/2/03 1:36 PM Page 3
Page 4

44
Consumer Safety Information
IMPORTANT SAFEGUARDS
When using electric appliances, basic
safety precautions should always be
followed, including the following:
1. Read all instructions.
2. To protect against risk of electrical
shock, do not put cord, plug, or any
portion of the mixer in water or other
liquid.
3. Close supervision is necessary when
any appliance is used by or near
children.
4. Unplug from outlet when not in use,
before putting on or taking off parts,
and before cleaning.
5. Avoid contacting moving parts. Keep
hands, hair, and clothing, as well as
spatulas and other utensils, away from
beater during operation to reduce risk
of injury to persons, and/or damage to
mixer.
6. Remove beaters from mixer before
washing.
7. Do not let cord hang over edge of
table or counter, or touch hot surfaces,
including stove.
8. Do not operate any appliance with
a damaged cord or plug, or after the
appliance malfunctions or is dropped
or damaged in any manner. Call our
toll-free customer service number for
information on examination, repair, or
electrical or mechanical adjustment.
9. The use of attachments not
recommended or sold by Hamilton
Beach/Proctor-Silex, Inc. for use with
this model may cause fire, electric
shock or injury.
10. Do not use outdoors.
11. Do not place on or near a hot gas or
electric burner, or in a heated oven.
12. Check that control is off before plugging cord into wall outlet. To disconnect, turn control to OFF, then remove
plug from wall outlet.
13. Do not use appliance for other than
intended purpose.
SAVE THESE INSTRUCTIONS
This appliance is intended for
household use only.
This appliance is equipped with a groundedtype 3-wire cord (3-prong plug). This type
of plug will only fit into an electrical outlet
made for a 3-prong plug. This is a safety
feature intended to help reduce the risk of
electrical shock. If the plug should fail to fit
contact a qualified electrician to replace the
obsolete outlet. Do not attempt to defeat
the safety purpose of the grounding pin by
modifying the plug in any way.
The length of the cord used on this appliance was selected to reduce the hazards
of becoming tangled in, or tripping over a
longer cord. If a longer cord is necessary
an approved extension cord may be used.
The electrical rating of the extension cord
must be equal to or greater than the rating
of the mixer. Care must be taken to
arrange the extension cord so that it will
not drape over the countertop or tabletop
where it can be pulled on by children or
accidentally tripped over.
An extension cord should be connected to
the appliance first, before it is plugged into
the outlet.
To avoid an electrical circuit overload do
not use another high wattage appliance on
the same circuit with the mixer.
WARNING: To reduce risk of personal
injury, always unplug mixer before inserting
or removing beaters.
BEFORE FIRST USE: Wash the bowl,
two-piece pouring shield, and all mixing
attachments in hot, soapy water. Rinse
and dry.
840115400 ENv05.qxd 7/2/03 1:36 PM Page 4
Page 5

55
Customer Service Information
Before Calling for Assistance
Please read before calling:
• The mixer may warm up during
use. Under heavy loads with
extended mixing time periods, the
top of the unit may feel warm to
the touch. This is normal.
• The mixer may emit an odor, especially when new. This is common
with electric motors.
• If the flat beater hits the bowl, stop
the mixer. See page 3 for more
information.
If your mixer should malfunction or fail to operate, please
check the following:
• Is the mixer plugged in?
• Is the fuse in the circuit to the
mixer in working order? If you have
a circuit breaker box, be sure the
circuit is closed.
• Turn the mixer off for 10 to 15 seconds, then turn the mixer back on.
• If the problem is not due to one of
the items mentioned above, see
Customer Service Information.
• DO NOT return the mixer to the
retailer as they do not provide
service.
If you have a question about your mixer, call our toll-free customer service
number. Before calling, please note the model, type, and series numbers and fill
in that information below. These numbers can be found on the bottom of your
mixer. This information will help us answer your question much more quickly.
MODEL:___________________ TYPE :___________________ SERIES: __________________
CUSTOMER SERVICE NUMBERS
In the U.S. 1-800-851-8900
In Canada 1-800-267-2826
Web site address: www.hamiltonbeach.com
KEEP THESE NUMBERS FOR FUTURE REFERENCE!
H
AMILTON
BEACH PROCTOR-SILEX,INC.
P
ROCTOR-SILEX CANADA,INC.
263 Yadkin Road. Southern Pines, North Carolina 28387
Picton, Ontario K0K 2T0
Assistance and Service
Information
840115400 ENv05.qxd 7/2/03 1:36 PM Page 5
Page 6
6
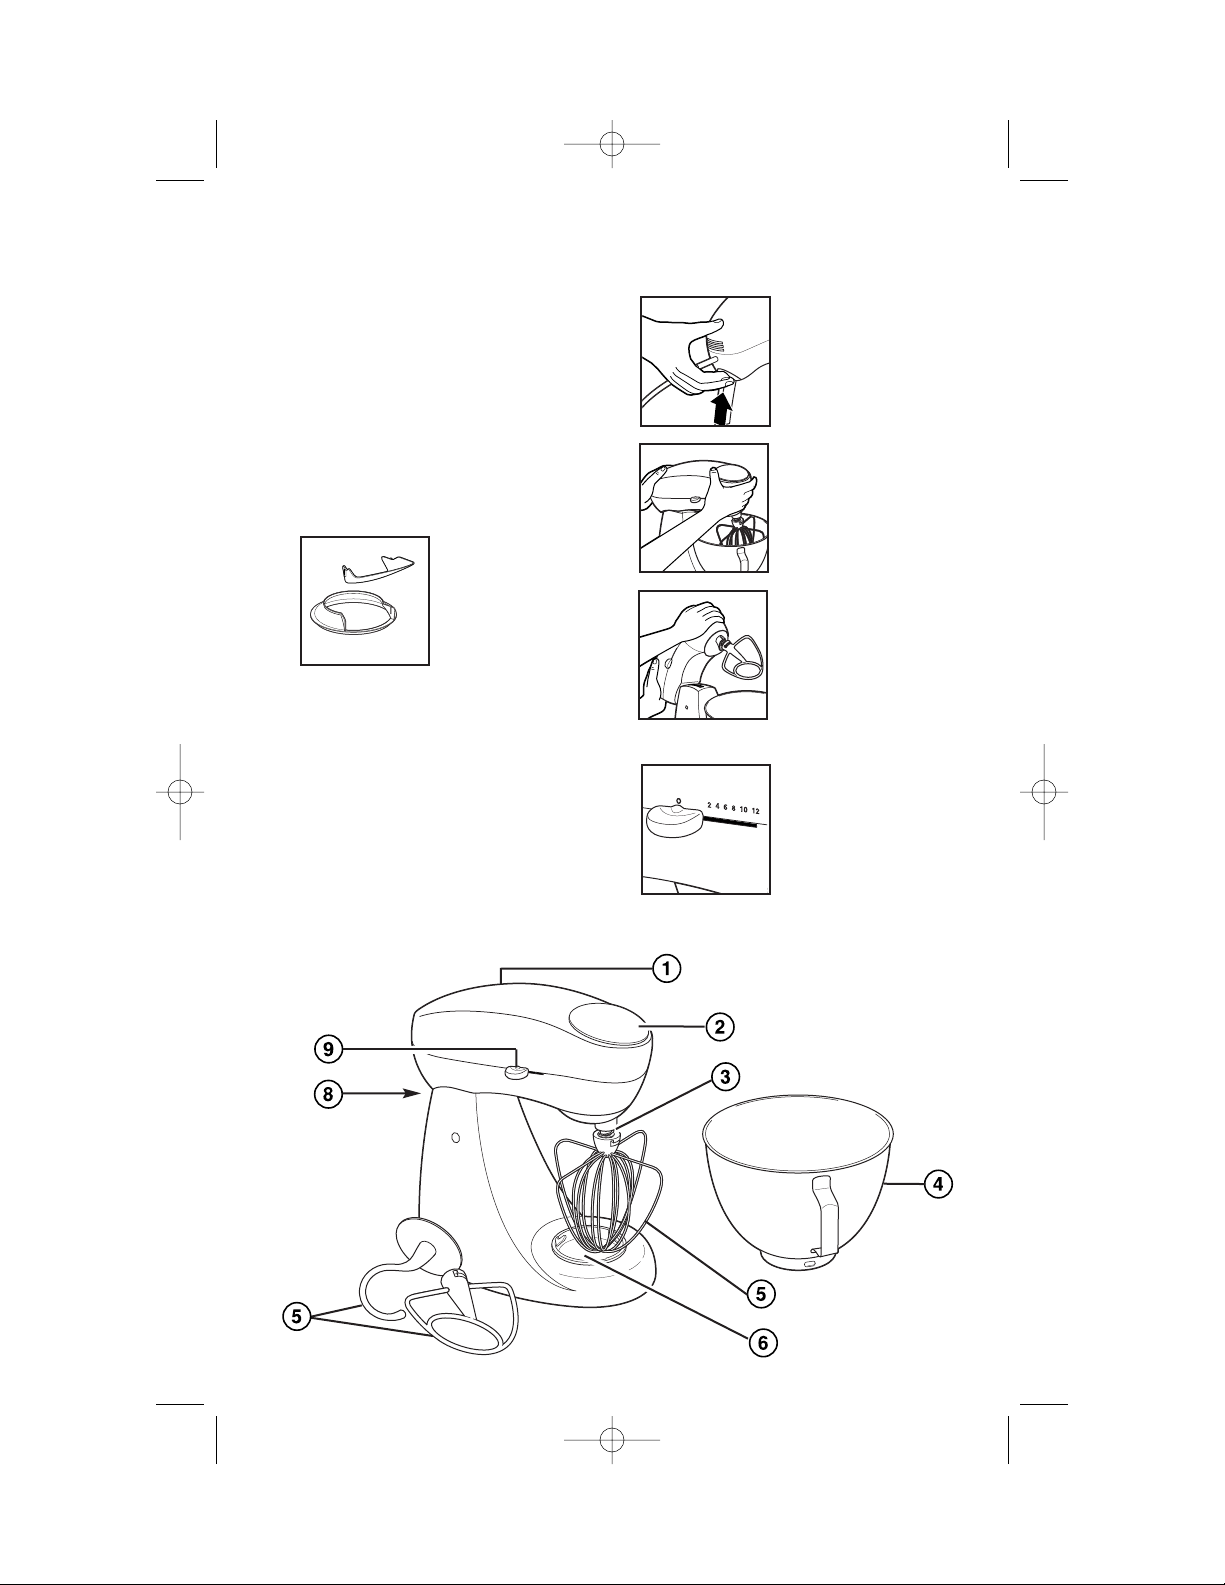
Parts and Features
1. Mixer Head
2. Logo Plate
3. Attachment Shaft
4. Bowl
5. Attachments
Mixer attachments include a flat
beater, a wire whisk, and a dough
hook.
6. Bowl Lock
7. Pouring Shield (see page 8 for
more information).
8. Mixer Release Button
This button locks
the Mixer Head
down to ensure
thorough mixing.
When the Mixer
Head is raised,
it locks in the
upright position.
Hold the Mixer
Head when lowering
it into the bowl.
Press up on the
button to release
the Mixer Head.
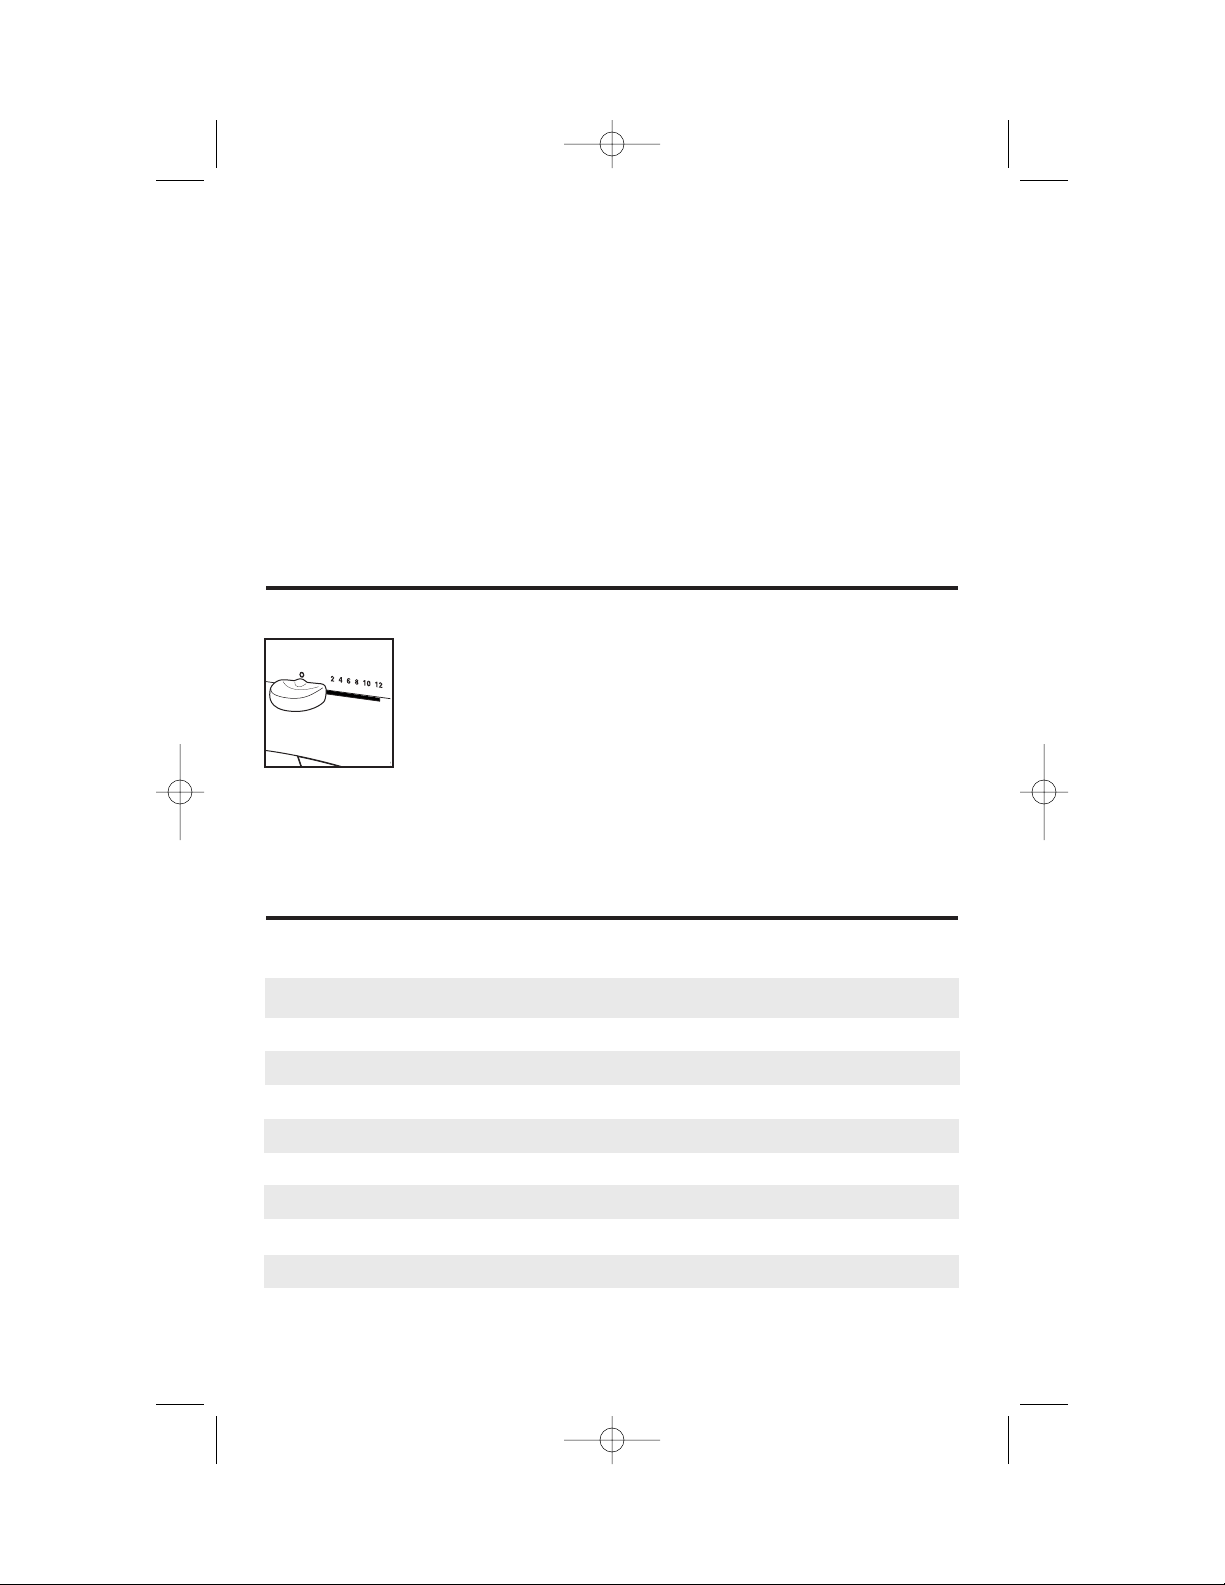
9. Setting Control
Select a setting
from 2 to 12.
The setting of the
mixer increases with
the numbers.
840115400 ENv05.qxd 7/2/03 1:36 PM Page 6
Page 7

7
How to Assemble Your Mixer
1. Make sure Setting Control is set to
O and Mixer is unplugged.
2. Press up on Mixer Release Button
and tilt Mixer Head up.
3. Place Bowl in bowl lock and turn
clockwise until Bowl locks into place.
4. Press up on Mixer Release Button
and tilt Mixer Head down.
5. Plug Mixer into electrical outlet.
To Remove:
1. Make sure Setting Control is set to
O and Mixer is unplugged.
2. Press up on Mixer Release Button
and tilt Mixer Head up.
3. Turn Bowl counterclockwise to unlock.
To Attach the Bowl
wWARNING
Injury Hazard
Unplug mixer before inserting or removing beaters.
Unplug mixer before cleaning. Failure to do so can result in broken
bones or cuts.
1. Make sure Setting Control is set to
O and Mixer is unplugged.
2. Press up on the Mixer Release
Button and tilt the Mixer Head up.
3. Insert Attachment onto Beater Shaft
and press upward as far as possible.
4. Turn the Attachment to the right,
hooking beater over pin on shaft.
5. Press up on Mixer Release Button
and tilt the Mixer Head down.
6. Plug Mixer into electrical outlet.
To Attach the Beater, Wire Whisk, or Dough Hook
840115400 ENv05.qxd 7/2/03 1:36 PM Page 7
Page 8

8
1. Make sure Setting Control is set to
O and Mixer is unplugged.
2. Press up on Mixer Release Button
and tilt Mixer Head up.
3. Attach Bowl and desired Mixer
attachment. See page 7 for more
information.
4. Slide the narrow section of
Pouring Shield under Mixer
attachment. See Illustration 1.
5. Place Pouring Shield on bowl.
See Illustrations 2 and 3.
6. Align the narrow section of collar
on Pouring Shield with indent on
beater shaft. See Illustration 4.
7. Press up on Mixer Release Button
and tilt Mixer Head down.
8. Turn opening of Pouring Shield
to desired position.
9. Insert Pouring Shield tabs in slots
on collar. See Illustration 5.
10. To remove the Pouring Shield,
reverse the order of directions.
To Attach the Pouring Shield
840115400 ENv05.qxd 7/2/03 1:36 PM Page 8
Page 9
9
Using Your Stand Mixer Attachments
The following mixing guide is a suggestion for selecting mixing settings. Begin on
setting 2 and increase to desired setting depending on the recipe consistency.
FOOD ATTACHMENT SETTING
Cakes (mixes and from scratch) Flat Beater 4-6
Cookie Dough Flat Beater 4-6
Mashed Potatoes Flat Beater 6-8
Frosting Flat Beater 6-8
Egg Whites (for meringues, etc.) Whisk 10-12
Whipped Cream Whisk 12
Instant Pudding Whisk 2
Bread Dough Hook 2-4
1. Before first use, wash the Bowl,
two-piece Pouring Shield and
attachments in hot, soapy water.
Rinse and dry.
2. Make sure Setting Control is set to
O and Mixer is unplugged.
3. Press up on Mixer Release Button
and tilt Mixer Head up. Insert an
attachment.
4. Lock Bowl onto base using the
“Bowl Lock” feature.
5. Press up on Mixer Release Button
and tilt Mixer Head down.
6. Plug Mixer into electrical outlet.
Select desired setting. Prepare
recipe according to instructions.
7. When finished, turn Setting Control
to O. Unplug from outlet.
8. Press up on Mixer Release Button
and tilt Mixer Head up.
9. Remove Attachment.
How to Use Your Mixer
How to Set the Speed Control
Plug mixer into a properly-grounded
electrical outlet.
Speed Control should
always be set on lowest speed for starting,
then gradually moved
to desired higher
speed to avoid
splashing ingredients out of bowl.
See the chart below for suggested
speed control settings.
Electronic Speed Sensor Control
The Mixer has an Electronic Speed
Sensor Control that is designed to
maintain the same speed under different load conditions (such as when
flour is added to a batter). You might
hear slight speed variations as the
Mixer electronically adjusts to the
speed at which it is set.
840115400 ENv05.qxd 7/2/03 1:36 PM Page 9
Page 10

10
• The Mixer Head locks down for
thorough mixing.
• When mixing thin batters use medium speeds and frequently stop the
mixer to scrape the sides of the
bowl with a spatula. Place liquid
ingredients in the bowl first and then
add dry ingredients.
• Always stay near Mixer during use.
• If a spoon is accidentally caught in
an attachment or the motor stalls,
slide the Setting Control to O then
unplug. Clear the obstruction or
reduce the amount of mixture in the
bowl. Let the motor cool for 5 minutes before continuing.
Dough Hook Tips
Flat Beater Tips
• Use the flat beater attachment to
mix:
CAKES
COOKIE DOUGH
FUDGE
POTATOES
• Cookie dough is one of the thickest
doughs to mix. Make it easier by
following these tips:
✔ Have butter or margarine at room
temperature.
✔ Add ingredients one at a time,
thoroughly mixing after each
addition.
✔ Add flour one cup at a time.
✔ If the mixer seems to struggle,
increase the speed setting.
General Mixing Tips
Place liquid ingredients in bowl first
and then add dry ingredients.
Always stay near Mixer during use.
To begin mixing, use the low setting
until the ingredients are thoroughly
combined. This will reduce spattering.
Adding Ingredients
Always add ingredients as close to the
sides of the bowl as possible, not
directly into the moving beater. The
Pouring Shield can be used to help
add ingredients.
Cake Mixes
When preparing package cake mixes,
use Speed 2 for low speed, Speed 4
for medium speed, and Speed 6 for
high speed. For best results, mix for
the time stated on the package directions.
Liquid Mixtures
Mixtures containing large amounts of
liquid ingredients should be mixed at
lower speeds to avoid splashing.
Increase speed only after the mixture
has thickened.
Thin Batters
When mixing thin batters use medium
speeds and frequently stop the mixer
to scrape the sides of bowl with a
spatula.
Stand Mixer Tips
840115400 ENv05.qxd 7/2/03 1:36 PM Page 10
Page 11

11
Wire Whisk Tips
• A whisk is designed to whip liquids,
such as egg whites and cream. Do
not use the whisk for mixing thick
mixtures such as dough, fudge, or
mashed potatoes
• Your mixer is designed to whisk a
minimum of 2 large egg whites or 1
cup of cream. Mixer performance is
enhanced as the tip of the whisk is
immersed into the liquid. If smaller
quantities are needed, a hand mixer
is recommended.
Egg Whites
Place egg whites in clean, dry mixing
bowl. Attach bowl and wire whisk. To
avoid splashing, gradually turn Speed
Control to desired speed. See chart
below.
AMOUNT SPEED
2 to 4 egg whites to 10
6 or more egg whites to 8
Your Hamilton Beach®Stand MIxer
whips egg whites quickly. Watch
carefully to avoid overwhipping.
Here’s what to expect:
Frothy
Large, uneven air bubbles.
Begins to Hold Shape
Air bubbles are fine and compact;
product is white.
Soft Peak
Tips of peaks fall over when whisk is
removed.
Almost Stiff
Sharp peaks form when whisk is
removed, but whites are still soft.
Stiff but not Dry
Sharp, stiff peaks form when whisk is
removed. Whites are uniform in color
and glisten.
Stiff and Dry
Sharp, stiff peaks form when whisk is
removed. Whites are speckled and
dull in appearance.
Whipped Cream
Pour cold whipping cream into chilled
bowl. Attach bowl and wire whip. To
avoid splashing, gradually turn to
designated speed and whip to
desired stage. See chart below.
AMOUNT SPEED
1 cup to 10
1 pint to 8
Your Hamilton Beach®Stand MIxer
whips cream very quickly. Watch
cream closely during whipping
because there are just a few seconds
between whipping stages. Look for
these characteristics:
Begins to Thicken
Cream is thick and custard-like.
Holds its Shape
Cream forms soft peaks when whisk
is removed. Can be folded into other
ingredients when making desserts
and sauces.
Stiff
Cream stands in stiff, sharp peaks
when whisk is removed. Use for topping on cakes or desserts, or filling for
cream puffs.
840115400 ENv05.qxd 7/2/03 1:36 PM Page 11
Page 12

12
1. Turn Setting Control to O. Unplug
cord from outlet.
2. Press up on Mixer Release Button
and tilt Mixer Head up.
3. To remove Attachment, press the
Attachment up as far as possible
and then turn to the left. Pull the
Attachment off shaft.
4. The Bowl, Pouring Shield, and
Attachments can be washed in hot,
soapy water or in a dishwasher.
5. Wipe Mixer Head and Base with a
damp cloth.
How to Clean Your Mixer
Troubleshooting
PROBLEM
Food is not
mixed.
Food splatters
during mixing.
Mixer “walks” on
counter during
mixing.
Things TO CHECK
• Place liquid ingredients in bowl before adding dry
ingredients.
• Stop Mixer and scrape sides of bowl.
• Increase Control Setting speed.
• Use the Pouring Shield to reduce splatters during
mixing.
• Reduce Control Setting speed.
• Reduce quantity of ingredients in bowl.
• Make sure countertop is clean. This allows mixer
feet to grip countertop and reduce mixer movement.
840115400 ENv05.qxd 7/2/03 1:36 PM Page 12
Page 13

13
Appetizers Check our Web site for more recipes.
Cheddar Rounds
1
⁄
2 cup (125 ml) butter
2 cups (225 g) Cheddar cheese, grated
1
⁄
2 cup (125 ml) flour
Preheat oven to 350ºF (180ºC). Using the flat beater attachment, beat butter and
cheese on setting 4 until mixed. Reduce speed to setting 2; add flour and seasonings. Mix for 1 minute. Turn off mixer and scrape sides and bottom of bowl.
Continue mixing on setting 4 until mixture blends and leaves sides of bowl.
Shape into balls the size of large marbles and place on baking sheet. Bake 15 to
20 minutes. Serve warm or at room temperature. Makes about 48 rounds.
Parmesan Puffs
4 ounces (115 g) cream cheese
1 cup (250 ml) mayonnaise
2
⁄3 cup (150 ml) Parmesan cheese, grated
Preheat oven to 325ºF (160ºC). Using the flat beater attachment, beat cream
cheese and mayonnaise on setting 4 until mixed. Turn off mixer and scrape
sides and bottom of bowl. Add cheese and seasonings and continue to mix
on setting 6 until blended. Spoon mixture into a plastic storage bag then snip
off a corner to make a pastry bag. Fill a baking sheet with crackers then
squeeze the cheese mixture onto crackers. Bake 8 to 10 minutes until cheese
mixture is slightly browned. Best served hot. Makes 11⁄2 cups (375 ml).
Classic Cheese Ball
2 8-ounce (225 g) packages cream
cheese, softened
1 8-ounce (225 g) package shredded
sharp cheddar cheese
1 tablespoon (15 ml) finely chopped
onion
Using wire whisk attachment beat cream cheese and Cheddar cheese on
medium speed until well blended. Mix in all remaining ingredients except for
pecans and place in a covered container. Refrigerate several hours or
overnight. Just before serving, shape into ball and roll in pecans. Makes 24
servings.
Hot Crab Dip
1 8-ounce (225 g) package cream
cheese, softened
1 small onion, finely chopped
5 tablespoons (75 ml) mayonnaise
Preheat oven to 350ºF (180ºC). Using flat paddle attachment, beat cream
cheese, onion, mayonnaise, crabmeat, garlic powder, salt, and pepper. On
medium speed until well blended. Spread mixture into a 1-quart (1 L) baking
dish. Bake for 20 minutes in the preheated oven. Best serve warm with bread
or crackers. Makes 16 servings.
1
⁄4 teaspoon (1.25 ml) paprika
1
⁄2 teaspoon (2.5 ml) chili powder
1
⁄8 teaspoon (.60 ml) salt
1
⁄8 teaspoon (.60 ml ) cayenne pepper
1
⁄8
teaspoon (.60 ml ) chili powder
Crackers
1 teaspoon (5 ml) Worcestershire
sauce
1 teaspoon (5 ml) lemon juice
Dash ground red pepper (optional)
Dash salt
1 cup (250 ml) chopped pecans
2 6-ounce (170 g) cans crabmeat,
drained and flaked
1
⁄4
teaspoon (1.25 ml) garlic powder
Salt and pepper to taste
840115400 ENv05.qxd 7/2/03 1:36 PM Page 13
Page 14

14
1
⁄2 cup (125 ml) green pepper, finely
minced
2.25-ounce (64 g) jar dried, chipped
beef, finely chopped
1 cup (250 ml) chopped pecans
Italian Butter
1 cup (250 ml) unsalted butter,
softened
1 tablespoon (15 ml) garlic, minced
1
⁄4 cup (60 ml) Parmesan cheese, grated
1 teaspoon (5 ml) garlic salt
Using wire whisk attachment beat softened butter on medium speed until light
and fluffy. Combine garlic, Parmesan cheese, garlic salt, Italian seasoning,
pepper and paprika. Mix on low setting until smooth. Spread on bread or
crackers. Store covered in the refrigerator. Makes 8 servings.
Pizza Butter
1 cup (250 ml) unsalted butter,
softened
1 6 ounce (170 g) can tomato paste
1 cup (250 ml) Parmesan cheese, grated
Using wire whisk attachment beat butter until light and fluffy. Add tomato
paste, Parmesan cheese, garlic salt, oregano, and parsley; mix on medium
speed until smooth. Spread on bread or crackers. Store covered in the refrigerator. Makes 8 servings.
Baked Southern Mex Dip
8 ounces (225 g) cream cheese
2 cups (225 ml) pepper jack cheese,
shredded
1 cup (250 ml) sour cream
1
⁄4
cup (60 ml) onion, finely minced
Preheat oven to 350ºF (180ºC). Using the flat beater attachment, beat cream
cheese and pepper jack cheese on setting 4 until blended. Add sour cream
and continue to mix. Turn off mixer and scrape sides and bottom of bowl.
Add onion, green pepper, chipped beef and half of the pecans. Mix on setting
4 until blended. Pour into greased 1
1
⁄2-quart (11⁄2 L) casserole dish and sprin-
kle remaining pecans on top. Bake 20 minutes. Serve with crackers. Makes 4
cups (1 L).
Artichoke Cheese Dip
12-ounce (350 g) jar marinated
artichoke hearts, drained
3
⁄
4 cup (175 ml) mayonnaise
1
⁄
2
cup (125 ml) Parmesan cheese,
grated
Place all ingredients in mixing bowl. Using flat beater attachment, mix on
speed 4 until blended. Refrigerate for at least 2 hours to let flavors blend.
Serve with crackers. Makes about 3 cups (750 ml).
1 teaspoon (5 ml) Italian seasoning
1
⁄2 teaspoon (2.5 ml) pepper
1
⁄4 teaspoon (1.25 ml) paprika
1
1
⁄2
teaspoon (7.5 ml) garlic salt
1
⁄2 teaspoon (2.5 ml) oregano
1 tablespoon (15 ml) parsley
Appetizers Check our Web site for more recipes.
1
⁄
2
cup (125 ml) Monterey Jack cheese,
shredded
1 teaspoon (5 ml) garlic salt
1 teaspoon (5 ml) soy sauce
1
⁄2 teaspoon (2.5 ml) hot pepper sauce
840115400 ENv05.qxd 7/2/03 1:36 PM Page 14
Page 15

15
Italian Noodle Casserole
1 pound (450 g) lean ground beef
1
⁄2 cup (125 ml) onion, chopped
1
⁄2 cup (125 ml) green pepper, chopped
1 teaspoon (5 ml) vegetable oil
26-ounce (650 g) jar spaghetti sauce
8-ounces (225 g) egg noodles
Preheat oven to 375ºF (190ºC). In a large skillet over medium-high heat, cook
ground beef, onions, and green pepper in oil, until ground beef is done. Stir in
spaghetti sauce and set aside. Cook egg noodles according to package
directions. Drain noodles. Using flat beater attachment, mix egg, sour cream
and mozzarella cheese on speed 4 until blended. Add noodles and mix on
speed 2 until noodles are coated. In a 4-quart (1 L) casserole dish, spoon
one-half of the meat sauce over bottom. Pour noodle mixture onto meat sauce
and spread out evenly. Then top with remaining meat sauce. Sprinkle with the
Parmesan cheese and bake for 35 to 40 minutes or until bubbling around
edges. Makes 6 servings
Classic Meatloaf
1 tablespoon (15 ml) vegetable oil
1 cup (250 ml) chopped onion
20 saltine crackers
1
⁄2 cup (125 ml) milk
2 eggs
2 tablespoons (30 ml) Worcestershire
Preheat oven to 350ºF (180ºC). Place oil and onion in a microwave-safe bowl.
Microwave on High about 5 minutes or until onion is soft. Place onion in the
mixing bowl. Crumble the crackers into the bowl. Add remaining ingredients in
the order listed. Using the dough hook attachment, mix on setting 4 until well
mixed, about 1 minute. Remove mixture from the bowl and place in a 9x13inch (33x23x5 cm) casserole dish. Shape into a flattened oval or egg shape.
Bake 50 to 60 minutes or until internal temperature is 160ºF (71ºC). Makes 6 to
8 servings.
Parmesan Shrimp Puff
1 tablespoon (15 ml) butter
1
⁄4 cup (60 ml) finely chopped onion
1 teaspoon (5 ml) garlic
1 tablespoon (15 ml) flour
1
⁄2 cup (125 ml) beer or chicken broth
Preheat oven to 400ºF (200ºC). In a skillet over medium-high heat, sauté onion in
butter until soft, about 5 minutes. Add garlic and cook another minute. Sprinkle
with flour then cook and stir another minute. Stir egg yolk into beer or broth. Add
to skillet and cook and stir until slightly thickened, about 2 minutes. Remove from
heat. Stir shrimp into cooked onion mixture. Set aside. Using whisk attachment,
beat egg whites on setting 12 until stiff, about 3 minutes. Remove bowl from
stand. Add Parmesan cheese and shrimp mixture to beaten egg whites. Stir gently
to mix. Spoon into greased 2-quart (2 L) casserole dish. Bake 15 minutes. Makes
4 servings.
1 egg
1 cup (250 ml) sour cream
2
⁄3 cup (150 ml) mozzarella cheese,
shredded
2 tablespoons (30 ml) Parmesan
cheese, grated
Entrees Check our Web site for more recipes.
1 egg yolk
1 pound (450 g) small to medium
shrimp, peeled and cooked
3 egg whites
1
⁄
4 cup (60 ml) grated Parmesan cheese
2 tablespoons (30 ml) prepared mustard
1 teaspoon (5 ml) salt
1
⁄2 teaspoon (2.5 ml) pepper
1
⁄2 teaspoon (2.5 ml) basil
1
⁄2
teaspoon (2.5 ml) thyme
2 pounds (900 g) lean ground beef
840115400 ENv05.qxd 7/2/03 1:36 PM Page 15
Page 16

16
1
⁄4 teaspoon (1.25 ml) salt
2 tablespoons (30 ml) flour
1 egg
1
⁄2 cup (125 ml) milk
8-ounce (225 g) package corn
muffin mix
2 tablespoons (30 ml) canned diced
green chili peppers
South Of The Border Tamale Casserole
1 cup (250 ml) onion, chopped
1 cup (250 ml) green pepper, chopped
1 pound (450 g) lean ground beef
1 teaspoon (5 ml) vegetable oil
15-ounce (425 g) can corn, drained
8-ounce (225 ml) can tomato sauce
1 teaspoon (5 ml) chili powder
1 teaspoon (5 ml) cumin
Preheat oven to 375ºF (190ºC). In a large skillet over medium-high heat, cook
onion, green pepper and ground beef in oil until done. Add corn, tomato sauce,
chili powder, cumin and salt. Stir to mix then reduce heat to low. Place egg,
milk, muffin mix and green chili peppers in mixing bowl. Using whisk attachment, mix at setting 2 until combined. Stop mixer and scrape sides and bottom
of bowl. Continue to mix on setting 4 until well blended. Remove ground beef
mixture from heat and pour into a greased 21⁄2
quart (2
1
⁄2
L) casserole dish. Pour
muffin mixture evenly over top. Bake 25 to 30 minutes until top is slightly
browned around edges. Makes 6 servings.
Chicken and Vegetable Cobbler
3 tablespoons (45 ml) butter
1
⁄3 cup (80 ml) onion, chopped
1
⁄3
cup (80 ml) celery, finely chopped
1
⁄3
cup (80 ml) flour
3 cups (750 ml) chicken broth
1
⁄2 teaspoon (2.5 ml) salt
1
⁄2
teaspoon (2.5 ml) dried basil
1
⁄4
teaspoon (1.25 ml) pepper
Preheat oven to 400ºF (200ºC). In a large skillet over medium-high heat, sauté
onion and celery in butter until soft, about 5 minutes. Sprinkle flour over onion
and celery in the skillet. Stir and cook about 1 minute. Add chicken broth to the
skillet and stir to mix. Add sugar, salt, basil, and pepper. Cook and stir occasionally until thickened, about 5 to 8 minutes. Remove from heat. In a greased
9x13-inch (33x23x5 cm) casserole dish layer chicken, peas, and carrots. Pour
thickened sauce over all. Using the whisk attachment, mix buttermilk and eggs
on setting 8 for about 1 minute. Add self-rising flour and mix on setting 6. Turn
off mixer and scrape the sides and bottom of the bowl. Continue to mix on setting 6 about 30 seconds. Pour mixture evenly over the top of the layered chicken and vegetables. Bake 35 minutes or until top is lightly browned and casserole is bubbling. Makes 6 to 8 servings.
Entrees Check our Web site for more recipes.
3 cups (750 ml) cooked cubed chicken
15-ounce (425 g) can green peas,
drained
15-ounce (425 g) can sliced carrots,
drained
3
⁄4
cup (175 ml) buttermilk
3 eggs
1
1
⁄4 cup (310 ml) self-rising flour
840115400 ENv05.qxd 7/2/03 1:36 PM Page 16
Page 17

17
1
⁄4
teaspoon (1.25 ml) salt
2
⁄3 cup (150 ml) buttermilk
1 cup (250 ml) coconut
8-ounce (225 ml) can crushed pineapple,
drained
Pound Layer Cake
4 eggs, separated
1 cup (250 ml) butter
2 cups (500 ml) sugar
2 cups (500 ml) cake flour
Preheat oven to 325ºF (160ºC). Using the whisk attachment beat egg whites on
setting 12 until stiff, about 3 minutes. Remove beaten egg whites and set
aside. In same bowl (no need to wash) using flat beater attachment, cream
together butter and sugar on setting 4. Increase speed to setting 6 and add
egg yolks one at a time, beating well after each addition. Add vanilla. In a small
bowl stir together cake flour and baking soda. Reduce speed to setting 2 then
add half of the flour mixture. Add the sour cream, then the remaining flour and
continue mixing until well blended. Add the beaten egg whites and continue to
mix on setting 2 about 1 minute. Stop mixer and scrape sides and bottom of
bowl. Then continue to mix another 15 seconds. Divide batter between 2
greased and wax paper lined 9-inch (23x3 cm) round cake pans. Bake 40 to 45
minutes or until tests done with a toothpick. Cool in pan 5 minutes then
remove from pans and cool on racks. Frost or serve plain with fruit and
whipped topping. Makes 2 layers.
Hawaiian Pineapple-Coconut Cake
1
⁄2
cup (125 ml) butter
2 cups (500 ml) sugar
2 eggs
1 teaspoon (5 ml) vanilla
2
1
⁄3 cups (580 ml) cake flour
1 teaspoon (5 ml) baking soda
Preheat oven to 350ºF (180ºC). Using the flat beater attachment, beat together
the butter, sugar, and eggs on setting 4 until blended. In a small bowl stir to mix
the cake flour, baking soda, and salt. On setting 2 add half of the flour mixture
then slowly add the buttermilk. Add the remaining flour mixture. Add the
coconut and pineapple and mix until just blended. Pour batter into 2 greased
and wax paper lined 9-inch (23x3 cm) round cake pans. Bake 40 minutes or
until tests done with a toothpick. Cool in pans 5 minutes then remove from pans
and cool on racks. Frost with Coconut Cream Cheese Frosting.
Makes one 2-layer cake.
Coconut Cream Cheese Frosting
8-ounces (225 g) cream cheese
1
⁄
4 cup (60 ml) butter, room temperature
3 cups (750 ml) confectioners sugar
1 teaspoon (5 ml) vanilla
3
⁄4 cup (175 ml) coconut
Using flat beater attachment, mix cream cheese and butter on setting 4 until
smooth. Add confectioners sugar and vanilla and beat until smooth and fluffy.
Add coconut and beat until mixed.
1
⁄4 teaspoon (1.25 ml) baking powder
2
⁄3 cup (150 ml) sour cream
2 teaspoons (10 ml) vanilla
Cakes and Frostings
Check our Web site
for more recipes.
840115400 ENv05.qxd 7/2/03 1:36 PM Page 17
Page 18

18
Chocolate Velvet Layer Cake
2 cups (500 ml) cake flour
1
⁄2 cup (125 ml) unsweetened
baking cocoa
2 teaspoons (10 ml) baking soda
1
⁄4 teaspoon (1.25 ml) salt
10 tablespoons (185 ml) butter,
room temperature
Preheat oven to 350ºF (180ºC). In a small bowl stir together flour, cocoa, baking
soda, and salt. Set aside. Using flat beater attachment, cream butter and sugar
on setting 4. Add eggs 1 at a time beating well after each addition. Add vanilla.
Reduce speed to setting 2. Add half of flour mixture, then all of sour cream. Add
remaining flour mixture. Then slowly pour in coffee. Mix on setting 2 about 30
seconds. Turn off mixer and scrape sides and bottom of bowl. Turn mixer on to
setting 4 and mix until thoroughly blended. Divide batter between 2 greased and
wax paper lined 9-inch (23x3 cm) round cake pans. Bake 30 to 35 minutes or
until tests done. Cool in pan for 5 minutes then remove from pans and cool on
racks. Frost with Bittersweet Chocolate Frosting. Makes one 2-layer cake.
Bittersweet Chocolate Frosting
1
⁄3 cup (80 ml) butter, room temperature
21⁄2 cups (625 ml) confectioners sugar
3
⁄4
cup (175 ml) unsweetened
baking cocoa
Using flat beater attachment, beat butter on setting 4 until smooth. Add confectioners sugar and cocoa alternately with milk and continue beating until smooth.
Add vanilla and beat until smooth and blended.
Danish Apple Cake
2 eggs, separated
1
⁄4 cup (60 ml) butter, room temperature
1
⁄2
cup (125 ml) sugar
1
⁄
2 cup (125 ml) light brown sugar,
packed
1 teaspoon (5 ml) vanilla
Preheat oven to 325ºF (160ºC). Using whisk attachment, beat 2 egg whites on
setting 12 until stiff. Remove from bowl and set aside. Using same bowl (not
necessary to wash) and flat beater, beat egg yolks, sugars, and vanilla on setting 4 until mixed. Add flour, baking powder, and cinnamon. Mix on setting 2
until blended. Add apples and beaten egg whites and stir on setting 2 just until
mixed. Pour into a greased 9-inch (23 cm) pie plate and bake for 45 minutes or
until browned. Serve topped with vanilla ice cream. Makes 6 to 8 servings.
2 cups (500 ml) light brown sugar,
packed
2 eggs
1 teaspoon (5 ml) vanilla
3
⁄4 cup (175 ml) sour cream
3
⁄4 cup (175 ml) cold brewed coffee
1
⁄4
cup (60 ml) milk
1 to 2 tablespoons (15 to 30 ml) cold
brewed coffee
1 teaspoon (5 ml) vanilla
1 cup (250 ml) flour
2 teaspoons (10 ml) baking powder
1
⁄2
teaspoon (2.5 ml) cinnamon
2 cups (750 ml) apple, peeled and finely
chopped
Cakes and Frostings
Check our Web site
for more recipes.
840115400 ENv05.qxd 7/2/03 1:36 PM Page 18
Page 19

19
Lemon Cake
21⁄3 cups (580 ml) all-purpose flour
11⁄2 teaspoons (7.5 ml) baking powder
1
⁄2 teaspoon (2.5 ml) baking soda
1
⁄4 teaspoon (1.25 ml) salt
1 cup (250 ml) butter, softened
2 cups (500 ml) sugar
Preheat oven to 350ºF (180ºC). Grease and flour three 9x11⁄2-inch (23x3 cm)
round cake pans; set aside.
In a medium bowl, combine flour, baking powder, baking soda, and salt. Set aside.
Using flat paddle attachment, cream together the butter and sugar on medium
speed until light and fluffy. Reduce speed to low and beat in the eggs one at a time.
Add flour mixture and buttermilk alternately mixing on low just until combined. Add
lemon peel and lemon juice and mix until well combined.
Pour batter into prepared pans. Bake for 25 to 30 minutes or a toothpick inserted into the center of the cake comes out clean. Cool in pans on wire racks for
10 minutes. Invert onto wire racks to cool completely. When cool frost with
Lemon Butter Frosting. Makes one 3-layer cake.
Lemon Butter Frosting
6 cups (1,500 ml) confectioners sugar
1 cup (250 ml) butter, softened
1
⁄4
cup (60 ml) fresh lemon juice
Using flat paddle attachment, cream sugar and butter on low setting until combined. Add lemon juice and lemon zest, beat until smooth. Beat in milk then
increase speed and continue to beat until light and fluffy. Spread frosting over
cooled cake.
4 eggs
1 cup (250 ml) buttermilk
2 teaspoon (10 ml) finally shredded
lemon peel
2 tablespoons (30 ml) lemon juice
Cakes and Frostings
Check our Web site
for more recipes.
2 teaspoon (10 ml) grated lemon zest
1
⁄4
cup (60 ml) milk
840115400 ENv05.qxd 7/2/03 1:36 PM Page 19
Page 20

20
Italian Cream Cake
1 cup (250 ml) buttermilk
1 teaspoon (5 ml) baking soda
1
⁄2 cup (125 ml) butter
1
⁄2 cup (125 ml) shortening
2 cups (500 ml) sugar
Preheat oven to 350ºF (180ºC). Grease and flour three 9x11⁄2-inch (23x3 cm)
round cake pans; set aside.
In a small bowl, dissolve the baking soda in the buttermilk; set aside.
Using flat paddle attachment, cream together butter, shortening, and sugar on
medium speed until light and fluffy. Mix in eggs one at a time. Add buttermilk
mixture, vanilla extract, coconut, and baking powder. Reduce speed to low and
gradually add flour. Mix until just combined.
Bake in the preheated oven for 30 to 35 minutes or a toothpick inserted into the
center of the cake comes out clean. Cool in pans on wire racks for 10 minutes.
Invert onto wire racks to cool completely. When cool frost with Cream Cheese
Frosting. Makes one 3-layer cake.
Cream Cheese Frosting
2 8-ounce (225 g) packages
cream cheese, softened
1
⁄2 cup (125 ml) butter, softened
Using flat paddle, beat cream cheese, butter, and vanilla on medium speed until
light and fluffy. On the lowest speed, gradually add confectioners sugar until well
blended. Turn mixer on high and beat until frosting is light and fluffy. Spread
frosting over the cooled cake.
Country Carrot Cake
2 teaspoons (10 ml) baking powder
2 teaspoons (10 ml) baking soda
1
⁄2
teaspoon (2.5 ml) salt
2 teaspoons (10 ml) ground cinnamon
1 teaspoon (5 ml) ground nutmeg
1
⁄2 teaspoon (2.5 ml) ground cloves
1
⁄4 cup (60 ml) vegetable oil
11⁄2 (375 ml) cups sugar
1
⁄2 cup (125 ml) brown sugar
2 teaspoons (10 ml) vanilla
Preheat oven 350ºF (180ºC). Grease and flour a 13x9x2-inch (33x25x5 cm) pan;
set aside.
In a medium bowl, mix together flour, baking powder, baking soda, salt, cinnamon,
nutmeg, and cloves; set aside. Using flat paddle, mix oil, sugar, brown sugar, vanilla,
and eggs on medium speed until smooth. Reduce speed to low, add pineapple,
walnuts, coconut, carrots, and raisins until well blended. Gradually add flour mixture. Mix until well combined. Pour batter into prepared pan and bake for about 40
to 50 minutes or a toothpick inserted into the center of the cake comes out clean.
Cool on wire rack until completely cool. Frost with Cream Cheese Frosting (see
recipe above). Makes one 13 x 9-inch sheet cake.
5 eggs
1 teaspoon (5 ml) vanilla extract
1 cup (250 ml) flaked coconut
1 teaspoon (5 ml) baking soda
2 cups (500 ml) all-purpose flour
3 eggs
1 cup (250 ml) crushed pineapple with
juice
1
1
⁄2
cups (375 ml) chopped toasted
pecans or English walnuts
1
⁄
2 (125 ml) cup shredded coconut
2 cups (500 ml) shredded carrots
1 cup (250 ml) raisins
3 cups (750 ml) flour
1 tablespoon (15 ml) vanilla extract
2 pounds (900 g) confectioners sugar
Cakes and Frostings
Check our Web site
for more recipes.
840115400 ENv05.qxd 7/2/03 1:36 PM Page 20
Page 21

21
White Chocolate Cheesecake
11⁄2 cups (375 ml) graham
cracker crumbs
1 tablespoon (15 ml) sugar
1
⁄3 cup (80 ml) butter, melted
4 8-ounce (900 g) packages
cream cheese
Preheat oven to 325ºF (160ºC). In a medium bowl mix graham cracker crumbs,
sugar, and butter. Butter a 9-inch (23 cm) spring form pan. Press crumbs onto
bottom and 1⁄2-inch (1 cm) up the sides. Set aside. Using flat beater attachment,
beat cream cheese on setting 4 until smooth. Add sugar and continue to beat.
Add one egg and beat until mixed. Turn off mixer and scrape sides and bottom
of bowl. Add remaining eggs one at a time beating after each addition. Reduce
speed to setting 2 then add lemon and vanilla. With mixer running on setting 2
slowly pour in melted white chocolate. Mix just until blended. Pour mixture into
prepared crust and bake 1 hour and 15 minutes or until cheesecake is slightly
browned around the edges. The center may still look “wet.” Let cool completely
before serving. Makes 16 servings.
Fluffy Sweet Potato Pie
2 eggs, separated
15-ounce (425 g) can sweet potatoes,
drained OR 1 cup (250 ml) mashed
3
⁄4
cup (175 ml) light brown sugar,
packed
1 tablespoon (15 ml) flour
1
⁄4 teaspoon (1.25 ml) salt
Preheat oven to 375ºF (190ºC). Using whisk attachment on setting 12, beat egg
whites until stiff but not dry. Set aside. Using flat beater and the same bowl (not
necessary to wash) beat egg yolks and sweet potatoes on setting 6. Blend until
smooth. Add brown sugar, flour, salt, cinnamon, and nutmeg. Blend until mixed.
Reduce speed to setting 2 and add milk and vanilla. Stir. Turn off mixer and
scrape sides and bottom of bowl. Add the beaten whites and mix on setting 4
until incorporated. Pour into pie shell. Bake 40 minutes or until filling is set.
Makes 6 to 8 servings.
1 cup (250 ml) sugar
3 eggs
1 tablespoon (15 ml) lemon juice
1 teaspoon (5 ml) vanilla
6-ounces (170 g) white chocolate,
melted
1
⁄4 teaspoon (1.25 ml) cinnamon
1
⁄2 teaspoon (2.5 ml) nutmeg
3
⁄4
cup (175 ml) evaporated milk or
whipping cream
1 teaspoon vanilla
9-inch (23 cm) deep dish unbaked pie
shell
Pies and Other Desserts
Check our Web site for more recipes.
840115400 ENv05.qxd 7/2/03 1:36 PM Page 21
Page 22

22
9-inch (23 cm) chocolate graham
cracker or cookie crumb crust
1-ounce (25 g) semi-sweet baking
chocolate, grated
Pies and Other Desserts
Check our Web site for more recipes.
Cool Cappuccino Pie
1 cup (250 ml) whipping cream
4 ounces (115 mg) cream cheese
3 tablespoons (45 ml) instant coffee
1 cup (250 ml) milk
3.5-ounce (100 g) box instant
vanilla pudding
Using whisk attachment, whip cream on setting 12 until stiff. Remove from bowl
and set aside. Using same whisk and bowl (not necessary to wash) beat cream
cheese, instant coffee, and 2 tablespoons (30 ml) of the milk on setting 6 until
smooth. Add pudding and remaining milk and beat on setting 6 about 1 minute.
Turn off mixer and scrape sides and bottom of bowl. Add whipped cream and
mix on speed 4 until blended. Pour into pie shell and sprinkle grated chocolate
on top. Refrigerate at least 4 hours before serving. Makes 6 to 8 servings.
Tiramisu
11⁄2
cups (375 ml) whipping cream,
divided
1 cup (250 ml) sugar
2 eggs
8-ounces (225 g) cream cheese,
room temperature
1 teaspoon (5 ml) vanilla
*If you do not want to use the liqueur, substitute
2
⁄3 cup (150 ml) brewed coffee
with 2 tablespoons (30 ml) sugar for the liqueur and coffee.
Best if made a day before serving.
In a medium saucepan combine 1⁄2
cup (125 ml) whipping cream,
1
⁄2
cup (125 ml)
sugar, and eggs. Cook and whisk constantly over medium-high heat until thickened, about 6 minutes. Pour custard into a small bowl and set in freezer to cool.
Using whisk attachment, beat 1 cup (250 ml) whipping cream on setting 12 until
stiff. Set aside. Using same whisk and bowl (not necessary to wash) beat cream
cheese and
1
⁄
2 cup (125 ml) sugar on setting 6 until blended. Add cooled custard
and beat on setting 6 until smooth. Turn off mixer and scrape sides and bottom of
bowl. Add vanilla and the whipped cream and mix on setting 4 until smooth and
incorporated. Cut pound cake into
1
⁄2-inch (1 cm) slices. Mix coffee liqueur with
coffee. Reserve 2 tablespoons (30 ml) chopped chocolate. Assemble in a deep
bowl. Make a layer of pound cake then drizzle with liqueur-coffee mixture. Sprinkle
with chopped chocolate. Spoon on cream mixture. Repeat layering cake, coffee,
chocolate then cream mixture. Sprinkle reserved chocolate on top. Cover and
refrigerate. Makes 8 to 10 servings.
10-ounce prepared pound cake, bakery
or freezer section
1
⁄3 cup (80 ml) coffee liqueur*
1
⁄3 cup (80 ml) brewed coffee,
room temperature
6-ounces (170 g) semi-sweet baking
chocolate, finely chopped
840115400 ENv05.qxd 7/2/03 1:36 PM Page 22
Page 23

23
Best Ever Sugar Cookies
21⁄2 cups (625 ml) all purpose flour
1 teaspoon (5 ml) baking powder
1
⁄2 teaspoon (2.5 ml) baking soda
1
⁄4 teaspoon (1.25 ml) salt
1
⁄4 teaspoon (1.25 ml) nutmeg
Preheat oven to 375ºF (190ºC).
Mix together flour, baking powder, baking soda, salt, and nutmeg and set aside.
Using flat paddle, cream butter on high speed until light and fluffy. Reduce speed
to lowest setting. Add sugar, egg, and vanilla, mixing thoroughly. Gradually add dry
ingredients and milk; continue mixing until thoroughly mixed. Form cookie dough
into 11⁄2
-inch (2.5 cm) diameter balls and arrange balls on ungreased baking
sheets. Flatten balls slightly with the bottom of a drinking glass.
Bake in oven for 6 to 7 minutes or until lightly golden around edges. Cool on
wire racks. Makes about 4 dozen.
Quick ’n Easy Banana Pudding
1 8-ounce (225 g) package cream
cheese, softened
1 14-ounce (400 g) can sweetened
condensed milk
1 3.4-ounce (95 g) package instant
vanilla pudding mix
2 cups (500 ml) cold milk
Using wire whisk attachment beat cream cheese on high setting until light and
fluffy. Reduce speed to low setting. Add condensed milk, pudding mix, milk, and
vanilla. Continue to mix until smooth. Turn off mixer and fold in 1⁄2
of the whipped
topping.
Line the bottom of a 13x9x2-inch (33x25x5 cm) dish with vanilla wafers. Arrange
sliced bananas evenly over wafers. Spread with pudding mixture. Top with
remaining whipped topping. Chill. Makes 8 servings.
Light and Tart Lemon Pie
2 eggs separated
3 tablespoons (45 ml) butter
1 cup (250 ml) sugar
3 tablespoons (45 ml) flour
Preheat oven to 350ºF (180ºC). Using whisk attachment on setting 12 beat egg
whites until stiff but not dry. Set aside. Using flat beater and the same bowl (not
necessary to wash) beat butter, sugar, and flour on setting 4. Add egg yolks and
mix until blended. Add milk, lemon juice, and zest. Mix until blended. Reduce
speed to setting 2 and add beaten egg whites. Mix until whites are incorporated.
Pour into pie shell and bake 45 to 50 minutes or until top is browned and filling is
set. Let pie cool completely before serving. Makes 6 to 8 servings.
Pies and Other Desserts
Check our Web site for more recipes.
3
⁄4 cup (175 ml) butter, softened
3
⁄4 cup (175 ml) sugar
1 egg
1 teaspoon (5 ml) vanilla
1
⁄4 cup (60 ml) milk
1 teaspoon (5 ml) vanilla
1 8-ounce (225 g) container frozen
whipped topping, thawed
1
⁄2 of a 12-ounce (350 g) package
vanilla wafers
3 medium ripe bananas, sliced
1
⁄2 cup (125 ml) milk
1
⁄
2 cup (60 ml) lemon juice
Grated zest of 1 lemon (yellow part only)
9-inch (23 cm) unbaked pie shell
840115400 ENv05.qxd 7/2/03 1:36 PM Page 23
Page 24

24
Pies and Other Desserts
Check our Web site for more recipes.
Magic Cookies
1 cup (250 ml) butter
1 cup (250 ml) sugar
1 cup (250 ml) light brown sugar
2 eggs
2 cups (500 ml) flour
1 teaspoon (5 ml) baking soda
Preheat oven to 350ºF (180ºC). With flat beater attachment, cream together
butter, sugar, and brown sugar at a medium setting until well blended. Mix in
vanilla and eggs. Reduce speed and gradually add flour, baking soda, baking
powder, and salt mix until smooth. On a low setting, mix in oatmeal, chocolate chips, and coconut until well mixed. Drop rounded spoon full onto
ungreased cookie sheet. Bake on middle rack of oven for 12 to 14 minutes.
Makes 3 dozen cookies.
Brownie Cookies
2
⁄3 cup (160 ml) shortening
11⁄2
cups (375 ml) brown sugar, packed
1 tablespoon (15 ml) water
1 teaspoon (5 ml) vanilla
2 eggs
1
1
⁄2 cups (375 ml) flour
Preaheat oven to 375ºF (190ºC). With flat beater, cream shortening and brown
sugar on medium setting until blended. Add water, vanilla, and eggs and mix.
Add flour, cocoa, baking soda, and salt and beat at a medium setting until thoroughly mixed. Stir in chocolate chips on low setting. Drop tablespoons of
dough on ungreased baking sheets. Bake 7 to 9 minutes. Do not overcook.
Makes 36 cookies.
“Soft” Peanut Butter Cookies
1
⁄2 cup (125 ml) vegetable shorting
1
⁄2 cup (125 ml) peanut butter
11⁄4 cup (310 ml) light brown sugar
1 egg
Preheat oven to 275ºF (140ºC). Using the flat beater attachment, beat shortening, peanut butter, brown sugar, egg, and vanilla at a medium setting until well
blended. Reduce speed to low and gradually add dry ingredients until blended.
Dough will be crumbly. Roll 3 tablespoon-size portions of the dough into a ball.
Place on ungreased cookie sheet. Press to 1⁄2-inch (1 cm) thick. Bake 18 to 20
minutes. Do not overcook. Makes 16 cookies.
1
⁄2 teaspoon (2.5 ml) baking powder
1
⁄2 teaspoon (2.5 ml) salt
2 cups (500 ml) oatmeal
1 tablespoon (15 ml) vanilla
12 ounces (350 g) chocolate chips
11⁄2 cups (375 ml) coconut
1
⁄3 cup (80 ml) unsweetened baking
cocoa
1
⁄4
teaspoon (1.25 ml) baking soda
1
⁄2 teaspoon (2.5 ml) salt
12 ounces (350 g) semi-sweet
chocolate chips
1 teaspoon (5 ml) vanilla
3
⁄4 teaspoon (3.75 ml) salt
11⁄2 cups (375 ml) flour
1 teaspoon (5 ml) baking soda
840115400 ENv05.qxd 7/2/03 1:36 PM Page 24
Page 25

25
Breakfast Favorites
Check our Web site for more recipes.
Sour Cream Coffee Cake
Crumb topping
11⁄2 cups (375 ml) all-purpose flour
11⁄2 sticks (3⁄4 cup) [175 ml] unsalted
butter, softened
1
⁄3 cup (80 ml) packed light
brown sugar
1
⁄3 cup (80 ml) sugar
11⁄4 teaspoon (6.25 ml) ground
cinnamon
1 cup (250 ml) pecans, chopped
Struesel
1
⁄3
cup (80 ml) all-purpose flour
1
⁄2 cup (125 ml) packed light brown
sugar, divided
3
⁄4
teaspoon (3.75 ml) ground cinnamon
3 tablespoons (45 ml) cold butter
Crumb topping: In a small bowl, combine flour, butter, brown sugar, gradulated sugar and cinnamon mix with fork until large crumbs are formed. Add
pecans and mix to incorporate.
Streusel: In another small bowl, combine flour, brown sugar, cinnamon and
butter. Mix with fork until large crumbs are formed.
Cake: Lower oven rack to lowest position. Preheat oven 350ºF (180ºC).
Grease 10-inch bundt ban with butter.
Using the flat paddle attachment, cream butter on medium speed until
smooth. Add sugar, baking powder, baking soda and salt. Beat on medium
speed for 3 minutes. With mixer on low speed, add in eggs 1 at a time until
well-blended, mix in vanilla and sour cream. Gradually add flour. Continue to
mix until well blended.
Spread about 2 cups (500 ml) of batter into the bottom of prepared pan,
Sprinkle evenly with
1
⁄2 of streusel mixture. Repeat. Spread remaining batter
over and top with crumb topping.
Bake 50 to 60 minutes or a toothpick inserted into the center of the cake
comes out clean. Cool on wire rack 30 minutes. Invert cake onto plate and
then flip on wire rack with topping side up. Cool completely. Makes one cake.
Cake
12 tablespoons (180 ml) unsalted
butter, softened
1
1
⁄4 cup (310 ml) sugar
1 tablespoon (15 ml) baking powder
3
⁄4 teaspoon (3.75 ml) baking soda
3
⁄4 teaspoon (3.75 ml) salt
4 large eggs
1 tablespoon (15 ml) vanilla
11⁄2
cups (375 ml) sour cream
2
1
⁄4 cups (560 ml) all-purpose flour
840115400 ENv05.qxd 7/2/03 1:36 PM Page 25
Page 26

26
No Cook Fudge Truffles
8-ounce (225 g) package cream
cheese, room temperature
1
⁄4
cup (60 ml) butter, room temperature
1 teaspoon (5 ml) vanilla
2
⁄3
teaspoon (1.25 ml) salt
Using the flat beater attachment, beat cream cheese and butter on setting 6
until smooth. Add vanilla, salt and cocoa and mix on setting 4. Add confectioners sugar 1 cup (250 ml) at a time and beat until smooth. Shape into 1-inch (2.5
cm) balls then place in freezer for 1 hour. Remove from freezer and roll in nuts.
Refrigerate. Makes about 3 dozen.
Mini Meringue Morsels
2 egg whites
2
⁄3 teaspoon (1.25 ml) cream of tartar
1
⁄2 cup (125 ml) sugar
2 tablespoons (30 ml) unsweetened baking cocoa
Preheat oven to 275ºF (140ºC). Using the whisk attachment, beat egg whites
and cream of tartar on setting 12 until soft peaks form. Reduce speed to setting 10 and slowly add sugar. Beat until stiff peaks form. Remove from stand
and fold in cocoa. Place mixture in pastry bag. (Or spoon into a plastic storage
bag with a small corner snipped off.) Place parchment paper on cookie sheet.
Pipe out small mounds of meringue (slightly less than one tablespoon). Place in
oven and bake for 15 minutes. Turn off oven but leave meringues in oven
another hour. Remove and let cool. Makes about 6 dozen meringues.
Candies Check our Web site for more recipes.
Breakfast Favorites
Check our Web site for more recipes.
2
⁄3 cup (150 ml) unsweetened
baking cocoa
31⁄2
cups (875 ml) confectioners sugar
1
⁄2 cup (125 ml) finely chopped pecans
or walnuts
Cinnamon Butter
1 cup (250ml) unsalted butter, softened
2 tablespoons (30 ml) confectioners sugar
Using whisk attachment beat butter on high speed until light and fluffy.
Reduce mixer to low speed, add sugar, cinnamon, and nutmeg and whip
until smooth and creamy. The perfect addition to pancakes, toast, or biscuits. Store covered in the refrigerator. Makes 8 servings.
Honey Butter
1 cup (250 ml) unsalted butter, softened
1
⁄2
cup (125 ml) honey
Using whisk attachment beat butter on high speed until light and fluffy.
Reduce mixer to low speed, add honey and whip until smooth. The perfect
addition to pancakes, toast, or biscuits. Store covered in the refrigerator.
Makes 8 servings.
1 teaspoon (5ml) ground cinnamon
1 dash ground nutmeg
840115400 ENv05.qxd 7/2/03 1:36 PM Page 26
Page 27

H
AMILTON BEACH PROCTOR-SILEX,INC.
P
ROCTOR-SILEX CANADA,INC.
263 Yadkin Road. Southern Pines, North Carolina 28387
Picton, Ontario K0K 2T0
7/03
840115400
90 Minute Pan Bread
1
⁄2 cup (125 ml) warm water,
100 to 110ºF (38 to 43ºC)
2 .25-ounce (8 g each) packages
active dry yeast
2
⁄3 cup (150 ml) warm milk
1
⁄4 cup (60 ml) sugar
Pour water into mixing bowl. Add yeast and let dissolve for 5 minutes. Add
milk, sugar, butter salt, and egg. Using dough hook attachment mix ingredients
on setting 2, then add 3 cups (750 ml) flour. Add additional flour if necessary to
make a sticky soft dough. Knead on setting 4 for 3 minutes. Cover and let rise
in a warm place for 30 minutes.
Preheat oven to 400ºF (200ºC). Stir dough then place in a greased 9x13-inch
(33x23x5 cm) baking pan. Push dough to edges of pan. Let rise in warm place
30 minutes. Bake for 15 to 20 minutes until golden brown. Remove from oven
and brush top with melted butter. Makes 20 servings.
Simple Yeast Rolls
1 cup (250 ml) warm water,
100 to 110ºF (38 to 43ºC)
.25-ounce (8 g) package active dry yeast
1
⁄4 cup (60 ml) butter, melted and cooled
Pour water into mixing bowl. Add yeast and let dissolve for 5 minutes. Add butter,
sugar, salt and egg. Using dough hook mix on speed 2 for about 30 seconds. Add 3
cups (750 ml) of the flour and mix on speed 4 about 2 minutes. Add additional flour if
necessary to make a soft dough. Cover and let rise in warm place about 1 hour.
Preheat the oven to 350ºF (180ºC). Stir down the dough and dump onto lightly
floured surface. Divide the dough into 4 equal portions, then divide each portion
into 4 golf ball sized balls. Place the 16 balls in a greased 9x13-inch (33x23x5
cm) baking pan. Let rise in a warm place about 30 minutes. Bake 25 to 30 minutes. Makes 16 rolls.
Soft Yeast Biscuit Rolls
.25-ounce (8 g) package active dry yeast
1
⁄4 cup (60 ml) warm water,
100 to 110ºF (38 to 43ºC)
4 cups (1 L) flour
3 tablespoons (45 ml) sugar
Preheat oven to 400ºF (200ºC). Dissolve yeast in water and set aside. Place flour,
sugar, baking powder, baking soda and salt in mixing bowl. Using dough hook
attachment, stir dry ingredients on setting 2. Add shortening and increase speed to
setting 4. Mix about 1 minute. Add dissolved yeast and continue to mix. Slowly add
buttermilk. Mix on setting 4 about 1 minute. Dump the dough onto lightly floured
surface and sprinkle dough with additional flour. Gently roll dough to 1⁄2-inch (1 cm)
thickness. Cut with round biscuit cutter. Place dough with sides touching on baking
sheet. Bake 15 to 20 minutes. Makes 16 to 20 biscuits.
1
⁄4 cup (60 ml) butter, room temperature
1 teaspoon (5 ml) salt
1 egg
31⁄2 to 4 cups (875 ml to 1 L) flour
1 tablespoon (15 ml) butter, melted
3 tablespoon (45 ml) sugar
1 teaspoon (5 ml) salt
1 egg
3 to 3
1
⁄2 cups (750 to 875 ml) flour
2 teaspoons (10 ml) baking powder
1 teaspoon (5 ml) baking soda
1 teaspoon (5 ml) salt
2
⁄3 cup (150 ml) vegetable shortening
11⁄4 cups (310 ml) buttermilk
Dinner Rolls Check our Web site for more recipes.
hamiltonbeach.com
840115400 ENv05.qxd 7/2/03 1:37 PM Page 27
Page 28

RECETTES ET
GUIDE DE
L'UTILISATEUR
USA: 1-800-851-8900 Canada: 1-800-267-2826
BATTEUR SUR SOCLE TOUT EN MÉTAL
840115400
840115400 FRv05.qxd 7/2/03 1:55 PM Page 1
Page 29

2
Cher propriétaire de batteur sur socle,
Nous vous félicitons de votre achat d’un batteur sur socle. Le batteur
sur socle Hamilton Beach
®
Eclectrics™ajoute un brin de modernité aux
électroménagers fiables, tout métal d’autrefois.
Posséder un appareil Hamilton Beach®c’est un peu comme posséder un
moment d’histoire. En 1904, Louis Hamilton et Chester Beach ont fait
équipe pour introduire dans les foyers nord-américains des appareils
ménagers motorisés tels que les aspirateurs, machines à coudre et batteurs.
En l’honneur de leur héritage centenaire, nous avons combiné la construction
métallique des appareils du passé que l’on disait « construits pour durer » à
l’esthétique moderne pour que vous bénéficiez dans votre cuisine de la qualité durable et de l’esthétique.
En utilisant votre batteur tout métal, songez aux antécédents qui l’ont
précédé. Profitez de la confiance que vous avez en un appareil appuyé par
des années d’expérience et une garantie de 3 ans. Mais surtout, remplissez
votre foyer des délicieux arômes de gâteaux, biscuits et pains que votre
batteur sur socle peut vous aider à créer!
J’espère que votre batteur sur socle Hamilton Beach®Eclectrics™vous
donnera satisfaction pendant des années.
Sincères salutations,
Michael J. Morecroft
Président et chef de la direction de
Hamilton Beach/Proctor-Silex, Inc.
840115400 FRv05.qxd 7/2/03 1:55 PM Page 2
Page 30

3
Renseignements sur la garantie ........ 3
Précautions importantes...................... 4
Renseignements sur l’assistance
et le service .......................................... 5
Pièces et caractéristiques .................. 6
Assemblage du batteur ........................7
Utilisation du batteur............................ 9
Conseils pour le batteur sur socle ...... 10
Nettoyage du batteur ........................ 12
Dépannage ........................................ 12
Recettes ........................................ 13-29
Hors-d’œuvre .................................. 13
Plats principaux .............................. 16
Gâteaux et glaçages ...................... 19
Tartes et autres desserts ................ 23
Délices pour le petit déjeuner........ 27
Sucreries .......................................... 28
Petits pains pour le dîner .............. 29
Table des matières
Renseignements sur la garantie
Garantie standard de trois ans
Félicitations! Vous possédez maintenant l’un des meilleurs batteurs sur socle. Nous
sommes si confiants dans la qualité et la fabrication de votre nouveau batteur sur socle
que nous étayons votre achat avec une garantie de remplacement de 3 ans sans ennuis.
Si votre batteur sur socle ne fonctionne pas bien ou refuse de fonctionner pendant 3 ans
à partir de la date d’achat, nous livrerons à votre porte un batteur sur socle neuf en remplacement et reprendrons votre vieux batteur sans frais. Voici comment ça fonctionne :
Durée de la Comment remplir Ce que fera Hamilton Beach®ne
la garantie la garantie : Hamilton Beach
®
paiera pas pour :
Trois ans à partir
de la date de
l’achat original
pour les batteurs
sur socle utilisés
aux États-Unis
continentaux, en
Alaska, à Hawaii
et au Canada.
Cette garantie
s’applique
seulement à
l’acheteur
d’origine.
1. Suivez les instructions
de ce manuel.
Consultez les sections « Conseils et
dépannage » si vous
avez des problèmes
pour faire fonctionner
l’appareil. Si vous
avez des questions,
composez un des
numéros du service à
la clientèle, page 5.
2. Gardez votre preuve
d’achat. Si l’appareil
ne fonctionne pas
dans les 3 ans suivant
l’achat, composez
un des numéros du
service à la clientèle,
page 5.
1. Envoyer un billet
de livraison prépayé pour envoyer
l’appareil.
2. Expédier un
appareil de
rechange tout neuf
à votre adresse.
Défaillances du produit
attribuables à l’abus, au
mésusage, à la négligence,
à l’utilisation à des fins
commerciales ou à un
usage contraire à ce
manuel.
CETTE GARANTIE REMPLACE TOUTE AUTRE
GARANTIE, EXPRESSE
OU IMPLICITE, ÉCRITE
OU ORALE, Y COMPRIS
TOUTE GARANTIE DE
QUALITÉ MARCHANDE
OU DE CONFORMITÉ À
UNE FIN PARTICULIÈRE.
TOUTE RESPONSABILITÉ
EST EXPRESSÉMENT
LIMITÉE À UN MONTANT
ÉGAL AU PRIX D’ACHAT
PAYÉ. TOUTES LES
RÉCLAMATIONS POUR
DOMMAGES SPÉCIAUX
ET INDIRECTS SONT PAR
LES PRÉSENTES
EXCLUES.
840115400 FRv05.qxd 7/2/03 1:55 PM Page 3
Page 31

4
Renseignements de sécurité aux consommateurs
PRÉCAUTIONS IMPORTANTES
Lors de l’utilisation d’appareils électroménagers, des précautions de sécurité fondamentales doivent toujours être observées y compris
ce qui suit :
1. Lire toutes les instructions.
2. Pour protéger contre le risque de choc
électrique, ne pas immerger le cordon,
la fiche ou le boîtier du batteur dans
l’eau ou autre liquide.
3. Une bonne surveillance est nécessaire
pour tout appareil utilisé par des
enfants ou près d’eux.
4. Débrancher l’appareil de la prise de
courant électrique lorsqu’il n’est pas
utilisé et avant d’ajouter ou d’y enlever
des pièces et avant le nettoyage.
5. Éviter le contact avec les pièces
mobiles. Garder les mains, les cheveux
et les vêtements, de même que les
spatules et autres ustensiles, loin des
fouets durant l’opération pour réduire
le risque de blessure aux personnes
et/ou des dommages au batteur.
6. Enlever les fouets et autres acces-
soires du batteur avant le lavage.
7. Ne pas laisser le cordon pendre du
bord d’une table ou d’un comptoir, ou
toucher des surfaces chaudes, y compris la cuisinière.
8. Ne pas faire fonctionner un appareil
ménager avec un cordon ou une fiche
endommagé, ou lorsque l’appareil ne
fonctionne pas bien ou a été endommagé d’une manière quelconque.
Appeler notre service d’assistance aux
clients au numéro sans frais pour renseignements, vérification, réparations
ou réglages électriques ou
mécaniques.
9.
L’utilisation d’accessoires non recommandés
ou vendus par Hamilton
Beach/Proctor-Silex, Inc. pour utilisation
avec ce modèle peut causer un
incendie, un choc électrique ou une
blessure.
10. Ne pas utiliser à l’extérieur.
11. Ne pas placer l’appareil sur ou près
d’un brûleur à gaz ou d’un élément
électrique chaud, ou dans un four
chauffé.
12. Vérifier que le réglage est à OFF
(ARRÊT) avant de brancher le cordon
dans une prise de courant murale.
Pour le débrancher, tourner le réglage
à OFF et ensuite retirer la fiche de la
prise de courant murale.
13. Ne pas utiliser l’appareil pour un usage
autre que celui auquel il est destiné.
CONSERVEZ CES INSTRUCTIONS
Cet appareil est conçu uniquement pour
l’usage domestique.
Cet appareil est muni d’un cordon de liaison à la terre à 3 broches (fiche à 3
alvéoles). Ce type de fiche conviendra
uniquement à une prise électrique conçue
pour une fiche à 3 alvéoles. Il s’agit d’une
caractéristique de sécurité visant à réduire
le risque de choc électrique. Si la fiche ne
peut pas être insérée dans la prise, contacter un électricien qualifié pour qu’il remplace la prise désuète. Ne pas essayer de
contourner l’objectif de sécurité de la fiche
de liaison à la terre en la modifiant de
quelque manière que ce soit.
La longueur du cordon utilisé avec cet
appareil a été sélectionnée pour réduire les
risques d’emmêlement ou de trébuchement sur un cordon plus long. Si l’on a
besoin d’un cordon plus long, on peut
utiliser une rallonge approuvée. Le calibre
de la rallonge doit être égal ou supérieur
au calibre du batteur. La rallonge doit être
installée avec précaution pour éviter
qu’elle ne tombe sur le comptoir ou la
table où des enfants peuvent tirer dessus
ou trébucher accidentellement.
Un cordon de rallonge devrait d’abord être
relié à l’appareil avant de le brancher dans
la prise.
Pour éviter une surcharge du circuit électrique, ne pas utiliser un autre appareil à
haute tension sur le même circuit que le
batteur.
AVERTISSEMENT : Pour réduire le risque
de blessure personnelle, toujours
débrancher le batteur avant d’insérer ou
d’enlever les fouets.
AVANT LA PREMIÈRE UTILISATION :
Laver le bol et les fouets à l’eau chaude
savonneuse. Rincer et sécher.
840115400 FRv05.qxd 7/2/03 1:55 PM Page 4
Page 32

5
Information sur le Service à la clientèle
Avant de demander de l’assistance
Prière de lire ce qui suit avant
d’appeler :
• Le batteur peut chauffer durant
l’usage. Dans le cas de charges
lourdes et de périodes d’utilisation
prolongée, la partie supérieure de
l’appareil pourra être tiède au
toucher. Ceci est normal.
• Le batteur peut émettre une odeur,
surtout quand il est neuf. C’est une
chose normale avec les moteurs
électriques.
• Si le fouet plat frappe le bol, arrêter
le batteur. Consulter la page 3 pour
plus de renseignements.
Si votre batteur fonctionne
mal ou refuse de fonctionner,
veuillez vérifier les points
suivants :
• Le batteur est-il branché?
• Le fusible du circuit qui alimente le
batteur est-il en bon état? Si vous
possédez un coupe-circuit,
assurez-vous que le circuit est
fermé.
• Éteindre le batteur 10 à 15
secondes, puis le rallumer.
• Si le problème n’est pas
attribuable à l’un des points qui
précèdent, voir l’information sur le
Service à la clientèle.
• NE PAS retourner le batteur au
détaillant; ce dernier n’offre pas
de service de réparation.
Si vous avez une question au sujet de votre batteur, téléphonez au numéro sans
frais de notre service à la clientèle. Avant l’appel, veuillez noter les numéros de
modèle, de type et de série et les inscrire ci-dessous. Ces numéros se trouvent
sur le dessous de votre batteur. Ces renseignements nous aideront à répondre
à votre question beaucoup plus rapidement.
MODÈLE :__________________ TYPE :___________________ SÉRIE : __________________
NUMÉROS DU SERVICE À LA CLIENTÈLE
Aux É.-U. 1-800-851-8900
Au Canada 1-800-267-2826
Adresse du site web : www.hamiltonbeach.com
CONSERVEZ CES NUMÉROS POUR RÉFÉRENCE ULTÉRIEURE!
H
AMILTON
BEACH PROCTOR-SILEX,INC.
P
ROCTOR-SILEX CANADA,INC.
263 Yadkin Road. Southern Pines, North Carolina 28387
Picton, Ontario K0K 2T0
Renseignements sur
l’assistance et le service
840115400 FRv05.qxd 7/2/03 1:55 PM Page 5
Page 33

6
Pièces et caractéristiques
1. Tête du batteur
2. Plaque du logo
3. Tige de fixation
4. Bol
5. Accessoires
Les accessoires du batteur comprennent un fouet plat, un fouet à
fil et un crochet pétrisseur.
6. Verrouillage du bol
7. Bec verseur anti-éclaboussures
(voir la page 8
pour plus de
renseignements).
8. Bouton de dégagement du batteur
Ce bouton verrouille la tête du
batteur en position
abaissée pour
assurer un mélange
complet. Lorsqu’on
relève la tête du
batteur, elle se verrouille en position
verticale. Tenir la
tête du batteur
lorsqu’on la baisse
dans le bol.
Appuyer sur le bouton pour dégager la
tête du batteur.
9. Commande de réglage
Sélectionner un
réglage entre 2 et
12. Le réglage du
batteur augmente
en suivant les
nombres.
840115400 FRv05.qxd 7/2/03 1:55 PM Page 6
Page 34

7
Assemblage du batteur
1. S’assurer que la commande de
réglage est réglée à O et que le batteur est débranché.
2. Appuyer sur le bouton de dégagement du batteur et relever la tête du
batteur.
3. Placer le bol sur le plateau de
verrouillage et tourner dans le sens
des aiguilles d’une montre jusqu’à ce
que le bol se verrouille en place.
4. Appuyer sur le bouton de dégagement et incliner la tête du batteur
vers le bas.
5. Brancher le batteur sur une prise
électrique.
Pour l’enlever :
1. S’assurer que la commande de
réglage est réglée à O (remise en
marche/arrêt) et que le batteur est
débranché.
2. Appuyer sur le bouton de dégagement du batteur et relever la tête du
batteur.
3. Faire tourner le bol dans le sens
inverse des aiguilles d’une montre
pour déverrouiller.
Fixation du bol
wAVERTISSEMENT
Risque de blessure
Débrancher le batteur avant d’insérer ou d’enlever des fouets.
Débrancher le batteur avant le nettoyage. Le non-respect de cette
instruction peut provoquer des fractures ou des coupures.
1. S’assurer que la commande de
réglage est réglée à O et que le
batteur est débranché.
2. Appuyer sur le bouton de
dégagement du batteur et
relever la tête du batteur.
3. Insérer l’accessoire sur la tige des
fouets et appuyer vers le haut le
plus loin possible.
4. Faire tourner l’accessoire vers la
droite, en fixant le fouet sur l’attache de la tige.
5. Appuyer sur le bouton de dégage-
ment et incliner la tête du batteur
vers le bas.
6. Brancher le batteur sur une prise
électrique.
Fixation du fouet, du fouet à fil ou du crochet pétrisseur
840115400 FRv05.qxd 7/2/03 1:55 PM Page 7
Page 35

8
1. S’assurer que la commande de
réglage est réglée à O et que le
batteur est débranché.
2. Appuyer sur le bouton de dégage-
ment du batteur et relever la tête
du batteur.
3. Fixer le bol et l’accessoire désiré.
Voir la page 7 pour plus de renseignements.
4. Glisser la section étroite du bec
anti-éclaboussures sous l’accessoire Voir l’illustration 1.
5. Placer le bec anti-éclaboussures
sur le bol. Voir les illustrations 2
et 3.
6. Aligner la section étroite du collier
anti-éclaboussures avec l’échancrure sur la tige du batteur. Voir
l’illustration 4.
7. Appuyer sur le bouton de dégage-
ment du batteur et incliner la tête
du batteur.
8. Tourner l’ouverture du bec anti-
éclaboussures à la position
désirée.
9. Insérer le bec verseur dans les
fentes du collier anti-éclaboussures. Voir l’illustration 5.
10. Pour retirer le bec verseur anti-
éclaboussures, suivre les instructions dans le sens inverse.
Fixation du bec verseur anti-éclaboussures
840115400 FRv05.qxd 7/2/03 1:55 PM Page 8
Page 36

9
Utilisation des accessoires du batteur sur socle
Le guide de mélange qui suit est une suggestion pour le choix des réglages de
mélange. Commencer au réglage 2 et augmenter au réglage désiré selon la
consistance de la recette.
ALIMENT ACCESSOIRE RÉGLAGE
Gâteaux (mélanges ou faits maison) Fouet plat 4-6
Pâte à biscuits Fouet plat 4-6
Purée de pommes de terre Fouet plat 6-8
Glaçage Fouet plat 6-8
Blancs d’œufs (pour meringues, etc.) Fouet 10-12
Crème fouettée Fouet 12
Crème-dessert instantanée Fouet 2
Pain Crochet pétrisseur 2-4
1. Avant la première utilisation, laver le
bol et les accessoires dans de l’eau
chaude savonneuse. Rincer et sécher.
2. S’assurer que la commande de
réglage est réglée à O et que le
batteur est débranché.
3. Appuyer sur le bouton de dégagement du batteur et relever la tête
du batteur. Insérer un accessoire.
4. Verrouiller le bol sur la base en
utilisant la caractéristique
« Verrouillage du bol ».
5. Appuyer sur le bouton de dégage-
ment du batteur et incliner la tête
du batteur.
6. Brancher le batteur sur une prise
électrique. Sélectionner le réglage
désiré. Préparer la recette selon les
indications.
7. Lorsque la préparation est terminée,
tourner la commande de réglage à
O. Débrancher de la prise.
8. Appuyer sur le bouton de dégage-
ment du batteur et relever la tête du
batteur.
9. Enlever l’accessoire.
Utilisation du batteur
Réglage de la commande de vitesse
Brancher le batteur sur une prise élec-
trique correctement
mise à la terre. La commande de vitesse
devrait toujours être
réglée sur la vitesse la
plus basse pour la mise
en marche, puis gradu-
ellement augmentée à
la vitesse plus élevée désirée pour éviter
la projection d’ingrédients hors du bol.
Voir le tableau ci-dessous pour les
réglages de la commande de vitesse
suggérés.
Détecteur électronique de maintien
de la vitesse
Le batteur est doté d’un détecteur
électronique de maintien de la vitesse
conçu pour maintenir la même vitesse
sous différentes conditions de charge
(telle que l’addition de farine à la pâte).
Il est possible que vous entendiez de
légères variations de vitesse alors que le
batteur s’ajuste électroniquement à la
vitesse réglée.
840115400 FRv05.qxd 7/2/03 1:55 PM Page 9
Page 37

10
• La tête du batteur se verrouille en position abaissée pour un mélange complet.
• Lors du mélange de pâtes coulantes,
utiliser des vitesses moyennes et arrêter
fréquemment le batteur pour racler les
côtés du bol avec une spatule. Mettre
les ingrédients liquides dans le bol en
premier, puis ajouter les ingrédients
secs.
• Toujours rester près du batteur durant
l’utilisation.
• Si une cuiller se prend accidentellement
dans l’accessoire ou si le moteur cale,
glisser la commande de réglage à O,
puis débrancher le batteur. Dégager
l’obstruction ou réduire la quantité du
mélange dans le bol. Laisser le moteur
refroidir pendant 5 minutes avant de
continuer.
Conseils pour le crochet pétrisseur
Conseils pour le fouet plat
• Utiliser le fouet plat pour mélanger :
GÂTEAUX
PÂTE À BISCUITS
CARAMEL
POMMES DE TERRE
• La pâte à biscuits est l’une des pâtes
les plus épaisses à mélanger. Les conseils suivants faciliteront la tâche :
✔ Veiller à ce que le beurre ou la mar-
garine soit à la température ambiante.
✔ Ajouter les ingrédients un à la fois en
les mélangeant bien après chaque
addition.
✔ Ajouter la farine une tasse à la fois.
✔ Si le batteur semble forcer, accroître
le réglage
Conseils généraux de mélange
Mettre les ingrédients liquides dans le bol
en premier, puis ajouter les ingrédients secs.
Toujours rester près du batteur durant l’u-
tilisation.
Pour commencer le mélange, utiliser un
réglage bas jusqu’à ce que les ingrédients
soient complètement combinés. Ceci réduira
les éclaboussures.
Addition d’ingrédients
Toujours ajouter les ingrédients le plus près
possible des bords du bol, non directement
dans le fouet en mouvement. Le bec verseur
anti-éclaboussures peut être utilisé pour
faciliter l’addition d’ingrédients.
Mélanges à gâteaux
Lors de la préparation de mélanges à
gâteaux en boîte, utiliser la vitesse 2 comme
vitesse basse, la vitesse 4 comme vitesse
moyenne et la vitesse 6 comme vitesse
élevée. Pour les meilleurs résultats, suivre les
indications de durée de mélange données
sur l’emballage.
Mélanges liquides
Les mélanges contenant de grandes quantités de liquides devraient être mélangés à
des vitesses plus basses pour éviter les
éclaboussures. N’augmenter la vitesse
qu’une fois le mélange épaissi.
Mélanges coulants
Lors du mélange de pâtes coulantes, utiliser
des vitesses moyennes et arrêter fréquemment le batteur pour racler les côtés du bol
avec une spatule.
Conseils pour le batteur sur socle
840115400 FRv05.qxd 7/2/03 1:55 PM Page 10
Page 38

11
Conseils pour le fouet à fil
• Un fouet à fil est conçu pour battre les
liquides tels que les blancs d’œufs et la
crème. Ne pas utiliser le fouet à fil pour
malaxer des mélanges épais tels que la
pâte, le caramel ou les pommes de terre
en purée.
• Votre batteur est conçu pour battre un
minimum de 2 gros blancs d’œufs ou 1
tasse de crème. Le rendement du batteur s’améliore au fur et à mesure que le
fouet est immergé dans le liquide. Si
des quantités moindres sont requises,
l’utilisation d’un batteur à main est
recommandée.
Blancs d’œufs
Mettre les blancs d’œufs dans un bol
à mélanger propre et sec. Fixer le bol
et le fouet à fil. Pour éviter les
éclaboussures, augmenter graduellement la vitesse au réglage désiré. Voir
le tableau ci-dessous.
QUANTITÉ VITESSE
2 à 4 blancs d’œufs à 10
6 blancs d’œufs ou plus à 8
Votre batteur sur socle Hamilton
Beach®bat les blancs d’œufs
rapidement. Surveiller attentivement
pour ne pas les battre excessivement.
La liste suivante vous dit à quoi vous
attendre :
Mousseux
Grosses bulles d’air inégales.
Commence à prendre forme
Les bulles d’air sont fines et compactes; le produit est blanc.
Pointe molle
Les pointes retombent quand le fouet
est retiré.
Presque fermes
Des pointes acérées se forment
quand le fouet est retiré, mais les
blancs sont encore mous.
Fermes mais pas secs
Pointes acérées et fermes quand le
fouet est retiré. Les blancs sont de
couleur homogène et brillante.
Fermes et secs
Pointes acérées et fermes quand le
fouet est retiré. Les blancs sont
tachetés et d’apparence fade.
Crème à fouetter
Verser la crème à fouetter froide dans
un bol réfrigéré. Fixer le bol et le fouet
à fil. Pour éviter les éclaboussures,
augmenter graduellement la vitesse
au réglage désiré et fouetter à la consistance désirée. Voir le tableau cidessous.
QUANTITÉ VITESSE
1 tasse (250 ml) à 10
1 chopine à 8
Votre batteur sur socle Hamilton Beach
®
fouette la crème très rapidement.
Surveiller la crème attentivement durant
l’opération car quelques secondes
seulement séparent les stades de
consistance. Rechercher les caractéristiques suivantes :
Commence à épaissir
La crème est épaisse et ressemble à
une crème dessert.
Conserve sa forme
La crème forme des pointes molles
quand le fouet est retiré. Peut être
incorporée aux autres ingrédients lors
de la préparation de desserts et
sauces.
Ferme
La crème forme des pointes fermes et
acérées quand le fouet est retiré.
L’utiliser comme garniture sur des
gâteaux ou desserts ou pour fourrer
des choux à la crème.
840115400 FRv05.qxd 7/2/03 1:55 PM Page 11
Page 39

12
1. Tourner la commande de réglage à
O. Débrancher le cordon de la prise.
2. Appuyer sur le bouton de dégage-
ment du batteur et relever la tête du
batteur.
3. Pour enlever l’accessoire, appuyer
sur l’accessoire vers le haut le plus
loin possible puis tourner vers la
gauche. Tirer sur l’accessoire pour le
retirer de la tige.
4. Le bol du batteur et les acces-
soires peuvent être lavés dans de
l’eau chaude savonneuse ou au
lave-vaisselle.
5. Essuyer la tête et la base du bat-
teur avec un chiffon humide.
Nettoyage du batteur
1
⁄4 c. à thé (1,25 ml) de paprika
1
⁄2 c. à thé (2,5 ml) de poudre de chili
1
⁄8 de c. à thé (0,60 ml) de sel
Dépannage
PROBLÈME
Aliments non
mélangés.
Éclaboussures
d’aliments durant
le mélange.
Le batteur se
déplace sur le
comptoir durant
le mélange.
Choses À VÉRIFIER
• Mettre les ingrédients liquides dans le bol avant d’ajouter les ingrédients secs.
• Arrêter le batteur et racler les cotés du bol.
• Augmenter le réglage de la vitesse
• Utiliser le bec verseur anti-éclaboussures durant le
mélange.
• Réduire le réglage de la vitesse.
• Réduire la quantité d’ingrédients dans le bol.
• S’assurer que le comptoir est propre. Ceci permet
aux pieds du batteur d’agripper le comptoir et réduit
le déplacement du batteur.
Hors-d’œuvre Pour plus de recettes, consulter notre site Internet.
Boules au Cheddar
1
⁄2 tasse (125 ml) de beurre
2 tasses (225 g) de fromage
Cheddar, râpé
1
⁄2 tasse (125 ml) de farine
Préchauffer le four à 350ºF (180ºC). Avec l’accessoire en forme de palette,
défaire le beurre et le fromage au réglage 4 jusqu’à ce qu’ils soient mélangés.
Réduire la vitesse au réglage 2; ajouter la farine et les assaisonnements.
Mélanger pendant 1 minute. Arrêter le batteur et racler les parois et le fond
du bol. Continuer à mélanger au réglage 4 jusqu’à ce que le mélange soit
homogène et se détache des parois du bol. Former des boules de la taille
d’une grosse bille et les placer sur une tôle allant au four. Cuire pendant 15 à
20 minutes. Servir chaud ou à température ambiante. Donne environ 48
boules.
840115400 FRv05.qxd 7/2/03 1:55 PM Page 12
Page 40

13
Hors-d’œuvre Pour plus de recettes, consulter notre site Internet.
Bouchées au parmesan
4 onces (115 g) de fromage à la crème
1 tasse (250 ml) de mayonnaise
2
⁄
3 de tasse (150 ml) de parmesan, râpé
1
⁄
8 de c. à thé (0,60 ml) de cayenne
Préchauffer le four à 325ºF (160ºC). Avec l’accessoire en forme de palette,
défaire le fromage à la crème et la mayonnaise au réglage 4 jusqu’à ce qu’ils
soient mélangés. Arrêter le batteur et racler les parois et le fond du bol.
Ajouter le parmesan et les assaisonnements et continuer à mélanger au
réglage 6 jusqu’à ce que le tout soit homogène. À l’aide d’une cuiller, mettre
la pâte dans un sac en plastique pour aliments puis couper un coin pour en
faire une poche à douille. Placer des craquelins l’un à côté de l’autre sur une
tôle allant au four puis disposer sur ceux-ci du mélange au fromage. Cuire
pendant 8 à 10 minutes jusqu’à ce que le mélange au fromage soit légèrement doré. Servir préférablement chaud. Donne 11⁄2 tasse (375 ml).
Boule au fromage classique
2 paquets de 8 onces (225 g) de
fromage à la crème, ramolli
1 paquet de 8 onces (225 g) de
fromage cheddar fort, râpé
1 c. à table (15 ml) d’oignon
finement émincé
Avec le fouet, battre le fromage à la crème et le cheddar à vitesse moyenne
jusqu’à ce que le mélange soit homogène. Mélanger le reste des ingrédients
à l’exception des pacanes et placer le tout dans un contenant couvert.
Mettre au réfrigérateur pendant plusieurs heures ou toute la nuit. Juste avant
de servir, former une boule avec le mélange et la rouler dans les pacanes.
Donne 24 portions.
Trempette chaude au crabe
1 paquet de 8 onces (225 g) de
fromage à la crème, ramolli
1 petit oignon, finement émincé
5 c. à table (75 ml) de mayonnaise
Préchauffer le four à 350ºF (180ºC). Avec l’accessoire en forme de palette,
défaire le fromage à la crème, l’oignon, la mayonnaise, la chair de crabe, l’ail
en poudre, le sel et le poivre, à vitesse moyenne et bien mélanger le tout.
Étaler le mélange dans un plat de 1 pinte (1 litre) allant au four. Cuire pendant
20 minutes dans le four préchauffé. Servir préférablement chaud avec du
pain ou des craquelins. Donne 16 portions.
1
⁄8 de c. à thé (0,60 ml) de
poudre de chili
Craquelins
1 c. à thé (5 ml) de sauce Worcestershire
1 c. à thé (5 ml) de jus de citron
1 pincée de piment rouge en poudre
(facultatif)
1 pincée de sel
1 tasse (250 ml) de pacanes hachées
2 boîtes de 6 onces (170 g) de chair
de crabe, égouttée et émiettée
1
⁄4 de c. à thé (1,25 ml) d’ail en poudre
Sel et poivre au goût
840115400 FRv05.qxd 7/2/03 1:55 PM Page 13
Page 41

1
⁄2 tasse (125 ml) de fromage Monterrey
Jack, déchiqueté
1 c. à thé (5 ml) de sel d’ail
1 c. à thé (5 ml) de sauce au soja
1
⁄2
c. à thé (2,5 ml) de sauce piquante
14
Beurre à l’italienne
1 tasse (250 ml) de beurre non salé,
ramolli
1 c. à table (15 ml) d’ail émincé
1
⁄4
de tasse (60 ml) de parmesan râpé
1 c. à thé (5 ml) de sel d’ail
Avec le fouet, battre le beurre ramolli à vitesse moyenne jusqu’à ce qu’il soit
léger et onctueux. Mélanger ail, parmesan, sel d’ail, assaisonnement à l’italienne, poivre et paprika. Mélanger le tout à un réglage bas jusqu’à ce que le
mélange soit homogène. Étaler sur du pain ou des craquelins. Conserver au
réfrigérateur dans un contenant couvert. Donne 8 portions.
Beurre au goût de pizza
1 tasse (250 ml) de beurre non salé,
ramolli
1 boîte de 6 onces (170 g) de
purée de tomate
Avec le fouet, battre le beurre jusqu’à ce qu’il soit léger et onctueux. Ajouter la
purée de tomate, le parmesan, le sel d’ail, l’origan, le persil et mélanger à
vitesse moyenne jusqu’à ce que le mélange soit homogène. Étaler sur du pain
ou des craquelins. Conserver au réfrigérateur dans un contenant couvert.
Donne 8 portions.
Trempette à la mexicaine, cuite au four
8 onces (225 g) de fromage à la crème
2 tasses (225 ml) de fromage
Monterrey Jack au piment,
déchiqueté
1 tasse (250 ml) de crème sure
1
⁄4 de tasse (60 ml) d’oignon,
finement émincé
Préchauffer le four à 350ºF (180ºC). Avec l’accessoire en forme de palette,
défaire le fromage à la crème et le Monterrey Jack au réglage 4 jusqu’à ce qu’ils
soient mélangés. Ajouter la crème sure et continuer de mélanger. Arrêter le batteur et racler les parois et le fond du bol. Ajouter l’oignon, le poivron vert, le
bœuf séché et la moitié des pacanes. Mélanger au réglage 4 jusqu’à ce que le
tout soit homogène. Verser le mélange dans un plat de 11⁄2 pinte (11⁄2 litre) allant
au four, graissé, et parsemer par-dessus le reste des pacanes. Cuire pendant 20
minutes. Servir avec des craquelins. Donne 4 tasses (1 L) de trempette.
Trempette à l’artichaut et au fromage
1 pot de 12 onces (350 g) de cœurs
d’artichauts marinés, égouttés
3
⁄4 de tasse (175 ml) de mayonnaise
1
⁄
2 tasse (125 ml) de parmesan, râpé
Mettre tous les ingrédients dans le bol à mélanger. Avec l’accessoire en
forme de palette, mélanger au réglage 4 jusqu’à ce que le tout soit mélangé.
Réfrigérer pendant au moins 2 heures pour rehausser la saveur. Servir avec
des craquelins. Donne environ 3 tasses (750 ml).
.
1 c. à thé (5 ml) d’assaisonnement à
l’italienne
1
⁄2 c. à thé (2,5 ml) de poivre
1
⁄4 de c. à thé (1,25 ml) de paprika en
poudre
1 tasse (250 ml) de parmesan râpé
1
1
⁄2
c. à thé (7,5 ml) de sel d’ail
1
⁄2
c. à thé (2,5 ml) d’origan
1 c. à table (15 ml) de persil
Hors-d’œuvre Pour plus de recettes, consulter notre site Internet.
1
⁄2
tasse (125 ml) de poivron vert,
finement émincé
1 pot de 2,25 onces (64 g) de bœuf
séché en morceaux, finement
émincé
1 tasse (250 ml) de pacanes émincées
840115400 FRv05.qxd 7/2/03 1:55 PM Page 14
Page 42

15
Nouilles à l’italienne
1 livre (450 g) de bœuf maigre, haché
1
⁄2 tasse (125 ml) d’oignon, haché
1
⁄2 tasse (125 ml) de poivron vert, haché
1 c. à thé (5 ml) d’huile végétale
1 pot de 26 onces (650 g) de
sauce à spaghetti
Préchauffer le four à 375ºF (190ºC). Dans un grand poêlon, cuire à feu moyen le bœuf
haché, les oignons, et le poivron vert dans l’huile, jusqu’à ce que le bœuf soit cuit.
Incorporer la sauce à spaghetti et mettre de côté. Cuire les nouilles aux œufs selon les
indications sur le paquet. Égoutter les nouilles. Avec l’accessoire en forme de palette,
mélanger l’œuf, la crème sure et la mozzarella à la vitesse 4 jusqu’à ce que le tout soit
mélangé. Ajouter les nouilles et mélanger au réglage 2 jusqu’à ce que les nouilles soient
enduites. Dans un plat de 4 pintes (4 litres) allant au four, verser à la cuiller dans le fond
du plat la moitié de la sauce à la viande. Verser le mélange aux nouilles par-dessus la
sauce à la viande et l’étaler uniformément. Étaler en dernier le reste de la sauce à la
viande. Saupoudrer de parmesan et cuire pendant 35 à 40 minutes, ou jusqu’à ce que le
mélange bouillonne sur les bords. Donne 6 portions.
Pain de viande classique
1 c. à table (15 ml) d’huile végétale
1 tasse (250 ml) d’oignon émincé
20 craquelins salés
1
⁄2
tasse (125 ml) de lait
2 œufs
2 c. à table (30 ml) de sauce Worcestershire
Préchauffer le four à 350ºF (180ºC). Mettre l’huile et l’oignon dans un bol allant au four à
micro-ondes. Cuire à chaleur élevée pendant 5 minutes, ou jusqu’à ce que l’oignon
ramollisse. Mettre l’oignon dans le bol à mélanger. Émietter les craquelins dans le bol.
Ajouter les ingrédients qui restent dans l’ordre indiqué. Avec le crochet de pétrissage,
mélanger le tout au réglage 4 jusqu’à ce que les ingrédients soient bien mélangés, soit
environ 1 minute. Retirer le mélange du bol et le placer dans un moule de 9 po x 13 po
(33 x 23 x 5 cm). Façonner le mélange en forme ovale aplatie. Cuire 50 à 60 minutes ou
jusqu’à ce que la température interne soit de 160ºF (71ºC). Donne 6 à 8 portions.
Feuilleté de crevettes au parmesan
1 c. à table (15 ml) de beurre
1
⁄4 de tasse (60 ml) d’oignon
finement haché
1 c. à thé (5 ml) d’ail
1 c. à table (15 ml) de farine
1
⁄2 tasse (125 ml) de bière ou de
bouillon de poulet
Préchauffer le four à 400ºF (200ºC). Dans un poêlon à feu moyen à fort, faire sauter l’oignon
dans le beurre jusqu’à ce qu’il ramollisse, environ 5 minutes. Ajouter l’ail et cuire encore 1
minute. Saupoudrer de farine puis cuire en remuant pendant une minute de plus. Délayer le
jaune d’œuf dans la bière ou le bouillon. Le verser dans le poêlon et cuire en remuant
jusqu’à ce que le mélange épaississe légèrement pendant environ 2 minutes. Retirer du feu.
Incorporer en remuant les crevettes au mélange d’oignons cuits. Mettre de côté. À l’aide du
fouet, battre en neige ferme les blancs d’œufs au réglage 12, environ 3 minutes. Retirer le
bol du socle. Incorporer délicatement le mélange de parmesan et de crevettes aux blancs
d’œufs battus en neige. Verser le mélange à la cuiller dans un plat de 2 pintes (2 L) allant au
four, graissé. Cuire pendant 15 minutes. Donne 4 portions.
8 onces (225 g) de nouilles aux œufs
1 œuf
1 tasse (250 ml) de crème sure
2
⁄3 de tasse (150 ml) de fromage
mozzarella, déchiqueté
2 c. à table (30 ml) de parmesan, râpé
Plats principaux
2 c. à table (30 ml) de moutarde préparée
1 c. à thé (5 ml) de sel
1
⁄2 c. à thé (2,5 ml) de poivre
1
⁄2 c. à thé (2,5 ml) de basilic
1
⁄2 c. à thé (2,5 ml) de thym
2 livres (900 g) de bœuf maigre, haché
Pour plus de recettes, consulter
notre site Internet.
1 jaune d’œuf
1 livre (450 g) de crevettes petites à
moyennes, décortiquées et cuites
3 blancs d’œuf
1
⁄
4
de tasse (60 ml) de parmesan râpé
840115400 FRv05.qxd 7/2/03 1:55 PM Page 15
Page 43

16
3 tasses (750 ml) de poulet cuit coupé
en dés
1 boîte de 15 onces (425 g) de petits
pois verts, égouttés
1 boîte de 15 onces (425 g) de carottes
tranchées, égouttées
3
⁄4 de tasse (175 ml) de babeurre
3 œufs
11⁄4
tasse (310 ml) de farine auto levante
1 c. à thé (5 ml) de cumin
1
⁄4 de c. à thé (1,25 ml) de sel
2 c. à table (30 ml) de farine
1 œuf
1
⁄2 tasse (125 ml) de lait
1 paquet de 8 onces (225 g) de
mélange à muffins au maïs
2 c. à table (30 ml) de piment du
chili vert, coupé en dés, en boîte
Tamales à la mexicaine
1 tasse (250 ml) d’oignon haché
1 tasse (250 ml) de poivron vert haché
1 livre (450 g) de bœuf maigre, haché
1 c. à thé (5 ml) d’huile végétale
1 boîte de 15 onces (425 g) de maïs,
égoutté
1 boîte de 8 onces (225 ml) de sauce
tomate
1 c. à thé (5 ml) de poudre de chili
Préchauffer le four à 375ºF (190ºC). Dans un grand poêlon cuire à feu moyen à
chaud, l’oignon, le poivron vert et le bœuf haché dans l’huile jusqu’à ce que
celui-ci soit cuit. Ajouter le maïs, la sauce tomate, la poudre de chili, le cumin et
le sel. Remuer les ingrédients et réduire la chaleur à feu doux. Dans le bol à
mélanger, mettre l’œuf, le lait, le mélange à muffins et le piment du chili vert.
Avec le fouet, mélanger les ingrédients au réglage 2. Arrêter le batteur et racler
les parois et le fond du bol. Continuer à mélanger au réglage 4 jusqu’à ce que
le tout soit bien mélangé. Retirer le mélange de bœuf du feu et le verser dans
un plat allant au four, graissé, de 21⁄2 pintes (21⁄2 L). Verser uniformément sur le
mélange à muffins. Cuire pendant 25 à 30 minutes jusqu’à ce que le dessus ait
légèrement bruni sur les bords. Makes 6 servings.
Tourtière au poulet et aux légumes
3 c. à table (45 ml) de beurre
1
⁄3
de tasse (80 ml) d’oignon haché
1
⁄3
de tasse (80 ml) de céleri
finement haché
1
⁄3 de tasse (80 ml) de farine
3 tasses (750 ml) de bouillon de poulet
1
⁄2
c. à thé (2,5 ml) de sel
1
⁄2 c. à thé (2,5 ml) de basilic séché
1
⁄4 c. à thé (1,25 ml) de poivre
Préchauffer le four à 400ºF (200ºC). Dans un grand poêlon faire sauter à feu
moyen à fort l’oignon et le céleri dans le beurre jusqu’à ramollissement, environ
5 minutes. Saupoudrer la farine sur le mélange oignon céleri dans le poêlon.
Remuer et cuire pendant environ 1 minute. Ajouter le bouillon de poulet au
poêlon et mélanger le tout. Ajouter le sel, le basilic et le poivre. Cuire et remuer
occasionnellement jusqu’à épaississement, environ 5 à 8 minutes. Retirer du feu.
Dans un plat allant au four de 9 po x 13 po (33 x 23 x 5 cm) et graissé, étaler le
poulet, les petits pois et les carottes. Verser la sauce épaissie par-dessus. À
l’aide du fouet, mélanger le babeurre et les œufs au réglage 8 pendant environ
1 minute. Ajouter la farine auto levante et mélanger au réglage 6. Arrêter le
batteur et racler les parois et le fond du bol. Continuer à mélanger au réglage 6
pendant environ 30 secondes. Verser le mélange uniformément sur le poulet et
les légumes. Cuire pendant 35 minutes ou jusqu’à ce que le dessus soit légèrement doré et que le contenu du plat bouillotte. Donne 6 à 8 portions.
Plats principaux
Pour plus de recettes, consulter
notre site Internet.
840115400 FRv05.qxd 7/2/03 1:55 PM Page 16
Page 44

17
1
⁄4 de c. à thé (1,25 ml) de sel
2
⁄3 de tasse (150 ml) de babeurre
1 tasse (250 ml) de noix de coco râpée
1 boîte de 8 onces (225 ml) d’ananas
broyé, égoutté
Quatre quart étagé
4 œufs, séparés
1 tasse (250 ml) de beurre
2 tasses (500 ml) de sucre
2 tasses (500 ml) de farine à gâteaux
Préchauffer le four à 325 ºF (160ºC). À l’aide du fouet battre les blancs d’œufs
en neige ferme au réglage 12, environ 3 minutes. Retirer les blancs d’œufs battus et les mettre de côté. Dans le même bol (pas besoin de le laver), à l’aide de
l’accessoire en forme de palette, défaire en crème le beurre et le sucre au
réglage 4. Augmenter la vitesse au réglage 6, incorporer les jaunes un à la fois
en battant bien à mesure qu’un jaune est ajouté. Ajouter la vanille. Dans un petit
bol, mélanger la farine à gâteaux et la levure chimique. Réduire la vitesse au
réglage 2 puis ajouter la moitié du mélange de farine. Ajouter la crème sure puis
le reste de farine et continuer à mélanger jusqu’à ce que le tout soit homogène.
Ajouter les blancs d’œufs battus et continuer à mélanger au réglage 2 pendant
environ 1 minute. Arrêter le batteur et racler les parois et le fond du bol. Ensuite,
continuer à mélanger pendant 15 secondes de plus. Répartir la pâte dans 2
moules ronds de 9 pouces (23 cm x 3 cm de hauteur) graissés et garnis de
papier ciré. Cuire pendant 40 à 45 minutes ou jusqu’à ce qu’un cure-dent en
sorte propre. Laisser refroidir dans le moule pendant 5 minutes, puis retirer le
gâteau des moules et laisser refroidir sur des grilles. Garnir de glaçage ou servir
simplement avec des fruits et de la garniture fouettée. Donne 2 étages.
Gâteau hawaïen à l’ananas et noix de coco
1
⁄2 tasse (125 ml) de beurre
2 tasses (500 ml) de sucre
2 œufs
1 c. à thé (5 ml) de vanille
21⁄3 tasses (580 ml) de farine à gâteaux
1 c. à thé (5 ml) de bicarbonate de soude
Préchauffer le four à 350ºF (180ºC). Avec l’accessoire plat en forme de palette battre
ensemble le beurre, le sucre et les œufs au réglage 4 jusqu’à ce que le tout soit
mélangé. Dans un petit bol mélanger la farine à gâteaux, le bicarbonate de soude et
le sel. Au réglage 2, ajouter la moitié du mélange de farine et y incorporer lentement
le babeurre. Ajouter le reste de farine. Ajouter la noix de coco et l’ananas jusqu’à ce
que le tout soit tout juste mélangé. Verser la pâte dans 2 moules ronds de 9 pouces
(23 x 3 cm de hauteur) graissés et garnis de papier ciré. Cuire pendant 40 minutes
ou jusqu’à ce qu’un cure-dent en sorte propre. Laisser refroidir dans les moules pendant 5 minutes puis retirer des moules et laisser refroidir sur des grilles. Garnir de
glaçage au fromage à la crème et à la noix de coco. Donne un gâteau à 2 étages.
Glaçage au fromage à la crème et à la noix de coco
8 onces (225 g) de fromage à la crème
1
⁄
4
de tasse (60 ml) de beurre,
à température ambiante
Avec l’accessoire en forme de palette mélanger le fromage à la crème et le
beurre au réglage 4 jusqu’à consistance homogène. Ajouter le sucre glace et la
vanille et continuer à battre jusqu’à ce que le mélange soit léger et onctueux.
Ajouter la noix de coco et battre pour l’incorporer au mélange.
1
⁄4 de c. à thé (1,25 ml) de levure chimique
2
⁄3 de tasse (150 ml) de crème sure
2 c. à thé (10 ml) de vanille
Gâteaux et glaçages
Pour plus de recettes,
consulter notre site Internet.
3 tasses (750 ml) de sucre glace
1 c. à thé (5 ml) de vanille
3
⁄
4 de tasse (175 ml) de noix de coco
râpée
840115400 FRv05.qxd 7/2/03 1:55 PM Page 17
Page 45

18
Gâteau au chocolat velouté et étagé
2 tasses (500 ml) de farine à gâteaux
1
⁄2 tasse (125 ml) de cacao en poudre
non sucré
2 c. à thé (10 ml) de bicarbonate
de soude
1
⁄4 de c. à thé (1,25 ml) de sel
10 c. à table (185 ml) de beurre,
à température ambiante
Préchauffer le four à 350ºF (180ºC). Dans un petit bol mélanger la farine, le
cacao, le bicarbonate de soude et le sel. Mettre de côté. Avec l’accessoire en
forme de palette, défaire en crème le beurre et le sucre au réglage 4. Ajouter les
œufs un à la fois en battant bien après l’ajout de chaque œuf. Ajouter la vanille.
Réduire la vitesse au réglage 2. Ajouter la moitié du mélange de farine, puis
toute la crème sure. Ajouter le reste du mélange de farine. Puis verser lentement
le café. Mélanger au réglage 2 pendant environ 30 secondes. Arrêter le batteur
et racler les parois et le fond du bol. Mettre le batteur au réglage 4 et mélanger
jusqu’à consistance homogène. Répartir la pâte dans 2 moules ronds de 9
pouces (23 x 3 cm de hauteur) graissés et garnis de papier ciré. Cuire pendant
30 à 35 minutes ou jusqu’à ce qu’un cure-dent en sorte propre. Laisser refroidir
dans les moules pendant 5 minutes puis retirer des moules et laisser refroidir sur
des grilles. Garnir de glaçage au chocolat mi-amer. Donne un gâteau à 2 étages.
Glaçage au chocolat mi-amer
1
⁄3 de tasse (80 ml) de beurre,
à température ambiante
21⁄2
tasses (625 ml) de sucre glace
3
⁄4
de tasse (175 ml) de cacao en
poudre non sucré
Avec l’accessoire en forme de palette, battre le beurre au réglage 4 jusqu’à ce
qu’il soit crémeux. Ajouter le sucre glace et le cacao alternativement avec le lait
et continuer à battre jusqu’à ce que le mélange soit onctueux. Ajouter la vanille
et battre jusqu’à ce que le mélange soit onctueux et homogène.
Gâteau danois aux pommes
2 œufs, séparés
1
⁄
4 de tasse (60 ml) de beurre,
à température ambiante
1
⁄
2 tasse (125 ml) de sucre granulé
1
⁄
2 tasse (125 ml) de cassonade dorée,
tassée
Préchauffer le four à 325ºF (160ºC). Avec le fouet, battre en neige ferme les 2
blancs d’œufs au réglage 12. Retirer du bol et mettre de côté. Dans le même
bol (il n’est pas nécessaire de le laver) et avec l’accessoire en forme de palette,
battre les jaunes, les sucres et la vanille au réglage 4 jusqu’à ce que le tout soit
mélangé. Ajouter la farine, la levure chimique et la cannelle. Mélanger au
réglage 2 jusqu’à ce que le tout soit mélangé. Ajouter les pommes et les blancs
d’œufs battus et remuer au réglage 2 jusqu’à ce que les ingrédients soient tout
juste mélangés. Verser le tout dans un plat à tarte graissé de 9 pouces (23 cm)
et cuire pendant 45 minutes ou jusqu’à ce que le dessus soit doré. Servir garni
de crème glacée. Donne 6 à 8 portions.
2 tasses (500 ml) de cassonade dorée,
tassée
2 œufs
1 c. à thé (5 ml) de vanille
3
⁄4 de tasse (175 ml) de crème sure
3
⁄4 de tasse (175 ml) de café infusé froid
1
⁄4 de tasse (60 ml) de lait
1 à 2 c. à table (15 à 30 ml) de café
infusé froid
1 c. à thé (5 ml) de vanille
1 c. à thé (5 ml) de vanille
1 tasse (250 ml) de farine
2 c. à thé (10 ml) de levure chimique
1
⁄2 c. à thé (2,5 ml) de cannelle
2 tasses (750 ml) de pommes,
pelées et finement hachées
Gâteaux et glaçages
Pour plus de recettes,
consulter notre site Internet.
840115400 FRv05.qxd 7/2/03 1:55 PM Page 18
Page 46

19
Gâteau au citron
21⁄3 tasses (580 ml) de farine tout usage
11⁄2 c. à thé (7,5 ml) de levure chimique
1
⁄2 c. à thé (2,5 ml) de bicarbonate de
soude
1
⁄4 c. à thé (1,25 ml) de sel
1 tasse (250 ml) de beurre, ramolli
Préchauffer le four à 350ºF (180ºC). Graisser et fariner 3 moules ronds de 9x11⁄2
po (23x3 cm); mettre de côté. Dans un bol moyen, mélanger la farine, la levure,
le bicarbonate, et le sel. Mettre de côté. Avec l’accessoire plat en forme de
palette, défaire en crème le beurre et le sucre à vitesse moyenne jusqu’à ce
qu’ils soient légers et onctueux. Réduire la vitesse à basse et incorporer les
œufs, un à la fois. Ajouter le mélange de farine et le babeurre alternativement en
mélangeant à basse vitesse jusqu’à ce que le tout soit tout juste mélangé.
Ajouter les zeste et jus de citron et mélanger jusqu’à ce que le tout soit bien
incorporé.
Verser la pâte dans les moules préparés. Cuire dans le four préchauffé pendant
25 à 30 minutes, ou jusqu'à ce qu’un cure-dent inséré au centre du gâteau en
sorte propre. Laisser refroidir dans les moules sur des grilles, pendant 10 minutes. Inverser sur des grilles métalliques pour laisser refroidir complètement.
Une fois refroidi, garnir d’un glaçage au beurre et au citron. Donne un gâteau à
3 étages.
Glaçage au beurre et au citron
6 tasses (1,500 ml) de sucre glace
1 tasse (250 ml) de beurre, ramolli
1
⁄4
de tasse (60 ml) de jus de citron frais
2 c. à thé (10 ml) de zeste de citron râpé
1
⁄4
de tasse (60 ml) de lait
Avec l’accessoire en forme de palette, défaire en crème le sucre et le beurre à
basse vitesse jusqu’à ce que les ingrédients soient mélangés. Ajouter les jus et
zeste de citron et battre pour bien mélanger le tout. Incorporer le lait tout en battant, augmenter la vitesse et continuer à battre jusqu’à ce que le mélange soit
homogène et onctueux. Napper de glaçage le gâteau refroidi.
2 tasses (500 ml) de sucre granulé
4 œufs
1 tasse (250 ml) de babeurre
2 c. à thé (10 ml) de zeste de citron
finement râpé
2 c. à table (30 ml) de jus de citron
Gâteaux et glaçages
Pour plus de recettes,
consulter notre site Internet.
840115400 FRv05.qxd 7/2/03 1:55 PM Page 19
Page 47

20
Gâteau à la crème italienne
1 tasse (250 ml) de babeurre
1 c. à thé (5 ml) de bicarbonate de soude
1
⁄2 tasse (125 ml) de beurre
1
⁄2 tasse (125 ml) de shortening
2 tasses (500 ml) de sucre granulé
Préchauffer le four à 350ºF (180ºC). Graisser et fariner 3 moules ronds de 9x11⁄2
po (23x3 cm); mettre de côté. Dans un petit bol, délayer le bicarbonate de
soude dans le babeurre; mettre de côté.
Avec l’accessoire en forme de palette, défaire en crème le beurre, le shortening
et le sucre à vitesse moyenne jusqu’à ce que le mélange soit léger et onctueux.
Incorporer les œufs un à la fois. Ajouter le mélange de babeurre, l’extrait de
vanille, la noix de coco et la levure chimique. Réduire la vitesse à un réglage
plus bas et incorporer petit à petit la farine. Mélanger jusqu’à ce que les ingrédients soient tout juste mélangés. Cuire dans le four préchauffé pendant 30 à
35 minutes ou jusqu’à ce qu’un cure-dent inséré au centre du gâteau en sorte
propre. Laisser refroidir dans les moules sur des grilles métalliques pendant 10
minutes. Inverser sur des grilles métalliques et laisser refroidir complètement.
Une fois refroidi, garnir le gâteau d’un glaçage au fromage à la crème. Donne
un gâteau à 3 étages.
Glaçage au fromage à la crème
2 paquets de 8 onces (225 g) de
fromage à la crème, ramolli
1
⁄2
tasse (125 ml) de beurre, ramolli
Avec l’accessoire en forme de palette, défaire en crème le beurre, le fromage à
la crème et l’extrait de vanille à vitesse moyenne, jusqu’à ce que le mélange
soit léger et onctueux. Réduire la vitesse au réglage le plus bas et incorporer
petit à petit le sucre glace jusqu’à ce que le mélange soit homogène.
Augmenter la vitesse à un réglage élevé et battre jusqu’à ce que le glaçage soit
léger et onctueux. Napper de glaçage le gâteau refroidi.
5 œufs
1 c. à thé (5 ml) d’extrait de vanille
1 tasse (250 ml) de noix de coco râpée
1 c. à thé (5 ml) de levure chimique
2 tasses (500 ml) de farine tout usage
1 c. à table (15 ml) d’extrait de vanille
2 livres (900 g) de sucre glace
Gâteaux et glaçages
Pour plus de recettes,
consulter notre site Internet.
840115400 FRv05.qxd 7/2/03 1:55 PM Page 20
Page 48

21
Gâteaux et glaçages
Pour plus de recettes,
consulter notre site Internet.
Gâteau aux carottes campagnard
2 c. à thé (10 ml) de levure chimique
2 c. à thé (10 ml) de bicarbonate
de soude
1
⁄2 c. à thé (2,5 ml) de sel
2 c. à thé (10 ml) de cannelle en poudre
1 c. à thé (5 ml) de muscade moulue
1
⁄2 c. à thé (2,5 ml) de clou de girofle
en poudre
1
⁄4 de tasse (60 ml) d’huile végétale
11⁄2 tasse (375 ml) de sucre granulé
1
⁄2 tasse (125 ml) de cassonade
Préchauffer le four à 350ºF (180ºC). Graisser et fariner un plat de 13 x 9 x 2 po
(33 x 25 x 5 cm); le mettre de côté.
Dans un bol moyen, mélanger la farine, la levure chimique, le bicarbonate, le
sel, la cannelle, la muscade et le clou de girofle; les mettre de côté. Avec
l’accessoire en forme de palette, mélanger l’huile, le sucre granulé, la
cassonade, l’extrait de vanille et les œufs à vitesse moyenne jusqu’à ce que le
mélange soit onctueux. Réduire la vitesse à un réglage bas et ajouter l’ananas,
les noix, la noix de coco, les carottes et les raisins secs jusqu’à ce qu’ils soient
bien mélangés. Ajouter petit à petit le mélange de farine. Mélanger pour bien
incorporer le tout. Verser la pâte dans le plat préparé et cuire dans le four
préchauffé pendant environ 40 à 50 minutes ou jusqu’à ce qu’un cure-dent
inséré au centre du gâteau en sorte propre. Laisser refroidir sur une grille
métallique jusqu’à refroidissement total. Garnir d’un glaçage au fromage à la
crème (voir la recette ci-dessus). Donne un gâteau de 13 x 9 po.
2 c. à thé (10 ml) d’extrait de vanille
3 œufs
1 tasse (250 ml) d’ananas broyé avec
jus
1
1
⁄2 tasse (375 ml) de pacanes grillées
hachées ou de noix
1
⁄2 tasse (125 ml) de noix de coco
râpée
2 tasses (500 ml) de carottes râpées
1 tasse (250 ml) de raisins secs
3 tasses (750 ml) de farine
840115400 FRv05.qxd 7/2/03 1:55 PM Page 21
Page 49

22
Gâteau au fromage et au chocolat blanc
11⁄2 tasse (375 ml) de miettes de
biscuits Graham
1 c. à table (15 ml) de sucre
1
⁄3 de tasse (80 ml) de beurre, fondu
4 paquets de 8 onces (900 g)
de fromage à la crème
Préchauffer le four à 325ºF (160ºC). Dans un bol moyen, mélanger miettes de
biscuits Graham, sucre et beurre. Beurrer un moule à charnière de 9 po (23
cm). Presser du bout des doigts les miettes sur le fond et à 1⁄2 po (1 cm) de
hauteur autour de la paroi. Mettre de côté. Avec l’accessoire en forme de
palette, battre le fromage à la crème au réglage 4 jusqu’à ce qu’il soit onctueux.
Ajouter le sucre et continuer à battre. Ajouter un œuf et battre pour mélanger.
Arrêter le batteur et racler les parois et le fond du bol. Ajouter les autres œufs,
un à la fois, et battre après l’ajout de chaque œuf. Réduire la vitesse au réglage
2 puis ajouter le citron et la vanille. Avec le moteur en marche au réglage 2,
verser lentement le chocolat blanc fondu. Mélanger à peine les ingrédients.
Verser le mélange dans la pâte préparée et cuire pendant 1 heure et 15 minutes
ou jusqu’à ce que le gâteau au fromage soit légèrement doré sur les bords. Le
centre peut encore avoir un aspect “humide”. Laisser refroidir complètement
avant de servir. Donne 16 portions.
Tarte légère à la patate douce
2 œufs, séparés
1 de 15 onces (425 g) de patates
douces, égouttée
OU 1 tasse (250 ml) de purée
3
⁄4 de tasse (175 ml) de cassonade
dorée, tassée
1 c. à table (15 ml) de farine
1
⁄4
de c. à thé (1,25 ml) de sel
Préchauffer le four à 375ºF (190ºC). Avec le fouet battre en neige légère les
blancs d’œufs au réglage 12. Les mettre de côté. Avec l’accessoire en forme de
palette et le même bol (pas nécessaire de le laver) battre les jaunes d’œufs et les
patates douces au réglage 6. Mélanger jusqu’à consistance onctueuse. Ajouter la
cassonade, la farine, le sel, la cannelle et la muscade. Mélanger les ingrédients.
Réduire la vitesse au réglage 2 et incorporer le lait et la vanille. Remuer. Arrêter le
batteur et racler les parois et le fond du bol. Incorporer en mélangeant les blancs
d’œufs battus au réglage 4. Verser dans la pâte. Cuire pendant 40 minutes ou
jusqu’à ce que la garniture soit prise. Donne 6 à 8 portions.
1 tasse (250 ml) de sucre
3 œufs
1 c. à table (15 ml) de jus de citron
1 c. à thé (5 ml) de vanille
6 onces (170 g) de chocolat blanc,
fondu
1
⁄4
de c. à thé (1,25 ml) de cannelle
1
⁄2 c. à thé (2,5 ml) de muscade
3
⁄4 de tasse (175 ml) de lait évaporé ou
de crème à fouetter
1 c. à thé de vanille
1 pâte à tarte profonde de 9 po
(23 cm) non cuite
Tartes et autres desserts
Pour plus de recettes, consulter notre site Internet.
840115400 FRv05.qxd 7/2/03 1:55 PM Page 22
Page 50

23
Tartes et autres desserts
Pour plus de recettes, consulter notre site Internet.
Tarte au citron légère et acidulée
2 œufs, séparés
3 c. à table (45 ml) de beurre
1 tasse (250 ml) de sucre
3 c. à table (45 ml) de farine
1
⁄2 tasse (125 ml) de lait
Préchauffer le four à 350ºF (180ºC). Avec le fouet, battre les blancs d’œufs en
neige légère au réglage 12. Mettre de côté. Avec l’accessoire en forme de palette
et le même bol (pas nécessaire de le laver), battre le beurre, le sucre et la farine
au réglage 4. Ajouter les jaunes d’œufs et mélanger les ingrédients. Ajouter le lait,
puis le jus et le zeste de citron. Mélanger les ingrédients. Réduire la vitesse au
réglage 2 et ajouter les blancs d’œuf. Mélanger de manière à incorporer les
blancs. Verser le mélange dans la pâte et cuire pendant 45 à 50 minutes ou
jusqu’à ce que le dessus ait bruni et la garniture soit prise. Laisser la tarte refroidir
complètement avant de la servir. Donne 6 à 8 portions.
Tarte fraîche au cappuccino
1 tasse (250 ml) de crème à fouetter
4 onces (115 mg) de fromage à la crème
3 c. à table (45 ml) de café instantané
1 tasse (250 ml) de lait
1 paquet de 3,5 onces (100 g) de
pouding instantané à la vanille
Avec le fouet, battre la crème au réglage 12 jusqu’à consistance ferme. Retirer
du bol et mettre de côté. Avec les mêmes bol et fouet (pas nécessaire de les
laver) battre fromage à la crème, le café instantané et 2 c. à table (30 ml) de lait
au réglage 6, jusqu’à consistance onctueuse. Ajouter le pouding et le reste du
lait et battre au réglage 6 environ 1 minute.
Arrêter le batteur et racler les parois et le fond du bol. Ajouter la crème fouettée
et mélanger les ingrédients au réglage 4. Verser dans la pâte à tarte et
saupoudrer le dessus de chocolat râpé. Réfrigérer pendant au moins 4 heures
avant de servir. Donne 6 à 8 portions.
1
⁄2 tasse (60 ml) de jus de citron
Zeste d’un citron râpé (partie jaune
uniquement)
Pâte à tarte de 9 po (23 cm) non cuite
Pâte de 9 po (23 cm) aux miettes de
biscuits Graham au chocolat ou de
biscuits
1 once (25 g) de chocolat à cuire
mi-sucré, râpé
840115400 FRv05.qxd 7/2/03 1:55 PM Page 23
Page 51

3
⁄4 de tasse (175 ml) de beurre, ramolli
3
⁄4
de tasse (175 ml) de sucre
1 œuf
1 c. à thé (5 ml) d’extrait de vanille
1
⁄
4 de tasse (60 ml) de lait
24
Tartes et autres desserts
Pour plus de recettes, consulter notre site Internet.
Tiramisu
11⁄2 tasse (375 ml) de crème à fouetter,
répartie
1 tasse (250 ml) de sucre
2 œufs
8 onces (225 g) de fromage à la crème,
à température ambiante
1 c. à thé (5 ml) de vanille
Quatre quart de 10 onces, de la
boulangerie ou congelé
*Si vous ne voulez pas utiliser la liqueur, utiliser
2
⁄3 de tasse (150 ml) de café infusé et 2
c. à table (30 ml) de sucre au lieu de la liqueur et du café.
Il est préférable de préparer le tiramisu un jour à l’avance. Dans une casserole
moyenne, combiner
1
⁄2 tasse (125 ml) de crème à fouetter, 1⁄2 tasse (125 ml) de sucre,
et les œufs. Cuire en remuant constamment sur feu moyen à chaud jusqu’à épaississement, soit environ 6 minutes. Verser la crème dans un petit bol et mettre au congélateur pour la refroidir. Avec le fouet, battre 1 tasse (250 ml) de crème à fouetter au
réglage 12 jusqu’à consistance ferme. Avec les mêmes fouet et bol (pas nécessaire
de les laver) battre le fromage à la crème et
1
⁄2
tasse (125 ml) de sucre au réglage 6
jusqu’à ce que les ingrédients soient mélangés. Ajouter la crème refroidie et battre au
réglage 6 jusqu’à consistance onctueuse. Arrêter le batteur et racler les parois et le
fond du bol. Ajouter la vanille et la crème fouettée et mélanger au réglage 4 jusqu’à ce
que le mélange soit onctueux. Couper le quatre quart en tranches d'un demi pouce (1
cm). Mélanger la liqueur (facultatif) et le café. Réserver 2 c. à table (30 ml) de chocolat
haché. Dans un bol profond, assembler le tiramisu en mettant une rangée de quatre
quarts, ensuite arroser du mélange de café et de liqueur. Saupoudrer de chocolat
haché. Répartir à la cuiller le mélange de crème. Répéter les mêmes étapes pour une
autre rangée de quatre quart, chocolat et mélange de crème. Saupoudrer le dessus
de chocolat haché. Couvrir et mettre au réfrigérateur. Donne 8 à 10 portions.
Les meilleurs biscuits au sucre
21⁄2
tasses (625 ml) de farine tout usage
1 c. à thé (5 ml) de levure chimique
1
⁄2
c. à thé (2,5 ml) de bicarbonate
de soude
1
⁄4 de c. à thé (1,25 ml) de sel
1
⁄4 de c. à thé (1,25 ml) de muscade
Four préchauffé à 375ºF (190ºC).
Mélanger farine, levure chimique, bicarbonate, sel et muscade et les mettre de côté.
Avec l’accessoire en forme de palette, défaire en crème le beurre à vitesse élevée
jusqu’à consistance légère et onctueuse. Réduire la vitesse au réglage le plus bas.
Ajouter le sucre, l’œuf et l’extrait de vanille en mélangeant soigneusement.
Incorporer petit à petit les ingrédients secs et le lait et continuer à mélanger parfaitement tous les ingrédients. Façonner la pâte à biscuits en boules de 1
1
⁄
2
po (2,5
cm) de diamètre et les disposer sur des tôles allant au four non graissées. Aplatir
légèrement les boules avec le fond d’un verre ordinaire. Cuire dans le four
préchauffé pendant 6 à 7 minutes ou jusqu’à ce que les bords soient légèrement
dorés. Laisser refroidir sur des grilles métalliques. Donne environ 4 douzaines.
1
⁄3 de tasse (80 ml) de liqueur à base
de café *
1
⁄3 de tasse (80 ml) de café infusé,à
température ambiante
6 onces (170 g) de chocolat à cuire
mi-sucré, finement haché
840115400 FRv05.qxd 7/2/03 1:55 PM Page 24
Page 52

25
Carrés au chocolat
1 sachet de 14 onces (400 g)
de caramels
1 boîte de 12 onces (350 g) de lait
évaporé, réparti
1 paquet de 18,25 onces (547,5 g)
de mélange à gâteau au chocolat
Préchauffer le four à 350ºF (180ºC). Graisser un plat de 13x9x2 pouces (33x25x5
cm); mettre de côté.
Déballer les caramels et les mettre dans une casserole avec 2 c. à table (30 ml) de
lait évaporé. Laisser fondre sur feu moyen à bas, en mélangeant constamment.
Avec l’accessoire en forme de palette, combiner le reste de lait évaporé, le mélange
à gâteau et le beurre fondu, à basse vitesse jusqu’à ce que les ingrédients soient
bien mélangés. Étaler la moitié de ce mélange dans le plat préparé et cuire pendant
10 minutes. Retirer du four.
Parsemer le dessus de pépites de chocolat et répandre les caramels fondus.
Répartir un peu partout à la cuiller le reste du mélange de gâteau. Parsemer de
pacanes et remettre le plat au four pendant 20 minutes. Donne 24 portions.
Pouding à la banane rapide et simple
1 paquet de 8 onces (225 g) de
fromage à la crème, ramolli
1 boîte de 14 onces (400 g) de lait
condensé sucré
1 paquet de 3,4 once (95 g) de
mélange de poudinginstantané
à la vanille
2 tasses (500 ml) de lait froid
Avec le fouet battre le fromage à la crème à vitesse élevée jusqu’à ce qu’il soit léger
et onctueux. Réduire la vitesse à un réglage bas. Ajouter le lait condensé, le
mélange de pouding, le lait et l’extrait de vanille. Continuer à mélanger jusqu’à consistance onctueuse. Arrêter le batteur et incorporer soigneusement la moitié de la
garniture fouettée. Garnir le fond d’un plat de 13 x 9 x 2 po (33 x 25 x 5 cm) de
gaufrettes à la vanille. Disposer uniformément les tranches de bananes dessus.
Répandre le mélange de pouding et ensuite le reste de la garniture fouettée pardessus. Laisser prendre au réfrigérateur. Donne 8 portions.
Biscuits magiques
1 tasse (250 ml) de beurre
1 tasse (250 ml) de sucre
1 tasse (250 ml) de cassonade dorée
2 œufs
2 tasses (500 ml) de farine
1 c. à thé (5 ml) de bicarbonate de soude
Préchauffer le four à 350ºF (180° C). Avec l’accessoire en forme de palette, défaire
en crème le beurre, le sucre et la cassonade à vitesse moyenne jusqu’à ce que les
ingrédients soient bien mélangés. Ajouter la vanille et les œufs. Réduire la vitesse et
incorporer petit à petit la farine, le bicarbonate, la levure et le sel et mélanger
jusqu’à consistance onctueuse. À basse vitesse, incorporer l’avoine, les pépites de
chocolat et la noix de coco jusqu’à ce que les ingrédients soient bien mélangés.
Sur une tôle non graissée, répartir des pleines cuillers de pâte. Cuire sur la grille au
milieu du four pendant 12 à 14 minutes. Donne 3 douzaines de biscuits.
6 c. à table (90 ml) de beurre, fondu
1 tasse (250 ml) de pépites de
chocolat mi-sucré
1
⁄4 de livre (115 g) de pacanes
entières (facultatif)
Tartes et autres desserts
Pour plus de recettes, consulter notre site Internet.
1
⁄
2 c. à thé de levure chimique
1
⁄2 c. à thé de sel
2 tasses de flocons d’avoine
1 c. à table de vanille
12 onces de pépites de chocolat
11⁄
2 tasse de noix de coco râpée
2 tasses (500 ml) de lait froid
1 c. à thé (5 ml) d’extrait de vanille
1 contenant de 8 onces (225 g) de
garniture fouettée, décongelée
1
⁄2
paquet de 12 onces (350 g) de
gaufrettes à la vanille
3 bananes moyennes mûres, tranchées
840115400 FRv05.qxd 7/2/03 1:55 PM Page 25
Page 53

26
Biscuits au chocolat
2
⁄3 de tasse (160 ml) de shortening
11⁄2 tasse (375 ml) de cassonade, tassée
1 c. à table (15 ml) d’eau
1 c. à thé (5 ml) de vanille
2 œufs
11⁄2 tasse (375 ml) de farine
1
⁄3 de tasse (80 ml) de cacao en
poudre non sucré
Préchauffer le four à 375ºF (190° C). Avec l’accessoire en forme de palette,
défaire en crème le shortening et la cassonade à réglage moyen jusqu’à ce
qu’ils soient mélangés. Ajouter l’eau, la vanille et les œufs et mélanger. Ajouter
la farine, le cacao, le bicarbonate et le sel et battre à réglage moyen jusqu’à ce
que les ingrédients soient parfaitement mélangés. À réglage bas, incorporer les
pépites de chocolat. Répartir des cuillerées à table de pâte sur des tôles non
graissées. Cuire pendant 7 à 9 minutes. Ne pas cuire excessivement. Donne
36 biscuits.
Biscuits moelleux au beurre d’arachides
1
⁄2 tasse (125 ml) de shortening végétal
1
⁄2 tasse (125 ml) de beurre d’arachides
11⁄4 tasse (310 ml) de cassonade dorée
1 œuf
1 c. à thé (5 ml) de vanille
Préchauffer le four à 275ºF (140° C). Avec l’accessoire en forme de palette,
battre shortening, beurre d’arachides, cassonade, œuf et vanille à réglage
moyen jusqu’à ce que les ingrédients soient bien mélangés. Réduire la vitesse
à un réglage bas et incorporer petit à petit les ingrédients secs jusqu’à ce qu’ils
soient mélangés. La pâte sera friable. Façonner des portions de pâte de 3
cuillers à table en forme de boules. Les placer sur une tôle non graissée et les
aplatir d’une épaisseur de 1⁄2 pouce (1 cm). Cuire pendant 18 à 20 minutes.
Ne pas cuire excessivement. Donne 16 biscuits.
1
⁄4 de c. à thé (1,25 ml) de bicarbonate
de soude
1
⁄2 c. à thé (2,5 ml) de sel
12 onces de pépites de chocolat
mi-sucré
3
⁄4 de c. à thé (3,75 ml) de sel
11⁄2 tasse (375 ml) de farine
1 c. à thé (5 ml) de bicarbonate de
soude
Tartes et autres desserts
Pour plus de recettes, consulter notre site Internet.
840115400 FRv05.qxd 7/2/03 1:55 PM Page 26
Page 54

27
Délices pour le petit déjeuner
Pour plus de recettes, consulter notre site Internet.
Gâteau à la crème sure pour la pause-café
Garniture croûtée
11⁄2 tasse (375 ml) de farine tout usage
11⁄2 bâtonnet (3⁄4 de tasse) [175 ml]
de beurre non salé, ramolli
1
⁄3 de tasse (80 ml) de cassonade
dorée, tassée
1
⁄3 de tasse (80 ml) de sucre granulé
11⁄4
c. à thé (6,25 ml) de cannelle
moulue
1 tasse (250 ml) de pacanes, hachées
Garniture Streusel
1
⁄3
de tasse (80 ml) de farine tout usage
1
⁄2 tasse (125 ml) de cassonade dorée,
tassée, répartie
3
⁄4
de c. à thé (3,75 ml) de cannelle moulue
3 c. à table (45 ml) de beurre froid
Garniture croûtée : Dans un petit bol, combiner la farine, le beurre, la cassonade, le sucre granulé et la cannelle et mélanger à la fourchette pour
obtenir de gros grumeaux. Incorporer les pacanes au mélange.
Garniture Streusel : Dans un autre petit bol, combiner la farine, la cassonade,
la cannelle et le beurre. Mélanger à la fourchette pour obtenir de gros
grumeaux.
Gâteau : Placer la grille du four à la position la plus basse. Préchauffer le four
à 350ºF (180ºC). Graisser avec du beurre un moule Bundt de 10 pouces.
Avec l’accessoire en forme de palette, défaire en crème le beurre jusqu’à ce
qu’il soit onctueux. Ajouter le sucre, la levure, le bicarbonate et le sel. Battre à
vitesse moyenne pendant 3 minutes. Avec le moteur en marche à basse
vitesse, ajouter les œufs, 1 à la fois, jusqu’à ce qu’ils soient bien mélangés,
puis incorporer la vanille et la crème sure. Incorporer petit à petit la farine et
continuer à mélanger jusqu’à ce que les ingrédients soient bien incorporés.
Étaler environ 2 tasses (500 ml) de pâte au fond du moule préparé. Parsemer
uniformément la moitié de la garniture Streusel. Répéter ces étapes. Étaler le
reste de la pâte et parsemer par-dessus les ingrédients de la garniture
croûtée.
Cuire pendant 50 à 60 minutes ou jusqu’à ce qu’un cure-dent inséré au
centre du gâteau en sorte propre. Laisser refroidir pendant 30 minutes sur
une grille métallique. Inverser le gâteau sur un plat et ensuite le retourner
sur la grille métallique, côté garniture croûtée vers le haut. Laisser refroidir
complètement. Donne un gâteau.
Gâteau
12 c. à table (180 ml) de beurre
non salé, ramolli
1
1
⁄4 tasse (310 ml) de sucre granulé
1 c. à table (15 ml) de levure
chimique
3
⁄4 c. à thé (3,75 ml) de bicarbonate
de soude
3
⁄4 c. à thé (3,75 ml) de sel
4 gros œufs
1 c. à table (15 ml) d’extrait de vanille
11⁄2 tasse (375 ml) de crème sure
21⁄4
tasses (560 ml) de farine tout
usage
840115400 FRv05.qxd 7/2/03 1:55 PM Page 27
Page 55

28
Truffes au chocolat, sans cuisson
1 paquet de 8 onces (225 g) de fromage
à la crème, à température ambiante
1
⁄4 de tasse (60 ml) de beurre,
à température ambiante
1 c. à thé (5 ml) de vanille
2
⁄3 de c. à thé (1,25 ml) de sel
Avec l’accessoire en forme de palette, battre le fromage à la crème et le beurre au
réglage 6 jusqu’à ce qu’ils soient onctueux. Ajouter la vanille, le sel et le cacao et
mélanger au réglage 4. Incorporer le sucre glace, 1 tasse (250 ml) à la fois, et battre
jusqu’à consistance onctueuse. Façonner des boules de 1 pouce (2,5 cm) et les
garder au congélateur pendant 1 heure. Les retirer du congélateur et les rouler dans
les noix. Conserver au réfrigérateur. Donne environ 3 douzaines.
Meringues miniatures
2 blancs d’œufs
2
⁄3 de c. à thé (1,25 ml) de
crème de tartre
Préchauffer le four à 275ºF (140ºC). Avec le fouet, battre en neige légère les blancs
d’œufs et la crème de tartre au réglage 12. Réduire la vitesse au réglage 10 et
incorporer lentement le sucre. Battre en neige très ferme. Retirer du socle et incorporer délicatement le cacao à la spatule. Mettre le mélange dans une poche à
douille. (Ou déposer à la cuiller le mélange dans un sac de plastique pour aliments
et en couper un coin pour obtenir une poche). Garnir une tôle à biscuits de papier
sulfurisé et dresser des petits tas de meringue (un peu moins qu’une cuiller à table).
Mettre la tôle au four et cuire pendant 15 minutes. Éteindre le four et laisser les
meringues sécher pendant une heure de plus. Retirer du four et laisser refroidir.
Donne environ 6 douzaines de meringues.
Sucrerie Pour plus de recettes, consulter notre site Internet
2
⁄3 de tasse (150 ml) de cacao en
poudre non sucré
31⁄2
tasses (875 ml) de sucre glace
1
⁄2 tasse (125 ml) de pacanes ou
noix, finement hachées
Beurre à la cannelle
1 tasse (250 ml) de beurre non salé,
ramolli
2 c. à table (30 ml) de sucre glace
Avec le fouet, battre le beurre à vitesse élevée jusqu’à ce qu’il soit léger et onctueux.
Réduire la vitesse à un réglage bas puis incorporer le sucre, la cannelle et la muscade et battre jusqu’à consistance onctueuse et crémeuse. Ce beurre accompagne
parfaitement les crêpes, rôties et biscuits. Conserver dans un contenant fermé, au
réfrigérateur. Donne 8 portions.
Beurre au miel
1 tasse (250 ml) de beurre non salé,
ramolli
Avec le fouet, battre le beurre à vitesse élevée jusqu'à ce qu’il soit léger et
onctueux. Réduire la vitesse à un réglage bas puis ajouter le miel et battre jusqu’à
consistance onctueuse. Ce beurre accompagne parfaitement les crêpes, rôties et
biscuits. Conserver dans un contenant fermé, au réfrigérateur. Donne 8 portions.
1 c. à thé (5 ml) de cannelle moulue
1 pincée de muscade en poudre
2 c. à table (30 ml) de cacao en poudre
non sucré
1
⁄2 tasse (125 ml) de sucre
1
⁄2 tasse (125 ml) de miel
840115400 FRv05.qxd 7/2/03 1:55 PM Page 28
Page 56

1
⁄4 de tasse (60 ml) de beurre, à tempéra-
ture ambiante
1 c. à thé (5 ml) de sel
1 œuf
3
1
⁄2 à 4 tasses (875 ml à 1 L) de farine
1 c. à table (15 ml) de beurre, fondu
3 c. à table (45 ml) de sucre
1 c. à thé (5 ml) de sel
1 œuf
3 à 3
1
⁄2
tasses (750 à 875 ml) de farine
Petits pains pour le dîner
Pain en moule, prêt en 90 minutes
1
⁄2 tasse (125 ml) d’eau tiède,
de 100 à 110ºF (38 à 43ºC)
2 sachets de _ once (8 g chacun)
de levure de boulanger, sèche
2
⁄3 de tasse (150 ml) de lait tiède
1
⁄4 de tasse (60 ml) de sucre
Verser l’eau dans le bol à mélanger. Ajouter la levure et la laisser se dissoudre pendant 5
minutes. Ajouter lait, sucre, beurre, sel et œuf. Avec le crochet de pétrissage, mélanger
les ingrédients au réglage 2, puis ajouter 3 tasses (750 ml) de farine. Ajouter plus de
farine au besoin pour obtenir une pâte molle et collante. Pétrir au réglage 4 pendant 3
minutes. Couvrir et laisser la pâte lever dans un endroit tiède pendant 30 minutes.
Préchauffer le four à 400ºF (200ºC). Remuer la pâte puis la mettre dans un plat de 9 x
13 pouces (33 x 23 x 5 cm), graissé, allant au four. Étendre en aplatissant la pâte
jusqu’aux bords du plat. Laisser la pâte lever dans un endroit tiède pendant 30 minutes.
Cuire pendant 15 à 20 minutes jusqu’à ce qu’elle devienne dorée. Retirer du four et
badigeonner le dessus de beurre fondu. Donne 20 portions.
Petits pains simples au levain
1 tasse (250 ml) d’eau tiède,
de 100 à 110ºF (38 à 43ºC)
1 paquet de _ d’once (8 g) de levure
de boulanger, sèche
1
⁄4 de tasse (60 ml) de beurre,
fondu et refroidi
Verser l’eau dans le bol à mélanger. Ajouter la levure et la laisser se dissoudre pendant 5 minutes. Ajouter le beurre, le sucre, le sel et l’œuf. Avec le crochet de pétrissage mélanger les
ingrédients à la vitesse 2 pendant environ 30 secondes. Ajouter 3 tasses (750 ml) de farine et
mélanger au réglage 4 pendant environ 2 minutes. Ajouter de la farine au besoin pour obtenir
une pâte molle. Couvrir la pâte et la laisser lever dans un endroit tiède pendant environ 1 heure.
Préchauffer le four à 350ºF (180ºC). Remuer la pâte pour l’abaisser et la mettre sur une surface légèrement farinée. Diviser la pâte en 4 parties égales, ensuite diviser chaque portion en
4 boules de la grosseur d’une balle de golf. Placer les 16 boules ainsi obtenues dans un plat
allant au four graissé de 9 x 13 pouces (33 x 23 x 5 cm). Laisser la pâte lever dans un endroit
tiède pendant environ 30 minutes. Cuire pendant 25 à 30 minutes. Donne 16 petits pains.
Pains moelleux au levain
1 sachet de 1⁄4 once (8 g) de levure
de boulanger, sèche
1
⁄4 de tasse (60 ml) d’eau tiède,
de 100 à 110ºF (38 à 43ºC)
4 tasses (1 L) de farine
3 c. à table (45 ml) de sucre
Préchauffer le four à 400ºF (200ºC). Laisser la levure se dissoudre dans l’eau et la mettre de
côté. Mettre la farine, le sucre, la levure chimique, le bicarbonate et le sel dans le bol à mélanger.
Avec le crochet de pétrissage remuer les ingrédients secs au réglage 2. Ajouter le shortening et
augmenter la vitesse au réglage 4. Mélanger pendant environ 1 minute. Ajouter la levure dissoute et continuer à mélanger. Incorporer lentement le babeurre. Mélanger au réglage 4 pendant environ 1 minute. Mettre la pâte sur une surface légèrement farinée et saupoudrer de plus
de farine. Étendre la pâte délicatement sur une épaisseur d’un demi pouce (1 cm). Couper avec
un emporte-pièce rond et placer les rondelles de pâte sur une tôle en s’assurant que les bords
se touchent. Cuire pendant 15 à 20 minutes. Donne 16 à 20 biscuits.
2 c. à thé (10 ml) de levure chimique
1 c. à thé (5 ml) de bicarbonate de soude
1 c. à thé (5 ml) de sel
2
⁄3 de tasse (150 ml) de shortening végétal
1
1
⁄4 tasse (310 ml) de babeurre
H
AMILTON BEACH PROCTOR-SILEX,INC.
P
ROCTOR-SILEX CANADA,INC.
263 Yadkin Road. Southern Pines, North Carolina 28387
Picton, Ontario K0K 2T0
840115400
hamiltonbeach.com
7/03
840115400 FRv05.qxd 7/2/03 1:55 PM Page 29
 Loading...