

Page 1

READ BEFORE USE
LIRE AVANT UTILISATION
LEA ANTES DE USAR
Visit www.hamiltonbeach.com for our
complete line of products and Use and
Care Guides – as well as delicious recipes,
tips, and to register your product online!
Rendez-vous sur www.hamiltonbeach.ca
pour notre liste complète de produits et de
nos manuels utilisateur – ainsi que nos
délicieuses recettes et nos conseils !
¡Visite www.hamiltonbeach.com (
o
www.hamiltonbeach.com.mx (México)
para ver otros productos de Hamilton Beach
o para contactarnos!
EE. UU.)
Stay or Go™
Blender
Questions?
Please call us – our friendly
associates are ready to help.
USA: 1.800.851.8900
Questions ?
N’hésitez pas à nous appeler –
nos associés s’empresseront
de vous aider.
CAN : 1.800.267.2826
¿Preguntas?
Por favor llámenos – nuestros
amables representantes están
listos para ayudar.
EE.
UU.: 1.800.851.8900
MEX: 01 800 71 16 100
Le invitamos a leer cuidadosamente este
instructivo antes de usar su aparato.
Mélangeur
Licuadora
English ....................... 2
Français .................... 13
Español .................... 25
Page 2

IMPORTANT SAFEGUARDS
When using electrical appliances, basic safety precautions should always be followed to reduce the risk of fire, electric shock, and/or injury to
persons, including the following:
1. Read all instructions.
2. This appliance is not intended for use by persons (including
children) with reduced physical, sensory, or mental capabilities,
or lack of experience and knowledge, unless they are closely
supervised and instructed concerning use of the appliance by a
person responsible for their safety.
3. Close supervision is necessary when any appliance is used by
or near children. Children should be supervised to ensure that
they do not play with the appliance.
4. To protect against risk of electrical shock, do not put cord, plug,
base, or motor in water or other liquid.
5. Unplug cord from outlet when not in use, before putting on or
taking off parts, and before cleaning.
6. Avoid contact with moving parts.
7. Do not operate any appliance with a damaged cord or plug,
or after the appliance malfunctions, or has been dropped or
damaged in any manner. Call our toll-free customer service
number for information on examination, repair, or electrical or
mechanical adjustment.
8. The use of attachments, including canning jars, not
recommended or sold by the appliance manufacturer may cause
a risk of injury to persons.
9. Do not use outdoors.
10. Do not let cord hang over edge of table or counter or touch hot
surfaces, including stove.
11. Keep hands and utensils out of blending jar while blending
to reduce the risk of severe personal injury and/or damage to
blender. A rubber spatula may be used but must be used only
when blender is not running.
12. Blades are sharp; handle carefully—especially when
assembling, disassembling, or cleaning inside blending jar.
13. Do not use a broken, chipped, or cracked blending jar.
14. Do not use broken, cracked, or loose cutting blade assembly.
15. To reduce the risk of injury, never place cutting blade assembly
on base without blending jar or grinding cup properly attached.
16. Always operate blender with lid in place.
17. Do not blend hot liquids in the travel jar or grinding cup.
18. When blending hot liquids in the 32-oz. blending jar, remove
center piece of two-piece cover. Hot liquids may push lid off jar
during blending. To prevent possible burns: Do not fill blending
jar beyond the 3-cup (710-ml) level. With the protection of an
oven mitt or thick towel, place one hand on top of lid. Keep
exposed skin away from lid. Start blending
at lowest speed.
19. Ensure collar on base of blending jar, travel jar, and grinding
cup are tight and secure. Injury can result if moving blades
accidentally become exposed.
20. If the jar should twist or rotate when the motor is switched ON
(I), switch OFF (O) immediately and tighten jar in collar
or on blender base.
21. Do not leave blender unattended while it is operating.
22. Before plugging cord into wall outlet, turn the control to OFF (O).
To disconnect cord, turn the control to OFF (O). Then remove
plug from wall outlet.
23. Do not use appliance for other than intended purpose.
24. 24. Do not place on or near a hot gas or electric burner or in a
heated oven.
SAVE THESE INSTRUCTIONS!
2
Page 3

Other Consumer Safety Information
This appliance is intended for household use only. Use for food
or liquids only.
w WARNING
with a polarized plug (one wide blade) to reduce the risk of
electric shock. The plug fits only one way into a polarized outlet.
Do not defeat the safety purpose of the plug by modifying the
plug in any way or by using an adapter. If the plug does not fit
fully into the outlet, reverse the plug. If it still does not fit, have an
electrician replace the outlet.
Electrical Shock Hazard: This appliance is provided
Wattage/Peak Power Information
The wattage/ampere rating of the blender is determined by an
Underwriters Laboratory test and is based on available cutting
blade assembly, jar combinations, and attachments that may
not be provided with your unit, but are available as replacement
parts. This is a measure of input wattage/amperes after 30
seconds of operation. The blender as provided may draw
significantly less power.
Peak power is the measure of the motor wattage during the first
seconds of operation. This is when a blender requires the most
power to crush ice, frozen fruit, etc. This is a better measure of
what a blender motor can consume when power is needed
most.
The length of the cord used on this appliance was selected to
reduce the hazards of becoming tangled in or tripping over a
longer cord. If a longer cord is necessary, an approved extension
cord may be used. The electrical rating of the extension cord
must be equal to or greater than the rating of the appliance. Care
must be taken to arrange the extension cord so that it will not
drape over the countertop or tabletop where it can be pulled on
by children or accidentally tripped over.
If the cutting blade assembly locks and will not move, it will
damage the motor. Do not use. Call the toll-free customer service
number for information.
Do not place blending jar in the freezer filled with food or liquid.
This can result in damage to the cutting blade assembly, jar,
blender, and possibly result in personal injury.
BEFORE FIRST USE: After unpacking blender, wash everything
except blender base in hot, soapy water. Dry thoroughly. Wipe
blender base with a damp cloth or sponge. DO NOT IMMERSE
BASE IN WATER. Care should be taken when handling cutting
blade assembly as it is very sharp.
3
Page 4

Parts and Features
BEFORE FIRST USE: After unpacking the blender, follow
the instructions in “Care and Cleaning.”
*To order parts:
US: 1.800.851.8900
www.hamiltonbeach.com
Canada: 1.800.267.2826
Mexico: 01 800 71 16 100
Drinking Lid*
Shaker/Storage
Lid*
32-oz. Blending Jar*
Filler-Cap*
Lid*
*Optional accessory on
select models
Cutting Blades With
Permanent Gasket*
(Do not try to remove
gasket.)
Collar*
Control Panel
Control Panel
16-oz. Travel Jar*
4
8-oz. Grinding Cup*
Base
Page 5

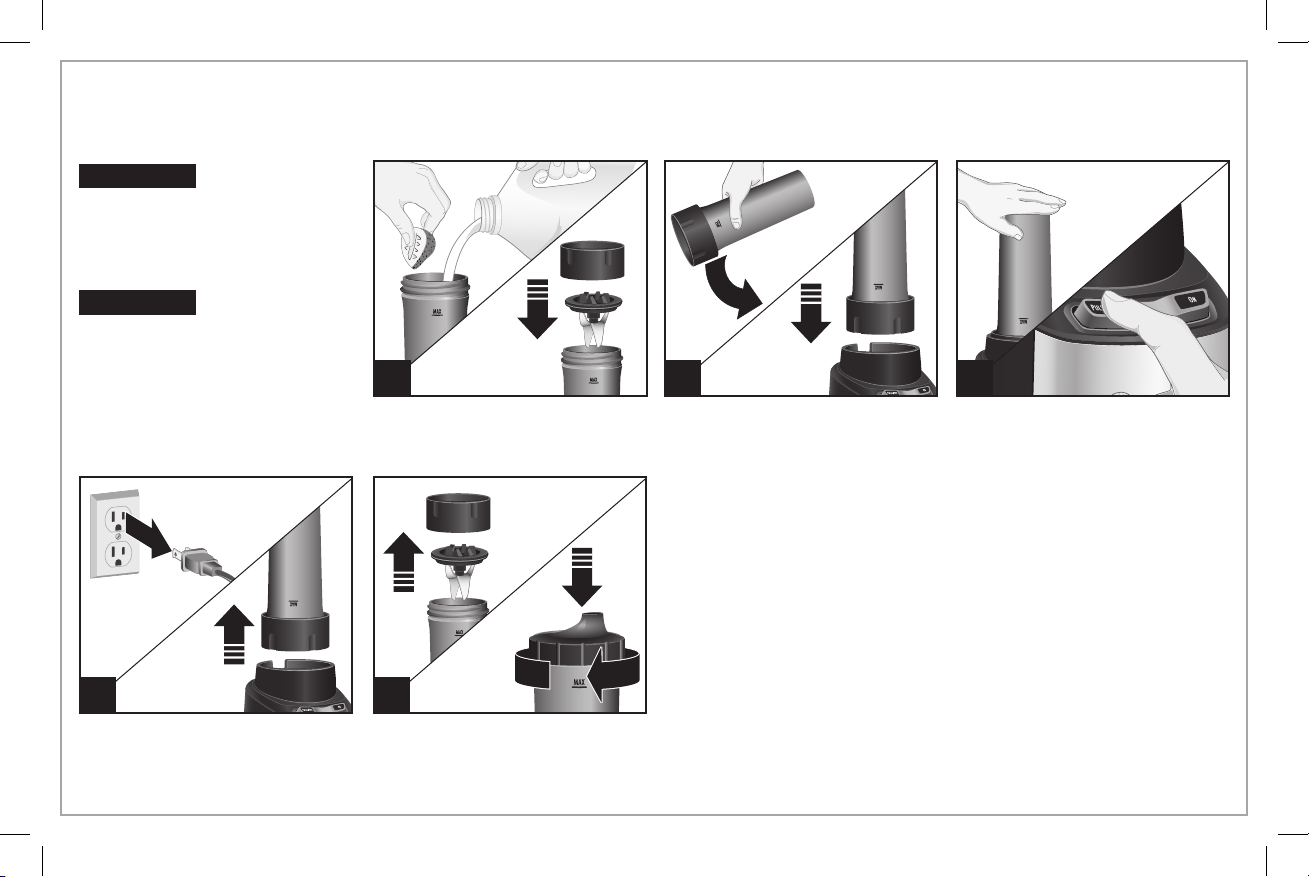
Using Your Blending Jar
IMPORTANT: Your blending jar
and cutting blade assembly are
subject to wear during normal
use. Always inspect jar for nicks,
chips, or cracks. Always inspect
cutting blade assembly for
broken, cracked, or loose blades.
If jar or cutting blade assembly
is damaged, do not use. Call
our toll-free customer service
number to obtain replacement
parts.
w WARNING
Handle blades carefully; they are very sharp. Make sure
unit is turned OFF (O) and is unplugged.
Laceration Hazard.
321
w WARNING
Burn Hazard: Do not blend hot
liquids in the travel jar or grinding
cup. When blending hot liquids,
remove filler-cap. Hot liquids may
push lid off jar during blending.
To prevent possible burns: Do
not fill blending jar beyond the
3-cup (710-ml) level. With the
protection of an oven mitt or
thick towel, place one hand on
4
5 6 – OPTIONAL
Push the desired speed button.
When using the PULSE button,
the blender will only run when
the button is held down.
top of lid. Keep exposed skin
away from lid. Start blending at
lowest speed.
5
Page 6

Using Your Blending Jar (cont.)
Blender Tips
1087 9
• To add foods when blender is operating, remove filler-cap from lid
and add ingredients through the opening.
• For best performance in the 32-oz. blending jar, the minimum
amount of liquid needed per recipe is 1 cup (8 ounces/237 ml). The
16-oz. travel jar requires 3/4 cup (177 ml) liquid per recipe for best
performance. Add more liquid if food is not blending properly.
6
• If blending action stops during blending or ingredients stick to
sides of the jar, there may not be enough liquid in the jar to blend
efficiently.
• Do not try to mash potatoes, mix stiff dough, whip egg whites,
grind raw meat, or extract juices from fruits and vegetables.
• Do not store food or liquids in the blending jar.
• Avoid bumping or dropping the blender when in operation or at
any time.
Page 7
Using the Travel Jar (optional accessory on select models)
w WARNING
Do not blend hot ingredients.
Pressure may build, causing jar
to pop off and hot ingredients to
erupt.
w WARNING
Handle blades carefully; they
are very sharp. Make sure unit is
turned OFF (O) and is unplugged.
Burn Hazard.
Laceration Hazard.
4 5
1 2 3
Add ingredients to travel jar.
Carefully place cutting assembly
and collar onto travel jar.
Turn travel jar upside down and
place onto base.
Blending Tips for the 16-oz. Travel Jar
• For best performance in the 16-oz. travel jar, the minimum amount of
liquid needed per recipe is 3/4 cup (6 ounces/177 ml).
• Do not chop or process hard foods such as cheese, crackers, or meat.
• If blending action stops during blending or ingredients stick to sides
of the jar, turn blender OFF (O). Remove jar, collar, and blade and
use a narrow rubber spatula to stir.
Turn bottom up; remove collar
and cutting blade assembly from
jar. Hand-tighten drinking lid onto
travel jar.
• Do not process hot foods or liquids in travel jar.
• Avoid bumping or dropping the blender.
• If blender stops working, unplug and allow 15 minutes before using.
Plug into outlet to start blending.
Hold jar in place while blending.
Plug into outlet. Press ON (I) or
PULSE to blend 60 seconds or
until smooth. Always operate on
a countertop or other supporting
surface.
7
Page 8

TIPS FOR BEST RESULTS:
Blending Drinks
TYPE OF DRINK INGREDIENTS (32 oz.) INGREDIENTS (16 oz.) BLENDER SETTING/TIME
Fruit Smoothie 1 1/2 cups (355 ml) milk
Milkshake 1 3/4 cups (414 ml) milk
Frozen Drink 2 cups (473 ml) drink mix, such as
Grinding Food
Parmesan Cheese 4 oz. (113 g) 1/2-in. (1.3-cm) cubes
Nuts 1/2 cup (118 ml) None
Cookie or Cracker Crumbs 1/2 cup (118 ml) Break cookies or crackers into pieces
Coffee Beans 1/2 cup (118 ml) None
8
2 cups (473 ml) yogurt
2 1/2 cups (591 ml) frozen berries or
other fruit
Serves: 4–5
4 large scoops ice cream
1/4 cup (59 ml) flavored syrup
Serves: 4–5
Piña Colada mix
4 oz. (118 ml) liquor, if desired
20 ice cubes
Serves: 4–5
TIPS FOR BEST RESULTS:
FOOD MAX AMOUNT IN GRINDING CUP PREPARATION
• Press PULSE until food is the desired texture.
• Parmesan cheese and other hard cheeses should remain refrigerated prior to blending.
• Always place liquid in blending jar first, then remaining ingredients.
• If ice is not blending, stop blender and pulse a few times.
3/4 cup (177 ml) milk
3/4 cup (177 ml) yogurt
1 cup (237 ml) frozen berries or
other fruit
Serves: 1–2
1 cup (237 ml) milk
2 large scoops ice cream
2 to 3 tablespoons (30 to 44 ml)
flavored syrup
Serves: 1–2
1 cup (237 ml) drink mix, such as
Piña Colada mix
2 oz. (59 ml) liquor, if desired
10 ice cubes
Serves: 2–3
PULSE for 60 seconds.
Press ON (I) and blend until
well blended.
Press ON (I) and blend until
well blended.
PULSE for 60 seconds.
Press ON (I) and blend until
well blended.
Page 9

Using the Grinding Cup (optional accessory on select models)
w WARNING
Laceration Hazard.
Ensure unit is OFF (O) and
unplugged before attaching
grinding cup. Do not plug in and
turn on until cup is secured onto
base.
Always turn OFF (O), unplug,
and allow blade to stop spinning
before removing from base.
Handle blades carefully; they are
very sharp.
w WARNING
Burn Hazard.
Do not blend hot ingredients.
Pressure may build, causing jar
to pop off and hot ingredients to
erupt.
4 5 6
1 2 3
Add ingredients (no more than
1/2 cup or to the MAX fill line)
to grinding cup. Carefully place
cutting assembly and collar onto
cup.
Turn bottom up, remove collar
and cutting blade assembly from
cup. Hand-tighten shaker/storage
lid onto cup.
Turn cup upside down and place
onto base.
Turn top of lid to desired hole
size. Shake to dispense.
Hold cup in place while blending.
Plug into outlet. Press ON (I) or
PULSE to chop. Always operate
on a countertop or other
supporting surface.
NOTE: Do not blend liquid
ingredients in the 8-oz. grinding
cup.
9
Page 10

Care and Cleaning
NOTE: Some optional accessories are shown that may be included with some models.
w WARNING
Disconnect power before cleaning. Do not immerse
cord, plug, base, or motor in water or other liquid.
Electrical Shock Hazard.
1
5 DISHWASHER-SAFE
EASY CLEAN: To Easy Clean, pour 2 cups (473 ml) warm water into 32-oz. jar and add 1 drop liquid dishwashing detergent. Press ON (I) and
blend for 10 seconds. Discard soapy water. Rinse with clean water. To Easy Clean the travel jar and grinding cup, repeat directions above,
except reduce warm water to 3/4 cup (177 ml).
This is not a substitute for regular cleaning as instructed in “Care and Cleaning.”
Easy Clean should only be used to rinse the blender between batches of processing the same food. When the processing of a single type of
food is finished, the blender should be disassembled and thoroughly cleaned as instructed in “Care and Cleaning.”
10
2
Wipe blender base, control panel,
and cord with a damp cloth or
sponge. To remove stubborn
spots, use a mild, nonabrasive
cleanser.
3 4
DO NOT use the “SANI” setting
when washing in the dishwasher.
“SANI” cycle temperatures could
damage your product. Parts may
also be washed with hot, soapy
water. Care should be taken
when handling the cutting blade
assembly as it is very sharp.
Rinse and dry thoroughly. Do
not soak.
Page 11

Recipes for 32-oz. Blending Jar
Triple Berry Smoothie
1/2 cup (118 ml) cranberry-raspberry juice
1 cup (237 ml) fresh strawberries, hulled
1 cup (237 ml) fresh raspberries
1/2 cup (118 ml) fresh blueberries
1/2 cup (118 ml) vanilla yogurt
10 ice cubes
Directions:
1. Place ingredients in blending jar in order listed.
2. Cover and blend until smooth.
TEST KITCHEN TIP: Try different combinations of fresh berries and
juice to make new flavors of smoothies.
Serves: 4
Mango Smoothie
1/2 cup (118 ml) fresh orange juice
1/2 cup (118 ml) peach yogurt
2 tablespoons (30 ml) honey
1 cup (237 ml) fresh mango
3–4 ice cubes
Directions:
1. Place ingredients in blending jar in order listed.
2. Cover and blend until smooth.
*Always place liquid ingredients in blender first.
Serves: 2–4
Vanilla Milkshake With Mix-Ins
3/4 cup (177 ml) milk
3 large scoops vanilla ice cream
1/4 cup (59 ml) crushed candy or cookies, optional
Directions:
1. Place ingredients in blending jar in order listed.
2. Cover and blend until smooth.
TEST KITCHEN TIPS:
• Always place liquid ingredients in blender first.
• For best results, crush candy or cookies before adding to
milkshake. When milkshake is blended, pour crushed candy or
cookies on top and PULSE blender 3 to 4 times to mix.
Serves: 2–3
Fresh and Spicy Salsa
1 onion, peeled and quartered
1 clove garlic
1 jalapeno pepper, stem removed
4 small tomatoes, quartered
1/4 cup (59 ml) cilantro
1 tablespoon (15 ml) lime juice
1/2 teaspoon (2.5 ml) cumin
Salt and pepper to taste
Directions:
1. Place onion, garlic, and pepper in blender. Cover and PULSE until
finely minced. Stir as needed. Stop blender.
2. Add tomatoes, cilantro, lime juice, cumin, salt, and pepper. Cover
and PULSE until desired texture is reached, stirring as needed.
Serves: 6–8
11
Page 12

Limited Warranty
This warranty applies to products purchased and used in the U.S. and Canada. This is the only express warranty for this product and
is in lieu of any other warranty or condition.
This product is warranted to be free from defects in material and workmanship for a period of five (5) years from the date of original
purchase in Canada and three (3) years from the date of original purchase in the U.S. During this period, your exclusive remedy is
repair or replacement of this product or any component found to be defective, at our option; however, you are responsible for all
costs associated with returning the product to us and our returning a product or component under this warranty to you. If the product
or component is no longer available, we will replace with a similar one of equal or greater value.
This warranty does not cover glass, filters, wear from normal use, use not in conformity with the printed directions, or damage to
the product resulting from accident, alteration, abuse, or misuse. This warranty extends only to the original consumer purchaser or
gift recipient. Keep the original sales receipt, as proof of purchase is required to make a warranty claim. This warranty is void if the
product is used for other than single-family household use or subjected to any voltage and waveform other than as specified on the
rating label (e.g., 120V ~ 60 Hz).
We exclude all claims for special, incidental, and consequential damages caused by breach of express or implied warranty. All
liability is limited to the amount of the purchase price. Every implied warranty, including any statutory warranty or condition
of merchantability or fitness for a particular purpose, is disclaimed except to the extent prohibited by law, in which case such
warranty or condition is limited to the duration of this written warranty. This warranty gives you specific legal rights. You may have
other legal rights that vary depending on where you live. Some states or provinces do not allow limitations on implied warranties or
special, incidental, or consequential damages, so the foregoing limitations may not apply to you.
To make a warranty claim, do not return this appliance to the store. Please call 1.800.851.8900 in the U.S. or 1.800.267.2826 in Canada
or visit hamiltonbeach.com in the U.S. or hamiltonbeach.ca in Canada. For faster service, locate the model, type, and series numbers
on your appliance.
12
Page 13

PRÉCAUTIONS IMPORTANTES
Pour utiliser un appareil électroménager, vous devez toujours prendre des mesures élémentaires de sécurité pour réduire le risque d’incendie,
d’électrocution et/ou de blessure corporelle, en particulier les mesures suivantes :
1. Lire toutes les instructions.
2. Cet appareil n’est pas destiné à être utilisé par des personnes (y
compris les enfants) dont les capacités physiques, sensorielles
ou mentales sont réduites, ou manquant d’expérience et
de connaissance, sauf si elles sont étroitement surveillées
et instruites sur l’utilisation de l’appareil par une personne
responsable de leur sécurité.
3. Une surveillance étroite est requise pour tout appareil utilisé par
ou près des enfants. Surveiller que les enfants ne jouent pas
avec l’appareil.
4. Pour éviter les risques d’électrocution, ne pas immerger
le cordon, la fiche, la base ou le moteur dans l’eau ou
tout autre liquide.
5. Débrancher le cordon de la prise dès la fin de l’utilisation, avant
d’installer ou de retirer des pièces et avant le nettoyage.
6. Éviter de toucher les parties mobiles.
7. Ne pas utiliser aucun appareil dont le cordon ou la prise est
endommagé, ou suite à toutes anomalies de fonctionnement
de l’appareil, une chute ou tout autre dommage quel qu’il soit.
Appeler notre numéro sans frais de service à la clientèle pour des
renseignements concernant l’examen, la réparation ou l’ajustement
électrique ou mécanique.
8. L’utilisation d’accessoires non recommandés ou vendus par
le fabricant de l’appareil, incluant les boîtes de conserve, peut
provoquer des blessures.
9. Ne pas utiliser à l’extérieur.
10. Ne pas laisser pendre le cordon de la table ou du comptoir
et éviter tout contact entre le cordon et les surfaces chaudes
incluant la cuisinière.
11.
Tenir les mains et les ustensiles hors du récipient de mélangeur
pendant le fonctionnement pour réduire les risques de blessures
ou de dommages à l’appareil. Un racloir en caoutchouc peut être
utilisé, mais uniquement lorsque le moteur de l’appareil est arrêté.
12.
Les lames sont tranchantes ; manipuler avec soin lors de
l’assemblage et du démontage ou lors du nettoyage de l’intérieur
du récipient du mélangeur.
13.
Ne pas utiliser un récipient de mélangeur brisé, craqué ou fissuré.
14. Ne pas utiliser des lames brisées, fissurées ou lâches.
15. Pour éviter les risques de blessure, ne jamais placer les lames
sans avoir correctement avoir sécurisé le récipient
ou la tasse de broyage
16. Toujours installer le couvercle avant de faire fonctionner l’appareil.
17. Ne pas mélanger de liquides chauds dans la tasse de voyage ou
de broyage.
18. Lors du mélange de liquides très chauds dans le récipient
mélangeur de
en deux parties. Les liquides chauds peuvent pousser sur le
couvercle pendant le mélange. Pour prévenir les brûlures : Ne
pas remplir au-delà de la marque 3 tasses (710 ml) du récipient
du mélangeur. À l’aide d’un gant de cuisinier ou d’une serviette
épaisse, placer une main sur le dessus du couvercle. Garder la
peau exposée éloignée du couvercle. Commencer à mélanger en
utilisant la vitesse minimale.
19. Serrer et sécuriser le collier de la base du récipient du
mélangeur, la tasse de voyage et de broyage. Des risques de
blessures peuvent survenir si les lames en mouvement sont
accidentellement exposées.
20. Si le récipient bouge ou tourne pendant que le moteur est en
marche (ON/I), mettre immédiatement le mélangeur hors tension
(OFF/O) puis serrer le collier au mélangeur ou à la base du
mélangeur.
21. Ne pas laisser le mélangeur sans surveillance pendant le
fonctionnement.
22. Avant de brancher la fiche dans la prise, tourner la commande
à OFF (arrêt/O). Débrancher le cordon et tourner la commande à
OFF (arrêt/O). Retirer ensuite la fiche de la prise murale.
32 oz (946 ml), retirer la pièce central du couvercle
sur la base.
de mélangeur
de
13
Page 14

23. N’utiliser cet appareil que pour les fonctions auxquelles il est
destiné.
CONSERVER CES INSTRUCTIONS !
Autres consignes de sécurité pour le consommateur
Cet appareil est destiné à un usage domestique uniquement.
Utiliser seulement pour les aliments et les liquides.
w AVERTISSEMENT
fourni avec une fiche polarisée (une broche large) pour réduire le
risque d’électrocution. Cette fiche n’entre que dans un seul sens
dans une prise polarisée. Ne contrecarrez pas l’objectif sécuritaire
de cette fiche en la modifiant de quelque manière que ce soit ou en
utilisant un adaptateur. Si vous ne pouvez pas insérer complètement
la fiche dans la prise, inversez la fiche. Si elle refuse toujours de
s’insérer, faire remplacer la prise par un électricien.
Information au sujet de la tension et
La puissance et l’intensité nominales du mélangeur sont
déterminées par un essai du Underwriters laboratories basé sur
des combinaisons de lames, de récipient et des accessoires pouvant
ne pas être offerts pour votre appareil, mais offertes comme pièces
de rechange. Ceci est une mesure d’entrée de tension et d’intensité
suite à un fonctionnement d’une durée de 30 secondes. Le
mélangeur, comme fourni, peut être plus éconergétique.
La puissance maximale est la mesure de la puissance restituée du
moteur au cours des premières secondes de fonctionnement. Ceci
représente la puissance maximale requise par votre mélangeur
14
Risque de choc électrique : Cet appareil est
de la puissance maximale
24. Ne placer pas sur ou à proximité d’un brûleur électrique ou à gaz
chaud ou dans un four chaud.
La longueur du cordon installé sur cet appareil a été sélectionnée
afin de réduire les risques d’enchevêtrement ou de faux pas
causés par un fil trop long. L’utilisation d’une rallonge approuvée
est permise si le cordon est trop court. Les caractéristiques
électriques de la rallonge doivent être équivalentes ou supérieures
aux caractéristiques de l’appareil. Prendre toutes les précautions
nécessaires pour installer la rallonge de manière à ne pas la faire
courir sur le comptoir ou sur une table pour éviter qu’un enfant ne
tire sur le cordon ou trébuche accidentellement.
Les lames qui se bloquent ou refusent de bouger peuvent
endommager le moteur. Ne pas utiliser. Appeler la ligne sans
frais du Service à la clientèle pour plus d’informations.
Ne pas stocker le récipient du mélangeur au congélateur s’il contient
des aliments ou du liquide. Ceci pourrait endommager les lames, le
récipient, le mélangeur et éventuellement, occasionner des blessures.
pour piler la glace, les fruits congelés, etc. Ceci est une mesure plus
juste du moteur du mélangeur lors de sa demande énergétique
maximale.
AVANT LA PREMIÈRE UTILISATION : Après avoir déballé le
mélangeur, laver tout le mélangeur à l’exception de la base dans
l’eau chaude savonneuse. Assécher complètement. Essuyer la
base du mélangeur avec un linge humide ou une éponge. NE PAS
IMMERGER PAS LA BASE DANS L’EAU. Les lames du mélangeur
sont très tranchantes et demandent à être manipulées avec grande
prudence.
Page 15

Pièces et caractéristiques
*Pour commander des pièces :
Canada : 1.800.267.2826
Bouchon de
remplissage*
AVANT LA PREMIÈRE UTILISATION :
Déballer le mélangeur et suivre les instructions
au chapitre « Entretien et nettoyage ».
*Accessoire en option
sur certains modèles
Tasse de voyage
de 16 oz (473 ml)*
Couvercle à bec*
Couvercle pour
mélange / rangement*
Tasse de broyage
de 8 oz (237 ml)*
Récipient du mélangeur
de 32 oz (946 ml)*
Base
Couvercle*
Lames de coupe avec joint
d’étanchéité permanent*
(Ne pas essayer de
démonter le joint.)
Collier*
Panneau de contrôle
Panneau de contrôle
15
Page 16

Utilisation du récipient du mélangeur
IMPORTANT : Le récipient
mélangeur
lames du mélangeur peuvent s’user
au cours de l’utilisation normale.
Inspecter toujours le récipient à
la recherche d’entailles, d’écailles
ou de fissures. Inspecter toujours
l’assemblage des lames à la
recherche de brisures, fissures ou
de relâchement. Ne pas utiliser un
récipient ou un assemblage de lame
endommagé. Appeler le numéro
sans frais du Service à la clientèle
pour obtenir des pièces de rechange.
et l’assemblage des
du
w AVERTISSEMENT
Risque de déchirures.
Tenir las lames avec soins ; ils sont très
coupantes. S’assurer que l’appareil est
hors tension (OFF/O) et débranché.
321
16
w AVERTISSEMENT
Risque de brûlures : Ne pas
mélanger de liquides chauds dans
la tasse de voyage ou de broyage.
Lors du mélange de liquides
chauds, retirer le bouchon
de remplissage. Les liquides
chauds peuvent pousser sur le
couvercle pendant le mélange.
Pour prévenir les brûlures : Ne
pas remplir au-delà de la marque
4
5 6 – OPTIONNEL
Appuyer sur le bouton de vitesse
désiré. Lors de l’utilisation du bouton
PULSE (impulsion), le mélangeur
ne fonctionne que pendant que le
bouton reste appuyé.
3 tasses (710 ml) du récipient du
mélangeur. À l’aide d’un gant
de cuisinier ou d’une serviette
épaisse, placer une main sur le
dessus du couvercle. du couvercle.
Commencer à mélanger
en utilisant la vitesse minimale.
Page 17

Utilisation du récipient du mélangeur
(suite)
87 9
Conseils
• Pour ajouter des aliments pendant que le mélangeur fonctionne,
retirer le bouchon de remplissage et ajouter les ingrédients par
l’ouverture.
• Pour un meilleur résultat dans le récipient du mélangeur de
32 oz, la quantité minimale de liquide nécessaire par recette
est de 8 oz. Pour un meilleur résultat de la tasse de voyage de
16 oz, une quantité de 6 oz (177 ml) de liquide par recette est
nécessaire. Ajouter du liquide si les aliments ne se mélangent pas
correctement.
10
• Si le processus de mélange cesse pendant le fonctionnement
ou que les ingrédients collent aux parois du récipient, il faudra
peut-être ajouter du liquide dans le récipient pour obtenir un
mélange efficace.
• Ne pas tenter de piler les pommes de terre, les mélanges de pâtes
massives, fouetter des blancs d’oeufs, broyer de la viande crue ou
d’extraire des jus de fruits et de légumes.
• Ne pas stocker d’aliments ou de liquides dans le récipient du
mélangeur.
• Éviter de frapper ou échapper le mélangeur pendant son
fonctionnement, et ce, en tout temps.
17
Page 18

Utilisation de la tasse de voyage
w AVERTISSEMENT
Risque de brûlures.
Ne pas mélanger d’ingrédients
chauds. La pression provoquée
par la chaleur peut provoquer
l’éclatement du couvercle et
répandre les ingrédients chauds.
w AVERTISSEMENT
Risque de déchirures.
Tenir las lames avec soins ; ils
sont très coupantes. S’assurer
que l’appareil est hors tension
(OFF/O) et débranché.
4 5
18
1 2 3
Verser les ingrédients dans la tasse
de voyage. Installer soigneusement
l’assemblage de lame et le collier
sur la tasse de voyage.
Inverser
en place pendant le mélange. Brancher dans la prise. Appuyer sur ON
(marche/I) ou PULSE (impulsion) et mélanger pendant 60 secondes ou
jusqu’à ce que la texture soit lisse.
sur un comptoir ou autre surface d’appui.
la tasse de voyage
et l’installer sur la base. Tenir le récipient
Conseils de mélange pour la tasse
de voyage de 16 oz
• Pour un meilleur résultat dans la tasse de voyage de 16 oz, la quantité minimale
de liquide nécessaire par recette est de 6 oz (177 ml).
• Ne hacher ni ne mélanger des aliments durs comme le fromage, les craquelins
ou la viande.
• Si le mouvement de brassage cesse en cours de mélange ou si les ingrédients
adhèrent aux parois du bol, éteigner (O) le mélangeur. Retirer la bouteille, le
collier et la lame et mélanger avec une spatule étroite en plastique.
• Ne mélanger pas des aliments ou des liquides chauds dans la tasse de voyage.
Retourner à la verticale, retirer
le collier et la lame du récipient.
Serrer manuellement le couvercle
sur
la tasse de voyage
.
• Éviter de heurter ou échapper le mélangeur.
• Si le mélangeur cesse de fonctionner, le débrancher et attendre 15 minutes avant
de l’utiliser à nouveau. Brancher la fiche dans la prise de courant et commencer
le mélange.
(accessoire en option
sur certains modèles)
Toujours faire fonctionner l’appareil
Page 19

CONSEILS POUR DE MEILLEURS RESULTANTS :
Mélanger des boissons
SORTE DE
BOISSON INGRÉDIENTS (32 oz) INGRÉDIENTS (16 oz) RÉGLAGE/DURÉE
Frappé aux fruits 1 1/2 tasses (355 ml) de lait
2 tasses (473 ml) de yogourt
2 1/2 tasses (591 ml) de baies/fruits congelés
Servir : 4 à 5
Lait frappé 1 3/4 tasses (414 ml) de lait
4 grosses cuillères pleines de crème glacée
1/4 tasse (59 ml) de sirop aromatisé
Servir : 4 à 5
Boisson congelée 2 tasses (473 ml) de mélange pour boisson
comme un mélange pour pina colada
4 oz. (118 ml) de liqueur, si désiré
20 cubes de glace
Servir : 4 à 5
3/4 tasse (177 ml) de lait
3/4 tasse (177 ml) de yogourt
1 tasse (237 ml) de baies/fruits congelés
Servir : 1 à 2
1 tasse (237 ml) de lait
2 grosses cuillères pleines de crème glacée
2 à 3 c. à soupe (30 à 44 ml) de sirop
aromatisé
Servir : 1 à 2
1 tasse (237 ml) de mélange pour boisson
comme un mélange pour pina colada
2 oz. (59 ml) de liqueur, si désiré
10 cubes de glace
Servir : 2 à 3
Pour broyer des aliments
• Toujours déposer le liquide dans le récipient du mélangeur
en premier ; verser ensuite les autres ingrédients.
• Si la glace ou les morceaux de fruits ne se mélangent pas,
arrêter le mélangeur et appuyer sur PULSE (impulsion) à
quelques reprises.
PULSE (impulser) pendant
60 secondes. Appuyer
sur ON (marche/I) et bien
mélanger.
Appuyer sur ON (marche/I)
et bien mélanger.
PULSE (impulser) pendant
60 secondes. Appuyer
sur ON (marche/I) et bien
mélanger.
CONSEILS POUR DE MEILLEURS RESULTANTS:
• Appuyer sur PULSE (impulsion) jusqu’à ce que les
aliments atteignent la texture désirée.
• Le parmesan et les autres fromages fermes doivent
rester au réfrigérateur avant de les mélanger.
ALIMENTS QUANTITÉ MAX. DE LA TASSE DE BROYAGE PRÉPARATION
Fromage parmesan 4 oz (113 g) Morceaux de 1/2 po (1,3 cm)
Noix 1/2 tasse (118 ml) Aucune
Miettes de biscuits ou craquelins 1/2 tasse (118 ml) Briser en morceaux
Grains de café 1/2 tasse (118 ml) Aucune
19
Page 20

Utilisation de la tasse de broyage
w AVERTISSEMENT
Risque de déchirures.
S’assurer que l’appareil est hors
tension (OFF/O) et débranché
avant d’installer la tasse de
broyage. Ne pas brancher ou
mettre l’appareil en marche tant
que la tasse n’est pas installée
correctement sur la base.
Toujours mettre l’appareil hors
tension (OFF/O), le débrancher
et laisser la lame s’immobiliser
avant de retirer la tasse de la
base. Tenir la lame avec soins;
elle est très coupante.
w AVERTISSEMENT
Risque de brûlures.
Ne pas mélanger d’ingrédients
chauds. La pression provoquée
par la chaleur peut provoquer
l’éclatement du couvercle et
répandre les ingrédients chauds.
REMARQUE : Ne pas mélanger
les ingrédients liquides dans
la tasse de broyage de 8 oz
(237 ml).
20
1 2 3
Ajouter les ingrédients (pas plus
de 1/2 tasse [118 ml] ou jusqu’à
la ligne de remplissage MAX)
dans la tasse de broyage. Installer
soigneusement l’assemblage de
lame et le collier sur la bouteille.
Inverser la tasse et l’installer sur la base. Tener la tasse en place
pendant le mélange. Brancher sur une prise de
sur ON (marche/I) ou PULSE (impulsion) pour hacher.
fonctionner l’appareil sur un comptoir ou autre surface d’appui.
4 5 6
Retourner à la verticale, retirer le collier et la lame du tasse. Visser
manuellement le couvercle pour mélange/rangement de café sur la tasse.
Tourner le dessus du couvercle pour obtenir la dimension d’ouverture
désirée. Agiter à distribuer.
(accessoire en option
sur certains modèles)
courant.
Appuyer
Toujours faire
Page 21

w AVERTISSEMENT
Entretien et nettoyage
NOTE : Certains accessoires en option sont indiqués pouvant être inclus avec certains modèles.
Débrancher le cordon d’alimentation avant le nettoyage.
N’immerger pas le cordon, la fiche ni la base dans quelque liquide.
Risque d’électrocution.
1
5
NETTOYAGE RAPIDE : Pour nettoyer rapidement, verser 2 tasses (473 ml) d’eau chaude dans le récipient de 32 oz et ajouter une goutte de savon à vaisselle. Appuyer
sur ON (marche/I) et mélanger pendant 10 secondes. Jeter l’eau savonneuse. Rincer avec de l’eau propre. Pour nettoyer facilement la tasse de voyage et de broyage,
répéter les instructions ci-dessus en réduisant la quantité d’eau chaude à 6 oz (177 ml).
Ceci ne remplace pas le nettoyage périodique indiqué au chapitre « Entretien et nettoyage ».
Cette méthode de nettoyage rapide ne doit être utilisée que pour rincer le mélangeur entre les transformations d’aliments identiques. Lorsque la transformation d’un
seul type d’aliment est terminée, le mélangeur doit être démonté et entièrement nettoyé comme indiqué au chapitre « Entretien et nettoyage ».
2
Essuyer la base du mélangeur,
le panneau de commande et le
cordon avec un linge humide
ou une éponge. Pour enlever
les taches rebelles, utiliser un
nettoyant doux et non abrasif.
3 4
NE PAS utiliser le réglage
“SANI” du lave-vaisselle. Les
températures du cycle “SANI”
peuvent endommager le produit.
Les pièces peuvent être lavées
également avec de l’eau chaud
et savonneux. L’assemblage de
lames est très tranchantes et
demandent à être manipulées
LAVABLES AU
LAVE-VAISSELLE
avec grande prudence. Rincer et
sécher soigneusement. Ne pas
faire tremper.
21
Page 22

Recettes pour récipient du mélangeur
de 32 oz
Frappés aux 3 fruits
1/2 tasse (118 ml) de jus de canneberge et framboise
1 tasse (237 ml) de fraises fraîches, équeutées
1 tasse (237 ml) de framboises fraîches
1/2 tasse (118 ml) de bleuets frais
1/2 tasse (118 ml) de yogourt à la vanille
10 glaçons
Instructions :
1. Déposer les ingrédients dans le récipient du mélangeur dans l’ordre
indiqué.
2. Couvrir et mélanger jusqu’à ce que le mélange soit lisse.
CONSEILS : Essayer d’autres combinaisons de fruits et de jus pour obtenir de
nouvelles saveurs de frappés.
Servir: 4
Frappé à la mangue
1/2 tasse (118 ml) de jus d’orange frais
1/2 tasse (118 ml) de yogourt aux pêches
2 c. à table (30 ml) de miel
1 tasse (237 ml) de mangue fraîche
3 à 4 glaçons
Instructions :
1. Déposer les ingrédients dans le récipient du mélangeur dans l’ordre
indiqué.
2. Couvrir et mélanger jusqu’à ce que le mélange soit lisse.
* Toujours déposer les ingrédients liquides dans le mélangeur en premier.
Servir: 2 à 4
22
Lait fouetté à la vanille et ingrédients
3/4 tasse (177 ml) de lait
3 grosses cuillères de crème glacée à la vanille
1/4 tasse (59 ml) de bonbons ou biscuits broyés, facultatifs
Instructions :
1. Déposer les ingrédients dans le récipient du mélangeur dans l’ordre
indiqué.
2. Couvrir et mélanger jusqu’à ce que le mélange soit lisse.
CONSEILS :
• Toujours déposer les ingrédients liquides dans le mélangeur en premier.
• Pour des résultats optimaux, broyer les bonbons ou les biscuits avant de les
ajouter au lait frappé. Lorsque le lait fouetté est mélangé, verser les bonbons
ou les biscuits broyés sur le dessus puis impulser 3 à 4 fois pour mélanger.
Servir: 2 à 3
Salsa fraîche et épicée
1 oignon pelé et coupé en
quartiers
1 gousse d’air
1 piment jalapeno, épépiné
4 petites tomates coupées en
quartier
Instructions :
1. Déposer l’oignon, l’ail et le piment dans le mélangeur. Couvrir et impulser
(PULSE) jusqu’à ce le tout soit finement haché. Mélanger au besoin. Mettre
le mélangeur hors tension.
2. Ajouter les tomates, la coriandre, le jus de limette, le cumin, le sel et le
poivre. Couvrir et impulser (PULSE) jusqu’à obtention de la texture désirée,
en remuant au besoin.
Servir: 6 à 8
1/4 tasse (59 ml) de coriandre
1 c. à table (15 ml) de jus
de limette
1/2 c. à thé (2,5 ml) de cumin
Sel et poivre au goût
Page 23

Notes
23
Page 24

Garantie limitée
Cette garantie s’applique aux produits achetés et utilisées aux É.-U. et au Canada. C’est la seule garantie expresse pour ce
produit et est en lieu et place de tout autre garantie ou condition.
Ce produit est garanti contre tout défaut de matériaux et de main-d’oeuvre pour une période des cinq (5) ans à compter de
la date d’achat d’origine au Canada et trois (3) ans à compter de la date d’achat d’origine aux É.-U. Au cours de cette période,
votre seul recours est la réparation ou le remplacement de ce produit ou tout composant s’avérant défectueux, à notre gré,
mais vous êtes responsable de tous les coûts liés à l’expédition du produit et le retour d’un produit ou d’un composant dans
le cadre de cette garantie. Si le produit ou un composant n’est plus offert, nous le remplacerons par un produit similaire de
valeur égale ou supérieure.
Cette garantie ne couvre pas le verre, les filtres, l’usure d’un usage normal, l’utilisation non conforme aux directives imprimées,
ou des dommages au produit résultant d’un accident, modification, utilisation abusive ou incorrecte. Cette garantie s’applique
seulement à l’acheteur original ou à la personne l’ayant reçu en cadeau. La présentation du reçu de vente d’origine comme
preuve d’achat est nécessaire pour faire une réclamation au titre de cette garantie. Cette garantie s’annule si le produit est
utilisé autrement que par une famille ou si l’appareil est soumis à toute tension ou forme d’onde différente des caractéristiques
nominales précisées sur l’étiquette (par ex. : 120 V ~ 60 Hz).
Nous excluons toutes les réclamations au titre de cette garantie pour les dommages spéciaux, consécutifs et indirects causés
par la violation de garantie expresse ou implicite. Toute responsabilité est limitée au prix d’achat. Chaque garantie implicite,
y compris toute garantie ou condition de qualité marchande ou d’adéquation à un usage particulier, est exonérée, sauf
dans la mesure interdite par la loi, auquel cas la garantie ou condition est limitée à la durée de cette garantie écrite. Cette
garantie vous donne des droits légaux précis. Vous pouvez avoir d’autres droits qui varient selon l’endroit où vous habitez.
Certaines provinces ne permettent pas les limitations sur les garanties implicites ou les dommages spéciaux ou indirects de
telle sorte que les limitations ci-dessus ne s’appliquent peut-être pas à votre cas.
Ne pas retourner cet appareil au magasin lors d’une réclamation au titre de cette garantie. Téléphoner au 1.800.851.8900 aux
É.-U. ou au 1.800.267.2826 au Canada ou visiter le site internet www.hamiltonbeach.com aux É.-U. ou www.hamiltonbeach.ca
au Canada. Pour un service plus rapide, trouvez le numéro de modèle, le type d’appareil et les numéros de série sur votre
appareil.
24
Page 25

SALVAGUARDIAS IMPORTANTES
Cuando utilice artefactos eléctricos, siempre deben seguirse precauciones de seguridad básicas a fin de reducir el riesgo de incendio,
descarga eléctrica, y/o lesiones a personas, incluyendo las siguientes:
1. Lea todas las instrucciones.
2. Este aparato no se destina para utilizarse por personas
(incluyendo niños) cuyas capacidades físicas, sensoriales o
mentales sean diferentes o estén reducidas, o carezcan de
experiencia o conocimiento, a menos que dichas personas
reciban una supervisión o capacitación para el funcionamiento
del aparato por una persona responsable de su seguridad.
3. Se requiere de una estrecha supervisión cuando el aparato se use
cerca de niños. Los niños deben supervisarse para asegurar que
ellos no empleen los aparatos como juguete.
4. Verifique que el voltaje de su instalación corresponda con el del
producto.
5. Para protegerse contra un riesgo de descarga eléctrica, no ponga
el cable, enchufe, base o motor en agua o cualquier otro líquido.
6. Desconecte el cable de la toma cuando no esté en uso, antes
de poner o quitar partes y antes de limpiar.
7. Evite el contacto con partes móviles.
8. Nunca opere cualquier aparato con un cable o enchufe dañado,
o después de un mal funcionamiento, o se caiga o dañe de
cualquier manera. Llame a nuestro número gratuito de servicio
al cliente para información sobre examinación, reparación o
ajuste électrico o mécanico.
9. El uso de aditamentos, incluyendo latas, no recomendados o
vendidos por el fabricante del aparato pueden causar un riesgo
de lesiones personales.
10. No lo use en exteriores.
11. No deje que el cable cuelgue del borde de la mesa o cubierta,
o toque superficies calientes, incluyendo la estufa.
12. Mantenga las manos y utensilios fuera de la jarra de licuado
mientras se mezcla para reducir el riesgo de lesiones personales
severas y/o daños a la licuadora. Se puede usar una espátula
de hule pero sólo debe ser usada cuando no esté funcionando
la licuadora.
13. Las cuchillas están afiladas; manéjelas con cuidado
especialmente cuando ensamble, desensamble o limpie
dentro de la jarra de licuado.
14. No use una jarra para licuado rota, estrellada o rajada.
15. No use un conjunto de cuchilla de corte roto, rajado o flojo.
16. Para reducir el riesgo de lesión, nunca coloque el conjunto de
cuchilla de corte sobre la base sin que la jarra para licuado o taza
moledora esté adecuadamente adherida.
17. Siempre use la licuadora con la tapa en su lugar.
18. No licue líquidos calientes en la jarra para viajes o la taza
moledora.
19. Cuando licue líquidos calientes en la jarra de licuado de 32 oz,
quite la pieza central de la tapa de dos piezas. Los líquidos
calientes pueden empujar la tapa durante el licuado. Para prevenir
posibles quemaduras: No llene la jarra de licuado más allá del
nivel de 3 tazas (710 ml). Con la protección de guantes de cocina o
una toalla gruesa, coloque una mano encima de la tapa. Mantenga
la piel expuesta lejos de la tapa. Comience a licuar
a una velocidad baja.
20. Asegúrese de que collar de la base de la jarra de licuado, la jarra
para viajes y la taza moledora esté fijo y asegurado. Pueden
ocurrir lesiones si las cuchillas móviles accidentalmente quedan
expuestas.
21. Si la jarra se tuerce o gira cuando el motor se enciende, apáguelo
(ON/I) inmediatamente y apriete (OFF/O) la jarra en el collar o en
la base de la licuadora.
22. No deje sin atención la licuadora mientras esté funcionando.
Antes de enchufar el cable en el tomacorriente, gire el control
a OFF (apagado/O). Para desconectar el cable, ponga el control
en OFF (apagado/O). Luego remueva el enchufe de la toma de
la pared.
25
Page 26

23. No use el aparato para otro propósito que no sea para el que fue
hecho.
¡GUARDE ESTAS INSTRUCCIONES!
Otra Información de Seguridad para el Cliente
Este aparato ha sido diseñado solamente para uso doméstico. Sólo
úselo para alimentos o líquidos.
w ADVERTENCIA
es provisto con un enchufe polarizado (una pata más ancha)
para reducir el riesgo de una descarga eléctrica. El enchufe
embona únicamente en una dirección dentro de un tomacorriente
polarizado. No trate de obviar el propósito de seguridad del enchufe
modificándolo de alguna manera o utilizando un adaptador. Si el
enchufe no entra completamente en la toma, invierta el enchufe. Si
aún no entra, haga que un electricista reemplace la toma.
Información sobre Watt/Energía Pico
La clasificación del wattaje/amperaje de la licuadora se determina
por una prueba de Laboratorio del Suscriptor y está basada en las
combinaciones de conjunto de cuchilla de corte, jarra, y accesorios
disponibles que pueden no proporcionarse con su unidad, pero
están disponibles como partes de reemplazo. Esta es una medida
de entrada de watt/amperes después de 30 segundos de operación.
La licuadora como se provee puede tomar significativamente menos
energía.
La energía pico es la medida del wattaje del motor durante los
primeros segundos de operación. Esto es cuando la licuadora
Peligro de Descarga Eléctrica: Este aparato
24. No coloque sobre o cerca de una cocina caliente eléctrica o a gas
o dentro de un horno caliente.
El largo del cable que se usa en este aparato fue seleccionado para
reducir el peligro de que alguien se enganche o tropiece con un
cable más largo. Si es necesario usar un cable más largo, se podrá
usar un cable de extensión aprobado. La clasificación eléctrica
nominal del cable de extensión debe ser igual o mayor que la
clasificación nominal del aparato. Es importante tener cuidado
de colocar el cable de extensión para que no se pliegue sobre el
mostrador o la mesera en donde niños puedan tirar del mismo o
tropezarse accidentalmente.
Si el conjunto de cuchilla de corte se atora y no se mueve, dañará el
motor. No la use. Llame a nuestro número de asistencia al cliente sin
costo para información.
No coloque la jarra de licuado en el congelador lleno de comida
o líquido. Esto puede resultar en un daño del conjunto de cuchilla de
corte, jarra, licuadora y resulte posiblemente en lesiones personales.
requiere la mayor energía para cortar hielo, fruta congelada, etc.
Esta es una mejor medición de lo que un motor de licuadora puede
consumir cuando más se requiere energía.
ANTES DE USAR POR PRIMERA VEZ: Después de desempacar la
licuadora, lave todo excepto la base de la licuadora en agua caliente
jabonosa. Seque completamente. Limpie la base de la licuadora con
un paño húmedo o esponja. NO SUMERJA LA BASE EN AGUA. Se
debe de tener cuidado cuando se manipule el conjunto de cuchilla
cortadora ya que está muy afilada.
26
Page 27

Partes y Características
*Para ordenar partes:
EE. U.U.: 1.800.851.8900
www.hamiltonbeach.com
México:
01 800 71 16 100
Tapa para
Beber*
ANTES DE USAR POR PRIMERA VEZ: Después de
desempacar la licuadora, siga las instrucciones en
“Cuidado y Limpieza”.
*Accessorio opcional
Tapa de Llenado*
Tapa*
Cuchillas de Corte con
Junta Permanente
(No trate de quitar la junta).
en modelos selectos
Jarra para Viajes
de 16 oz.*
Tapa de Mezclador/
Almacenamiento*
Taza Moledora
de 8 oz.*
Collar*
Panel de Control
Panel de Control
Jarra de Licuado
de 32 oz.*
Base
27
Page 28

Cómo Usar la Jarra de Licuado
IMPORTANTE: La jarra de su
licuado y el conjunto de cuchilla
de corte están sujetos a desgaste
durante el uso normal. Siempre
inspeccione la jarra por cortes,
astillas o rajaduras. Siempre
inspeccione el conjunto de
cuchilla de corte por cortes,
rajaduras o cuchillas sueltas. Si
la jarra o el conjunto de cuchilla
de corte están dañados, no los
use. Llame a nuestro número de
servicio a cliente sin costo para
obtener piezas de reemplazo.
w ADVERTENCIA
Peligro de Laceración.
Maneje las cuchillas cuidadosamente; está
muy afilada. Asegúrese de que la unidad
esté apagada (OFF/O) y desenchufada.
321
28
w ADVERTENCIA
Peligro de Quemaduras. No licue
líquidos calientes en la jarra para
viajes o la taza moledora. Cuando
licue líquidos calientes, quite
la tapa de llenado. Los líquidos
calientes pueden empujar la tapa
durante el licuado. Para prevenir
posibles quemaduras: No llene
la jarra de licuado más allá del
nivel de 3 tazas (710 ml). Con la
4
5 6 – OPCIONAL
Presione el botón de velocidad
deseado. Cuando utilice el botón
PULSE (pulso), la licuadora sólo
funcionará cuando el botón se
mantenga presionado.
protección de guantes de cocina
o una toalla gruesa, coloque
una mano encima de la tapa.
Mantenga la piel expuesta lejos
de la tapa. Comience a licuar a
una velocidad baja.
Page 29

Cómo Usar la Jarra de Licuado (cont.)
Consejos Para la Licuadora
1087 9
• Para agregar alimentos mientras la licuadora está en
funcionamiento, quite la tapa de llenado de la tapa del recipiente
y agregue los ingredientes a través de la abertura.
• Para un mejor desempeño de la jarra de licuado de 32 oz.,
la cantidad mínima de líquido necesaria por receta es 1 taza
(8 onzas/237 ml). La jarra para viajes de 16 oz. requiere 3/4 taza
(177 ml) de líquido por receta para lograr un mejor desempeño.
Agregue más líquido si el alimento no se licúa adecuadamente.
• Si la acción de licuado se detiene durante el licuado o los
ingredientes se pegan a los lados de la jarra, puede que no
haya suficiente líquido en la jarra para licuar efectivamente.
• No intente hacer puré de papa, licuar masa dura, batir claras de
huevo, moler carne cruda, o extraer jugos de frutas y verduras.
• No almacene alimentos o líquidos en la jarra de licuado.
• Evite golpear o dejar caer la licuadora cuando esté en
funcionamiento o en cualquier momento.
29
Page 30

Cómo Usar la Jarra para Viajes
w ADVERTENCIA
Peligro de Quemaduras.
No licue ingredientes calientes.
Puede acumularse presión, lo que
provocaría que el vaso se
de golpe y los ingredientes
salgan disparados.
w ADVERTENCIA
Peligro de Laceración.
Maneje las cuchillas cuidadosamente;
está muy afilada. Asegúrese de que
la unidad esté apagada (OFF/O) y
desenchufada.
4 5
30
destape
calientes
1 2 3
Agregue los ingredientes a la
jarra para viajes. Con cuidado
coloque el montaje de corte y el
anillo en la jarra para viajes.
Dé vuelta la jarra para viajes y colóquelo sobre la base. Sostenga la
jarra en su lugar cuando esté licuando. Enchufe en el tomacorriente.
Presione ON (encendido/I) o PULSE (pulso) para licuar de 60 segundos
o hasta que quede homogéneo. Siempre utilice la unidad sobre un
mostrador o otra superficie de apoyo.
Consejos de Licuado para la Jarra para
Viajes de 16 oz.
• Para un mejor desempeño de la jarra para viajes de 16 oz., la cantidad mínima
de líquido necesaria por receta es 3/4 taza (6 onzas/177 ml).
• No pique o procese alimentos duros tales como queso, galletas o carne.
• Si la acción de licuado se detiene o si los ingredientes se pegan a los costados
de la vaso, apague (O) la licuadora. Quite el vaso, el anillo y la cuchilla y utilice
una espátula de goma angosta para mezclar.
Dé vuelta, quite el anillo y el
montaje de corte de la jarra.
Ajuste a mano la tapa para beber
en la jarra para viajes.
• No procese alimentos o líquidos calientes en la jarra para viajes.
• Trate de no golpear o dejar caer la licuadora.
• Si la licuadora deja de funcionar, desenchúfela y deje pasar 15 minutos antes
de volver a usarla. Enchúfela en un tomacorriente para comenzar el licuado.
(accessorio opcional
en modelos selectos)
Page 31

CONSEJOS PARA MEJORES RESULTADOS:
Cómo Preparar Bebidas
TIPO DE BEBIDA INGREDIENTS (32 oz.) INGREDIENTES (16 oz.)
Smoothie
de Fruta
Batido de Leche 1 3/4 tazas (414 ml) de leche
Bebida
Congelada
1 1/2 tazas (355 ml) de leche
2 tazas (473 ml) de yogurt
2 1/2 tazas (591 ml) de bayas congeladas
u otra fruta
Rendimiento: 4 a 5
4 cucharadas grandes de helado
1/4 taza (59 ml) de jarabe saborizado
Rendimiento: 4 a 5
2 tazas (473 ml) de mezcla para bebidas,
como mezcla de Piña Colada
4 oz. (118 ml) de bebida alcohólica, si
así lo desea
20 cubitos de hielo
Rendimiento: 4 a 5
3/4 taza (177 ml) de leche
3/4 taza (177 ml) de yogurt
1 taza (237 ml) de bayas congeladas
u otra fruta
Rendimiento: 1 a 2
1 taza (237 ml) de leche
2 cucharadas grandes de helado
2 a 3 cucharada (30 a 44 ml) de jarabe
saborizado
Rendimiento: 1 a 2
1 taza (237 ml) de mezcla para bebidas,
como mezcla de Piña Colada
2 oz. (59 ml) de bebida alcohólica, si así
lo desea
10 cubitos de hielo
Rendimiento: 2 a 3
Cómo Moler Alimentos
• Siempre coloque primero el líquido en la jarra de licuado;
luego los ingredientes restantes.
• Si los trozos de fruta helados o congelados no se licuan,
detenga la licuadora y PULSE algunas veces.
CONSEJOS PARA MEJORES RESULTADOS:
• Presione PULSE hasta que los alimentos alcancen la textura deseada.
• El queso parmesano y otros quesos duros deben permanecer
refrigerados antes de efectuar el licuado.
CONFIGURACIÓN DE
LICUADORA/TIEMPO
Presione PULSE (pulso) por
60 segundos. Presione ON
(encendido/I) y licue hasta
que quede bien mezclado.
Presione ON (encendido/I) y
licue hasta que quede bien
mezclado.
Presione PULSE (pulso) por
60 segundos. Presione ON
(encendido/I) y licue hasta
que quede bien mezclado.
ALIMENTO CANTIDAD MÁX EN LA TAZA MOLEDORA PRÉPARATION
Queso Parmesano 4 oz. (113 g) Trozos 1/2 pulg. (1.3 cm)
Nueces 1/2 taza (118 ml) Ninguna
Galletas Dulces o Saladas en Trocitos 1/2 taza (118 ml) Romper en trozos
Granos de Café 1/2 taza (118 ml) Ninguna
31
Page 32

Cómo Usar la Taza Moledora
w ADVERTENCIA
Peligro de Laceración.
Verifique que la unidad esté OFF
(apagado/O) y desenchufada antes
de colocar la taza moledora. No
enchufe ni encienda la unidad hasta
que la taza se halle bien instalada
en la base.
Siempre OFF (apagado/O),
desenchufe y espere a que
la cuchilla deje de girar antes
de quitarla de la base. Maneje las
cuchillas cuidadosamente; está
muy afilada.
w ADVERTENCIA
Peligro de Quemaduras.
No licue ingredientes calientes.
Puede acumularse presión, lo que
provocaría que el vaso se
de golpe y los ingredientes
salgan disparados.
destape
calientes
1 2 3
Agregue los ingredientes (no más
de 1/2 taza o hasta la línea de
llenado MAX) a la taza moledora.
Con cuidado coloque el montaje
de corte y el anillo en la taza.
Dé vuelta la taza para viajes y colóquelo sobre la base. Sostenga la
taza en su lugar cuando esté licuando. Enchufe en el tomacorriente.
Presione ON (encendido/I) o PULSE (pulso) para picar. Siempre utilice
la unidad sobre un mostrador o otra superficie de apoyo.
(accessorio opcional
en modelos selectos)
NOTA: No licúe ingredientes
líquidos en la taza modelora de
8 oz (237 ml).
32
4 5 6
Dé vuelta, quite el anillo y el montaje de corte de la taza. Ajuste a
mano la tapa de mezclador/almacenamiento en la taza. Gire la parte
superior de la tapa hasta alcanzar el tamaño de orificio deseado.
Agite para servir.
Page 33

w ADVERTENCIA
Cuidado y Limpieza
NOTA: Algunos de los accesorios opcionales se muestran que puede ser incluido con algunos modelos.
Desconecte la energía antes de limpiar. No sumerja el cable, el enchufe,
base o motor en agua u otro liquido.
Peligro de Descarga Eléctrica.
1
5
LIMPIEZA SENCILLA: Para limpiar la unidad de manera sencilla, vierta 2 tazas (473 ml) de agua tibia en la jarra de 32 oz. y agregue 1 gota de detergente líquido para vajillas.
Presione ON (encendido/I) y licue durante 10 segundos. Elimine el agua jabonosa. Enjuague con agua limpia. Para efectuar una limpieza sencilla de la jarra para viajes y de la
taza moledora, repita las instrucciones anteriores, pero reduzca el agua tibia a 3/4 taza (177 ml).
Esto no es un reemplazo de la limpieza regular señalada en “Cuidado y Limpieza”.
La limpieza sencilla sólo debe utilizarse para enjuagar la licuadora entre tandas de preparación del mismo alimento. Cuando se haya finalizado la preparación de una clase
única de alimentos, la licuadora debe desarmarse y limpiarse a fondo siguiendo las instrucciones de “Cuidado y Limpieza”.
2
Limpie la base de la licuadora, el
panel de control y el cable con
un paño húmedo o esponja. Para
remover las manchas tercas, use
un limpiador suave no abrasivo.
3 4
No utilice la configuración
“SANI” cuando la lave en el
lavavajillas. Las temperaturas
del ciclo “SANI” pueden
dañar su producto. Las piezas
también pueden lavarse con
agua caliente jabonosa. Se
debe de tener cuidado cuando
se manipule el conjunto de
RESISTENTE AL
LAVAVAJILLAS
cuchilla de corte ya que está
muy afilada. Enjuague y seque
completamente. No empape.
33
Page 34

Recetas para la Jarra de Licuado de 32 oz.
Smoothie de Tres Bayas
1/2 taza (118 ml) de jugo de arándano-frambuesa
1 taza (237 ml) de frutillas frescas sin cabito
1 taza (237 ml) de frambuesas frescas
1/2 taza (118 ml) de arándanos frescos
1/2 taza (118 ml) de yogurt de vainilla
10 cubitos de hielo
Instrucciones:
1. Coloque los ingredientes en la jarra de licuado en el orden listado.
2. Cubra y mezcle que quede homogéneo.
CONSEJO DE COCINA: Pruebe diferentes combinaciones de bayas
y jugos frescos para preparar nuevos sabores de smoothies.
Rendimiento: 4
Smoothie de Mango
1/2 taza (118 ml) de jugo de naranja fresco
1/2 taza (118 ml) de yogurt de durazno
2 cucharadas (30 ml) de miel
1 taza (237 ml) de mango fresco
3–4 cubitos de hielo
Instrucciones:
1. Coloque los ingredientes en la jarra de licuado en el orden listado.
2. Cubra y mezcle que quede homogéneo.
*Siempre coloque primero los ingredientes líquidos en la licuadora.
Rendimiento: 2–4
Milkshake de Vainilla con Agregados
3/4 taza (177 ml) de leche
3 cucharadas grandes de helado de vainilla
1/4 taza (59 ml) de golosinas o galletas trituradas (opcional)
Instrucciones:
1. Coloque los ingredientes en la jarra de licuado en el orden listado.
2. Cubra y mezcle que quede homogéneo.
CONSEJOS DE COCINA:
• Siempre coloque primero los ingredientes líquidos en la licuadora.
• Para mejores resultados, triture golosinas o galletas antes de
agregarlos al milkshake. Cuando el milkshake esté licuado, vierta
golosinas o galletas trituradas por encima y presione PULSE
3 a 4 veces para mezclar.
Rendimiento: 2–3
Salsa Fresca y Picante
1 cebolla pelada y en cuartos 1/4 taza (59 ml) de cilantro
1 diente de ajo
1 pimiento jalapeño sin tallo
4 tomates pequeños en cuartos Sal y pimienta a gusto
Instrucciones:
1. Coloque la cebolla, el ajo y el pimiento en la licuadora. Cubra y
presione PULSE (pulso) hasta que quede bien picado. Mezcle
según sea necesario. Detenga la licuadora.
2. Agregue los tomates, el cilantro, el jugo de lima, el comino, sal
y pimienta. Cubra y presione PULSE hasta alcanzar la textura
deseada, mezclando según sea necesario.
Rendimiento: 6–8
1 cucharada (15 ml) de jugo de lima
1/2 cucharadita (2.5 ml) de comino
34
Page 35

Grupo HB PS, S.A. de C.V.
Monte Elbruz 124-301
Colonia Palmitas, Delegación Miguel Hidalgo
C.P. 11560, México, Distrito Federal
01 800 71 16 100
PÓLIZA DE GARANTÍA
PRODUCTO:
MARCA:
Grupo HB PS, S.A. de C.V. cuenta con una Red de Centros de Servicio Autorizada, por favor consulte en la lista anexa el nombre y dirección de los establecimientos en la
República Mexicana en donde usted podrá hacer efectiva la garantía, obtener partes, componentes, consumibles y accesorios; así como también obtener servicio para
productos fuera de garantía. Para mayor información llame sin costo: Centro de Atención al consumidor: 01 800 71 16 100
Grupo HB PS, S.A. de C.V. le otorga a partir de la fecha de compra:
GARANTÍA DE 3 AÑOS.
COBERTURA
• Esta garantía ampara, todas las piezas y componentes del producto que resulten con defecto de fabricación incluyendo la mano de obra.
Grupo HB PS,
•
todo lo anterior sin costo adicional para el consumidor.
• Esta garantía incluye los gastos de transportación del producto que deriven de su cumplimiento dentro de su red de servicio.
S.A. de C.V. se obliga a reemplazar, reparar o reponer, cualquier pieza o componente defectuoso; proporcionar la mano de obra necesaria para su diagnóstico y reparación,
LIMITACIONES
• Esta garantía no ampara el reemplazo de piezas deterioradas por uso o por desgaste normal, como son: cuchillas, vasos, jarras, filtros, etc.
• Grupo HB PS, S.A. de C.V. no se hace responsable por los accidentes producidos a consecuencia de una instalación eléctrica defectuosa, ausencia de toma de tierra, clavija de enchufe
en mal estado, etc.
EXCEPCIONES
Esta garantía no será efectiva en los siguientes casos:
a) Cuando el producto se hubiese utlizado en condiciones distintas a las normales. (Uso industrial, semi-industrial o comercial.)
b) Cuando el producto no hubiese sido operado de acuerdo con el instructivo de uso.
c) Cuando el producto hubiese sido alterado o reparado por personas no autorizadas por Grupo HB PS, S.A. de C.V. el fabricante nacional, importador o comercializador responsable
respectivo.
El consumidor puede solicitar que se haga efectiva la garantía ante la propia casa comercial donde adquirió su producto, siempre y cuando Grupo HB PS, S.A. de C.V. no cuente con talleres de
servicio.
MODELO:
35
Page 36

PROCEDIMIENTO PARA HACER EFECTIVA LA GARANTÍA
• Para hacer efectiva la garantía no deben exigirse mayores requisitos que la presentación del producto y la póliza correspondiente, debidamente sellada por el establecimiento que lo vendió.
• Para hacer efectiva la garantía, lleve su aparato al Centro de Servicio Autorizado más cercano a su domicilio (consulte la lista anexa).
• Si no existe Centro de Servicio Autorizado en su localidad llame a nuestro Centro de Atención al Consumidor para recibir instrucciones de como hacer efectiva su garantía.
• El tiempo de reparación, en ningún caso será mayor de 30 días naturales contados a partir de la fecha de recepción del producto en nuestros Centros de Servicio Autorizados.
• En caso de que el producto haya sido reparado o sometido a mantenimiento y el mismo presente deficiencias imputables al autor de la reparación o del mantenimiento dentro de los treinta
días naturales posteriores a la entrega del producto al consumidor, éste tendrá derecho a que sea reparado o mantenido de nuevo sin costo alguno. Si el plazo de la garantía es superior a
los treinta días naturales, se estará a dicho plazo.
• El tiempo que duren las reparaciones efectuadas al amparo de la garantía no es computable dentro del plazo de la misma. Cuando el bien haya sido reparado se iniciará la garantía respecto
de las piezas repuestas y continuará con relación al resto. En el caso de reposición del bien deberá renovarse el plazo de la garantía.
SELLO DEL VENDEDOR QUEJAS Y SUGERENCIASFECHA DE ENTREGA
DÍA___ MES___ AÑO___
Si desea hacer comentarios o sugerencias con respecto a nuestro servicio o tiene alguna queja derivada de la atención recibida en
alguno de nuestros Centros de Servicio Autorizados, por favor dirigirse a:
GERENCIA INTERNACIONAL DE SERVICIO
Email: mexico.service@hamiltonbeach.com.mx
01 800 71 16 100
RED DE CENTROS DE SERVICIO AUTORIZADA GRUPO HB PS, S.A. DE C.V.
Distrito Federal
ELECTRODOMÉSTICOS
Av. Plutarco Elias Cailes No. 1499
Zacahuitzco MEXICO 09490 D.F.
Tel: 01 55 5235 2323 • Fax: 01 55 5243 1397
CASA GARCIA
Av. Patriotismo No. 875-B
Mixcoac MEXICO 03910 D .F.
Tel: 01 55 5563 8723 • Fax: 01 55 5615 1856
Nuevo Leon
FERNANDO SEPULVEDA REFACCIONES
Ruperto Martínez No. 238 Ote.
Centro MONTERREY, 64000 N.L.
Tel: 01 81 8343 6700 • Fax: 01 81 8344 0486
Jalisco
SERVICIOS DE MANTENIMIENTO CASTILLO
Garibaldi No. 1450
Ladrón de Guevara
GUADALAJARA 44660 Jal.
Tel: 01 33 3825 3480 • Fax: 01 33 3826 1914
Chihuahua
DISTRIBUIDORA TURMIX
Av. Paseo Triunfo de la Rep. No. 5289 Local 2 A.
Int. Hipermart
Alamos de San Lorenzo
CD. JUAREZ 32340 Chih.
Tel: 01 656 617 8030 • Fax: 01 656 617 8030
Modelos:
52400, 52401
Tipo:
B78
Características Eléctricas:
120 V~ 60 Hz 250 W
Los modelos incluídos en el instructivo de Uso y Cuidado pueden ir seguidos o no por un sufijo correspondiente a una
o varias letras del alfabeto y sus combinaciones, separadas o no por un espacio, coma, diagonal, o guión. Como ejemplos
los sufijos pueden ser: “Y” y/o “MX” y/o “MXY” y/o “Z”.
7/15840250902
 Loading...