

HAMILTON BEACH 49980-CN User Manual
READ BEFORE USE
使用前阅读
Questions?
Please call us – our friendly
associates are ready to help.
China: 400-852-2655
使用本设备前,我们建议您仔细阅读
这些说明。
Visit www.hamiltonbeach.cn for our
complete line of products and Use and
Care Guides – as well as
delicious recipes, tips, and
to register your product online!
有关我们所有系列产品的使用与维护指
南 – 以及美味食谱、生活小贴士和
产品在线注册的更多信息,请访问
www.hamiltonbeach.cn
。
如有疑问?
请致电我们,我们的团队
随时准备为您提供帮助。
中国大陆客服热线:
400-852-2655
官方网站:www.hamiltonbeach.cn
型号:49980-CN
此说明书中图片仅供参考,
产品以实物为准。
The ScoopTM 2-Way
Brewer
ScoopTM 智能双模
咖啡机
English ..................... 2
简体中文 ..................16
2
IMPORTANT SAFEGUARDS
1. Read all instructions.
2. Do not touch hot surfaces. Use handles or knobs. Care must be
taken, as burns can occur from touching hot parts or from spilled,
hot liquid.
3. To protect against electric shock, do not place cord, plug, or
coffeemaker in water or other liquid.
4. Close supervision is necessary when any appliance is used by
or near children.
5. Allow to cool before putting on or taking off parts and before clean-
ing the appliance.
6. Coffeemaker must be operated on a flat surface away from the edge
of counter to prevent accidental tipping.
7. Do not operate any appliance with a damaged cord or plug, or after
the appliance malfunctions or has been damaged in any manner. Call
our toll-free customer service number for information on examination,
repair, or adjustment.
8. The use of accessory attachments not recommended by the
appliance manufacturer may cause injuries.
9. Do not use outdoors.
10. Do not let cord hang over edge of table or counter or touch hot
surfaces, including stove.
11. Do not place on or near a hot gas or electric burner, or in a heated
oven.
12.
The carafe is designed for use with this coffeemaker. It must never
be used on a range top or in a microwave oven
.
13. Do not set a hot carafe on a wet or cold surface.
14. Do not use a cracked carafe or one with a loose or weakened handle.
15. Do not clean carafe with cleansers, steel wool pads, or other abrasive
materials.
16. Do not use appliance for other than intended use.
17. WARNING: To reduce the risk of fire or electric shock, do not remove
the bottom cover of the coffeemaker. There are no user-serviceable
parts inside. Repair should be done by authorized service personnel
only.
18. To disconnect, turn any control to the OFF position and then remove
plug from wall outlet.
19. Be certain carafe lid is securely in place during brew cycle and when
pouring coffee. Do not use force when placing lid on carafe.
When using electrical appliances, basic safety precautions should always be followed to reduce the risk of fire, electric shock, and/or injury to persons,
including the following:
SAVE THESE INSTRUCTIONS!
OTHER CONSUMER SAFETY INFORMATION
This appliance is intended for household use only.
The length of the cord used on this appliance was selected to reduce
the hazards of becoming tangled in or tripping over a longer cord. If a
longer cord is necessary, an approved extension cord may be used. The
electrical rating of the extension cord must be equal to or greater than the
rating of the appliance. Care must be taken to arrange the extension cord
so that it will not drape over the countertop or tabletop where it can be
pulled on by children or accidentally tripped over.
To avoid an electrical circuit overload, do not use another high-wattage
appliance on the same circuit with this appliance.
3
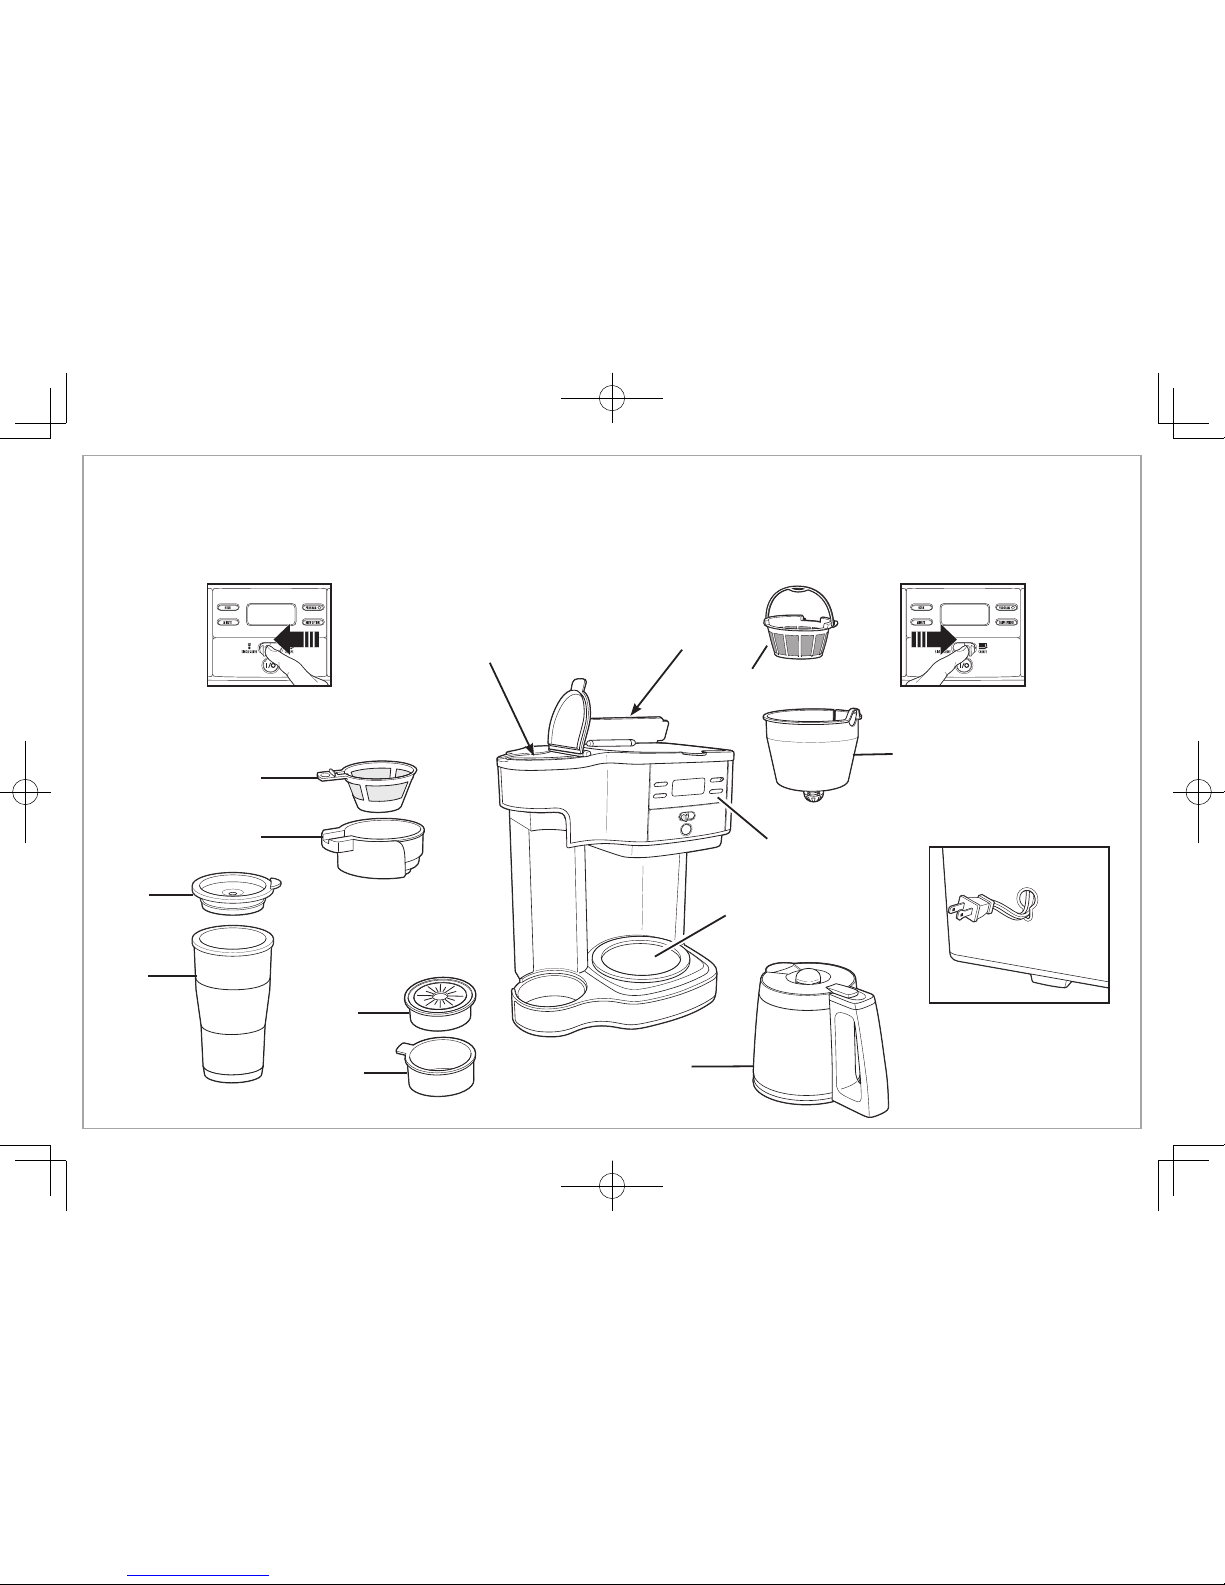
Single-Serve Side
Parts and Features
Scoop™ Brew Basket
Multilevel
Cup Rest
Drip Tray
Travel
Mug
Brew Basket
Permanent Coffee Filter
Control Panel
and Display
Keep-Hot Plate
Carafe
Single-Serve
Side Reservoir
Carafe Side
Reservoir
Filter Basket
Travel
Lid
Carafe Side
Parts and Features
Cord-Stuff Storage
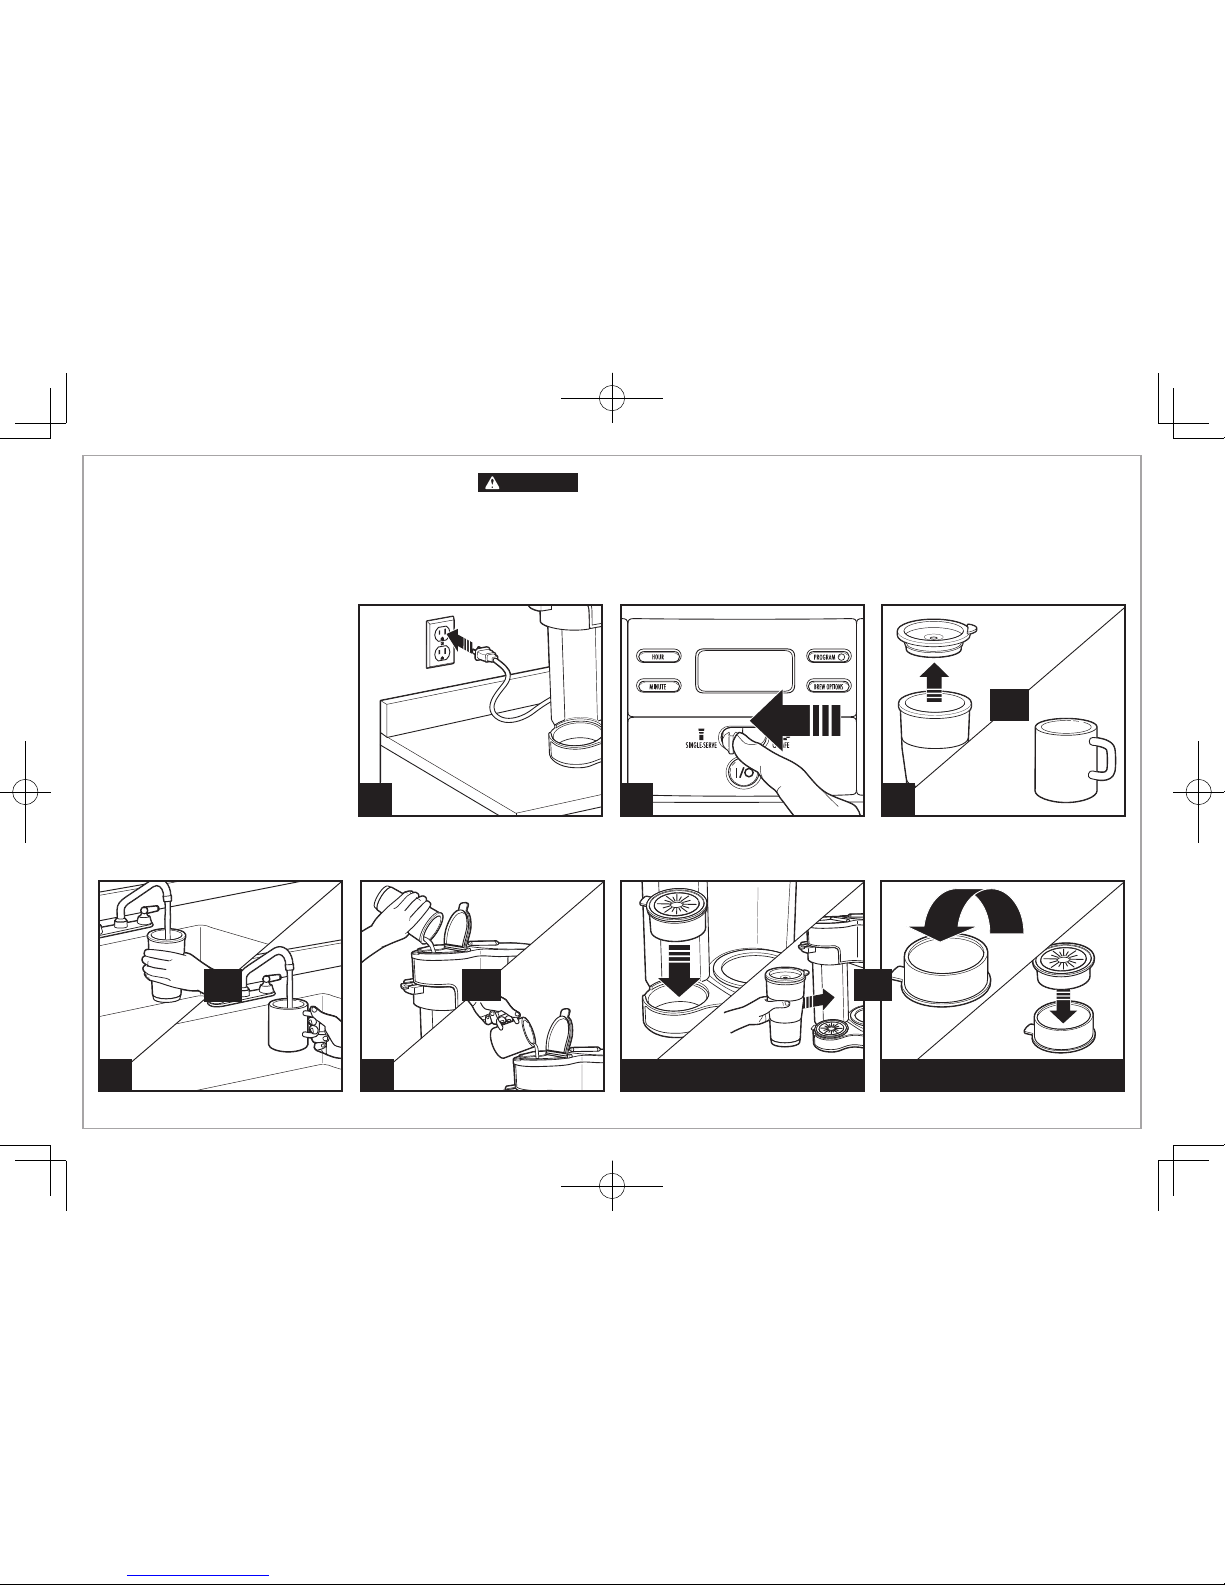
How to Use
Single-Serve Side
3
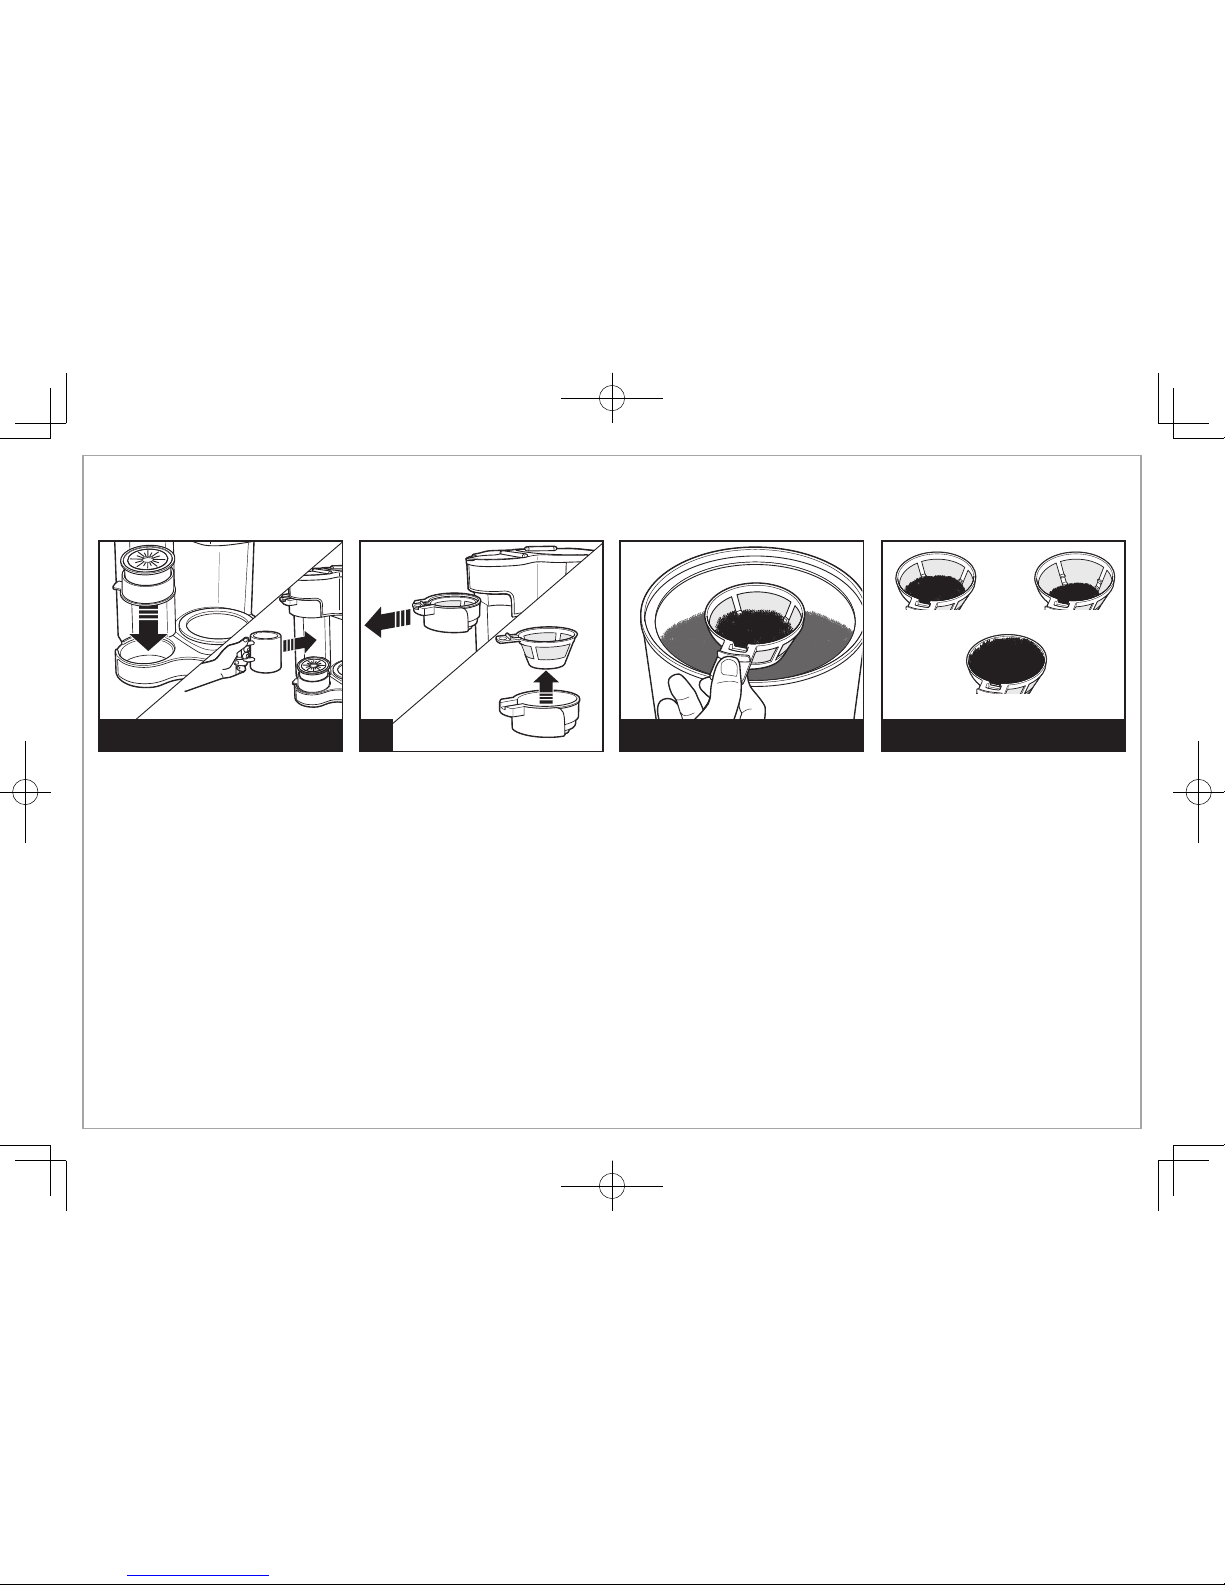
Burn Hazard.
To avoid contact with hot coffee or water:
• Do not use more than 14 ounces
(410 ml) of water.
• Fill single-serve reservoir with mug or
cup into which the coffee will be brewed.
• Fully insert mug or cup under filter
basket.
1
4
WARNING
AUTOMATIC SHUTOFF: The
coffeemaker will automatically
shut off after brew cycle is
complete.
NOTES:
• The unit will only brew on one
side at a time.
• To avoid overflow, use slightly
less grounds when brewing
decaf or flavored coffees.
• For Hotter Coffee: Rinse the
travel mug with warm water
before brewing; then replace
travel mug lid. Brew directly
into the travel mug with travel
mug lid in place.
5
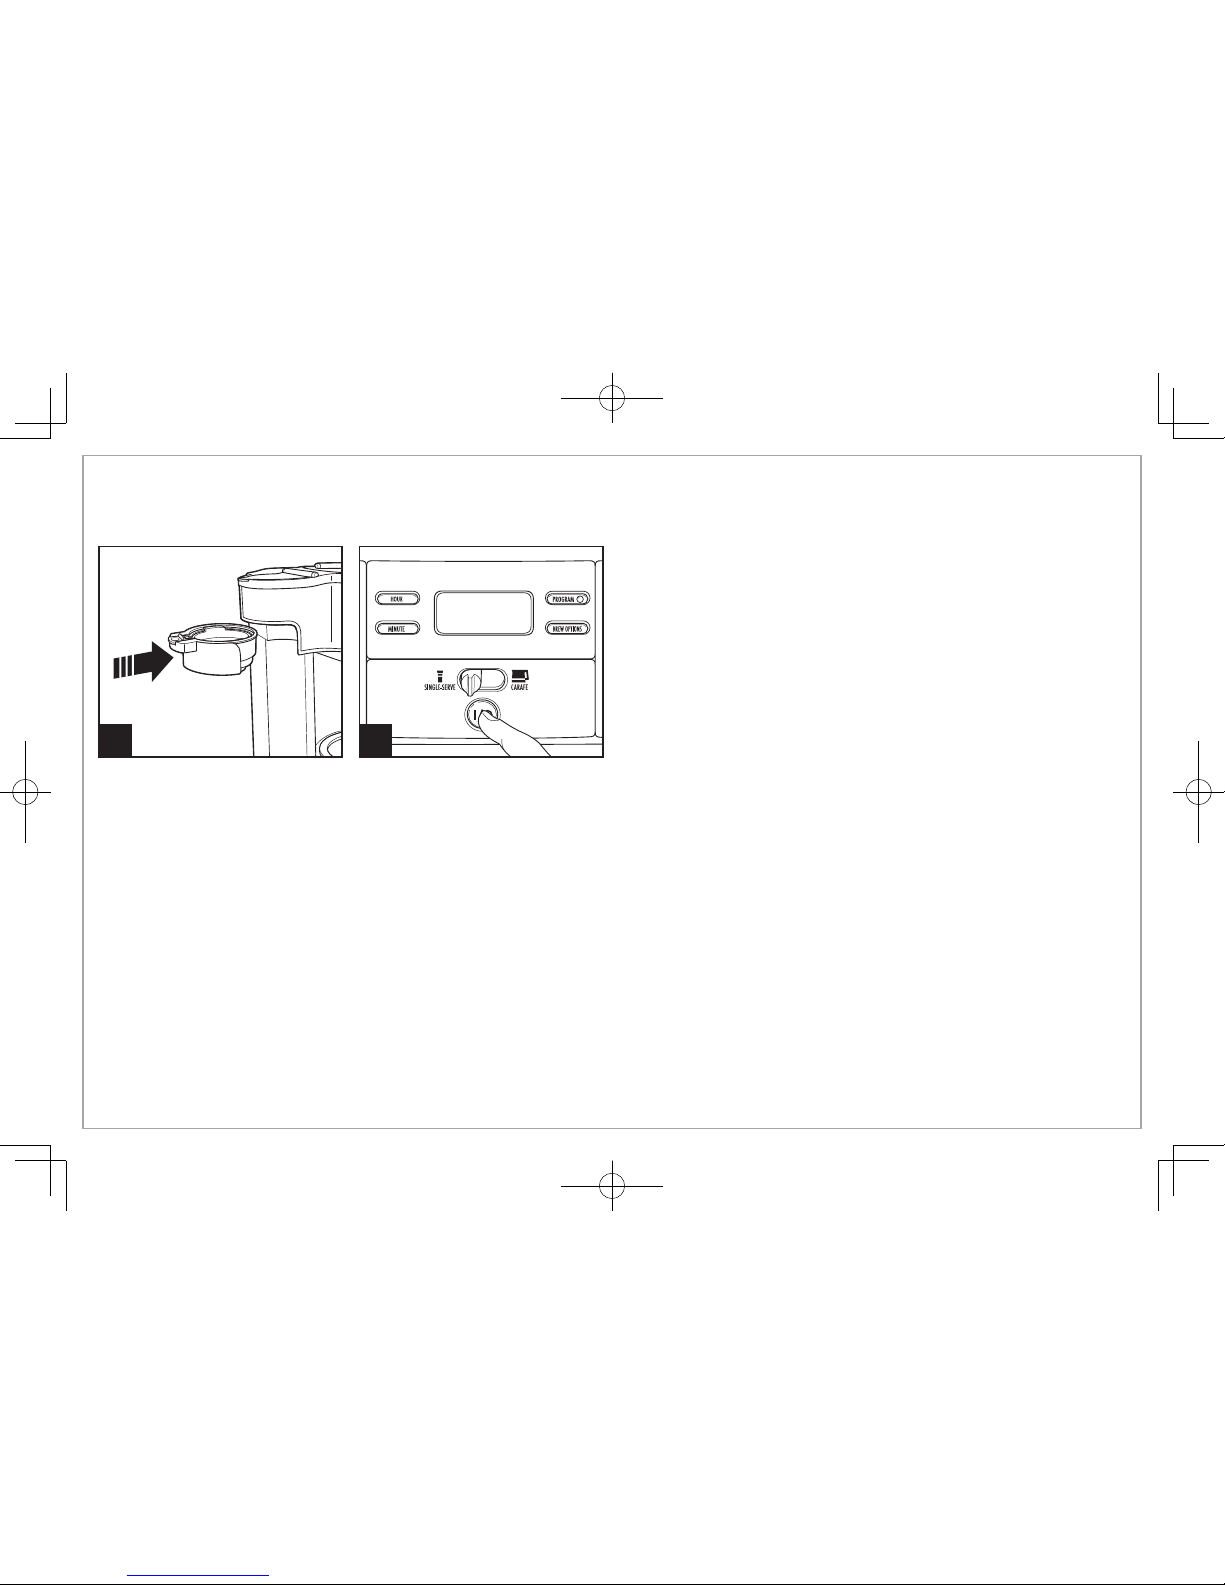
2
Push lever left to select SingleServe.
4
REGULAR MUGTRAVEL MUG
OR
OR
OR
OR
6
7A-1 – GROUNDS
5
How to Use Single-Serve Side (cont.)
REGULAR MUG
For regular coffee, use a
maximum of two level tablespoons of grounds. To avoid
overflow, use slightly less
grounds when brewing decaf
or flavored coffees.
WARNING! Keep ground coffee
below MAX fill line to prevent
overflow.
7A-2 – GROUNDS
Single-serve brew basket has two
markings: the lower level marking
if making 8 oz. (250 ml) of coffee,
and the higher level mark if
making 14 oz. (410 ml) of coffee.
DO NOT fill scoop to top or this
will cause overflow.
MAX FILL
LINE
MIN FILL
LINE
INCORRECT
6
How to Use Single-Serve Side (cont.)
8 9
Press I/O (ON/OFF) button
to begin the flow of coffee.
Coffeemaker will shut off when
brew cycle is complete. To stop
flow of coffee midcycle, press
I/O (ON/OFF) button.
7
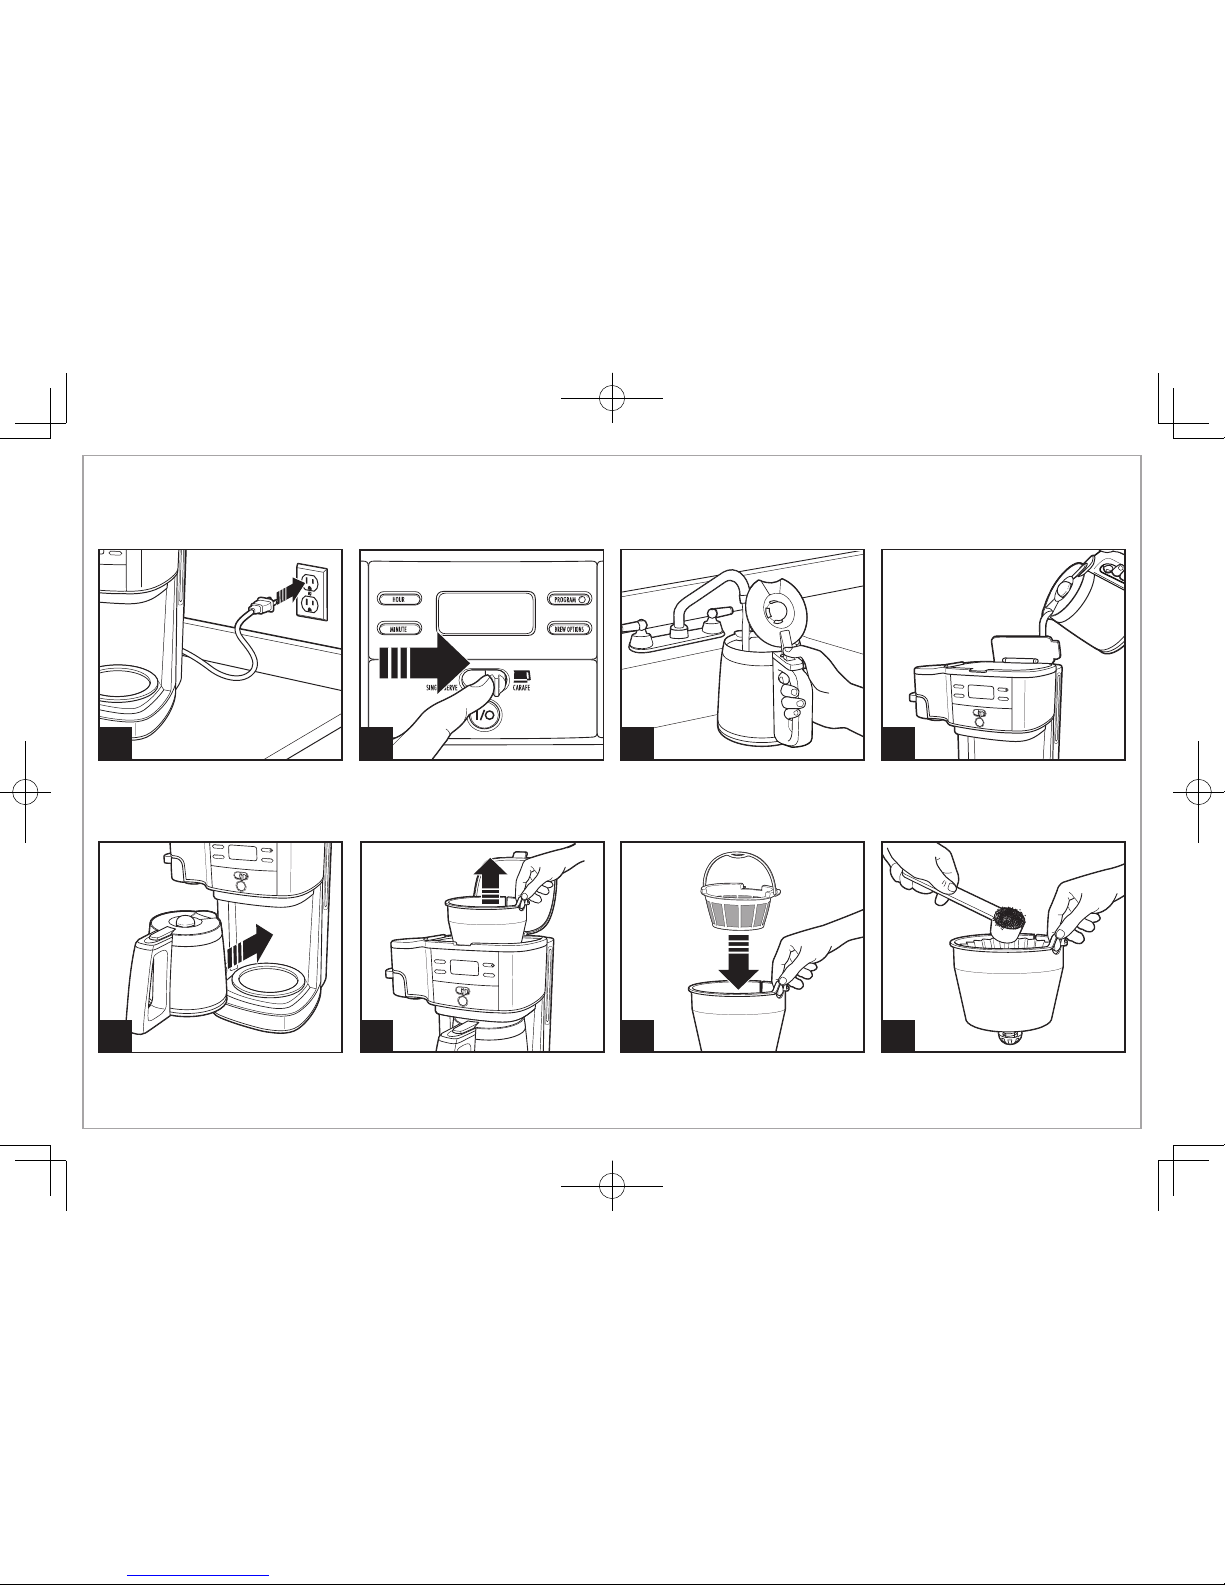
2
Push lever right to select Carafe.
How to Use Carafe Side
1 3
AUTOMATIC SHUTOFF: The coffeemaker will automatically
shut off 2 hours after brew cycle is complete.
NOTE: The unit will only brew on one side at a time.
6 7
8
4
Place a permanent filter in brew
basket. A cupcake-style paper
filter may also be used.
For each cup of coffee being
made, place one level tablespoon
(15 ml) of coffee into filter.
Lift lid and pour water from
carafe into reservoir.
NOTE: Do not fill past the 12-cup
mark (60 ounces [1.8 L]).
Place carafe, with carafe lid
attached, on keep-hot plate.
5
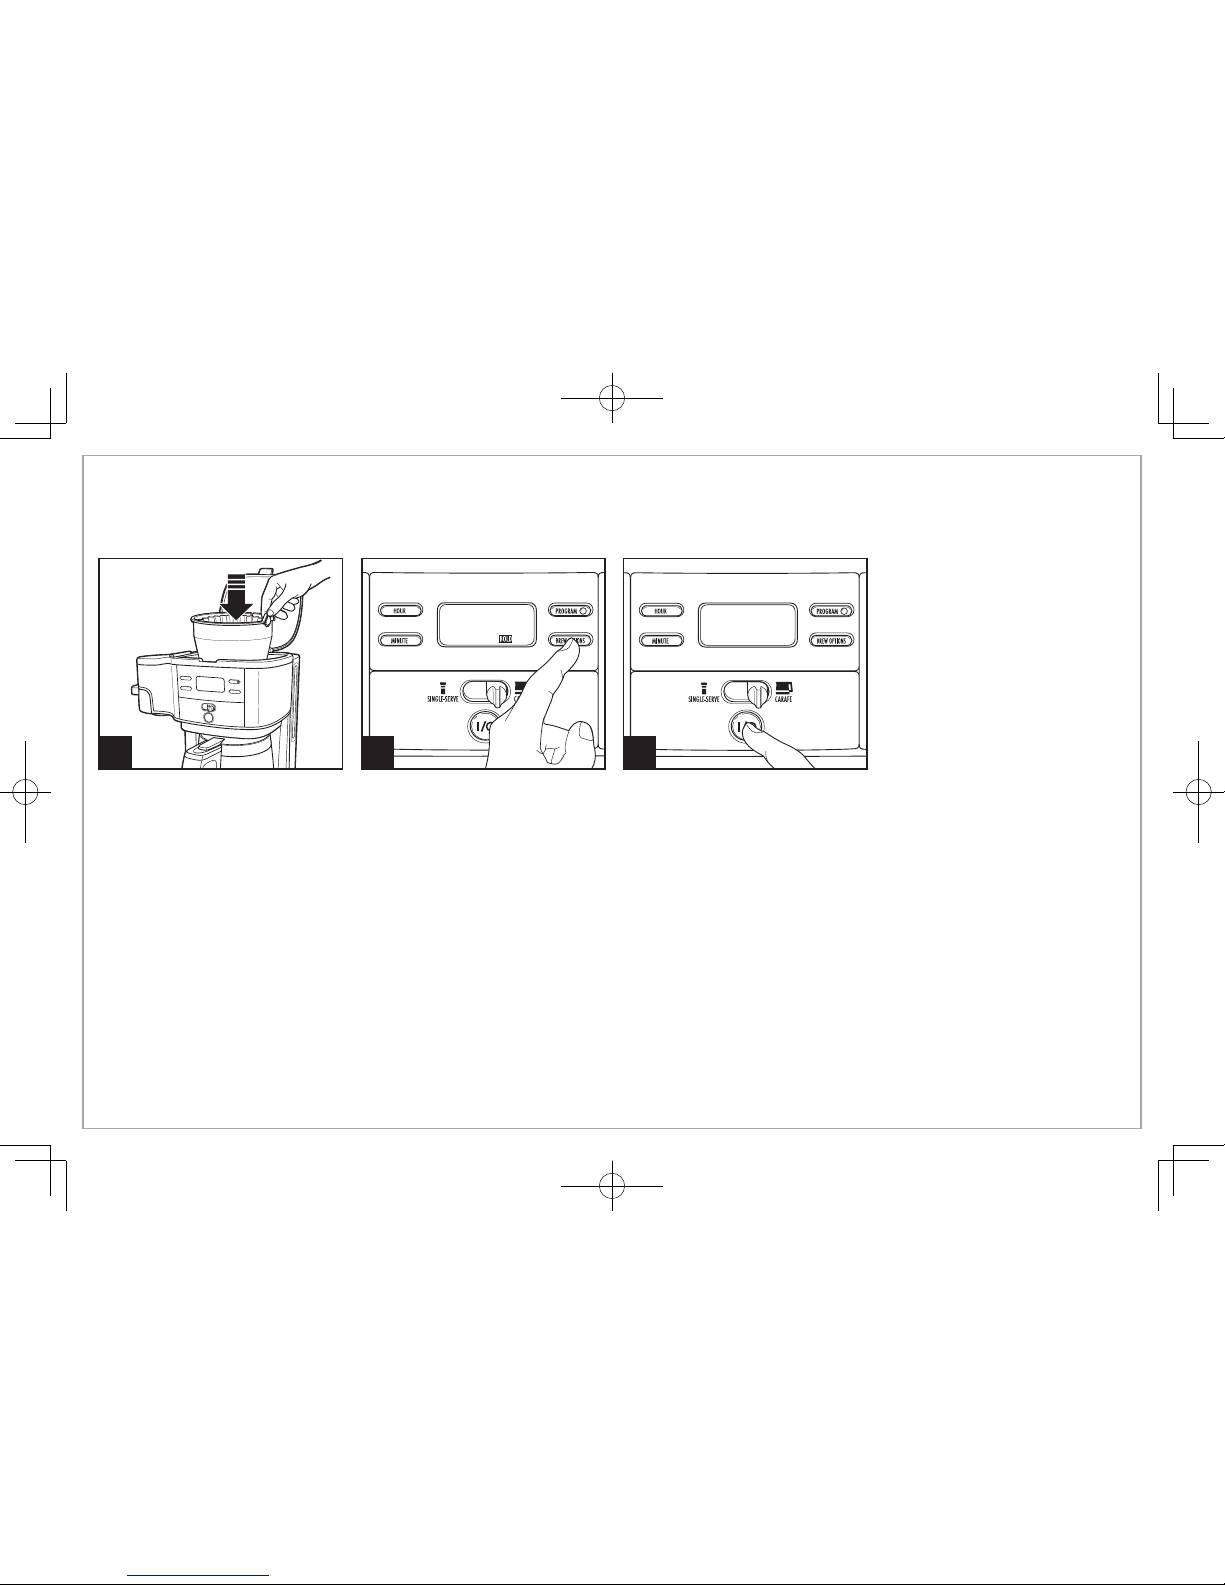
How to Use Carafe Side (cont.)
11
Press I/O (ON/OFF) button to
start. Press I/O (ON/OFF) button
again to turn off.
NOTE: If the coffeemaker is not
turned off manually, it will automatically shut off in 2 hours.
109
Place brew basket in brew basket
well. Ensure brew basket is fully
seated.
NOTE: BOLD mode will require additional time to complete a
brewing cycle. If Brew Option is not selected, the coffeemaker
will automatically brew on the regular/default setting.
For enhanced full/strong-flavored
coffee, press BREW OPTIONS
button until BOLD is displayed.
8
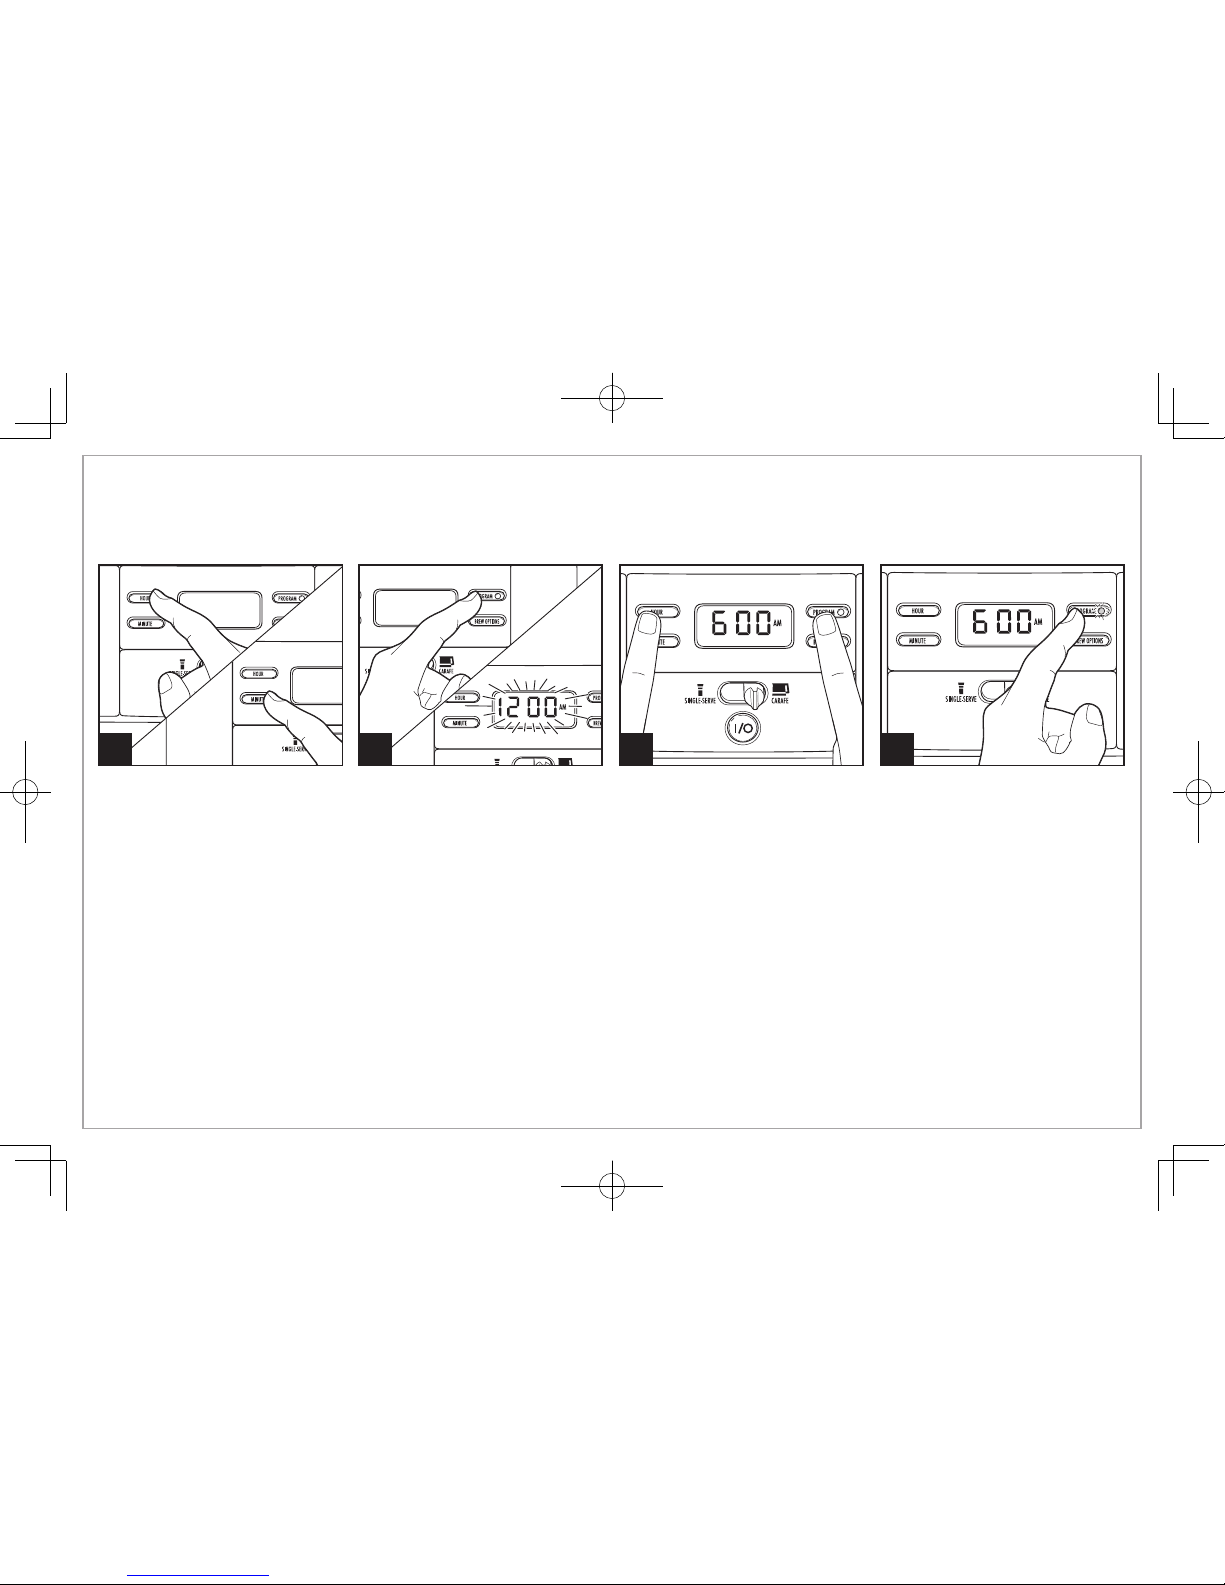
Programming (For Either the Single-Serve OR Carafe Side)
2
Press HOUR and then MINUTE to
set clock.
Hold PROGRAM until clock flashes.
3 4
Continue holding PROGRAM
button, press HOUR and MINUTE
until the desired brewing start
time is reached, and then release
PROGRAM button.
Press PROGRAM to activate
automatic brewing. A green
LED will illuminate to indicate the
unit is programmed.
1
NOTE: The unit will only brew on one side at a time.
Tips for Best-Tasting Coffee
• All coffees are made from either arabica beans or robusta beans, or
some combination of both. Arabica beans are slightly more expensive,
but tend to produce better-tasting coffee.
• Ground coffee will become stale much faster than whole beans.
If buying preground coffee, choose a package with the latest
expiration date or a smaller quantity.
• If grinding whole beans, set your coffee grinder on a fine/medium
grind. This will yield the best-tasting grounds. Try to use freshly
ground coffee within about a week of grinding.
• Using a water filter, filtered water, or bottled water will yield
better-tasting coffee than tap water.
• Use approximately 1 tablespoon of grounds for each cup of coffee
being made. To avoid overflow, use slightly less grounds (3/4 tablespoon [11 ml]) when brewing decaf or flavored coffees. Also, be aware
that using coffee that is ground too finely may also cause the filter
basket
to overflow.
• Make sure your coffeemaker is clean. See “Care and Cleaning”
sections.
9
 Loading...