

Hamilton Beach 40791-CN Instructions Manual

MELITTA LOGO
(to come)
Espresso Maker
Espresso Maker
意式咖啡机
中国大陆免费客服热线:
400-852-2655
官方网站:www.hamiltonbeach.cn
READ BEFORE USE
使用前,请阅读说明
此说明书中图片仅供参考,产品以实物为准。
型号:40791-CN
840193104
11/10
2
IMPORTANT SAFEGUARDS
SAVE THESE INSTRUCTIONS!
1. Read all instructions.
2. This appliance is intended to be used
in household and similar applications
such as: staff kitchen areas in shops,
offices, and other working environments; farm houses; by clients in
hotels, motels, and other residential
type environments; bed and breakfasttype environments.
3. Do not touch hot surfaces. Use handles
or knobs. Care must be taken, as
burns can occur from touching hot
parts or from spilled, hot liquid.
4. To protect against fire, electric shock,
and injury to persons, do not immerse
cord, plug, or espresso maker in water
or other liquid.
5. This appliance can be used by children
aged from 8 years and above and persons with reduced physical, sensory,
or mental capabilities or lack of experience and knowledge if they have
been given supervision or instruction
concerning use of the appliance in a
safe way and understand the hazards
involved Children shall not play with
the appliance. Cleaning and user maintenance shall not be made by children
with out supervision.
6. Close supervision is necessary when
any appliance is used by or near children.
7. Unplug from outlet when the espresso
maker is not in use and before cleaning. Allow to cool before putting on
or taking off parts and before cleaning
the appliance.
8. Appliance must be operated on a flat
surface away from the edge of counter
to prevent accidental tipping.
9. Do not operate any appliance with a
damaged cord or plug, or after the
appliance malfunctions or is dropped
or damaged in any manner. Call our
toll-free customer service number for
information on examination, repair, or
adjustment.
10. The use of accessory attachments not
recommended by the appliance manufacturer may result in fire, electric
shock, or injury to persons.
11. Do not use outdoors.
12. Do not let cord hang over edge of
table or counter or touch hot surfaces,
including the stove.
13. Be certain filter holder is securely
in place when brewing espresso.
Scalding may occur if the filter holder
is removed during the brewing cycle.
14. Do not place appliance on or near a
hot gas or electric burner or in a
heated oven.
15. To disconnect appliance, turn controls
to OFF and then remove plug from
wall outlet.
16. WARNING: To reduce the risk of fire
or electric shock, do not remove the
top or bottom covers. No userserviceable parts are inside. Repair
should be done by authorized service
personnel only.
17. Do not use appliance for other than
intended use.
18. CAUTION: In order to avoid a hazard
due to inadvertent resetting of the
thermal cut-out, this appliance must
not be supplied through an external
switching device, such as a timer, or
connected to a circuit that is regularly
switched on and off by the utility.
This product is intended for household
use only.
The length of the cord used on this appliance was selected to reduce the hazards
of becoming tangled in or tripping over a
longer cord. If a longer cord is necessary,
an approved extension cord may be used.
The electrical rating of the extension cord
must be equal to or greater than the rating
of the appliance. Care must be taken to
arrange the extension cord so that it will
not drape over the countertop or tabletop
where it can be pulled on by children or
accidentally tripped over.
To avoid an electrical circuit overload, do
not use another high-wattage appliance
on the same circuit with your espresso
maker.
When using electrical appliances, basic safety precautions should always be followed to
reduce the risk of fire, electric shock, and/or injury to persons, including the following:
OTHER CONSUMER SAFETY INFORMATION
3
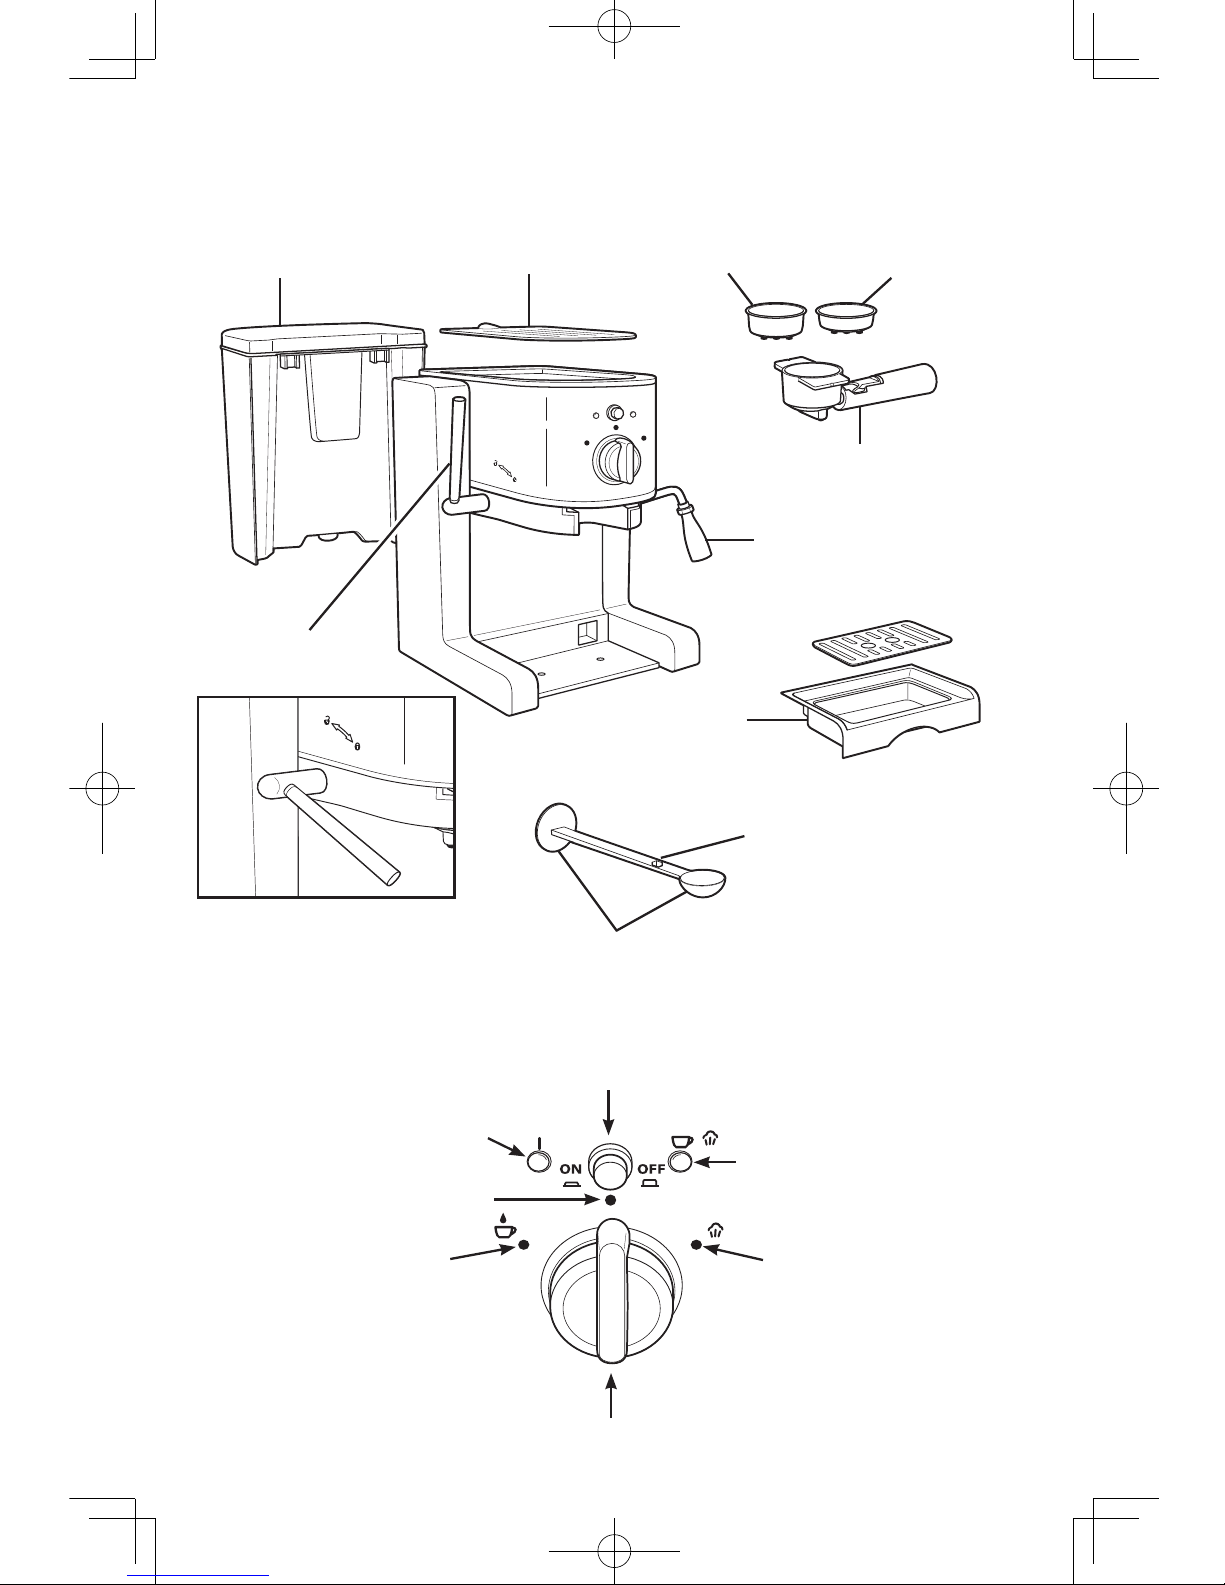
Parts and Features
Removable Water
Reservoir
Frothing Nozzle
and Cover
Measuring Scoop
with Tamping Tool
Removable
Drip Tray
Cup Storage/
Cup Warmer
Ground Espresso/Pod
Filter Holder
Espresso/Pod
Filter Holder
Espresso
Filter Holder
ON/OFF Button
Control Knob
Frothing Nozzle
Wrench
Filter Holder
Locking Lever
BREW Knob Position
STANDBY Knob Position
Amber ON Light
Green Ready Light
(for BREW and STEAM)
STEAM Knob Position
4
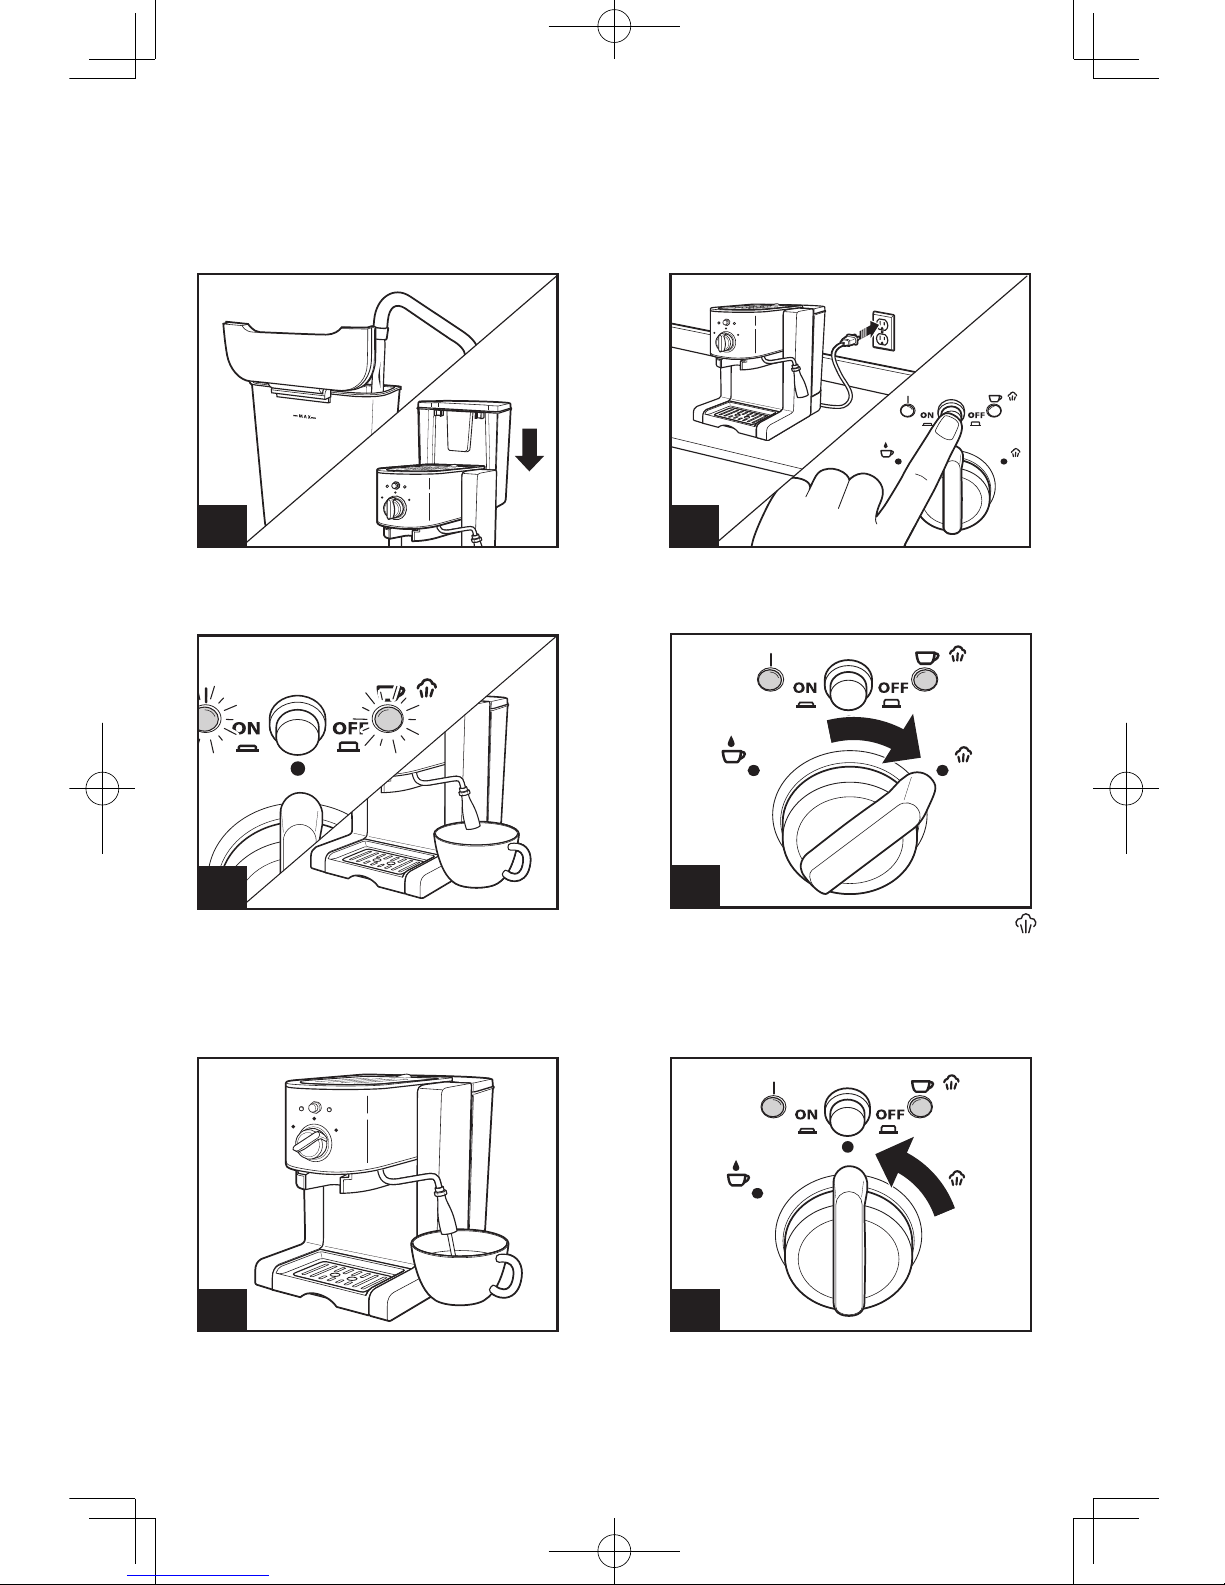
Before First Use (Priming the Pump)
2
1
4
3
5
NOTICE: Wash all removable parts in warm, soapy water. No parts may be washed in
a dishwasher. The water pump must be “primed” before first use to work properly.
Operating without water in the reservoir can permanently damage the appliance.
Fill the removable water reservoir to
the MAX fill line with cold water and
replace securely on the back of unit.
Plug in the unit and press the ON/OFF
button to turn unit on. The amber ON
light will illuminate.
Turn the control knob to the STEAM
setting. Steam will begin to flow from
the steam nozzle.
The ready light will glow green when
the water is heated and unit is ready
for use. Place an empty container
under frothing nozzle in order to catch
any drips of water from the steam
nozzle.
Allow steam to flow for about 2
minutes. NOTE: After the ready light
initially glows green, the light may
cycle on and off during operation.
6
Turn the control knob back to the
STANDBY position.
5
7 8
9
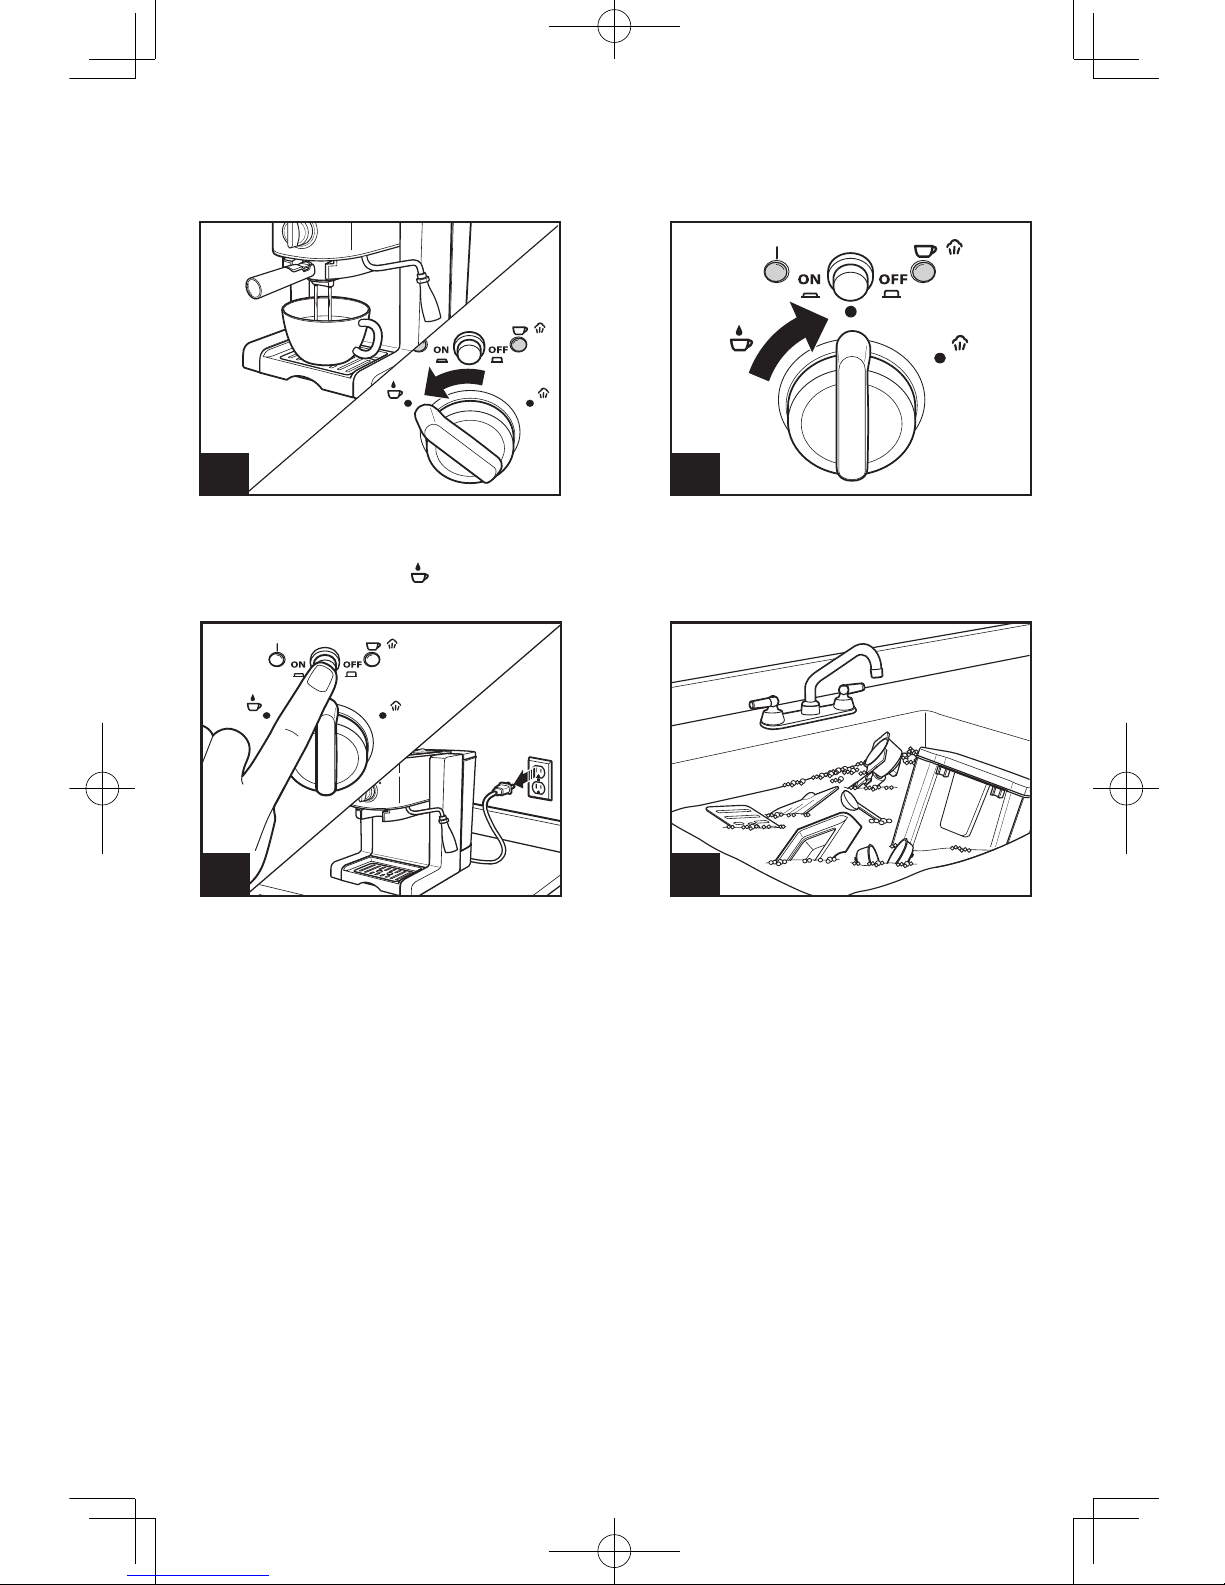
Before First Use (cont.)
Place a container under brew head—
it should be wide enough to catch
water from both spouts. Turn the
control knob to BREW and dispense
any remaining water from reservoir.
Turn control knob back to the
STANDBY position.
Press ON/OFF button to turn the unit
off. The light next to the button will
turn off. Unplug the unit.
10
Wash all parts again with warm,
soapy water and dry thoroughly.
WARNING! Shock Hazard. Do not
immerse machine, cord, or plug
in water or any other liquid. See
Cleaning section on page 12 for
full instructions.
6
How to Use
1
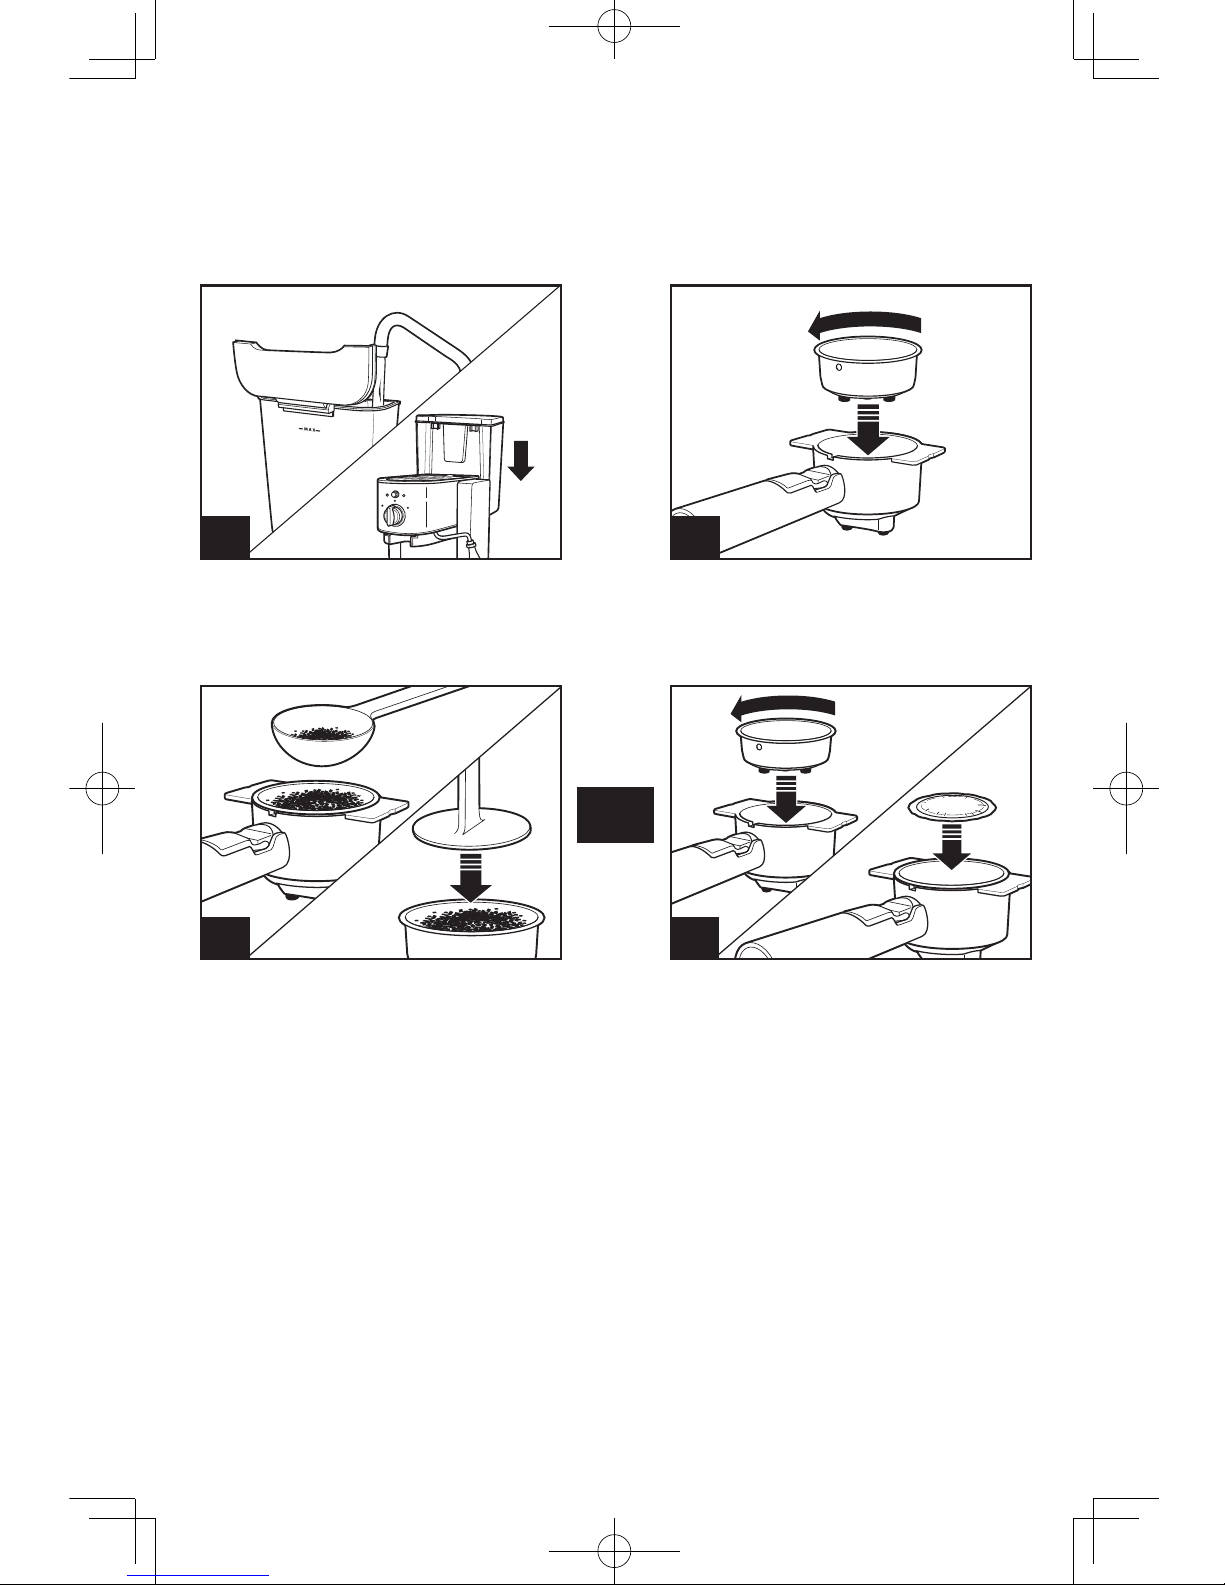
Fill the removable water reservoir with
desired amount of cold water and
replace securely on the back of unit.
NOTE: Ensure there are no grounds on the rim of the filter holder. This prevents a
proper seal from forming and may damage the machine.
Align raised dimple on the exterior of
espresso/pod filter holder with cutout
notch on inside of filter holder. Rotate
espresso/pod filter holder 180º to
secure in base.
2
3
Place ground espresso holder into
filter holder. Add one tablespoon of
ground espresso for each cup being
made. Use shallow holder for 1 cup
and deep holder for 2 cups. Press
grounds firmly into holder with
tamping tool and ensure no grounds
remain on the rim.
Place pod into filter holder. When
using an ESE (Easy Serving Espresso)
pod, always use the shallower espresso/pod filter holder. Never put two
pods in either filter holder at one time.
3
OR

7
How to Use (cont.)
6
Plug in and press the ON/OFF button
to turn unit on. The amber ON light
will illuminate. The ready light will
glow green when the water is heated
and unit is ready for use.
7
Place one or two cups under brew
head spouts. If using one cup, use one
wide enough to catch espresso from
both spouts.
4
Holding handle securely, align locking tabs of filter holder with the brew
head opening. Insert filter until it
slides all the way to the back and
cannot be pushed in any further.
Pull down on the lever handle to lock
the filter holder into place. The lever
will be locked when it is slightly below
horizontal and cannot be pushed
down any further.
5
9
As espresso dispenses, it will gradually
look lighter in color. Allow espresso
to drip from filter holder for 15–20
seconds before removing cup(s). This
will make about 1–1.5 oz. of espresso
if using two cups or 2–3 oz. if using
one cup.
8
Turn the control knob to BREW
to begin the flow of espresso.

8
How to Use (cont.)
10
Turn control knob back to the
STANDBY position.
NOTES:
• Some water may continue to drip intermittently from brew head. This is normal and a
result of product operation.
• This unit has a steam purge in the drip tray that will cycle if there is any water remaining in the heater. Some steam may escape under the drip tray—this is normal.
12
Wait about 1 minute before unlocking
the lever and removing filter holder.
This will allow any water still flowing
through the pump to finish.
11
Push ON/OFF button to OFF. Unplug
unit from outlet.
9
13
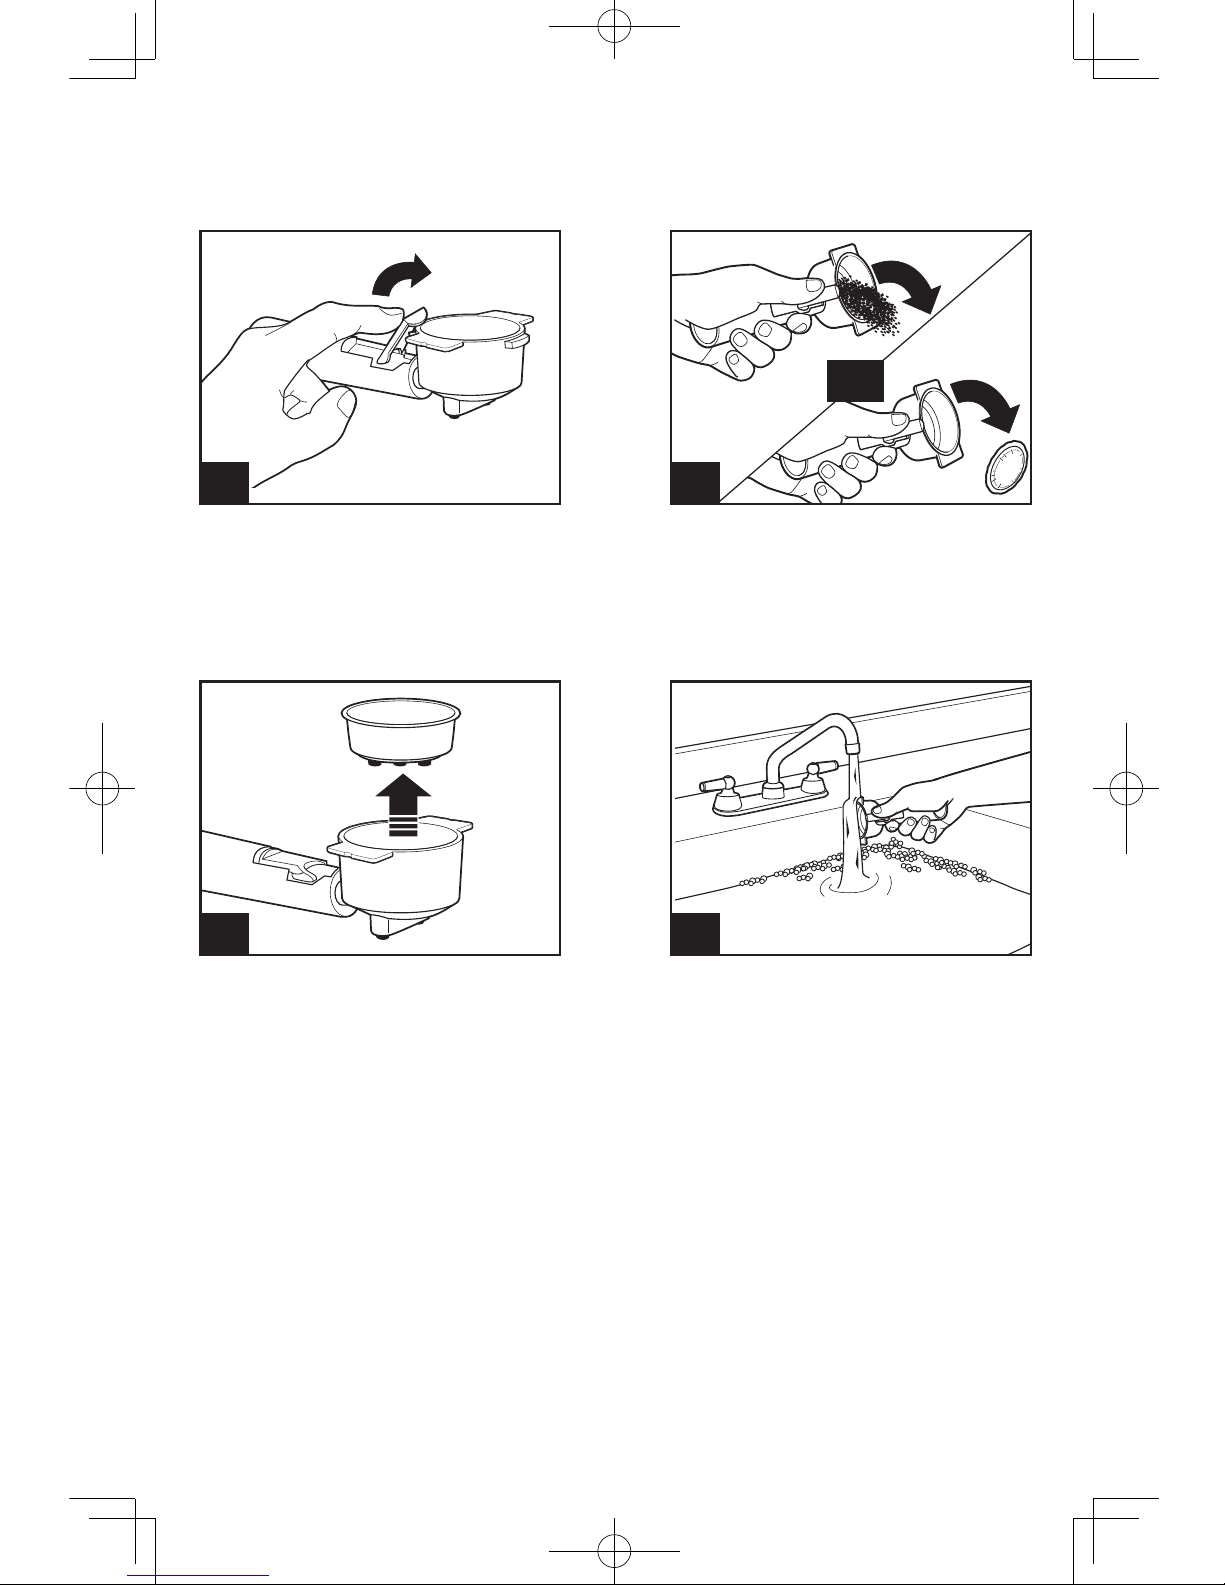
To empty espresso grounds and/or
an espresso pod from the filter holder,
flip the plastic lever located on the
handle of the filter holder and hold
the lever open.
CAUTION: The metal parts of the filter
holder may be hot.
14
Keeping thumb on handle lever,
dispose of espresso grounds and/or
pod filter.
15
Ensure filter holder is cool. Align raised
dimple on espresso/pod filter holder
with cutout notch in filter holder base;
then remove.
16
Clean filter holder and brew head after
each use. See Cleaning instructions
on page 12. DO NOT allow grounds
to remain in filter holder; this can
clog filter holder and cause unit to
malfunction.
How to Use (cont.)
OR
 Loading...