

Hamilton Beach 37547 User Guide
READ BEFORE USE
LIRE AVANT UTILISATION
LEA ANTES DE USAR
Visit www.hamiltonbeach.com for our
complete line of products and Use and
Care Guides – as well as delicious recipes,
tips, and to register your product online!
Rendez-vous sur www.hamiltonbeach.ca
pour notre liste complète de produits et de
nos manuels utilisateur – ainsi que nos
délicieuses recettes et nos conseils !
¡Visite www.hamiltonbeach.com (
www.hamiltonbeach.com.mx (México) para
ver otros productos de Hamilton Beach o para
contactarnos!
EE. UU.) o
Rice Cooker and Steamer
Cuiseur de riz
Questions?
Please call us – our friendly
associates are ready to help.
USA: 1.800.851.8900
Questions ?
N’hésitez pas à nous appeler –
nos associés s’empresseront
de vous aider.
CAN : 1.800.267.2826
¿Preguntas?
Por favor llámenos – nuestros
amables representantes están
listos para ayudar.
EE. UU.: 1.800.851.8900
MEX: 01 800 71 16 100
Le invitamos a leer cuidadosamente este
instructivo antes de usar su aparato.
et cuit- vapeur
de nourriture
Arrocera y
Vaporera
English ....................... 2
Français .................... 19
Español .................... 36

IMPORTANT SAFEGUARDS
When using electrical appliances, basic safety precautions should always be followed to reduce the risk of fire, electric shock, and/or injury to
persons, including the following:
1. Read all instructions.
2. This appliance is not intended for use by persons (including
children) with reduced physical, sensory, or mental capabilities,
or lack of experience and knowledge, unless they are closely
supervised and instructed concerning use of the appliance by a
person responsible for their safety.
3. Close supervision is necessary when any appliance is used by or
near children. Children should be supervised to ensure that they
do not play with the appliance.
4. Do not touch hot surfaces. Use handles or knobs. Use pot holders
when removing hot containers.
5. To protect against a risk of electrical shock, do not immerse cord,
plug, or base in water or other liquid.
6. Unplug from outlet when not in use. Unplug and allow to cool
before putting on or taking off parts, and before cleaning.
7. Do not operate any appliance with a damaged supply cord or
plug, or after the appliance malfunctions or has been dropped
or damaged in any manner. Supply cord replacement and
repairs must be conducted by the manufacturer, its service
agent, or similarly qualified persons in order to avoid a hazard.
Call the provided customer service number for information on
examination, repair, or adjustment.
8. The use of accessory attachments not recommended by the
appliance manufacturer may cause injuries.
9. Do not use outdoors.
10. Do not let cord hang over edge of table or counter or touch hot
surfaces, including the stove.
11. Do not place on or near a hot gas or an electric burner, or in a
heated oven.
12. Extreme caution must be used when moving an appliance
containing hot oil, food, water, or other hot liquids.
13. To disconnect, turn any controls to OFF (
from wall outlet.
14. Do not use appliance for other than intended use.
15. Lift and open cover carefully to avoid scalding, and allow water to
drip into the cooker.
16. CAUTION: Risk of electric shock. Cook only in removable cooking
pot.
17. Do not place the unit directly under cabinets when operating as
this product produces large amounts of steam. Avoid reaching
over the product when operating.
); then remove plug
SAVE THESE INSTRUCTIONS
Other Consumer Safety Information
This appliance is intended for household use only.
w WARNING
with a polarized plug (one wide blade) to reduce the risk of electric
shock. The plug fits only one way into a polarized outlet. Do not defeat
the safety purpose of the plug by modifying the plug in any way or by
using an adapter. If the plug does not fit fully into the outlet, reverse
the plug. If it still does not fit, have an electrician replace the outlet.
2
Electrical Shock Hazard: This appliance is provided
The length of the cord used on this appliance was selected to reduce
the hazards of becoming tangled in or tripping over a longer cord. If a
longer cord is necessary, an approved extension cord may be used.
The electrical rating of the extension cord must be equal to or greater
than the rating of the appliance. Care must be taken to arrange the
extension cord so that it will not drape over the countertop or tabletop
where it can be pulled on by children or accidentally tripped over.
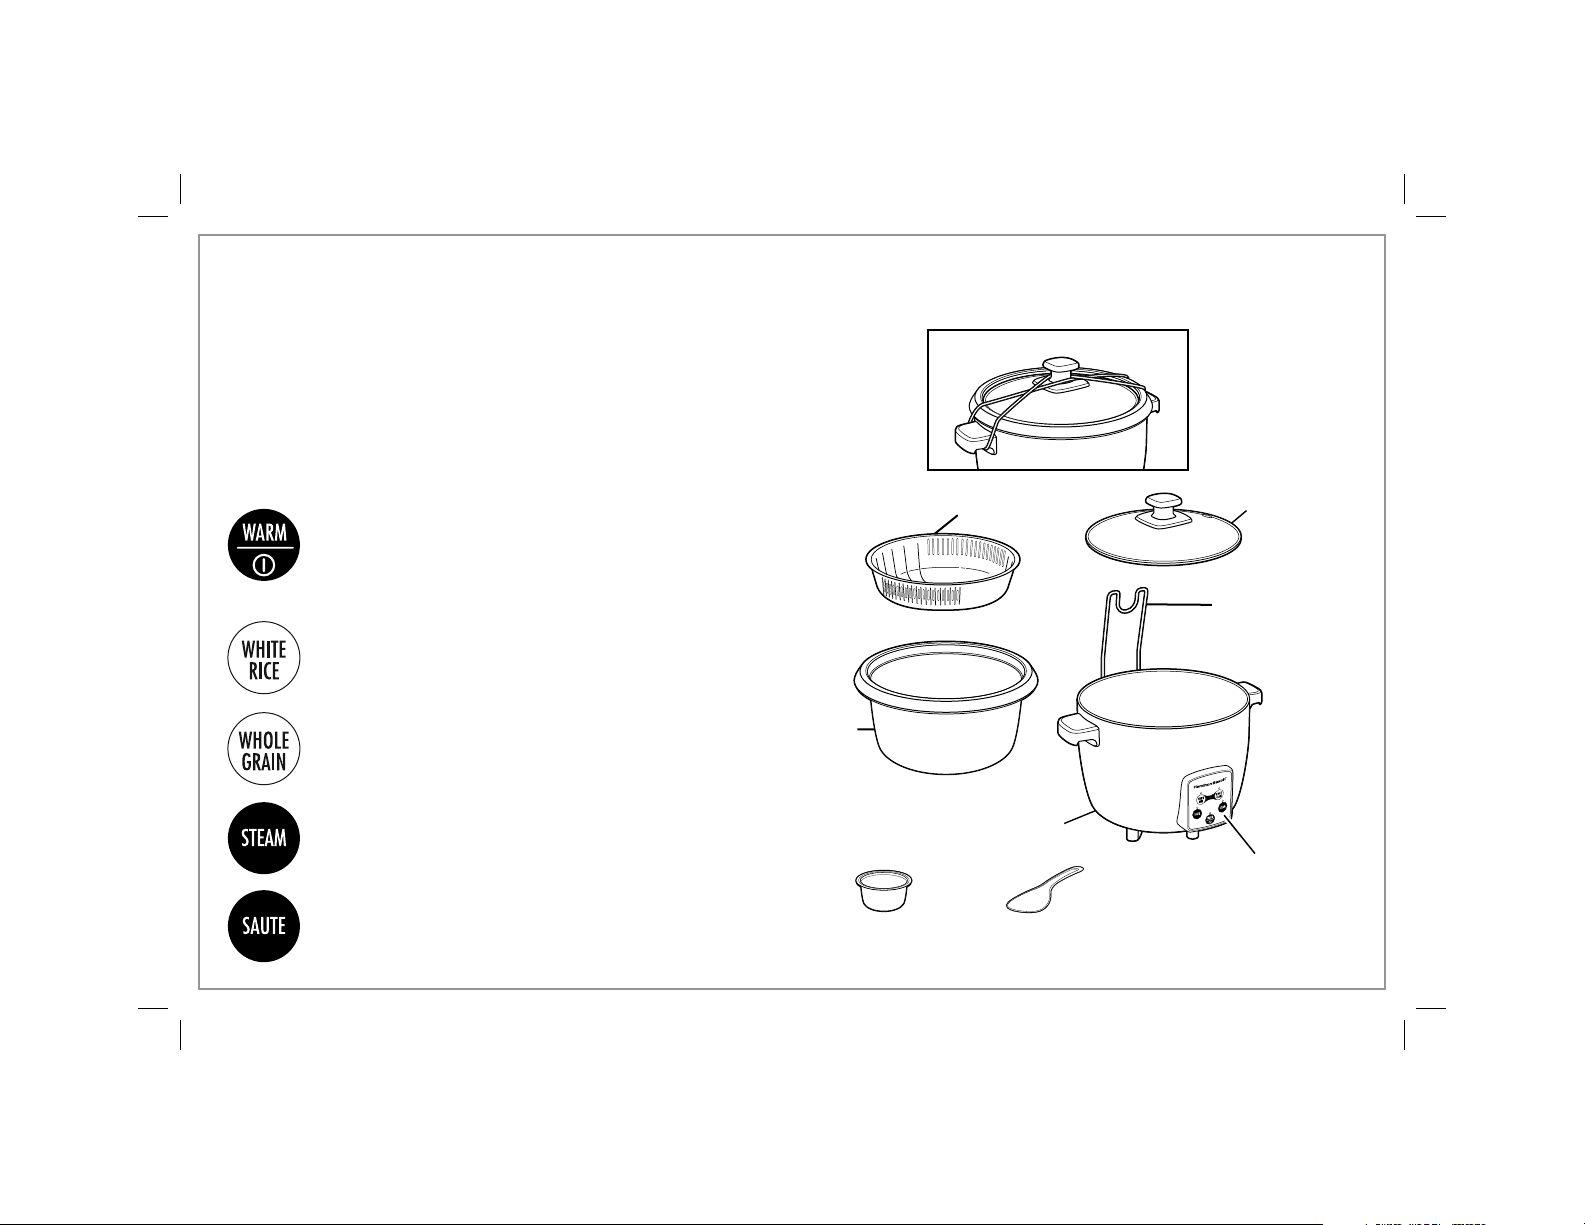
Parts and Features
*To order parts:
US: 1.800.851.8900
www.hamiltonbeach.com
Canada: 1.800.267.2826
Mexico: 01 800 71 16 100
Lid Latch*
(on select models)
Use to turn on rice cooker, warm, and to turn off. Unit
automatically shifts to WARM when rice is cooked,
when in WHITE RICE and WHOLE GRAIN programs.
WARM can be pressed at any time to cancel the
program.
WHITE RICE: Use to cook white rice for a
preprogrammed cook time.
WHOLE GRAIN: Use to cook brown rice or
other grains (any other than white rice) for a
preprogrammed cook time.
STEAM: Use to steam food for up to 30 minutes.
SAUTE: Use to saute food for up to 60 minutes.
Cooking Pot*
6-Ounce (177 ml)*
Rinsing/Steamer Basket*
Base
Rice Paddle*Rice Measuring Cup
Lid
Removable Lid
Rest (on select
models)
Control Panel
3
Electrical Shock Hazard. Cook only in removable cooking pot. Never
Burn Hazard. Steam from steam vent can cause injury.
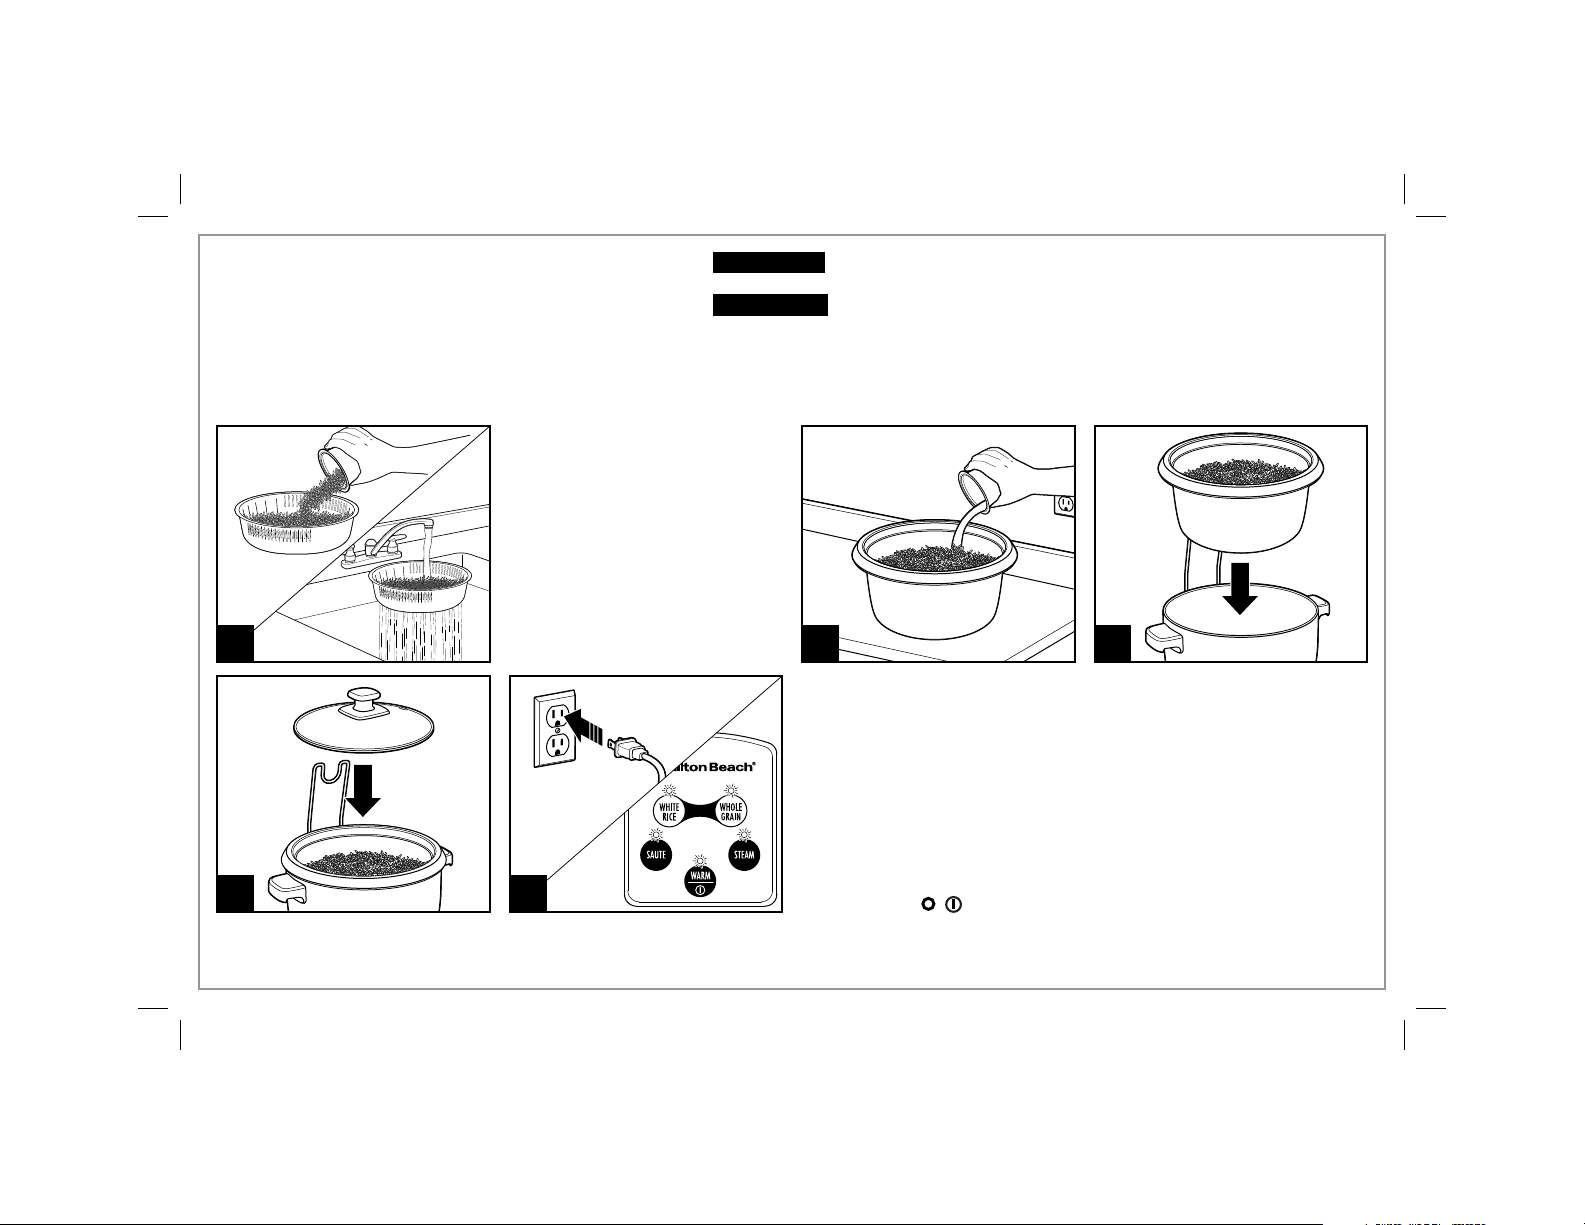
How to Cook Rice
w WARNING
place water or food directly into the base.
w CAUTION
BEFORE FIRST USE: Wash all removable parts, including steamer basket, rice measuring
cup, and rice paddle, following Care and Cleaning instructions; dry thoroughly.
RICE MEASURING CUP INFORMATION
NOTE: Do not throw away the rice measuring cup that comes with your unit. This is an important tool in using your rice cooker successfully and its
size is standard in the rice industry. One rice measuring cup equals 6 oz. (177 ml) or approximately 3/4 cup U.S. standard measuring cup.
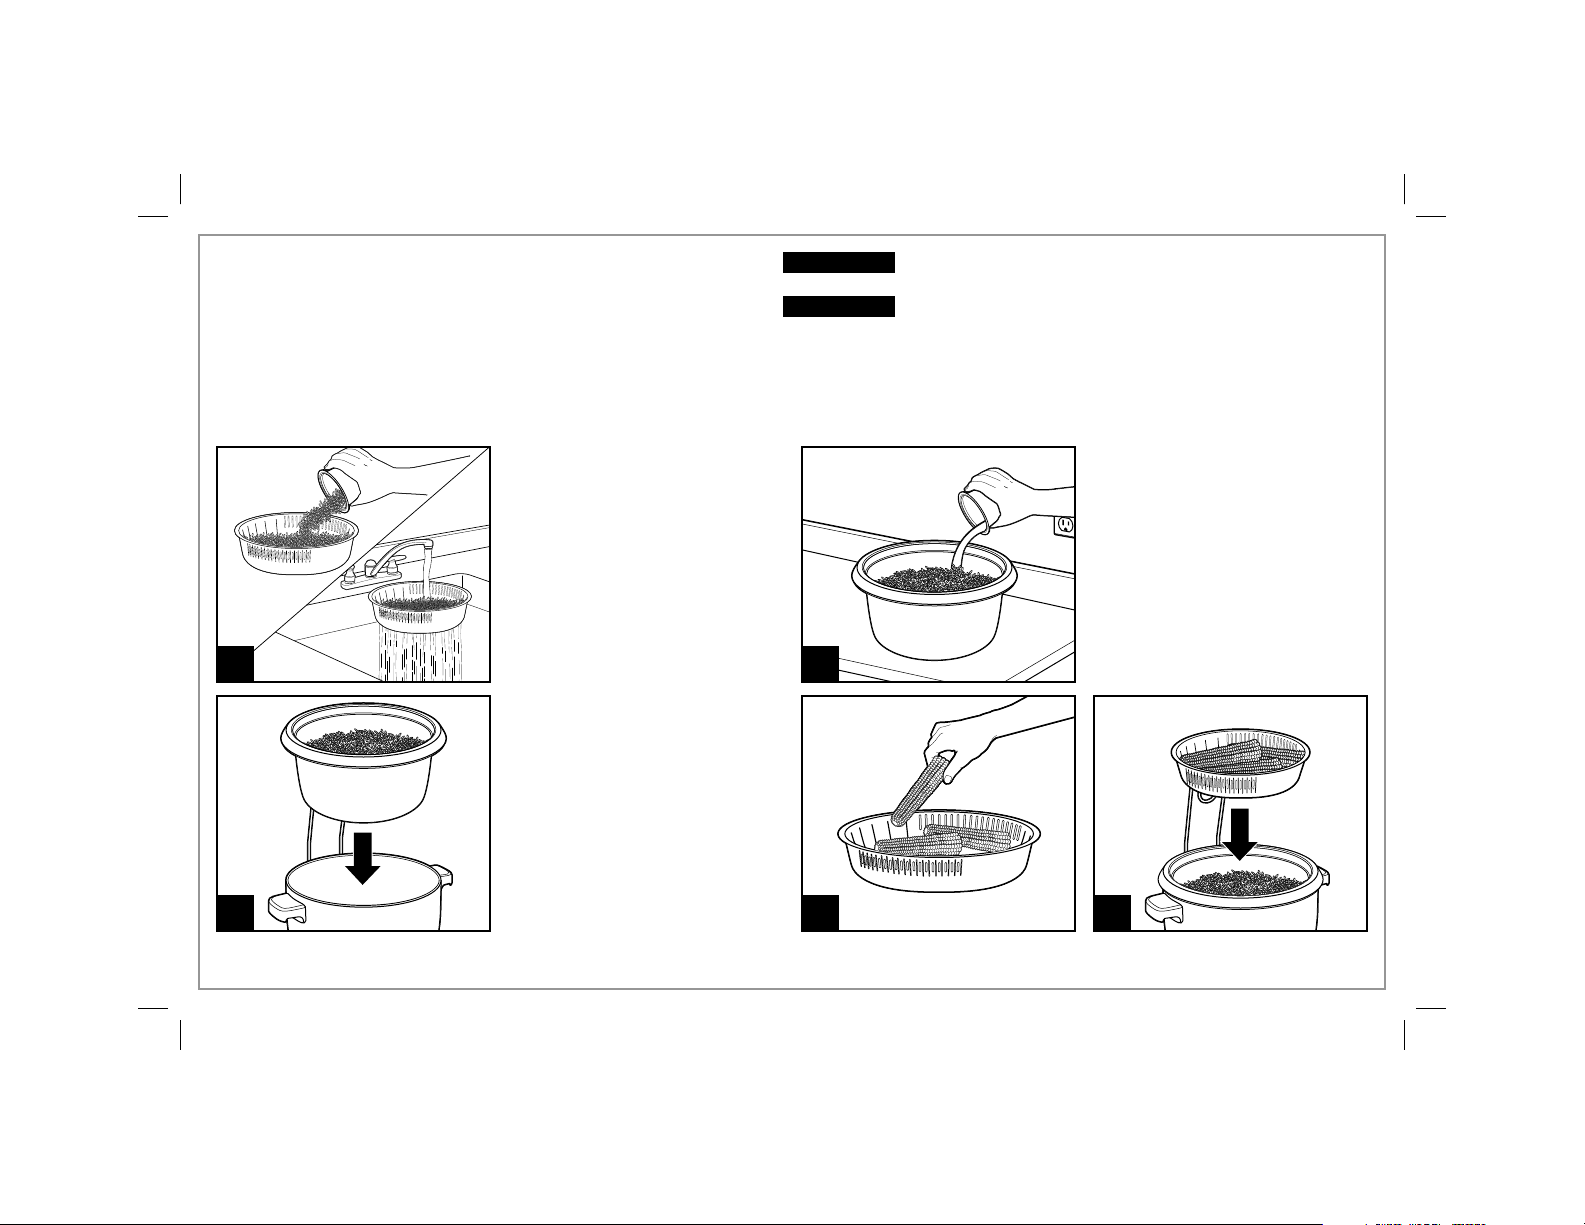
Measure rice with rice measuring
cup. Add the desired amount
of measured uncooked rice
to steamer basket. Do not fill
above side vents to prevent
rice from falling through while
rinsing. Place basket under a
slow-flowing faucet and rinse.
Add drained rice to cooking
1
4
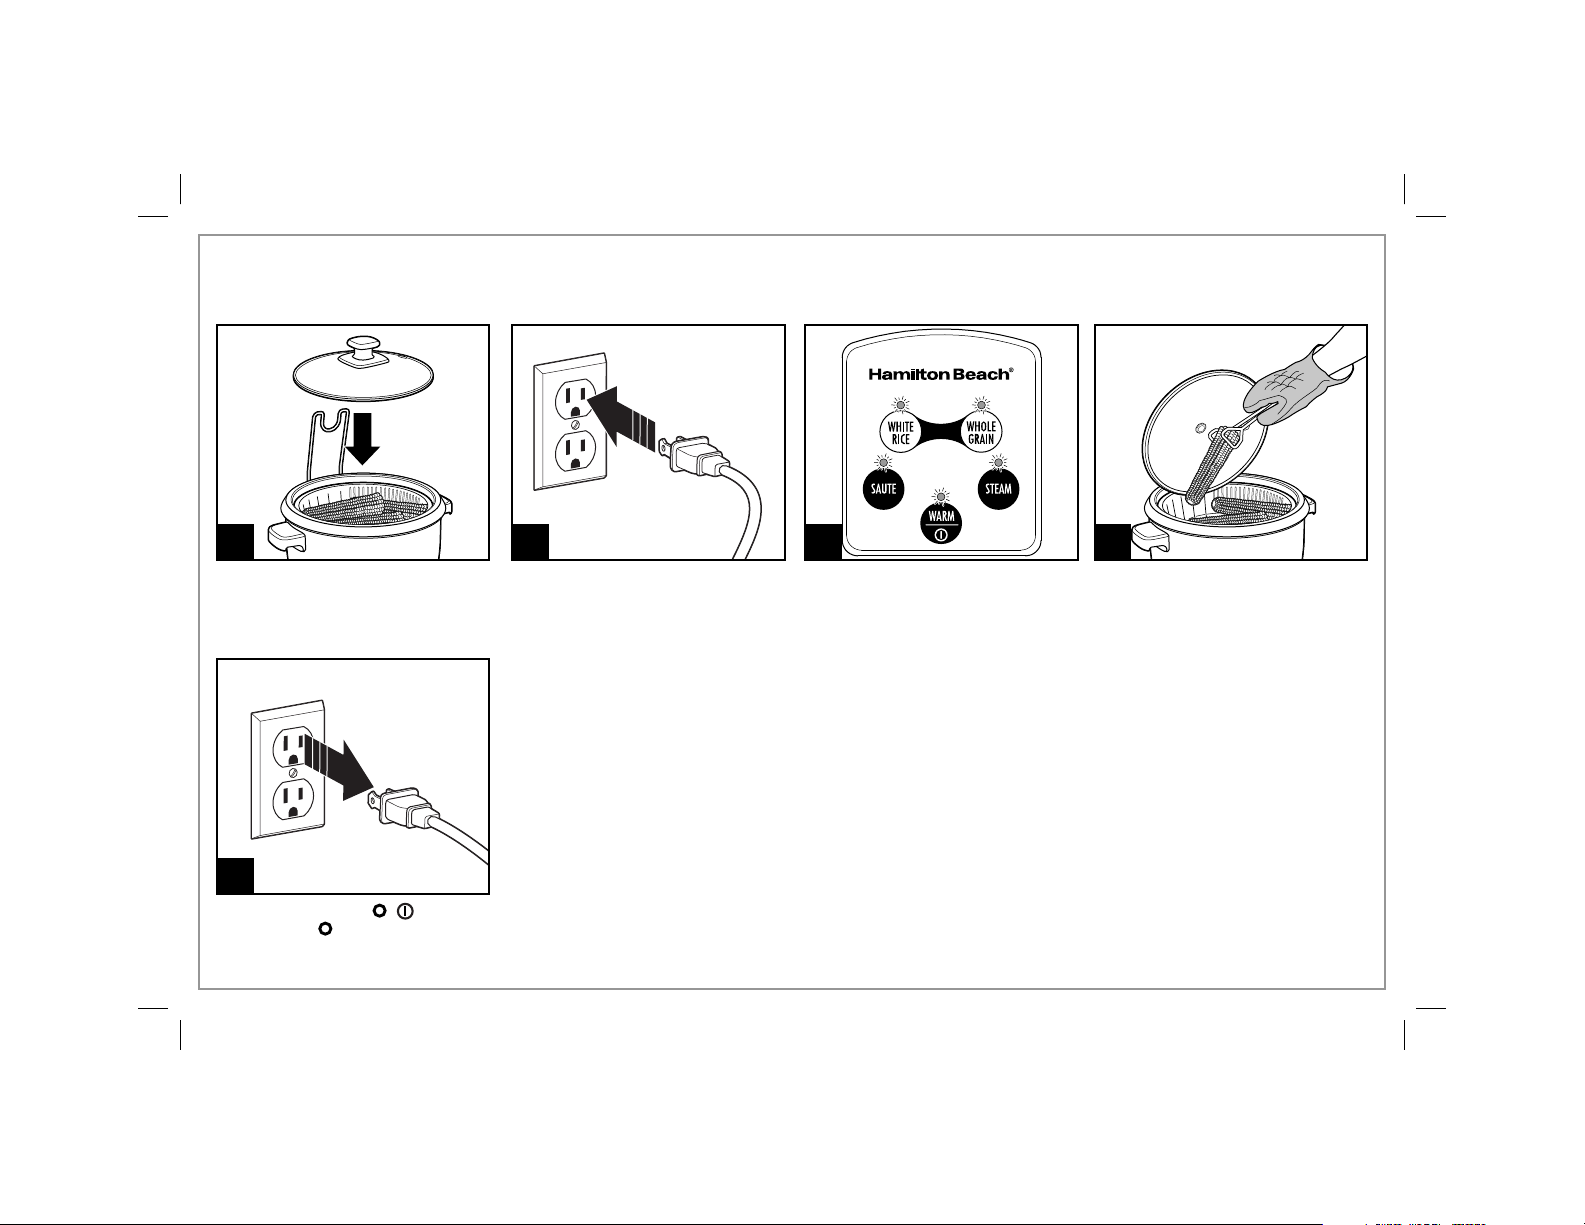
Add lid to cooking pot.
4
pot. Repeat rinsing with any
remaining rice.
5
Plug into outlet. The unit will beep
and all lights will flash on control
panel.
2
Follow charts on pages 6 and
7 for cooking amounts, times,
and yields. Fill with water to
corresponding water line. Example:
If you add 3 level rice cups of rice
to the cooking pot, add water to the
“3” line of the cooking pot. DO NOT
exceed MAX fill line.
If program is not selected, the rice
cooker control panel lights will flash
for 15 seconds and the rice cooker
will turn off. If rice cooker turns off,
press WARM/(I/ )/ again.
3
Place cooking pot securely into
the base. NOTE: Make sure
bottom of cooking pot is not bent
or warped, or it will not conduct
heat correctly.

How to Cook Rice (cont.)
While lights are flashing, press
desired program. Light will
illuminate for program selected.
When finished cooking, the rice
cooker will switch to WARM
and light will illuminate for up to
12 hours and turn off
automatically.
TIP: If you prefer a softer rice,
8
let cooked rice rest on WARM at
least 10 to 15 minutes.
76
9
Press the WARM/(I/
to turn OFF ( ); unplug. All lights
will be off.
)/ button
For WHITE RICE and WHOLE
GRAIN programs, the rice cooker
will adjust the cooking time
throughout the cooking cycle
based on the amount of rice and
moisture in the cooker. You may
notice that the cooker will place
a hold on the time or significantly
decrease cooking time as the
moisture content changes.
5

Rice Cooking Chart
• Chart is based on measuring rice and water with the rice measuring cup provided.
• There are many different types of rice. Rice packaging directions may call for different amounts of rice and water from the chart; following
package directions may vary results.
• Do not exceed MAX fill line to prevent overflow while rice is cooking.
RICE COOKER
TYPE OF RICE
Long grain white White Rice 8 cups (1.42 L) fill to 8 line
Long grain brown Whole Grain 8 cups (1.42 L) fill to 8 line
Arborio White Rice 8 cups (1.42 L) fill to 8 line
Basmati*** White Rice 8 cups (1.42 L) fill to 8 line
Jasmine*** White Rice 8 cups (1.42 L) fill to 8 line
Sushi Rice White Rice 8 cups (1.42 L) fill to 8 line
*Measured in rice measuring cup
**Measured in 1-cup U.S. measure
***Rinse before cooking
6
SETTING
MAXIMUM AMOUNT
OF RICE*
MAXIMUM AMOUNT
OF WATER
APPROX.
COOKING TIME
62–64 min
78–80 min
55–57 min
61–63 min
58–60 min
60–62 min
YIELD**
16+ cups
16+ cups
16+ cups
16+ cups
16+ cups
16+ cups

Grain and Cereal Cooking Chart
• Follow directions to cook rice, except choose WHOLE GRAIN or WHITE RICE setting. Add water as indicated on grain and cereal
cooking chart.
• Chart is based on measuring grain or cereal and water with the rice measuring cup provided. Teff, amaranth, and other very small
grains are not recommended.
• Cook the grains on the WHOLE GRAIN setting.
• Cook the cereals on the WHITE RICE setting.
TYPE OF GRAIN
OR CEREAL
Barley 1 cup (177 ml) 3 cups (532 ml)
Buckwheat 4 cups (710 ml) 10 cups (1.77 L)
Farro 8 cups (1.42 L) fill to 8 line
Millet 5 cups (887 ml) 10 cups (1.77 L)
Quinoa*** 8 cups (1.42 L) fill to 8 line
Wheatberries 8 cups (1.42 L) fill to 8 line about 2 hours 16 cups
Cream of Wheat****
Grits 1 cup (177 ml) 4 cups (710 ml) 35 min 3 cups
Old-Fashioned Oatmeal 6 cups (1.06 L) 10 cups (1.77 L) 50 min 10 cups
*Measured in rice measuring cup
**Measured in 1-cup U.S. measure
***Rinse before cooking
****Stir once or twice during cooking
†
Cream of Wheat is a trademark of B&G Foods North America, Inc. Use of the trademark does not imply any affiliation with or endorsement by B&G North America, Inc.
†
MAXIMUM AMOUNT
OF GRAIN OR CEREAL*
1 cup (177 ml) 5 cups (887 ml) 48 min 3 cups
MAXIMUM AMOUNT
OF WATER*
APPROX.
COOKING TIME
58–60 min
58–60 min
78–80 min
58–60 min
68–70 min
YIELD**
2 cups
10 cups
17 cups
12 cups
17 cups
7
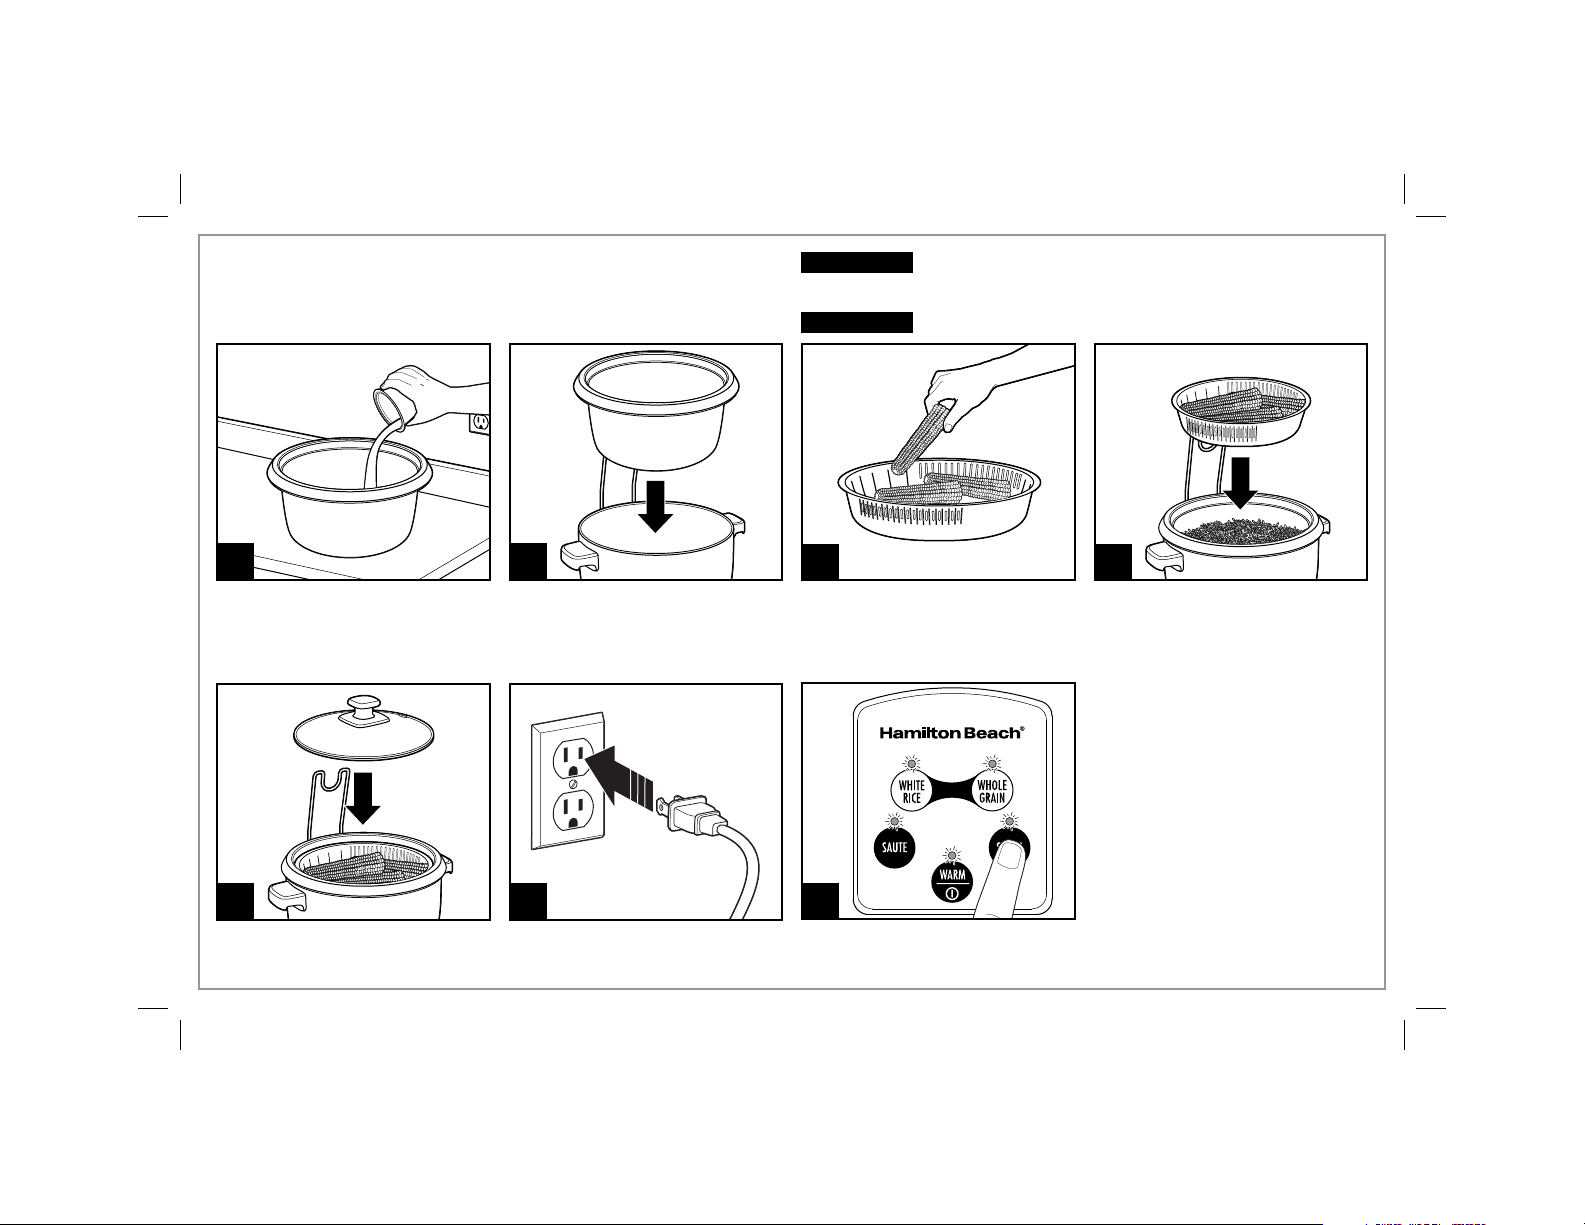
How to Steam Food
w WARNING
cooking pot and steamer basket. Never place water or food directly
into the base.
w CAUTION
Electrical Shock Hazard. Cook only in removable
Burn Hazard. Steam from steam vent can cause injury.
1
Pour desired amount of water in
cooking pot.
2
Place cooking pot securely into
the base. NOTE: Make sure
bottom of cooking pot is not bent
or warped, or it will not conduct
heat correctly.
65
Add lid to cooking pot. Plug into outlet.
8
3
Add food to steamer basket
according to the Steam Cooking
Chart on page 10.
7
All lights will be flashing. Press
STEAM button.
4
Place steamer basket into
cooking pot.
How to Steam Food (cont.)
8 9
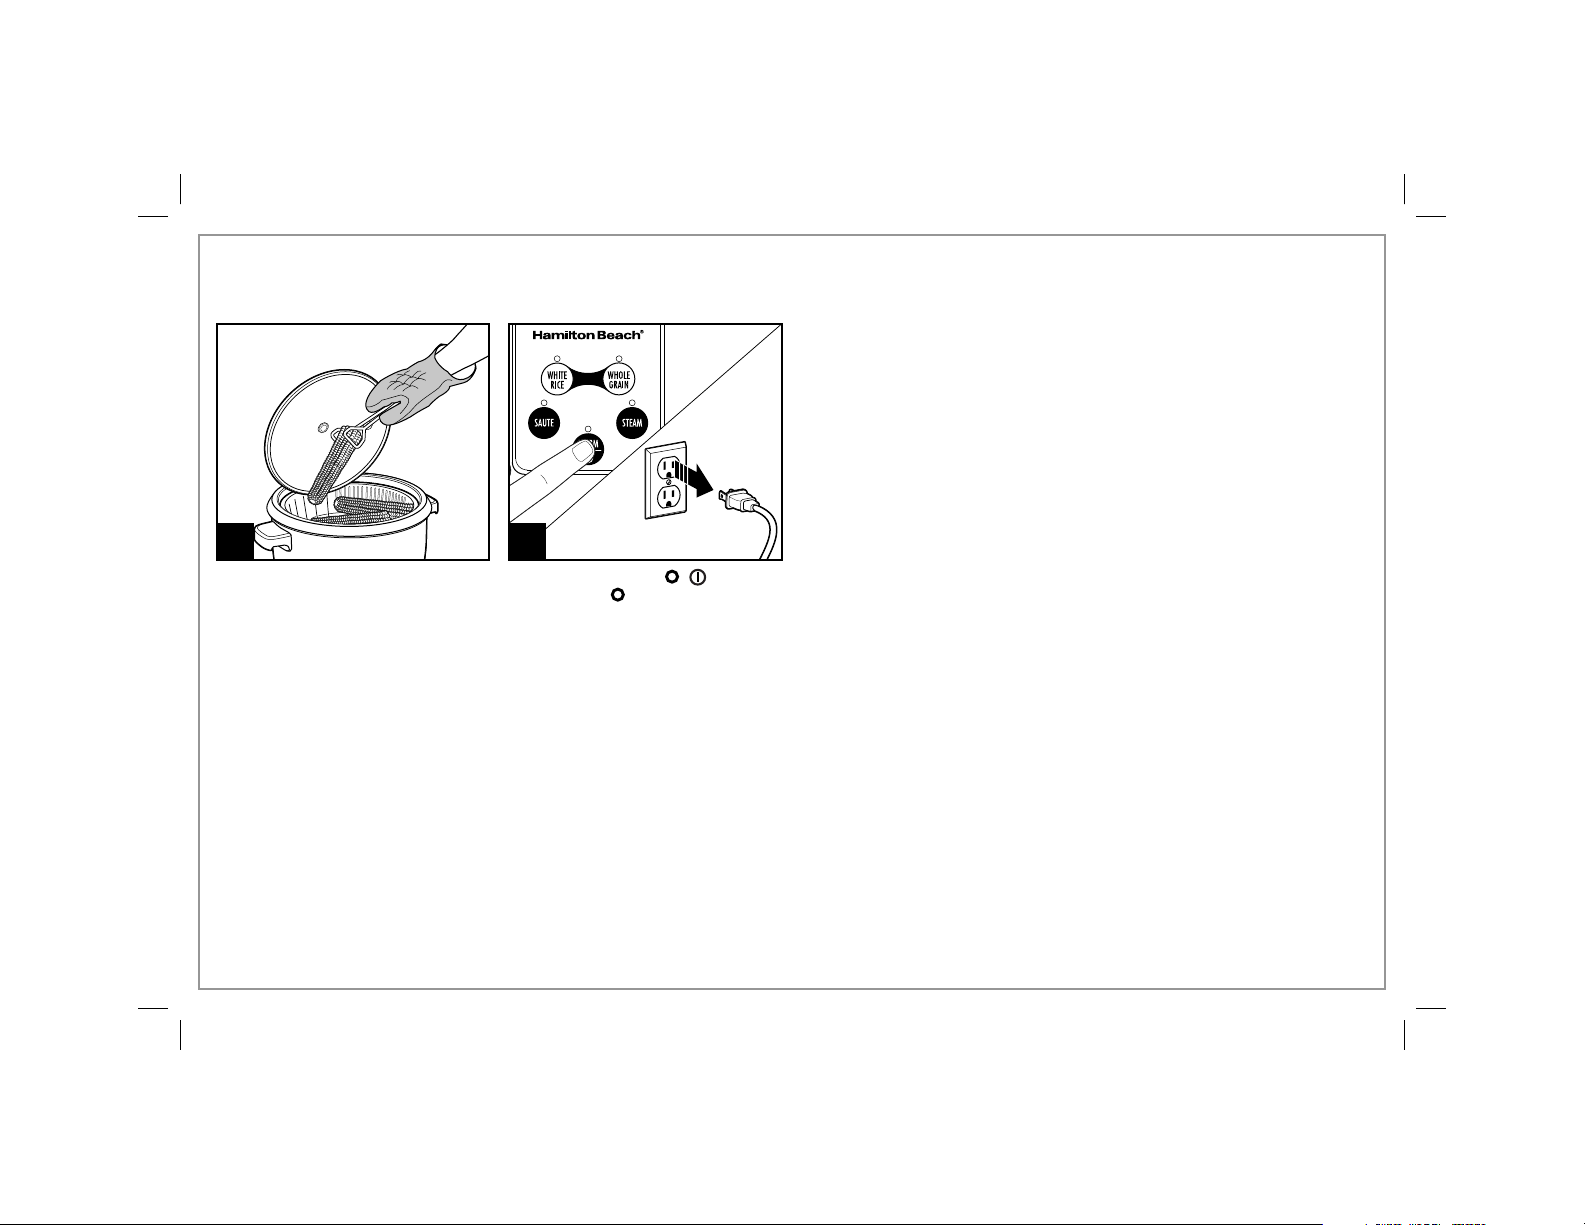
Using an oven mitt, remove food
from steamer basket. NOTE: If
pot boils dry, rice cooker will
beep. To continue STEAM, add
more water. Unit will resume
steaming if water is added before
3 minutes.
Press the WARM/(I/
to turn OFF ( ); unplug. All lights
will be off.
)/ button
9

Steam Cooking Chart
Cook the following on the STEAM setting.
MAXIMUM AMOUNT
TYPE OF FOOD
Vegetables:
Asparagus, cut in 3-inch pieces 4 cups (946 ml) 2 cups (473 ml) 14–16 min Crisp-tender
Broccoli, florets 4 cups (946 ml) 2 cups (473 ml) 13–15 min Crisp-tender
Carrots, sliced 1/4-inch thick 4 cups (946 ml) 2 cups (473 ml) 25–27 min Crisp-tender
Corn-on-the-Cob 2–3 ears 2 cups (473 ml) 18–20 min Crisp-tender
Potatoes, 3/4-inch cubes 4 cups (946 ml) 2 cups (473 ml) 26–28 min Tender
Zucchini, sliced 1/4-inch thick 4 cups (946 ml) 2 cups (473 ml) 14–16 min Crisp-tender
Poultry/Seafood:
Chicken, tenders 20 oz. (567 g) 2 cups (473 ml) 22–24 min Internal temperature
Salmon, fillet 20 oz. (567 g) 2 cups (473 ml) 18–20 min Internal temperature
Shrimp, peeled and deveined
31–40 count
*Measured in 1-cup U.S. measure
• The more food added to the steamer basket, the longer the steam
time should be.
• Smaller pieces of food will steam faster than larger pieces.
OF FOOD*
24 oz. (680 g) 2 cups (473 ml) 18–20 min Pink and opaque
MAXIMUM AMOUNT
OF WATER*
APPROX.
COOKING TIME
DONENESS TEST
FOR FOOD
160°–165°F (71°–74°C)
145°F (63°C)
10
Electrical Shock Hazard. Cook only in removable cooking
Burn Hazard. Steam from steam vent can cause injury.
To Steam Food
w WARNING
pot and steamer basket. Never place water or food directly into the base.
w CAUTION
While Cooking Rice
RICE MEASURING CUP INFORMATION
NOTE: Do not throw away the rice measuring cup that comes with your unit. This is an important tool in using your rice cooker successfully and its
size is standard in the rice industry. One rice measuring cup equals 6 oz. (177 ml) or approximately 3/4 cup U.S. standard measuring cup.
Measure rice with rice measuring
cup. Add the desired amount
of measured uncooked rice
to steamer basket. Do not fill
above side vents to prevent
rice from falling through while
rinsing. Place basket under a
slow-flowing faucet and rinse.
Add drained rice to cooking
1
pot. Repeat rinsing with any
remaining rice.
NOTE: Some foods should be
added to the steamer basket
at the start of cooking rice and
others need to be added when
steaming starts heavily from the
lid vent.
2
Follow charts on pages 13
and 14 for cooking amounts,
times, and yields. Fill with water
to corresponding water line.
Example: If you add 3 level rice
cups of rice to the cooking pot,
add water to the “3” line of the
cooking pot.
Place cooking pot securely into
the base. NOTE: Make sure
bottom of cooking pot is not bent
3
or warped, or it will not conduct
heat correctly.
4
Add food to steamer basket. Place steamer basket into
5
cooking pot.
11
To Steam Food While Cooking Rice (cont.)
6
Add lid to cooking pot.
10
Press the WARM/(I/
to turn OFF ( ); unplug. All lights
will be off.
12
)/ button
7
Plug into outlet.
8
While lights are flashing, press
desired program. For WHITE RICE
and WHOLE GRAIN programs,
the rice cooker will adjust the
cooking time throughout the
cooking cycle based on the
amount of rice and moisture in
the cooker. You may notice that
the cooker will place a hold on
the time or significantly decrease
cooking time as the moisture
content changes.
9
Using an oven mitt, remove food
from steamer basket. NOTE: If
pot boils dry, rice cooker will
beep. To continue STEAM, add
more water. Unit will resume
steaming if water is added before
3 minutes.

Steaming Food With Rice Chart
Cook the following on the WHITE RICE setting. Chart is based on measuring rice and water with the rice measuring cup provided. If you lose
the rice measuring cup, one rice measuring cup equals 6 oz. (177 ml) or approximately 3/4 cup U.S. measure, or follow the recommended two
parts water to one part rice.
MAXIMUM
AMOUNT
TYPE OF FOOD
Asparagus, cut in 3-inch pieces 4 cups
Broccoli, florets 4 cups
Corn-on-the-Cob 2–3 ears 3 cups
Potatoes, cut in 2-inch chunks 4 cups
*Measured in 1-cup U.S. measure
**Measured in rice measuring cup
***All times are for long grain white rice
• The more food added to the steamer basket, the longer the steam
time should be.
• Smaller pieces of food will steam faster than larger pieces.
OF FOOD*
(946 ml)
(946 ml)
(946 ml)
MAXIMUM
AMOUNT
OF RICE**
3 cups
(532 ml)
3 cups
(532 ml)
(532 ml)
3 cups
(532 ml)
MAXIMUM
AMOUNT
OF WATER
fill to 3 line 35–37 min 7 cups Crisp-Tender: add
fill to 3 line 36–38 min 7 cups Crisp-Tender: add
fill to 3 line 47–49 min 7 cups Crisp-Tender
fill to 3 line 39–41 min 7 cups Firm: let stand 10
• Give rice a flavor boost by substituting an equal amount of chicken/
beef/vegetable broth for water.
APPROX.
COOKING
TIME***
YIELD OF
RICE*
DONENESS TEST
FOR FOOD
vegetables when
steaming heavily
from vent
vegetables when
steaming heavily
from vent
minutes on WARM
to finish steaming
potatoes
13

Steaming Food With Rice Chart (cont.)
TYPE OF FOOD
Yellow Squash and Red Bell
Peppers, sliced 1/4-inch thick
and 1-inch cubes
Chicken, tenders 20 oz.
Salmon, fillet 20 oz.
Shrimp, peeled and deveined
31–40 count
*Measured in 1-cup U.S. measure
**Measured in rice measuring cup
***All times are for long grain white rice
MAXIMUM
AMOUNT
OF FOOD*
4 cups
(946 ml)
(567 g)
(567 g)
24 oz.
(680 g)
MAXIMUM
AMOUNT
OF RICE**
3 cups
(532 ml)
3 cups
(532 ml)
3 cups
(532 ml)
3 cups
(532 ml)
MAXIMUM
AMOUNT
OF WATER
fill to 3 line 41–43 min 7 1/4 cups Crisp-Tender: add
fill to 3 line 46–48 min 7 1/2 cups Internal temperature
fill to 3 line 40–42 min 7 1/4 cups Internal temperature
fill to 3 line 39–41 min 7 1/4 cups Pink and opaque
APPROX.
COOKING
TIME***
YIELD OF
RICE*
DONENESS TEST
FOR FOOD
vegetables when
steaming heavily from
vent
160°–165°F (71°–74°C).
Let stand on WARM
up to 10 minutes if
needed.
145°F (63°C). Let stand
on WARM up to
10 minutes if needed.
14
How to Saute
w WARNING
pot and steamer basket. Never place water or food directly into the base.
Electrical Shock Hazard. Cook only in removable cooking
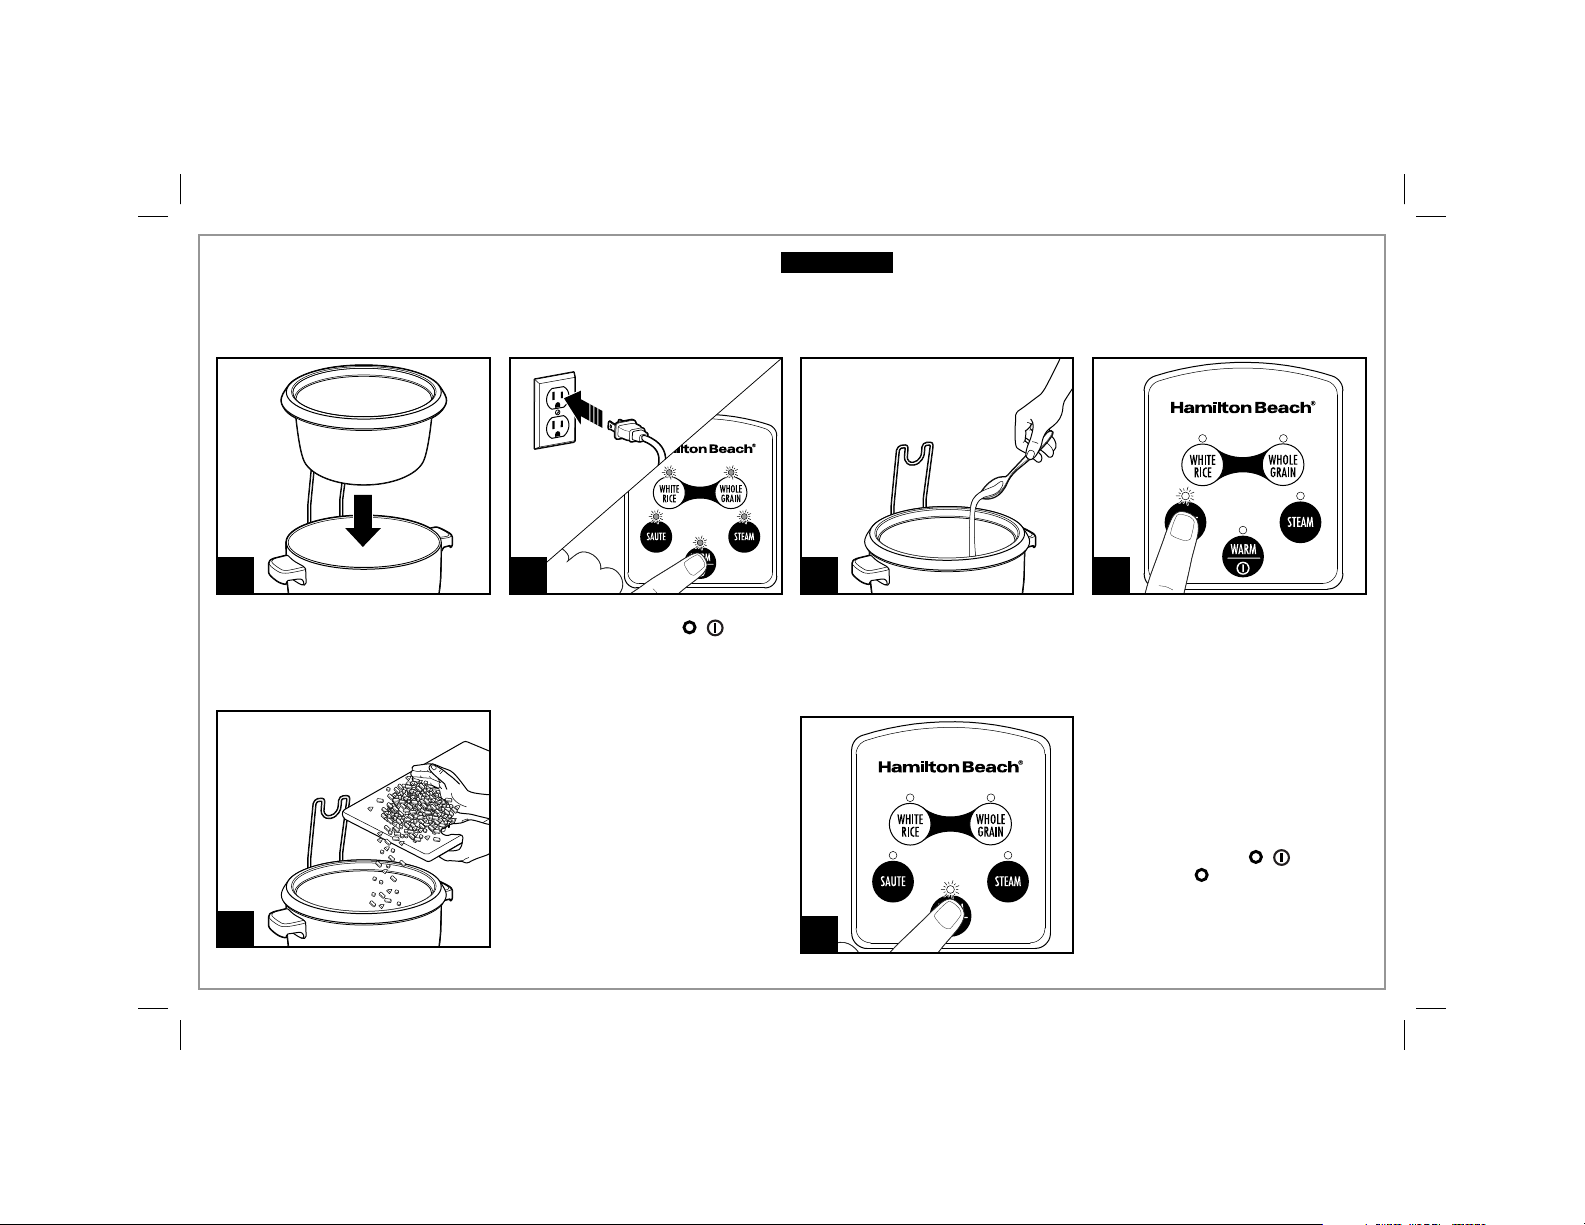
1
Place cooking pot securely into
the base. NOTE: Make sure
bottom of cooking pot is not bent
or warped, or it will not conduct
heat correctly.
5
2
Plug into outlet. All lights will
flash. Press WARM/(I/ )/ button
to turn on unit. If not pressed in
15 seconds, the unit will turn off
automatically.
Add ingredients to cooking
pot using a wooden or plastic
cooking utensil. Stir until
ingredients are cooked to desired
texture. The SAUTE program will
turn off automatically after
60 minutes.
3
Add oil or butter to cooking pot.
6
4
Press SAUTE button and heat for
5 minutes without lid.
Press the WARM/(I/
to turn OFF ( ) before 60
minutes; unplug. All lights will be
off. NOTE: If adding white rice or
whole grains, follow directions on
page 6 or 7.
)/ button
15
w WARNING
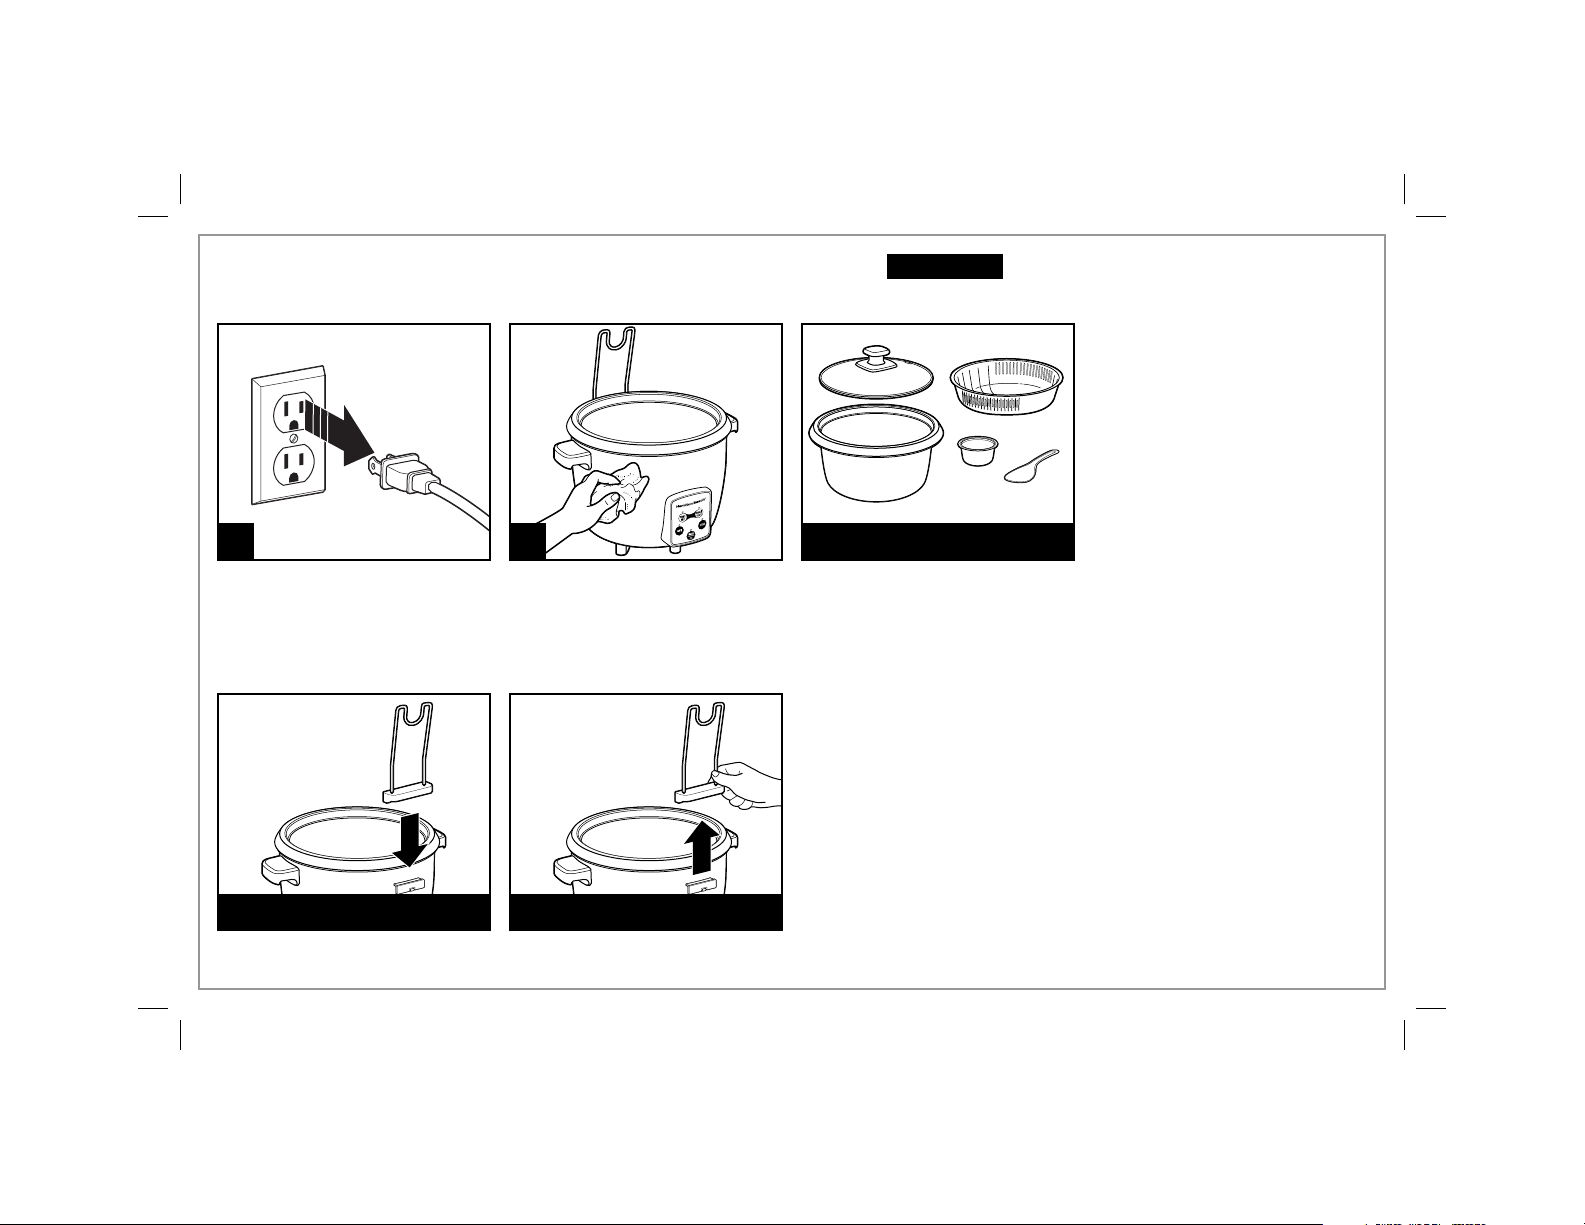
Care and Cleaning
21
Unplug. Wipe cooking pot with a damp cloth or sponge. To remove stubborn
spots, use a mild nonabrasive cleanser.
DISHWASHER-SAFE
Do not immerse base, cord, or plug in water or other liquid.
Electrical Shock Hazard.
Cooking pot and lid are
dishwasher-safe. Steamer basket,
rice measuring cup, and rice
paddle are dishwasher-safe for
top rack only.
DO NOT use the “SANI” setting
when washing in the dishwasher.
“SANI” cycle temperatures could
damage your product.
Assembling and Removing Lid Rest
REMOVINGASSEMBLING
Slide removable lid rest down onto lid rest holder. Reverse for storage.
16

Troubleshooting
PROBLEM
Cooker doesn’t
turn on.
Rice is not cooked.
Rice is mushy.
When using STEAM
program, rice cooker
starts to “beep” every
2 seconds.
When using the
SAUTE program,
rice cooker starts to
beep and all lights are
illuminated.
Cooking pot not fitting.
Rice cooker starts to
beep and all lights are
illuminated.
PROBABLE CAUSE/SOLUTION
• Cooker is not plugged in. Make sure rice cooker is plugged into a properly operating electrical
outlet or press WARM/(I/ )/ button to activate the unit.
• Not enough water/cooking liquid. Follow package directions or see Rice Cooking Chart for more
information.
• Place cooking pot securely into the base. NOTE: If cooking pot is bent or warped, it will not seat
properly in base and, therefore, will not conduct heat correctly. To replace cooking pot, call the tollfree Customer Assistance number listed on the cover of this guide.
• Let rice rest for 10 to 15 minutes after cooking is complete and rice cooker has switched to WARM.
• Too much liquid added to cooking pot. Reduce liquid.
• Cooking pot has boiled dry. Add more water within 3 minutes or rice cooker will turn off ( )
automatically.
• Temperature of rice cooker has become too hot. Unplug and wait 10 minutes to cool down. Plug
into outlet and resume cooking.
• Call the toll-free Customer Assistance number listed on the cover of this guide.
• The rice cooker has malfunctioned. Call the toll-free Customer Assistance number listed on the
cover of this guide.
17
 Loading...