

Page 1

READ BEFORE USE
LIRE AVANT UTILISATION
LEA ANTES DE USAR
Visit www.hamiltonbeach.com for our
complete line of products and Use and
Care Guides – as well as delicious recipes,
tips, and to register your product online.
Rendez-vous sur www.hamiltonbeach.ca
pour notre liste complète de produits et de
nos manuels utilisateur – ainsi que nos
délicieuses recettes et nos conseils.
Visite www.hamiltonbeach.com (
o
www.hamiltonbeach.com.mx (México)
para ver otros productos de Hamilton Beach
o para contactarnos.
EE. UU.)
Rice Cooker & Food Steamer
2–8 Cup Food Capacity
Cuiseur de riz et
Questions
Please call us – our friendly
associates are ready to help.
USA: 1.800.851.8900
Questions
N’hésitez pas à nous appeler –
nos associés s’empresseront
de vous aider.
CAN : 1.800.267.2826
Preguntas
Por favor llámenos – nuestros
amables representantes están
listos para ayudar.
EE. UU.: 1.800.851.8900
MEX: 01 800 71 16 100
Le invitamos a leer cuidadosamente este
instructivo antes de usar su aparato.
marmite à vapeur
Capacité de 473 ml à 1,9 L
Arrocera y Vaporera
Capacité de 473 ml à 1.9 L
English ...................... 2
Français .................. 17
Español ................... 33
Page 2

IMPORTANT SAFEGUARDS
When using electrical appliances, basic safety precautions should always be followed to reduce the risk of fire, electric shock, and/or injury to
persons, including the following:
1. Read all instructions.
2. This appliance is not intended for use by persons (including
children) with reduced physical, sensory, or mental capabilities,
or lack of experience and knowledge, unless they are closely
supervised and instructed concerning use of the appliance by a
person responsible for their safety.
3. Close supervision is necessary when any appliance is used by
or near children. Children should be supervised to ensure that
they do not play with the appliance.
4. Do not touch hot surfaces. Use handles or knobs. Use pot
holders when removing hot containers.
5. To protect against a risk of electrical shock, do not immerse
cord, plug, or base in water or other liquid.
6. Unplug from outlet when not in use. Unplug and allow to cool
before putting on or taking off parts, and before cleaning.
7. Do not operate any appliance with a damaged supply cord or
plug, or after the appliance malfunctions or has been dropped
or damaged in any manner. Supply cord replacement and
repairs must be conducted by the manufacturer, its service
agent, or similarly qualified persons in order to avoid a hazard.
Call the provided customer service number for information on
examination, repair, or adjustment.
8. The use of accessory attachments not recommended by the
appliance manufacturer may cause injuries.
9. Do not use outdoors.
10. Do not let cord hang over edge of table or counter or touch hot
surfaces, including the stove.
11. Do not place on or near a hot gas or an electric burner, or in
a heated oven.
12. Extreme caution must be used when moving an appliance
containing hot oil, food, water, or other hot liquids.
13. To disconnect, turn controls to OFF and then remove plug from
wall outlet.
14. Do not use appliance for other than intended use.
15. Lift and open cover carefully to avoid scalding, and allow water
to drip into the cooker.
16. CAUTION! Risk of electric shock. Cook only in removable
container.
17. Do not place the unit directly under cabinets when operating as
this product produces large amounts of steam. Avoid reaching
over the product when operating.
SAVE THESE INSTRUCTIONS
Other Consumer Safety Information
This appliance is intended for household use only.
w WARNING
plug (one wide blade) that reduces the risk of electric shock. The plug fits only
one way into a polarized outlet. Do not defeat the safety purpose of the plug
by modifying the plug in any way or by using an adapter. If the plug does not
fit fully into the outlet, reverse the plug. If it still does not fit, have an electrician
replace the outlet.
2
Electrical Shock Hazard: This appliance has a polarized
The length of the cord used on this appliance was selected to reduce the
hazards of becoming tangled in or tripping over a longer cord. If a longer
cord is necessary, an approved extension cord may be used. The electrical
rating of the extension cord must be equal to or greater than the rating of the
appliance. Care must be taken to arrange the extension cord so that it will not
drape over the countertop or tabletop where it can be pulled on by children
or accidentally tripped over.
To avoid an electrical circuit overload, do not use another high-wattage
appliance on the same circuit with this appliance.
Page 3

Parts and Features
*To order parts:
US: 1.800.851.8900
www.hamiltonbeach.com
Canada: 1.800.267.2826
Mexico: 01 800 71 16 100
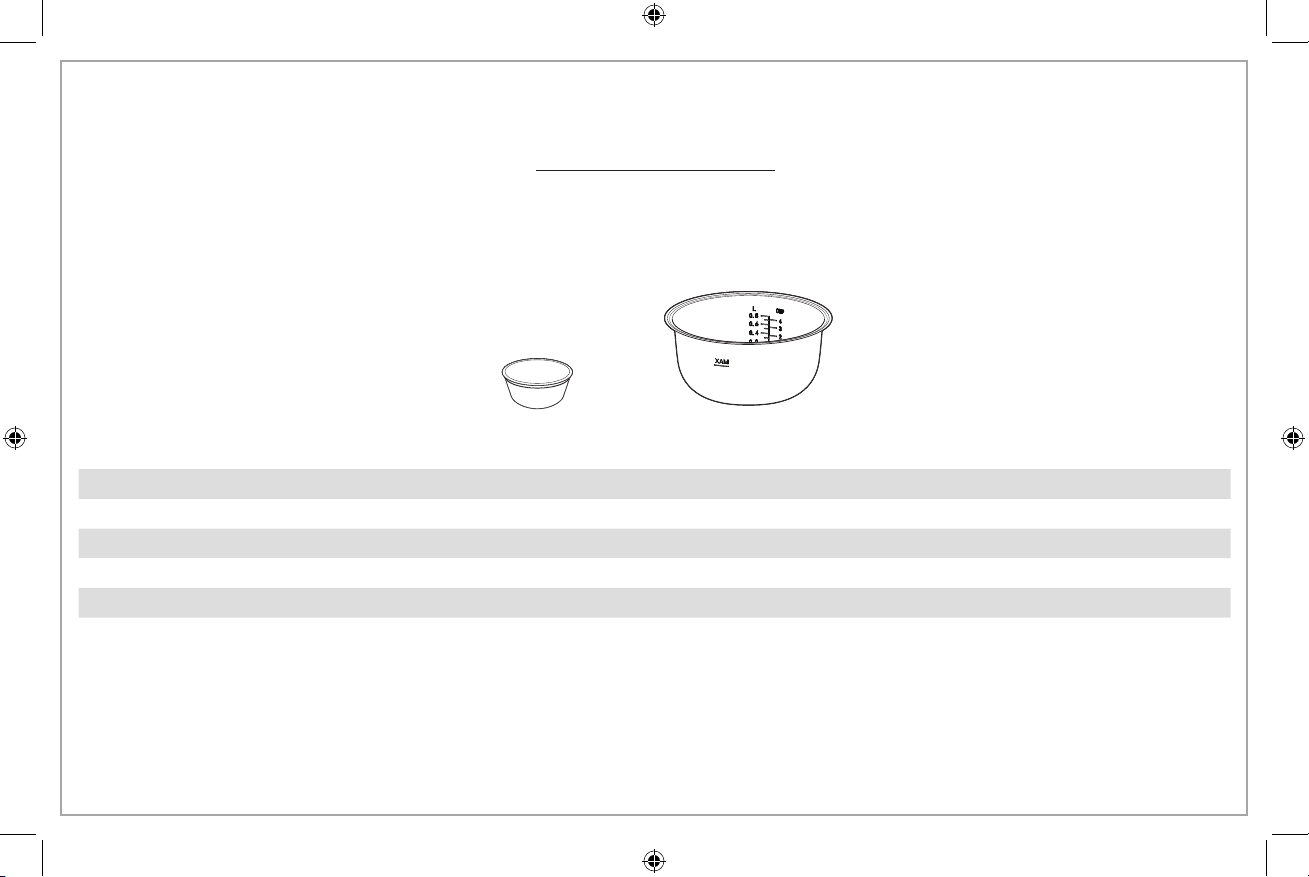
Rice Measuring Cup
6-Ounce (177 ml),
3/4 cup US Standard
Measure*
WARM: Press to start cooking or to turn the cooker off.
Unit automatically shifts to Warm function after every
function EXCEPT Steam.
WHITE RICE: Use to cook white rice for a
preprogrammed cook time.
Rice Paddle*
Cooking Pot
with Water
Fill Lines*
Removable Lid Liner
(see Cleaning for
removal instructions)
Steamer Basket*
Lid
Condensation
Collector
Base
WHOLE GRAIN: Use to cook brown rice or other
grains (any other than white rice) for a preprogrammed
cook time.
STEAM: Use to steam food for a selected steam time.
Steaming time can be set from 0 (to just boil water) to
30 minutes.
HOT CEREAL: Use to cook all types of hot cereals,
oats, or grits. This function will heat and then simmer
for the selected period of time.
Control Panel
(on certain models)
Control Panel
3
Page 4

How to Make Rice or Grains
w WARNING
cooking pot. Never place water or food directly into the base.
BEFORE FIRST USE: Wash cooking pot following Care and
Cleaning instructions; dry thoroughly.
RICE MEASURING CUP INFORMATION
NOTE: Do not throw away the rice measuring
cup that comes with your unit. This is an
important tool in using your rice cooker
successfully and its size is standard in the
rice industry. One rice measuring cup equals
6 oz. (177 ml) or approximately 3/4 cup U.S.
standard.
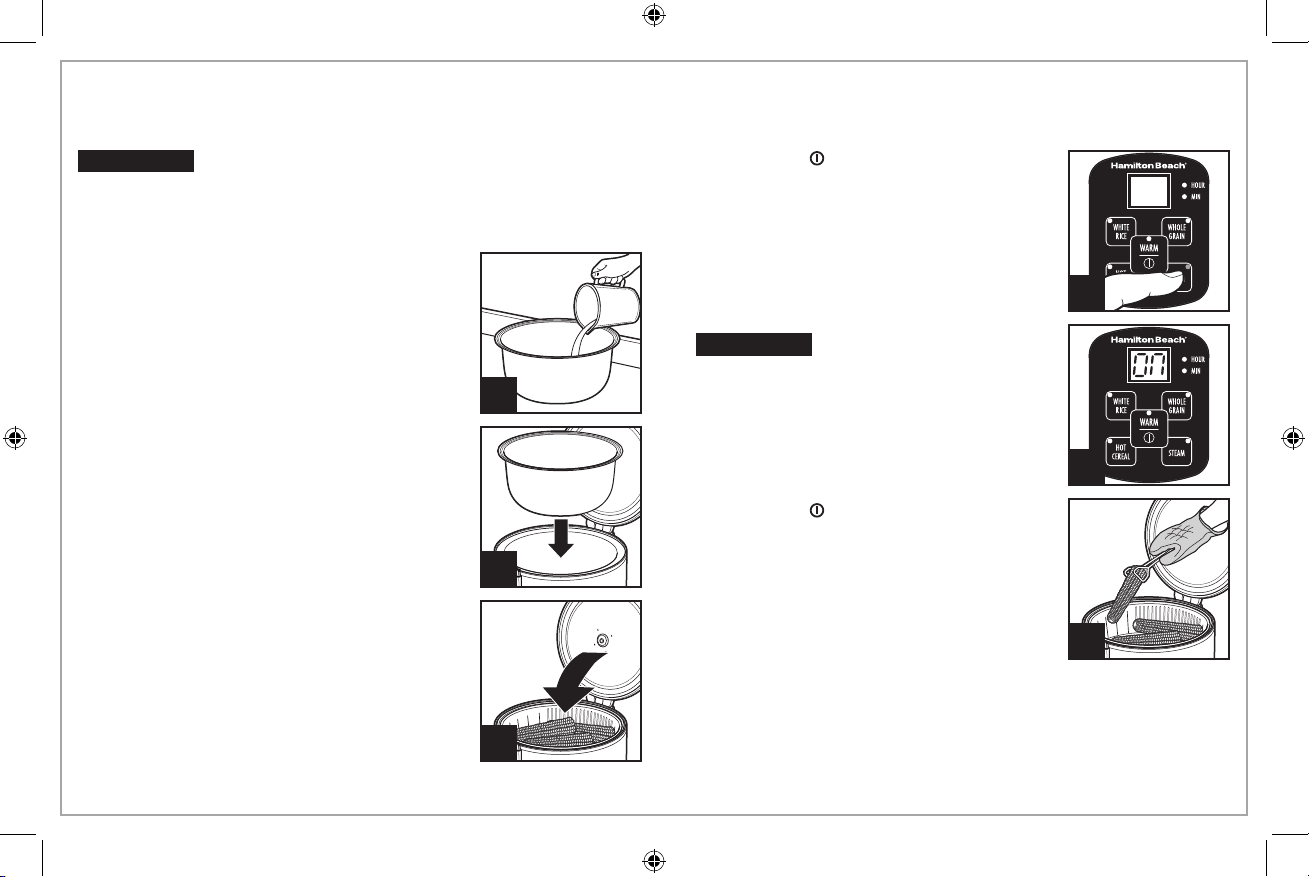
1. Measure rice with rice measuring cup. Add
the desired amount of measured uncooked
rice to steamer basket. Do not fill above
side vents to prevent rice from falling
through while rinsing. Place basket under a
slow-flowing faucet and rinse. Add drained
rice to cooking pot. Repeat rinsing with
any remaining rice.
OR
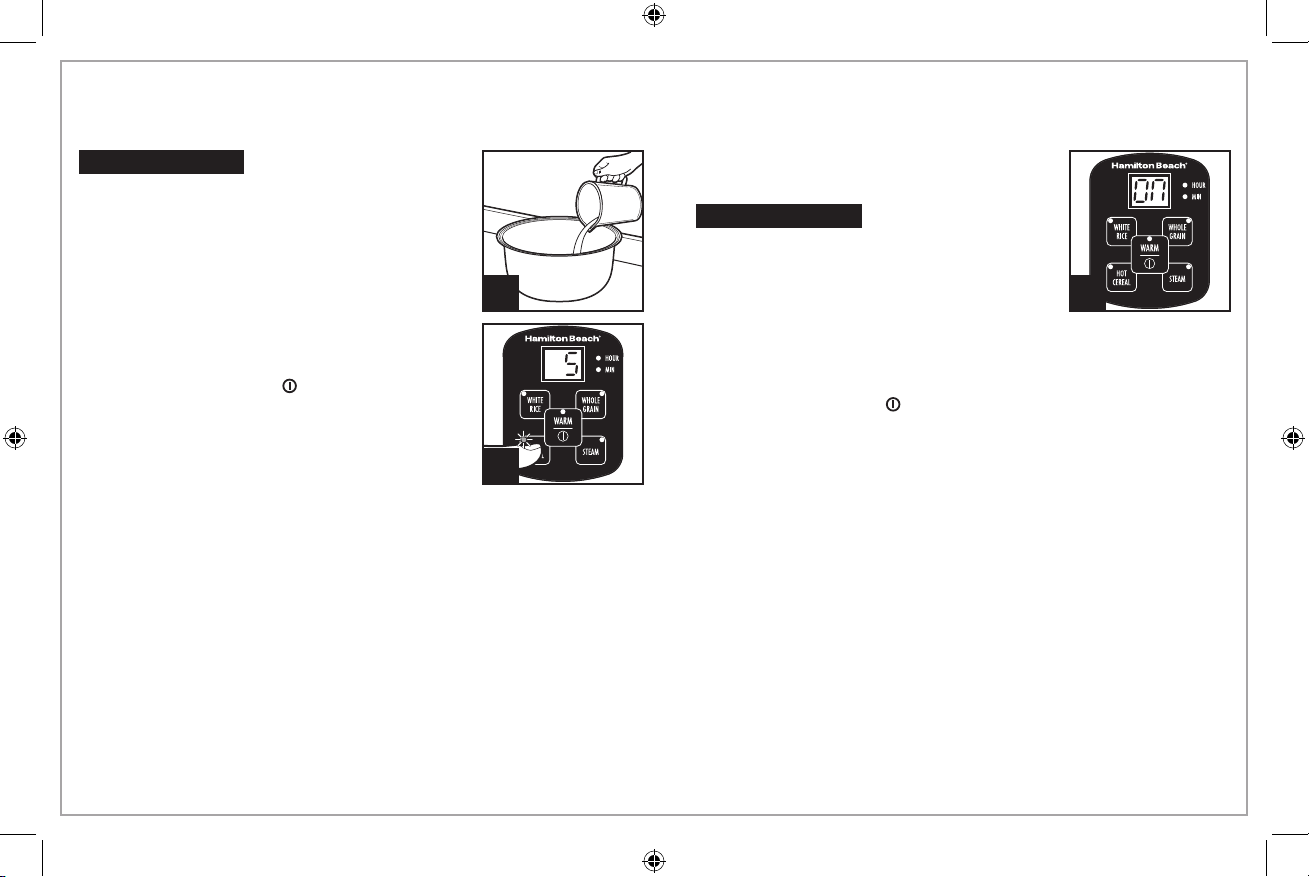
1. Add desired amount of uncooked rice
or grains to pot; then fill with water to
corresponding water line or follow package
directions. Example: If you add 3 level rice
cups of rice to the cooking pot, add water
to the “3” line of the cooking pot. DO NOT
exceed MAX fill line.
2. Carefully place cooking pot straight down
on base. Make sure cooking pot is securely
seated by rotating the pot left and right.
NOTE: Make sure bottom of cooking pot is
not bent or warped, or it will not conduct
heat correctly.
4
Electrical Shock Hazard. Cook only in removable
1
1
2
3. Close Lid.
4. Plug into outlet; all lights will flash on
control panel. If program is not selected,
rice cooker control panel will flash for 15
seconds and the rice cooker will turn off.
5. Press WARM ( ) button; then press
WHITE RICE button (45 minutes displayed)
or WHOLE GRAIN button (60 minutes
displayed).
6. Once a mode is selected, the default time
for that mode is displayed. The digital
rice cooker will adjust the cooking time
throughout the cooking cycle based on
the amount of rice or grain and moisture
in the cooker. You may notice that the
cooker will place a hold on the time or
significantly decrease cooking time as the
moisture content changes. NOTE: Empty
condensation collector as needed during
cooking.
7. When finished cooking, cooker will switch
to Warm and light will glow. Display will
count up Warm time for up to 12 hours.
After 12 hours, the rice cooker will turn off.
OR, press WARM ( ) to turn off. TIP: If you
prefer a softer rice, let cooked rice rest on
Warm at least 10 to 15 minutes.
w WARNING
handle to carry cooker when contents are
hot. Steam from steam vent can cause injury.
8. Unplug.
Burn Hazard. Never use lid
3
5
7
Page 5
Rice Cooking Chart
• Chart is based on measuring rice and water with the rice measuring cup provided.
• There are many different types of rice. Rice packaging directions may call for different amounts of rice and water from the chart; following
package directions may vary results.
• Fill with water to corresponding water line. Example: If you add 3 level rice cups of rice to the cooking pot, add water to the “3” line of the
cooking pot.
• Do not exceed MAX fill line to prevent overflow while rice is cooking.
RICE COOKER
TYPE OF RICE
Long grain white White Rice 4 cups (710 ml) fill to 4 line
Long grain brown Whole Grain 3 cups (532 ml) fill to 4 line
Arborio White Rice 2 1/2 cups (444 ml) fill to 4 line
Basmati*** White Rice 2 1/2 cups (444 ml) fill to 4 line
Jasmine*** White Rice 2 1/2 cups (444 ml) fill to 4 line
Sushi Rice White Rice 2 1/2 cups (444 ml) fill to 4 line
*Measured in rice measuring cup, 6-ounce (177 ml), 3/4 cup US standard measure
**Measured in 1-cup U.S. measure
***Rinse before cooking
SETTING
MAXIMUM AMOUNT
OF RICE*
MAXIMUM AMOUNT
OF WATER IN POT
APPROX.
COOKING TIME
44–46 min
66–68 min
36–38 min
37–39 min
48–50 min
39–41 min
YIELD**
6 3/4 cups (1.6 L)
6 1/2 cups (1.5 L)
6 cups (1.4 L)
6 cups (1.4 L)
6 cups (1.4 L)
6 1/2 cups (1.5 L)
5
Page 6

Grain Cooking Chart
• Follow directions to cook rice, except choose WHOLE GRAIN setting. Add water as indicated on package directions.
• Chart is based on measuring grain and water with standard US measuring cups. Teff, amaranth, and other very small grains are not
recommended.
MAXIMUM AMOUNT
TYPE OF GRAIN
Farro 1 1/2 cups (266 ml) 3 1/4 cups (577 ml)
Quinoa*** 1 cup (177 ml) 2 cups (355 ml)
Wheatberries 2 1/2 cups (444 ml) 3 3/4 cups (665 ml)
*Measured in rice measuring cup, 6-ounce (177 ml), 3/4 cup US standard measure
**Measured in 1-cup U.S. measure
***Rinse before cooking
6
OF GRAIN*
MAXIMUM AMOUNT
OF WATER IN POT*
APPROX.
COOKING TIME
75–78 min
60–62 min
105–110 min
YIELD**
5 cups (1.2 L)
4 1/2 cups (1.1 L)
5 cups (1.2 L)
Page 7

How to Make Hot Cereal
w WARNING
only in removable cooking pot and steamer
basket. Never place water or food directly into
the base.
1. Add desired amount of cereal and water
to cooking pot. Carefully place cooking pot
straight down on base. Make sure cooking
pot is securely seated by rotating the pot
left and right.
2. Plug into outlet. Press WARM ( ) button
to turn on; then press HOT CEREAL button.
Press and hold button to set cooking time
from 5 minutes to 5 hours.
Electrical Shock Hazard. Cook
3. Display will show “ON” during heating,
and display will count down set time when
water reaches boiling.
w WARNING
handle to carry cooker when contents are
hot. Steam from steam vent can cause
injury.
1
4. When finished cooking, cooker will beep
5 times, switch to WARM, and light will
glow. Display will count up Warm time for
up to 12 hours. After 12 hours, the rice cooker will turn off,
or press WARM ( ) to turn off.
5. Unplug.
Burn Hazard. Never use lid
3
2
7
Page 8

Cereal Cooking Chart
• Follow directions to cook rice, except choose HOT CEREAL setting. Add water as indicated on package.
• Cook the cereals on the HOT CEREAL setting. Press and hold HOT CEREAL button to desired cooking time. Timer begins to count
down when water reaches boiling.
MAXIMUM AMOUNT
TYPE OF CEREAL
Cream of Wheat**
Grits 3/4 cup (177 ml) 3 cups (710 ml)
Old-Fashioned
Oatmeal**
*Measured in 1-cup U.S. measure
**Stir once or twice during cooking
†
Cream of Wheat is a trademark of B&G Foods North America, Inc. Use of the trademark does not imply any affiliation with or endorsement by B&G North America, Inc.
8
†
OF CEREAL*
1 1/2 cups (355 ml) 3 3/4 cups (887 ml)
2 cups (473 ml) 3 1/2 cups (828 ml)
MAXIMUM AMOUNT
OF WATER IN POT*
APPROX.
COOKING TIME
37–39
min 3 1/3 cups (788 ml)
42–44
min 2 cups (473 ml)
48–50
min 2 1/2 cups (591 ml)
YIELD**
Page 9
How to Steam Food
w WARNING
cooking pot and steamer basket. Never place water or food directly
into the base.
BEFORE FIRST USE: Wash cooking pot following Care and
Cleaning instructions; dry thoroughly.
1. Pour desired amount of water in cooking
pot.
2. Carefully place cooking pot straight down
on base. Make sure cooking pot is securely
seated by rotating the pot left and right.
3. Add food to steamer basket and place in
cooking pot. Close lid.
4. Plug into outlet.
Electrical Shock Hazard. Cook only in removable
1
2
5. Press WARM ( ) button to turn on; then
press STEAM button. Press and hold STEAM
button to set time from 0 to 30 minutes.
6. Display will show “ON” during heating,
and display will count down set time once
steaming has begun. Rice cooker will beep
and automatically turn off when selected
steam time is complete. Press lid button to
open. Using oven mitts, carefully remove
food with tongs or plastic utensils.
w WARNING
handle to carry cooker when contents are
hot. Steam from steam vent can cause
injury.
7. NOTE: If pot boils dry, rice cooker will
beep and the remaining time will flash in
display. To continue steaming, add more
water. Unit will resume steaming if water is
added before 3 minutes. After 3 minutes,
press WARM ( ) to cancel steam function.
Press STEAM button; keep pressing STEAM
button to set steam time from 0 to 30
minutes.
8. Unplug.
Burn Hazard. Never use lid
5
6
7
3
9
Page 10

Vegetable Steaming Tips
• The more vegetables added to the steamer basket, the longer the
steam time should be.
• Smaller pieces of vegetables will steam faster than larger pieces.
• Allowing rice to “rest” for approximately 5–10 minutes after
cooking will yield better-textured rice.
• Give vegetables or rice a flavor boost by substituting an equal
amount of chicken/beef/vegetable broth for water.
• Note that the steam times listed here are approximate and for
reference only.
• Cook time may vary from the programmed time based on actual
amounts of ingredients and water. The rice cooker will adjust time
as necessary.
10
Page 11

Steam Cooking Chart
Cook the following on the STEAM setting.
MAXIMUM AMOUNT
TYPE OF FOOD
Vegetables:
Soft Vegetables (zucchini,
yellow squash, asparagus)
Firm Vegetables (corn-on-the-
cob, carrots, potatoes)
Poultry/Seafood:
Chicken, tenders 8 oz. (227 g) fill to 1 line 8–10 min Internal temperature
Salmon, fillet 8 oz. (227 g) fill to 1 line 5–7 min Internal temperature
Shrimp, peeled and deveined
31-40 count
*Measured in 1-cup U.S. measure
• The more food added to the steamer basket, the longer the steam
time should be.
• Smaller pieces of food will steam faster than larger pieces.
OF FOOD*
2 cups (473 ml) fill to 1 line 4–7 min Crisp-tender
2 cups (473 ml) fill to 1 line 7–15 min Crisp-tender
8 oz. (227 g) fill to 1 line 2–3 min Pink and opaque
MAXIMUM AMOUNT
OF WATER*
APPROX.
COOKING TIME
DONENESS TEST
FOR FOOD
160°–165°F (71°–74°C)
145°F (63°C)
11
Page 12

How to Steam Food While Cooking Rice
w WARNING
cooking pot and steamer basket. Never place water or food directly
into the base.
BEFORE FIRST USE: Wash cooking pot following Care and
Cleaning instructions; dry thoroughly.
RICE MEASURING CUP INFORMATION
NOTE: Do not throw away the rice measuring
cup that comes with your unit. This is an
important tool in using your rice cooker
successfully and its size is standard in the
rice industry. One rice measuring cup equals
6 oz. (177 ml) or approximately 3/4 cup U.S.
standard.
1. Measure rice with rice measuring cup. Add
the desired amount of measured uncooked
rice to steamer basket. Do not fill above
side vents to prevent rice from falling
through while rinsing. Place basket under a
slow-flowing faucet and rinse. Add drained
rice to cooking pot. Repeat rinsing with
any remaining rice.
OR
1. Add desired amount of uncooked rice
or grains to pot; then fill with water to
corresponding water line or follow package
directions. Example: For rice, if you add 3
level rice cups of rice to the cooking pot,
add water to the “3” line of the cooking
pot. DO NOT exceed MAX fill line.
2. Carefully place cooking pot straight down
on base. Make sure cooking pot is securely
seated by rotating the pot left and right.
NOTE: Make sure bottom of cooking pot is
not bent or warped, or it will not conduct
heat correctly.
12
Electrical Shock Hazard. Cook only in removable
1
1
2
3. Add food to steamer basket and place in
cooking pot. Close lid.
4. Plug into outlet. All lights will flash on
control panel. If program is not selected,
rice cooker control panel will flash for
15 seconds and the rice cooker will
turn off.
5. Press WARM ( ) button; then press WHITE
RICE button (45 minutes will display). The
digital rice cooker will adjust the cooking
time throughout the cooking cycle based
on the amount of rice and moisture in
the cooker. You may notice that the
cooker will place a hold on the time or
significantly decrease cooking time as the
moisture content changes.
6. Rice cooker will beep and automatically
switch to Warm and start to count up in
display. Press lid button to open. Using
oven mitts, carefully remove food with
tongs or plastic utensils.
w WARNING
handle to carry cooker when contents are
hot. Steam from steam vent can cause
injury.
7. Unplug.
Burn Hazard. Never use lid
3
5
6
Page 13

Steaming Food With Rice Chart
Cook the following on the WHITE RICE setting.
MAXIMUM
AMOUNT
TYPE OF FOOD
Asparagus, cut in 3-inch pieces 2 cups
Broccoli, florets 2 cups
Corn-on-the-Cob 3 ears, cut in
Potatoes, cut in 3/4–1 inch chunks 2 1/2 cups
*Measured in 1-cup U.S. measure
**Measured in rice measuring cup
***All times are for long grain white rice
• The more food added to the steamer basket, the longer the steam
time should be.
• Smaller pieces of food will steam faster than larger pieces.
OF FOOD*
(473 ml)
(473 ml)
half
(591 ml)
MAXIMUM
AMOUNT
OF RICE**
2 cups
(354 ml)
2 cups
(354 ml)
2 cups
(354 ml)
2 cups
(354 ml)
MAXIMUM
AMOUNT
OF WATER
fill to 2 line 32–34 min 4 1/2 cups Crisp-Tender
fill to 2 line 34–36 min 4 1/2 cups Tender
fill to 2 line 38–40 min 4 1/2 cups Crisp-Tender
fill to 2 line 36–38 min 5 cups Crisp-Tender
• Give rice a flavor boost by substituting an equal amount of chicken/
beef/vegetable broth for water.
APPROX.
COOKING
TIME***
YIELD OF
RICE*
DONENESS TEST
FOR FOOD
13
Page 14

Steaming Food With Rice Chart (cont.)
TYPE OF FOOD
Yellow Squash and Red Bell
Peppers, sliced 1/4-inch thick
and 1-inch cubes
Chicken, tenders 10 oz. (283 g) 2 cups
Salmon, fillet
Shrimp, peeled and deveined
31–40 count
*Measured in 1-cup U.S. measure
**Measured in rice measuring cup
***All times are for long grain white rice
MAXIMUM
AMOUNT
OF FOOD*
2 1/4 cups
(532 ml)
8 oz. (227 g)
10 oz. (283 g)
MAXIMUM
AMOUNT
OF RICE**
2 cups
(354 ml)
(354 ml)
2 cups
(354 ml)
2 cups
(354 ml)
MAXIMUM
AMOUNT
OF WATER
fill to 2 line 40–42 min 4 1/2 cups Crisp-Tender
fill to 2 line 44–46 min 4 1/2 cups Internal temperature
fill to 2 line 43–45 min 5 cups Internal temperature
fill to 2 line 42–44 min 5 cups Pink and opaque
APPROX.
COOKING
TIME***
YIELD OF
RICE*
DONENESS TEST
FOR FOOD
160°–165°F (71°–74°C)
145°F (63°C)
14
Page 15

Care and Cleaning
w WARNING
or plug in water or other liquid.
1. Make sure rice cooker is unplugged.
2. Remove lid liner and condensation collector.
3. Wash all removable parts in hot, soapy water. Rinse and dry.
4. To clean base, wipe with a damp, cloth and then wipe dry. Do
not use abrasive cleaners. Do not immerse base in water.
Electrical Shock Hazard. Do not immerse base, cord,
Troubleshooting
Cooker doesn’t turn on.
• Cooker is not plugged in. Make sure rice cooker is plugged into a
properly operating electrical outlet.
Rice is not cooked.
• Not enough water/cooking liquid. Follow package directions.
• Carefully place cooking pot straight down in base. Make sure
cooking pot is securely seated by rotating the pot left and right.
NOTE: If cooking pot is bent or warped, it will not seat properly
in base and, therefore, will not conduct heat correctly. To replace
cooking pot, call the toll-free Customer Assistance number listed
on the cover of this guide.
• Let rice rest for 10 to 15 minutes after cooking is complete and rice
cooker has switched to Warm.
Rice is mushy.
• Too much liquid added to cooking pot. Reduce liquid.
Rice cooker starts to “beep” during Steam Cook.
• Cooking pot has boiled dry. Add more water and select Steam
function to continue steaming or press WARM ( ).
Cooking pot not fitting.
• Call the toll-free Customer Assistance number listed on the cover
of this guide.
Display time skips minutes or holds time.
• Rice cooker is adjusting time for the type of rice and amount of rice
and moisture in the cooker. The rice cooker is working correctly.
You may notice that the cooker will place a hold on the time
or significantly decrease cooking time as the moisture content
changes.
15
Page 16

Limited Warranty
This warranty applies to products purchased and used in the U.S. and Canada. This is the only express warranty for this product and
is in lieu of any other warranty or condition.
This product is warranted to be free from defects in material and workmanship for a period of five (5) years from the date of original
purchase in Canada and one (1) year from the date of original purchase in the U.S. During this period, your exclusive remedy is repair
or replacement of this product or any component found to be defective, at our option; however, you are responsible for all costs
associated with returning the product to us and our returning a product or component under this warranty to you. If the product or
component is no longer available, we will replace with a similar one of equal or greater value.
This warranty does not cover glass, filters, wear from normal use, use not in conformity with the printed directions, or damage to
the product resulting from accident, alteration, abuse, or misuse. This warranty extends only to the original consumer purchaser or
gift recipient. Keep the original sales receipt, as proof of purchase is required to make a warranty claim. This warranty is void if the
product is used for other than single-family household use or subjected to any voltage and waveform other than as specified on the
rating label (e.g., 120V ~ 60 Hz).
We exclude all claims for special, incidental, and consequential damages caused by breach of express or implied warranty. All
liability is limited to the amount of the purchase price. Every implied warranty, including any statutory warranty or condition
of merchantability or fitness for a particular purpose, is disclaimed except to the extent prohibited by law, in which case such
warranty or condition is limited to the duration of this written warranty. This warranty gives you specific legal rights. You may have
other legal rights that vary depending on where you live. Some states or provinces do not allow limitations on implied warranties or
special, incidental, or consequential damages, so the foregoing limitations may not apply to you.
To make a warranty claim, do not return this appliance to the store. Please call 1.800.851.8900 in the U.S. or 1.800.267.2826 in Canada
or visit hamiltonbeach.com in the U.S. or hamiltonbeach.ca in Canada. For faster service, locate the model, type, and series numbers
on your appliance.
16
Page 17

PRÉCAUTIONS IMPORTANTES
Pour utiliser un appareil électroménager, vous devez toujours prendre des mesures élémentaires de sécurité pour réduire le risque d’incendie,
d’électrocution et/ou de blessure corporelle, en particulier les mesures suivantes :
1. Lire toutes les instructions.
2. Cet appareil n’est pas destiné à être utilisé par des personnes (y
compris les enfants) dont les capacités physiques, sensorielles
ou mentales sont réduites, ou manquant d’expérience et
de connaissance, sauf si elles sont étroitement surveillées
et instruites sur l’utilisation de l’appareil par une personne
responsable de leur sécurité.
3. Une surveillance étroite est requise pour tout appareil utilisé par
ou près des enfants. Surveiller que les enfants ne jouent pas
avec l’appareil.
4. Ne pas toucher les surfaces chaudes. Utiliser les poignées ou
les boutons. Utiliser des sous-plats pour déposer les récipients
chauds.
5. Pour éviter les risques d’électrocution, ne pas immerger le
cordon, la fiche ou la base dans l’eau ou tout autre liquide.
6. Débrancher la fiche de la prise murale dès la fin de l’utilisation.
Débrancher et laisser refroidir l’appareil avant d’installer ou de
retirer des pièces et avant de le nettoyer.
7. Ne pas faire fonctionner un appareil électroménager avec un
cordon ou une fiche endommagée, ou lorsque l’appareil ne
fonctionne pas bien ou a été échappé ou endommagé d’une
manière quelconque. Le remplacement et la réparation du
cordon d’alimentation doivent être faits par le fabricant, son
agent de service ou toute personne qualifiée de façon à éviter
tout danger. Appeler le numéro de service à la clientèle fourni
pour des renseignements concernant l’examen, la réparation ou
l’ajustement.
8. L’utilisation d’accessoires non recommandés par le fabricant
d’électroménagers peut causer des blessures.
9. Ne pas utiliser à l’extérieur.
10. Ne pas laisser pendre le cordon de la table ou du comptoir
et éviter que le cordon n’entre en contact avec des surfaces
chaudes, y compris la cuisinière.
11. Ne pas placer sur ou près de surfaces chaudes comme un
brûleur électrique ou à gaz ou un four chaud.
12. Exercer une très grande prudence lors du déplacement d’un
appareil contenant de l’huile et des aliments chauds, de l’eau
ou tout autre liquide chaud.
13. Pour débrancher, mettre toutes les commandes à OFF (arrêt)
puis débrancher la fiche de la prise murale.
14. N’utiliser cet appareil que pour les fonctions auxquelles il est
destiné.
15. Soulever et ouvrir le couvercle avec précaution pour éviter
l’échaudage et permettre l’égouttement de l’eau dans le cuiseur.
16. ATTENTION ! Risque de choc électrique. Cuire uniquement dans
le pot de cuisson amovible.
17. Ne pas placer l’appareil directement sous les armoires pendant
le fonctionnement, car cet appareil dégage une grande quantité
de vapeur. Éviter de tendre la main pour atteindre l’appareil
pendant le fonctionnement.
CONSERVER CES INSTRUCTIONS
17
Page 18

Pièces et caractéristiques
*Pour commander des pièces :
Canada : 1.800.267.2826
Panier cuit-vapeur*
Couvercle
18
Mesure pour le riz
6 oz (177 ml)
Mesure de 3/4 tasse
(177 ml) régulière,
système américain*
WARM (réchauffer) : Appuyer pour commencer la cuisson
ou éteindre le cuiseur. L’appareil passera automatiquement
au mode Warm (réchauffer) après chaque activation du
mode SAUF Steam (vapeur).
WHITE RICE (riz blanc) : Utiliser pour cuire le riz blanc selon
une durée de cuisson préprogrammée.
WHOLE GRAIN (grain entier) : Utiliser pour cuire le grain brun
ou autres grains (autre que le riz blanc) selon une durée de cuisson
préprogrammée.
STEAM (vapeur) : Utiliser pour cuire les aliments à la vapeur
selon une durée de cuisson à la vapeur choisie. La durée de
cuisson à la vapeur peut être réglée de 0 (uniquement pour
bouillir l’eau) à 30 minutes.
HOT CEREAL (céréales chaudes) : Utiliser pour cuire toutes
sortes de céréales, avoines et gruaux chauds. Ce mode
réchauffera puis mijotera selon le temps sélectionné.
Spatule à riz*
Pot de cuisson
avec lignes de
remplissage*
Couvercle anneau
amovible
(voir Nettoyage pour les
instructions de retrait)
Panneau de contrôle
(sur certains modèles)
Collecteur
d’eau
condensée
Base
Panneau de
contrôle
Page 19

Cuisson du riz et des grains
3.
w
AVERTISSEMENT
dans le pot de cuisson amovible. Ne jamais verser d’eau ou déposer des aliments
directement dans la base.
AVANT LA PREMIÈRE UTILISATION : Laver le pot de cuisson en suivant les
instructions au chapitre Entretien et nettoyage ; assécher complètement.
INFORMATION À PROPOS À LA TASSE DU MESUREUR DE RIZ
REMARQUE : Ne pas jeter la tasse du mesureur de
riz qui accompagne votre appareil. Le mesureur
est un accessoire important pour l’utilisation
optimale du cuiseur de riz grâce à son format
conforme à l’industrie du riz. Une tasse du
mesureur de riz n’est pas équivalente à une tasse
à mesurer basée sur le système de mesures
américain (le mesureur de riz en plastique contient
environ 6 oz. [177 ml] ou 3/4 de tasse).
1.
Mesurer la quantité de riz avec la mesure
pour le riz. Ajouter la quantité désiré de riz
mesuré non cuit dans le panier cuit-vapeur.
Ne pas remplir au-delà des évents pour éviter
que le riz ne tombe pendant le rinçage. Placer
le panier sous un jet d’eau faible du robinet
et rincer. Ajouter le riz rincé dans le pot de
cuisson. Répéter le rinçage avec le reste du riz.
OU
1.
Ajouter la quantité de riz cru désirée dans
le pot de cuisson. Remplir d’eau jusqu’à la
ligne de remplissage d’eau correspondante
ou suivre le mode d’emploi sur l’emballage.
Exemple : Pour 3 mesures de riz ajoutées au
cuiseur de riz, ajouter de l’eau jusqu’à la ligne
« 3 » du pot de cuisson. Ne pas excéder le
niveau de remplissage MAX.
2.
Déposer délicatement le pot de cuisson dans
la base. S’assurer que le pot de cuisson est
solidement ancré en le tournant vers la gauche
et vers la droite. REMARQUE : S’assurer que
le fond du pot de cuisson n’est pas croche
ou tordu, autrement le transfert de chaleur ne
sera pas uniforme.
Risque de choc électrique. Cuire les aliments uniquement
1
1
2
Fermer le couvercle.
4.
Brancher dans la prise de courant; tous les
témoins du panneau de contrôle clignoteront. Si
aucun programme n’est sélectionné, le panneau
de contrôle du cuiseur de riz clignotera pendant
15 secondes puis le cuiseur de riz s’éteindra.
5.
Appuyer sur le bouton de
puis appuyer sur le bouton WHITE RICE (riz
blanc) (l’afficheur indiquera 45 minutes) ou
WHOLE GRAIN (grain entier) (l’afficheur indiquera
60 minutes).
6.
Une fois le mode sélectionné, la durée par
défaut de ce mode s’affichera. Le cuiseur de riz
numérique règlera le temps de cuisson pendant
tout le cycle de cuisson selon la quantité de riz
ou de grain et l’humidité dans le cuiseur. Il est
possible que le cuiseur de riz effectue une pause
de durée ou diminue considérablement la durée
de cuisson dès qu’il détecte des modifications
du contenu d’humidité. REMARQUE : Vider le
collecteur d’eau condensée au besoin pendant la
cuisson.
7.
À la fin de la cuisson, le cuiseur passera au
mode Warm (réchauffer) et le témoin s’allumera.
L’afficheur indiquera le compte à rebours du
mode Warm (réchauffer) jusqu’à 12 heures.
Après 12 heures, le cuiseur de riz s’éteindra. OU,
appuyer sur le bouton
pour éteindre le cuiseur. CONSEIL : Pour obtenir
un riz plus tendre, laisser reposer le riz au mode Warm (réchauffer)
pendant au moins 10 à 15 minutes.
w
AVERTISSEMENT
pour transporter le cuiseur contenant des aliments chauds. La vapeur
s’échappant de l’évent peut provoquer des blessures.
8.
Débrancher.
WARM ( )
(réchauffer)
3
5
WARM ( )
Risque de brûlures. Ne jamais utiliser la poignée
(réchauffer)
7
19
Page 20

Aide-mémoire pour la cuisson du riz
• Le tableau est basé selon la quantité de riz et d’eau mesurée avec la mesure de riz fournie.
• Il existe plusieurs sortes de riz. Les modes d’emploi sur les emballages de riz peuvent demander des quantités différentes de riz et d’eau que
celles mentionnées au tableau; les résultats peuvent être différents si l’on utilise les modes d’emploi sur les emballages.
• Remplir d’eau jusqu’à la ligne correspondante. Exemple : Pour trois mesures de riz dans le pot de cuisson, ajouter de l’eau jusqu’à la ligne
« 3 » du pot de cuisson.
• Ne pas remplir au-delà de la ligne « MAX » pour éviter le débordement pendant la cuisson du riz.
RÉGLAGES DU
SORTE DE RIZ
Blanc, à grain long Riz blanc 4 tasses (710 ml) Remplir jusqu’à la ligne « 4 »
Brun, à grain long Grain entier 3 tasses (532 ml) Remplir jusqu’à la ligne « 4 »
Arborio Riz blanc 2 1/2 tasses (444 ml) Remplir jusqu’à la ligne « 4 »
Basmati*** Riz blanc 2 1/2 tasses (444 ml) Remplir jusqu’à la ligne « 4 »
Jasmine*** Riz blanc 2 1/2 tasses (444 ml) Remplir jusqu’à la ligne « 4 »
Riz à sushi Riz blanc 2 1/2 tasses (444 ml) Remplir jusqu’à la ligne « 4 »
*Quantité mesurée dans la mesure de riz, 6 oz (177 ml), Mesure de 3/4 tasse (177 ml) régulière, système américain
**Quantité mesurée dans une tasse (mesure impériale)
***Rincer avant de faire cuire
20
CUISEUR DE RIZ
MAX. QUANTITÉ
DE RIZ*
QUANTITÉ D’EAU
MAXIMUM DANS LE POT
DURÉE DE
CUISSON APPROX.
44–46 min
66–68 min
36–38 min
37–39 min
48–50 min
39–41 min
PORTION**
6 3/4 cups (1,6 L)
6 1/2 cups (1,5 L)
6 cups (1,4 L)
6 cups (1,4 L)
6 cups (1,4 L)
6 1/2 cups (1,5 L )
Page 21

Tableau de cuisson des grains
• Suivre les instructions de cuisson du riz, mais sélectionner le réglage WHOLE GRAIN (grain entier). Ajouter de l’eau en suivant les
instructions sur l’emballage.
• Les mesures de grains et d’eau du tableau sont basées sur des tasses à mesurer en système impérial. Le tef, l’amarante et les autres
grains très petits ne sont pas recommandés.
QUANTITÉ MAX.
SORTE DE GRAIN
Farro 1 1/2 tasses (266 ml) 3 1/4 tasses (577 ml)
Quinoa*** 1 tasse (177 ml) 2 tasses (355 ml)
Wheatberries 2 1/2 tasses (444 ml) 3 3/4 tasses (665 ml)
*Quantité mesurée dans la mesure de riz, 6 oz (177 ml), Mesure de 3/4 tasse (177 ml) régulière, système américain
**Quantité mesurée dans une tasse (mesure impériale)
***Rincer avant de faire cuire
DE GRAIN*
QUANTITÉ D’EAU MAXIMUM
DANS LE POT*
DURÉE DE CUISSON
APPROX.
75 à 78 min
60 à 62 min
105 à 110 min
PORTION**
5 tasses (1,2 L)
4 1/2 tasses (1,1 L)
5 tasses (1,2 L)
21
Page 22
Cuisson des céréales chaudes
w
AVERTISSEMENT
Cuire les aliments uniquement dans le pot de
cuisson amovible et le panier cuit-vapeur. Ne
jamais verser d’eau ou déposer des aliments
directement dans la base.
1. Ajouter la quantité de céréales et d’eau
désirée dans le pot de cuisson. Insérer
soigneusement le pot de cuisson dans la
base. S’assurer que le pot de cuisson est
bien assis au fond en le tournant de gauche
à droite.
2. Brancher dans la prise de courant. Appuyer
sur le bouton WARM ( ) (réchauffer) puis
appuyer sur le bouton HOT CEREAL
(céréales chaudes). Appuyer et maintenir
le bouton enfoncé pour régler la durée de
cuisson de 5 minutes à 5 heures.
Risque de choc électrique.
3. L’afficheur indiquera « ON » (en marche)
pendant le chauffage et le compte à rebours
de la durée dès que l’eau bout.
w
AVERTISSEMENT
jamais utiliser la poignée pour transporter
le cuiseur contenant des aliments chauds.
La vapeur s’échappant de l’évent peut
1
provoquer des blessures.
4. Lorsque la cuisson est terminée, le cuiseur
émettra 5 bips, passera au mode WARM
(réchauffer) et le
témoin s’allumera. L’afficheur indiquera le compte à rebours
jusqu’à 12 heures. Après 12 heures, le cuiseur de riz s’éteindra
ou appuyer sur WARM ( ) (réchauffer) pour éteindre le cuiseur.
5. Débrancher.
Risque de brûlures. Ne
3
2
22
Page 23

Tableau de cuisson des céréales
• Suivre les instructions de cuisson du riz, mais sélectionner le réglage « HOT CEREAL » (céréales chaudes). Ajouter de l’eau comme
indiqué sur l’emballage.
• Cuire les céréales au réglage « HOT CEREAL (céréales chaudes). Appuyer et maintenir le bouton « HOT CEREAL (céréales chaudes)
jusqu’à la durée de cuisson désirée. La minuterie commencera le compte à rebours dès que l’eau bout.
SORTE
OU CÉRÉALES
Cream of Wheat****†
(Crème de blé)
Gruau de maïs 3/4 tasse (177 ml) 3 tasses (710 ml)
Gruau à l’ancienne**** 2 tasses (473 ml) 3 1/2 tasses (828 ml)
*Quantité mesurée dans la mesure de riz
**Quantité mesurée dans une tasse (mesure impériale)
***Rincer avant de faire cuire
****Melanger une ou doux fois pendant la cuisson
†
Cream of Wheat est une marque de commerce de B&G Foods North America, Inc. L’utilisation de la marque de commerce ne suppose ni affiliation ni approbation par B&G Foods
North America, Inc.
QUANTITÉ MAX.
DE CÉRÉALES*
1 1/2 tasses (355 ml) 3 3/4 tasses (887 ml)
QUANTITÉ D’EAU MAXIMUM
DANS LE POT*
DURÉE DE CUISSON
APPROX.
37–39
min 3 1/3 tasses (788 ml)
42–44
min 2 tasses (473 ml)
48–50
min 2 1/2 tasses (591 ml)
PORTION**
23
Page 24

Cuisson des aliments à la vapeur
w AVERTISSEMENT
uniquement dans le pot de cuisson amovible et le panier
cuit-vapeur. Ne jamais verser d’eau ou déposer des aliments
directement dans la base.
AVANT LA PREMIÈRE UTILISATION: Laver le
pot de cuisson en suivant les instructions au
chapitre Nettoyage ; assécher complètement.
1. Verser la quantité désirée d’eau dans le
pot de cuisson.
2. Déposer délicatement le pot de cuisson
dans la base. S’assurer que le pot de
cuisson est solidement ancré en le
tournant vers la gauche et vers la droite.
3. Mettre les aliments dans le panier cuitvapeur et le mettre dans le pot de cuisson.
Fermer le couvercle.
4. Brancher dans la prise de courant.
Risque de choc électrique. Cuire les aliments
1
2
3
5. Appuyer sur le bouton WARM ( )
(réchauffer) pour mettre en marche puis
appuyer sur le bouton STEAM (vapeur).
Appuyer sur le bouton STEAM (vapeur)
pour régler la durée de 0 à 30 minutes.
6. L’afficheur indiquera « ON » (en marche)
pendant la cuisson et affichera la durée
restante dès que la cuisson à la vapeur
commence. Le cuiseur de riz émettra des
bips et s’éteindra automatique lorsque le
temps de vapeur sélectionné est écoulé.
Appuyer sur le bouton du couvercle pour
ouvrir. Utiliser des gants de cuisinier pour
retirer soigneusement les aliments avec
des pinces ou des ustensiles en plastique.
w AVERTISSEMENT
jamais utiliser la poignée pour transporter
le cuiseur contenant des aliments chauds.
La vapeur s’échappant de l’évent peut
provoquer des blessures.
7. REMARQUE : S’il ne reste plus de vapeur
dans le pot, le cuiseur de riz émettra un
signal sonore et l’afficheur indiquera la
durée résiduelle. Pour poursuivre Steam
Cook (cuisson à la vapeur), ajouter de
l’eau. L’appareil continuera la cuisson à
la vapeur si l’eau est ajoutée avant les 3
minutes. Après 3 minutes, appuyer sur le
bouton WARM ( ) (réchauffer) pour annuler
le mode de vapeur. Appuyer sur le bouton STEAM (vapeur) et le
maintenir enfoncé pour régler la durée de 0 à 30 minutes.
8. Débrancher.
Risque de brûlures. Ne
5
6
7
24
Page 25

Conseils pour la cuisson à la vapeur des légumes
• Plus il y a de légumes dans le panier cuit-vapeur, plus ils
prendront longtemps à cuire.
• Les morceaux plus petits de légumes cuiront plus vite que les
plus gros.
• Laisser reposer le riz environ 5 à 10 minutes après la cuisson pour
obtenir une texture de riz optimale.
• Rehausser la saveur des légumes ou du riz en substituant une
quantité égale de bouillon de poulet, de bœuf ou de légumes à
l’eau.
• Remarquer que les durées de cuisson à la vapeur indiquées sont
approximatives et utilisées comme référence seulement.
• La durée de cuisson peut varier selon la durée programmée
basée selon les quantités actuelles d’ingrédients et d’eau. Le
cuiseur de riz ajustera la durée selon le besoin.
25
Page 26

Tableau de cuisson à la vapeur
Sélectionner le réglage STEAM (vapeur) pour cuire les aliments suivants.
QUANTITÉ
MAXIMUM
SORTE D’ALIMENTS
Légumes :
Légumes souples (courgette,
courges jaunes, asperges)
Légumes fermes (maïs sur épi,
carottes, pommes de terre)
Volaille/fruits de mer :
Poulet, filets 8 oz. (227 g) Remplir jusqu’à la
Saumon, filet 8 oz. (227 g) Remplir jusqu’à la
Crevette, pelée et déveinée 31 à 40 count 8 oz. (227 g) Remplir jusqu’à la
*Quantité mesurée dans une tasse (mesure impériale)
• Plus il y a d’aliments dans le panier cuit-vapeur, plus ils
prendront longtemps à cuire.
D’ALIMENTS*
2 tasses (473 ml) Remplir jusqu’à la
2 tasses (473 ml) Remplir jusqu’à la
QUANTITÉ
MAXIMUM
D’EAU*
ligne « 1 »
ligne « 1 »
ligne « 1 »
ligne « 1 »
ligne « 1 »
• Les morceaux plus petits d’aliments cuiront plus vite que
les plus gros.
DURÉE DE
CUISSON
APPROX.
4 à 7 min Croquant-tendre
7 à 15 min Croquant-tendre
8 à 10 min Température interne
5 à 7 min Température interne
2 à 3 min Rose et opaque
VÉRIFICATION DE LA
CUISSON DES ALIMENTS
160°–165°F (71°–74°C)
145°F (63°C)
26
Page 27

Cuisson à la vapeur des aliments pendant la cuisson du riz
3.
w AVERTISSEMENT
dans le pot de cuisson amovible et le panier cuit-vapeur. Ne jamais verser d’eau ou
déposer des aliments directement dans la base.
AVANT LA PREMIÈRE UTILISATION : Laver le pot de cuisson en suivant les
instructions au chapitre Entretien et nettoyage ; assécher complètement.
INFORMATION À PROPOS À LA TASSE DU MESUREUR DE RIZ
REMARQUE : Ne pas jeter la tasse du mesureur de riz qui
accompagne votre appareil. Le mesureur est un accessoire
important pour l’utilisation optimale du cuiseur de riz grâce
à son format conforme à l’industrie du riz. Une tasse du
mesureur de riz n’est pas équivalente à une tasse à mesurer
basée sur le système de mesures américain (le mesureur
de riz en plastique contient environ 6 oz. [177 ml] ou 3/4 de
tasse).
1.
Mesurer la quantité de riz avec la mesure pour le riz.
Ajouter la quantité désiré de riz mesuré non cuit dans
le panier cuit-vapeur. Ne pas remplir au-delà des évents
pour éviter que le riz ne tombe pendant le rinçage.
Placer le panier sous un jet d’eau faible du robinet
et rincer. Ajouter le riz rincé dans le pot de cuisson.
Répéter le rinçage avec le reste du riz.
OU
1.
Ajouter la quantité de riz cru désirée dans le pot de
cuisson. Remplir d’eau jusqu’à la ligne de remplissage
d’eau correspondante ou suivre le mode d’emploi sur
l’emballage. Exemple : Pour 3 mesures de riz ajoutées
au cuiseur de riz, ajouter de l’eau jusqu’à la ligne
« 3 » du pot de cuisson. Ne pas excéder le niveau
de remplissage MAX.
2.
Déposer délicatement le pot de cuisson dans la base.
S’assurer que le pot de cuisson est solidement ancré
en le tournant vers la gauche et vers la droite.
REMARQUE : S’assurer que le fond du pot de cuisson
n’est pas croche ou tordu, autrement le transfert de
chaleur ne sera pas uniforme.
Risque de choc électrique. Cuire les aliments uniquement
1
1
2
Mettre les aliments dans le panier cuit-vapeur et le
mettre dans le pot de cuisson. Fermer le couvercle.
4.
Brancher dans la prise de courant. Tous les témoins
du panneau de commande clignoteront. Si aucun
programme n’est sélectionné, le panneau de
commande du cuiseur de riz clignotera pendant 15
secondes puis le cuiseur de riz s’éteindra.
5.
Appuyer sur le bouton de WARM ( ) (réchauffer) puis
appuyer sur le bouton WHITE RICE (riz blanc) (l’afficheur
indiquera 45 minutes). Le cuiseur de riz numérique
règlera le temps de cuisson pendant tout le cycle de
cuisson selon la quantité de riz et d’humidité dans le
cuiseur. Le cuiseur peut passer en mode d’attente ou
diminuer considérable la durée de cuisson au fur et à
mesure que le contenu en humidité change.
6.
Le cuiseur de riz émettra un signal sonore et passera
automatiquement au mode Warm (réchauffer) et
l’afficheur indiquera le compte à rebours. Appuyer sur
le bouton du couvercle pour ouvrir. Utiliser des gants
de cuisinier pour retirer soigneusement les aliments
avec des pinces ou des ustensiles en plastique.
w AVERTISSEMENT
jamais utiliser la poignée pour transporter le cuiseur
contenant des aliments chauds. La vapeur s’échappant
de l’évent peut provoquer des blessures.
7.
Débrancher.
Risque de brûlures. Ne
3
5
6
27
Page 28

Cuisson à la vapeur d’aliments avec riz
Sélectionner le réglage WHITE RICE (riz blanc) pour cuire les aliments suivants.
QUANTITÉ
MAXIMUM
SORTE D’ALIMENTS
Asperges, coupées en morceaux
de 3 po (7,6 cm)
Brocoli, fleurettes 2 tasses
Épi de maïs
Pommes de terre, cubes
de 3/4 à 1 po (1,9 à 2,5 cm)
*Quantité mesurée dans une tasse (mesure impériale)
**Quantité mesurée dans la measure de riz
***Toutes les durées indiquées sont pour le riz blanc à grain long
• Plus il y a d’aliments dans le panier cuit-vapeur, plus ils
prendront longtemps à cuire.
• Les morceaux plus petits d’aliments cuiront plus vite que
les plus gros.
D’ALIMENTS*
2 tasses
(473 ml)
(473 ml)
3 rondelles,
coupée en deux
2 1/2 tasses
(591 ml)
QUANTITÉ
MAXIMUM
DE RIZ**
2 tasses
(354 ml)
2 tasses
(354 ml)
2 tasses
(354 ml)
2 tasses
(354 ml)
QUANTITÉ
MAXIMUM
D’EAU
Remplir jusqu’à
la ligne « 2 »
Remplir jusqu’à
la ligne « 2 »
Remplir jusqu’à
la ligne « 2 »
Remplir jusqu’à
la ligne « 2 »
• Rehausser la saveur d’aliments ou du riz en substituant une
quantité égale de bouillon de poulet, de bœuf ou de légumes à
l’eau.
DURÉE DE
CUISSON
APPROX.***
32 à 34 min 4 1/2
34 à 36 min 4 1/2
38 à 40 min 4 1/2
36 à 38 min 5 tasses Croquant-tendre
PORTION
DE RIZ* TEST DE CUISSON
Croquant-tendre
tasses
Tendre
tasses
Croquant-tendre
tasses
28
Page 29

Cuisson à la vapeur d’aliments avec riz (suite)
QUANTITÉ
MAXIMUM
SORTE D’ALIMENTS
Courge jaune et poivrons rouges,
tranches de 1/4 po (0,6 cm)
d’épaisseur et cubes de
1 po (2,5 cm)
Poulet, filets 10 oz. (283 g) 2 tasses
Saumon, filet
Crevette, pelée et déveinée
31 à 40 count
*Quantité mesurée dans une tasse (mesure impériale)
**Quantité mesurée dans la measure de riz
***Toutes les durées indiquées sont pour le riz blanc à grain long
D’ALIMENTS*
2 1/4 tasses
(532 ml)
8 oz. (227 g)
10 oz. (283 g)
QUANTITÉ
MAXIMUM
DE RIZ**
2 tasses
(354 ml)
(354 ml)
2 tasses
(354 ml)
2 tasses
(354 ml)
QUANTITÉ
MAXIMUM
D’EAU
Remplir jusqu’à
la ligne « 2 »
Remplir jusqu’à
la ligne « 2 »
Remplir jusqu’à
la ligne « 2 »
Remplir jusqu’à
la ligne « 2 »
DURÉE DE
CUISSON
APPROX.***
40 à 42 min 4 1/2
44 à 46 min 4 1/2
43 à 45 min 5 tasses Température interne
42 à 44 min 5 tasses Rose et opaque
PORTION
DE RIZ* TEST DE CUISSON
Croquant-tendre
tasses
Température interne
tasses
160°–165°F (71°–74°C)
145°F (63°C)
29
Page 30

Entretien et nettoyage
w AVERTISSEMENT
Ne pas immerger la base, le cordon ou la fiche dans l’eau ou tout
autre liquide.
1. S’assurer que le cuiseur de riz est débranché.
2. Retirer l’anneau amovible du couvercle et le collecteur d’eau
condensée.
3. Laver toutes les pièces amovibles dans de l’eau chaude
savonneuse. Rincer et sécher.
4. Pour nettoyer la base, essuyer avec un linge humide et sécher
avec un linge sec. Ne pas utiliser de nettoyants abrasifs. Ne pas
immerger la base dans l’eau.
Risque de choc électrique.
30
Page 31

Dépannage
Le cuiseur refuse de se mettre en marche.
• Le cuiseur n’est pas branché. S’assurer que le cuiseur de riz est
branché dans une prise murale qui fonctionne correctement.
Le riz n’est pas cuit.
• Trop peu d’eau/de liquide de cuisson. Suivre le mode d’emploi
inscrit sur l’emballage.
• Déposer délicatement le pot de cuisson dans la base. S’assurer
que le pot de cuisson est solidement ancré en le tournant vers
la gauche et vers la droite. REMARQUE : Si le pot de cuisson est
croche ou tordu, il ne reposera pas correctement dans sa base et
le transfert de chaleur ne sera pas uniforme. Pour remplacer le pot
de cuisson, appeler le numéro sans frais du Service à la clientèle
inscrit sur la page couverture de ce guide.
• Laisser reposer le riz pendant 10 à 15 minutes suivant la fin de
la cuisson et que le cuiseur de riz soit passé au mode Warm
(réchauffer).
Le riz est pâteux.
• Trop d’eau ajoutée dans le pot de cuisson. Réduire la quantité de
liquide.
Le cuiseur de riz émet un signal sonore pendant le cycle Steam Cook
(cuisson à la vapeur).
• Le pot a chauffé à vide. Ajouter plus d’eau et sélectionner le mode
Steam (vapeur) puis continuer la cuisson à la vapeur ou appuyer
sur le bouton de marche/arrêt WARM ( ) (réchauffer).
Le pot de cuisson ne s’insère pas.
• Appeler le numéro sans frais du Service à la clientèle inscrit sur la
page couverture de ce guide.
La minuterie n’indique pas toutes les minutes ou effectue une pause
de durée.
• Le cuiseur de riz règle la durée selon la sorte et la quantité de riz
ainsi que l’humidité contenue dans le cuiseur de riz. Le cuiseur
de riz fonctionne normalement. Il est possible que le cuiseur de
riz effectue une pause de durée ou diminue considérablement la
durée de cuisson dès qu’il détecte des modifications du contenu
d’humidité.
31
Page 32

Garantie limitée
Cette garantie s’applique aux produits achetés et utilisées aux É.-U. et au Canada. C’est la seule garantie expresse pour ce
produit et est en lieu et place de tout autre garantie ou condition.
Ce produit est garanti contre tout défaut de matériaux et de main-d’oeuvre pour une période des cinq (5) ans à compter de
la date d’achat d’origine au Canada et un (1) an à compter de la date d’achat d’origine aux É.-U. Au cours de cette période,
votre seul recours est la réparation ou le remplacement de ce produit ou tout composant s’avérant défectueux, à notre gré,
mais vous êtes responsable de tous les coûts liés à l’expédition du produit et le retour d’un produit ou d’un composant dans
le cadre de cette garantie. Si le produit ou un composant n’est plus offert, nous le remplacerons par un produit similaire de
valeur égale ou supérieure.
Cette garantie ne couvre pas le verre, les filtres, l’usure d’un usage normal, l’utilisation non conforme aux directives imprimées,
ou des dommages au produit résultant d’un accident, modification, utilisation abusive ou incorrecte. Cette garantie s’applique
seulement à l’acheteur original ou à la personne l’ayant reçu en cadeau. La présentation du reçu de vente d’origine comme
preuve d’achat est nécessaire pour faire une réclamation au titre de cette garantie. Cette garantie s’annule si le produit est
utilisé autrement que par une famille ou si l’appareil est soumis à toute tension ou forme d’onde différente des caractéristiques
nominales précisées sur l’étiquette (par ex. : 120 V ~ 60 Hz).
Nous excluons toutes les réclamations au titre de cette garantie pour les dommages spéciaux, consécutifs et indirects causés
par la violation de garantie expresse ou implicite. Toute responsabilité est limitée au prix d’achat. Chaque garantie implicite,
y compris toute garantie ou condition de qualité marchande ou d’adéquation à un usage particulier, est exonérée, sauf
dans la mesure interdite par la loi, auquel cas la garantie ou condition est limitée à la durée de cette garantie écrite. Cette
garantie vous donne des droits légaux précis. Vous pouvez avoir d’autres droits qui varient selon l’endroit où vous habitez.
Certaines provinces ne permettent pas les limitations sur les garanties implicites ou les dommages spéciaux ou indirects de
telle sorte que les limitations ci-dessus ne s’appliquent peut-être pas à votre cas.
Ne pas retourner cet appareil au magasin lors d’une réclamation au titre de cette garantie. Téléphoner au 1.800.851.8900 aux
É.-U. ou au 1.800.267.2826 au Canada ou visiter le site internet www.hamiltonbeach.com aux É.-U. ou www.hamiltonbeach.ca
au Canada. Pour un service plus rapide, trouvez le numéro de modèle, le type d’appareil et les numéros de série sur votre
appareil.
32
Page 33

SALVAGUARDIAS IMPORTANTES
Cuando utilice artefactos eléctricos, siempre deben seguirse precauciones de seguridad básicas a fin de reducir el riesgo de incendio, descarga eléctrica, y/o
lesiones a personas, incluyendo las siguientes:
1. Lea todas las instrucciones.
2. Este aparato no se destina para utilizarse por personas (incluyendo
niños) cuyas capacidades físicas, sensoriales o mentales sean
diferentes o estén reducidas, o carezcan de experiencia o
conocimiento, a menos que dichas personas reciban una supervisión
o capacitación para el funcionamiento del aparato por una persona
responsable de su seguridad.
3. Se requiere de una estrecha supervisión cuando el aparato se use cerca
de niños. Los niños deben supervisarse para asegurar que ellos no
empleen los aparatos como juguete.
4. Verifique que el voltaje de su instalación corresponda con el del
producto.
5. No toque las superficies calientes. Use las manijas o perillas. Use
guantes de cocina cuando remueva contenedores calientes.
6. Para protegerse contra un riesgo de descarga eléctrica no sumerja el
cable, enchufe o base en agua u otro líquido.
7. Desconecte de la toma cuando no esté en uso. Desconecte y deje
enfriar antes de poner o quitar partes y antes de limpiar.
8. No opere ningún aparato con cables o enchufe dañados o después de
que el aparato funcione mal o se caiga o dañe de cualquier manera.
El reemplazo del cable de suministro y las reparaciones deben ser
efectuadas por el fabricante, su agente de servicio, o personas
igualmente calificadas para poder evitar un peligro. Llame al número de
servicio al cliente proporcionado para información sobre examinación,
reparación o ajuste.
9. El uso de aditamentos de accesorio no recomendados por el fabricante
del aparato puede causar lesiones.
10. No use en exteriores.
11. No deje que el cable cuelgue del borde de la mesa o cubierta, o que
toque superficies calientes, incluyendo la estufa.
12. No coloque sobre o cerca de un quemador caliente de gas o eléctrico,
o sobre un horno calentado.
13. Se debe tener precaución extrema cuando se mueve un aparato
que contenga aceite caliente, comida caliente, agua u otros líquidos
calientes.
14. Para desconectar, gire los controles a OFF (apagado) y luego quite el
enchufe del tomacorriente.
15. No use el aparato para otro uso que no sea para el que fue hecho.
16. Levante y abra la cubierta cuidadosamente para evitar escaldaduras, y
permita que el agua escurra a la olla.
17. PRECAUCIÓN! Riesgo de descarga eléctrica. Cocine sólo en el
contenedor removible.
18. No coloque la unidad directamente bajo gabinetes cuando esté
funcionando ya que este producto produce grandes cantidades de
vapor. Evite tratar de alcanzar algo por arriba cuando esté funcionando.
GUARDE ESTAS INSTRUCCIONES
Otra Información de Seguridad para el Cliente
Este aparato ha sido diseñado solamente para uso doméstico.
w ADVERTENCIA
con un enchufe polarizado (una pata más ancha) para reducir el riesgo de una
descarga eléctrica. El enchufe embona únicamente en una dirección dentro
de un tomacorriente polarizado. No trate de obviar el propósito de seguridad
del enchufe modificándolo de alguna manera o utilizando un adaptador. Si el
enchufe no entra completamente en la toma, invierta el enchufe. Si aún no entra,
haga que un electricista reemplace la toma.
Peligro de Descarga Eléctrica: Este aparato es provisto
El largo del cable que se usa en este aparato fue seleccionado para reducir
el peligro de que alguien se enganche o tropiece con un cable más largo. Si
es necesario usar un cable más largo, se podrá usar un cable de extensión
aprobado. La clasificación eléctrica nominal del cable de extensión debe ser igual
o mayor que la clasificación nominal del aparato. Es importante tener cuidado
de colocar el cable de extensión para que no se pliegue sobre el mostrador o la
mesera en donde niños puedan tirar del mismo o tropezarse accidentalmente.
Para evitar una sobrecarga eléctrica del circuito, no use otro aparato de alto
voltaje en el mismo circuito con este aparato.
33
Page 34

Piezas y Características
*Para ordenar partes:
EE. UU.: 1.800.851.8900
www.hamiltonbeach.com
México: 01 800 71 16 100
Canastilla de la
Vaporera*
Tapa
34
Taza Medidora de Arroz
6-Ounce (177 ml)
3/4 de taza medidora
estándar de los EE.UU.*
WARM (calentar): Presione para comenzar a
cocinar o para apagar la unidad. La unidad cambia
automáticamente a la función Warm (calentar) después
de cada función CON EXCEPCIÓN de Steam (vapor).
WHITE RICE (arroz blanco): Use para cocinar arroz
blanco por un tiempo programado de cocción.
WHOLE GRAIN (integral): Use para cocinar arroz
integral y otros granos (que no sea arroz blanco) por un
tiempo preprogramado de cocción.
STEAM (cocción): Use para cocinar con vapor por un
tiempo a vapor seleccionado. El tiempo de cocimiento
a vapor puede ajustarse a 0 (para sólo hervir agua) a
30 minutos.
HOT CEREAL (cereal caliente): Utilícelo para cocer
toda clase de cereales calientes, avena o sémola de
maíz. Esta función calienta y luego cocina a fuego
lento durante el tiempo seleccionado.
Paleta para
Arroz*
Olla de Cocción
con Líneas de
Llenado de
Agua*
Tapa Forro
Removible
(vea Limpieza
para instrucciones
para remover)
Panel de Control
(en algunos modelos)
Recolector de
Condensación
Base
Panel de Control
Page 35

Cómo Preparar Arroz o Granos
w ADVERTENCIA
la olla de cocción removible. Nunca coloque agua o alimento
Peligro de Descarga Eléctrica. Cocine sólo en
directamente en la base.
ANTES DE USAR POR PRIMERA VEZ: Lave la olla de cocción
siguiendo las instrucciones de Cuidado y Limpieza; seque
completamente.
INFORMACIÓN DE LA TAZA MEDIDORA DE ARROZ
NOTA: No tire la taza del medidora de arroz que
viene con su unidad. Esta es una herramienta
importante para usar su arrocera exitosamente y su
tamaño es estándar en la industria del arroz. Una
taza del medidor de arroz no es igual a una taza de
EU estándar (la taza del medidora de arroz es de 6
onzas/177 ml o aproximadamente 3/4 de una taza
de EU).
1. Mida el arroz con la taza medidora. Agregue
la cantidad deseada de arroz sin cocer a la
canastilla de la vaporera. No llene por encima
de las ventilaciones laterales para evitar que
el arroz se caiga durante el enjuague. Coloque
la canastilla debajo de un grifo de flujo lento y
enjuague. Agregue el arroz enjuagado a la olla
de cocción. Repita el proceso de enjuague con
el arroz restante.
O
1. Agregue la cantidad deseada de arroz sin cocer
a la olla; luego llene con agua hasta la línea de
agua correspondiente. Ejemplo: Para 3 tazas de
arroz, agregue 3 tazas medidoras rasas de arroz
y luego agregue agua hasta la línea “3”. No
sobrepase la línea de llenado.
2. Coloque cuidadosamente la olla de cocción
derecha sobre la base. Asegúrese que la olla de
cocción esté sentada de manera segura girando
la olla de izquierda a derecha. NOTA: Asegúrese
que el fondo de la olla de cocción no esté
doblado o deformado o no conducirá el calor
correctamente.
1
1
2
3. Cierre la tapa.
4. Enchufe en el tomacorriente; todas las luces del
panel de control titilarán. Si no se selecciona
un programa, el panel de control de la arrocera
titilará por 15 segundos y la arrocera se
apagará.
5. Presione el botón WARM ( ) (calentar); luego
presione el botón WHITE RICE (arroz blanco) (se
visualiza 45 minutos) o el botón WHOLE GRAIN
(grano entero) (se visualiza 60 minutos).
6. Una vez que se selecciona un modo, puede
visualizarse el tiempo predeterminado para ese
modo. La arrocera digital ajustará el tiempo de
cocción a través del ciclo de cocción en base a
la cantidad de arroz y humedad de la arrocera.
Usted notará que la arrocera detendrá el tiempo
o disminuirá en forma significativa el tiempo
de cocción a medida que cambia el contenido
de humedad. NOTA: Vacíe el recolector de
condensación según sea necesario durante el
cocimiento.
7. Cuando haya finalizado la cocción, la unidad
cambiará a Warm (calentar) y se encenderá
la luz. En la pantalla podrá verse el tiempo de
Warm (calentar) en forma ascendente por hasta
12 horas. Después de 12 horas, la arrocera
se apagará. O, presione WARM ( ) (calentar)
para apagar. CONSEJO: Si usted prefiere un
arroz más cocido, deje que el arroz cocido
permanezca en Warm (calentar) durante por lo menos 10 a 15 minutos.
w ADVERTENCIA
tapa para llevar la arrocera cuando el contenido esté caliente. El vapor
que sale de la ventila puede causar lesiones.
8. Desenchufe.
Peligro de Quemaduras. Nunca use la manija de la
3
5
7
35
Page 36

Tabla de Cocción de Arroz
• La tabla está basada en las mediciones de arroz y agua utilizando la taza medidora provista.
• Existe una gran variedad de tipos de arroz. Las instrucciones del paquete de arroz pueden indicar cantidades de arroz y agua diferentes a las
incluidas en la tabla; seguir las instrucciones del paquete puede hacer variar los resultados.
• Llene con agua hasta la línea de agua correspondiente. Ejemplo: Si usted agrega 3 tazas rasas de arroz a la olla de cocción, agregue agua
hasta la línea “3” de la olla de cocción.
• No supere la línea MÁX de llenado para evitar desbordes mientras el arroz se está cociendo.
CONFIGURACIÓN
TIPO DE ARROZ
Blanco, Grano Largo Arroz Blanco 4 tazas (710 ml) Llene hasta la línea 4
Café, Grano Largo Integral 3 tazas (532 ml) Llene hasta la línea 4
Arborio Arroz Blanco 2 1/2 tazas (444 ml) Llene hasta la línea 4
Basmati*** Arroz Blanco 2 1/2 tazas (444 ml) Llene hasta la línea 4
Jazmín*** Arroz Blanco 2 1/2 tazas (444 ml) Llene hasta la línea 4
Arroz para Sushi Arroz Blanco 2 1/2 tazas (444 ml) Llene hasta la línea 4
*Medición en la taza medidora de arroz, 6-Ounce (177 ml), 3/4 de taza medidora estándar de los EE.UU.
**Mediante medición de 1 taza de los EE.UU.
***Enjuague antes de cocerla
36
DE LA ARROCERA
MAX. CANTIDAD DE
ARROZ*
CANTIDAD MÁXIMA
DE AGUA EN LA OLLA
TIEMPO DE COCCIÓN
44–46 min
66–68 min
36–38 min
37–39 min
48–50 min
39–41 min
APROX.
RENDIMIENTO**
6 3/4 tazas (1.6 L)
6 1/2 tazas (1.5 L)
6 tazas (1.4 L)
6 tazas (1.4 L)
6 tazas (1.4 L)
6 1/2 tazas (1.5 L)
Page 37

Tabla de Cocción de Granos
• Siga las instrucciones de la arrocera, pero elija la configuración WHOLE GRAIN (integral). Agregue agua según las instrucciones del
paquete.
• La tabla está basada en las mediciones de granos y agua utilizando las tazas medidoras estándar de los EE.UU. No se recomiendan el
teff, amaranto y otros granos muy pequeños.
CANTIDAD MÁXIMA
TIPO DE GRANO
Farro 1 1/2 tazas (266 ml) 3 1/4 tazas (577 ml)
Quinoa*** 1 taza (177 ml) 2 tazas (355 ml)
Wheatberries 2 1/2 tazas (444 ml) 3 3/4 tazas (665 ml)
*Medición en la taza medidora de arroz, 6-Ounce (177 ml), 3/4 de taza medidora estándar de los EE.UU.
**Mediante medición de 1 taza de los EE.UU.
***Enjuague antes de cocerla
DE GRANO
CANTIDAD MÁXIMA DE AGUA
EN LA OLLA*
TIEMPO DE COCCIÓN
APROX.
75–78 min
60–62 min
105–110 min
RENDIMIENTO**
5 tazas (1.2 L)
4 1/2 tazas (1.1 L)
5 tazas (1.2 L)
37
Page 38

Cómo Preparar Cereales Calientes
w ADVERTENCIA
Eléctrica. Cocine sólo en la olla de cocción
removible y canastilla de la vaporera. Nunca
coloque agua o alimento directamente en la
base.
1. Agregue la cantidad deseada de cereal
y agua a la olla de cocción. Con cuidado
coloque la olla de cocción directo sobre la
base. Asegúrese de que la olla de cocción
esté bien colocada girando la olla hacia la
derecha y hacia la izquierda.
2. Enchufe en el tomacorriente. Presione el
botón WARM ( ) (calentar) para encender;
luego presione el botón HOT CEREAL (cereal
caliente). Presione y sostenga el botón
para configurar el tiempo de cocción desde
5 minutos hasta 5 horas.
Peligro de Descarga
3. En la pantalla podrá verse “ON”
(encendido) durante el calentamiento, y la
cuenta regresiva del tiempo programado
cuando el agua llegue al hervor.
w ADVERTENCIA
Nunca use la manija de la tapa para llevar
la arrocera cuando el contenido esté
1
2
caliente. El vapor que sale de la ventila
puede causar lesiones.
4. Cuando haya finalizado la cocción, la
arrocera emitirá
5 pitidos, cambiará a WARM (calentar) y se encenderá la luz.
En la pantalla podrá verse el tiempo de Warm (calentar) en
forma ascendente por hasta 12 horas. Después de 12 horas,
la arrocera se apagará, o presione WARM ( ) (calentar) para
apagarla.
5. Desenchufe.
Peligro de Quemaduras.
3
38
Page 39

Tabla de Cocción de Cereales
• Siga las instrucciones para cocer el arroz, pero elija la configuración HOT CEREAL (cereal caliente). Agregue agua según las
instrucciones del paquete.
• Cocine los cereales en la configuración HOT CEREAL (cereal caliente). Presione y sostenga el botón HOT CEREAL (cereal caliente) hasta
alcanzar el tiempo de cocción deseado. El temporizador comienza la cuenta regresiva cuando el agua alcanza el hervor.
CANTIDAD MÁXIMA
TIPO DE CEREAL
Cream of Wheat****
(Crema de Trigo)
Sémola 3/4 taza (177 ml) 3 tazas (710 ml)
Avena Estilo
Tradicional****
*Medición en la taza medidora de arroz
**Mediante medición de 1 taza de los EE.UU.
***Enjuague antes de cocerla
****Mezcle una o dos veces durante la cocción
†
Cream of Wheat es una marca registrada de B&G Foods North America, Inc. El uso de la marca registrada no implica ninguna afiliación o promoción por parte de B&G North America, Inc.
†
DE CEREAL*
1 1/2 tazas (355 ml) 3 3/4 tazas (887 ml)
2 tazas (473 ml) 3 1/2 tazas (828 ml)
CANTIDAD MÁXIMA DE AGUA
EN LA OLLA*
TIEMPO DE COCCIÓN
APROX.
37–39
min 3 1/3 tazas (788 ml)
42–44
min 2 tazas (473 ml)
48–50
min 2 1/2 tazas (591 ml)
RENDIMIENTO**
39
Page 40

Cómo Cocinar Alimentos a Vapor
w ADVERTENCIA
la olla de cocción removible y canastilla de la vaporera. Nunca
coloque agua o alimento directamente en la base.
ANTES DE USAR POR PRIMERA VEZ: Lave la olla de cocción
siguiendo las instrucciones de Cuidado y
Limpieza; seque completamente.
1. Vacíe la cantidad deseada de agua en la
olla de cocción.
2. Coloque cuidadosamente la olla de
cocción derecha sobre la base. Asegúrese
que la olla de cocción esté sentada de
manera segura girando la olla de izquierda
a derecha.
3. Agregue los alimentos a la canastilla de la
vaporera y colóquela en la olla de cocción.
Cierre la tapa.
4. Enchufe en el tomacorriente.
Peligro de Descarga Eléctrica. Cocine sólo en
1
2
3
5. Presione el botón WARM ( ) (calentar) para
encender; luego presione el botón STEAM
(vapor). Presione y sostenga el botón
STEAM (vapor) para configurar el tiempo de
0 a 30 minutos.
6. En la pantalla podrá verse “ON”
(encendido) durante el proceso de
calentamiento, y la cuenta regresiva del
tiempo programado una vez que haya
comenzado la cocción por vapor. La
arrocera emitirá un pitido y se apagará
en forma automática cuando el tiempo
de vapor seleccionado haya finalizado.
Presione el botón de la tapa para abrirla.
Utilizando guantes de cocina, con cuidado
quite los alimentos con pinzas o utensilios
de plástico.
w ADVERTENCIA
Nunca use la manija de la tapa para llevar
la arrocera cuando el contenido esté
caliente. El vapor que sale de la ventila
puede causar lesiones.
7. NOTA: Si la olla hierve en seco, la arrocera
emitirá un pitido y el tiempo restante
titilará en la pantalla. Para continuar con
la cocción al vapor, agregue más agua.
La unidad reanudará la cocción por vapor
si se agrega agua antes de los 3 minutos.
Después de 3 minutos, presione WARM
( ) (calentar) para cancelar la función de vapor. Presione el
botón STEAM (vapor); siga presionando el botón STEAM (vapor)
para configurar el tiempo de vapor de 0 a 30 minutos.
8. Desenchufe.
Peligro de Quemaduras.
5
6
7
40
Page 41

Consejos para la Cocción de Vegetales con Vapor
• Cuantos más vegetales se agreguen a la canastilla de la vaporera,
más tiempo tardará la cocción con vapor.
• Los trozos más pequeños de vegetales se cocinarán más
rápidamente que los trozos más grandes.
• El dejar al arroz “reposar” por aproximadamente 5 a 10 minutos
después de cocinar dará una mejor textura al arroz.
• Dé un impulso de sabor los vegetales o arroz sustituyendo una
cantidad igual de caldo de pollo/res/vegetales por el agua.
• Note que los tiempos de cocción aquí enlistados son
aproximados y sólo para referencia.
• El tiempo de cocción puede variar del tiempo programado en
base a las cantidades reales de ingredientes y agua. La arrocera
ajustará el tiempo según sea necesario.
41
Page 42

Tabla de Cocción al Vapor
Cocine los siguientes en la configuración STEAM (cocción al vapor).
MAX. CANTIDAD
TIPO DE ALIMENTO
Vegetables:
Vegetales más blandos
(ej., zucchini, zapallo amarillo,
espárragos)
Vegetales más firmes
(ej., mazorca de maíz,
zanahorias, papas)
Carne de Ave/Frutos de Mar:
Frituras de pollo 8 oz. (227 g) Llene hasta la línea 1 8–10 min Temperatura interna
Filete de salmón 8 oz. (227 g) Llene hasta la línea 1 5–7 min Temperatura interna 145°F (63°C)
Langostinos pelados y sin
vaina 31–40 recuento
*Mediante medición de 1 taza de los EE.UU.
• Cuantos más alimentos se agreguen a la canastilla de la vaporera,
más tiempo tardará la cocción con vapor.
• Los trozos más pequeños de alimentos se cocinarán al vapor más
rápidamente que los trozos más grandes.
DE ALIMENTOS*
2 tazas (473 ml) Llene hasta la línea 1 4–7 min Crocante-tierno
2 tazas (473 ml) Llene hasta la línea 1 7–15 min Crocante-tierno
8 oz. (227 g) Llene hasta la línea 1 2–3 min Rosados y opacos
MAX. CANTIDAD
DE AGUA*
TIEMPO DE COCCIÓN
APPROX.
PRUEBA DE NIVEL
DE COCCIÓN
160°–165°F (71°–74°C)
42
Page 43

Cómo Cocer Alimentos al Vapor con Arroz
w ADVERTENCIA
olla de cocción removible y canastilla de la vaporer. Nunca coloque
agua o alimento directamente en la base.
ANTES DE USAR POR PRIMERA VEZ: Lave la olla de cocción
siguiendo las instrucciones de Cuidado y Limpieza; seque
completamente.
INFORMACIÓN DE LA TAZA MEDIDORA DE ARROZ
NOTA: No tire la taza del medidora de arroz que viene
con su unidad. Esta es una herramienta importante
para usar su arrocera exitosamente y su tamaño es
estándar en la industria del arroz. Una taza del medidor
de arroz no es igual a una taza de EU estándar (la
taza del medidora de arroz es de 6 onzas/177 ml o
aproximadamente 3/4 de una taza de EU).
1. Mida el arroz con la taza medidora.
Agregue la cantidad deseada de arroz
sin cocer a la canastilla de la vaporera.
No llene por encima de las ventilaciones
laterales para evitar que el arroz se
caiga durante el enjuague. Coloque la
canastilla debajo de un grifo de flujo lento
y enjuague. Agregue el arroz enjuagado
a la olla de cocción. Repita el proceso de
enjuague con el arroz restante.
O
1. Agregue la cantidad deseada de arroz sin
cocer a la olla; luego llene con agua hasta
la línea de agua correspondiente. Ejemplo:
Para 3 tazas de arroz, agregue 3 tazas
medidoras rasas de arroz y luego agregue
agua hasta la línea “3”. No sobrepase la
línea de llenado.
2. Coloque cuidadosamente la olla de
cocción derecha sobre la base. Asegúrese
que la olla de cocción esté sentada de
manera segura girando la olla de izquierda
a derecha. NOTA: Asegúrese que el fondo
de la olla de cocción no esté doblado
o deformado o no conducirá el calor
correctamente.
Peligro de Descarga Eléctrica. Cocine sólo en la
1
1
2
3. Agregue los alimentos a la canastilla de la
vaporera y colóquela en la olla de cocción.
Cierre la tapa.
4. Enchufe en el tomacorriente. Titilarán
todas las luces del panel de control. Si
no se selecciona un programa, el panel
de control de la arrocera titilará por
15 segundos y la arrocera se apagará.
5. Presione el botón WARM ( ) (calentar);
luego presione el botón WHITE RICE (arroz
blanco) (se visualizará 45 minutos). La
arrocera digital ajustará el tiempo de
cocción a través del ciclo de cocción en
base a la cantidad de arroz y humedad de
la arrocera. Usted notará que la arrocera
detendrá el tiempo o disminuirá en forma
significativa el tiempo de cocción a medida
que cambia el contenido de humedad.
6. La arrocera emitirá un pitido y
automáticamente cambiará a Warm
(calentar) y comenzará una cuenta
ascendente en la pantalla. Presione el
botón de la tapa para abrirla. Utilizando
guantes de cocina, con cuidado quite
los alimentos con pinzas o utensilios de
plástico.
w ADVERTENCIA
Nunca use la manija de la tapa para llevar
la arrocera cuando el contenido esté
caliente. El vapor que sale de la ventila puede causar lesiones.
7. Desenchufe.
Peligro de Quemaduras.
3
5
6
43
Page 44

Tabla de Cocer Alimentos al Vapor con Arroz
Cocine los siguientes en la configuración WHITE RICE (arroz blanco).
CANTIDAD
MÁXIMA DE
TIPO DE ALIMENTO
Espárragos cortados en trozos
de 3 pulgadas (7.6 cm)
Flores de brócoli 2 tazas
Mazorca de maíz 3 mazorca,
Papas cortadas en trozos de
3/4 a 1 pulgado (1.9 a 2.5 cm)
*Mediante medición de 1 taza de los EE.UU.
**Medición en la taza mediadora de arroz
***Todos los tiempos son para arroz blanco de grano largo
• Cuantos más alimentos se agreguen a la canastilla de la vaporera,
más tiempo tardará la cocción con vapor.
• Los trozos más pequeños de alimentos se cocinarán más
rápidamente que los trozos más grandes.
ALIMENTOS*
2 tazas
(473 ml)
(473 ml)
cortado al
medio
2 1/2 tazas
(591 ml)
MAX.
CANTIDAD
DE ARROZ**
2 tazas
(354 ml)
2 tazas
(354 ml)
2 tazas
(354 ml)
2 tazas
(354 ml)
MAX.
CANTIDAD
DE AGUA
Llene hasta la
línea 2
Llene hasta la
línea 2
Llene hasta la
línea 2
Llene hasta la
línea 2
• Dé un impulso de sabor arroz sustituyendo una cantidad igual de
caldo de pollo/res/vegetales por el agua.
TIEMPO DE
COCCIÓN
APROX.***
32–34 min 4 1/2 tazas Crocante-tierno
34–36 min 4 1/2 tazas Tierno
38–40 min 4 1/2 tazas Crocante-tierno
36–38 min 5 tazas Crocante-tierno
RENDIMIENTO
DEL ARROZ*
PRUEBA DE
NIVEL DE
COCCIÓN
44
Page 45

Tabla de Cocer Alimentos al Vapor
con Arroz (cont.)
CANTIDAD
MÁXIMA DE
TIPO DE ALIMENTO
Zapallo amarillo y pimientos
rojos cortados en rebanadas
de 1/4 pulgadas (0.6 cm) y
cubos de 1 pulgada (2.5 cm)
Frituras de pollo 10 oz. (283 g) 2 tazas
Filete de salmón
Langostinos pelados y sin
vaina 31–40 recuento
*Mediante medición de 1 taza de los EE.UU.
**Medición en la taza mediadora de arroz
***Todos los tiempos son para arroz blanco de grano largo
ALIMENTOS*
2 1/4 tazas
(532 ml)
8 oz. (227 g)
10 oz. (283 g)
CANTIDAD
DE ARROZ**
2 tazas
(354 ml)
(354 ml)
2 tazas
(354 ml)
2 tazas
(354 ml)
MAX.
MAX.
CANTIDAD
DE AGUA
Llene hasta la
línea 2
Llene hasta la
línea 2
Llene hasta la
línea 2
Llene hasta la
línea 2
TIEMPO DE
COCCIÓN
APROX.***
40–42 min 4 1/2 tazas Crocante-
44–46 min 4 1/2 tazas Temperatura
43–45 min 5 tazas Temperatura
42–44 min 5 tazas Rosados y
RENDIMIENTO
DEL ARROZ*
PRUEBA DE
NIVEL DE
COCCIÓN
tierno
interna
160°–165°F
(71°–74°C)
interna
145°F (63°C)
opacos
45
Page 46

Cuidado y Limpieza
w ADVERTENCIA
base, el cable o enchufe en agua u otros líquidos.
1. Verifique que la arrocera esté desenchufada.
2. Quite la tapa forro y el recolector de condensación.
Peligro de Descarga Eléctrica. No sumerja la
Resolviendo Problemas
La arrocera no se enciende.
• La arrocera no está conectada. Asegúrese que la arrocera esté
conectada en una toma eléctrica operando adecuadamente.
El arroz no está cocido.
• No hay suficiente agua/líquido de cocción. Siga las instrucciones
del paquete.
• Coloque cuidadosamente la olla de cocción derecha sobre la base.
Asegúrese que la olla de cocción esté sentada de manera segura
girando la olla de izquierda a derecha. NOTA: Si la olla de cocción
está doblada o deformada no sentará bien en la base y, por lo
tanto, no conducirá el calor adecuadamente. Para reemplazar la
olla de cocción, llame al número de Asistencia al Cliente sin costo
enlistado en la cubierta de esta guía.
• Deje reposar el arroz de 10 a 15 minutos después de completar la
cocción y que la arrocera haya pasado a Warm (caliente).
El arroz está blando.
• Se agregó mucho líquido a la olla de cocción. Reduzca el líquido.
3. Lave todas las piezas removibles en agua caliente jabonosa.
Enjuague y seque.
4. Limpie la base con un paño húmedo y luego seque con otro
paño. No utilice limpiadores abrasivos. No sumerja la base en
agua.
La arrocera comienza a emitir un “bip” durante Steam Cook
(cocción al vapor).
• La olla de cocción hirvió hasta secarse. Agregue más agua y
presione Steam Cook (cocción al a vapor) para continuar cociendo
a vapor o presione WARM ( ).
La olla de cocción no se ajusta bien.
• Llame al número gratuito de asistencia al cliente incluido en la tapa
de esta guía.
El tiempo en visualización saltea minutos o detiene el tiempo.
• La arrocera está ajustando el tiempo en base al tipo de arroz y
cantidad de arroz y humedad de la arrocera. La arrocera funciona
perfectamente. Usted notará que la arrocera detendrá el tiempo o
disminuirá en forma significativa el tiempo de cocción a medida
que cambia el contenido de humedad.
46
Page 47

Grupo HB PS, S.A. de C.V.
Monte Elbruz No. 124 - 401
Col. Polanco V Sección, Miguel Hidalgo
Ciudad de México, C.P. 11560
PÓLIZA DE GARANTÍA
PRODUCTO: MARCA: MODELO:
Grupo HB PS, S.A. de C.V. cuenta con una Red de Centros de Servicio Autorizada, por favor consulte en la lista anexa el nombre y dirección de los establecimientos en la
República Mexicana en donde usted podrá hacer efectiva la garantía, obtener partes, componentes, consumibles y accesorios; así como también obtener servicio para
productos fuera de garantía. Para mayor información llame sin costo: Centro de Atención al consumidor: 01 800 71 16 100
Grupo HB PS, S.A. de C.V. le otorga a partir de la fecha de compra:
• Esta garantía ampara, todas las piezas y componentes del producto que resulten con defecto de fabricación incluyendo la mano de obra.
• Grupo HB PS, S.A. de C.V. se obliga a reemplazar, reparar o reponer, cualquier pieza o componente defectuoso; proporcionar la mano de obra necesaria para su diagnóstico y reparación,
todo lo anterior sin costo adicional para el consumidor.
• Esta garantía incluye los gastos de transportación del producto que deriven de su cumplimiento dentro de su red de servicio.
• Esta garantía no ampara el reemplazo de piezas deterioradas por uso o por desgaste normal, como son: cuchillas, vasos, jarras, filtros, etc.
• Grupo HB PS, S.A. de C.V. no se hace responsable por los accidentes producidos a consecuencia de una instalación eléctrica defectuosa, ausencia de toma de tierra, clavija de enchufe
en mal estado, etc.
Esta garantía no será efectiva en los siguientes casos:
a) Cuando el producto se hubiese utlizado en condiciones distintas a las normales. (Uso industrial, semi-industrial o comercial.)
b) Cuando el producto no hubiese sido operado de acuerdo con el instructivo de uso.
c) Cuando el producto hubiese sido alterado o reparado por personas no autorizadas por Grupo HB PS, S.A. de C.V. el fabricante nacional, importador o comercializador responsable
respectivo.
El consumidor puede solicitar que se haga efectiva la garantía ante la propia casa comercial donde adquirió su producto, siempre y cuando Grupo HB PS, S.A. de C.V. no cuente con talleres de
servicio.
GARANTÍA DE 1 AÑO.
COBERTURA
LIMITACIONES
EXCEPCIONES
47
Page 48

PROCEDIMIENTO PARA HACER EFECTIVA LA GARANTÍA
• Para hacer efectiva la garantía no deben exigirse mayores requisitos que la presentación del producto y la póliza correspondiente, debidamente sellada por el establecimiento que lo vendió.
• Para hacer efectiva la garantía, lleve su aparato al Centro de Servicio Autorizado más cercano a su domicilio (consulte la lista anexa).
• Si no existe Centro de Servicio Autorizado en su localidad llame a nuestro Centro de Atención al Consumidor para recibir instrucciones de como hacer efectiva su garantía.
• El tiempo de reparación, en ningún caso será mayor de 30 días naturales contados a partir de la fecha de recepción del producto en nuestros Centros de Servicio Autorizados.
• En caso de que el producto haya sido reparado o sometido a mantenimiento y el mismo presente deficiencias imputables al autor de la reparación o del mantenimiento dentro de los treinta
días naturales posteriores a la entrega del producto al consumidor, éste tendrá derecho a que sea reparado o mantenido de nuevo sin costo alguno. Si el plazo de la garantía es superior a
los treinta días naturales, se estará a dicho plazo.
• El tiempo que duren las reparaciones efectuadas al amparo de la garantía no es computable dentro del plazo de la misma. Cuando el bien haya sido reparado se iniciará la garantía respecto
de las piezas repuestas y continuará con relación al resto. En el caso de reposición del bien deberá renovarse el plazo de la garantía.
SELLO DEL VENDEDOR QUEJAS Y SUGERENCIASFECHA DE ENTREGA
Si desea hacer comentarios o sugerencias con respecto a nuestro servicio o tiene alguna queja derivada de la atención recibida en
DÍA___ MES___ AÑO___
alguno de nuestros Centros de Servicio Autorizados, por favor dirigirse a:
GERENCIA INTERNACIONAL DE SERVICIO
Email: mexico.service@hamiltonbeach.com.mx
01 800 71 16 100
RED DE CENTROS DE SERVICIO AUTORIZADA GRUPO HB PS, S.A. DE C.V.
Distrito Federal
ELECTRODOMÉSTICOS
Av. Plutarco Elias Cailes No. 1499
Zacahuitzco MEXICO 09490 D.F.
Tel: 01 55 5235 2323 • Fax: 01 55 5243 1397
CASA GARCIA
Av. Patriotismo No. 875-B
Mixcoac MEXICO 03910 D. F.
Tel: 01 55 5563 8723 • Fax: 01 55 5615 1856
Nuevo Leon
FERNANDO SEPULVEDA REFACCIONES
Ruperto Martínez No. 238 Ote.
Centro MONTERREY, 64000 N.L.
Tel: 01 81 8343 6700 • Fax: 01 81 8344 0486
Jalisco
SERVICIOS DE MANTENIMIENTO CASTILLO
Garibaldi No. 1450
Ladrón de Guevara
GUADALAJARA 44660 Jal.
Tel: 01 33 3825 3480 • Fax: 01 33 3826 1914
Modelos:
37518, 37519
Tipo:
RC23
Características Eléctricas:
120 V~ 60 Hz 400 W
Los modelos incluídos en el instructivo de Uso y Cuidado pueden ir seguidos o no por un sufijo correspondiente a una
o varias letras del alfabeto y sus combinaciones, separadas o no por un espacio, coma, diagonal, o guión. Como ejemplos
los sufijos pueden ser: “Y” y/o “MX” y/o “MXY” y/o “Z”.
840282301
1/18
 Loading...