

Page 1
READ BEFORE USE
LIRE AVANT UTILISATION
LEA ANTES DE USAR
Visit www.hamiltonbeach.com for our
complete line of products and Use and
Care Guides – as well as delicious recipes,
tips, and to register your product online!
Rendez-vous sur www.hamiltonbeach.ca
pour notre liste complète de produits et de
nos manuels utilisateur – ainsi que nos
délicieuses recettes, nos conseils et pour
enregistrer votre produit en ligne !
¡Visite www.hamiltonbeach.com.mx
para obtener nuestra línea completa de
productos y las Guías de Uso y Cuidado,
además de deliciosas recetas, consejos y
para registrar su producto en línea!
Deep Fryer
Friteuse
Questions?
Please call us – our friendly
associates are ready to help.
USA: 1.800.851.8900
Questions ?
N’hésitez pas à nous appeler –
nos associés s’empresseront
de vous aider.
CAN : 1.800.267.2826
¿Preguntas?
Por favor llámenos – nuestros
amables representantes están
listos para ayudar.
MEX: 01 800 71 16 100
Le invitamos a leer cuidadosamente este
instructivo antes de usar su aparato.
Freidora Eléctrica
English ...................... 2
Français ................... 15
Español ................... 29
840225202 ENv01.indd 1840225202 ENv01.indd 1 6/27/14 7:41 PM6/27/14 7:41 PM
Page 2

IMPORTANT SAFEGUARDS
When using electrical appliances, basic safety precautions should always be followed to reduce the risk of fire, electric shock, and/or injury to
persons, including the following:
1. Read all instructions.
2. Do not touch hot surfaces. Use handles or knobs.
3. To protect against risk of electric shock, do not immerse cord,
plugs, or removable control panel with heating element in water
or other liquid.
4. Close supervision is necessary when any appliance is used by or
near children.
5. Be sure handle is properly assembled to basket and locked into
place. See detailed assembly instructions.
6. Unplug from wall outlet when not in use and before cleaning.
Allow to cool before putting on or taking off parts and before
cleaning the appliance.
7. Do not operate any appliance with a damaged cord or plug,
or after the appliance malfunctions or has been damaged in
any manner. Call our toll-free customer service number for
information on examination, repair, or adjustment.
8. The use of accessory attachments not recommended or sold by
the appliance manufacturer for use with this model may cause
injuries.
9. Do not use outdoors.
10. Do not let cord hang over edge of table or counter or touch hot
surfaces.
11. Do not place on or near a hot gas or electric burner, or in a
heated oven.
12. Never move deep fryer containing hot oil.
13. Always attach plug to appliance first; then plug cord in the wall
outlet. To disconnect, turn any control to MIN and remove plug
from wall outlet.
14. Do not use appliance for other than intended purpose.
15. To reduce the risk of injury, NEVER fill oil above MAX fill mark.
16. Always ensure removable pot is filled to at least MIN level when
using oil.
17. Never leave appliance unattended while in use.
18. Always dry foods and remove ice before frying.
19. Always dry deep fryer components thoroughly after cleaning and
before frying.
20. Always fry with lid in place.
21. Do not use refrigerated oil.
22. Never block vent on lid. Be aware of steam emitting from vent.
23. Escaping steam may cause burns to hands or fingers. Open the
lid carefully.
24. Always raise basket and allow food to drain before removing lid
or food basket.
SAVE THESE INSTRUCTIONS!
2
840225202 ENv01.indd 2840225202 ENv01.indd 2 6/27/14 7:41 PM6/27/14 7:41 PM
Page 3

Other Consumer Safety Information
This product is intended for household use only.
This product is only intended for the preparation, cooking, and
serving of foods. This product is not intended for use with any
nonfood materials or products.
WARNING! Shock Hazard: This appliance has a polarized plug (one
wide blade) that reduces the risk of electric shock. The plug fits only
one way into a polarized outlet. Do not defeat the safety purpose of
the plug by modifying the plug in any way or by using an adapter.
If the plug does not fit fully into the outlet, reverse the plug. If it still
does not fit, have an electrician replace the outlet.
WARNING! Burn Hazards.
• Serious hot-oil burns may result from a deep-fat fryer being pulled
off a countertop. Do not allow the cord to hang over the edge of the
counter where it may be grabbed by children or become entangled
with the user. Do not use with an extension cord.
• Hot liquid will splash if you miss the drain bracket and accidentally
drop the frying basket into the hot liquid. Do not lean over the
deep fryer when the lid is off.
3
840225202 ENv01.indd 3840225202 ENv01.indd 3 6/27/14 7:41 PM6/27/14 7:41 PM
Page 4

Parts and Features
Steam Vent
Removable Lid
Frying Basket
Heating Element
Assembly
Removable Oil Pot
Base
Removable Vent Cover
View Window
Basket
Handle
Basket Drain
Bracket
Reset Button
Magnetic Cord Assembly
TIMER
Button
Power
Light
READY
Light
Adjustable
Thermostat
MIN
4
840225202 ENv01.indd 4840225202 ENv01.indd 4 6/27/14 7:41 PM6/27/14 7:41 PM
Page 5

How to Assemble the Fryer
1
Place base on a stable, flat
surface. Insert oil pot into base.
5 6
840225202 ENv01.indd 5840225202 ENv01.indd 5 6/27/14 7:41 PM6/27/14 7:41 PM
2
Align grooves of heating element
assembly with grooves on base.
Push down on heating element
assembly to connect it to the
base.
NOTE: Heater cannot be turned
on unless correctly installed on
base.
For storage: Squeeze tines
together and then rotate handle
into basket.
3
To assemble handle, squeeze
tines of handle together. Align
tines with round holes on metal
bracket of basket.
4
Release tines to allow them to
spread and then pull handle back
to lock into metal bracket.
Align vent cover and vent of
lid toward heating element
assembly. Lid snaps into place.
5
Page 6

How the Timer Works
The timer counts down. It can be set for any time between 1 and 99 minutes.
“BEEP”
1
To set timer, press TIMER button
once for display to show “00.”
Continue pressing button to
advance timer by 1 minute per
press. To advance timer faster,
press and hold TIMER button
down.
6
840225202 ENv01.indd 6840225202 ENv01.indd 6 6/27/14 7:41 PM6/27/14 7:41 PM
2
Timer will start counting down
selected time shortly after you
stop pressing TIMER button.
During countdown time, display
will flash.
3 4
Timer can be reset to “00” while
it counts down. When the display
is flashing, hold the TIMER button
until display shows “00.”
NOTE: Timer will shut itself off
after 45 seconds of inactivity.
Timer will beep when it reaches
zero and will beep again after
approximately 30 seconds. Timer
will turn off automatically.
NOTE: Timer DOES NOT turn off
fryer.
Page 7

w WARNING
Burn Hazard.
Frying
BEFORE FIRST USE: Thoroughly clean and dry fryer. See “Cleaning Your Fryer” section.
NOTE: Never operate unit without oil in tank or unit will exceed temperature limit and will require resetting. See “How to Reset” section for details.
• Never fill oil above MAX fill mark.
• Never move fryer when it is in operation or when
fryer contains hot oil.
• Never leave fryer unattended while in use.
• Remove as much moisture from food as
possible. Do not add water or ice to oil.
• Escaping steam may cause burns to hands or
fingers. Open lid carefully.
• Failure to follow these instructions may result in
serious burns since hot oil may spill from fryer.
1 2 3 4
Place assembled fryer on a stable,
level, heat-resistant surface out of
reach of children. Lift lid to open.
Remove basket from fryer. Fill fryer with at least 10 but no
more than 12 cups of oil to top
indicator mark on removable
oil pot.
NOTICE: Never operate unit
without oil in pot or unit will
exceed temperature limit and will
require resetting. (See “How to
Reset” on page 12.)
Make sure fryer is turned to MIN.
Attach magnetic end of cord
assembly to fryer socket. Magnetic
end of cord will only go in one
way. Be careful not to disturb
magnetic connection when
plugging cord into electrical outlet.
NOTE: The low magnetic force
allows the cord to “break away”
which prevents unit from
accidentally being pulled off
a countertop.
7
840225202 ENv01.indd 7840225202 ENv01.indd 7 6/27/14 7:41 PM6/27/14 7:41 PM
Page 8

Frying (cont.)
FRYING TIP: READY light may go out after frying a batch of food. When oil has reached selected
temperature, READY light will come back on. Unit is now ready to fry next batch of food.
5
7 8
Carefully place basket in fryer.
Replace lid.
WARNING! Never operate unit
without oil in pot or unit will
exceed temperature limit and will
require resetting.
8
Replace lid. Plug in unit. Set
thermostat to desired setting.
Preheat fryer until READY light
comes on (10 to 15 minutes). For
more
information on temperature
selection,
or Frying Chart. READY light will
come on when oil has reached
preset temperature.
When frying is done, remove
lid, raise basket, and hook over
removable oil pot to drain.
NOTE: Do not allow condensation
to drain into oil pot while
removing lid or while unit is off.
check food package
6
9
Carefully empty food from basket
and place in a bowl or colander
lined with paper towel. Fill and
repeat as needed. Set thermostat
to MIN and unplug appliance
after use.
To fry food, place food in basket.
TO FRY UNBATTERED FOOD:
Place food in basket and proceed
with Step 7.
TO FRY BATTERED FOOD (such
as tempura batter): Lower basket
into oil; then carefully drop food
directly into oil.
NOTE: Do not exceed maximum
amount of food to be fried in one
batch. See Frying Chart for more
information.
840225202 ENv01.indd 8840225202 ENv01.indd 8 6/27/14 7:41 PM6/27/14 7:41 PM
Page 9

Frying Chart
FOOD
Frozen French Fries
Fresh-Cut French Fries
Frozen Onion Rings
Frozen Fish Sticks
Frozen Jumbo Butterflied
Shrimp
Frozen Chicken Tenders
Fresh Whole Chicken Wings
*3/4 full basket
NOTES:
• Length of cooking time and temperature may vary based on
batch size and weight.
• For best results, fry a single layer of food for each batch.
• Frozen, uncooked chicken should be thawed, excess water
removed, and patted dry with paper towel prior to cooking.
• See “Frying Tips” for more information to obtain best results.
• Always follow package directions.
QUANTITY
8 cups*
8 cups*
8 cups*
8 cups*
8 cups*
8 cups*
6
FRYING
TEMPERATURE
375°F (190°C)
375°F (190°C)
375°F (190°C)
350°F (180°C)
350°F (180°C)
375°F (190°C)
375°F (190°C)
• When cooking meat, poultry, or fish, use cooking thermometer
to determine internal temperatures.
• Visit foodsafety.gov for more information on safe internal
cooking temperatures.
IF YOU LIVE IN A HIGH-ALTITUDE AREA:
The Extension service will have detailed information about cooking
for your area. To locate the Cooperative Extension service in your
county, please visit: http://www.csrees.usda.gov/Extension/.
COOKING TIME
12 to 14 minutes
15 to 18 minutes
3 to 5 minutes
3 to 5 minutes
2 to 4 minutes
5 to 7 minutes
13 to 15 minutes
INTERNAL TEMP/
DONENESS
Brown and crisp
Brown and crisp
Brown and crisp
145°F (63°C)
145°F (63°C)
165°F (73°C)
165°F (73°C)
9
840225202 ENv01.indd 9840225202 ENv01.indd 9 6/27/14 7:41 PM6/27/14 7:41 PM
Page 10

Burn Hazard.
w WARNING
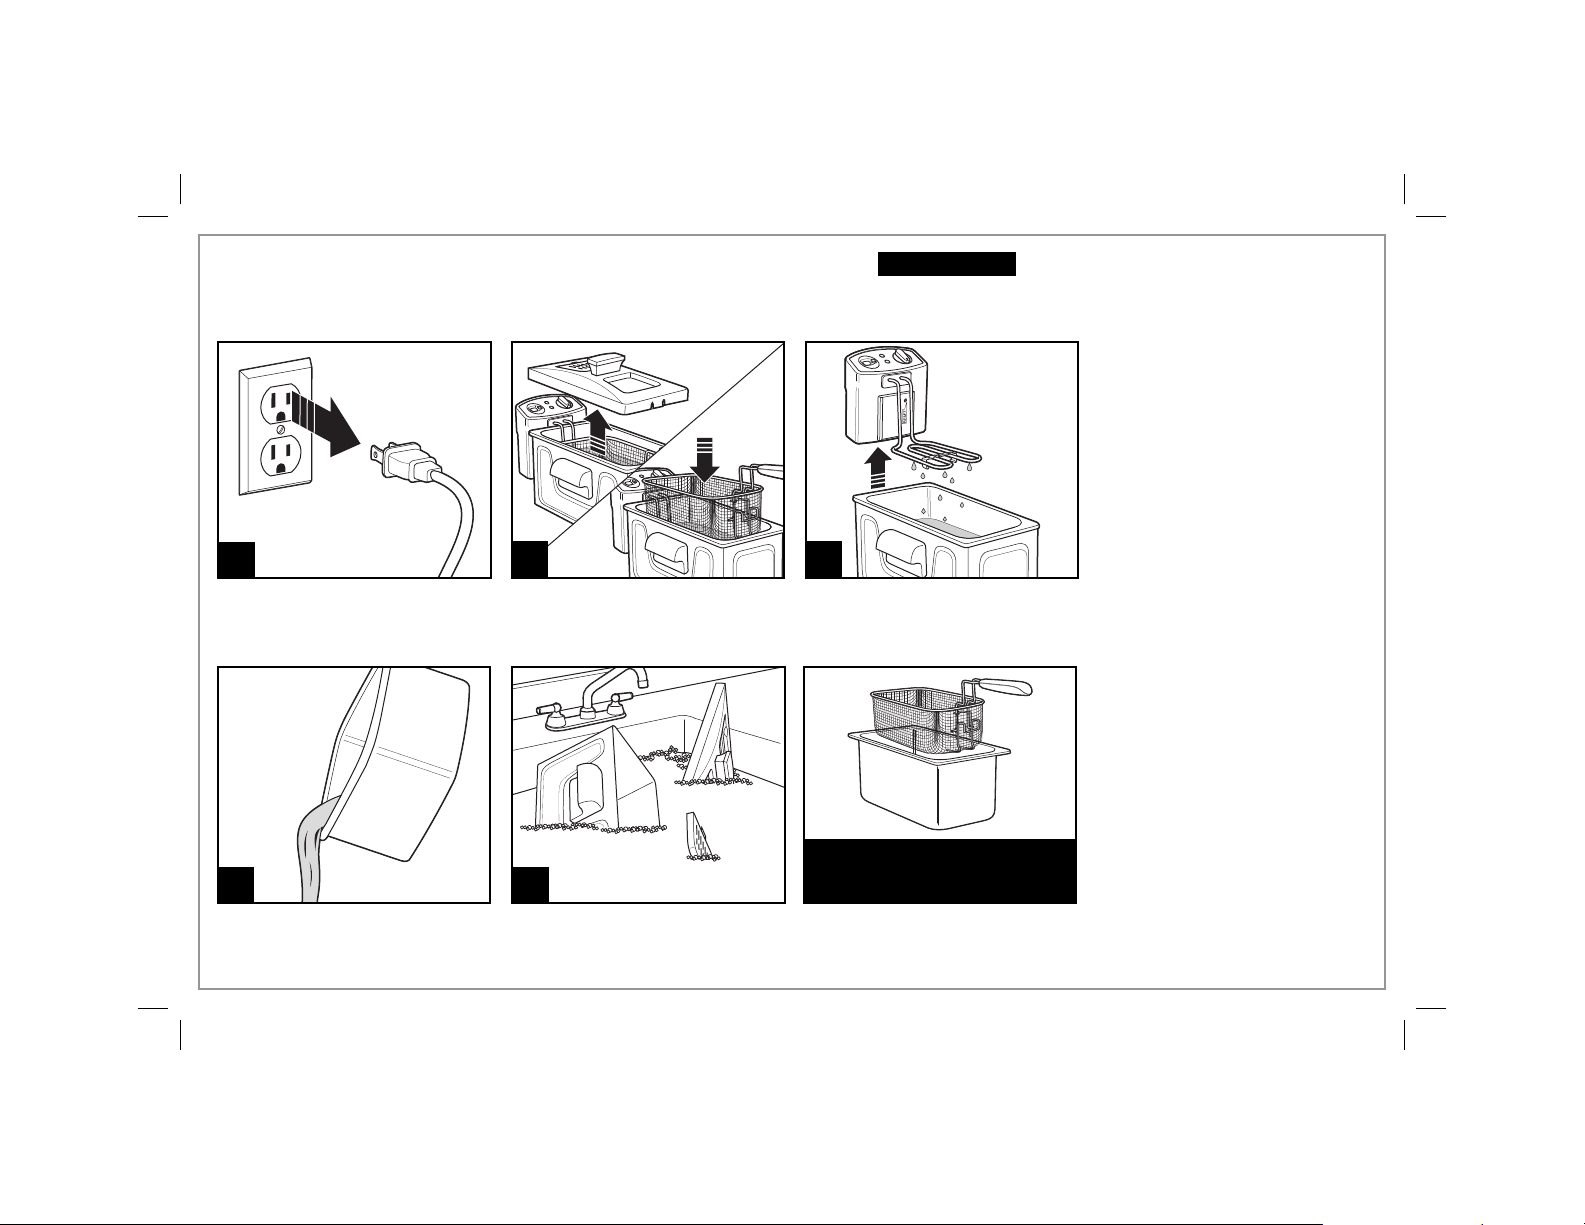
Cleaning Your Fryer
1
Unplug from wall outlet. Wait
until oil has cooled. This can take
several hours.
4 5 DISHWASHER-SAFE
Lift oil pot from base and pour
out oil. Wipe all excess oil or oil
film from oil pot.
10
2 3
Remove lid and remove basket
from fryer.
Lid
Base
Vent Cover
Clean base, lid, and vent cover
with hot, soapy water. Dry
thoroughly. Position lid vertically
to drain and allow to dry
thoroughly.
To avoid eruptions and/or spatter of hot oil, dry all fryer components
thoroughly before using.
Lift heating element assembly
from base and allow oil to drain
into oil pot.
DO NOT use the “SANI” setting
when washing in the dishwasher.
“SANI” cycle temperatures could
damage your product.
Do not immerse heating element
assembly in water.
NOTE: To avoid damaging fryer,
use care when cleaning heating
element assembly. Gently wipe
with soft cloth dampened with
hot, soapy water.
840225202 ENv01.indd 10840225202 ENv01.indd 10 6/27/14 7:41 PM6/27/14 7:41 PM
Page 11

Frying Tips
SELECTING AND CHANGING THE FRYING OIL:
• Use a good quality vegetable or peanut oil.
• Frying foods in butter, margarine, olive oil, or animal fat is
NOT recommended because of low temperature smoke point.
• DO NOT mix two types of oil.
• Change oil regularly to maintain optimum frying and flavor quality.
• Oil used for french fries can be used 10 to 12 times before
changing if oil is filtered after each use. Oil used for food that
is high in protein (such as meat or fish) should be changed
more frequently.
• To filter oil, allow oil to cool completely. Cheesecloth or paper
towel may be used as a filter to strain oil.
• Always follow food package directions.
• DO NOT add fresh oil to used oil.
• Always change the oil when it has a strong smell or taste, or
when it turns dark and/or syrupy.
BEFORE FRYING:
• Remove any excess water from fresh food by blotting with
a paper towel. Excess water or ice particles can cause
hot oil to splatter or foam.
GENERAL TIPS:
• DO NOT use plastic utensils in hot oil.
• Season food AFTER frying.
• If food is not as crisp as desired, reduce batch size.
DISPOSING OF OIL:
• Pour cool oil into its original (resealable) empty plastic bottle.
BASKET USAGE WITH FRESHLY BATTERED FOODS:
• Freshly battered foods should be carefully placed directly into oil.
First, lower basket completely and then carefully place each piece
of battered food into hot oil. Use basket to remove fried battered
foods.
STORAGE:
• Basket handle can be disengaged and rotated into basket. Place
oil pot in base and then place basket and power cord in oil pot.
• It is best to store all oils in the refrigerator or a cool, dark, dry
place for up to six months.
Visit www.hamiltonbeach.com for our complete line
of products and Use and Care Guides –
as well as delicious recipes, tips, and
to register your product online!
11
840225202 ENv01.indd 11840225202 ENv01.indd 11 6/27/14 7:41 PM6/27/14 7:41 PM
Page 12

Troubleshooting
HOW TO RESET:
If your unit is not heating or will not turn on, your unit may need to be reset.
1. Make sure fryer and oil are cold.
2. Turn temperature control to MIN.
3. Unplug magnetic cord from the wall outlet.
4. Remove removable control panel and heater element.
5. Use a thin pointed object such as a wooden skewer or thin screwdriver to push in RESET button.
PROBLEM
Fried food does not have
a golden-brown color and/
or is not crispy.
Fryer gives off a strong,
unpleasant odor.
Unit does not heat.
12
840225202 ENv01.indd 12840225202 ENv01.indd 12 6/27/14 7:41 PM6/27/14 7:41 PM
PROBABLE CAUSE
• Selected temperature is too low or food has not been fried long enough. Check food package or Frying
Chart for correct temperature or preparation time.
• There is too much food in basket. Never fry too much food at one time. See food package, Frying Chart,
or recipe for correct frying amount. Food pieces may be too thick to fry adequately.
• Volume of oil is too low.
• Oil isn’t fresh. Change oil. Filter oil regularly to keep it fresh longer.
• When frying food with a high moisture content (such as chicken or fries), change oil frequently.
• Type of oil is not suitable for deep-frying food. Use good quality frying oil. Do not mix two different
types of oil or fat.
• Ensure magnetic cord assembly is properly attached to fryer socket.
• Ensure electrical cord assembly is plugged into electrical outlet.
• Heating element assembly not correctly assembled. Make sure heating element assembly is properly
installed on base. See “How to Assemble the Fryer” section.
• Press RESET button on heating element assembly by inserting a small pointed item (such as a wooden
skewer) into the opening labeled RESET. Make sure fryer has recommended amount of oil in oil pot.
Page 13

Troubleshooting (cont.)
PROBLEM
During frying, the oil spills
over the edge of the fryer.
Condensation forms on
viewing window.
Oil film buildup on oil pot.
Oil foams too much during
frying.
PROBABLE CAUSE
• There is too much oil in fryer. Make sure that oil does not exceed maximum level mark.
• Basket/food immersed too quickly. Carefully raise basket out of oil.
• Food contains too much liquid. Dry food thoroughly before placing it in fryer. Follow instructions in
“Frying” section.
• When frying food with a high moisture content (such as chicken or fries), change oil frequently.
• There is too much food in frying basket. Do not fry more food at one time than quantities indicated on
food package or Frying Chart.
• Water vapor from food collects on window. When unit is cold, wipe a small amount of oil on inside of
viewing window to prevent condensation buildup.
• Use plastic scouring pad to clean.
• To clean oil residue from oil pot, use a household degreaser.
• Food contains too much liquid. Dry food thoroughly before placing it in fryer.
• When frying food with a high moisture content (such as chicken or fries), change oil frequently.
• Type of oil is not suitable for deep-frying food. Use good quality frying oil. Do not mix two different types
of oil or fat.
• Basket/food immersed too quickly. Carefully raise basket into air.
• The use of refrigerated oil may cause excessive splattering. Use room-temperature oil.
• Oil pot has not been cleaned properly. See instructions in the “Cleaning Your Fryer” section.
13
840225202 ENv01.indd 13840225202 ENv01.indd 13 6/27/14 7:41 PM6/27/14 7:41 PM
Page 14

Limited Warranty
This warranty applies to products purchased and used in the U.S. and Canada. This is the only express warranty for this product and
is in lieu of any other warranty or condition.
This product is warranted to be free from defects in material and workmanship for a period of one (1) year from the date of original
purchase. During this period, your exclusive remedy is repair or replacement of this product or any component found to be defective,
at our option; however, you are responsible for all costs associated with returning the product to us and our returning a product or
component under this warranty to you. If the product or component is no longer available, we will replace with a similar one of equal
or greater value.
This warranty does not cover glass, filters, wear from normal use, use not in conformity with the printed directions, or damage to
the product resulting from accident, alteration, abuse, or misuse. This warranty extends only to the original consumer purchaser or
gift recipient. Keep the original sales receipt, as proof of purchase is required to make a warranty claim. This warranty is void if the
product is used for other than single-family household use or subjected to any voltage and waveform other than as specified on the
rating label (e.g., 120V ~ 60 Hz).
We exclude all claims for special, incidental, and consequential damages caused by breach of express or implied warranty. All
liability is limited to the amount of the purchase price. Every implied warranty, including any statutory warranty or condition
of merchantability or fitness for a particular purpose, is disclaimed except to the extent prohibited by law, in which case such
warranty or condition is limited to the duration of this written warranty. This warranty gives you specific legal rights. You may have
other legal rights that vary depending on where you live. Some states or provinces do not allow limitations on implied warranties or
special, incidental, or consequential damages, so the foregoing limitations may not apply to you.
To make a warranty claim, do not return this appliance to the store. Please call 1.800.851.8900 in the U.S. or 1.800.267.2826 in Canada
or visit hamiltonbeach.com in the U.S. or hamiltonbeach.ca in Canada. For faster service, locate the model, type, and series numbers
on your appliance.
14
840225202 ENv01.indd 14840225202 ENv01.indd 14 6/27/14 7:41 PM6/27/14 7:41 PM
Page 15

PRÉCAUTIONS IMPORTANES
Pour utiliser un appareil électroménager, vous devez toujours prendre des mesures élémentaires de sécurité pour réduire le risque
d’incendie, d’électrocution et/ou de blessure corporelle, en particulier les mesures suivantes :
1. Lire toutes les instructions.
2. Ne pas toucher aux surfaces chaudes. Utiliser les poignées ou
les boutons.
3. Pour se protéger contre le risque de choc électrique, ne pas
immerger le cordon, la fiche ou l’ensemble d’élément chauffage
dans l’eau ou autre liquide.
4. Une bonne surveillance est nécessaire lorsqu’un appareil
ménager est utilisé par des enfants ou près d’eux.
5. Assurer que le manche soit bien assemblé au panier et fixé en
place. Consulter les instructions détaillées de montage.
6. Débrancher la friteuse de la prise de murale lorsqu’elle n’est pas
utilisée et avant le nettoyage. La laisser refroidir avant d’y ajouter
ou d’y enlever des pièces ou de la nettoyer.
7. Ne pas faire fonctionner un appareil ménager avec une fiche ou
un cordon endommagé(e) ou lorsque l’appareil ne fonctionne
pas bien ou a été endommagé d’une manière quelconque.
Appeler notre numéro sans frais de service à la clientèle pour
des renseignements concernant l’examen, la réparation ou
l’ajustement.
8. L’utilisation d’accessoires non recommandés ou non vendus par
le fabricant d’appareil pour ce modèle peut causer des blessures.
9. Ne pas utiliser à l’extérieur.
10. Ne pas laisser le cordon pendre du bord d’une table ou d’un
comptoir, ni toucher des surfaces chaudes.
11. Ne pas placer l’appareil sur ou près d’un brûleur à gaz ou
électrique chaud ou dans un four chauffé.
12. Ne déplacer jamais la friteuse contenant de l’huile chaude.
13. Toujours brancher le cordon sur l’appareil d’abord, puis sur
une prise de courant murale. Pour débrancher, mettre tous les
contacts en position MIN et retirer la fiche de la prise murale.
14. Ne pas utiliser la friteuse à une fin autre que celle pour laquelle
elle a été conçue.
15. Pour réduire le risque de blessure, NE PAS remplir d’huile
au-dessus du repère de niveau maximal.
16. Toujours assurer que le pot à huile amovible soit rempli au moins
au niveau minimum.
17. Ne jamais laisser la friteuse sans surveillance durant son
utilisation.
18. Toujours sécher les aliments et enlever la glace avant de faire
frire.
19. Toujours sécher complètement les éléments de la friteuse après
les avoir lavés et avant de faire frire.
20. Toujours frire avec le couvercle en place.
21. Ne jamais utiliser d’huile réfrigérée.
22. Ne jamais bloquer l’évent sur le couvercle. Ayez conscience de
la vapeur qui sort de l’évent.
23. Des émissions de vapeur peuvent entraîner des brûlures aux
mains ou aux doigts. Faites bien attention quand vous ouvrez
le couvercle.
24. Toujours soulever le panier et permetter aux aliments d’égoutter
avant de retirer le couvercle ou le panier alimentaire.
CONSERVER CES INSTRUCTIONS !
15
840225202 FRv01.indd 15840225202 FRv01.indd 15 6/27/14 7:42 PM6/27/14 7:42 PM
Page 16

Autres renseignements de sécurité aux consommateurs
Cet appareil est conçu uniquement pour l’usage domestique.
Cet appareil est conçu uniquement pour la préparation, la cuisson
et servir des aliments. Cet appareil n’est pas conçu pour l’utilisation
de matériaux ou produits non alimentaires.
AVERTISSEMENT ! Risque d’électrocution : Cet appareil
électroménager possède une fiche polarisée (une broche large)
qui réduit le risque d’électrocution. Cette fiche n’entre que dans
un seul sens dans une prise polarisée. Ne contrecarrez pas
l’objectif sécuritaire de cette fiche en la modifiant de quelque
manière que ce soit ou en utilisant un adaptateur. Si vous ne
pouvez pas insérer complètement la fiche dans la prise, inversez
la fiche. Si elle refuse toujours de s’insérer, faire remplacer la prise
par un électricien.
AVERTISSEMENT ! Danger de brûlure.
• De l’huile chaude renversée d’une bassine à friture tirée par
mégarde du comptoir peut causer des brûlures sévères. Ne
jamais laisser le cordon d’alimentation pendre par l’extrémité
d’un comptoir. Il peut être saisi par un enfant et il peut se mêler
pendant l’usage. Ne jamais utiliser avec une rallonge.
• Vous serez éclaboussé par du liquide chaud si vous manquez le
support d’égouttage et laissez tomber accidentellement le panier
à frire dans le liquide chaud. Ne vous penchez jamais sur la
friteuse sans couvercle.
16
840225202 FRv01.indd 16840225202 FRv01.indd 16 6/27/14 7:42 PM6/27/14 7:42 PM
Page 17

Pièces et caractéristiques
Évents de vapeur
Capuchon amovible
Baquet à frire
Ensemble
d’élément de
chauffage
Pot à huile amovible
Base
Couvercle à évents amovibles
Fenêtre
Poignée de
baquet
Support d’égouttage
de baquet
Bouton de
remise à zéro
Ensemble de cordon magnétique
Minuterie
Lumière
de courant
marche
Lumière prête
à cuire
Thermostat
ajustable
MIN
17
840225202 FRv01.indd 17840225202 FRv01.indd 17 6/27/14 7:42 PM6/27/14 7:42 PM
Page 18

Montage de la friteuse
1
Placer la base sur une surface
plate, stable. Mettre le pot à huile
dans la base.
5 6
18
840225202 FRv01.indd 18840225202 FRv01.indd 18 6/27/14 7:42 PM6/27/14 7:42 PM
2
Aligner les rayures de l’ensemble
d’élément de chauffage aux
rayures de la base. Pousser vers
le bas l’ensemble d’élément de
chauffage pour le joindre à la
base.
REMARQUE : Le chauffage ne
peut pas être branché s’il est mal
installé sur la base.
Pour ranger, appuyer sur les
dents afin de les réunir et faites
tourner le manche dans le
baquet.
3
Pour assembler le manche,
presser sur les dents du manche
afin de les rassembler. Aligner les
dents aux trous ronds du support
en métal du baquet.
4
Relâcher les dents pour leur
permettre de s’étendre et de
se fixer au support en métal.
Aligner l’évent du couvercle
à l’ensemble d’élément de
chauffage. Le couvercle se fixe
en place.
Page 19

Comment fonctionne la minuterie
La minuterie de la friteuse compte à rebours. On peut la régler pour n’importe quel temps entre 1 et 99 minutes.
“BIP”
1
Pour régler la minuterie, appuyer
une fois sur le bouton TIMER
(minuterie) jusqu’à ce que
l’afficheur indique « 00 ».
Continuer à appuyer sur le
bouton pour faire avancer la
minuterie une minute chaque
fois que vous appuyez. Pour
faire avancer plus vite, appuyer
et tener appuyé le bouton TIMER
(minuterie).
840225202 FRv01.indd 19840225202 FRv01.indd 19 6/27/14 7:42 PM6/27/14 7:42 PM
2
La minuterie commence à
compter à rebours le temps
choisi peu après que vous cessiez
d’appuyer sur le bouton TIMER
(minuterie). Pendant le compte à
rebours, la minuterie clignote.
3 4
La minuterie peut être
réinitialisée à « 00 » pendant le
compte à rebours. Pendant que
l’affichage clignote, maintenir
le bouton TIMER (minuterie)
enfoncé jusqu’à ce que « 00 »
s’affiche.
REMARQUE : La minuterie
s’éteint automatiquement après
45 secondes d’inactivité.
La minuterie sonne quand elle
atteint zéro et sonne à nouveau
après environ 30 secondes.
La minuterie s’arrête
automatiquement.
REMARQUE : La minuterie
N’ARRÊTE PAS la friteuse.
19
Page 20

w AVERTISSEMENT
Risque de brûlure.
Friture
AVANT LE PREMIER USAGE : Nettoyer soigneusement la friteuse. Consulter la section « Nettoyage de votre friteuse ».
REMARQUE : Ne jamais faire fonctionner l’appareil sans huile dans le pot pour éviter de dépasser la limite de température et devoir
réinitialiser l’appareil. Consulter le chapitre « Réinitialisation » pour obtenir les détails.
• Ne jamais remplir d’huile au-dessus du repère MAX.
• Ne jamais déplacer la friteuse durant son utilisation
ou lorsqu’elle contient de l’huile chaude.
• Ne laisser jamais la friteuse sans surveillance quand
elle fonctionne.
• Éliminer le plus possible l’humidité des aliments.
Ne pas ajouter d’eau ou de glace dans l’huile.
• Des projections de vapeur peuvent occasionner
des blessures à vos mains ou à vos doigts. Faites
attention quand vous ouvrez le couvercle.
• Le non-respect de ces instructions peut causer des
brûlures graves car de l’huile chaude risque de
déborder de la friteuse.
1 2 3 4
Placer la friteuse assemblée sur
une surface stable, de niveau,
résistante à la chaleur et hors
de portée des enfants. Soulever
l’ouverture du couvercle pour
ouvrir.
20
Retirer le panier de la friteuse. Remplisser la friteuse avec au moins 10 tasses mais pas plus de 12
tasses d’huile jusqu’à la marque du haut sur le pot d’huile amovible.
AVIS : Ne jamais faire fonctionner cet appareil sans huile dans le
pot, car l’appareil surchauffera et nécessitera une réinitialisation de
la température.
S’assurer que le friteuse est réglée à MIN. Brancher l’extrémité
magnétique du cordon d’alimentation dans la prise de la friteuse.
Cette extrémité magnétique ne peut être branchée que d’une
seulefaçon. Prendre soin de ne pas déloger la connexion magnétique
lors du branchement dans une prise de courant.
REMARQUE : La force magnétique est relativement faible de manière
à ce que le cordon se détache s’il est tiré par inadvertance ; ce qui
empêche la friteuse d’être tirée et de tomber du comptoir.
(Voir le chapitre « Réinitialisation »
à la page 25.)
840225202 FRv01.indd 20840225202 FRv01.indd 20 6/27/14 7:42 PM6/27/14 7:42 PM
Page 21

Friture (suite)
CONSEIL DE FRITURE : Le témoin READY (prêt) peut s’éteindre après la friture d’un lot d’aliments.
Il se rallumera une fois que l’huile aura atteint la température sélectionnée. La friteuse est alors
prête à frire le lot d’aliments suivant.
5
7 8
Mettre soigneusement le panier
dans la friteuse. Fermer le
couvercle.
AVERTISSEMENT ! Ne jamais
faire fonctionner cet appareil sans
huile dans le pot, car l’appareil
surchauffera et nécessitera une
réinitialisation de la température.
Fermer le couvercle. Brancher
l’appareil. Régler le thermostat
au réglage désiré. Préchauffer
la friteuse jusqu’à ce que le
témoin READY (prêt) pour la
cuisson s’allume (au bout de
10 à 15 minutes). Pour plus de
renseignements au sujet de la
sélection de la température,
consulter l’emballage de l’aliment
ou le Tableau de friture. Le témoin
READY (prêt) s’allume dès que l’huile
a attient la température préréglée.
Quand vous avez terminé de frire,
enlever le couvercle, soulever le
panier et accrocher sur le pot à
huile amovible pour égoutter.
REMARQUE :
enlever le couvercle et quand
le couvercle est enlevé, ne
permettre pas de condensation
couler dans le pot à huile.
Quand vous
6
9
Vider avec soins les aliments du
panier et placer-les dans un bol
ou une passoire doublée d’une
serviette en papier. Remplisser et
répéter autant de fois que c’est
nécessaire. Mettre le thermostat
en position MIN et débrancher
votre appareil après l’usage.
Déposer les aliments dans le
panier pour les faire frire.
POUR FAIRE FRIRE UN ALIMENT
NON ENROBÉ DE PÂTE : Mettre
l’aliment dans le panier et passer
à l’étape 7.
POUR FAIRE FRIRE UN ALIMENT
ENROBÉ DE PÂTE (comme la
pâte de tempura) : Pour abaisser
le panier dans l’huile, puis
mettre l’aliment avec précaution
directement dans l’huile.
REMARQUE : Ne dépasser pas
la quantité maximale d’aliments
à frire dans un seul lot. Voir le
Tableau de friture.
21
840225202 FRv01.indd 21840225202 FRv01.indd 21 6/27/14 7:42 PM6/27/14 7:42 PM
Page 22

Guide de cuisson
ALIMENT
Frites surgelées
Frites régulières fraîches
Rondelles d’oignon surgelées
Bâtonnets de poisson surgelés
Crevettes papillon grande
surgelées
Filets de poulets surgelés
Ailes de poulet entières
fraîches
*3/4 panier plein
REMARQUES:
• La durée de cuisson et la température peuvent varier selon la quantité
et le poids.
• Pour de meilleurs résultats, faire frire une seule couche d’aliments
à chaque lot.
• Le poulet congelé non cuit doit être dégelé puis débarrassé de
son excès d’eau et épongé avec une serviette de papier avant
la cuisson.
• Voir les « Conseils de friture » pour obtenir les informations utiles
pour obtenir de meilleurs résultats.
• Toujours suivre les instructions sur l’emballage.
QUANTITÉ
8 tasses*
8 tasses*
8 tasses*
8 tasses*
8 tasses*
8 tasses*
6
TEMP. DE FRITURE
190 °C (375 °F)
190 °C (375 °F)
190 °C (375 °F)
180 °C (350 °F)
180 °C (350 °F)
190 °C (375 °F)
190 °C (375 °F)
TEMP. INTERNE/
DURÉE DE CUISSON
12 à 14 minutes
15 à 18 minutes
3 à 5 minutes
3 à 5 minutes
2 à 4 minutes
5 à 7 minutes
13 à 15 minutes
• Lors de la cuisson de viande, poulet ou poisson, utiliser un
thermomètre de cuisson pour déterminer les températures internes.
• Visiter les différents sites gouvernementaux pour plus d’information
à propos des températures internes de cuisson.
SI VOUS HABITEZ DANS UNE RÉGION À HAUTE ALTITUDE :
Les services de vulgarisation offrent les informations au sujet
de la cuisson pour votre région. Pour trouver la coopérative
de services de vulgarisation, veuillez visiter le site
http://www.csrees.usda.gov/Extension/.
CUISSON SÉCURITAIRE
Brunes et croustillantes
Brunes et croustillantes
Brunes et croustillantes
63 °C (145 °F)
63 °C (145 °F)
73 °C (165 °F)
73 °C (165 °F)
22
840225202 FRv01.indd 22840225202 FRv01.indd 22 6/27/14 7:42 PM6/27/14 7:42 PM
Page 23

Nettoyage de votre friteuse
1
Débrancher de la prise murale. Attender que l’huile se refroidisse.
Cela peut prendre plusieurs heures. Enlever le couvercle. Enlever
le panier de la friteuse.
2 3
Soulever l’ensemble d’élément
de chauffage de la base et laisser
égoutter l’huile dans le pot à
huile.
Capuchon
w AVERTISSEMENT
Risque de brûlure.
Pour éviter les éruptions et les projections d’huile
chaude, assécher complètement toutes les
composantes de la friteuse avant son utilisation.
N’immerger jamais l’ensemble
d’élément de chauffage dans
l’eau.
REMARQUE : Pour éviter
d’endommager la friteuse,
nettoyer l’ensemble d’élément
de chauffage avec soin. Essuyer
doucement à l’aide d’un
chiffon imbibé d’eau chaude
savonneuse.
Base
4 5
Soulever le pot à huile de la base
et vider l’huile. Essuyer toute
l’huile en excès ou la pellicule
d’huile du pot à huile.
840225202 FRv01.indd 23840225202 FRv01.indd 23 6/27/14 7:42 PM6/27/14 7:42 PM
Nettoyer la base, le couvercle et le couvercle de l’évent dans de
l’eau savonneuse chaude. Laisser-le sécher complètement. Poser
le couvercle verticalement pour s’égoutter et laissez-le sécher
complètement.
Couvercle à évents
LAVABLES AU
LAVE-VAISSELLE
NE PAS utiliser le réglage
“SANI” du lave-vaisselle. Les
températures du cycle “SANI”
peuvent endommager le produit.
23
Page 24

Conseils de friture
CHOIX ET REMPLACEMENT DE L’HUILE DE FRITURE :
• Utiliser une huile végétale ou d’arachides de bonne qualité.
• La friture d’aliments dans le beurre, margarine, huile d’olive ou
graisse animale est DÉCONSEILLÉE, car la température du point
de fumage est trop basse.
• NE PAS mélanger deux types d’huile.
• Remplacer l’huile périodiquement pour maintenir une friture et
une saveur de grande qualité.
• L’huile utilisée pour frire les frites et filtrée après chaque utilisation
peut être réutilisée 10 à 12 fois avant son remplacement. L’huile
utilisée avec des aliments riches en protéines (comme la viande
ou le poisson) doit être remplacée plus souvent.
• Pour filtrer l’huile, permettre le refroidissement complet de celle-ci.
L’huile peut être filtrée à l’aide d’une étamine ou une serviette de
papier.
• Toujours suivre les instructions sur l’emballage.
• NE PAS ajouter d’huile fraîche ou usée.
• Toujours changer l’huile si elle commence à mousser lorsqu’elle
est chauffée, quand elle a une forte odeur ou un goût prononcé
ou quand elle devient plus foncée ou sirupeuse.
AVANT DE FRIRE :
• Éponger tout l’excès d’eau des aliments frais à l’aide d’une serviette
de papier. L’excès d’eau ou de particules de glace peut provoquer
des projections ou de la mousse.
24
CONSEILS UTILES :
• NE PAS utiliser d’ustensiles en plastique dans l’huile chaude.
• Assaisonner les aliments APRÈS la cuisson.
• Réduire la quantité d’aliments du lot s’ils ne sont pas aussi
croustillants que souhaité.
ÉLIMINATION DE L’HUILE :
• Verser l’huile froide dans le contenant de plastique d’origine
(refermable).
UTILISATION DU PANIER AVEC LES ALIMENTS EN PÂTE À FRIRE
FRAÎCHE :
• Les aliments en pâte à frire fraîche doivent être mis avec
précaution directement dans l’huile chaude. Premièrement,
abaisser entièrement le panier et placer chaque morceau pané
avec précaution dans l’huile chaude. Utiliser le panier pour retirer
les aliments panés frits.
RANGEMENT :
• La poignée peut être dégagée et tournée dans le baquet. Placer
le pot à huile dans la base puis placer le panier et le cordon
d’alimentation dans le pot à huile.
• Il est préférable de stocker toutes les huiles au réfrigérateur ou
dans un endroit frais, sombre et sec jusqu’à six mois.
Rendez-vous sur www.hamiltonbeach.ca pour notre
liste complète de produits et de nos manuels
utilisateur – ainsi que nos délicieuses
recettes, nos conseils et pour
enregistrer votre produit en ligne !
840225202 FRv01.indd 24840225202 FRv01.indd 24 6/27/14 7:42 PM6/27/14 7:42 PM
Page 25

Dépannage
RÉINITIALISATION :
Une réinitialisation de l’appareil peut être nécessaire si ce dernier ne chauffe pas ou ne se met pas sous tension.
1. S’assurer que le friteuse et l’huile sont froides.
2. Régler le selecteur de température à MIN.
3. Débrancher le cordon magnétique de la prise murale.
4. Retirer l’ensemble d’élément de chauffage et commandes amovible.
5. Appuyer sur le bouton RESET (réinitialisation) avec un objet pointu comme un cure-dent ou un petit tournevis.
PROBLÈME
Les aliments frits n’ont
pas une couleur brun
doré et/ou ne sont pas
croustillants.
La friteuse dégage une
odeur forte, déplaisante.
840225202 FRv01.indd 25840225202 FRv01.indd 25 6/27/14 7:42 PM6/27/14 7:42 PM
CAUSE PROBABLE
• La température choisie est trop basse ou les aliments n’ont pas frit suffisamment longtemps. Vérifier
le paquet ou le tableau de friture pour trouver la bonne température ou le bon temps de friture.
• Il y a trop de nourriture dans le panier. Ne faites jamais frire trop d’aliments en même temps. Voir le
paquet d’aliment, le tableau de friture ou la recette pour trouver la bonne durée. Les aliments sont
peut-être trop épais pour bien frire.
• Le volume de l’huile est trop bas.
• L’huile n’est pas fraîche. Changer l’huile. Changer le filtre à huile régulièrement pour qu’il reste jeune.
• Quand vous faites frire des aliments qui ont une teneur de haute humidité (comme le poulet ou les
frites), changer d’huile fréquemment.
• Le genre d’huile ne convient pas à la friture en profondeur d’aliments à frire entièrement. Utiliser de
l’huile de friture de bonne qualité. Ne mélanger pas deux différentes catégories d’huile.
25
Page 26

Dépannage (suite)
PROBLÈME
L’appareil ne
chauffe pas.
Pendant la friture, l’huile
déborde au-dessus de la
friteuse.
Il se forme de la
condensation sur
la fenêtre.
CAUSE PROBABLE
• Assurez-vous que l’ensemble de cordon magnétique est bien attaché à la prise de la friteuse.
• Assurez-vous que l’ensemble de cordon électrique soit branché dans une prise électrique.
• L’ensemble d’éléments de chauffage n’est pas bien monté. Assurez-vous que l’ensemble d’éléments
de chauffage est bien installé sur la base. Voir la section « Montage de la friteuse ».
• Appuyer sur le bouton de remise à zéro du panneau de contrôle de l’élément de chauffage en
insérant un petit article pointu (comme un cure-dent) dans l’ouverture marquée RESET (remise à
zéro). Assurez-vous que la friteuse a le montant recommandé d’huile dans le pot à huile.
• Il y a trop d’huile dans la friteuse. Assurez-vous que l’huile ne dépasse pas la marque de niveau
maximum.
• Le panier/la nourriture a été immergé trop rapidement. Soulever doucement le panier en l’air.
• Les aliments contiennent trop de liquide. Faites sécher complètement les aliments afant de les mettre
dans la friteuse. Suiver les instructions de la section « Friture ».
• Quand vous faites frire des aliments à haut degré d’humidité (comme le poulet ou les frites) changer
souvent l’huile.
• Il y a trop d’aliments dans le panier à friture. Ne faites pas frire en même temps plus d’aliments que
les quantités indiquées sur l’emballage des aliments ou sur le tableau de friture.
• De la vapeur d’eau des aliments s’amasse sur la fenêtre. Quand votre appareil est froid, frotter un
petit montant d’huile à l’intérieur de la fenêtre pour empêcher la condensation.
26
840225202 FRv01.indd 26840225202 FRv01.indd 26 6/27/14 7:42 PM6/27/14 7:42 PM
Page 27

Dépannage (suite)
PROBLÈME
Une pellicule d’huile
s’amasse sur le pot à
huile.
L’huile mousse trop
pendant la friture.
CAUSE PROBABLE
• Utiliser un tampon de récurage en matière plastique pour nettoyer.
• Pour nettoyer les résidus d’huile du pot à huile, utiliser un produit dégraissant ménager.
•
Les aliments contiennent trop de liquide. Faites sécher complètement les aliments afant de les mettre
dans la friteuse.
•
Quand vous faites frire des aliments à haut degré d’humidité (comme le poulet ou les frites) changer
souvent l’huile.
•
La catégorie d’huile ne convient pas à la friture. Utiliser de l’huile de friture de bonne qualité. Ne
mélanger jamais deux qualités d’huile ou de gras.
•
Le panier/la nourriture a été immergé trop rapidement. Soulever doucement le panier en l’air.
•
L’utilisation d’huile réfrigérée peut occasionner trop de projections. Utiliser de l’huile à température
ambiante
•
Le pot d’huile n’a pas été bien nettoyé. Voir les instructions dans la section « Nettoyage de votre
friteuse ».
.
27
840225202 FRv01.indd 27840225202 FRv01.indd 27 6/27/14 7:42 PM6/27/14 7:42 PM
Page 28

Garantie limitée
Cette garantie s’applique aux produits achetés et utilisées aux É.-U. et au Canada. C’est la seule garantie expresse pour ce
produit et est en lieu et place de tout autre garantie ou condition.
Ce produit est garanti contre tout défaut de matériaux et de main-d’oeuvre pour une période de un (1) an à compter de la
date d’achat d’origine. Au cours de cette période, votre seul recours est la réparation ou le remplacement de ce produit ou
tout composant s’avérant défectueux, à notre gré, mais vous êtes responsable de tous les coûts liés à l’expédition du produit
et le retour d’un produit ou d’un composant dans le cadre de cette garantie. Si le produit ou un composant n’est plus offert,
nous le remplacerons par un produit similaire de valeur égale ou supérieure.
Cette garantie ne couvre pas le verre, les filtres, l’usure d’un usage normal, l’utilisation non conforme aux directives imprimées,
ou des dommages au produit résultant d’un accident, modification, utilisation abusive ou incorrecte. Cette garantie s’applique
seulement à l’acheteur original ou à la personne l’ayant reçu en cadeau. La présentation du reçu de vente d’origine comme
preuve d’achat est nécessaire pour faire une réclamation au titre de cette garantie. Cette garantie s’annule si le produit est
utilisé autrement que par une famille ou si l’appareil est soumis à toute tension ou forme d’onde différente des caractéristiques
nominales précisées sur l’étiquette (par ex. : 120 V ~ 60 Hz).
Nous excluons toutes les réclamations au titre de cette garantie pour les dommages spéciaux, consécutifs et indirects causés
par la violation de garantie expresse ou implicite. Toute responsabilité est limitée au prix d’achat. Chaque garantie implicite,
y compris toute garantie ou condition de qualité marchande ou d’adéquation à un usage particulier, est exonérée, sauf
dans la mesure interdite par la loi, auquel cas la garantie ou condition est limitée à la durée de cette garantie écrite. Cette
garantie vous donne des droits légaux précis. Vous pouvez avoir d’autres droits qui varient selon l’endroit où vous habitez.
Certaines provinces ne permettent pas les limitations sur les garanties implicites ou les dommages spéciaux ou indirects de
telle sorte que les limitations ci-dessus ne s’appliquent peut-être pas à votre cas.
Ne pas retourner cet appareil au magasin lors d’une réclamation au titre de cette garantie. Téléphoner au 1.800.851.8900 aux
É.-U. ou au 1.800.267.2826 au Canada ou visiter le site internet www.hamiltonbeach.com aux É.-U. ou www.hamiltonbeach.ca
au Canada. Pour un service plus rapide, trouvez le numéro de modèle, le type d’appareil et les numéros de série sur votre
appareil.
28
840225202 FRv01.indd 28840225202 FRv01.indd 28 6/27/14 7:42 PM6/27/14 7:42 PM
Page 29

SALVAGUARDIAS IMPORTANTES
Cuando utilice artefactos eléctricos, siempre deben seguirse precauciones de seguridad básicas a fin de reducir el riesgo de incendio,
descarga eléctrica, y/o lesiones a personas, incluyendo las siguientes:
1. Lea todas las instrucciones.
2. Este aparato no se destina para utilizarse por personas
(incluyendo niños) cuyas capacidades físicas, sensoriales o
mentales sean diferentes o estén reducidas, o carezcan de
experiencia o conocimiento, a menos que dichas personas
reciban una supervisión o capacitación para el funcionamiento
del aparato por una persona responsable de su seguridad.
3. Se requiere de una estrecha supervisión cuando el aparato se
use cerca de niños. Los niños deben supervisarse para asegurar
que ellos no empleen los aparatos como juguete.
4. Verifique que el voltaje de su instalación corresponda con
el del producto.
5. No toque superficies calientes. Use manijas o perillas.
6. Para protegerse contra riesgo de choque eléctrico, no sumerja
el cable, los enchufes o el montage de elemento calentador en
agua ni en ningún otro líquido.
7. Asegúrese de que las manijas estén bien colocadas en la canasta
y trabadas en su lugar. Ver las instrucciones de montaje
detalladas.
8. Desenchúfelo del tomacorriente de pared cuando no lo esté
usando y antes de la limpieza. Deje que se enfríe antes de colocar
o quitar piezas y de limpiar el aparato.
9. No opere ningún aparato eléctrico si el cable o el enchufe están
averiados, después de un mal funcionamiento del aparato, o si
éste se ha averiado de alguna forma. Llame a nuestro número
gratuito de servicio al cliente para obtener información sobre
examinación, reparación o ajuste.
10. El uso de accesorios no recomendados o vendidos por el
fabricante del artefacto para que sean usados con este modelo
puede causar heridas.
11. No lo use al aire libre.
12. No deje colgar el cable sobre el borde de la mesa o mostrador,
ni que toque superficies calientes.
13. No coloque el aparato sobre o cerca de un quemador a gas
o eléctrico caliente, ni dentro de un horno caliente.
14. Nunca mueva la friedora que contenga aceite caliente.
15. Siempre conecte el enchufe al aparato primero y después
conecte el cable en el tomacorriente de la pared. Para
desenchufar, gire cualquier control a MIN y desconecte el
enchufe del tomacorriente de pared.
16. No use el aparato eléctrico para ningún otro fin que no sea el
indicado.
17. Para reducir el riesgo de lesiones, NO llene de aceite más allá
de la marca de llenado máximo.
18. Siempre asegúrese de que el depósito de aceite removible se
encuentre llena hasta por lo menos la marca MIN.
19. Nunca deje el aparato desatendido mientras lo esté usando.
20. Siempre seque los alimentos y retire el hielo antes de freírlos.
21. Siempre seque los componentes de la freidora cuidadosamente
después de lavarlos y antes de freír.
22. Siempre fría los alimentos con la tapa en su lugar.
23. No utilice aceite refrigerado.
24. Nunca bloquee la ventilación de la tapa. Esté atento al vapor
que surge de la ventilación.
25. El vapor que escapa puede provocar quemaduras a manos
y dedos. Abra la tapa con cuidado.
26. Siempre eleve la canasta y permita que los alimentos se
escurran.
¡GUARDE ESTAS INSTRUCCIONES!
29
840225202 SPv01.indd 29840225202 SPv01.indd 29 6/27/14 7:53 PM6/27/14 7:53 PM
Page 30

Otra Información para la Seguridad del Consumidor
Este aparato ha sido diseñado solamente para uso doméstico.
Este producto fue diseñado exclusivamente para la preparación,
cocción y servicio de alimentos. Este producto no fue diseñado
para ser utilizado con materiales o productos no alimenticios.
¡ADVERTENCIA! Peligro de Descarga Eléctrica: Este aparato
cuenta con un enchufe polarizado (una pata más ancha) que
reduce el riesgo de una descarga eléctrica. El enchufe embona
únicamente en una dirección dentro de un tomacorriente
polarizado. No trate de obviar el propósito de seguridad del
enchufe modificándolo de alguna manera o utilizando un
adaptador. Si el enchufe no entra completamente en la toma,
invierta el enchufe. Si aún no entra, haga que un electricista
reemplace la toma.
¡ADVERTENCIA! Peligro de Quemaduras.
• Pueden provocarse quemaduras graves si se tira una freidora
desde una mesada. No permita que el cable cuelgue por sobre la
mesada; los niños podrían tirar de él o podrían engancharse con
el mismo durante el uso. No lo utilice con un cable de extensión.
• El líquido caliente se salpicará si no cuenta con el soporte para
escurrido y accidentalmente deja caer la canasta para freír en el
líquido caliente. No se incline sobre la freidora cuando la tapa no
se encuentre colocada.
30
840225202 SPv01.indd 30840225202 SPv01.indd 30 6/27/14 7:53 PM6/27/14 7:53 PM
Page 31

Piezas y Características
Ventilación de Vapor
Tapa Removible
Canasta para Freír
Montaje de
Elemento
Calentador
Olla de Aceite
Removible
Base
Cubierta de Ventilación Removible
Ventana de Observación
Mango de
la Canasta
Soporte para
Escurrido de
la Canasta
Botón de Reinicio
Montaje de Cable Magnético
Botón TIMER
(temporizador)
Luz de
POWER
(encendido)
Luz de READY (listo)
Termostato
Ajustable
MIN
31
840225202 SPv01.indd 31840225202 SPv01.indd 31 6/27/14 7:53 PM6/27/14 7:53 PM
Page 32

Cómo Ensamblar la Freidora
1
Deposite la base en una superficie
plana y estable. Coloque la olla de
aceite dentro de la base.
5 6
32
840225202 SPv01.indd 32840225202 SPv01.indd 32 6/27/14 7:53 PM6/27/14 7:53 PM
2
Alinee las ranuras del montaje
del elemento calentador con
las ranuras de la base. Presione
hacia abajo el montaje del
elemento calentador para
conectarlo con la base.
NOTA: El calentador no
puede encenderse a menos
que se encuentre instalado
correctamente sobre la base.
Para guardar, presione los
dientes hacia adentro y luego
gire el mango hacia la parte
interna de la canasta.
3
Para ensamblar el mango,
presione hacia adentro los
dientes del mismo. Alinee los
dientes con los orificios redondos
ubicados en el soporte de metal
de la canasta.
4
Libere los dientes para que
se expandan y se ubiquen
correctamente en el soporte
de metal.
Alinee la ventilación de la tapa
hacia el montaje del elemento
calentador. La tapa se ajusta a
presión.
Page 33

Cómo Funciona el Temporizador
El temporizador de la freidora realiza un conteo regresivo. Puede programarse para cualquier período entre 1 y 99 minutos.
“BIP”
1
Para configurar el temporizador,
presione una vez el botón
TIMER (temporizador) para
visualizar “00” en la pantalla. Siga
presionando el botón a 1 minuto
por presión. Para avanzar el
tiempo con más rapidez, presione
el botón TIMER (temporizador) y
sosténgalo.
840225202 SPv01.indd 33840225202 SPv01.indd 33 6/27/14 7:53 PM6/27/14 7:53 PM
2
El temporizador comenzará a
contar en forma regresiva el
tiempo seleccionado después de
que haya dejado de presionar
el botón TIMER (temporizador).
Durante el período de conteo
regresivo la pantalla destellará.
3 4
El temporizador puede
reconfigurarse a “00” mientras
realiza el conteo regresivo.
Cuando la pantalla destelle,
sostenga el botón TIMER
(temporizador) hasta que la
pantalla indique “00”.
NOTA: El temporizador se
apagará después de 45 segundos
de inactividad.
El temporizador emitirá un
sonido cuando llegue a cero y
volverá a emitirlo después de apr
oximadamente 30 segundos.
El temporizador se apagará en
forma automática.
NOTA: El temporizador NO
APAGA la freidora.
33
Page 34

w ADVERTENCIA
Peligro de Quemaduras.
Cómo
Freír
ANTES DEL PRIMER USO: Lave la freidora con detenimiento. Ver “Limpieza de su Freidora”.
NOTA: Nunca utilice la unidad sin aceite en el depósito o la unidad superará el límite de temperatura y hará falta reiniciar la unidad.
Ver la sección “Cómo Reiniciar” para más detalles.
• Nunca llene con aceite más allá de la marca máxima
de llenado “MAX”.
• Nunca mueva la freidora mientras está en uso o
cuando ésta contenga aceite caliente.
• Nunca deje la freidora sin supervisión mientras se
encuentre en funcionamiento.
•
Quite la mayor cantidad posible de humedad de los
alimentos. No agregue agua o hielo al aceite.
• El vapor que sale puede provocar quemaduras en las
manos o en los dedos. Abra la tapa con cuidado.
• No seguir estas instrucciones puede ocasionar
quemaduras graves ya que el aceite caliente puede
salpicarse fuera de la freidora.
1 2 3 4
Coloque la freidora en una
superficie estable, nivelada
y resistente al calor que se
encuentre fuera del alcance de
los niños. Levante la tapa para
abrir.
34
Saque la canasta de la freidora. Llene la freidora con no menos de 10 y no más de 12 tazas de aceite
teniendo como referencia la marca indicadora ubicada en la olla de
aceite removible.
AVISO: Nunca haga funcionar la unidad sin aceite en la olla, de lo
contario la unidad excedería el límite de temperatura y necesitaría una
restauración. (Ver la sección “Cómo Reiniciar” en la página 39.)
Verifique que la freidora se encuentre en MIN.
cable magnético al receptáculo de la freidora. El cable magnético
solamente se fijará de una forma. Tenga cuidado de no interferir con
la conexión magnética cuando enchufe el cable en un tomacorriente.
NOTA: La baja fuerza magnética permite que el cable “se desprenda”,
lo que evita que la unidad sea tirada accidentalmente desde la mesada.
Fije el ensamblaje del
840225202 SPv01.indd 34840225202 SPv01.indd 34 6/27/14 7:53 PM6/27/14 7:53 PM
Page 35

Cómo Freír (cont.)
Cierre la tapa. Enchufe. Fije el
termostato en el ajuste deseado.
Precaliente la freidora hasta que
se encienda la Luz de READY
(listo) (10 a 15 minutos). Para
obtener mayor información sobre
selección de temperatura, revise
el paquete del alimento o la
Tabla de Freír. La Luz de READY
(listo) se encenderá cuando el
aceite alcance la temperatura
5
preseleccionada.
CONSEJOS PARA FREÍR: Es posible que la Luz de READY (listo) se apague
después de freír una tanda de alimentos. Cuando el aceite haya alcanzado la
temperatura seleccionada, volverá a encenderse la Luz de READY (listo). Ahora,
la unidad estará lista para freír la próxima tanda de alimentos.
Para freír los alimentos,
colóquelos en la canasta
Para freír comida sin masa,
coloque los alimentos en la
canasta y continúe con el paso 7.
Para freír alimentos con masa,
(como el tempura), para bajar la
canasta en el aceite, luego deje
caer con cuidado los alimentos
en el aceite.
6
NOTA: No exceda la cantidad
máxima de alimentos a freír en
una tanda. Vea la Tabla de Freír.
.
7 8
Coloque con cuidado la canasta
dentro de la freidora. Cierre la tapa.
¡ADVERTENCIA! Nunca haga
funcionar la unidad sin aceite
en la olla, de lo contario la
unidad excedería el límite de
temperatura y necesitaría una
restauración.
840225202 SPv01.indd 35840225202 SPv01.indd 35 6/27/14 7:53 PM6/27/14 7:53 PM
Cuando haya terminado de freír,
retire la tapa, levante la canasta y
engánchela sobre la olla de aceite
removible para el escurrido.
NOTA: Cuando retire la tapa y
mientras esté apagada, no
permita que la condensación
ingrese a la olla de aceite.
9
Retire los alimentos de la canasta
con cuidado y colóquelos en un
recipiente o colador forrados con
papel absorbente. Llene y repita
la operación cuantas veces sea
necesario. Fije el termostato en
MIN y desenchufe el aparato
después del uso.
35
Page 36

Tabla de Freír
ALIMENTOS
Papas Fritas Congeladas
Papas Fritas Recién Cortadas
Aros de Cebolla Congelados
Palitos de Pescado
Congelados
Langostinos en Mariposa
Gigante Congelados
Frituras de Pollo Congeladas
Alitas de Pollo Enteros
Frescas
*3/4 canasta llena
NOTAS:
• El tiempo y la temperatura de cocción pueden variar dependiendo
del tamaño y peso de la tanda.
• Para obtener los mejores resultados, cocine cada tanda con una
capa única de alimentos.
• Al pollo crudo y congelado se lo debe descongelar, quitarle el
exceso de agua y secarlo con toallas de papel antes de cocinarlo.
• Para obtener mayor información y los mejores resultados remítase
a los “Consejos para la Freidora”.
36
CANTIDAD
8 tazas*
8 tazas*
8 tazas*
8 tazas*
8 tazas*
8 tazas*
6
TEMP. PARA FREÍR
375°F (190°C)
375°F (190°C)
375°F (190°C)
350°F (180°C)
350°F (180°C)
375°F (190°C)
375°F (190°C)
TIEMPO DE COCCIÓN
12 a 14 minutos
15 a 18 minutos
3 a 5 minutos
3 a 5 minutos
2 a 4 minutos
5 a 7 minutos
13 a 15 minutos
• Siempre siga las instrucciones del envase.
• Al cocinar carne vacuna, de ave o pescado, utilice el termómetro
de cocina para determinar las temperaturas internas.
• Para obtener mayor información sobre las temperaturas seguras
de cocción internas, visite www.foodsafety.gov.
SI USTED VIVE EN UNA ÁREA DE ALTITUD ELEVADA:
El servicio de extensión tendrá información detallada sobre cocción
en su área. Para ubicar el servicio de extensión cooperativa en su
condado, tenga a bien visitar la siguiente página:
http://www.csrees.usda.gov/Extension/.
COCCIÓN/TEMP. INTERNA
Tiernos pero firmes
Tiernos pero firmes
Tiernos pero firmes
145°F (63°C)
145°F (63°C)
165°F (73°C)
165°F (73°C)
840225202 SPv01.indd 36840225202 SPv01.indd 36 6/27/14 7:53 PM6/27/14 7:53 PM
Page 37
Limpieza de su Freidora
1
Desenchufe del tomacorriente.
Espere hasta que el aceite se
haya enfriado. Esto puede llevar
varias horas.
2 3
Retire la tapa y retire la canasta
de la freidora.
Tapa
Levante el montaje del elemento
calentador de la base y deje
que el aceite escurra dentro del
depósito de aceite.
w ADVERTENCIA
Peligro de Quemaduras.
Para evitar erupciones y/o salpicaduras de aceite caliente,
seque completamente todos los componentes de la
freidora antes de utilizarla.
No introduzca el montaje del
elemento calentador en agua.
NOTA: Para evitar dañar la
freidora, sea cuidadoso al
limpiar el montaje del elemento
calentador. Límpielo suavemente
con un paño mojado con agua
jabonosa caliente.
Base
4 5
Levante la olla de aceite de la
base y deseche el aceite. Limpie
todo el exceso o película de
aceite de la olla.
840225202 SPv01.indd 37840225202 SPv01.indd 37 6/27/14 7:53 PM6/27/14 7:53 PM
Limpie la base, la tapa, y la cubierta de la ventilación con agua
jabonosa caliente. Seque cuidadosamente. Coloque la tapa de
manera vertical para que se escurra y permita que se seque por
completo.
Cubierta de Ventilación
RESISTENTE AL
LAVAVAJILLAS
No utilice la configuración “SANI”
cuando la lave en el lavavajillas.
Las temperaturas del ciclo “SANI”
pueden dañar su producto.
37
Page 38

Consejos para la Freidora
CÓMO SELECCIONAR Y CAMBIAR EL ACEITE PARA FREÍR:
• Utilice una buena cantidad de aceite vegetal o de maní.
• NO se recomienda freír los alimentos en manteca, margarina,
aceite de oliva ni grasa animal por la baja temperatura del punto
de humo.
• NO mezcle dos tipos de aceite.
• Cambie el aceite con frecuencia para mantener la calidad óptima
en la fritura y el sabor.
• El aceite utilizado para las papas fritas se puede utilizar hasta 10 o
12 veces más antes de cambiarlo, siempre que se filtre el aceite
después de cada uso. El aceite utilizado para alimentos altos en
proteínas (tales como la carne o el pescado) debe cambiarse más
frecuentemente.
• Para filtrar el aceite, deje que el aceite se enfríe completamente.
Para colar el aceite se pueden utilizar toallas de papel o gasas
como filtros.
• Siempre siga las instrucciones del envase.
• NO le agregue aceite nuevo al aceite usado.
• Cambie siempre el aceite cuando comience a espumar al calentarlo,
cuando tuviese un sabor u olor fuerte o cuando se torne oscuro y/o
espeso.
ANTES DE FREÍR:
• Quite el exceso de agua de los alimentos frescos absorbiéndolos
con toallas de papel. El exceso de agua o partículas de hielo
pueden ocasionar salpicaduras o espuma en el aceite caliente.
CONSEJOS GENERALES:
• NO utilice utensilios de plástico en el aceite caliente.
• Sazone los alimentos DESPUÉS de freírlos.
• Si los alimentos no estuvieran crocantes como se desea, reduzca
el tamaño de la tanda.
CÓMO DESECHAR EL ACEITE:
• Vierta el aceite frío dentro de su botella original (que vuelva a
cerrar) de plástico vacía.
USO DE LA CANASTA PARA ALIMENTOS CON MASA FRESCA:
• Los alimentos con masa fresca se deben ubicar cuidadosamente
y de manera directa dentro del aceite. Primero, baje la canasta
completamente y luego coloque cuidadosamente cada porción de
alimento con masa dentro del aceite caliente. Utilice la canasta para
sacar los alimentos con masa fritos.
ALMACENAMIENTO:
• La manija de la canasta se puede desconectar y rotar hacia adentro
de la canasta. Coloque el depósito del aceite en la base y luego la
canasta y el cable eléctrico en el depósito del aceite.
• Es mejor guardar todos los aceites en el refrigerador o en un lugar
frío, oscuro y seco por un período de hasta seis meses.
¡Visite www.hamiltonbeach.com.mx para obtener
nuestra línea completa de productos y las Guías
de Uso y Cuidado, además de deliciosas
recetas, consejos y para registrar su
producto en línea!
38
840225202 SPv01.indd 38840225202 SPv01.indd 38 6/27/14 7:53 PM6/27/14 7:53 PM
Page 39

Resolviendo Problemas
CÓMO REINICIAR:
Si su unidad no calienta o no se enciende, quizás deba reiniciarla.
1. Verifique que la freidora y el aceite se encuentren fríos.
2. Gire el control de la temperatura a MIN.
3. Desenchufe el cable magnético del tomacorriente de pared.
4. Quite el panel de control removible y el elemento calentador.
5. Utilice un objeto fino acabado en punta, como una brocheta de madera o un destornillador fino,
para presionar el botón RESET (reiniciar).
PROBLEMA
Los alimentos fritos no
tienen un color dorado y/o
no están crocantes.
La freidora emite un olor
fuerte y desagradable.
840225202 SPv01.indd 39840225202 SPv01.indd 39 6/27/14 7:53 PM6/27/14 7:53 PM
CAUSA PROBABLE
• La temperatura seleccionada es muy baja o los alimentos no se han frito el tiempo suficiente. Consulte
las instrucciones del paquete de alimentos o la Tabla de Freír para la temperatura o tiempos de
preparación correctos.
• Hay demasiados alimentos en la canasta. Nunca fría demasiada comida de una sola vez. Consulte las
instrucciones del paquete de los alimentos, la Tabla de Freír o la receta para obtener las cantidades
correctas. Las piezas de comida pueden ser demasiado gruesas para freírse de manera adecuada.
• El volumen del aceite es muy bajo.
• El aceite no está fresco. Cámbielo. Filtre el aceite de manera regular para mantenerlo fresco durante
más tiempo.
• Cuando fría alimentos con un contenido de humedad muy alto (como pollo o papas) cambie el aceite
con frecuencia.
• El tipo de aceite no es el adecuado para freír alimentos. Utilice aceite para freír de buena calidad. No
mezcle dos tipos diferentes de aceite.
39
Page 40

Resolviendo Problemas (cont.)
PROBLEMA
La unidad no calienta.
Durante el funcionamiento,
el aceite se derrama por
encima del borde de la
freidora.
Se forma condensación en
la ventana de observación.
CAUSA PROBABLE
• Asegúrese de que el cable magnético se encuentre fijado correctamente al toma de la freidora.
• Asegúrese de que el cable eléctrico se encuentre enchufado al tomacorriente.
• El montaje del elemento calentador no está ensamblado correctamente. Asegúrese de que esté bien
instalado sobre la base. Ver la sección “Cómo Ensamblar la Freidora”.
•
Presione Reset en el elemento calentador / panel de control introduciendo un elemento con punta
(como una brocheta de madera) en el orificio con el nombre de RESET. Verifique que la freidora
contiene la cantidad recomendada de aceite dentro de la olla.
• Hay demasiado aceite en la freidora. Asegúrese de que el aceite no supera el límite máximo.
• Se han colocado la canasta o los alimentos demasiado rápido. Eleve la canasta con cuidado.
• La comida contiene demasiado líquido. Seque los alimentos con detenimiento antes de colocarlos en
la freidora. Siga las instrucciones de la sección “Cómo Freír”.
• Cuando deba freír alimentos con una cantidad elevada de humedad (como pollo o papas) cambie el
aceite con frecuencia.
• Hay demasiada comida en la canasta. No fría más alimentos en una tanda que las cantidades indicadas
en el paquete o en la Tabla de Freír.
• Se concentra en la ventana vapor de agua proveniente de los alimentos. Cuando la unidad esté fría,
pase una pequeña cantidad de aceite sobre la parte interna de la ventana para prevenir la acumulación
de condensación.
40
840225202 SPv01.indd 40840225202 SPv01.indd 40 6/27/14 7:53 PM6/27/14 7:53 PM
Page 41

Resolviendo Problemas (cont.)
PROBLEMA
Acumulación de una
película de aceite en la
olla de aceite.
El aceite hace demasiada
espuma durante
la cocción.
CAUSA PROBABLE
• Utilice una esponjilla para limpiar.
• Para limpiar restos de aceite de una olla de aceite, use un desengrasante de uso doméstico.
•
Los alimentos contienen demasiado líquido. Séquelos con detenimiento antes de colocarlos en la
freidora.
•
Cuando deba freír alimentos con un alto contenido de humedad (como pollo o papas) cambie el aceite
con frecuencia.
•
El tipo de aceite no es el adecuado para freír alimentos. Utilice aceite para freír de buena calidad.
No mezcle dos tipos diferentes de aceite o grasa.
•
Colocó la canasta o los alimentos demasiado rápido. Eleve la canasta con cuidado.
•
El uso de aceite refrigerado puede provocar salpicaduras excesivas. Utilice aceite a temperatura
ambiente.
•
La olla de aceite no se ha limpiado correctamente. Ver instrucciones en la sección de “Limpieza de
su Freidora”.
41
840225202 SPv01.indd 41840225202 SPv01.indd 41 6/27/14 7:53 PM6/27/14 7:53 PM
Page 42
Grupo HB PS, S.A. de C.V.
Monte Elbruz 124-301
Colonia Palmitas, Delegación Miguel Hidalgo
C.P. 11560, México, Distrito Federal
01 800 71 16 100
PÓLIZA DE GARANTÍA
PRODUCTO: MARCA: MODELO:
Grupo HB PS, S.A. de C.V. cuenta con una Red de Centros de Servicio Autorizada, por favor consulte en la lista anexa el nombre y dirección de los establecimientos en la
República Mexicana en donde usted podrá hacer efectiva la garantía, obtener partes, componentes, consumibles y accesorios; así como también obtener servicio para
productos fuera de garantía. Para mayor información llame sin costo: Centro de Atención al consumidor: 01 800 71 16 100
Grupo HB PS, S.A. de C.V. le otorga a partir de la fecha de compra:
• Esta garantía ampara, todas las piezas y componentes del producto que resulten con defecto de fabricación incluyendo la mano de obra.
• Grupo HB PS, S.A. de C.V. se obliga a reemplazar, reparar o reponer, cualquier pieza o componente defectuoso; proporcionar la mano de obra necesaria para su diagnóstico y reparación,
todo lo anterior sin costo adicional para el consumidor.
• Esta garantía incluye los gastos de transportación del producto que deriven de su cumplimiento dentro de su red de servicio.
• Esta garantía no ampara el reemplazo de piezas deterioradas por uso o por desgaste normal, como son: cuchillas, vasos, jarras, filtros, etc.
• Grupo HB PS, S.A. de C.V. no se hace responsable por los accidentes producidos a consecuencia de una instalación eléctrica defectuosa, ausencia de toma de tierra, clavija de enchufe
en mal estado, etc.
Esta garantía no será efectiva en los siguientes casos:
a) Cuando el producto se hubiese utlizado en condiciones distintas a las normales. (Uso industrial, semi-industrial o comercial.)
b) Cuando el producto no hubiese sido operado de acuerdo con el instructivo de uso.
c) Cuando el producto hubiese sido alterado o reparado por personas no autorizadas por Grupo HB PS, S.A. de C.V. el fabricante nacional, importador o comercializador responsable
respectivo.
El consumidor puede solicitar que se haga efectiva la garantía ante la propia casa comercial donde adquirió su producto, siempre y cuando Grupo HB PS, S.A. de C.V. no cuente con talleres de
servicio.
GARANTÍA DE 1 AÑO.
COBERTURA
LIMITACIONES
EXCEPCIONES
42
840225202 SPv01.indd 42840225202 SPv01.indd 42 6/27/14 7:53 PM6/27/14 7:53 PM
Page 43

PROCEDIMIENTO PARA HACER EFECTIVA LA GARANTÍA
• Para hacer efectiva la garantía no deben exigirse mayores requisitos que la presentación del producto y la póliza correspondiente, debidamente sellada por el establecimiento que lo vendió.
• Para hacer efectiva la garantía, lleve su aparato al Centro de Servicio Autorizado más cercano a su domicilio (consulte la lista anexa).
• Si no existe Centro de Servicio Autorizado en su localidad llame a nuestro Centro de Atención al Consumidor para recibir instrucciones de como hacer efectiva su garantía.
• El tiempo de reparación, en ningún caso será mayor de 30 días naturales contados a partir de la fecha de recepción del producto en nuestros Centros de Servicio Autorizados.
• En caso de que el producto haya sido reparado o sometido a mantenimiento y el mismo presente deficiencias imputables al autor de la reparación o del mantenimiento dentro de los treinta
días naturales posteriores a la entrega del producto al consumidor, éste tendrá derecho a que sea reparado o mantenido de nuevo sin costo alguno. Si el plazo de la garantía es superior a
los treinta días naturales, se estará a dicho plazo.
• El tiempo que duren las reparaciones efectuadas al amparo de la garantía no es computable dentro del plazo de la misma. Cuando el bien haya sido reparado se iniciará la garantía respecto
de las piezas repuestas y continuará con relación al resto. En el caso de reposición del bien deberá renovarse el plazo de la garantía.
SELLO DEL VENDEDOR QUEJAS Y SUGERENCIASFECHA DE ENTREGA
DÍA___ MES___ AÑO___
Si desea hacer comentarios o sugerencias con respecto a nuestro servicio o tiene alguna queja derivada de la atención recibida en
alguno de nuestros Centros de Servicio Autorizados, por favor dirigirse a:
GERENCIA INTERNACIONAL DE SERVICIO
Email: mexico.service@hamiltonbeach.com.mx
01 800 71 16 100
RED DE CENTROS DE SERVICIO AUTORIZADA GRUPO HB PS, S.A. DE C.V.
Distrito Federal
ELECTRODOMÉSTICOS
Av. Plutarco Elias Cailes No. 1499
Zacahuitzco MEXICO 09490 D.F.
Tel: 01 55 5235 2323 • Fax: 01 55 5243 1397
CASA GARCIA
Av. Patriotismo No. 875-B
Mixcoac MEXICO 03910 D.F.
Tel: 01 55 5563 8723 • Fax: 01 55 5615 1856
Nuevo Leon
FERNANDO SEPULVEDA REFACCIONES
Ruperto Martínez No. 238 Ote.
Centro MONTERREY, 64000 N.L.
Tel: 01 81 8343 6700 • Fax: 01 81 8344 0486
Jalisco
SERVICIOS DE MANTENIMIENTO CASTILLO
Garibaldi No. 1450
Ladrón de Guevara
GUADALAJARA 44660 Jal.
Tel: 01 33 3825 3480 • Fax: 01 33 3826 1914
Chihuahua
DISTRIBUIDORA TURMIX
Av. Paseo Triunfo de la Rep. No. 5289 Local 2 A.
Int. Hipermart
Alamos de San Lorenzo
CD. JUAREZ 32340 Chih.
Tel: 01 656 617 8030 • Fax: 01 656 617 8030
43
840225202 SPv01.indd 43840225202 SPv01.indd 43 6/27/14 7:53 PM6/27/14 7:53 PM
Page 44

Modelo:
35033
Tipo:
DF10
Características Eléctricas:
120 V~ 60 Hz 1500 W
Los modelos incluídos en el instructivo de Uso y Cuidado pueden ir seguidos o no por un sufijo correspondiente a una
o varias letras del alfabeto y sus combinaciones, separadas o no por un espacio, coma, diagonal, o guión. Como ejemplos
los sufijos pueden ser: “Y” y/o “MX” y/o “MXY” y/o “Z”.
840225202
840225202 SPv01.indd 44840225202 SPv01.indd 44 6/27/14 7:53 PM6/27/14 7:53 PM
6/14
 Loading...