

Hamilton Beach 35021 User Manual
READ BEFORE USE
LIRE AVANT UTILISATION
LEA ANTES DE USAR
Visit www.hamiltonbeach.com for our
complete line of products and Use and
Care Guides – as well as
delicious recipes, tips, and
to register your product online!
Rendez-vous sur www.hamiltonbeach.ca
pour notre liste complète de produits et de
nos manuels utilisateur – ainsi que nos
délicieuses recettes, nos conseils et pour
enregistrer votre produit en ligne !
¡Visite www.hamiltonbeach.com.mx para
obtener nuestra línea completa de productos
y las Guías de Uso y Cuidado, además de
deliciosas recetas, consejos y para registrar
su producto en línea!
Questions?
Please call us – our friendly
associates are ready to help.
USA: 1.800.851.8900
Questions ?
N’hésitez pas à nous appeler –
nos associés s’empresseront
de vous aider.
CAN : 1.800.267.2826
¿Preguntas?
Por favor llámenos – nuestros
amables representantes están
listos para ayudar.
MEX: 01 800 71 16 100
Le invitamos a leer cuidadosamente
este instructivo antes de usar su
aparato.
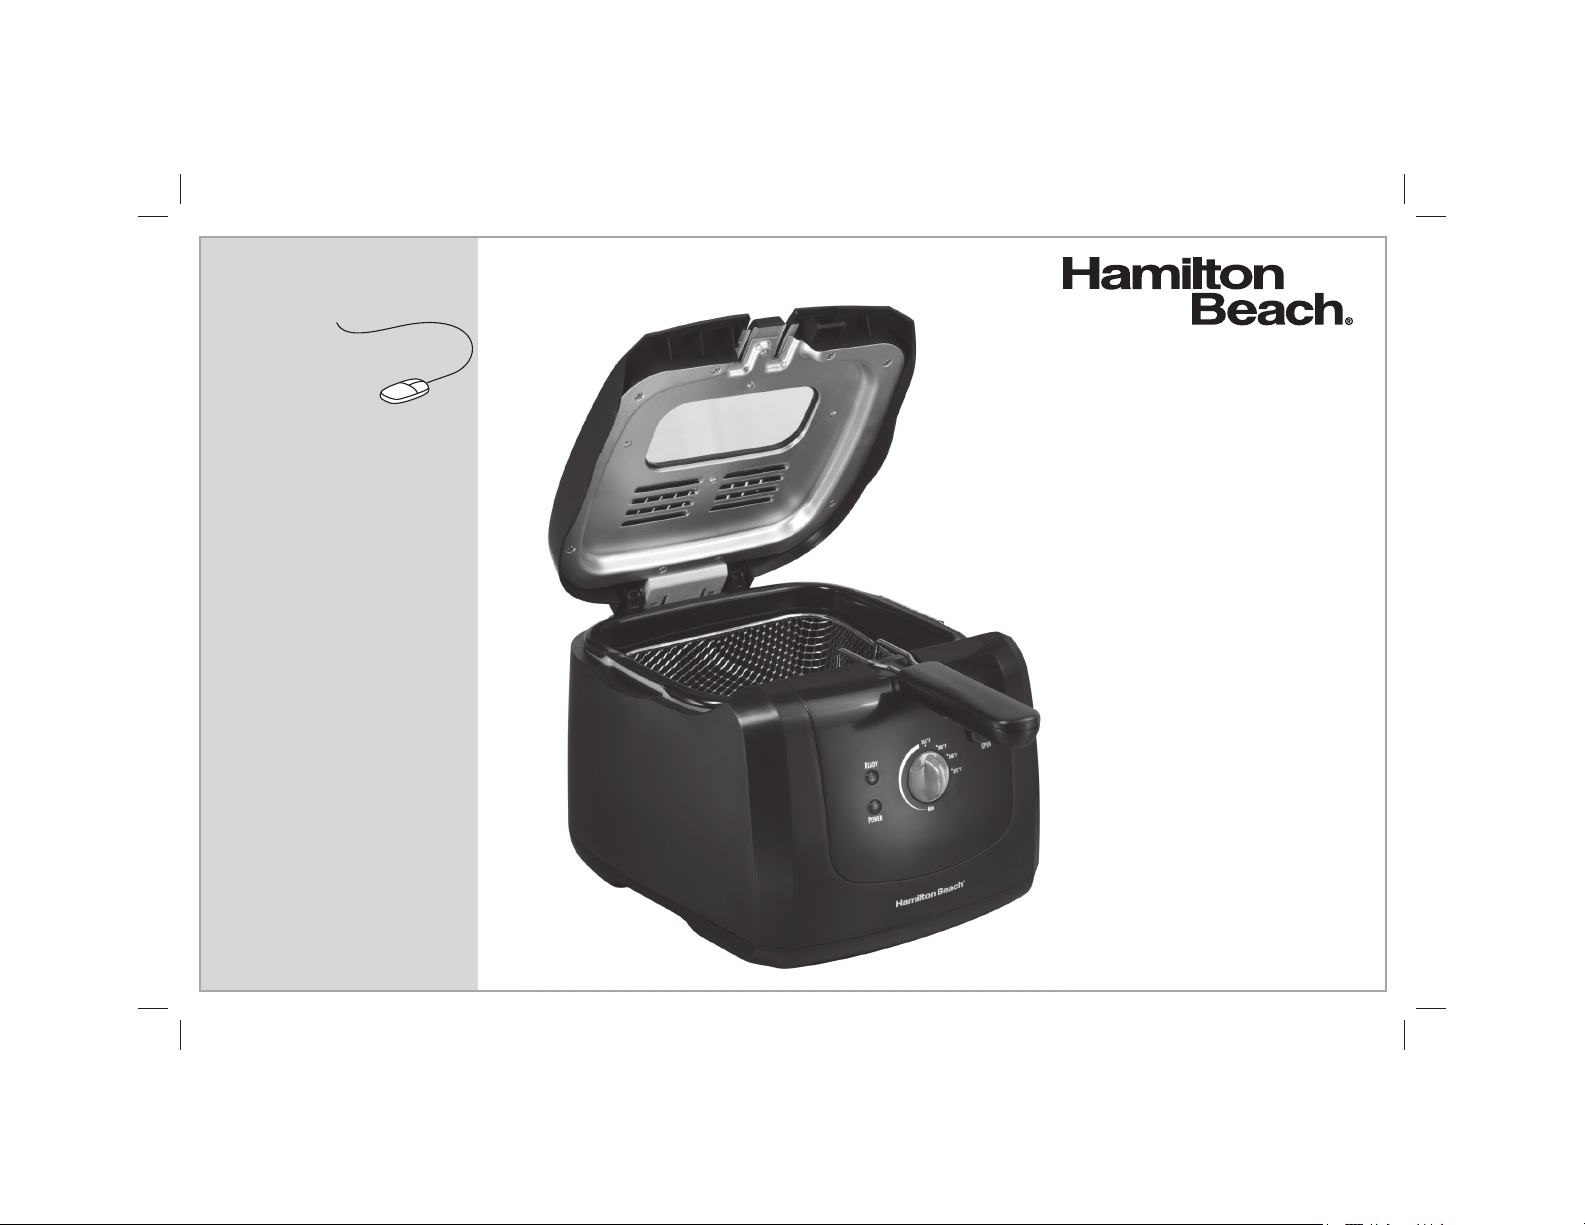
Deep Fryer
Friteuse
Freidora Eléctrica
English ...................... 2
Français .................. 15
Español ................... 27
840217100 ENv05.indd 1840217100 ENv05.indd 1 4/30/12 11:42 AM4/30/12 11:42 AM

IMPORTANT SAFEGUARDS
When using electrical appliances, basic safety precautions should always be followed to reduce the risk of fire, electric shock, and/or injury to
persons, including the following:
1. Read all instructions.
2. Do not touch hot surfaces. Use handles or knobs.
3. To protect against risk of electric shock, do not immerse cord,
plugs, base, or removable control panel with heating element
in water or other liquid.
4. Close supervision is necessary when any appliance is used by or
near children.
5. Be sure handle is properly assembled to basket and locked into
place. See detailed assembly instructions.
6. Unplug from wall outlet when not in use and before cleaning.
Allow to cool before putting on or taking off parts and before
cleaning the appliance.
7. Do not operate any appliance with a damaged cord or plug,
or after the appliance malfunctions or has been damaged in
any manner. Call our toll-free customer service number for
information on examination, repair, or adjustment.
8. The use of accessory attachments not recommended or sold by
the appliance manufacturer for use with this model may cause
injuries.
9. Do not use outdoors.
10. Do not let cord hang over edge of table or counter or touch hot
surfaces.
11. Do not place on or near a hot gas or electric burner, or in a
heated oven.
12. Never move deep fryer containing hot oil.
13. Always attach plug to appliance first; then plug cord in the wall
outlet. To disconnect, turn any control to MIN and remove plug
from wall outlet.
14. Do not use appliance for other than intended purpose.
15. To reduce the risk of injury, NEVER fill oil above MAX fill mark.
16. Always ensure removable tank is filled to at least MIN level when
using oil.
17. Never leave appliance unattended while in use.
18. Always dry foods and remove ice before frying.
19. Always dry deep fryer components thoroughly after cleaning and
before frying.
20. Always fry with lid in place.
21. Do not use refrigerated oil.
22. Never block vent on lid. Be aware of steam emitting from vent.
23. Escaping steam may cause burns to hands or fingers. Open the
lid carefully.
24. Always raise basket, rest on oil tank, and allow food to drain
before removing lid or food basket.
SAVE THESE INSTRUCTIONS!
2
840217100 ENv05.indd 2840217100 ENv05.indd 2 4/30/12 11:42 AM4/30/12 11:42 AM

Other Consumer Safety Information
This product is intended for household use only.
This product is only intended for the preparation, cooking, and
serving of foods. This product is not intended for use with any
nonfood materials or products.
WARNING! Shock Hazard: This appliance has a polarized plug (one
wide blade) that reduces the risk of electric shock. The plug fits only
one way into a polarized outlet. Do not defeat the safety purpose of
the plug by modifying the plug in any way or by using an adapter.
If the plug does not fit fully into the outlet, reverse the plug. If it still
does not fit, have an electrician replace the outlet.
WARNING! Burn Hazards.
• Serious hot-oil burns may result from a deep-fat fryer being pulled
off a countertop. Do not allow the cord to hang over the edge of the
counter where it may be grabbed by children or become entangled
with the user. Do not use with an extension cord.
• Hot liquid will splash if you miss the drain bracket and accidentally
drop the frying basket into the hot liquid. Do not lean over the
deep fryer when the lid is off.
3
840217100 ENv05.indd 3840217100 ENv05.indd 3 4/30/12 11:42 AM4/30/12 11:42 AM
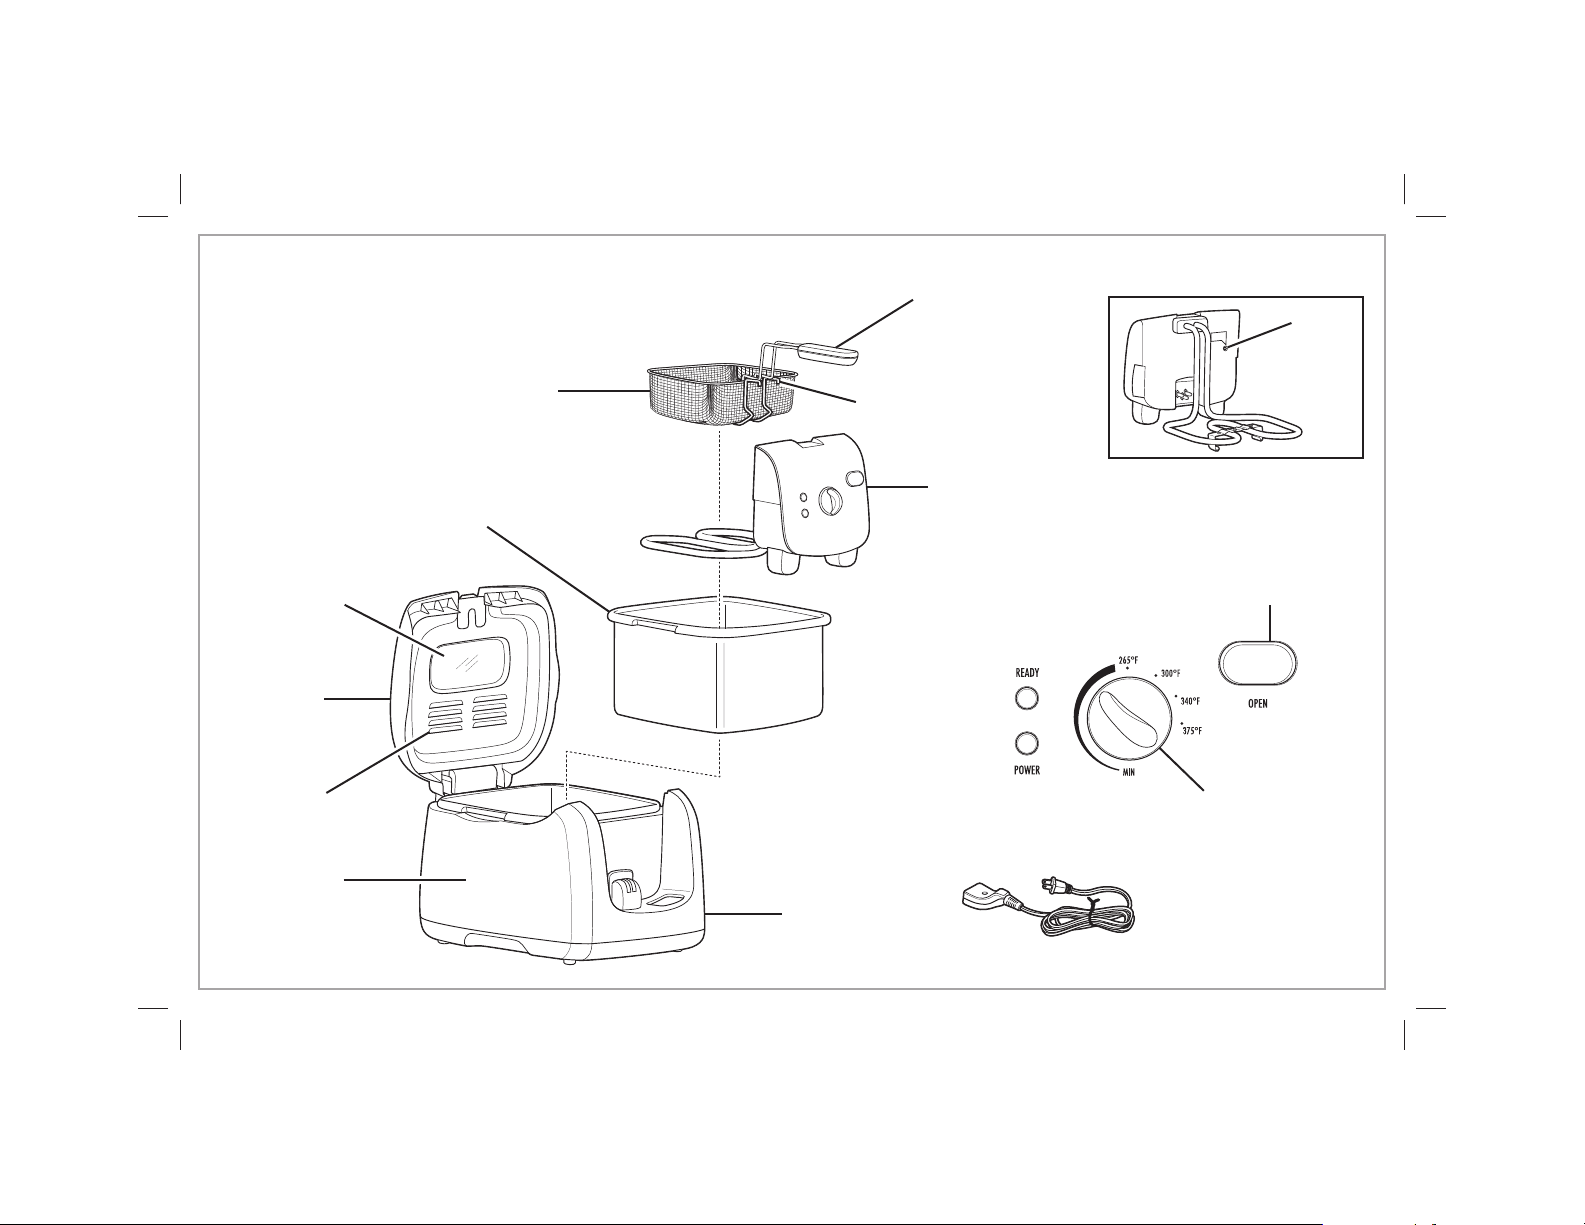
Parts and Features
Removable Basket
Handle
T
E
S
RE
RESET
Button
View Window
Removable
Lid
Steam Vent
Cool Touch
Sides
4
Frying Basket
Removable Oil Tank
Base
Basket
Drain Bracket
Removable Control
Panel With Heating
Element
READY Light
POWER Light
Magnetic Cord Assembly
OPEN Button
(to release lid)
Temperature
Control
840217100 ENv05.indd 4840217100 ENv05.indd 4 4/30/12 11:42 AM4/30/12 11:42 AM
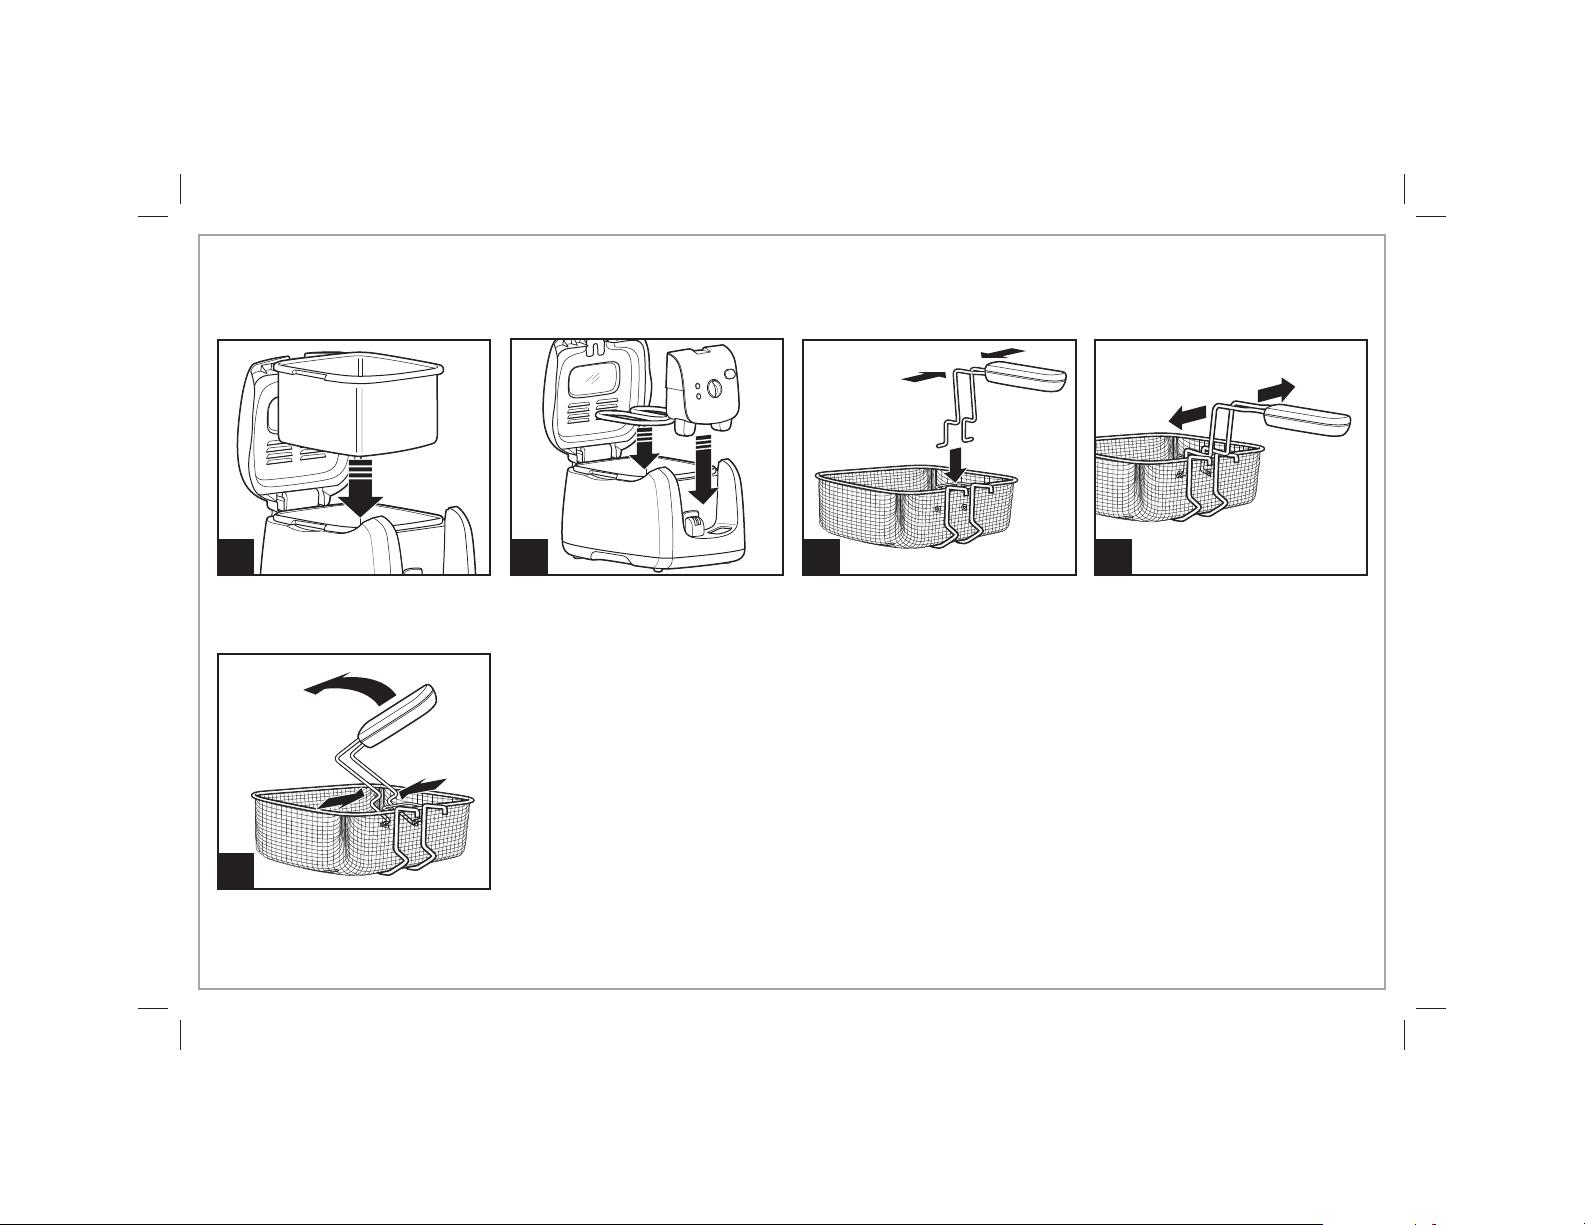
How to Assemble the Fryer
1
Place base on a stable, flat surface.
Insert oil tank into base.
2
Slide control panel with heating
element into base; making sure it
is in place. NOTE: Heater cannot
be turned on unless correctly
installed on base.
3
To assemble handle, squeeze tines
of handle together. Align tines with
round holes on metal bracket of
basket.
4
Release tines to allow them to
spread and then pull handle back
to lock into metal bracket.
5
For storage: Push handle into
basket and squeeze tines together
to remove handle.
5
840217100 ENv05.indd 5840217100 ENv05.indd 5 4/30/12 11:42 AM4/30/12 11:42 AM
BEFORE FIRST USE: Thoroughly clean and dry fryer. See “Cleaning Your Fryer” section.
Frying
w WARNING
Burn Hazard.
• Never fill oil above MAX fill mark.
• Never move fryer when it is in operation or when fryer contains
hot oil.
• Never leave fryer unattended while in use.
• Remove as much moisture from food as possible. Do not add
water or ice to oil.
NOTE: Never operate unit without oil in tank or unit will exceed temperature limit and will
require resetting. See “How to Reset” section for details.
• Escaping steam may cause burns to hands or fingers. Open lid
carefully.
• Failure to follow these instructions may result in serious burns since
hot oil may spill from fryer.
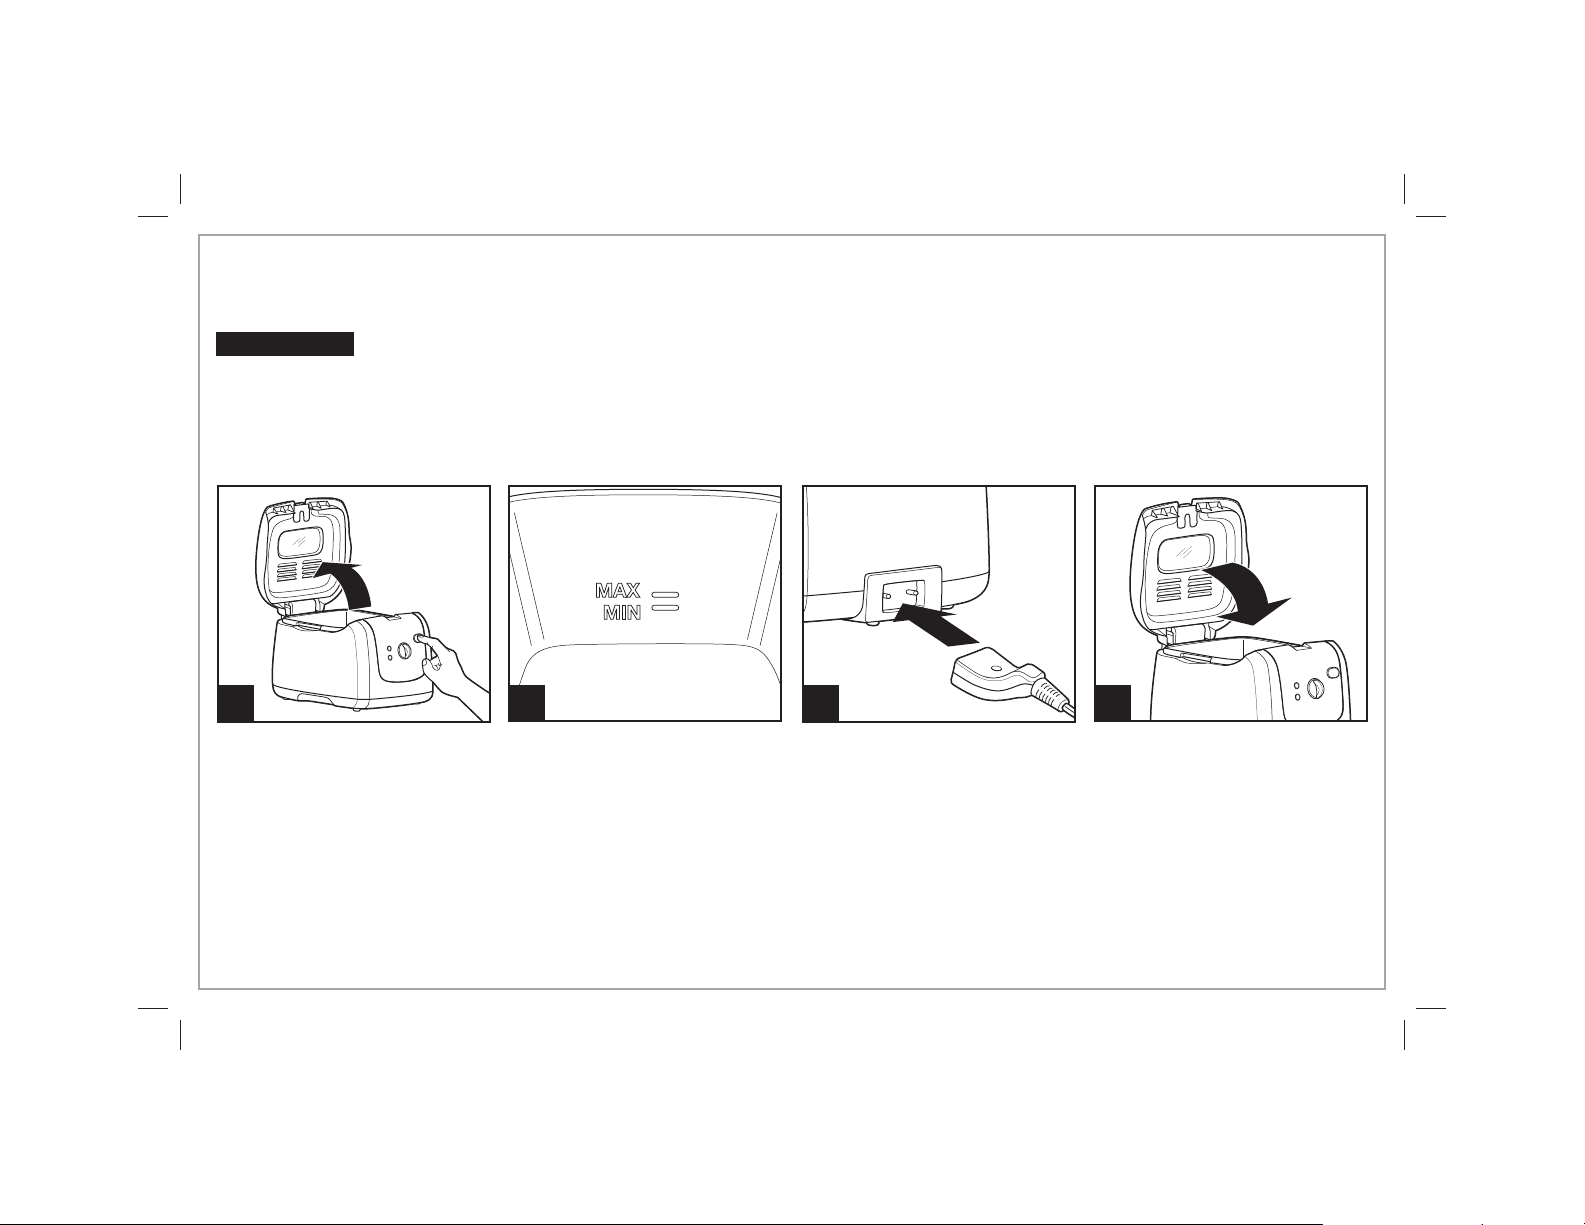
1 3
Place assembled fryer on a stable,
level, heat-resistant surface out of
reach of children.
Press OPEN button to open lid.
6
840217100 ENv05.indd 6840217100 ENv05.indd 6 4/30/12 11:42 AM4/30/12 11:42 AM
2
Fill fryer with at least 6 but no
more than 8 cups of oil to MAX
indicator mark on removable oil
tank.
NOTICE: Never operate unit
without oil in tank or unit will
exceed temperature limit and will
require resetting. (See “How to
Reset” on page 11.)
Make sure fryer is turned to MIN.
Attach magnetic end of cord
assembly to fryer socket.
Magnetic end of cord will only
go in one way. Be careful not to
disturb magnetic connection when
plugging cord into electrical outlet.
NOTE: Magnetic force is relatively
low to ensure that the cord will
break away in the event of being
inadvertently pulled, thereby
preventing deep fryer from being
pulled off a countertop.
4
Close lid. Set temperature control
to desired setting. Preheat fryer
until READY Light comes on
(6 to 10 minutes). For more
information on temperature
selection,
Frying Chart. READY Light will
come on when oil has reached
preset temperature.
check food package or

Frying (cont.)
FRYING TIP: READY Light may go out after frying a batch of food.
When oil has reached selected temperature, READY Light will come
back on. Unit is now ready to fry the next batch of food.
6 75
To fry food, place food in basket.
NOTE: Do not exceed maximum
amount of food to be fried in one
batch. See Frying Chart for more
information.
To drain food, leave lid closed,
pull up basket handle until it
hooks on edge of oil tank.
840217100 ENv05.indd 7840217100 ENv05.indd 7 4/30/12 11:42 AM4/30/12 11:42 AM
Press OPEN button to open lid. Carefully hang basket on oil tank.
109 11
Close lid.
To remove food, press OPEN
button to open lid. Line a bowl
or colander with paper towels.
Carefully, empty food from basket
onto paper towels. Fill basket and
repeat frying as desired.
8
Lower basket into tank. Set time
based on Frying Chart or package
directions.
Turn temperature control to MIN
and unplug appliance after use.
7

Frying Chart
FOOD (FULL BASKET)
Frozen French Fries
Fresh-Cut French Fries
Frozen Onion Rings
Frozen Fish Sticks
Frozen Butterflied Shrimp
Frozen Chicken Tenders
FOOD (SINGLE LAYER)
Frozen Chicken Wing Pieces
Fresh Chicken Wing Pieces
NOTES:
• Length of cooking time and temperature may vary based on
batch size and weight.
• For best results, fry a single layer of food for each batch.
• Frozen, uncooked chicken should be thawed, excess water
removed, and patted dry with paper towel prior to cooking.
• See “Frying Tips” for more information to obtain best results.
• Always follow package directions.
FRYING TEMPERATURE
375°F (190°C)
375°F (190°C)
375°F (190°C)
350°F (180°C)
350°F (180°C)
375°F (190°C)
FRYING TEMPERATURE
375°F (190°C)
375°F (190°C)
COOKING TIME
8 to 10 minutes
7 to 9 minutes
6 to 8 minutes
4 to 6 minutes
3 to 5 minutes
3 to 5 minutes
COOKING TIME
8 to 10 minutes
7 to 9 minutes
• When cooking meat, poultry, or fish, use cooking thermometer
to determine internal temperatures.
• Visit foodsafety.gov for more information on safe internal
cooking temperatures.
IF YOU LIVE IN A HIGH-ALTITUDE AREA:
The Extension service will have detailed information about cooking
for your area. To locate the Cooperative Extension service in your
county, please visit: http://www.csrees.usda.gov/Extension/.
INTERNAL TEMP/DONENESS
Brown and crisp
Brown and crisp
Brown and crisp
145°F (63°C)
145°F (63°C)
165°F (73°C)
INTERNAL TEMP/DONENESS
165°F (73°C)
165°F (73°C)
8
840217100 ENv05.indd 8840217100 ENv05.indd 8 4/30/12 11:42 AM4/30/12 11:42 AM
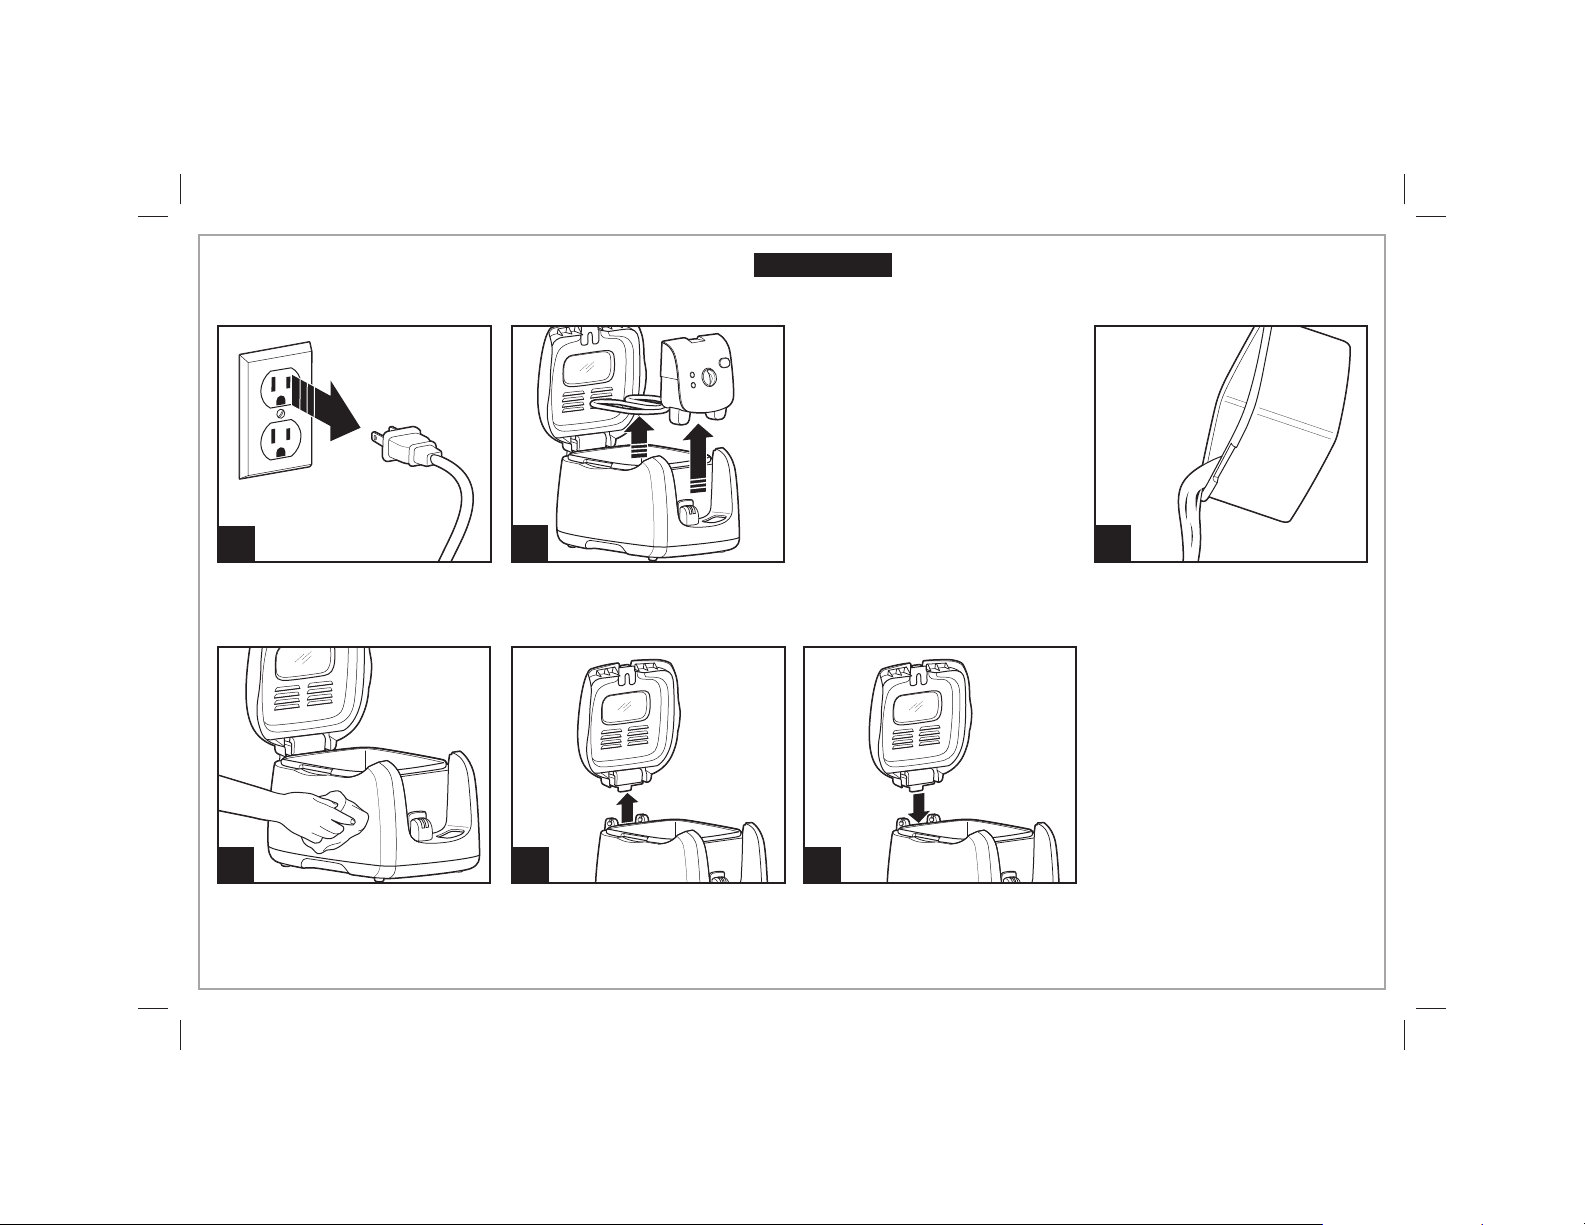
Cleaning Your Fryer
1
Make sure fryer is turned to MIN.
Unplug from wall outlet. Wait
until oil has cooled. This can take
several hours.
2 3
Lift control panel up and out of
base. Do not drip oil on base.
Burn Hazard.
w WARNING
Do not immerse heating element
assembly in water.
NOTE: To avoid damaging fryer,
use care when cleaning heating
element assembly. Gently wipe
with soft cloth dampened with
hot, soapy water.
To avoid eruptions and/or spatter of hot oil, dry all fryer
components thoroughly before using.
Lift oil tank from fryer and pour
out oil. Wipe all excess oil or oil
film from oil tank.
4 5 6
Clean outside of base with hot,
soapy water. Do not immerse
unit in water.
840217100 ENv05.indd 9840217100 ENv05.indd 9 4/30/12 11:42 AM4/30/12 11:42 AM
Press OPEN button to release
and open lid. Hold base with one
hand; use other hand to slightly
tilt lid towards the control panel
and pull lid up.
TO REINSERT LID: Place lid on the lid
hinge, making sure the silver spring
lines up with the opening on the back of
the base. Slightly tilt lid towards control
panel; gently press lid down into place.
9

Frying Tips
SELECTING AND CHANGING THE FRYING OIL:
• Use a good quality vegetable or peanut oil.
• Frying foods in butter, margarine, olive oil, or animal fat is
NOT recommended because of low temperature smoke point.
• DO NOT mix two types of oil.
• Change oil regularly to maintain optimum frying and flavor quality.
• Oil used for french fries can be used 10 to 12 times before
changing if oil is filtered after each use. Oil used for food that
is high in protein (such as meat or fish) should be changed
more frequently.
• To filter oil, allow oil to cool completely. Cheesecloth or paper
towel may be used as a filter to strain oil.
• Always follow food package directions.
• DO NOT add fresh oil to used oil.
• Always change the oil when it has a strong smell or taste, or when
it turns dark and/or syrupy.
BEFORE FRYING:
• Excess water or ice particles can cause hot oil to splatter or
foam. Remove any excess water from fresh food by blotting
with a paper towel. Remove any ice chunks or buildup from
frozen foods.
GENERAL TIPS:
• DO NOT use plastic utensils in hot oil.
• Season food AFTER frying.
• If food is not as crisp as desired, reduce batch size.
DISPOSING OF OIL:
• Pour cool oil into its original (resealable) empty plastic bottle.
BASKET USAGE WITH FRESHLY BATTERED FOODS:
• Freshly battered foods should be carefully placed directly into oil.
First, lower basket completely and then carefully place each piece
of battered food into hot oil. Use basket to remove fried battered
foods.
STORAGE:
• Basket handle can be disengaged and rotated into basket. Place
oil tank in base and then place basket and power cord in oil tank.
• It is best to store all oils in the refrigerator or a cool, dark, dry
place for up to six months.
Visit www.hamiltonbeach.com for our
complete line of products and Use and Care
Guides – as well as delicious
recipes, tips, and to register
your product online!
10
840217100 ENv05.indd 10840217100 ENv05.indd 10 4/30/12 11:42 AM4/30/12 11:42 AM
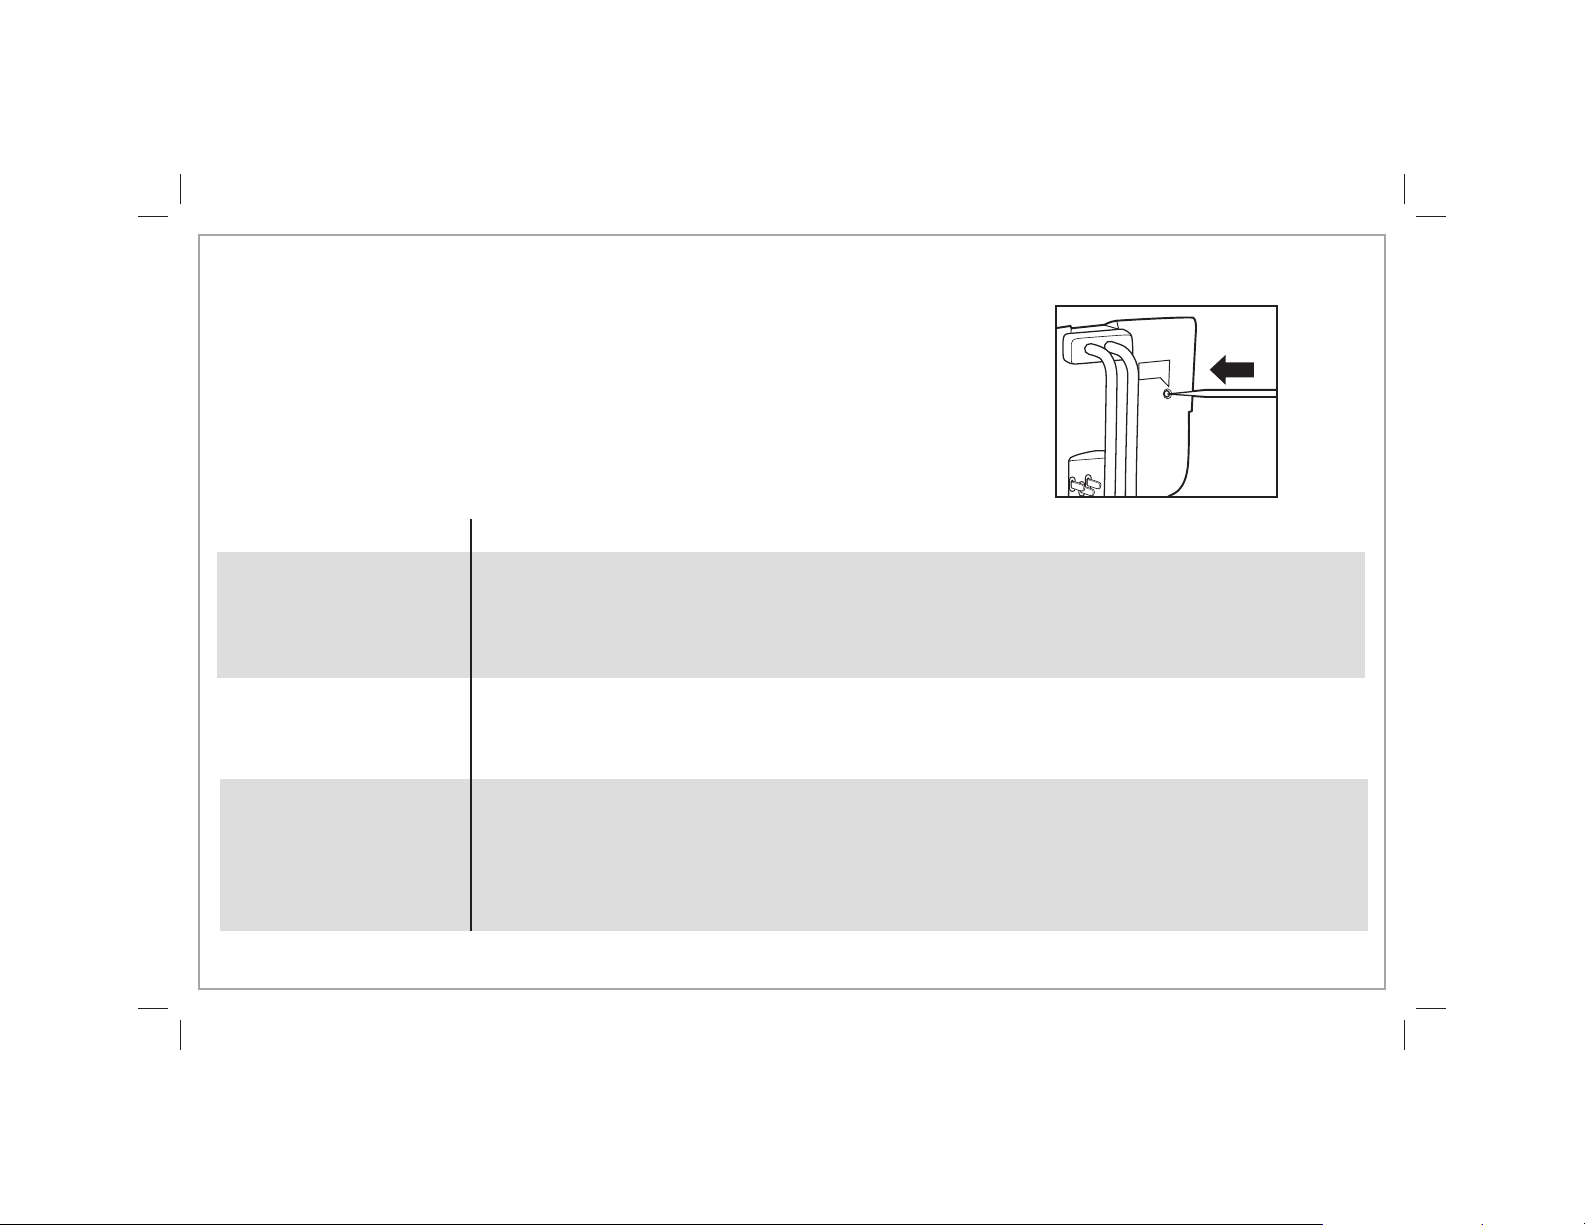
Troubleshooting
HOW TO RESET:
If your unit is not heating or will not turn on, your unit may need to be reset.
1. Make sure fryer and oil are cold.
2. Turn temperature control to MIN.
3. Unplug magnetic cord from the wall outlet.
4. Remove removable control panel and heater element.
5. Use a thin pointed object such as a wooden skewer or thin screwdriver to push in RESET button.
RESET
PROBLEM
Fried food does not have
a golden-brown color and/
or is not crispy.
Fryer gives off a strong,
unpleasant odor.
Unit does not heat.
840217100 ENv05.indd 11840217100 ENv05.indd 11 4/30/12 11:42 AM4/30/12 11:42 AM
PROBABLE CAUSE
• Selected temperature is too low or food has not been fried long enough. Check food package or Frying
Chart for correct temperature or preparation time.
• There is too much food in basket. Never fry too much food at one time. See food package, Frying Chart,
or recipe for correct frying amount. Food pieces may be too thick to fry adequately.
• Volume of oil is too low.
• Oil isn’t fresh. Change oil. Filter oil regularly to keep it fresh longer.
• When frying food with a high moisture content (such as chicken or fries), change oil frequently.
• Type of oil is not suitable for deep-frying food. Use good quality frying oil. Do not mix two different
types of oil or fat.
• Ensure magnetic cord assembly is properly attached to fryer socket.
• Ensure electrical cord assembly is plugged into electrical outlet.
• Heating element assembly not correctly assembled. Make sure heating element assembly is properly
installed on base. See “How to Assemble the Fryer” section.
• Press RESET button on heating element assembly. Make sure fryer has recommended amount of oil in
oil tank.
11

Troubleshooting (cont.)
PROBLEM
During frying, the oil spills
over the edge of the fryer.
Condensation forms on
viewing window.
Oil film buildup on oil tank.
PROBABLE CAUSE
• There is too much oil in fryer. Make sure that oil does not exceed maximum level mark.
• Basket/food immersed too quickly. Carefully raise basket out of oil.
• Food contains too much liquid. Dry food thoroughly before placing it in fryer. Follow instructions in
“Frying” section.
• When frying food with a high moisture content (such as chicken or fries), change oil frequently.
• There is too much food in frying basket. Do not fry more food at one time than quantities indicated on
food package or Frying Chart.
• Type of oil is not suitable for deep-frying food. Use good quality frying oil. Do not mix two different
types of oil or fat.
• The use of refrigerated oil may cause excessive splattering. Use room-temperature oil.
• Oil tank has not been cleaned properly. See instructions in the “Cleaning Your Fryer” section.
• Water vapor from food collects on window. When unit is cold, wipe a small amount of oil on inside of
viewing window to prevent condensation buildup.
• Use plastic scouring pad to clean.
• To clean oil residue from oil tank, use a household degreaser.
12
840217100 ENv05.indd 12840217100 ENv05.indd 12 4/30/12 11:42 AM4/30/12 11:42 AM
 Loading...