

Page 1

READ BEFORE USE
LIRE AVANT UTILISATION
LEA ANTES DE USAR
Questions?
Please call us – our friendly
associates are ready to help.
USA: 1.800.851.8900
¿Preguntas?
Por favor llámenos – nuestros
amables representantes están
listos para ayudar.
MEX: 01 800 71 16 100
Le invitamos a leer cuidadosamente
este instructivo antes de usar su
aparato.
Visit www.hamiltonbeach.com for our
complete line of products and Use and
Care Guides – as well as
delicious recipes, tips, and
to register your product online!
Rendez-vous sur www.hamiltonbeach.ca
pour notre liste complète de produits et de
nos manuels utilisateur – ainsi que nos
délicieuses recettes, nos conseils et pour
enregistrer votre produit en ligne !
¡Visite www.hamiltonbeach.com.mx para
obtener nuestra línea completa de productos
y las Guías de Uso y Cuidado, además de
deliciosas recetas, consejos y para registrar
su producto en línea!
Questions ?
N’hésitez pas à nous appeler –
nos associés s’empresseront
de vous aider.
CAN : 1.800.267.2826
Countertop Induction Cooktop
Table de cuisson à induction de comptoir
Estufa de Inducción para Mostrador
English ...................... 2
Français .................. 13
Español .................. 25
840210600 ENv03.qxd:Layout 1 12/19/11 9:19 AM Page 1
Page 2

2
IMPORTANT SAFEGUARDS
1. Read all instructions.
2. Do not touch hot surfaces.
3. To protect against risk of electric shock, do not immerse cord,
plug, or unit in water or other liquid.
4. Close supervision is necessary for any appliance being used by
or near children.
5. Unplug from outlet when not in use and before cleaning. Allow
to cool.
6. Do not operate any appliance with a damaged cord or plug
or after the appliance malfunctions or has been damaged in
any manner. Call our toll-free customer service number for
information on examination, repair, or adjustment.
7. The use of accessory attachments not recommended by the
appliance manufacturer may cause injuries.
8. Do not use outdoors.
9. Do not let cord hang over edge of table or counter or touch hot
surfaces, including a stove.
10. Do not place on or near a hot gas or electric burner, or in a heated
oven.
11. Extreme caution must be used when moving an appliance or
cooking vessel containing hot oil or other hot liquids.
12. To disconnect, turn unit OFF and then remove plug from wall
outlet.
13. Do not use appliance for other than intended use.
14. Do not place any credit cards or magnetized items on cooktop
surface.
15. Do not insert any objects in vent holes.
16. Do not operate on metal surfaces.
17. Do not cook on broken cooktop. If cooktop should break, cleaning
solutions and spillovers may penetrate the broken cooktop and
create a risk of shock. Turn the unit OFF immediately. Call
Customer Service at 800.851.8900.
18. Never heat empty cookware on cooktop.
19. Clean cooktop with caution. If a wet sponge or cloth is used to
wipe spills on a hot cooking area, be careful to avoid steam burn.
Some cleaners can produce noxious fumes if applied to a hot
surface.
20. Do not place metallic objects such as knives, forks, spoons, and
lids on the cooktop since they can get hot.
21. Never place aluminum foil on cooktop.
When using electrical appliances, basic safety precautions should always be followed, including the following:
SAVE THESE INSTRUCTIONS!
840210600 ENv03.qxd:Layout 1 12/19/11 9:19 AM Page 2
Page 3

3
OTHER CONSUMER SAFETY INFORMATION
This appliance is intended for household use only.
WARNING! Shock Hazard: This product is provided with a grounded
(3-prong) plug to reduce the risk of electric shock. The plug fits only
one way into a grounded outlet. Do not defeat the safety purpose of
the plug by modifying the plug in any way or by using an adapter. If
the plug does not fit into the outlet, have an electrician replace the
outlet.
The length of the cord used on this appliance was selected to reduce
the hazards of becoming tangled in or tripping over a longer cord.
If a longer cord is necessary, an approved extension cord may be
used. The electrical rating of the extension cord must be equal to or
greater than the rating of the appliance. The extension cord must be
a grounding-type, 3-wire cord. Care must be taken to arrange the
extension cord so that it will not drape over the countertop or tabletop where it can be pulled on by children or accidentally tripped
over.
To avoid an electrical circuit overload, do not use another highwattage appliance on the same circuit with this appliance.
840210600 ENv03.qxd:Layout 1 12/19/11 9:19 AM Page 3
Page 4

4
Parts and Features
Air Inlet
Control Panel
Exhaust
Cooking Zone
HOW INDUCTION COOKING WORKS:
Induction cooking works through a magnetic field between the induction
coils beneath the glass top and the ferrous (iron-containing) material in
the cookware. Heat from induction is only produced in the pan itself, not
in the glass top. The cooktop will get hot where the pan is placed, as a
result of heat transfer from the pan.
Cookware
Glass Plate
Magnetic Field
Control Panel
840210600 ENv03.qxd:Layout 1 12/19/11 9:19 AM Page 4
Page 5

5
Benefits of Induction Cooking
ENERGY-EFFICIENT
• Heats only diameter of pan so no wasted energy.
• Heating begins instantly for faster cook time.
EASY CLEANUP
• Spills are less likely to bake onto the glass top. Simply wipe up
when cool.
SAFETY FEATURES
• No open flame.
• No emissions.
• Surface not in contact with pan stays cool.
• Cooktop will not work without pan.
• Automatic shutoff once cookware is removed.
NOTE: When cookware is removed from the cooking surface, the
coil will de-energize. But if cookware is returned to the cooking
surface within 20 seconds, the coil will automatically re-energize.
Selecting the Right Cookware
• Only induction-ready cookware will work with induction
cooktops. Cookware must have iron in bottom of pan. Place
small kitchen magnet on cookware bottom; if it holds, it is
induction cooktop-ready.
• Cast iron, enamel cast iron, and some stainless steel will work
on induction cooktops. If unsure, check cookware bottom with
a magnet.
• Use only flat-bottom cookware that is 5 to 10 inches (13 to 25 cm)
in diameter.
COOKWARE THAT WORKS:
• Some stainless steel
• Enamel cast iron
• Enamel on steel
• Cast iron
COOKWARE THAT WILL NOT WORK:
• Copper bottom
• Glass
• Aluminum (includes many nonstick pans)
• Pottery-type cookware
840210600 ENv03.qxd:Layout 1 12/19/11 9:19 AM Page 5
Page 6
6
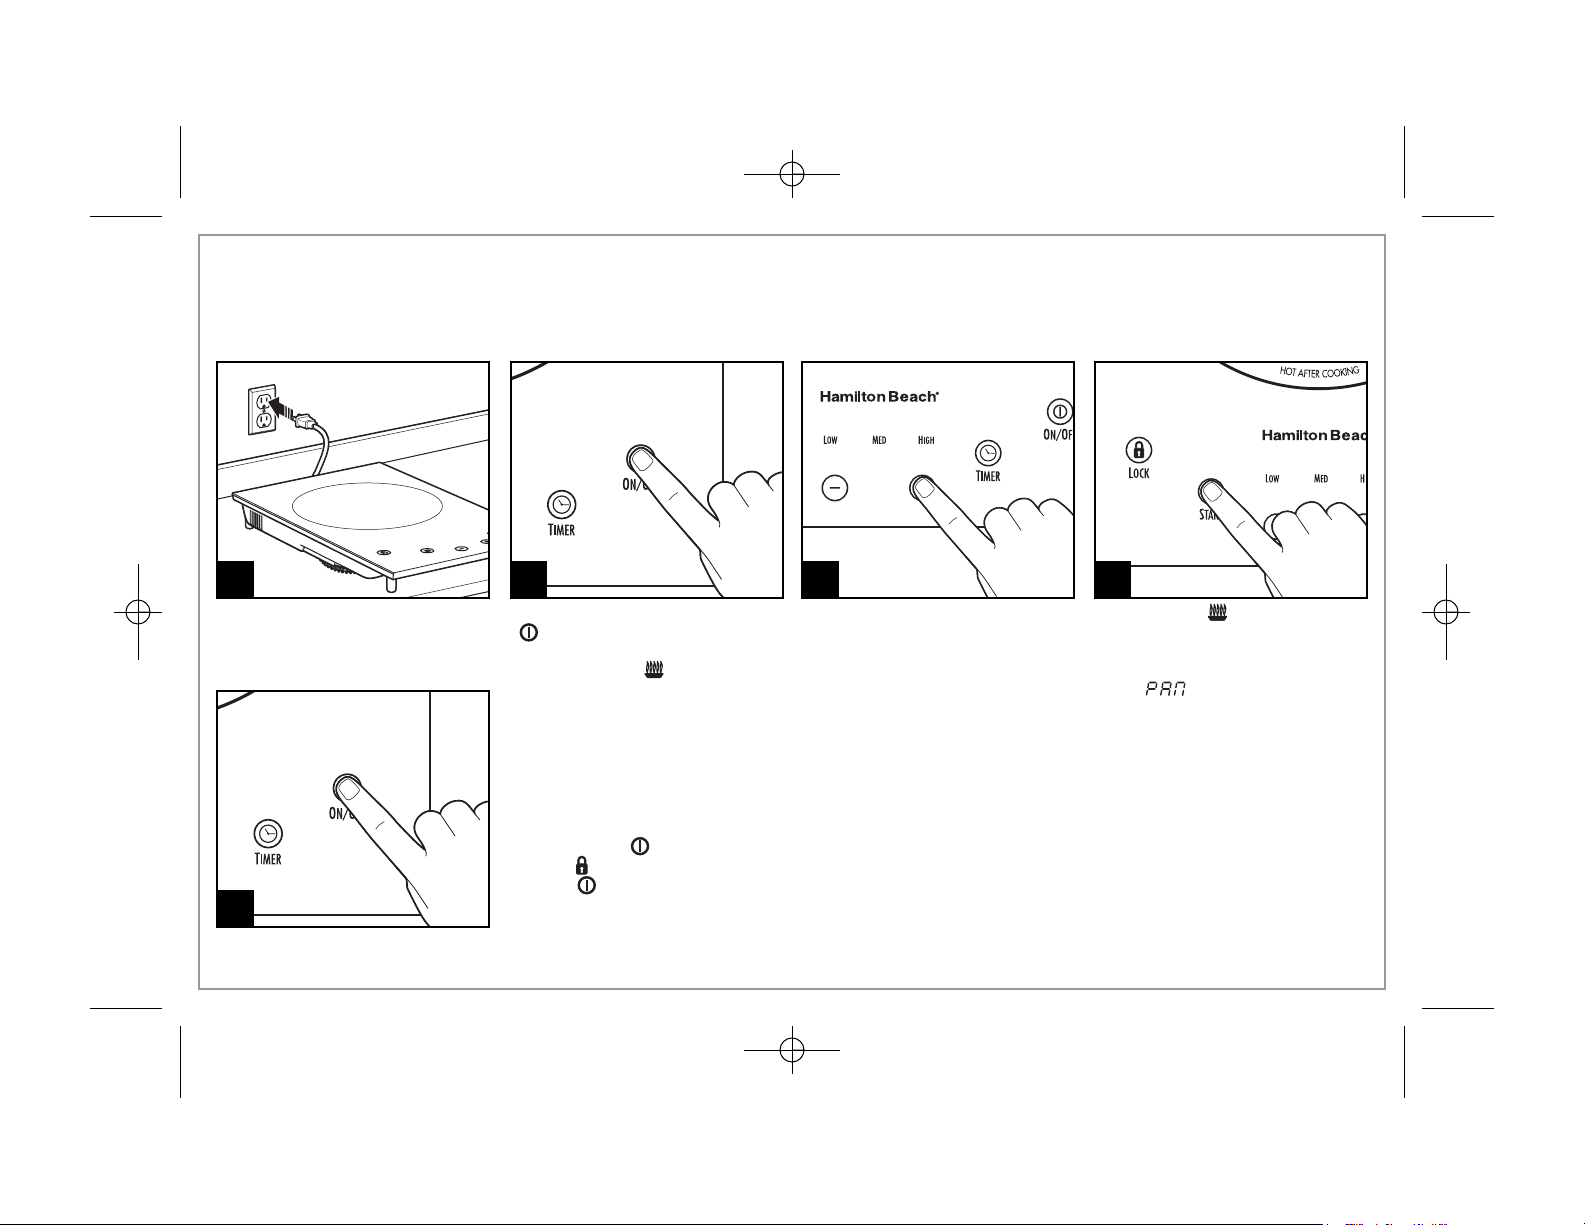
Using the Cooktop
2 41 3
Plug cooktop into wall outlet.
ON/OFF display will flash and turn
off.
Touch (do not press hard) ON/OFF
( ). Display will flash four bars
(––––) above temperature
settings. START ( ) will flash.
LOW temperature setting will flash.
Touch START ( ). Solid light
appears. Fan turns on. Cooktop
will beep to remind you to place
cookware in center of cooking
zone ( ).
BEFORE FIRST USE:
• Read all instructions and important safeguards in manual.
• Remove all packaging materials.
• Wipe cooktop surface with soft, water-dampened cloth.
Touch – or + to adjust cooking
temperature. Beep will sound
for every touch to increase or
decrease cooking temperature.
Place cookware in cooking zone.
5
Touch ON/OFF ( ) to turn OFF.
If LOCK ( ) is engaged, holding
ON/OFF ( ) for 3 seconds will
override LOCK and turns the unit
OFF.
840210600 ENv03.qxd:Layout 1 12/19/11 1:14 PM Page 6
Page 7
7
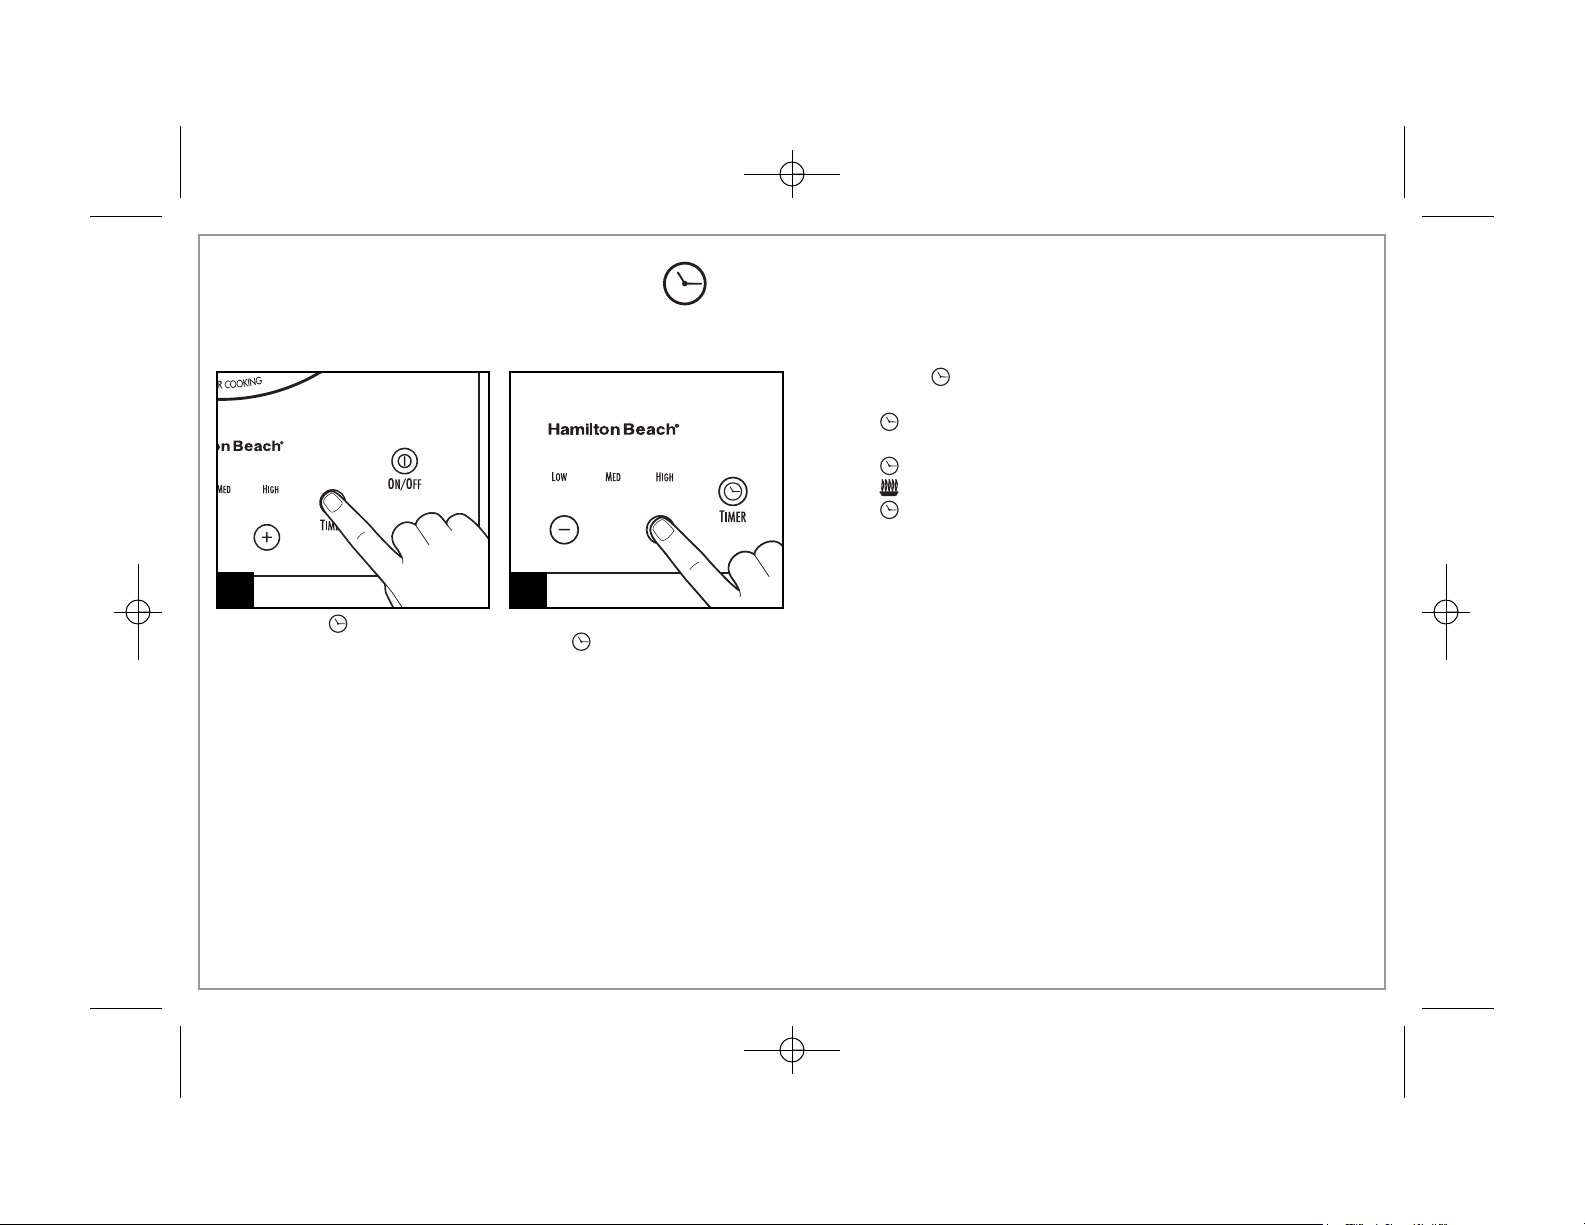
Using the TIMER ( )
21
Touch TIMER ( ).
Touch – or + to set TIMER. Hold
TIMER ( ) to increase time by
10-minute increments. Maximum
time is 120 minutes.
Follow Steps 1–4 of “Using the Cooktop” on page 6.
• When
TIMER ( )
is touched, the time flashes for 6 seconds before
start or to adjust time.
• TIMER ( ) will pause if you remove cookware.
• Replacing cookware within 20 seconds will continue cooking and
TIMER ( ) resumes. If over 20 seconds but less than standby time,
START ( ) must be pressed.
• TIMER ( ) switches the unit OFF at the end of set time.
840210600 ENv03.qxd:Layout 1 12/19/11 9:19 AM Page 7
Page 8

8
Using the LOCK ( )
21
Hold LOCK ( ) for 3 seconds until
red light appears.
To unlock: Hold
LOCK ( )
for 3
seconds until red light appears.
IF YOU LIVE IN A HIGH-ALTITUDE AREA:
The Extension service will have detailed information about cooking
for your area. To locate the Cooperative Extension service in your
county, please visit: http://www.csrees.usda.gov/Extension/.
3
Holding ON/OFF ( ) for 3 seconds
overrides LOCK ( ) and switches
unit OFF.
840210600 ENv03.qxd:Layout 1 12/19/11 9:19 AM Page 8
Page 9

9
Care and Cleaning
21
When finished cooking, turn
cooktop OFF ( ) and unplug from
outlet. Allow cooktop to cool
completely.
Wipe cooktop surface with soft,
water-dampened cloth. If further
cleaning is needed, wipe cooktop
surface with mixture of water and
mild detergent.
Do not use abrasive cleaners or
abrasive sponges on the cooktop.
NOTES:
• Do NOT slide cookware over
cooktop.
• Do NOT place anything other
than compatible cookware
on cooktop surface.
Electrical Shock Hazard.
Disconnect power before cleaning.
Do not immerse cord or plug in any liquid.
w
WARNING
840210600 ENv03.qxd:Layout 1 12/19/11 9:19 AM Page 9
Page 10

10
Troubleshooting
PROBLEM
Cooktop does not
work after being
turned on.
Control panel does
not work when
buttons are pressed.
Cooktop keeps
beeping.
Error code E0, E4,
E5, E7, or E8 when
cooktop display
flashes an Error
Code.
Error code E1 when
cooktop display
flashes an Error
Code.
Error code E2 or E3
when cooktop
display flashes an
Error Code.
Error code E6 when
cooktop is turned off.
PROBABLE CAUSE
• LOCK has been set. Make sure cooktop is unlocked.
• Buttons are being pressed too hard—they only need to be touched to operate.
• Cooktop not plugged in. Plug cooktop into wall outlet. Repeat start process in “Using the Cooktop”
section on page 6.
• Cookware not in center of cooking zone.
• LOCK has been set. Make sure cooktop is unlocked.
• Cookware not induction-compatible. Make sure to use compatible cookware. See “Selecting the Right
Cookware” section on page 5.
• Cooktop is defective. Do not attempt to repair. Contact Customer Service at 800-851-8900.
• Blocked airflow. Cooktop must be at least 1-inch (2.5 cm) away from wall or other obstructions.
• There may be too many appliances in the same outlet. Plug into wall outlet with no other appliances.
• Cookware heated too long. Remove cookware to cool. Repeat start process in “Using the Cooktop”
section on page 6.
840210600 ENv03.qxd:Layout 1 12/19/11 9:19 AM Page 10
Page 11

11
Notes
840210600 ENv03.qxd:Layout 1 12/19/11 9:19 AM Page 11
Page 12

12
This warranty applies to products purchased and used in the U.S. and Canada. This is the only express warranty for this product
and is in lieu of any other warranty or condition.
This product is warranted to be free from defects in material and workmanship for a period of one (1) year from the date of
original purchase. During this period, your exclusive remedy is repair or replacement of this product or any component found
to be defective, at our option; however, you are responsible for all costs associated with returning the product to us and our
returning a product or component under this warranty to you. If the product or component is no longer available, we will
replace with a similar one of equal or greater value.
This warranty does not cover glass, filters, wear from normal use, use not in conformity with the printed directions, or damage
to the product resulting from accident, alteration, abuse, or misuse. This warranty extends only to the original consumer
purchaser or gift recipient. Keep the original sales receipt, as proof of purchase is required to make a warranty claim. This
warranty is void if the product is used for other than single-family household use or subjected to any voltage and waveform
other than as specified on the rating label (e.g., 120V ~ 60 Hz).
We exclude all claims for special, incidental, and consequential damages caused by breach of express or implied warranty. All
liability is limited to the amount of the purchase price. Every implied warranty, including any statutory warranty or condition
of merchantability or fitness for a particular purpose, is disclaimed except to the extent prohibited by law, in which case such
warranty or condition is limited to the duration of this written warranty. This warranty gives you specific legal rights. You may
have other legal rights that vary depending on where you live. Some states or provinces do not allow limitations on implied
warranties or special, incidental, or consequential damages, so the foregoing limitations may not apply to you.
To make a warranty claim, do not return this appliance to the store. Please call 1.800.851.8900 in the U.S. or 1.800.267.2826 in
Canada or visit hamiltonbeach.com in the U.S. or hamiltonbeach.ca in Canada. For faster service, locate the model, type, and
series numbers on your appliance.
Limited Warranty
840210600 ENv03.qxd:Layout 1 12/19/11 9:19 AM Page 12
Page 13

13
PRÉCAUTIONS IMPORTANTES
1. Lire toutes les instructions.
2. Ne pas toucher les surfaces chaudes.
3. Pour éviter les risques d’électrocution, ne pas immerger le
cordon, la fiche, ou l’unité dans l’eau ou tout autre liquide.
4. L’utilisation de tout appareil par ou près des enfants exige une
surveillance accrue.
5. Débrancher le cordon de la prise lorsque l’appareil ne sert pas
et avant de le nettoyer. Le laisser refroidir.
6. Ne pas faire fonctionner aucun appareil dont le cordon ou
la prise sont endommagés ou suite à une défectuosité, si
l’appareil est tombé ou endommagé de quelque manière que
ce soit. Appeler notre numéro sans frais de service à la clientèle
pour des renseignements concernant l’examen, la réparation
ou l’ajustement.
7. L’utilisation d’accessoires non recommandés par le fabricant
d’électroménagers peut causer des blessures.
8. Ne pas utiliser à l’extérieur.
9. Ne pas laisser pendre le cordon de la table ou du comptoir
et éviter tout contact entre le cordon et les surfaces chaudes
incluant la cuisinière.
10. Ne pas placer sur ou près d’un bruleur électrique ou à gaz chaud
ou dans un four chaud.
11. Une très grande prudence doit être exercée lors du déplacement
de tout appareil contenant des huiles ou des liquides chauds.
12. Pour débrancher, tourner l’unité à ARRÊT ; retirer ensuite la fiche
de la prise de cordon murale.
13. N’utiliser cet appareil que pour les fonctions auxquelles il est
destiné.
14. Ne placez pas de cartes de crédit ou magnétisées les articles
sur la surface la table de cuisson.
15. N’insérez des objets dans les orifices de ventilation.
16. Ne faites pas fonctionner sur les surfaces métalliques.
17. Ne pas cuire sur une table de cuisson brisée. Les solutions de
nettoyage et les débordements peuvent pénétrer dans la table
de cuisson brisée et représentent un risque de décharge
électrique. Éteindre immédiatement l’appareil. Appeler le Service
à la clientèle au 1-800-851-8900.
18. Ne jamais faire chauffer une casserole vide sur la table de
cuisson.
19. Nettoyer la table de cuisson avec soin. Éviter soigneusement la
vapeur dégagée par l’utilisation d’une éponge ou d’un chiffon
humide lors du nettoyage de la surface de cuisson pour éviter
les brûlures. Certains nettoyants peuvent produire des vapeurs
toxiques lorsqu’appliqués sur une surface chaude.
20. Ne pas déposer d’objets métalliques comme des couteaux,
fourchettes, cuillères ou couvercles sur la table de cuisson pour
éviter qu’ils ne chauffent.
21. Ne jamais déposer de feuille d’aluminium sur la table de cuisson.
Lors d’utilisation d’appareils ménagers, des précautions élémentaires d’usage doivent toujours être respectées, y compris les consignes
suivantes :
CONSERVER CES INSTRUCTIONS !
840210600 FRv03.qxd:Layout 1 12/19/11 9:19 AM Page 13
Page 14

14
AUTRES CONSIGNES DE SÉCURITÉ POUR LE CONSOMMATEUR
Cet appareil est destiné à un usage domestique uniquement.
AVERTISSEMENT ! Risque d’électrocution : Ce produit est fourni
avec une fiche à prise de terre (3 broches) pour réduire le risque
de choc électrique. La fiche ne tient que dans un sens dans une
prise mise à la terre. Ne pas transformer le dispositif de sécurité
de la fiche en modifiant celle-ci de quelconque façon ou en utilisant
un adaptateur. Si vous ne pouvez pas insérer la fiche dans la prise,
faire remplacer la prise par un électricien.
La longueur du cordon installé sur cet appareil a été sélectionnée
afin de réduire les risques d’enchevêtrement ou de faux pas causés
par un fil trop long. L’utilisation d’une rallonge approuvée est permise
si le cordon est trop court. Les caractéristiques électriques de la
rallonge doivent être équivalentes ou supérieures aux caractéristiques
de l’appareil. La rallonge doit être du type à mise à la terre, à 3 fils.
Prendre toutes les précautions nécessaires pour installer la rallonge de
manière à ne pas la faire courir sur le comptoir ou sur une table pour
éviter qu’un enfant ne tire sur le cordon ou trébuche accidentellement.
Pour éviter la surcharge du circuit électrique, ne pas utiliser un autre
appareil à haute puissance sur le même circuit que cet appareil.
840210600 FRv03.qxd:Layout 1 12/19/11 9:19 AM Page 14
Page 15

15
Pièces et caractéristiques
Prise d’air
Panneau de
contrôle
Évent
Surface de cuisson
FONCTIONNEMENT DE L’INDUCTION :
La cuisson par induction s’effectue par un champ magnétique créé entre
les bobines d’induction sous la surface de verre et le matériau ferreux
(renfermant du fer) de la casserole. La chaleur de l’induction ne se dégage
que par la casserole et non la surface de verre. La table de cuisson sera
chaude à l’endroit où la casserole est déposée transférant ainsi cette
chaleur à la casserole.
Casserole
Plaque de verre
Champ magnétique
Panneau de contrôle
840210600 FRv03.qxd:Layout 1 12/19/11 9:19 AM Page 15
Page 16

16
Avantages de la cuisson à induction
ÉCONOMIE D’ÉNERGIE
• Ne chauffe que le diamètre de la casserole pour éviter la perte
d’énergie.
• Chaleur immédiate pour une durée de cuisson plus courte.
NETTOYAGE FACILE
• La probabilité de débordements cuits sur la table de cuisson est
faible. Essuyer simplement le dégât une fois refroidi.
CARACTÉRISTIQUES DE SÉCURITÉ
• Aucune flamme nue.
• Aucune émission.
• La surface n’étant pas en contact avec la casserole reste froide.
• La table de cuisson ne fonctionne pas sans casserole.
• S’éteint automatiquement dès que la casserole est retirée.
REMARQUE : La bobine se met hors tension dès que la casserole
est retirée de la surface de cuisson. La bobine se remettra
automatiquement sous tension lorsque la casserole est déposée
à nouveau sur la surface de cuisson en moins de 20 secondes.
Choix de la batterie de cuisine
• Seules les batteries de cuisine conçues pour la cuisson par
induction fonctionneront avec les tables de cuisson par induction.
Les casseroles de la batterie de cuisine doivent comporter un fond
contenant du fer. Placer un petit aimant de cuisine sur le fond de la
casserole ; l’aimant qui adhère au fond de la casserole indique que
l’article peut être utilisé pour la cuisson par induction.
• La fonte, la fonte émaillée et un peu d’acier inoxydable sont des
matériaux compatibles avec les tables de cuisson par induction.
En cas de doute, vérifier le fond de la casserole en utilisant un
aimant.
• Utiliser seulement une casserole à fond plat d’un diamètre de 12,7
à 25,4 cm (5 à 10 po).
LES BATTERIES DE CUISINE ADAPTÉES CONTIENNENT :
• Un peu d’acier inoxydable
• De la fonte émaillée
• De l’acier émaillé
• De la fonte
LES BATTERIES DE CUISINE NON ADAPTÉES CONTIENNENT :
• Un fond en cuivre
• Du verre
• De l’aluminium (incluant plusieurs casseroles antiadhésives)
• De la terre cuite
840210600 FRv03.qxd:Layout 1 12/19/11 9:19 AM Page 16
Page 17

17
Utilisation de la table de cuisson
2 41 3
Brancher la fiche de la table de
cuisson dans la prise. L’afficheur
de MARCHE/ARRÊT clignotera puis
s’éteindra.
Effleurer (sans appuyer fortement)
la touche ON/OFF (marche/arrêt)
( ). L’afficheur indiquera quatre
lignes (––––) au-dessus des
réglages de température. Le mot
START (en marche) ( ) clignotera.
Le témoin de réglage de LOW
(basse) température clignotera.
Effleurer la touche START (en
marche) ( ). Un témoin fixe
apparaîtra. Le ventilateur démarre.
La table de cuisson émettra un
signal sonore pour rappeler de
déposer la casserole au centre
de la surface de cuisson ( ).
AVANT LA PREMIÈRE UTILISATION :
• Lire toutes les instructions et mises en
garde importantes du manuel.
• Retirer tous les matériaux d’emballage.
• Essuyer la surface de la table de cuisson
avec un linge doux et imbibé d’eau.
Effleurer les touches – ou + pour
régler la température de cuisson.
Un signal se fera entendre à
chaque effleurement de touche
d’augmentation ou de diminution
de la température de cuisson.
Déposer la batterie de cuisine sur
la surface de cuisson.
5
Effleurer la touche ON/OFF
(marche/arrêt) ( ) pour éteindre
la table. Si LOCK (verrou) ( ) est
activé, maintenir la touche ON/OFF
(marche/arrêt) ( ) pendant 3
secondes pour annuler la fonction
de LOCK (verrou) ( ) et éteindre
l’appareil.
840210600 FRv03.qxd:Layout 1 12/19/11 1:15 PM Page 17
Page 18

18
Utilisation de TIMER (minuterie) ( )
21
Effleurer la touche TIMER
(minuterie) ( ).
Effleurer les touches – ou + pour
régler la
TIMER (minuterie)
.
Maintenir la touche
TIMER
(minuterie) ( )
pour augmenter
la durée par incréments de
10 minutes. La durée maximale
est de 120 minutes.
Suivre les étapes 1 à 4 du chapitre « Utilisation de la table de cuisson » à la page 17.
• En effleurant la touche de
TIMER (minuterie)
( ), la durée clignote
pendant 6 secondes avant la mise en marche ou le réglage de la
durée.
• Le décompte de
TIMER (minuterie)
( ) s’arrêtera si l’on retire la
casserole.
• Redéposer le casserole en moins de 20 secondes pour que la
minuterie reprenne le décompte et que la cuisson continue. Il
faudra appuyer sur START (en marche) ( ) si la casserole est
déposée à nouveau au-delà des 20 secondes, mais sans excéder
le temps de pause de la minuterie.
• TIMER (minuterie) ( ) éteint l’appareil dès que le temps est écoulé.
840210600 FRv03.qxd:Layout 1 12/19/11 9:19 AM Page 18
Page 19

19
Utilisation de LOCK (verrouillage) ( )
21
Effleurer et maintenir la touche
LOCK (verrouillage) ( ) pendant 3
secondes jusqu’à ce que le témoin
rouge s’illumine.
Pour déverrouiller : Effleurer
et maintenir la touche
LOCK
(verrouillage) ( )
pendant 3
secondes jusqu’à ce que le témoin
rouge s’illumine.
SI VOUS HABITEZ DANS UNE RÉGION À HAUTE ALTITUDE :
Les services de vulgarisation offrent les informations au sujet
de la cuisson pour votre région. Pour trouver la coopérative
de services de vulgarisation, veuillez visiter le site
http://www.csrees.usda.gov/Extension/.
3
Effleurer et maintenir la touche
ON/OFF (marche/arrêt) ( )
pendant 3 secondes pour annuler
la fonction de
LOCK (verrouillage)
( )
et éteindre l’appareil.
840210600 FRv03.qxd:Layout 1 12/19/11 9:19 AM Page 19
Page 20

20
Entretien et nettoyage
21
Dès la fin de la cuisson, éteindre
la table de cuisson et débrancher
( ) la fiche de la prise. Laisser
refroidir complètement la table
de cuisson.
Essuyer la surface de la table de
cuisson avec un linge doux imbibé
d’eau. Si un nettoyage plus
important s’impose, essuyer
la surface de la table de cuisson
avec une solution de détergent
d’eau et d’eau.
Ne pas utiliser de produits
nettoyants abrasifs ou de tampon
à récurer en abrasifs.
REMARQUES :
• Ne PAS glisser la casserole
sur la table de cuisson.
• Ne rien déposer d’autre que
des casseroles compatibles
avec la surface de la table de
cuisson.
Risque d’électrocution.
Débrancher l’appareil avant le nettoyage.
Ne pas immerger le cordon ou la fiche dans
quelconque liquide.
w
AVERTISSEMENT
840210600 FRv03.qxd:Layout 1 12/19/11 9:19 AM Page 20
Page 21

21
Dépannage
PROBLÈME
La table de cuisson
ne fonctionne pas
après avoir appuyé
sur la touche de mise
en marche.
Le panneau de
commande ne
répond pas lorsque
les touches sont
effleurées.
Signal sonore de
la table de cuisson
persistant.
Table de cuisson
affichant un code
d’erreur clignotant
E0, E4, E5, E7 ou E8.
Table de cuisson
affichant un code
d’erreur clignotant
E1.
CAUSE POSSIBLE
• LOCK (verrouillage) est activée. S’assurer que la fonction de verrouillage est désactivée.
• Enfoncement trop important sur les touches – seul un effleurement suffit pour les faire fonctionner.
• La table de cuisson n’est pas branchée. Brancher la fiche de la table de cuisson dans la prise. Répéter
la procédure de mise en marche au chapitre « Utilisation de la table de cuisson » à la page 17.
• La batterie de cuisine n’est pas centrée avec la surface de cuisson.
• LOCK (verrouillage) est activée. S’assurer que la fonction de verrouillage est désactivée.
• La batterie de cuisine n’est pas compatible pour la cuisson à induction. S’assurer d’utiliser une batterie
de cuisine compatible. Voir le chapitre « Choix de la batterie de cuisine » à la page 16.
• La table de cuisson est défectueuse. Ne pas tenter de la réparer. Appeler le Service à la clientèle au
1-800-851-8900.
• Évent obstrué. La table de cuisson doit être éloignée de moins 2,5 cm (1 po) du mur ou autres obstacles.
840210600 FRv03.qxd:Layout 1 12/19/11 9:19 AM Page 21
Page 22

22
Dépannage (suite)
PROBLÈME
Table de cuisson
affichant un code
d’erreur clignotant
E2 ou E3.
Table de cuisson
hors tension affichant
le code d’erreur E6
clignotant.
CAUSE POSSIBLE
• Plusieurs autres appareils sont branchés à la même prise. Brancher dans une prise libre de tous autres
appareils.
• La batterie de cuisine a été chauffée trop longtemps. Retirer la batterie de cuisine pour la faire refroidir.
Répéter la procédure de mise en marche au chapitre « Utilisation de la table de cuisson » à la page 17.
840210600 FRv03.qxd:Layout 1 12/19/11 9:19 AM Page 22
Page 23

23
Notes
840210600 FRv03.qxd:Layout 1 12/19/11 9:19 AM Page 23
Page 24

24
Cette garantie s’applique aux produits achetés et utilisées aux É.-U. et au Canada. C’est la seule garantie expresse pour ce
produit et est en lieu et place de tout autre garantie ou condition.
Ce produit est garanti contre tout défaut de matériaux et de main-d’oeuvre pour une période de un (1) an à compter de la
date d’achat d’origine. Au cours de cette période, votre seul recours est la réparation ou le remplacement de ce produit ou
tout composant s’avérant défectueux, à notre gré, mais vous êtes responsable de tous les coûts liés à l’expédition du produit
et le retour d’un produit ou d’un composant dans le cadre de cette garantie. Si le produit ou un composant n’est plus offert,
nous le remplacerons par un produit similaire de valeur égale ou supérieure.
Cette garantie ne couvre pas le verre, les filtres, l’usure d’un usage normal, l’utilisation non conforme aux directives imprimées,
ou des dommages au produit résultant d’un accident, modification, utilisation abusive ou incorrecte. Cette garantie s’applique
seulement à l’acheteur original ou à la personne l’ayant reçu en cadeau. La présentation du reçu de vente d’origine comme
preuve d’achat est nécessaire pour faire une réclamation au titre de cette garantie. Cette garantie s’annule si le produit est
utilisé autrement que par une famille ou si l’appareil est soumis à toute tension ou forme d’onde différente des caractéristiques
nominales précisées sur l’étiquette (par ex. : 120 V ~ 60 Hz).
Nous excluons toutes les réclamations au titre de cette garantie pour les dommages spéciaux, consécutifs et indirects causés
par la violation de garantie expresse ou implicite. Toute responsabilité est limitée au prix d’achat. Chaque garantie implicite,
y compris toute garantie ou condition de qualité marchande ou d’adéquation à un usage particulier, est exonérée, sauf
dans la mesure interdite par la loi, auquel cas la garantie ou condition est limitée à la durée de cette garantie écrite. Cette
garantie vous donne des droits légaux précis. Vous pouvez avoir d’autres droits qui varient selon l’endroit où vous habitez.
Certaines provinces ne permettent pas les limitations sur les garanties implicites ou les dommages spéciaux ou indirects de
telle sorte que les limitations ci-dessus ne s’appliquent peut-être pas à votre cas.
Ne pas retourner cet appareil au magasin lors d’une réclamation au titre de cette garantie. Téléphoner au 1.800.851.8900 aux
É.-U. ou au 1.800.267.2826 au Canada ou visiter le site internet www.hamiltonbeach.com aux É.-U. ou www.hamiltonbeach.ca
au Canada. Pour un service plus rapide, trouvez le numéro de modèle, le type d’appareil et les numéros de série sur votre
appareil.
Garantie limitée
840210600 FRv03.qxd:Layout 1 12/19/11 9:19 AM Page 24
Page 25

25
SALVAGUARDIAS IMPORTANTES
1. Lea todas las instrucciones.
2. Verifique que el voltaje de su instalación corresponda con el
del producto.
3. No toque las superficies calientes.
4. Para protegerse contra una descarga eléctrica, no sumerja
el cable o aparato en agua u otro líquido.
5. Se requiere de una estrecha supervisión cuando cualquier
aparato está siendo usado por o cerca de niños.
6. Desconecte de la toma cuando no esté en uso o antes de limpiar.
Permita que se enfríe.
7. No opere ningún aparato con un cable o enchufe dañado, o
después de que el aparato tenga un mal funcionamiento o se
haya caído o dañado de cualquier forma. Llame a nuestro
número gratuito de servicio al cliente para información sobre
examinación, reparación o ajuste.
8. El uso de aditamentos de accesorio no recomendados por el
fabricante del aparato puede causar lesiones.
9. No use en exteriores.
10. No deje que el cable cuelgue del borde de la mesa o cubierta,
o toque superficies calientes, incluyendo la estufa.
11. No coloque sobre o cerca de quemadores de gas o eléctricos
calientes o en un horno calentado.
12. Se debe tener extrema precaución cuando se mueva un aparato
que contenga aceite caliente u otros líquidos calientes.
13. Para desconectar, coloque aparato al ENCENDIDO y luego
remueva el cable de la toma de la pared.
14. No use el aparato para otro uso que no sea para el que fue
hecho.
15. No coloque tarjetas de crédito o elementos magnetizados en
la superficie de la estufa.
16. No introduzca objetos en los orificios de ventilación.
17. No haga funcionar sobre superficies metálicas.
18. No cocine sobre una estufa rota. Si la estufa se rompe, las
soluciones de limpieza y los derrames pueden penetrar en la
estufa rota y crear un riesgo de descarga eléctrica. Apague la
unidad de inmediato. Llame al Servicio de Atención del Cliente
al 800.851.8900.
19. Nunca caliente recipientes de cocción vacíos en la estufa.
20. Limpie la estufa con cuidado. Si se utiliza una esponja o un paño
húmedos para limpiar derrames sobre un área de cocción
caliente, tenga cuidado de evitar quemaduras de vapor. Algunos
limpiadores pueden producir humos tóxicos si se los aplica a una
superficie caliente.
21. No coloque objetos metálicos tales como cuchillos, tenedores,
cucharas y tapas sobre la estufa porque pueden calentarse.
22. Nunca coloque papel de aluminio sobre la estufa.
Cuando use aparatos eléctricos, debe seguir siempre precauciones básicas de seguridad, incluyendo las siguientes:
¡GUARDE ESTAS INSTRUCCIONES!
840210600 SPv03.qxd:Layout 1 12/19/11 9:20 AM Page 25
Page 26

26
OTRA INFORMACIÓN DE SEGURIDAD PARA EL CLIENTE
Este aparato ha sido diseñado solamente para uso doméstico.
¡ADVERTENCIA! Peligro de Descarga: Este producto cuenta con
un enchufe con conexión a tierra (3 clavijas) para reducir el riesgo
de una descarga eléctrica. El enchufe calza únicamente en una
dirección dentro de un tomacorriente con conexión a tierra. No
elimine el propósito de seguridad del enchufe modificando el
enchufe de ninguna manera o usando un adaptador. Si el enchufe
no entra en la toma, haga que un eléctrico reemplace la toma.
La longitud del cable usado para este aparato fue seleccionado para
reducir los riesgos de enredarse o tropezarse con un cable más
largo. Si se necesita un cable más largo se puede usar una extensión
aprobada. La clasificación eléctrica de la cable extensión debe ser
igual o mayor que la clasificación del aparato. El cable de extensión
debe ser del tipo de conexión a tierra con 3 cables. Es importante
tener cuidado de colocar el cable de extensión para que no se
pliegue sobre el mostrador o la mesera en donde niños puedan
tirar del mismo o tropezarse accidentalmente.
Para evitar una sobrecarga eléctrica del circuito, no use otro aparato
de alto voltaje en el mismo circuito con este aparato.
840210600 SPv03.qxd:Layout 1 12/19/11 9:20 AM Page 26
Page 27

27
Partes y Características
Entrada de Aire
Panel de Control
Salida
Zona de Cocción
CÓMO FUNCIONA LA COCCIÓN POR INDUCCIÓN:
La cocción por inducción funciona mediante un campo magnético entre las
bobinas de inducción ubicadas debajo de la tapa de vidrio y el material ferroso
(que contiene hierro) del recipiente de cocción. El calor de la inducción sólo
se produce en el recipiente mismo, no en la superficie de vidrio. La estufa se
calentará donde se coloca el recipiente, como resultado de la transferencia de
calor del recipiente.
Recipiente
de Cocción
Placa de Vidrio
Campo Magnético
Panel de Control
840210600 SPv03.qxd:Layout 1 12/19/11 9:20 AM Page 27
Page 28

28
Beneficios de la Cocción por Inducción
USO EFICIENTE DE LA ENERGÍA
• Calienta sólo el diámetro del recipiente para no desperdiciar
energía.
• El calentamiento comienza instantáneamente para lograr un
tiempo de cocción más rápido.
LIMPIEZA SENCILLA
• Es menos probable que los derrames se peguen a la superficie
de vidrio. Simplemente limpie con un paño cuando se enfríen.
CARACTERÍSTICAS DE SEGURIDAD
• No hay llama abierta.
• No se producen emisiones.
• La superficie que no está en contacto con el recipiente se mantiene
fría.
• La estufa no funciona sin un recipiente.
• El artefacto se apaga en forma automática una vez que se retira el
recipiente de cocción.
NOTA: Cuando se retira el recipiente de la superficie de cocción,
la bobina se desactivará. Pero si de devuelve el recipiente a la
superficie de cocción dentro de los 20 segundos, la bobina se
activará en forma automática.
Cómo Seleccionar los Recipientes Correctos
• Las estufas de inducción sólo funcionan con recipientes aptos
para inducción. Los recipientes de cocción deben tener hierro en
la base. Coloque un pequeño imán de cocina sobre la base del
recipiente; si se sostiene, es apto para estufas de inducción.
• El hierro fundido, el hierro fundido esmaltado y algunos aceros
inoxidables funcionan en las estufas de inducción. Si tiene dudas,
verifique la base del recipiente de cocción con un imán.
• Use sólo recipientes de cocción de bases planas de un diámetro de
5 a 10 pulgadas (12.7 a 25.4 cm).
RECIPIENTES DE COCCIÓN QUE FUNCIONAN:
• Algunos aceros inoxidables
• Hierro fundido esmaltado
• Esmalte sobre acero
• Hierro fundido
RECIPIENTES QUE NO FUNCIONAN:
• Bases de cobre
• Vidrio
• Aluminio (incluye muchos recipientes antiadherentes)
• Recipientes de tipo cerámica
840210600 SPv03.qxd:Layout 1 12/19/11 9:20 AM Page 28
Page 29

29
Cómo Usar la Estufa
2 41 3
Enchufe la estufa en un
tomacorriente. La pantalla
ENCENDIDO/APAGADO destellará
y se apagará.
Toque (no presione mucho)
ON/OFF (encendido/apagado)
( ). La pantalla mostrará cuatro
barras (––––) encima de las
configuraciones de temperatura.
START (iniciar) ( ) destellará en
la pantalla. La configuración de
temperatura LOW (baja) destellará.
Toque START (iniciar) ( ).
Aparecerá una luz sin titilar. El
ventilador se enciende. La estufa
emitirá un pitido para recordarle
de colocar el recipiente en el
centro de la zona de cocción
( ).
ANTES DE USAR POR PRIMERA VEZ:
• Lea todas las instrucciones y protecciones importantes de este manual.
• Quite todos los materiales de empaque.
• Limpie la superficie de la estufa con un paño suave embebido en agua.
Toque – o + para ajustar la
temperatura de cocción. Sonará
un pitido con cada toque para
aumentar o reducir la temperatura
de cocción. Coloque los
recipientes en la zona de cocción.
5
Toque ON/OFF (encendido/apagado)
( ) para apagar. Si se acciona
LOCK (bloqueo) ( ), sostenga
ON/OFF (encendido/apagado) ( )
durante 3 segundos para
desactivar LOCK (bloqueo) y
apagar la unidad.
840210600 SPv03.qxd:Layout 1 12/19/11 1:16 PM Page 29
Page 30

30
Cómo Usar la TIMER (temporizador) ( )
21
Toque
TIMER
(temporizador) ( ).
Toque – o + para configurar TIMER
(temporizador)
. Sostenga TIMER
(temporizador) ( )
para aumentar
el tiempo en unidades de 10
minutos. El tiempo máximo es
de 120 minutos.
Siga los pasos 1–4 de “Cómo Usar la Estufa” de la página 29.
• Cuando se presiona TIMER
(temporizador) ( )
, el tiempo titila
durante 6 segundos antes de comenzar o para ajustar el tiempo.
• TIMER
(temporizador) ( )
se pausará si se quita el recipiente de
cocción.
• Si vuelve a colocar los recipientes dentro de los 20 segundos, la
cocción continuará y TIMER
(temporizador) ( )
se reanudará. Si
se superan los 20 segundos pero se alcanza un tiempo menor al
de espera, debe presionarse START (iniciar) ( ).
• TIMER
(temporizador) ( )
apaga la unidad al finalizar el tiempo
configurado.
840210600 SPv03.qxd:Layout 1 12/19/11 9:20 AM Page 30
Page 31

31
Cómo Usar la LOCK (bloqueo) ( )
21
Sostenga LOCK (bloqueo) ( )
durante 3 segundos hasta que
aparezca una luz roja.
Para desbloquear: Sostenga
LOCK
(bloqueo) ( )
durante 3 segundos
hasta que aparezca una luz roja.
SI USTED VIVE EN UNA ÁREA DE ALTITUD ELEVADA:
El servicio de extensión tendrá información detallada sobre cocción
en su área. Para ubicar el servicio de extensión cooperativa en su
condado, tenga a bien visitar la siguiente
página: http://www.csrees.usda.gov/Extension/.
3
Si sostiene ON/OFF (encendido/
apagado) ( ) durante 3 segundos,
se desactiva
LOCK (bloqueo) ( )
y
la unidad se apaga.
840210600 SPv03.qxd:Layout 1 12/19/11 9:20 AM Page 31
Page 32

32
Cuidado y Limpieza
21
Cuando haya finalizado la
cocción, apague la estufa ( ) y
desenchúfela del tomacorriente.
Permita que la estufa se enfríe por
completo.
Limpie la superficie de la estufa
con un paño suave embebido en
agua. Si necesita una limpieza
más profunda, limpie la superficie
de la estufa con una mezcla de
agua y un detergente suave.
No use limpiadores abrasivos
o estropajos de abrasivos.
NOTAS:
• NO deslice el recipiente de
cocción sobre la estufa.
• NO coloque otros elementos
sobre la superficie de
cocción que no sean los
recipientes compatibles.
Peligro de Descarga Eléctrica.
Desconecte la energía antes de limpiar.
No sumerja el cable o enchufe en ningún líquido.
w
ADVERTENCIA
840210600 SPv03.qxd:Layout 1 12/19/11 9:20 AM Page 32
Page 33

33
Resolviendo Problemas
PROBLEMA
La estufa no funciona
después de
encenderla.
El panel de control
no funciona cuando
se presionan los
botones.
La estufa no para de
emitir pitidos.
Código de error E0,
E4, E5, E7, o E8
cuando la pantalla
de la estufa destella
un código de error.
Código de error E1
cuando la pantalla de
la estufa destella un
código de error.
CAUSA PROBABLE
• Se ha configurado LOCK (bloqueo). Verifique que la estufa esté desbloqueada.
• Se están presionado los botones con demasiada fuerza; sólo deben tocarse para funcionar.
• No se ha enchufado la estufa. Enchufe la estufa en un tomacorriente. Repita el proceso de inicio de la
sección “Cómo Usar la Estufa” de la página 29.
• Los recipientes no se encuentra en el centro de la zona de cocción.
• Se ha configurado LOCK (bloqueo). Verifique que la estufa esté desbloqueada.
• Los recipientes de cocción no son compatibles para inducción. Asegúrese de utilizar recipientes de
cocción compatibles. Ver la sección “Cómo Seleccionar los Recipientes Correctos” de la página 28.
• La estufa está averiada. No intente repararla. Comuníquese con el Servicio de Atención al Cliente al
800-851-8900.
• Flujo de aire bloqueado. La estufa debe hallarse a por lo menos 1 pulgada (2.5 cm) de la pared u otras
obstrucciones.
840210600 SPv03.qxd:Layout 1 12/19/11 9:20 AM Page 33
Page 34

34
Resolviendo Problemas (cont.)
PROBLEMA
Código de error E2 o
E3 cuando la pantalla
de la estufa destella
un código de error.
Código de error E6
cuando se apaga la
estufa.
CAUSA PROBABLE
• Quizás haya demasiados artefacto en el mismo tomacorriente. Enchufe en un tomacorriente donde no
haya otros artefactos.
• Se han calentado los recipientes de cocción durante mucho tiempo. Quítelos para que se enfríen. Repita
el proceso de inicio de la sección “Cómo Usar la Estufa” de la página 29.
840210600 SPv03.qxd:Layout 1 12/19/11 9:20 AM Page 34
Page 35

35
Grupo HB PS, S.A. de C.V.
Monte Elbruz No. 124 Int. 601
Col. Palmitas Polanco
México, D.F. C.P. 11560
01-800-71-16-100
PRODUCTO:
MARCA:
MODELO:
Grupo HB PS, S.A. de C.V. cuenta con una Red de Centros de Servicio Autorizada, por favor consulte en la lista anexa el nombre y dirección de los establecimientos en la
República Mexicana en donde usted podrá hacer efectiva la garantía, obtener partes, componentes, consumibles y accesorios; así como también obtener servicio para
productos fuera de garantía. Para mayor información llame sin costo: Centro de Atención al consumidor: 01 800 71 16 100
Grupo HB PS, S.A. de C.V. le otorga a partir de la fecha de compra:
GARANTÍA DE 1 AÑO.
• Esta garantía ampara, todas las piezas y componentes del producto que resulten con defecto de fabricación incluyendo la mano de obra.
•
Grupo HB PS,
S.A. de C.V. se obliga a reemplazar, reparar o reponer, cualquier pieza o componente defectuoso; proporcionar la mano de obra necesaria para su diagnóstico y reparación,
todo lo anterior sin costo adicional para el consumidor.
• Esta garantía incluye los gastos de transportación del producto que deriven de su cumplimiento dentro de su red de servicio.
LIMITACIONES
• Esta garantía no ampara el reemplazo de piezas deterioradas por uso o por desgaste normal, como son: cuchillas, vasos, vasos, filtros, etc.
• Grupo HB PS, S.A. de C.V. no se hace responsable por los accidentes producidos a consecuencia de una instalación eléctrica defectuosa, ausencia de toma de tierra, clavija de enchufe
en mal estado, etc.
COBERTURA
PÓLIZA DE GARANTÍA
EXCEPCIONES
Esta garantía no será efectiva en los siguientes casos:
a) Cuando el producto se hubiese utlizado en condiciones distintas a las normales. (Uso industrial, semi-industrial o comercial.)
b) Cuando el producto no hubiese sido operado de acuerdo con el instructivo de uso.
c) Cuando el producto hubiese sido alterado o reparado por personas no autorizadas por Grupo HB PS, S.A. de C.V. el fabricante nacional, importador o comercializador responsable
respectivo.
d) Esta garantía pierde su validez si el producto es utilizado en un medio diferente a una vivienda unifamiliar o se somete a cualquier voltaje o forma de onda diferente a la especificada
en la etiqueta de clasificación (ej., 120V ~ 60 Hz).
El consumidor puede solicitar que se haga efectiva la garantía ante la propia casa comercial donde adquirió su producto, siempre y cuando Grupo HB PS, S.A. de C.V. no cuente con talleres de
servicio.
840210600 SPv03.qxd:Layout 1 12/19/11 9:20 AM Page 35
Page 36

12/11840210600
PROCEDIMIENTO PARA HACER EFECTIVA LA GARANTÍA
• Para hacer efectiva la garantía no deben exigirse mayores requisitos que la presentación del producto y la póliza correspondiente, debidamente sellada por el establecimiento que lo vendió.
• Para hacer efectiva la garantía, lleve su aparato al Centro de Servicio Autorizado más cercano a su domicilio (consulte la lista anexa).
• Si no existe Centro de Servicio Autorizado en su localidad llame a nuestro Centro de Atención al Consumidor para recibir instrucciones de como hacer efectiva su garantía.
• El tiempo de reparación, en ningún caso será mayor de 30 días naturales contados a partir de la fecha de recepción del producto en nuestros Centros de Servicio Autorizados.
• En caso de que el producto haya sido reparado o sometido a mantenimiento y el mismo presente deficiencias imputables al autor de la reparación o del mantenimiento dentro de los treinta
días naturales posteriores a la entrega del producto al consumidor, éste tendrá derecho a que sea reparado o mantenido de nuevo sin costo alguno. Si el plazo de la garantía es superior a los
treinta días naturales, se estará a dicho plazo.
• El tiempo que duren las reparaciones efectuadas al amparo de la garantía no es computable dentro del plazo de la misma. Cuando el bien haya sido reparado se iniciará la garantía respecto
de las piezas repuestas y continuará con relación al resto. En el caso de reposición del bien deberá renovarse el plazo de la garantía.
DÍA___ MES___ AÑO___
Si desea hacer comentarios o sugerencias con respecto a nuestro servicio o tiene alguna queja derivada de la atención recibida en
alguno de nuestros Centros de Servicio Autorizados, por favor dirigirse a:
GERENCIA INTERNACIONAL DE SERVICIO
01 800 71 16 100
Email: mexico.service@hamiltonbeach.com.mx
RED DE CENTROS DE SERVICIO AUTORIZADA GRUPO HB PS, S.A. DE C.V.
Distrito Federal
ELECTRODOMÉSTICOS
Av. Plutarco Elias Cailes No. 1499
Zacahuitzco MEXICO 09490 D.F.
Tel: 01 55 5235 2323 • Fax: 01 55 5243 1397
CASA GARCIA
Av. Patriotismo No. 875-B
Mixcoac MEXICO 03910 D.F.
Tel: 01 55 5563 8723 • Fax: 01 55 5615 1856
Nuevo Leon
FERNANDO SEPULVEDA REFACCIONES
Ruperto Martínez No. 238 Ote.
Centro MONTERREY, 64000 N.L.
Tel: 01 81 8343 6700 • Fax: 01 81 8344 0486
Jalisco
SERVICIOS DE MANTENIMIENTO CASTILLO
Garibaldi No. 1450
Ladrón de Guevara
GUADALAJARA 44660 Jal.
Tel: 01 33 3825 3480 • Fax: 01 33 3826 1914
Chihuahua
DISTRIBUIDORA TURMIX
Av. Paseo Triunfo de la Rep. No. 5289 Local 2 A.
Int. Hipermart
Alamos de San Lorenzo
CD. JUAREZ 32340 Chih.
Tel: 01 656 617 8030 • Fax: 01 656 617 8030
Los modelos incluídos en el instructivo de Uso y Cuidado pueden ir seguidos o no por un sufijo correspondiente a una
o varias letras del alfabeto y sus combinaciones, separadas o no por un espacio, coma, diagonal, o guión. Como ejemplos
los sufijos pueden ser: “Y” y/o “MX” y/o “MXY” y/o “Z”.
Modelo:
34102
Tipo:
TS02
Características Eléctricas:
120V~ 60Hz 1300W
840210600 SPv03.qxd:Layout 1 12/19/11 9:20 AM Page 36
 Loading...