

Hamilton Beach 33464 User Guide
READ BEFORE USE
LIRE AVANT UTILISATION
LEA ANTES DE USAR
Visit www.hamiltonbeach.com for our
complete line of products and Use and
Care Guides – as well as delicious recipes,
tips, and to register your product online!
Rendez-vous sur www.hamiltonbeach.ca
pour notre liste complète de produits et de
nos manuels utilisateur – ainsi que nos
délicieuses recettes, nos conseils et pour
enregistrer votre produit en ligne !
¡Visite www.hamiltonbeach.com.mx
para obtener nuestra línea completa de
productos y las Guías de Uso y Cuidado,
además de deliciosas recetas, consejos y
para registrar su producto en línea!
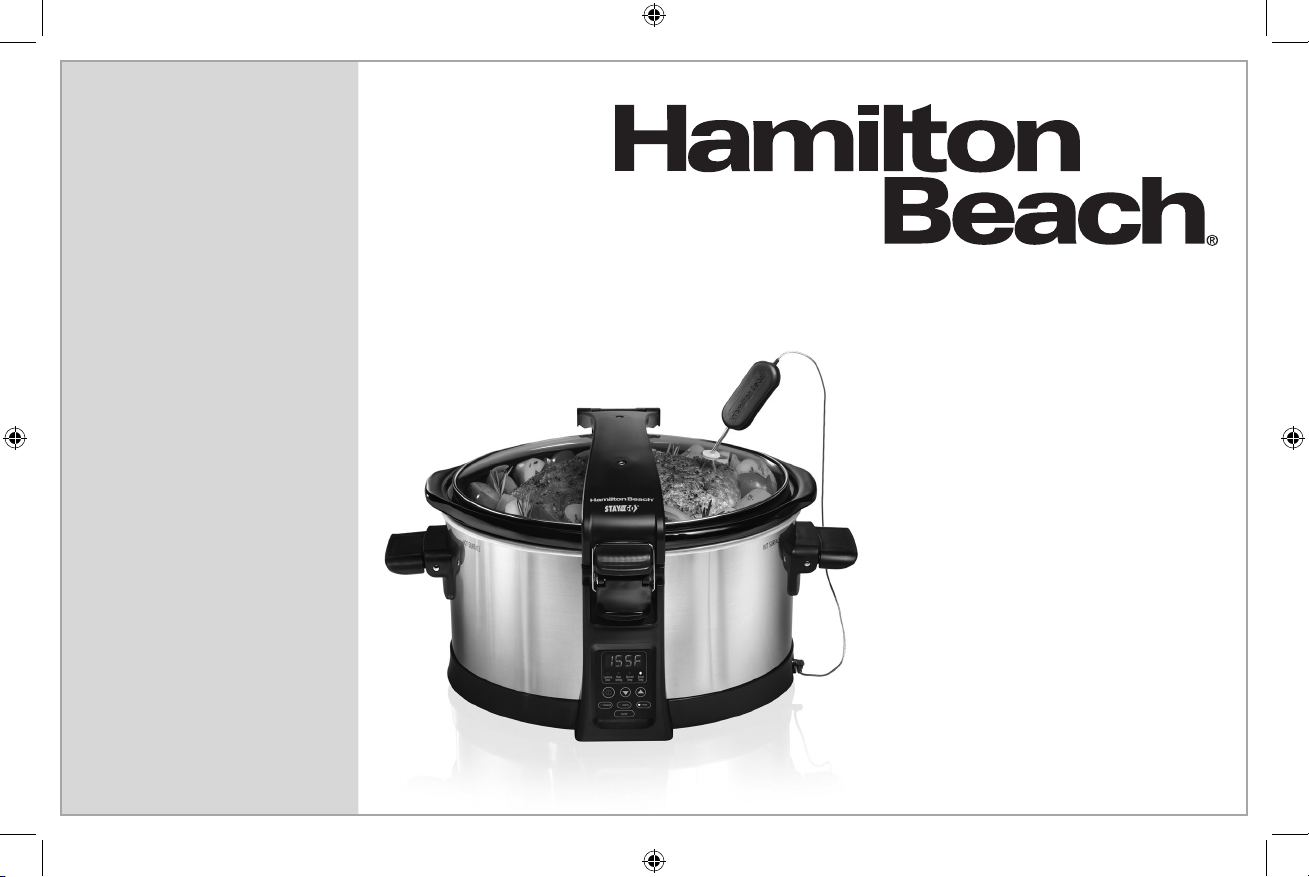
Programmable
Slow Cooker
Questions?
Please call us – our friendly
associates are ready to help.
USA: 1.800.851.8900
Questions ?
N’hésitez pas à nous appeler –
nos associés s’empresseront
de vous aider.
CAN : 1.800.267.2826
¿Preguntas?
Por favor llámenos – nuestros
amables representantes están
listos para ayudar.
MEX: 01 800 71 16 100
Le invitamos a leer cuidadosamente este
instructivo antes de usar su aparato.
Mijoteuse
programmable
Olla de Cocción
Lenta Programable
English ...................... 2
Français ................... 17
Español ................... 31

IMPORTANT SAFEGUARDS
When using electrical appliances, basic safety precautions should always be followed to reduce the risk of fire, electric shock, and/or
injury to persons, including the following:
1. Read all instructions.
2. This appliance is not intended for use by persons (including
children) with reduced physical, sensory, or mental
capabilities, or lack of experience and knowledge, unless they
are closely supervised and instructed concerning use of the
appliance by a person responsible for their safety.
3. Close supervision is necessary when any appliance is used by
or near children. Children should be supervised to ensure that
they do not play with the appliance.
4. Do not touch hot surfaces. Use handles or knobs.
5. To protect against electrical shock, do not immerse cord,
plug, or base in water or other liquid.
6. Unplug from outlet when not in use and before cleaning.
Allow to cool before putting on or taking off parts.
7. Do not operate any appliance with a damaged supply cord or
plug, or after the appliance malfunctions or has been dropped
or damaged in any manner. Supply cord replacement and
repairs must be conducted by the manufacturer, its service
agent, or similarly qualified persons in order to avoid a hazard.
Call the provided customer service number for information on
examination, repair, or adjustment.
8. The use of accessory attachments not recommended by the
appliance manufacturer may cause injuries.
9. Do not use outdoors.
10. Do not let cord hang over edge of table or counter, or touch
hot surfaces, including stove.
11. Do not place removable crock or base on or near hot gas or
an electric burner. Do not place slow cooker base in a heated
oven.
12. Extreme caution must be used when moving an appliance
containing hot oil or other hot liquids.
13. To disconnect slow cooker, turn control to OFF ( ); then
remove plug from wall outlet.
14. CAUTION! To prevent damage or shock hazard, do not cook
in base. Cook only in removable crock.
15. Avoid sudden temperature changes, such as adding
refrigerated foods into a heated removable crock.
16. Intended for countertop use only.
17. WARNING: Spilled food can cause serious burns. Keep
appliance and cord away from children. Never drape cord
over edge of counter, never use outlet below counter, and
never use with an extension cord.
18. Do not use appliance for other than intended use.
SAVE THESE INSTRUCTIONS
2

Other Consumer Safety Information
This product is intended for household use only.
This product is only intended for the preparation, cooking, and
serving of foods. This product is not intended for use with any
nonfood materials or products.
WARNING! Shock Hazard: This appliance has a polarized plug
(one wide blade) that reduces the risk of electric shock. The
plug fits only one way into a polarized outlet. Do not defeat the
safety purpose of the plug by modifying the plug in any way or
by using an adapter. If the plug does not fit fully into the outlet,
reverse the plug. If it still does not fit, have an electrician replace
the outlet.
CROCK AND LID: PRECAUTIONS AND INFORMATION
• Please handle crock and lid carefully to ensure long life.
• Avoid sudden, extreme temperature changes. For example,
do not place a hot lid or crock into cold water, or onto a wet
surface.
• Avoid hitting crock or lid against faucet or other hard surfaces.
• Do not use crock or lid if chipped, cracked, or severely
scratched.
• Do not use abrasive cleansers or metal scouring pads.
REMOVING LID AND CROCK
The sides of the slow cooker’s base get very warm because
the heating elements are located here. Use handles on base if
necessary. Use oven mitts to remove crock.
A short power-supply cord is used to reduce the risk resulting
from it being grabbed by children, becoming entangled in, or
tripping over a longer cord.
• The bottom of the crock is very rough and can damage the
countertop. Use caution.
• The crock and lid can become very hot. Use caution. Do not
place directly on any unprotected surface or countertop.
• The crock is microwave-safe and oven-proof, but never heat
crock when empty. Never place lid on a burner or stove top.
Do not place lid in a microwave oven, conventional oven, or
on stove top.
When removing lid, tilt so that opening faces away from you to
avoid being burned by steam.
3
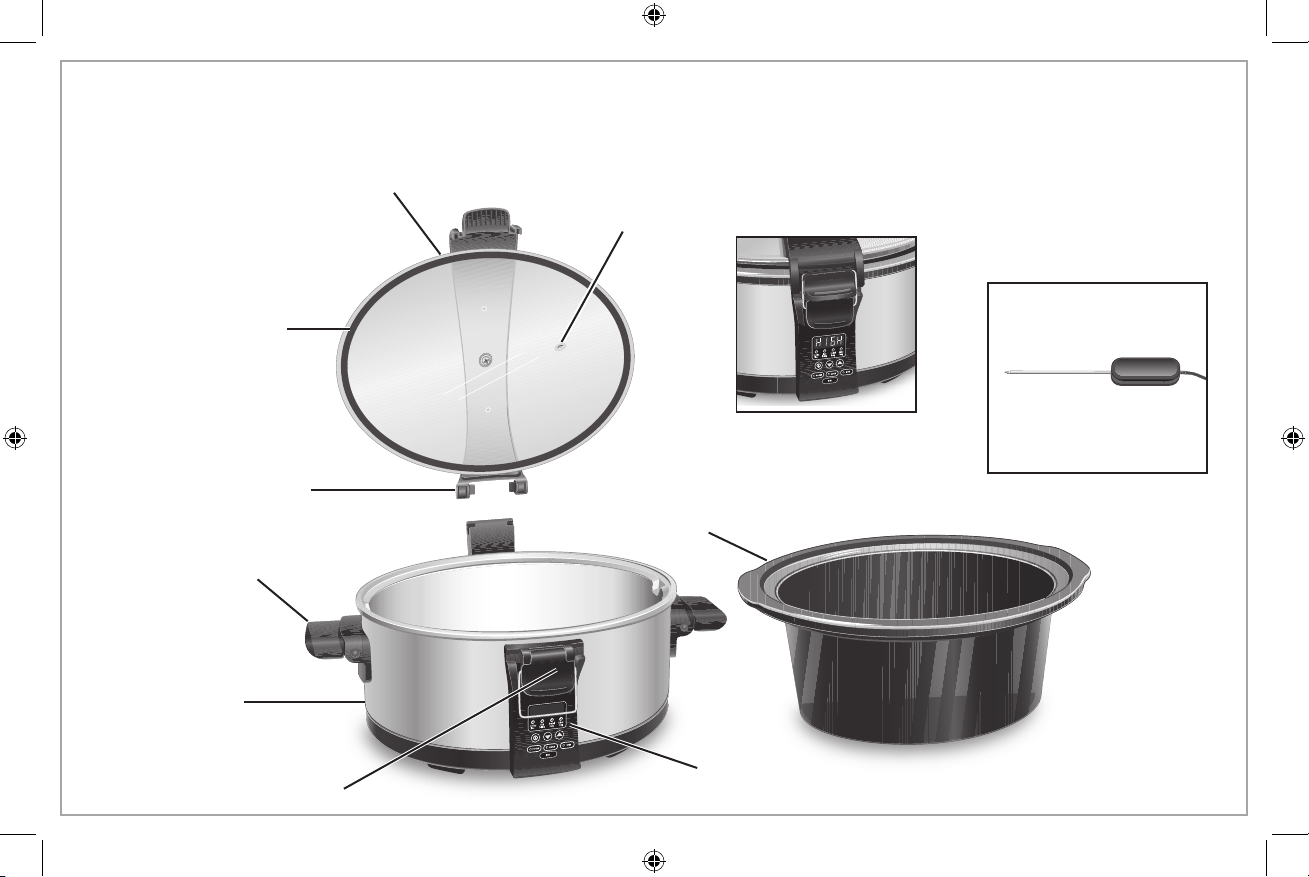
Parts and Features
*To order parts:
US: 1.800.851.8900
Canada: 1.800.267.2826
www.hamiltonbeach.com
Lid Gasket
Lid Hinge
Folding Base Handles
Lid*
Crock Capacity
For best results, fill the crock at least half full but no more than one inch
from the rim. If only half-filled, check for doneness 1 to 2 hours earlier
than recipe.
Probe Hole
Probe*
(available on some models)
Clip locked in place for
cooking or transporting.
Do not store with lid
clamped down.
Crock*
Base
Control Panel/
4
Clip Latch
Display

Cooking Modes
No matter what you plan to cook, this slow cooker has three
cooking modes to make it easy. Here’s how to choose the
one that’s right for your lifestyle and the food you’re cooking.
Will you be away when your food is finished cooking?
Use PROGRAM Mode. Input preferred amount of cooking time
and the slow cooker automatically shifts to Warm at the end of
the selected cooking time. Food won’t overcook!
Do you want to cook the traditional way without setting a time?
— OR —
Do you want to heat previously cooked food?
Use MANUAL Mode. Lets you select traditional High or Low settings.
Are you cooking a large cut of meat or using a recipe that
requires food to reach a certain temperature?
Use PROBE Mode. For many foods, especially large cuts of meat
like roasts, chicken, turkey and pork, internal food temperature
is the best test for doneness. The temperature probe with this
slow cooker takes the guesswork out of slow cooking. Select the
desired internal food temperature and the slow cooker will
automatically shift to Warm once the temperature is reached.
By using the Cooking Guide for Probe chart, you can estimate
the amount of time the food will need to cook.
Visit foodsafety.gov for more information about cooking times
and proper internal temperature settings.
Do you want to keep previously cooked food warm?
(For instance, moving slow cooker from kitchen to buffet table.)
Use the PROBE Mode. Once food reaches desired temperature,
you can select the Warm setting to monitor food temperature.
Use the MANUAL Mode. Lets you select Warm setting.
Use the PROGRAM Mode. Lets you select Warm setting.
The slow cooker will shut off after desired time.
5
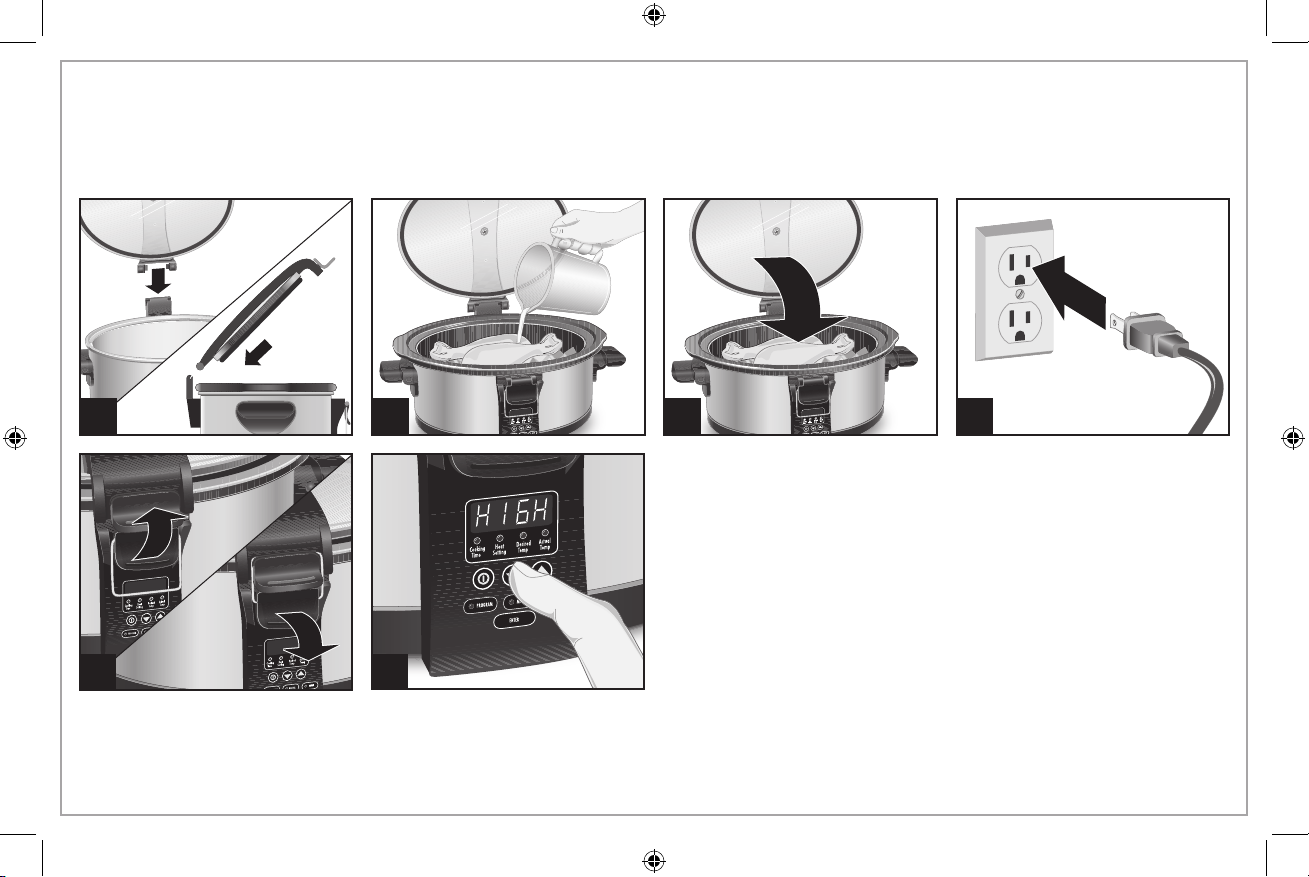
How to Use Your Slow Cooker
BEFORE FIRST USE: Wash lid and crock in hot, soapy water. Rinse and dry.
1
5
Latch the lid during the cooking
process for even cooking and to
prevent heat loss.
6
2 3
6
Choose desired cooking mode.
(See following pages for
Program, Manual, and Probe
mode instructions.)
4
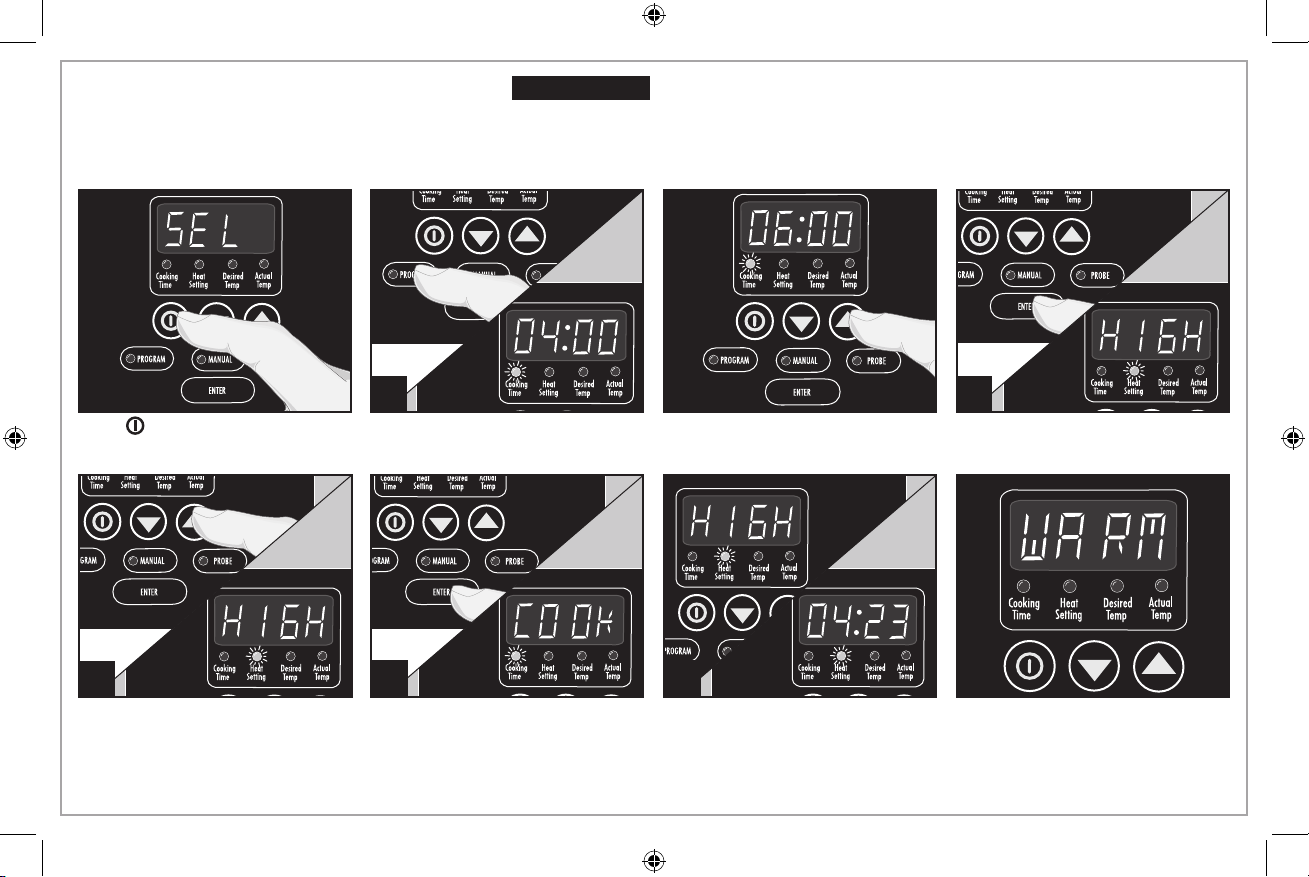
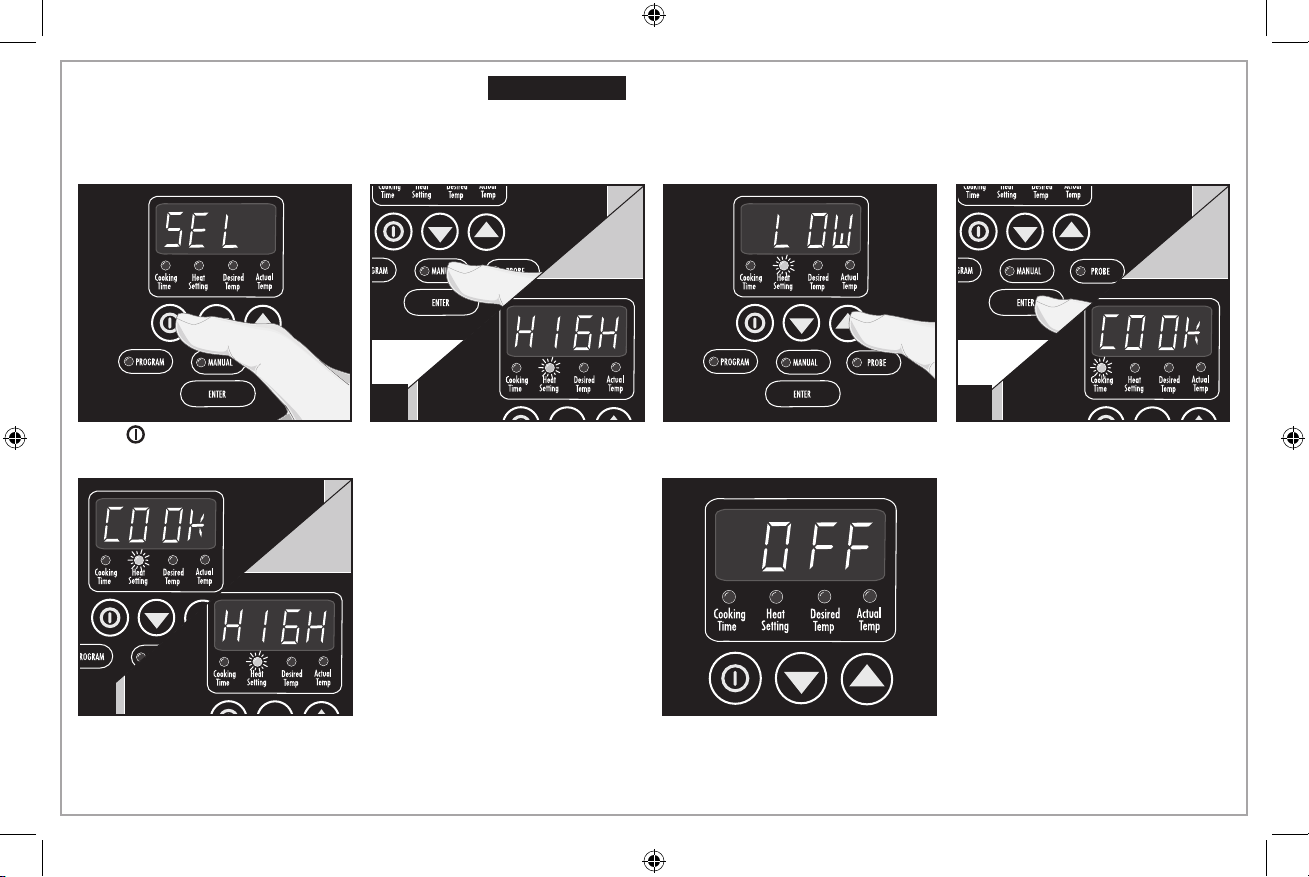
Program Mode
Food Safety Hazard.
w WARNING
Food must be hot enough to prevent bacterial growth before using Warm setting. The Warm setting should
only be used after a recipe has been thoroughly cooked. Do not reheat food on Warm setting. If food has
been cooked and then refrigerated, reheat it on LOW or HIGH and then switch to Warm. Visit foodsafety.gov
for more information.
1
Press (ON). Press PROGRAM. Cooking Time
5
Press arrows to select heat setting. Press ENTER to start unit and a
2
will illuminate.
6
3-second beep will sound.
NOTE: Unit will automatically
start in 20 seconds if ENTER is not
pressed.
3
Press arrows to select cooking
time.
7
Display will alternate between heat setting and remaining time. At
the end of cook time, slow cooker will automatically switch to Warm
setting and unit will turn off and display OFF after a total of 14 hours.
NOTE: If Warm setting selected, unit will turn off and display
OFF after selected time.
4
Press ENTER. Heat Setting will
illuminate.
8
7
Manual Mode
Food Safety Hazard.
w WARNING
Food must be hot enough to prevent bacterial growth before using Warm setting. The Warm setting should
only be used after a recipe has been thoroughly cooked. Do not reheat food on Warm setting. If food has been
cooked and then refrigerated, reheat it on LOW or HIGH and then switch to Warm. Visit foodsafety.gov for more
information.
1 2 3
Press (ON). Press MANUAL. Heat Setting will
5
8
illuminate.
The display will alternate between
COOK and heat setting (if HIGH or
LOW is selected). If using Warm
setting, display will remain on
WARM.
Press arrows to select heat setting.
6
4
Press ENTER to start unit and a
3-second beep will sound.
NOTE: Unit will automatically
start in 20 seconds if ENTER is not
pressed.
The unit will turn off and display
OFF after a total of 14 hours.
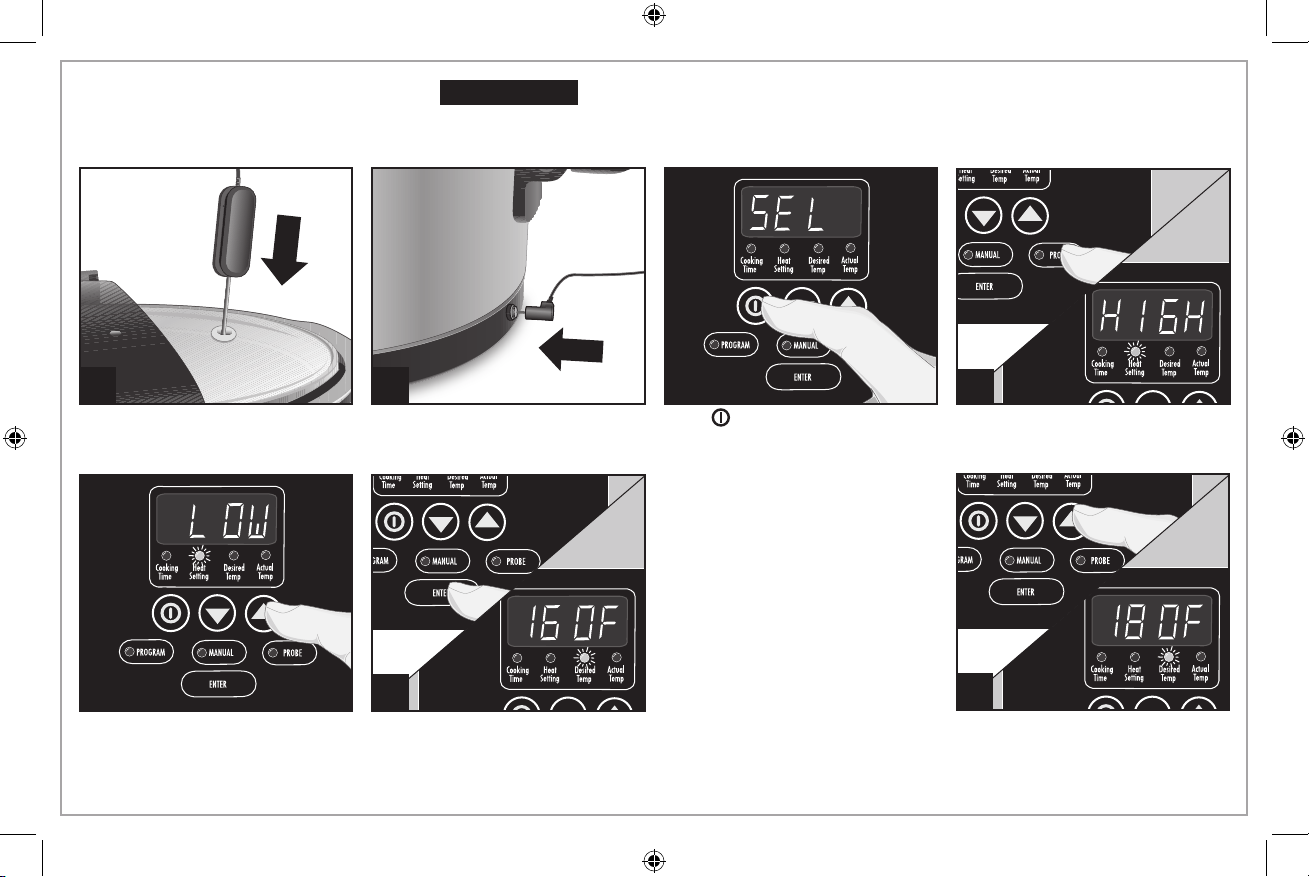
Probe Mode
Food Safety Hazard.
w WARNING
Food must be hot enough to prevent bacterial growth before using Warm setting. The Warm setting should only be
used after a recipe has been thoroughly cooked. Do not reheat food on Warm setting. If food has been cooked and then
refrigerated, reheat it on LOW or HIGH and then switch to Warm. Visit foodsafety.gov for more information.
1 2 3
Make sure probe is in center of
food and not touching bottom of
crock.
Insert probe into jack on side of
slow cooker.
5 6
Press arrows to select desired
heat setting. Select HIGH or
LOW.
Press ENTER. Desired Temp will
illuminate.
Press (ON).
NOTE: To change temperature
display from ºF to ºC:
Press PROBE and ENTER at the
same time.
The temperature in ºC will
now be displayed.
If slow cooker is unplugged,
it will reset to ºF.
4
Press PROBE. Heat Setting will be
illuminated.
7
Press arrows to select desired
temperature.
9
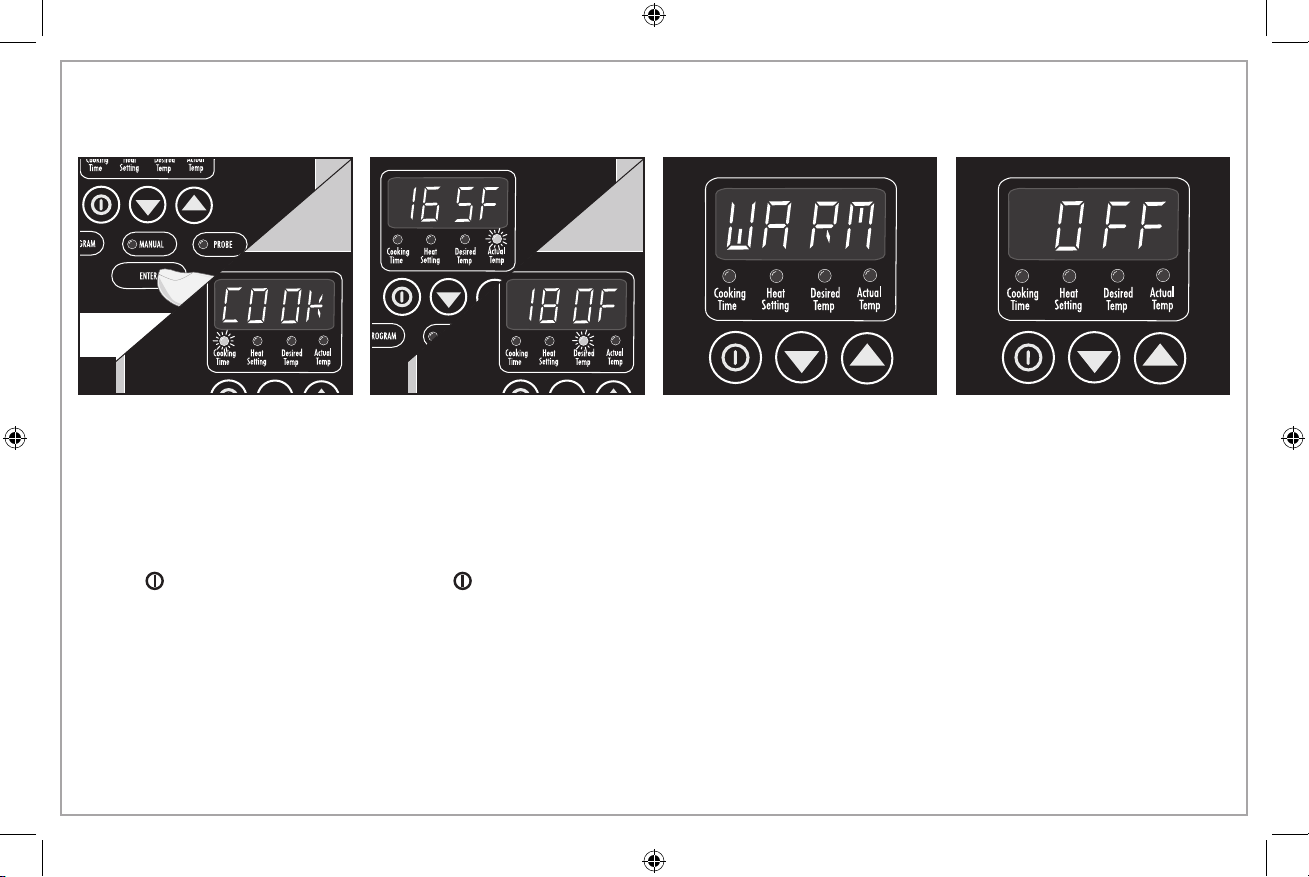
Probe Mode (cont.)
8
Press ENTER. COOK will display
and 3-second beep will sound.
NOTE: Unit will automatically
start in 20 seconds if ENTER is not
pressed.
9
Display will alternate between
actual temperature and the
temperature selected.
To monitor temperature after food is cooked:
1. Press (OFF) if not already off); then press (ON).
2. Press PROBE. Heat Setting will be illuminated.
3. Press arrows to select WARM.
4. Press ENTER. WARM will display and 3-second beep will sound.
NOTE: The unit will automatically start in 20 seconds if ENTER is not
pressed. Display will alternate between WARM and actual temperature.
The unit will turn off and display OFF after a total of 14 hours.
10
10
When selected temperature is
reached, the unit will switch to
Warm and display WARM
constantly.
11
The unit will turn off and display
OFF after a total of 14 hours.

Cooking Guide for Probe
Visit www.foodsafety.gov for more information
on safe internal cooking temperatures.
FOOD/WEIGHT LOW HIGH DESIRED TEMP
Beef Roast (3 lbs/1.5 kg) 3–4 hours 1.5 hours 145°F/63°C
Beef Brisket (4–5 lbs/2–2.2 kg) 8 hours 6 hours 145°F/63°C
Turkey Breast (6–7 lbs/3–3.5 kg)* 6–7 hours 3–4 hours 180°F/82°C
Whole Chicken (4–6 lbs/2–3 kg) 4.5–5 hours 2.5–3 hours 165°F/74°C
Chicken Pieces (bone-in) (3–4 lbs/1.5–2 kg) 4–5 hours 1.5 hours 180°F/82°C
Chicken Breasts (4 lbs/2 kg) 4 hours 3.5 hours 180°F/82°C
Fully Cooked Ham (7.5 lbs/3.5 kg)* 4–5 hours 3 hours 145°F/63°C
Pork Tenderloin (2–3 lbs/1–1.5 kg) 2–3 hours 1.5–2 hours 160°F/71°C
Pork Roast (4–5 lbs/2–2.2 kg) 4–5 hours 2.5 hours 160°F/71°C
Pork Chops (2–3 lbs/1–1.5 kg) 5 hours 2–3 hours 160°F/71°C
* For 6-quart slow cooker only. Adjust the size and weight of food to fit 5-quart (or smaller) slow cooker.
NOTE: If cooking dense vegetables (such as potatoes or other root vegetables) with meats, check for doneness when desired meat
temperature is reached. These types of vegetables may take longer to cook when cooked with meats/foods such as those listed in the
Cooking Guide above.
11
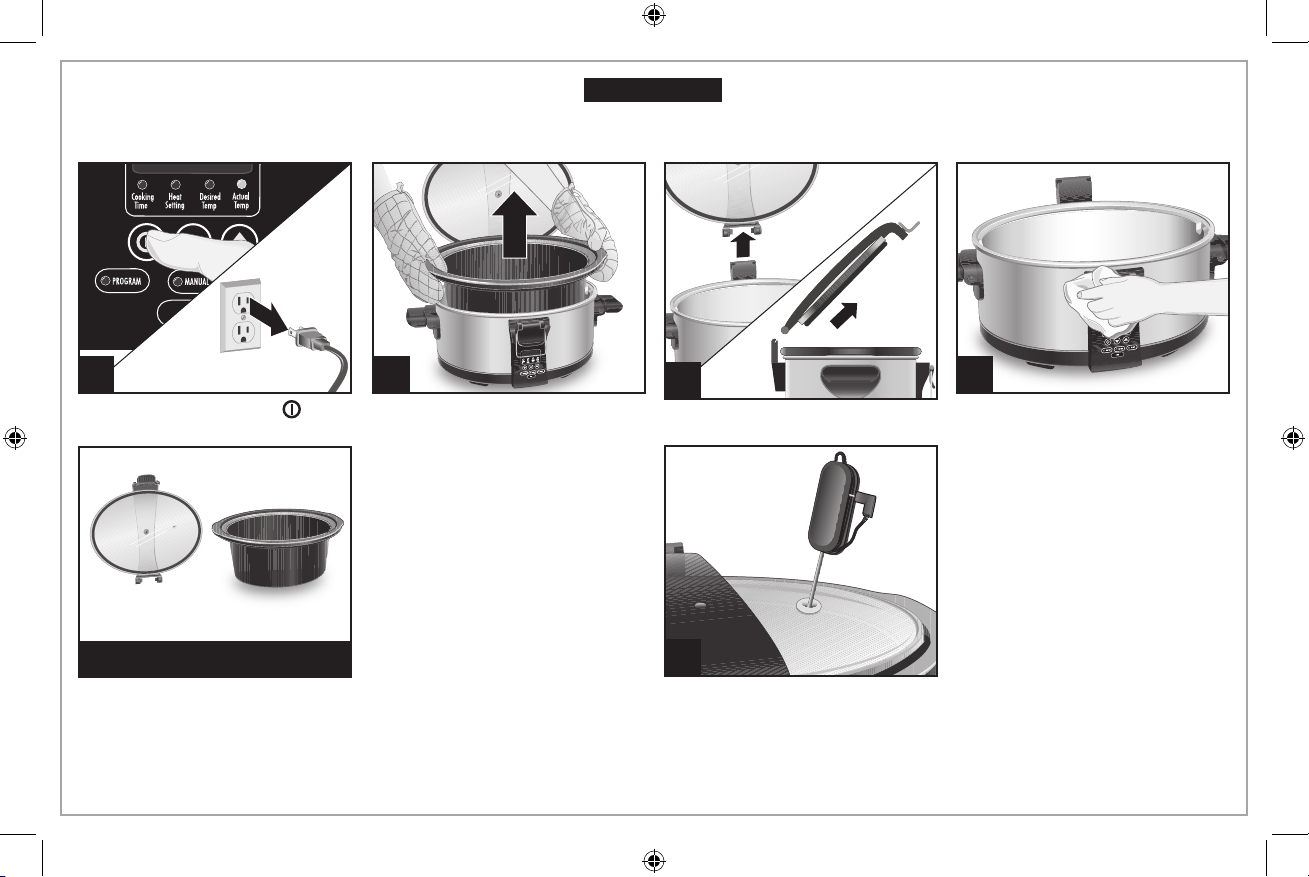
Care and Cleaning
w WARNING
Electrical Shock Hazard.
Disconnect power before cleaning. Do not immerse cord, plug, or base in
any liquid.
1 2
and unplug.
DISHWASHER-SAFE
DO NOT use the “SANI” setting
when washing in the dishwasher.
“SANI” cycle temperatures could
damage your product.
12
Remove crock and let cool.If not already OFF, press (OFF)
To prevent lingering food smells,
found in most plastic containers,
clean rubber lid gasket with hot,
soapy water after each use.
Store with lid ajar.
3
5
Wrap probe wire around handle
for storage.
4

Tips for Slow Cooking
• The crock should be at least half-filled for best results. If only
half-filled, check for doneness 1 to 2 hours earlier than recipe.
• Stirring is not necessary when slow cooking. Removing glass lid
results in major heat loss and the cooking time may need to
be extended. However, if cooking on High, you may want to stir
occasionally.
• If cooking soups or stews, leave a 2-inch (5-cm) space between
the top of the crock and the food so that the recipe can come to
a simmer.
• Many recipes call for cooking all day. If your morning schedule
doesn’t allow time to prepare a recipe, do it the night before.
Place all ingredients in crock, cover with lid, and refrigerate
overnight. In the morning, simply place crock in slow cooker.
Food Safety Tips
• Do not use frozen, uncooked meat in the slow cooker. Thaw any
meat or poultry before slow cooking.
• Visit www.foodsafety.gov for more information on safe internal
cooking temperatures.
• To store leftovers after cooking, do NOT place the entire crock in the
refrigerator since contents will take too long to cool. Instead, divide
leftovers into smaller containers and place into refrigerator.
• Some foods are not suited for extended cooking in a slow cooker.
Pasta, seafood, milk, cream, or sour cream should be added 2
hours before serving. Evaporated milk or condensed soups are
perfect for slow cooking.
• The higher the fat content of meat, the less liquid is needed. If
cooking meat with a high fat content, place thick onion slices
underneath so meat will not sit on (and cook in) fat.
• Slow cookers allow for very little evaporation. If making your
favorite soup, stew, or sauce, reduce liquid called for in original
recipe. If too thick, liquid can be added later.
• If cooking a vegetable-type casserole, there will need to be liquid
in the recipe to prevent scorching on the sides of crock.
• Never allow undercooked or raw meat to sit at room temperature
in the slow cooker. Once meat is placed into the crock, it should be
cooked immediately (unless prepping slow cooker the night before,
where crock should be placed into the refrigerator).
IF YOU LIVE IN A HIGH-ALTITUDE AREA:
The Extension service will have detailed information about cooking
for your area. To locate the Cooperative Extension service in your
county, please visit: http://www.csrees.usda.gov/Extension/.
13
Troubleshooting
PROBLEM
There is no display visible
on the control panel.
I can’t program the current
time on the control panel.
Food is undercooked.
The food isn’t done after
cooking the amount of time
recommended in my
recipe.
My meal was overcooked.
Why?
PROBABLE CAUSE/SOLUTION
• Is the unit plugged in?
• Is the unit turned on? Display should flash SEL.
• Test that the electrical outlet is working with a lamp in known working order.
• Power interruption of 5 seconds or longer.
• There is no “clock” feature on this slow cooker, only a countdown timer.
• Was food cooked on the Warm setting? Do not cook on Warm setting; always cook on Low or High
heat settings.
• Was power interrupted (due to brownout, electrical storm, etc.) for 5 seconds or longer?
NOTE: For a power interruption of 5 seconds or less, the slow cooker will remember the programmed
heat and time settings.
• Did you select the Low heat setting, but used a cooking time based on the High heat setting?
• Did you have the glass lid placed correctly on the slow cooker?
• This can be due to voltage variations (which are commonplace everywhere) or altitude. The slight
fluctuations in power do not have a noticeable effect on most appliances. However, it can alter the
cooking times in the slow cooker by extending the cooking times. Allow sufficient time and select the
appropriate heat setting. You will learn through experience if the shorter or longer time is needed.
• Was the crock at least half full? The slow cooker has been designed to thoroughly cook food in a filled
crock. If the crock is only half-filled, check for doneness 1 to 2 hours earlier than recipe time.
• Did you select hours based on a Low heat recipe?
• Foods will continue to increase in temperature after desired temperature has been reached.
14

Notes
15
 Loading...