

Page 1

READ BEFORE USE
LIRE AVANT UTILISATION
LEA ANTES DE USAR
Visit www.hamiltonbeach.com for our
complete line of products and Use and
Care Guides – as well as delicious recipes,
tips, and to register your product online.
Rendez-vous sur www.hamiltonbeach.ca
pour notre liste complète de produits et de
nos manuels utilisateur – ainsi que nos
délicieuses recettes et nos conseils .
Visite www.hamiltonbeach.com (
o
www.hamiltonbeach.com.mx (México)
para ver otros productos de Hamilton Beach
o para contactarnos.
Questions
Please call us – our friendly
associates are ready to help.
USA: 1.800.851.8900
Questions
N’hésitez pas à nous appeler –
nos associés s’empresseront
de vous aider.
CAN : 1.800.267.2826
Preguntas
Por favor llámenos – nuestros
amables representantes están
listos para ayudar.
EE. UU.: 1.800.851.8900
MEX: 01 800 71 16 100
Le invitamos a leer cuidadosamente este
instructivo antes de usar su aparato.
EE. UU.)
Slow Cooker
Mijoteuse
Olla de Cocción
Lenta
English ...................... 2
Français ................... 11
Español ................... 21
Page 2

IMPORTANT SAFEGUARDS
When using electrical appliances, basic safety precautions should always be followed to reduce the risk of fire, electric shock, and/or injury to
persons, including the following:
1. Read all instructions.
2. This appliance is not intended for use by persons (including
children) with reduced physical, sensory, or mental capabilities,
or lack of experience and knowledge, unless they are closely
supervised and instructed concerning use of the appliance by a
person responsible for their safety.
3. Close supervision is necessary when any appliance is used by
or near children. Children should be supervised to ensure that
they do not play with the appliance.
4. Do not touch hot surfaces. Use handles or knobs.
5. To protect against electric shock, do not immerse cord, plug, or
base in water or other liquid.
6. Unplug from outlet when not in use and before cleaning. Allow
to cool before putting on or taking off parts.
7. Do not operate any appliance with a damaged supply cord or
plug, or after the appliance malfunctions or has been dropped
or damaged in any manner. Supply cord replacement and
repairs must be conducted by the manufacturer, its service
agent, or similarly qualified persons in order to avoid a hazard.
Call the provided customer service number for information on
examination, repair, or adjustment.
8. The use of accessory attachments not recommended by the
appliance manufacturer may cause injuries.
9. Do not use outdoors.
10. Do not let cord hang over edge of table or counter, or touch hot
surfaces, including stove.
11. Do not place removable crock or base on or near hot gas or
an electric burner. Do not place slow cooker base in a heated
oven.
12. Extreme caution must be used when moving an appliance
containing hot oil or other hot liquids.
13. To disconnect slow cooker, turn control knob to OFF ( ); then
remove plug from wall outlet.
14. CAUTION: To prevent damage or shock hazard, do not cook in
base. Cook only in removable crock.
15. Avoid sudden temperature changes, such as adding
refrigerated foods into a heated removable crock.
16. Intended for countertop use only.
17. WARNING: Spilled food can cause serious burns. Keep
appliance and cord away from children. Never drape cord over
edge of counter, never use outlet below counter, and never use
with an extension cord.
18. Do not use appliance for other than intended use.
SAVE THESE INSTRUCTIONS
2
Page 3

Other Consumer Safety Information
This appliance is intended for household use only.
This appliance is only intended for the preparation, cooking, and
serving of foods. This appliance is not intended for use with any
nonfood materials or products.
w WARNING
with a polarized plug (one wide blade) to reduce the risk of electric
shock. The plug fits only one way into a polarized outlet. Do not
defeat the safety purpose of the plug by modifying the plug in any
way or by using an adapter. If the plug does not fit fully into the
outlet, reverse the plug. If it still does not fit, have an electrician
replace the outlet.
Electrical Shock Hazard: This appliance is provided
CROCK AND LID: PRECAUTIONS AND INFORMATION
• Please handle crock and lid carefully to ensure long life.
• Avoid sudden, extreme temperature changes. For example, do not
place a hot lid or crock into cold water, or onto a wet surface.
• Avoid hitting crock or lid against faucet or other hard surfaces.
• Do not use crock or lid if chipped, cracked, or severely scratched.
• Do not use abrasive cleansers or metal scouring pads.
• The bottom of the crock is very rough and can damage the
countertop. Use caution.
A short power-supply cord is used to reduce the risk resulting from
it being grabbed by children, becoming entangled in, or tripping
over a longer cord.
• The crock and lid can become very hot. Use caution. Do not
place directly on any unprotected surface or countertop.
• The crock is microwave-safe and oven-proof, but never heat crock
when empty. Never place crock on a burner or stove top.
• Do not place lid in a microwave oven, conventional oven, or on
stove top.
REMOVING LID AND CROCK
When removing lid, tilt so that opening faces away from you to
avoid being burned by steam.
The sides of the slow cooker’s base get very warm because
the heating elements are located here. Use handles on base if
necessary. Use oven mitts to remove crock.
3
Page 4

Parts and Features
*To order parts:
US: 1.800.851.8900
www.hamiltonbeach.com
Canada: 1.800.267.2826
Mexico: 01 800 71 16 100
Lid*
Clip Hook
Vents
Base
Handles
Base
Control Knob
4
Lid Gasket
Crock*
Wire Clip
Clip Latch
Page 5
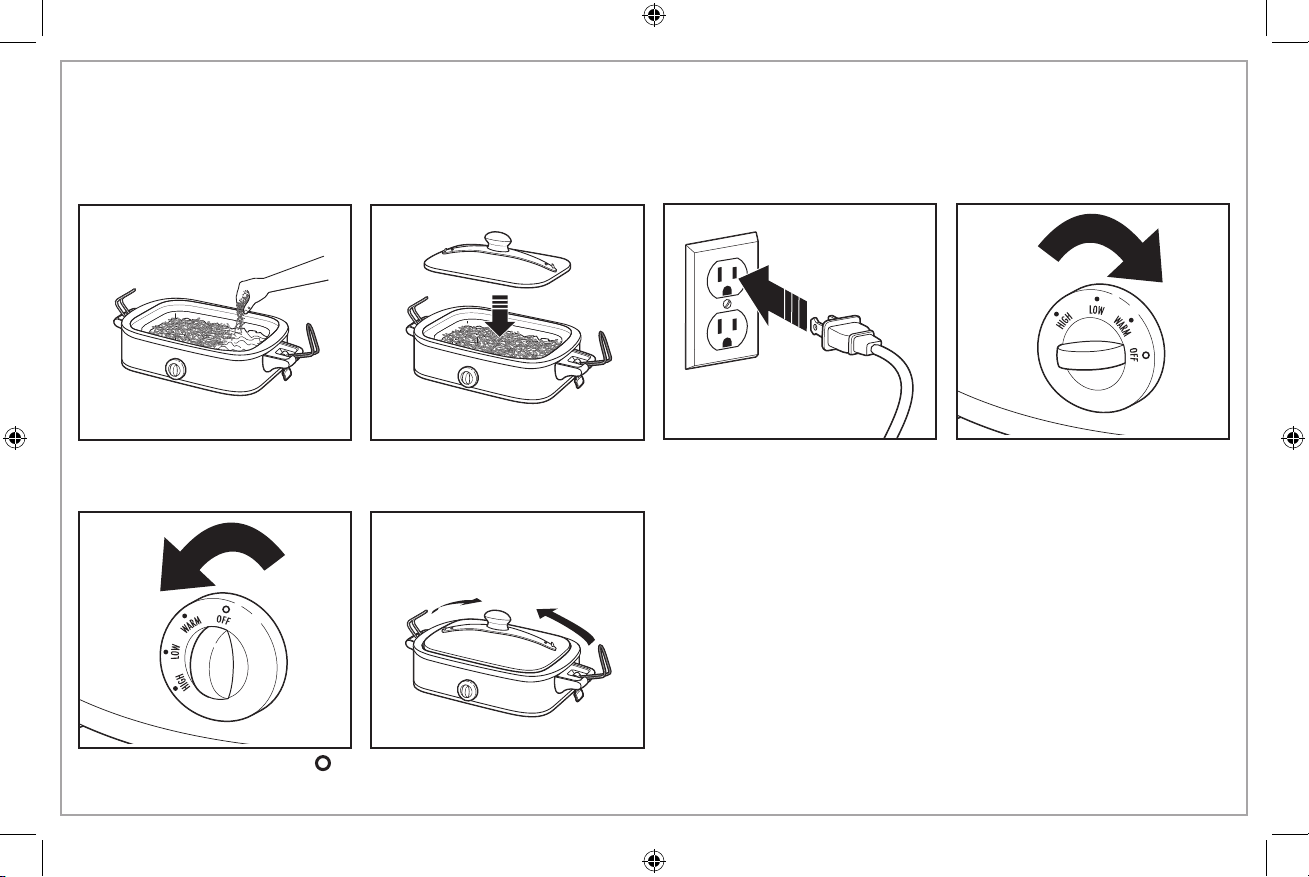
BEFORE FIRST USE: Wash glass lid
How to Use Your Slow Cooker
NOTE: This casserole slow cooker is meant to cook recipes like lasagna, dips, and cobblers. Recipes with a large proportion of liquid should
be filled no more than halfway in the crock.
and removable crock in hot, soapy
water. Rinse and dry.
1. Add ingredients to the crock. 2. Cover. 3. Plug into outlet. 4. Rotate control knob to LOW or
NOTES:
• Food must be hot enough to prevent bacterial growth before
using WARM setting.
• The WARM setting should only be used after a recipe has been
thoroughly cooked.
• Do not reheat food on WARM setting.
• If food has been cooked and then refrigerated, reheat it on LOW
or HIGH; then switch to WARM.
5. When finished, turn OFF ( )
and unplug.
6. Secure wire clips for
transport.
• Visit foodsafety.gov for more information.
HIGH. Do not cook on WARM.
5
Page 6

Recipes
Lasagna
Ingredients:
1 pound (0.5 kg) hot or sweet Italian sausage, casings removed
1 medium onion, chopped
2 cloves garlic, chopped
2 jars (24 ounces each [680 g]) marinara sauce
3 teaspoons (15 ml) dried Italian Seasoning, divided
9 uncooked oven-ready lasagna noodles
1 container (15 ounces [425 g]) part-skim ricotta cheese
1 cup (237 ml) grated Parmesan cheese
2 large eggs, slightly beaten
4 cups (946 ml) shredded mozzarella cheese
Chopped parsley
Directions:
1. In a large skillet over medium-high, cook sausage until browned
and no longer pink; drain. Add onions and garlic to skillet and cook
until just beginning to soften, about 3 minutes. Stir in marinara
sauce and 2 teaspoons Italian seasoning.
2. Spread 1/2 cup of sauce mixture in bottom of slow cooker crock.
Layer 3 lasagna noodles over sauce, breaking to fit.
3. In a medium bowl, mix ricotta cheese, Parmesan cheese, eggs and
remaining Italian seasoning. Spread 1/3 of mixture over noodles in
crock. Sprinkle with 1 cup mozzarella cheese. Repeat layers 2 more
times, ending with sauce. Reserve remaining mozzarella cheese for
top.
4. Cover slow cooker and cook on HIGH for 2 1/2 to 3 hours or on
LOW for 6 to 6 1/2 hours.
5. Sprinkle with remaining mozzarella cheese and let stand until
cheese is melted. Sprinkle with chopped parsley before serving.
Serves: 6–8
Chili and Cornbread Casserole
Ingredients:
1 pound (0.5 kg) lean ground beef
1 can (16 ounces [454 g]) dark red kidney beans, rinsed and drained
1 can (14.5 ounces [411 g]) diced tomatoes with onions and green
pepper
1 can (10 ounces [283 g]) chunky diced tomatoes and green chilies
1 package (1.5 ounces [43 g]) chili seasoning mix
2 tablespoons (30 ml) tomato paste
1 package (8.5 ounces [241 g]) corn muffin mix
1 cup (237 ml) shredded sharp cheddar cheese
Sour cream, optional
Jalapeno slices,optional
Green onion slices, optional
Directions:
1. In a large skillet over medium-high, brown ground beef. Drain and
transfer to slow cooker crock.
2. Add kidney beans, tomatoes, chili seasoning mix and tomato paste
to crock and mix until blended. Spread chili mixture in an even
layer in crock.
3. In a medium bowl, prepare corn muffin mix following package
directions. Spoon batter over chili in crock.
4. Cover slow cooker and cook on HIGH for 2 to 2 1/2 hours or LOW
for 4 to 4 1/2 hours. Reduce to WARM. Sprinkle with cheese and
let stand until melted, about 15 minutes. Top with sour cream,
jalapeno slices and green onions, if desired.
Serves: 6–8
6
Page 7

Recipes (cont.)
Apple Cranberry Cobbler
Ingredients:
APPLE FILLING
6 large Granny Smith apples, peeled, cored and thinly sliced
1 cup (237 ml) dried cranberries
1/3 cup (79 ml) all-purpose flour
1 cup (237 ml) sugar
1 1/2 teaspoons (7 ml) ground cinnamon
COBBLER TOPPING
1 cup (237 ml) plus 3 tablespoons (44 ml) all-purpose flour
1/4 cup (59 ml) sugar
1 teaspoon (5 ml) baking powder
1/4 teaspoon (1.2 ml) ground cinnamon
1/4 teaspoon (1.2 ml) salt
1/2 cup (118 ml) milk
3 tablespoons (44 ml) butter, melted
Directions:
1. In a slow cooker crock combine all apple filling ingredients. Stir
until apples are evenly coated.
2. In a medium bowl, combine all cobbler topping ingredients. With a
teaspoon or small scoop, drop dough on top of the apple mixture
in the crock.
3. Cover slow cooker and cook on HIGH for 2 1/2 to 3 hours or LOW
for 4 to 5 hours. Remove cover and let stand for 15 minutes before
serving. Sprinkle with confectioners’ sugar and serve with whipped
cream or ice cream.
Serves: 8–10
Test Kitchen Tip: To save time cutting apples, use the ribbon cut
of a spiralizer.
7
Page 8

Care and Cleaning
w WARNING
Disconnect power before cleaning. Do not immerse cord, plug,
or base in any liquid.
Electrical Shock Hazard.
1. Unplug.
2. Let completely cool.
3. Wipe the base with a soft, damp cloth.
Tips for Slow Cooking
• Stirring is not necessary when slow cooking. Removing the glass
lid results in major heat loss and the cooking time may need to
be extended. However, if cooking on HIGH, you may want to stir
occasionally.
• Many recipes call for cooking all day. If your morning schedule
doesn’t allow time to prepare a recipe, do it the night before. Place
all ingredients in removable crock, cover with lid, and refrigerate
overnight. In the morning, simply place the removable crock in the
slow cooker.
• Some foods are not suited for extended cooking in a slow cooker.
Pasta, seafood, milk, cream, or sour cream should be added
2 hours before serving. Evaporated milk or condensed soups are
perfect for slow cooking.
4. The crock and lid can be washed in hot, soapy water or in the
dishwasher. DO NOT use the “SANI” setting when washing in
the dishwasher. “SANI” cycle temperatures could damage your
product. To prevent lingering food smells, found in most plastic
containers, clean rubber lid gasket with hot, soapy water after each
use. Store with lid ajar.
• Slow cookers allow for very little evaporation. If making your
favorite soup, stew, or sauce, reduce liquid called for in original
recipe. If too thick, liquid can be added later.
• If cooking a vegetable-type casserole, there will need to be liquid
in the recipe to prevent scorching on the sides of the removable
crock.
• Reduce the amount of ingredients in a recipe calling for a larger
slow cooker to accommodate the 3.5-quart crock.
• Flavors of fresh herbs and dried spices can lessen over cooking
time. Add fresh herbs towards the end of the cooking time for the
best flavor.
8
Page 9

Food Safety Tips
• Do not use frozen, uncooked meat in the slow cooker. Thaw any
meat or poultry before slow cooking.
• Visit www.foodsafety.gov for more information on safe internal
cooking temperatures.
• To store leftovers after cooking, do NOT place the entire removable
crock in the refrigerator since contents will take too long to cool.
Instead, divide leftovers into smaller containers and place into
refrigerator.
Troubleshooting
Food is undercooked.
• Was food cooked on the WARM setting? Do not cook on WARM;
always cook on LOW or HIGH heat settings.
• Was power interrupted?
• Did you select the LOW heat setting, but used a cooking time based
on the HIGH heat setting?
• Did you have the glass lid placed correctly on the slow cooker?
My meal was overcooked. Why?
• Did you select hours based on a LOW heat recipe?
• Foods will continue to increase in temperature after desired
temperature has been reached.
• Never allow undercooked or raw meat to sit at room temperature
in the slow cooker. Once meat is placed into the removable crock,
it should be cooked immediately (unless prepping slow cooker the
night before, where crock should be placed into the refrigerator).
The food isn’t done after cooking the amount of time recommended
in my recipe.
• This can be due to voltage variations (which are commonplace
everywhere) or altitude. The slight fluctuations in power do not
have a noticeable effect on most appliances. However, it can alter
the cooking times in the slow cooker. Lower than rated voltage
will require longer cooking times and higher than rated voltage will
require shorter cooking times. You will learn through experience if a
shorter or longer time is needed.
Lid gasket collapsed.
• This can be caused by sudden temperature change, like running cold
water over a warm lid. Allow lid to sit at room temperature. It will
return to its original shape within 24 hours.
• To help maintain shape of gasket, do not cook with clips latched and
do not store empty unit with clips latched.
9
Page 10

Limited Warranty
This warranty applies to products purchased and used in the U.S. and Canada. This is the only express warranty for this product and
is in lieu of any other warranty or condition.
This product is warranted to be free from defects in material and workmanship for a period of five (5) years from the date of original
purchase in Canada and one (1) year from the date of original purchase in the U.S. During this period, your exclusive remedy is repair
or replacement of this product or any component found to be defective, at our option; however, you are responsible for all costs
associated with returning the product to us and our returning a product or component under this warranty to you. If the product or
component is no longer available, we will replace with a similar one of equal or greater value.
This warranty does not cover glass, filters, wear from normal use, use not in conformity with the printed directions, or damage to
the product resulting from accident, alteration, abuse, or misuse. This warranty extends only to the original consumer purchaser or
gift recipient. Keep the original sales receipt, as proof of purchase is required to make a warranty claim. This warranty is void if the
product is used for other than single-family household use or subjected to any voltage and waveform other than as specified on the
rating label (e.g., 120 V ~ 60 Hz).
We exclude all claims for special, incidental, and consequential damages caused by breach of express or implied warranty. All
liability is limited to the amount of the purchase price. Every implied warranty, including any statutory warranty or condition
of merchantability or fitness for a particular purpose, is disclaimed except to the extent prohibited by law, in which case such
warranty or condition is limited to the duration of this written warranty. This warranty gives you specific legal rights. You may have
other legal rights that vary depending on where you live. Some states or provinces do not allow limitations on implied warranties or
special, incidental, or consequential damages, so the foregoing limitations may not apply to you.
To make a warranty claim, do not return this appliance to the store. Please call 1.800.851.8900 in the U.S. or 1.800.267.2826 in Canada
or visit hamiltonbeach.com in the U.S. or hamiltonbeach.ca in Canada. For faster service, locate the model, type, and series numbers
on your appliance.
10
Page 11

PRÉCAUTIONS IMPORTANTES
Pour utiliser un appareil électroménager, vous devez toujours prendre des mesures élémentaires de sécurité pour réduire le risque d’incendie,
d’électrocution et/ou de blessure corporelle, en particulier les mesures suivantes :
1. Lire toutes les instructions.
2. Cet appareil n’est pas destiné à être utilisé par des personnes
(y compris les enfants) dont les capacités physiques,
sensorielles ou mentales sont réduites, ou manquant
d’expérience et de connaissance, sauf si elles sont étroitement
surveillées et instruites sur l’utilisation de l’appareil par une
personne responsable de leur sécurité.
3. Une surveillance étroite est requise pour tout appareil utilisé par
ou près des enfants. Surveiller que les enfants ne jouent pas
avec l’appareil.
4. Ne pas toucher les surfaces chaudes. Utiliser les poignées ou
les boutons.
5. Pour se protéger contre le risque de choc électrique, ne pas
immerger le cordon, la fiche ou la base dans l’eau ou tout autre
liquide.
6. Débrancher l’appareil de la prise de courant électrique lorsqu’il
n’est pas utilisé et avant un nettoyage. Le laisser refroidir avant
un nettoyage et avant d’y placer ou d’y enlever des pièces.
7. Ne pas faire fonctionner un appareil électroménager avec un
cordon ou une fiche endommagée, ou lorsque l’appareil ne
fonctionne pas bien ou a été échappé ou endommagé d’une
manière quelconque. Le remplacement et la réparation du
cordon d’alimentation doivent être faits par le fabricant, son
agent de service ou toute personne qualifiée de façon à éviter
tout danger. Appeler le numéro de service à la clientèle fourni
pour des renseignements concernant l’examen, la réparation ou
l’ajustement.
8. L’utilisation d’accessoires non recommandés par le fabricant de
l’appareil peut causer des blessures.
9. Ne pas utiliser à l’extérieur.
10. Ne pas laisser le cordon pendre du bord d’une table ou d’un
comptoir, ou toucher des surfaces chaudes, y compris la
cuisinière.
11. Ne pas placer le pot amovible ou base sur ou près d’un brûleur
à gaz chaud, ou d’un élément électrique. Ne pas placer la base
de la mijoteuse dans un four chauffé.
12. Il est nécessaire de faire preuve de la plus grande prudence
en déplaçant un appareil électroménager contenant de l’huile
chaude ou d’autres liquides chauds.
13. Pour débrancher la mijoteuse, tourner le bouton de commande
à ARRÊT (OFF/ ), puis débrancher la fiche de la prise.
14. MISE EN GARDE : Afin de prévenir l’endommagement ou le
risque de choc, ne pas cuire dans la base. Cuire seulement
dans le plat amovible.
15. Éviter les changements soudains de température, tels que
l’ajout de nourriture sortant du réfrigérateur dans un plat
chauffé.
16. Destiné à une utilisation sur comptoir seulement.
17. AVERTISSEMENT : Les renversements d’aliments peuvent
causer des brûlures sévères. Garder l’appareil et le cordon
à l’écart des enfants. Ne laisser jamais pendre le cordon
pardessus le bord du comptoir, n’utiliser jamais de prise située
sous le comptoir et n’utiliser jamais une rallonge de cordon.
18. Ne pas utiliser l’appareil électroménager à une fin autre que
celle prévue.
CONSERVEZ CES INSTRUCTIONS
11
Page 12

Autre consigne de sécurité pour le consommateur
Cet appareil est destiné à un usage domestique uniquement.
Cet appareil est conçu uniquement pour préparer, faire cuire et servir
des aliments. Cet appareil n’est pas conçu pour une utilisation avec
toute autre matière ou produit non alimentaire.
w AVERTISSEMENT
fourni avec une fiche polarisée (une broche large) pour réduire le
risque d’électrocution. Cette fiche n’entre que dans un seul sens dans
une prise polarisée. Ne contrecarrez pas l’objectif sécuritaire de cette
fiche en la modifiant de quelque manière que ce soit ou en utilisant
un adaptateur. Si vous ne pouvez pas insérer complètement la fiche
dans la prise, inversez la fiche. Si elle refuse toujours de s’insérer, faire
remplacer la prise par un électricien.
Risque de choc électrique : Cet appareil est
COUVERCLE ET POT : PRÉCAUTIONS ET INFORMATION
• Veuillez manipuler le pot et le couvercle avec soin pour assurer
leur durabilité.
• Évitez des changements de température brusques et extrêmes.
Par exemple, ne placez pas un couvercle ou un pot chaud dans
l’eau froide ou sur une surface mouillée.
• Évitez de frapper le pot et le couvercle sur le robinet ou sur toute
surface rigide.
• N’utilisez pas le pot ou le couvercle si l’un ou l’autre est ébréché,
fendillé ou très écorché.
• N’utilisez pas de nettoyeurs abrasifs ou de tampon métallique à
récurer.
Un cordon d’alimentation court est utilisé pour réduire le risque
d’emmêlement, de trébuchement ou de saisie par un enfant.
• La base du pot est très rugueuse et peut endommager un
revêtement de comptoir. Faites preuve de prudence.
• Le pot et son couvercle peuvent devenir très chauds. Faites
preuve de prudence. Ne les déposez pas directement sur
une surface ou un revêtement de comptoir non protégés.
• Le pot peut aller au four à micro-ondes et au four régulier. Évitez,
toutefois, de chauffer le pot lorsqu’il est vide.
• Ne placez jamais le couvercle sur un rond de poêle ou directement
sur le poêle. Ne placez pas le couvercle dans le four à microondes, dans le four conventionnel ou directement sur le poêle.
SOULÈVEMENT DU COUVERCLE ET DU POT
Soulevez le couvercle de façon à diriger les vapeurs loin de votre
visage pour éviter de vous brûler.
12
Les côtés de la base de la mijoteuse deviennent très chauds car c’est
là que se trouvent les éléments chauffants. Au besoin, utilisez les
poignées sur la base. Utilisez des gants de cuisine pour retirer le pot.
Page 13

Pièces et caractéristiques
*Pour commander des pièces :
Canada : 1.800.267.2826
Couvercle*
Griffe de serrage
Orifices
Poignées
de la base
Base
Bouton de commande
Joint de couvercle
Pot*
Pince de sangle
Verrouillage
de la griffe
13
Page 14

AVANT LA PREMIÈRE UTILISATION :
Utilisation de la mijoteuse
REMARQUE : Cette casserole mijoteuse a été conçue pour la cuisson de recettes comme des lasagnes, trempettes et cobblers. Certaines
recettes contenant beaucoup de liquide il ne faut pas remplir la mijoteuse de liquide au-delà de la moitié de sa capacité.
Laver le couvercle et le pot dans l’eau
chaude savonneuse. Rincer et assécher.
1. Mettre les ingrédients dans
le pot.
5. Lorsque la cuisson est
terminée, tourner le bouton
à ARRÉT (OFF/ ) et
débrancher.
14
2. Couvrir. 3. Brancher dans la prise de
6. Sécuriser les griffes de
serrage pour le transport.
courant.
REMARQUES :
• Les aliments doivent être suffisamment chauds pour prévenir toute
croissance bactérienne avant d’utiliser le réglage WARM (chaud).
• Le réglage WARM (chaud) ne doit être utilisé qu’après la cuisson
complète des aliments.
• Ne réchauffez pas les aliments placés sous le réglage WARM
(chaud).
• Si les aliments ont cuit et ont été réfrigérés, réchauffez-les à
température LOW (basse) ou HIGH (élevée); passez ensuite
au réglage WARM (chaud).
• Visitez le site Internet foodsafety.gov pour de plus amples
informations.
4.
Tourner le bouton de commande
à LOW (basse) ou HIGH (élevée).
Ne pas cuire en utilisant le mode
de WARM (chaud).
Page 15

Recettes
Lasagna
Ingrédients :
1 lb (0,5 kg) de saucisses italiennes douces sans boyau
1 oignon moyen haché
2 gousses d’ail hachées
2 pots de 24 oz (680 g) chacun de sauce marinara
3 c. à thé (15 ml) d’assaisonnement à l’italienne séché, divisées
9 nouilles à lasagne prêtes à cuire
1 pot de 15 oz (425 g) de fromage ricotta léger
1 tasse (237 ml) de fromage parmesan râpé
2 gros œufs légèrement battus
4 tasses (946 ml) de fromage mozzarella râpé
Persil haché
Instructions :
1. Dans une grande poêle à frire à feu moyen, cuire les saucisses
jusqu’à ce qu’elles soient dorées et perdues leur couleur rosée.
Ajouter l’oignon et l’ail dans la poêle à frire et cuire jusqu’à tendreté,
environ 3 minutes. Incorporer et mélanger à la sauce marinara et
ajouter 2 c. à thé d’assaisonnement à l’italienne.
2. Étendre 1/2 tasse du mélange de sauce au fond du pot de la
mijoteuse. Briser et déposer 3 nouilles à lasagne pour couvrir la
sauce.
3. Dans un bol moyen, mélanger le fromage ricotta, le fromage
parmesan, les œufs et le reste de l’assaisonnement à l’italienne.
Étendre 1/3 du mélange sur les nouilles déposées dans le pot.
Parsemer avec 1 tasse de fromage parmesan. Répéter cette étape
2 fois de plus pour finir avec la sauce. Réserver le reste du fromage
mozzarella pour le dessus.
4. Couvrir la mijoteuse et cuire à intensité HIGH (élevée) pendant 2,5 à
3 heures ou à faible LOW (intensité) pendant 6 à 6,5 heures.
5. Parsemer le reste du fromage mozzarella et laisser reposer jusqu’à
ce que le fromage soit fondu. Garnir de persil haché avant de servir.
6 à 8 portions
Casserole de chili et pain de maïs
Ingrédients :
1 lb (0,5 kg) de bœuf haché maigre
1 pot de 16 oz (454 g) d’haricots secs rouges foncés, rincés et égouttés
1 boite de 14,5 oz (411 g) de tomates en dés avec oignons et poivron
vert
1 boite de 10 oz (283 g) de tomates en gros dés avec piments chilis
1 enveloppe de 1,5 oz (43 gr) d’assaisonnement pour chili
2 c. à table (30 ml) de pâte de tomate
1 enveloppe de 8,5 oz (241 g) de mélange à muffins au maïs
1 tasse (237 ml) de fromage cheddar fort râpé
Crème sûre, facultative
Tranches de piments jalapeno, facultatives
Tranches d’oignon vert, facultatives
Instructions :
1. Dans une grande poêle à frire à feu moyen, faire brunir le bœuf
haché. Égoutter et transférer dans le pot de la mijoteuse.
2. Ajouter les haricots secs, les tomates, l’assaisonnement pour chili et
la pâte tomate dans le pot et bien mélanger. Parsemer uniformément
le mélange de chili dans le pot.
3. Dans un bol moyen, préparer le mélange à muffins au maïs selon les
directives sur l’emballage. Déposer le mélange à la cuillère sur le chili
contenu dans le pot.
4. Couvrir la mijoteuse et cuire à intensité HIGH (élevée) pendant 2 à 2,5
heures ou à faible LOW (intensité) pendant 4 à 4,5 heures. Réduire
l’intensité à WARM (garde au chaud). Parsemer le fromage et laisser
reposer jusqu’à ce que le fromage soit fondu, environ 15 minutes.
Garnir de crème sûre, tranches de piments jalapeno et d’oignon vert,
au goût.
6 à 8 portions
15
Page 16

Recettes (suite)
Cobbler canneberges et pommes
Ingrédients :
GARNITURE AUX POMMES
6 grosses pommes Granny Smith, pelées, sans le cœur et tranchées
finement
1 tasse (237 ml) de canneberges séchées
1/3 de tasse (79 ml) de farine tout usage
1 tasse (237 ml) de sucre
1 1/2 c. à thé (7 ml) de cannelle moulue
GARNITURE POUR COBBLER
1 tasse (237 ml) et 3 c. à table (44 ml) de farine tout usage
1/4 tasse (59 ml) de sucre
1 c. à thé (5 ml) de poudre à pâte
1/4 c. à thé (1,2 ml) de cannelle moulue
1/4 c. à thé (1,2 ml) de sel
1/2 tasse (118 ml) de lait
3 c. à table (44 ml) de beurre fondu
Instructions :
1. Dans le pot de la mijoteuse, combiner les ingrédients de la garniture
aux pommes. Bien mélanger pour enrober uniformément les pommes.
2. Dans un bol moyen, combiner tous les ingrédients de la garniture pour
cobbler. Avec une cuillère à thé ou une petite cuillère, déposer la pâte
sur le mélange de pommes contenu dans le pot.
3. Couvrir la mijoteuse et cuire à intensité HIGH (élevée) pendant
2,5 à 3 heures ou à faible LOW (intensité) pendant 4 à 5 heures. Retirer
le couvercle et laisser reposer pendant 15 minutes avant de servir.
Parsemer de sucre glace et servir avec de la crème fouettée ou de
la crème glacée.
8 à 10 portions
Conseil de cuisson : Économiser du temps en coupant les pommes
avec la lame à trancher d’un spiraleur.
16
Page 17

Nettoyage et entretien
w AVERTISSEMENT
Débranchez l’appareil avant le nettoyage. N’immergez pas le
cordon, la fiche ou la base dans tout autre liquide.
Risque d’électrocution.
1. Débrancher.
2. Laisser refroidir complètement.
3. Essuyer la base avec un linge doux et humide.
4. Le pot et le couvercle sont lavables dans l’eau chaude savonneuse
ou au lave-vaisselle. NE PAS utiliser le réglage « SANI » du lavevaisselle. Les températures du cycle « SANI » peuvent endommager
le produit. Pour éviter les odeurs persistantes d’aliments comme
celles que l’on retrouve dans la plupart des contenants de plastique,
nettoyer le joint d’étanchéité en caoutchouc dans l’eau chaude
savonneuse après chaque utilisation. Ranger sans fermer le
couvercle.
Conseils pour cuisson à la mijoteuse
• Il n’est pas nécessaire de brasser les aliments dans la mijoteuse;
le retrait du couvercle de vitre entraîne une perte importante de
chaleur, ce qui peut obliger à prolonger le temps de cuisson.
Toutefois, si vous cuisir à température HIGH (élevée), vous voudrez
sans doute brasser les aliments de temps à autre.
• Plusieurs recettes exigent toute une journée de cuisson. Si votre
horaire du matin ne vous permet pas de préparer la recette,
cuisiner-la le soir précédent. Déposer tous les ingrédients dans
le pot amovible, mettre le couvercle en place et réfrigérer toute
la nuit. Le matin, déposer le pot amovible dans la mijoteuse.
• Certains aliments ne se prêtent pas bien à une cuisson prolongée
à la mijoteuse. Verser les pâtes, les fruits de mer, le lait, la crème
ou la crème sûre dans la mijoteuse 2 heures avant de servir la
recette. Le lait évaporé et les soupes concentrées se prêtent bien
à la cuisson à la mijoteuse.
• Peu d’évaporation se produit lors de cuisson à la mijoteuse.
Lorsque vous préparer votre soupe, votre sauce ou votre ragoût
préféré, réduiser le volume de liquide indiqué dans la recette
originale. Si le mélange est trop épais, vous pourrez ajouter du
liquide éventuellement.
• Lorsque vous préparez une casserole de légumes, vous devrez
ajouter du liquide à la recette pour éviter que le mélange ne brûle
le long des parois du pot amovible.
• Réduire la quantité d’ingrédients de recettes volumineuses de
manière à les adapter au pot de 3,5 pintes (4 litres).
• La saveur des herbes fraîches et des épices séchées peut diminuer
pendant la durée de cuisson. Ajouter des herbes fraîches vers la
fin de la durée de cuisson pour rehausser la saveur des mets.
17
Page 18

Conseils de sécurité pour la cuisson
• N’utilisez jamais de viande congelée, non cuite dans la mijoteuse.
Dégelez toute viande ou toute volaille avant de la faire mijoter.
• Visiter le site www.foodsafety.gov pour plus d’information au sujet
de la température de cuisson interne des aliments.
• Pour ranger les restes après la cuisson, ne PAS placer toute la
mijoteuse au réfrigérateur, car la durée de refroidissement sera
trop longue. Séparer les restes en les déposants dans des petits
contenants et placer au réfrigérateur.
Dépannage
Les aliments ne sont pas assez cuits.
• Les aliments ont-ils cuit avec le réglage WARM (chaud) ? Ne pas
utiliser le réglage WARM (chaud) pour cuire les aliments; toujours
utiliser les intensités LOW (basses) ou HIGH (élevées).
• Y a-t-il eu une panne électrique ?
• Le réglage de basse LOW (intensité) a-t-il été choisi et utilisé pour un
temps de cuisson basé sur la haute HIGH (intensité) ?
• Le couvercle était-il placé correctement sur la mijoteuse ?
La viande est trop cuite. Pourquoi ?
• Avez-vous choisi les heures en vous basant sur une recette à
température basse ?
• La température des aliments continue de s’élever après avoir atteint
la température désirée.
18
• Ne jamais laisser reposer une viande insuffisamment cuite ou
crue dans une mijoteuse à la température ambiante. La viande
doit être cuite dès qu’elle est placée dans la mijoteuse (sauf pour
les préparations faites la veille et que la mijoteuse a été placée au
réfrigérateur).
Les aliments ne sont pas cuits même après avoir suivi le temps de
cuisson recommandé par ma recette.
• Ceci peut survenir suite à des variations de tension électrique
(phénomène commun presque partout) ou à l’altitude. Les petites
variations de tension n’ont pas d’effets remarqués sur la plupart des
appareils électroménagers. Cependant, elles peuvent nuire au
temps de cuisson de la mijoteuse. Une tension inférieure à celle
recommandée nécessitera un temps de cuisson plus long alors
qu’une tension supérieure à celle recommandée nécessitera un
temps de cuisson plus court. Vous apprendrez ces temps de cuisson
plus ou moins longs avec l’expérience.
Le joint du couvercle est affaissé.
• Ceci peut être occasionné par un changement subit de température
comme faire couler de l’eau froide sur un couvercle chaud. Laisser
refroidir le couvercle à la température ambiante. Le joint reprendra
sa forme originale après 24 heures.
• Pour maintenir la forme du joint, ne pas cuire en enclenchant les
verrous et ne pas enclencher les verrous lors du rangement.
Page 19

Remarques
19
Page 20

Garantie limitée
Cette garantie s’applique aux produits achetés et utilisées aux É.-U. et au Canada. C’est la seule garantie expresse pour ce
produit et est en lieu et place de tout autre garantie ou condition.
Ce produit est garanti contre tout défaut de matériaux et de main-d’oeuvre pour une période des cinq (5) ans à compter de
la date d’achat d’origine au Canada et un (1) an à compter de la date d’achat d’origine aux É.-U. Au cours de cette période,
votre seul recours est la réparation ou le remplacement de ce produit ou tout composant s’avérant défectueux, à notre gré,
mais vous êtes responsable de tous les coûts liés à l’expédition du produit et le retour d’un produit ou d’un composant dans
le cadre de cette garantie. Si le produit ou un composant n’est plus offert, nous le remplacerons par un produit similaire de
valeur égale ou supérieure.
Cette garantie ne couvre pas le verre, les filtres, l’usure d’un usage normal, l’utilisation non conforme aux directives imprimées,
ou des dommages au produit résultant d’un accident, modification, utilisation abusive ou incorrecte. Cette garantie s’applique
seulement à l’acheteur original ou à la personne l’ayant reçu en cadeau. La présentation du reçu de vente d’origine comme
preuve d’achat est nécessaire pour faire une réclamation au titre de cette garantie. Cette garantie s’annule si le produit est
utilisé autrement que par une famille ou si l’appareil est soumis à toute tension ou forme d’onde différente des caractéristiques
nominales précisées sur l’étiquette (par ex. : 120 V ~ 60 Hz).
Nous excluons toutes les réclamations au titre de cette garantie pour les dommages spéciaux, consécutifs et indirects causés
par la violation de garantie expresse ou implicite. Toute responsabilité est limitée au prix d’achat. Chaque garantie implicite,
y compris toute garantie ou condition de qualité marchande ou d’adéquation à un usage particulier, est exonérée, sauf
dans la mesure interdite par la loi, auquel cas la garantie ou condition est limitée à la durée de cette garantie écrite. Cette
garantie vous donne des droits légaux précis. Vous pouvez avoir d’autres droits qui varient selon l’endroit où vous habitez.
Certaines provinces ne permettent pas les limitations sur les garanties implicites ou les dommages spéciaux ou indirects de
telle sorte que les limitations ci-dessus ne s’appliquent peut-être pas à votre cas.
Ne pas retourner cet appareil au magasin lors d’une réclamation au titre de cette garantie. Téléphoner au 1.800.851.8900 aux
É.-U. ou au 1.800.267.2826 au Canada ou visiter le site internet www.hamiltonbeach.com aux É.-U. ou www.hamiltonbeach.ca
au Canada. Pour un service plus rapide, trouvez le numéro de modèle, le type d’appareil et les numéros de série sur votre
appareil.
20
Page 21

SALVAGUARDIAS IMPORTANTES
Cuando utilice artefactos eléctricos, siempre deben seguirse precauciones de seguridad básicas a fin de reducir el riesgo de incendio,
descarga eléctrica, y/o lesiones a personas, incluyendo las siguientes:
1. Lea todas las instrucciones.
2. Este aparato no se destina para utilizarse por personas
(incluyendo niños) cuyas capacidades físicas, sensoriales o
mentales sean diferentes o estén reducidas, o carezcan de
experiencia o conocimiento, a menos que dichas personas
reciban una supervisión o capacitación para el funcionamiento
del aparato por una persona responsable de su seguridad.
3. Se requiere de una estrecha supervisión cuando el aparato se
use cerca de niños. Los niños deben supervisarse para asegurar
que ellos no empleen los aparatos como juguete.
4. Verifique que el voltaje de su instalación corresponda con el del
producto.
5. No toque superficies calientes. Use los mangos o las perillas.
6. Para protegerse contra el riesgo de choque eléctrico, no
sumerja el cordón, el enchufe ni la base en agua ni en ningún
otro líquido.
7. Desenchúfelo del tomacorriente cuando no lo esté usando y
antes de la limpieza. Deje que se enfríe antes de colocar o sacar
alguna pieza.
8. No opere ningún aparato con cables o enchufe dañados o
después de que el aparato funcione mal o se caiga o dañe
de cualquier manera. El reemplazo del cable de suministro y
las reparaciones deben ser efectuadas por el fabricante, su
agente de servicio, o personas igualmente calificadas para
poder evitar un peligro. Llame al número de servicio al cliente
proporcionado para información sobre examinación, reparación
o ajuste.
9. El uso de accesorios no recomendados por fabricante de
electrodomésticos puede causar lesiones.
10. No lo use al aire libre.
11. No deje que el cordón cuelgue sobre el borde de una mesa
o de un mostrador, o que toque alguna superficie caliente,
incluyendo la superficie de una estufa.
12. No coloque la olla removible o base sobre o cerca de una
fuente de gas caliente o de un quemador eléctrico. No coloque
la base de la olla de cocción lenta de un horno caliente.
13. Es importante tener extremo cuidado cuando se mueva un
aparato electrodoméstico que contenga aceite caliente u otros
líquidos calientes.
14. Para desconectar la olla eléctrica de cocción lenta, coloque la
perilla en la posición apagado (OFF/ ); saque el enchufe del
tomacorriente.
15. PRECAUCIÓN: Para evitar daños o peligros de choque eléctrico
no cocine sobre la base. Cocine solamente dentro del recipiente
desmontable.
16. Evite cambios repentinos de temperatura, como la adición de
alimentos refrigerados en una vasija caliente.
17. Sólo para uso en la cubierta de cocina.
18. ADVERTENCIA: El derrame de alimentos puede provocar
quemaduras graves. Mantenga el artefacto y el cable alejados
de los niños. Nunca deje colgar el cable sobre el borde del
mostrador, nunca utilice un tomacorriente ubicado por debajo
del mostrador y nunca utilice el artefacto con una cable de
extensión.
19. No use el aparato electrodoméstico para ningún otro fin que no
sea el indicado.
GUARDE ESTAS INSTRUCCIONES
21
Page 22

Otra Información de Seguridad para el Cliente
Este aparato ha sido diseñado solamente para uso doméstico.
Este aparato ha sido diseñado solamente para la preparación,
cocción y servido de alimentos. No está diseñado para usarse con
materiales que no sean alimentos ni con productos no alimenticios.
w ADVERTENCIA
es provisto con un enchufe polarizado (una pata más ancha) para
reducir el riesgo de una descarga eléctrica. El enchufe embona
únicamente en una dirección dentro de un tomacorriente polarizado.
No trate de obviar el propósito de seguridad del enchufe
modificándolo de alguna manera o utilizando un adaptador. Si el
enchufe no entra completamente en la toma, invierta el enchufe.
Si aún no entra, haga que un electricista reemplace la toma.
Peligro de Descarga Eléctrica: Este aparato
OLLA Y TAPA: PRECAUCIONES E INFORMACIÓN
• Por favor maneje la olla y tapa cuidadosamente para asegurarles
una vida larga.
• Evite cambios repentinos y extremos de temperatura. Por ejemplo,
no coloque una tapa u olla caliente en agua fría o sobre una
superficie húmeda.
• Evite golpear al olla y tapa contra el fregadero u otra superficie
dura.
• No use la olla o tapa si está astillada, quebrada o severamente
tallada.
• No use limpiadores abrasivos o estropajos de metal.
Se utiliza un cable eléctrico corto para reducir los riesgos de
enredarse o tropezar con un cable más largo o de que sea jalado por
niños.
• La parte inferior de la olla es muy áspera y puede dañar una
cubeirta. Tenga precaución.
• La olla y tapa pueden volverse muy calientes. Tenga precaución.
No los ponga directamente sobre ninguna superficie o cubierta
desprotegida.
• La olla puede usarse en microondas y es a prueba de hornos, pero
nunca caliente la olla cuando esté vacía. Nunca coloque la tapa en
un quemador o sobre la estufa.
• No coloque la tapa en un horno de microondas, horno convencional o sobre la estufa.
REMUEVA LA TAPA Y OLLA
Cuando remueva la tapa, inclínela de manera que la abertura quede
hacia otro lado que no sea hacia usted para evitar quemaduras por
el vapor.
22
Los lados de la base de la olla de cocción lenta se ponen muy
calientes debido a los elementos caloríficos localizados en ella. Use
las manijas en la base si es necesario. Use guantes para remover
la olla.
Page 23

Partes y Características
*Para ordenar partes:
EE. UU.: 1.800.851.8900
www.hamiltonbeach.com
México: 01 800 71 16 100
Tapa*
Gancho Clip
Ventilación
Manijas
de la Base
Base
Perilla de Control
Empaque de Tapa
Olla*
Clip de Alambre
Broche de Clip
23
Page 24

ANTES DE USAR POR PRIMERA VEZ:
Cómo Usar Su Olla de Coccion
NOTA: Esta olla de cocción lenta está concebida para cocinar recetas como lasagnas, dips y cobblers. Las recetas que contengan una gran
proporción de líquido
Lave la tapa y olla en agua caliente jabonosa. Enjuague y seque.
1. Coloque los ingredientes en
la olla.
5. Cuando termine, APÁGUELO
(OFF/ ) y enchufe.
24
2. Cubra. 3. Enchufe en el tomacorriente. 4. Gire la perilla de control a
LOW (bajo) o HIGH (alto). No
cocine en WARM (caliente).
NOTAS:
• La comida de estar lo suficientemente caliente para prevenir el
crecimiento de bacterias antes de usar el ajuste de WARM
(caliente).
• El ajuste de WARM (caliente) debe ser usado solamente después
de que una receta ha sido cocinada completamente.
• No recaliente la comida en el ajuste WARM (caliente).
• Si la comida ha sido cocinada y luego refrigerada, recaliente en
LOW (bajo) o HIGH (alto), luego cambie a WARM (caliente).
• Visite foodsafety.gov para más información.
6. Asegure los clips de alambre
para transportarlo.
Page 25

Recetas
Lasagna
Ingredientes:
1 libra (0.5 kg) de salchicha italiana picante o dulce sin la piel
1 cebolla mediana picada
2 dientes de ajo picados
2 frascos (24 onzas [680 g] cada uno) de salsa marinara
3 cucharaditas (5 ml) de aderezo italiano deshidratado (separadas)
9 fideos para lasagna sin cocinar listos para el horno
1 recipiente (15 onzas [425 g] cada uno) de queso ricotta descremado
1 taza (237 ml) de queso Parmesano rallado
2 huevos grandes batidos ligeramente
4 tazas (946 ml) de queso mozzarella rallado
Perejil picado
Instrucciones:
1. En una sartén grande a fuego medio-alto, cocine la salchicha hasta
dorarla y que pierda el color rosado; escurra. Agregue las cebollas
y el ajo a la sartén y cocine hasta que comiencen a ablandarse,
por alrededor de 3 minutos. Incorpore la salsa marinara y 2
cucharaditas de aderezo italiano.
2. Esparza 1/2 taza de la mezcla de salsa en el fondo de la olla de
cocción lenta. Coloque en una capa 3 fideos de lasagna sobre la
salsa; rómpalos para que entren bien.
3. En un tazón mediano, mezcle el queso ricotta, el queso Parmesano,
los huevos y el aderezo italiano restante. Vierta 1/3 de la mezcla
sobre los fideos de la olla. Espolvoree con 1 taza de queso
mozzarella. Repita las capas 2 veces más, finalizando con la salsa.
Reserve el queso mozzarella restante para colocar por encima.
4. Cubra la olla de cocción lenta y cocine en HIGH (alta) por 2 1/2 a
3 horas o en LOW (baja) durante 6 a 6 1/2 horas.
5. Espolvoree con el queso mozzarella restante y deje reposar hasta
que se derrita el queso. Espolvoree con perejil picado antes de
servir.
Rendimiento: 6–8
Estofado de pan de maíz y chiles
Ingredientes:
1 libra (0.5 kg) de carne picada magra
1 lata (16 onzas [454 g]) de frijoles rojos oscuros, enjuagados y
escurridos
1 lata (14.5 onzas [411 g]) de tomates en cubos con cebollas y pimientos
verdes
1 lata (10 onzas [283 g]) de tomates en cubos grandes y pimientos chiles
verdes
1 paquete (1.5 onzas [43 g]) de mezcla de condimento de chiles
2 cucharadas (30 ml) de pasta de tomate
1 paquete (8.5 onzas [241 g]) de mezcla de muffins de maíz
1 taza (237 ml) de queso cheddar fuerte rallado
Crema agria (opcional)
Rebanadas de jalapeño (opcional)
Rebanadas de cebolleta (opcional)
Instrucciones:
1. En una sartén grande a fuego medio-alto, dore la carne picada.
Escurra y pase a la olla de cocción lenta.
2. Agregue los frijoles, los tomates, la mezcla de condimento de chiles y
la pasta de tomate a la olla y mezcle bien. Esparza la mezcla de chiles
en una capa pareja sobre la olla.
3. En un tazón mediano, prepare la mezcla de muffins de maíz siguiendo
las instrucciones del paquete. Coloque la mezcla con una cuchara
sobre los chiles de la olla.
4. Cubra la olla de cocción lenta y cocine en HIGH (alta) por 2 a
2 1/2 horas o en LOW (baja) durante 4 a 4 1/2 horas. Reduzca a
WARM (caliente). Espolvoree con queso y deje reposar hasta que
se derrita, por alrededor de 15 minutos. Si así lo desea, coloque por
encima crema agria, rebanadas de jalapeños y cebolletas.
Rendimiento: 6–8
25
Page 26

Recetas (cont.)
Cobbler de manzanas y arándanos
Ingredientes:
RELLENO DE MANZANA
6 manzanas Granny Smith grandes peladas, sin centro y en rebanadas
finas
1 taza (237 ml) de arándanos secos
1/3 taza (79 ml) de harina para todo propósito
1 taza (237 ml) de azúcar
1 1/2 cucharadita (7 ml) de canela molida
COBERTURA DEL COBBLER
1 taza (237 ml) más 3 cucharadas (44 ml) de harina para todo propósito
1/4 taza (59 ml) de azúcar
1 cucharadita (5 ml) de polvo para hornear
1/4 cucharadita (1.2 ml) de canela molida
1/4 cucharadita (1.2 ml) de sal
1/2 taza (118 ml) de leche
3 cucharadas (44 ml) de mantequilla derretida
Instrucciones:
1. En una olla de cocción lenta mezcle todos los ingredientes del
relleno de manzana. Mezcle hasta que las manzanas queden bien
cubiertas.
2. En un tazón mediano, mezcle todos los ingredientes de la cobertura
del cobbler. Con una cucharadita o una cuchara pequeña, coloque la
masa sobre la mezcla de manzana de la olla.
3. Cubra la olla de cocción lenta y cocine en HIGH (alta) por 2 1/2 a
3 horas o en LOW (baja) durante 4 a 5 horas. Quite la tapa y deje
reposar por 15 minutos antes de servir. Espolvoree con azúcar en
polvo y sirva con crema batida o helado.
Rendimiento: 8–10
Consejo de cocina: Para ahorrar tiempo, corte las manzanas en
cintas con un rallador en espiral.
26
Page 27

w ADVERTENCIA
Cuidado y Limpieza
1. Desenchufe la unidad.
2. Deje enfriar por completo.
3. Limpie la base con un paño suave húmedo.
Desconecte la energía antes de limpiar. No sumerja el cable,
enchufe o base en ningún líquido.
4. La olla y la tapa pueden lavarse en agua caliente jabonosa o en
el lavavajillas. NO utilice la configuración “SANI” cuando lave las
piezas en el lavavajillas. Las temperaturas del ciclo “SANI” pueden
dañar su producto. Para evitar los aromas persistentes a alimentos,
comunes en la mayoría de los recipientes plásticos, lave la junta de
goma de la tapa con agua caliente jabonosa después de cada uso.
Guarde con la tapa entreabierta.
Concejos para Cocinar Lento
Peligro de Descarga Eléctrica.
• No se requiere menear cuando se cocina lento y remover la tapa
de vidro resulta en una gran pérdida de calor y puede necesitar
que se extienda el tiempo de cocinado. Sin embargo, si se cocina
en HIGH (alto), puede querer menear ocasionalmente.
• Muchas recetas requieren cocerse todo el día. Si su programa
matutino no le deja tiempo para preparar una receta, hágalo
la noche anterior. Coloque todos los ingredientes en la olla
removible, cubra con la tapa y refrigere durante la noche.
En la mañana, coloque la olla removible en la base.
• Algunos alimentos no se adaptan a un cocimento extendido en
una olla de cocción lenta. La pasta, mariscos, leche, crema o
crema agria deben de agregarse 2 horas antes de servirse. La
leche evaporada o sopas condensadas son perfectas para el
cocimiento lento.
• Las ollas de cocción lenta permiten muy poca evaporación. Si
hace su sopa, guisado o salsa favorita, reduzca el líquido indicado
en la receta original. Si está muy espeso, se puede agregar líquido
posteriormente.
• Si cocina una cacerola de tipo vegetal, necesita haber líquido en
el recipiente para prevenir que se quemen los lados de la olla
removible.
• Reduzca la cantidad de ingredientes de una receta concebida para
una olla de cocción lenta más grande para que puedan cocinarse
bien en una olla de 3.5 cuartos de galón.
• Los sabores de hierbas frescas y especias deshidratadas pueden
disminuir durante el tiempo de cocción. Agregue las hierbas
frescas hacia el final del tiempo de cocción para obtener un mejor
sabor.
27
Page 28

Consejos de Seguridad de Alimentos
• No use carne congelada sin cocinar en la olla de cocción lenta.
Descongele todas las carnes vacunas y de aves antes de iniciar
la cocción lenta.
• Para obtener más información sobre temperaturas seguras de
cocción interna, visite www.foodsafety.gov.
• Para almacenar sobras después de la cocción, NO coloque toda
la olla en el refrigerador porque los alimentos tardarán demasiado
en enfriarse. Divida las sobras en recipientes más pequeños y
colóquelos en el refrigerador.
• Nunca permita que carne cruda o poco cocida quede a temperatura
Resolviendo Problemas
A la comida le falta cocer.
• ¿Se cocinó la comida en el ajuste de WARM (caliente)? No cocine en
WARM (caliente); siempre cocine en los ajustes de calor LOW (bajo) o
HIGH (alto).
• ¿Se interrupió la corriente?
• ¿Seleccionó el ajuste de calor LOW (bajo), pero uso el tiempo de
cocción basado en el ajuste de calor HIGH (alto)?
• ¿Colocó la tapa correctamente en la olla?
Mi comida se coció de más. ¿Por qué?
• ¿Eligió el tiempo en base a una receta de calor LOW (baja)?
• Los alimentos continuarán incrementando la temperatura después
que la temperatura deseada se ha alcanzado.
28
La comida no se coció después de la cantidad de tiempo
recomendada por mi receta.
•
Se colapsó el empaque de la tapa.
• Esto puede causarse por cambios repentinos de temperatura, como
• Para ayudar a mantener la forma del empaque, no cocine con los
ambiente dentro de la olla de cocción lenta. Una vez que la carne se
coloca en la olla, ésta debe cocinarse de inmediato (a menos que se
prepare la olla de cocción lenta la noche anterior, en cuyo caso la
olla debe colocarse en el refrigerador).
Esto se puede deber a las variaciones de voltaje (que es común en
todos lados) o la altitud. Las ligeras fluctuaciones en la corriente no
tienen efectos notables en la mayoría de los aparatos. Sin embargo,
puede alterar los tiempos de cocción en una olla. Un voltaje menor al
clasificado requerirá tiempos de cocción más prolongados y un voltaje
mayor requerirá tiempos de cocción más reducidos. Aprenderá con la
experiencia si se requiere de un tiempo menor o mayor.
pasar agua fría sobre una tapa caliente. Deje que la tapa se asiente
a temperatura de habitación. Regresará a su forma original en 24
horas.
broches ajustados y no almacene la unidad vacía con los broches
ajustados.
Page 29

Notas
29
Page 30

Grupo HB PS, S.A. de C.V.
Monte Elbruz No. 124 - 401
Col. Polanco V Sección, Miguel Hidalgo
Ciudad de México, C.P. 11560
PÓLIZA DE GARANTÍA
PRODUCTO:
MARCA:
Grupo HB PS, S.A. de C.V. cuenta con una Red de Centros de Servicio Autorizada, por favor consulte en la lista anexa el nombre y dirección de los establecimientos en la
República Mexicana en donde usted podrá hacer efectiva la garantía, obtener partes, componentes, consumibles y accesorios; así como también obtener servicio para
productos fuera de garantía. Para mayor información llame sin costo: Centro de Atención al consumidor: 01 800 71 16 100
Grupo HB PS, S.A. de C.V. le otorga a partir de la fecha de compra:
GARANTÍA DE 1 AÑO.
COBERTURA
• Esta garantía ampara, todas las piezas y componentes del producto que resulten con defecto de fabricación incluyendo la mano de obra.
Grupo HB PS,
•
todo lo anterior sin costo adicional para el consumidor.
• Esta garantía incluye los gastos de transportación del producto que deriven de su cumplimiento dentro de su red de servicio.
S.A. de C.V. se obliga a reemplazar, reparar o reponer, cualquier pieza o componente defectuoso; proporcionar la mano de obra necesaria para su diagnóstico y reparación,
LIMITACIONES
• Esta garantía no ampara el reemplazo de piezas deterioradas por uso o por desgaste normal, como son: cuchillas, vasos, jarras, filtros, etc.
• Grupo HB PS, S.A. de C.V. no se hace responsable por los accidentes producidos a consecuencia de una instalación eléctrica defectuosa, ausencia de toma de tierra, clavija de enchufe
en mal estado, etc.
EXCEPCIONES
Esta garantía no será efectiva en los siguientes casos:
a) Cuando el producto se hubiese utlizado en condiciones distintas a las normales. (Uso industrial, semi-industrial o comercial.)
b) Cuando el producto no hubiese sido operado de acuerdo con el instructivo de uso.
c) Cuando el producto hubiese sido alterado o reparado por personas no autorizadas por Grupo HB PS, S.A. de C.V. el fabricante nacional, importador o comercializador responsable
respectivo.
El consumidor puede solicitar que se haga efectiva la garantía ante la propia casa comercial donde adquirió su producto, siempre y cuando Grupo HB PS, S.A. de C.V. no cuente con talleres de
servicio.
MODELO:
30
Page 31

PROCEDIMIENTO PARA HACER EFECTIVA LA GARANTÍA
• Para hacer efectiva la garantía, lleve su aparato al Centro de Servicio Autorizado más cercano a su domicilio (consulte la lista anexa).
• Si no existe Centro de Servicio Autorizado en su localidad llame a nuestro Centro de Atención al Consumidor para recibir instrucciones de como hacer efectiva su garantía.
FECHA DE ENTREGA SELLO DEL VENDEDOR QUEJAS Y SUGERENCIAS
Si desea hacer comentarios o sugerencias con respecto a nuestro servicio o tiene alguna queja derivada de la atención
DÍA___ MES___ AÑO___
recibida en alguno de nuestros Centros de Servicio Autorizados, por favor dirigirse a:
GERENCIA INTERNACIONAL DE SERVICIO
Email: mexico.service@hamiltonbeach.com.mx
01 800 71 16 100
CENTROS DE SERVICIO AUTORIZADOS
Ciudad de México
ELECTRODOMÉSTICOS
Av. Plutarco Elias Calles, No. 1499
Zacahuitzco, Ciudad de México, C.P. 09490
Tel: 01 55 5235 2323
Fax: 01 55 5243 1397
CASA GARCIA
Av. Patriotismo No. 875-B
Mixcoac, Ciudad de México, C.P. 03910
Tel: 01 55 5563 8723
Fax: 01 55 5615 1856
Nuevo León
FERNANDO SEPULVEDA REFACCIONES
Ruperto Martínez No. 238 Ote.
Centro MONTERREY, 64000 N.L.
Tel: 01 81 8343 6700 • Fax: 01 81 8344 0486
Jalisco
SERVICIOS DE MANTENIMIENTO CASTILLO
Garibaldi No. 1450
Ladrón de Guevara
GUADALAJARA 44660 Jal.
Tel: 01 33 3825 3480 • Fax: 01 33 3826 1914
31
Page 32

Modelo:
33444
Tipo:
SC74
Características Eléctricas:
120 V~ 60 Hz 290 W
Los modelos incluídos en el instructivo de Uso y Cuidado pueden ir seguidos o no por un sufijo correspondiente a una
o varias letras del alfabeto y sus combinaciones, separadas o no por un espacio, coma, diagonal, o guión. Como ejemplos
los sufijos pueden ser: “Y” y/o “MX” y/o “MXY” y/o “Z”.
840277801
2/18
 Loading...