

Page 1
READ BEFORE USE
LIRE AVANT UTILISATION
LEA ANTES DE USAR
Visit www.hamiltonbeach.com for our
complete line of products and Use and
Care Guides – as well as delicious recipes,
tips, and to register your product online!
Rendez-vous sur www.hamiltonbeach.ca
pour notre liste complète de produits et de
nos manuels utilisateur – ainsi que nos
délicieuses recettes et nos conseils !
¡Visite www.hamiltonbeach.com (
o
www.hamiltonbeach.com.mx (México)
para ver otros productos de Hamilton Beach
o para contactarnos!
EE. UU.)
IntelliTime™ Slow
Cooker
Questions?
Please call us – our friendly
associates are ready to help.
USA: 1.800.851.8900
Questions ?
N’hésitez pas à nous appeler –
nos associés s’empresseront
de vous aider.
CAN : 1.800.267.2826
¿Preguntas?
Por favor llámenos – nuestros
amables representantes están
listos para ayudar.
EE. UU.: 1.800.851.8900
MEX: 01 800 71 16 100
Le invitamos a leer cuidadosamente este
instructivo antes de usar su aparato.
IntelliTimeMC
Mijoteuse
IntelliTime™
Olla de Cocción
English ....................... 2
Français .................... 15
Español .................... 27
Page 2

IMPORTANT SAFEGUARDS
When using electrical appliances, basic safety precautions should always be followed to reduce the risk of fire, electric shock, and/or injury to
persons, including the following:
1. Read all instructions.
2. This appliance is not intended for use by persons (including
children) with reduced physical, sensory, or mental capabilities,
or lack of experience and knowledge, unless they are closely
supervised and instructed concerning use of the appliance by a
person responsible for their safety.
3. Close supervision is necessary when any appliance is used by
or near children. Children should be supervised to ensure that
they do not play with the appliance.
4. Do not touch hot surfaces. Use handles or knobs.
5. To protect against electric shock, do not immerse cord, plug, or
base in water or other liquid.
6. Unplug from outlet when not in use and before cleaning. Allow
to cool before putting on or taking off parts.
7. Do not operate any appliance with a damaged supply cord or
plug, or after the appliance malfunctions or has been dropped
or damaged in any manner. Supply cord replacement and
repairs must be conducted by the manufacturer, its service
agent, or similarly qualified persons in order to avoid a hazard.
Call the provided customer service number for information on
examination, repair, or adjustment.
8. The use of accessory attachments not recommended by the
appliance manufacturer may cause injuries.
9. Do not use outdoors.
10. Do not let cord hang over edge of table or counter, or touch hot
surfaces, including stove.
11. Do not place removable crock or base on or near hot gas or
an electric burner. Do not place slow cooker base in a heated
oven.
12. Extreme caution must be used when moving an appliance
containing hot oil or other hot liquids.
13. To disconnect slow cooker, turn OFF; then remove plug
from wall outlet.
14. CAUTION: To prevent damage or shock hazard, do not cook in
base. Cook only in removable crock.
15. Avoid sudden temperature changes, such as adding
refrigerated foods into a heated removable crock.
16. Intended for countertop use only.
17. WARNING: Spilled food can cause serious burns. Keep
appliance and cord away from children. Never drape cord over
edge of counter, never use outlet below counter, and never use
with an extension cord.
18. Do not use appliance for other than intended use.
SAVE THESE INSTRUCTIONS
2
Page 3

Other Consumer Safety Information
This appliance is intended for household use only.
This appliance is only intended for the preparation, cooking,
and serving of foods. This appliance is not intended for use
with any nonfood materials or products.
w WARNING
provided with a polarized plug (one wide blade) to reduce
the risk of electric shock. The plug fits only one way into a
polarized outlet. Do not defeat the safety purpose of the plug
by modifying the plug in any way or by using an adapter. If the
plug does not fit fully into the outlet, reverse the plug. If it still
does not fit, have an electrician replace the outlet.
Electrical Shock Hazard: This appliance is
CROCK AND LID: PRECAUTIONS AND INFORMATION
• Please handle crock and lid carefully to ensure long life.
• Avoid sudden, extreme temperature changes. For example,
do not place a hot lid or crock into cold water, or onto a wet
surface.
• Avoid hitting crock or lid against faucet or other hard
surfaces.
• Do not use crock or lid if chipped, cracked, or severely
scratched.
A short power-supply cord is used to reduce the risk resulting from
it being grabbed by children, becoming entangled in, or tripping
over a longer cord.
• Do not use abrasive cleansers or metal scouring pads.
• The bottom of the crock is very rough and can damage the
countertop. Use caution.
• The crock and lid can become very hot. Use caution. Do not
place directly on any unprotected surface or countertop.
• The crock is microwave-safe and oven-proof, but never heat
crock when empty. Never place lid on a burner or stove top.
Do not place lid in a microwave oven, conventional oven, or
on stove top.
REMOVING LID AND CROCK
When removing lid, tilt so that opening faces away from you to
avoid being burned by steam.
The sides of the slow cooker’s base get very warm because
the heating elements are located here. Use handles on base if
necessary. Use oven mitts to remove crock.
3
Page 4
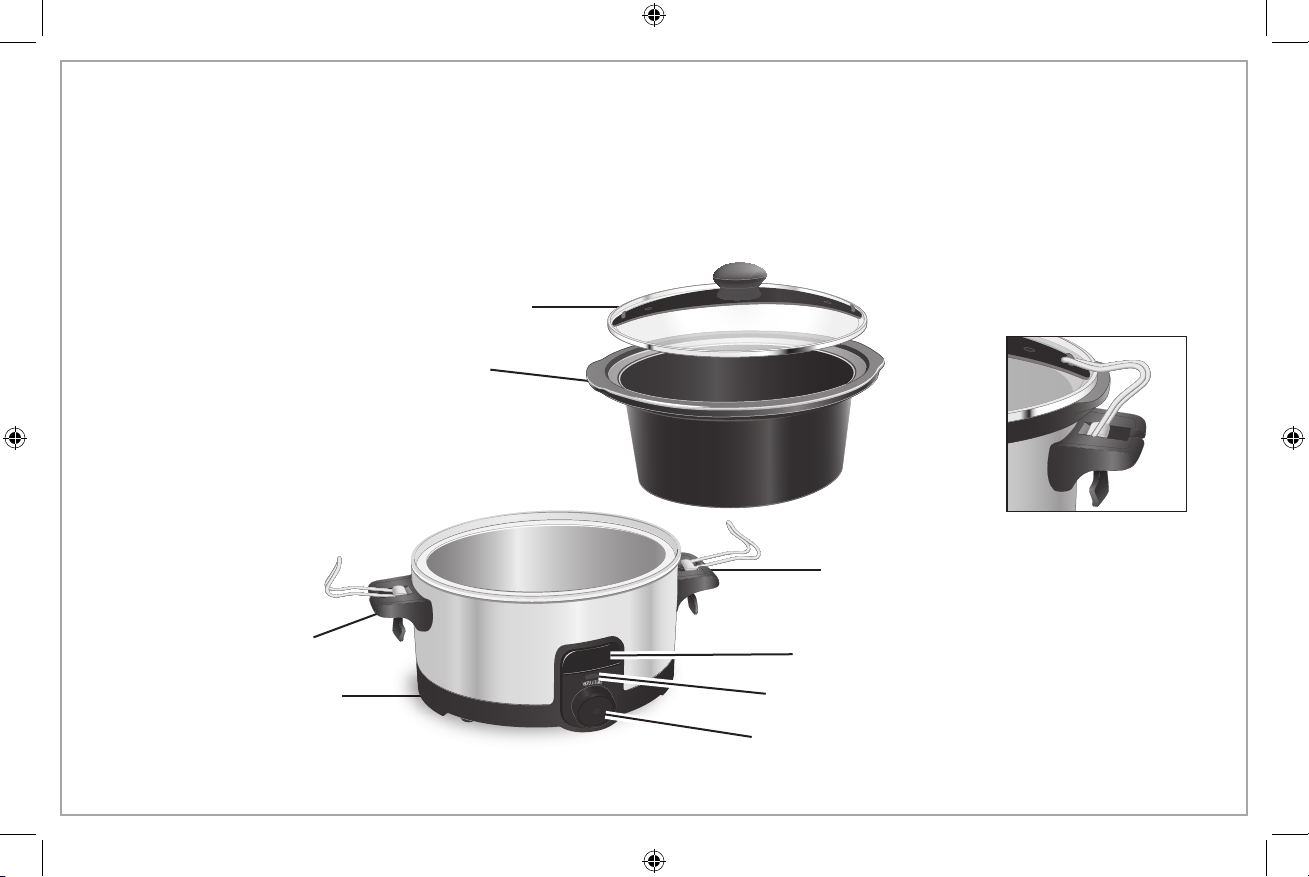
Parts and Features
*To order parts:
US: 1.800.851.8900
www.hamiltonbeach.com
Canada: 1.800.267.2826
Mexico:
01 800 71 16 100
Crock Capacity
For best results, fill crock no more than 1 inch (2.5 cm)
from the cover. If only half-filled, check for doneness 1
to 2 hours earlier than recipe states.
Glass Lid*
Removable
Stoneware Crock*
Handle
Handle
Base
4
Display
IntelliTime™ Light
Control Dial With
ON/OFF Button
Wire Clips
Handles shown with wire
clips locked in place for
transporting only. Do not
cook or store with lid
clamped down.
Page 5

Introduction
No more dry, mushy slow-cooked meals. The IntelliTime™ slow cooker automatically adjusts the heat to prevent overcooking. Most slow
cooker recipes call for a 6- to 8-hour cook time, but many working families are out of the house for 10 or more hours a day. With the
IntelliTime slow cooker, food is finished precisely when you want, even up to 12 hours later.
The IntelliTime slow cooker has two modes of cooking—IntelliTime mode and Manual mode. The IntelliTime mode adjusts heat based on
the number of hours you want to cook, from 4 hours to 12 hours. When the cooking time has ended, it shifts to WARM for 4 hours. It is
ideal for cooking large meats, meat and vegetable combinations, or long-cooking soups and stews. The Manual mode is the traditional
way of slow cooking with heat settings of WARM, LOW, MEDIUM, and HIGH. Choose the Manual mode for foods with cooking times of
less than 4 hours or recipes such as desserts and egg dishes.
How to Use IntelliTime Mode
INTELLITIME: Choose cooking time from 4 hours to 12 hours in 30-minute increments. In this mode, the slow cooker automatically adjusts
the heat to the hours selected.
Examples of Common IntelliTime Settings
Choose your starting time in the left column. Look across the top to choose a serve time. Your IntelliTime setting is the number of hours at the
point where the two intersect.
SERVE TIME 5:30 p.m. 6:00 p.m. 6:30 p.m. 7:00 p.m 7:30 p.m. 8:00 p.m.
6:30 a.m. 11 11 1/2 12 12* 12* 12*
COOKING
START TIME
7:00 a.m. 10 1/2 11 11 1/2 12 12* 12*
7:30 a.m. 10 10 1/2 11 11 1/2 12 12*
8:00 a.m. 9 1/2 10 10 1/2 11 11 1/2 12
NUMBER OF HOURS TO SET INTELLITIME
*Will switch to WARM after 12 hours.
5
Page 6
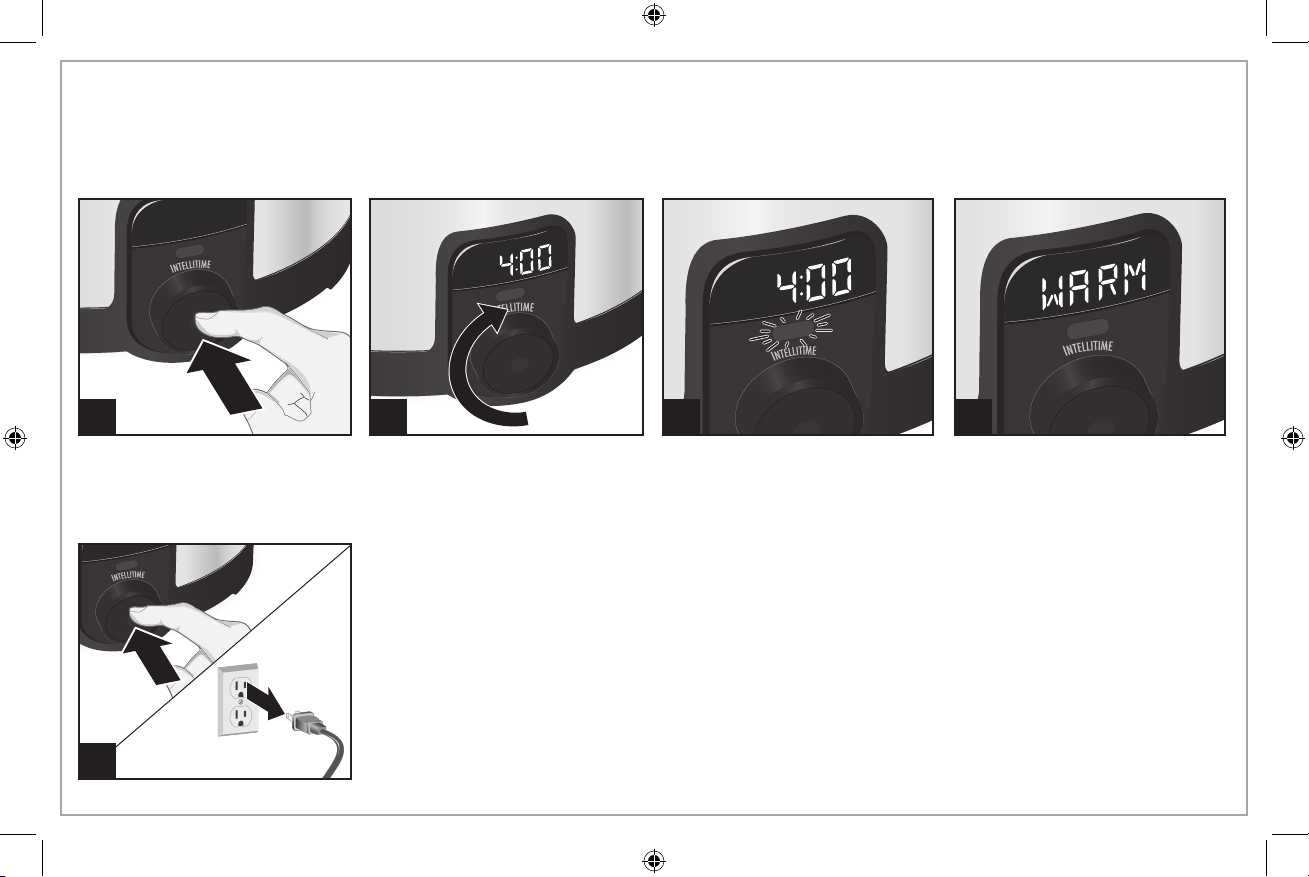
How to Use IntelliTime™ Mode (cont.)
BEFORE FIRST USE: Wash lid and crock in hot, soapy water. Rinse and dry.
1
Plug in slow cooker. Press ON/
OFF button to turn on. Display
will flash 4:00. (Slow cooker will
start in 4:00 if no other setting is
selected.)
5
6
2
Rotate knob to the right to select cooking time from 4 to 12 hours in
30-minute increments. Push button to start or wait a few seconds and
slow cooker will start automatically. The slow cooker will beep when
it starts and IntelliTime light will be illuminated.
NOTE: Display flashes when setting can be changed and remains lit
after the beep and cooking starts. Once cooking starts, settings cannot
be adjusted. Turn slow cooker off and restart to reset.
To turn off at any time, press and
hold ON/OFF button. Unplug from
wall outlet.
3 4
EXAMPLE FOR SETTING INTELLITIME: Your recipe for Beef Stew
calls for cooking on LOW for 6 to 8 hours. You will be away from
home for 10 hours. Ignore the recipe time and set the dial for 10
hours. The slow cooker adjusts heat to make your Beef Stew ready
to eat, not overcooked, at 10 hours. Can’t make it home in 10 hours?
No problem, the slow cooker automatically switches to WARM for up
to 4 hours after cooking time has ended.
When cooking is finished, slow
cooker will automatically switch
to the WARM setting.
MAX cooking
with an additional 4 hours of
warming time. After any time
setting, the slow cooker will
automatically switch to WARM
for up to 4 hours.
time is 12 hours
Page 7
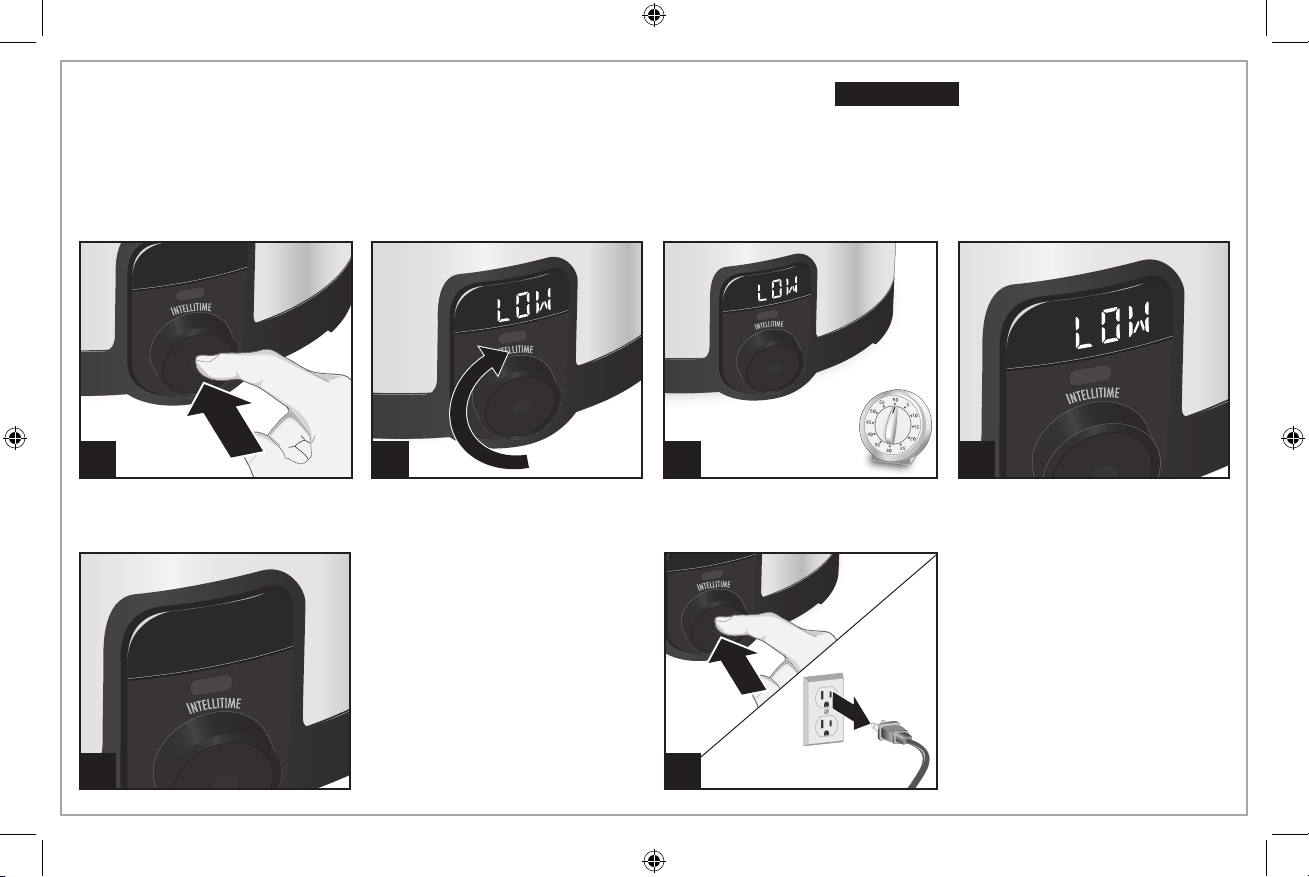
How to Use Manual Mode
MANUAL: Choose desired heat settings WARM, LOW, MEDIUM, or HIGH. In this mode,
slow cooker will NOT keep track of cooking time. A kitchen timer should be used.
1 2 43
Plug in slow cooker. Press ON/
OFF button to turn on. Display will
flash 4:00.
Rotate knob past the IntelliTime™
mode settings to select desired
heat setting, WARM, LOW,
MEDIUM, or HIGH.
Use a separate kitchen timer to
keep track of cooking time when
using the Manual mode.
w WARNING
Food must be hot enough to prevent bacterial
growth before using WARM setting. The WARM
setting should only be used after a recipe has
been thoroughly cooked. Do not reheat food on
WARM setting. Visit foodsafety.gov for more
information.
Food Safety Hazard.
Push button to start or wait a few
seconds and slow cooker will start
automatically. The slow cooker
will beep when it starts.
NOTE: Display flashes when
setting can be changed and
remains lit after the beep and
cooking starts. Once cooking
starts, settings cannot be
adjusted. Turn slow cooker off
and restart to reset.
5
After 14 hours, the slow cooker
will automatically turn off.
6
To turn off at any time, press and
hold ON/OFF button. Unplug from
wall outlet.
7
Page 8

Care and Cleaning
w WARNING
Disconnect power before cleaning. Do not immerse
cord, plug, or base in any liquid.
Electrical Shock Hazard.
1
2 3
Remove crock and let cool.
DISHWASHER-SAFE
DO NOT use the “SANI” setting
when washing in the dishwasher.
“SANI” cycle temperatures could
damage your product.
Visit www.hamiltonbeach.com for our complete
line of products and Use and Care Guides –
as well as delicious recipes, tips, and
to register your product online!
8
Page 9

Tips for Slow Cooking
• The crock should be at least half-filled for best results. If only
half-filled, foods may cook faster.
• Stirring is not necessary when slow cooking. Removing glass
lid results in major heat loss and the cooking time may need to
be extended.
• Many recipes call for cooking all day. If your morning schedule
doesn’t allow time to prepare a recipe, do it the night before.
Place all ingredients in crock, cover with lid, and refrigerate
overnight. In the morning, simply place crock in slow cooker.
• When choosing recipes for this slow cooker, look for recipes
that call for cooking time on HIGH 4 to 5 hours or LOW 6 to 8
hours. Recipes calling for less cooking time should be checked
periodically for doneness.
Food Safety Tips
• Do not use frozen, uncooked meat in the slow cooker. Thaw any
meat or poultry before slow cooking.
• Visit www.foodsafety.gov for more information on safe internal
cooking temperatures.
• To store leftovers after cooking, do NOT place the entire crock in the
refrigerator since contents will take too long to cool. Instead, divide
leftovers into smaller containers and place into refrigerator.
• Some foods are not suited for extended cooking in a slow cooker.
Pasta, seafood, milk, cream, or sour cream should be added 2
hours before serving. Evaporated milk or condensed soups are
perfect for slow cooking.
• The higher the fat content of meat, the less liquid is needed. If
cooking meat with a high fat content, place thick onion slices
underneath so meat will not sit on (and cook in) fat.
• Slow cookers allow for very little evaporation. If making your
favorite soup, stew, or sauce, reduce liquid called for in original
recipe. If too thick, liquid can be added later.
• If cooking a vegetable-type casserole, there will need to be liquid
in the recipe to prevent scorching on the sides of the crock.
• Never allow undercooked or raw meat to sit at room temperature
in the slow cooker. Once meat is placed into the crock, it should be
cooked immediately (unless prepping slow cooker the night before,
where crock should be placed into the refrigerator).
IF YOU LIVE IN A HIGH-ALTITUDE AREA:
The Extension service will have detailed information about cooking
for your area. To locate the Cooperative Extension service in your
county, please visit: http://www.csrees.usda.gov/Extension/.
9
Page 10

Troubleshooting
PROBLEM PROBABLE CAUSE/SOLUTION
Food is undercooked. • Was food cooked on the Warm setting? Do not cook on Warm.
• Was power interrupted?
• Did the slow cooker cook for the complete time selected? Select HIGH or the 4-hour setting to
add more time to the recipe.
• Recipe had too much liquid.
• Crock was overfilled.
• Did you have the lid placed correctly on the slow cooker?
My meal was
overcooked. Why?
• Was the crock at least half full? The slow cooker has been designed to thoroughly cook food
in a filled crock. If the crock is only half-filled, foods may cook faster. Check for doneness
periodically.
• Foods will continue to increase in temperature after desired temperature has been reached.
• Recipe called for shorter than normal cook time and IntelliTime™ mode was used.
10
Page 11

Recipes
Beef Pot Roast
3–5 lb. (1.3–2.2 kg) beef pot roast
1 1/2 teaspoons (7.5 ml) salt
1 teaspoon (5 ml) pepper
4 potatoes, quartered
4 carrots, cut into 1-inch (2.5-cm) pieces
2 onions, quartered
1 envelope dry onion mix
1/2 cup (118 ml) beef broth or water
1. Season roast with salt and pepper. In skillet, over mediumhigh heat, brown roast on all sides; set aside.
2. Place vegetables in crock. Place roast on top of vegetables.
3. Sprinkle with onion soup mix. Drizzle beef broth over meat
and vegetables. Cover slow cooker.
4. Choose IntelliTime™ or Manual mode for desired cooking time
OR heat setting. Slow cooker will beep and start cooking after
5 seconds.
INTELLITIME Mode: Number of hours of cooking time desired
(select from 4 to 12 hours)
MANUAL Mode: HIGH for 5 hours, MEDIUM for 7 1/2 hours, OR
LOW for 10 hours
Serves: 4 to 6
TEST KITCHEN TIP: Pot roast should cook until fork-tender.
Whole Chicken and Vegetables
1 medium onion, sliced
5 1/2–6 lb. (2.5–2.7 kg) whole chicken
2 teaspoons (10 ml) seasoned salt
1 teaspoon (5 ml) cracked black pepper
4 medium carrots, cut into 1 1/2-inch (3.8-cm) pieces
4 small red potatoes, cut into eighths
2 celery ribs, cut into 1 1/2-inch (3.8-cm) pieces
1. Place half of sliced onion on bottom of slow cooker crock.
2. Rinse chicken and pat dry. Sprinkle all sides with seasoned salt
and pepper. Place chicken on top of sliced onions in crock.
3. Arrange remaining onion, carrots, potatoes and celery around
chicken. Cover slow cooker.
4. Choose IntelliTime™ or Manual mode for desired cooking time
OR heat setting. Slow cooker will beep and start cooking after
5 seconds.
INTELLITIME Mode: Number of hours of cooking time desired
(select from 4 to 12 hours)
MANUAL Mode: HIGH for 4 hours, MEDIUM for 5 hours, OR
LOW for 6 to 8 hours
Serves: 4 to 6
TEST KITCHEN TIP: Chicken is done when meat temperature
registers 165°F (74°C) in the thickest part of the breast.
11
Page 12

Recipes (cont.)
Pork Roast With Carrots, Apples, and Rosemary
2 Granny Smith apples, cored and each cut into 8 wedges
1 tablespoon (15 ml) lemon juice
4 lb. (1.8 kg) boneless loin pork roast
1 teaspoon (5 ml) salt
1/2 teaspoon (2.5 ml) fresh ground pepper
1 medium onion, cut in eighths
4 large carrots, cut into 1 1/2-inch (3.8-cm) pieces
1 fresh rosemary sprig
1. Toss apples with lemon juice; set aside.
2. Season roast with salt and pepper.
3. Place half of onions and 4 to 6 apple wedges in crock.
4. Top with seasoned roast. Surround roast with remaining apples,
onions and carrots and top with rosemary. Cover slow cooker.
5. Choose IntelliTime™ or Manual mode for desired cooking time
OR heat setting. Slow cooker will beep and start cooking after
5 seconds.
INTELLITIME Mode: Number of hours of cooking time desired
(select from 4 to 12 hours)
MANUAL Mode: HIGH for 4 hours, MEDIUM for 5 1/2 to 6 hours,
OR LOW for 7 to 8 hours
Serves: 4 to 6
TEST KITCHEN TIP: For food safety, be sure to cook until meat
thermometer registers at least 145°F (63°C).
Butternut Squash Soup
1 large (1 1/2 lb./680 g) butternut squash, peeled, seeded, and cut
into 2-inch (5-cm) chunks
2 medium red potatoes, peeled and cut into 1-inch (2.5-cm) chunks
1 medium onion, chopped
3 large garlic cloves, chopped
5 cups (1.2 L) chicken broth
1 1/2 teaspoons (7.5 ml) dried rubbed sage
1/2 teaspoon (2.5 ml) salt
1/4 teaspoon (1.3 ml) pepper
1. Place squash, potatoes, onion and garlic in crock.
2. Add chicken broth, sage, salt and pepper. Cover slow cooker.
3. Choose IntelliTime™ or Manual mode for desired cooking time
OR heat setting. Slow cooker will beep and start cooking after
5 seconds.
4. Let cool slightly; then puree soup in a blender or food
processor.
INTELLITIME Mode: Number of hours of cooking time desired
(select from 4 to 12 hours)
MANUAL Mode: HIGH for 4 hours, MEDIUM for 5 hours, OR
LOW for 6 to 7 hours
Serves: 8 to 10
TEST KITCHEN TIP: For easy squash preparation, microwave for
2 minutes prior to cutting. Placing in the microwave oven will
soften the rind, making cutting in half easier.
12
Page 13

Notes
13
Page 14

Limited Warranty
This warranty applies to products purchased and used in the U.S. and Canada. This is the only express warranty for this product and
is in lieu of any other warranty or condition.
This product is warranted to be free from defects in material and workmanship for a period of five (5) years from the date of original
purchase in Canada and one (1) year from the date of original purchase in the U.S. During this period, your exclusive remedy is repair
or replacement of this product or any component found to be defective, at our option; however, you are responsible for all costs
associated with returning the product to us and our returning a product or component under this warranty to you. If the product or
component is no longer available, we will replace with a similar one of equal or greater value.
This warranty does not cover glass, filters, wear from normal use, use not in conformity with the printed directions, or damage to
the product resulting from accident, alteration, abuse, or misuse. This warranty extends only to the original consumer purchaser or
gift recipient. Keep the original sales receipt, as proof of purchase is required to make a warranty claim. This warranty is void if the
product is used for other than single-family household use or subjected to any voltage and waveform other than as specified on the
rating label (e.g., 120V ~ 60 Hz).
We exclude all claims for special, incidental, and consequential damages caused by breach of express or implied warranty. All
liability is limited to the amount of the purchase price. Every implied warranty, including any statutory warranty or condition
of merchantability or fitness for a particular purpose, is disclaimed except to the extent prohibited by law, in which case such
warranty or condition is limited to the duration of this written warranty. This warranty gives you specific legal rights. You may have
other legal rights that vary depending on where you live. Some states or provinces do not allow limitations on implied warranties or
special, incidental, or consequential damages, so the foregoing limitations may not apply to you.
To make a warranty claim, do not return this appliance to the store. Please call 1.800.851.8900 in the U.S. or 1.800.267.2826 in Canada
or visit hamiltonbeach.com in the U.S. or hamiltonbeach.ca in Canada. For faster service, locate the model, type, and series numbers
on your appliance.
14
Page 15

PRÉCAUTIONS IMPORTANTES
Pour utiliser un appareil électroménager, vous devez toujours prendre des mesures élémentaires de sécurité pour réduire le risque d’incendie,
d’électrocution et/ou de blessure corporelle, en particulier les mesures suivantes :
1. Lire toutes les instructions.
2. Cet appareil n’est pas destiné à être utilisé par des personnes
(y compris les enfants) dont les capacités physiques,
sensorielles ou mentales sont réduites, ou manquant
d’expérience et de connaissance, sauf si elles sont étroitement
surveillées et instruites sur l’utilisation de l’appareil par une
personne responsable de leur sécurité.
3. Une surveillance étroite est requise pour tout appareil utilisé par
ou près des enfants. Surveiller que les enfants ne jouent pas
avec l’appareil.
4. Ne pas toucher les surfaces chaudes. Utiliser les poignées ou
les boutons.
5. Pour se protéger contre le risque de choc électrique, ne pas
immerger le cordon, la fiche ou la base dans l’eau ou tout autre
liquide.
6. Débrancher l’appareil de la prise de courant électrique lorsqu’il
n’est pas utilisé et avant un nettoyage. Le laisser refroidir avant
un nettoyage et avant d’y placer ou d’y enlever des pièces.
7. Ne pas faire fonctionner un appareil électroménager avec un
cordon ou une fiche endommagée, ou lorsque l’appareil ne
fonctionne pas bien ou a été échappé ou endommagé d’une
manière quelconque. Le remplacement et la réparation du
cordon d’alimentation doivent être faits par le fabricant, son
agent de service ou toute personne qualifiée de façon à éviter
tout danger. Appeler le numéro de service à la clientèle fourni
pour des renseignements concernant l’examen, la réparation ou
l’ajustement.
8. L’utilisation d’accessoires non recommandés par le fabricant de
l’appareil peut causer des blessures.
9. Ne pas utiliser à l’extérieur.
10. Ne pas laisser le cordon pendre du bord d’une table ou d’un
comptoir, ou toucher des surfaces chaudes, y compris la
cuisinière.
11. Ne pas placer le pot amovible ou base sur ou près d’un brûleur
à gaz chaud, ou d’un élément électrique. Ne pas placer la base
de la mijoteuse dans un four chauffé.
12. Il est nécessaire de faire preuve de la plus grande prudence
en déplaçant un appareil électroménager contenant de l’huile
chaude ou d’autres liquides chauds.
13. Pour débrancher la mijoteuse, tourner à OFF (arrêt), puis
débrancher la fiche de la prise.
14. MISE EN GARDE : Afin de prévenir l’endommagement ou le
risque de choc, ne pas cuire dans la base. Cuire seulement
dans le plat amovible.
15. Éviter les changements soudains de température, tels que
l’ajout de nourriture sortant du réfrigérateur dans un plat
chauffé.
16. Destiné à une utilisation sur comptoir seulement.
17. AVERTISSEMENT : Les renversements d’aliments peuvent
causer des brûlures sévères. Garder l’appareil et le cordon
à l’écart des enfants. Ne laisser jamais pendre le cordon
pardessus le bord du comptoir, n’utiliser jamais de prise située
sous le comptoir et n’utiliser jamais une rallonge de cordon.
18. Ne pas utiliser l’appareil électroménager à une fin autre que
celle prévue.
CONSERVEZ CES INSTRUCTIONS
15
Page 16

Autre consigne de sécurité pour le consommateur
Cet appareil est destiné à un usage domestique uniquement.
Cet appareil est conçu uniquement pour préparer, faire cuire
et servir des aliments. Cet appareil n’est pas conçu pour une
utilisation avec toute autre matière ou produit non alimentaire.
w AVERTISSEMENT
fourni avec une fiche polarisée (une broche large) pour réduire le
risque d’électrocution. Cette fiche n’entre que dans un seul sens
dans une prise polarisée. Ne contrecarrez pas l’objectif sécuritaire
de cette fiche en la modifiant de quelque manière que ce soit
ou en utilisant un adaptateur. Si vous ne pouvez pas insérer
complètement la fiche dans la prise, inversez la fiche. Si elle refuse
toujours de s’insérer, faire remplacer la prise par un électricien.
• Veuiller manipuler le pot et le couvercle avec soin pour assurer
leur durabilité.
• Éviter des changements de température brusques et extrêmes.
Par exemple, ne placer pas un couvercle ou un pot chaud dans
l’eau froide ou sur une surface mouillée.
• Éviter de frapper le pot et le couvercle sur le robinet ou sur toute
surface rigide.
• N’utiliser pas le pot ou le couvercle si l’un ou l’autre est ébréché,
fendillé ou très écorché.
• N’utiliser pas de nettoyeurs abrasifs ou de tampon métallique à
récurer.
Risque de choc électrique : Cet appareil est
COUVERCLE ET POT : PRÉCAUTIONS ET INFORMATION
Un cordon d’alimentation court est utilisé pour réduire le risque
d’emmêlement, de trébuchement ou de saisie par un enfant.
• La base du pot est très rugueuse et peut endommager un
revêtement de comptoir. Faites preuve de prudence.
• Le pot et son couvercle peuvent devenir très chauds. Faites
preuve de prudence. Ne les déposer pas directement sur une
surface ou un revêtement de comptoir non protégés.
• Le pot peut aller au four à micro-ondes et au four régulier.
Éviter, toutefois, de chauffer le pot lorsqu’il est vide. Ne placer
jamais le couvercle sur un rond de poêle ou directement sur le
poêle. Ne placer pas le couvercle dans le four à micro-ondes,
dans le four conventionnel ou directement sur le poêle.
SOULÈVEMENT DU COUVERCLE ET DU POT
Lors de l’ouverture du couvercle, incliner ce dernier de
manière à ce que la vapeur ne soit pas dirigée vers le corps et
éviter les brûlures.
16
Les côtés de la base de la mijoteuse deviennent très chauds car
c’est là que se trouvent les éléments chauffants. Au besoin, utiliser
les poignées sur la base. Utiliser des gants de cuisine pour retirer
le pot.
Page 17

Pièces et caractéristiques
*Pour commander des pièces :
Canada : 1.800.267.2826
Capacité du pot
Pour des résultats optimaux, remplir le pot jusqu’à
un maximum de 1 po (2,5 cm) du couvercle. Si le pot
est rempli à mi-hauteur, vérifier l’état de cuisson 1 à
2 heures avant l’achèvement du temps de cuisson
indiqué dans la recette.
Poignée
Base
Couvercle en verre*
Pot de grès
amovible*
Poignée
Affichage
Témoin IntelliTime
Bouton de commande avec
le bouton (marche/arrêt)
MC
Attaches en fil
Poignées illustrées avec attaches
en fil verrouillées en place et
utilisées uniquement pour le
transport. Ne pas cuire d’aliments
ou ranger l’appareil lorsque le
couvercle est enclenché.
17
Page 18

Introduction
Les aliments mijotés ne seront plus jamais secs ni trop cuits. La mijoteuse IntelliTimeMC règle automatiquement la chaleur pour éviter
de surcuire les aliments. La plupart des recettes pour mijoteuse nécessitent une durée de cuisson de 6 à 8 heures alors que plusieurs
familles s’absentent de la maison pendant 10 heures et même plus pendant la journée. Grâce à la mijoteuse IntelliTime, les aliments sont
cuits au moment précis où vous le désirez et même jusqu’à 12 heures plus tard.
La mijoteuse IntelliTime possède deux modes de cuisson — le mode IntelliTime et un mode manuel. Le mode IntelliTime règle la chaleur
selon le nombre d’heures de cuisson désirée, soit de 4 à 12 heures. Lorsque le temps de cuisson est écoulé, la mijoteuse bascule au
réglage WARM (chaud) pendant 4 heures. Ce réglage est idéal pour cuire les grosses pièces de viande, un repas volumineux, une
combinaison de légumes ou cuire lentement les soupes et les ragoûts. Le mode manuel est le mode traditionnel de cuisson lente grâce
aux réglages WARM (chaud), LOW (faible), MEDIUM (moyen) et HIGH (élevé). Sélectionner le mode manuel pour des durées de cuisson
de moins de 4 heures ou pour des recettes de desserts et de mets à base d’œufs.
Utilisation du mode IntelliTime
INTELLITIME : Sélectionner une durée de cuisson de 4 à 12 heures par incréments de 30 minutes. Ce mode règle automatiquement la
chaleur de la mijoteuse selon les heures sélectionnées.
Exemples des réglages IntelliTime usuels
Sélectionner l’heure de démarrage dans la colonne gauche. Repérer l’heure de service dans la ligne supérieure. Le réglage du mode
IntelliTime est représenté par le nombre d’heures situé à l’intersection des deux chiffres.
HEURE DU SERVICE 17 h 30 18 h 18 h 30 19 h 19 h 30 20 h
6 h 30 11 11 1/2 12 12* 12* 12*
HEURE DE
DÉMARRAGE DE LA
CUISSON
18
7 h 10 1/2 11 11 1/2 12 12* 12*
7 h 30 10 10 1/2 11 11 1/2 12 12*
8 h 9 1/2 10 10 1/2 11 11 1/2 12
NOMBRE D’HEURES POUR RÉGLER LE MODE INTELLITIME
NOMBRE D’HEURES POUR RÉGLER LE MODE INTELLITIME
*Basculera au réglage WARM (chaud) après 12 heures.
Page 19

Utilisation du mode IntelliTimeMC (suite)
AVANT LA PREMIÈRE UTILISATION : Laver le couvercle et le pot dans l’eau chaude savonneuse. Rincer et assécher.
1 2
Brancher la mijoteuse. Appuyer
sur le bouton (marche/arrêt)
mettre sous tension.
indiquera 4:00. (La mijoteuse
se mettra en marche dans 4:00
si aucune autre durée n’a été
sélectionnée.)
pour
L’afficheur
5
3 4
Tourner le bouton vers la droite pour sélectionner une durée de
cuisson de 4 à 12 heures par incréments de 30 minutes. Appuyer
sur le bouton pour commencer ou attendre quelques secondes pour
que la mijoteuse se mette automatiquement en marche. La mijoteuse
émettra un signal sonore lors du démarrage et le témoin IntelliTime
s’allumera.
REMARQUE : L’afficheur clignote lorsque le réglage peut être modifié
et reste allumé après le signal de démarrage de la cuisson. Les
réglages ne peuvent plus être modifiés une fois que la cuisson est
commencée. Éteindre la mijoteuse et la remettre en marche pour
modifier les réglages.
EXEMPLE DE RÉGLAGE INTELLITIME : La recette de ragoût de bœuf demande
Pour éteindre en tout temps,
appuyer et maintenir le bouton
(marche/arrêt) enfoncé.
Débrancher la mijoteuse
de la prise de courant.
une cuisson au réglage LOW (faible) pendant 6 à 8 heures. Vous serez absent de
la maison pendant 10 heures. Ignorer le temps de la recette et régler le cadran à
10 heures. La mijoteuse règlera la chaleur pour que votre ragoût de bœuf soit prêt à
servir, sans être trop cuit, dans 10 heures. Vous ne pourrez pas être à la maison dans
10 heures ? Aucun problème; la mijoteuse basculera automatiquement au réglage
WARM (chaud) pendant 4 heures dès la fin du cycle de cuisson.
Dès que la cuisson est
terminée, la mijoteuse basculera
automatiquement au réglage
WARM (chaud).
La durée maximale de cuisson
est de 12 heures avec une durée
additionnelle de garde au chaud
des aliments de 4 heures. Dès
que la durée de cuisson est
écoulée, la mijoteuse basculera
automatiquement au réglage
WARM (chaud) pendant une
période pouvant atteindre 4 heures.
19
Page 20

Utilisation du
mode manuel
MANUEL : Sélectionner le réglage de chaleur désiré soit WARM (chaud), LOW (faible), MEDIUM (moyen) ou HIGH (élevé). L’utilisation de ce
mode pour la mijoteuse ne tient PAS compte du temps de cuisson. Une minuterie de cuisine doit être utilisée.
w AVERTISSEMENT
Les aliments doivent être suffisamment chauds pour prévenir toute croissance
bactérienne avant d’utiliser le réglage WARM (chaud). Le réglage WARM (chaud)
ne doit être utilisé qu’après la cuisson complète des aliments. Ne réchauffer
pas les aliments placés sous le réglage WARM (chaud). Visiter le site Internet
foodsafety.gov pour de plus amples informations.
Danger pour la salubrité des aliments.
1 2 43
Brancher la mijoteuse. Appuyer
sur le bouton (marche/arrêt)
pour mettre sous tension.
L’afficheur indiquera 4:00.
20
Tourner le bouton au-delà des
réglages du mode IntelliTimeMC
pour sélectionner le réglage de
chaleur désiré, WARM (chaud),
LOW (faible), MEDIUM (moyen)
ou HIGH (élevé).
Utiliser une minuterie de cuisine
distincte pour observer le temps
de cuisson lorsque l’on utilise le
mode manuel.
Appuyer sur le bouton pour
commencer ou attendre quelques
secondes pour que la mijoteuse
se mette automatiquement en
marche. La mijoteuse émettra un
signal sonore lors du démarrage.
REMARQUE : L’afficheur clignote
lorsque le réglage peut être
modifié et reste allumé après le
signal de démarrage de la cuisson.
Les réglages ne peuvent plus être
modifiés une fois que la cuisson
est commencée. Éteindre la
mijoteuse et la remettre en marche
pour modifier les réglages.
Page 21

Utilisation du mode manuel (suite)
La mijoteuse s’éteint
5 6
automatiquement après
14 heures.
Pour éteindre en tout temps,
appuyer et maintenir le bouton
(marche/arrêt) enfoncé.
Débrancher la mijoteuse
de la prise de courant.
Nettoyage et entretien
1 2 3
Retirer le couvercle et laisser
refroidir.
w AVERTISSEMENT
Débrancher l’appareil avant le nettoyage. Ne pas immerger
le cordon, la fiche ou la base dans aucune liquide.
Risque d’électrocution.
LAVABLE AU
LAVE-VAISSELLE
NE PAS utiliser le réglage “SANI” du lave-vaisselle. Les températures
du cycle “SANI” peuvent endommager le produit.
21
Page 22

Conseils pour cuisson à la mijoteuse
• Pour de meilleurs résultats, remplisser le pot d’aliments jusqu’à
demi-hauteur. Les aliments peuvent cuire plus rapidement si la
mijoteuse n’est remplie qu’à moitié.
• Il n’est pas nécessaire de brasser les aliments dans la mijoteuse ;
le retrait du couvercle de vitre entraîne une perte importante de
chaleur, ce qui peut obliger à prolonger le temps de cuisson.
• Plusieurs recettes exigent toute une journée de cuisson. Si votre
horaire du matin ne vous permet pas de préparer la recette,
cuisiner-la le soir précédent. Déposer tous les ingrédients dans
le pot, metter le couvercle en place et réfrigérer toute la nuit.
Le matin, déposer le pot dans la base.
• Lors du choix de recettes pour cette mijoteuse, rechercher des
recettes nécessitant un réglage de cuisson HIGH (élevé) pendant
4 à 5 heures ou un réglage LOW (faible) pendant 6 à 8 heures. Les
recettes nécessitant un temps de cuisson moindre doivent être
vérifiées périodiquement pour déterminer si les aliments sont cuits.
• Certains aliments ne se prêtent pas bien à une cuisson prolongée
à la mijoteuse. Verser les pâtes, les fruits de mer, le lait, la crème
ou la crème sûre dans la mijoteuse 2 heures avant de servir la
recette. Le lait évaporé et les soupes concentrées se prêtent bien à
la cuisson à la mijoteuse.
• Plus la teneur en gras dans la viande est élevée, moins il faut de
liquide pour la recette. Lorsque vous cuisez des viandes à teneur
élevée en gras, déposez des tranches d’oignons épaisses sous
la viande pour éviter que la viande ne repose et ne cuise dans
le gras.
• Peu d’évaporation se produit lors de cuisson à la mijoteuse.
Lorsque vous préparez votre soupe, votre sauce ou votre ragoût
préféré, réduisez le volume de liquide indiqué dans la recette
originale. Si le mélange est trop épais, vous pourrez ajouter du
liquide éventuellement.
• Lorsque vous préparez une casserole de légumes, vous devrez
ajouter du liquide à la recette pour éviter que le mélange ne brûle
le long des parois du pot.
Conseils de sécurité pour la cuisson
• N’utiliser jamais de viande congelée, non cuite dans la mijoteuse.
Dégeler toute viande ou toute volaille avant de la faire mijoter.
• Visiter le site www.foodsafety.gov pour plus d’information au sujet
de la température de cuisson interne des aliments.
• Pour ranger les restes après la cuisson, ne PAS placer toute la
mijoteuse au réfrigérateur, car la durée de refroidissement sera
trop longue. Séparer les restes en les déposants dans des petits
contenants et placer au réfrigérateur.
22
• Ne jamais laisser reposer une viande insuffisamment cuite ou
crue dans une mijoteuse à la température ambiante. La viande
doit être cuite dès qu’elle est placée dans la mijoteuse (sauf pour
les préparations faites la veille et que la mijoteuse a été placée au
réfrigérateur).
SI VOUS HABITEZ DANS UNE RÉGION À HAUTE ALTITUDE :
Les services de vulgarisation offrent les informations au sujet
de la cuisson pour votre région. Pour trouver la coopérative de
services de vulgarisation, veuiller visiter le site
http://www.csrees.usda.gov/Extension/.
Page 23

Dépannage
PROBLÈME CAUSE PROBABLE
Les aliments ne sont pas
asser cuits.
La viande est trop cuite.
Pourquoi ?
• Les aliments ont-ils cuit avec le réglage WARM (chaud) ? Ne pas utiliser le réglage WARM
(chaud) pour cuire les aliments.
• Y a-t-il eu une panne électrique ?
• Est-ce que la mijoteuse a fonctionné pendant toute la durée de cuisson choisie ? Sélectionner
HIGH (élevée) ou le réglage de 4 heures pour augmenter le temps de cuisson à la recette.
• La recette contient trop de liquide.
• La mijoteuse a été trop remplie.
• Le couvercle était-il placé correctement sur la mijoteuse ?
• Le pot était-il rempli jusqu’à la moitié de sa capacité ? La mijoteuse a été conçue pour cuire
entièrement les aliments dans un pot rempli à pleine capacité. Les aliments peuvent cuire plus
rapidement si la mijoteuse n’est remplie qu’à moitié. Vérifier périodiquement pour déterminer si
les aliments sont cuits.
• La température des aliments continue de s’élever après avoir atteint la température désirée.
• La recette demandait un temps de cuisson plus court que normalement et le mode IntelliTime
a été utilisé.
Rendez-vous sur www.hamiltonbeach.ca pour notre
liste complète de produits et de nos manuels
utilisateur – ainsi que nos délicieuses
recettes, nos conseils et pour
enregistrer votre produit en ligne !
MC
23
Page 24

Recettes
Bœuf braisé
Bœuf à braiser de 3 à 5 lb (1,3 à 2,2 kg)
1 1/2 c. à thé (7,5 ml) de sel
1 c. à thé (5 ml) de poivre
4 pommes de terre, coupées en quartier
4 carottes coupées en morceaux de 1 po (2,5 cm)
2 oignons coupés en quartier
1 enveloppe de soupe à l’oignon en poudre
1/2 tasse (118 ml) de bouillon de bœuf ou d’eau
1. Assaisonner la viande avec le sel et le poivre. Dans un poêlon,
à chaleur moyenne-élevé, faire brunir la viande de tous les
côtés ; mettre de côté.
2. Déposer les légumes dans la mijoteuse. Déposer la viande
sur les légumes.
3. Parsemer avec la soupe à l’oignon en poudre. Verser le bouillon
de bœuf sur la viande et les légumes. Couvrir la mijoteuse.
4. Choisir le mode IntelliTimeMC ou manuel selon la durée de cuisson
désirée OU choisir le réglage de chaleur. La mijoteuse émettra un
signal sonore et commencera la cuisson après 5 secondes.
Mode INTELLITIME : Nombre d’heures de cuisson désirée
(sélectionner de 4 à 12 heures)
Mode MANUEL : Régler à HIGH (élevé) pendant 5 heures,
MEDIUM (moyen) pendant 7 1/2 heures OU LOW (faible) pendant
10 heures
Servir : 4 à 6
CONSEILS DE CUISSON : Le bœuf à braiser doit cuire jusqu’à ce
qu’il s’effiloche à la fourchette.
Poulet entier et légumes
1 oignon moyen, tranché
Poulet entier de 5 1/2 à 6 lb (2,5 à 2,7 kg)
2 c. à thé (10 ml) de sel assaisonné
1 c. à thé (5 ml) de poivre noir concassé
4 carottes moyennes, coupées en morceaux de 1 1/2 po (3,8 cm)
4 petites pommes de terre rouges, coupées en 8
2 branches de céleri, coupées en morceaux de 1 1/2 po (3,8 cm)
1. Déposer la moitié des tranches d’oignon au fond de la
mijoteuse.
2. Rincer et assécher le poulet. Parsemer le sel assaisonné et le
poivre concassé sur toutes les surfaces du poulet et le déposer
sur les tranches d’oignon déposé dans la mijoteuse.
3. Déposer les autres tranches d’oignon, les carottes, les pommes
de terre et le céleri autour du poulet. Couvrir la mijoteuse.
4. Choisir le mode
désirée OU choisir le réglage de chaleur. La mijoteuse émettra
un signal sonore et commencera la cuisson après 5 secondes.
Mode INTELLITIME : Nombre d’heures de cuisson désirée
(sélectionner de 4 à 12 heures)
Mode MANUEL : Régler à HIGH (élevé) pendant 4 heures,
MEDIUM (moyen) pendant 5 heures OU LOW (faible) pendant
6 à 8 heures
Servir : 4 à 6
CONSEILS DE CUISSON : Le poulet est cuit lorsque la température
du thermomètre à viande inséré dans la partie la plus épaisse de la
poitrine indique 165 °F (74 °C).
IntelliTimeMC ou manuel
selon la durée de cuisson
24
Page 25

Recettes (suite)
Rôti de porc avec carottes, pommes et romarin
2 pommes vertes (Granny Smith), sans cœurs et coupées
en 8 tranches
1 c. à soupe (15 ml) de jus de citron
Rôti de porc désossé de 4 lb (1,8 kg)
1 c. à thé (5 ml) de sel
1/2 c. à thé (2,5 ml) de poivre fraîchement moulu
1 oignon moyen, coupé en 8 morceaux
4 grosses carottes, coupées en morceaux de 1 1/2 po (3,8 cm)
1 branche de romarin frais
1. Remuer les pommes dans le jus de citron et mettre de côté.
2. Assaisonner le porc avec le sel et le poivre.
3. Déposer la moitié des morceaux d’oignon et 4 à 6 tranches de
pommes dans la mijoteuse.
4. Déposer le rôti assaisonné dans la mijoteuse. Entourer le rôti
avec le reste des pommes, d’oignon et les carottes et la branche
de romarin. Couvrir la mijoteuse.
5. Choisir le mode
désirée OU choisir le réglage de chaleur. La mijoteuse émettra
un signal sonore et commencera la cuisson après 5 secondes.
Mode INTELLITIME : Nombre d’heures de cuisson désirée
(sélectionner de 4 à 12 heures)
Mode MANUEL : Régler à HIGH (élevé) pendant 4 heures,
MEDIUM (moyen) pendant 5 1/2 à 6 heures OU LOW (faible)
pendant 7 à 8 heures
Servir : 4 à 6
CONSEILS DE CUISSON : Pour une cuisson sécuritaire, s’assurer
que le thermomètre à viande indique une température d’au moins
145 °F (63 °C).
IntelliTimeMC ou manuel
selon la durée de cuisson
Soupe à la courge musquée
1 grosse courge musquée de 1 1/2 lb (680 g), pelée, épépinée
et coupée en morceaux de 2 po (5 cm)
2 pommes de terre rouges moyennes, pelées et coupées en
morceaux de 1 po (2,5 cm)
1 oignon moyen, haché
3 grosses gousses d’ailles, hachées
5 tasses (1,2 litre) de bouillon de poulet
1 1/2 c. à thé (7,5 ml) de marinade sèche à la sauge
1/2 c. à thé (2,5 ml) de sel
1/4 c. à thé (1,3 ml) de poivre
1. Déposer la courge, les pommes de terre, l’oignon et l’ail dans
la mijoteuse.
2. Ajouter le bouillon de poulet, la sauge, le sel et le poivre. Couvrir
la mijoteuse.
3. Choisir le mode IntelliTimeMC ou manuel selon la durée de cuisson
désirée OU choisir le réglage de chaleur. La mijoteuse émettra un
signal sonore et commencera la cuisson après 5 secondes.
4. Laisser légèrement refroidir puis verser la soupe dans le
mélangeur ou le robot culinaire et mettre en purée.
Mode INTELLITIME : Nombre d’heures de cuisson désirée
(sélectionner de 4 à 12 heures)
Mode MANUEL : Régler à HIGH (élevé) pendant 4 heures,
MEDIUM (moyen) pendant 5 heures OU LOW (faible) pendant
6 à 7 heures
Servir : 8 à 10
CONSEILS DE CUISSON : Cuire la courge au four à microondes
pendant 2 minutes pour faciliter sa préparation. La cuisson au four
à microondes attendrira la pelure et elle sera plus facile à couper
en deux.
25
Page 26

Garantie limitée
Cette garantie s’applique aux produits achetés et utilisées aux É.-U. et au Canada. C’est la seule garantie expresse pour ce
produit et est en lieu et place de tout autre garantie ou condition.
Ce produit est garanti contre tout défaut de matériaux et de main-d’oeuvre pour une période des cinq (5) ans à compter de
la date d’achat d’origine au Canada et un (1) an à compter de la date d’achat d’origine aux É.-U. Au cours de cette période,
votre seul recours est la réparation ou le remplacement de ce produit ou tout composant s’avérant défectueux, à notre gré,
mais vous êtes responsable de tous les coûts liés à l’expédition du produit et le retour d’un produit ou d’un composant dans
le cadre de cette garantie. Si le produit ou un composant n’est plus offert, nous le remplacerons par un produit similaire de
valeur égale ou supérieure.
Cette garantie ne couvre pas le verre, les filtres, l’usure d’un usage normal, l’utilisation non conforme aux directives imprimées,
ou des dommages au produit résultant d’un accident, modification, utilisation abusive ou incorrecte. Cette garantie s’applique
seulement à l’acheteur original ou à la personne l’ayant reçu en cadeau. La présentation du reçu de vente d’origine comme
preuve d’achat est nécessaire pour faire une réclamation au titre de cette garantie. Cette garantie s’annule si le produit est
utilisé autrement que par une famille ou si l’appareil est soumis à toute tension ou forme d’onde différente des caractéristiques
nominales précisées sur l’étiquette (par ex. : 120 V ~ 60 Hz).
Nous excluons toutes les réclamations au titre de cette garantie pour les dommages spéciaux, consécutifs et indirects causés
par la violation de garantie expresse ou implicite. Toute responsabilité est limitée au prix d’achat. Chaque garantie implicite,
y compris toute garantie ou condition de qualité marchande ou d’adéquation à un usage particulier, est exonérée, sauf
dans la mesure interdite par la loi, auquel cas la garantie ou condition est limitée à la durée de cette garantie écrite. Cette
garantie vous donne des droits légaux précis. Vous pouvez avoir d’autres droits qui varient selon l’endroit où vous habitez.
Certaines provinces ne permettent pas les limitations sur les garanties implicites ou les dommages spéciaux ou indirects de
telle sorte que les limitations ci-dessus ne s’appliquent peut-être pas à votre cas.
Ne pas retourner cet appareil au magasin lors d’une réclamation au titre de cette garantie. Téléphoner au 1.800.851.8900 aux
É.-U. ou au 1.800.267.2826 au Canada ou visiter le site internet www.hamiltonbeach.com aux É.-U. ou www.hamiltonbeach.ca
au Canada. Pour un service plus rapide, trouvez le numéro de modèle, le type d’appareil et les numéros de série sur votre
appareil.
26
Page 27

SALVAGUARDIAS IMPORTANTES
Cuando utilice artefactos eléctricos, siempre deben seguirse precauciones de seguridad básicas a fin de reducir el riesgo de incendio,
descarga eléctrica, y/o lesiones a personas, incluyendo las siguientes:
1. Lea todas las instrucciones.
2. Este aparato no se destina para utilizarse por personas
(incluyendo niños) cuyas capacidades físicas, sensoriales o
mentales sean diferentes o estén reducidas, o carezcan de
experiencia o conocimiento, a menos que dichas personas
reciban una supervisión o capacitación para el funcionamiento
del aparato por una persona responsable de su seguridad.
3. Se requiere de una estrecha supervisión cuando el aparato se
use cerca de niños. Los niños deben supervisarse para asegurar
que ellos no empleen los aparatos como juguete.
4. Verifique que el voltaje de su instalación corresponda con el del
producto.
5. No toque superficies calientes. Use los mangos o las perillas.
6. Para protegerse contra el riesgo de choque eléctrico, no
sumerja el cordón, el enchufe ni la base en agua ni en ningún
otro líquido.
7. Desenchúfelo del tomacorriente cuando no lo esté usando y
antes de la limpieza. Deje que se enfríe antes de colocar o sacar
alguna pieza.
8. No opere ningún aparato con cables o enchufe dañados o
después de que el aparato funcione mal o se caiga o dañe
de cualquier manera. El reemplazo del cable de suministro y
las reparaciones deben ser efectuadas por el fabricante, su
agente de servicio, o personas igualmente calificadas para
poder evitar un peligro. Llame al número de servicio al cliente
proporcionado para información sobre examinación, reparación
o ajuste.
9. El uso de accesorios no recomendados por fabricante de
electrodomésticos puede causar lesiones.
10. No lo use al aire libre.
11. No deje que el cordón cuelgue sobre el borde de una mesa
o de un mostrador, o que toque alguna superficie caliente,
incluyendo la superficie de una estufa.
12. No coloque la olla removible o base sobre o cerca de una
fuente de gas caliente o de un quemador eléctrico. No coloque
la base de la olla de cocción lenta de un horno caliente.
13. Es importante tener extremo cuidado cuando se mueva un
aparato electrodoméstico que contenga aceite caliente u otros
líquidos calientes.
14. Para desconectar la olla eléctrica de ccocimiento lento, coloque
OFF (apagada); saque el enchufe del tomacorriente.
15. PRECAUCIÓN: Para evitar daños o peligros de choque eléctrico
no cocine sobre la base. Cocine solamente dentro del recipiente
desmontable.
16. Evite cambios repentinos de temperatura, como la adición de
alimentos refrigerados en una vasija caliente.
17. Sólo para uso en la cubierta de cocina.
18. ADVERTENCIA: El derrame de alimentos puede provocar
quemaduras graves. Mantenga el artefacto y el cable alejados
de los niños. Nunca deje colgar el cable sobre el borde del
mostrador, nunca utilice un tomacorriente ubicado por debajo
del mostrador y nunca utilice el artefacto con una cable de
extensión.
19. No use el aparato electrodoméstico para ningún otro fin que no
sea el indicado.
GUARDE ESTAS INSTRUCCIONES
27
Page 28

Información Adicional de Seguridad
Este aparato ha sido diseñado solamente para uso doméstico.
Este producto ha sido diseñado solamente para la preparación,
cocción y servido de alimentos. No está diseñado para usarse con
materiales que no sean alimentos ni con productos no alimenticios.
w ADVERTENCIA
es provisto con un enchufe polarizado (una pata más ancha)
para reducir el riesgo de una descarga eléctrica. El enchufe
embona únicamente en una dirección dentro de un tomacorriente
polarizado. No trate de obviar el propósito de seguridad del enchufe
modificándolo de alguna manera o utilizando un adaptador. Si el
enchufe no entra completamente en la toma, invierta el enchufe. Si
aún no entra, haga que un electricista reemplace la toma.
Peligro de Descarga Eléctrica: Este producto
TAPA Y OLLA: PRECAUCIONES E INFORMACIÓN
• Por favor maneje la olla y tapa cuidadosamente para asegurarles
una vida larga.
• Evite cambios repentinos y extremos de temperatura. Por ejemplo,
no coloque una tapa u olla caliente en agua fría o sobre una
superficie húmeda.
• Evite golpear al olla y tapa contra el fregadero u otra superficie
dura.
• No use la olla o tapa si está astillada, quebrada o severamente
tallada.
• No use limpiadores abrasivos o estropajos de metal.
REMUEVA LA TAPA Y OLLA
Cuando remueva la tapa, inclínela de manera que la abertura quede
hacia otro lado que no sea hacia usted para evitar quemaduras por
el vapor.
Se utiliza un cable eléctrico corto para reducir los riesgos de
enredarse o tropezar con un cable más largo o de que sea jalado por
niños.
• La parte inferior de la olla es muy áspera y puede dañar una
cubeirta. Tenga precaución.
• La olla y tapa pueden volverse muy calientes. Tenga precaución.
No los ponga directamente sobre ninguna superficie o cubierta
desprotegida.
• La olla puede usarse en microondas y es a prueba de hornos, pero
nunca caliente la olla cuando esté vacía. Nunca coloque la tapa o
la olla sobre una hornalla o estufa. No coloque la tapa en un horno
de microondas, horno convencional o sobre la estufa.
Los lados de la base de la olla de cocimiento lento se ponen muy
calientes debido a los elementos caloríficos localizados en ella. Use
las manijas en la base si es necesario. Use guantes para remover
la olla.
28
Page 29

Piezas y Características
*Para ordenar partes:
EE. UU.:
www.hamiltonbeach.com
México:
1.800.851.8900
01 800 71 16 100
Tapa de Vidrio*
Olla de Cerámica
Removible*
Mango
Capacidad de Olla
Para obtener mejores resultados, llene el recipiente a
no más de 1 pulgada (2.5 cm) desde la tapa. Si sólo
está llena a la mitad, revise si terminó 1 a 2 horas más
temprano que en la receta.
Ganchos de Alambre
Manijas mostradas con
ganchos de alambre
Mango
Pantalla
sólo para transportar. No
cocine o almacene con la
tapa sujeta hacia abajo.
Base
Luz IntelliTime™
Perilla de Control con
Botón (encendido/apagado)
29
Page 30

Introducción
No más comidas secas y blandas cocinadas lentamente. La olla de cocción lenta IntelliTime™ ajusta el calor automáticamente para evitar
la sobrecocción. La mayoría de las recetas para ollas de cocción lenta requieren un tiempo de cocción de 6 a 8 horas, pero muchas
familias trabajan fuera del hogar por más de 10 horas al día. Con la olla de cocción lenta IntelliTime, los alimentos se terminan de cocinar
precisamente cuando usted lo desea, incluso hasta 12 horas después.
La olla de cocción lenta IntelliTime cuenta con dos modos de cocción: Modo IntelliTime y modo Manual. El modo IntelliTime ajusta
el calor en base a la cantidad de horas que usted desea cocinar los alimentos, desde 4 a 12 horas. Cuando el tiempo de cocción ha
finalizado, la olla cambia a WARM (caliente) durante 4 horas. Resulta ideal para cocinar trozos grandes de carne, combinaciones de carne
y vegetales, o sopas o guisos de cocción prolongada. El modo Manual es la manera tradicional de cocción lenta con las configuraciones
de calor WARM (caliente), LOW (bajo), MEDIUM (medio), y HIGH (alto). Elija el modo Manual para alimentos con tiempos de cocción
menores a las 4 horas o recetas tales como postres o platos con huevo.
Cómo Utilizar el Modo IntelliTime
INTELLITIME: Elija el tiempo de cocción de 4 a 12 horas aumentando en unidades de 30 minutos. En este modo, la olla de cocción
lenta ajusta el calor automáticamente a las horas seleccionadas.
Ejemplos de Configuraciones Comunes IntelliTime
Elija la hora de inicio de la columna izquierda. Observe la parte superior de las columnas para elegir el tiempo de servicio. La
configuración IntelliTime es la cantidad de horas señaladas en el punto en donde se cruzan.
HORA DE SERVICIO 5:30 p.m. 6:00 p.m. 6:30 p.m. 7:00 p.m 7:30 p.m. 8:00 p.m.
6:30 a.m. 11 11 1/2 12 12* 12* 12*
HORA DE INICIO DE
COCCIÓN
30
7:00 a.m. 10 1/2 11 11 1/2 12 12* 12*
7:30 a.m. 10 10 1/2 11 11 1/2 12 12*
8:00 a.m. 9 1/2 10 10 1/2 11 11 1/2 12
CANTIDAD DE HORAS PARA CONFIGURAR INTELLITIME
*Cambiará a WARM (caliente) después de 12 horas.
Page 31

Cómo Utilizar el Modo IntelliTime™ (cont.)
ANTES DE USAR POR PRIMERA VEZ: Lave la tapa y olla en agua caliente jabonosa. Enjuague y seque.
1 2
Enchufe la olla de cocción lenta.
Presione el botón (encendido/
apagado) para encender. En la
pantalla se verá 4:00. (La olla
de cocción lenta se accionará
en 4:00 si no se selecciona otra
configuración).
5
3 4
Gire la perilla hacia la derecha para seleccionar el tiempo de cocción
desde 4 a 12 horas en unidades de 30 minutos. Presione el botón
para iniciar o espere unos segundos y la olla de cocción se accionará
en forma automática. La olla de cocción lenta emitirá
comenzar y la luz IntelliTime se iluminará.
NOTA: La pantalla titila cuando la configuración
y permanece encendida después del pitido y del inicio de la
cocción. Una vez que se inicia la cocción, las configuraciones no
pueden ajustarse. Apague la olla de cocción y vuelva a iniciar para
reconfigurar.
EJEMPLO DE CONFIGURACIÓN DE INTELLITIME: La receta de estofado de carne
requiere una cocción en LOW (bajo) por 6 a 8 horas. Usted no estará en casa por
Para apagar en cualquier
momento, presione y sostenga
el botón (encendido/apagado).
Desenchufe del tomacorriente.
10 horas. Ignore el tiempo de la receta y configure la perilla para 10 horas. La olla de
cocción lenta ajusta el calor para que su estofado de carne esté listo para comer, sin
sufrir una sobrecocción, a las 10 horas. ¿No pudo llegar a casa a las 10 horas? No
hay problema, la olla de cocción lenta cambia automáticamente a WARM (caliente)
por 4 horas después de finalizado el tiempo de cocción.
un sonido al
puede cambiarse
Cuando la cocción haya
finalizado, la olla de cocción lenta
automáticamente cambiará a la
configuración WARM (caliente).
El tiempo de cocción MAX
es de 12 horas con unas 4
horas adicionales de tiempo
de calentamiento. Después de
cualquier configuración de tiempo,
la olla de cocción lenta cambiará
automáticamente a WARM
(caliente) hasta por 4 horas.
31
Page 32

Cómo Utilizar el Modo
Manual
MANUAL: Elija las configuraciones de calor deseadas WARM (caliente), LOW (bajo), MEDIUM (medio), o HIGH (alto). En este modo, la olla de
cocción lenta NO llevará la cuenta del tiempo de cocción. Deberá utilizarse un temporizador de cocina.
w ADVERTENCIA
comida de estar lo suficientemente caliente para prevenir el crecimiento
de bacterias antes de usar el ajuste WARM (caliente). El ajuste WARM
(caliente) debe ser usado solamente después de que una receta ha sido
cocinada completamente. No recaliente la comida en el ajuste WARM
(caliente). Visite foodsafety.gov para más información.
Peligro de Seguridad de Comida. La
1 2 43
Enchufe la olla de cocción lenta.
Presione el botón (encendido/
apagado) para encender. En la
pantalla se verá 4:00.
32
Gire la perilla pasando las
configuraciones de modo
IntelliTime™ para seleccionar la
configuración de calor deseada,
WARM (caliente), LOW (bajo),
MEDIUM (medio), o HIGH (alto).
Utilice un temporizador de cocina
separado para llevar la cuenta del
tiempo de cocción cuando utilice
el modo Manual.
Presione el botón para iniciar o
espere unos segundos y la olla
de cocción se accionará en
forma automática. La olla de
cocción lenta emitirá
al comenzar.
NOTA: La pantalla titila cuando la
configuración puede cambiarse
y permanece encendida después
del pitido y del inicio de la cocción.
Una vez que se inicia la cocción,
las configuraciones no pueden
ajustarse. Apague la olla de
cocción y vuelva a iniciar para
reconfigurar.
un sonido
Page 33

Cómo Utilizar el Modo Manual (cont.)
Después de 14 horas, la olla de
5 6
cocción lenta se apagará en forma
automática.
Limpieza y Cuidado
1 2 3
Remueva la olla y deje enfriar. No utilice la configuración “SANI” cuando la lave en el lavavajillas.
Para apagar en cualquier
momento, presione y sostenga
el botón (encendido/apagado).
Desenchufe del tomacorriente.
w ADVERTENCIA
Desconecte la energía antes de limpiar. No sumerja
el cable, enchufe o base en ningún líquido.
Peligro de Descarga Eléctrica.
RESISTENTE AL
LAVAVAJILLAS
Las temperaturas del ciclo “SANI” pueden dañar su producto.
33
Page 34

Concejos para Cocinar Lento
• La ollla debe estar por lo menos llenada a la mitad para mejores
resultados. Si sólo llena la olla por la mitad, los alimentos se
cocinarán más rápido.
• No se requiere menear cuando se cocina lento. Remover la tapa
de vidro resulta en una gran pérdida de calor y puede necesitar
que se extienda el tiempo de cocinado.
• Muchas recetas requieren cocerse todo el día. Si su programa
matutino no le deja tiempo para preparar una receta, hágalo la noche
anterior. Coloque todos los ingredientes en la olla, cubra con la tapa
y refrigere durante la noche. En la mañana, coloque la olla en la base.
• Cuando elija recetas para esta olla de cocción lenta, busque recetas
que requieran un tiempo de cocción en HIGH (alto) de 4 a 5 horas o
en LOW (bajo) de 6 a 8 horas. Las recetas que requieran un tiempo
de cocción menor deben controlarse periódicamente para verificar
su punto de cocción.
• Algunos alimentos no se adaptan a un cocimento extendido en
una olla de cocimiento lento. La pasta, mariscos, leche, crema
o crema agria deben de agregarse 2 horas antes de servirse.
La leche evaporada o sopas condensadas son perfectas para el
cocimiento lento.
• Entre más contenido de grasa tenga la carne, menos líquido
necesita. Si cocina carne con alto contenido de grasa, coloque
rebanadas gruesas de cebolla debajo de la carne de manera
que la carne no se asiente (y cocine) en la grasa.
• Las ollas de cocimiento lento permiten muy poca evaporación. Si
hace su sopa, guisado o salsa favorita, reduzca el líquido indicado
en la receta original. Si está muy espeso, se puede agregar líquido
posteriormente.
• Si cocina una cacerola de tipo vegetal, necesita haber líquido en
el recipiente para prevenir que se quemen los lados de la olla.
Consejos de Seguridad de Alimentos
• No use carne congelada sin cocinar en la olla de cocción lenta.
Descongele todas las carnes vacunas y de aves antes de iniciar
la cocción lenta.
• Para obtener más información sobre temperaturas seguras de
cocción interna, visite www.foodsafety.gov.
• Para almacenar sobras después de la cocción, NO coloque toda
la olla en el refrigerador porque los alimentos tardarán demasiado
en enfriarse. Divida las sobras en recipientes más pequeños y
colóquelos en el refrigerador.
34
• Nunca permita que carne cruda o poco cocida quede a temperatura
ambiente dentro de la olla de cocción lenta. Una vez que la carne
se coloca en la olla, ésta debe cocinarse de inmediato (a menos
que se prepare la olla de cocción lenta la noche anterior, en cuyo
caso la olla debe colocarse en el refrigerador).
SI USTED VIVE EN UNA ÁREA DE ALTITUD ELEVADA:
El servicio de extensión tendrá información detallada sobre cocción
en su área. Para ubicar el servicio de extensión cooperativa en
su condado, tenga a bien visitar la siguiente página:
http://www.csrees.usda.gov/Extension/.
Page 35

Resolviendo Problemas
PROBLEMA CAUSA PROBABLE
A la comida le falta
cocer.
Mi comida se coció de
más. ¿Por qué?
• ¿Se cocinó la comida en el ajuste WARM (caliente)? No cocine en WARM (caliente).
• ¿Se interrupió la corriente?
• ¿Completó la olla de cocción lenta el tiempo de cocción seleccionado? Seleccione HIGH (alto) o
la configuración de 4 horas para agregar más tiempo a la receta.
• Había demasiado líquido en la olla.
• La olla estaba demasiado llena.
• ¿Colocó la tapa correctamente en la olla?
• ¿Estaba al menos medio llena la olla? La olla de cocimiento lento ha sido diseñada para cocer
completamente el alimento con una olla llena. Si sólo llena la olla por la mitad, los alimentos se
cocinarán más rápido. Verifique el punto de cocción en forma periódica.
• Los alimentos continuarán incrementando la temperatura después que la temperatura deseada
se ha alcanzado.
• La receta requería un tiempo de cocción menor al normal y se utilizó el modo IntelliTime™.
¡Visite www.hamiltonbeach.com.mx para obtener
nuestra línea completa de productos y las Guías
de Uso y Cuidado, además de deliciosas
recetas, consejos y para registrar su
producto en línea!
35
Page 36

Recetas
Estofado de Carne de Res
1 trozo de carne de res de 3–5 lb. (1.3–2.2 kg)
1 1/2 cucharaditas (7.5 ml) de sal
1 cucharadita (5 ml) de pimienta
4 papas cortadas en cuartos
4 zanahorias cortadas en trozos de 1 pulgada (2.5 cm)
2 cebollas en cuartos
1 sobre de mezcla de cebolla deshidratada
1/2 taza (118 ml) de caldo de carne o agua
1. Condimente la carne con sal y pimienta. En una sartén, a fuego
mediano-alto, dore la carne sobre todos los lados; luego separe.
2. Coloque los vegetales en la olla. Coloque la carne sobre los
vegetales.
3. Espolvoree con la mezcla de sopa de cebollas. Vierta
suavemente el caldo de carne sobre la carne y los vegetales.
Tape la olla de cocción lenta.
4. Elija el modo IntelliTime™ o Manual para el tiempo de cocción
deseado O la configuración de calor. La olla de cocción lenta
emitirá un pitido y comenzará la cocción a los 5 segundos.
Modo INTELLITIME: Cantidad de horas de tiempo de cocción
deseado (seleccionar de 4 a 12 horas)
Modo MANUAL: HIGH (alto) por 5 horas, MEDIUM (medio) por
7 1/2 horas o LOW (bajo) por 10 horas
Porciones: 4 a 6
CONSEJO DE COCINA: El estofado debe cocinarse hasta que esté
lo suficientemente tierno como para cortarlo con un tenedor.
Pollo Entero y Vegetales
1 cebolla mediana picada
1 pollo entero de 5 1/2–6 lb. (2.5–2.7 kg)
2 cucharaditas (10 ml) de sal condimentada
1 cucharadita (5 ml) de pimienta negra molida
4 zanahorias medianas cortadas en trozos de 1 1/2 pulgada
(3.8 cm)
4 papas rojas pequeñas cortadas en octavos
2 ramas de apio cortadas en trozos de 1 1/2 pulgada (3.8 cm)
1. Coloque la mitad de la cebolla picada en la base de la olla de
cocción lenta.
2. Enjuague y seque el pollo con un paño. Espolvoree todos los
costados con sal condimentada y pimienta. Coloque el pollo
sobre las cebollas picadas dentro de la olla.
3. Coloque la cebolla restante, las zanahorias, las papas y el apio
alrededor del pollo. Tape la olla de cocción lenta.
4. Elija el modo IntelliTime™ o Manual para el tiempo de cocción
deseado O la configuración de calor. La olla de cocción lenta
emitirá un pitido y comenzará la cocción a los 5 segundos.
Modo INTELLITIME: Cantidad de horas de tiempo de cocción
deseado (seleccionar de 4 a 12 horas)
Modo MANUAL: HIGH (alto) por 4 horas, MEDIUM (medio) por
5 horas o LOW (bajo) por 6 a 8 horas
Porciones: 4 a 6
CONSEJO DE COCINA: El pollo está listo cuando la temperatura
de la carne indica 165°F (74°C) en la parte más gruesa de la
pechuga.
36
Page 37

Recetas (cont.)
Estofado de Cerdo con Zanahorias, Manzanas
y Romero
2 manzanas Granny Smith sin centro y cortadas en 8 cuñas
1 cucharada (15 ml) de jugo de limón
1 estofado de lomo de cerdo deshuesado de 4 lb. (1.8 kg)
1 cucharadita (5 ml) de sal
1/2 cucharadita (2.5 ml) de pimienta recién molida
1 cebolla mediana cortada en octavos
4 zanahorias grandes cortadas en trozos de 1 1/2 pulgada (3.8 cm)
1 ramita de romero fresco
1. Mezcle las manzanas con el jugo de limón; separe.
2. Condimente la carne con sal y pimienta.
3. Coloque la mitad de las cebollas y 4 a 6 cuñas de manzana
en la olla.
4. Coloque encima la carne condimentada. Rodee la carne con
las manzanas restantes, las cebollas y zanahorias y coloque
el romero encima de todo. Tape la olla de cocción lenta.
5. Elija el modo IntelliTime™ o Manual para el tiempo de cocción
deseado O la configuración de calor. La olla de cocción lenta
emitirá un pitido y comenzará la cocción a los 5 segundos.
Modo INTELLITIME: Cantidad de horas de tiempo de cocción
deseado (seleccionar de 4 a 12 horas)
Modo MANUAL: HIGH (alto) por 4 horas, MEDIUM (medio) por
5 1/2 a 6 horas o LOW (bajo) por 7 a 8 horas
Porciones: 4 a 6
CONSEJO DE COCINA: Para seguridad de los alimentos,
asegúrese de cocinar los alimentos hasta que el termómetro
de carne registre por lo menos 145°F (63°C).
Sopa de Calabaza
1 calabaza grande (1 1/2 lb./680 g) pelada, sin semillas y cortada
en trozos de 2 pulgadas (5 cm)
2 papas rojos medianos pelados y cortados en trozos de
1 pulgada (2.5 cm)
1 cebolla mediana picada
3 dientes de ajo grandes machacados
5 tazas (1.2 L) de caldo de pollo
1 1/2 cucharaditas (7.5 ml) de salvia deshidratada
1/2 cucharadita (2.5 ml) de sal
1/4 cucharadita (1.3 ml) de pimienta
1. Coloque la calabaza, las papas, la cebolla y el ajo en una olla.
2. Agregue el caldo de pollo, la salvia, la sal y pimienta. Tape la
olla de cocción lenta.
3. Elija el modo IntelliTime™ o Manual para el tiempo de cocción
deseado O la configuración de calor. La olla de cocción lenta
emitirá un pitido y comenzará la cocción a los 5 segundos.
4. Deje enfriar ligeramente; luego haga puré en una licuadora o
procesador de alimentos.
Modo INTELLITIME: Cantidad de horas de tiempo de cocción
deseado (seleccionar de 4 a 12 horas)
Modo MANUAL: HIGH (alto) por 4 horas, MEDIUM (medio) por
5 horas o LOW (bajo) por 6 a 7 horas
Porciones: 8 a 10
CONSEJO DE COCINA: Para una preparación más fácil de la
calabaza, cocine en el microondas por 2 minutos antes de cortar.
Si la coloca en el microondas, la cáscara se ablandará y será más
fácil cortar la calabaza a la mitad.
37
Page 38

Grupo HB PS, S.A. de C.V.
Monte Elbruz No. 124 - 401
Col. Polanco V Sección, Miguel Hidalgo
Ciudad de México, C.P. 11560
PÓLIZA DE GARANTÍA
PRODUCTO:
MARCA:
Grupo HB PS, S.A. de C.V. cuenta con una Red de Centros de Servicio Autorizada, por favor consulte en la lista anexa el nombre y dirección de los establecimientos en la
República Mexicana en donde usted podrá hacer efectiva la garantía, obtener partes, componentes, consumibles y accesorios; así como también obtener servicio para
productos fuera de garantía. Para mayor información llame sin costo: Centro de Atención al consumidor: 01 800 71 16 100
Grupo HB PS, S.A. de C.V. le otorga a partir de la fecha de compra:
GARANTÍA DE 1 AÑO.
COBERTURA
• Esta garantía ampara, todas las piezas y componentes del producto que resulten con defecto de fabricación incluyendo la mano de obra.
Grupo HB PS,
•
todo lo anterior sin costo adicional para el consumidor.
• Esta garantía incluye los gastos de transportación del producto que deriven de su cumplimiento dentro de su red de servicio.
S.A. de C.V. se obliga a reemplazar, reparar o reponer, cualquier pieza o componente defectuoso; proporcionar la mano de obra necesaria para su diagnóstico y reparación,
LIMITACIONES
• Esta garantía no ampara el reemplazo de piezas deterioradas por uso o por desgaste normal, como son: cuchillas, vasos, jarras, filtros, etc.
• Grupo HB PS, S.A. de C.V. no se hace responsable por los accidentes producidos a consecuencia de una instalación eléctrica defectuosa, ausencia de toma de tierra, clavija de enchufe
en mal estado, etc.
EXCEPCIONES
Esta garantía no será efectiva en los siguientes casos:
a) Cuando el producto se hubiese utlizado en condiciones distintas a las normales. (Uso industrial, semi-industrial o comercial.)
b) Cuando el producto no hubiese sido operado de acuerdo con el instructivo de uso.
c) Cuando el producto hubiese sido alterado o reparado por personas no autorizadas por Grupo HB PS, S.A. de C.V. el fabricante nacional, importador o comercializador responsable
respectivo.
El consumidor puede solicitar que se haga efectiva la garantía ante la propia casa comercial donde adquirió su producto, siempre y cuando Grupo HB PS, S.A. de C.V. no cuente con talleres de
servicio.
MODELO:
38
Page 39

PROCEDIMIENTO PARA HACER EFECTIVA LA GARANTÍA
• Para hacer efectiva la garantía, lleve su aparato al Centro de Servicio Autorizado más cercano a su domicilio (consulte la lista anexa).
• Si no existe Centro de Servicio Autorizado en su localidad llame a nuestro Centro de Atención al Consumidor para recibir instrucciones de como hacer efectiva su garantía.
FECHA DE ENTREGA SELLO DEL VENDEDOR QUEJAS Y SUGERENCIAS
Si desea hacer comentarios o sugerencias con respecto a nuestro servicio o tiene alguna queja derivada de la atención
DÍA___ MES___ AÑO___
recibida en alguno de nuestros Centros de Servicio Autorizados, por favor dirigirse a:
GERENCIA INTERNACIONAL DE SERVICIO
Email: mexico.service@hamiltonbeach.com.mx
01 800 71 16 100
CENTROS DE SERVICIO AUTORIZADOS
Ciudad de México
ELECTRODOMÉSTICOS
Av. Plutarco Elias Calles, No. 1499
Zacahuitzco, Ciudad de México, C.P. 09490
Tel: 01 55 5235 2323
Fax: 01 55 5243 1397
CASA GARCIA
Av. Patriotismo No. 875-B
Mixcoac, Ciudad de México, C.P. 03910
Tel: 01 55 5563 8723
Fax: 01 55 5615 1856
Nuevo León
FERNANDO SEPULVEDA REFACCIONES
Ruperto Martínez No. 238 Ote.
Centro MONTERREY, 64000 N.L.
Tel: 01 81 8343 6700 • Fax: 01 81 8344 0486
Jalisco
SERVICIOS DE MANTENIMIENTO CASTILLO
Garibaldi No. 1450
Ladrón de Guevara
GUADALAJARA 44660 Jal.
Tel: 01 33 3825 3480 • Fax: 01 33 3826 1914
39
Page 40

Modelo:
33367
Tipo:
SC65
Características Eléctricas:
120 V~ 60 Hz 280 W
Los modelos incluídos en el instructivo de Uso y Cuidado pueden ir seguidos o no por un sufijo correspondiente a una
o varias letras del alfabeto y sus combinaciones, separadas o no por un espacio, coma, diagonal, o guión. Como ejemplos
los sufijos pueden ser: “Y” y/o “MX” y/o “MXY” y/o “Z”.
840255902
2/18
 Loading...