

Page 1

READ BEFORE USE
LIRE AVANT UTILISATION
LEA ANTES DE USAR
Visit www.hamiltonbeach.com for our
complete line of products and Use and
Care Guides – as well as delicious recipes,
tips, and to register your product online!
Rendez-vous sur www.hamiltonbeach.ca
pour notre liste complète de produits et de
nos manuels utilisateur – ainsi que nos
délicieuses recettes et nos conseils !
¡Visite www.hamiltonbeach.com (
o
www.hamiltonbeach.com.mx (México)
para ver otros productos de Hamilton Beach
o para contactarnos!
EE. UU.)
Panini Press
Presse-panini
Questions?
Please call us – our friendly
associates are ready to help.
USA: 1.800.851.8900
Questions ?
N’hésitez pas à nous appeler –
nos associés s’empresseront
de vous aider.
CAN : 1.800.267.2826
¿Preguntas?
Por favor llámenos – nuestros
amables representantes están
listos para ayudar.
EE. UU.: 1.800.851.8900
MEX: 01 800 71 16 100
Le invitamos a leer cuidadosamente este
instructivo antes de usar su aparato.
840199004 ENv02.indd 1840199004 ENv02.indd 1 8/19/14 11:03 AM8/19/14 11:03 AM
Parrilla para
Panini
English ...................... 2
Français ................... 11
Español ................... 21
Page 2

IMPORTANT SAFEGUARDS
When using electrical appliances, basic safety precautions should always be followed to reduce the risk of fire, electric shock, and/or injury to
persons, including the following:
1. Read all instructions.
2. This appliance is not intended for use by persons (including
children) with reduced physical, sensory, or mental capabilities,
or lack of experience and knowledge, unless they are closely
supervised and instructed concerning use of the appliance by a
person responsible for their safety.
3. Close supervision is necessary when any appliance is used by
or near children. Children should be supervised to ensure that
they do not play with the appliance.
4. Do not touch hot surfaces. Use handles or knobs.
5. To protect against risk of electrical shock, do not immerse
appliance, cord, or plug in water or other liquid.
6. Unplug from outlet when not in use and before cleaning. Allow
to cool before putting on or taking off parts, and before
cleaning the appliance.
7. Do not operate any appliance with a damaged cord or plug, or
after the appliance malfunctions or is dropped or damaged in
any manner. Call our toll-free customer service number for
information on examination, repair, or adjustment.
8. Do not use outdoors.
9. The use of attachments not recommended or sold by the
appliance manufacturer for use with this model may cause
fire, electric shock, or injury.
10. Do not let cord hang over edge of table or counter or touch
hot surfaces, including stove.
11. Do not place on or near a hot gas or electric burner, or in a
heated oven.
12. Extreme caution must be used when moving an appliance
containing hot oil or other hot liquids.
13. Do not use appliance for other than intended purpose.
SAVE THESE INSTRUCTIONS!
2
840199004 ENv02.indd 2840199004 ENv02.indd 2 8/19/14 11:03 AM8/19/14 11:03 AM
Page 3

Other Consumer Safety Information
This appliance is intended for household use only.
WARNING! Shock Hazard: This product is provided with either a
polarized (one wide blade) or grounded (3-prong) plug to reduce
the risk of electric shock. The plug fits only one way into a polarized
or grounded outlet. Do not defeat the safety purpose of the plug by
modifying the plug in any way or by using an adapter. If the plug
does not fit fully into the outlet, reverse the plug. If it still does not fit,
have an electrician replace the outlet.
The length of the cord used on this appliance was selected to reduce
the hazards of becoming tangled in or tripping over a longer cord.
If a longer cord is necessary, an approved extension cord may be
used. The electrical rating of the extension cord must be equal to
or greater than the rating of the appliance. If the appliance is of the
grounding type, the extension cord should be a grounding-type,
3-wire cord. Care must be taken to arrange the extension cord so
that it will not drape over the countertop or tabletop where it can
be pulled on by children or accidentally tripped over. An extension
cord should be connected to the appliance first, before it is
plugged into the outlet.
To reduce risk of electrical shock, do not immerse the unit
in water.
To avoid an electrical circuit overload, do not use another
high-wattage appliance on the same circuit with the panini press.
Always use an oven mitt to protect hand when opening the panini
press.
CAUTION: Escaping steam may cause burns.
3
840199004 ENv02.indd 3840199004 ENv02.indd 3 8/19/14 11:03 AM8/19/14 11:03 AM
Page 4

Parts and Features
BEFORE FIRST USE: Wash the cooking surfaces of the
panini press as instructed under “Care and Cleaning.”
Cover
Nonstick Cooking
Surfaces
Base
Cover Lock
Red Power
ON Light
Indicator Lights
Your panini press features two
indicator lights.
Red indicates that power is on.
Green indicates that the unit is
preheated and ready to use.
Green Preheat
Light
Storage Latch
4
840199004 ENv02.indd 4840199004 ENv02.indd 4 8/19/14 11:03 AM8/19/14 11:03 AM
(optional feature on select models)
Page 5
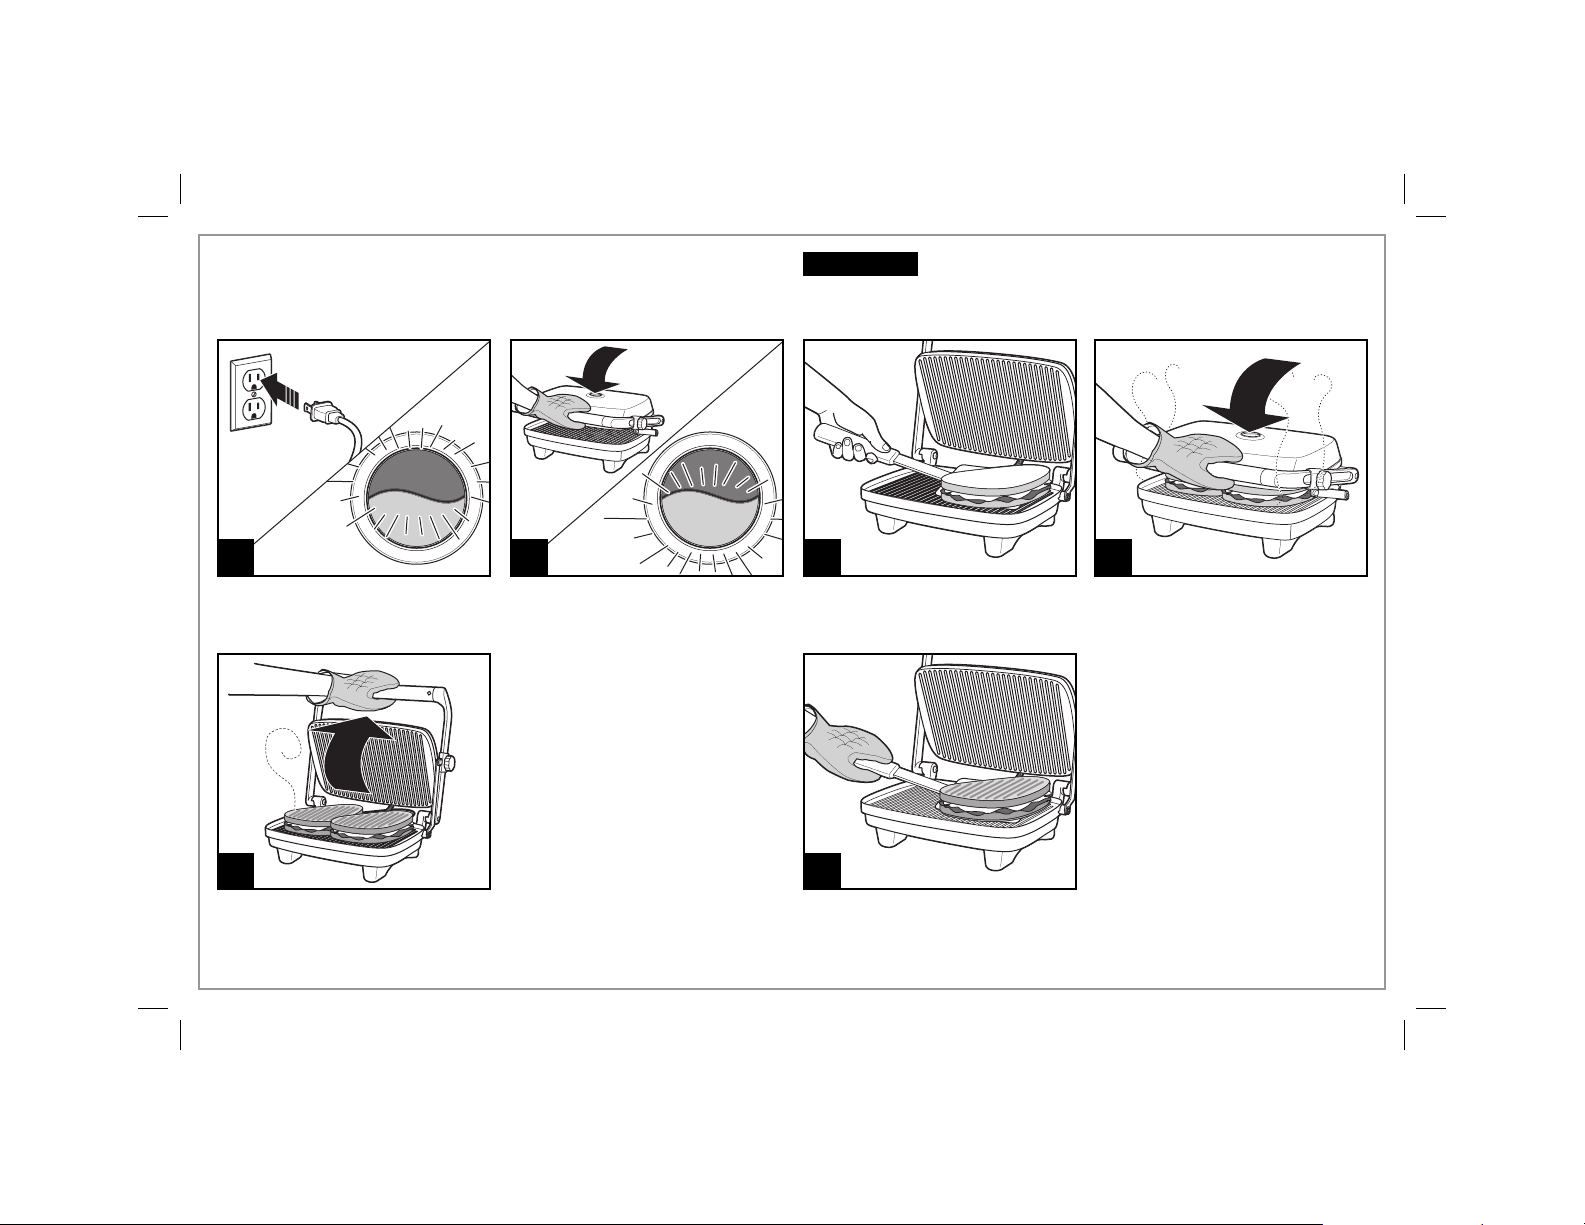
How to Use
w WARNING
Burn Hazard.
Exterior becomes hot. Use an oven mitt when cooking.
1
Plug cord into wall outlet. The
red light will glow.
5
Unlock the cover; then use an
oven mitt and carefully lift cover
and check food to see if cooked
to desired doneness.
840199004 ENv02.indd 5840199004 ENv02.indd 5 8/19/14 11:03 AM8/19/14 11:03 AM
Preheat panini press for 6
minutes. The red light comes on
and remains lit as long as the
panini press is plugged into an
outlet. Once the unit has reached
the proper temperature, the
green light will come on. Keep
cover closed.
Do not cut food on nonstick
cooking surface. If additional
cooking time is needed, lower
cover.
32
When preheated, raise cover. Place food to be cooked onto cooking
surface and lower cover to desired height. Lock the cover at the
desired height by turning the locking knob, if desired.
4
6
When food is cooked to desired
doneness, remove the food and
unplug the panini press. Let cool
before cleaning.
5
Page 6

Panini Press Tips
ALWAYS PREHEAT THE PANINI PRESS 6 MINUTES BEFORE
USING.
Read the Use and Care Guide before using the panini press.
•
Use vegetable cooking spray for convenient, stick-free
•
cooking. Or if you prefer, brush cooking surfaces with
vegetable oil before preheating.
Use plastic utensils on the nonstick cooking surfaces. Do
•
not use metal utensils since they will damage the nonstick
surface.
Thicker sandwiches may shift when being pressed. Use a
•
plastic spatula to reposition. Place sandwich in center of
press.
When a recipe calls for fruit, lock the cover in place above
•
the fruit so that it heats but does not contact the fruit.
There is no need to press down on the handle. The weight
•
of the cover will grill the top of the sandwich.
Cleanup is easy! Let panini press cool down. Wipe cooking
•
surfaces with damp paper towel or dish cloth.
• Do not latch the storage latch with anything between the
grids—this could break the storage latch. (Storage latch is
an optional feature on select models.)
IF YOU LIVE IN A HIGH-ALTITUDE AREA:
The Extension service will have detailed information about
cooking for your area. To locate the Cooperative Extension
service in your county, please visit:
http://www.csrees.usda.gov/Extension/.
6
840199004 ENv02.indd 6840199004 ENv02.indd 6 8/19/14 11:03 AM8/19/14 11:03 AM
Page 7

Care and Cleaning
1
Unplug panini press from outlet
and allow to cool.
Wipe cooking surfaces with a
paper towel to remove drippings.
Use a plastic spatula to scrape
away cooked-on food or grease.
2
Use a damp sponge with a
small amount of dishwashing
detergent to scrub cooking
surfaces. See illustration. Rinse
out sponge and wipe surfaces
clean. Use a clean, damp cloth
to wipe surfaces again.
Electrical Shock Hazard.
w WARNING
Disconnect power before cleaning. Do not immerse cord, plug, or base in water
or other liquid.
Do not use steel wool or any
type of abrasive cleaner to clean
the panini press, since it will
damage the nonstick cooking
surface and void the warranty.
3
Wipe outside of panini press with
a clean, damp cloth.
The unit can be stored with the
lid latch locked, sitting upright
on the hinge side. (Storage latch
OPTIONAL FEATURE
840199004 ENv02.indd 7840199004 ENv02.indd 7 8/19/14 11:03 AM8/19/14 11:03 AM
is an optional feature on select
models.)
7
Page 8

Recipes
NOTE: The panini press is not intended for cooking raw meats.
What is panini? Panini sandwiches are an Italian classic. These grilled
stuffed sandwiches offer unlimited possibilities, both as a lunch time
treat and anytime.
Popular Bread Types
Bread sizes and shapes vary by bakery and region. It may be
necessary to adapt panini press recipes to fit the number of bread
slices that can be cooked at one time.
Baguette
A crisp-crusted French bread formed in a long, narrow loaf, typically
about 3 inches (8 cm) wide and 15 inches (38 cm) long.
Turkey Club
8 slices Italian bread, 1/2-in.
(1.3-cm) thick
1/4 lb. (115 g) deli turkey slices,
divided into 4 servings
1/2 cup (118 ml) BBQ sauce
Directions:
Preheat panini press. Spread olive oil on one side of each slice of
bread. Place 4 slices of bread, oil side down, on the panini press.
Place turkey, 2 slices of tomatoes, 2 strips of bacon, 1 piece of
cheddar cheese, 2 Tablespoons
sauce on each slice of bread. Cover with remaining 4 slices of bread,
olive oil side up. Close panini press. Cook 3 to 5 minutes or until
desired brownness.
Makes 4 sandwiches.
8 slices tomato
8 bacon strips, cooked
4 slices cheddar cheese
1/2 cup (118 ml) sautéed onions
(optional)
Olive oil
(30 ml)
sautéed onions, and BBQ
French Bread
A light, crusty, yeast bread made with water. French bread is available
in many different shapes.
Italian Bread
A bread that is similar to French bread, but the loaves are typically
shorter and plumper.
Sourdough Bread
A bread with a slightly sour, tangy flavor from the leavening that has
a special yeast starter.
Chicken Quesadilla
4 flour tortillas
2 cups (473 ml) cooked chicken, chopped
1/2 cup (118 ml) cheddar cheese, shredded
Directions:
Preheat panini press. Fold tortilla in half. Place on panini press.
Add 1/2 cup (118 ml) chicken and 2 Tablespoons
tortilla. Close panini press. Cook 2 to 3 minutes or until cheese melts.
Remove from press and cut into 3 triangles. Repeat with remaining
ingredients.
Makes 4 quesadillas.
(30 ml)
cheese in
8
840199004 ENv02.indd 8840199004 ENv02.indd 8 8/19/14 11:03 AM8/19/14 11:03 AM
Page 9

Recipes (cont.)
Quick Pizza
1 can (13.8 oz./391 g)
refrigerator pizza crust
1 cup (237 ml) pizza sauce
1 cup (237 ml) mozzarella
cheese, shredded
Directions:
Preheat panini press. Open refrigerator pizza crust and cut into 4
oblong pieces. Place 1 piece of pizza crust onto panini press. Close
panini press. Cook 1 to 2 minutes. Open press and top crust with
pizza sauce, mozzarella cheese, and optional toppings. Lower top
of panini press and lock hinge to rest above pizza. Cook for 2 to 3
minutes, or until cheese melts. Repeat with remaining ingredients.
Makes 4 servings.
24 slices pepperoni (optional)
8 green pepper rings (optional)
4 fresh mushrooms, sliced
(optional)
Easy Fruit Turnovers
1 can (8 oz./227 g)
refrigerator crescent rolls
1 can (21 oz./595 g) fruit pie filling
Directions:
Preheat panini press. Open refrigerator crescent rolls and cut into 4
oblong pieces. Place 1 piece of dough onto panini press. Close panini
press. Cook 1 to 2 minutes. Open press and top with fruit pie filling.
Lower top of panini press and lock cover to rest above turnover. Cook
for 2 to 3 minutes to warm fruit. Repeat with additional dough and pie
filling. Combine sugar and cinnamon, and sprinkle over turnovers.
Cut turnovers in half.
Makes 8 servings.
1/2 cup (118 ml) sugar
1 teaspoon (5 ml) cinnamon
Reuben
8 slices sourdough bread, 1/2-in. (1.3-cm) thick
1/2 lb. (227 g) sliced corned beef
1/2 cup (118 ml) sauerkraut
4 slices Swiss cheese
Olive oil
Directions:
Preheat panini press. Spread olive oil on one side of each slice of
bread. Place 4 slices of bread, oil side down, on the panini press.
Place 1/8 lb. (57 g) corned beef, 2 Tablespoons (30 ml) sauerkraut,
and 1 slice of Swiss cheese on each slice of bread. Cover with
remaining 4 slices of bread, olive oil side up. Close panini press. Cook
3 to 5 minutes or until desired brownness.
Makes 4 sandwiches.
9
840199004 ENv02.indd 9840199004 ENv02.indd 9 8/19/14 11:03 AM8/19/14 11:03 AM
Page 10

Limited Warranty
This warranty applies to products purchased and used in the U.S. and Canada. This is the only express warranty for this product and
is in lieu of any other warranty or condition.
This product is warranted to be free from defects in material and workmanship for a period of one (1) year from the date of original
purchase. During this period, your exclusive remedy is repair or replacement of this product or any component found to be defective,
at our option; however, you are responsible for all costs associated with returning the product to us and our returning a product or
component under this warranty to you. If the product or component is no longer available, we will replace with a similar one of equal
or greater value.
This warranty does not cover glass, filters, wear from normal use, use not in conformity with the printed directions, or damage to
the product resulting from accident, alteration, abuse, or misuse. This warranty extends only to the original consumer purchaser or
gift recipient. Keep the original sales receipt, as proof of purchase is required to make a warranty claim. This warranty is void if the
product is used for other than single-family household use or subjected to any voltage and waveform other than as specified on the
rating label (e.g., 120V ~ 60 Hz).
We exclude all claims for special, incidental, and consequential damages caused by breach of express or implied warranty. All
liability is limited to the amount of the purchase price. Every implied warranty, including any statutory warranty or condition
of merchantability or fitness for a particular purpose, is disclaimed except to the extent prohibited by law, in which case such
warranty or condition is limited to the duration of this written warranty. This warranty gives you specific legal rights. You may have
other legal rights that vary depending on where you live. Some states or provinces do not allow limitations on implied warranties or
special, incidental, or consequential damages, so the foregoing limitations may not apply to you.
To make a warranty claim, do not return this appliance to the store. Please call 1.800.851.8900 in the U.S. or 1.800.267.2826 in Canada
or visit hamiltonbeach.com in the U.S. or hamiltonbeach.ca in Canada. For faster service, locate the model, type, and series numbers
on your appliance.
10
840199004 ENv02.indd 10840199004 ENv02.indd 10 8/19/14 11:03 AM8/19/14 11:03 AM
Page 11

PRÉCAUTIONS IMPORTANTES
Pour utiliser un appareil électroménager, vous devez toujours prendre des mesures élémentaires de sécurité pour réduire le risque d’incendie,
d’électrocution et/ou de blessure corporelle, en particulier les mesures suivantes :
1. Lire toutes les instructions.
2. Cet appareil n’est pas destiné à être utilisé par des personnes
(y compris les enfants) dont les capacités physiques, sensorielles
ou mentales sont réduites, ou manquant d’expérience et
de connaissance, sauf si elles sont étroitement surveillées
et instruites sur l’utilisation de l’appareil par une personne
responsable de leur sécurité.
3. Une bonne surveillance est nécessaire pour tout appareil utilisé
par des enfants ou près d’eux. Surveiller que les enfants ne
jouent pas avec l’appareil.
4. Ne pas toucher aux surfaces chaudes. Utiliser les poignées ou
les boutons.
5. Afin de vous prémunir contre le risque de choc électrique, ne
pas immerger l’appareil, le cordon ou la fiche dans l’eau ou tout
autre liquide.
6. Débrancher le presse-panini de la prise de courant lorsque vous
ne l’utilisez pas et avant le nettoyage. Laisser l’appareil refroidir
avant d’enlever ou de remettre des pièces en place et avant de
le nettoyer.
7. Ne pas faire fonctionner un appareil avec un cordon ou une fiche
endommagé(e), ou lorsque l’appareil ne fonctionne pas bien,
est tombé ou a été endommagé d’une manière quelconque.
Appeler notre numéro sans frais de service à la clientèle pour
des renseignements concernant l’examen, la réparation ou
l’ajustement.
8. Ne pas utiliser à l’extérieur.
9. L’utilisation d’accessoires non recommandés ou vendus par
le fabricant de l’appareil pour utilisation avec ce modèle peut
causer un incendie, un choc électrique ou une blessure.
10. Ne pas laisser le cordon pendre au bord d’une table ou d’un
comptoir ou entrer en contact avec une surface chaude, y
compris la cuisinière.
11. Ne pas placer l’appareil sur un brûleur à gaz ou électrique chaud
ou dans un four chauffé.
12. Une extrême prudence s’impose lors du déplacement d’un
appareil contenant de l’huile chaude ou tout autre liquide chaud.
13. N’utiliser cet appareil qu’aux fins auxquelles il a été conçu.
CONSERVER CES INSTRUCTIONS !
11
840199004 FRv01.indd 11840199004 FRv01.indd 11 8/18/14 10:17 AM8/18/14 10:17 AM
Page 12

Autres consignes de sécurité pour le consommateur
Cet appareil est conçu uniquement pour l’usage domestique.
AVERTISSEMENT ! Risque d’électrocution : Ce produit est doté
d’une fiche polarisée (lame plus large) ou d’une fiche (3 lames et
mise à la terre) pour réduire le risque d’électrocution. Cette fiche
s’insère d’une seule manière dans une prise polarisée ou prise avec
mise à la terre. Ne pas transformer le dispositif de sécurité de la
fiche en modifiant celle-ci de quelconque façon ou en utilisant un
adaptateur. Si vous ne pouvez pas insérer complètement la fiche
dans la prise, inversez la fiche. Si elle refuse toujours de s’insérer,
faire remplacer la prise par un électricien.
La longueur du cordon installé sur cet appareil a été sélectionnée
afin de réduire les risques d’enchevêtrement ou de faux pas
causés par un fil trop long. L’utilisation d’une rallonge approuvée
est permise, si le cordon est trop court. Les caractéristiques
électriques de la rallonge doivent être équivalentes ou supérieures
aux caractéristiques de l’appareil. Si cet appareil est du type à
mise à la terre, la rallonge doit être du type à mise à la terre, à 3
fils. Prendre toutes les précautions nécessaires pour installer la
rallonge de manière à ne pas la faire courir sur le comptoir ou sur
une table pour éviter qu’un enfant ne tire sur le cordon ou trébuche
accidentellement. La rallonge doit être connectée à l’appareil en
premier avant de la brancher dans la prise.
Afin de réduire le risque de choc électrique, ne pas plonger
l’appareil dans l’eau.
Pour éviter une surcharge du circuit électrique, ne pas utiliser
un autre appareil à haute tension sur le même circuit que le
presse-panini.
Toujours utiliser des mitaines de four pour se protéger les mains
avant d’ouvrir le presse-panini.
MISE EN GARDE : La vapeur qui s’échappe de l’appareil peut
causer des brûlures.
12
840199004 FRv01.indd 12840199004 FRv01.indd 12 8/18/14 10:17 AM8/18/14 10:17 AM
Page 13

Pièces et caractéristiques
AVANT LA PREMIÈRE UTILISATION : Veuiller laver les
surfaces de cuisson de l’appareil selon les instructions
à la section « Entretien et nettoyage ».
Couvercle
Surfaces
de cuisson
antiadhésives
Base
Verrou de
couvercle
Témoin
d’alimentation rouge
Témoins lumineux
Votre presse-panini est muni de deux témoins
lumineux.
Le rouge indique que l’appareil est en marche.
Le vert indique que l’appareil est préchauffé
et qu’il est prêt à être utilisé.
Témoin de
préchauffer vert
Loquet de rangement
(caractéristique en option sur certains modèles)
840199004 FRv01.indd 13840199004 FRv01.indd 13 8/18/14 10:17 AM8/18/14 10:17 AM
13
Page 14

Utilisation
w AVERTISSEMENT
Risque de brûlure.
L’extérieur devient chaud. Utiliser une mitaine de four en cuisinant.
1
Brancher l’appareil sur une prise.
Le témoin d’alimentation rouge
s’illuminera.
5
14
840199004 FRv01.indd 14840199004 FRv01.indd 14 8/18/14 10:17 AM8/18/14 10:17 AM
Préchauffer le presse-panini
pendant 6 minutes. Le témoin
rouge s’allume et reste allumé
tant que le presse-panini est
branché dans une prise. Le
témoin vert s’allume dès que
l’appareil atteint la température
convenable. Garder le couvercle
fermé.
Ouvrir le couvercle, puis, à l’aide
de mitaines de four, soulever
soigneusement le couvercle et
vérifier si les aliments sont cuits tel
que désiré. Ne pas découper les
aliments sur la surface de cuisson
antiadhésive. Si une cuisson
prolongée est nécessaire, baisser
le couvercle.
32
Soulever le couvercle lorsque l’appareil est préchauffé. Placer les
aliments à cuire sur la surface de cuisson et baisser le couvercle à
la hauteur désirée. Verrouiller le couvercle à la hauteur désirée en
tournant le bouton de verrouillage, si désiré.
6
4
Lorsque les aliments sont cuits
tel que désiré, les retirer et
débrancher le presse-panini.
Laisser l’appareil refroidir avant
de le nettoyer.
Page 15

Conseils pour le presse-panini
TOUJOURS PRÉCHAUFFER LE PRESSE-PANINI PENDANT
6 MINUTES AVANT DE L’UTILISER.
Lire le Guide d’utilisation et d’entretien avant d’utiliser le
•
presse-panini.
Utiliser de l’enduit en aérosol à base d’huile végétale pour
•
que les aliments cuisent facilement sans coller. Ou bien,
badigeonner les surfaces de cuisson avec de l’huile végétale
avant le préchauffage.
Utiliser des ustensiles en plastique sur les surfaces de
•
cuisson antiadhésives. Ne pas utiliser des ustensiles
métalliques qui pourraient endommager la surface
antiadhésive.
Les sandwiches plus épais pourraient se déplacer lorsqu’ils
•
sont placés dans le presse-panini. Utiliser une spatule en
plastique pour les remettre en position. Placer le
sandwich au centre de l’appareil.
Lorsqu’une recette comporte un fruit, verrouiller le
•
couvercle en place juste au-dessus du fruit pour qu’il
réchauffe celui-ci sans le toucher.
Il n’est pas nécessaire d’appuyer sur la poignée. Le poids
•
du couvercle suffit pour faire griller le dessus du sandwich.
Le nettoyage est facile ! Laisser refroidir le presse-panini.
•
Essuyer les surfaces de cuisson avec un essuie-tout ou un
linge à vaisselle humide.
• Ne pas fermer le loquet de rangement avec quelque
chose entre les grilles—ceci pourrait casser le loquet de
rangement. (Longet de rangement est une caractéristique
en option sur certains modèles.)
SI VOUS HABITEZ DANS UNE RÉGION À HAUTE ALTITUDE :
Les services de vulgarisation offrent les informations
au sujet de la cuisson pour votre région. Pour trouver
la coopérative de services de vulgarisation, veuiller visiter
le site http://www.csrees.usda.gov/Extension/.
15
840199004 FRv01.indd 15840199004 FRv01.indd 15 8/18/14 10:17 AM8/18/14 10:17 AM
Page 16

Entretien et nettoyage
w AVERTISSEMENT
Risque d’électrocution.
Débrancher l’appareil avant le nettoyage. Ne pas immerger le
cordon, la fiche ou la base dans l’eau ou toute autre liquide.
Essuyer les surfaces de cuisson
avec un essuie-tout pour enlever
les gouttes. Utiliser une spatule
1
Débrancher le presse-panini de
la prise de courant électrique et
laisser refroidir.
3
Utiliser un chiffon propre et
humide pour bien essuyer
l’extérieur du presse-panini.
16
840199004 FRv01.indd 16840199004 FRv01.indd 16 8/18/14 10:17 AM8/18/14 10:17 AM
en plastique pour gratter les
graisses et traces d’aliments cuits.
CARACTÉRISTIQUE
EN OPTION
L’appareil peut être rangé avec
le loquet du couvercle verrouillé,
en position verticale du côté de
la charnière.
2
Frotter les surfaces de cuisson
avec une éponge humide et
un peu de détergent à vaisselle
liquide. Voir l’illustration. Rincer
l’éponge et bien essuyer les
surfaces. Essuyer les surfaces à
nouveau avec un linge propre et
humide.
(Longet de rangement est une
caractéristique en option sur
certains modèles.)
Ne pas utiliser de laine d’acier
et de nettoyant abrasif pour
nettoyer le presse-panini car
ceux-ci pourraient endommager
la surface antiadhésive et annuler
la garantie.
Page 17

Recettes
REMARQUE : Le presse-panini n’est pas conçu pour la cuisson de
viandes crues.
Qu’est-ce qu’un panini ? Les sandwiches panini sont un classique
de la cuisine italienne. Ces sandwiches garnis et grillés offrent des
possibilités illimitées, au déjeuner et à tout autre moment.
Genres de pains populaires
Les grandeurs et les formes de pains varient selon les boulangeries
et les régions. Il peut être nécessaire d’ajuster les recettes du pressesandwich en fonction du nombre de tranches de pain qui peuvent
être grillées à la fois.
Sandwich club à la dinde
8 tranches de pain italien de
1/2 po (1,3 cm) d’épaisseur
1/4 lb (115 g) de dinde en
tranches, divisée en 4 portions
1/2 tasse (118 ml) de sauce
barbecue
Instructions :
Préchauffer le presse-panini. Badigeonner d’huile d’olive un seul côté
de chaque tranche de pain. Poser 4 tranches de pain sur le pressepanini, côté huilé vers le bas. Placer les tranches de dinde, 2 tranches
de tomate, 2 tranches de bacon, 1 tranche de fromage cheddar, 2 c.
à table (30 ml) d’oignons sautés, et de la sauce barbecue sur chaque
tranche de pain. Couvrir avec les 4 tranches de pain restantes, côté
huilé vers le haut. Fermer le presse-panini. Faire cuire pendant 3 à 5
minutes ou jusqu’au degré désiré de cuisson.
8 tranches de tomate
8 tranches de bacon cuit
4 tranches de fromage cheddar
1/2 tasse (118 ml) d’oignons sautés
(facultatif)
Huile d’olive
Donne 4 sandwiches.
Baguette
Pain français à croûte de forme allongée et étroite mesurant en
général 3 po (8 cm) de large et 15 po (38 cm) de long.
Pain français
Pain léger et croustillant à base de levure et d’eau. Le pain français
se présente sous différentes formes.
Pain italien
Pain qui ressemble au pain français mais dont la miche est en
général de forme plus courte et plus grosse.
Pain au levain
Un pain ayant un goût légèrement acide et savoureux qui provient
d’un levain spécial.
Quesadilla au poulet
4 tortillas à base de farine
2 tasses (473 ml) de poulet cuit, haché
1/2 tasse (118 ml) de fromage cheddar, râpé
Instructions :
Préchauffer le presse-panini. Plier une tortilla en deux. Placer celle-
ci sur le presse-panini. Ajouter 1/2 tasse (118 ml) de poulet et 2 c.
(30 ml)
à table
Faire cuire pendant 2 à 3 minutes ou jusqu’à ce que le fromage ait
fondu. Retirer la tortilla du presse-panini et la découper en 3 triangles.
Répéter la procédure avec les ingrédients qui restent.
quesadillas.
de fromage dans la tortilla. Fermer le presse-panini.
Donne 4
17
840199004 FRv01.indd 17840199004 FRv01.indd 17 8/18/14 10:17 AM8/18/14 10:17 AM
Page 18

Recettes (suite)
Pizza éclair
1 pâte (13.8 oz/391 g) à pizza
réfrigérée en boîte
1 tasse (237 ml) de sauce pour
pizza
1 tasse (237 ml) de fromage
mozzarella, râpé
Instructions :
Préchauffer le presse-panini. Ouvrir la boîte de croûte à pizza et
couper la pâte en 4 morceaux rectangulaires. Placer 1 morceau de
pâte à pizza sur le presse-panini. Fermer le presse-panini. Faire cuire
pendant 1 à 2 minutes. Ouvrir le presse-panini et étaler sur la pâte
la sauce pour pizza, le fromage mozzarella, et les garnitures selon le
goût. Baisser le couvercle du presse-panini et verrouiller le loquet
pour laisser le couvercle reposer juste au-dessus de la pizza. Faire
cuire pendant 2 à 3 minutes, ou jusqu’à ce que le fromage ait fondu.
Répéter la procédure avec les ingrédients qui restent.
4 portions.
18
24 tranches de pepperoni
(facultatif)
8 rondelles de poivron vert
(facultatif)
4 champignons frais, tranchés
(facultatif)
Donne
Chaussons aux fruits faciles
1 boîte (8 oz/227 g) de pâte à
croissants réfrigérée
1 boîte (21 oz/595 g) de garniture
pour tarte, à base de fruits
Instructions :
Préchauffer le presse-panini. Ouvrir la boîte de pâte à croissants
réfrigérée et couper celle-ci en 4 morceaux rectangulaires. Placer
1 morceau de pâte sur le presse-panini. Fermer le presse-panini.
Faire cuire pendant 1 à 2 minutes. Ouvrir le presse-panini et étaler
la garniture pour tarte. Baisser le couvercle du presse-panini et
verrouiller le loquet pour laisser le couvercle reposer juste au-dessus
du chausson. Cuire pendant 2 à 3 minutes pour réchauffer les
fruits. Répéter la procédure avec la pâte et la garniture qui restent.
Saupoudrer les chaussons d’un mélange de sucre et cannelle.
Couper les chaussons en deux.
1/2 tasse (118 ml) de sucre
1 c. à thé (5 ml) de cannelle
Donne 8 portions.
Sandwich Reuben
8 tranches de pain au levain de
1/2 po (1,3 cm) d’épaisseur
1/2 lb (227 g) de boeuf salé,
tranché
Préchauffer le presse-panini. Badigeonner d’huile d’olive un seul côté
de chaque tranche de pain. Placer 4 tranches de pain sur le pressepanini, côté huilé vers le bas. Placer 1/8 lb (57 g) de bœuf salé,
2 c. à table (30 ml) de choucroute et 1 tranche de fromage suisse
sur chaque tranche de pain. Couvrir avec les 4 autres tranches de
pain, côté huilé vers le haut. Fermer le presse-panini. Faire cuire
pendant 3 à 5 minutes ou jusqu’au degré désiré de cuisson.
4 sandwiches.
1/2 tasse (118 ml) de choucroute
4 tranches de fromage suisse
Huile d’olive
Donne
840199004 FRv01.indd 18840199004 FRv01.indd 18 8/18/14 10:17 AM8/18/14 10:17 AM
Page 19

Notes
19
840199004 FRv01.indd 19840199004 FRv01.indd 19 8/18/14 10:17 AM8/18/14 10:17 AM
Page 20

Garantie limitée
Cette garantie s’applique aux produits achetés et utilisées aux É.-U. et au Canada. C’est la seule garantie expresse pour ce
produit et est en lieu et place de tout autre garantie ou condition.
Ce produit est garanti contre tout défaut de matériaux et de main-d’oeuvre pour une période de un (1) an à compter de la
date d’achat d’origine. Au cours de cette période, votre seul recours est la réparation ou le remplacement de ce produit ou
tout composant s’avérant défectueux, à notre gré, mais vous êtes responsable de tous les coûts liés à l’expédition du produit
et le retour d’un produit ou d’un composant dans le cadre de cette garantie. Si le produit ou un composant n’est plus offert,
nous le remplacerons par un produit similaire de valeur égale ou supérieure.
Cette garantie ne couvre pas le verre, les filtres, l’usure d’un usage normal, l’utilisation non conforme aux directives imprimées,
ou des dommages au produit résultant d’un accident, modification, utilisation abusive ou incorrecte. Cette garantie s’applique
seulement à l’acheteur original ou à la personne l’ayant reçu en cadeau. La présentation du reçu de vente d’origine comme
preuve d’achat est nécessaire pour faire une réclamation au titre de cette garantie. Cette garantie s’annule si le produit est
utilisé autrement que par une famille ou si l’appareil est soumis à toute tension ou forme d’onde différente des caractéristiques
nominales précisées sur l’étiquette (par ex. : 120 V ~ 60 Hz).
Nous excluons toutes les réclamations au titre de cette garantie pour les dommages spéciaux, consécutifs et indirects causés
par la violation de garantie expresse ou implicite. Toute responsabilité est limitée au prix d’achat. Chaque garantie implicite,
y compris toute garantie ou condition de qualité marchande ou d’adéquation à un usage particulier, est exonérée, sauf
dans la mesure interdite par la loi, auquel cas la garantie ou condition est limitée à la durée de cette garantie écrite. Cette
garantie vous donne des droits légaux précis. Vous pouvez avoir d’autres droits qui varient selon l’endroit où vous habitez.
Certaines provinces ne permettent pas les limitations sur les garanties implicites ou les dommages spéciaux ou indirects de
telle sorte que les limitations ci-dessus ne s’appliquent peut-être pas à votre cas.
Ne pas retourner cet appareil au magasin lors d’une réclamation au titre de cette garantie. Téléphoner au 1.800.851.8900 aux
É.-U. ou au 1.800.267.2826 au Canada ou visiter le site internet www.hamiltonbeach.com aux É.-U. ou www.hamiltonbeach.ca
au Canada. Pour un service plus rapide, trouvez le numéro de modèle, le type d’appareil et les numéros de série sur votre
appareil.
20
840199004 FRv01.indd 20840199004 FRv01.indd 20 8/18/14 10:17 AM8/18/14 10:17 AM
Page 21

SALVAGUARDIAS IMPORTANTES
Cuando utilice artefactos eléctricos, siempre deben seguirse precauciones de seguridad básicas a fin de reducir el riesgo de incendio,
descarga eléctrica, y/o lesiones a personas, incluyendo las siguientes:
1. Lea todas las instrucciones.
2. Este aparato no se destina para utilizarse por personas
(incluyendo niños) cuyas capacidades físicas, sensoriales o
mentales sean diferentes o estén reducidas, o carezcan de
experiencia o conocimiento, a menos que dichas personas
reciban una supervisión o capacitación para el funcionamiento
del aparato por una persona responsable de su seguridad.
3. Se requiere de una estrecha supervisión cuando el aparato se use
cerca de niños. Los niños deben supervisarse para asegurar que
ellos no empleen los aparatos como juguete.
4. Verifique que el voltaje de su instalación corresponda con el del
producto.
5. No toque superficies calientes. Use las manijas o perillas.
6. Para protegerse contra riesgos de descarga eléctrica, no
sumerja el aparato, cable o enchufe en agua u otro líquido.
7. Desenchúfelo del tomacorriente cuando no lo esté usando
y antes de la limpieza. Deje que se enfríe antes de colocar o
sacar alguna pieza y antes de limpiar el aparato.
8. No opere ningún aparato con un cable o enchufe dañado, o
después de que el aparato tenga un mal funcionamiento o
se haya caído o dañado de cualquier forma. Llame a nuestro
número gratuito de servicio al cliente para información sobre
examinación, reparación o ajuste.
9. No use en exteriores.
10. El uso de accesorios no recomendados ni vendidos por el
fabricante del aparato para usar con este modelo puede causar
incendio, choque eléctrico o lesiones.
11. No deje que el cable cuelgue del borde de la mesa o cubierta,
o toque superficies calientes, incluyendo la estufa.
12. No coloque sobre o cerca de quemadoresde gas o eléctricos
calientes o en un horno calentado.
13. Se debe tener extrema precaución cuando se mueva un
aparato que contenga aceite caliente u otros líquidos calientes.
14. No use el aparato con otro propósito que no sea para el que
fue hecho.
¡GUARDE ESTAS INSTRUCCIONES!
21
840199004 SPv02.indd 21840199004 SPv02.indd 21 8/19/14 10:59 AM8/19/14 10:59 AM
Page 22

Otra Información de Seguridad para el Cliente
Este aparato está planeado para uso doméstico.
¡ADVERTENCIA! Peligro de Descarga Eléctrica: Este producto es
provisto con un enchufe ya sea polarizado (con un cuchilla ancha)
o aterrizado (3-clavija) para reducir el riesgo de descarga eléctrica.
El enchufe entra sólo de una manera en una toma polarizada
o aterrizada. No elimine el propósito de seguridad del enchufe
modificando el enchufe de ninguna manera o usando un adaptador.
Si el enchufe no entra completamente en la toma, invierta el
enchufe. Si aún no entra, haga que un electricista reemplace la
toma.
La longitud del cable usado para este aparato fue seleccionado para
reducir los riesgos de enredarse o tropezarse con un cable más
largo. Si se necesita un cable más largo, se puede usar un cable
extensión aprobado. La clasificación eléctrica de la cable extensión
debe ser igual o mayor que la clasificación del aparato. Si el aparato
es del tipo de conexión a tierra, el cable de extensión debe ser del
tipo de conexión a tierra con 3 cables. Es importante tener cuidado
de colocar el cable de extensión para que no se pliegue sobre el
mostrador o la mesera en donde niños puedan tirar del mismo o
tropezarse accidentalmente. Un cable extensión debe ser conectado
primero al aparato, antes de que sea conectado a la toma.
Para reducir el riesgo de una descarga eléctrica, no sumerja
la unidad en agua.
Para evitar sobrecargas en el circuito eléctrico, no use otro aparato
de alto consumo de watts en el mismo circuito de este parrilla para
panini.
Siempre use guantes para cocina para proteger las manos cuando
abra la parrilla para panini.
PRECAUCIÓN: El vapor que escapa puede quemar.
22
840199004 SPv02.indd 22840199004 SPv02.indd 22 8/19/14 10:59 AM8/19/14 10:59 AM
Page 23

Partes y Características
ANTES DEL PRIMER USO: Tenga a bien lavar las
superficies de cocción de la parrilla para panini como
se indica en “Cuidado y Limpieza”.
Cubierta
Superficies
de Cocción
Antiadherentes
Base
Traba de
la Tapa
Luz de
Encendido Roja
Luces Indicadoras
Su parrilla para panini cuenta con dos
luces indicadoras.
La luz roja indica que el artefacto está
encendido.
La luz verde indica que la unidad se
encuentra precalentada y lista para usar.
Luz de Precalentado
Verde
Traba de Almacenamiento
(característica opcional en modelos selectos)
840199004 SPv02.indd 23840199004 SPv02.indd 23 8/19/14 10:59 AM8/19/14 10:59 AM
23
Page 24

Cómo Utilizar
Peligro de Quemarse.
w ADVERTENCIA
La parte exterior se calienta. Utilice un guante de cocina.
1
Enchufe el cable en una toma eléctrica. La luz de Encendido roja se
encenderá. Precaliente la parrilla para panini durante 6 minutos. La luz
roja se enciende y continúa encendida siempre que la parrilla para
panini esté enchufada en un tomacorriente.
haya alcanzado
Mantenga la tapa cerrada.
5
24
840199004 SPv02.indd 24840199004 SPv02.indd 24 8/19/14 10:59 AM8/19/14 10:59 AM
la temperatura adecuada, la luz verde se encenderá.
Destrabe la tapa, luego, con
un guante de cocina, levante
la tapa con cuidado y verifique
los alimentos para comprobar
si alcanzaron la cocción
deseada. No corte los alimentos
sobre la superficie de cocción
antiadherente. Si se necesita
tiempo de cocción adicional,
baje la tapa.
Una vez que la unidad
32
Cuando se haya precalentado, levante la tapa. Coloque los alimentos
en la superficie de cocción y baje la tapa a la altura deseada. Trabe la
tapa a la altura deseada girando la perilla de trabado, si así lo desea.
6
4
Cuando los alimentos hayan
alcanzado la cocción deseada,
quítelos y desenchufe la parrilla
para panini. Deje enfriar antes de
limpiar.
Page 25

Consejos Sobre la Parrilla para Panini
SIEMPRE PRECALIENTE LA PARRILLA PARA PANINI
DURANTE 6 MINUTOS ANTES DE USAR.
Lea la Guía de Uso y Cuidado antes de usar la parrilla para
•
panini.
Use spray de cocción vegetal para una cocción conveniente
•
y antiadherente. O, si así lo prefiere, cepille las superficies de
cocción con aceite vegetal antes de precalentar.
Use utensilios plásticos sobre las superficies de cocción
•
antiadherentes. No utilice utensilios metálicos porque
pueden dañar la superficie antiadherente.
Los sándwiches más gruesos pueden desplazarse
•
cuando se los presiona. Utilice una espátula plástica para
reposicionarlos. Coloque los sándwiches en el centro de la
parrilla para panini.
Cuando debe utilizarse fruta en una receta, trabe la tapa en
•
su lugar por encima de la fruta para que se caliente pero no
haga contacto con ella.
No hace falta hacer presión en la manija. El peso de la tapa
•
asará la parte superior del sándwich.
¡La limpieza en sencilla! Deje que la parrilla para panini se
•
enfríe. Limpie las superficies de cocción con una toalla de
papel o un paño de cocina.
• No accione la traba de almacenamiento con algún elemento
entre las parrillas, porque podría romperse la traba de
almacenamiento. (La traba de almacenamiento es una
característica opcional en modelos selectos).
SI USTED VIVE EN UNA ÁREA DE ALTITUD ELEVADA:
El servicio de extensión tendrá información detallada sobre
cocción en su área. Para ubicar el servicio de extensión
cooperativa en su condado, tenga a bien visitar la siguiente
página: http://www.csrees.usda.gov/Extension/.
25
840199004 SPv02.indd 25840199004 SPv02.indd 25 8/19/14 10:59 AM8/19/14 10:59 AM
Page 26

Cuidado y Limpieza
Desenchufe la parrilla para panini
del tomacorriente y deje enfriar.
Limpie las superficies de cocción
con una toalla de papel para
quitar las salpicaduras. Utilice
una espátula plástica para
1
remover alimentos adheridos
o grasa.
w ADVERTENCIA
Peligro de Descarga Eléctrica.
Desconecte la energía antes de limpiar. No sumerja el cable, el enchufe o
base en agua u otro liquido.
No utilice esponjas metálicas
o cualquier clase de limpiador
abrasivo para limpiar la parrilla
para panini, ya que pueden
dañar la superficie de cocción
2
Utilice una esponja húmeda con
una pequeña cantidad de
detergente para vajillas para
limpiar las superficies de cocción.
Vea la ilustración. Enjuague la
esponja y limpie las superficies.
Use un paño limpio y húmedo
para limpiar las superficies de
nuevo.
antiadherente e invalidar la
garantía.
CARACTERÍSTICA
3
Use un paño limpio y húmedo
para limpiar la parte externa de
la parrilla para panini.
26
840199004 SPv02.indd 26840199004 SPv02.indd 26 8/19/14 10:59 AM8/19/14 10:59 AM
La unidad puede almacenarse
con la traba de la tapa cerrada,
colocada en posición vertical
sobre el lado de la bisagra.
OPCIONAL
(La traba de almacenamiento es
una característica opcional en
modelos selectos).
Page 27

Recetas
NOTA: La parrilla para panini no está concebida para cocinar
carnes crudas.
¿Qué es el panini? Los sándwiches panini son un clásico italiano.
Estos sandwiches rellenos asados ofrecen una cantidad ilimitada
de posibilidades, ya sea para el almuerzo o en cualquier momento.
Tipos de Panes Populares
Los tipos y formas de pan varían según la panadería y la región.
Puede ser necesario adaptar las recetas de la parrilla para panini para
adecuar la cantidad de rebanadas de pan que pueden cocinarse por
vez.
Club Sándwich de Pavo
8 rebanadas de pan italiano de
1/2 pulg. (1.3 cm) de grosor
Rebanadas de pavo de 1/4 lb.
(115 g), divididas en 4 porciones
1/2 taza (118 ml) de salsa
barbacoa
Instrucciones:
Precaliente la parrilla para panini. Unte aceite de oliva en un lado de
todas las rebanadas de pan. Coloque 4 rebanadas de pan, con el
lado del aceite hacia abajo, en la parrilla de panini. Coloque el pavo,
2 rebanadas de tomates, 2 tiras de tocino, 1 trozo de queso cheddar,
2 cucharadas (30 ml) de cebollas salteadas y salsa barbacoa en cada
rebanada de pan. Cubra con las 4 rebanadas de pan restantes, con
el lado del aceite de oliva hacia arriba. Cierre la parrilla para panini.
Cocine de 3 a 5 minutos o hasta alcanzar el dorado deseado.
para 4 sándwiches.
8 rebanadas de tomate
8 tiras de tocino
4 rebanadas de
1/2 taza (118 ml) de
salteadas
Aceite de oliva
, cocido
queso cheddar
cebollas
(opcional)
Alcanza
Baguette
Pan francés de corteza crocante de forma larga y angosta, de un ancho
de alrededor de 3 pulgadas (8 cm) y 15 pulgadas (38 cm) de largo.
Pan Francés
Pan liviano y crocante hecho con levadura y agua. El pan francés se
encuentra disponible en varias formas diferentes.
Pan Italiano
Pan similar al pan francés, pero las hogazas son comúnmente más
cortas y gordas.
Pan de Masa Fermentada
Pan con un sabor ligeramente ácido proveniente de la levadura que
cuenta con un iniciador especial.
Quesadilla de Pollo
4 tortillas de harina
2 tazas (473 ml) de pollo cocido picado
1/2 taza (118 ml) de queso cheddar rallado
Instrucciones:
Precaliente la parrilla para panini. Doble la tortilla a la mitad.
Colóquela en la parrilla para panini. Agregue 1/2 taza (118 ml) de
pollo y 2 cucharadas (30 ml) de queso en la tortilla. Cierre la parrilla
para panini. Cocine de 2 a 3 minutos o hasta que el queso se derrita.
Quite de la parrilla y corte en 3 triángulos. Repita la acción con los
ingredientes restantes. Alcanza para 4 quesadillas.
27
840199004 SPv02.indd 27840199004 SPv02.indd 27 8/19/14 10:59 AM8/19/14 10:59 AM
Page 28

Recetas (cont.)
Pizza Rápida
1 lata (13.8 oz/391 g) de masa
refrigerada para pizza
1 taza (237 ml) de salsa para
pizza
1 taza (237 ml) de queso
mozzarella rallado
Instrucciones:
Precaliente la parrilla para panini. Abra la lata de masa refrigerada
para pizza y corte en 4 piezas alargadas. Coloque 1 pieza de masa
para pizza en la parrilla para panini. Cierre la parrilla para panini.
Cocine de 1 a 2 minutos. Abra la parrilla y coloque la salsa para pizza,
el queso mozzarella y los ingredientes opcionales sobre la masa. Baje
la parte superior de la parrilla para panini y trabe la bisagra para que
quede por encima de la pizza. Cocine de 2 a 3 minutos o hasta que
el queso se derrita. Repita la acción con los ingredientes restantes.
Alcanza para 4 porciones.
28
24 rebanadas de pepperoni
(opcional)
8 aros de pimientos verdes
(opcional)
4 champiñones frescos, rebanados
(opcional)
Empanadillas de Fruta Sencillas
1 lata (8 oz/227 g) de medialunas
refrigeradas
1 lata (21 oz/595 g) de relleno
para pastel de frutas
Instrucciones:
Precaliente la parrilla para panini. Abra la lata de medialunas
refrigeradas y corte en 4 piezas alargadas. Coloque 1 pieza de masa
en la parrilla para panini. Cierre la parrilla para panini. Cocine de 1 a
2 minutos. Abra la parrilla y cubra con el relleno de pastel de frutas.
Baje la parte superior de la parrilla para panini y trabe la tapa para
que queda por encima de la empanadilla. Cocine de 2 a 3 minutos
para calentar la fruta. Repita la acción con la masa y el relleno para
pastel restantes. Mezcle el azúcar y la canela y espolvoree sobre
las empanadillas. Corte las empanadillas a la mitad.
8 porciones.
1/2 taza (118 ml) de azúcar
1 cucharadita (5 ml) de canela
Alcanza para
Reuben
8 rebanadas de pan de masa
fermentada de 1/2 pulg. (1.3 cm)
de grosor
1/2 lb. (227 g) de carne envasada
en rebanadas
Instrucciones:
Precaliente la parrilla para panini. Unte aceite de oliva en un lado
de todas las rebanadas de pan. Coloque 4 rebanadas de pan, con
el lado del aceite hacia abajo, en la parrilla de panini. Coloque
1/8 lb. (57 g) carne envasada, 2 cucharadas
1 rebanada de queso suizo en cada rebanada de pan. Cubra con las
4 rebanadas de pan restantes, con el lado del aceite de oliva hacia
arriba. Cierre la parrilla para panini. Cocine de 3 a 5 minutos o hasta
alcanzar el dorado deseado.
1/2 taza (118 ml) de chucrut
4 rebanadas de queso suizo
Aceite de oliva
(30 ml)
de chucrut, y
Alcanza para 4 sándwiches.
840199004 SPv02.indd 28840199004 SPv02.indd 28 8/19/14 10:59 AM8/19/14 10:59 AM
Page 29

Notas
29
840199004 SPv02.indd 29840199004 SPv02.indd 29 8/19/14 10:59 AM8/19/14 10:59 AM
Page 30

Grupo HB PS, S.A. de C.V.
Monte Elbruz 124-301
Colonia Palmitas, Delegación Miguel Hidalgo
C.P. 11560, México, Distrito Federal
01 800 71 16 100
PÓLIZA DE GARANTÍA
PRODUCTO: MARCA: MODELO:
Grupo HB PS, S.A. de C.V. cuenta con una Red de Centros de Servicio Autorizada, por favor consulte en la lista anexa el nombre y dirección de los establecimientos en la
República Mexicana en donde usted podrá hacer efectiva la garantía, obtener partes, componentes, consumibles y accesorios; así como también obtener servicio para
productos fuera de garantía. Para mayor información llame sin costo: Centro de Atención al consumidor: 01 800 71 16 100
Grupo HB PS, S.A. de C.V. le otorga a partir de la fecha de compra:
• Esta garantía ampara, todas las piezas y componentes del producto que resulten con defecto de fabricación incluyendo la mano de obra.
• Grupo HB PS, S.A. de C.V. se obliga a reemplazar, reparar o reponer, cualquier pieza o componente defectuoso; proporcionar la mano de obra necesaria para su diagnóstico y reparación,
todo lo anterior sin costo adicional para el consumidor.
• Esta garantía incluye los gastos de transportación del producto que deriven de su cumplimiento dentro de su red de servicio.
• Esta garantía no ampara el reemplazo de piezas deterioradas por uso o por desgaste normal, como son: cuchillas, vasos, jarras, filtros, etc.
• Grupo HB PS, S.A. de C.V. no se hace responsable por los accidentes producidos a consecuencia de una instalación eléctrica defectuosa, ausencia de toma de tierra, clavija de enchufe
en mal estado, etc.
Esta garantía no será efectiva en los siguientes casos:
a) Cuando el producto se hubiese utlizado en condiciones distintas a las normales. (Uso industrial, semi-industrial o comercial.)
b) Cuando el producto no hubiese sido operado de acuerdo con el instructivo de uso.
c) Cuando el producto hubiese sido alterado o reparado por personas no autorizadas por Grupo HB PS, S.A. de C.V. el fabricante nacional, importador o comercializador responsable
respectivo.
El consumidor puede solicitar que se haga efectiva la garantía ante la propia casa comercial donde adquirió su producto, siempre y cuando Grupo HB PS, S.A. de C.V. no cuente con talleres de
servicio.
GARANTÍA DE 1 AÑO.
COBERTURA
LIMITACIONES
EXCEPCIONES
30
840199004 SPv02.indd 30840199004 SPv02.indd 30 8/19/14 10:59 AM8/19/14 10:59 AM
Page 31

PROCEDIMIENTO PARA HACER EFECTIVA LA GARANTÍA
• Para hacer efectiva la garantía no deben exigirse mayores requisitos que la presentación del producto y la póliza correspondiente, debidamente sellada por el establecimiento que lo vendió.
• Para hacer efectiva la garantía, lleve su aparato al Centro de Servicio Autorizado más cercano a su domicilio (consulte la lista anexa).
• Si no existe Centro de Servicio Autorizado en su localidad llame a nuestro Centro de Atención al Consumidor para recibir instrucciones de como hacer efectiva su garantía.
• El tiempo de reparación, en ningún caso será mayor de 30 días naturales contados a partir de la fecha de recepción del producto en nuestros Centros de Servicio Autorizados.
• En caso de que el producto haya sido reparado o sometido a mantenimiento y el mismo presente deficiencias imputables al autor de la reparación o del mantenimiento dentro de los treinta
días naturales posteriores a la entrega del producto al consumidor, éste tendrá derecho a que sea reparado o mantenido de nuevo sin costo alguno. Si el plazo de la garantía es superior a
los treinta días naturales, se estará a dicho plazo.
• El tiempo que duren las reparaciones efectuadas al amparo de la garantía no es computable dentro del plazo de la misma. Cuando el bien haya sido reparado se iniciará la garantía respecto
de las piezas repuestas y continuará con relación al resto. En el caso de reposición del bien deberá renovarse el plazo de la garantía.
SELLO DEL VENDEDOR QUEJAS Y SUGERENCIASFECHA DE ENTREGA
DÍA___ MES___ AÑO___
Si desea hacer comentarios o sugerencias con respecto a nuestro servicio o tiene alguna queja derivada de la atención recibida en
alguno de nuestros Centros de Servicio Autorizados, por favor dirigirse a:
GERENCIA INTERNACIONAL DE SERVICIO
Email: mexico.service@hamiltonbeach.com.mx
01 800 71 16 100
RED DE CENTROS DE SERVICIO AUTORIZADA GRUPO HB PS, S.A. DE C.V.
Distrito Federal
ELECTRODOMÉSTICOS
Av. Plutarco Elias Cailes No. 1499
Zacahuitzco MEXICO 09490 D.F.
Tel: 01 55 5235 2323 • Fax: 01 55 5243 1397
CASA GARCIA
Av. Patriotismo No. 875-B
Mixcoac MEXICO 03910 D.F.
Tel: 01 55 5563 8723 • Fax: 01 55 5615 1856
Nuevo Leon
FERNANDO SEPULVEDA REFACCIONES
Ruperto Martínez No. 238 Ote.
Centro MONTERREY, 64000 N.L.
Tel: 01 81 8343 6700 • Fax: 01 81 8344 0486
Jalisco
SERVICIOS DE MANTENIMIENTO CASTILLO
Garibaldi No. 1450
Ladrón de Guevara
GUADALAJARA 44660 Jal.
Tel: 01 33 3825 3480 • Fax: 01 33 3826 1914
Chihuahua
DISTRIBUIDORA TURMIX
Av. Paseo Triunfo de la Rep. No. 5289 Local 2 A.
Int. Hipermart
Alamos de San Lorenzo
CD. JUAREZ 32340 Chih.
Tel: 01 656 617 8030 • Fax: 01 656 617 8030
31
840199004 SPv02.indd 31840199004 SPv02.indd 31 8/19/14 10:59 AM8/19/14 10:59 AM
Page 32

Modelos:
25460, 25462
Tipo:
ST26
Características Eléctricas:
120 V~ 60 Hz 1400 W
Los modelos incluídos en el instructivo de Uso y Cuidado pueden ir seguidos o no por un sufijo correspondiente a una
o varias letras del alfabeto y sus combinaciones, separadas o no por un espacio, coma, diagonal, o guión. Como ejemplos
los sufijos pueden ser: “Y” y/o “MX” y/o “MXY” y/o “Z”.
840199004
840199004 SPv02.indd 32840199004 SPv02.indd 32 8/19/14 10:59 AM8/19/14 10:59 AM
8/14
 Loading...