

Page 1
Fer à repasser Steam Storm
™
840105500
Steam Storm™Iron
English .............................. 2
USA: 1-800-851-8900
Français .......................... 11
Canada : 1-800-267-2826
Digitally signed by Elizabeth DeMerchant
cn=Elizabeth DeMerchant, o=Hamilton Beach / Proctor-Silex, c=US
Date: 2002.11.10 11:02:31 -05'00'
Reason: I am approving this document
4.25 X 5", 20 pages, English/French, Black Ink, No Bleeds, Map
840105500 Ev04.qxd 11/2/02 10:47 AM Page 1
Page 2

3
SAVE THESE INSTRUCTIONS
2
When using your flat iron, basic safety precautions should always be
followed, including the following:
READ ALL INSTRUCTIONS BEFORE USING
1. Use iron only for its intended use.
2. To protect against risk of electric shock, do not immerse the iron
in water or other liquids.
3. The iron should always be turned to OFF before plugging or
unplugging from outlet. Never yank cord to disconnect from
outlet; instead, grasp plug and pull to disconnect.
4. Do not allow cord to touch hot surfaces. Let iron cool completely
before putting away. Loop cord loosely around iron when storing.
5. Always disconnect iron from electrical outlet when filling with
water or emptying and when not in use.
6. Do not operate iron with a damaged cord or if the iron has been
dropped or damaged. To avoid the risk of electric shock, do not
disassemble the iron. Call our toll-free customer service number
for information on examination, repair or electrical or mechanical
adjustment. Incorrect reassembly can cause a risk of electric
shock when the iron is used.
7. Close supervision is necessary for any appliance being used by
or near children. Do not leave iron unattended while connected
or on an ironing board.
8. Burns can occur from touching hot metal parts, hot water, or
steam. Use caution when you turn a steam iron upside down –
there may be hot water in the reservoir.
SPECIAL INSTRUCTIONS
1. To avoid a circuit overload, do not operate another high wattage
appliance on the same circuit.
2. If an extension cord is absolutely necessary, a 10-ampere cord
should be used. Cords rated for less amperage may overheat.
Care should be taken to arrange the cord so that it cannot be
pulled or tripped over.
IMPORTANT SAFEGUARDS
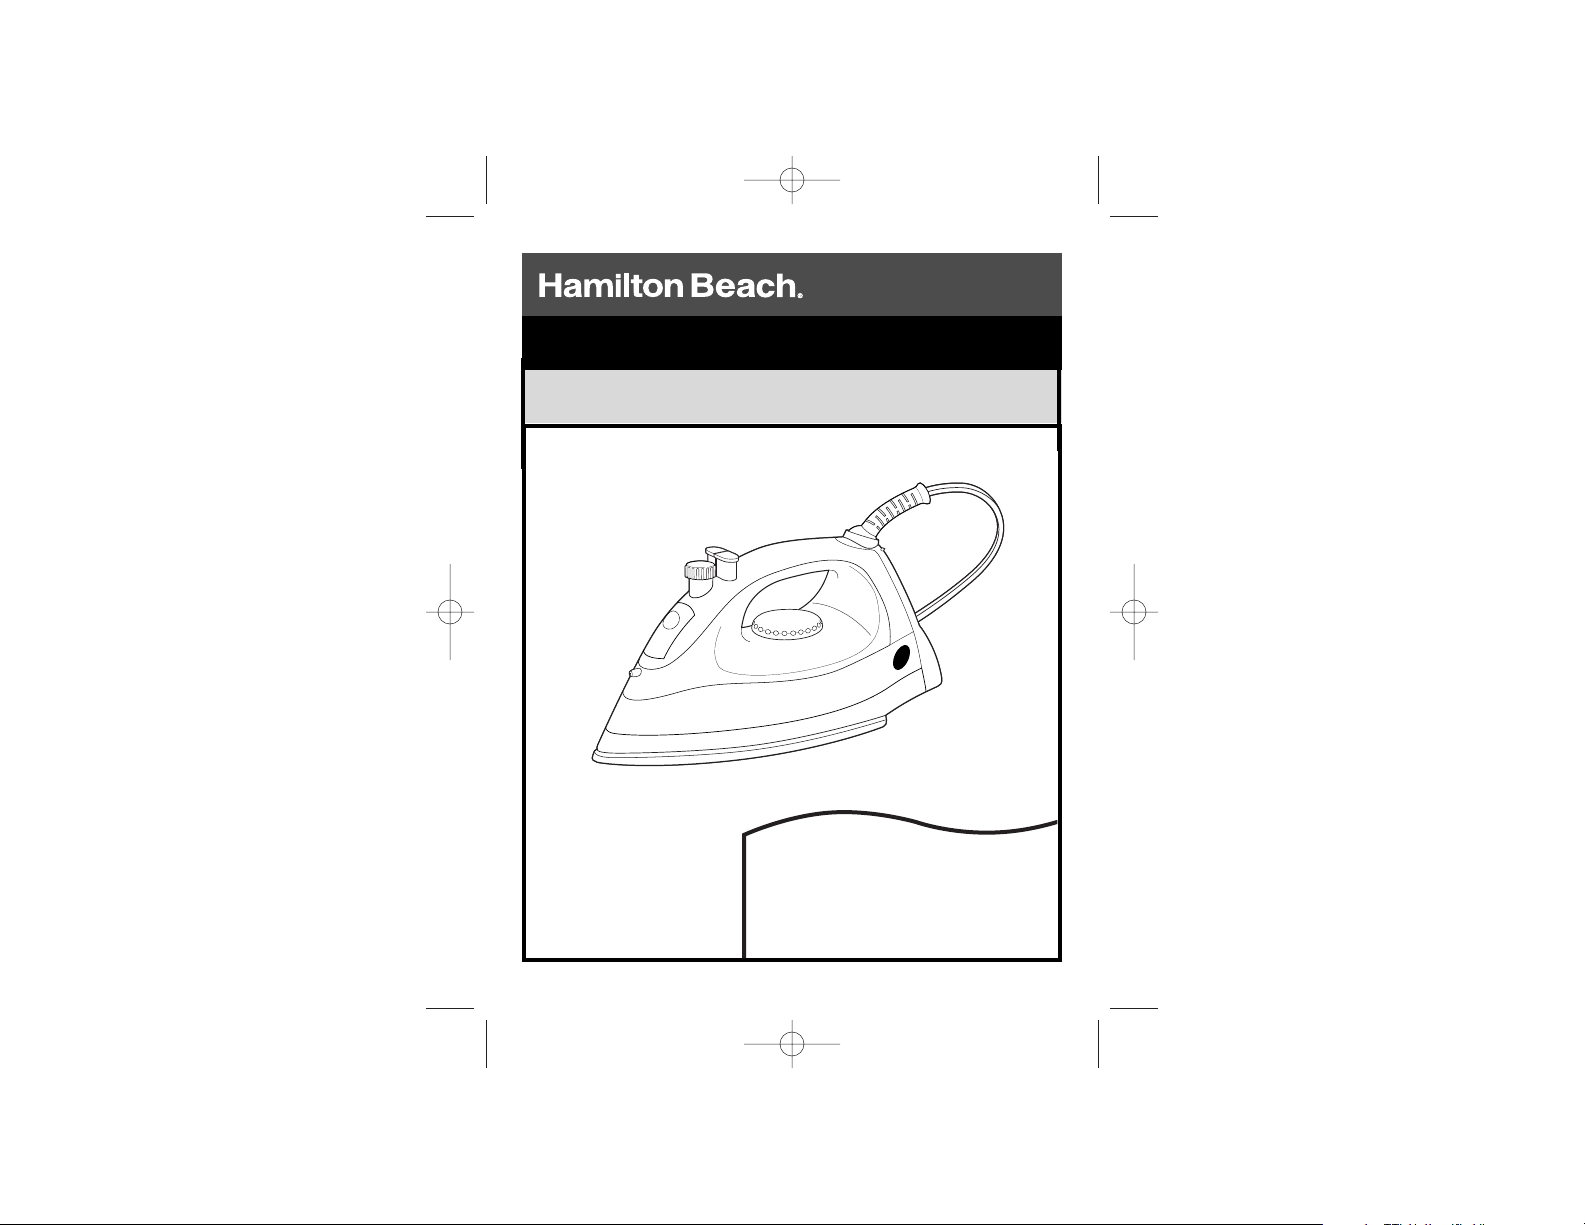
Parts and Features
1. Water Fill Cover
2. Adjustable Steam Knob
3. Spray and Blast Buttons
4. Heel Rest
5. Temperature
Control Dial
6. Power On Light or
Auto Shutoff Reset
Button/Light*
7. Soleplate
8. Water Window
* feature on selected models
CONSUMER SAFETY INFORMATION
This appliance is intended for household use only.
This appliance is equipped with a polarized plug. This type of plug has
one blade wider than the other. The plug will fit into an electrical outlet
only one way. This is a safety feature intended to help reduce the risk of
electrical shock. If you are unable to insert the plug into the outlet, try
reversing the plug. If the plug should still fail to fit, contact a qualified
electrician to replace the obsolete outlet. Do not attempt to defeat the
safety purpose of the polarized plug by modifying the plug in any way.
Use the iron on an ironing board. Ironing on any other surface
may damage that surface.
Do not iron or vertical steam clothes that are being worn.
Do not use vertical steam in the direction of people or pets.
840105500 Ev04.qxd 11/2/02 10:47 AM Page 2
Page 3
5
1. Plug the iron into outlet.
2. Turn Adjustable Steam Knob to
Dry Iron ( 0 ).
3. Turn Temperature Control Dial to
desired temperature. Allow 2 minutes
for iron to reach desired temperature.
4. To turn iron Off, turn Temperature
Control Dial to Off and unplug iron.
To Dry Iron
To Steam Iron
5. Allow 2 minutes for the iron to reach desired temperature.
6. Set Adjustable Steam Knob to the recommended steam
level. See the “Fabric Setting Chart.”
7. To turn iron off, set Adjustable Steam Knob to Dry Iron (0).
Turn the Temperature Control Dial to Off. Unplug iron.
8. Empty water from the iron following directions in
“Caring for Your Iron.”
Water: Please use ordinary tap water. If you have extremely
hard water, alternate between tap water and distilled water
for use in the iron.
4
Before First Use
• To clean steam vents before first use, prepare iron for steam ironing, then iron over an old cloth for a few minutes while letting the
iron steam. Press the Blast button several times to clean the vents.
Then follow the Self-Cleaning instructions (see page 7) beginning
with Step 3.
• Many irons spit or sputter during the first few uses with tap water.
This happens as the steam chamber becomes conditioned and
will stop after a few uses.
1. Unplug iron. Turn Adjustable Steam Knob to Dry Iron (0).
Set iron upright on heel rest. Open water fill cover.
2. Using a cup, slowly pour 6 ounces of
tap water into water tank opening.
Do not fill iron directly from the faucet.
3. Plug iron into outlet.
4. Turn Temperature Control Dial to
desired fabric setting in the steam
range.
To Vertical Steam
1. Follow Steps 1 through 6 in
“To Steam Iron.”
2. Hang garment in a location that is
not susceptible to damage from heat
or moisture. Do not hang in front of
wallpaper, window, or mirror.
3. Hold iron about 6 inches away from
garment and press and release the
Blast Button to steam out wrinkles. Do not press Blast
Button more than once every 2 seconds.
4. To turn iron off, turn Temperature Control Dial to Off.
Unplug iron.
5. Empty water from the iron following directions in “Caring
for Your Iron.”
NOTE: Do not allow hot soleplate to touch delicate garments.
840105500 Ev04.qxd 11/2/02 10:47 AM Page 4
Page 4
76
Optional Features (on select models)
Auto Shutoff Reset Button/Light
This light comes on when the iron is
first plugged in. After one hour, the
iron will shut off and the light will go out.
Push the Reset Button/Light to turn the
iron back on.
Power On Light
On units not provided with Auto Shutoff, this light comes on
when the iron is plugged in and remains on until the iron is
unplugged. The light stays on even if Temperature Control
Dial is turned to Off.
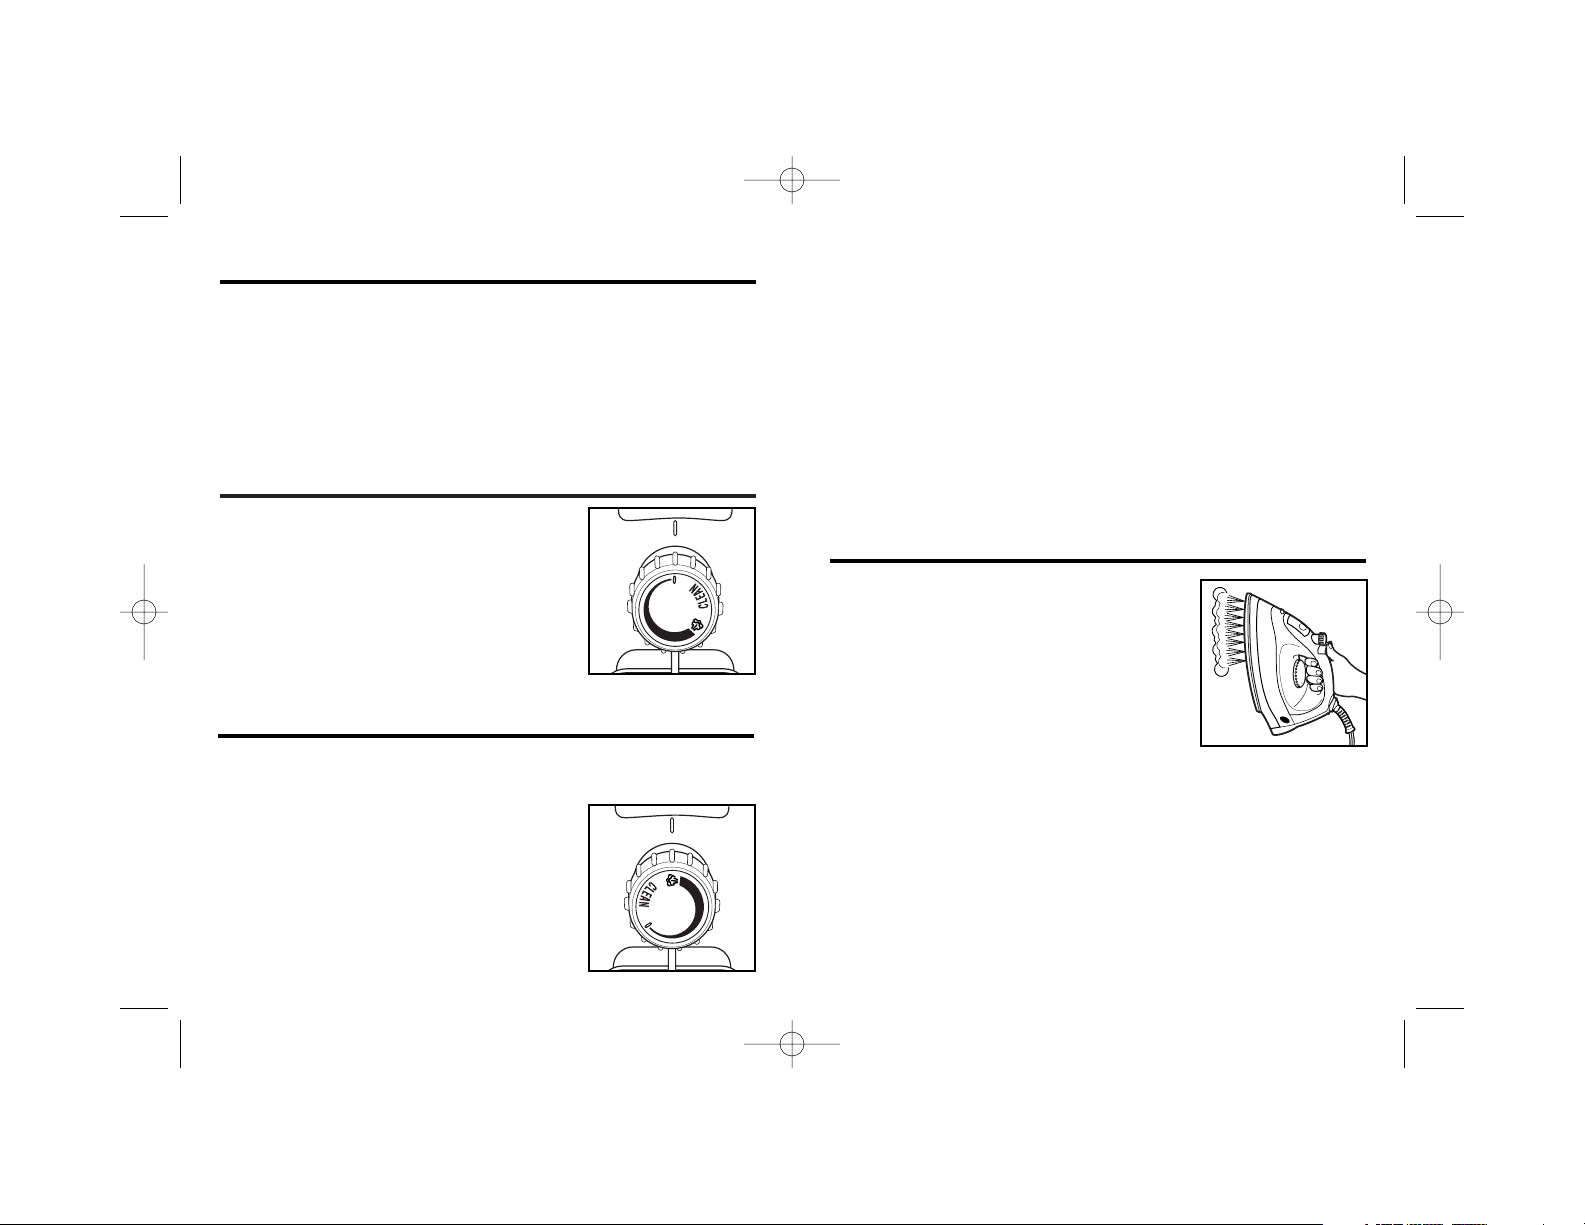
Adjustable Steam Knob
This knob provides minimum steam
for wool or maximum steam for linen.
Set the knob to the Dry Iron ( 0 ) setting
to iron without steam.
Caring and Cleaning
Iron Storage
1. The water tank of your iron should be emptied after each
use. Turn Temperature Control Dial to Off. Unplug the iron
and hold over a sink. Slowly tilt pointed end of iron down
over sink. Water will run out of water tank opening.
2. After iron has completely cooled, wrap cord loosely around
iron and store in an upright position. Do not store iron laying
flat on soleplate.
Soleplate
1. Never iron over zippers, pins, metal rivets, or snaps, as
these may scratch the soleplate.
2. To clean occasional build-up on the soleplate, wipe with
a sudsy cloth. Do not use abrasive cleansers or metal
scouring pads.
3. Always store iron upright in the heel rest position.
Self-Clean
To keep the steam vents clear of any build-up, follow these
instructions each time you iron using steam.
1. Fill iron with water then plug in iron.
2. Turn Temperature Control Dial to Linen setting and let iron
heat for 2 minutes.
3. Turn Temperature Control Dial to Off. Unplug iron and hold
over a sink with the soleplate facing down.
4. Turn Adjustable Steam Knob to CLEAN and gently pull the
Knob up. Hot water and steam will flow out of steam vents.
Allow all water to drain from iron.
5. Press and turn Adjustable Steam Knob counterclockwise
to reset then let cool and store.
Blast of Steam and Spray Buttons
Push Blast Button for an extra blast of
steam. Push Spray Button to release a
fine spray of water for difficult wrinkles in
cotton or linen.
Steam
Spray
840105500 Ev04.qxd 11/2/02 10:47 AM Page 6
Page 5

98
Iron won’t
heat
PROBLEM
THINGS TO CHECK
Water is
leaking
Iron
won’t
steam
Leaves
spots
• Is the iron plugged in and the outlet working?
Check the outlet by plugging in a lamp.
• Is the Temperature Control Dial turned to a
fabric setting?
• If automatic shutoff model, is the Reset Button
Light illuminated? If not, press to reset.
• Do not overfill the water tank.
• If steam ironing, is Adjustable Steam Knob in a
steam position, the Temperature Control Dial in
the steam range, and did the iron have enough
time to preheat?
• If dry ironing, make sure the Adjustable Steam
Knob is in the DRY IRON position.
• Check the water level.
• Is the Adjustable Steam Knob in a Steam
position?
• Has the iron had enough time to preheat?
• ALWAYS empty the water tank of the iron
after using. Water left in the tank may discolor
clothing and soleplate.
• If the iron cord should become twisted, unplug
iron and let cool. Hold iron cord in the middle
of entire length. Let plug and iron dangle freely
until cord uncoils. This will extend the life of
your iron cord.
Twisted
cord
Troubleshooting Troubleshooting (cont.)
Wrinkles
are not
removed
PROBLEM
THINGS TO CHECK
Iron is too
hot/not hot
enough
• Check Temperature Control Dial is set to
correct fabric.
• Check Temperature Control Dial and adjust
to desired setting level. Let iron cool down
5 minutes before continuing.
To Ir o n
Off
Nylon
Acrylic
Silk
Polyester
Wool
Rayon
Cotton
Linen
Ironing Instructions
Steam
Setting
Dry iron on the wrong side of the fabric.
Dry iron on the wrong side of the fabric.
Dry iron on the wrong side of the fabric.
Iron with fabric still damp.
Steam iron on the wrong side of fabric.
Iron on the wrong side of fabric.
Iron while still damp using steam
and/or spray.
Iron on wrong side of fabric while still
damp.
0
Fabric Setting Chart
840105500 Ev04.qxd 11/2/02 10:47 AM Page 8
Page 6

10
LIMITED WARRANTY
This product is warranted to be free from defects in material and workmanship for a
period of two (2) years for Hamilton Beach Portfolio products or one (1) year for
Hamilton Beach products from the date of original purchase, except as noted below.
During this period, we will repair or replace this product, at our option, at no cost. THE
FOREGOING WARRANTY IS IN LIEU OF ANY OTHER WARRANTY, WHETHER
EXPRESS OR IMPLIED, WRITTEN OR ORAL INCLUDING ANY WARRANTY OF
MERCHANTABILITY OR FITNESS FOR A PARTICULAR PURPOSE. ANY LIABILITY IS
EXPRESSLY LIMITED TO AN AMOUNT EQUAL TO THE PURCHASE PRICE PAID, AND
ALL CLAIMS FOR SPECIAL, INCIDENTAL AND CONSEQUENTIAL DAMAGES ARE
HEREBY EXCLUDED. There is no warranty with respect to the following, which may be
supplied with this product: glass parts, glass containers, cutter/strainer, blades, and/or
agitators. This warranty extends only to the original consumer purchaser and does not
cover a defect resulting from abuse, misuse, neglect, use for commercial purposes, or
any use not in conformity with the printed directions. This warranty gives you specific
legal rights, and you may also have other legal rights which vary from state to state, or
province to province. Some states or provinces do not allow limitations on implied
warranties or special, incidental or consequential damages, so the foregoing limitations
may not apply to you.
If you have a claim under this warranty, DO NOT RETURN THE APPLIANCE TO THE
STORE! Please call our CUSTOMER SERVICE NUMBER. (For faster service please
have model, series, and type numbers ready for operator to assist you.)
CUSTOMER SERVICE NUMBERS
In the U.S. 1-800-851-8900
In Canada 1-800-267-2826
Web site address: www.hamiltonbeach.com
KEEP THESE NUMBERS FOR FUTURE REFERENCE!
If you have a question, call our toll-free customer service
number. Before calling, please note the model, type, and series
numbers and fill in that information below. These numbers can
be found on the bottom of your appliance. This information will
help us answer your question much more quickly.
MODEL:_____________ TYPE:_____________ SERIES: _____________
Customer Service
840105500 Ev04.qxd 11/2/02 10:47 AM Page 10
Page 7

11
PRÉCAUTIONS IMPORTANTES
Lors de l’utilisation de votre fer à repasser, des précautions préliminaires
de sécurité doivent toujours être observées, y compris ce qui suit :
LIRE TOUTES LES INSTRUCTIONS AVANT L’UTILISATION
1. Utiliser le fer seulement pour sa fonction déterminée.
2. Pour protéger contre le risque de choc électrique, ne pas immerger
le fer dans l’eau ou autres liquides.
3. Le fer doit toujours être éteint (réglé à ARRÊT) avant d’être branché
sur une prise de courant ou débranché. Ne jamais tirer le cordon
pour le débrancher de la prise de courant; saisir plutôt la fiche et la
tirer pour la débrancher.
4. Ne pas laisser le cordon toucher les surfaces chaudes. Laisser le
fer se refroidir complètement avant de le remiser, et enrouler sans
le serrer le cordon autour du fer.
5. Toujours débrancher le fer d’une prise de courant électrique
lorsqu’on le remplit d’eau ou lorsqu’on le vide, ou s’il n’est pas utilisé.
6. Ne pas faire fonctionner le fer avec un cordon endommagé ou si
le fer a été échappé ou endommagé. Pour éviter le risque de
choc électrique, ne pas démonter le fer. Téléphoner au numéro
du service à la clientèle sans frais d’interurbain pour des
renseignements concernant l’examen, la réparation ou l’ajustement électrique ou mécanique. Un réassemblage incorrect peut
causer un risque de choc électrique lorsque le fer est utilisé.
7. Une bonne surveillance est nécessaire pour tout appareil utilisé
par des enfants ou près d’eux. Ne pas laisser le fer sans surveillance pendant qu’il est branché ou pendant qu’il est sur une
planche à repasser.
8. Des brûlures peuvent survenir lorsqu’on touche des pièces
chaudes en métal, de l’eau chaude ou de la vapeur. Adopter des
précautions lorsqu’on tourne un fer à vapeur à l’envers, car il peut
rester de l’eau dans le réservoir.
CONSERVEZ CES INSTRUCTIONS
840105500 Fv04.qxd 11/2/02 11:04 AM Page 11
Page 8

1. Brancher le fer à repasser.
2. Régler le commutateur de vapeur
réglable à repassage à sec
(0).
3. Tourner le cadran de réglage de la
température à la position désirée.
Attendre pendant deux minutes que le
fer atteigne la température désirée.
4. Pour arrêter le fer à repasser, ramener le
cadran de réglage de la température à la
position arrêt et débrancher le fer.
Repassage à sec
13
Avant la première utilisation
• Nettoyer les orifices de sortie de vapeur avant la première utilisation.
Préparer le fer pour le repassage à la vapeur, ensuite repasser sur un
vieux linge pendant quelques minutes. Appuyer plusieurs fois sur le
bouton d’aspersion. Cette action nettoiera les orifices. Ensuite suivre les
instructions d’autonettoyage (page 16) en commençant par l’étape 3.
• Lors des premières utilisations avec de l’eau du robinet, un fer à
repasser projette fréquemment de l’eau. Ceci se produit alors que la
chambre de vapeur n’est pas encore parfaitement conditionnée. Ce
phénomène cesse après quelques utilisations.
12
Pièces et caractéristiques
1. Couvercle de l’orifice de remplissage d’eau
2. Commutateur de réglage de la vapeur
3. Boutons de vaporisation et aspersion
4. Talon d’appui
5. Cadran de réglage
de la température
6. Voyant lumineux de
marche ou bouton/voyant
lumineux de remise en
marche et d’arrêt
automatique*
7. Semelle
8. Repère de
niveau d’eau
* caractéristique sur les modèles sélectionnés
Ce produit est conçu uniquement pour l’usage domestique.
Cet appareil est muni d’une fiche polarisée. Ce type de fiche présente
une broche plus large que l’autre. La fiche ne peut être introduite dans
une prise que dans un sens. Il s’agit d’une caractéristique de sécurité
visant à réduire le risque de choc électrique. Si la fiche ne peut pas
être insérée dans la prise, la tourner dans l’autre sens. Si elle ne peut
toujours pas être insérée dans la prise, contacter un électricien qualifié
pour qu’il remplace la prise désuète. Ne pas essayer de contourner
l’objectif de sécurité de la fiche polarisée en la modifiant de quelque
manière que ce soit.
Utiliser le fer sur une planche à repasser. Le repassage sur toute autre
surface peut endommager cette surface.
Ne pas repasser ni tenter une vaporisation verticale sur les vêtements
sur une personne.
Ne pas utiliser la vaporisation verticale en direction de gens ou
d'animaux de compagnie.
Repassage à la vapeur
1. D
ébrancher le fer à repasser.
Tourner le
commutateur de réglage de la vapeur à
repassage à sec
(0).
Mettre le fer vertical
sur le talon d’appui.
Ouvrir le couvercle de
l’orifice de remplissage d’eau.
2. Avec une tasse, verser lentement 6 oz
d’eau du robinet dans l’ouverture du
réservoir d’eau. Ne pas remplir le fer
directement sous le robinet.
RENSEIGNEMENTS POUR LA SÉCURITÉ DU CONSOMMATEUR
840105500 Fv04.qxd 11/2/02 11:04 AM Page 12
Page 9

15
Caractéristiques facultatives
(sur les modèles sélectionnés)
Commutateur de réglage
de la vapeur
Ce commutateur fournit le minimum de
vapeur pour la laine ou le maximum de
vapeur pour le lin. Régler le commutateur
à ( 0 ) pour passer au repassage à sec.
Boutons de vaporisation
et aspersion
Appuyer sur le bouton d’aspersion pour
une aspersion de vapeur supplémentaire.
Appuyer sur le bouton de vaporisation
pour projeter un fin brouillard d’eau pour
les faux plis difficiles sur le coton ou le lin.
14
Vaporisation verticale
1. Suivre les étapes 1 à 6 de la section
« Repassage à la vapeur ».
2. Suspendre le vêtement à un endroit
non susceptible d’être endommagé
par la chaleur ou l’humidité. Ne pas le
suspendre devant du papier peint, une
fenêtre ou un miroir.
3. Tenir le fer à environ 6 pouces du
vêtement et appuyer momentanément
sur le bouton d’aspersion pour défroisser les faux plis. Ne pas
appuyer sur le bouton plus qu’une fois à toutes les 2 secondes.
4. Pour arrêter le fer à repasser, tourner le cadran de réglage de
la température à Off. Débrancher le fer.
5. Vider toute l’eau qui reste dans le fer à repasser – voir « Entretien ».
REMARQUE : Veiller à ce que la semelle chaude ne touche pas
les vêtements délicats.
3. Brancher le fer sur une prise de courant.
4. Tourner le bouton de sélection au réglage de tissu désiré
dans la gamme de repassage à la vapeur.
5. Attendre pendant 2 minutes que le fer atteigne la tempéra-
ture désirée.
6. Régler le commutateur de réglage de la vapeur au niveau de
vapeur recommandé. Voir le « Tableau de tissus/ réglage. »
7. Pour arrêter le fer à repasser, placer le commutateur de
réglage de la vapeur à la position Repassage à sec ( 0 ).
Ramener le bouton de sélection de la température à la
position ARRÊT. Débrancher le fer à repasser.
8. Vider toute l’eau qui reste dans le fer à repasser – voir
« Entretien ».
Eau : Utiliser de l’eau ordinaire du robinet. S’il s’agit d’une
eau très dure, permuter entre eau distillée et eau du robinet
lors des utilisations successives du fer à repasser.
Bouton/voyant lumineux de remise
en marche et d’arrêt automatique
Le voyant s’allume dès que le fer est
branché. Au bout de 1 heure, le fer et le
voyant s’éteignent. Appuyer sur le bouton
de remise en marche pour rallumer le fer.
Voyant lumineux de marche
Sur les appareils sans arrêt automatique, ce voyant s’allume
lorsque le fer est branché et reste allumé jusqu’à ce qu’il soit
débranché. Le voyant reste allumé même si le cadran de
réglage de la température est réglé à Off (arrêt).
840105500 Fv04.qxd 11/2/02 11:04 AM Page 14
Page 10

17
Le fer à
repasser
ne chauffe
pas
PROBLÈME
CONTRÔLER CECI
Fuite d’eau
Pas
d’émission
de vapeur
Le fer à
repasser
laisse des
taches
• Fer à repasser branché? Prise de courant opérationnelle?
Brancher une lampe sur la prise de courant pour vérifier.
• Bouton de sélection de la température tourné à une
position correcte pour le repassage d’un tissu?
• Sur le modèle qui s’éteint automatiquement, le témoin
lumineux du bouton de remise en marche est-il
illuminé? Sinon, appuyer pour la remise en marche.
• Ne pas trop remplir le réservoir d’eau.
• Pour un repassage à la vapeur, le bouton de réglage
de l’émission de vapeur doit être à la position
« vapeur », le cadran de réglage de la température
doit être à une position dans la plage « vapeur »,
et on doit attendre que le fer à repasser se soit
suffisamment réchauffé.
• Pour le repassage à sec, vérifier que le commutateur de réglage de la vapeur est à la position de
repassage à sec DRY IRON.
• Contrôler le niveau d’eau.
• Commutateur de réglage de la vapeur à la position
VAPEUR?
• Fer à repasser suffisamment réchauffé?
• TOUJOURS vider le réservoir d’eau du fer après
l’utilisation. L’eau laissée dans le réservoir peut
décolorer le linge et la semelle du fer.
• Si le cordon du fer à repasser s’emmêle, débrancher
le fer et laisser refroidir. Tenir le cordon du fer par le
milieu et laisser le cordon se démêler tout seul.
Ceci prolongera la vie utile du cordon de votre fer
à repasser.
Cordon
emmêlé
Dépannage
16
Entretien et nettoyage
Rangement du fer à repasser
1. Vider le réservoir du fer à repasser après chaque utilisation.
Tourner le bouton de sélection de la température à la position
arrêt. Débrancher le fer à repasser et placer le fer au-dessus d’un
évier. Incliner lentement l’extrémité avant du fer à repasser pour
laisser l’eau s’écouler dans l’évier par l’ouverture du réservoir.
2. Lorsque le fer s’est complètement refroidi, enrouler le cordon
d’alimentation autour du fer; remiser le fer à repasser verticalement. Ne pas remiser le fer à repasser à plat sur la semelle.
Semelle
1. Ne jamais faire passer le fer à repasser sur fermetures à glissière,
épingles, rivets métalliques, boutons-pression, etc.; ces articles peuvent
provoquer des rayures sur la semelle.
2. Pour éliminer une accumulation occasionnelle de souillures sur la
semelle, essuyer avec un chiffon savonneux. Ne pas utiliser un
produit de nettoyage abrasif ou un tampon de récurage des métaux.
3. Remiser toujours le fer à repasser verticalement, en appui sur le talon.
Auto-nettoyage: Pour éviter que des résidus s’accumulent dans
les orifices de sortie de la vapeur, suivre ces instructions après
chaque repassage à la vapeur.
1. Remplir le fer à repasser avec de l’eau. Brancher le fer.
2. Tourner le cadran de réglage de la température au réglage pour Lin
et laisser le fer chauffer pendant 2 minutes.
3. Tourner le cadran de réglage de la température à Off (arrêt).
Débrancher le fer et le tenir au-dessus d’un évier avec la semelle
vers le bas.
4. Tourner le commutateur de vapeur réglable à CLEAN et tirer
doucement sur le commutateur. De l’eau chaude et de la vapeur
sortiront des orifices de sortie de la vapeur. Laisser toute l’eau
s’écouler du fer.
5. Appuyer et tourner le commutateur dans le sens antihoraire pour
le remettre en marche puis laisser le fer refroidir avant de le
remiser.
840105500 Fv04.qxd 11/2/02 11:04 AM Page 16
Page 11

19
GARANTIE LIMITÉE
Ce produit est garanti exempt de vices de matériau et de fabrication pendant une
période de deux (2) ans pour les produits Hamilton Beach Portfolio ou pendant un
(1) an pour les produits Hamilton Beach à partir de la date de l'achat original,
excepté ce qui est noté ci-dessous. Au cours de cette période, nous réparerons ou
remplacerons ce produit sans frais, à notre discrétion. LA GARANTIE CI-DESSUS
REMPLACE TOUTE AUTRE GARANTIE EXPRESSE OU IMPLICITE, ÉCRITE OU
ORALE, Y COMPRIS TOUTE GARANTIE DE QUALITÉ MARCHANDE OU DE
CONFORMITÉ À UNE FIN PARTICULIÈRE. TOUTE RESPONSABILITÉ EST
EXPRESSÉMENT LIMITÉE À UN MONTANT ÉGAL AU PRIX D’ACHAT PAYÉ ET
TOUTES LES RÉCLAMATIONS POUR DOMMAGES SPÉCIAUX ET INDIRECTS SONT
PAR LES PRÉSENTES EXCLUES. La garantie ne s’applique pas aux accessoires
suivants qui pourraient être vendus avec ce produit : pièces en verre, récipients en
verre, couteau/tamis, lames et/ou agitateurs. Cette garantie ne s’applique qu’à
l’acheteur d’origine et ne couvre pas un vice causé par l’abus, le mésusage, la
négligence, l’usage à des fins commerciales ou tout autre usage non prescrit dans le
mode d’emploi. Cette garantie vous confère des droits juridiques spécifiques et vous
pouvez aussi jouir d’autres droits juridiques qui peuvent varier d’un État à un autre
ou d’une province à une autre. Certains États ou provinces ne permettent pas les
limitations sur les garanties implicites ou les dommages spéciaux ou indirects de telle
sorte que les limitations ci-dessus ne s’appliquent peut-être pas dans votre cas.
Si vous désirez procéder à une réclamation en vertu de cette garantie, NE
RETOURNEZ PAS L’APPAREIL AU MAGASIN! Veuillez téléphoner au NUMÉRO DU
SERVICE À LA CLIENTÈLE. (Pour un service plus rapide, ayez à portée de la main
les numéros de série et de modèle et de type de votre appareil lorsque vous
communiquez avec un représentant.)
NUMÉROS DU SERVICE À LA CLIENTÈLE
Aux États-Unis 1-800-851-8900
Au Canada 1-800-267-2826
Adresse du site Web : www.hamiltonbeach.com
CONSERVEZ CES NUMÉROS POUR RÉFÉRENCE ULTÉRIEURE!
Service à la clientèle
Si vous avez une question, veuillez composer notre numéro sans
frais de service à la clientèle. Avant d’appeler, veuillez noter les
numéros de modèle, de type et de série ci-dessous. Ces numéros se
trouvent à la base de votre appareil. Ces informations nous aideront
à répondre beaucoup plus rapidement à votre question.
MODÈLE :____________ TYPE :____________ SÉRIE : _____________
18
Dépannage (suite)
Faux plis
non
éliminés
PROBLÈME
CONTRÔLER CECI
Fer trop
chaud/pas
assez
chaud
• Vérifier que le cadran de réglage de la
température est réglé pour la fibre appropriée.
• Vérifier le cadran de réglage de la température
et l’ajuster au réglage désiré. Laisser le fer
refroidir pendant 5 minutes avant de continuer
le repassage.
Repassage
Arrêt
Nylon
Acrylique
Soie
Polyester
Laine
Rayonne
Coton
Lin
Instructions de repassage
Réglage
de vapeur
Repasser à sec sur l’envers du vêtement.
Repasser à sec sur l’envers du vêtement.
Repasser à sec sur l’envers du vêtement.
Repasser le linge encore humide.
Repasser à la vapeur sur l’envers du
vêtement.
Repasser à sec sur l’envers du vêtement.
Repasser le linge encore humide en
utilisant la vapeur et/ou l’aspersion.
Repasser sur l’envers du vêtement
encore humide.
0
Tableau de tissus/réglage
840105500 Fv04.qxd 11/2/02 11:04 AM Page 18
Page 12

20
11/02
H
AMILTONBEACHPROCTOR-SILEX,INC
.P
ROCTOR-SILEXCANADA,INC
.
263 Yadkin Road
Southern Pines, NC 28387
Picton, Ontario K0K 2T0
840105500
Web site address: www.hamiltonbeach.com
840105500 Fv04.qxd 11/2/02 11:04 AM Page 20
 Loading...