


Hamilton Beach 5910, 05518C, 5520, 5519, 5920 User Manual
...
Humidifier
840115700
Humidifier Safety............................ 2
Know Your Humidifier.................... 4
How to Assemble and Use............ 5
How to Clean................................ 11
Troubleshooting Guide ................ 14
Customer Service.......................... 16
In USA: 1-800-851-8900
In Canada: 1-800-267-2826
840115700 Ev00.qxd 6/6/03 8:58 AM Page 1

2
IMPORTANT SAFEGUARDS
SAVE THESE INSTRUCTIONS!
Humidifier Safety
1. Read all instructions before using this
humidifier. Save these instructions
for reference.
2. Always place the humidifier on a firm,
flat, level, water-resistant surface.
3. To reduce the risk of electrical shock,
never plug humidifier into an outlet
while your hands are wet.
4. Never drop or insert any objects into
any openings.
5. Never place the humidifier in a location
where it is accessible to children.
6. Do not place the humidifier on or
near heat sources such as stoves,
radiators, heaters, or in direct sunlight.
7. Never connect the humidifier to any
power source other than 120 V AC.
8. Always unplug the humidifier before
refilling, cleaning, servicing, or moving.
9. Before each use, check the cord and
plug for damage. Do not operate any
appliance with a damaged cord or plug,
or after the appliance malfunctions or
is dropped or damaged in any manner.
Call our toll-free customer service number
for information on examination, repair or
electrical or mechanical adjustment.
10. Always unplug and empty humidifier
and tank when it is not in use.
11. Never tilt or attempt to move the
humidifier or supporting surface while
it is operating or full of water. Turn off
and unplug the humidifier before
removing the water tank and moving
the unit.
12. This humidifier requires regular
cleaning and maintenance. Refer
to the instructions in the “How to
Clean” section. Never clean the
humidifier in a manner other than
described in this manual.
13. Do not immerse fan enclosure in
water or other liquids, or allow it
to get wet.
14. Never use detergents, household
cleaners, or other solvents to clean the
humidifier, other than those specified
in the Cleaning Instructions provided
in this manual.
15. Do not direct output from unit at walls,
furniture, or the like.
16. Do not use filters or other replacement
parts not recommended or sold by
Hamilton Beach/Proctor-Silex, Inc.
17. To disconnect cord, turn the control
to OFF, then remove plug from
wall outlet.
18. Do not use appliance for other than
its intended purpose.
19. Never stand or sit on any part of the
humidifier, and never place objects
on the humidifier.
READ AND SAVE THESE INSTRUCTIONS.
When using electric appliances, basic safety precautions should always be followed,
including the following:
840115700 Ev00.qxd 6/6/03 8:58 AM Page 2

3
Consumer Safety Information
This appliance is intended for
household use only.
This appliance is equipped with a
polarized plug. This type of plug has
one blade wider than the other. The
plug will fit into an electrical outlet
only one way. This is a safety feature
intended to help reduce the risk of
electrical shock.
If you are unable to insert the plug into
the outlet, try reversing the plug. If the
plug should still fail to fit, contact a
qualified electrician to replace the
obsolete outlet. Do not attempt to
defeat the safety purpose of the
polarized plug by modifying the plug
in any way.
If a longer cord is necessary an
approved extension cord may be used.
The electrical rating of the extension
cord must be equal to or greater than
the rating of the humidifier. Care must
be taken to arrange the extension cord
so that it will not drape over the countertop or tabletop where it can be
pulled on by children or accidentally
tripped over.
Do Not Over-humidify
Do not over-humidify. The suggested
level for the best health benefit is 50%.
Some units can be set for desired
humidity ranges from 20 to 90%, but
care should be taken not to overhumidify, which will be dependent on
both the construction of your home
and the outside weather conditions.
Do not allow water to condense on
walls, floors, or windows as water
damage could result. If you see these
conditions occur, lower the desired
humidity level on the humidifier or turn
the unit off. Hamilton Beach/ProctorSilex, Inc. will not be responsible for
damage caused by water.
Before First Use
Be sure to remove all packing materials.
Choose a flat, level, water-resistant
location for the humidifier that will allow
for good air circulation and that is not
accessible to children.
Do not place the humidifier where it
or its cord presents a tripping or
stumbling hazard, or where the air
vents are blocked.
840115700 Ev00.qxd 6/6/03 8:58 AM Page 3
4
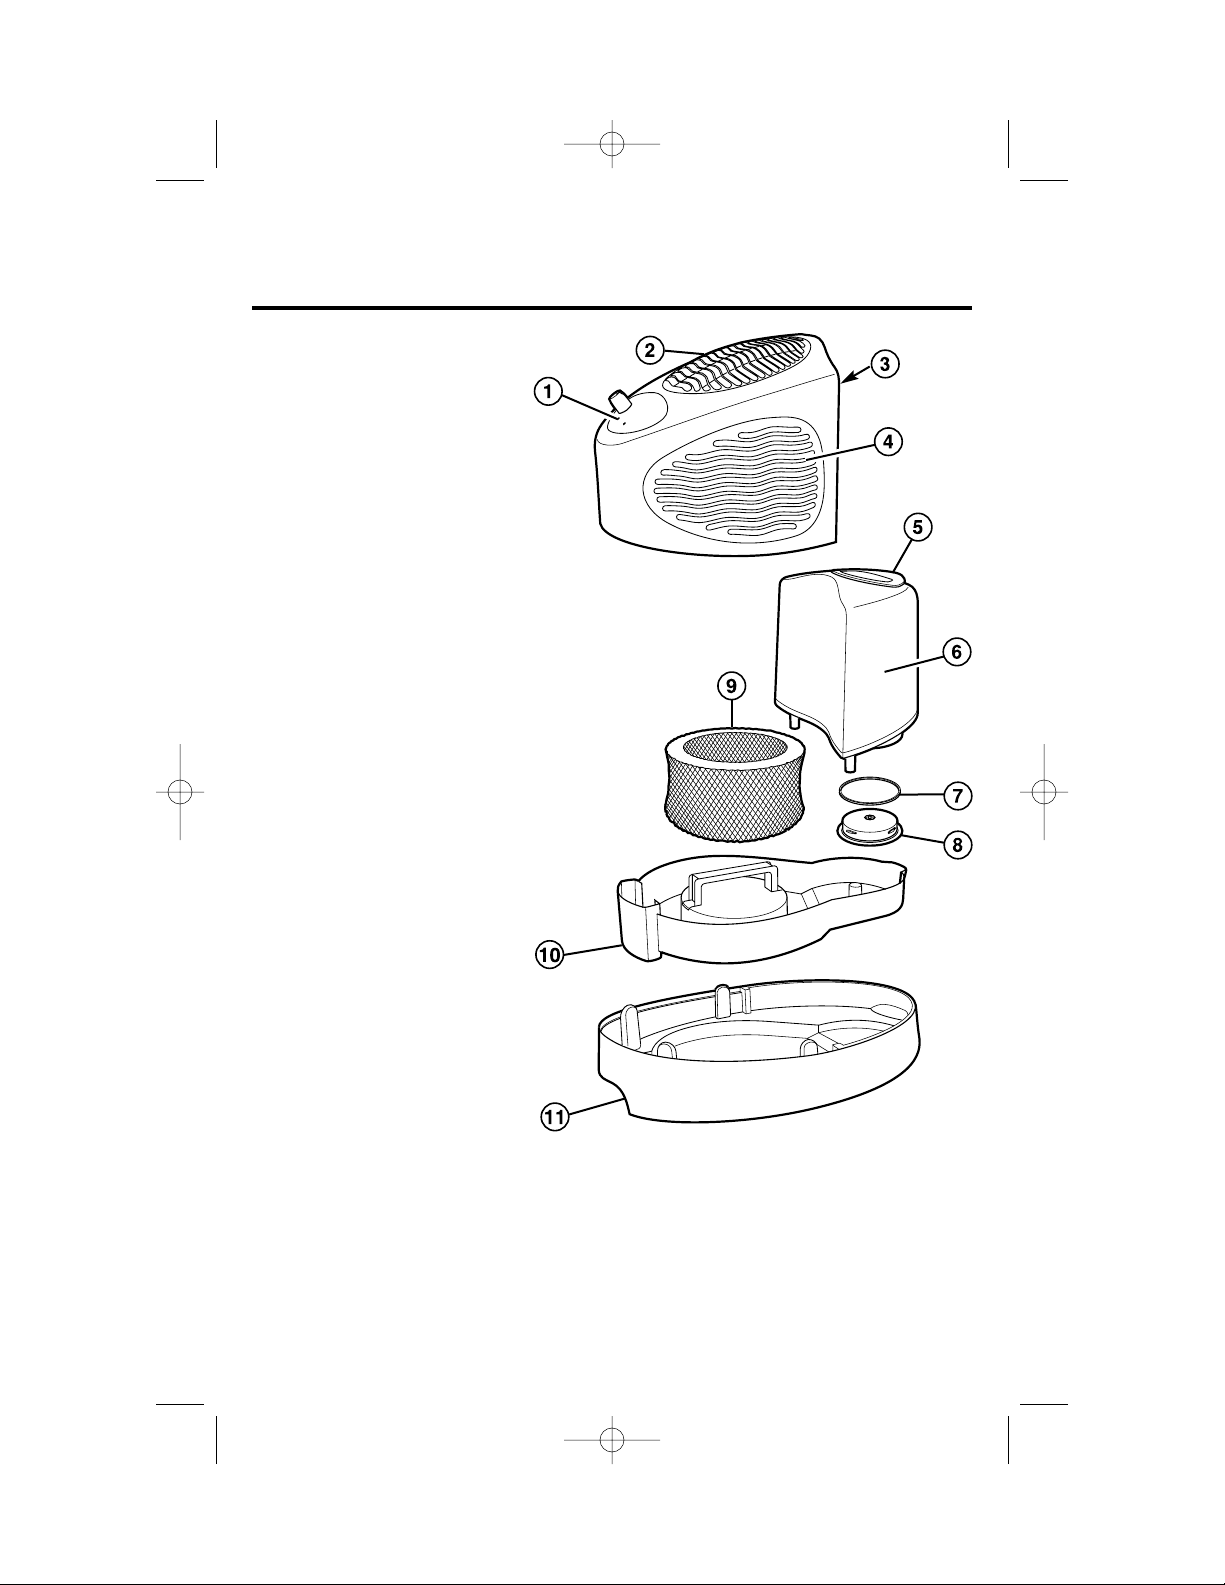
Know Your Humidifier
Parts and Features
Fan Enclosure
1. Control Panel
2. Exhaust Grille
3. Cord Wrap (see page 6)
4. Air Intake Grilles
Water Tank Assembly
5. Carrying Handle
6. Water Tank
7. Gasket
8. Filler Cap
Base Assembly
9. Filter
10. Water Tray
11. Humidifier Base
840115700 Ev00.qxd 6/6/03 8:58 AM Page 4
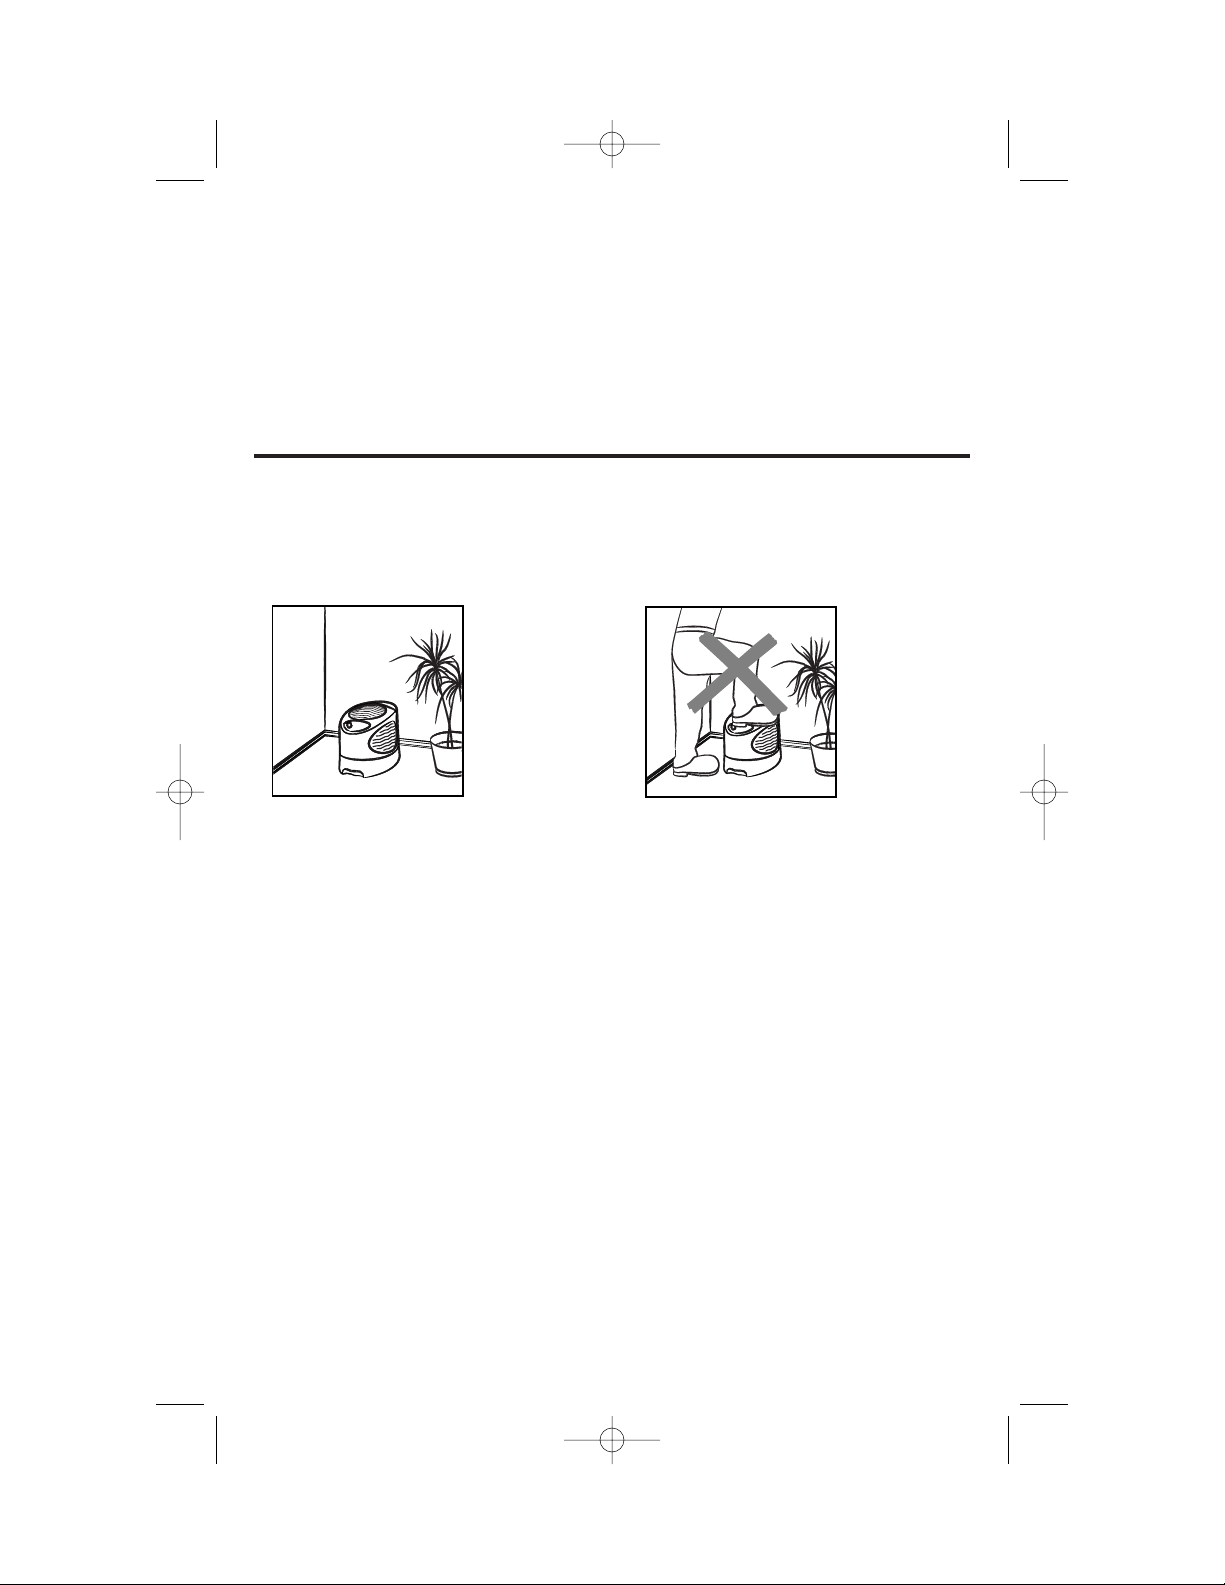
DO NOT:
• Do not stand, sit, or place any
objects on
the humidifier.
It is not
designed
to support
additional
weight.
• Do not block the air intake and
exhaust grilles. This will cause poor
performance and may cause moisture
damage and mildew build-up.
• Do not use in a small, enclosed
space or in an area with a humidity
level above 50%. Excessive humidity
could result.
• Do not place on or near heat sources
such as stoves, radiators, or heaters,
or in direct sunlight.
• Never place the humidifier in a
closed room. A closed room may
result in excessive humidity.
• To reduce electrical noise and
interference, do not place on or near,
or plug into the same outlet as, TVs,
baby monitors, or cordless phones.
5
How to Assemble and Use
IMPORTANT: Your Hamilton Beach humidifier is designed for easy use and
maintenance. Make sure that the water tray and filter are properly installed before
filling the tank and operating the humidifier.
DO NOT USE THE HUMIDIFIER WITHOUT THE FILTER IN PLACE!
Selecting the Proper Location
To prevent the risk of injury or damage to the humidifier and furnishings and
provide the best possible performance of your humidifier, follow the placement
guidelines below:
DO:
• Place the humidifier on a flat, stable,
waterproof
surface.
• Place the humidifier along an inside
wall near an electrical outlet where
it is out of the way and it and its cord
do not present
a tripping hazard.
• Select a location with adequate
air circulation.
• Leave at least six inches (15 cm)
between the humidifier and any walls
or furnishings. Failure to do so could
cause poor air circulation and
mildew or moisture damage to walls
or furniture.
• Unplug the humidifier and empty the
water tank and tray if the humidifier is
to be moved, or will not be used
for several days.
840115700 Ev00.qxd 6/6/03 8:58 AM Page 5
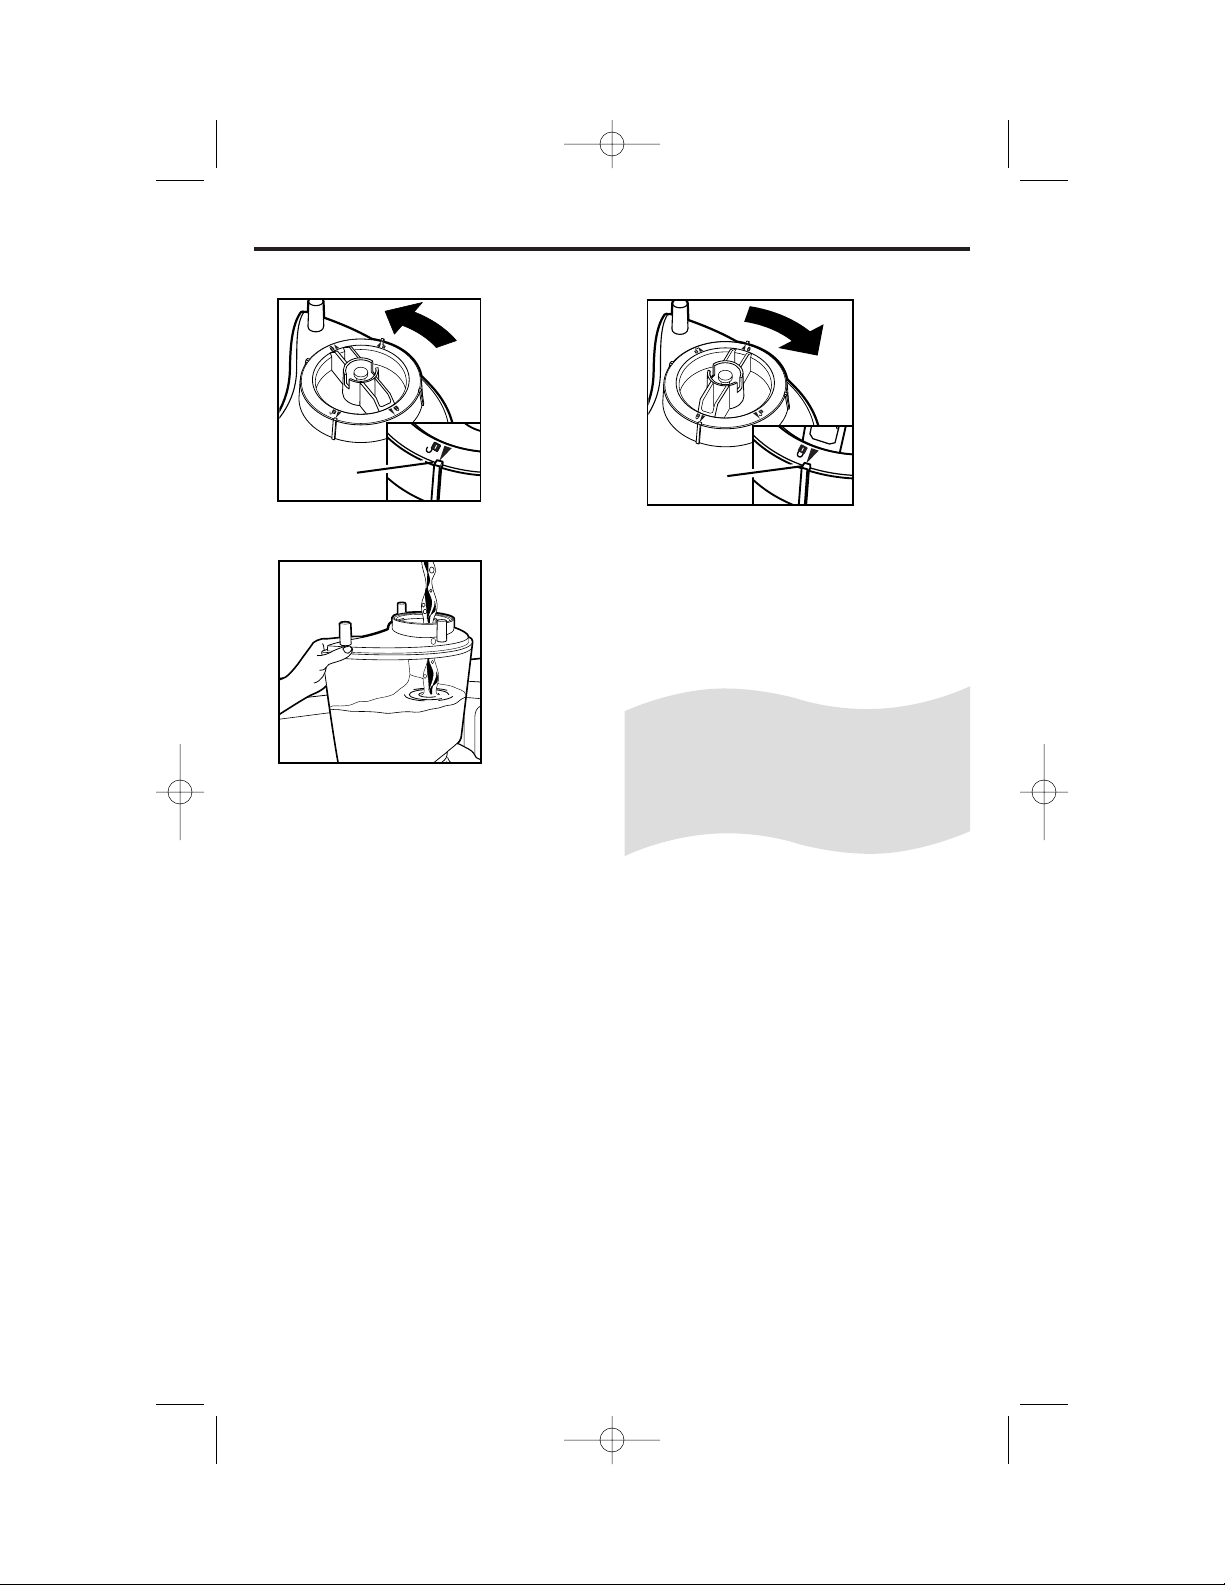
6
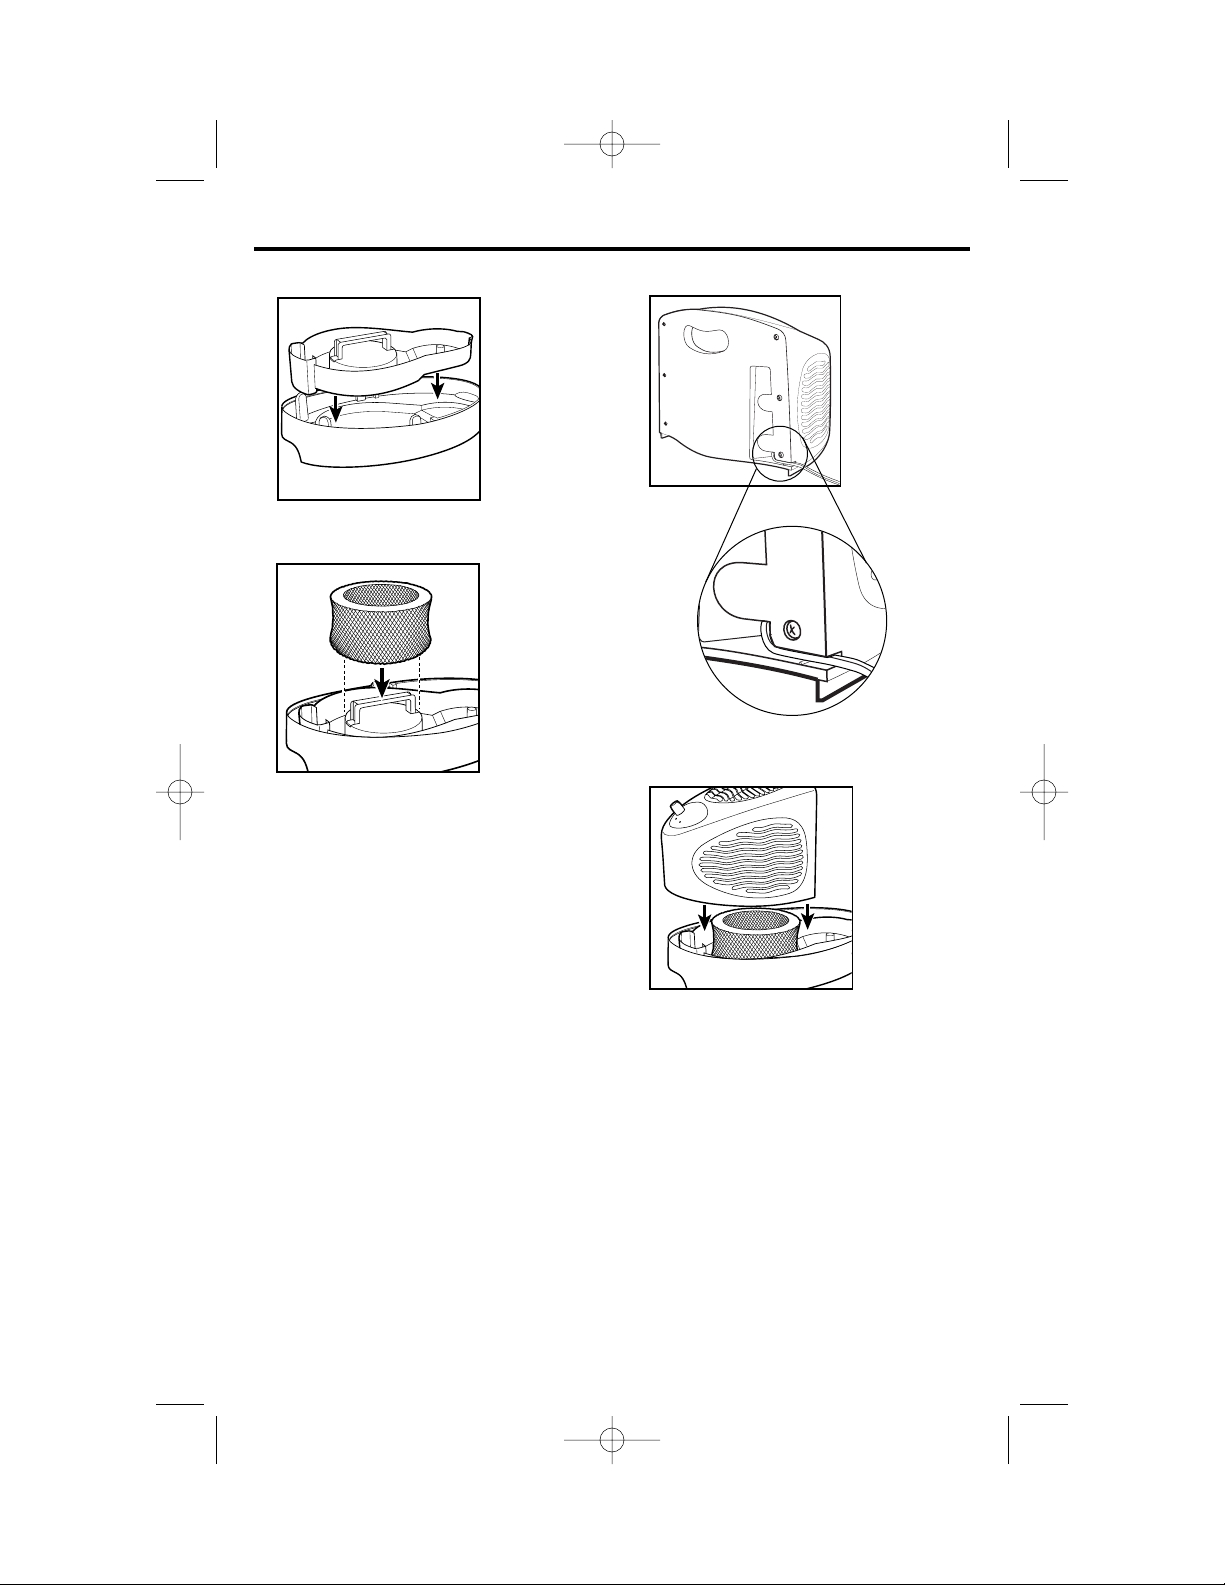
1. Insert the water tray into the humidifier
base. Be
sure that it
is securely
seated in
the indent
in the base.
4. Set the fan enclosure onto the
humidifier
base. Make
sure that
the filter
lines up
with the
fan cover.
2. Place the filter on the water tray
as shown.
3. Slide the cord through the notch at
the bottom
of the cord
wrap compartment.
Excess cord
can be
stored in
the cord wrap
compartment.
Humidifier Assembly
840115700 Ev00.qxd 6/6/03 8:58 AM Page 6
1. Remove the filler cap on the bottom
of the tank
by turning it
counterclockwise
until the
UNLOCK
arrows line
up with the
ridges on
the tank.
2. Fill the tank with COOL tap water.
DO NOT
USE HOT
WATER.
Be sure to
keep the
tank free of
debris.
NOTE: Using distilled or deionized
water will prolong the life of the filter.
3. Replace the filler cap and turn
clockwise
until the
LOCK
arrows line
up with the
ridges on
the tank
opening.
Return the
tank to
an upright
position. When carrying the tank, use
the carry handle and support the
tank from the other side.
NOTE: Always make sure the filler
cap is locked and the gasket is in
place before inverting water tank.
7
Filling the Water Tank
Unlocked
Position
Locked
Position
Filter Tip!
To prolong the life of the filter, it is
recommended that you turn over the
filter each time you fill the water tank.
840115700 Ev00.qxd 6/6/03 8:58 AM Page 7
8
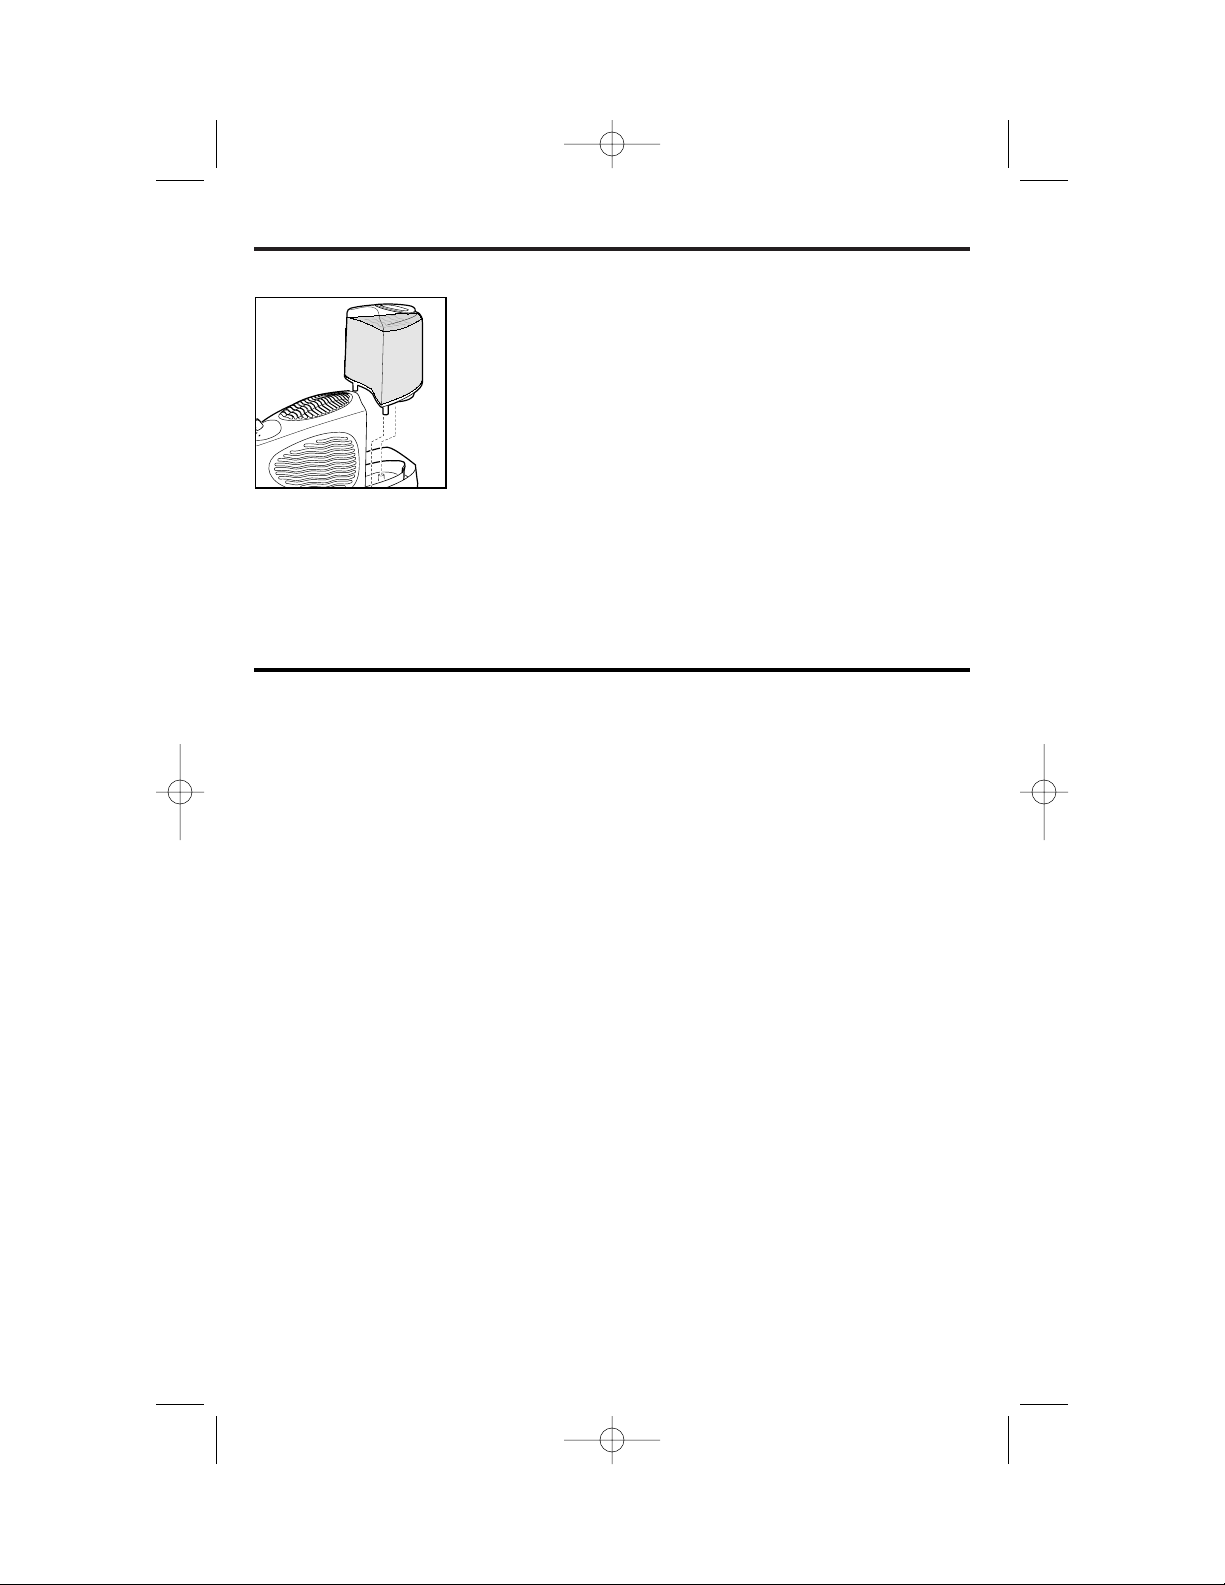
Placing the Water Tank on the Base
Lower the tank into place until it is
properly seated,
using the fan
enclosure and
the base to align
the tank.
IMPORTANT! Never pour water into
or allow water to splash into air intake
or exhaust grilles.
NOTE: Some water will flow out of
the tank and into the water tray when
the tank is in position.
CAUTION: Once the humidifier has
been filled, do not attempt to tilt or
move it. If it is necessary to move
the humidifier, make sure it is
unplugged and remove the water
tank first.
Plugging in the Humidifier
WARNING: To reduce the risk of
electrical shock, never plug in the
humidifier while your hands are wet!
Once the humidifier has been assembled
and placed in its final location, and the
tank has been filled, plug the humidifier
into a wall outlet.
NOTE: The polarized plug will only
fit in one direction—DO NOT try
to force the plug! If you are unable to
insert the plug into the outlet, try
reversing the plug. If the plug still does
not fit, contact a qualified electrician to
replace the obsolete outlet.
840115700 Ev00.qxd 6/6/03 8:58 AM Page 8
9
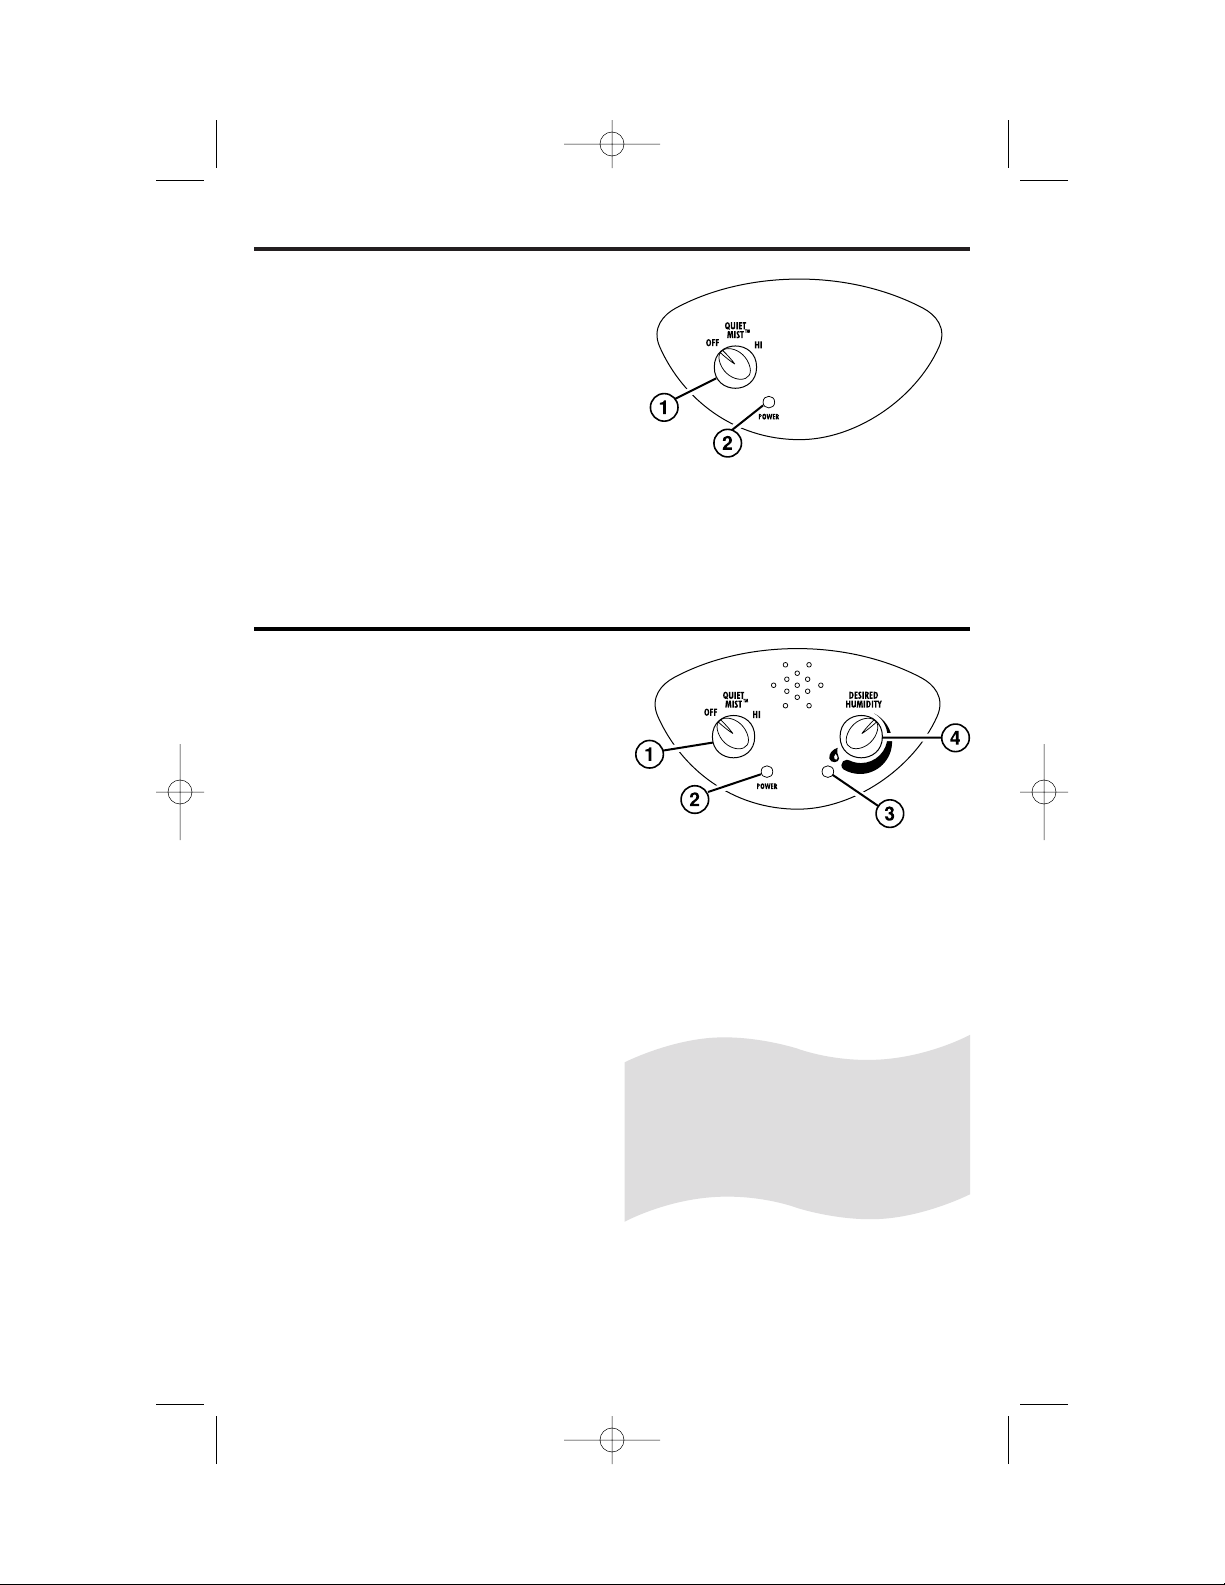
Setting the Controls –
2-Speed Humidifier
1. Fan Speed Knob
2. Power On Indicator – lights
when unit is on.
1. Fan Speed Knob
2. Power On Indicator – lights
when unit is on.
3. Desired Humidity Indicator –
lights when desired humidity is
reached.
4. Desired Humidity Setting Knob
Setting the Controls –
2-Speed Humidifier with Humidistat
Setting the fan speed
Turn the fan speed knob to the
desired setting. To increase the
humidity in a room more quickly, set
the knob to HI. For quiet, nighttime
operation or for a more gradual
increase, set the knob to Quietmist™.
Indicator lights
The power on indicator will light to
indicate that the humidifier is on.
Setting the fan speed
Turn the fan speed knob to the
desired setting. To increase the
humidity in a room more quickly, set
the knob to HI. For quiet, nighttime
operation or for a more gradual
increase, set the knob to Quietmist™.
Setting the humidistat
The desired humidity knob allows
you to set the humidifier to cycle on
and off to maintain a selected humidity
level. Turn the knob clockwise for
higher humidity, counterclockwise for
less. Once the desired humidity level is
reached, the desired humidity indicator
will light and the fan will turn off (unit
is in stand-by mode).
Indicator lights
The power on indicator will light
to indicate that the humidifier is on.
Quietmist
™
For quiet, nighttime operation or
for a more gradual increase in the
humidity level, set the knob to
Quietmist.™
840115700 Ev00.qxd 6/6/03 8:58 AM Page 9

10
Setting the fan speed
Turn the fan speed knob to the
desired setting. To increase the
humidity in a room more quickly, set
the knob to HI. For normal operation,
set the knob to MED. For quiet,
nighttime operation or for a more
gradual increase, set the knob to
Quietmist™.
Setting the electronic humidistat
The electronic humidistat allows you to
set the humidity within a range from
20% to 90%, in 5% increments. The
current room humidity level is displayed
in large numbers, while the desired
humidity level is displayed in smaller
numbers. If the current room humidity
level drops below 20%, the display will
show LO. If it is higher than 90%, HI
will be displayed. Press the ▲ and ▼
buttons to adjust the humidity level. The
humidifier will then turn on automatically
whenever the current room humidity
drops more than 2% below the desired
humidity. Once the desired humidity is
reached, the fan will turn off and the
unit will go into stand-by mode.
Indicator lights
The power on indicator will light to
indicate that the humidifier is on.
1. Fan Speed Knob
2. Humidity Setting Buttons (▲/▼)
3. Power On Indicator – lights when
unit is on
Digital Display
4. Current Room Humidity Percentage
5. Desired Humidity Percentage
Setting the Controls –
3-Speed Humidifier with
Electronic Humidistat
Quietmist
™
For quiet, nighttime operation or
for a more gradual increase in the
humidity level, set the knob to
Quietmist.™
840115700 Ev00.qxd 6/6/03 8:59 AM Page 10