

MC
MC MC
MC-
--
-3
33
3
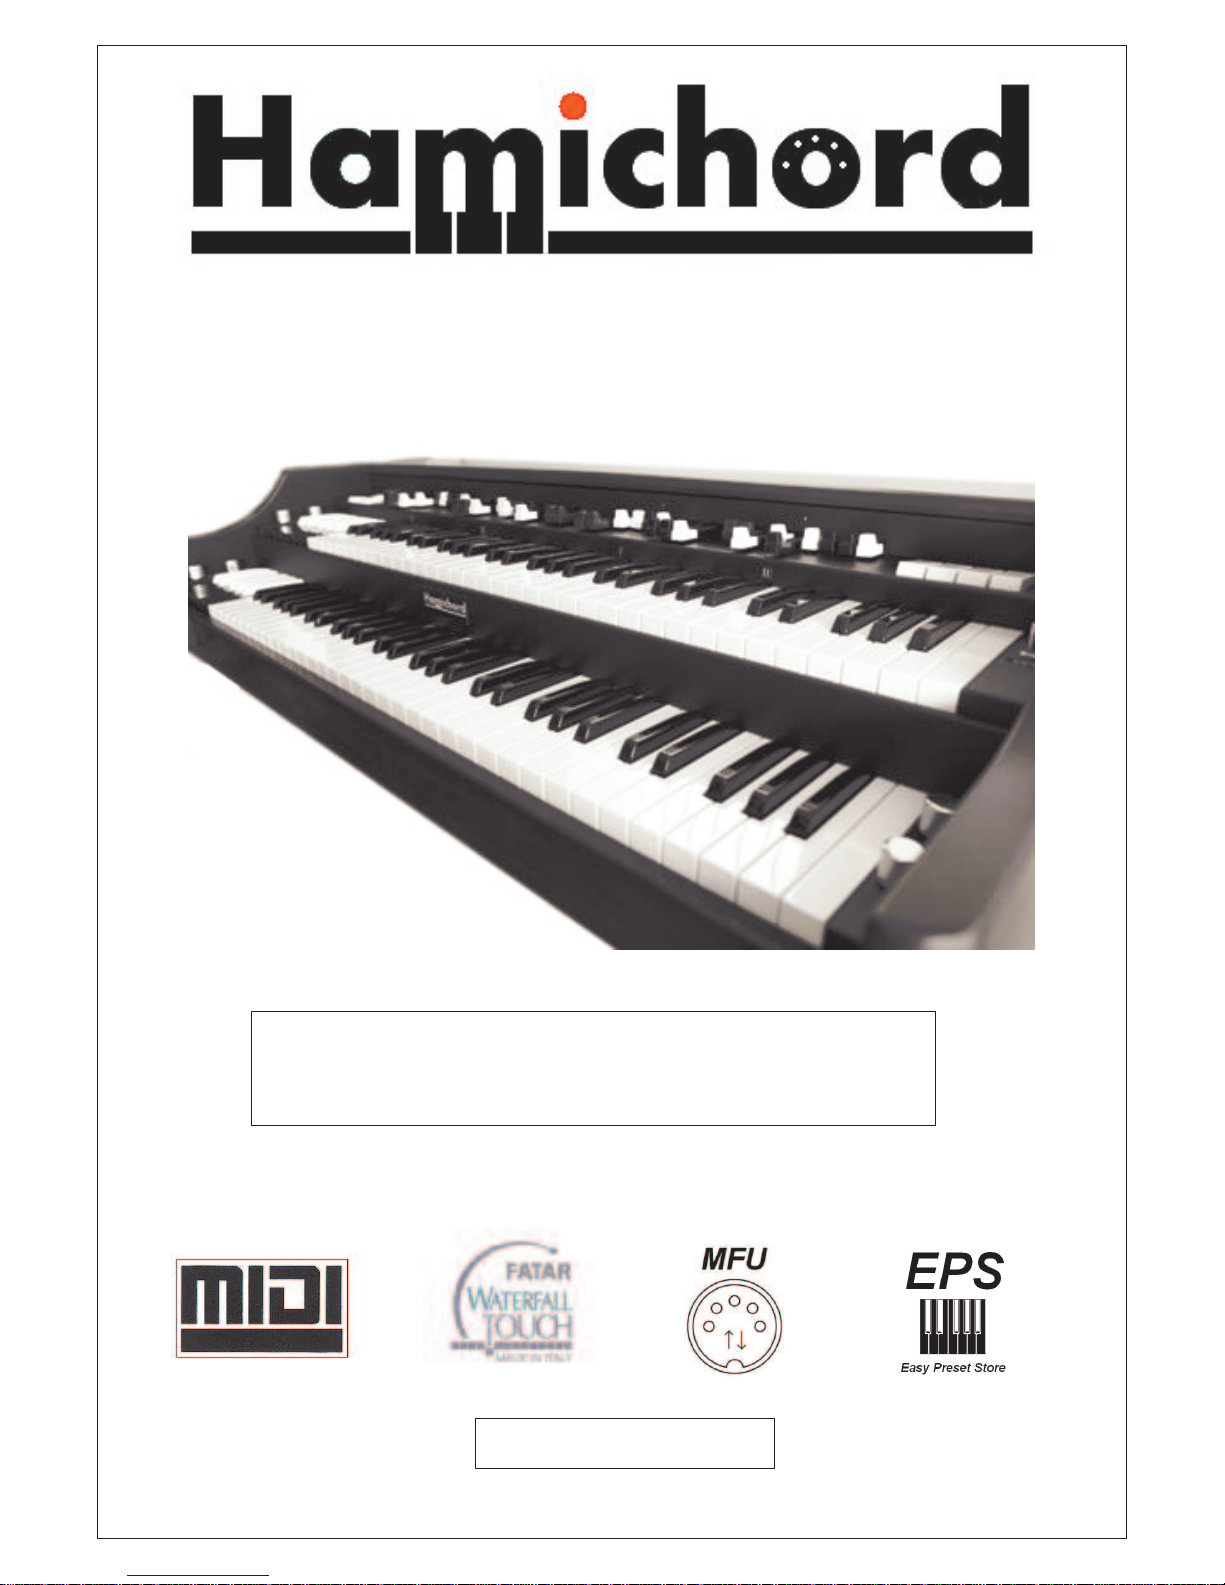
User Manual
MADE IN ITALY

1) GENERAL WARNINGS.
2) PACKAGE AND HANDLING.
3) ACCESSORIES IN THE PACKAGE.
4) CONNECTIONS, CONTROLS AND POSITIONING.
5) START-UP AND SHUT DOWN OF THE INSTRUMENT:
INSTRUCTIONS FOR USE.
TABLE OF CONTENTS
PLEASE READ CAREFULLY BEFORE CONNECTING ANY CABLES.
!!! WARNING !!!
• Do not place the instrument in wet or dirty environments
• Do not remove the protective coverings.
• Do not touch the AC plug with wet hands.
DEFAULT OF FACTORY
• Your instrument by default will work from 100V to 240V AC 50/60 Hz and it is a legal
requirement that you are advised of this.
• Be sure that local electrical standards are compliant with the instrument.
• Your serial number is written on the back panel of your instrument.
DO NOT REMOVE THE UPPER OR BACK COVERS FOR ANY REASON!
IN THE EVENT THAT YOU REQUIRE SUPPORT OR TECHNICAL ASSISTANCE ON
YOUR INSTRUMENT, PLEASE ASK YOUR DEALER OR AN AUTHORISED BG’S
TECHNICAL CENTER.
THE AC CONNECTION IS NEXT TO THE ON-OFF BUTTON AND IS SITUATED AT THE
BACK LEFT HAND SIDE OF THE INSTRUMENT.
BEFORE CONNECTING THE AC CABLE PLEASE MAKE ALL OTHER CONNECTIONS
FIRST.
!!!WARNING!!!
THIS IS A CLASS 1 PRODUCT AND SO REQUIRES A GOOD EARTH CONNECTION IN
ORDER TO WORK PROPERLY.
1)
GENERAL WARNINGS

When you are using the instrument, please be aware of the following:
• If present, ventilation holes must not be covered.
• Air must circulate freely around instrument
• The instrument must be installed in a place free of vibration.
• Do not expose it to electro-magnetic interference
• Do not expose it to heat, cold, wet and dust.
• Do not expose it to direct sunlight.
• Do not expose it to electrostatic forces.
• Do not place on it things with flames like candles etc…
• Do not place on it vessels containing fluids.
If anything enters the instrument, please contact your dealer or the official Bg’s
Musical instruments service support.
N.B.
1. Do not unplug the AC cord by forcing the cable.
2. When not in use please unplug the AC cable
3.
3.3.
3.
Please unplug the AC cable during thunderstorms.
!!!WARNING!!!
PLEASE BE AWARE THAT WHEN THE ‘ON-OFF’ BUTTON IS AT “0”, THE
INSTRUMENT IS STILL CONNECTED TO THE MAIN POWER.
WHEN THE INSTRUMENT IS CONNECTED TO THE AC LINE AND THE ON-OFF
BUTTON IS IN POSITION “1” (ON), THE MIDI INTERFACE AND THE CONTROLLER IS
ON. JUST REMEMBER THAT WHEN YOU TURN THE ON-OFF BUTTON TO “1” (ON),
THE 4 LEDS SHOULD LIGHT: THIS INDICATES THAT THE INSTRUMENT IS
OPERATING.
PRECAUTIONS
Please remove the organ from its packaging carefully. The organ midi controller weights
just over 25 KG!
If not placed in the original Hamichord stand, we recommend that the organ has to be
placed on a stand which is rated at least at 40 KG which will give a more than sufficient
safety margin.
!!!WARNING!!!
The packaging bag is not a toy! Keep it outside the reach of children!
BG’s Musical Instruments, is not responsible for any injuries incurred by incorrect use of
the organ or the packaging materials.
The Hamichord MC-3 pack contains:
• HAMICHORD MC-3 organ midi controller
• Owner Manual
• AC plug IEC and ROHS compliant
• Hamichord swell pedal
2) PACKAGE AND HANDLING
3) PACKAGING CONTENTS
The power lead supplied is a standard IEC connector terminated with a German ‘Schuko’
plug.
Be sure that the ‘on/off’ switch is in the ‘off’ position before connecting the power cable.
The instrument is suitable to be used in most countries of the world accepting voltages
between 100 to 240 AC. But please ask your dealer for using in your country, and please
be sure that your personal AC supply is suitable with the instrument requirements.
CONNECTION OF THE ORGAN
Please remember that we HIGHLY suggest the use of the Hamichord swell pedal. We
cannot guarantee that every pedal on the market is suitable for use with your organ:
Before connecting another kind of pedal, please be sure that it is electrically compliant.
BG’s srl is not responsible for any damage that may happen to the instrument due to the
use of an incompatible swell pedal or volume pedal!
POSITIONING
The optimal support for the instrument is the original Hamichord stand, however, you can
use alternative supports if they are suitable for the weight of the organ.
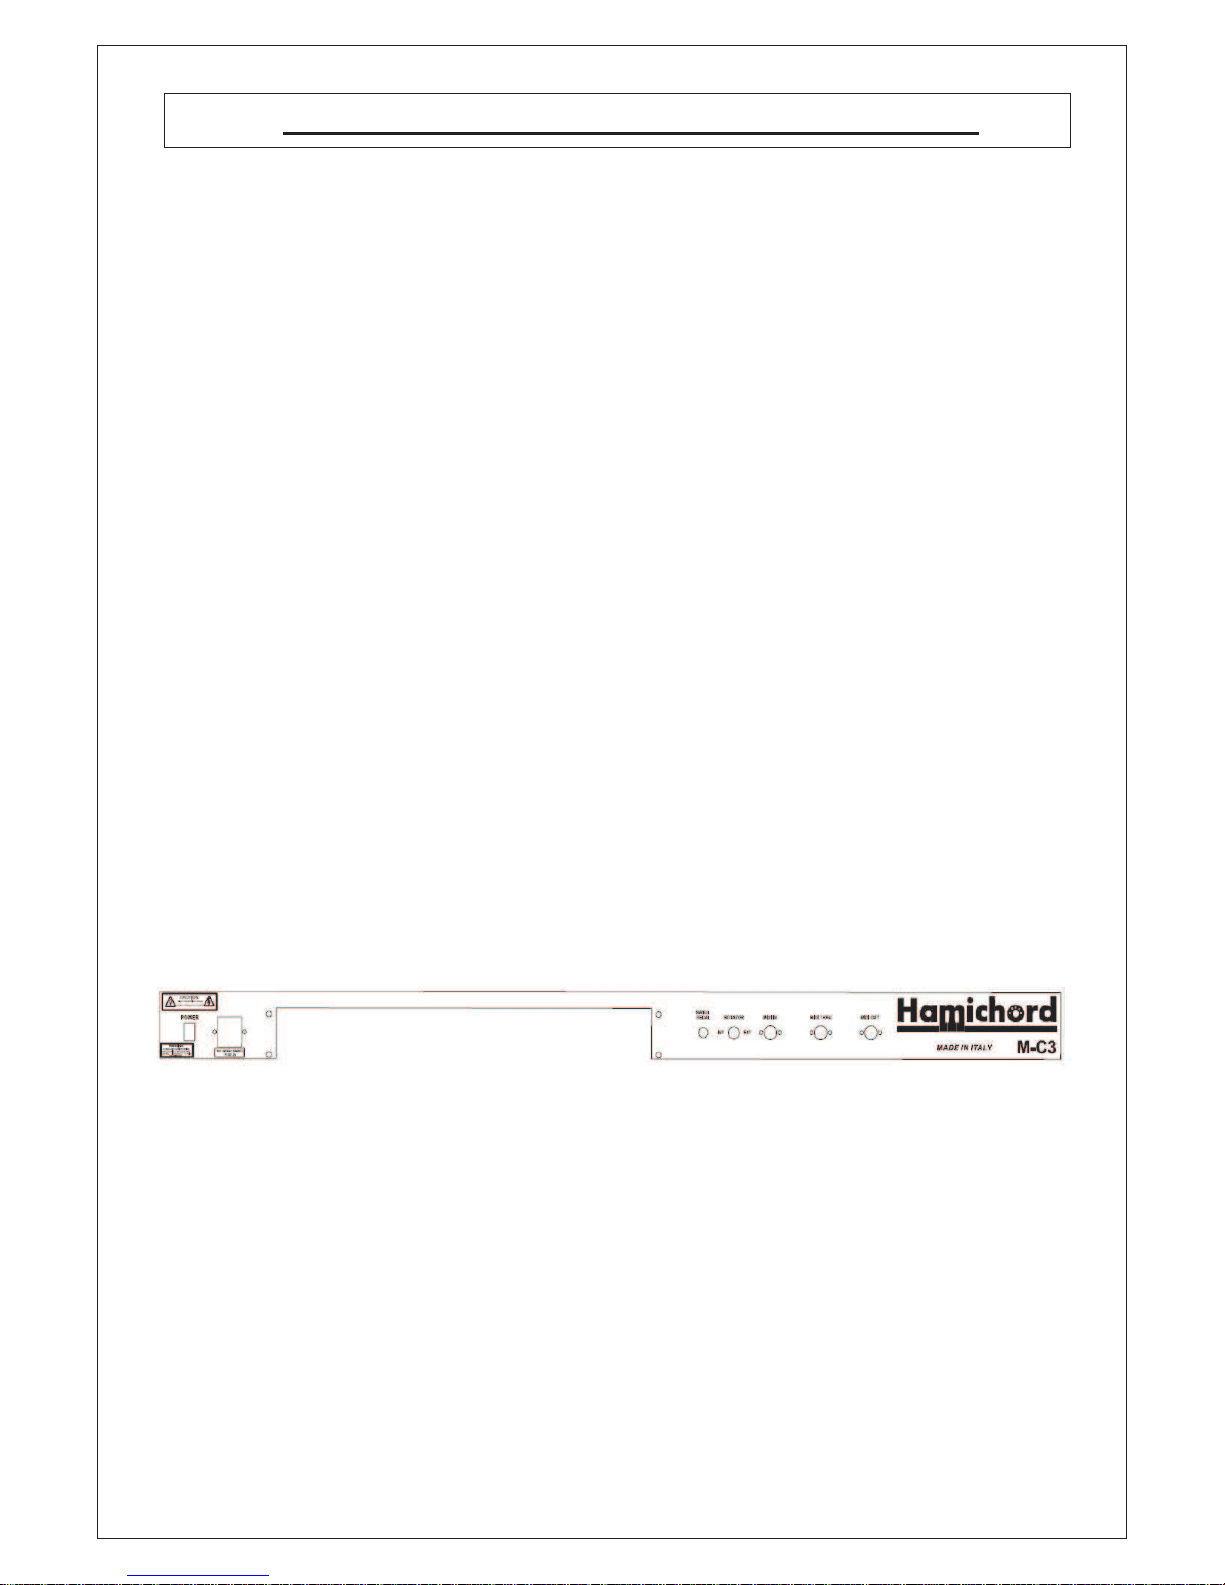
CONNECTIONS AND CONTROLS
Back panel connections:
• AC Plug in (from 100 to 240 V)
• Button On/I – Off/0
• Rotator EXT-INT: With this selector you can choose between the internal rotary
simulator and switching to an external rotary speaker. When the selector is in
“internal” position, the front switch will use the internal rotary simulator. When the
selector is in “external” position, the internal simulation is turned off and the front
switch will switch speeds on your external rotary speaker connected via the 11 pin
connector (if connected to exp-edition).
4)
CONNECTIONS, CONTROLS AND POSITIONING.

• Swell Pedal: jack stereo output ¼ Inch
Please use only the original HAMICHORD swell pedal, other pedals may damage
the instrument; if you would like to know if your own pedal is compatible with
Hamichord please contact us.
WARNING!: do not plug or unplug the swell pedal with the organ on! This may
damage the organ or cause it to work incorrectly.
• Midi Out: standard din 5 pin output.
With this socket you can connect various types of MIDI systems: default controller
configuration is:
Channel 1 : Drawbars, buttons, slides, swell pedal and other controllers. Upper
keyboard.
Channel 2 : Lower keyboard.
• Midi IN: input din 5 pin.
With this connector you can use an external system capable of sending midi
messages (such as a master-keyboard) and can also be used to upgrade the
firmware of the instrument with the MFU Technology.
• Midi THRU: output din 5 pin.
Unfiltered copy of Midi in.
WARNING: We strongly suggest you not to connect or disconnect midi cables
when the system is running!!! The instrument may not work properly and it
can result in damaging.
• Access to internal rack slot for connecting exp-edition. Near the on/off button,
you can see a metal panel that is easily removable with two screws.

HAMICHORD FUNCTIONS
START THE MIDI CONTROLLER
In this state Hamichord can only talk to an external MIDI devices (sequencer, computer,
etc ) using the “midi out” socket; also the other midi sockets work. Once you connect the
AC plug, turn the on/off button to I (on): this operation will turn on the midi controller that
will be in full operation in 3-4 seconds; The system is ready when all of the four lights
above the drawbars are on. After this, the midi controller needs to be synchronized with
the hardware interface: the preset section hasn’t got the mechanical latch system, the
first thing to do before playing is to choose one preset or choose the drawbar sets by
pressing A# or B key on the lower and on the upper manual. The respective LEDs of the
drawbars set power up; drawbars set not active has got the LED off. If Hamichord Expedition is connected you can turn-on it through the switch (1) you find on the upper right
End-block. When the system start the LED above the switch will light.
5)
5)5)
5)
START
-
UP AND SHUT DOWN OF THE INSTRUMENT:
INSTRUCTIONS FOR USE.

GENERAL PRINCIPLES OF WORKING
The organ has 2 manuals consisting of 61 keys and 12 keys of presets on
each manual: you can recognize preset keys from playing keys by the fact
that presets keys are on the left and the colours are inverted.
Functions related to presets are:
Presets upper manual (2)
C: cancel, All drawbars closed – no sound. Leds of related
drawbars sets flashing.
C#- A Each key could be modified by user: see the “store prest function”
section. Leds of related drawbars sets off.
A#: drawbars set I active - relative led is on
B: drawbars set II active with percussion - relative led is on
Presets lower manual (3)
C: cancel, All drawbars closed – no sound . Led’s of related
drawbars sets flashing.
C#- A Each key could be modified by user: see the “store prest function”
section. Leds of related drawbars sets off.
A#: drawbars set I active - relative led is on
B: drawbars set II active - relative led is on
Drawbars Section
Each Upper (4) and Lower (5) drawbars set has 9 rotary slides with caps of
these colors:
brown: 16’ – 5&1/3’
white: 8’ – 4’ – 2’ – 1’
black: 2&2/3’ – 1&1/3’ – 1&3/5’
With these you can mix the harmonics and set the volume of each foot by
moving from 0 (drawbar close) to 8 (drawbar open) .

From left to right every set is made by:
16’
One octave below 8’ with repetition of first low octave.
5-1/3
A fifth over 8’
8’
Fundamental
4’
An octave above 8’
2-2/3
One octave and a fifth above 8’
2
Two octaves above 8’ with repetition of the last upper octave.
1-1/3
Two octaves and a third above 8’.
1-3/5
Two octaves and a fifth above 8’
1
Three octaves above 8’ with repetition of last 2 high octaves.
Pedal Board Drawbars
In the middle of the 4 drawbars set, you will find 2 brown drawbars that are
used for controlling the 32’ and 16’ when an external midi pedal board is
connected.
STORE PRESETS FUNCTION:
With EPS Technology you can easily save your own drawbars configuration
and recall when you want ( also after shut down ) by operate in this way:
Do your own drawbars configuration on the upper manual moving each
drawbar ( first set from the left ): when you reach the desired sound, choose
the preset key ( inverted coloured keys) where you want your sound to be
saved: press and hold keys for 4-5 seconds until the related LEDS will flash
one time.
Done! Now your sound is stored in that preset key. You can delete it by do
the operation described above another time.
For store presets on the lower manual do the same but using the third set
from the left.
For store and recall presets use only the inverted coloured keys from C# to
A. of both manuals.
EFFECTS
Percussion (6)
In the Upper manual with the B preset active, is it possible to activate the
percussion effect with the buttons set in the higher right part of the
instrument.
Perc. On/off: Percussion on or percussion off.
Perc. Volume Soft/Norm. : Two different volumes of percussion.
Perc. Decay : Percussion decay Fast and Slow
Perc. Harmonic : Harmonic of the percussion , II (second )
and III (third ).

Vibrato / Chorus / Volume Normal/soft
In the upper left part of the instrument you can find the knob for Vibrato and
Chorus (7).
V I – V II – V III : Three different vibrato depths.
C I – C II – C III : Three different chorus depths.
This effect can be assigned separately for each manual selecting the Upper
and Lower Tabs (8) in the extreme left of the panel.
In the same left part of the instrument there’s also a tab called “Volum
normal/soft” (8) that decrease 2/3 of the general volume of the controller.
Rotating controllers and knobs
On the left and the right end blocks of the Hamichord there are 6 knobs
which send specific MIDI MESSAGES (control changes (CC)) which you can
assign to a particular feature ( please refer to your expander instruction or to
your software manual).
On Upper Left End-block (9) you have two potentiometers for controlling the
general volume and the quantity of saturation of the internal tube amp
simulator:
On Lower Left End-block (10) you will find two knobs that control the keyclick and reverb.
On the Lower Right End-block (11) there are two knobs for controlling the
treble and bass level
Pedal Board Drawbars
In the middle of the 4 drawbars set, you will find 2 brown drawbars that are
used for controlling the 32’ and 16’ when an external midi pedal board is
connected.
All CC are fixed and cannot be changed by the user: see the CC map for
reference.
Turning off the instrument
When the instrument is operating as a MIDI CONTROLLER, to turn off the
instrument you have to simply turn the rear button to 0 (off).

HAMICHORD M-C3 MIDI IMPLEMENTATION CHART
FUNCTION TRASMITTED RECOGNIZED REMARKS
Basic Channel
Default:
Changed:
:1-2
:1-
2
X
Mode Messages
Default:
Altered:
X X
Note Number
True Voice
0-127
_______________
X
Velocity
Note On
Note Off
X
X
X
X
Without velocity kit
Aftertouch
Keys:
Channel :
X X
X
X
Pitch Bend X X
Control Change X X
Program Change X X
System Exclusive GM, GM2, MMC O, firmware upgrade
Song Position
Common song select
X X
System : Clock
Exclusive : Command
X X X X
Aux : Local ON/OFF
Messages: All Notes
OFF
:Active Sense
:Reset
X
X
X
X
O
O
O
O
Notes
APPENDICES

MIDI CC MAP
CONTROL
CC
NUMBER
AUTOMATION
VALUE NOTES
Upper Drawbar 16'
(brown)
12 0-127
Upper drawbar 5 1/3'
(brown)
13 0-127
Upper drawbar 8'
(white)
14 0-127
Upper drawbar 4'
(white)
15 0-127
Upper drawbar 2 2/3'
(black)
16 0-127
Upper drawbar 2'
(white)
17 0-127
Upper drawbar 1 3/5'
(black)
18 0-127
Upper drawbar 1 1/3'
(black)
19 0-127
A Set -
active if A#
preset key of upper
manual is selected
Upper drawbar 1'
(white)
20 0-127
Upper Drawbar 16'
(brown)
12 0-127
Upper drawbar 5 1/3'
(brown)
13 0-127
Upper drawbar 8'
(white)
14 0-127
Upper drawbar 4'
(white)
15 0-127
Upper drawbar 2 2/3'
(black)
16 0-127
Upper drawbar 2'
(white)
17 0-127
Upper drawbar 1 3/5'
(black)
18 0-127
Upper drawbar 1 1/3'
(black)
19 0-127
B Set
- Active if B
preset key of upper
manual is selected
Upper drawbar 1'
(white)
20 0-127
Lower Drawbar 16'
(brown)
21 0-127
Lower drawbar 5 1/3'
(brown)
22 0-127
Lower drawbar 8'
(white)
23 0-127
Lower drawbar 4'
(white)
24 0-127
Lower drawbar 2 2/3'
(black)
25 0-127
Lower drawbar 2'
(white)
26 0-127
Lower drawbar 1 3/5'
(black)
27 0-127
Lower drawbar 1 1/3'
(black)
28 0-127
C Set
- Active if A#
preset key of lower
manual is selected
Lower drawbar 1'
(white)
29 0-127

Lower Drawbar 16'
(brown)
21 0-127
Lower drawbar 5 1/3'
(brown)
22 0-127
Lower drawbar 8'
(white)
23 0-127
Lower drawbar 4'
(white)
24 0-127
Lower drawbar 2 2/3'
(black)
25 0-127
Lower drawbar 2'
(white)
26 0-127
Lower drawbar 1 3/5'
(black)
27 0-127
Upper drawbar 1 1/3'
(black)
28 0-127
D Set -
Active if B
preset key of lower
manual is selected
Lower drawbar 1'
(white)
29 0-127
C Cancel
ONOFF
C# Preset 1
ONOFF
EPS
D Preset 2
ONOFF
EPS
D# Preset 3
ONOFF
EPS
E Preset 4
ONOFF
EPS
F Preset 5
ONOFF
EPS
F# Preset 6
ONOFF
EPS
G Preset 7
ONOFF
EPS
G# Preset 8
ONOFF
EPS
A Preset 9
ONOFF
EPS
A# first set active
ONOFF
sync
Upper presets
B
second set
active
ONOFF
sync

C Cancel
ON-
OFF
C# Preset 1
ON-
OFF
EPS
D Preset 2
ON-
OFF
EPS
D# Preset 3
ON-
OFF
EPS
E Preset 4
ON-
OFF
EPS
F Preset 5
ON-
OFF
EPS
F# Preset 6
ON-
OFF
EPS
G Preset 7
ON-
OFF
EPS
G# Preset 8
ON-
OFF
EPS
A Preset 9
ON-
OFF
EPS
A#
Third set
active
ON-
OFF
sync
Lower presets
B
fourth set
active
ON-
OFF
sync
Pedalboard Drawbar 32'
30 0-127
Pedalboard Drawbar 16'
31 0-127
Vibrato-Chorus 32 0-127
Rotator ON/OFF 33-53
ON-
OFF
Volume 36 0-127
Volume Normal-soft 36
decrease 50%
of Volume pot
Drive 35 0-127
Click 38 0-127
Reverb 39 0-127
Treble 40 0-127
Bass 41 0-127
Percussion ON 42
ON-
OFF
Only if set B
is active
Percussion Volume 43
ON-
OFF
Percussion Decay 44
ON-
OFF
Percussion Harmonic 45
ON-
OFF
Vibrato upper 46
ON-
OFF
Vibrato lower 47
ON-
OFF
Rotary run 48
ON-
OFF
Controllers
Rotary fast 49
ON-
OFF

If you experience problems, please see the relevant item and take the appropriate
measures.
1)The power is turned ON(I), but the four leds don’t light.
-Be sure the power chord is connected to the AC main.
-Be sure the power chord is fixed well in the rear panel of M-C3.
-Check if the controller is able to send midi messages, if so, please contact
assistance.
2)The power is turned ON(I), the four leds light but the controller doesn’t send midi
messages.
-Check the midi cable you are using.
-Check the instruments that is receiving midi messages from M-C3 : in
particular check configuration of midi channel, general midi configuration,
and other midi function: see your midi instrument manual for details.
-if you are not sure about configuration of the midi instrument connected to
M-C3, use a MIDI cable/adapter with indication of midi activities.
If there’s no midi activities, please contact the assistance.
3)Operating with the percussion ON/OFF tab, it’s impossible to enable the
percussion sound.
-Check if the led above the B drawbars set is active, if not, please select the
appropriate set ( percussion only work on set B).
4)Connecting M-C3 to a midi system like PC with VST or expander, control changes
don’t work in the right way.
-Please remember that M-C3 control change messages are fixed and is
impossible to change them; according to this, you have to manually change in
the midi system connected to M-C3 every control change number for match
with the controller or use the midi-learn function of the expander-PC/VST. See
your instrument manual for detail.
If you experience problems not listed above or if you notice strange behaviour on
your instrument, don’t hesitate to contact BG’s Musical instrument or the authorized
assistance.
TROUBLESHOOTING

This product is made under the actual rules of the CE.
In case in the future your instrument gets too old to play/use or malfunctions
beyond repair, please observe the instructions of this mark or, if any question, be
sure to contact your dealer or your nearest town or municipal office for its proper
disposal.
Contacts
ContactsContacts
Contacts
BG’s S.r.l.
Via Cilea, 30 – 60022 – Castelfidardo-AN-
ITALY
Tel. +39-071-7825229
Fax +39-071-7824012
Vat number IT02112920422
Official Website:
www.bgmi.it
E-mail:
info@bgmi.it
The Hamichord brand name and logo are trademarks of the respective owners.
All rights are reserved.
 Loading...