Page 1
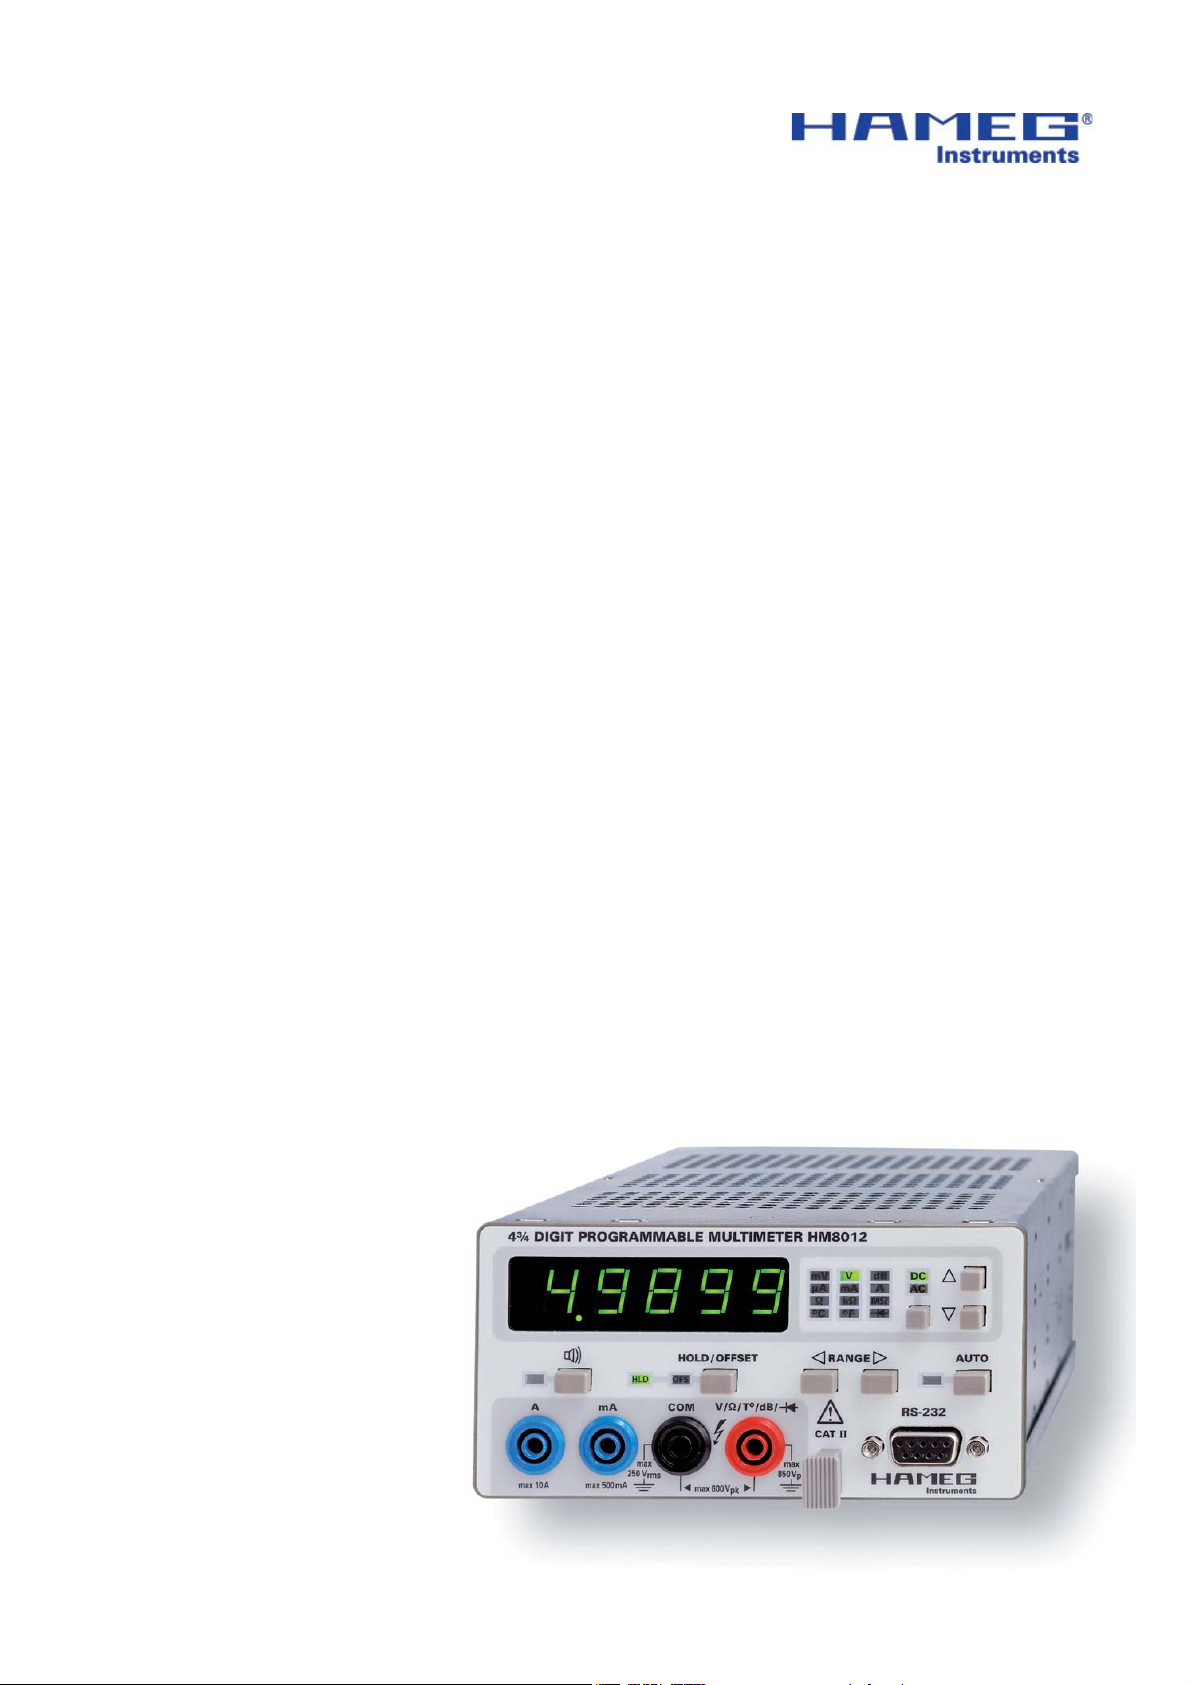
4¾-Digit Multimeter
HM8012
Service-Manual
Page 2

General information regarding the CE marking
Hersteller HAMEG Instruments GmbH KONFORMITÄTSERKLÄRUNG
Manufacturer Industriestraße 6 DECLARATION OF CONFORMITY
Fabricant D-63533 Mainhausen DECLARATION DE CONFORMITE
Die HAMEG Instruments GmbH bescheinigt die Konformität für das Produkt
The HAMEG Instruments GmbH herewith declares conformity of the product
HAMEG Instruments GmbH déclare la conformite du produit
Bezeichnung / Product name / Designation:
Multimeter / Multimeter /
Multimètre
Typ / Type / Type: HM8012
mit / with / avec: –
Optionen / Options / Options: –
mit den folgenden Bestimmungen / with applicable regulations / avec les directives
suivantes
EMV Richtlinie 89/336/EWG ergänzt durch 91/263/EWG, 92/31/EWG
EMC Directive 89/336/EEC amended by 91/263/EWG, 92/31/EEC
Directive EMC 89/336/CEE amendée par 91/263/EWG, 92/31/CEE
Niederspannungsrichtlinie 73/23/EWG ergänzt durch 93/68/EWG
Low-Voltage Equipment Directive 73/23/EEC amended by 93/68/EEC
Directive des equipements basse tension 73/23/CEE amendée par 93/68/CEE
Angewendete harmonisierte Normen / Harmonized standards applied / Normes
harmonisées utilisées
Sicherheit / Safety / Sécurité
EN 61010-1:2001 (IEC 61010-1:2001)
Überspannungskategorie / Overvoltage category / Catégorie de surtension: II
Verschmutzungsgrad / Degree of pollution / Degré de pollution: 2
Elektromagnetische Verträglichkeit / Electromagnetic compatibility /
Compatibilité électromagnétique
EN 61326-1/A1 Störaussendung / Radiation / Emission:
Tabelle / table / tableau 4; Klasse / Class / Classe B.
Störfestigkeit / Immunity / Imunitee: Tabelle / table / tableau A1.
EN 61000-3-2/A14 Oberschwingungsströme / Harmonic current emissions / Émissions
de courant harmonique: Klasse / Class / Classe D.
EN 61000-3-3 Spannungsschwankungen u. Flicker / Voltage fl uctuations and fl icker /
Fluctuations de tension et du fl icker.
Datum /Date /Date
22.07.2004
Unterschrift / Signature /Signatur
G. Hübenett
Produktmanager
General information regarding the CE marking
HAMEG instruments fulfi ll the regulations of the EMC directive. The
conformity test made by HAMEG is based on the actual generic- and
product standards. In cases where different limit values are applicable,
HAMEG applies the severer standard. For emission the limits for
residential, commercial and light industry are applied. Regarding the
immunity (susceptibility) the limits for industrial environment have
been used.
The measuring- and data lines of the instrument have much infl uence
on emmission and immunity and therefore on meeting the acceptance
limits. For different applications the lines and/or cables used may
be different. For measurement operation the following hints and
conditions regarding emission and immunity should be observed:
1. Data cables
For the connection between instruments resp. their interfaces and
external devices, (computer, printer etc.) suffi ciently screened cables
must be used. Without a special instruction in the manual for a reduced
cable length, the maximum cable length of a dataline must be less than
3 meters and not be used outside buildings. If an interface has several
connectors only one connector must have a connection to a cable.
Basically interconnections must have a double screening. For IEEE-bus
purposes the double screened cables HZ72S and HZ72L from HAMEG
are suitable.
3. Infl uence on measuring instruments.
Under the presence of strong high frequency electric or magnetic fi elds,
even with careful setup of the measuring equipment an infl uence of
such signals is unavoidable.
This will not cause damage or put the instrument out of operation. Small
deviations of the measuring value (reading) exceeding the instruments
specifi cations may result from such conditions in individual cases.
HAMEG Instruments GmbH
2. Signal cables
Basically test leads for signal interconnection between test point and
instrument should be as short as possible. Without instruction in the
manual for a shorter length, signal lines must be less than 3 meters
and not be used outside buildings.
Signal lines must screened (coaxial cable - RG58/U). A proper ground
connection is required. In combination with signal generators double
screened cables (RG223/U, RG214/U) must be used.
2
Subject to change without notice
Page 3

Content
Declaration of Conformity 2
General information regarding the CE-marking 2
4¾ Digit Programmable Multimeter HM8012 4
Specifi cations 5
Control elements 6
Function test 7
Calibration 8
Circuit and layout diagrams 9
Subject to change without notice
3
Page 4
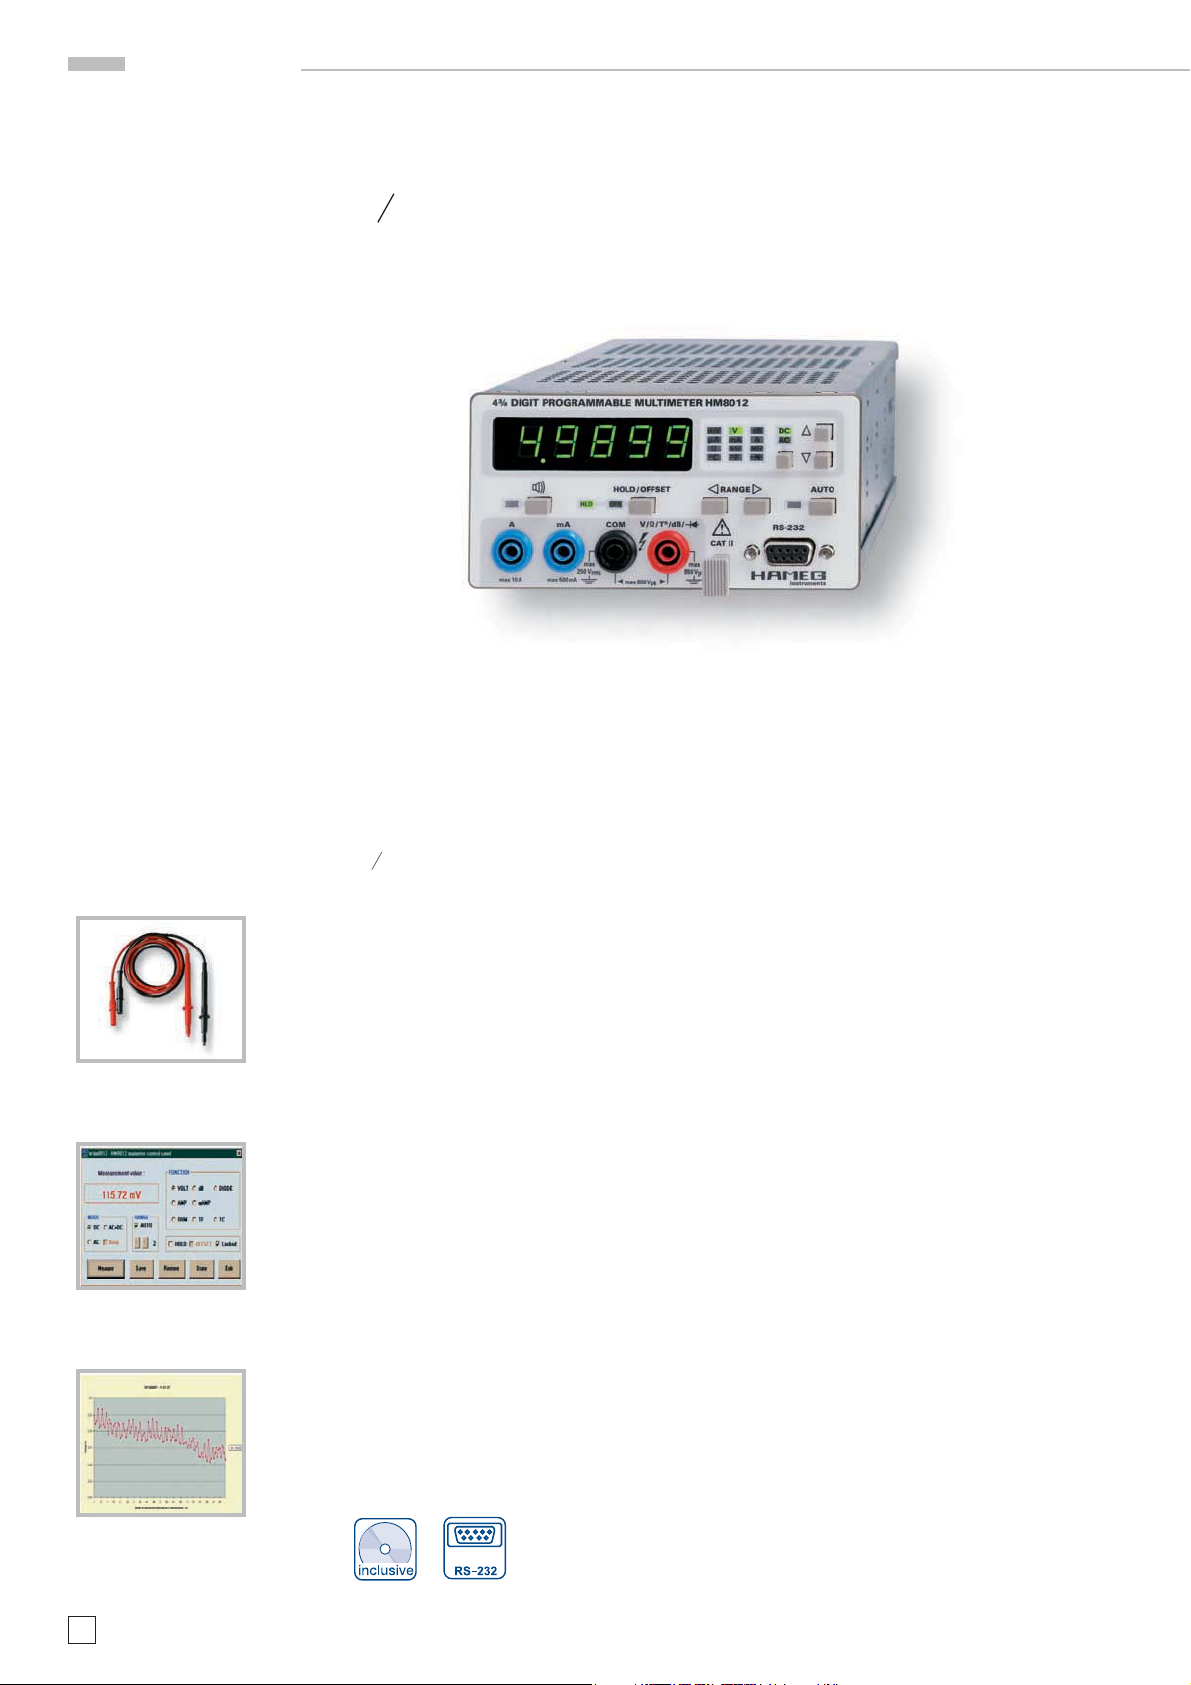
HM8012
4 -digit display with 50,000 counts, basic accuracy 0.05%
Automatic and manual range selection
Max. resolution 10 μV, 0.01 dBm, 10 nA, 10 mΩ, 0.1 °C/°F
Offset function / relative value measurement in basic
measurement functions
Input impedance ›1 GΩ (0.5 V and 5 V DC range)
RS-232 interface
PC software for control and data logging
Mainframe HM8001-2 required for operation
3
4
4 -Digit Programmable Multimeter
HM8012
3
4
WDM8012 Software
(included)
HZ15 (included)
WDM8012 Software
(included)
4
Subject to change without notice
Page 5

Specifications
4 -Digit programmable Multimeter HM8012
Valid at 23 °C after a 30 minute warm-up period
DC voltage
Measurement ranges: 500mV, 5V, 50 V, 500V, 600 V
Resolution: 10 μV, 100μV, 1m V, 10mV, 100m V
Accuracy:
5 V, 500 V, 600V: ±(0.05 % of reading +0.002 % of full scale)
500 mV, 50 V: ±(0.05% of reading + 0.004 % of full scale)
Overload protection:
V/Ω/T°/dB/ to COM and to chassis:
850 V
p
at max. 60 Hz or 600 V
DC
COM against chassis: 250 V
rms
at max. 60 Hz or 250 V
DC
Input resistance:
50 V, 500 V, 600V: 10 MΩ II 90 pF
500 mV, 5 V: › 1GΩ II 90 pF
Input current: 10 A
CMRR1): ≥ 100 dB (50 /60Hz ± 0.5 %)
SMRR2): ≥ 60 dB (50/60 Hz ± 0.5%)
dB Mode
Accuracy: ±(0.02 dB+2 digits) (display › -38.7 dBm)
Resolution: 0.01 dB above 18 % of rating
DC current
Measurement ranges: 500μA, 5 mA, 50 mA, 500mA, 10 A
Resolution: 10 nA, 100nA, 1 μA, 10μA, 1 mA
Accuracy:
0.5-500 mA: ±(0.2 % of reading + 0.004 % of full scale)
10 A: ±(0.3 % of reading + 0.004 % of full scale)
Voltage drop:
10 A range: 0.2 V max.
500 mA range: 2.5 V max.
other ranges: 0.7 V max.
AC voltage
Measurement ranges: 500mV, 5 V, 50 V, 500V, 600 V
Resolution: 10 μV, 100 mV, 1mV, 10 mV, 100mV
Accuracy 0.5-50 V:
40 Hz-5 kHz: ± (0.4 % of reading + 0.07 % of full scale)
20 Hz-20 kHz: ± (1 % of reading + 0.07 % of full scale)
Accuracy 500 V and 600 V:
40 Hz-1 kHz: ± (0.4 % of reading + 0.07 % of full scale)
20 Hz-1 kHz: ± (1 % of reading + 0.07 % of full scale)
Overload protection:
V/Ω/T°/dB/ to COM and to chassis:
850 Vpat max. 60 Hz or 600 V
DC
COM against chassis: 250 V
rms
at max. 60 Hz or 250 V
DC
Input impedance
AC mode: 1 MΩ II 90pF
AC + DC mode: 10 MΩ II 90 pF
Bandwidth at –3 dB: 80 kHz typical
dB mode: 20 Hz - 20 kHz
Accuracy
–23.8 dBm to 59.8 dBm: ±0.2 dBm
Resolution: 0.01 dB above 9 mV
CMRR1): ≥ 60 dB (50/60 Hz ± 0.5%)
Crest factor: 7 max.
3
4
AC current
Measurement ranges: 500μA, 5 mA, 50 mA, 500mA, 10 A
Resolution: 10 nA, 100nA, 1 μA, 10μA, 1 mA
Accuracy:
0.5 - 500 mA: ±(0.7 % of reading + 0.07 % of f.s.)40 Hz - 5 kHz
10 A: ±(1 % of reading + 0.07 % of full scale)
AC + DC measurements
As shown for AC + 25 digits
Resistance
Measurement ranges: 500Ω, 5 kΩ, 50 kΩ, 500kΩ, 5 MΩ, 50 MΩ
Resolution: 10 mΩ, 100 mΩ, 1Ω, 10 Ω, 100Ω, 1 kΩ
Accuracy:
500 Ω to 500 kΩ: ±(0.05% of reading + 0.004% of f.s.+50 mΩ)
5 MΩ to 50 MΩ: ±(0.3% of reading + 0.004 % of full scale)
Input protection max. 300V
rms
Measurement current: 500 Ω-5kΩ range: 1 mA
50 kΩ range: 100 μA
500 kΩ range: 10 μA
5-50 MΩ range: 100 nA
Measurement voltage: 10V typical for open inputs, depending on the
value of resistance to be measured. Negative polarity of measurement
voltage is across common terminal.
Temperature
2-wire resistance measurement with linearization for PT100 sensors as
per standard EN60751
Range: –200° C to +500° C
Resolution: 0.1° C
Measurement current: approx. 1mA
Display: in ° C, ° F
Accuracy: ± 0.1°C from – 200° C to + 200° C
± 0.2° C from 200° C to 500° C
(exception: sensor tolerance)
Temperature coefficient: (reference 23°C)
V = 500 mV, 50 V 30 ppm/° C
600 V range 80 ppm/° C
other ranges 20 ppm/° C
V ~ 600 V range 80 ppm /° C
other ranges 50 ppm/° C
mA all ranges 200 ppm/° C
mA~all ranges 300 ppm/° C
Ω 5MΩ, 50 MΩ ranges 200 ppm/° C
other ranges 50 ppm/° C
Miscellaneous
Power supply (from mainframe):
+ 5 V 300 mA
~26 V 140 mA
Operating temperature: + 10°C to + 40° C
Max. relative humidity: 80 % (without condensation)
Dimensions ( W x H x D) (without 22-pole flat plug):
135 x 68 x 228 mm
Weight: approx. 0.5kg
1)
Common mode rejection ratio
2)
Serial mode rejection ratio
Accessories supplied: Operator’s Manual, HZ15 PVC test leads, HM8012: +
Software CD and interface cable
Optional accessories: HZ10 Silicone test leads, HZ812 PT100 Temperature Sensor
HM8012E/140705/ce · Subject to alterations · © HAMEG Instruments GmbH · ® Registered Trademark · DQS-certified in accordance with DIN EN ISO 9001:2000, Reg.-No.: DE-071040 QM
HAMEG Instruments GmbH · Industriestr. 6 · D-63533 Mainhausen · Tel +49 (0)6182 800 0 · Fax +49 (0)6182 800 100 · www.hameg.com · info@hameg.com
A Rohde & Schwarz Company
www.hameg.com
Subject to change without notice
5
Page 6
Control Elements
Control Elements
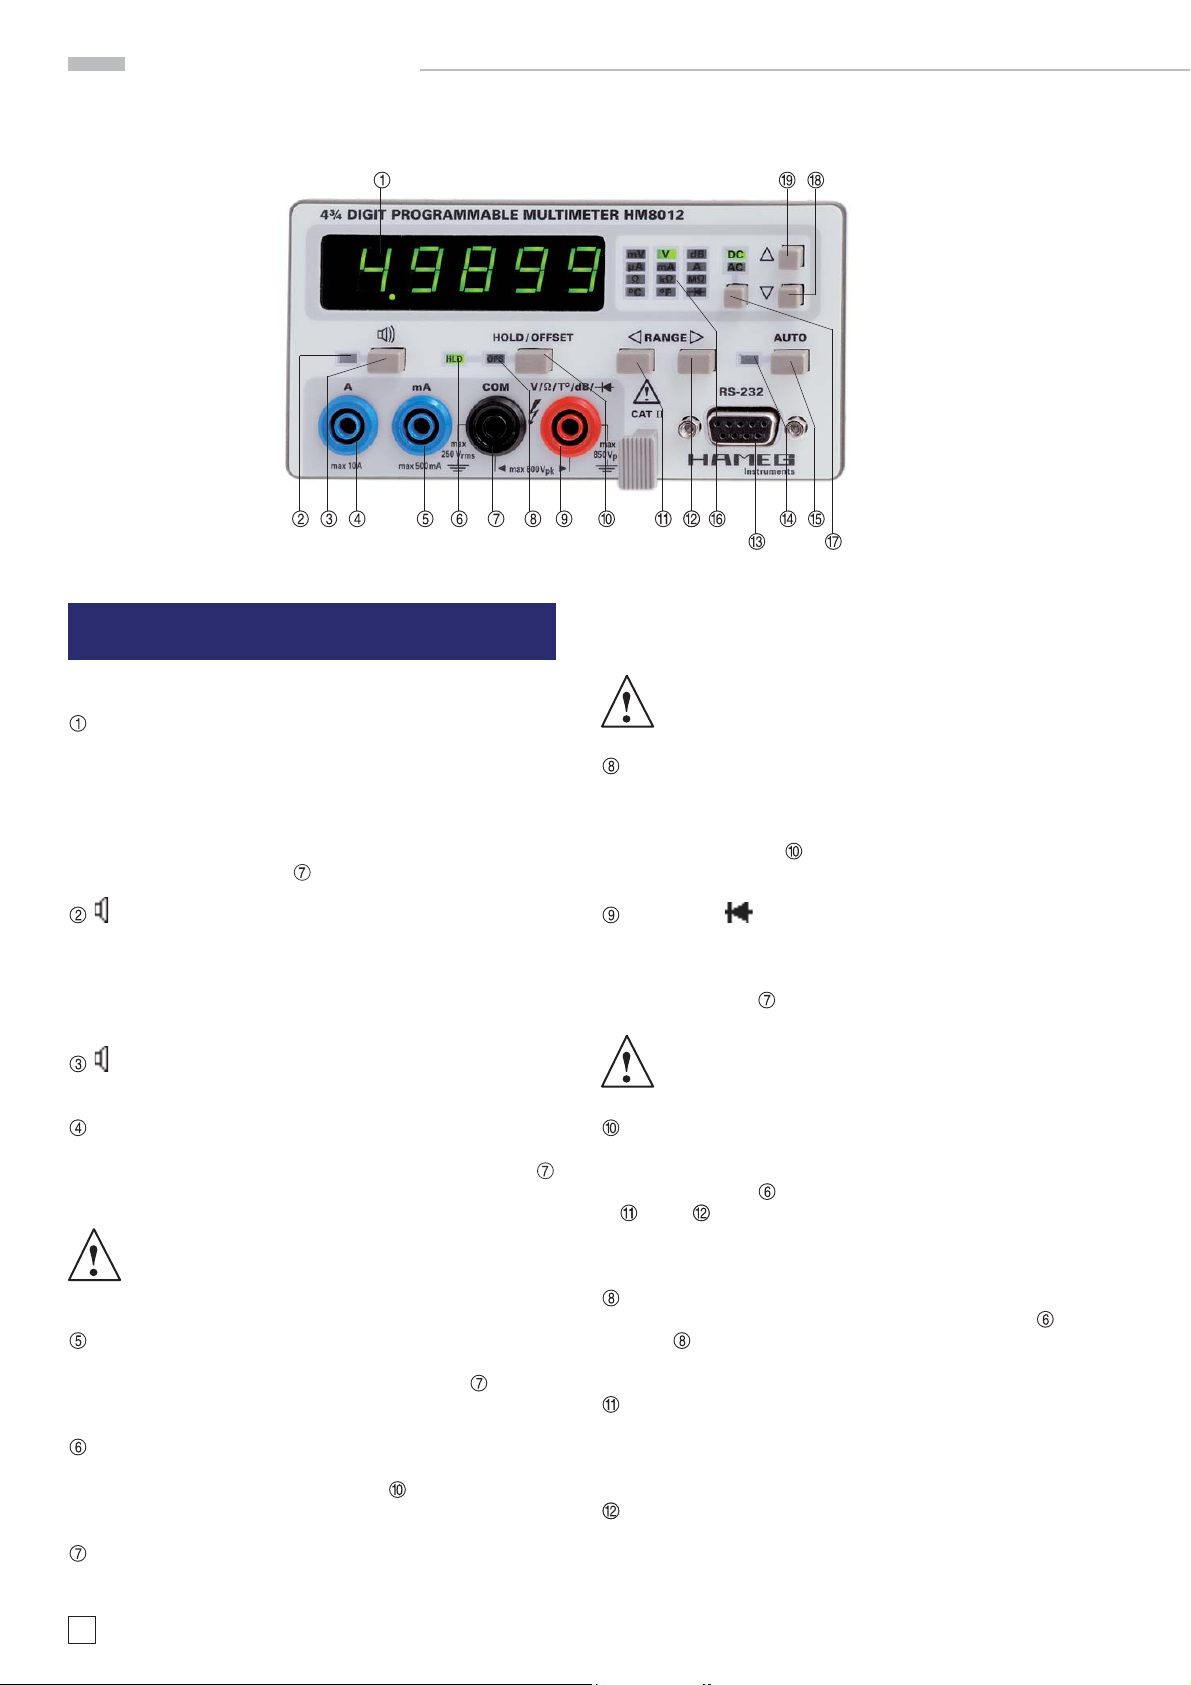
DISPLAY (7-segment LED + LED)
The digital display shows the measurement value with 4¾ digit
resolution, in which the largest fi gure is used up to “5”. It will
also display various warning messages. The measurement
value will be displayed with decimal points and polarity sign.
For DC measurement, a minus sign will appear in front of the
fi gures when the positive polarity of the measured value is
connected to the COM input
(LED)
Indicator denoting validation of the audible continuity test signal. When used as an ohmmeter, the audible signal triggers
when the measured resistance value is less than 0.1% of the
range or 50 counts. For other functions, the indicator is hidden.
BEEP (pushbutton)
Pushbutton for activating the audible signal.
A (safety terminal for 4 mm banana plugs)
Connection (high potential) for DC and AC current measurements in the 10 A range in conjunction with the COM input
(low potential).
Current in excess of 10 A (max. 20 A) must not be
applied for a period exceeding 30 s, otherwise the
internal measurement resistor thermal device will
blow.
mA (safety terminal for 4 mm banana plugs)
Connection (high potential) for DC and AC current measurements up to 500 mA in conjunction with COM input
tential). The input is fuse-protected.
HOLD (LED)
Indicator denoting that the displayed value has been frozen.
The function can be activated using key
pressing the HOLD/OFFSET key.
COM (safety terminal for 4 mm bana plugs)
The COM terminal (low potential) is the common connector for
.
(low po-
. Deactivation is by
all the measurement functions to which the potential close to
the ground of the measured quantity will be applied.
For safety reasons, the voltage across this ter-
minal compared to the case (guard wire, ground)
shall be 250 V at most.
OFFSET (LED)
Indicator denoting that the displayed value is a relative measurement. The displayed value corresponds to the input value
less the value present on the display during initial action on
the HOLD/OFFSET key
. Activate this function by means of a
second press on the HOLD/OFFSET key.
V/Ω/T°/dB/
(safety terminal for 4 mm banana plugs)
Connection (high potential) for measurements of voltages,
resistances, temperatures and diode junctions in conjunction
with the COM input
(safety terminal).
For safety reasons, the voltage across this ter-
minal compared to the case (guard wire, ground)
shall be 600 V
at most.
DC
HOLD/OFFSET (pushbutton)
Pushbutton for validating the HOLD or OFFSET functions. Pressing the key the fi rst time will freeze the front panel display.
The HOLD indicator
and keys are inoperative.
then lights up. The AUTO, AC-DC, BEEP,
A second press gives access to the relative mode. The value
mem or ized b y the HOLD func ti on is then su btr acted f ro m each
measurement before being displayed. The OFFSET indicator
lights up.
A third press will freeze the relative value. The HOLD
OFFSET
indicators light up. A fourth press will delete the
HOLD and OFFSET mode.
(pushbutton)
Pushbutton for changing to a lower range. On each press, the
new range is displayed fl eetingly on the display in code form
(L1 for lowest range, L2 for second range, etc.).
(pushbutton)
Pushb ut ton fo r changin g to a higher r an ge. Each t ime presse d,
the new range will be displayed fl eetingly on the d ispl ay i n code
form (L1 for lowest range, L2 for second range, etc.).
and
6
Subject to change without notice
Page 7
Function Test
RS-232 (DB9)
Female DB9 connector intended for serial communication.
AUTO (LED)
Indicator signalling that the multimeter is in AUTOMATIC mode.
In this mode, action on keys
and is inoperative.
AUTO (pushbutton)
Pushbutton for switching the AUTO range selection to the MANUAL range selection and vice versa.
In MANUAL mode, the choice of range is left to user initiative
using the keys
and .
Unit display zone (LED)
This zone contains a display of the measurement units. It also identifi es the function selected by pressing the
or
key.
AC-DC (pushbutton)
This key is used for selecting the measurement mode (DC, rms
AC or rms AC + DC).
Indicators below indicate the measurement mode:
DC: measurement of DC voltages
AC: measurement of RMS AC voltages
DC + AC: measurement of RMS AC+DC voltages.
(pushbutton)
Pushbutton for selecting the next function.
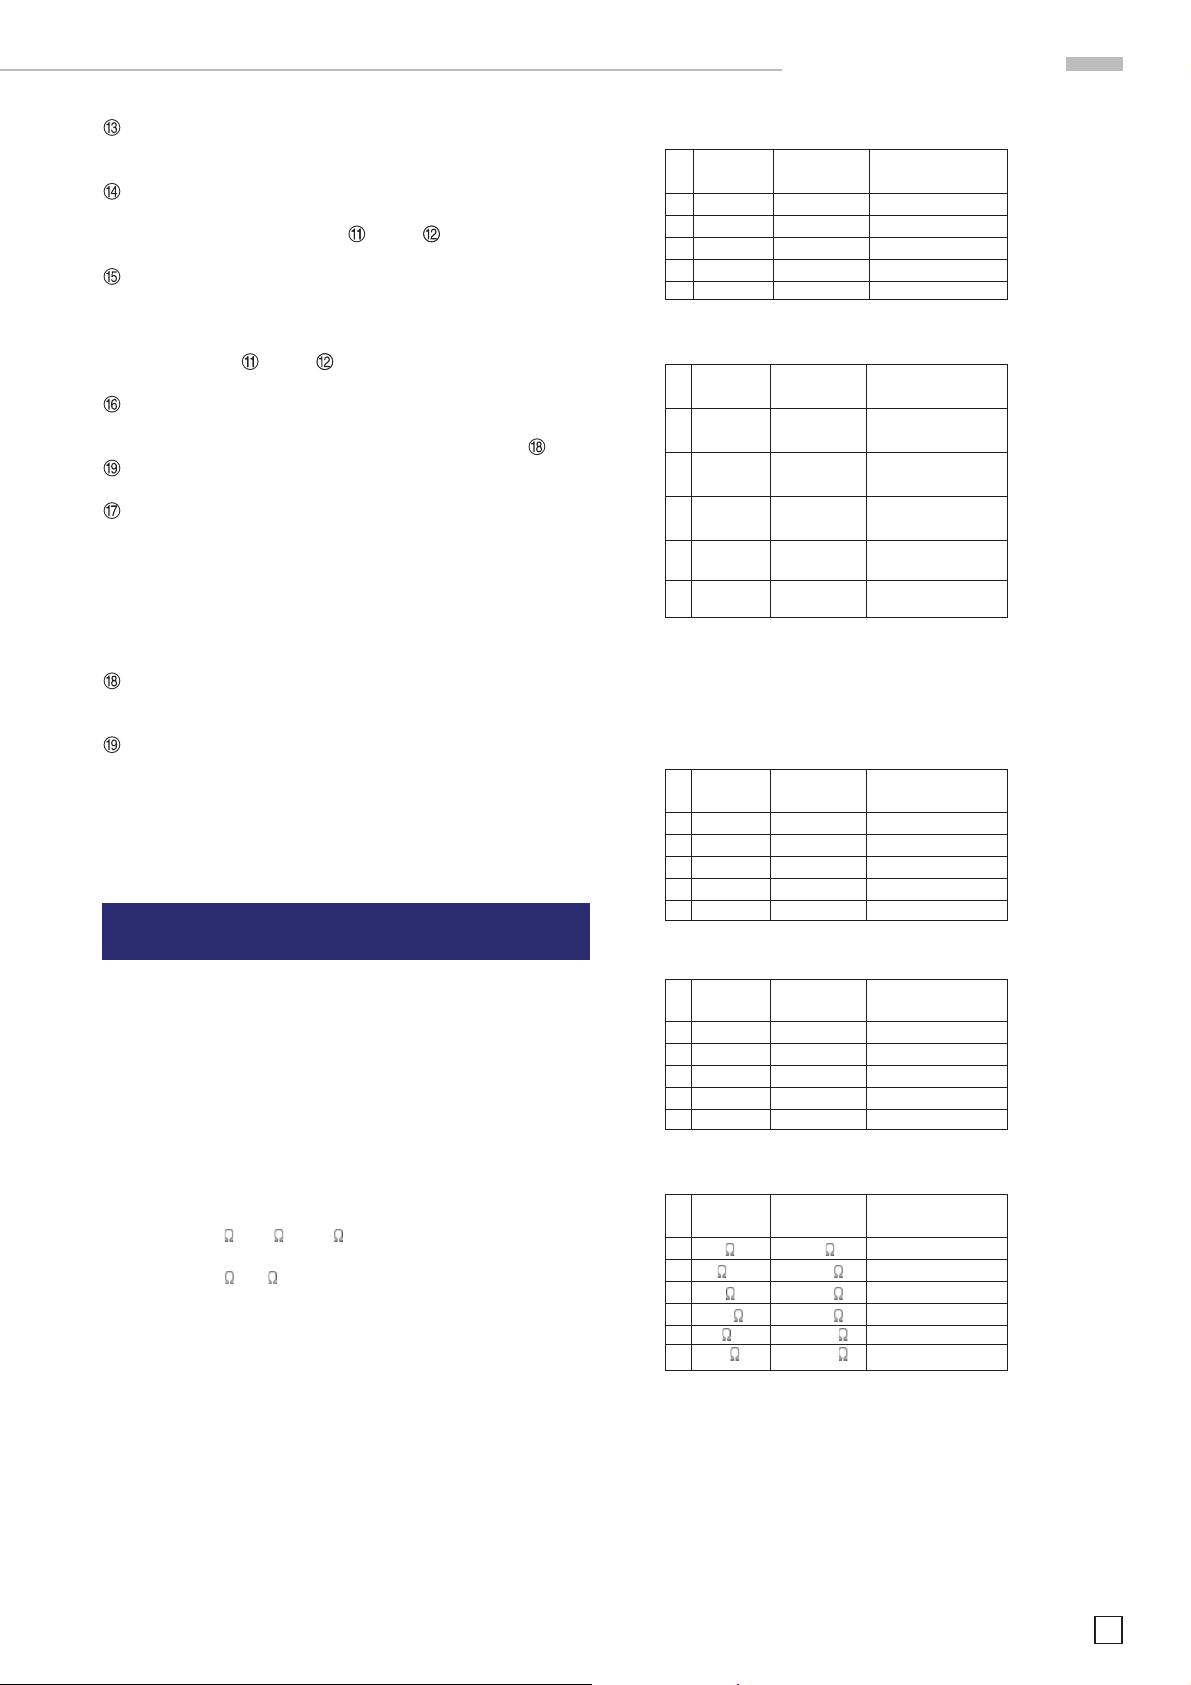
a) DC voltage ranges
No. Range Reference Display limits
(+23 °C)
1 500 mV 250 mV 249.85 - 250.15
2 5 V 2.5 V 2.4986 - 2.5014
3 50 V 25. V 24.985 - 25.015
4 500 V 250 V 249.86 - 250.14
5 600 V 550.00 V 549.7 - 550.3
b) AC voltage ranges
No. Range Reference Display limits
(+23 °C)
1 500 mV 250 mV (1) 248.65 - 251.35
(2) 247.15 - 252.85
2 5 V 2.5 V (1) 2.4865 - 2.5135
(2) 2,4715 - 2.5285
3 50 V 25 V (1) 24.865 - 25.135
(2) 24.715 - 25.285
4 500 V 250 V (3) 248.65 - 251.35
(4) 247.15 - 252.85
5 600 V 550 V (3) 547.3 - 552.6
(4) 544.0 - 555.9
(1) = 40 Hz to 5 kHz
(2) = 20 Hz to 20 kHz
(3) = 40 Hz to 1 kHz
(4) = 20 Hz to 1 kHz.
(pushbutton)
Pushbutton for selecting the previous function. On startup,
the unit switches automatically to the DC voltmeter, MANUAL
mode function and 600 voltrange.
Function Test
This test should help to verify, at certain intervals, the functions of HM8012 without any great expenditure in measurement
instruments. To achieve thermal balance, the module and the
basic instrument, in its case, must be energized for at least 60
minutes before the test begins.
Measurement equipment used
Calibrator AC/DC for instance Fluke 5101B / Fluke 5700A /
Rotek 600
Resistors of 5 k
J by Vishay
Resistors 500 k
Vishay.
Test procedure
If one of the indicated calibrators is available or if precision calibrators are appropriate, all the HM8012 measurements ranges
can be checked using the following tables which indicate the
limi t v alues. Re ca libr atio n, ho wever, s ho uld o nly be p er fo rm ed
if the appropriate precision calibrator is available.
, 50 k , 500 k 0.01% for instance model S102
, 5 M 0.02%, for instance models CNS020 by
c) DC current ranges
No.
Range Reference Display limits
(+23 °C)
1 500 μA 250.00 μA 249.48 - 250.52
2 5 mA 2.5000 mA 2.4948 - 2.5052
3 50 mA 25.000 mA 24.948 - 25.052
4 500 mA 250.00 mA 249.48 - 250.52
5 10 A 1.800 A 1.794 - 1.806
d) AC current ranges (f = 400 Hz)
No.
Range Reference Display limits
(+23 °C)
1 500 μA 250.00 μA 247.9 - 252.1
2 5 mA 2.5000 mA 2.479 - 2.521
3 50 mA 25.000 mA 24.79 - 25.21
4 500 mA 250.00 mA 247.9 - 252.1
5 10 A 1.800 A 1.775 - 1.825
e) Resistor ranges
No.
Range Reference Display limits
(+23 °C)
1 500 200.00 199.83 - 200.17
2 5 k 2.0000 k 1.9989 - 2.0011
3 50 k 20.000 k 19.989 - 20.011
4 500 k 200.00 k 199.89 - 200.11
5 5 M 2.0000 M 1.9939 - 2.0061
6 50 M 20.000 M 19.393 - 20.061
Before any change of ranges, ensure that the signal at HM8012
does not represent an unacceptable load of the object under
examination. For the link between the calibrator and HM8012,
shielded cables must be used to prevent any unwanted infl u-
ence caused by the measurement signal.
Subject to change without notice
7
Page 8
Calibration
Calibration
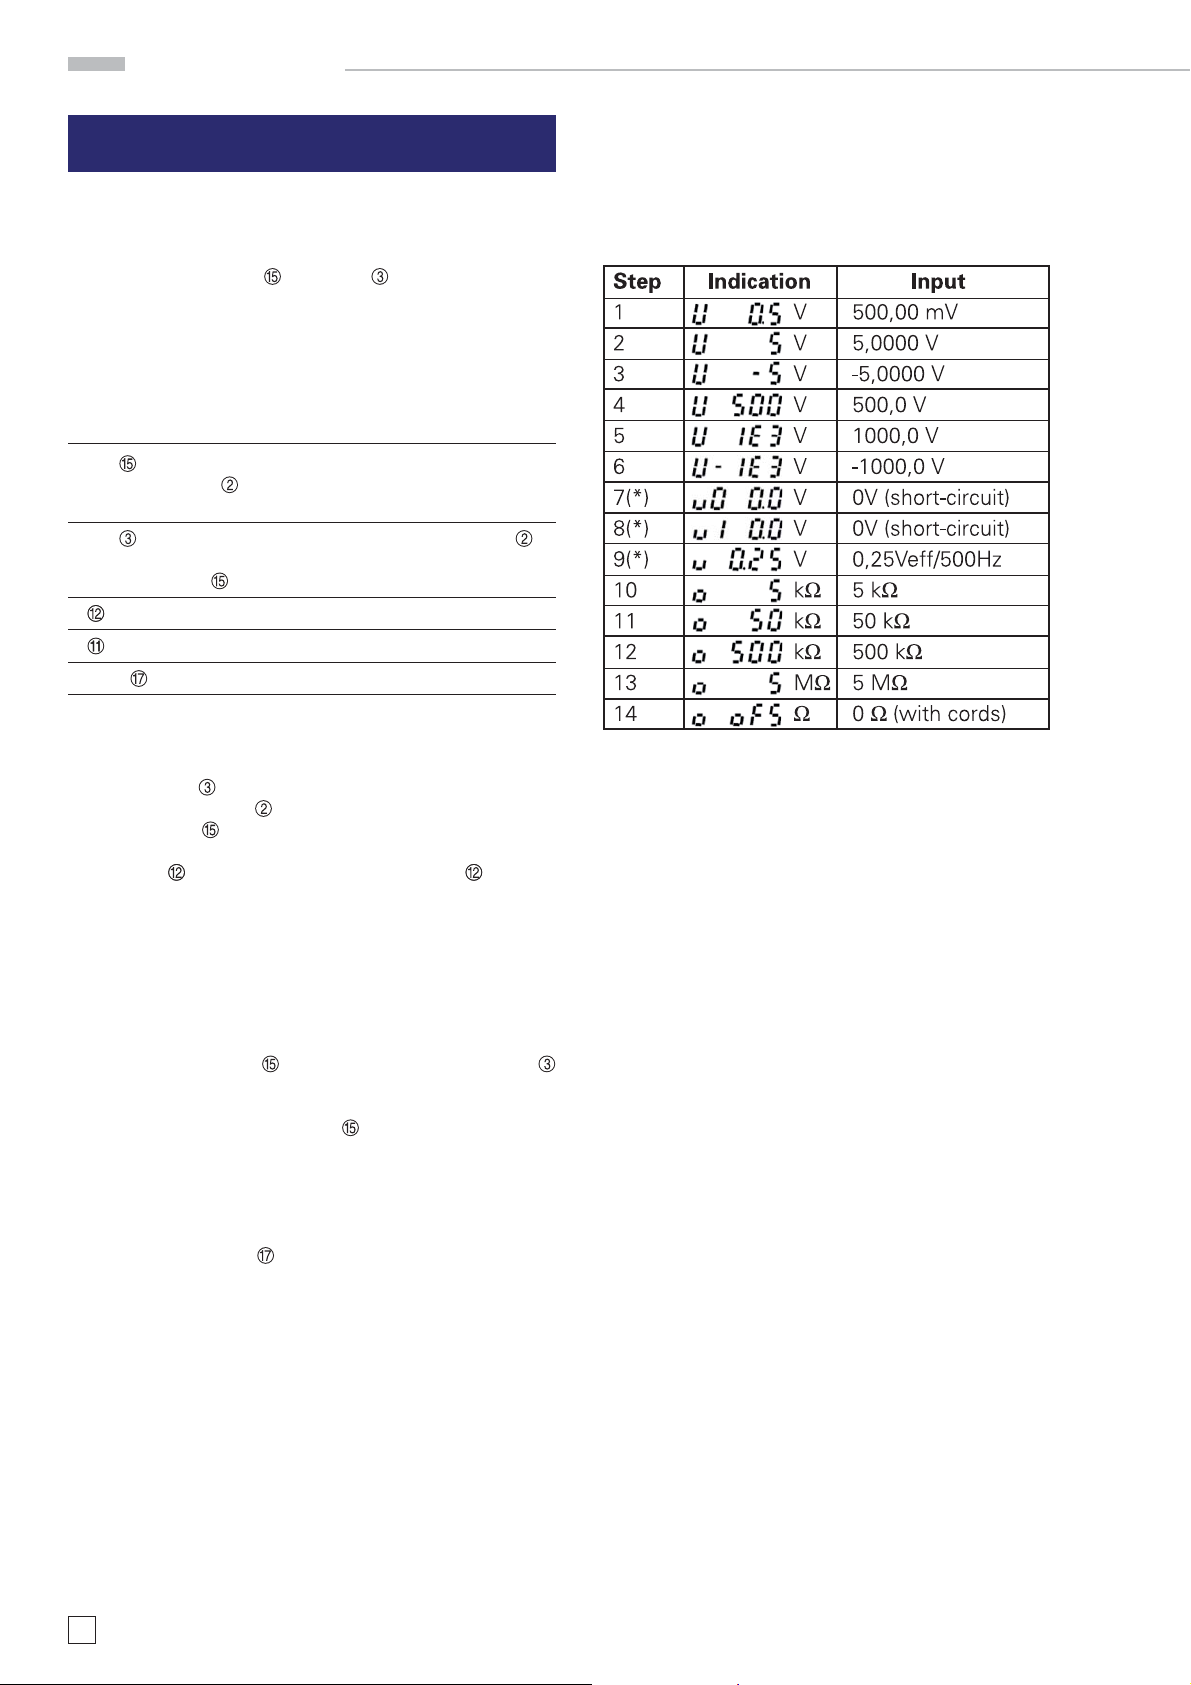
Calibration of the HM8012 digital multimeter is performed
mainly by software. In order to enter the calibration menu keep
both pushbuttons AUTO
message CAL is displayed. After the release of both pushbuttons the fi rst calibr ation step will be indicated. First the unit will
be shown then the value of the calibration voltage etc. which
has to be applied to the instrument. In this mode the following
pushbuttons will function as given:
Pushbutton Action
AUTO
BEEP
AC+DC
Corrected value of the range selected if the
LED
ding step will be displayed.
Displays not yet calibrated values. The LED
will be on, the value can be changed by pushbutton
Change to the following calibration step.
Change to the preceding calibration step.
Saving the calibrated values.
and BEEP depressed until the-
is on, otherwise the input of the prece-
.
Calibration of frequency compensation
While observing the necessary safet y precautions open the instrument. Select the 50 V AC range. Apply 25 V AC 15 kHz. Adjust
the capacitor CV1 until the display reads 25,000 ±5 digits.
Listing of calibration steps
Calibration procedure
1. Apply the calibration value specifi ed.
2. Press BEEP
displayed. The LED
3. Press AUTO
value should be displayed.
4. Press
play the actual calibration information without moving to
another step.)
Please note:
In order to guarantee a fully calibrated instrument be sure to
perform a complete calibration cycle.
Hints:
– Pressing the AUTO
pushbutton will display the value resulting from the preceding calibration; in case it is correct no calibration will
be necessary. Pressing AUTO
strument to the menu. Pressing either or the next or
the last calibration step will be accessed.
– For precise resistance calibration it is necessary to connect
the calibration resistors as closely to the input terminals
as possible.
– Pressing the AC/DC
values.
. The former not yet corrected value will be
will be on.
to perform the calibration, the corrected
in order to proceed. (Pressing will dis-
pushbutton without the BEEP
again will return the in-
pushbutton will store the calibrated
(*) Wait for complete stabilization of the display.
8
Subject to change without notice
Page 9
Circuit and layout diagrams
Subject to change without notice
9
Page 10

Circuit and layout diagrams
10
Subject to change without notice
Page 11

Circuit and layout diagrams
Subject to change without notice
11
Page 12

Circuit and layout diagrams
12
Subject to change without notice
Page 13

Circuit and layout diagrams
Subject to change without notice
13
Page 14

Circuit and layout diagrams
14
Subject to change without notice
Page 15

Circuit and layout diagrams
Subject to change without notice
15
Page 16

Circuit and layout diagrams
16
Subject to change without notice
Page 17

Circuit and layout diagrams
Subject to change without notice
17
Page 18

Circuit and layout diagrams
18
Subject to change without notice
Page 19

Circuit and layout diagrams
Subject to change without notice
19
Page 20

Circuit and layout diagrams
20
Subject to change without notice
Page 21

Circuit and layout diagrams
Subject to change without notice
21
Page 22
Circuit and layout diagrams
22
Subject to change without notice
Page 23

Circuit and layout diagrams
Subject to change without notice
23
Page 24
Circuit and layout diagrams
24
Subject to change without notice
Page 25

Circuit and layout diagrams
Subject to change without notice
25
Page 26

Notes
26
Subject to change without notice
Page 27

Notes
Subject to change without notice
27
Page 28

Oscilloscopes
Spectrum Analyzer
Power Supplies
Modular System
8000 Series
Programmable Instruments
8100 Series
authorized dealer
4S-8012- 00E0
www.hameg.de
Subject to change without notice
4S-8012-00E0 / 02-11-2005-gw HAMEG Instruments GmbH
© HAMEG Instruments GmbH Industriestraße 6
A Rohde & Schwarz Company D-63533 Mainhausen
® registered trademark Tel +49 (0) 61 82 800-0
DQS-Certifi cation: DIN EN ISO 9001:2000 Fax +49 (0) 61 82 800-100
Reg.-Nr.: 071040 QM sales@hameg.de
 Loading...