


Table of Contents
1. Package list .................................................................................................................................. 2
2. Hardware Interface....................................................................................................................... 2
3. LED Indicator Description........................................................................................................... 2
4. How to connect the device to user Wi-Fi devices (IOS system e.g.)........................................... 3
5. Copy Files.................................................................................................................................... 3
5.1 Connect to computer through USB cable to establish removable disk.............................. 3
5.2 Connect wireless network to the computer to build wireless disk..................................... 4
6. Wireless Sharing .......................................................................................................................... 5
6.1 Play file on management interface..................................................................................... 5
6.2 IOS and Android Client: HameCloud ................................................................................ 6
7. Wi-Fi Hotspot/ Repeater Setting.................................................................................................. 7
7.1 Setting on management interface....................................................................................... 7
7.2 IOS and Android Client Setting: HameCloud.................................................................... 9
8. Modify Wi-Fi password............................................................................................................. 10
9. FAQ.............................................................................................................................................11
1. Package list
SPR-S3 device
User manual
Warranty card
Micro USB data cable
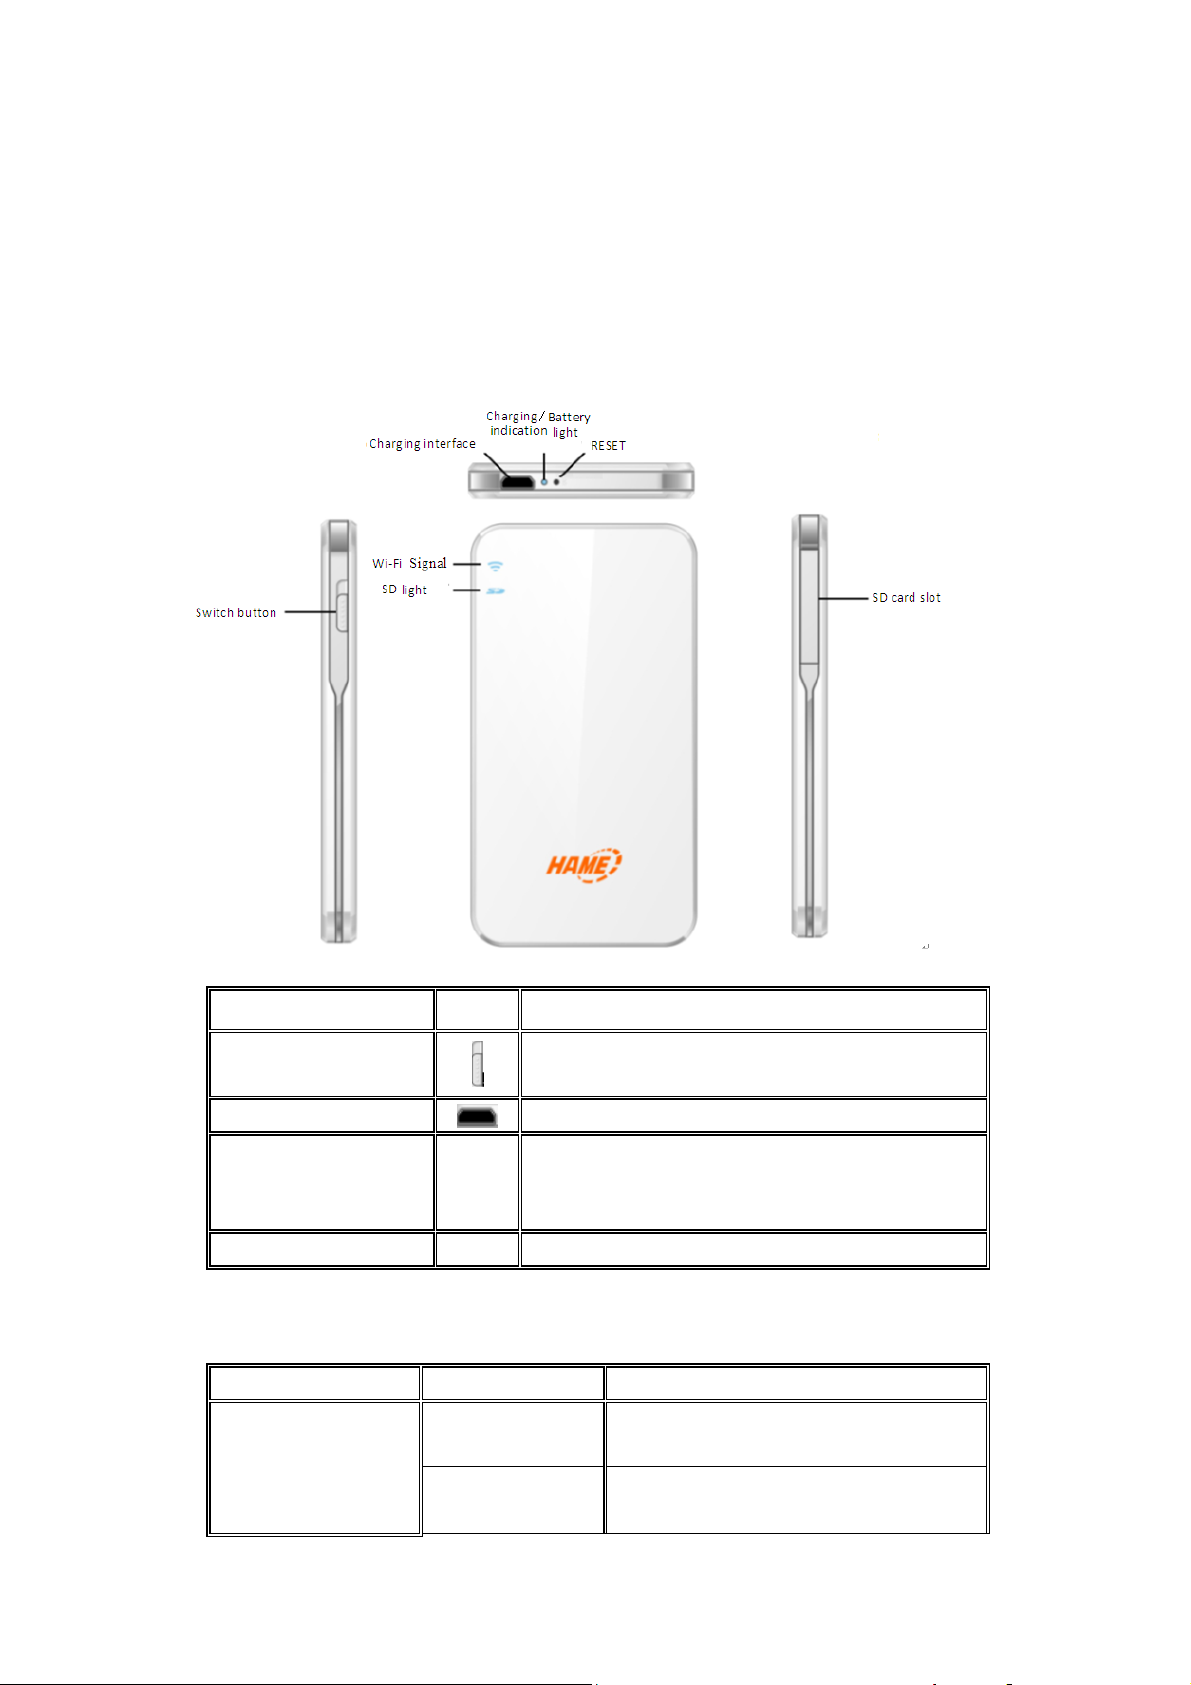
2. Hardware Interface
Function description of hardware interface:
Hardware Interface
Switch Button
Charging Interface
RESET R
SD Card Slot SD Insert SD card.
Mark
Function Description
Push up to turn on; push down to turn off.
To connect power adapter to charge the
Under turn-on status, press and hold “R” for 5 – 10
seconds, if the Wi-Fi indicator is flashing in purple,
Reset is activated.
3. LED Indicator Description
Indicator light Status Description
Wi-Fi
Red
Blue
device.
The device is turned on, the programs are
running; or wireless connection fails.
The device is turned on, and wireless
connection is available.
Purple
SD
Battery power
Charging
Off No SD card.
Blue SD card is inserted
Blue High power
Red Low power
Blue-purple Charging
Blue Fully charged
Wi-Fi repeater succeeds, and Internet is
accessible.
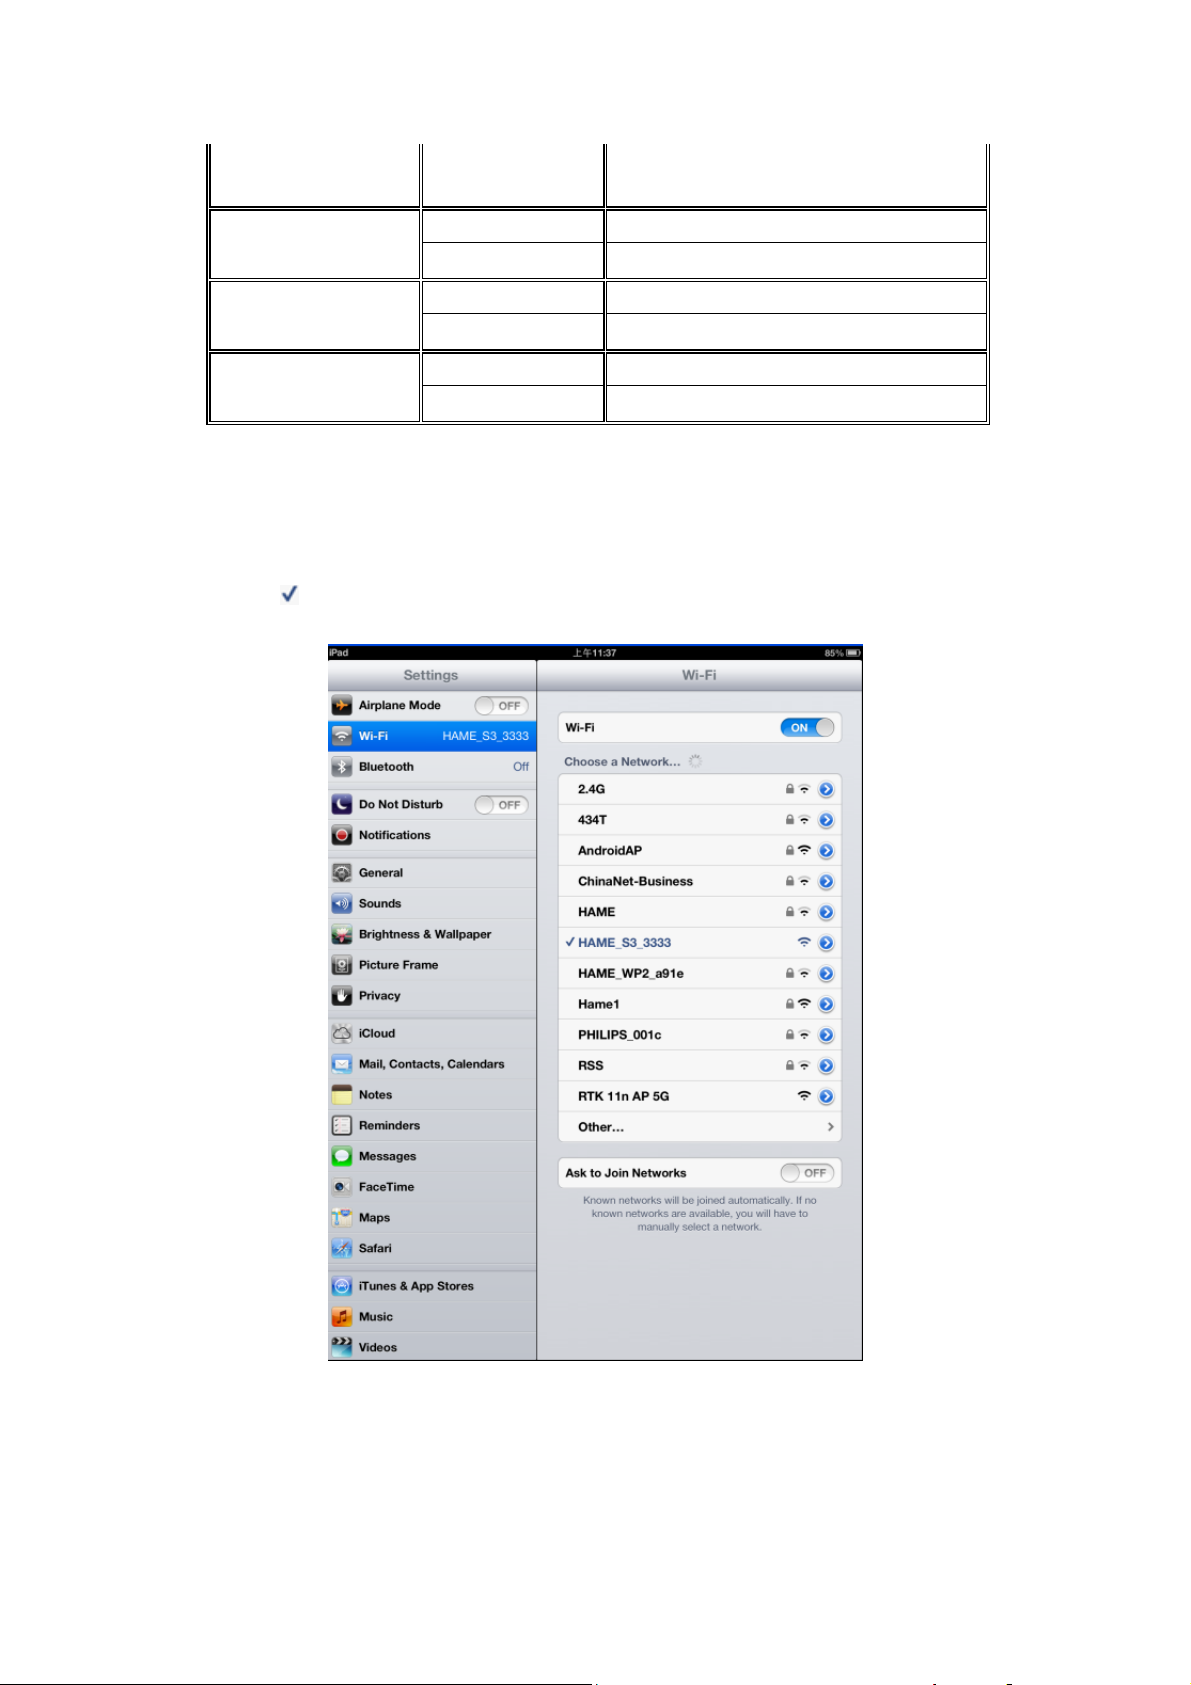
4. How to connect the device to user Wi-Fi devices (IOS system e.g.)
1、 Push up the switch button of the device to start.
2、 Select the device’s wireless network (HAME_S3_xxxx) on Wi-Fi page.
3、 If “
connected to the Wi-Fi network of the device successfully.
”is displayed in front of HAME_S3, it indicates that the user Wi-Fi device has
5. Copy Files
5.1 Connect to computer through USB cable to establish removable disk
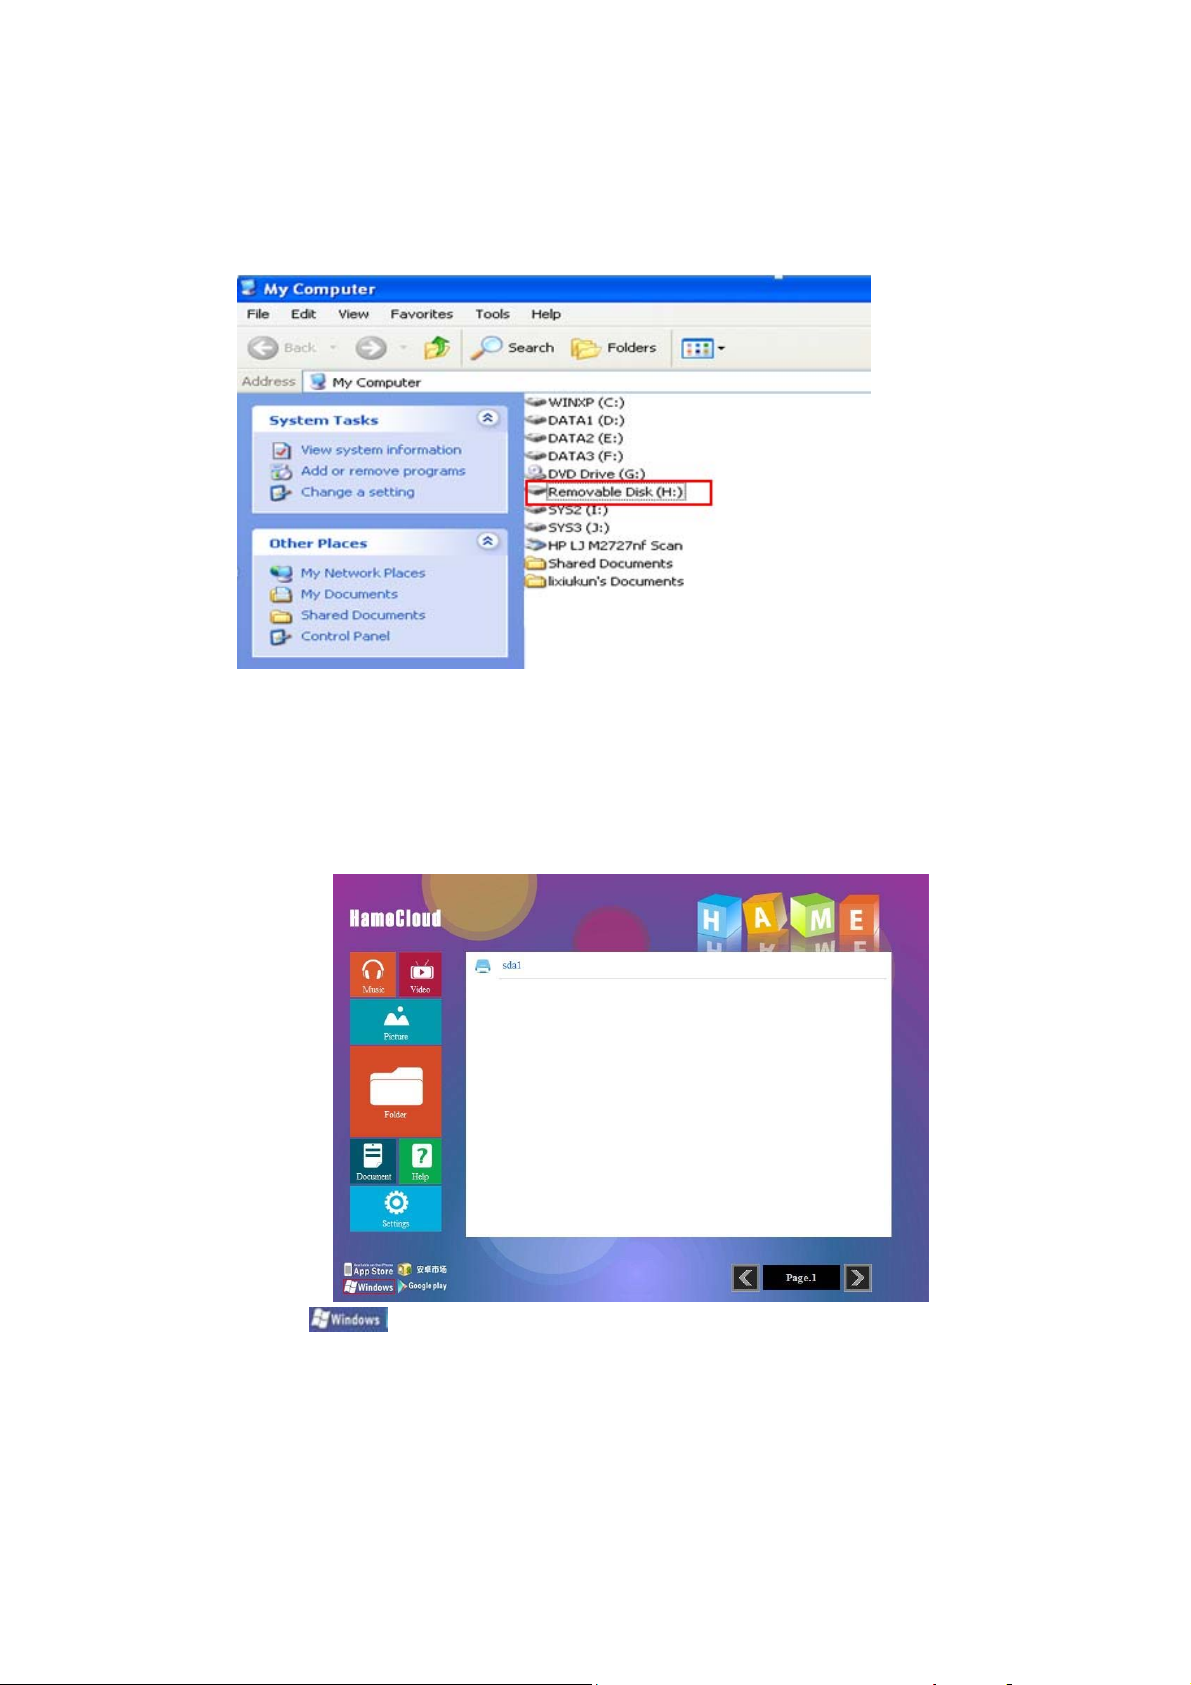
1、 Insert SD card into the device when the device is under turn off status.
2、 Connect the device to the USB interface of computer via data cable.
3、 The computer can detect SD card and display it as “Removable Disk” on “My
Computer”.
4、 Click “Removable Disk” to show all the documents in the di sk, and now you can copy,
delete or view relevant files.
5.2 Connect wireless network to the computer to build wireless disk
1、 Turn on the device and connect computer to the device via Wi-Fi. Input
http://192.168.169.1 into browser to enter the management page.
2、 Client
icon at the left bottom corner of the page to download Window Client.

3、 Click “Run” button to install it, and then a network drive icon
wireless disk of SD card, will appear in “My Computer”. Double click the icon to enter disk
management interface. All documents in SD card are stored in sda1 folder.
, which is the
4、 Click and enter sda1 folder to browse, edit, add or delete file in SD card. The operation step
is same with removable disk.
6. Wireless Sharing
The device supports standard DLNA protocol. All software players and hardware players
complying with DLNA standards can access photo, music, video and document in storage device.
The device can support 5 connectors simultaneously.
6.1 Play file on management interface
1、 Insert SD card into SD card slot and push up the switch button of the device to turn on it.
2、 Connect internet device to the device through Wi-Fi and input http://192.168.169.1 into the
browser of the internet device to enter setting page.

3、 Click icon button on the left: music, video, picture, document or folder, and then click sda1
button to select corresponding document to play. Click folder icon to display all types of
documents in SD card. (Browser defaults to use QuickTime player. If some music or video
fail to be played, please install corresponding format of plug-in unit or player.)
6.2 IOS and Android Client: HameCloud
1、 Turn on the device and connect mobile phone or tablet PC to it via Wi-Fi. Input
http://192.168.169.1 into default browser to enter the management page.
2、 Click multimedia client icon in the left bottom corner, download and install the software.
Icon of Apple clie nt is
while icon of Android client is .
3、 Find “HameCloud” in application program of mobile phone and click it to enter client
interface.

4、 Click icons of picture, video and music to display document list of corresponding types in
SD card and then select any document to browse or play. Click document icon and it will
display all types of documents in SD card. If some music or video fail to be played, please
download and install player supporting such format. (For Android: QvodPlay; IOS:
OPlayerHD, Good player).
7. Wi-Fi Hotspot/ Repeater Setting
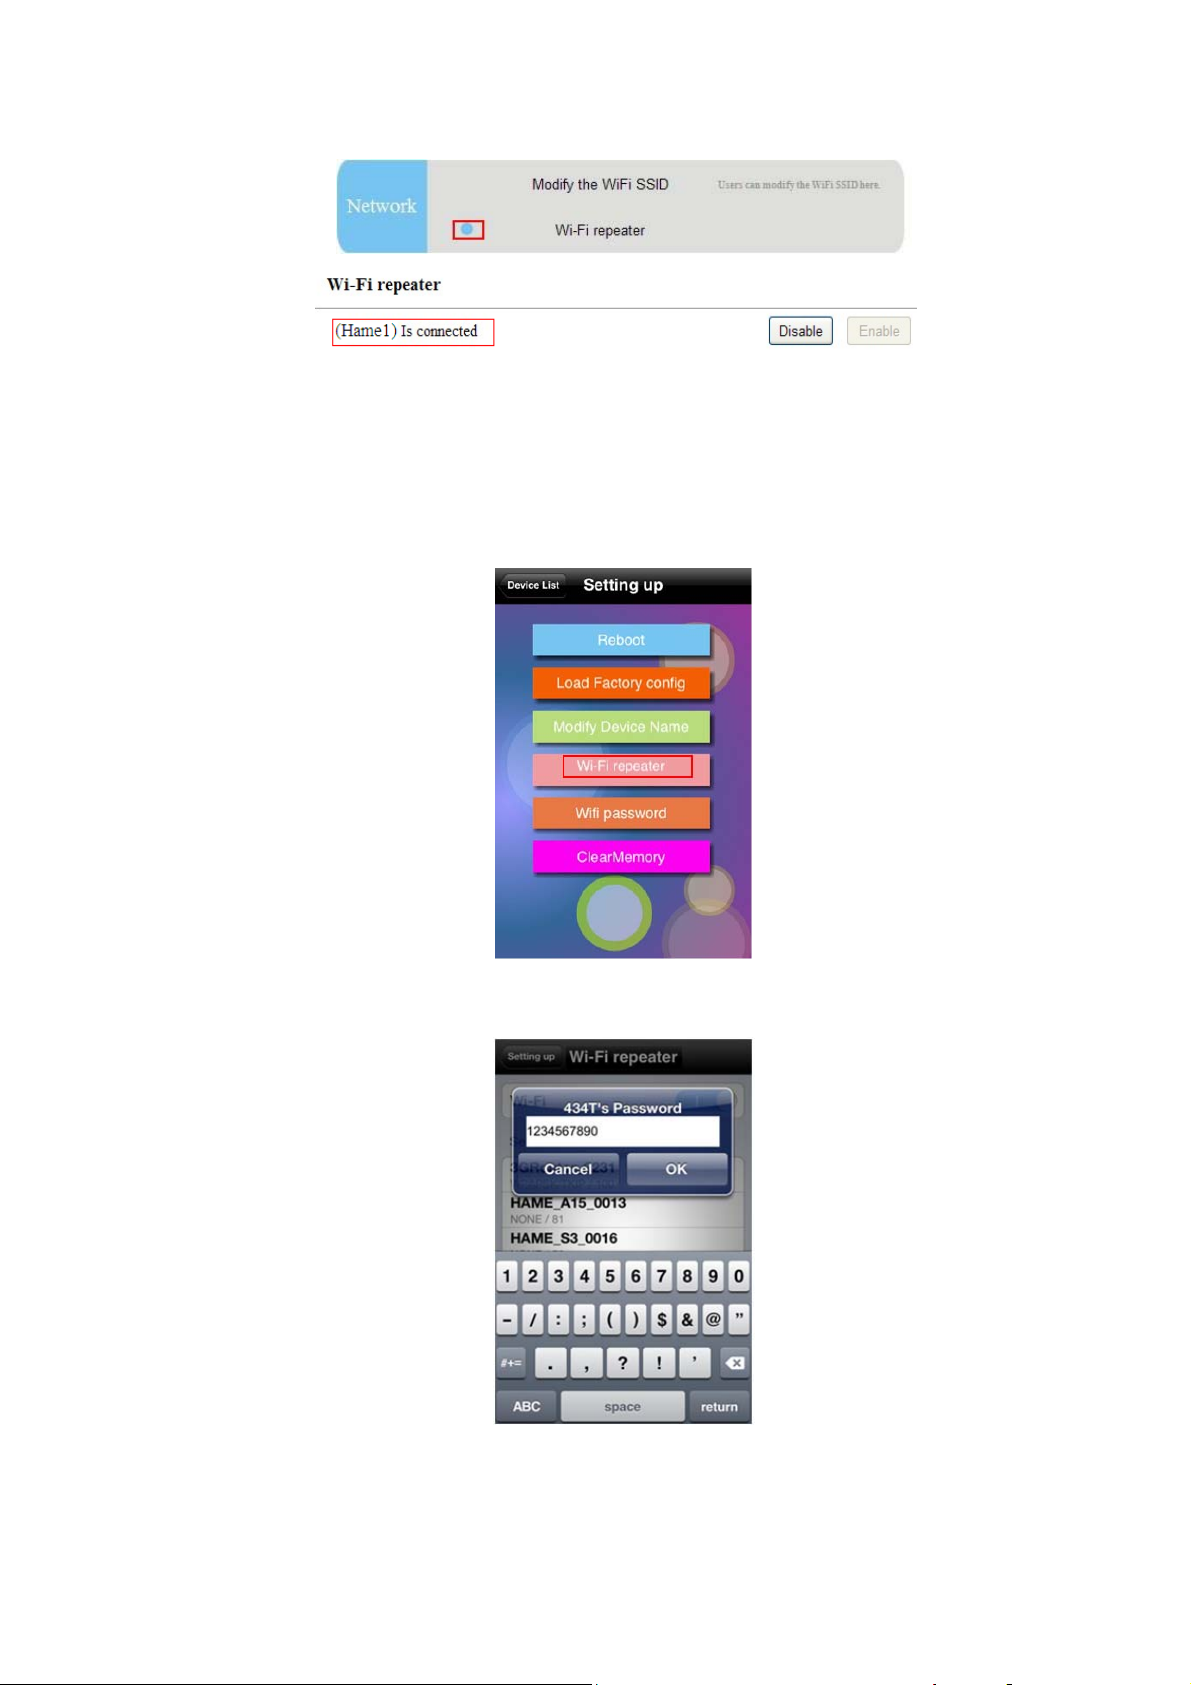
7.1 Setting on management interface
1、 Turn on the host and connect mobile phone, tablet PC or computer to it via Wi-Fi. Input
http://192.168.169.1 into the default browser to enter management page.
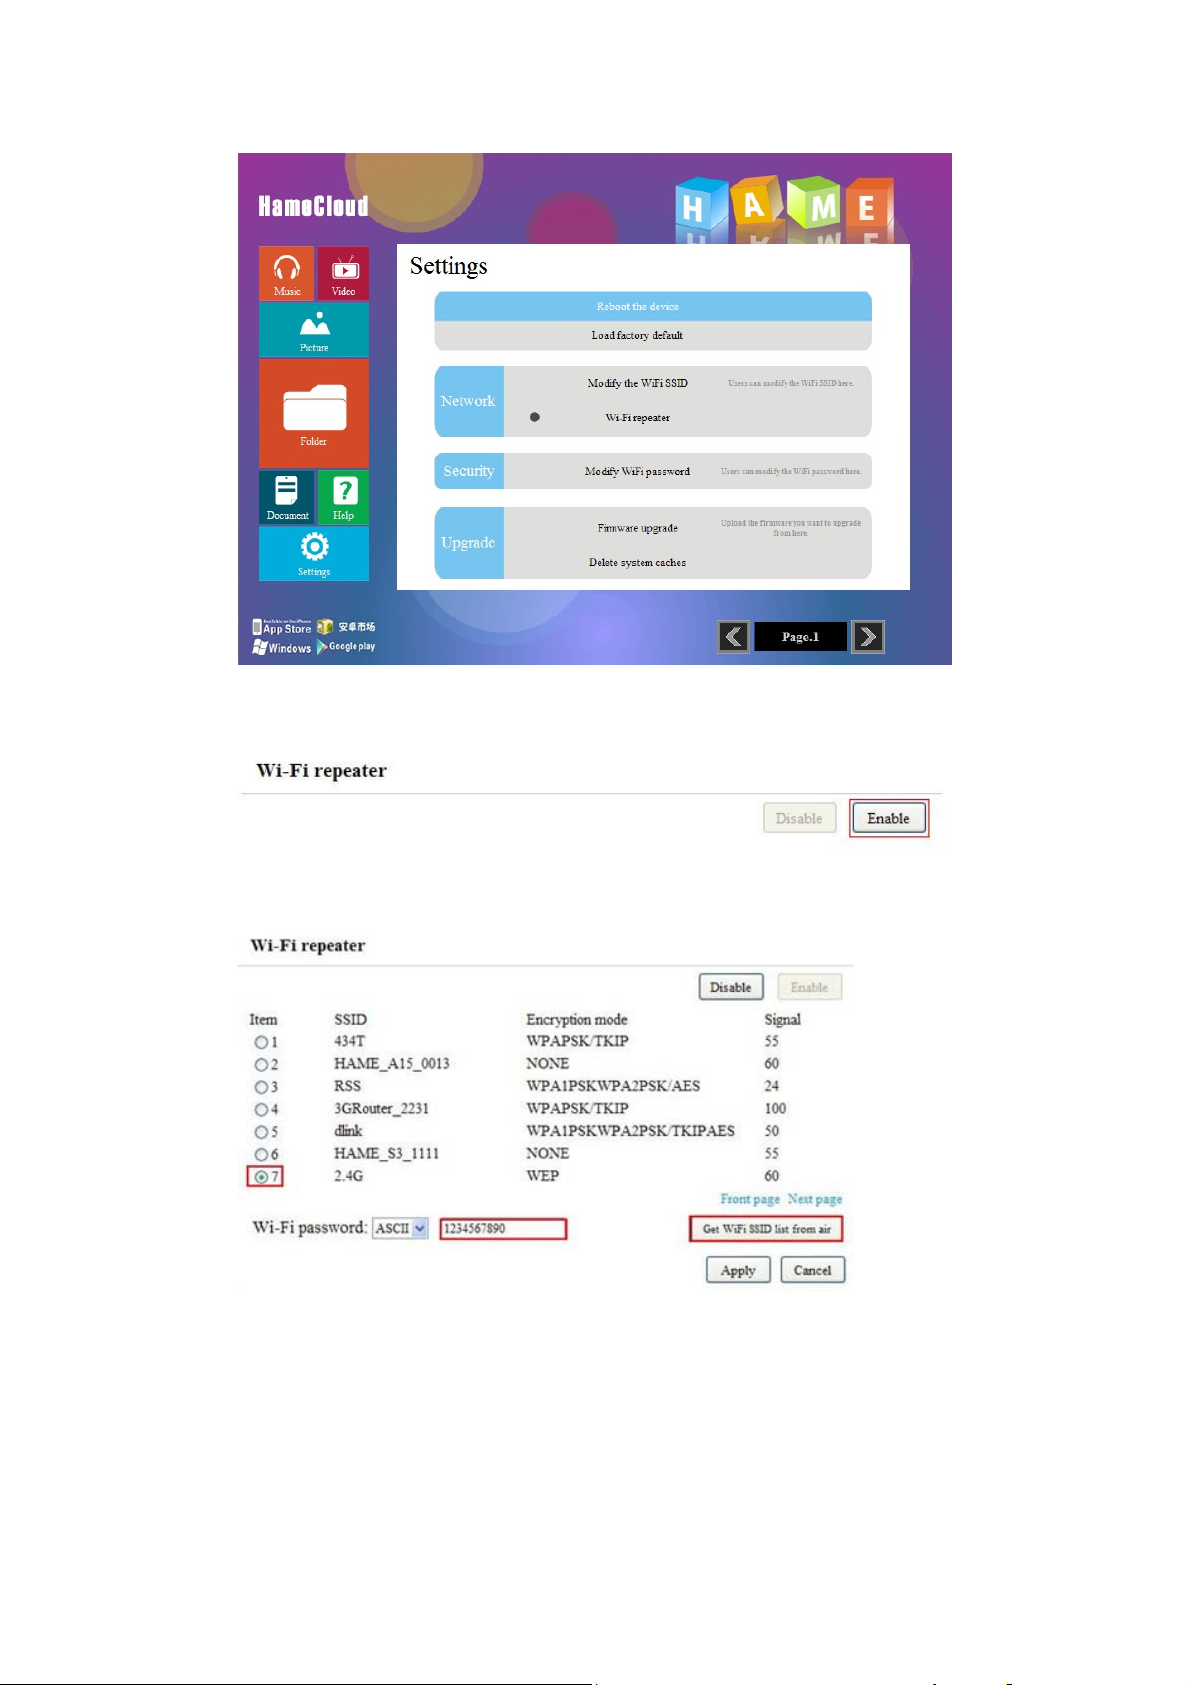
2、 Click “Setting” button and then click “Wi-Fi repeater” to enter setting page. Wi-Fi
repeater is disabled by default, so please click “Enable” button.
3、 Click “Get Wi-Fi SSID lint from air”, select Wi-Fi hotspot name to be connected, and
then input Wi-Fi password, and at last click “Apply” button.
4、 Setting Wi-Fi Repeater successfully indication: Wi-Fi indicator light of the device is in
purple.
Connection indication dot before Wi-Fi repeater is in blue on setting page and the
connected wireless internet name will be shown on Wi-Fi repeater page.
7.2 IOS and Android Client Setting: HameCloud
1、 Turn on the device and connect Smartphone or tablet PC to it via Wi-Fi. Select client
HameCloud and click “Setting”-“Wi-Fi repeater” button.
2、 Start Wi-Fi repeater function and select Wi-Fi hotspot network name to connect wirelessly,
then input Wi-Fi password, and at last click “OK” button.
3、 If Wi-Fi indicator of the device is in purple, it indicates that Wi-Fi repeater is successfully
connected.
Client shows the mark indicating successful connection of Wi-Fi repeater: There is an icon
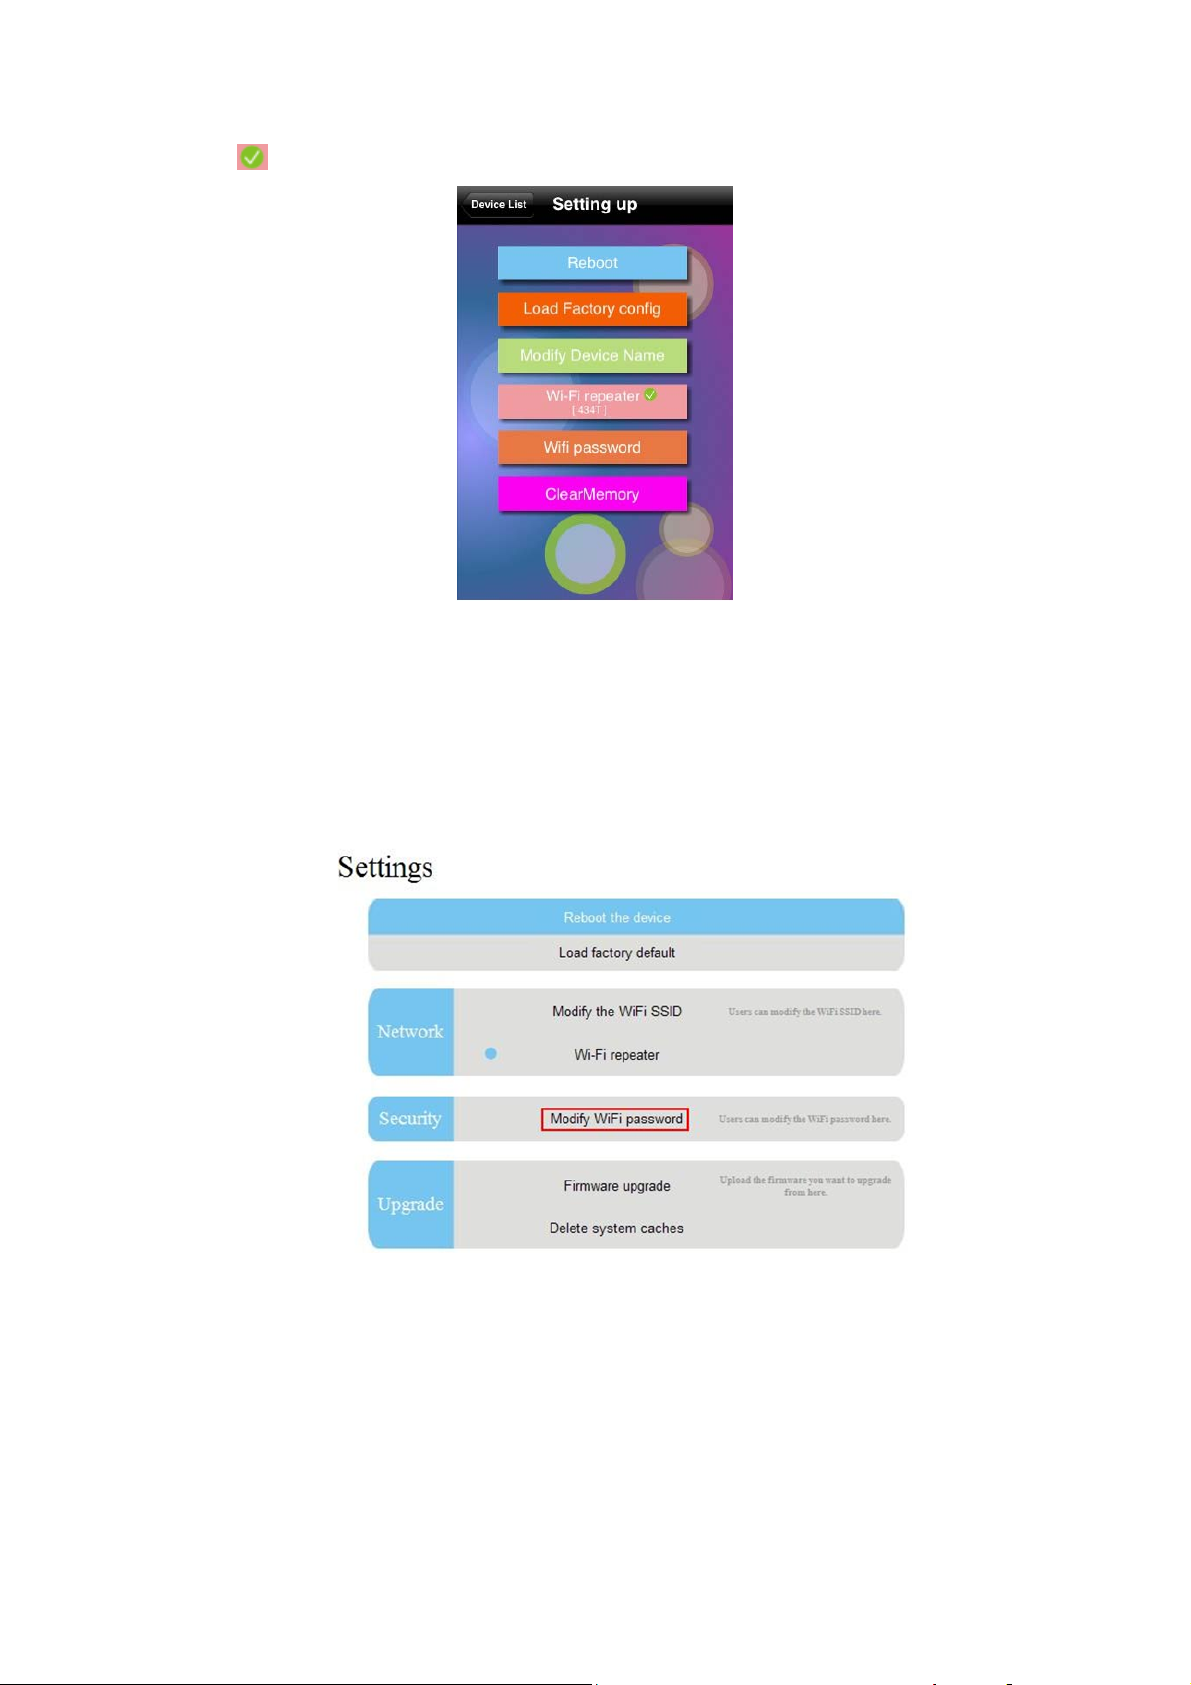
after “Wi-Fi repeater” on setting page and it shows the connected Wi-Fi hotspot name.
8. Modify Wi-Fi password
1、 Turn on the device and connect wireless network to it.
2、 Click the client HameCloud or enter management interface: http:// 192.168.169.1, then
click “Settings” button.
3、 On the settings page, click “Modify Wi-Fi Password” button.
4、 Input new Wi-Fi password and click “Apply” button. When the new password is valid,
wireless network will automatically disconnect. Please refresh wireless network name and
enter new Wi-Fi password to connect.

9. FAQ
Q: No file can be detected on management interface or client.
①Please check if SD card is inserted correctly and SD card indicator is on in blue when
the device turns on.
②Please make sure the power is sufficient enough. If not, SD card will not be identified
normally.
③Please click “Delete System Caches” button on setting page.
④Please restart the device and identify SD card again.
Q: When file is added or modified in wireless disk, the previous file is still on
management interface or HameCloud client, or it is unable to find the added file.
①This is system cache. Please click “Delete System Caches” button on setting page.
When the page displays “System Caches Deleted”, please recheck the file.
②Please restart the device and then check again.
Q: When play video, some formats of file fail to be played.
①If you play video through browser, the system default player is Quick Player. Please
confirm that the player has been installed.
②If QuickTime player fails to play some format of video, please download plug-in units or
other players that support such formats. Android system is compatible with QvodPlay
while Apple system is compatible with OPlayerHD, Good player, etc.
Company: Hame Technology Co., Limited
Name: Wi-Fi Disk
Model Number: S3
This device complies with Part 15 of the FCC Rules. Operation is
subject to the following two conditions: (1) this device may not cause
harmful interference, and (2) this device must accept any interference
received, including interference that may cause undesired operation.
FCC ID: R7F-S3
Changes or modifications not expressly approved by the party responsible
for compliance could void the user's authority to operate the equipment。
NOTE: This equipment has been tested and found to comply with the
limits for a Class B digital device, pursuant to Part 15 of the FCC Rules.
These limits are designed to provide reasonable protection against
harmful interference in a residential installation. This equipment
generates, uses and can radiate radio frequency energy and, if not
installed and used in accordance with the instructions, may cause harmful
interference to radio communications. However, there is no guarantee
that interference will not occur in a particular installation. If this equipment
does cause harmful interference to radio or television reception, which
can be determined by turning the equipment off and on, the user is
encouraged to try to correct the interference by one or more of the
following measures:
-- Reorient or relocate the receiving antenna.
-- Increase the separation between the equipment and receiver.
-- Connect the equipment into an outlet on a circuit different
from that to which the receiver is connected.
-- Consult the dealer or an experienced radio/TV technician for help.
 Loading...