

User
Manual
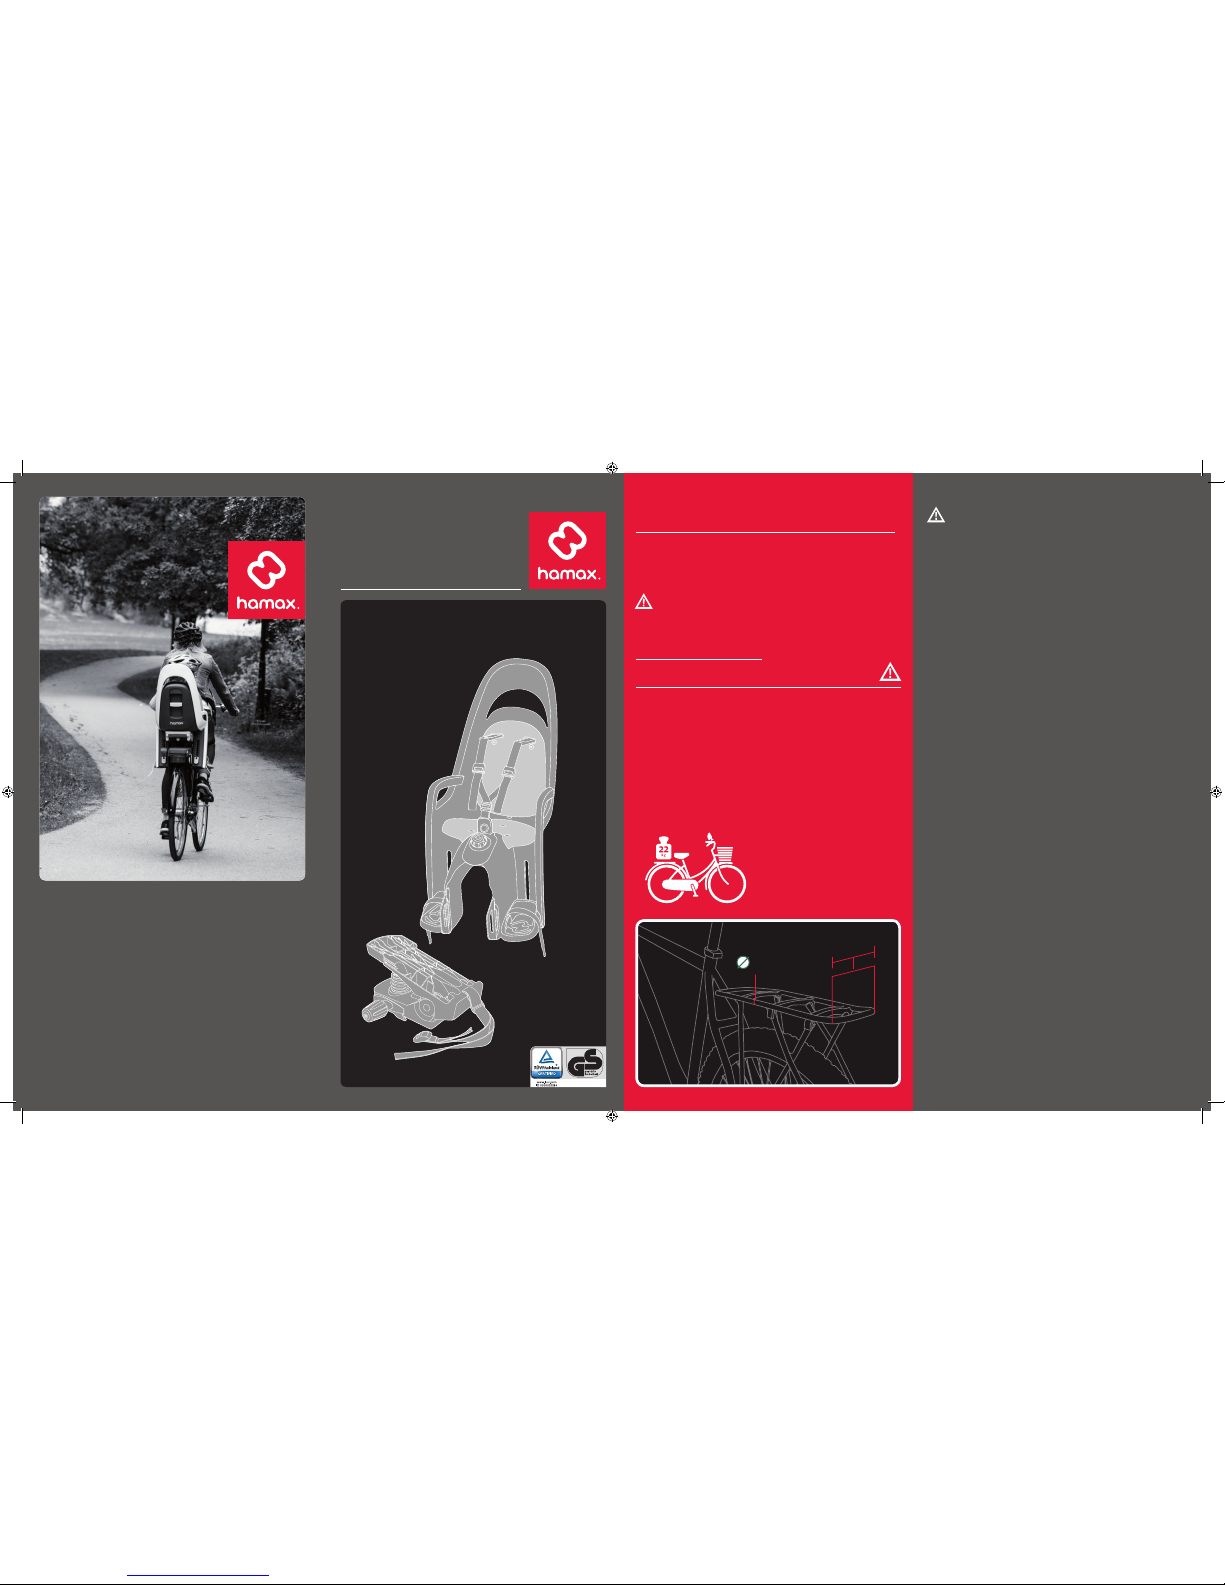
Hamax ID: HAM604809
US User manual Caress w/carrier adapter
Ø = 10 – 20 mm
120 – 180
mm
Hamax AS
Visiting address:
Vålerveien 159
N-1599 Moss
Norway
Tel.: +47 69 23 38 38
email: customerservice@hamax.no
www.hamax.com
User Manual
CAUTION!
Approved according to
ASTM F1625-00(2012)
WARNING:
Improper installation, use or maintenance of
the bicycle child seat can result in serious
injury or death to the child or rider. To reduce
these risks read and follow the important
warnings and instructions below.
• ALWAYS use the safety belt/restraint
system and ensure the child is snugly
restrained in the seat.
• ALWAYS Ensure the rider and child wear
approved and properly fitted bicycle helmets.
• NEVER leave a child unattended in the carrier.
• NEVER leave a child in the carrier with the
bicycle supported only by the kick stand.
• DO NOT use the carrier if any part is broken or
missing.
• DO NOT modify the carrier. This may create a
dangerous condition and will invalidate the
warranty.
• DO NOT attach extra luggage or equipment
to the carrier, as they may exceed the load
limit and lessen stability. The maximum
capacity of the carrier is 22 kg (48.5 lb).
• IMPORTANT: The load of a child carrier will
lessen the bicycle’s stability and alter
handling characteristics, particularly steering
and braking.
• Presence of a child carrier on a bicycle may
require alteration of the method used by the
rider to mount or dismount the bicycle. Take
care when getting on or off bicycle.
• Before each ride, ensure the mounted carrier
does not interfere with braking, pedaling or
steering of the bicycle.
• NEVER ride the bicycle in inclement or
hazardous conditions.
• NEVER ride the bicycle at night without
adequate lighting.
• Reflectors meeting CPSC regulations must
be visible whether the carrier is on the
bicycle or not.
• BE CERTAIN any exposed saddle springs are
covered.
• BE CERTAIN foot protectors are attached.
INSTALLATION
• Can be mounted on bicycles with a luggage
carrier which meets the EN 14872 standard
(25 Kg or more).
• Can be mounted on bicycles with a luggage
carrier with a width between 120 and 180 mm.
• Can be mounted on bicycles with a luggage
carrier with a tube diameter between 10 and
20 mm.
• Cannot be mounted on bicycles with a
luggage carrier that is does not have straight
and parallel sides
• Cannot be mounted on bicycles with a
luggage carrier with a tube diameter of less
than 10 mm
• Cannot be mounted on bicycles with a
luggage carrier with a tube diameter of more
than 20 mm
• The seat should only be mounted on a bicycle
which is suitable for this kind of load. Please
ask your bicycle supplier for detailed advice.
• The child seat is fitted on the luggage carrier
of the bike with the carrier adapter. See
picture E. The carrier adapter knob must be
tightened hard enough to fix the seat securely
and prevent it from sliding. Make it a rule to
check this before starting a trip with the bike.
• Make sure the carrier adapter is well
tightened and check this at regular intervals
• The additional safety strap needs to be
secured to the bicycle frame or seat post
• For optimal comfort and safety of the child,
ensure that the seat does not slope forwards,
so that the child does not tend to slide out of it.
Hamax recommend that the backrest should
slope backwards slightly.
• Check all parts of the bike that they function
correctly with the bicycle seat mounted.
• Make sure any exposed rear saddle springs
are covered
USE
• To take a child on a bicycle, the rider must
normally be over 16 years. Check your
national laws and regulations.
• The child seat is approved for children from
about 9 months to 6 years or maximum 22 kg
weight. Ensure that you re-check from time to
time that the child’s weight and size do not
exceed the maximum capacity of the seat.
• Do not carry a child that is too young to sit
safely in the seat. The child must be able to sit
unaided for a longer period of time, at least as
long as the intended bicycle journey. Please
observe the recommended minimum age.
If you are uncertain, please consult a
pediatrician.
• Ensure that it is not possible for any part of
the child’s body or clothing to come into
contact with any moving part of the seat or
cycle and to re-check as the child grows, due
to the danger of entrapment of feet in the
wheel and of the finders in brake mechanisms
and sprung saddles. The child seat gives good
side and feet protection. However, you are
recommended to buy and fit a closed wheel
guard/chain guard. You can buy this at your
bicycle dealer.
• Check there are no sharp objects, such as split
wires, on the bicycle that can harm the child.
• Ensure that the restraint system is not loose
or able to become trapped in any moving
parts particularly the wheels, including when
the cycle is ridden without a child in the seat.
• Always use the safety belt/restraint system,
ensuring the child is restrained in the seat.
• A child sitting in a child seat should be dressed
more warmly than the rider.
• The child should be protected against rain
with suitable waterproof garments.
• The rider and the child should both be wearing
approved and properly fit helmets.
• Remember that the child seat can get very hot
standing out in the sunshine, so check the
child seat before placing your child in it.
• When transporting the bicycle by car (outside
the car) remove the seat. Air turbulence might
damage the seat or loosen its fastenings to
the cycle, which could result in an accident.
MAINTENANCE
• When cleaning the seat, use only lukewarm
soapy water.
• If the child seat is involved in an accident or
are damaged, contact your dealer to check
that it can still be used. Damaged parts must
always be replaced. Contact your dealer if
you are not sure how to fit the new parts.
We wish you and your child many enjoyable
bicycle trips with your Hamax child seat!
EN
EN
Congratulations on purchasing the Hamax bicycle child seat. You now have
a comfortable and safe child seat when used as intended that can be
adjusted to fit your child as she/he grows.
Please read the User Manual carefully before assembling or using the child seat.
WARNING! Failure to comply with the manufacturer’s instructions
can lead to serious injury or death of the passenger/rider!
Keep the User Manual in a safe place and review periodically and if you
buy extra equipment for your child seat.
FRESMISE EN GARDE!
¡CUIDADO!
Caress w/carrier adapter

Le siège de bicylette pour enfants est
couvert par une garantie dès son achat.
La période de garantie dépend de la
législation du pays en question.
La garantie s’applique aux vices de
matériaux ou de fabrication et ne couvre
pas les dommages dus à une mauvaise
utilisation, un manque d’entretien, non
observation des instructions du manuel
de l’utilisateur, l’application de forces
exagérées ou l’usure normale.
Cette garantie ne s’applique qu’au
premier propriétaire. Veuillez lire
attentivement les recommandations
d’utilisation et d’entretien. Des conditions
pouvant causer une usure prématurée du
transporteur, pourraient ne pas être
couvertes par la garantie. Si des
réparations sont nécessaires sur le siège
ou si souhaitez présenter une demande
de garantie, veuillez contacter votre
fournisseur local, chez lequel vous avez
acheté le siège.
El asiento infantil para bicicleta Hamax
cuenta con garantía desde la fecha de su
compra. El periodo de garantía depende
de la legislación del país en cuestión.
La garantía se aplica con defectos en los
materiales o de fabricación, y no cubre
daños producidos por su uso indebido,
falta de mantenimiento, incapacidad para
seguir el manual de instrucciones, el uso
de la fuerza o el desgaste habitual.
La garantía tan solo es válida para su
usuario original. Por favor, lea
detenidamente las recomendaciones de
uso y mantenimiento. La garantía no
cubre las condiciones que puedan
provocar el desgaste prematuro del
asiento. Si el asiento requiriese de algún
servicio o desea poner alguna queja
sobre la garantía, por favor contacte con
el vendedor local del que hubiera
adquirido su asiento.
FRESGARANTIE
GARANTÍA
CARESS W/CARRIER ADAPTER
WARRANTY
The Hamax Bicycle Child carrier is warranted from
the date of purchase. The warranty period
depends on the law of the country in question.
The warranty applies to defects in materials or
workmanship, and does not cover damage due to
improper use, lack of maintenance, failure to
follow the user manual, use of force or normal
wear and tear. The warranty is valid for the
original user only. Please read the use and
maintenance recommendations carefully.
Conditions that may cause premature wear of the
carrier may not be covered by the warranty.
Should the carrier require service or you want to
make a warranty claim, please contact your local
dealer from whom you purchased your carrier.
EN
FR
1. Siège principal
2. Système de harnais
3. Dossier coulissant
4. Boucle
5. Supports de pieds
6. Adaptateur de porte-bagage complet
a) Molette de fixation
b) Serrure
c) Goupille de verrouillage
d) Clé
e) Sangle de sécurité
7. Bouton d’inclinaison
8. Protection de pied
ES
1. Asiento principal
2. Sistema de retención
3. Respaldo regulable
4. Hebilla
5. Reposapiés
6. Adaptador del portaequipajes
a) Mando de sujeción
b) Cierre
c) Pasador de cierre
d) Llave
e) Correa de seguridad
7. Mando de reclinación
8. Protección para los pies
1
7
3
2
4
5
8
6d
8
6e
6
6a
6b
6c
EN
1. Main seat
2. Restraint system
3. Sliding backrest
4. Buckle
5. Foot rests
6. Carrier Adapter complete
a) Fastening knob
b) Lock
c) Locking pin
d) Key
e) Security strap
7. Reclining knob
8. Footguard
User
Manual
Caress w/carrier adapter
FR Retournez le siège avec
l’adaptateur de porte-bagage, puis
sortez la goupille de verrouillage (6c)
pour libérer les clés (6d). Vous pouvez
maintenant retirer l’adaptateur de
porte-bagage (6) en le pivotant vers le
haut et en le sortant ensuite de ses
gonds (fig. 2 et 3).
ES Gire el asiento con el adaptador
del portaequipajes hasta situarlo boca
abajo y extraiga el pasador de cierre
(6c) para soltar las llaves (6d). A
continuación, podrá desmontar el
adaptador del portaequipajes (6)
tirando de él hacia arriba y soltándolo
del extremo (figs. 2 y 3).
A
Release keys, separate the seat & adapter
EN Turn the seat w/carrier adapter upside-down, slide out
the locking pin (6c) to release the keys (6d). Now the carrier
adapter (6) can be removed by flipping it up, and then
unhinging it at the end (pic. 2 & 3).
CARESS W/CARRIER ADAPTER
6c
6d
zoom
Pic. 2
Pic. 3
6
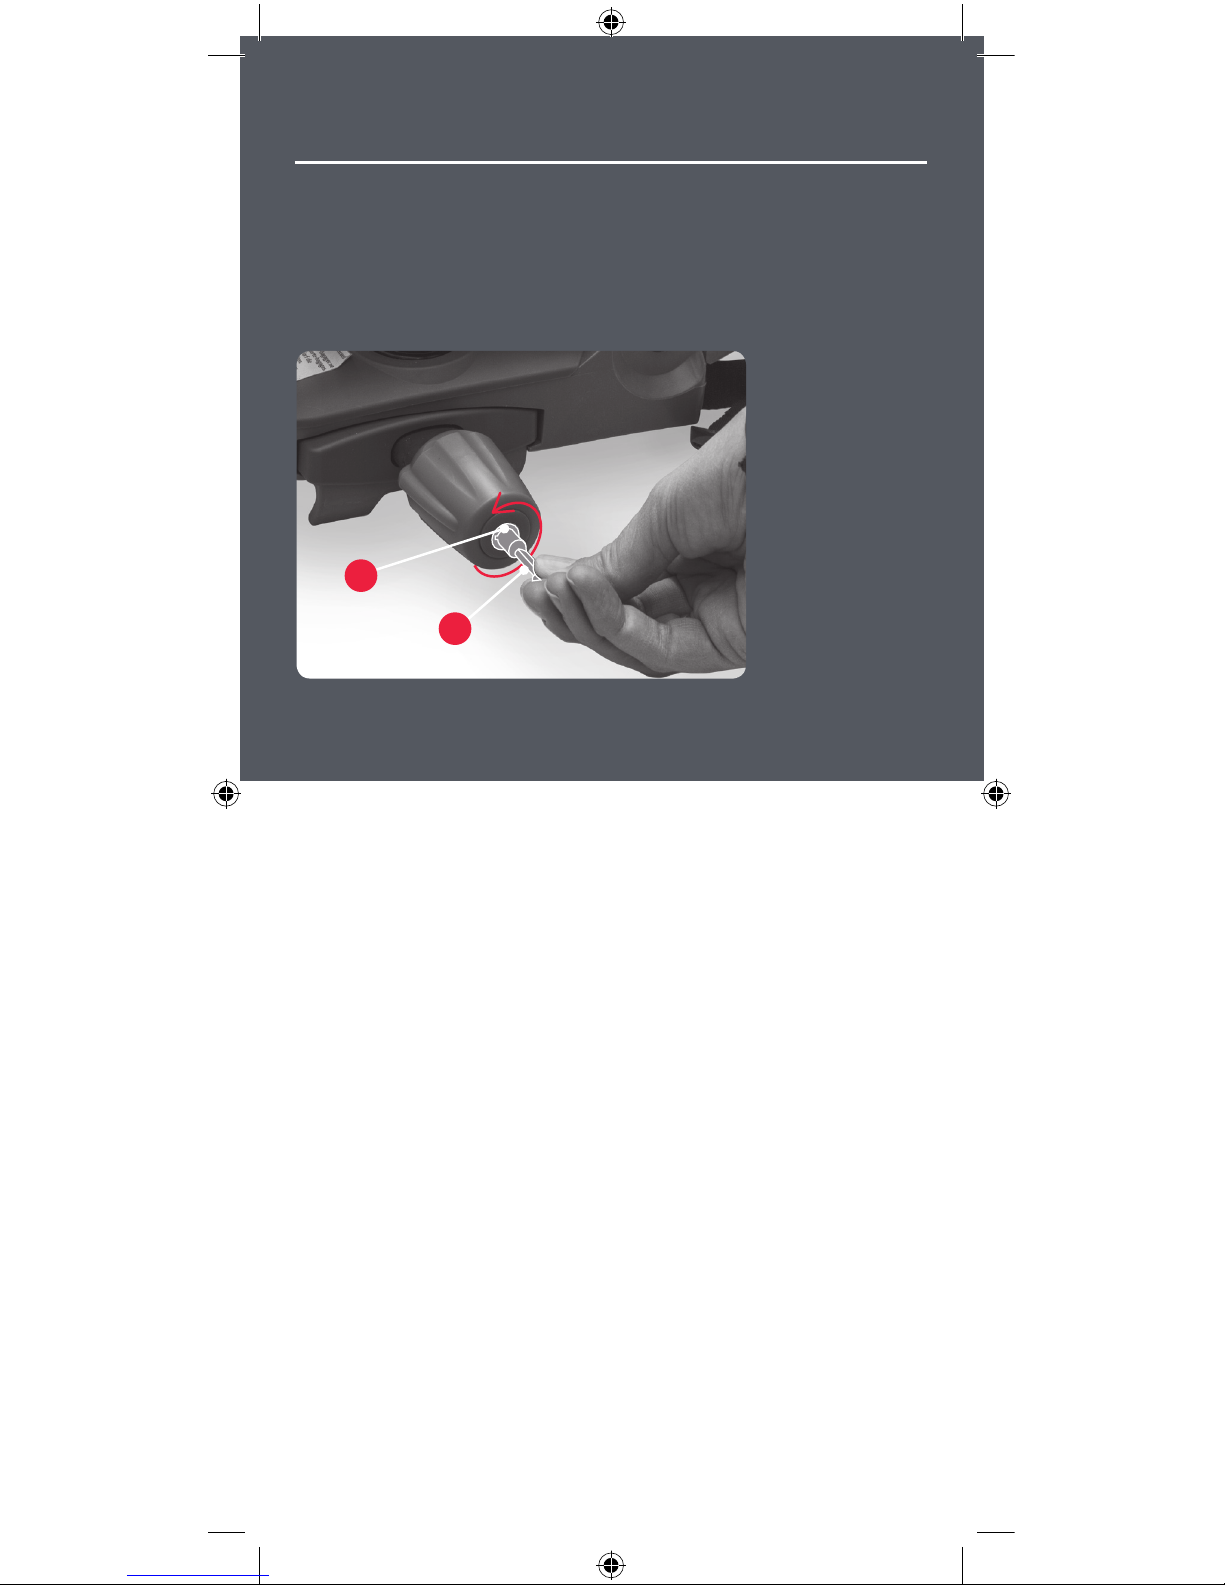
FR La clé (6d) doit être insérée dans
la serrure (6b) et tournée sur 360
degrés dans le sens inverse des
aiguilles d’une montre, avant de la
retirer.
ES Debe introducir la llave (6d) en el
cierre (6b) y girarla 360° en sentido
contrario al de las agujas del reloj
antes de extraerla.
B
Unlock the carrier adapter with the supplied keys
EN The key (6d) needs to be inserted in the lock
(6b) and turned 360 degrees counterclockwise
before removing it.
CARESS W/CARRIER ADAPTER
6b
6d

Unlocked Locked
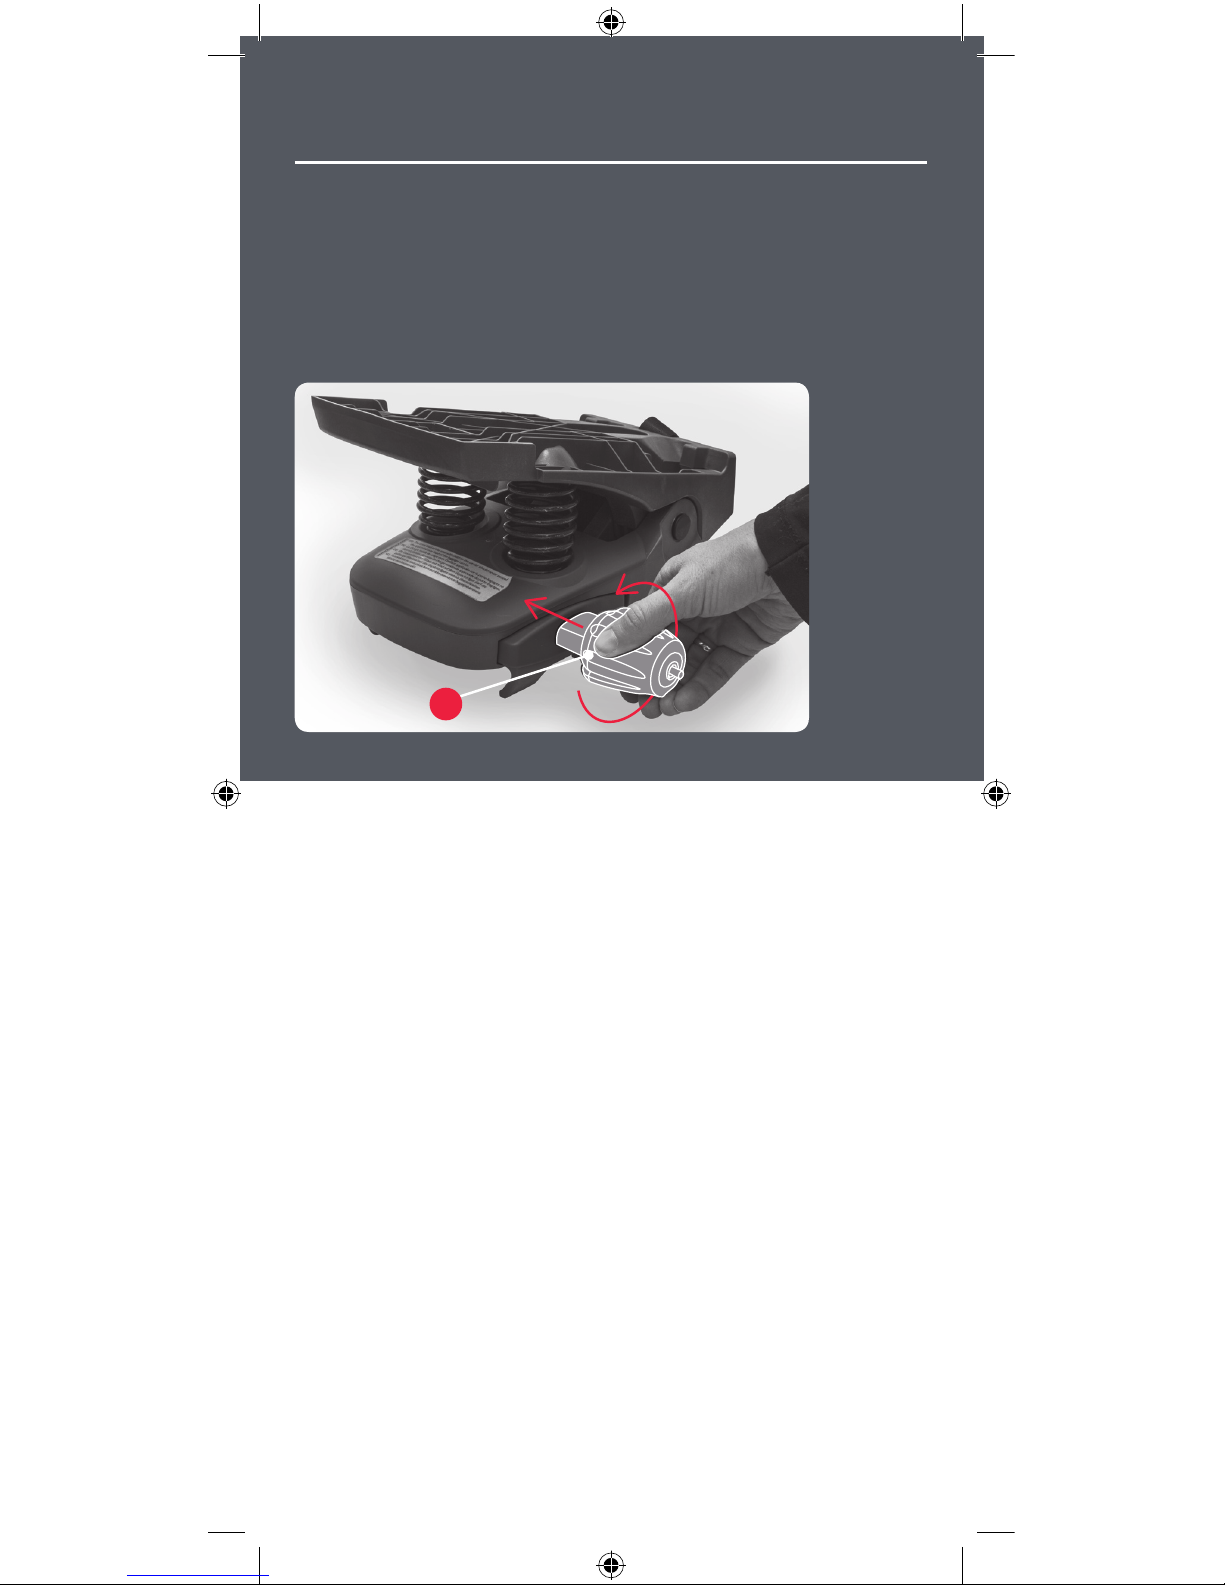
FR Dévissez les crampons en tournant
la molette (6a) dans le sens inverse des
aiguilles d’une montre, jusqu’à ce que
les crampons passent autour du portebagage. Vous devez appuyer sur la
molette pendant que vous la tournez.
ES Abra las mordazas girando el
mando (6a) en sentido contrario al de
las agujas del reloj hasta que estas
queden ajustadas alrededor del
adaptador del portaequipajes. Para ello,
debe presionar el mando mientras lo
gira.
C
Unscrew the carrier adapter
EN Screw the claws outward by turning the
knob (6a) counterclockwise untill the claws fit
around the luggage carrier. The knob needs to be
pushed in while turning.
CARESS W/CARRIER ADAPTER
6a

FR Posez le siège (1) face vers le bas.
Tenez l’adaptateur de porte-bagage (6)
à la même position comme illustré par
la fig. 1, puis placez-le sur ses gonds,
comme illustré par la fig. 2.
ES Coloque el asiento (1) con la parte
delantera boca abajo. Sujete el
adaptador del portaequipajes (6) en la
posición que se muestra en la fig. 1 y
acóplelo tal como se indica en la fig. 2.
D1
Connect the seat & adapter
EN Lay the seat (1) with the front side down. Hold the
carrier adapter (6) in the same position as pic. 1, and
hinge it on like in pic. 2.
CARESS W/CARRIER ADAPTER
Pic. 1
1
6

Pic. 2

FR Insérez la goupille de verrouillage
(6c) dans le guide en vous assurant
que son extrémité soit dirigée vers le
haut afin d’atteindre la position
correcte. Une fois fixée, la goupille de
verrouillage ne devrait pas pouvoir
bouger.
ES Introduzca el pasador de cierre
(6c) en su guía y compruebe que el
extremo quede orientado hacia arriba
para garantizar su correcto montaje.
Una vez acoplado, el pasador de cierre
no debe poder moverse.
D2
Slide in the locking pin
EN Slide in the locking pin (6c) in its track, make
sure the end is pointing upwards for it to fit correctly.
When fastened the locking pin should not be able to
move.
CARESS W/CARRIER ADAPTER
6c

FR Positionnez le siège (1) le plus loin
possible vers l’avant, tout en laissant
assez d’espace pour pouvoir récliner le
siège. Assurez-vous que la marque du
centre de gravité (9) se trouve à moins
de 10 cm derrière l’essieu arrière.
ES Coloque el asiento (1) en la
posición más adelantada posible,
dejando espacio para reclinarlo.
Asegúrese de que la marca del centro
de gravedad (9) esté, como máximo,
10 cm por detrás del cubo de la rueda
trasera.
max
10
cm
E1
Place the seat on the luggage carrier
EN Position the seat (1) as much towards the front as
possible while still leaving room for reclining the seat.
Make sure the centre of gravity mark (9) is less than 10 cm
behind the rear hub.
CARESS W/CARRIER ADAPTER
zoom
1
9

FR Fixez le siège sur le porte-bagage
en appuyant sur la molette (6a) et en
la tournant dans le sens des aiguilles
d’une montre jusqu’à ce que les
crampons saisissent les tubes latéraux
du porte-bagage. Serrez suffisamment
pour maintenir fermement en place le
siège et l’empêcher de glisser.
Prenez l’habitude de vérifier cela avant
de chaque randonnée en vélo.
ES Para fijar el asiento al
portaequipajes, presione y gire el
mando (6a) en el sentido de las agujas
del reloj hasta que las mordazas
queden sujetas a los tubos laterales del
portaequipajes. Apriételo lo suficiente
para asegurar el asiento y evitar que se
deslice.
Acostúmbrese a comprobar el apriete
antes de empezar el paseo en bicicleta.
E2
Fasten the seat on the luggage carrier
EN Fix the seat to the luggage carrier
by pushing in and turning the knob (6a)
clockwise until the claws grasp the side
tubes of the luggage carrier. Tighten
hard enough to fix the seat securely and
prevent it from sliding.
Make it a rule to check this before
starting a trip with the bike.
CARESS W/CARRIER ADAPTER
6a

FR Appuyez sur la goupille de
verrouillage (6b) sur l’extrémité de la
molette (6a). La molette est désormais
verrouillée et ne peut être déverrouillée
qu’à l’aide des clés fournies.
ES Presione el pasador de cierre (6b)
del extremo del mando (6a). El mando
quedará bloqueado; para desbloquearlo,
deberá usar las llaves incluidas (6d).
F
Lock the carrier adapter
EN Push in the lock pin (6b) on the end of
the knob (6a). The knob is now locked and
can be unlocked with the supplied keys (6d).
CARESS W/CARRIER ADAPTER
6b
6a

FR La sangle de sécurité additionnelle
doit être attachée au cadre ou à la tige
de la selle. Passez la sangle de sécurité
(6e) dans les trous comme illustré par la
fig. 1 et 2, puis tirez sur son extrémité
pour la serrer. Si nécessaire, vous
pouvez ajuster la longueur de la sangle.
ES La correa de seguridad adicional
debe fijarse al cuadro o al tubo del
asiento. Haga pasar la correa de
seguridad (6e) por los orificios, tal
como se muestra en las figs. 1 y 2; a
continuación, tire del extremo para
apretarla. Si es necesario, puede
ajustar la longitud de la correa.
G
Fasten the additional security strap
EN The additional security strap needs to be secured to
the frame or seat post. Lead the security strap (6e) through
the holes as shown in pic. 1 & 2, then pull at the end to
tighten it. If needed the length of the strap can be adjusted.
CARESS W/CARRIER ADAPTER
Pic. 1
6e

Pic. 2

FR Pour libérer le support de pieds
(5) : Libérez le levier du repose-pieds à
l’arrière en le pivotant vers le haut.
Placez le repose-pieds (5) à la hauteur
appropriée, puis fixez le repose-pieds
en poussant le levier vers le bas.
ES Cómo soltar el reposapiés (5):
Suelte la sujeción situada en la parte
posterior del reposapiés tirando de ella
hacia arriba. Coloque el reposapiés (5)
a la altura deseada y fíjelo presionando
la sujeción hacia abajo.
H1
EN How to release the foot rest (5): Release the footrest
handle on the back by flipping it upwards. Move the foot
rest (5) to the preferred height and fasten the foot rest by
pressing the foot rest handle down.
Foot rest adjustment
CARESS W/CARRIER ADAPTER
5

FR Méthode de libération de la sangle
de pieds (a) : Pour fixer la sangle de
pieds, glissez la sangle dans le guide et
tirez vers le bas jusqu’à atteindre la
longueur appropriée. La sangle se
verrouille automatiquement. Il n’est
possible de serrer la sangle que
lorsqu’elle se trouve dans le guide. Pour
libérer la sangle de pieds, il suffit de la
retirer du guide.
ES Cómo soltar la correa del pie (a):
Para ajustar la correa del pie,
introdúzcala en su guía y tire de ella
hacia abajo hasta darla la longitud
deseada. La correa quedará bloqueada
automáticamente. Únicamente puede
apretarse la correa si ésta se encuentra
en su guía. Para aflojar la correa del pie
sólo tiene que sacarla de su guía.
H2
EN How to fasten/release the foot strap (a): To fasten the
foot strap put the strap into the track and pull down to
preferred length. The strap will automatically lock. It’s only
possible to tighten the strap when it is in the track. To loosen
the foot strap, just pull it out of the track.
Foot strap adjustment
CARESS W/CARRIER ADAPTER
a
a

FR Pour monter la protection de pieds
supplémentaire (8) : Poussez la
protection de pied dans les rainures
d’ajustement jusqu’à ce qu’elle
produise un clic.
ES Para montar la protección
adicional para los pies (8): Presione la
protección para los pies para acoplarla
a las ranuras existentes hasta que
escuche un chasquido.
I
EN To mount the extra footguard (8):
Press the footguard into the fitting
grooves until it clicks.
Extra footguard
CARESS W/CARRIER ADAPTER
8
zoom

CLICK!
Opposite view
8
8

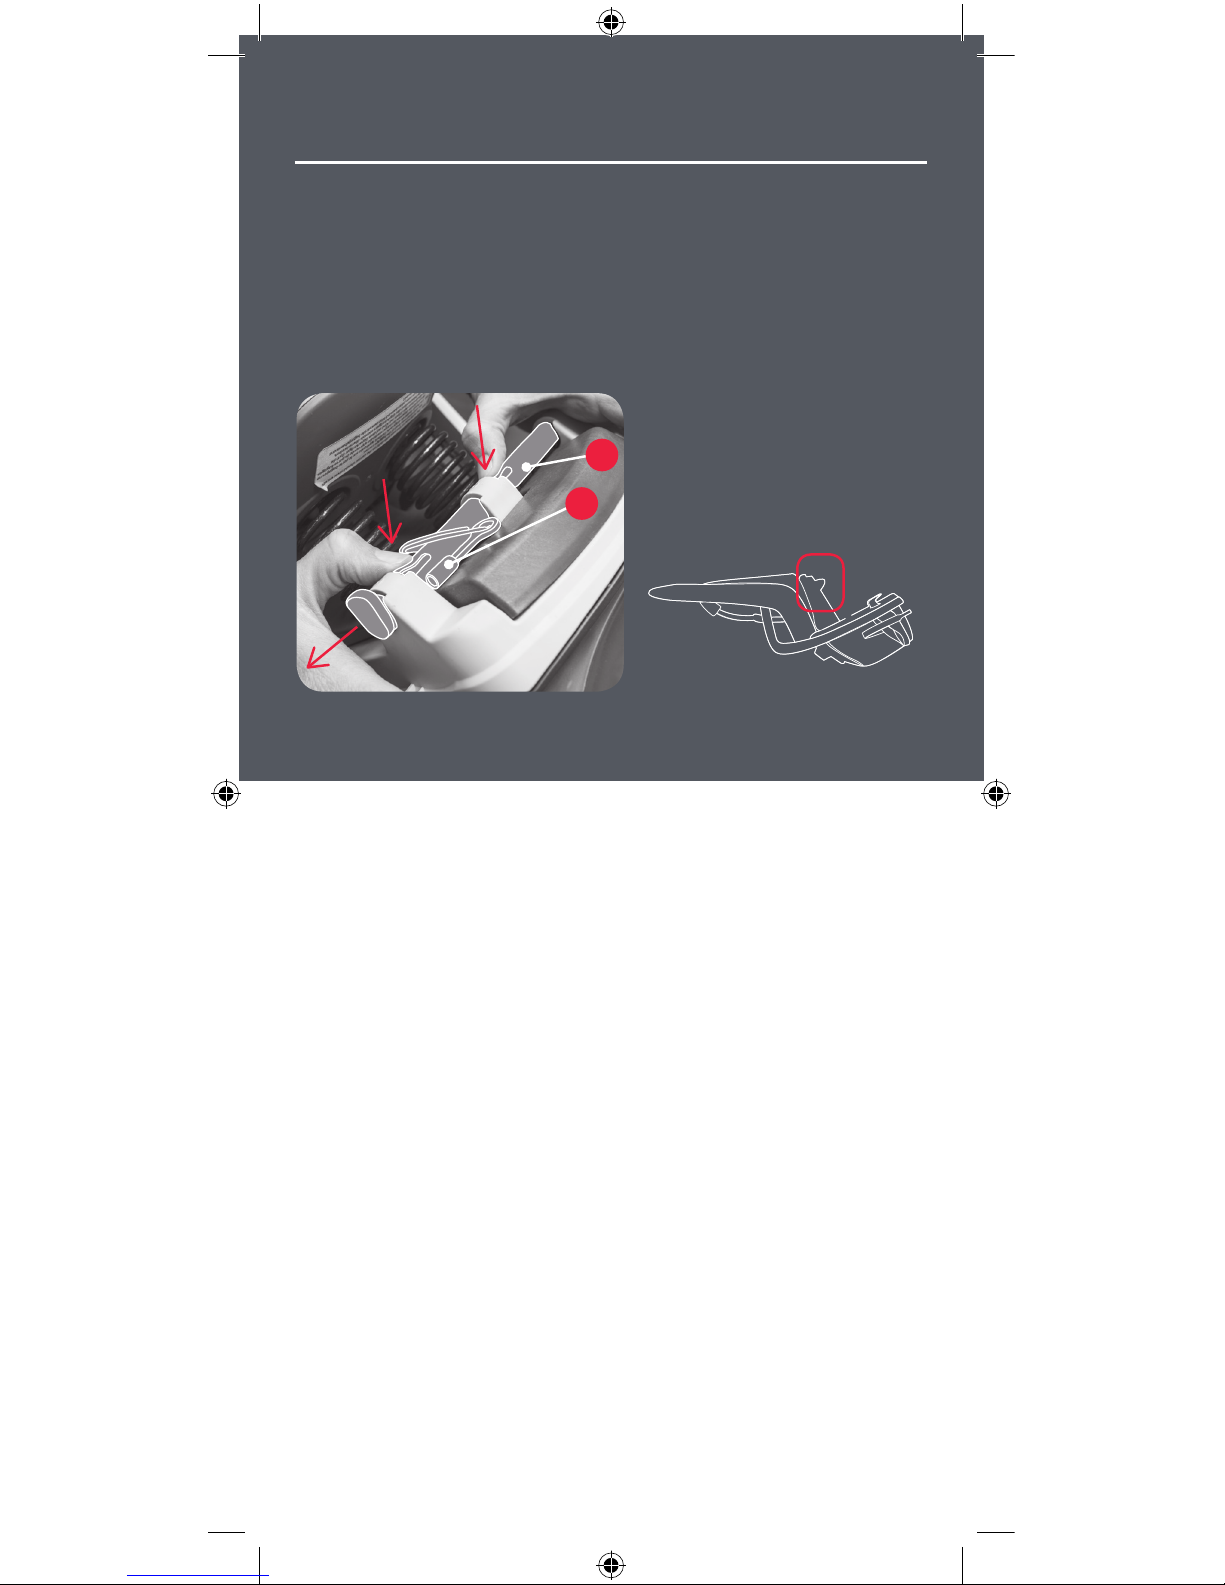
FR Le système de harnais (2) peut
être attaché et détaché en enfonçant la
boucle (4) comme montré à
l’illustration #1. Il est important
d’appuyer sur le centre de la boucle
pour la libérer (#2 et #3). La force d’un
adulte est nécessaire pour ouvrir la
boucle ; c’est une question de sécurité,
pour que l’enfant ne puisse l’ouvrir.
ES El sistema de retención (2) puede
abrocharse y desabrocharse
presionando la hebilla (4) que se
muestra en la fig. 1. Es importante que
presione la parte central de la hebilla
para desabrocharla (#2 & #3). Para
abrir la hebilla se necesita la fuerza de
un adulto, con el fin de que el niño no
pueda abrirla y garantizar su seguridad.
J1
EN The restraint system (2) can be attached and detached by
pressing in or out the buckle (4) shown in pic. 1. It is important to
press at the middle of the buckle button (pic. 2 & 3) when
detaching the restraint system. The buckle button needs an
adult force to open, this is for the safety of the child, so they
cannot open it.
Restraint system
CARESS W/CARRIER ADAPTER
Where to push:
Pic. 1
Pic. 2 Pic. 3
a
2
b
4
c
4
OKNOT
OK

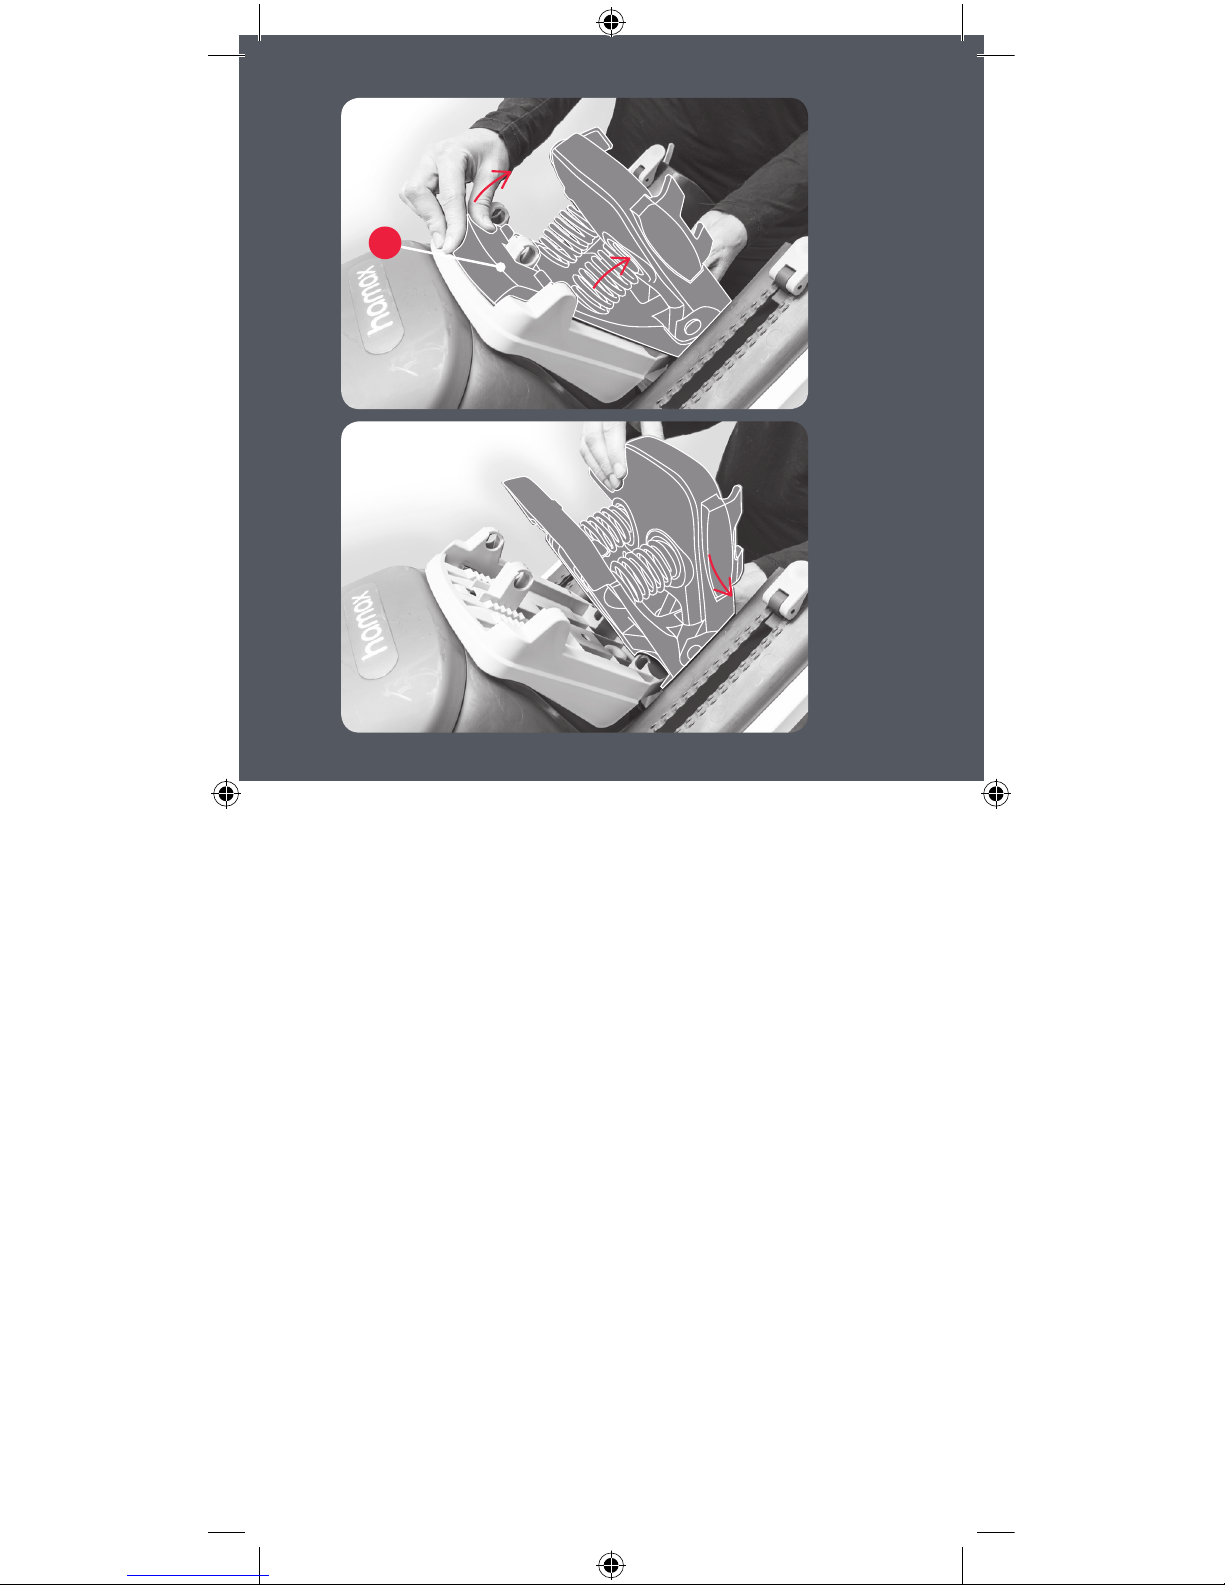
FR La longueur du système de
harnais peut être réglée à l’aide des
boucles a et b.Pour régler les boucles
(a+b), tenez les boucles comme le
montre l’illustration 1. En appuyant sur
le bouton rouge et en tirant vers le haut
la boucle, la ceinture est libérée.
Pour serrer le système de harnais, tirez
simplement sur l’extrémité des
ceintures (l’illustration 2).
Déplacez la boucle (c) vers le haut pour
empêcher les ceintures de glisser des
épaules de l’enfant (l’illustration 3.)
ES La longitud del sistema de
retención puede ajustarse utilizando las
hebillas a y b. Para ajustar dichas
hebillas (a y b), sujete la hebilla
correspondiente tal como se muestra
en la fig. 1. Al presionar el botón rojo,
la correa se aflojará si tira de la hebilla
hacia arriba.
Para ceñir el sistema de retención sólo
tiene que tirar del extremo de las
correas (consulte la fig. 2).
Mueva la hebilla (c) hacia arriba para
asegurar la correa, de forma que ésta
no pueda soltarse de los hombros del
niño (consulte la fig. 3).
J2
Chest buckle adjustment
EN The restraint system length can
be adjusted by adjusting buckle a
and b. To adjust buckles (a+b) hold
the buckle as shown in pic. 1. By
pressing the red button, the belt
loosens by pulling the buckle
upwards.
To tighten the restraint system just
pull end of the belt straps (pic. 2).
Move the buckle (c) up to secure the
belt so it cannot fall down from the
child’s shoulders (pic. 3).
Pic. 1
Pic. 2
Pic. 3
CARESS W/CARRIER ADAPTER
a
b
a/b
c
a/b
c
2

FR La hauteur du dossier coulissant
(3) peut être réglée, pour que le dossier
et le système de harnais s’adaptent à la
hauteur des épaules de l’enfant. Placez
le dossier à la hauteur appropriée et
verrouillez en poussant le levier vers le
bas.
ES La altura del respaldo regulable
(3) puede ajustarse para que el
respaldo y el sistema de retención
queden a una altura correcta con
respecto a los hombros del niño. Mueva
el respaldo hasta situarlo a la altura
deseada y fíjelo desplazando la palanca
hacia abajo.
K
Sliding backrest
EN The sliding backrest (3) height can be
adjusted, so the backrest and restraint system
is in the correct height to the child’s shoulders.
Move backrest to preferred height, and fasten
by pressing the lever down (pic. 1).
Pic. 1
CARESS W/CARRIER ADAPTER
3

FR Pour incliner le siège en arrière,
tournez la molette de réglage (7)
jusqu’à atteindre la position désirée.
ES Para reclinar el asiento, gire el
botón (7) hasta alcanzar la posición
deseada.
L
EN To recline the seat twist the reclining
knob (7) to the position required.
CARESS W/CARRIER ADAPTER
Reclinable function
7

FR
• Ajustez le système de retenue (2)
pour vous assurer que l’enfant est
fermement attaché dans le siège.
• Vérifiez si l’adaptateur de portebagage (6) est fermement fixé et qu’il
ne glisse pas
• Réglez les supports de pied (5) et
attachez les sangles de pied.
AVERTISSEMENT :
• Assurez-vous que le conducteur
et l’enfant portent toujours un
casque de bicyclette approuvé et
correctement ajusté.
• Ne laissez jamais un enfant sans
surveillance dans le siège de
bicyclette pour enfants.
• Ne laissez jamais un enfant dans
le siège de bicyclette pour enfants
lorsque la bicyclette n’est retenue
que par la béquille de
stationnement.
ES
• Ajuste el sistema de sujeción (2) para
asegurarse de que el niño está
correctamente sujeto al asiento.
• Compruebe que el adaptador del
portaequipajes (6) esté bien asegurado
y no se deslice
• Regule los reposapiés (5) y ajuste
bien las correas de los pies
ADVERTENCIA
• Asegúrese de que el conductor y
el niño siempre lleven cascos de
bicicleta aprobados y ajustados
como es debido.
• Nunca deje al niño solo sentado
en el asiento.
• Nunca deje al niño en el asiento
de la bicicleta si esta está apoyada
solo sobre la pata de cabra.
M
Before embarking on a bicycle trip
CARESS W/CARRIER ADAPTER
EN
• Adjust the restraint system (2) to
ensure the child is snugly
restrained in the seat.
• Check if the carrier adapter (6)
still is secured well and does not
slide
• Adjust the foot rests (5) and
fasten foot straps.
WARNING
• Ensure the rider and child
always wear approved and
properly fitted bicycle helmets.
• Never leave a child unattended
in the bicycle child seat.
• Never leave a child in the
bicycle child seat with the
bicycle supported only by the
kick stand.
5

6
2
5

FR L’adaptateur de porte-bagage pour
montage sur porte-bagage peut être
retiré du siège Caress et remplacé par
un arc porteur.
Pour ce faire, vous devez retirer le
siège de l’adaptateur de porte-bagage.
Déverrouillez la serrure (6b) (fig. 1) et
dévissez la molette (6a) en appuyant
dessus et en la tournant dans le sens
inverse des aiguilles d’une montre
jusqu’à ce que le siège puisse être
retiré (fig. 2).
ES El adaptador para realizar el
montaje en el portaequipajes puede
desmontarse del asiento Caress y
sustituirse por una horquilla
sustentadora.
Para hacerlo, debe separar el asiento
del adaptador del portaequipajes.
Desbloquee el cierre (6b; fig. 1) y
desenrosque el mando (6a),
presionándolo y girándolo en sentido
contrario al de las agujas del reloj,
hasta que el asiento quede lo
suficientemente suelto como para
desmontarlo (fig. 2).
N1
How to remove the Carrier Adapter
EN The carrier adapter for luggage carrier mounting can be taken
off the Caress seat and can be replaced by a carrier bow.
To do this you need to take the seat of the carrier adapter. Unlock
the lock (6b)(pic. 1) and unscrew the knob (6a) by pushing it in and
turning counterclockwise until the seat is loose enough to take off
(pic. 2).
CARESS W/CARRIER ADAPTER
Pic. 1
6a
6b

Pic. 2

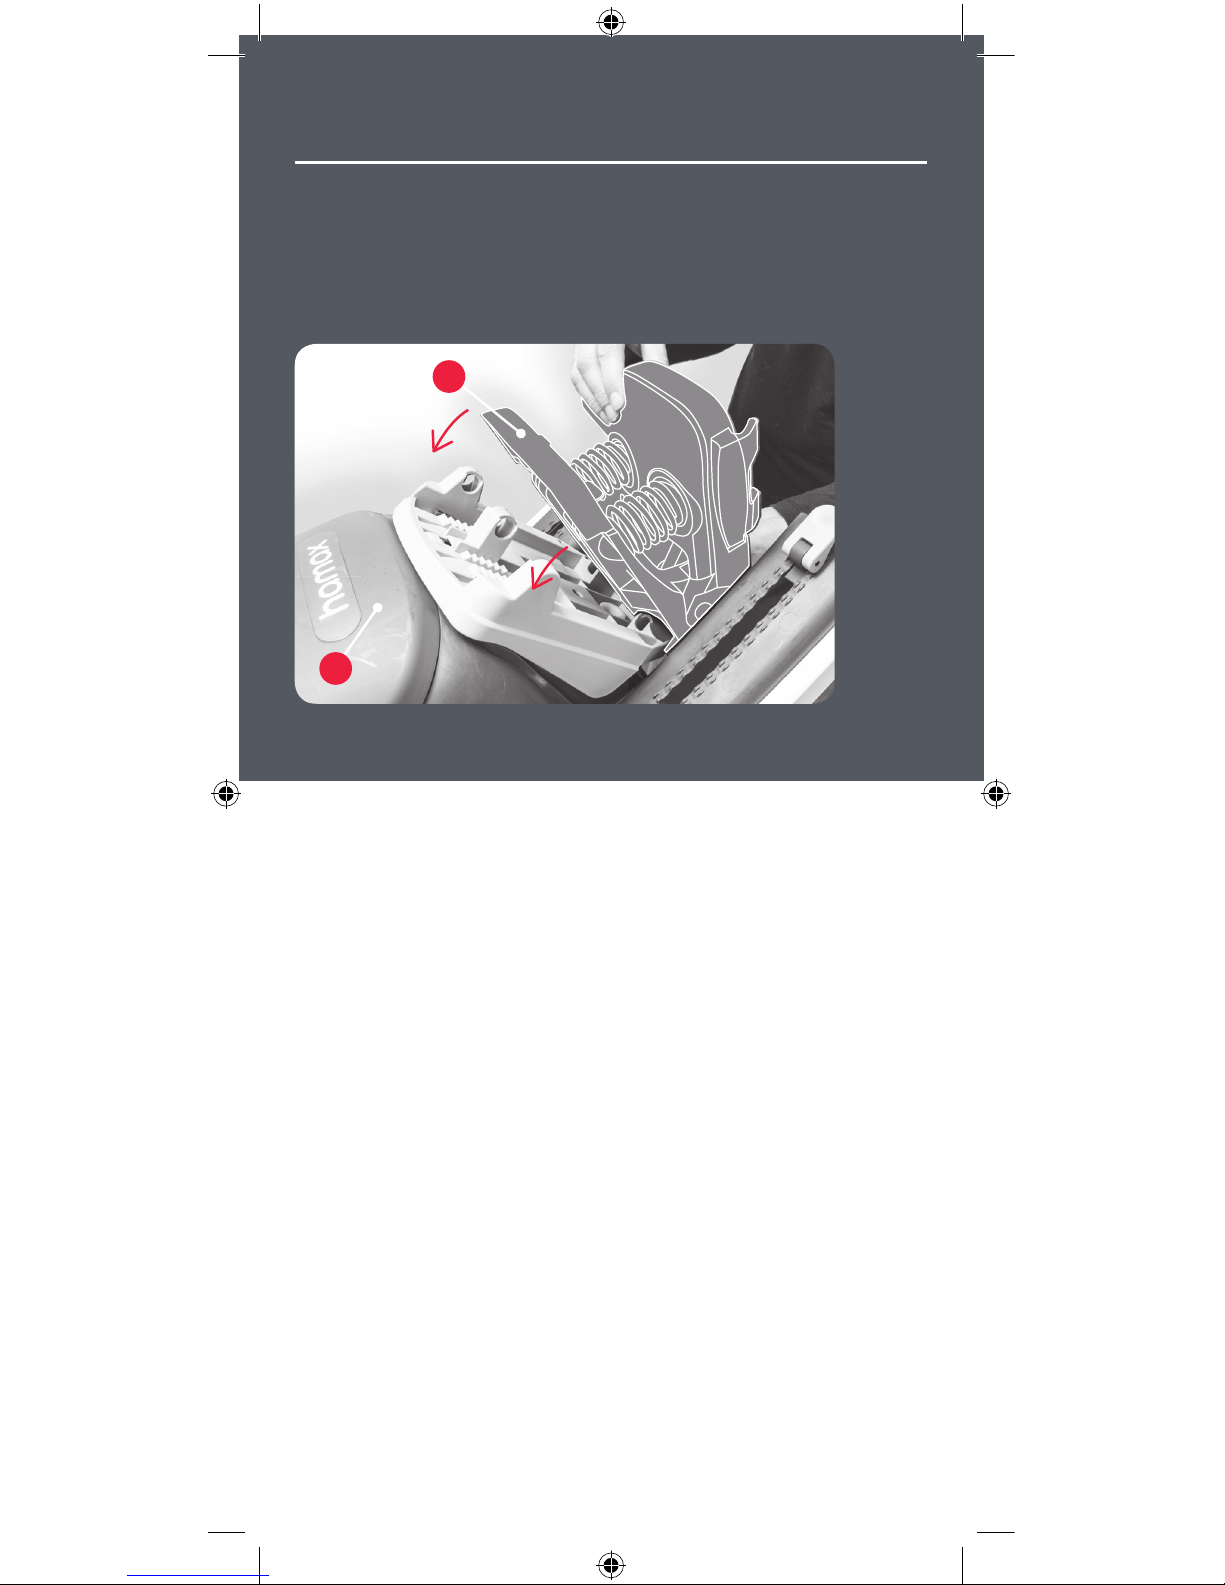
FR Retournez le siège (1). Appuyez
sur les deux doigts sur la goupille de
verrouillage (6c) et glissez-la hors de
l’emplacement (fig. 1). Vous pouvez
maintenant retirer l’adaptateur de
porte-bagage (6) en le pivotant vers le
haut et en le sortant ensuite de ses
gonds (fig. 2 et 3).
ES Gire el asiento (1) hasta situarlo
boca abajo. Presione ambos pestillos
del pasador de cierre (6c) y extráigalo
(fig. 1). A continuación, podrá
desmontar el adaptador del
portaequipajes (6) tirando de él hacia
arriba y soltándolo del extremo (figs. 2
y 3).
N2
How to remove the Carrier Adapter
EN Turn the seat (1) upside down. Press both snap fingers on
the locking pin (6c) and slide it out (pic. 1). Now the carrier
adapter (6) can be removed by flipping it up, and then
unhinging it at the end (pic. 2 & 3).
CARESS W/CARRIER ADAPTER
Pic. 1
6c
1

Pic. 2
Pic. 3
6

FR Montez la barre porteuse sur le
siège :
Insérez l’arc porteur dans le sens de la
longueur dans les trous sous la base du
siège. Insérez une goupille de
verrouillage d’arc porteur (remarquez
qu’il s’agit d’un composant différent
que la goupille de verrouillage de
l’adaptateur de porte-bagage) dans les
trous sous la base du siège, en la
laissant en position non verrouillée pour
permettre le réglage final
ultérieurement.
Insérez l’arc porteur dans l’étrier de
fixation sur la bicyclette et réglez la
position longitudinale correcte = 10 cm
maximum entre la marque centrale du
siège et l’essieu arrière. Après le
réglage, verrouillez le siège en tournant
la goupille de verrouillage excentrique à
la position verrouillée.
Pour des instructions détaillées et
des illustrations de chaque étape,
veuillez visiter notre site Web :
www.hamax.com
ES Acople la barra sustentadora al
asiento:
Introduzca la horquilla sustentadora por
los orificios la longitud necesaria por
debajo de la base del asiento.
Introduzca un pasador de cierre de la
horquilla sustentadora (tenga en cuenta
que se trata de una pieza distinta del
pasador de cierre del adaptador del
portaequipajes) por los orificios
situados bajo la base del asiento sin
llegar a bloquearlo, para permitir su
ajuste final.
Introduzca la horquilla sustentadora en
el soporte de sujeción de la bicicleta y
ajuste correctamente la longitud (10
cm como máximo) entre la marca
central del asiento y el cubo de la rueda
trasera. Tras ajustar el asiento,
bloquéelo girando el pasador de cierre
de eje excéntrico hasta la posición de
cierre.
Para obtener instrucciones e
ilustraciones detalladas de los
distintos pasos, consulte nuestro
sitio web (www.hamax.com).
N3
Changing to a carrier bow
EN Mount the carrier bar to the seat:
Insert the carrier bow through the holes lengthwise under the seat
base. Insert a carrier bow locking pin (note that this is a different
part than the carrier adapter locking pin) through the holes under
the seat base, keeping it in unlocked position to allow final
adjustment.
Insert the carrier bow into the fastening bracket on the bicycle and
adjust the correct lengthwise position = max. 10 cm between the
centre mark on the seat and the rear hub. After adjustment, lock the
seat by turning the eccentric shaft locking pin to locked position.
For detailed instructions and illustrations to each step, please
see our website: www.hamax.com
CARESS W/CARRIER ADAPTER

 Loading...