


Digital Camera
C11440-42U / C11440-42U01
Instruction manual
CAUT ION
Thank you for your purchase
• Follow the safety precautions in Chapter 1 in order to avoid personal
injury and damage to property when using this camera. Be sure to read
this Instruction manual beforehand in order to use the digital camera
correctly. The manual describes the correct method of handing the
camera and provides cautions in order to avoid accidents.
• After reading, keep the manual where it can be referred to at any time.
Ver. 1.1
February 2014
HAMAMATSU PHOTONICS K.K.
97710301-01

~ Blank page ~

C11440-42U/C11440-42U01 Instruction manual_Ver.1.1
1. SAFETY PRECAUTIONS
1-1 INDICATION OF THE SYMBOLS
The following symbols can be found on this camera:
Direct current
Alternating current
1-2 CLASSIFICATION OF WARNING
We have classified the warnings symbols that appear in this instruction manual and on the
camera as follows for your convenience. Make sure that you fully understand them and obey the
instructions they contain.
WARNING
CAUT ION
This symbol indicates a note to help you get the best performance from the
Note
camera. Read the contents of the note carefully to ensure correct and safe
use. Failure to observe one of these notes might impair the performance of
the camera.
This symbol indicates a cautionary item that should be obeyed when
handling the camera. Read the contents carefully to ensure correct and
safe use.
Improper handling of the camera without observing these
warnings could lead to serious injury to the user and even death.
Improper handling of the camera without observing these cautions
could lead to personal injury to the user or damage to property.
This symbol indicates an action that is forbidden. Read the contents
carefully and be sure to obey them.
This symbol indicates a compulsory action or instruction. Read the
contents carefully and be sure to obey them.
1

C11440-42U/C11440-42U01 Instruction manual_Ver.1.1
WARNING
Power supply
Use the camera with the voltage indicated on the rating sticker. Using a
different voltage can damage the camera and lead to fire or electric shock.
Cables
Be careful not to place heavy objects on cables or bend it excessively.
Doing so can damage the cable and lead to fire or electric shock.
Power supply cord
Use the accessory of the AC adaptor when this camera is used.
Do not touch the plug with wet hand. Doing so can lead to electric shock.
Do not attempt to dismantle or modify the camera
Doing so can also lead to damage and even injury, as some internal
components become very hot. Only touch parts as indicated in this
manual.
Do not insert a foreign substance into the camera
Do not allow foreign objects such as combustible substances, metal
objects or water to get inside the camera. They can damage the camera
and lead to fire or electric shock.
If an abnormality occurs
Such as the image suddenly disappearing or a strange noise, smell or see
smoke coming from the camera, stop the power supply immediately and
contact Hamamatsu subsidiary or local distributor. Never attempt to repair
the camera yourself.
2

C11440-42U/C11440-42U01 Instruction manual_Ver.1.1
CAUT ION
AC adaptor
When unplugging the AC adaptor, always pull by the plug, not the cord.
Doing so can lead to fire or electric shock.
Remove the AC adaptor from the outlet when not using the camera for long
periods of time. Doing so can damage the cable and lead to fire or electric
shock.
Connecting and disconnecting cables
Always turn off the power supply of the peripheral device before
connecting and disconnecting cables.
Fixed the camera
When fitting the camera to a tripod or other fixture, use the optional base
plate. Be careful that the fitting screw does not enter more than 8 mm from
the surface of the base plate. Screwing it in excessively can impair normal
operation.
Lenses (C11440-42U)
Be careful not to screw the lens more than 7 mm onto the C-mount of the
camera. Doing so can scratch the protective glass. (Some wide-angle
lenses in particular can have a thread of 7 mm or more.)
Shipping precautions
When transporting the camera by truck, ship, airplane, etc., wrap it
securely in packaging material or something similar.
Strong impact
Do not subject the camera to strong shocks by dropping it, for example.
Doing so can damage the camera.
Operating environment
This system is designed and tested for use in an industrial environment. If
this system is used in residential areas, EMI (electro-magnetic
interference) may occur. This system must not be used in residential
areas.
Disposal
When disposing of the camera, take appropriate measures in compliance
with applicable regulations regarding waste disposal and correctly
dispose of it yourself, or entrust disposal to a licensed industrial waste
disposal company. In any case, be sure to comply with the regulations in
your country, state, region or province to ensure the camera is disposed of
legally and correctly.
3

C11440-42U/C11440-42U01 Instruction manual_Ver.1.1
2. CHECK THE CONTENTS OF PACKAGE
When you open the package, check that the following items are included before use. If the
contents are incorrect, insufficient or damaged in any way, contact your local dealer without
attempting to operate the camera.
Camera (C11440-42U or C11440-42U01) 1
AC adaptor 1
Power supply cord for AC adaptor 1
Lens mount cap (attached to the camera) 1
C11440-42U/C11440-42U01 Before Use (Booklet) 1
C11440-42U/C11440-42U01 Instruction manual (CD-ROM) 1
[Option]
SMA-BNC cable A12106-05
Note
Note
SMA-SMA cable A12107-05
USB 3.0 A to Micro B cable A12046-03
USB 3.0 interface board M9982-22
Adjuster pole A11185-01
Base plate A11186-01
• The cable listed in option is highly recommended for use with the camera. The camera
system may not confirm to CE marking regulation if other type of cable is used with.
• If you use the adjuster pole and the base plate, see each installation manual.
4

C11440-42U/C11440-42U01 Instruction manual_Ver.1.1
3. INSTALLATION
Avoid using or storing this camera in the following places
• When the ambient temperature for using this system might fall below 0 °C or rise
above + 40 °C
• When the ambient temperature for storing this system might fall below - 10 °C or
rise above + 50 °C
• Where the temperature varies extremely
• In direct sunlight or near a heater
• Where the humidity is 70 % or more or where there is dripping water
• Close to a strong source of magnetism or ratio waves
• Where there is vibration
• Where it might come into contact with corrosive gases (such as chlorine or
fluorine)
• Where there is a lot of dust
How to place the camera (when the camera is placed on a table)
Do not place the camera the rear panel of the camera, which connectors
are located, to be at the bottom. (Do not block ventilation openings.)
Do not block ventilation openings
To prevent overheating in the camera’s interior, do not wrap the camera
in cloth or other material, or in any way allow the camera’s ventilation
ports to become blocked. If the camera is being operated in an enclosed
environment, ensure clearance of at least 2 cm from both the intake and
exhaust vents when setting up.
5

C11440-42U/C11440-42U01 Instruction manual_Ver.1.1
CCoonntteennttss
1. SAFETY PRECAUTIONS............................................................................ 1
1-1 INDICATION OF THE SYMBOLS ....................................................................... 1
1-2 CLASSIFICATION OF WARNING ...................................................................... 1
2. CHECK THE CONTENTS OF PACKAGE................................................... 4
3. INSTALLATION........................................................................................... 5
4. OVERVIEW.................................................................................................. 8
5. FEATURES.................................................................................................. 8
6. NAME AND FUNCTION OF THE PARTS ................................................. 10
7. CONNECTION........................................................................................... 13
7-1 CONNECTING OF CABLES ............................................................................. 13
8. OPERATION.............................................................................................. 14
8-1 PRECAUTIONS................................................................................................. 14
8-2 PREPARATION FOR IMAGING........................................................................ 14
8-3 IMAGING ........................................................................................................... 14
8-4 END OF IMAGING............................................................................................. 14
9. DESCRIPTION OF VARIOUS FUNCTIONS ............................................. 15
9-1 THEORY OF CMOS IMAGE SENSOR .............................................................15
9-2 READOUT METHOD (SCAN MODE) ............................................................... 17
9-3 CAMERA OPERATION MODES....................................................................... 18
9-4 FRAME RATE CALCULATION......................................................................... 19
9-5 CONFIGURING EXPOSURE TIME................................................................... 22
9-6 TIMING CHART OF CAMERA OPERATION MODES...................................... 23
9-6-1 FREE RUNNING MODE......................................................................................... 23
9-6-2 EXTERNAL TRIGGER MODE................................................................................ 25
9-6-3 TRIGGER OUTPUT................................................................................................ 30
9-6-4 GLOBAL RESET..................................................................................................... 33
9-7 REAL-TIME CORRECTION FUNCTIONS ........................................................ 34
10. PRECAUTION WHEN USING FL-400....................................................... 35
11. MAINTENANCE ........................................................................................ 36
11-1 CARE................................................................................................................. 36
12. TROUBLESHOOTING CHECKLIST ......................................................... 37
12-1 IMAGE IS NOT TRANSFERRED ...................................................................... 37
12-2 ALTHOUGH IMAGES ARE TRANSFFERED ................................................... 37
13. SPECIFICATIONS..................................................................................... 38
13-1 CAMERA SPECIFICATIONS ............................................................................ 38
13-2 SPECTRAL RESPONSE CHARACTERISTICS ............................................... 40
14. DIMENSIONAL OUTLINES....................................................................... 41
14-1 C11440-42U for C-mount ................................................................................. 41
6

C11440-42U/C11440-42U01 Instruction manual_Ver.1.1
14-2 C11440-42U01 for F-mount ............................................................................. 42
15. WARRANTY .............................................................................................. 43
REPAIRS ............................................................................................................................. 43
16. CONTACT INFORMATION ....................................................................... 44
7

C11440-42U/C11440-42U01 Instruction manual_Ver.1.1
4. OVERVIEW
C11440-42U/C11440-42U01 is equipped with the new scientific image sensor “FL-400”, an
advanced CMOS device that realizes the multiple benefits of high resolution, high readout speed,
and low noise all at once.
The camera provides 4.0 megapixels resolution at 30 frame/s (and up to 25 000 frame/s by
sub-array readout) while achieving 0.9 electrons (median) 1.5 electrons (r.m.s) readout noise
performance. Moreover, the camera delivers high sensitivity through its on-chip micro lens, 33
000:1 high dynamic range that make the camera suitable for almost any scientific application
from bright field imaging to low-light fluorescence imaging across a wide spectral range. Various
external trigger functions and timing output functions ensure proper timing control with peripheral
equipment to cover a wide range of applications.
The camera is the new scientific digital camera for life science microscopy, semiconductor
inspection, x-ray scintillator readout or industrial imaging.
5. FEATURES
(1) Readout noise
In the camera, the pixel amplifier is optimized: it has high gain from optimizing the
semiconductor process, and the difference among pixel amplifiers are greatly
minimized. In addition, there is on-chip CDS (correlated double sampling) circuit, which
plays an important role in achieving low noise. Moreover, the sensor features a split
readout scheme in which the top and bottom halves of the sensor are readout
independently, and the data of each horizontal line is read by 2 lines of column
amplifier and A/D in the top and the bottom in parallel and simultaneously. As a result, it
achieves very fast readout speed while keeping very good low-noise performance.
The camera has lower readout noise (0.9 electrons (median), 1.5 electrons (r.m.s))
than the conventional cooled CCD camera. Moreover, high-speed readout (30 frame/s
with 2048 pixels × 2048 pixels) with very low readout noise, which was impossible, can
now be achieved.
(2) Cooling structure
In the camera, the FL-400 is cooled down by the peltier element to suppress the dark
current. The camera has a special chamber structure to avoid the condensation.
(3) Pixel number and pixel size
The FL-400 sensor has 6.5 µm x 6.5 µm pixel sizes that is equivalent to conventional
CCD image sensor (2/3 inch, 1.3 megapixels). Also, the camera can observe a wider
field of view because the pixel number is about 3 times that of the conventional CCD
image sensor (2/3 inch, 1.3 megapixels)
(4) Readout method
The camera has a variety of readout modes. In addition to full resolution readout mode,
sub-array readout and binning readout are supported.
8

C11440-42U/C11440-42U01 Instruction manual_Ver.1.1
(5) Frame rate
The FL-400 realizes both low noise (0.9 electrons (median) 1.5 electrons (r.m.s)) and
high speed readout (30 frame/s with 2048 pixels x 2048 pixels) simultaneously, by a
split readout scheme in which the top and the bottom halves of the sensor are readout
independently, and the data of each horizontal line is read by 2 lines of column
amplifier and A/D in the top and the bottom in parallel and simultaneously.
(6) Real-time correction functions
When using the camera, there is a case that shading caused by uneven illumination or
optics is not negligible in the image. Also, there are a few pixels in FL-400 that have
slightly higher readout noise performance compared to surrounding pixels. For those
cases, the camera has real-time offset level, shading and defective pixel correction
features to further improve image quality. The correction is performed in real-time
without sacrificing the readout speed at all.
(7) Interface
This camera has USB 3.0 interface.
USB 3.0 interface is able to transfer 4 megapixels image with 30 frame/s. It is versatile
interface. It transfers image with moderate transfer speed.
(8) Camera operation modes
The camera has three operation modes: 1) the free running mode, in which the
exposure and readout timing are controlled by the internal microprocessor, and 2) the
external trigger mode, in which the exposure and readout timing are decided by an
external trigger. 3) the start trigger mode is used to start operating the camera by a
trigger input for a continuous imaging.
9

C11440-42U/C11440-42U01 Instruction manual_Ver.1.1
6. NAME AND FUNCTION OF THE PARTS
(1) C11440-42U for C-mount
① ② ③ ④
⑧ ⑨
⑤ ⑥ ⑦
(2) C11440-42U01 for F-mount
① ② ③ ④
⑧ ⑨
⑤ ⑥ ⑦
10

CAUT ION
• Do not place the rear panel of the camera, which connectors are
located, to be at the bottom (Do not block ventilation openings.).
① Lens mount
C11440-42U can be attached to C-mount lens or an optics system.
C11440-42U01 can be attached to F-mount lens or an optics system.
Note
• The depth of the C-mount is 7 mm. Screwing in the mount too far
can scratch the glass surface.
② USB 3.0 interface connector [USB 3.0]
This is connected to the USB 3.0 interface connector on the computer.
③ Trigger input connector [EXT.TRIG]
This is used when the camera is being operated using external synchronization.
Input is 3.3 V LVCMOS level, and input impedance is 10 kΩ.
When an external trigger is input, the trigger is activated at the falling or rising edge of the
signal. (You can choose external trigger polarity between Negative and Positive.)
④ Timing out connector 1,2,3 [TIMING 1,2,3]
This is used when peripheral device(s) require synchronization with the camera.
Output is 3.3 V LVCMOS level, and it is output though
Output impedance is 33 Ω.
Note
• Determine termination according to cable length and so on.
⑤ DC power input connector [DC IN]
This is the power supply terminal. Use the accessory AC adaptor.
⑥ Power switch [POWER]
The power is turned on/off.
When the power switch is set to "ON", the camera turns on and starts initialization and the lamp
blinks in green.
When the initialization is completed , the lamp color stays in green.
When the camera transfers data and the lamp color is orange.
When the power switch is set to "OFF", the camera returns to the power off state and the lamp
turns off.
⑦ STATUS lamp [STATUS]
The LED indicates status of camera.
Lighting color Status of power distribution
Turn off (no color) Power off
Green (Blinking) Initialization
Green (lighting) Power on
Orange (lighting) Data transfer
Red (lighting) Heat up
CAUT ION
• When the camera heats up, stop operation and unplug the AC
adaptor immediately.
C11440-42U/C11440-42U01 Instruction manual_Ver.1.1
BUS TRANSCEIVER IC SN74AVC8T245.
11

C11440-42U/C11440-42U01 Instruction manual_Ver.1.1
⑧ Air outlet
This is the outlet for the heat ventilation.
• To prevent overheating inside the camera, do not wrap the camera in cloth or
other material, or block the camera’s ventilation.
• If the camera is being operated in an enclosed environment, ensure to keep
clearance at least 2 cm from both intake and exhaust vents when setting up.
⑨ Installation holes for Base plate
These are the holes to install the base plate.
• If you use the adjuster pole and the base plate, see each installation manual.
12

C11440-42U/C11440-42U01 Instruction manual_Ver.1.1
7. CONNECTION
7-1 CONNECTING OF CABLES
Refer to the figure when connecting the various cables.
Camera (Rear)
USB 3.0 Interface board
Computer
① AC adaptor
② USB 3.0 Interface cable
• When you connect cables, turn off the power supply of the camera and the peripheral devices.
• If you use the adjuster pole and the base plate, see each installation manual.
CAUT ION
• Do not place the rear panel of the camera, which connectors are located,
to be at the bottom (Do not block ventilation openings.).
① AC adaptor
This is the cord to supply a power supply. Use the accessory AC adaptor.
② USB 3.0 interface cable (Option)
This is the cable to connect the USB 3.0 interface connector of the camera and the USB 3.0
interface connector on the computer.
Note
• Hamamatsu recommends A12046-03 optional USB 3.0 interface cable for this
camera. The camera complies with EMC direction with using A12467-03 Camera
Link interface cable. Be careful that the camera with other interface cable may not
fulfill the EMC directive requirements.
Figure 7-1
13

C11440-42U/C11440-42U01 Instruction manual_Ver.1.1
8. OPERATION
8-1 PRECAUTIONS
Be careful of the following when you operate the camera.
(1) Cooling method
Cooling of this equipment is done using a Peltier element. With a Peltier element, when
current is supplied, one surface is cooled, and the other surface is heated. The FL-400
is positioned on the cooling side, and cooling is done by discharging the heat from the
heated surface. This cooling method is passive air-cooling.
(2) Ambient temperature
The recommended ambient temperature for camera operation is between 20 ºC and
25 °C. Thus, the maximum temperatures to which the FL-400 can be cooled, and the
stability of the cooled temperature, are affected by the ambient temperature. The
ambient temperature should be maintained at a constant temperature in order for
cooling to be effective.
(3) Protection circuit
A double protection circuit protects this camera’s thermoelectric cooling device. If the
heat dissipater becomes abnormally hot, the protection circuit sets off a buzzer alarm
and stopping current supply to Peltier element simultaneously.
When the protection circuit is activated immediately turn off the power switch. Then
investigate cause and remove the cause of the overheating and restart the camera.
8-2 PREPARATION FOR IMAGING
Use the following procedure when starting operating of the camera.
(1) Connect devices as shown in Figure 7-1 before you start operation.
(2) Turn on the computer's power switch.
The cooling temperature becomes stable about 5 minutes after cooling begins.
• When the cables are connected, confirm the power switch of peripheral device is in the OFF position.
8-3 IMAGING
Start the control and imaging with the application software.
Note
• Please refer to the instruction manual attached to the software for the way of using it and the details.
8-4 END OF IMAGING
Carry out the procedure below when imaging is finished.
(1) End the imaging or transmission of image data with the application software.
(2) Turn off the power to the peripheral device.
14

C11440-42U/C11440-42U01 Instruction manual_Ver.1.1
9. DESCRIPTION OF VARIOUS FUNCTIONS
9-1 THEORY OF CMOS IMAGE SENSOR
The pixel of a CMOS image sensor is composed of the photodiode and the amplifier that
converts the charge into voltage. Entered light is converted to charge and converted to voltage in
the pixel. The voltage of each pixel is output by switching the switch one by one. (Figure 9-1)
The FL-4
double sampling) circuit, which plays an important role in achieving low noise. In addition, the
FL-400 realizes both low noise and high speed readout simultaneously, by a split readout
scheme in which the top and the bottom halves of the sensor are readout independently, and the
data of each horizontal line is read by 2 lines of column amplifier and A/D in the top and the
bottom in parallel and simultaneously.
00 scientific CMOS image sensor used in this camera has an on-chip CDS (correlated
Figure 9-1 Structure of the FL-400
15

C11440-42U/C11440-42U01 Instruction manual_Ver.1.1
The exposure and the readout method of FL-400 is rolling shutter.
In the rolling shutter, the exposure and readout are done line by line. Therefore, the exposure
timing is different on one screen. (Figure 9-2)
But even if th
e object moves during the exposure, the affect of rolling shutter is very small.
Figure 9-2 Readout timing of Rolling shutter
16
C11440-42U/C11440-42U01 Instruction manual_Ver.1.1
9-2 READOUT METHOD (SCAN MODE)
The camera has the following scan modes.
(1) Normal readout
Perform charge readout from camera individually for all pixels.
(2) Binning readout
With this camera, 2×2 binning readout and 4×4 binning are available by adding the
signal of adjacent pixels in the digital domain, Binning readout is a method for
achieving high sensitivity in exchange for losing resolution.
(3) Sub-array readout
Sub-array readout is a procedure only a region of interest is scanned. It is possible to
increase the frame rate by reducing the number of vertical lines scanned. When a
target area is placed in the center of the screen, sub-array readout can perform the
fastest readout. In sub-array readout, binning configuration is enabled.
Size and a position of the readout area can be configured according to the table below.
Settings
Binning Size Position Size Position
1×1 (Normal readout) 512 pixels 32 pixels 8 lines 4 lines
Horizontal Vertical
2×2 binning readout 256 pixels 16 pixels 4 lines 2 lines
4×4 binning readout 128 pixels 8 pixels 2 lines 1 lines
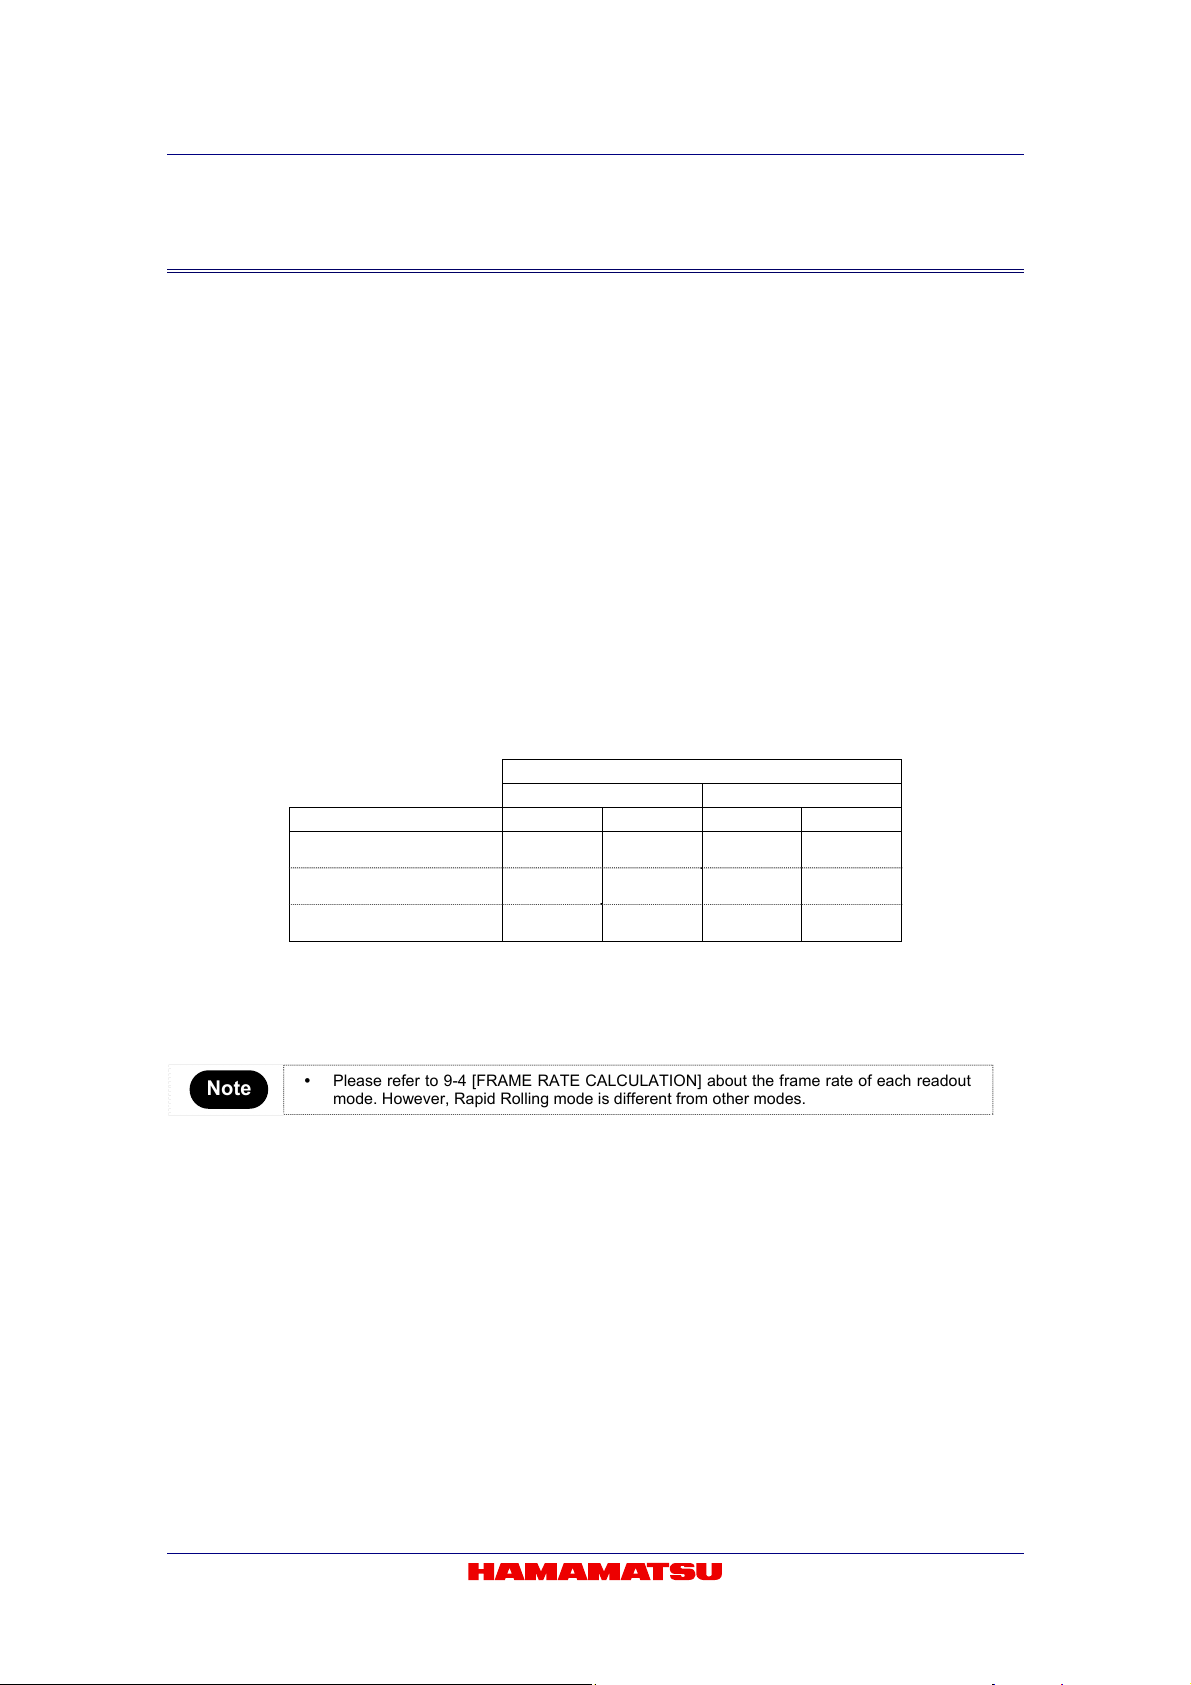
(4) Rapid Rolling Mode
This readout mode is preferred to be used when acquiring images of fast moving
samples in order to minimize distortion come from rolling shutter.
Note
• Please refer to 9-4 [FRAME RATE CALCULATION] about the frame rate of each readout
mode. However, Rapid Rolling mode is different from other modes.
17

C11440-42U/C11440-42U01 Instruction manual_Ver.1.1
9-3 CAMERA OPERATION MODES
The camera has the following operation modes.
(1) Free running mode
The camera has the free running mode which the exposure and readout timing can be
set by software command and controlled by an internal microprocessor. The free
running mode has normal readout mode (in which the exposure time is longer than the
1 frame readout time) and electrical shutter mode (in which the exposure time is
shorter than the 1 frame readout time). These readout modes are automatically
switched depending on the exposure time setting.
(2) External trigger mode
The camera has various external trigger functions to synchronize the camera with the
external equipment. In the external trigger mode, the external equipment becomes a
master and the camera becomes a slave.
① Edge trigger mode
The edge trigger mode is used so that the exposure starts according to an external signal.
② Level trigger mode
The level trigger mode is used to control both exposure start timing and exposure time length
by inputting external trigger pulses.
③ Synchronous readout trigger mode
The synchronous readout trigger mode is used for continuous imaging when it is necessary to
control the exposure start timing of each frame from an external source. It is useful for confocal
microscopy.
(3) Start trigger mode
The start trigger mode is to start operating the camera by a trigger input for a
continuous imaging.
Note
• Please refer to 9-6 [TIMING CHART OF CAMERA OPERATION MODES] about the detail of
timing chart of these modes.
18

C11440-42U/C11440-42U01 Instruction manual_Ver.1.1
9-4 FRAME RATE CALCULATION
The calculation formula of frame rate and the value of frame rate are as below.
■ Calculation formula
Vn = Number of vertical line
(The center of the set area is the middle of the sensor.)
Exp1 = 3 ms to 10 s
1H = 32.4812 × 10
Free running mode 1/(Vn/2×1H)
External trigger mode (Edge/Level) 1/(Vn/2×1H+Exp1+1H×9)
External trigger mode (Synchronous readout) 1/(Vn/2×1H+1H×17)
• The Exp1 value has to be input to the calculation formula below in units of seconds.
■ Value of frame rate
Horizontal width
× Vertical width
2048
The calculation formula of frame rate and the value of frame rate for Rapid Rolling Mode are
shown in next page.
2048
1024
512
256
128
64
8
-6
Free running mode
30 27
60 50
120 85
240 133
481 185
962 229
7696 290
External trigger mode
(Edge/Level)
(frame/s)
External trigger mode
(Synchronous readout)
29
58
112
212
380
628
1466
19

C11440-42U/C11440-42U01 Instruction manual_Ver.1.1
■ Calculation formula (Rapid Rolling Mode)
Vn = Number of vertical line
(The center of the set area is the middle of the sensor.)
Exp1 = 1 ms to 10 s
Exp2 = 1.05 ms to 10 s
1H = 10 × 10
-6
int () = The decimal point is rounded down.
• The Exp1 and Exp2 values must be input to the calculation formula below in units of
seconds.
Binning
Free running mode
External trigger mode
(Edge trigger)
External trigger mode
(Level trigger)
External trigger mode
(Synchronous readout)
1×1
1×1 512 -
2×2
4×4
1×1 112≦Vn≦2048 1/(Vn/2×1H+Exp1+1H×9)
1×1
1×1 512 -
2×2
4×4
1×1
1×1
1×1 512 -
2×2
4×4
1×1
1×1
1×1 512 -
2×2
4×4
Horizontal
width
1024
1536
2048
- -
1024
1536
2048
- -
1024
1536
2048
1024
1536
2048
- -
1024
1536
2048
64
1024
1536
2048
- -
Vertical
width
- 1/(int(Vn/2048/30/1H)×1H)
8≦Vn≦104
112≦Vn≦2048 1/(int(Vn/2048/30/1H)×1H)
8≦Vn≦104
32 ≦Vn≦2048 1/(int(Vn/2048/30/1H)×1H)
8 ≦Vn≦24
Calculation formula
1/(Vn/2×1H)
1/(Vn/2×1H+1H×9+Exp1)
1/(Vn/2×1H+1H×4+Exp2)
1/(Vn/2×1H+1H×17)
20

C11440-42U/C11440-42U01 Instruction manual_Ver.1.1
■ Value of frame rate (Rapid Rolling Mode)
1×1 (Normal readout)
Vertical width
width
Free running mode
External trigger mode
(Edge trigger)
External trigger mode
(Level trigger)
External trigger mode
(Synchronous readout)
Horizontal
2048 30 97 97
1024 60 195 195
512 120 390 390
256 240 781 781
128 480 1562 1562
64 961 3125 3125
8 7692 25 000 25 000
2048 30 88 88
1024 60 160 160
512 120 271 271
256 240 416 416
128 480 568 568
64 694 694 694
8 862 862 862
2048 30 87 87
1024 60 159 159
512 120 270 270
256 240 413 413
128 480 561 561
64 684 684 684
8 847 847 847
2048 30 96 96
1024 60 189 189
512 120 366 366
256 240 689 689
128 480 1234 1234
64 961 2040 2040
8 4761 4761 4761
Note
• The calculation formula and the frame rate value of Start trigger mode (External trigger
mode) are same as the free running mode. About this mode, refer to 9-6-2-4 [Start
trigger mode].
1024 / 1536
/ 2048
(frame/s)
Binning:
2×2 / 4×4
512 ―
21

C11440-42U/C11440-42U01 Instruction manual_Ver.1.1
9-5 CONFIGURING EXPOSURE TIME
The exposure time setting can be done by absolute value. The actual exposure time setting is
defined by the following formula, and the camera automatically calculates a larger and closest
value from the specified exposure time setting.
Exp1 = 3 ms to 10 s (at sub-array 129.99 µs to 10 s)
Exp2 = Exp1 × 10
The actual exposure time setting for Rapid Rolling Mode is defined by the following formula.
• The Exp1 values must be input to the calculation formula below in units of seconds.
32.4812 µs × Exp2
6
÷ 32.4812 µs (round up at decimal point)
10 µs × Exp2
Exp1 = 1 ms to 10 s (at sub-array 40 µs to 10 s)
Exp2 = Exp1 × 10
6
÷ 10 µs (round up at decimal point)
Available setting range of the exposure time is the following.
Free running mode
Free running mode (at Sub-array)
External trigger mode
1 ms to 10 s (Rapid Rolling Mode)
129.99 µs* to 10 s
40 µs* to 10 s (Rapid Rolling Mode)
1 ms to 10 s (Rapid Rolling Mode)
Note
* 129.99 µs and 40 µs (Rapid Rolling Mode) for the Free running mode (at Sub-array) is
the minimum exposure time when sub-array is set to 8 lines vertically symmetric (4 lines
in top half and 4 lines in bottom half) with respect to the horizontally center axis. The
minimum exposure time vary depend on vertical line number of sub-array setting.
3 ms to 10 s
3 ms to 10 s
22

C11440-42U/C11440-42U01 Instruction manual_Ver.1.1
9-6 TIMING CHART OF CAMERA OPERATION MODES
9-6-1 FREE RUNNING MODE
The camera has the free running mode which the exposure and readout timing can be set by
software command and controlled by an internal microprocessor. The free running mode has
normal readout mode (in which the exposure time is longer than the 1 frame readout time) and
electrical shutter mode (in which the exposure time is shorter than the 1 frame readout time).
These readout modes are automatically switched depending on the exposure time setting.
Note
9-6-1-1 Normal readout mode
The normal readout mode is suitable for observation, monitoring, field of view and focus
adjustment, and animation because it can operate with full resolution, which is faster than the
video rate (30 frame/s).
In addition, the exposure time can be extended to collect more signals and increase the
signal-to-noise ratio if the object is dark. In the normal readout mode, the exposure time is the
same or longer than the 1 frame readout time. In this mode, the frame rate depends on the
exposure time, and it becomes frame rate = 1/exposure time. The maximum exposure time is 10
s.
• Please contact to Hamamatsu subsidiary or local distributor for the detail of the timing
information.
Figure 9-3
23
C11440-42U/C11440-42U01 Instruction manual_Ver.1.1
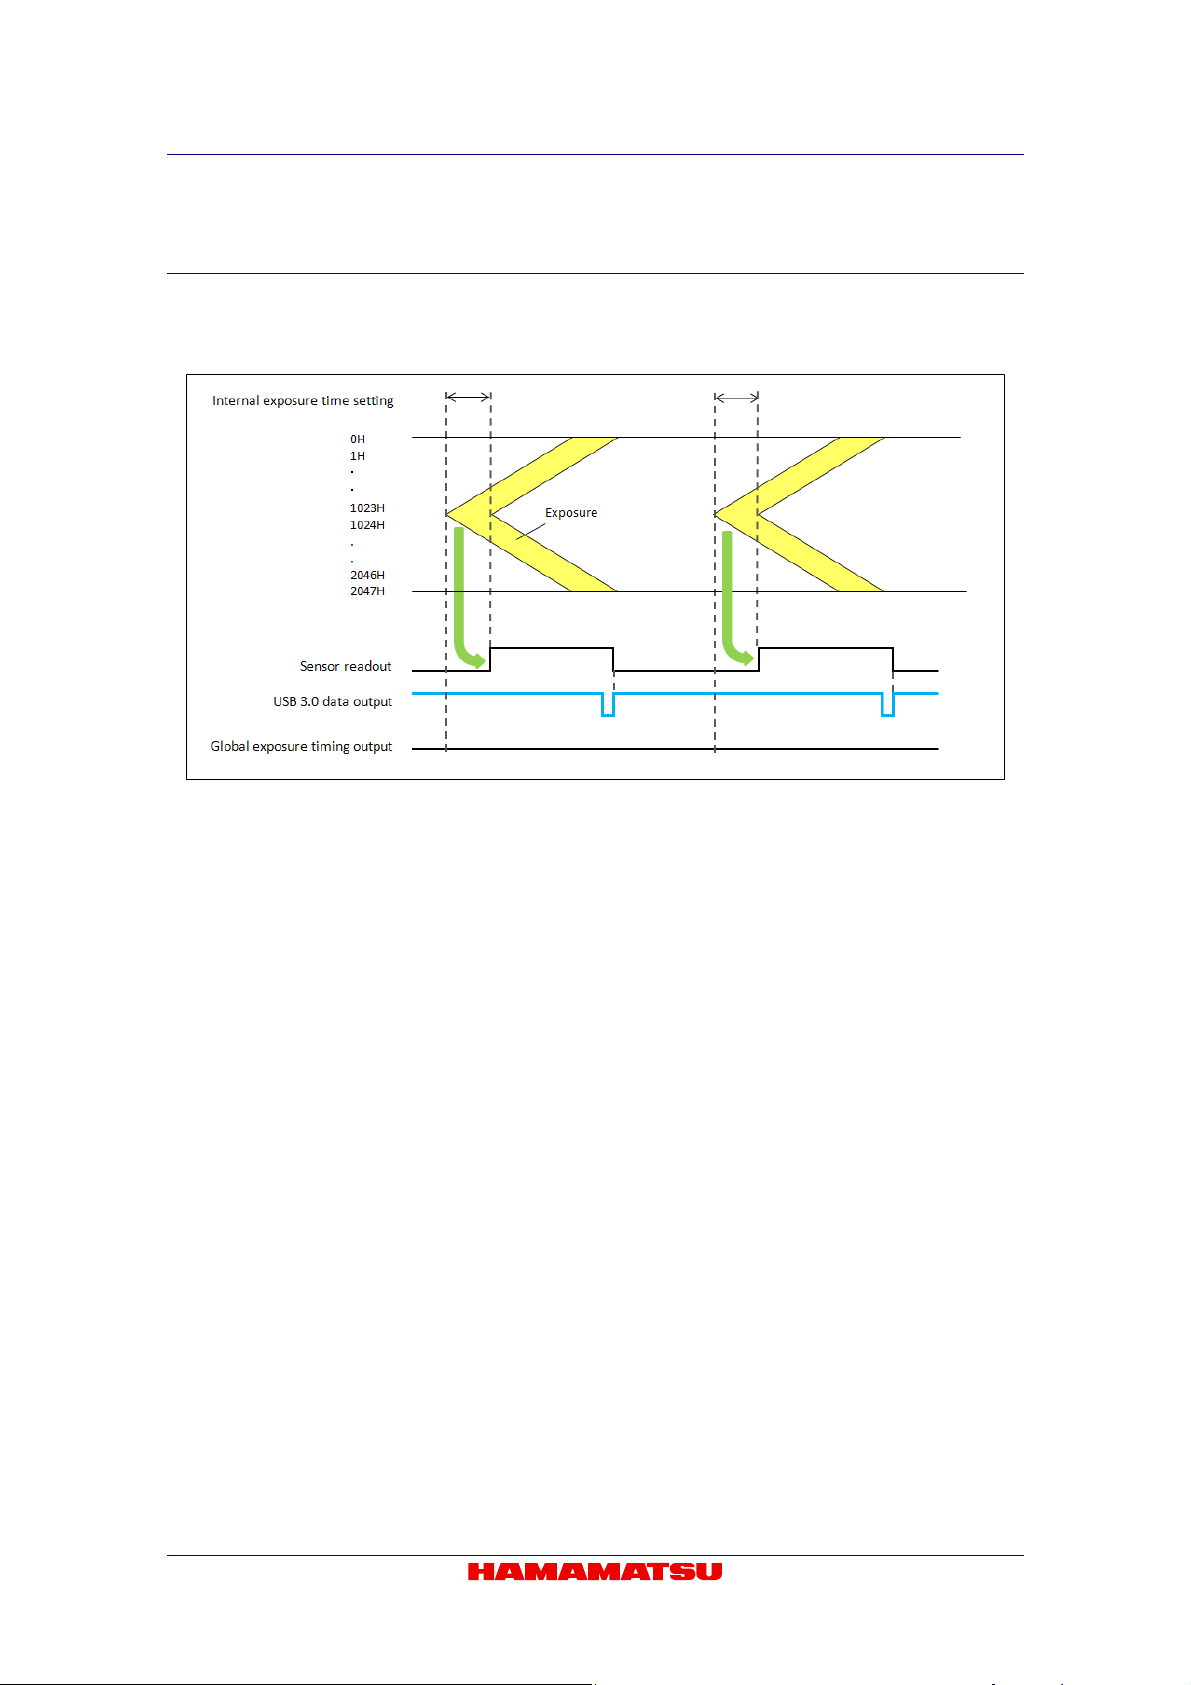
9-6-1-2 Electrical shutter mode
The electrical shutter mode is used to get a proper signal level when signal overflow happens
due to too much input photons in normal readout mode. In this mode, the fastest frame rate is 30
Hz at full resolution even when the exposure time is short.
Figure 9-4
24

C11440-42U/C11440-42U01 Instruction manual_Ver.1.1
9-6-2 EXTERNAL TRIGGER MODE
The camera has various external trigger functions to synchronize the camera with the external
equipment. In the external trigger mode, the external equipment becomes a master and the
camera becomes a slave.
Not e
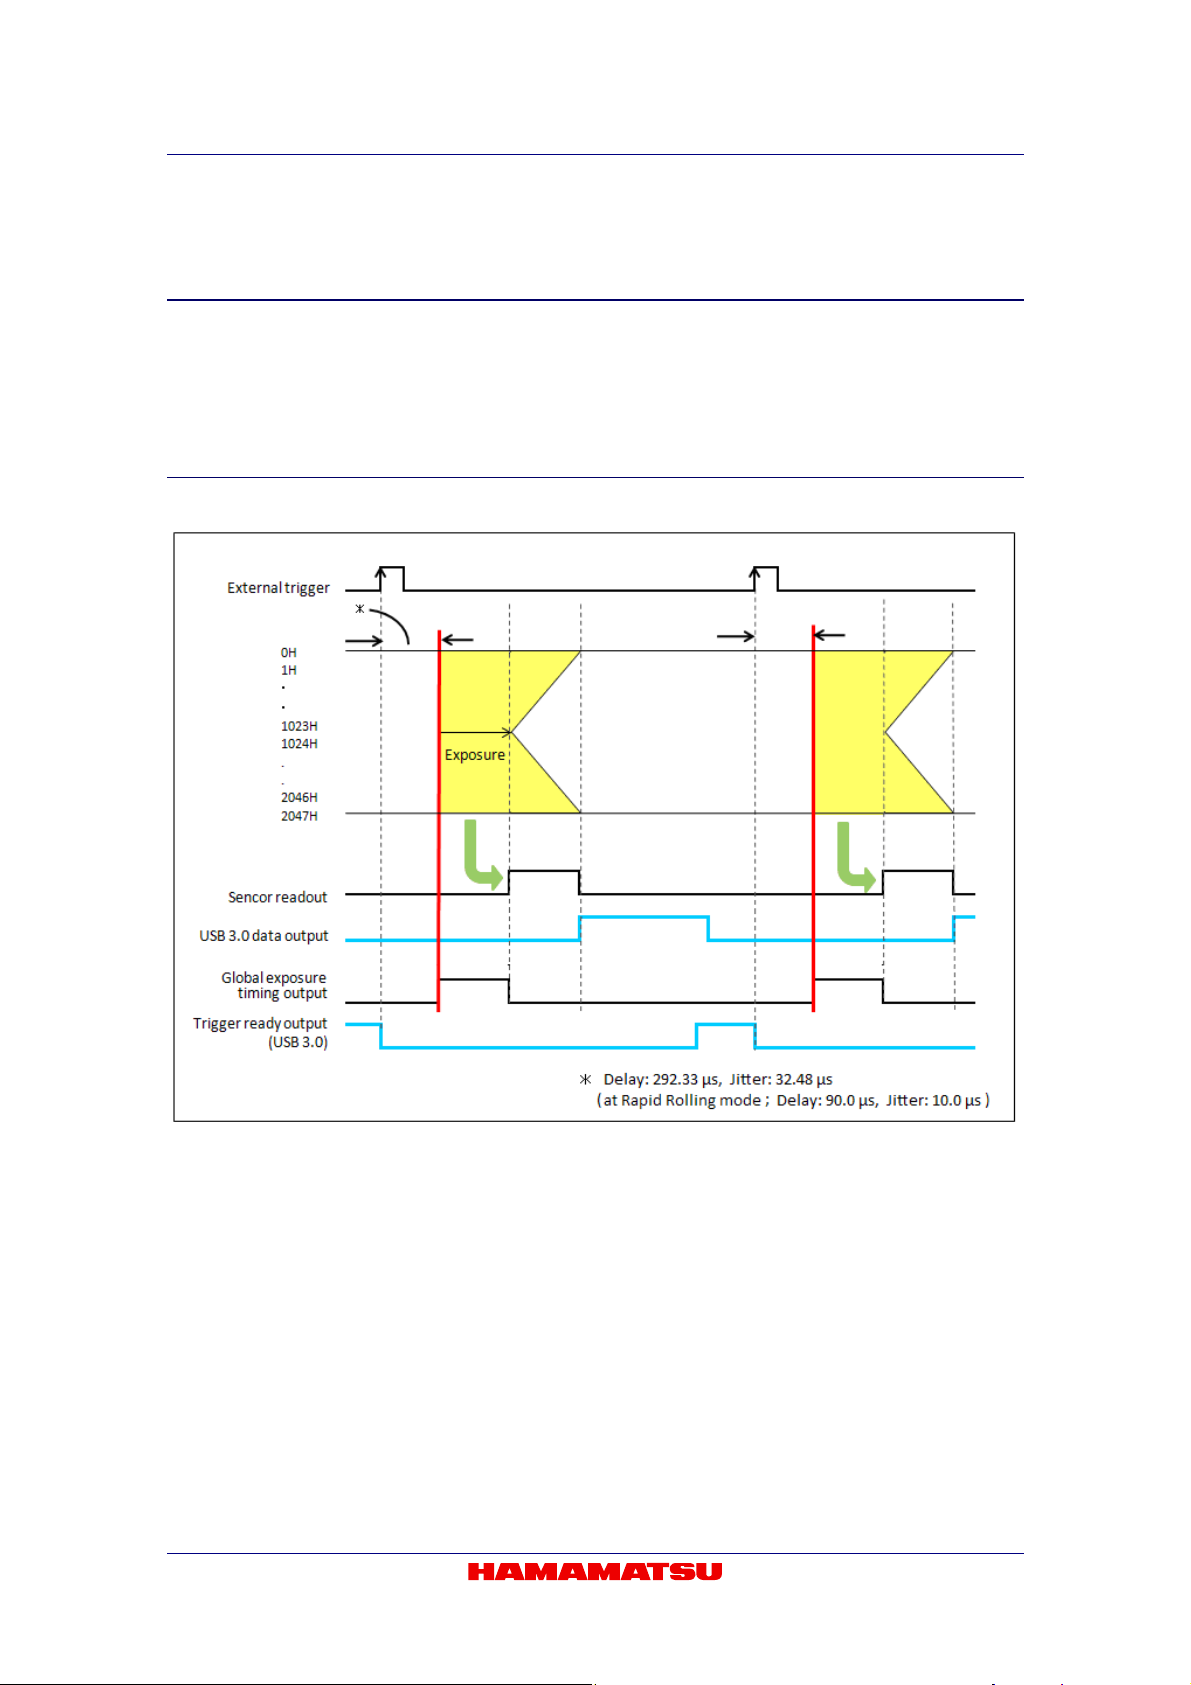
9-6-2-1 Edge trigger mode
The edge trigger mode is used so that the exposure starts according to an external signal.
Exposure time is set by software command. In this mode, the exposure of the first line begins on
the edge (rising/falling) timing of the input trigger signal into the camera. (1023H and 1024H in
the following figure) The exposure of the second line is begun after the readout time of one line
passes (1022H and 1025H in the following figure), and the exposure is begun one by one for
each line.
• Please contact to Hamamatsu subsidiary or local distributor for the detail of the timing
information.
Figure 9-5 (Ex. rising edge)
25

C11440-42U/C11440-42U01 Instruction manual_Ver.1.1
9-6-2-2 Level trigger mode
The level trigger mode is used to control both exposure start timing and exposure time length by
inputting external trigger pulses. In the mode, the camera starts exposure at the start of high or
low period of the input trigger pulse and stops exposure at the end of high or low period of the
input trigger pulse. The example below is for the trigger level High. The exposure of the first line
begins when the trigger signal becomes High, and the exposure of the second line begins after
the readout time of line one passes. Each exposure begins one by one for each line. The
exposure of the first line is finished when the trigger signal becomes low, and signal readout is
begun. The exposure time of each line is defined by the time that the input trigger is high. The
minimum trigger pulse width is 1 ms + 50 µs.
Figure 9-6 (Ex. rising edge)
26

C11440-42U/C11440-42U01 Instruction manual_Ver.1.1
9-6-2-3 Synchronous readout trigger mode
The synchronous readout trigger mode is used for continuous imaging when it is necessary to
control the exposure start timing of each frame from an external source. It is useful for confocal
microscopy. For example, when the camera is used with a spinning disk confocal microscope
and the camera exposure time is synchronized to the spinning disk's rotation speed, it is possible
to eliminate uneven illumination (called banding noise) caused by variation of the spinning disk
rotation speed. Also, it is useful for securing as long exposure time as possible while controlling
the exposure start timings by external trigger signals.
(1) Normal operation (when the pulse count is set as 1.)
The synchronous readout trigger mode is used for continuous imaging when it is
necessary to control the exposure start timing of each frame from an outside source
and also when it is necessary to secure as long exposure time as possible. In the
synchronous readout trigger mode, the camera ends each exposure, starts the readout
and also, at the same time, starts the next exposure at the edge of the input trigger
signal (rising / falling edge). That is, the interval between the same edges of the input
trigger becomes the exposure time.
Figure 9-7 (Ex. rising edge)
27

C11440-42U/C11440-42U01 Instruction manual_Ver.1.1
(2) Pulse count
Also in the synchronous readout trigger mode, synchronous readout can be controlled
by specifying, set by command, the number of timing pulses to determine the exposure
time. The following figure shows the exposure timing when the pulse count is set as 3.
Figure 9-8 (Pulse count)
28

C11440-42U/C11440-42U01 Instruction manual_Ver.1.1
9-6-2-4 Start trigger mode
The start trigger mode is to start operating the camera by a trigger input for a continuous imaging.
It is useful to secure the frame rate as fast as possible when continuous image acquisition and
not to sacrifice the exposure time. For example, when it is necessary to measure the
phenomenon after stimulation, it is possible to start continuous image acquisition at the
stimulation timing.
The start trigger mode is to start operating the camera by a trigger input for continuous imaging,
and it works at the highest frame rate because it is operated in internal trigger mode. In the start
trigger mode, the camera starts exposure and switches to internal trigger mode by the edge of an
external trigger signal (rising / falling edge).
Figure 9-9 (Ex. rising edge)
9-6-2-5 External trigger delay function
In most cases when a delay is needed between the laser pulse emission and the exposure start
is needed, a delay unit is set between the laser and camera to control trigger timing. In each
external trigger mode of the camera, the delay can be set to the trigger signal input to the camera
by command. With this setting, a range of trigger can be arranged without a delay unit. The
range for delay time is 0 µs to 10 s (10 µs steps).
29

C11440-42U/C11440-42U01 Instruction manual_Ver.1.1
9-6-3 TRIGGER OUTPUT
The camera provides a range of trigger output signals to synchronize with an external instrument
and the camera becomes the master and the external instrument becomes the slave. There are
three different trigger output functions as follows. Also, it can output continuous High output
(High output fixed) or continuous Low output (Low output fixed).
These three different trigger output functions can be selected by software command, and
they are output from Timing out connector.
Note
9-6-3-1 Global exposure timing output
It shows the global exposure timing where all lines expose at the same time. There is a case that
one event is divided into two frames because the timing of the exposure in each line is different
for the rolling shutter. However, by using the Global exposure timing output the global exposure
becomes possible for the phenomenon that happens for this period. Global exposure timing
output shows the period where all lines expose at the same time.
Note
• Please refer to Figure 9-3 to Figure 9-9 about details of each trigger output functions.
• There is no output signal when the exposure time is less than the frame rate.
30

C11440-42U/C11440-42U01 Instruction manual_Ver.1.1
9-6-3-2 Programmable timing output
By using the programmable timing output, synchronizing external devices is simple. A system
that needs simple timing signal does not require a delay unit or pulse generator. It is possible to
program and output a pulse that has an optional pulse width and an optional delay time to the
end of readout timing or Vsync. The setting range for delay time is 0 µs to 10 s, and the setting
range for pulse width is 10 µs to 10 s.
The relation between the parameter which can be set with each reference signal, and an output
signal becomes below.
Reference signal Output signal
Read End
Vsync
Camera outputs a pulse after certain delay, from the end of sensor readout.
Also the pulse width can be set.
Camera outputs a pulse after certain delay, from the beginning of readout. Also
the pulse width can be set.
Figure 9-10
9-6-3-3 Trigger ready output
The trigger ready output is useful to make the frame intervals as short as possible in external
trigger mode. For example, when the camera is working in the edge trigger mode, the next frame
can start after the previous frame exposure is done. Thus, the camera cannot accept a trigger for
the next frame during the exposure period. To reduce useless time to be as short as possible, it
is necessary to know the period when the camera can accept a trigger for the next frame. The
trigger ready output shows the trigger ready period when the camera can accept an external
trigger in the external trigger mode.
31

C11440-42U/C11440-42U01 Instruction manual_Ver.1.1
9-6-3-4 Multi-channel sync
The camera provides 3 programmable timing outputs from Timing out connector 1, 2 and 3 in a
sequence. For example, these programmable timing outputs are useful to control a light source
and get a color image.
Figure 9-11
32
C11440-42U/C11440-42U01 Instruction manual_Ver.1.1
9-6-4 GLOBAL RESET
Global reset function enables to reset the electric charge of all pixels at the same time. Then all
pixels can start exposure at the same time.
Global reset can work with Edge trigger mode and Level trigger mode.
9-6-4-1 Edge trigger mode
Figure 9-12
33

C11440-42U/C11440-42U01 Instruction manual_Ver.1.1
9-6-4-2 Level trigger mode
Figure 9-13
9-7 REAL-TIME CORRECTION FUNCTIONS
There are a few pixels in FL-400 that have slightly higher readout noise performance compared
to surrounding pixels. The camera has real-time variant pixel correction features to improve
image quality. The correction is performed in real-time without sacrificing the readout speed at all.
This function can be turned ON and OFF. (Default is ON)
34

C11440-42U/C11440-42U01 Instruction manual_Ver.1.1
10. PRECAUTION WHEN USING FL-400
This camera uses FL-400 (scientific CMOS image sensor). Careful attention must be paid to the
following points when using FL-400:
(1) White spot
Subjecting FL-400 to extended exposures may cause failure in part of the silicon wafer,
resulting in white spots. Currently this phenomenon is not currently preventable. If
FL-400 is at a fixed temperature, recurrence of the white spot increases proportionally
with the exposure time, so this can be rectified with dark subtraction*. Cosmic ray may
generate white spot.
* After acquiring an image using a certain exposure time is loaded, the FL-400 is exposed to darkness for the same
amount of time, and another image is obtained. After this, the difference between the images is determined, and the
data for the dark portion of the original image is nullified.
(2) Folding distortion
A rough-edged flicker may be visible when imaging striped patterns, lines, and similar
subject matter.
(3) Over light
CAUT ION
• Be careful not to input too strong light such as high-energy laser
into FL-400 because FL-400 may be damaged by over light.
35

C11440-42U/C11440-42U01 Instruction manual_Ver.1.1
11. MAINTENANCE
11-1 CARE
Perform cleaning of the camera with the dry soft cloth.
Then, the glass window on the image sensor should be cleaned according to the following.
(1) Blow the dust from the glass window with an air duster.
(2) Moisten a lens cleaning paper with a little ethanol, and wipe over center area of the
window, gently.
(3) Confirm whether dust is not left.
Attach the camera to an optics, and check if there is dust or not under the uniform light
condition. If there is dust on the image, please clean the glass window again.
• Do not wipe with a damp cloth or unclean cloth.
• Use Lens Cleaning Paper for cleaning of glass window in front of the image sensor.
• Please use a plastic tweezers and take extra care not to scratch the glass window with the
tweezers. Even with plastic tweezers, there is possibility to make scratch on the glass
window in case tweezers touch it.
• Please avoid touching the surrounding parts of image area when wiping the glass window.
36

C11440-42U/C11440-42U01 Instruction manual_Ver.1.1
12. TROUBLESHOOTING CHECKLIST
If an abnormality occurs, look up the possible causes in the following tables and, if necessary,
report the details to Hamamatsu subsidiary or local distributor.
12-1 IMAGE IS NOT TRANSFERRED
Cause Measures Chapter
AC adaptor or other cable is loose Reconnect the cable 7
AC adaptor or other cable is broken Replace the cable 7
The correct command has not been sent
to the camera
12-2 ALTHOUGH IMAGES ARE TRANSFFERED
(1) Scratches or discoloration visible on the screen
Cause Measures Chapter
Lens is dirty Wipe the lens 11
Recheck command
(2) Image is blurred
Cause Measures Chapter
Lens is not focused Contact Hamamatsu subsidiary or local distributor 16
Condensation appear Confirm the operating environmental conditions 13
(3) Only shadowed images are output
Cause Measures Chapter
Lens mount cap has been left on Remove the cap
Amount of light is too much or too low Reduce amount of light
(4) All screens overflow
Cause Measures Chapter
Too much amount of light Reduce amount of light
Contrast enhancement is too high Reduce gain
(5) Noise appears on the screen
Cause Measures Chapter
Exogenous noise Find and remove cause
Poor connection of internal connector
Defective circuit system
Contact Hamamatsu subsidiary or
local distributor
16
37

C11440-42U/C11440-42U01 Instruction manual_Ver.1.1
13. SPECIFICATIONS
13-1 CAMERA SPECIFICATIONS
(1) Electric specifications
Imaging device Scientific CMOS image sensor FL-400
Effective number of pixels 2048 (H) × 2048 (V)
Cell size 6.5 µm (H) × 6.5 µm (V)
Effective area 13.312 mm (H) × 13.312 mm (V)
Full well capacity (typ.) 30 000 electrons
Readout speed
Readout noise (r.m.s)
Dynamic range *1 33 000 : 1
Cooling method Peltier device + Forced air-cooled
Cooling temperature + 10 °C (Ambient temperature: + 10 °C to + 30 ºC)
Frame rate
Readout mode
Dark current 0.6 electron/pixel/s (at Cooling temperature: + 10 °C)
Exposure time
A/D bit 16 bit
Linearity Less than 3 %
Conversion factor 0.46 electrons/count (typ.)
Dark offset 100 counts (at Normal readout)
External trigger Function
External signal input External input (SMA connector)
External trigger input level 3.3 V LVCMOS level
External trigger output level 3.3 V LVCMOS level
33 ms
10 ms (Rapid Rolling Mode)
1.5 electrons (typ.)
1.9 electrons (typ.) (Rapid Rolling Mode)
at Full resolution 30 frame/s
at 1024 lines
at center position
at 8 lines
at center position
at Horizontal 512 pixels at
8 lines at center position
Normal readout mode 1×1
Binning readout mode 2×2,4×4 (Digital binning) *2
Sub-array readout mode
Free running mode
Free running mode
/ Sub-array mode
External trigger mode
Edge trigger / Global reset edge trigger
Level trigger / Global reset level trigger
Synchronous readout trigger
Start trigger
60 frame/s
7696 frame/s
25 000 frame/s
(Rapid Rolling Mode)
Configurable for each vertical 8
pixels and horizontal 512 pixels.
3 ms to 10 s
1 ms to 10 s (Rapid Rolling Mode)
129.99 µs to 10 s
40 µs to 10 s (Rapid Rolling Mode)
3 ms to 10 s
1 ms to 10 s (Rapid Rolling Mode)
38

C11440-42U/C11440-42U01 Instruction manual_Ver.1.1
External trigger delay
function
External signal output
Image processing function
Interface USB 3.0 Super Speed
Lens mount
* 1 Calculated from the ratio of the full well capacity and the readout noise.
* 2 Digital binning processing in the camera.
0 µs to 10 s (10 µs steps)
Global exposure timing output
Trigger ready output
Programmable timing output 1
Programmable timing output 2
Programmable timing output 3
(Continuous High or Low output)
Multi-channel Sync
Real-time offset correction
Real-time gain correction
Real-time defect pixel correction (Default)
C11440-42U: C-mount
C11440-42U01: F-mount
(2) Power supply specifications
Camera
AC adaptor
Note
Input power supply DC12 V
Power consumption 26 W
Input power supply AC100 V to AC240 V 50 Hz/60 Hz
Typical output DC12 V
Power consumption 75 VA
• Fluctuations of input power supply voltages are not to exceed ± 10 % of the nominal
voltage.
(3) Operating environment
Ambient operating temperature 0 ºC to + 40 ºC
Ambient storage temperature -10 ºC to + 50 ºC
Ambient operating humidity Less than 70 %, no condensation
Ambient storage humidity Less than 90 %, no condensation
Operating space Indoor, altitude up to 2000 m
(4) Dimensional outline and weight
Dimensional outline 85 mm (W) × 85.5 mm (H) × 120.5 mm (D)
Weight
Note
• Please see Chapter 14 [DIMENSIONAL OUTLINES] for detail of dimensions.
Camera Approx. 1.1 kg
AC adaptor + power supply cord Approx. 1.0 kg
(5) Applicable standards
EMC EN61326-1: 2006 Class A
39

C11440-42U/C11440-42U01 Instruction manual_Ver.1.1
13-2 SPECTRAL RESPONSE CHARACTERISTICS
80.0
70.0
60.0
50.0
40.0
Q.E. [%]
30.0
20.0
10.0
0.0
400 500 600 700 800 900 1000
Wavelength [nm]
Figure 13-1
40

C11440-42U/C11440-42U01 Instruction manual_Ver.1.1
14. DIMENSIONAL OUTLINES
14-1 C11440-42U for C-mount
(Unit: mm)
41

C11440-42U/C11440-42U01 Instruction manual_Ver.1.1
14-2 C11440-42U01 for F-mount
(Unit: mm)
42

C11440-42U/C11440-42U01 Instruction manual_Ver.1.1
15. WARRANTY
Hamamatsu Photonics have fully inspected this system and checked that its performance
conforms to specifications. In the unlikely event of breakdown or other malfunction, contact
Hamamatsu subsidiary or local distributor.
(1) Unless otherwise stated by Hamamatsu subsidiary or local distributor, this system is
under warranty for 24 months from the delivery date.
- Degradation with cosmic rays, the radiation (X-rays, gamma rays, UV light, etc.) of FL-400 is
excepted.
(2) The warranty only covers defects in the materials and manufacturing of the system.
You may be liable for repairs during the warranty period in the event of a natural disaster
or if you handle the system contrary to the instructions in this manual, use it without due
caution, or try to modify it.
(3) We will repair the system or replace it, subject to availability, free of charge within the
terms of the warranty.
REPAIRS
(1) If you notice anything wrong with the camera, confirm whether or not it is malfunctioning by
referring to the troubleshooting checklist in this instruction manual. You must first clarify
the symptoms in order to avoid any misunderstanding or error.
(2) If you have any trouble or are unclear about anything, contact Hamamatsu subsidiary or
local distributor giving the product name, serial number and details of the problem. If
Hamamatsu Photonics consider the problem to be a malfunction, we will decide whether
dispatch an engineer or have the camera returned to us for repairs.
43

C11440-42U/C11440-42U01 Instruction manual_Ver.1.1
16. CONTACT INFORMATION
HAMAMATSU PHOTONICS K. K., Systems Division
812 Joko-cho, Higashi-ku, Hamamatsu City, 431-3196, Japan
Telephone (81) 53-431-0124, Fax: (81) 53-435-1574
E-mail: export@sys.hpk.co.jp
U.S.A. and Canada
Hamamatsu Corporation
360 Foothill Road, Bridgewater, N.J. 08807-0910, U.S.A.
Telephone: (1) 908-231-0960, Fax: (1) 908-231-0852
E-mail: usa@hamamatsu.com
Germany
Hamamatsu Photonics Deutschland GmbH
Arzbergerstr. 10, D-82211 Herrsching am Ammersee, Germany
Telephone: (49) 8152-375-0, Fax: (49) 8152-265-8
E-mail: info@hamamatsu.de
France
Hamamatsu Photonics France S.A.R.L.
19, Rue du Saule Trapu, Parc du Moulin de Massy, 91882 Massy Cedex, France
Telephone: (33) 1 69 53 71 00, Fax: (33) 1 69 53 71 10
E-mal: infos@hamamatsu.fr
United Kingdom
Hamamatsu Photonics UK Limited
2 Howard Court, 10 Tewin Road, Welwyn Garden City Hertfordshire AL7 1BW, United Kingdom
Telephone: (44) 1707-294888, Fax: (44) 1707-325777
E-mail: info@hamamatsu.co.uk
North Europe
Hamamatsu Photonics Norden AB
Smidesvagän 12, SE-171 41 Solna, Sweden
Telephone: (46) 8-509-031-00, Fax: (46)8-509-031-01
E-mail: info@hamamatsu.se
Italy
Hamamatsu Photonics Italia S.R.L.
Strada della Moia, 1/E 20020 Arese (Milano), Italy
Telephone: (39) 02-935 81 733, Fax: (39) 02-935 81 741
E-mail: info@hamamatsu.it
China
Hamamatsu Photonics (China) Co., Ltd.
1201 Tower B, Jiaming Center, 27 Dongsanhuan Beilu, Chaoyang District, Beijing 100020, China
Telephone: (86)10-6586-6006, Fax: (86)10-6586-2866
E-mail: hpc@hamamatsu.com.cn
The contents of this manual are subject to change without notice.
The unauthorized reproduction or distribution of parts or all of this manual is prohibited.
If one of the following problems occurs, please contact Hamamatsu Photonics.
(See the CONTACT INFORMATION.) We will deal with the problem immediately.
Some contents of the manual are dubious, incorrect or missing.
Some pages of the manual are missing or in the wrong order.
The manual is missing or dirty.
44
 Loading...