

Page 1
00090882_00090885/03.10
All listed brands are trademarks of the corresponding companies. Errors and omissions excepted, and subject to technical changes.
Our general terms of delivery and payment are applied.
Hama GmbH & Co KG
D-86651 Monheim/Germany
www.hama.com
00090882man_de_en_fr.indd Abs1:200090882man_de_en_fr.indd Abs1:2 12.03.10 11:5212.03.10 11:52
Page 2
00090882
_
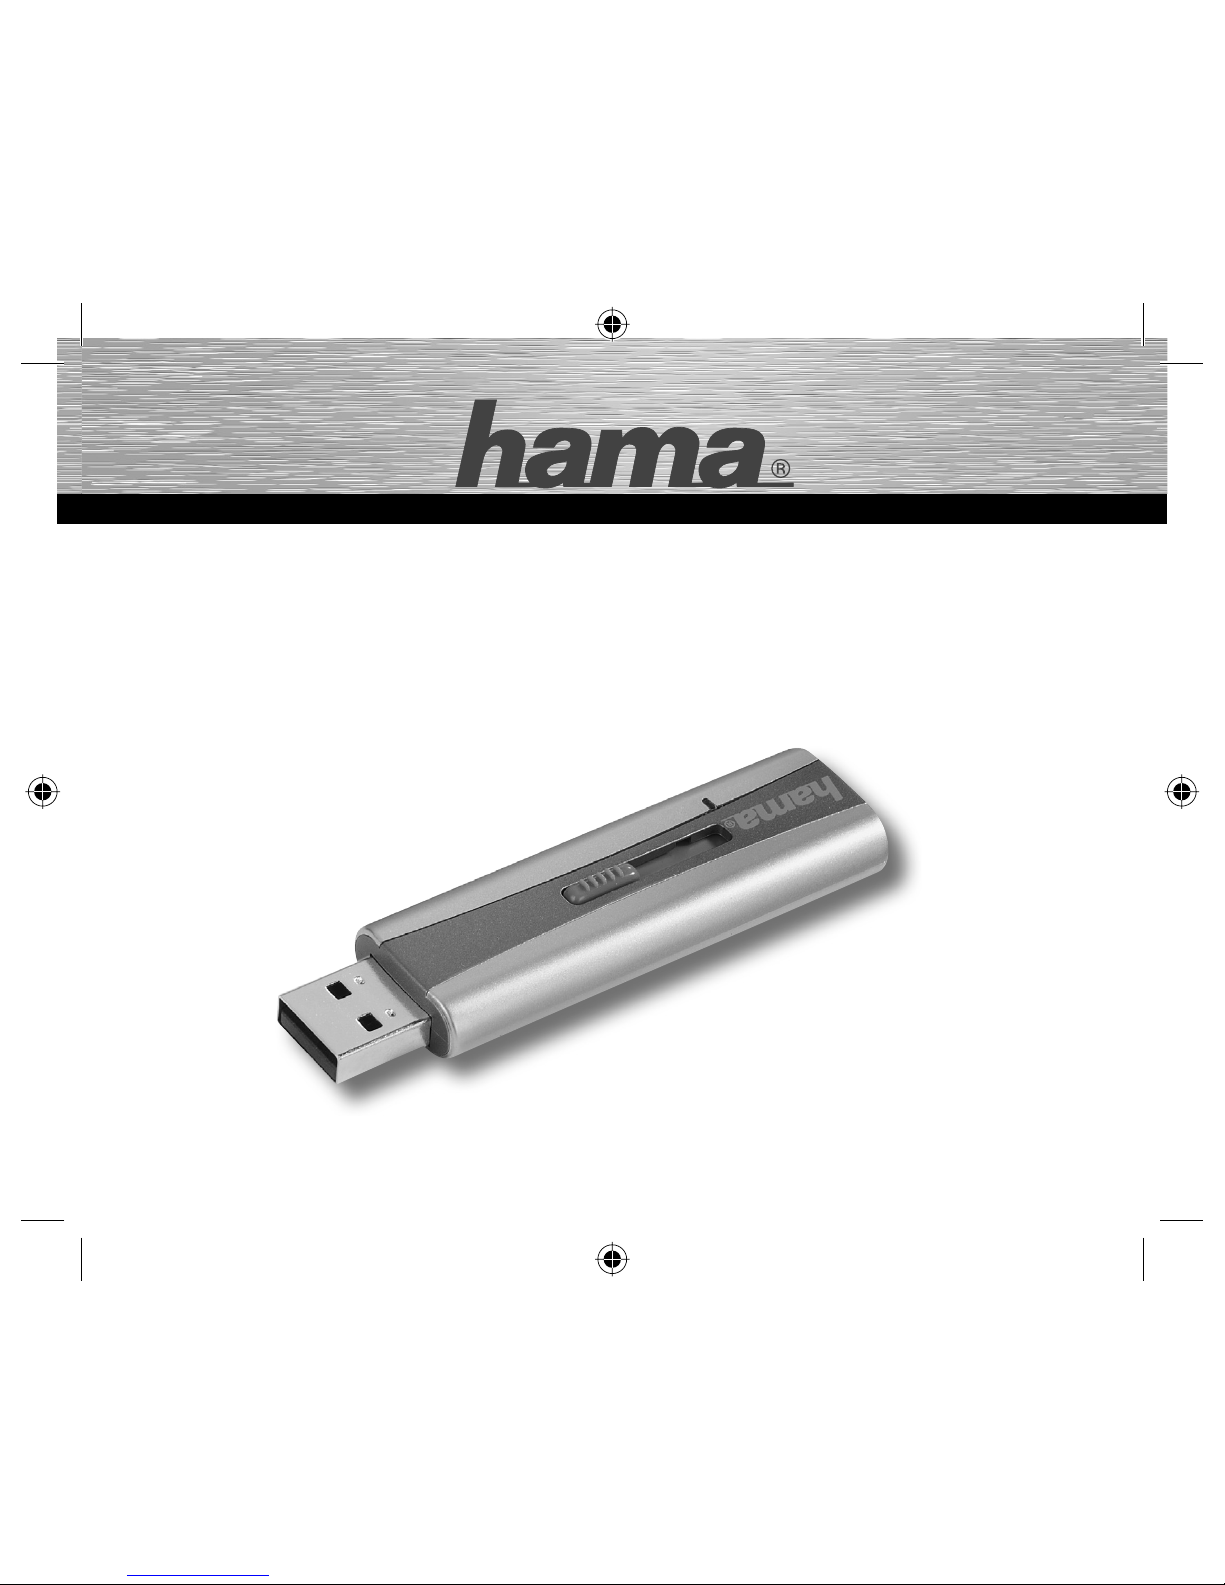
Highspeed FlashPen Floater
USB 2.0
DIGITAL
00090882man_de_en_fr.indd Abs2:100090882man_de_en_fr.indd Abs2:1 12.03.10 11:5212.03.10 11:52
Page 3
2
Achtung:
Der Hama Highspeed FlashPen Floater darf niemals von dem
Computer oder Notebook getrennt werden solange noch ein
Datentransfer stattfi ndet!
Ein Datenverlust wäre dann nicht auszuschließen.
Bitte beachten Sie hierzu die Hinweise in dieser Kurzanleitung.
Die Firma Hama GmbH & Co.KG haftet unter keinen Umständen für
den Verlust von Daten, die auf
Datenträgern gespeichert wurden!
Unterstützte Betriebssysteme:
Windows 2000/ME/XP/Vista sowie Mac OS 9.x oder höher.
Windows ME/XP/Vista sowie Windows 2000 und Mac OS X oder
höher verfügen über eine integrierte
Treiberunterstützung für diesen FlashPen.
Für Windows ME/XP und 2000:
Es sind keine zusätzlichen Treiberdateien
erforderlich. Der Hama FlashPen wird automatisch erkannt und
installiert. Im Windows Explorer sehen Sie nun ein zusätzliches
Laufwerk „Wechseldatenträger“.
Zum Entfernen des FlashPens klicken Sie mit der rechten Maustaste
auf das kleine grüne Pfeilsymbol in der Systray (rechts unten neben
der Windows Uhr) und danach auf => Hardware entfernen oder
auswerfen bzw. Hardware sicher entfernen. Klicken Sie nun auf
=> Deaktivieren bzw. Beenden => OK. Jetzt erscheint die Meldung,
dass Sie die Hardware sicher entfernen können => OK bzw.
Schließen. Danach können Sie den Hama FlashPen abstecken.
Für Windows Vista
Windows Vista stellt eine s.g. ReadyBoost-Funktion (mehr dazu Info
unter www.microsoft.com) zur Verfügung, welche die Nutzung eines
Flash-Speichers (z.B. Hama Highspeed FlashPen Floater) als
schnellen Zwischenspeicher ermöglicht.
Schließen Sie Ihren Hama Highspeed FlashPen Floater an
einem freien USB 2.0 Anschluss an. Die Installation erfolgt
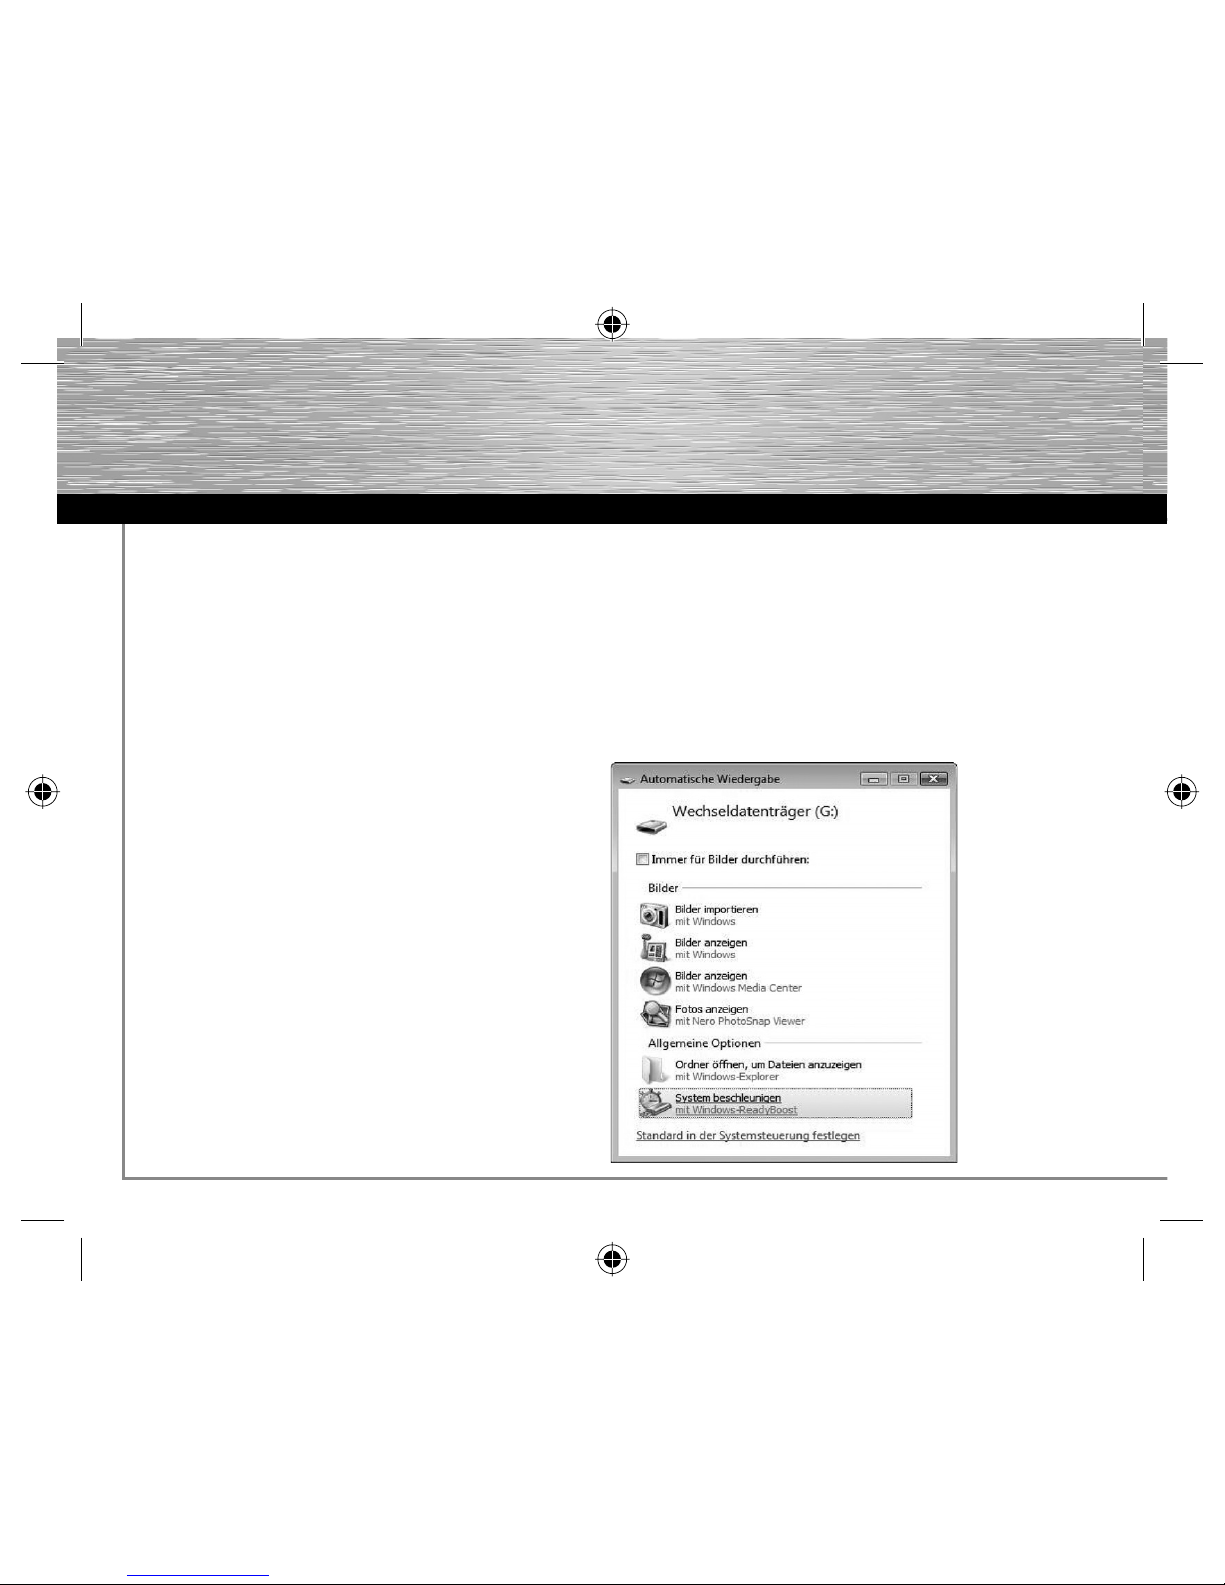
automatisch. Nach erfolgreicher Installation erscheint folgendes
Dialogfenster.
Bitte wählen Sie den Befehl System beschleunigen.
d
Bedienungsanleitung
00090882man_de_en_fr.indd Abs2:200090882man_de_en_fr.indd Abs2:2 12.03.10 11:5212.03.10 11:52
Page 4
3
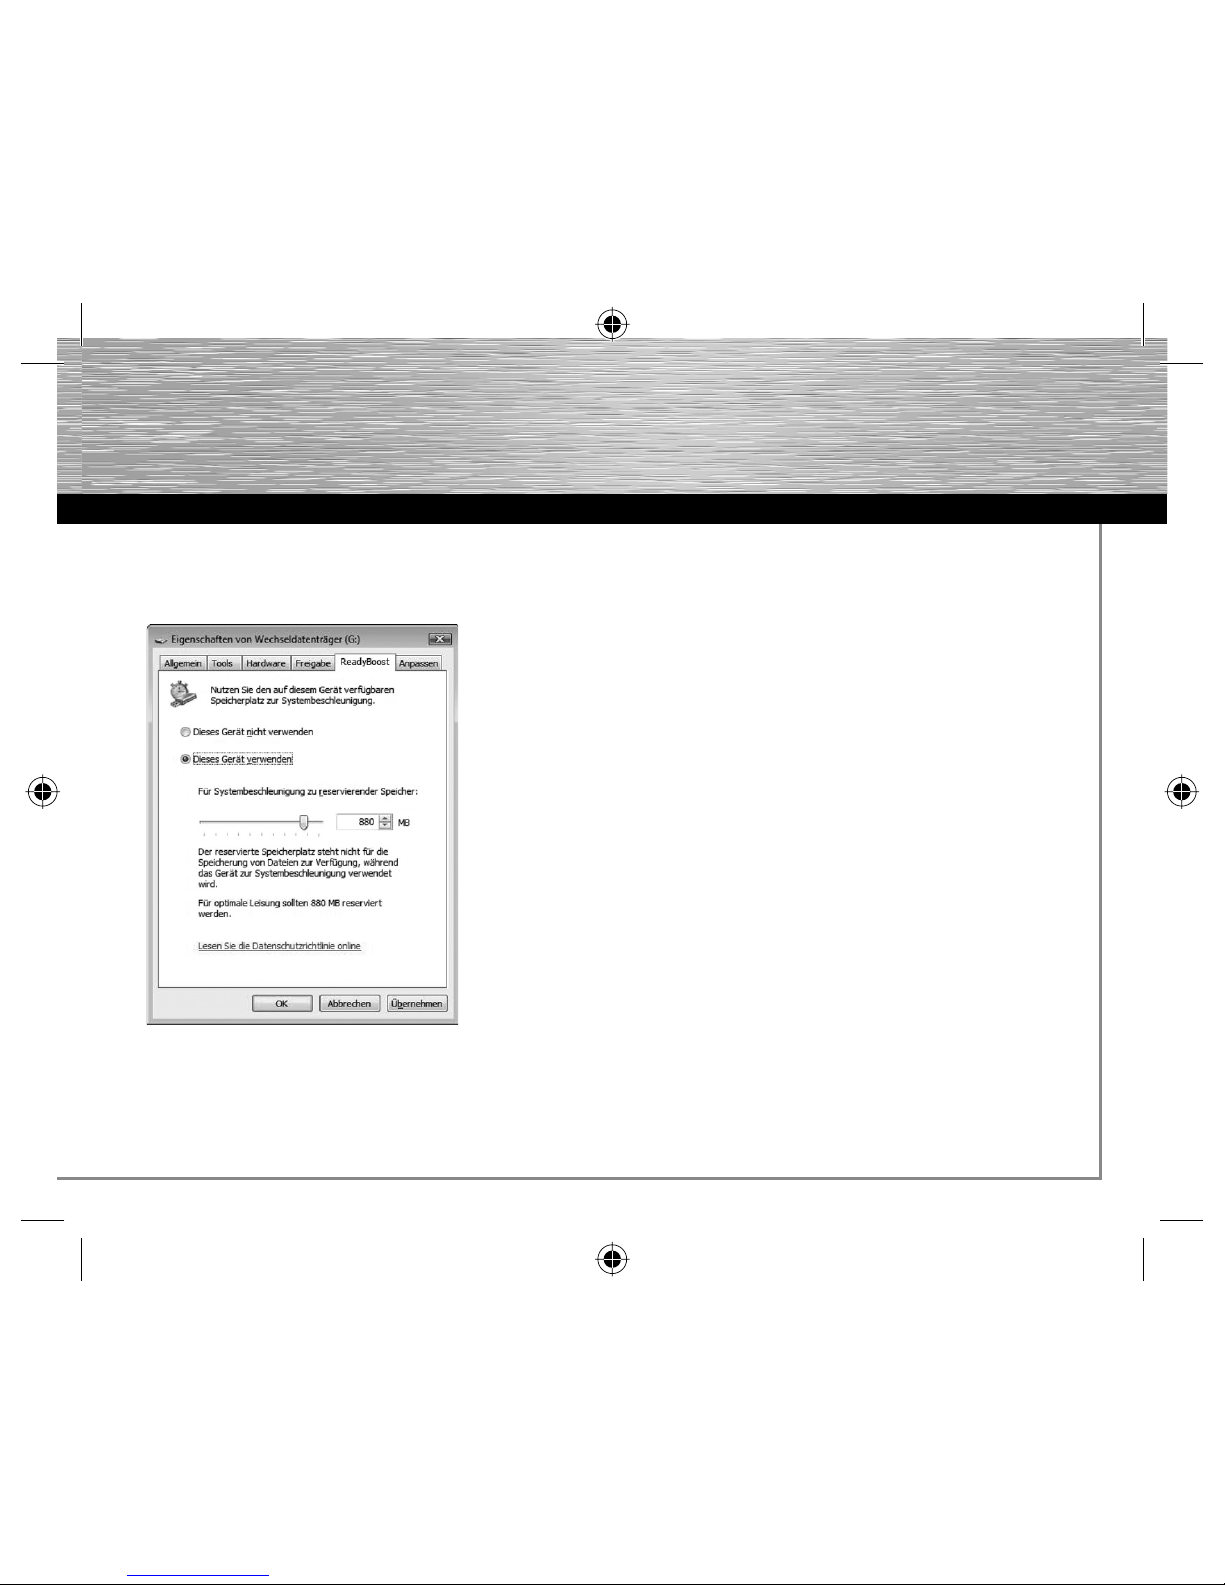
Nachdem Sie den Befehl System beschleunigen gewählt haben,
erscheint folgendes Eigenschaften-Fenster.
Um die ReadyBoost Funktion zu aktivieren, wählen Sie den Befehl
Dieses Gerät verwenden unter dem Register ReadyBoost.
Mit dem Schieberegler legen Sie jetzt fest, wie viel Speicher Sie für
die ReadyBoost Funktion verwenden wollen.
Die gewählte Kapazität wird dann vom System als ReadyBoost.
sfcache reserviert und der FlashPen lässt sich erst wieder als
Massendatenträger verwenden, wenn ReadyBoost für den Stick
deaktiviert wird.
Wenn Sie die ReadyBoost Funktion nicht nutzen wollen, wählen Sie
den Befehl Dieses Gerät nicht verwenden. Ihr Hama FlashPen Floater
kann nun als Massendatenträger genutzt werden.
Hinweis:
Hama empfi ehlt folgende Voraussetzungen für ReadyBoost-Funktion
• Speicherkapazität über 256MB
(Die Cache-File kann durch ReadyBoost Funktion
von 235 MB bis max. 4GB generiert werden)
• USB 2.0 Anschluss
• Min. Schreib/Lesegeschwindigkeit
Random Read (4KB block) > 3 MB / Sec
Random Write (512KB block) > 2 MB / Sec
• mit min. 64MB freiem Speicher
Nur ein Flashspeicher-Gerät pro Computer/
Notebook kann für die ReadyBoost-Funktion
verwendet werden.
00090882man_de_en_fr.indd Abs2:300090882man_de_en_fr.indd Abs2:3 12.03.10 11:5212.03.10 11:52
Page 5
4
Attention :
The Hama Highspeed FlashPen Floater must never be separated from
the computer or from the notebook as long as there is a data transfer.
A loss of data could not be excluded.
Please follow the pieces of advice given in this quick reference guide.
Under no circumstances, the fi rm Hama GmbH & Co KG is responsible
for the loss of data which have been stored on storage media.
Supported operating systems:
Windows 2000/ME/XP/Vista as well as Mac OS 9.x or higher.
Windows ME/XP/Vista as well as Windows 2000 and Mac OS X or
higher have an integrated driver support for this FlashPen.
For Windows ME/XP and 2000:
No additional driver fi les are required. The Hama FlashPen is
automatically detected and installed. On My Computer you can see
now an additional drive “removable disk”.
In order to remove the FlashPen, click with the right mouse button
the small green arrow symbol in the systray (on the bottom right next
to the Windows clock) and afterwards => Remove or eject hardware
or Remove hardware safely. Now click => Deactivate or Exit => OK.
A message appears now stating that you can remove the hardware
safely => OK or Exit. Afterwards, you can remove the Hama FlashPen.
For Windows Vista
Windows Vista offers a so-called ReadyBoost function
(see www.microsoft.com for more information). This function enables
the use of a fl ash memory (e.g. Hama Highspeed FlashPen Floater) as
quick intermediate memory.
Connect your Hama Highspeed FlashPen Floater to a free USB 2.0
connection.
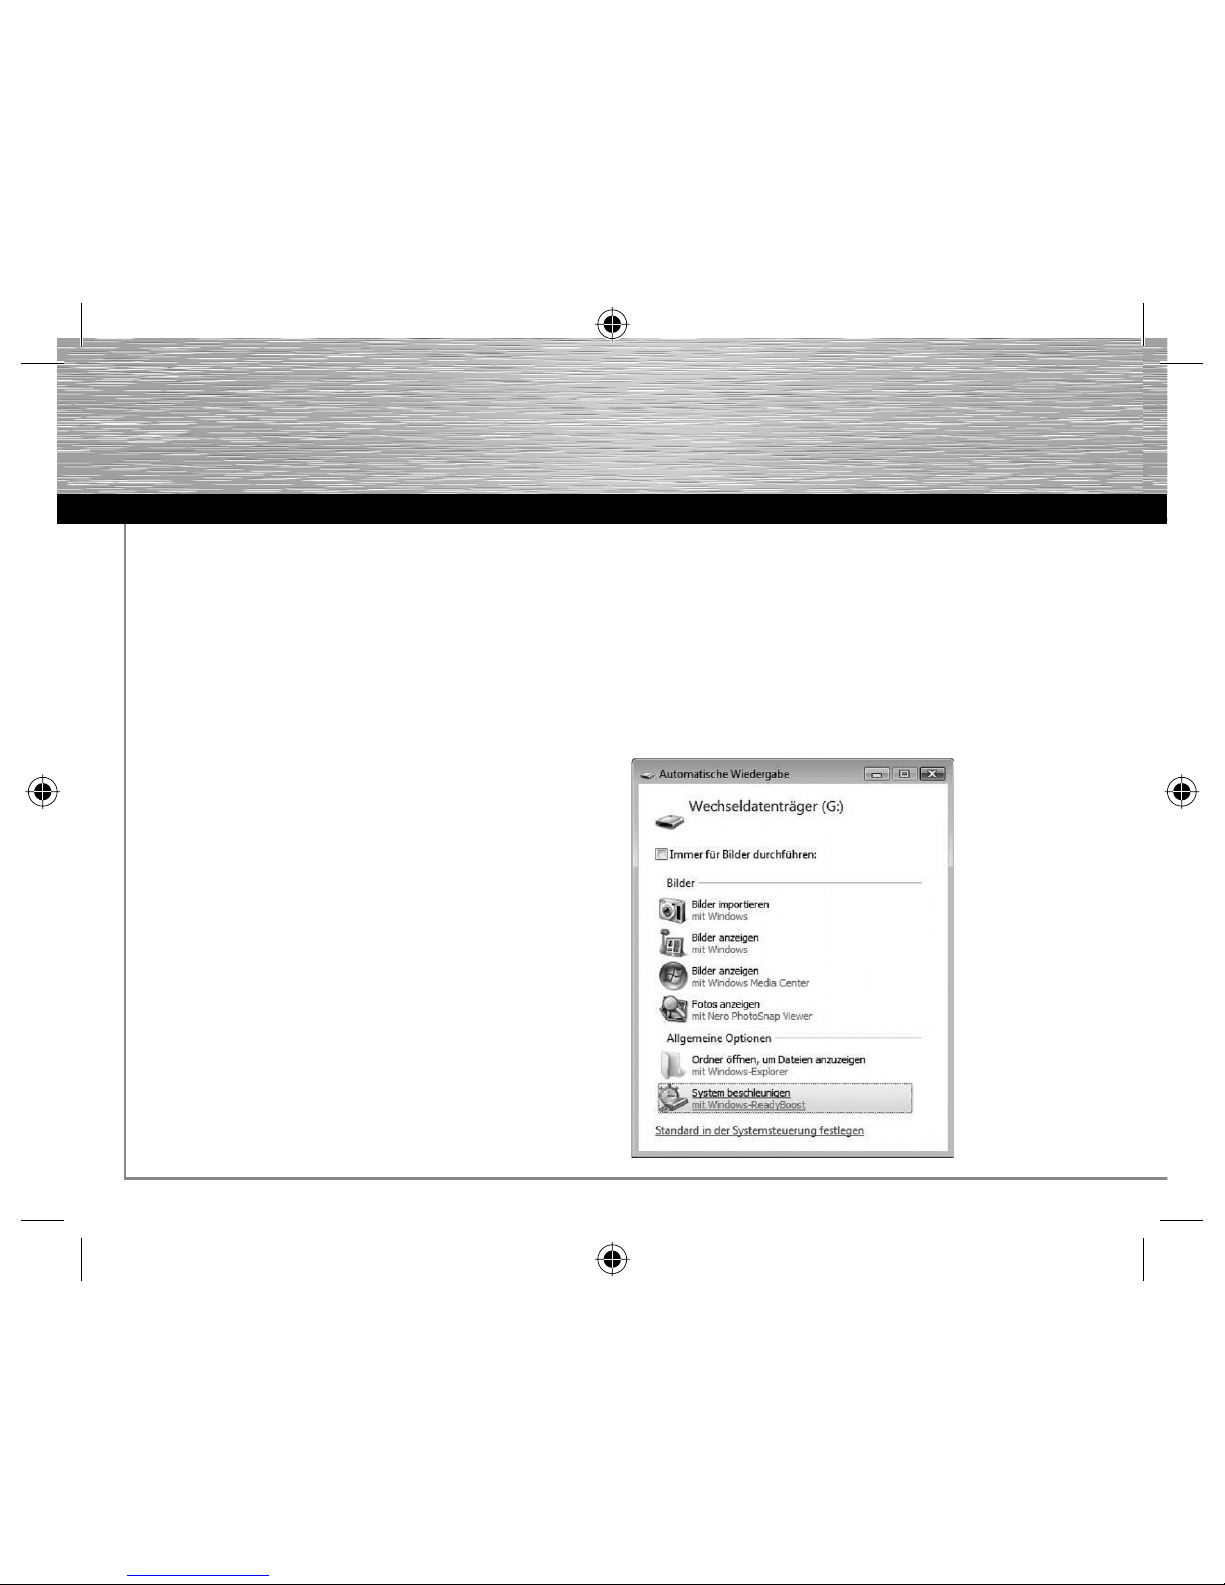
The installation is carried out automatically. The following dialogue
box appears after a successful installation.
Please select the command Speed up my system.
Operating Instruction
g
00090882man_de_en_fr.indd Abs2:400090882man_de_en_fr.indd Abs2:4 12.03.10 11:5212.03.10 11:52
Page 6
5
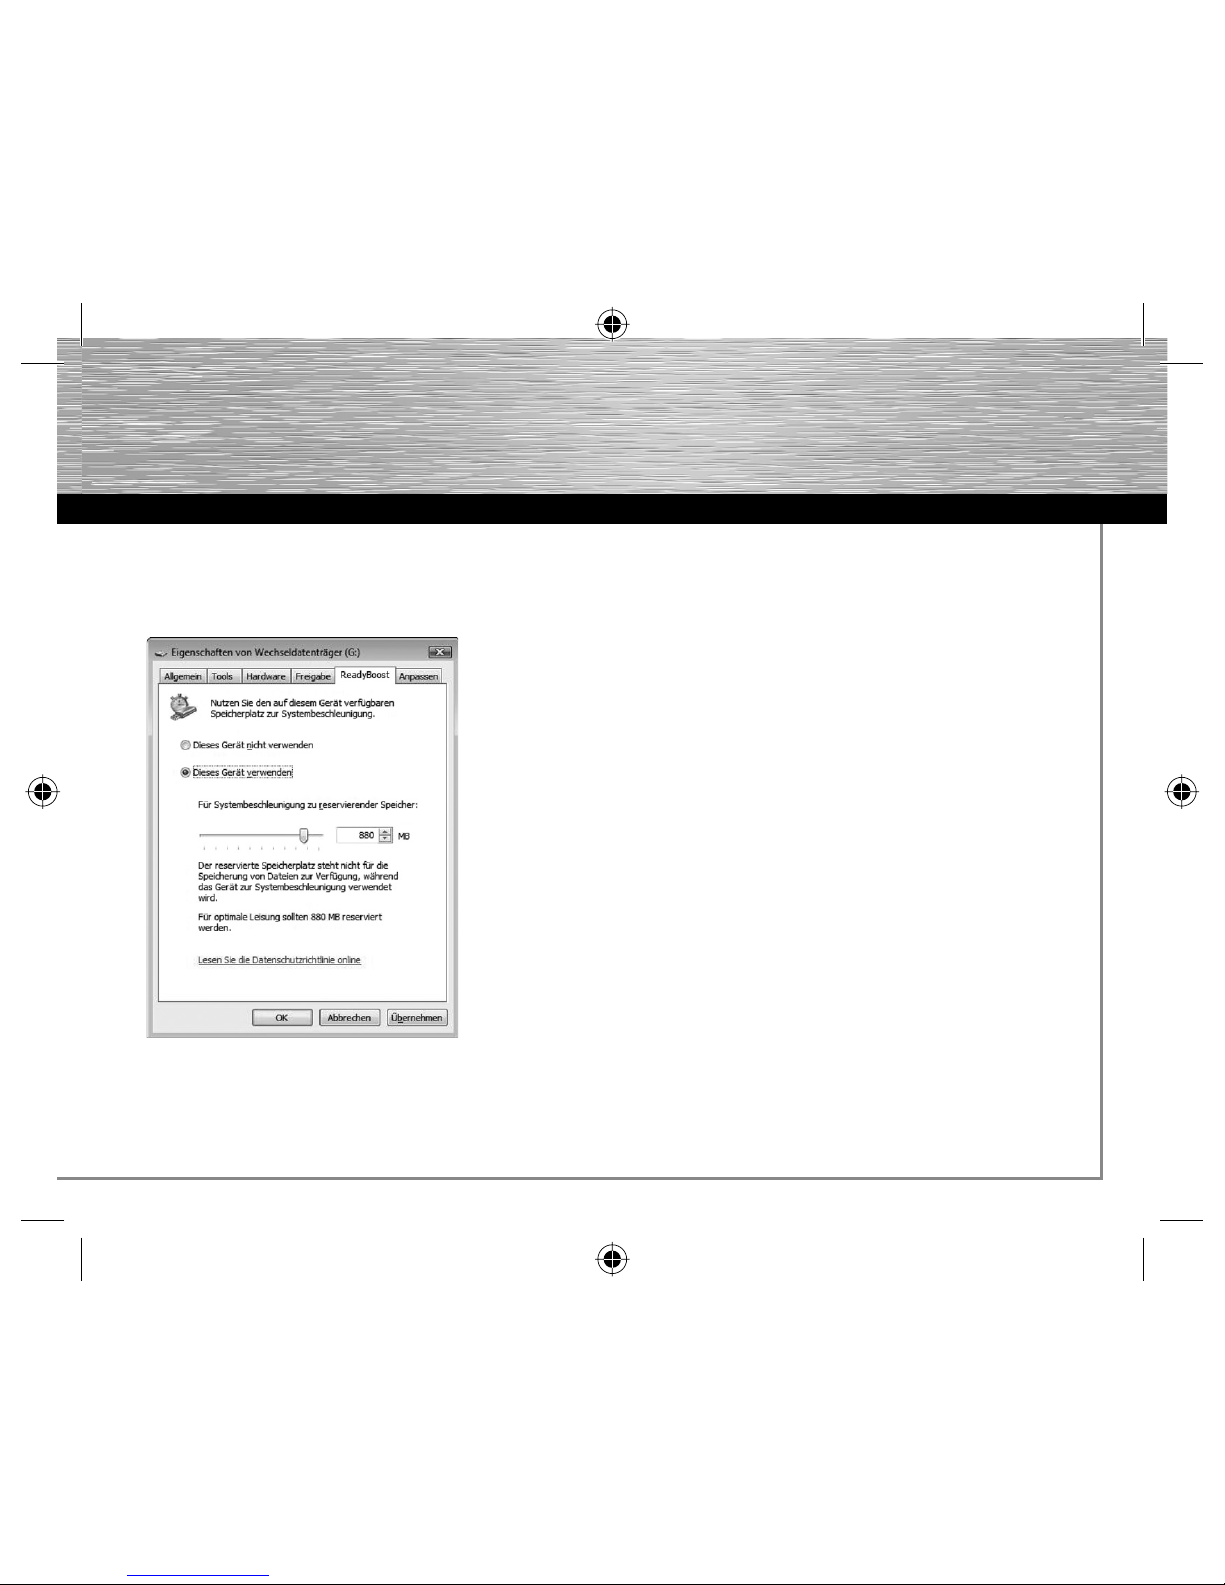
When you have chosen the command Speed up my system, the
following property window appears.
Please select the command Use this device in the tab ReadyBoost
in order to activate the ReadyBoost function.
With the sliding regulator you determine now how much memory
you want to use for the ReadyBoost function.
The system reserves the selected capacity as ReadyBoost.sfcache;
the FlashPen can only be used as mass storage medium again if
ReadyBoost is deactivated for the stick.
Select the command Do not use this device if you do not want to use
the ReadyBoost function. Your Hama FlashPen Floater can now be
used as mass storage medium.
Note:
Hama recommends the following points for the ReadyBoost function
• Memory capacity over 256MB (the cache fi le can
be generated by the ReadyBoost function from
235 MB to max. 4GB)
• USB 2.0 connection
• Min. writing/reading speed
Random Read (4KB block) > 3 MB /sec.
Random Write (512KB block) > 2 MB / sec.
• With min. 64MB free memory
Only one fl ash memory device per computer/
notebook can be used for the ReadyBoost function.
00090882man_de_en_fr.indd Abs2:500090882man_de_en_fr.indd Abs2:5 12.03.10 11:5212.03.10 11:52
Page 7
6
Attention :
Le Highspeed FlashPen Floater Hama ne doit jamais être séparé de
l’ordinateur ou de l’ordinateur portable dès qu’il y a un transfert de
données !
Une perte de données ne pourrait pas être exclue !
Veuillez pour cela observer les indications données dans ce mode
d’emploi.
En aucun cas, l’entreprise Hama GmbH & Co KG n’est responsable
de la perte de données qui ont été stockées sur des supports de
données !
Systèmes d’exploitation supportés :
Windows 2000/ME/XP/Vista ainsi que Mac OS 9.x ou plus.
Windows ME/XP/Vista ainsi que Windows 2000 et Mac OS X ou plus
disposent d’un support de pilotes intégré pour ce FlashPen.
Pour Windows ME/XP et 2000 :
Des fi chiers de pilotes supplémentaires ne sont
pas nécessaires. Le FlashPen Hama est
automatiquement reconnu et installé. Dans l’exploreur Windows vous
voyez maintenant un lecteur supplémentaire « support de données
amovible ».
Pour retirer le Flash Pen, veuillez cliquer avec le bouton droit de la
souris sur le petit symbole fl éché vert dans le coin droit le plus bas
du pupitre de commande de Windows, puis sur => Suppression de
matériel ou éjecter ou Retirer correctement le matériel. Cliquez maintenant sur =>Désactiver ou Terminer => OK. Maintenant, un message
apparaît vous annonçant que vous pouvez retirer
correctement le matériel => OK ou Terminer.
Après, vous pouvez débrancher le FlashPen Hama.
Pour Windows Vista
Windows Vista vous offre une fonction qu’on appelle ReadyBoost
(voir www.microsoft.com pour plus d’informations). Cette fonction
vous permet d’utiliser une mémoire fl ash (par ex. le Highspeed
FlashPen Floater de Hama) comme mémoire intermédiaire rapide.
Branchez votre Highspeed FlashPen Floater de Hama à un port USB
2.0 libre. L’installation s’effectue automatiquement.
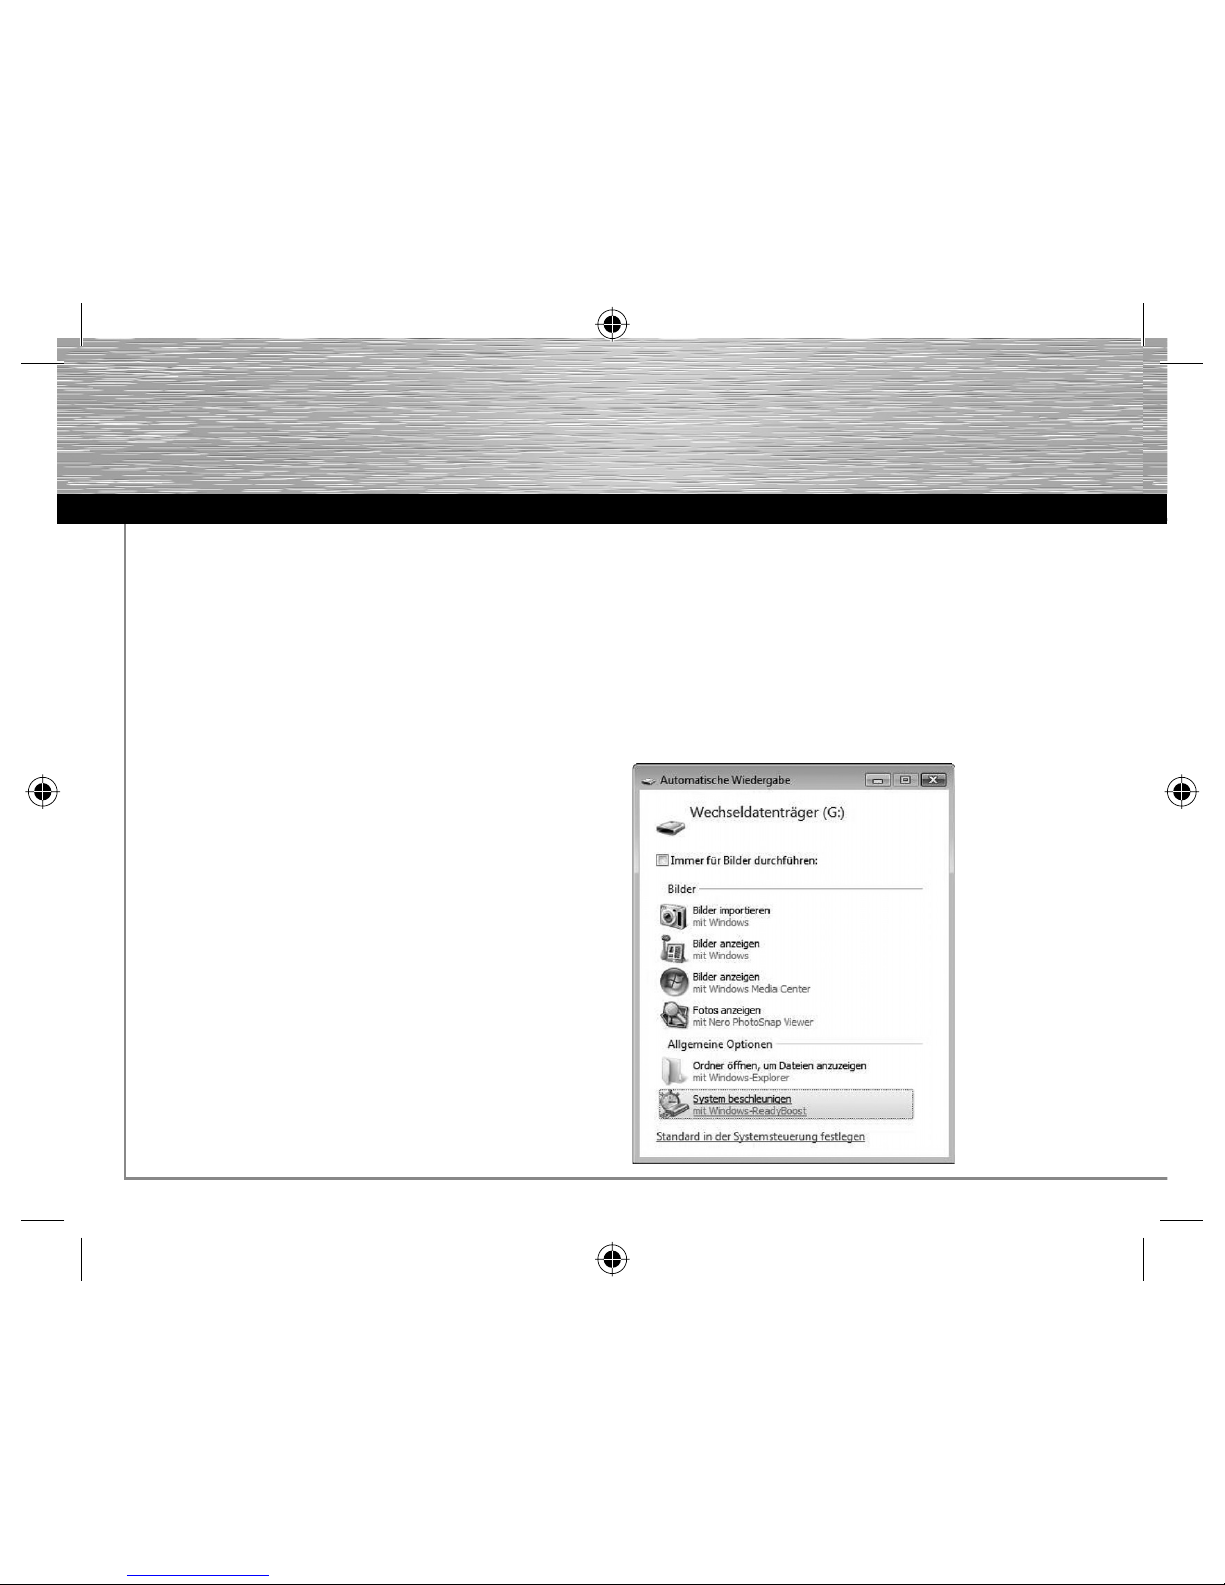
La fenêtre de dialogue suivante apparaît après une installation
réussie.
Veuillez sélectionner l’instruction Accélérer mon système.
Mode d‘emploi
f
00090882man_de_en_fr.indd Abs2:600090882man_de_en_fr.indd Abs2:6 12.03.10 11:5212.03.10 11:52
Page 8
7
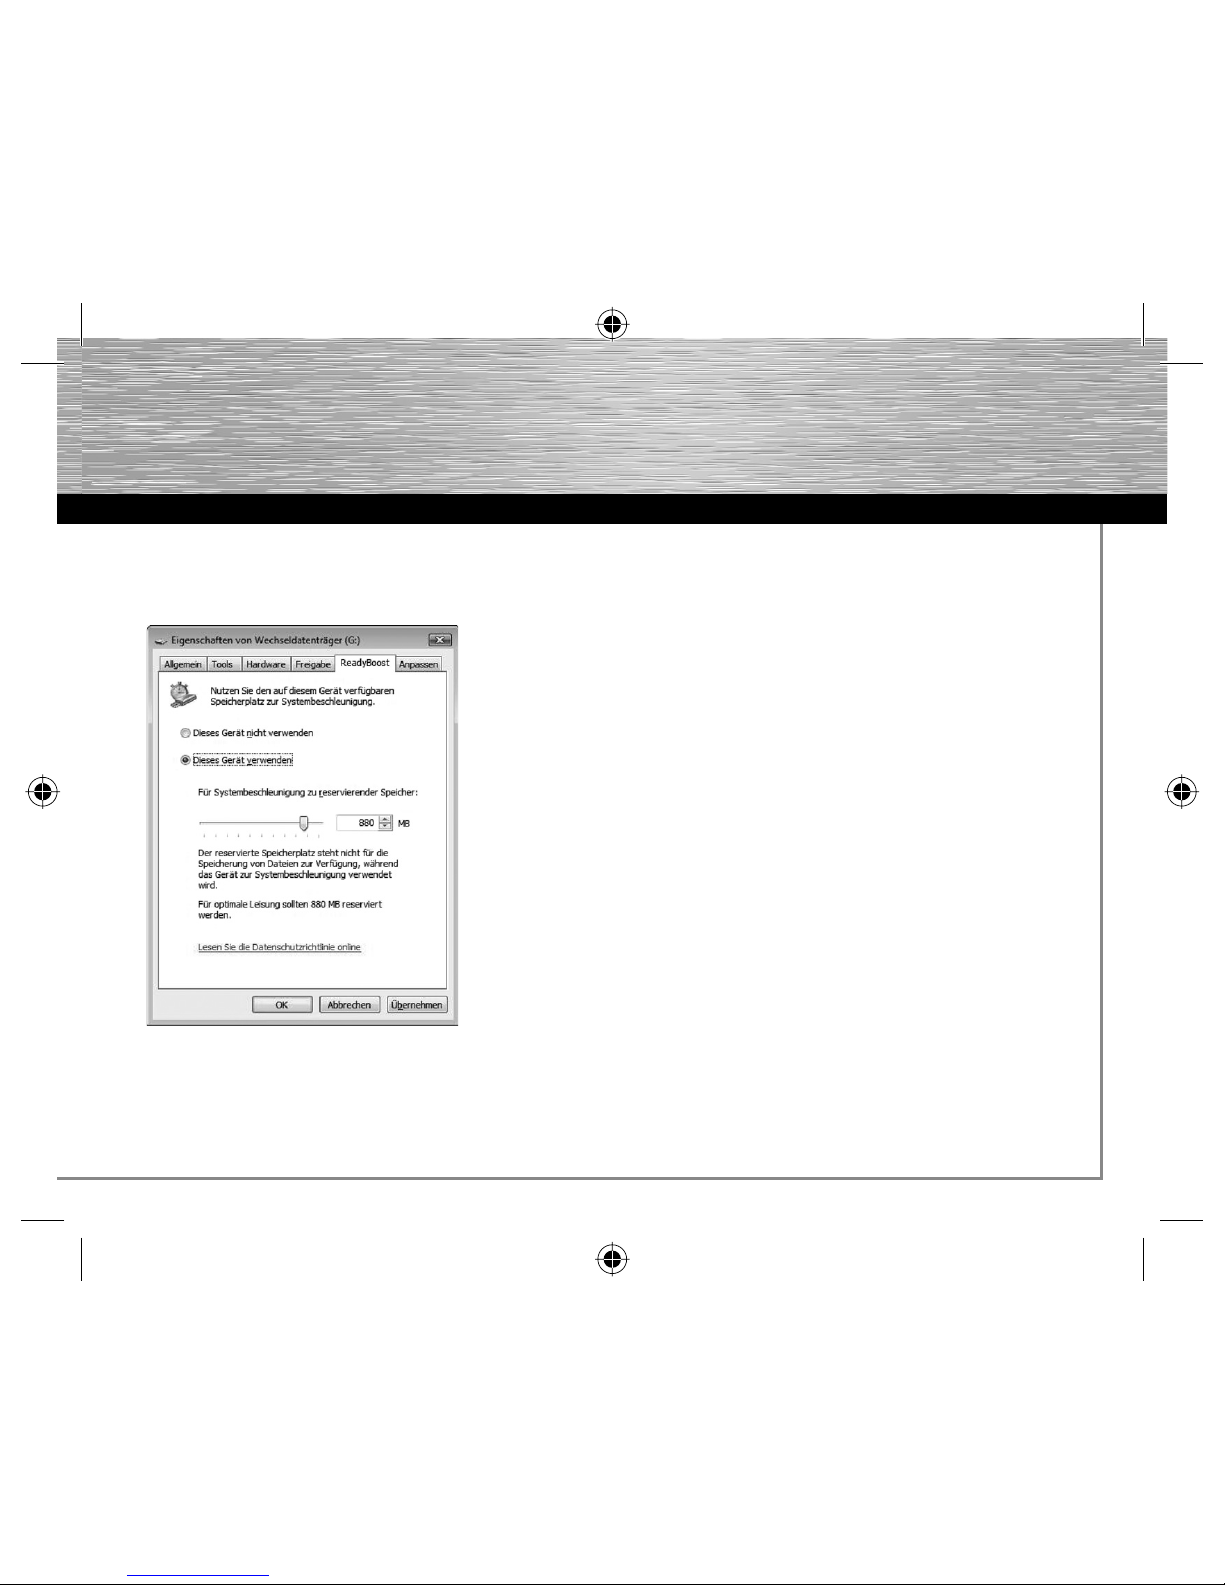
La fenêtre de propriétés suivante apparaît dès que vous avez
sélectionné l’instruction Accélérer mon système.
Veuillez sélectionner l’instruction Utiliser cet périphérique dans
l’onglet ReadyBoost pour activer la fonction ReadyBoost.
Avec le régulateur coulissant vous déterminez maintenant combien
de mémoire vous voulez utiliser pour la fonction ReadyBoost.
Le système réserve alors la capacité sélectionnée comme
ReadyBoost.sfcache ; le FlashPen peut seulement être utilisé de
nouveau comme support de données de masse si ReadyBoost
est désactivé pour le stick.
Veuillez sélectionner l’instruction Ne pas utiliser ce périphérique
vous ne voulez pas utiliser la fonction ReadyBoost. Maintenant,
votre FlashPen Floater Hama peut être utilisé comme support de
données de masse.
Remarque :
Hama recommande les points suivants pour la fonction ReadyBoost
• Capacité mémoire de plus de 256MB (le fi chier
cache peut être généré de 235 MB à 4GB max.
par la fonction ReadyBoost)
• Connexion USB 2.0
• Vitesse d’écriture/de lecture min.
Random Read (4KB block) > 3 MB / seconde
Random Write (512KB block) > 2 MB / seconde
• Avec une mémoire libre d’au moins 64MB
Pour la fonction ReadyBoost, vous pouvez seulement utiliser un
appareil à mémoire fl ash par ordinateur/ordinateur portable etc.
00090882man_de_en_fr.indd Abs2:700090882man_de_en_fr.indd Abs2:7 12.03.10 11:5212.03.10 11:52
 Loading...