

Page 1
Hama GmbH & Co KG
D-86651 Monheim/Germany
www.hama.com
All listed brands are trademarks of the corresponding companies. Errors and omissions excepted,
and subject to technical changes. Our general terms of delivery and payment are applied.
00062759/07.07
Page 2
COMPUTER
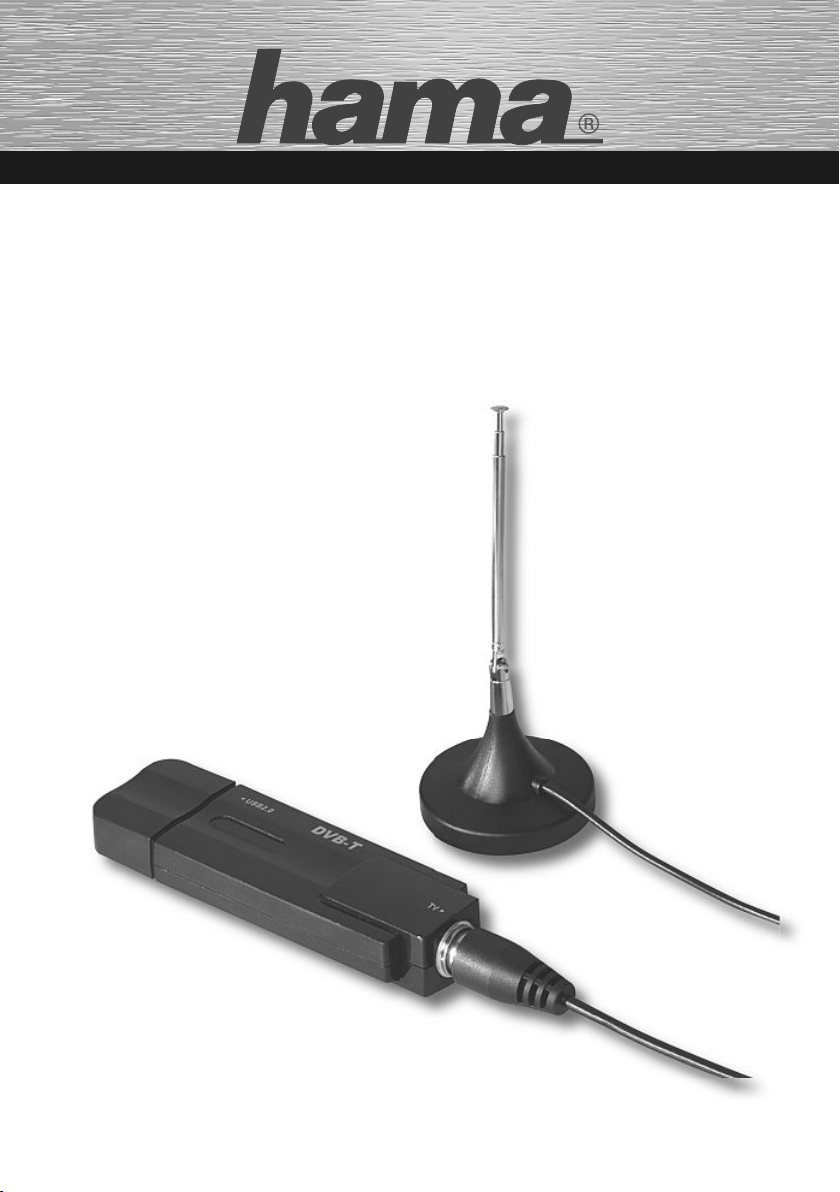
DVB-T USB-Stick
Stick TNT USB
00062759
Page 3
d
Bedienungsanleitung
Packungsinhalt:
1x DVB-T USB Stick
1x Treiber und Software CD-ROM
1x passive DVB-T Antenne
1x gedruckte Installationsanleitung
1x Entsorgungshinweise
Systemvoraussetzung:
Prozessor: 1,5 Ghz oder höher
Hauptspeicher: 512 Mbyte oder mehr
Grafikkarte: DirectX 9.0c kompatibel mit
mind. 64 Mbyte lokalen Speicher
Sound: AC97 kompatibel
Festplattenkapazität: min. 1 Gbyte freien Speicherplatz
(NTFS empfohlen)
Betriebssystem: Windows XP + SP 2
Windows Vista 32bit oder 64bit
Edition
Freie USB 2.0 Buchse
Microsoft DirectX 9.0c oder höher muss installiert sein.
Sonstige Voraussetzung:
Zum Empfang von DVB-T Signalen, muss sichergestellt
sein, dass eine ausreichende DVB-T Versorgung an
Ihrem Standort gewährleistet ist. Weiterhin kann es
sein, dass in Randgebieten die beiliegende passive
DVB-T Antenne nicht ausreicht, um einen problemlosen
Empfang zu ermöglichen. In diesem Fall wird empfohlen,
entweder eine evtl. vorhandene Dachantenne oder eine
aktive DVB-T Antenne mit integriertem Verstärker zu
benutzen. Falls Sie mehr Informationen über die DVB-T
Versorgung in Deutschland erhalten möchten, besuchen
Sie bitte die Webseite www.ueberallfernsehen.de.
Dort können Sie die Versorgung mit DVB-T an Ihrem
gewünschten Standort überprüfen.
Installation unter Windows Vista 32bit und
64bit Editionen:
Hinweis: Bitte installieren Sie den Treiber bevor Sie
den DVB-T Empfänger an Ihrem Rechner / Notebook
anschließen!
Legen Sie bitte die beiliegende Treiber CD-ROM in Ihr
CD Laufwerk ein. Sollte das CD-Menü nicht automatisch
starten, wählen Sie bitte das CD-Laufwerk aus, indem
Sie die Tr eiber CD eingelegt haben und klicken doppelt
auf die Datei Autorun.exe!
Sobald das CD-Menü auf Ihren Bildschirm erscheint,
wählen Sie bitte Ihre jeweilige Sprache aus. Im nächsten Fenster wählen Sie die Auswahl Windows Treiber
installieren aus.
2
Daraufhin werden Sie von der Benutzerkontensteu-
erung aufgefordert, Ihre Zustimmung zur Fortsetzung
des Vorgangs zu geben, klicken Sie daher auf die
Schaltfläche -> Zulassen. Daraufhin startet das Treiberinstallationsprogramm, klicken Sie zum Fortsetzen
auf die Schaltfläche -> Next. Das Programm installiert
nun den entsprechenden Tr eiber auf Ihre Festplatte.
Nach einer Weile werden Sie auf die erfolgreiche
Installation hingewiesen, klicken Sie nun auf -> Finish.
Nach Beendigung der Installation wird empfohlen, dass
Betriebssystem neu zu starten, und erst dann den DVB-T
Empfänger einzustecken. Nach dem Neustart von
Windows wird, nachdem der Empfänger eingesteckt
wurde, nach einer Weile erkannt und installiert.
Wichtige Hinweise für Windows Vista:
Ob der DVB-T Empfänger ordnungsgemäß installiert
wurde, können Sie unter Start (Windows Logo) -> Sy-
stemsteuerung -> System und Wartung -> Geräte-Manager nachsehen. Unter Umständen werden Sie von der
Benutzerkontensteuerung aufgefordert, dieser Aktion
zuzustimmen. Klicken Sie deshalb auf die Schaltfläche
-> Fortsetzen. Folgender Eintrag muss ohne gelbes
Ausrufezeichen vorhanden sein.
Audio-, Video- und Gerätecontroller
• AF9015 BDA Device
Installation unter Windows XP:
Hinweise: Bitte installieren Sie den Treiber bevor Sie
den DVB-T Empfänger an Ihrem Rechner / Notebook
anschließen!
Stellen Sie außerdem sicher, dass Ihr Benutzerkonto
über Administrationsrechte verfügt, anderenfalls, wird
die Installation fehlschlagen.
Weiterhin empfehlen wir vorher sicherzustellen, dass
das aktuellste Service Pack von Microsoft installiert ist.
Legen Sie bitte die beiliegende Treiber CD-ROM in Ihr
CD Laufwerk ein. Sollte das CD-Menü nicht automatisch
starten, wählen Sie bitte das CD-Laufwerk aus, indem
Sie die Tr eiber CD eingelegt haben und klicken doppelt
auf die Datei Autorun.exe!
Sobald das CD-Menü auf Ihren Bildschirm erscheint,
wählen Sie bitte Ihre jeweilige Sprache aus. Im nächsten Fenster wählen Sie die Auswahl Windows Treiber
installieren aus. Daraufhin startet das Treiberinstallationsprogramm, klicken Sie zum Fortsetzen auf die
Schaltfläche -> Next. Das Programm installiert nun den
entsprechenden Tr eiber auf Ihre Festplatte.
Page 4
Nach einer Weile werden Sie auf die erfolgreiche
Installation hingewiesen, klicken Sie nun auf -> Finish.
Nach Beendigung der Installation muss das Betriebssystem neu gestartet werden, erst danach darf der DVB-T
Empfänger eingesteckt werden.
Wichtige Hinweise für Windows XP:
Ob der DVB-T Empfänger ordnungsgemäß installiert
wurde, können Sie unter Start -> Systemsteuerung ->
Leistung und Wartung -> System -> Hardware ->
Geräte-Manager nachsehen. Folgender Eintrag muss
ohne gelbes Ausrufezeichen vorhanden sein.
Audio-, Video- und Gerätecontroller
• AF9015 BDA Device
Installation der Presto! PVR Software:
1. Schalten Sie den Computer ein und loggen Sie sich
als Administrator oder Benutzer mit entsprechenden
Rechten in Windows System ein.
2. Legen Sie die beiliegende Treiber CD-ROM in Ihr
Laufwerk ein, falls noch nicht geschehen. Sollte
das Installationsprogramm nicht automatisch starten,
befolgen Sie anschließende Schritte:
1. Klicken Sie doppelt auf das Arbeitsplatz Icon auf
Ihrem Desktop mit der linken Maus Taste.
2. Klicken Sie mit der rechten Maustaste auf Ihr
CD-ROM bzw. DVD-Laufwerk indem Sie gerade die
Treiber CD-ROM eingelegt haben und wählen
AutoPlay. Nun startet das Installationsprogramm.
3. Wählen Sie Ihre gewünschte Sprache aus.
4. Installieren Sie nun die Presto! PVR Software, durch
klicken auf die Schaltfläche -> Software installieren.
Folgen Sie nun bitte den Anweisungen des
Installationsprogramms.
5. Auf der Treiber CD-ROM fi nden Sie außerdem
weitere Hinweise und Hilfen über die Presto! PVR
Software. Klicken Sie hierzu auf die Schaltfläche
Anleitung anzeigen, bitte beachten Sie, das Sie
vorher evtl. den Adobe Acrobat Reader installieren
müssen. Diesen fi nden Sie ebenfalls auf der Treiber
CD-ROM.
6. Verbinden Sie nun den Hama DVB-T USB Stick
mit der passiven DVB-T Antenne oder einer anderen
Antenne Ihrer Wahl. Starten Sie nun die Software
indem Sie auf Ihrem Desktop auf das Icon mit der
Beschriftung Presto! PVR doppelt klicken.
Programmsuchlauf:
Bevor Sie nach Programmen suchen, stellen Sie sicher,
dass die Antenne mit dem Hama DVB-T Empfänger verbunden ist und der USB Stick am Computer angesteckt
wurde.
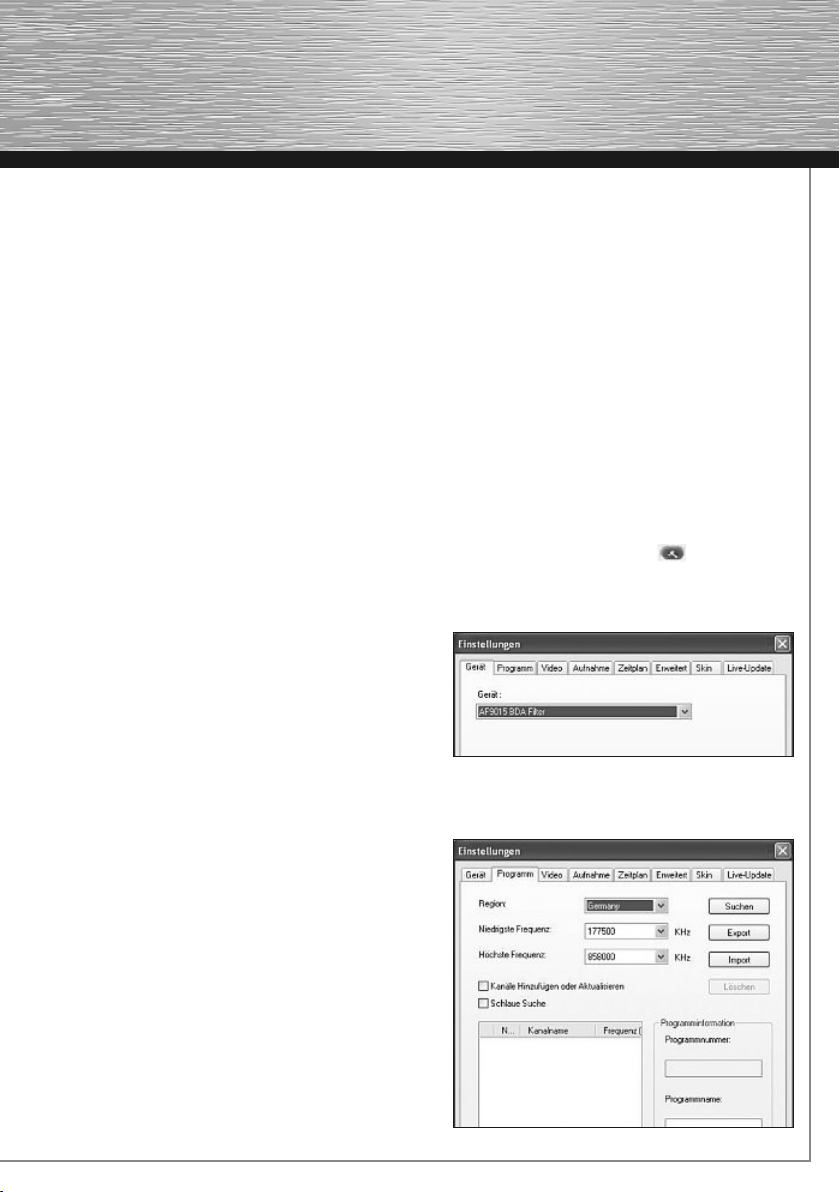
1. Klicken Sie auf das Icon um das Konfigurationsmenü zu öffnen, und wählen Sie dann anschließend
die Rubrik Gerät aus.
2. In der Geräteliste wählen Sie Ihr Gerät aus.
3. Wählen Sie die Rubrik Programm im Konfigurationsmenü und unter Region z.B. Germany für Deutschland
aus. Zur Programmsuche klicken Sie auf die Schaltfl äche Suchen.
Hinweis für Windows Vista Benutzer:
Unter Umständen werden Sie von der Benutzerkontensteuerung aufgefordert dieser Aktion zuzustimmen,
klicken Sie daher auf die Schaltfläche -> Fortsetzen, um
die Installation der Software zu ermöglichen.
Hinweis:
Die Seriennummer für die Presto! PVR Software fi nden
Sie auf der CD-Hülle. Bitte bewahren Sie diese Hülle
sorgfältig auf, da die Seriennummer bei jeder Installation benötigt wird!
3
Page 5
4. Klicken Sie auf Fertig stellen, sobald die Programmsuche abgeschlossen ist, um das Menü zu schließen.
Weitere Hinweise und Details über die beiliegende Presto! PVR Software und dessen Funktionen entnehmen
Sie bitte der gespeicherten PDF Datei auf der Tr eiber
CD-ROM. Die Anleitung können Sie aufrufen, indem
Sie auf der CD die Schaltfläche -> Anleitung lesen
anklicken.
Anmerkung: Gegebenenfalls ist vorher noch der Adobe
Acrobat Reader zu installieren. Klicken Sie hierbei im
Menü auf die Schaltfläche -> Acrobat Reader installieren und folgen den Anweisung des Programms.
Sicherheitshinweise:
• Halten Sie das Gerät von Flüssigkeiten, wie z.B.
Wasser fern.
• Betreiben Sie das Gerät nicht in feuchte Umgebungen
• Das Gerät besitzt keine zu wartende Bauteile,
deshalb dürfen Reparaturen nur von autorisiertem
Fachpersonal durchgeführt werden.
Produktinformationen:
Bei defekt oder Problemen mit dem Gerät wenden
Sie sich bitte an Ihrem Händler oder an die Hama
Produktberatung.
Internet/World Wide Web:
Produktunterstützung, neue Tr eiber oder Informationen
bekommen Sie unter www.hama.com
Support Hotline – Hama Produktberatung:
Tel. +49 (0) 9091 / 502-115
Fax. +49 (0) 9091 / 502-272
e-mail: [email protected]
Hinweise zur Fehlerbehebung:
Bitte beachten Sie, dass wir unser Produkt vor der Einführung sorgfältig auf evtl. Fehler und Inkompatibilitäten
getestet haben. Da es aber eine Vielzahl von verschiedener Hardwarekonfigurationen gibt, ist es unmöglich
alle Varianten zu testen.
Sollten bei Ihnen eines der folgenden Probleme
auftauchen, versuchen Sie dies wie in den Antworten
beschrieben zu lösen, bevor Sie die Hama Produktberatung in Anspruch nehmen.
Frage:
Nach Installation der Tr eiber und der Software bringt
die Software Presto! PVR folgende Fehlermeldung:
„Das Gerät ist nicht bereit. Prüfen Sie, ob Ihr Gerät
ordnungsgemäß angeschlossen ist.“
Antwort:
Bitte stellen Sie sicher das der DVB-T USB Stick an Ihrem Computer/Notebook korrekt angeschlossen ist und
von Ihrem System korrekt erkannt wird. Das Problem
kann auch durch eine falsche Treiberinstallation verursacht worden sein. Bitte überprüfen Sie nochmal exakt
die Installationshinweise in diesem Handbuch!
Frage:
Es werden nicht alle verfügbaren DVB-T Kanäle
gefunden.
Antwort:
Manche Kanäle könnten verschlüsselt sein, oder
ein spezielles MHP fähiges Gerät erfordern. Der
Hama DVB-T Stick kann nur unverschlüsselte Kanäle
anzeigen, des weiteren ist es auch nicht möglich MHP
Kanäle zu empfangen. Sollten Sie sicher sein, das
trotzdem nicht alle verfügbaren Programme gefunden
werden, versuchen Sie den Antennenstandort zu wechseln bis alle Kanäle gefunden und angezeigt werden
können. Alternativ müssen Sie je nach Standort eine
DVB-T Antenne mit integrierten Verstärker oder eine
Dachantenne benutzen.
Frage:
Kann der DVB-T Stick auch mit anderer Software
betrieben werden?
Antwort:
Teilweise. Mit dem DVB-T Stick werden BDA Tr eiber
mitgeliefert, die auch mit entsprechender Software von
Drittherstellern funktionieren sollte (z.B. Media Center,
CyberLink PowerCinema oder Media Portal usw.). Bitte
beachten Sie, dass wir keinerlei Support für Drittanbieter Software anbieten können.
Frage:
Unter Windows Vista 64Bit Edition, erzeugt die Presto!
PVR Software eine Fehlermeldung, die besagt, dass das
Gerät nicht bereit oder eingesteckt ist.
Antwort:
Dieser Fehler wird durch den Soundkartentreiber von
Microsoft verursacht. Bitte installieren Sie den neuesten Tr eiber von dem Hersteller Ihrer Soundkarte bzw.
Ihres Soundchips, um den Fehler zu korrigieren.
4
Page 6
g
Operating Instruction
Package contents:
1 x DVB-T USB stick
1 x Driver + software CD-ROM
1 x Passive DVB-T antenna
1 x Installation instructions printout
1 x Disposal instructions
System requirements:
Processor: 1.5 GHz or higher
Main memory: 512 MB or more
Graphics card: DirectX 9.0c compatible with
min. 64 MB local memory
Sound: AC97 compatible
Hard drive capacity: Min. 1 GB of free space
(NTFS recommended)
Operating system: Windows XP + SP 2
Windows Vista 32 bit or 64 bit
edition
One spare USB 2.0 port
Microsoft DirectX 9.0c or higher must be installed.
Other requirements:
In order to receive DVB-T signals, you must ensure that
your region is sufficiently covered by a DVB-T network.
In borderline areas, the enclosed passive DVB-T antenna may not be sufficient to allow perfect reception. In
this case, we recommend that you use a roof antenna,
if available, or an active DVB-T antenna with an integrated amplifier. If you require more information on DVB-T
coverage in Germany, please visit the website www.
ueberallfernsehen.de. By entering your post code you
can check DVB-T coverage in your region.
Installation on Windows Vista 32 bit and
64 bit editions:
Note: Install the driver before connecting the DVB-T
receiver to your computer or laptop.
Insert the enclosed driver CD in your CD-ROM drive. If
the CD menu does not start automatically, select the
CD-ROM drive in which you have inserted the driver CD
and double-click the Autorun.exe. fi le.
When the CD menu appears on your screen, select your
user language. Select Install Windows Driver in the
next window. You are now asked by the User Account
Control whether you want to continue. Click the Allow
button. Driver installation starts. Click the Next button
to continue. The program then installs the respective
driver on your hard drive. After a short time, you will
be notified that the installation has been successful.
Then click Finish. We recommend that you restart the
operating system after completing installation and do
not insert the DVB-T receiver until you do so. After you
have restarted Windows and inserted the receiver, the
computer recognises and installs the receiver after a
short time.
Important instructions for Windows Vista:
You can verify whether the DVB receiver has been successfully installed by checking under Start (Windows
logo) -> Control Panel -> System and Maintenance ->
Device Manager. In some circumstances, you may be
asked by User Access Control to approve this action.
Click Continue. The following entry must appear without
a yellow exclamation mark.
Sound, video and game controllers
• AF9015 BDA Device
Installation on Windows XP:
Note: Install the driver before connecting the DVB-T
receiver to your computer or laptop.
Ensure that your user account has administrator rights,
otherwise the installation will not be successful.
We also recommend you ensure beforehand that the
latest Microsoft Service Pack is installed.
Insert the enclosed driver CD in your CD-ROM drive. If
the CD menu does not start automatically, select the
CD-ROM drive in which you have inserted the driver CD
and double-click the Autorun.exe. fi le.
When the CD menu appears on your screen, select
your user language. Select Install Windows Driver in
the next window. Driver installation starts. Click the
Next button to continue. The program then installs
the respective driver on your hard drive. After a short
time, you will be notified that the installation has been
successful. Then click Finish. You must then restart the
operating system after completing installation and not
insert the DVB-T receiver until doing so.
Important instructions for Windows XP:
You can check whether the DVB-T receiver was
installed properly under Start -> Control Panel ->
Performance and Maintenance -> System -> Hardware
-> Device Manager. The following entry must appear
without a yellow exclamation mark.
Sound, video and game controllers
• AF9015 BDA Device
5
Page 7
Installing Presto! PVR Software:
1. Start your computer and log on to Windows as
administrator or as a user with administrator privileges.
2. Place the enclosed driver CD into your CD-ROM drive
if you have not already done so. If the installation
program does not start automatically, proceed as
follows:
1. Double-click the My Computer icon on your
desktop with the left mouse button.
2. Right-click on the CD-ROM or DVD drive
containing the driver CD-ROM and select
AutoPlay. The installation program now starts.
3. Select the desired language.
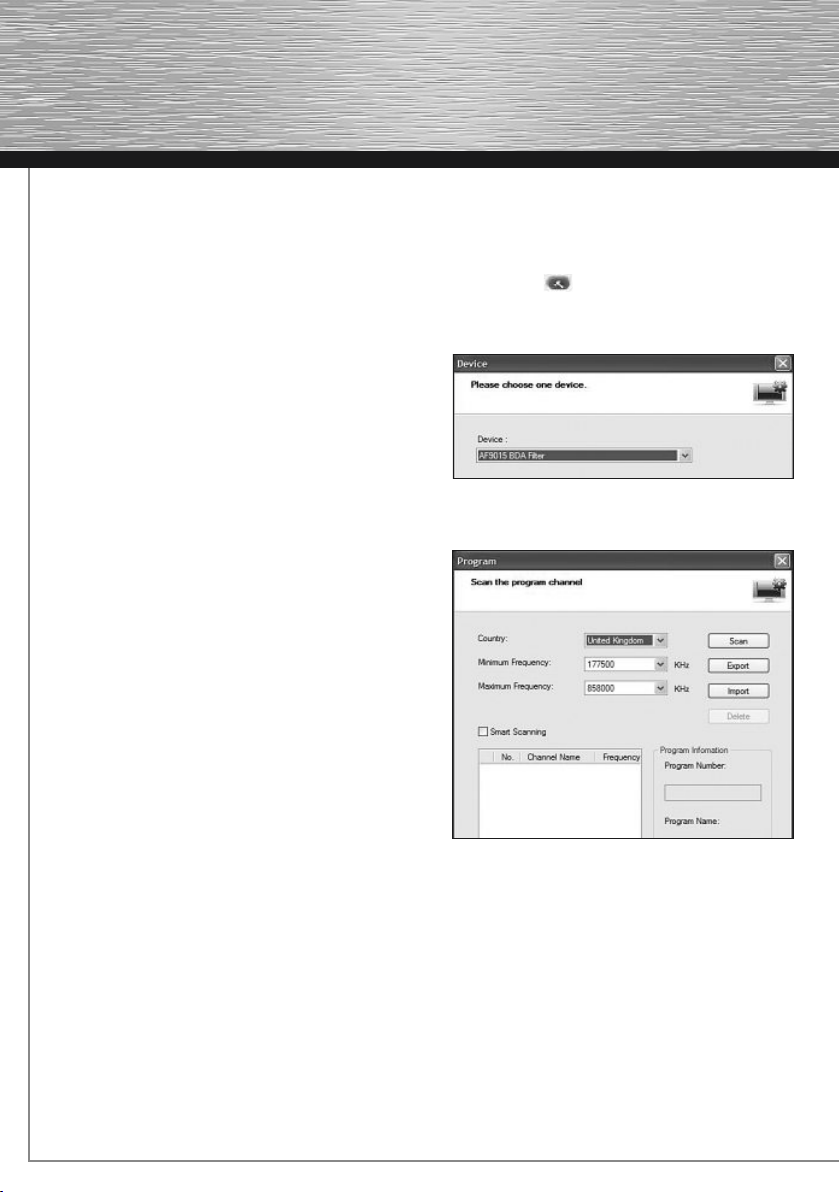
Channel Search:
Before searching for channels, make sure that the
antenna is connected to the Hama DVB-T receiver and
the USB stick has been plugged into the computer.
1. Click the icon to open the configuration menu
and select the Device tab.
2. Select your device from the list.
4. Install Presto! PVR software by clicking the Install
software button. Follow the installation program
instructions.
Note for Windows Vista users:
In some circumstances, you may be asked by the User
Account Control to confirm this action. To enable the
software installation, click the Continue button.
Note:
The serial number for Presto! PVR Software is on the
CD case. Keep the serial number in a safe place, as you
must enter it every time you reinstall the software.
5. The CD-ROM also contains additional information
and tips for Presto! PVR Software. To view it, click
the Read Instructions button. Please note that you
must have installed Adobe Acrobat Reader
beforehand. This is also included on the driver
CD-ROM.
6. Connect the Hama DVB-T USB stick to the passive
DVB-T antenna or another of your choice. Start the
software by double-clicking the icon labelled Presto!
PVR on your desktop.
3. Select the Channel tab in the configuration window
and choose a region, such as United Kingdom
Scan button to search for channels.
4. Click OK/Finish as soon as the channel search is
completed to close the dialog box.
More notes and details about the accompanying Presto!
PVR software and its functions are contained in the PDF
fi les on the driver CD-ROM. You can view the instructions by clicking on the Read manual button on the CD.
Note: It may be necessary to install Adobe Acrobat
Reader beforehand. To do so, click the Install Acrobat
Reader button in the window and follow the program
instructions.
. Click the
6
Page 8
Safety instructions:
• Keep the device away from liquids, e.g. water.
• Do not use the device in damp environments.
• There are no serviceable components in the device.
• Only authorised qualified staff may carry out repairs
on it.
Product information:
Please contact your dealer or Hama Product Consulting if you have any problems with the device, or it is
defective.
Internet / World Wide Web:
Product support, new drivers or information can be
found at www.hama.com
Support hotline – Hama Product Consulting:
Tel. +49 (0) 9091 502 115
Fax. +49 (0) 9091 / 502-272
E-mail: [email protected]
Instructions for Tr oubleshooting
Please note that we test our products carefully for faults
and incompatibilities before releasing them. However,
due to the variety of possible hardware configurations,
it is impossible to test all of them.
If one of the following problems occurs, try to solve it
as described in the solutions before contacting Hama
Product Consulting.
Question:
Not all available DVB-T channels are found.
Answer:
Some channels may be encrypted or require a special
MHP-capable device. The Hama DVB-T stick can only
show non-encrypted channels. In addition, it cannot
be used to receive MHP channels. If you are sure that
not all available channels were found, try to change
the location of the antenna until the problem is solved.
Alternatively, you may need to use a DVB-T antenna
with an integrated amplifier or, depending on location, a
roof antenna.
Question:
Can the DVB-T stick be operated with other software?
Answer:
Partially. BDA drivers are included with the DVB-T stick,
which should also function with appropriate software
from third manufacturers (for example, Media Center,
CyberLink PowerCinema or Media Portal, etc.). Note
that we offer no support for third-party software.
Question:
On Windows Vista 64 bit edition, the Presto! PVR
software issues an error message stating that “The
device is not ready. Please check whether your device
is connected correctly.”.
Answer:
This error is caused by Microsoft sound card drivers.
You can correct this error by installing the latest driver
from the supplier of your sound card or sound chip.
Question:
After driver and software installation, the Presto! PVR
software issues the following error message: “The
device is not ready. Please check whether your device
is connected correctly.”
Answer:
Ensure that the DVB-T USB stick is connected to your
computer or laptop properly and is recognised by your
system correctly. The problem may also have been
caused by incorrectly installing the driver. Check the
installation instructions in this manual once more.
7
Page 9
f
Mode d´emploi
Contenu de l´emballage :
1x Stick TNT USB
1x Pilote et logiciel sur CD-ROM
1x Antenne TNT passive
1x Guide d´installation imprimé
1x Mesures d´élimination des déchets
Systèmes requis :
Processeur : 1,5 Ghz ou plus élevé
Mémoire centrale : 512 MB ou plus
Carte graphique : DirectX 9.0c compatible avec une
Son : compatible avec AC97
Capacité du disque dur :
Système d´exploitation :
Prise USB 2.0 disponible
Microsoft DirectX 9.0c ou une version plus élevée doit
être installé.
mémoire locale de 64 MB minimum
Une mémoire libre de 1 GB minimum
(recommandé NFTS)
Windows XP + SP 2
Windows Vista Edition 32bits
ou 64bits
Autre condition :
Pour pouvoir recevoir les signaux TNT, il faut d´abord
s´assurer que l´alimentation TNT est garantie à votre
emplacement. Il se peut que dans des régions limitrophes, l´antenne TNT passive fournie ne suffise pas
pour obtenir une réception optimale. Dans ce cas, il est
recommandé d´utiliser soit une antenne de toit éventuellement existante soit une antenne TNT active avec un
amplificateur intégré. Si vous souhaitez recevoir plus
d´informations sur l´alimentation TNT en Allemagne,
veuillez consulter le site Web www.ueberallfernsehen.de
Vous pourrez vérifier si votre lieu d´emplacement est
alimenté par le système TNT.
Installation sous Windows Vista Editions 32bits
et 64bits :
Remarque : Veuillez s´il vous plaît installer le pilote
avant de brancher le récepteur TNT à votre PC/ordinateur portable!
Insérez le pilote CD-ROM dans votre lecteur CD. Si le
menu CD ne démarre pas automatiquement, veuillez sélectionner le lecteur CD, dans lequel vous avez inséré le
pilote CD puis double-cliquez sur le fi chier Autorun.exe!
La Contrôle de compte d´utilisateur va demander votre
accord pour la poursuite du procédé, cliquez alors sur
le bouton de commande -> Autoriser. Le programme
d´installation du pilote démarre alors; pour continuer,
cliquez sur le bouton de commande -> Next. Le programme installe à présent le pilote correspondant sur
votre disque dur. Au bout d´un moment, vous recevrez
un message indiquant l´installation réussie, cliquez
alors sur -> Finish. Une fois l´installation terminée, il est
recommandé de redémarrer le système d´exploitation,
puis de brancher le récepteur TNT. Après le redémarrage de Windows, une fois que le récepteur est branché,
au bout d´un instant il sera reconnu et installé.
Remarques importantes concernant Windows Vista :
Pour vérifier si le récepteur TNT a été installé correctement, cliquez sur Démarrer (Windows Logo) ->
Panneau de configuration -> Système et maintenance ->
Gestionnaire des périphériques. Le cas échéant, la
Contrôle de compte d´utilisateur
d´approuver cette action. Veuillez alors cliquer sur le bouton
de commande -> Continuer. L´inscription suivante doit
alors apparaître sans point d´exclamation jaune.
Contrôleurs audio/vidéo et jeu
• AF9015 BDA Device
va vous demander
Installation sous Windows XP :
Remarques : Veuillez s´il vous plaît installer le pilote
avant de brancher le récepteur TNT à votre PC/
ordinateur portable!
De plus, vérifiez que votre compte utilisateur dispose de droits d´administrateur, dans le cas contraire,
.
l´installation ne fonctionnera pas.
Enfin, nous vous recommandons de vérifier auparavant
que le Service Pack de Microsoft le plus actuel est
installé.
Insérez le pilote CD-ROM dans votre lecteur CD. Si le
menu CD ne démarre pas automatiquement, veuillez sélectionner le lecteur CD, dans lequel vous avez inséré le
pilote CD puis double-cliquez sur le fi chier Autorun.exe!
Dès que le menu CD apparaît sur votre écran, sélectionnez la langue souhaitée. Dans la fenêtre suivante,
sélectionnez Installer le pilote Windows.
Dès que le menu CD apparaît sur votre écran, sélectionnez la langue souhaitée. Dans la fenêtre suivante,
sélectionnez Installer le pilote Windows.
8
Page 10
Le programme d´installation du pilote démarre alors;
pour continuer, cliquez sur le bouton de commande
-> Next. Le programme installe à présent le pilote
correspondant sur
votre disque dur. Au bout d´un moment, vous recevrez
un message indiquant l´installation réussie, cliquez
alors sur -> Finish. Une fois l´installation terminée, il faut
redémarrer le système d´exploitation; c´est seulement
après que vous pourrez brancher le récepteur TNT.
Remarques importantes concernant Windows XP :
Pour vérifier si le récepteur TNT a été installé correctement, cliquez sur Démarrer -> Panneau de configuration
-> Performances et maintenance -> Système ->
Matériel -> Gestionnaire des périphériques.
L´inscription suivante doit alors apparaître sans point
d´exclamation jaune.
Information :
Vous trouverez le numéro de série du logiciel Presto!
PVR sur la pochette du CD. Veuillez conserver soigneusement cette pochette car vous aurez besoin du numéro
de série à chaque installation!
5. Sur le pilote CD-ROM vous trouverez d´autres
indications et aides concernant le logiciel Presto!
PVR. Pour cela, cliquez sur le bouton de commande
Lire instruction, veuillez noter qu´éventuellement
vous devrez d´abord installer Adobe Acrobat Reader.
Vous le trouverez également sur le pilote CD-ROM.
6. Reliez maintenant le stick TNT USB de Hama avec
l´antenne TNT passive ou une autre antenne de votre
choix. Démarrez maintenant le logiciel en doublecliquant sur votre Desktop sur l´icône Presto! PVR.
Contrôleurs audio/vidéo et jeu
• AF9015 BDA Device
Installation du logiciel Presto! PVR :
1. Allumez votre ordinateur et inscrivez-vous dans le
système Windows comme administrateur ou
utilisateur avec les droits correspondants.
2. Insérez le pilote CD-ROM fourni dans votre lecteur
si ce n´est pas déjà fait. Si le programme
d´installation ne démarre pas automatiquement,
suivez les étapes suivantes :
1. Double-cliquez sur l´icône Poste de travail avec le
bouton gauche de votre souris.
2. A l´aide du bouton droit de la souris cliquez sur
votre lecteur CD-ROM ou DVD dans lequel vous
venez d´insérer le pilote CD-ROM et sélectionnez
AutoPlay. A présent, le programme d´installation
va démarrer.
3. Sélectionnez la langue souhaitée.
4. Installez à présent le logiciel Presto! PVR en cliquant
sur le bouton de commande -> Installer le logiciel.
Suivez à présent les instructions du programme
d´installation .
Remarque sur l´Utilisateur Windows Vista :
Le cas échéant, la Contrôle de compte d´utilisateur va
vous demander d´approuver cette action, cliquez alors
sur le bouton de commande -> Continuer afin de rendre
possible l´installation du logiciel.
Recherche des programmes :
Avant de rechercher les programmes, assurez-vous que
l´antenne est reliée au récepteur TNT de Hama et que le
stick USB est bien raccordé à l´ordinateur.
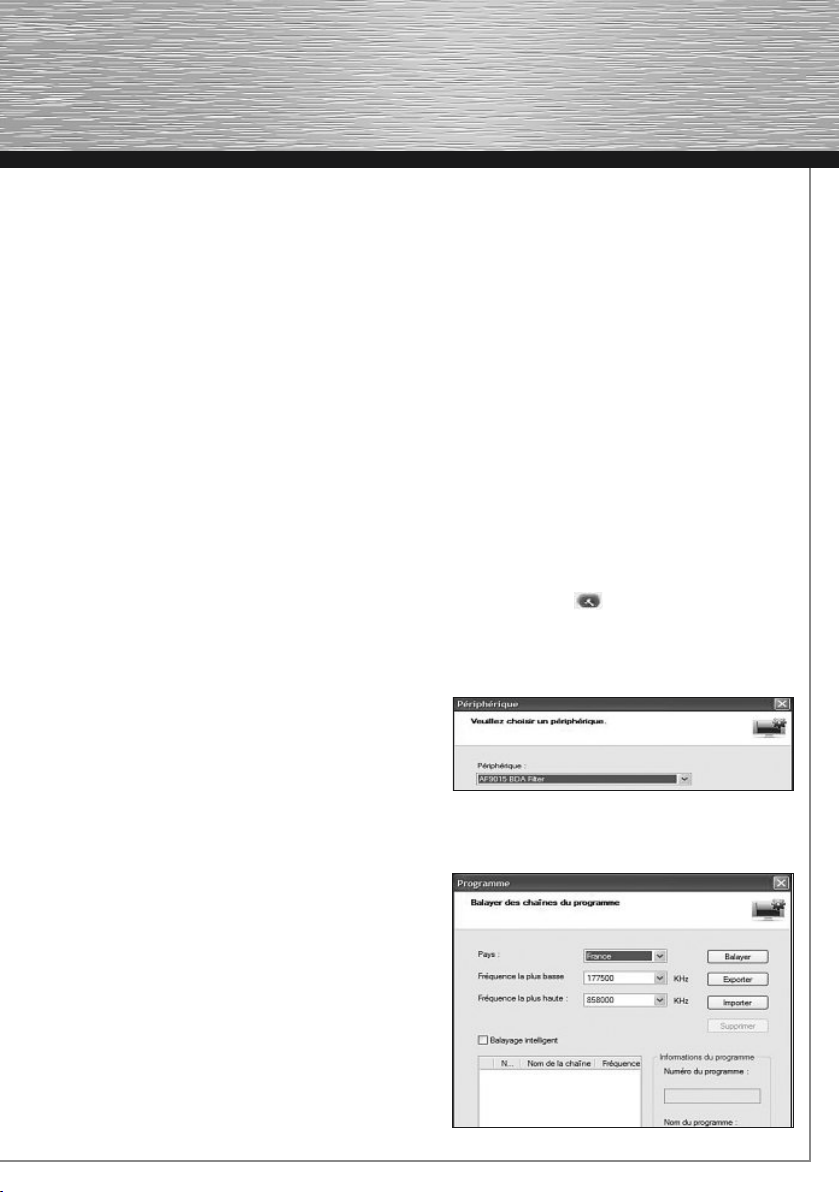
1. Cliquez sur l´icône pour ouvrir le menu de
configuration et sélectionnez ensuite la rubrique
périphérique.
Sélectionnez votre
2.
périphérique
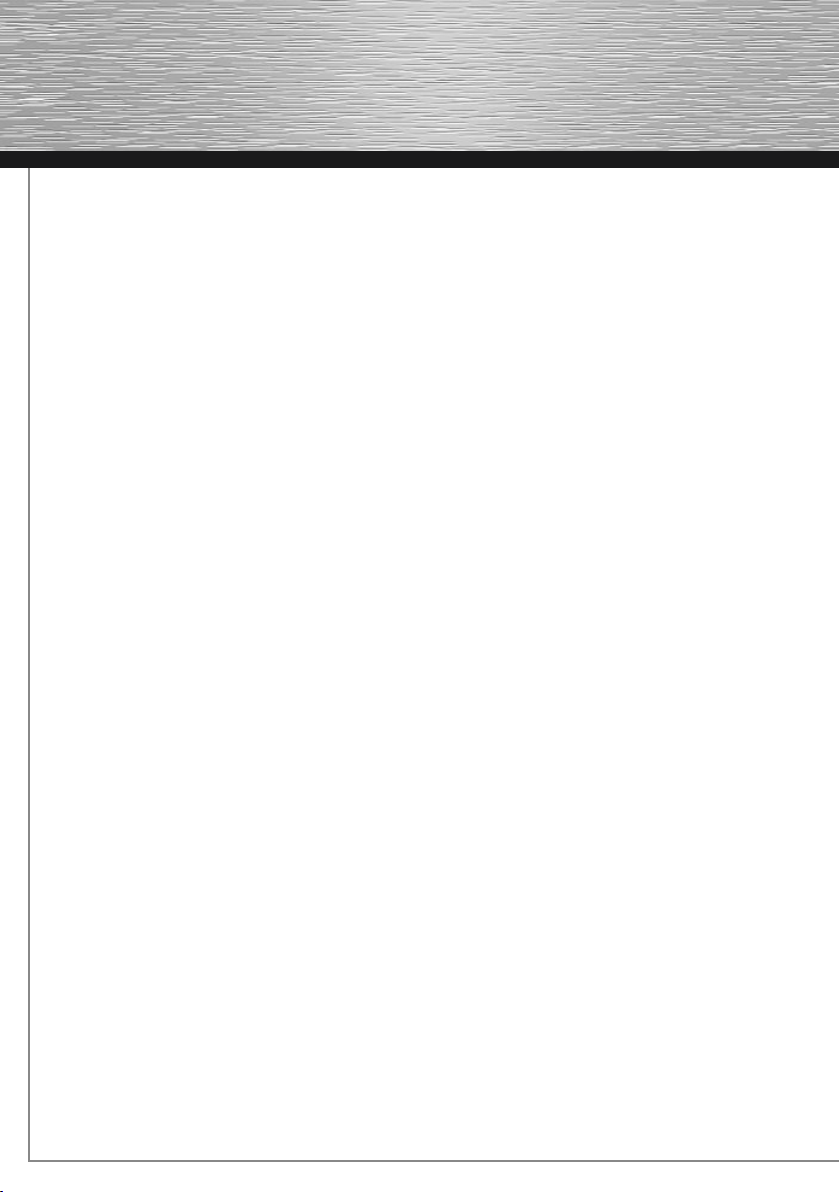
3. Sélectionnez la rubrique Programme dans le menu
de configuration et pour la région par ex. France
pour France. Pour rechercher un programme
cliquez sur le bouton de commande Chercher.
.
périphérique
dans la liste des
9
Page 11
4. Cliquez sur Achever dès que la recherche des
programmes est terminée afin de fermer le menu.
Vous trouverez d´autres informations et détails sur le
logiciel Presto! PVR fourni et sur ses fonctions dans le
fi chier PDF du pilote CD-ROM. En cliquant sur le bouton
de commande -> Lire instruction du CD vous pourrez y
accéder.
Remarque : Il faut auparavant installer Adobe Acrobat
Reader. Pour cela, cliquez dans le menu sur le bouton
de commande Installer Acrobat Reader et suivez les
instructions du programme.
Mesures de sécurité :
• Ne placez pas votre appareil près de liquides, comme
par ex. près de l´eau.
• N´utilisez pas votre appareil dans un endroit humide.
• L´appareil ne comprend pas d´éléments de
construction à entretenir, c´est pourquoi les
réparations ne doivent être effectuées que par du
personnel spécialisé.
Informations sur le produit :
En cas de problème ou de produit défectueux, veuillez
vous adresser à votre commerçant spécialisé ou au
service de conseil de produits de Hama.
Internet/World Wide Web:
Pour les supports de produits, les nouveaux pilotes
ou pour de plus amples informations sur les produits,
veuillez consulter le site internet www.hama.com
Support Hotline (ligne directe) –
Service du conseil des produits Hama :
Tel. +49 (0) 9091 / 502-115
Fax. +49 (0) 9091 / 502-272
e-mail: [email protected]
Conseils de dépannage :
Veuillez noter que nous avons testé notre produit avant
son introduction sur le marché sur d´éventuels problèmes ou incompatibilités. Mais étant donné la multitude
de configurations de matériel différentes qui existent, il
est impossible de tester toutes les variations.
Si vous rencontrez un des problèmes suivants, veuillez
essayer de le résoudre comme il est décrit ci-dessous
avant de contacter le service de conseil des produits
de Hama!
10
Question :
Après l´installation du pilote et du logiciel, le logiciel
Presto!PVR indique le message d´erreur suivant : „Le
périphérique n´est pas prêt. Veuillez vérifiez que votre
périphérique est connecté.“
Réponse :
Assurez-vous que le stick USB TNT est branché
correctement à votre ordinateur/ordinateur portable
et qu´il est reconnu par votre système. Le problème
peut également provenir d´une mauvaise installation du
pilote. Veuillez s´il vous plaît relire et vérifier les notices
concernant l´installation dans ce manuel d´utilisation!
Question :
Les canaux TNT disponibles ne sont pas tous trouvables
Réponse :
Certains canaux peuvent être codés ou nécessitent
un appareil spécial et compatible avec MHP. Le stick
TNT Hama peut uniquement montrer les canaux non
codés, de plus il n´est pas toujours possible de recevoir
les canaux MHP. Si vous êtes certain que tous les
programmes disponibles n´ont pas été trouvés, essayez
de changer la place de l´antenne jusqu´à ce que vous
accédiez à tous les programmes. Une autre possibilité
est d´utiliser une antenne TNT avec un amplificateur
intégré ou une antenne toit.
Question :
Est-ce que le stick TNT peut également fonctionner
avec un autre logiciel?
Réponse : Partiellement. Avec le stick TNT des pilotes
BDA sont livrés qui normalement fonctionnent avec le
logiciel correspondant de fabricants tiers (par ex. Meida
Center, CyberLink PowerCinema ou Media Portal etc.).
Veuillez noter que nous ne pouvons pas offrir de support
pour les logiciels de tiers.
Question :
Sous Windows Vista Edition 64Bits, le logiciel Presto!PVR
affiche un message d´erreur, signalant que „Le
périphérique n´est pas prêt. Veuillez vérifiez que votre
périphérique est connecté.“.
Réponse :
Ce défaut est causé par le pilote de cartes son de
Microsoft. Veuillez installer le nouveau pilote du
fabricant de votre carte son ou de vos chips son afin de
solutionner le problème.
Page 12
11
 Loading...