

Page 1

00062726/04.07
All list ed bran ds are tr adema rks of th e corr espond ing comp anies. Errors and omissions excepted,
and subject to technical changes. Our general terms of delivery and payment are applied.
Hama GmbH & Co KG
D-86651 Monheim/Germany
www.hama.com
00062726bda.indd Abs1:200062726bda.indd Abs1:2 02.10.2007 12:48:10 Uhr02.10.2007 12:48:10 Uhr
Page 2
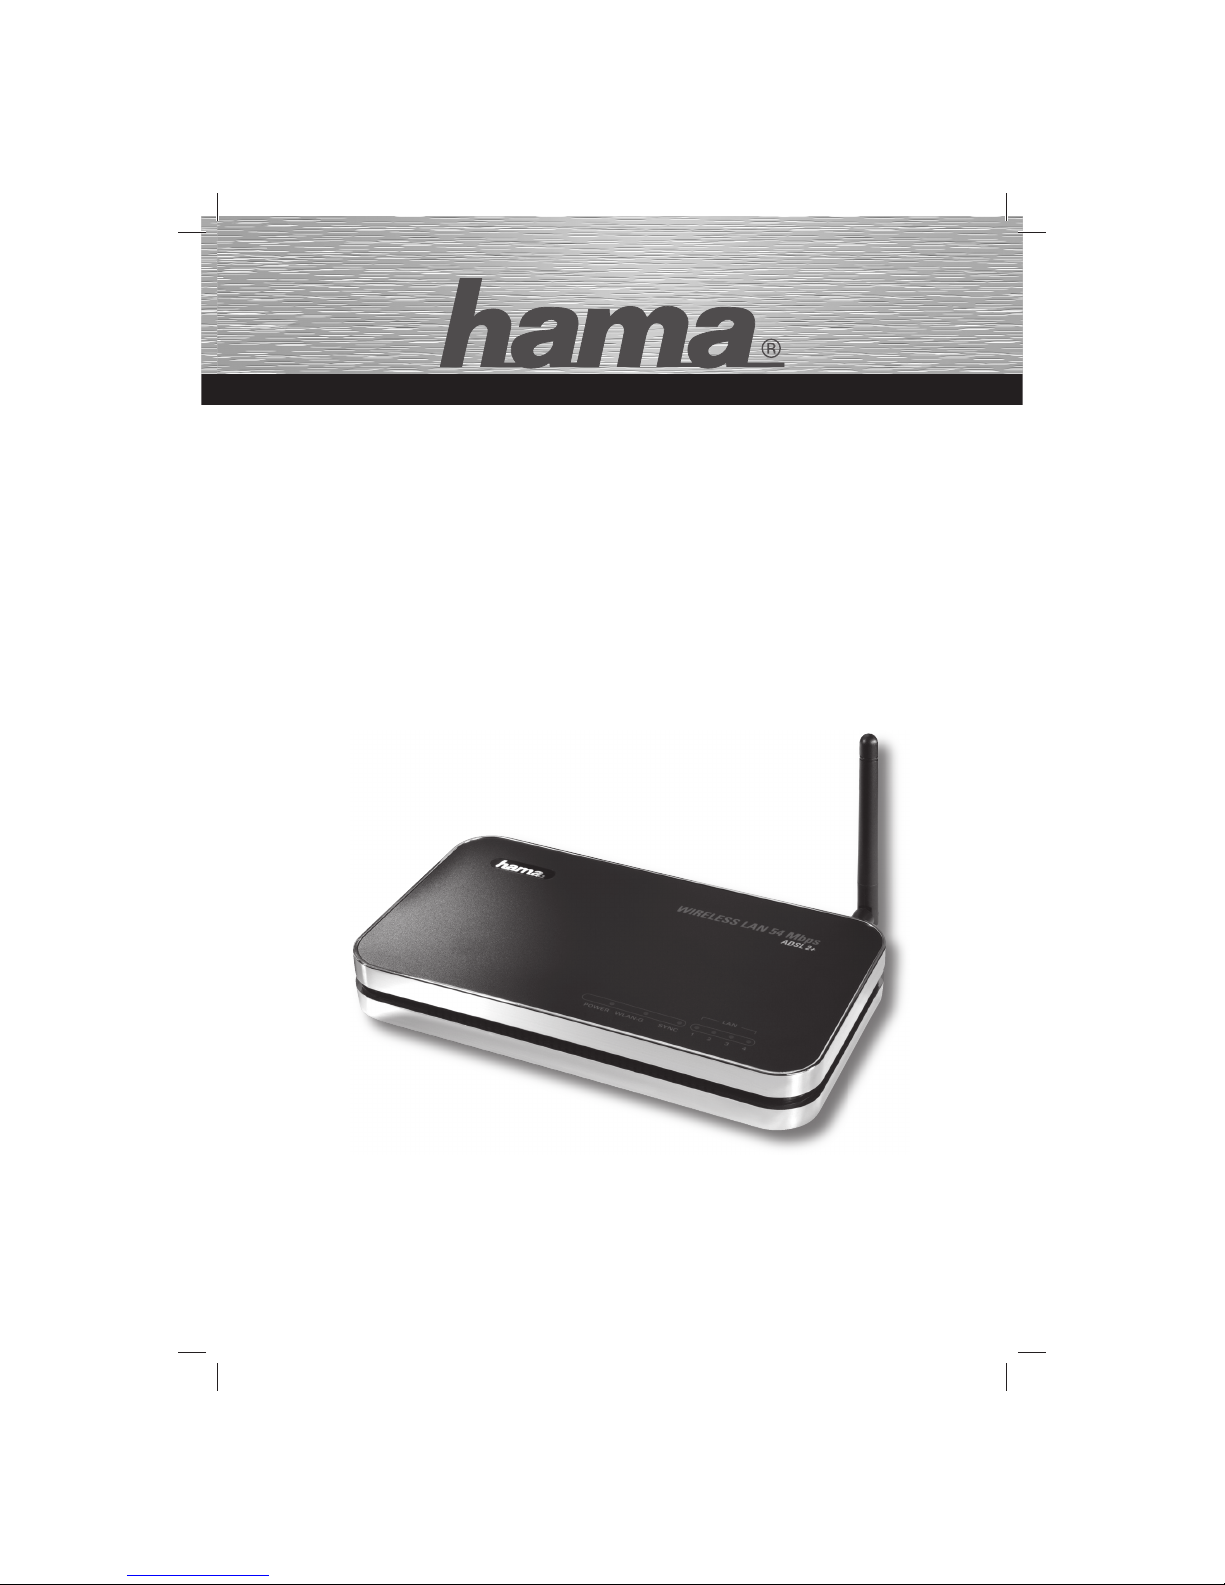
»WLAN Modem Router
ADSL2+, 54 Mbps«
Internetverteiler mit integriertem Modem
Internet distributor with integrated modem
WIRELESS LAN
00062726
00062726bda.indd Abs2:100062726bda.indd Abs2:1 02.10.2007 12:48:12 Uhr02.10.2007 12:48:12 Uhr
Page 3

27
Contents:
1. Connecting the WLA N ADSL2+ Modem Router 28
2. Confi guring the Operating System and Computer 29
3. Confi guring the WL AN ADSL2+ Modem Router 30
3.1. Confi guring the internet connection using the Quick Start Option 30
3.1.1. Setting a new router password: 31
3.1.2. Set ting the time zone 31
3.1.3. Selecting a broadband connection (ISP Connection Type) 31
3.1.4. PPPoE user data 32
4. Confi guring the Wireless LA N 33
4.1. WEP encryption: 33
4.2. WPA and WPA2 encryption: 34
4.3. Advanced settings 35
4.4. Wireless MAC Address Filtering 35
5. Interface Setup (Confi guring L AN Settings) 36
5.1. Router local IP 36
5.2. DHCP server 36
6. Internet Settings 36
6.1. ATM VC (DSL modem setting) 37
6.2. Encapsulation (DSL protocol) 37
6.3. PPPoE/PPPoA (Broadband connection protocol) 37
6.4. Connection setting (DSL connection setting) 38
6.5 . IP address (IP address setting for the router) 39
7. Advanced Setup (Advanced Router Set ting) 39
7.1. Firewall 40
7.2 . N AT: 40
7.2 .1. DMZ 40
7.2.2. Vir tual server (Port for warding) 41
8. Access Management 41
8.1. ACL (Access control for certain ser vices) 42
8.2. IP fi lter (access control using IP address) 4 3
8.3. SNMP 44
8.4. UPnP (Universal Plug and Play set ting): 44
8.5 . DDNS (Dynamic Domain Name System) 45
9. Maintenance (Router Management) 45
9.1. Administration 46
9.1.1. Resetting the password: 46
9.2 . Time zone (Setting the time zone) 46
9.3. Firmware (Updating fi rmware) 47
9.4. SysRestart (Restar ting/reset ting the router) 47
9.5. Diagnostics (Router self-test) 48
10. Status 48
10.1. Device info 49
10.2. System log 49
11. Help 49
12. Glossary (Explanation of Terminology) 50
13. Support and Contact Information 51
g
Operating Instruction
00062727bda.indd Abs2:2700062727bda.indd Abs2:27 02.10.2007 11:14:34 Uhr02.10.2007 11:14:34 Uhr
Page 4

28
Package contents:
1x Hama Wireless L AN ADSL2+ Modem Router, 54 Mbps
1x 12 V power supply unit
1x Printed operating instructions
1x confi guration cable
Remark concerning the positioning:
The connection quality depends strongly on the place or surroundings where you put up the WLAN device. Please
ensure that the device or its antennae are neither covered nor built in. We advise you against putting it up near metallic
objects or other electric or radiant devices. In case of reception fl uctuations or connection interruptions we recommend
you to move interference sources such as DECT telephones, mobile phones, Bluetooth devices or other WLAN networks
out of the way. If this is not possible, it may also be helpful to change the cable.
System requirements:
• Operating system with TCP/IP protocol installed
• Java-capable web browser such as Mozilla F irefox, Microsoft Internet E xplorer or Opera.
Safety instructions:
Do not use the device in moist or extremely dusty areas, on radiators or in the vicinity of heat sources. This device
is not designed for use outdoors. Protect the device from pressure and impact. The device may not be opened or
moved during operation. Do not use the device without an antenna at tached
Caution Use the router with the enclosed power supply unit only. Using other power supply units can cause
irreparable damage to the product.
Note: !! The “Connect On-Demand” setting is recommended if you have a pay-as-you-go tariff (if you pay
according to volume or time). This means that the Internet connection is disconnected automatically
after the period set in the “Idle time” option. Connection costs may be high if you are permanently
connected to the internet. Please also note that closing the browser does not automatically
disconnect you from the Internet. A number of programs send queries to the Internet or receive
data without this being clearly indicated. For the router, these queries are jus t as valid as opening
a browser, for example. If you want to ensure that there is no active connection to the Internet, you
should switch of f the device.
Requirements for installing the HAMA WLAN ADSL2+ Modem Router, 54 Mbps:
Ensure that you have the following before installing the Hama WL AN ADSL2+ Modem Router:
1. ADSL or ADSL 2+-enabled connection
2. Installed DSL split ter provided by your DSL connection ser vice provider
3. User information from your Internet provider
4. DSL connecting cable (between the split ter and modem)
5. CAT 5 STP net work cable with a RJ-45 connection
1 Connecting the WL AN ADSL2+ Modem Router:
1. Connect the computers and other network devices such as hubs /switches to sockets 1- 4. Use a crossover
or CAT5 patch cable (max. 100 m). The integrated switch automatically detects the connection speed of 10 or
100 Mbps, half/full duplex transfer mode and the t ype of cable used.
2. Connect the DSL splitter to the “ADSL” connection on the rear of the WL AN ADSL2+ modem router using the
DSL connecting cable.
3. Plug the provided power supply unit into an empty socket and connect it to the router.
Caution: Unsuitable power supply units can cause damage.
00062727bda.indd Abs2:2800062727bda.indd Abs2:28 02.10.2007 11:14:34 Uhr02.10.2007 11:14:34 Uhr
Page 5
29
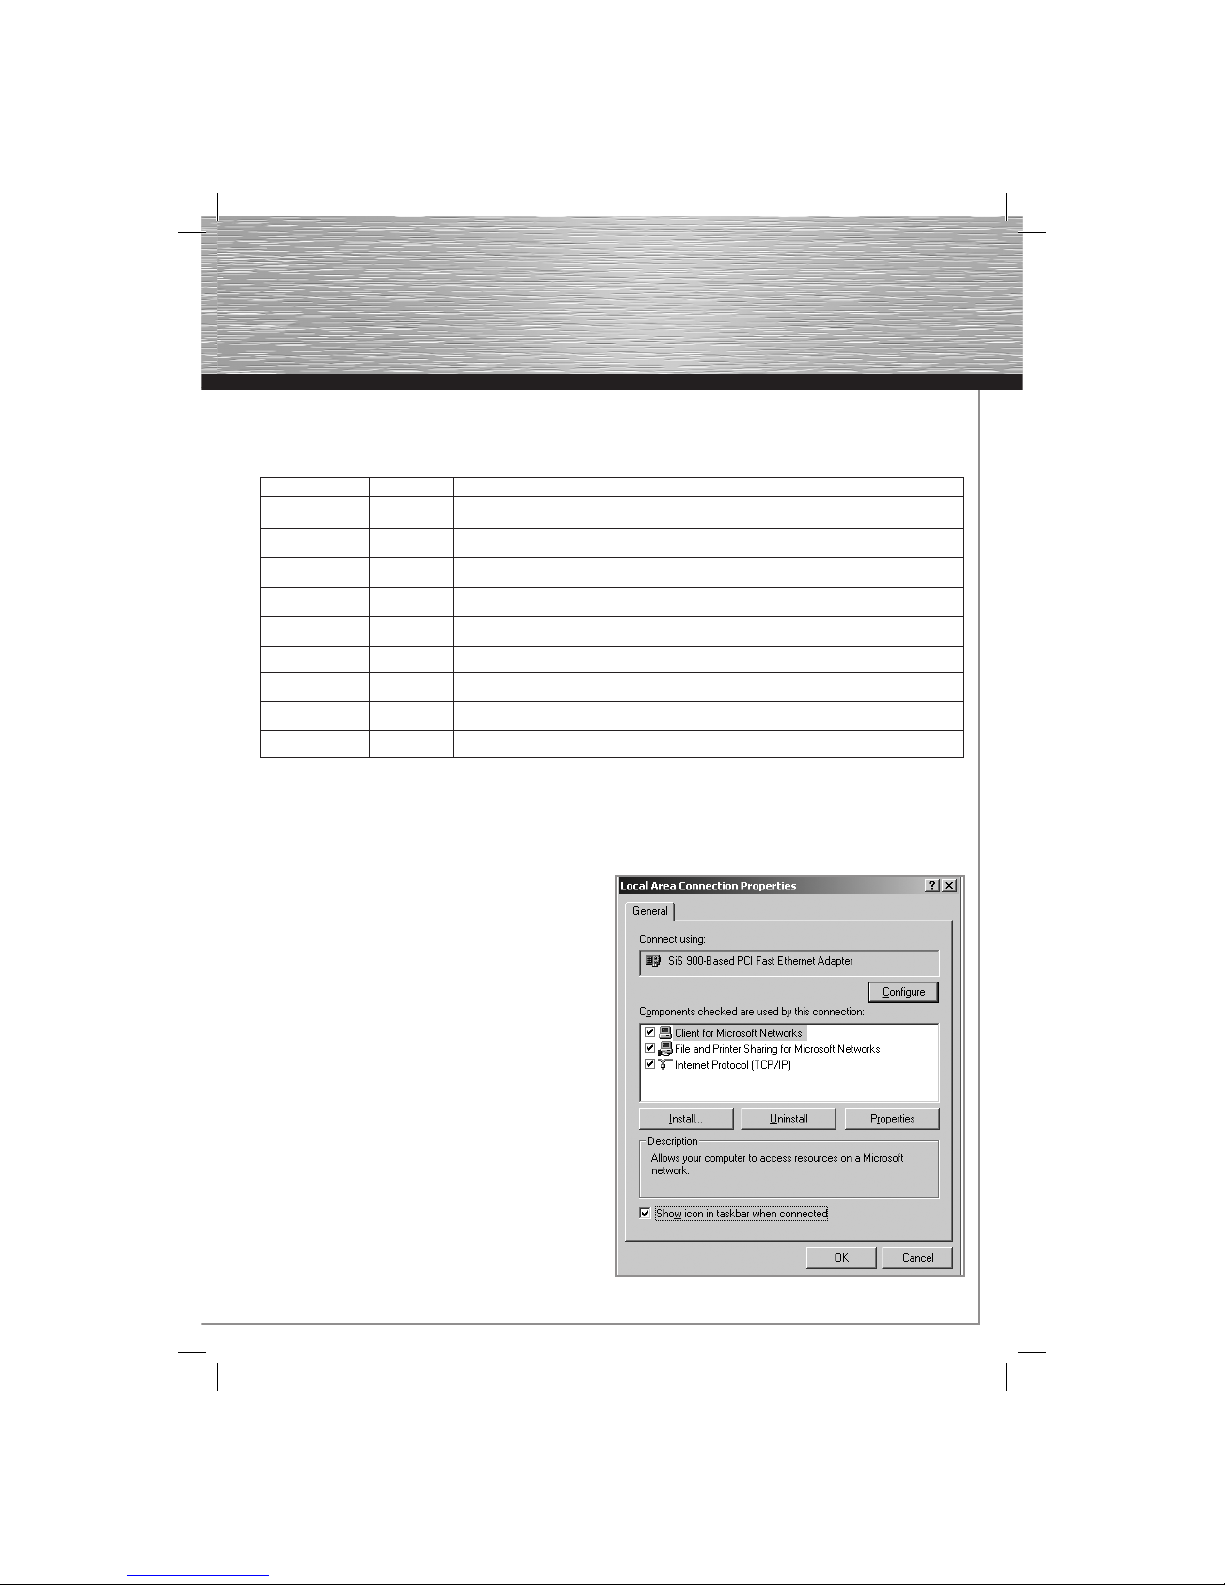
Checking installation:
There are dif ferent LEDs for indicating the status on the top of the device:
LED Condition Status
POW ER Illuminated Power supply unit is connected and supplying power
Off No power unit connected, device not being supplied with power
WL AN device Flashing Wireless L AN is activated / data is being sent
Off Wireless L AN is deactivated
SYNC Illuminated Modem has successfully synchronised with the switching centre
Flashing Modem is attempting to synchronise with the switching centre
LA N 1-4 Illuminated The corresponding LAN port has established a correct net work connection
Flashing Data transfer via respective LAN por t
Off No connection
2. Confi guring the Operating System and Computer
The TCP/IP protocol must be installed on all PCs that will be using the Internet. By default , the IP address
192.168.2.1 and an activated DHCP server are confi gured for the router. This means that the connected PCs are
automatically allocated suitable addresses and other settings. We recommend that you keep these settings.
Proceed as follows to check the settings on your PC:
On your W indows Desk top click
Start -> Settings -> Control Panel -> Network
Connections
or, with Windows Vista,
Start (Windows logo) -> Control Panel -> Network and
Internet -> Network Connections
Select the connection type (network adapter) between
your PC and the router, e.g. “LAN connection”. When
you right-click the corresponding connection, a menu is
displayed; select Properties.
Select the Internet Protocol (TCP/IP) entry in the list
and then click Properties.
00062727bda.indd Abs2:2900062727bda.indd Abs2:29 02.10.2007 11:14:35 Uhr02.10.2007 11:14:35 Uhr
Page 6
30
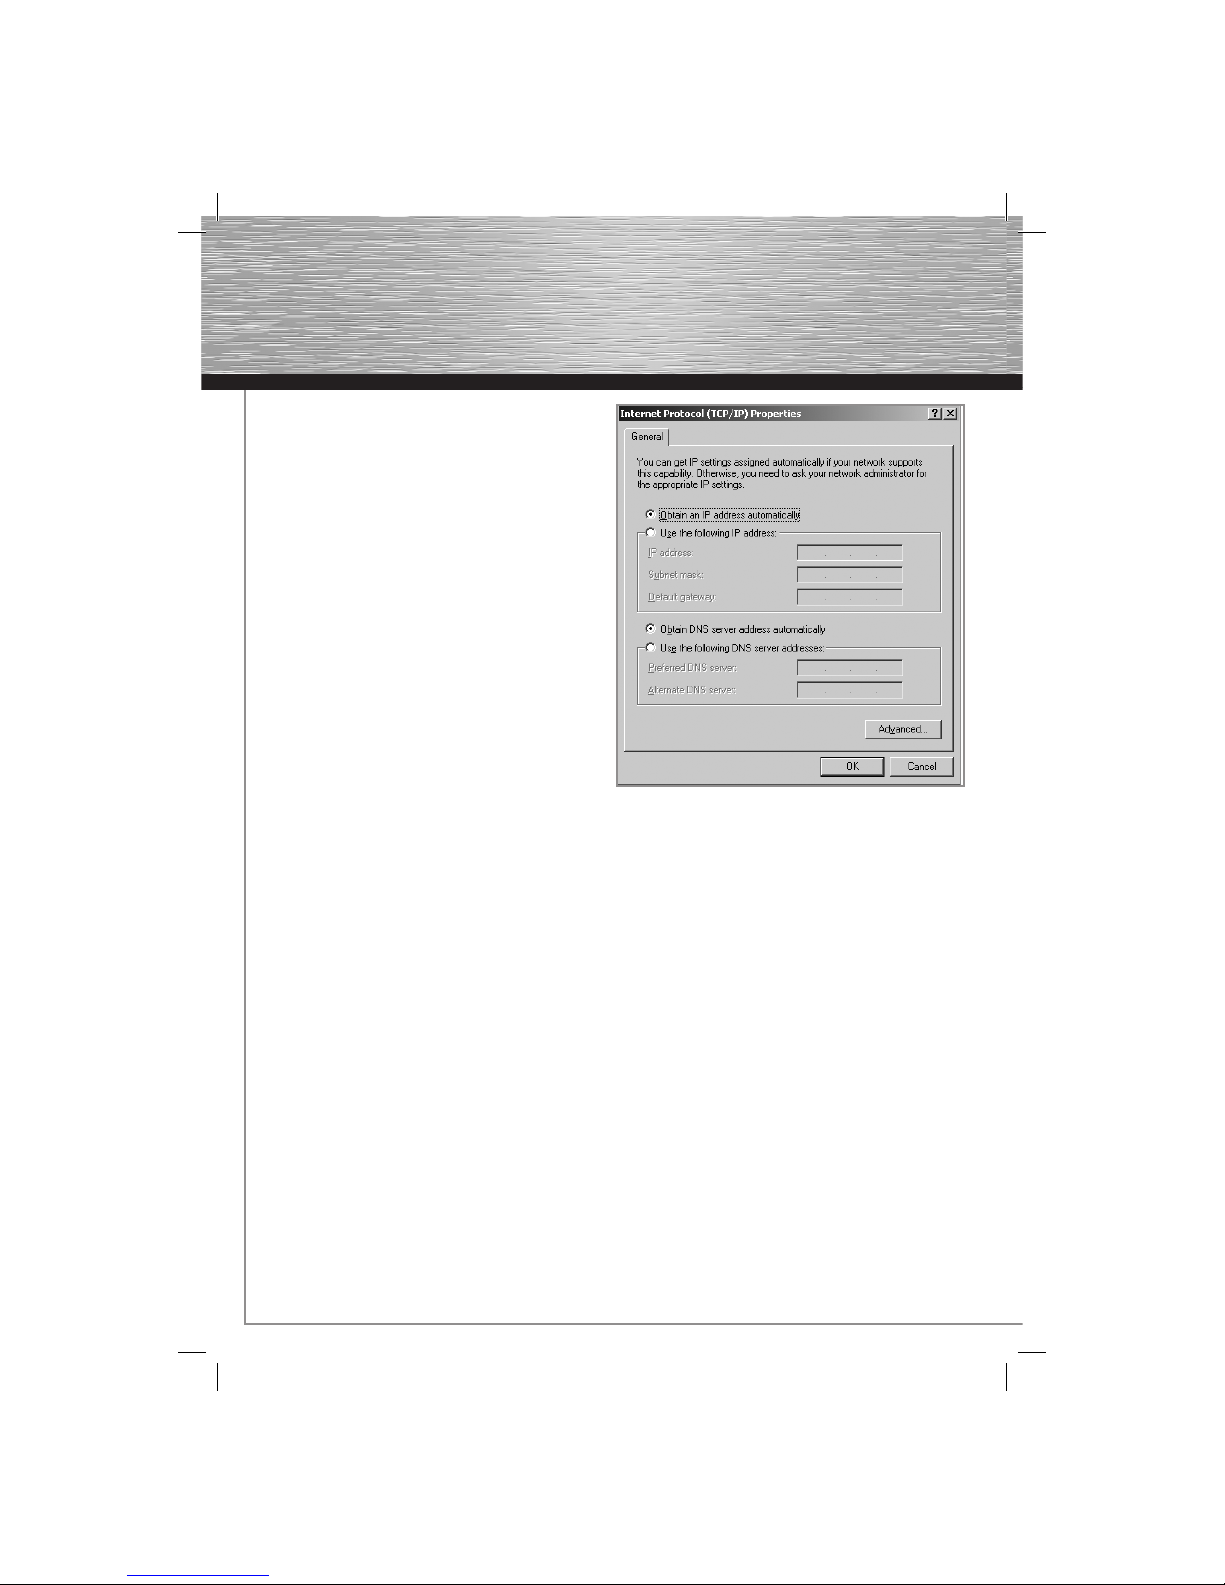
Ensure that the Obtain an IP address automatically and
Obtain DNS server address automatically check boxes
are selected. Confi rm by clicking OK, and again in the
subsequent window.
Your PC is now confi gured so that it now assigns the IP
address
automatically from the router. You can then
confi gure the router using the web browser.
The browser must be Java-capable and the Java
function
must be activated (Internet E xplorer 6.0 or above, or
Mozilla Firefox , for example).
3. Confi guring the WLAN ADSL2+ Modem Router
To start the confi guration process, open your browser and enter http://192 .168. 2.1 as the address. The login
window appears. Initially the user name is set to admin and the password is 1234. Af ter entering these, click OK to
log on to the router.
You can confi gure the router manually or using the integrated Wizard (Quick Start). After confi guration using the
Wizard (Quick Start), the device is set so that the connected computers can access the internet.
Note: For securit y reasons, you must change the password. The standard set tings are identical for many devices
and can allow others to access the router confi guration. See chapter 3.1.1 for more information.
3.1 Confi guring the internet connection using the Quick Start Option
After you have logged in, start the Wizard by clicking on the navigation menu called Quick Start, then Run WIZARD
and NEXT.
00062727bda.indd Abs2:3000062727bda.indd Abs2:30 02.10.2007 11:14:35 Uhr02.10.2007 11:14:35 Uhr
Page 7
31
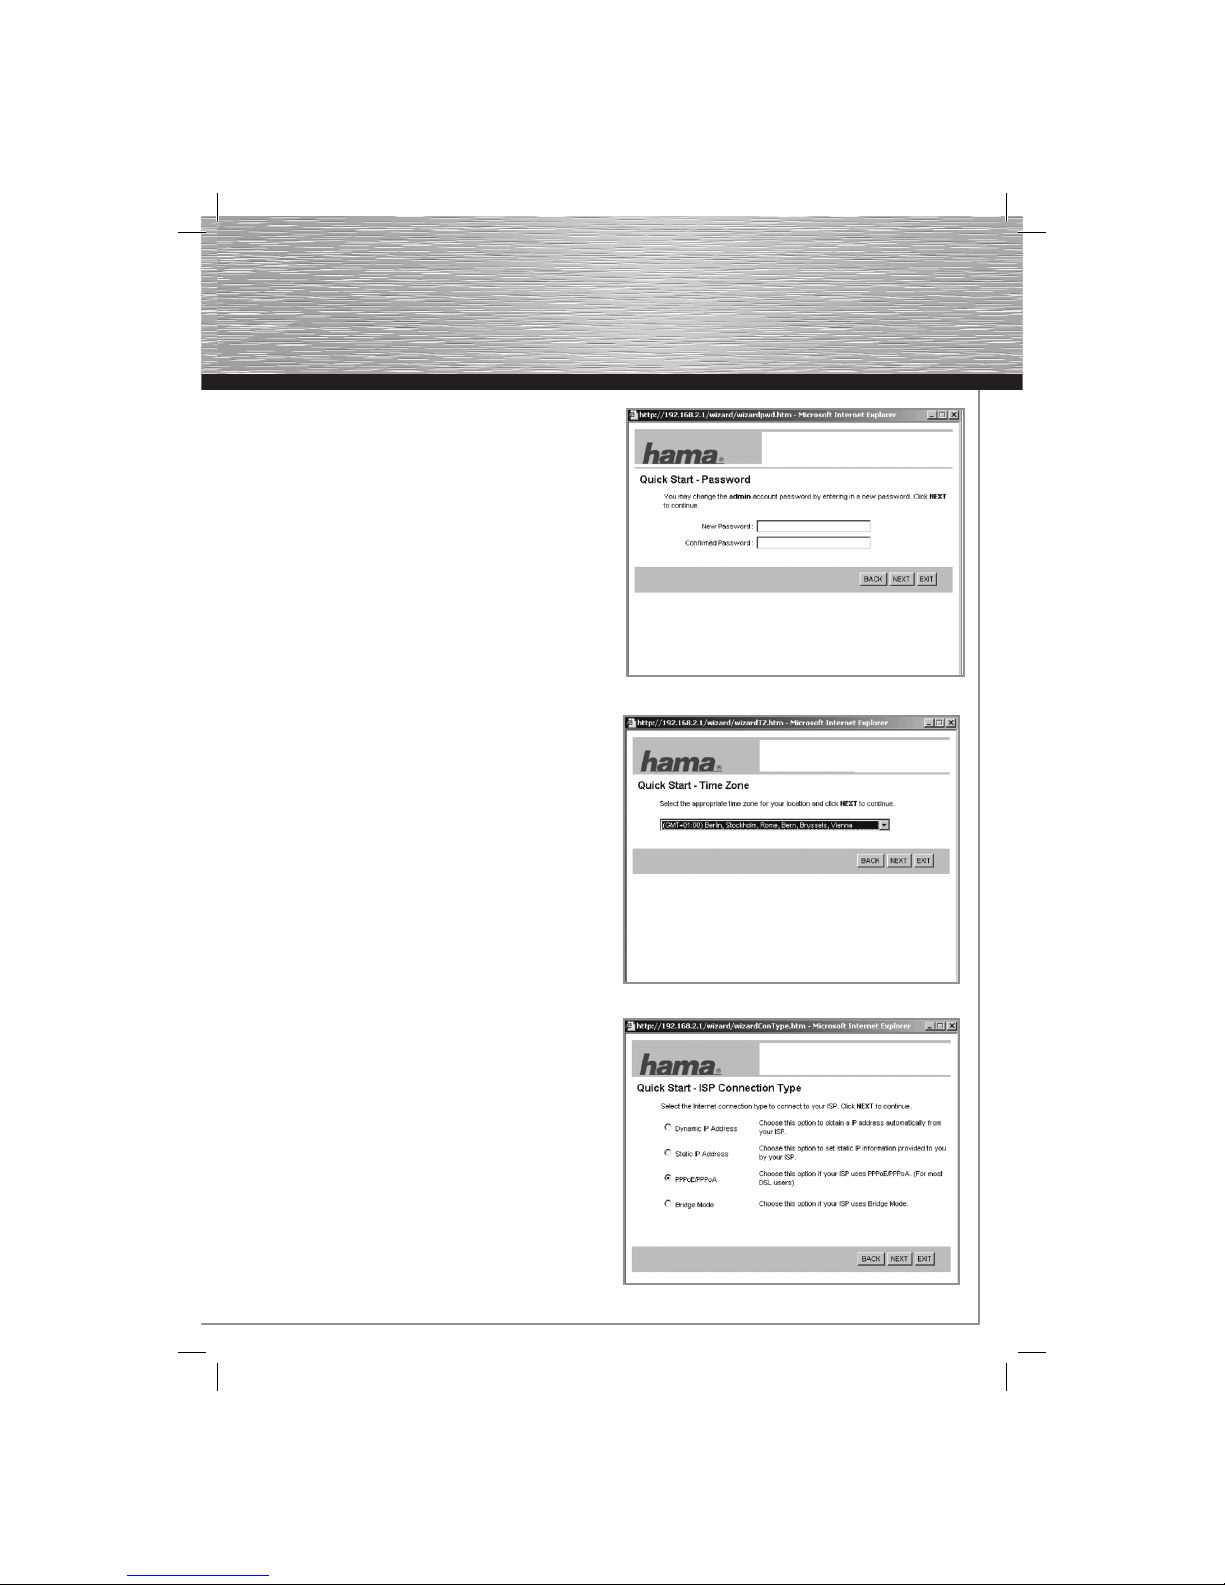
3.1.1 Setting a new router password:
Enter a new password for the router on this page.
Enter your new password in the New Password: fi eld.
Confi rm by accurately entering your new password again
in the Confi rmed Password: fi eld. Then click NEXT.
Note: You must keep your password in a safe place and
avoid using words that others may guess easily.
3.1.2 Setting the time zone
Choose your time zone in the menu, e.g. “(GMT +01:00)
Berlin, Stockholm, Rome, Bern, Brussels, Vienna” for
Germany. Click => NEXT to continue.
3.1.3 Selecting a broadband connection
(ISP Connection Type)
In the following step, you are asked to specify the WAN
connection t ype. Due to the widespread use of DSL via
PPPoE, the remainder of the description will refer to
this t ype of connection. For the PPPoE connection type,
select PPPoE/PPPoA. Then click NEXT.
00062727bda.indd Abs2:3100062727bda.indd Abs2:31 02.10.2007 11:14:36 Uhr02.10.2007 11:14:36 Uhr
Page 8
32
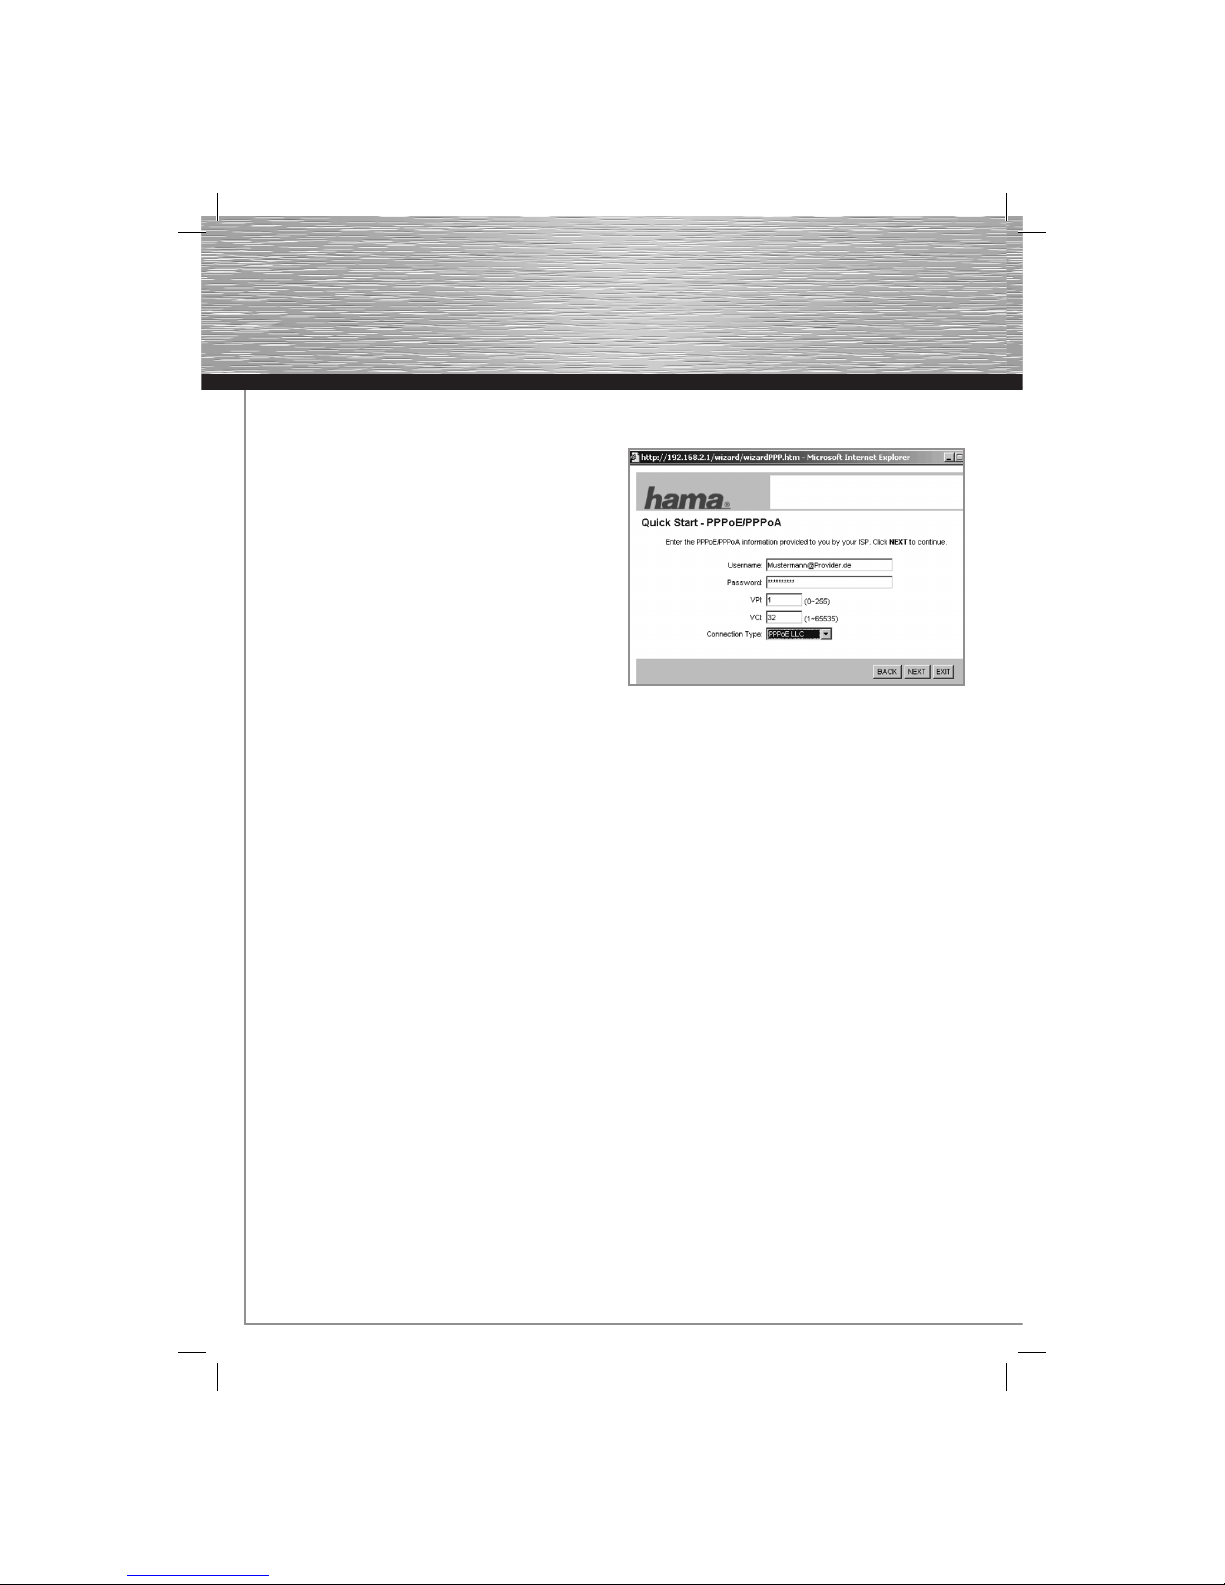
3.1.4 PPPoE user data
You must enter the access data for your provider in the
next window. Refer to the documents from your Internet
provider for this information.
Username:
Refer to the documents from your Internet provider for this
name, which is specifi c to the provider.
In addition to the access data, enter the following:
Password:
Refer to the documents from your Internet provider for the provider-specifi c password.
VPI and VCI:
Consult your internet provider for these values. When this manual was printed, the following values were
applicable for DSL connections with Deutsche Telekom and similar companies:
VPI: 1
VCI: 32.
As indicated, the values can var y according to the country or provider.
Connection type (Broadband connection type):
For the PPPoE connection type, select the PPPoE LLC option.
Then click NEXT. In the nex t window you will be notifi ed that the confi guration has been successful. Save your
entries by clicking NEXT.
Confi guring your internet connection using the Wizard (Quick Start) is then complete.
Click CLOSE to save your settings.
You must then restart the router for the set tings to take effect . To do so, call the Maintenance menu, select the
SysRestart sub-item and then choose System Restart with: Current Settings. Then click RESTART.
00062727bda.indd Abs2:3200062727bda.indd Abs2:32 02.10.2007 11:14:36 Uhr02.10.2007 11:14:36 Uhr
Page 9
33
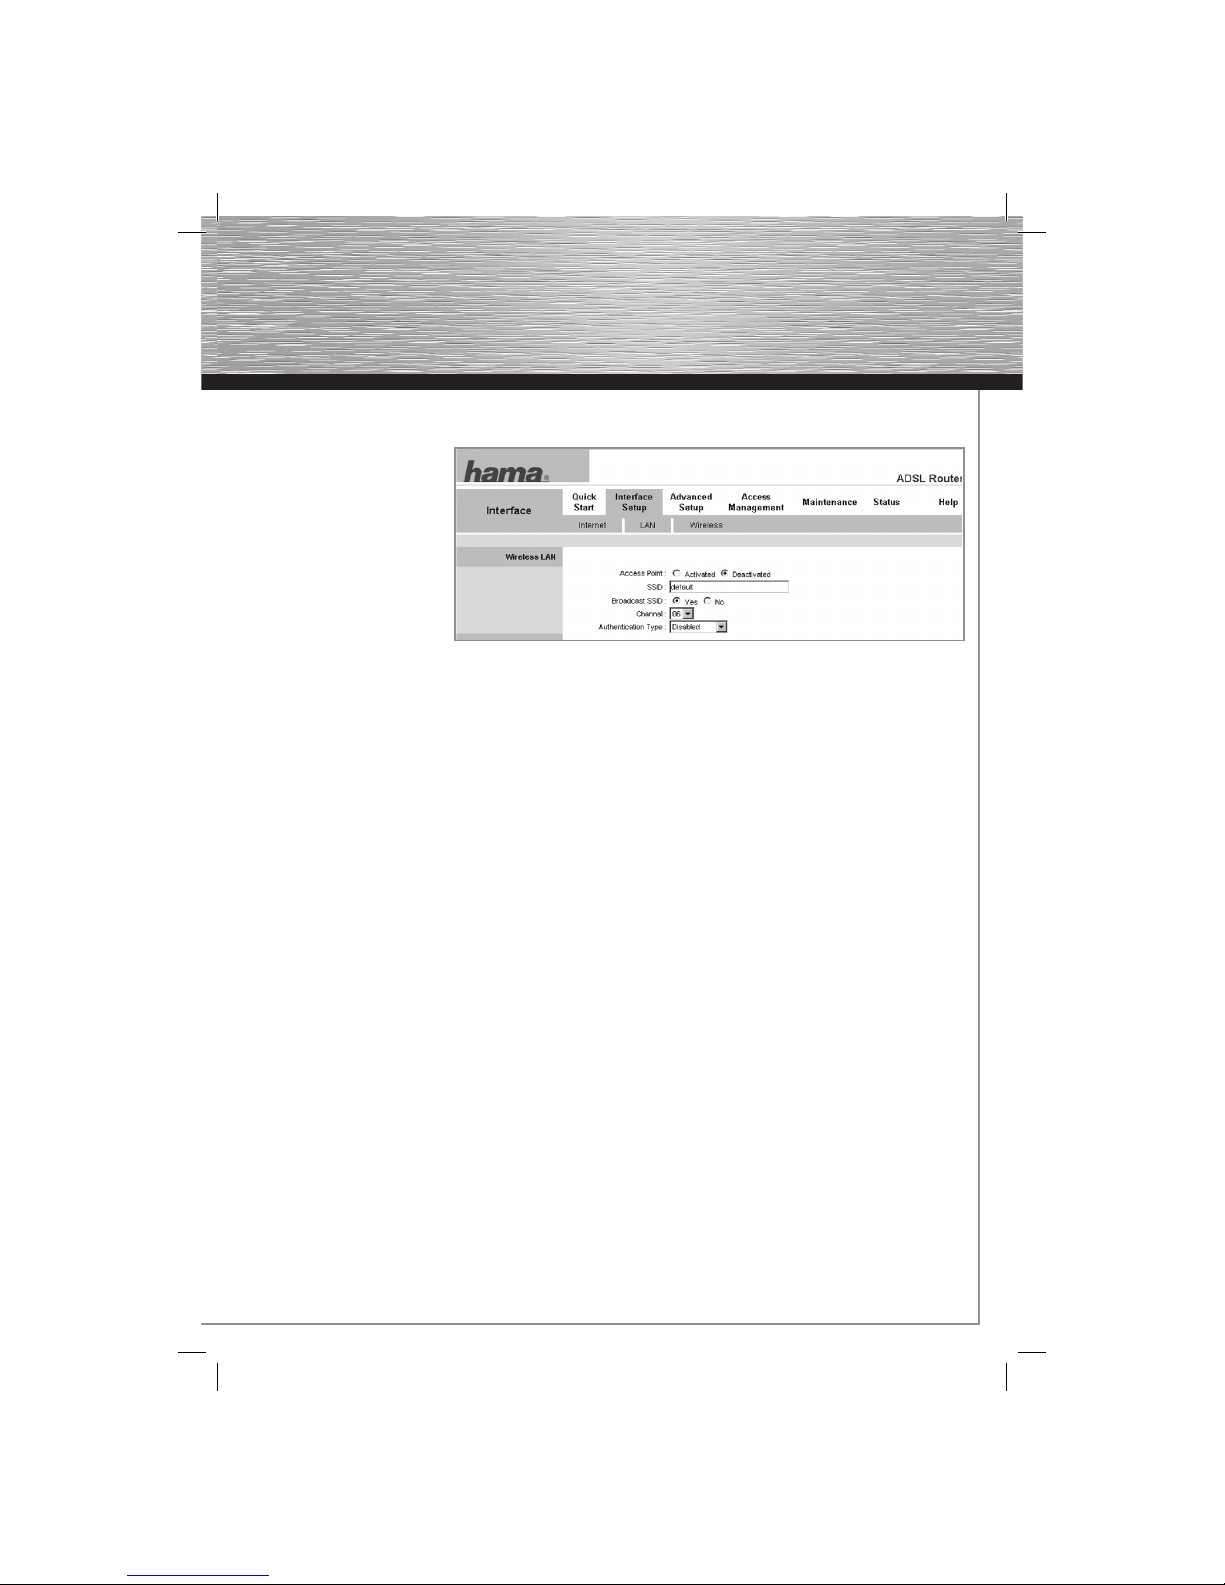
4. Confi guring the Wireless L AN
Wireless L AN is deactivated
by default for security
reasons. If you want to
activate the function, go to
the Interface Setup menu and
select the Wireless sub-item.
Note that activating Wireless
LAN without set ting an
encryption poses a serious
security risk.
Access Point:
Switches Wireless L AN on or off. To switch on Wireless L AN, select Activated; to switch it off, select Deactivated.
SSID:
You can enter a clearly identifi able name for your W ireless LAN in this fi eld. The name can have a maximum of 30
characters. Special characters are not suppor ted.
Broadcast SSID (Display WLAN network name):
Here, you can stipulate whether or not your Wireless LAN name should be visible to everyone in the network. The
default setting is Yes.
Channel:
Select the channel you wish to use for your wireless L AN network. In Germany you can choose from channels 1 to
13. Note: You may not be able to select every channel, depending on your location.
Authentication Type (Setting encryption type):
This fi eld is extremely impor tant for the security of your Wireless L AN network. Select the encryption type and
strength. The Hama WL AN ADSL2+ Modem Router suppor ts the following encryption standards:
WEP (6 4 and 128 Bit)
WPA-PSK (TKIP)
WPA2-PSK (AES)
4.1 WEP encryption:
Wired Equivalent Privacy (WEP) is a standard encryption algorithm for WLAN. It controls access to the network
and guarantees the integrity of the data. T his method is considered unsafe and outdated due to a number of
weaknesses.
00062727bda.indd Abs2:3300062727bda.indd Abs2:33 02.10.2007 11:14:36 Uhr02.10.2007 11:14:36 Uhr
Page 10
34
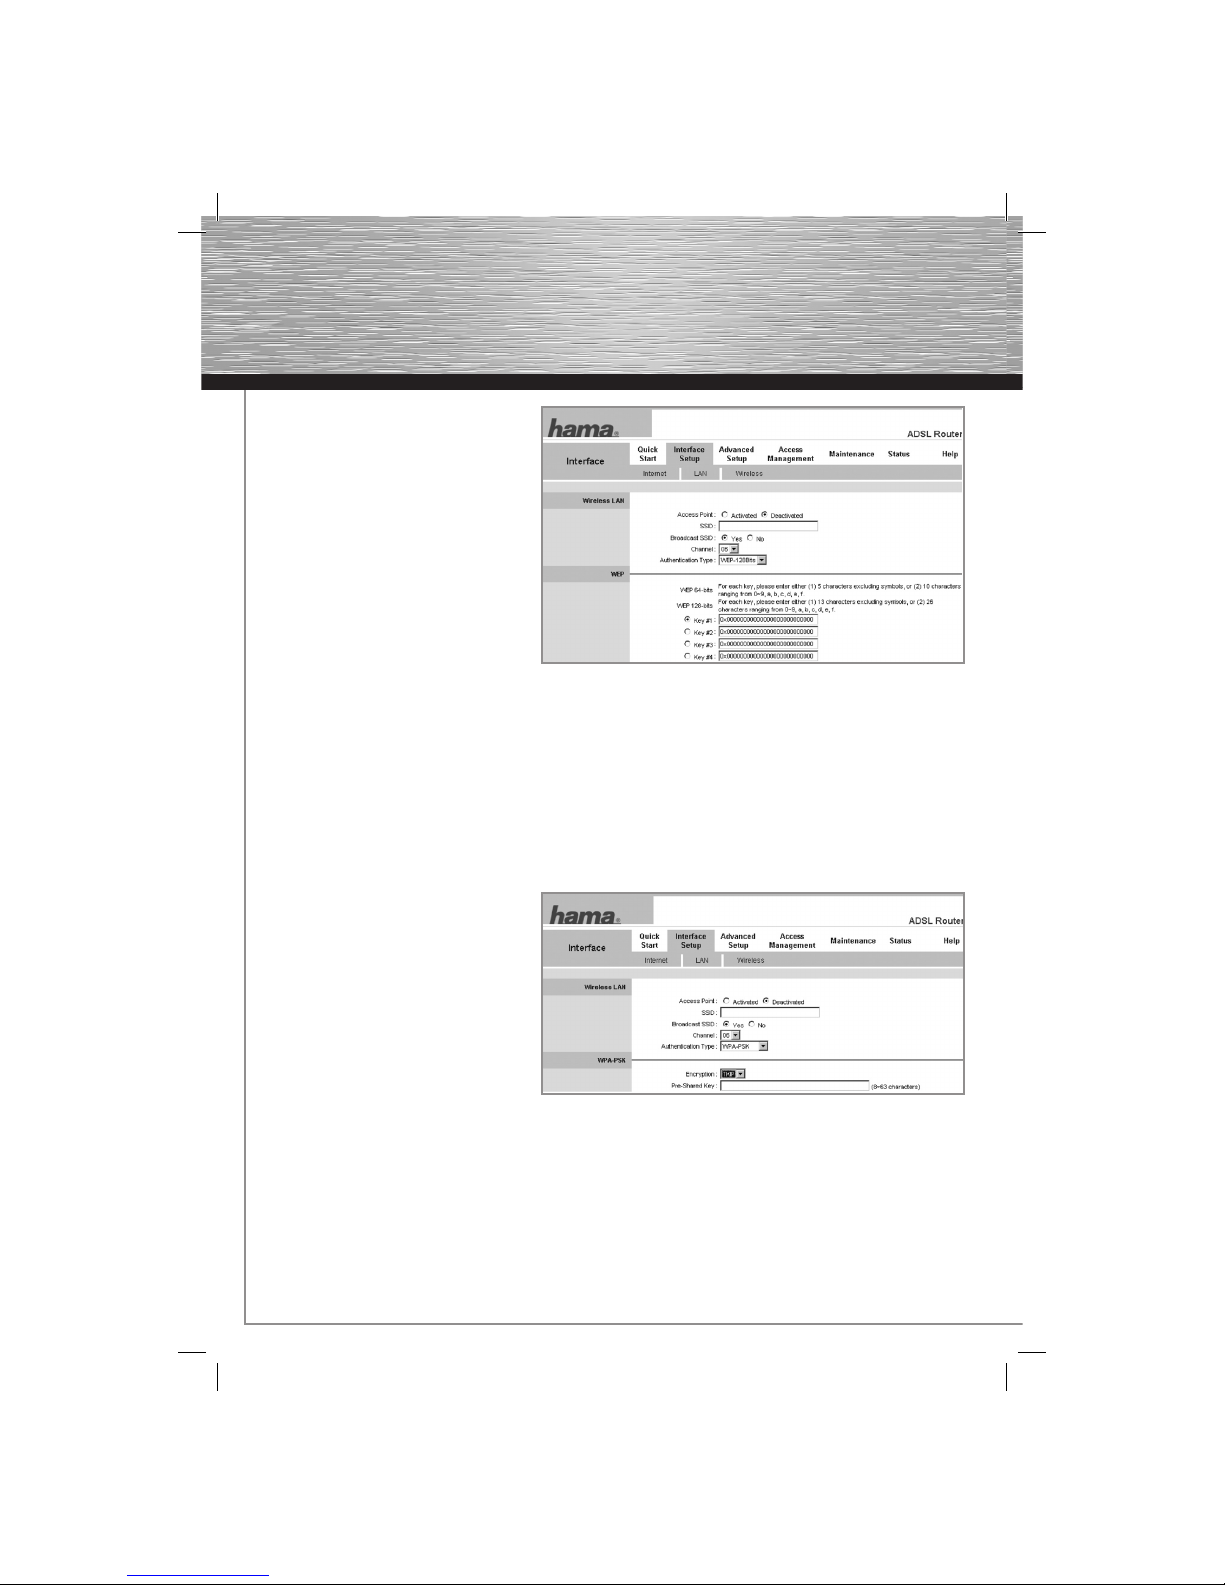
First select whether you want to use 64
bit or 128 bit encryption. T he latter offers
greater security. Next, enter ox and your
Security key (you can use characters
ranging from 0 -9 and a-f). The length of the
key is limited to 10 letters/numbers for the
64 bi t encryption, and 26 letters/numbers
for the 128 bit encryption.
You can preset up to four keys in the Key #1
to #4 fi elds. Select Key #1, for example, and
enter your key of choice with the required
length.
Examples:
64 bit Hex (10 characters) = 0x231074a6ef
128 bit Hex (2 6 characters) = 0 x231074a6b9 773ce43 f91a5bef3
Click SAVE at the bottom of the window to save your settings.
4.2 WPA and WPA 2 encryption:
Wi-Fi Protected Access (WPA) is an encryption method for W LAN. W PA contains the WEP architecture, but offers
additional protection using dynamic codes that are based on the Temporal Key Integrity Protocol (TKIP). WPA
also of fers pre-shared keys (PSK) for user authentication. WPA 2 is a development of WPA and uses a different
encryption algorithm, the Advanced Encr yption Standard (AES).
Choose between WPA-PSK and WPA2-PSK
in the Authentication Type fi e l d .
Next, enter the “Pre-Shared Key” (PSK).
The key must be between 8 and 6 3 random
characters; letters ( A-Z), numbers and
punctuation marks are permit ted. Any client
wanting to access the access point must
know this character string.
Click SAVE at the bottom of the window to
save your settings.
00062727bda.indd Abs2:3400062727bda.indd Abs2:34 02.10.2007 11:14:37 Uhr02.10.2007 11:14:37 Uhr
Page 11
35
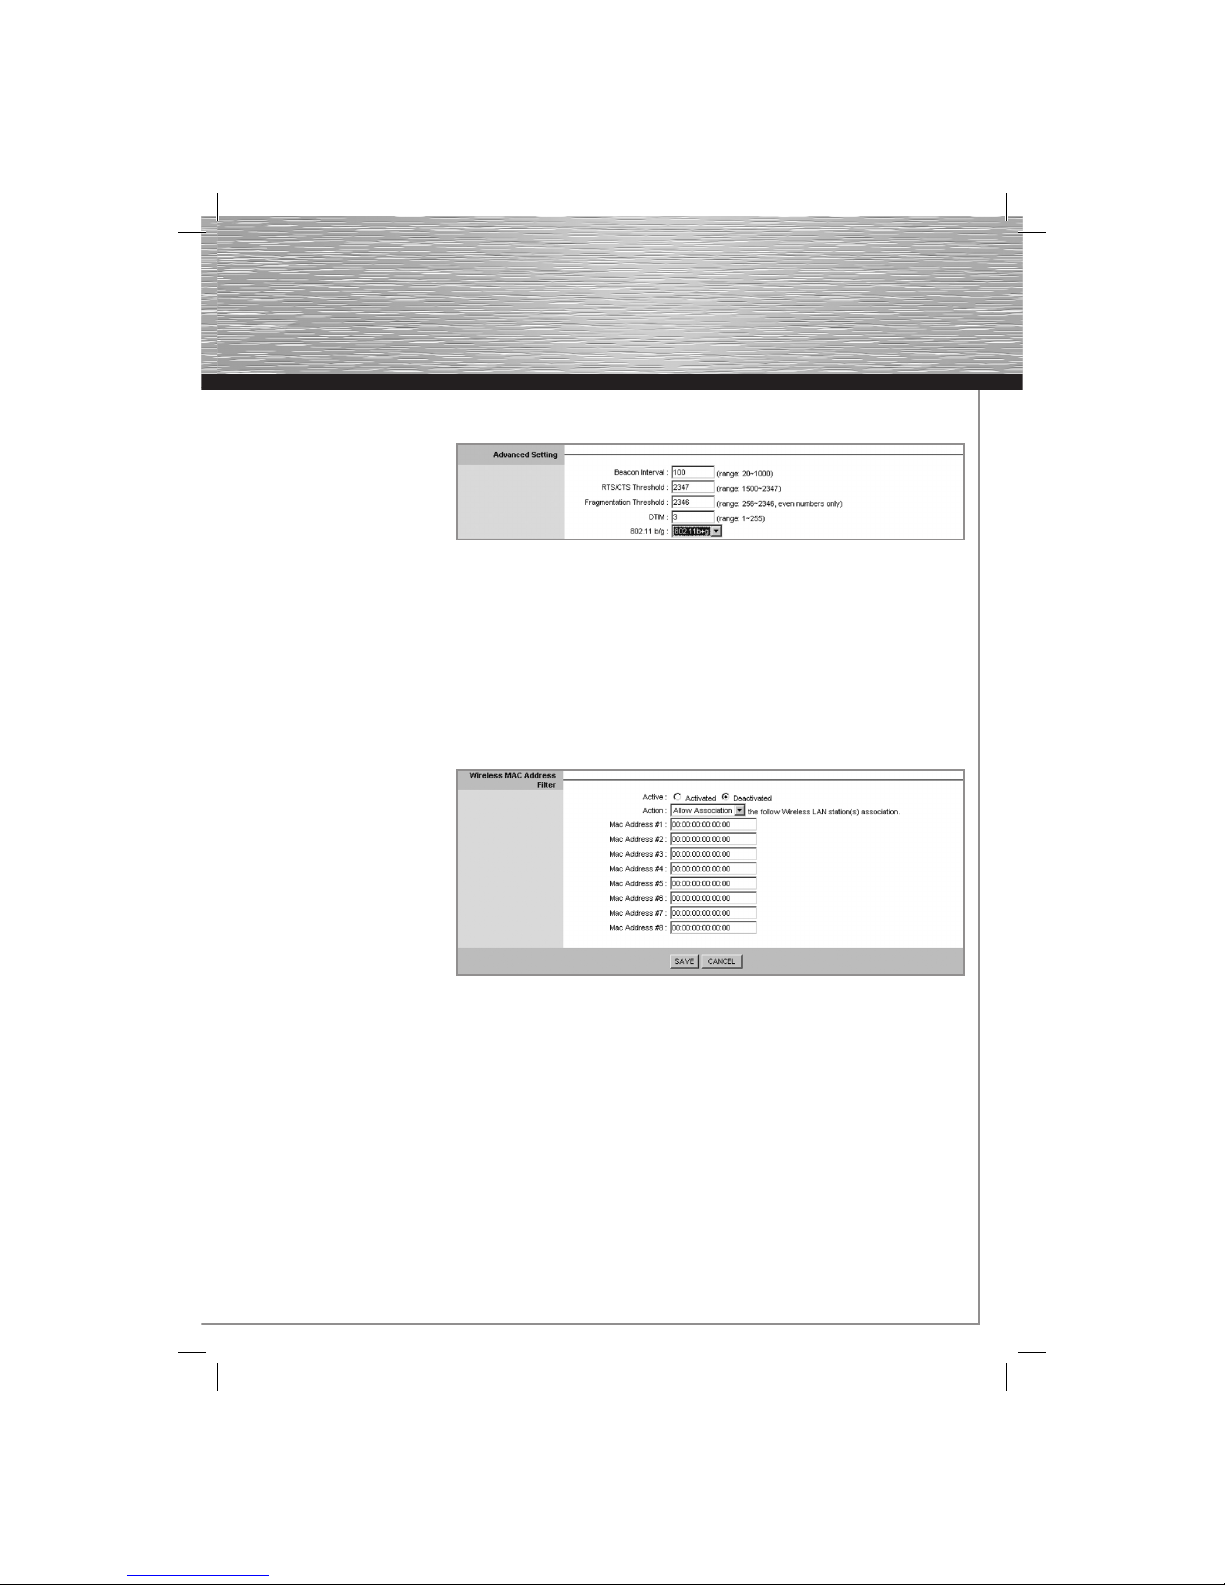
4.3 Advanced settings:
Only the 802.11b/g fi eld is
relevant here. You can set
your Wireless LAN access
point so that this is only
communicated to other clients
that are based on the 802.11b
(11 Mbps) or 802.11g (54 Mbps) standard. The Hama WLAN ADSL2+ Modem Router 54 Mbps supports the following
standards:
802.11b = only WL AN devices based on 11 Mbps are supported.
802.11g = only WL AN devices based on 5 4 Mbps standard are suppor ted.
802.11b+g = WL AN devices based on 5 4 and 11 Mbps standards are supported at the same time.
Click SAVE at the bottom of the window to save your settings.
4.4 Wireless MAC Address Filtering:
With this function, you can
stipulate which notebooks
and PCs with Wireless LAN
are allowed/denied access
to your network/Internet
by entering their M AC
addresses.
First, this function needs to be
activated. Do so by selecting
Activated in the Active: fi eld.
Then choose either Allow
Association or Deny Association in the Action fi eld, for the respective computer.
Allow Association: Only the MAC addresses that you have entered are given access.
Deny Association: None of the MAC addresses that you have entered are given access.
Enter the MAC address of your fi rst chosen computer in the MAC Address #1 fi eld:
Example: The MAC address of your computer is 0 0:12:34:56 :0A:0A, so you enter this address into the Mac Address
#1 fi eld, exactly as it is written on your computer.
To fi nd out the M AC address of your computer, refer to the operating instructions for your operating system, or ask
your system administrator. For additional computers, proceed as outlined above.
Click SAVE at the bottom of the window to save your settings.
00062727bda.indd Abs2:3500062727bda.indd Abs2:35 02.10.2007 11:14:37 Uhr02.10.2007 11:14:37 Uhr
Page 12
36
5. Interface Setup
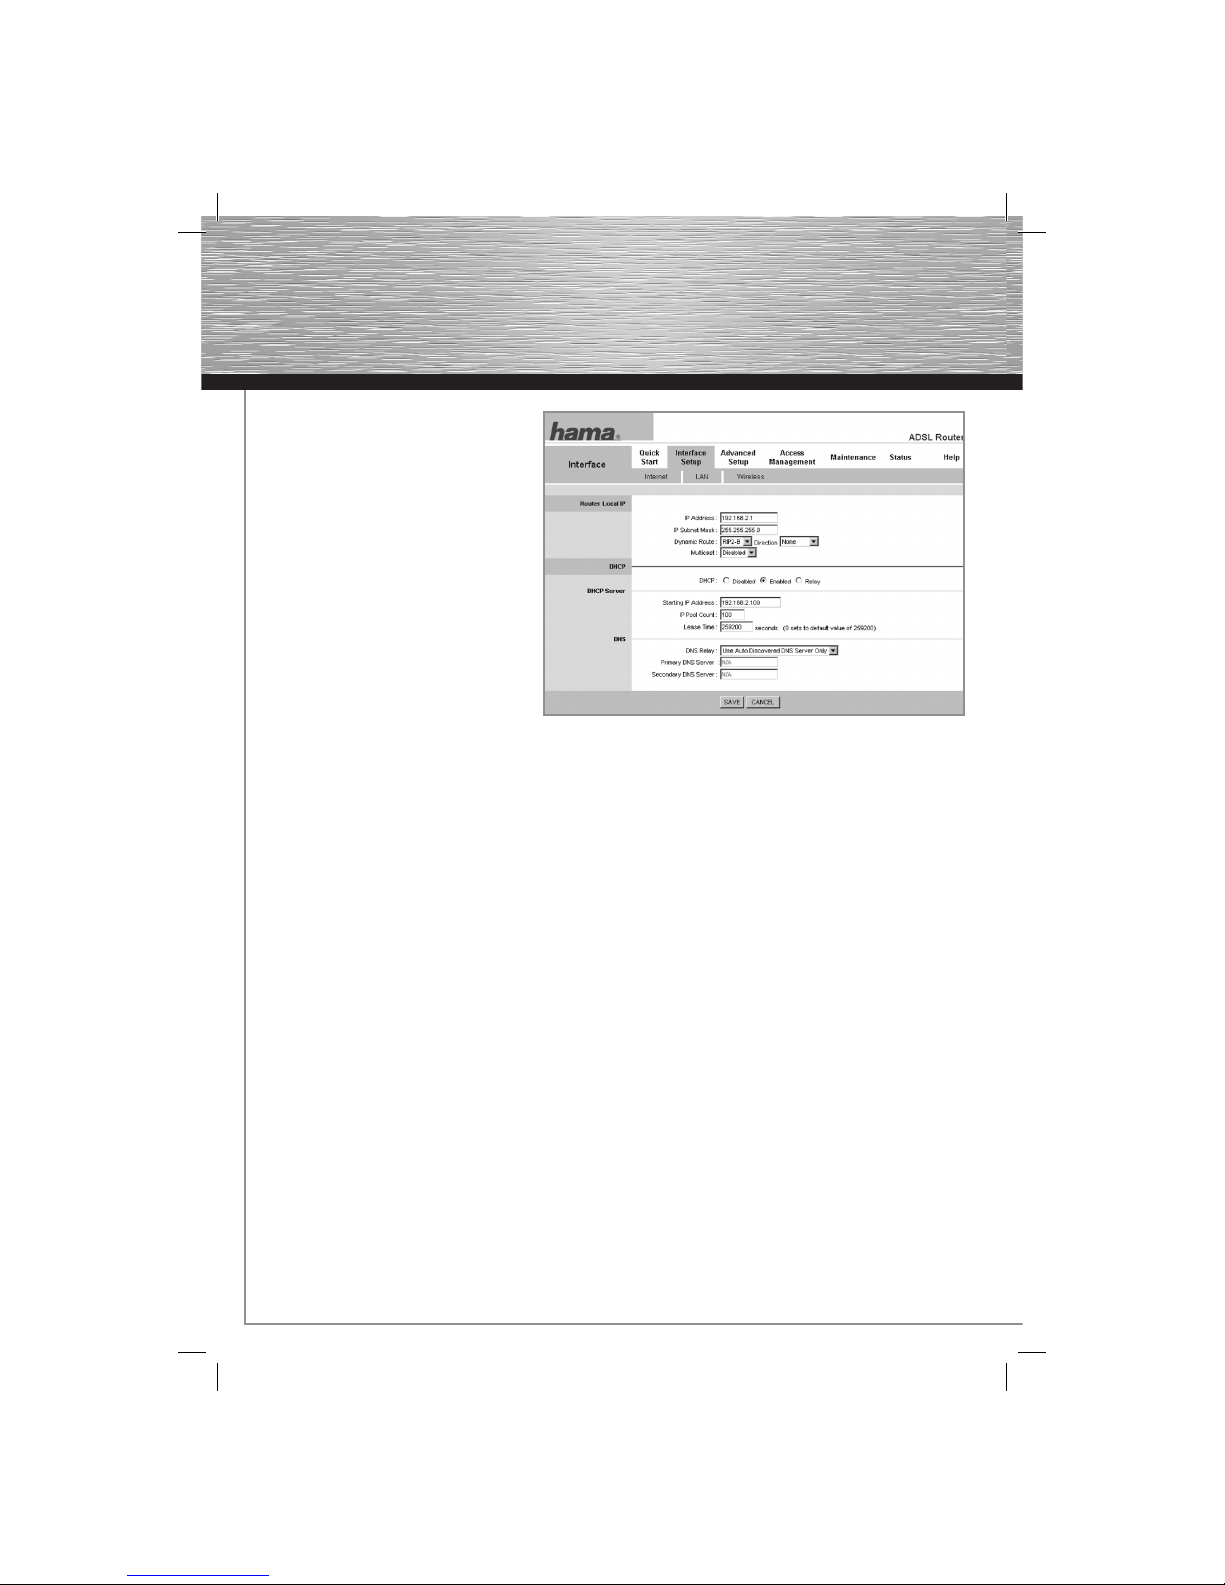
In this screen, you can change the standard
LAN set tings of the router.
In the Main Menu, select the Interface
Setup menu item, followed by the LAN
sub-item.
5.1 Router local IP:
The IP Address of the router is set to 192 .168.2 .1 by default . If you want to use a different address for the router, you
can make the necessary changes here. The corresponding IP Subnet Mask is entered in the fi eld directly below
this. All other fi elds are only relevant for specialised application areas, which cannot be explained in depth here.
We recommend that you keep the default settings.
Click SAVE at the bottom of the window to save your settings.
Warning: The new LAN confi guration takes ef fect after res tarting. You must therefore use the new IP address to
open the web interface in the browser.
5.2 DHCP Server:
The integrated DHCP ser ver allows IP addresses to be assigned to connected clients automatically. Select
Disabled if you assign the IP addresses manually in your network , and therefore do not need a DHCP server. Select
Enabled if you want to use the DHCP server. The Lease Time set ting specifi es how long the assigned IP address
is to apply for the client. T he IP address range from which the DHCP server can assign IP addresses to clients is
restricted by the Start-IP Address and the End-IP Address.
Click SAVE at the bottom of the window to save your settings.
6. Internet Settings
In this screen, you can change the parameters for the integrated ADSL 2+ modem in the router. In the Main Menu,
select the Interface Setup menu item, and then the Internet sub-item. The most important settings in this area are
explained below:
00062727bda.indd Abs2:3600062727bda.indd Abs2:36 02.10.2007 11:14:38 Uhr02.10.2007 11:14:38 Uhr
Page 13

37
6.1 ATM VC: (DSL modem setting)
Asynchronous Transfer
Mode (ATM) is a method of
transferring data whereby
the data traffi c is transferred
in small packets, and the
transfer is coded and
asynchronous. You must enter
the following values, which
differ according to the DSL connection.
Vir tual Circuit: PVCO is selected by default.
Status: Activated must be selected.
VPI: 1
VCI: 32
Note: The values 1 and 32 are only valid for the Deutsche Telekom DSL connection. If your connection is through a
different company or you are not resident in Germany, ask your DSL connection provider for these values.
Click SAVE at the bottom of the window to save your settings.
6.2 Encapsulation: (DSL protocol)
The purpose of encapsulation
is to encapsulate other
protocols and to transpor t
these in the form of IP
tunnels.
Click SAVE at the bottom of the window to save your settings.
6.3 PPPoE/PPPoA: (Broadband connection protocol)
PPP over Ethernet (PPPoE)
is the use of the Point-toPoint Protocol (PPP) with an
Ethernet connection.
00062727bda.indd Abs2:3700062727bda.indd Abs2:37 02.10.2007 11:14:38 Uhr02.10.2007 11:14:38 Uhr
Page 14
38
Username: Enter the user name that you received from your Internet provider in this fi eld.
Password: Enter the user password that you received from your Internet provider in this fi eld.
Encapsulation: The Hama WL AN ADSL2+ Modem Router suppor ts the following encapsulation protocols:
PPPoE LLC, PPPoE VC-Mux , PPPoA LL C and PPPoA VC-Mux. If you are not sure which protocol
you need for your Internet connection, consult your DSL provider.
Bridge Interface: Deactivated
This function should only be activated if you want to use the W LAN ADSL2+ Modem Router as a
modem only, and you want to switch of f the router function.
Click SAVE at the bottom of the window to save your settings.
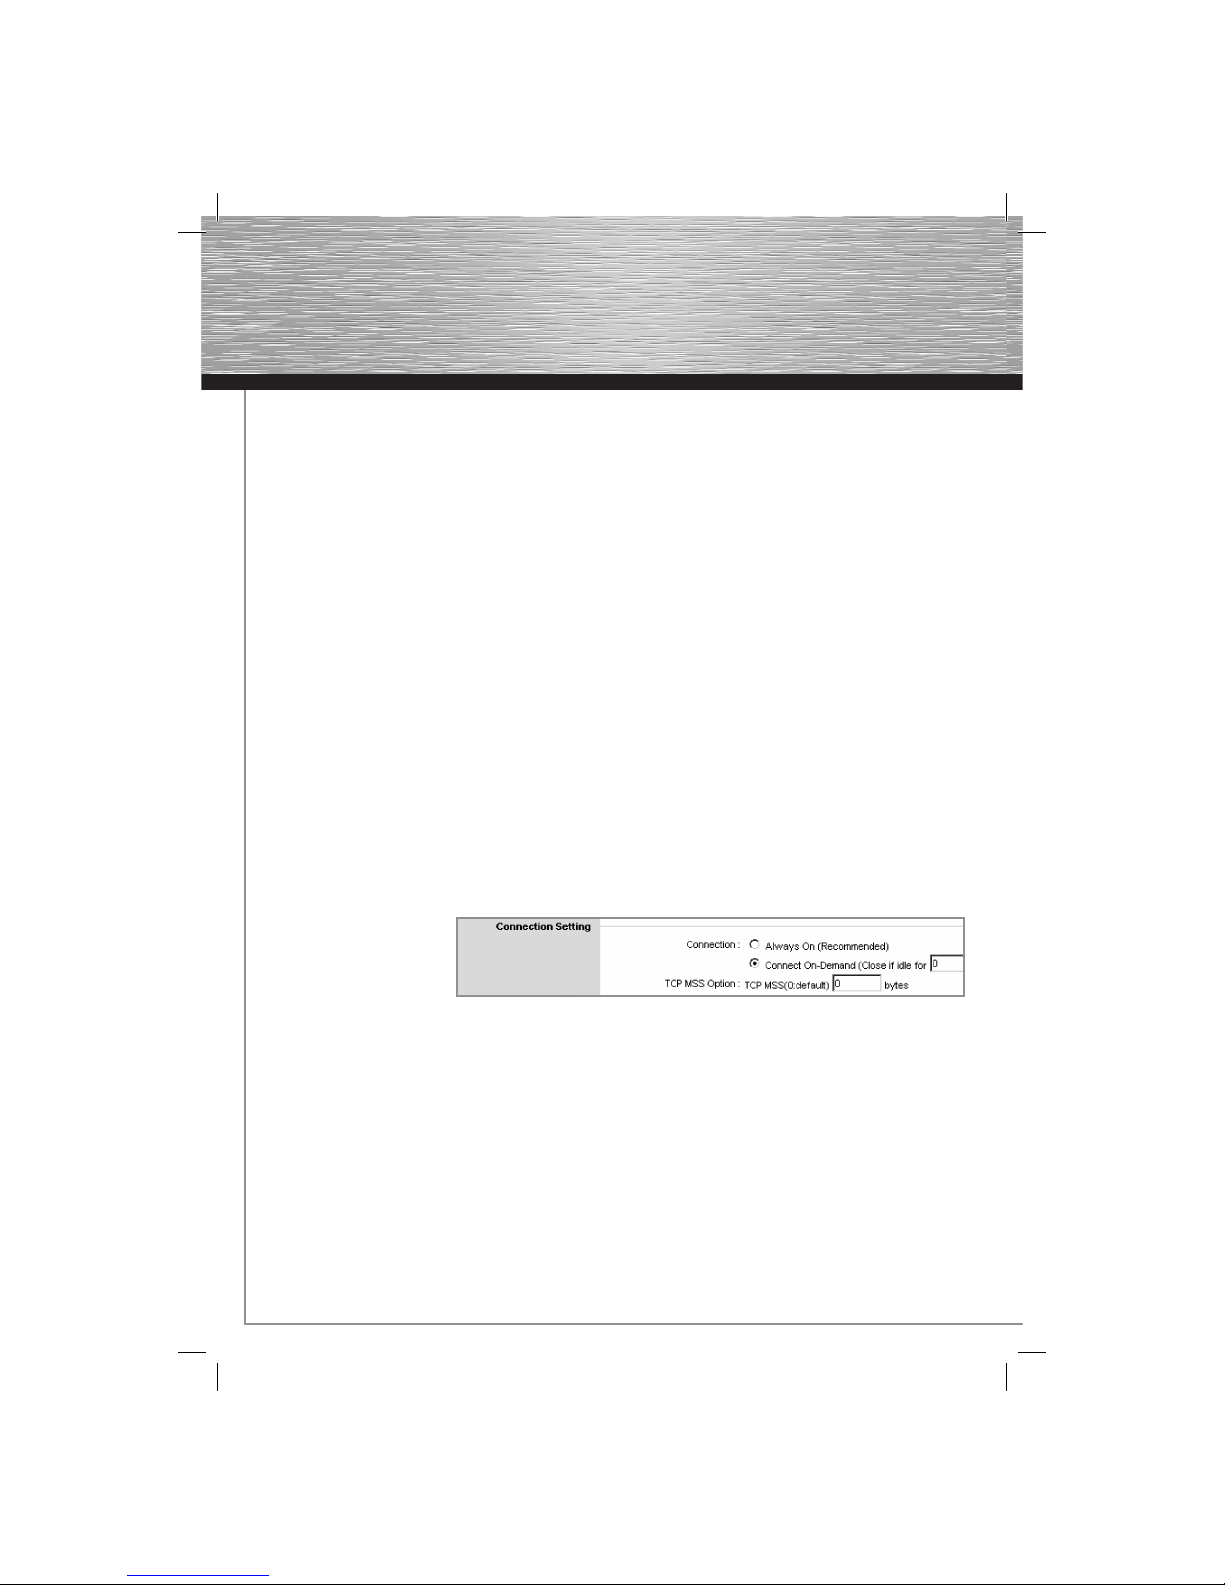
6.4 Connection setting (DSL connection setting)
In the following settings (Connection), you can choose between Always On and Connect On-Demand.
Always On:
The Internet is permanently connected. Connection costs may be high if you are permanently connected to the
internet and have a pay-as-you-go tariff.
Connect On-Demand:
The “Connect On-Demand” setting is recommended if you have a pay-as-you-go tariff (if you pay according to
volume or time). This means that the internet connection is disconnected automatically after the period set in the
“Close if idle for XY minutes” fi eld.
Important:
Please also note that closing
the browser does not
automatically disconnect you
from the internet. A number of
programs send queries to the
internet or receive data without it being clearly visible to the user. For the router, these queries are just as valid as
opening a browser, for example. If you want to ensure that there is no active connection to the internet, you should
switch of f the device.
Click SAVE at the bottom of the window to save your settings.
00062727bda.indd Abs2:3800062727bda.indd Abs2:38 02.10.2007 11:14:39 Uhr02.10.2007 11:14:39 Uhr
Page 15

39
6.5 IP address (IP address setting for the router)
An IP address (Internet
Protocol address) is a number
that facilitates the addressing
of computers and other
devices in an IP network.
If you need to use a specifi c
IP address from your Internet
provider, carr y out the
following settings:
Get IP Address: Static means that you must use an IP address that has been determined by your Internet
provider. Dynamic is set as default for most German DSL providers, and is therefore set as
default here, too.
Static IP address: If required, enter the speci fi ed IP address.
IP Subnet Mask: If required, enter the specifi ed Subnet IP address.
Gateway: If required, enter the specifi ed standard Gateway IP address.
NAT: This fi eld should always be enabled.
TCP MTU Option: MTU stands for Maximal Transfer Unit and specifi es the maximum packet size to be transferred.
If you are unsure about this setting, we recommend that you keep the default value. You can set
values between 0 and 1492.
All other settings are too specialised and are therefore not covered in this manual.
Click SAVE at the bottom of the window to save your settings.
7. Advanced Setup: (Advanced Router Setting)
In this overview, you can customise the router to suit your individual requirements. In the Main Menu, select the
Advanced Setup menu item.
00062727bda.indd Abs2:3900062727bda.indd Abs2:39 02.10.2007 11:14:39 Uhr02.10.2007 11:14:39 Uhr
Page 16
40
7.1 Firewall
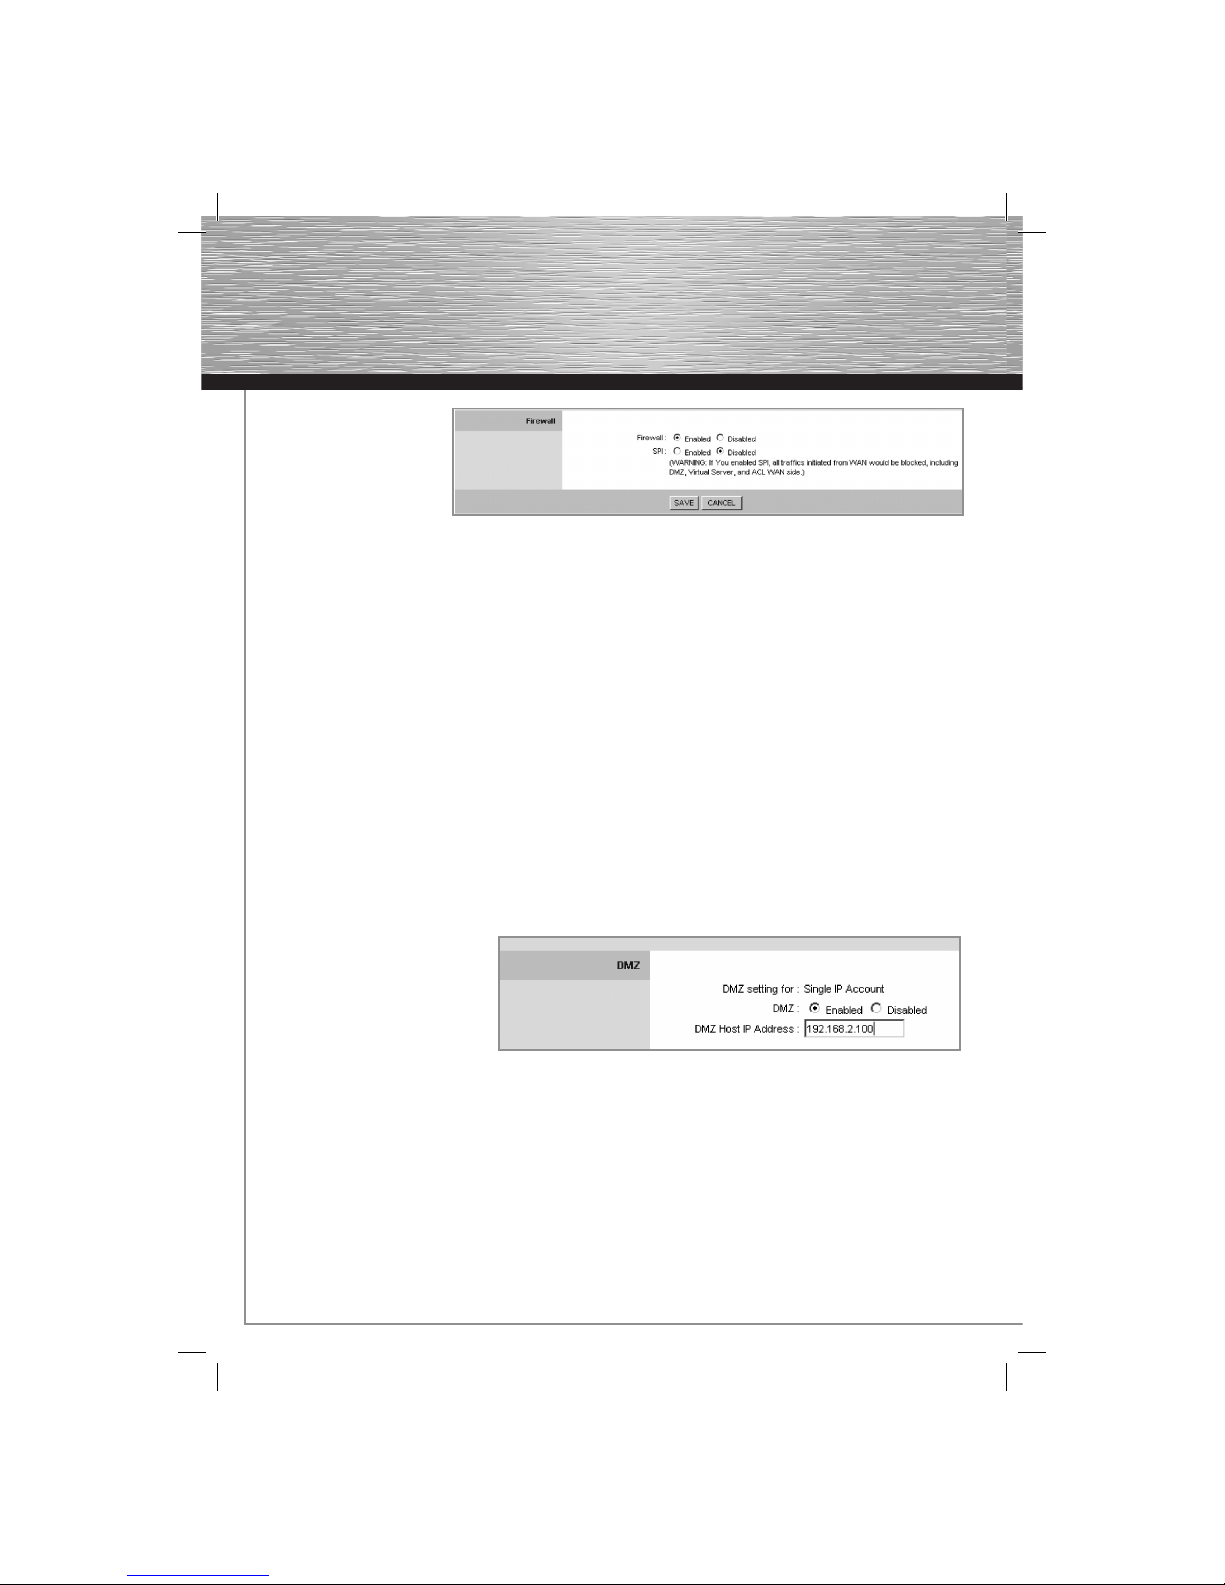
A Firewall is a net work
of safety components in
computer technology that
permits or denies network
traf fi c using a predefi ned
fi rewall security policy. The aim of a fi rewall is to control the transfer between a local network (L AN) (high trust)
and the Internet (low trust).
Firewall: Enabled means that the integrated fi rewall is switched on.
Disabled means that the integrated fi rewall is switched off.
SPI: Enabled means that the integrated packet fi lter is switched on.
Disabled means that the integrated packet fi lter is switched of f.
You can fi nd more information about SPI in the glossar y.
Click SAVE at the bottom of the window to save your settings
7.2 NAT:
In computer networking, Network Address Translation (NAT) is the collective term for the process of changing the
automated address information of data packets. The most common application areas are in routers and fi rewalls.
NAT Status: Activated means that NAT is switched on. This setting is imperative for router operation
of any kind.
To activate NAT, read section 6.5.
7.2.1 DMZ:
A Demilitarized Zone (DM Z) denotes
a computer network, where
access to its connected servers is
controlled via securit y checks.
The systems set up within the DMZ are protected against other networks (Internet, L AN, for example) using
fi rewalls. This separation allows access to services that are publicly accessible whils t protecting the internal
network (LA N) against unauthorised access.
DMZ: Enabled means that DMZ the is switched on.
Disabled means that the DMZ is switched of f.
DMZ Host IP Address: Enter the IP Address for the computer running a
server or program that requires the DMZ .
Click SAVE at the bot tom of the window to save your set tings.
00062727bda.indd Abs2:4000062727bda.indd Abs2:40 02.10.2007 11:14:39 Uhr02.10.2007 11:14:39 Uhr
Page 17
41
7.2. 2 Virtual server (Por t forwarding)
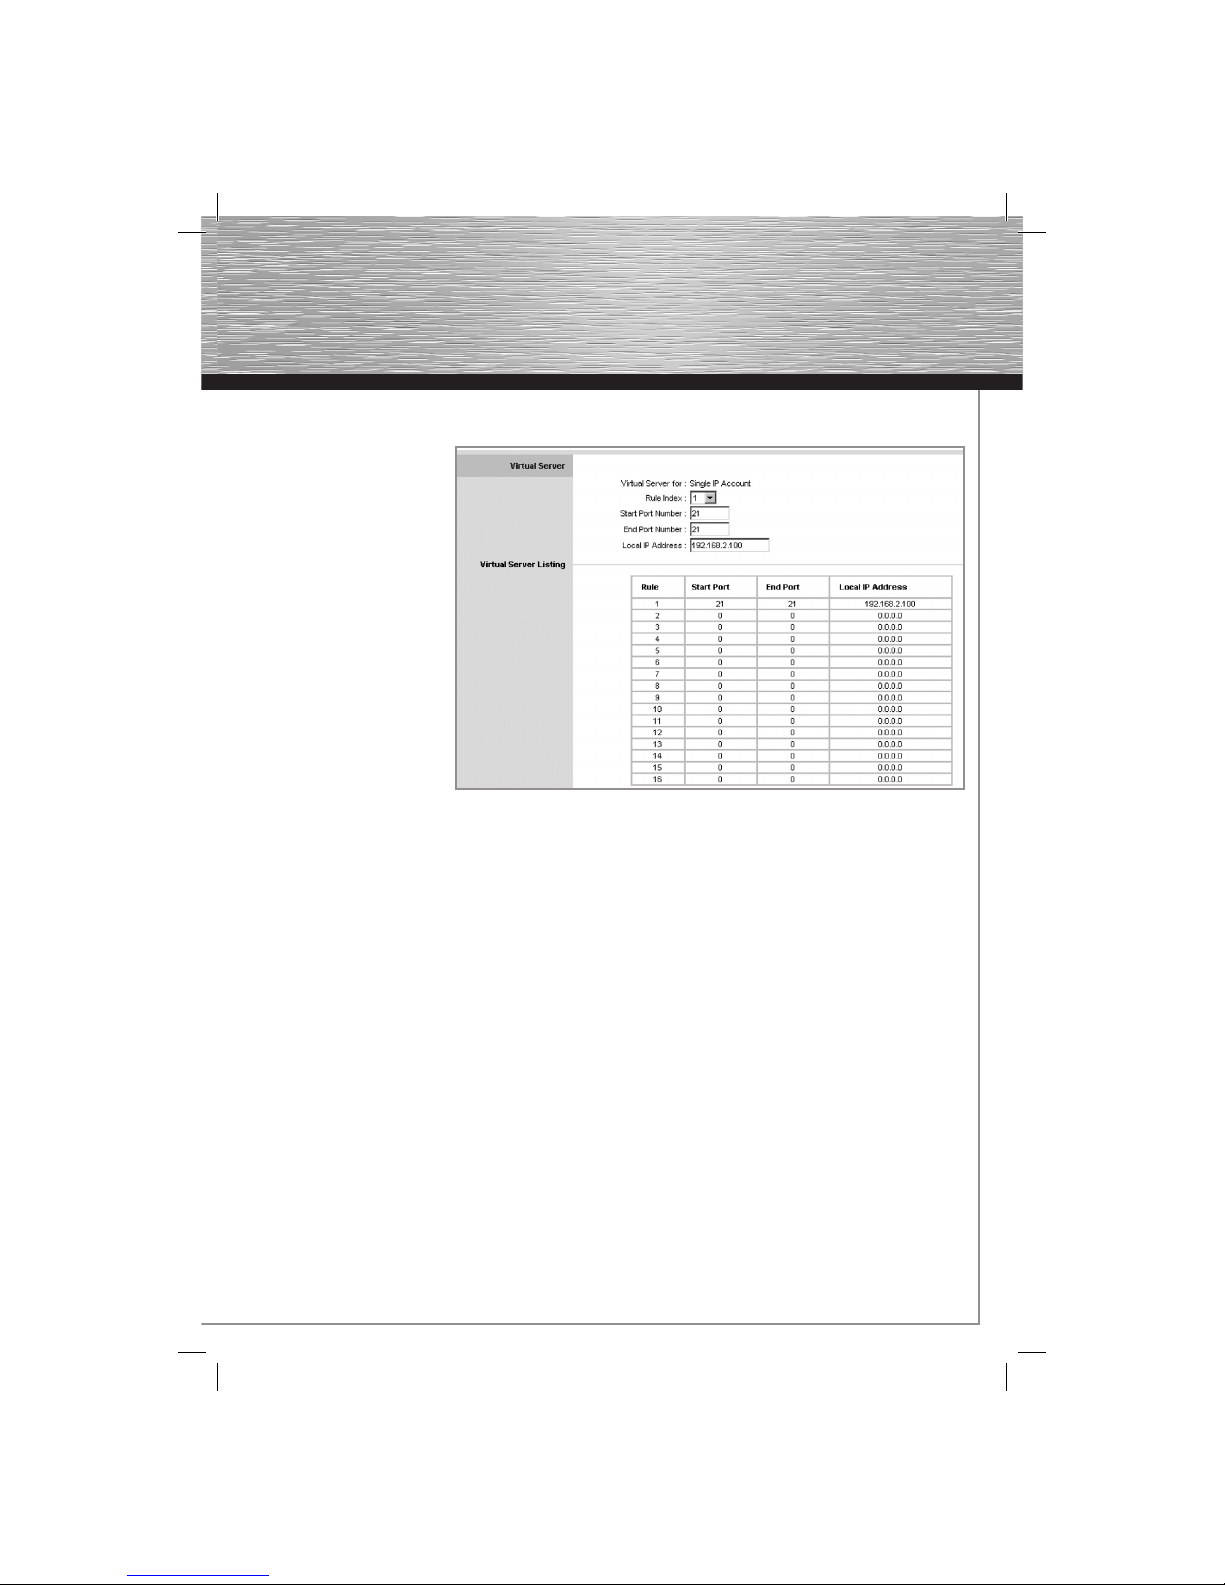
You will need por t forwarding
if you wish to set up a game
server for online gaming or for
P2P networks.
Rule Index: You can choose from 1 to 16; up to 16 dif ferent por t forwardings are possible.
Start Por t Number: Enter the fi rst port of the range that is to be forwarded, for example Port 21
End Por t Number: In this fi eld, enter the last port of the range that is to be forwarded, for example Por t 21
Note: You can enter several consecutive por ts at once by simply entering, for example, 3000 as the Start Port, and
3500 as the End Port.
Local IP address: In this fi eld enter the IP address of the computer on which the program requiring port
forwarding is installed.
Click SAVE at the bottom of the window to save your settings.
8. Access Management
In this overview, you can adjust the access settings comprehensively to suit your individual requirements. In the
Main Menu, select the Access Management menu item.
00062727bda.indd Abs2:4100062727bda.indd Abs2:41 02.10.2007 11:14:40 Uhr02.10.2007 11:14:40 Uhr
Page 18
42
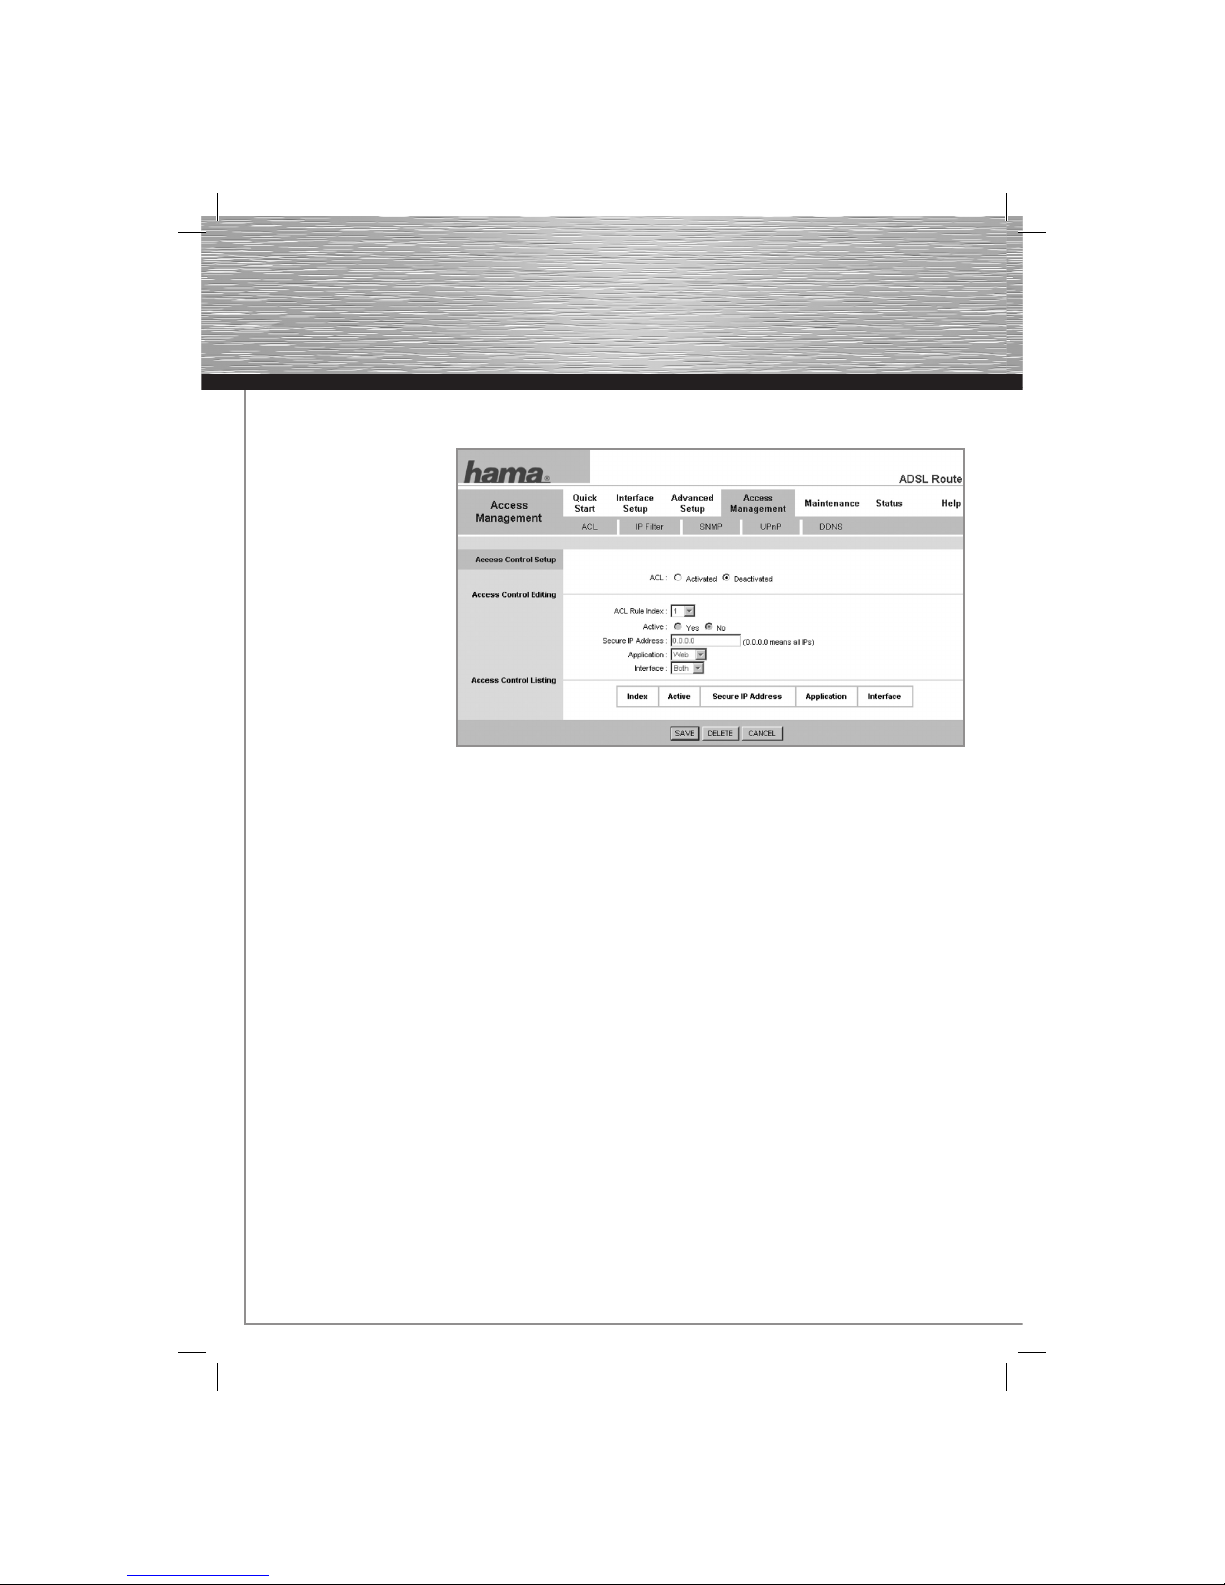
8.1 ACL: (Access control for certain services)
In the Main Menu, select the
Access Management menu
item, and then the ACL sub-
item.
The Access Control List (ACL)
allows you to specify exactly
which computers are allowed
to access which ser vice.
ACL: Activated means that the ACL is switched on.
Deactivated means that the ACL is switched off.
ACL Rule Index: You can choose from 1 to 16, which means that you can confi gure up to 16 different ACLs.
Active: Yes means that Rule 1, for example, is switched on.
No means that Rule 1, for example, is switched of f. You can also switch individual rules on or
off if required.
Secure IP Address: In this fi eld, enter the computer’s IP address if you want the rule to be valid for this computer
exclusively. If you want the rule to be valid for all computers connected to the router, enter
0.0.0.0.
Application: Enter the protocol/application to which the rule should apply. You can choose from the
following options: Web, FTP, Telnet, SNMP, Ping or ALL.
Interface: Select the exchange point for which the rule is valid. You can choose from the following
options: WAN, L AN and Both.
Click SAVE at the bottom of the window to save your settings.
00062727bda.indd Abs2:4200062727bda.indd Abs2:42 02.10.2007 11:14:40 Uhr02.10.2007 11:14:40 Uhr
Page 19
43
8.2 IP fi lter (access control using IP address)
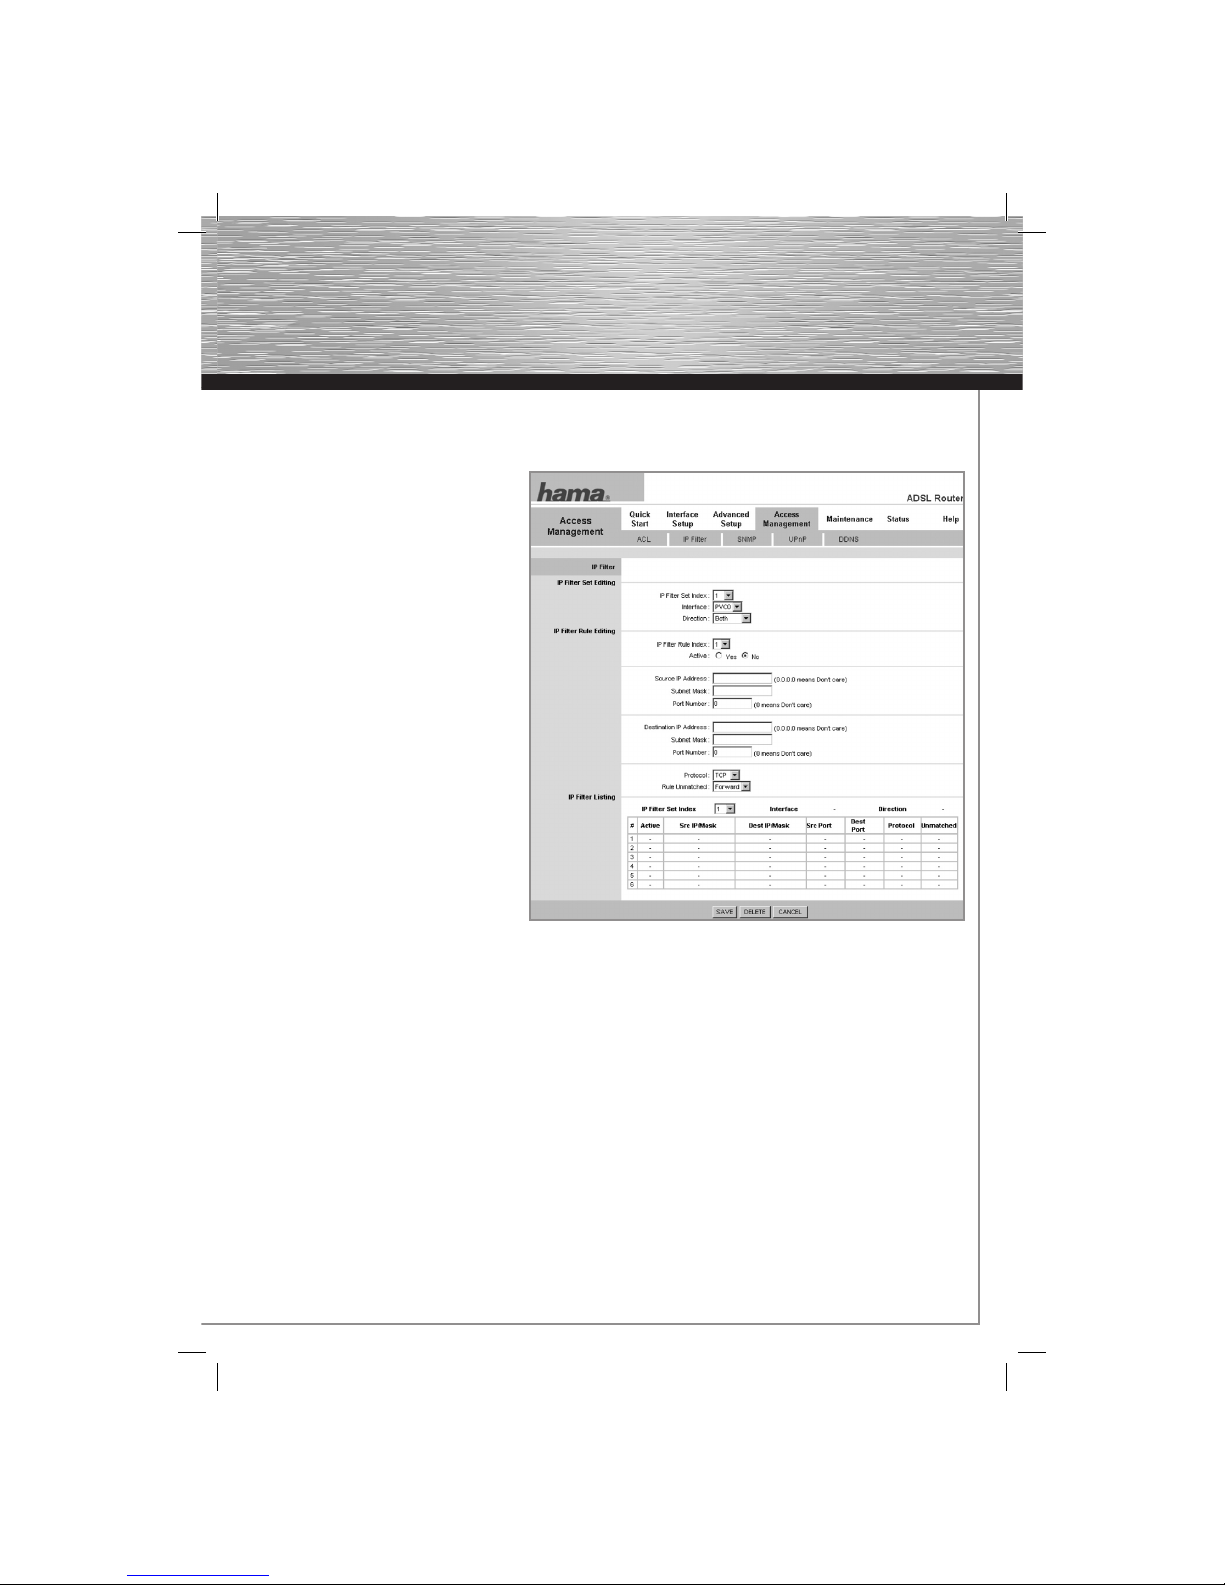
In the Main Menu, select the Access Management menu item, and then the IP Filter sub-item.
A packet fi lter is an application for
fi ltering the incoming and outgoing data
traf fi c in a computer network . This is
generally used to protect the network
from attackers, however the fi lter also
protects against unwanted outgoing
packets. This means, for example, that
you can prevent your own computer from
spreading unwanted and undetected
viruses on the Internet.
IP Filter Set Index: You can save up to 12
settings.
Interface: Use the same set ting
as entered in the
Virtual Circuit fi eld
on the Interface
Setup as entered on
the Interface Setup/
LAN/Virtual Circuit
page.
Direction: Incoming: Incoming
packets are fi ltered
Outgoing: Outgoing
packets are fi ltered
Both: Incoming and Outgoing packet s are fi ltered (checked) using the preset rule.
IP Rule Index: You can set 1 to 6 rules
Active: Yes means that the rule is switched on. No means that the rule is switched off.
You can also switch individual rules on or off if required.
Source IP Add: IP address of the source computer. If you enter 0.0.0.0 this set ting is ignored.
Subnet Mask: Subnet mask of the source computer.
Port: Enter the number of the port to which the rule is to apply. If you enter 0, this setting is ignored.
Destination IP Add: IP address of the “destination” computer. If you enter 0.0.0.0 this setting is ignored.
Subnet Mask: Subnet mask of the “destination” computer.
00062727bda.indd Abs2:4300062727bda.indd Abs2:43 02.10.2007 11:14:41 Uhr02.10.2007 11:14:41 Uhr
Page 20
44
Port: Enter the number of the port to which the rule is to apply. If you enter 0, this setting is ignored.
Protocol: Enter the IP protocol in this fi eld; choose between TCP, UDP or ICMP.
Click SAVE at the bottom of the window to save your settings.
8.3 SNMP:
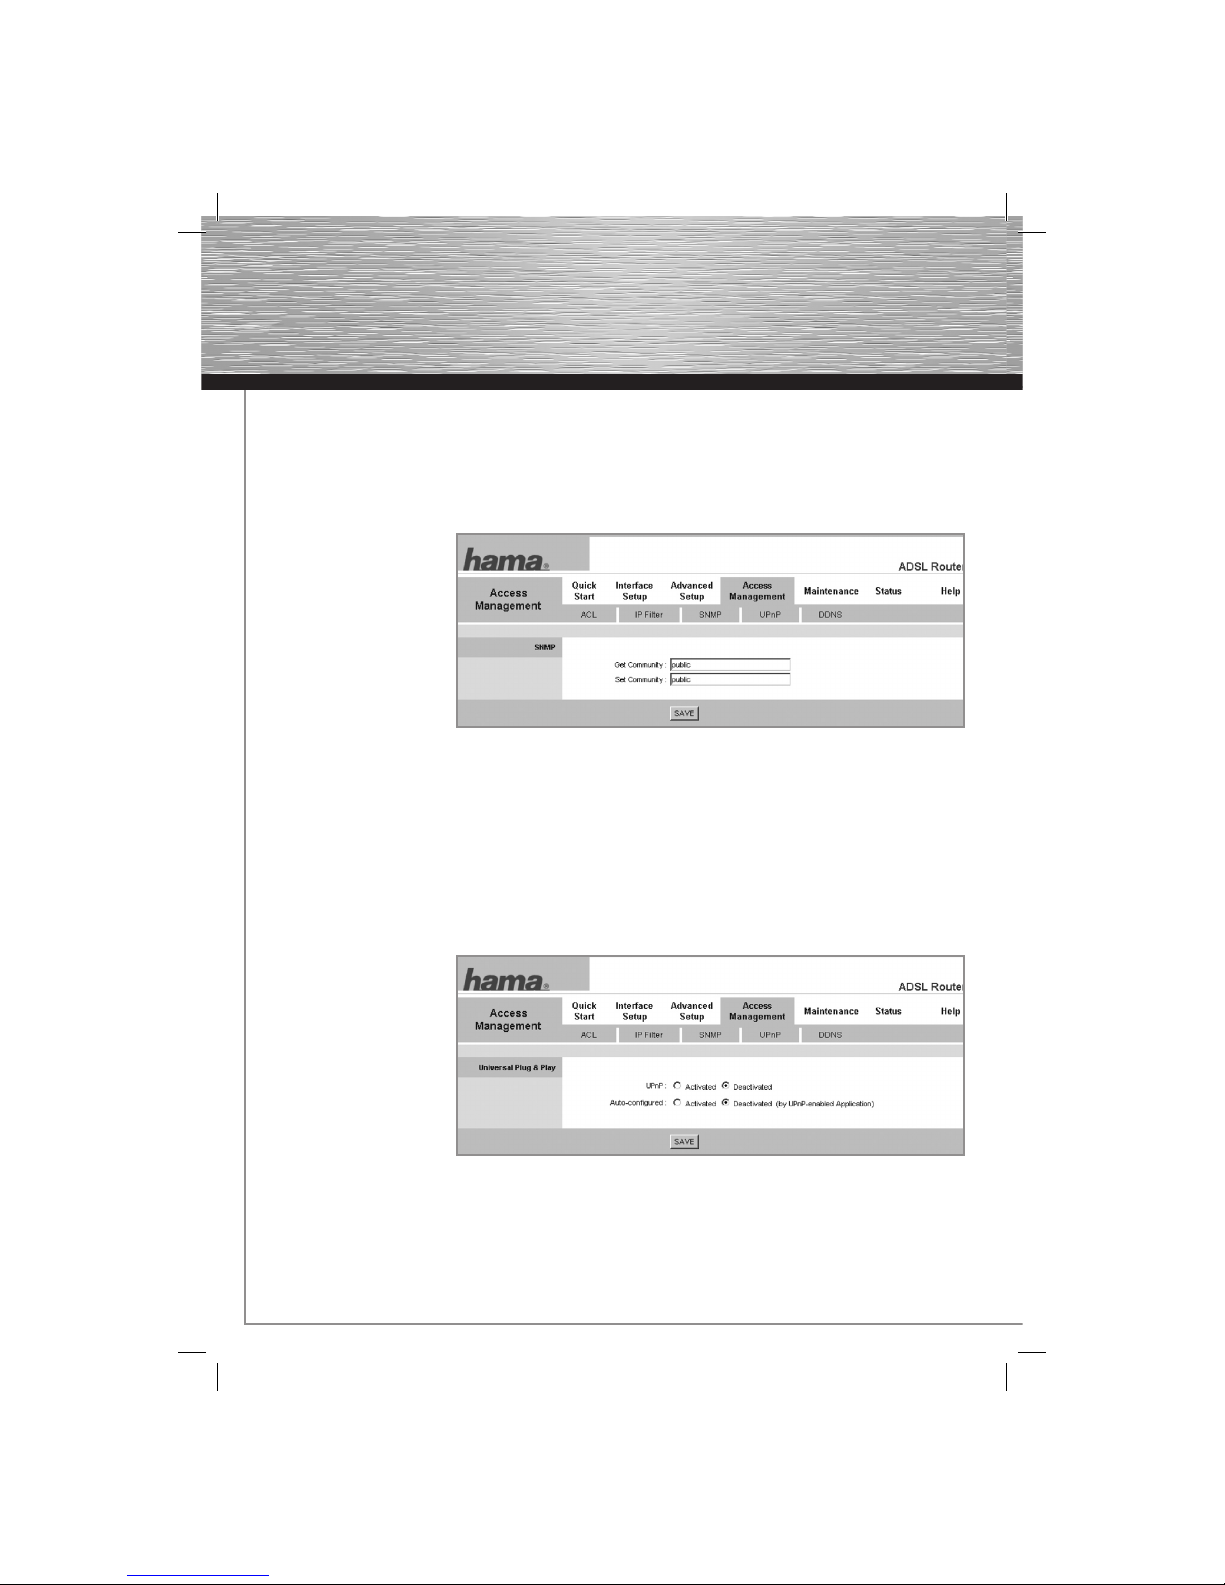
In the Main Menu, select the
Access Management menu
item, and then the SNMP
sub-item.
The Simple Network
Management Protocol is a
network protocol that was
developed for monitoring and
controlling net work elements
(routers, servers, switches, printers, computers etc.) from a central station.
Get Community: Enter the user name or public (visible to all).
Set Community: Enter the user name or public (visible to all).
Click SAVE at the bottom of the window to save your settings.
8.4 UPnP (Universal Plug and Play setting):
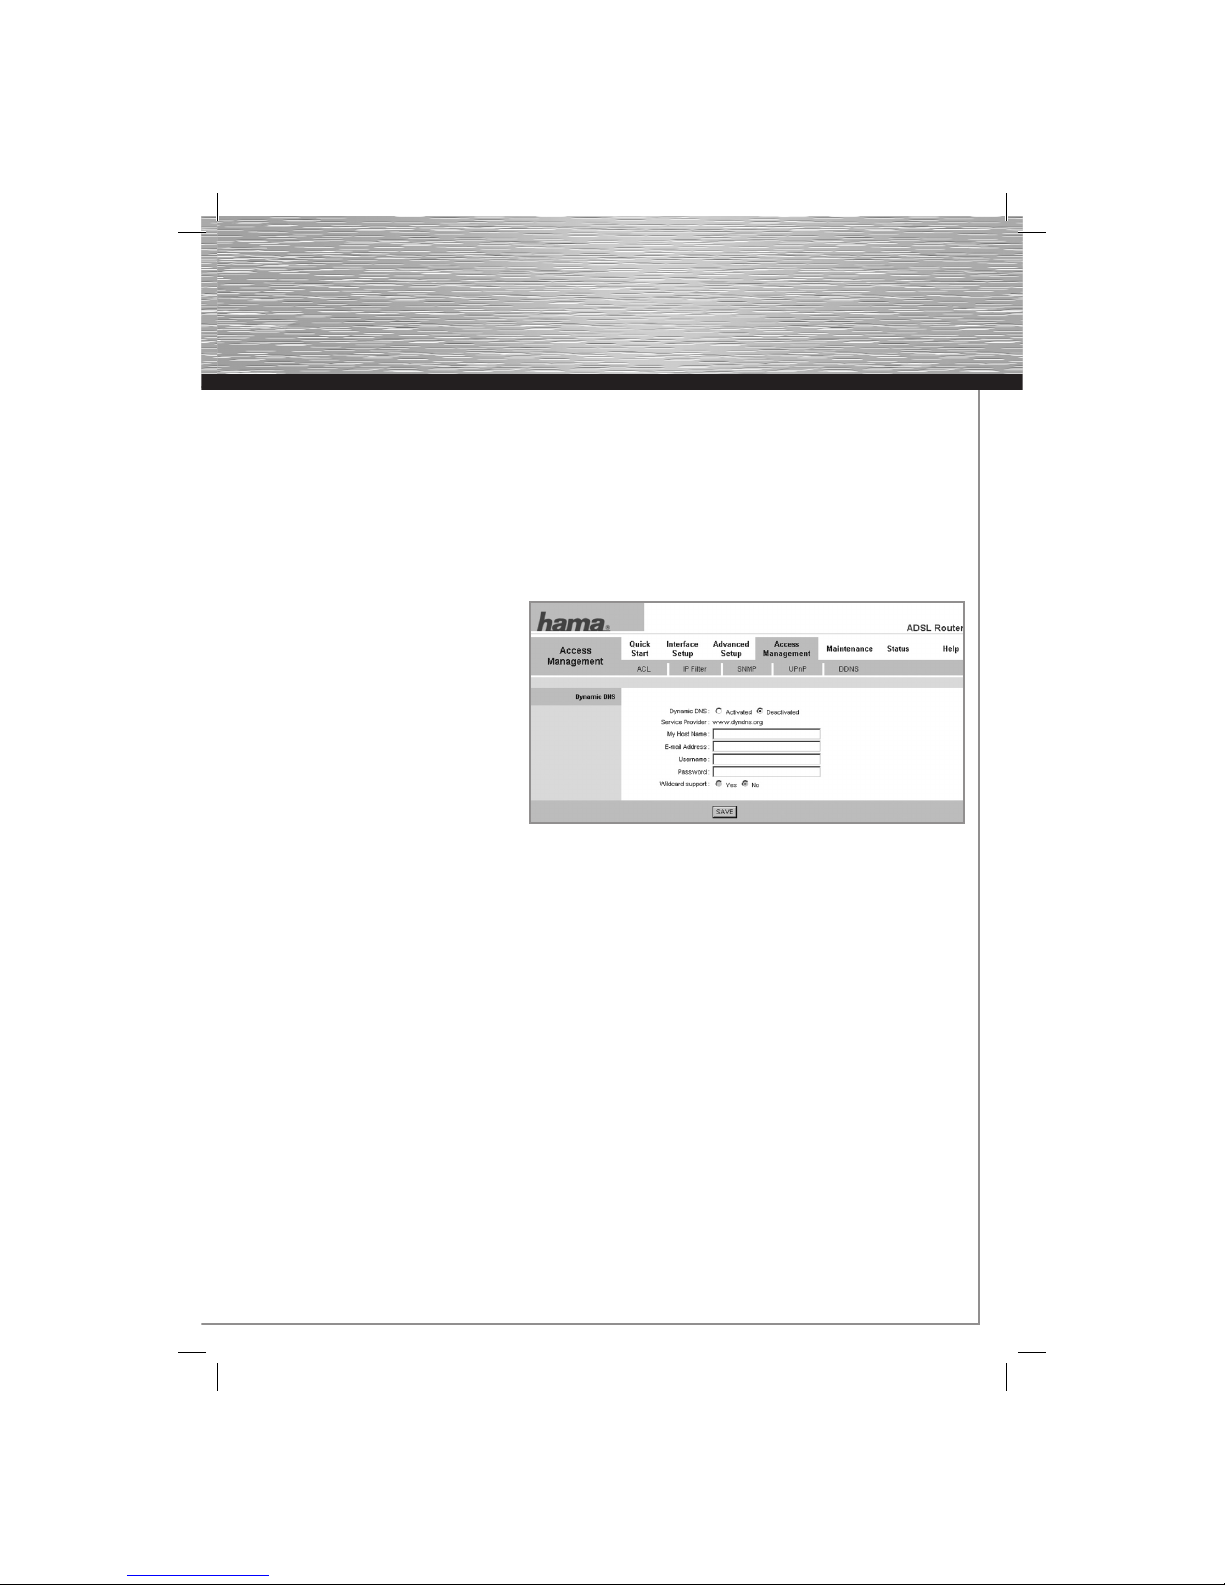
In the Main Menu, select the
Access Management menu
item, and then the UPnP
sub-item.
Universal Plug and Play
(UPnP) allows you to control
devices made by any
manufacturer
(media centres, routers,
printers), using an IP-based
network, with or without
central control. It is based on a series of s tandardised network protocols and data formats.
00062727bda.indd Abs2:4400062727bda.indd Abs2:44 02.10.2007 11:14:41 Uhr02.10.2007 11:14:41 Uhr
Page 21
45
UPnP: Activated means that UPnP is switched on.
Deactivated means that UPnP is switched off.
Auto-confi gured: Activated means that automatic UPnP is switched on.
Deactivated means that automatic UPnP is switched off.
Click SAVE at the bottom of the window to save your settings.
8.5 DDNS: (Dynamic Domain Name System)
In the Main Menu, select the Access
Management menu item, and then the
DDNS sub-item.
The DynDNS or dynamic Domain Name
System section is an internet service that
allows you to establish a fi xed hostname
as a pseudonym for a dynamically
changing IP Address. T his ensures that
you can always access a computer at
the same domain name.
Dynamic DNS: Activated means that the dynamic DNS is switched on.
Deactivated means that the dynamic DNS is swi tched off.
My Host Name: Host name that you have received from DynDNS.org, for example. Please enter the entire
name, including @DynDns.org
E-Mail Address: Enter the e-mail address that you specifi ed during DynDNS registration.
Username: Enter the username that you specifi ed during DynDNS registration.
Password: Enter the password that you specifi ed during DynDNS registration.
Click SAVE at the bottom of the window to save your settings.
9. Maintenance: (Router Management)
In this overview, you can adjust the access settings comprehensively to suit your individual requirements.
00062727bda.indd Abs2:4500062727bda.indd Abs2:45 02.10.2007 11:14:41 Uhr02.10.2007 11:14:41 Uhr
Page 22
46
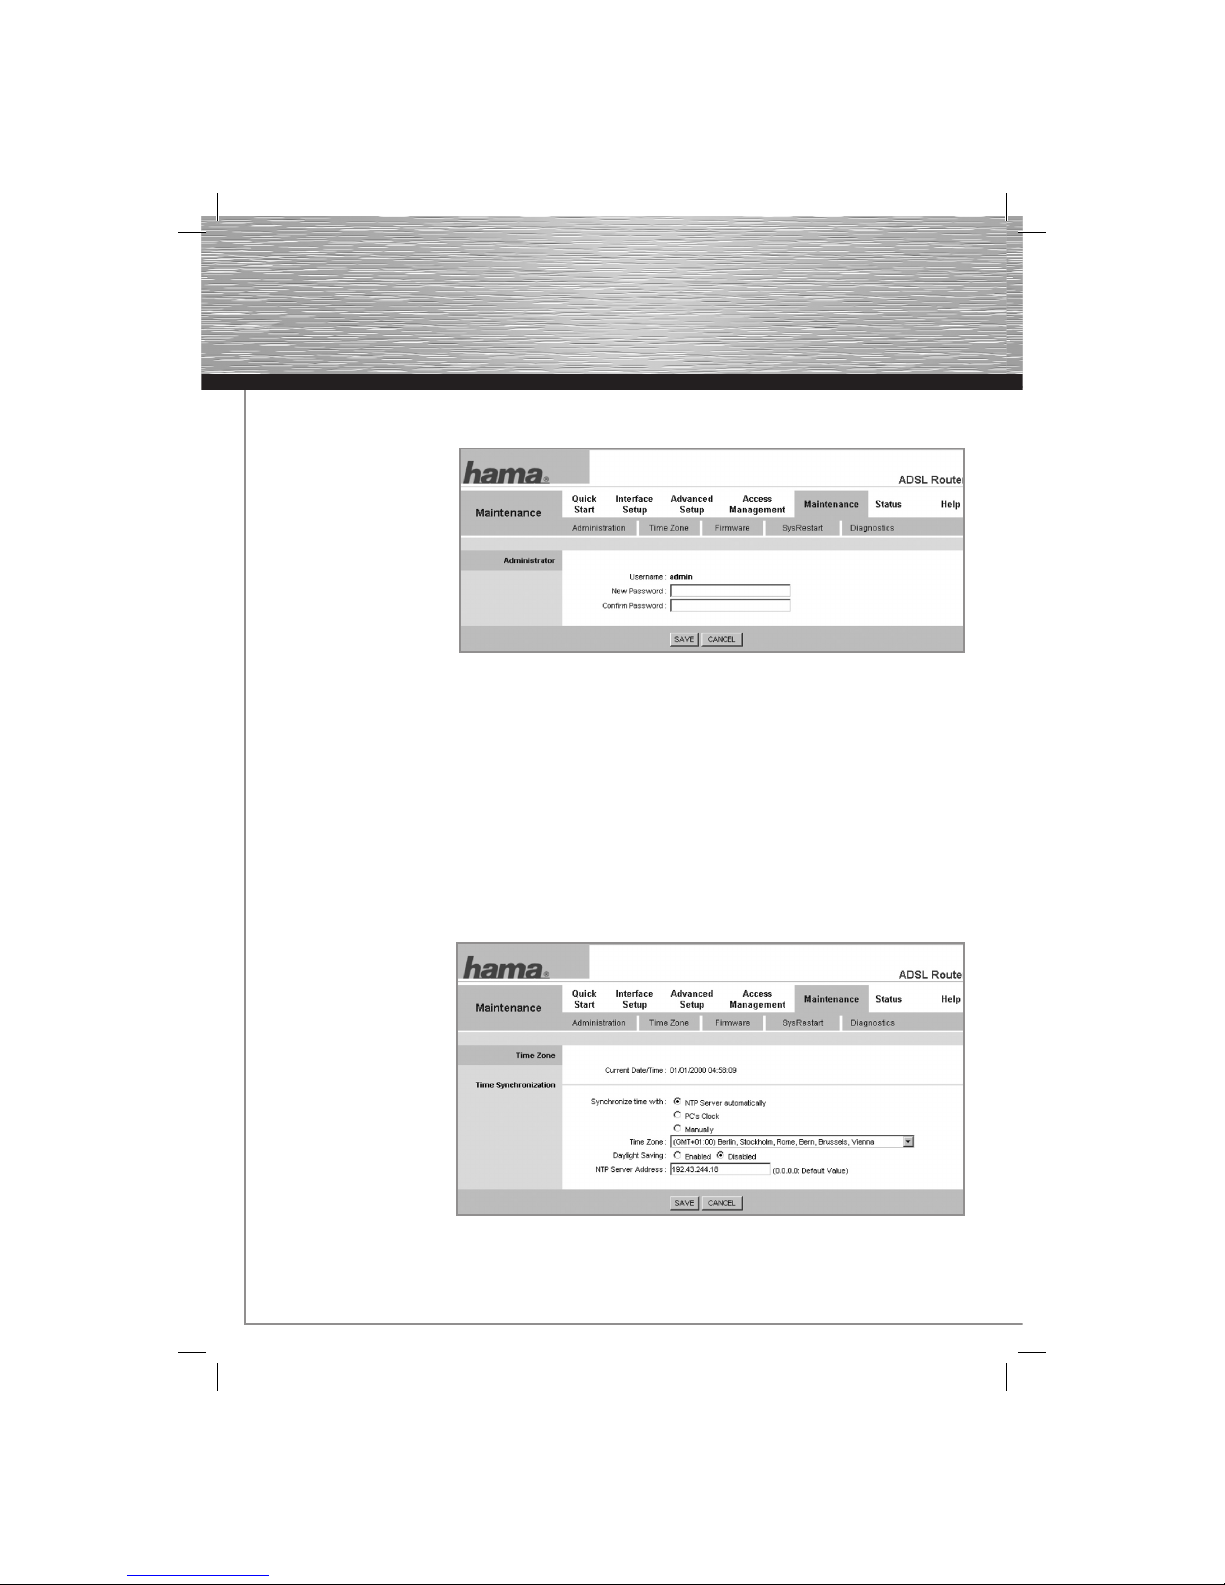
9.1 Administration:
In the Main Menu, select the
Maintenance menu item.
Select the Administration
sub-item.
On this page, you can change
the password for your
administrator of the Hama
WLAN ADSL2+ Modem
Router.
To change your password,
enter your new password in
the New Password fi eld and then accurately enter it again in the Confi rmed Password fi e l d .
Click SAVE at the bottom of the window to save your settings.
9.1.1 Resetting the password
Note: If you accidentally forget your password, you can reset the Hama WLAN ASDL2+ Modem Router back to the
default setting and use the default password, 1234. To reset the router, use a pen or similarly shaped item to press
down on the black pressure point on the back of the router for approx. 5 seconds. The router will then default to the
original factory settings.
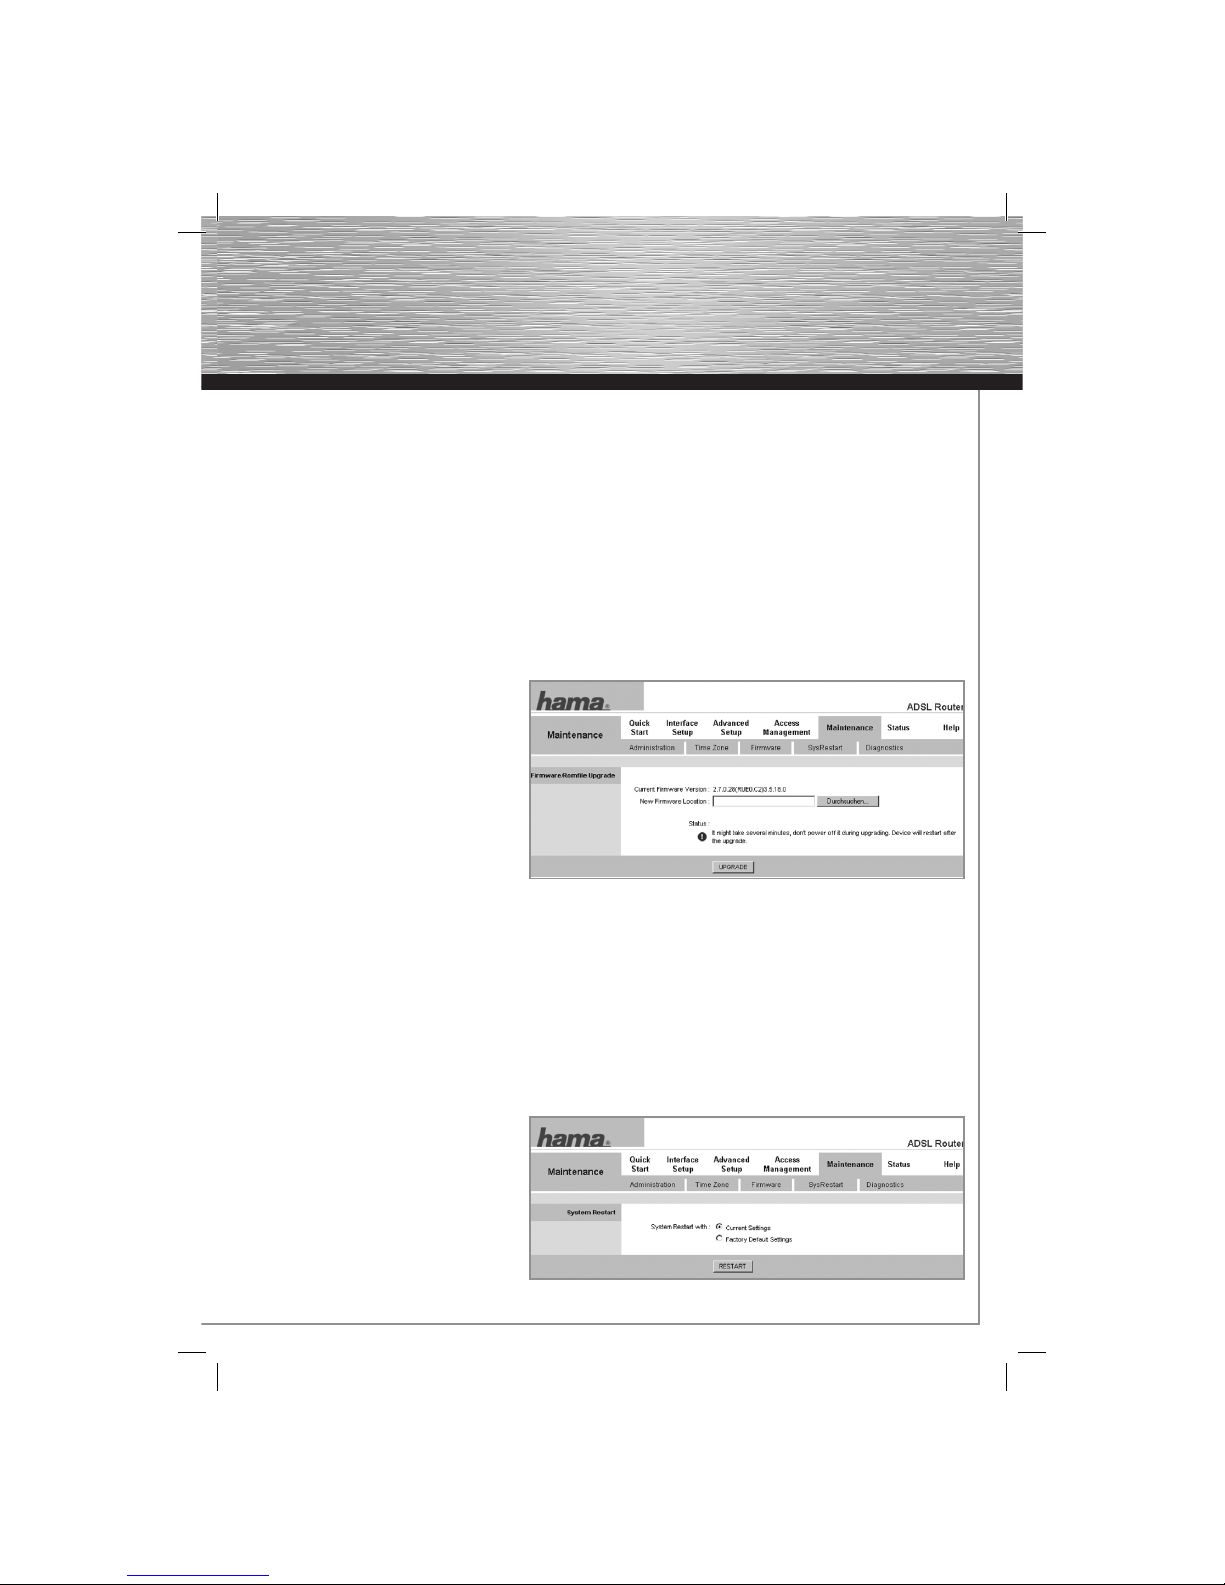
9.2 Time Zone: (Set ting the time zone)
In the Main Menu, select the
Maintenance menu item, and
then the Time Zone sub-item.
This is where you can set the
time zone, time and the date.
NTP Server automatically: The router adjusts the time and date to the server speci fi ed in the
NTP Server Address fi e l d .
00062727bda.indd Abs2:4600062727bda.indd Abs2:46 02.10.2007 11:14:42 Uhr02.10.2007 11:14:42 Uhr
Page 23
47
PC’s clock: The router adjusts the time and date to your computer.
Manually: You set the time and date manually.
Time Zone: Select the time zone of your location.
Daylight Saving: Enable or disable daylight savings time.
NTP Server Address: Usually a public ser ver that automatically adjusts the time and date.
Click SAVE at the bottom of the window to save your settings.
9.3 Firmware: (Updating fi rmware)
In the Main Menu, select the
Maintenance menu item, and then the
Firmware sub-item.
This is where you can import a new
fi rmware update if there is one available.
Check our homepage www.hama.com or
Hama Product Consulting to learn about
fi r m w a r e u p d a t e s .
Once you have downloaded the new
fi rmware, unpack it and save it to your
desktop. T hen click Browse, select the unpacked fi le, and click UPGRADE. The fi rmware then is copied to the router
and performs a restart:
Note: Only upgrade fi rmware if you are experiencing problems with the router. Other wise, we strongly recommend
against performing an update. The update deletes any changes that you have made previously and so you will need
to carr y out these settings again once the upgrade is complete. Please note that only fi rmware updates authorised
and released by Hama may be loaded onto the router; otherwise any warranty claims against Hama GmbH & Co. KG
are void.
9.4 SysRestar t: (Restarting/resetting the router)
In the Main Menu, select the
Maintenance menu item, and then the
SysRestart sub-item.
Here, you can res tart the router with the
current set tings or reset it to the factor y
default settings.
00062727bda.indd Abs2:4700062727bda.indd Abs2:47 02.10.2007 11:14:42 Uhr02.10.2007 11:14:42 Uhr
Page 24
48
If you want to restart the router with the current settings, select Current Settings and click RESTART.
If you want to reset the factory default set tings, select Factory Default Settings and click RESTART.
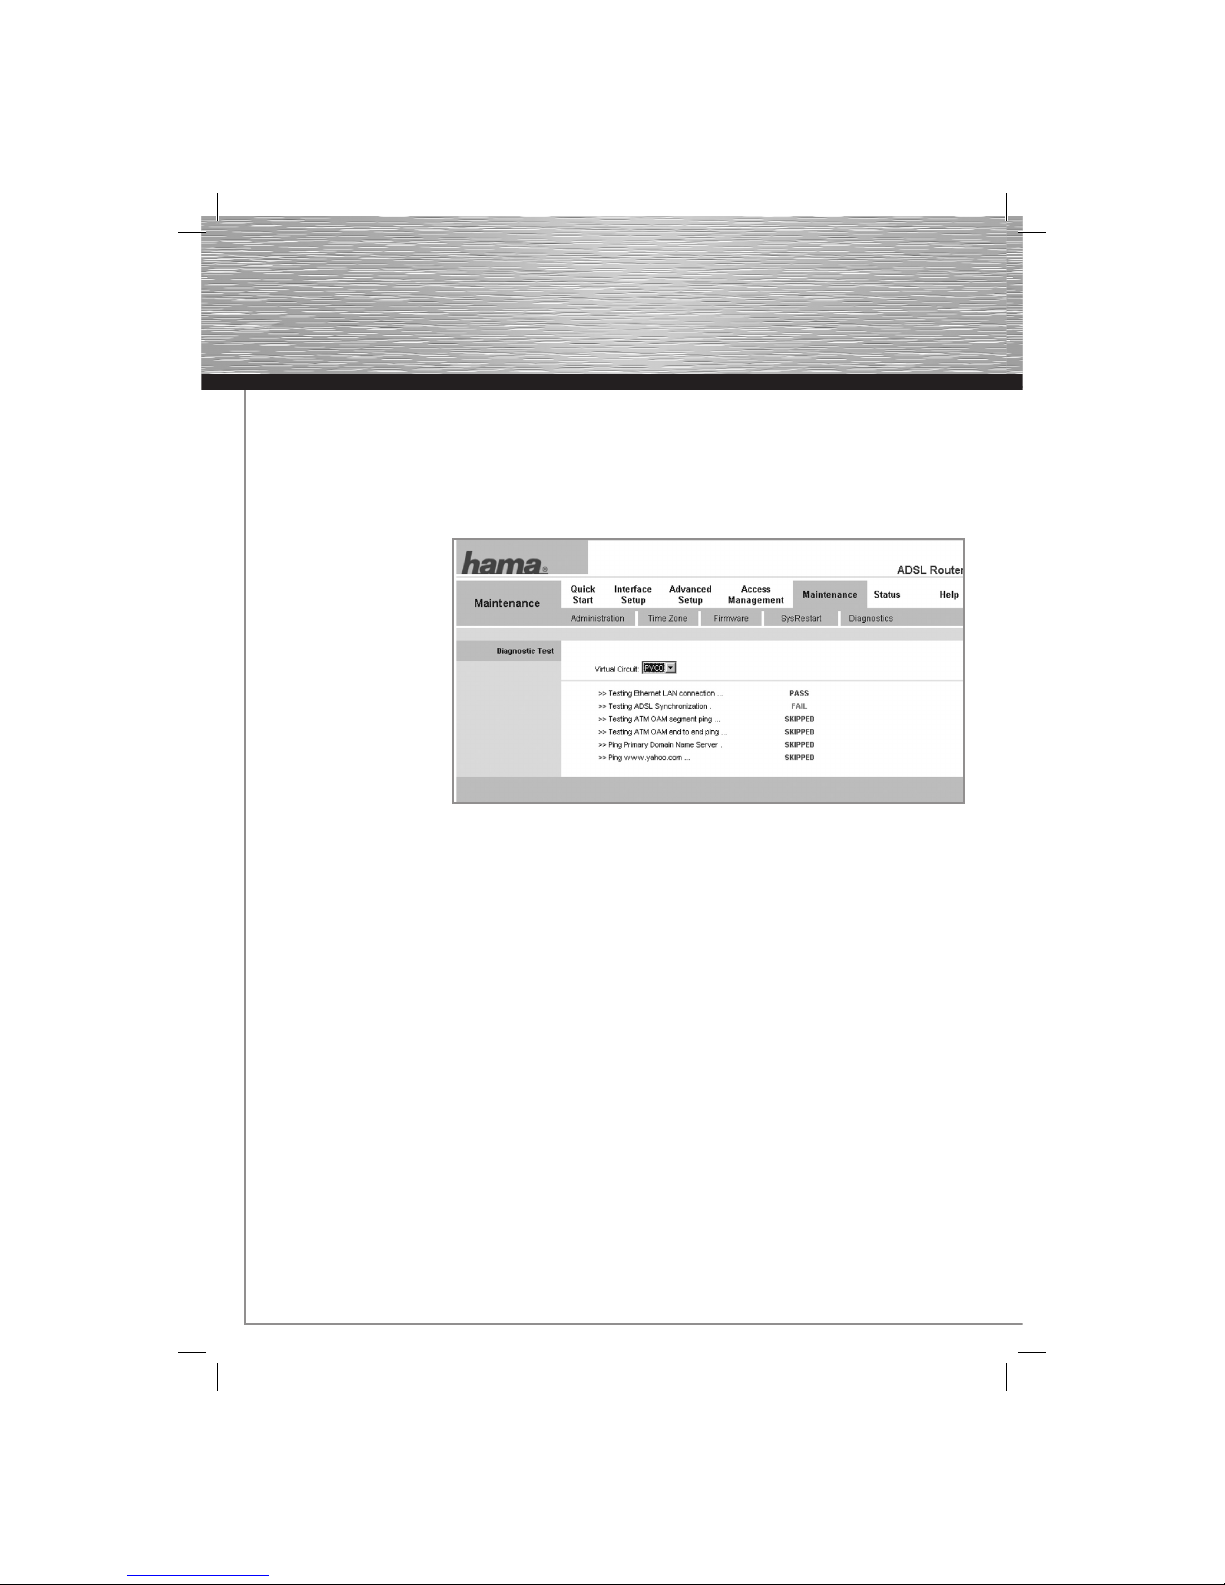
9.5 Diagnostics: (Router diagnostics)
In the Main Menu, select the
Maintenance menu item,
and then the Diagnostics
sub-item.
You can run a diagnostics
test for the WL AN ADSL 2+
Modem Router here.
Virtual Circuit: If you are retaining the default set tings, you must select PVCO in this fi eld.
PASS = Passed the test
FAIL = Error or incorrect confi guration
SKIPPED = Test was skipped
10. Status:
This overview provides detailed information about your current router settings. In the Main Menu, select the
Status menu item.
00062727bda.indd Abs2:4800062727bda.indd Abs2:48 02.10.2007 11:14:43 Uhr02.10.2007 11:14:43 Uhr
Page 25
49
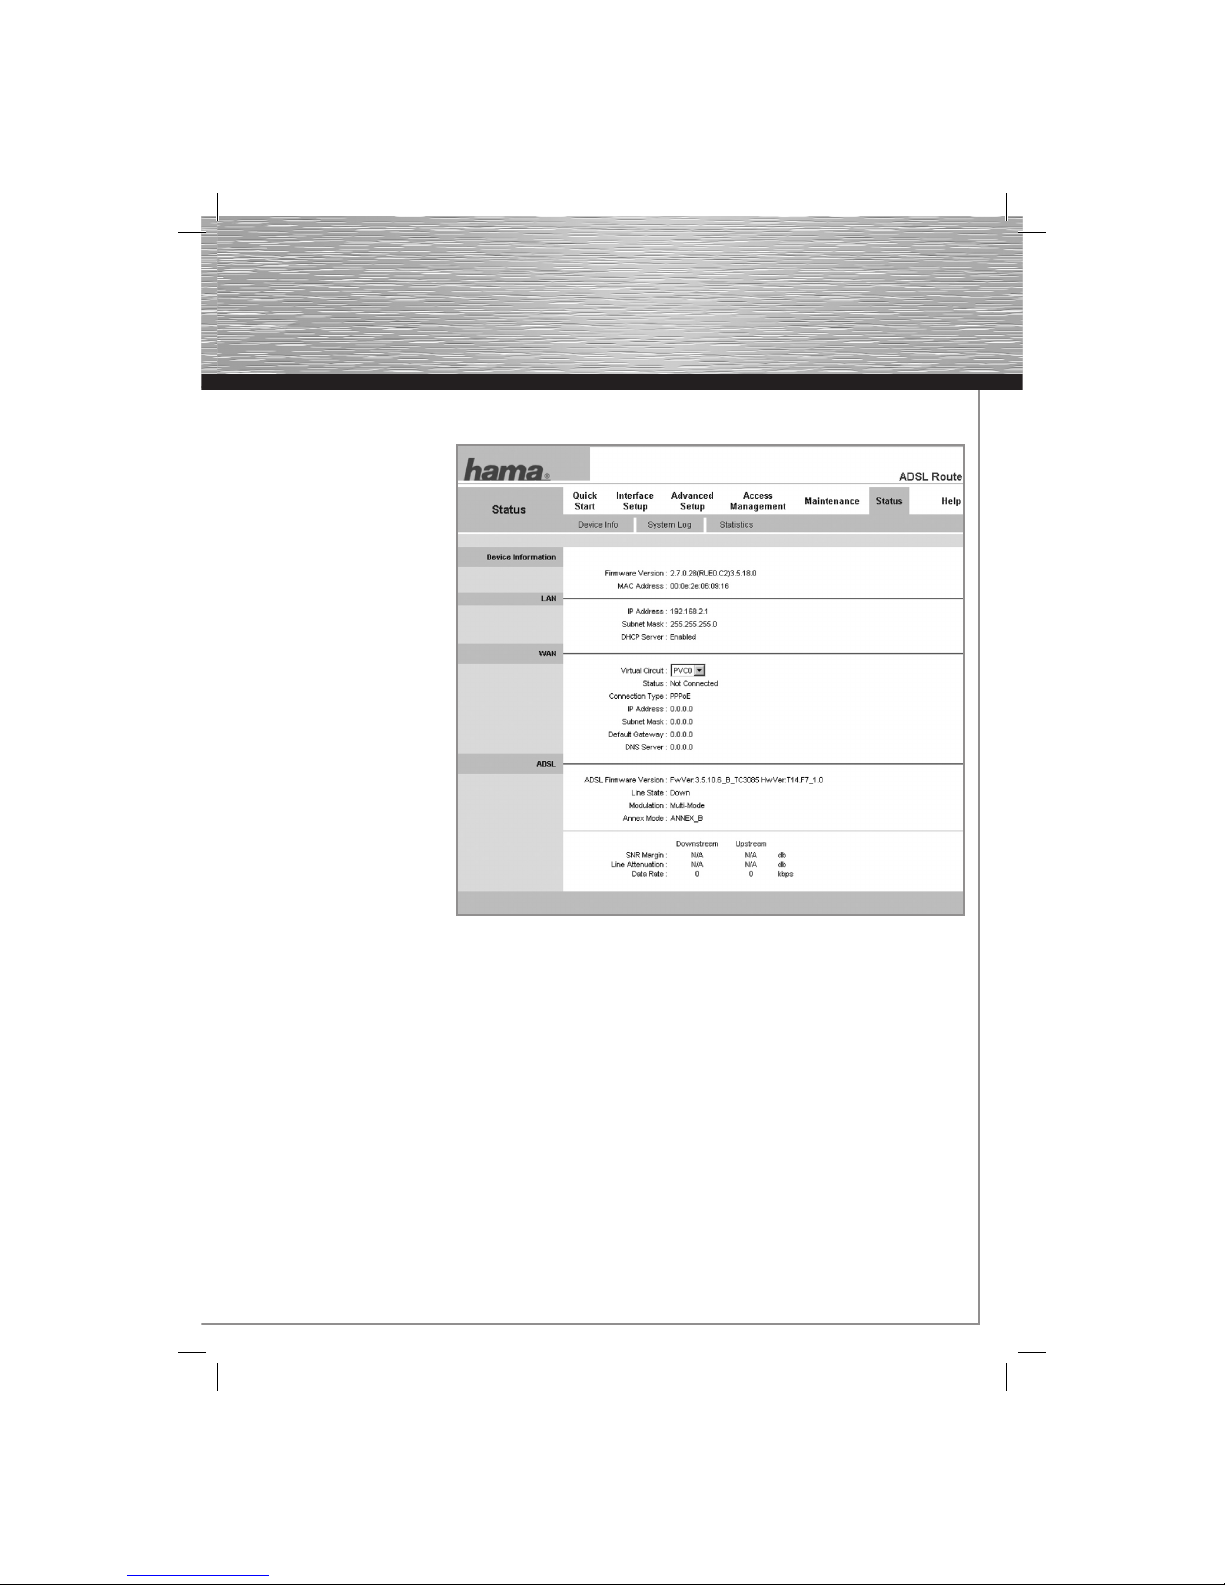
10.1 Device info:
This window provides an
overview of the current
operating status of your
ADSL2+ Modem Router.
If you contact or call Hama
Product Consulting, please
have a printout or screen
shot of the status over view
to hand.
10.2 System Log:
In the Main Menu, select the Status menu item, and then the System Log sub-item.
You can check the detailed error messages for the router in this view. If you contact or call Hama Product
Consulting, please have a printout of the system log to hand.
CLEAR LOG: Delete system log.
SAVE LOG: Save the system log in a fi le.
11. Help:
In the Main Menu, select the Help menu item.
This view provides an overview of the router in addition to detailed explanations of the different functions.
This is not yet available in English.
00062727bda.indd Abs2:4900062727bda.indd Abs2:49 02.10.2007 11:14:43 Uhr02.10.2007 11:14:43 Uhr
Page 26

50
12. Glossary (Explanation of terminology):
Client: The term Client is often used colloquially to mean computers in a computer net work on which
preferred client applications are performed.
MAC address: The MAC address (Media Access Control, Ethernet ID or, with Apple, Airport ID and Ethernet ID)
is the hardware address of every individual net work adapter, and is used as a unique identifi er for
devices in a net work. The MAC address is often found on the net work card, integrated into the
serial number. You can also locate the address using software; various commands are required
depending on the operating system.
SPI: Stateful Packet Inspection (SPI) refers to a dynamic packet fi lter whereby every data packet is
assigned a specifi c active session. The data packets are inspected and the connection state is
included in the decision. During the process of this connection in the fi rewall, the data packets
are inspected and entered into tables. A data packet comparison and the table determine whether
the data packet is passed through. Data packets that cannot be assigned certain criteria are
not allowed through. In securit y-relevant applications, fi rewalls that use the SPI procedure are
therefore superior to the standard packet fi lter fi rewalls.
Web: The World Wide Web (shortened to Web or ww w) is a system of hypertext documents that is
retrievable over the Internet. The user needs a Web browser to retrieve the data from the Web
server or to display the information on a screen, for example. In the document, the user can
navigate the hyperlinks (which refer to other documents) regardless of the Web server on which
the hyperlinks are saved.
FTP: The File Transfer Protocol is a network protocol for transferring fi les over TCP/IP net works. It is
used for transferring fi les from a server to a client (download), from a client to a server (upload) or
client-controlled bet ween two servers. F TP is also used for creating and reading fi les, as well as
for renaming and deleting fi les.
Tel net : Tel net ( Telecommunication Network) is the name of a widely-used net work protocol on the
Internet . It is usually used to allow users access to Internet processors by means of the command
line.
SNMP: The Simple Network Management Protocol is a network protocol that was developed for
monitoring and controlling network elements (routers, servers, switches, printers, computers
etc.) from a central station.
Ping: Ping is a program used to test whether a particular host or computer is reachable in a network
and for determining its response rate.
WAN: A Wide Area Network is a computer network that, in contrast to a LAN, covers a very large
geographical area.
00062727bda.indd Abs2:5000062727bda.indd Abs2:50 02.10.2007 11:14:43 Uhr02.10.2007 11:14:43 Uhr
Page 27

51
LAN: A Local Area Network is a network in which computers or clients are connected using net work
cables or wireless L AN.
TCP: Transmission Control Protocol (TCP) is a protocol that determines the way in which data should
be exchanged bet ween computers. All modern computer operating systems have TCP and employ
it for exchanging data with other computers. It is a component of the Internet protocol suite, the
core basis of the Internet .
UDP: The User Datagram Protocol (UDP) is a minimal, connectionless net work protocol that belongs
to the transport layer of the Internet protocol suite. The task of the UDP is to ensure that data
transferred over the internet arrives at the correct application.
ICMP: As with TCP and UDP, the Internet Control Message Protocol (ICMP) uses the Internet Protocol
(IP) and is a core protocol in the Internet protocol suite. Its purpose in networks is to send error
and information messages.
13. Support and Contact Information:
If the product is defective:
Please contact your dealer or Hama Product Consulting if you have any product claims.
Internet / World Wide Web:
Product support , updates or product information can be found at w ww.hama.com
Support hotline – Hama product consultation:
Tel. +4 9 (0) 9091 50 2 115
Fax + 49 (0) 9091 5 02 272
E-mail: [email protected]
Note
This product may only be used in Austria, S witzerland, France, England, Belgium, Spain, Holland, Hungary, Poland,
Sweden, Luxemburg, Ireland, Greece, The Czech Republic, Slovakia and Finland.
See www.hama.com for the declarations of conformity with R&T TE Directive 9 9/5/EC.
!
00062727bda.indd Abs2:5100062727bda.indd Abs2:51 02.10.2007 11:14:44 Uhr02.10.2007 11:14:44 Uhr
 Loading...