

Page 1

All listed brands are trademarks of the corresponding companies. Errors and omissions excepted,
and subject to technical changes. Our general terms of delivery and payment are applied.
Hama GmbH & Co KG
D-86651 Monheim/Germany
www.hama.com
00062713/09.07
Page 2
COMPUTER
USB-Multifunktions-Server
USB Multifunction Server
Serveur USB multifonction
00062713
Page 3
g
Operating Instruction
Contents
1. USB Multifunction Server wiring 12
2. Control Center installation 12
3. Network confi guration 12
4. Control Center 13
4.1 Basic confi guration 14
4.1.1 General confi guration 14
4.1.2 TCP/IP 14
4.1.3 Supported protocols 14
4.1.4 User accounts 15
4.1.5 Maintenance 15
4.1.6 E-mail 16
4.1.7 SNMP 16
5. Printer server (printer connection) 16
5.1 Direct connection 16
5.2 Network printers 16
6. Network scanners 17
7. Addition of USB storage media 17
to the network
7.1 Direct connection 17
7.2 Network access 18
7.2.1 Quick access 18
7.2.2 Installation of the SMB share on a PC 18
7.2.3 FTP access 18
8. Support und contact 19
It is also possible to connect a USB hub to the USB port,
however, keep in mind that only one device of each type
(printer/hard disk) can be managed. You should not
connect more than a total of two devices to the server.
Abbreviations in the text:
Hama USB Multifunction Server = MFS
Hama USB Multifunction Server Control Center = Control
Center
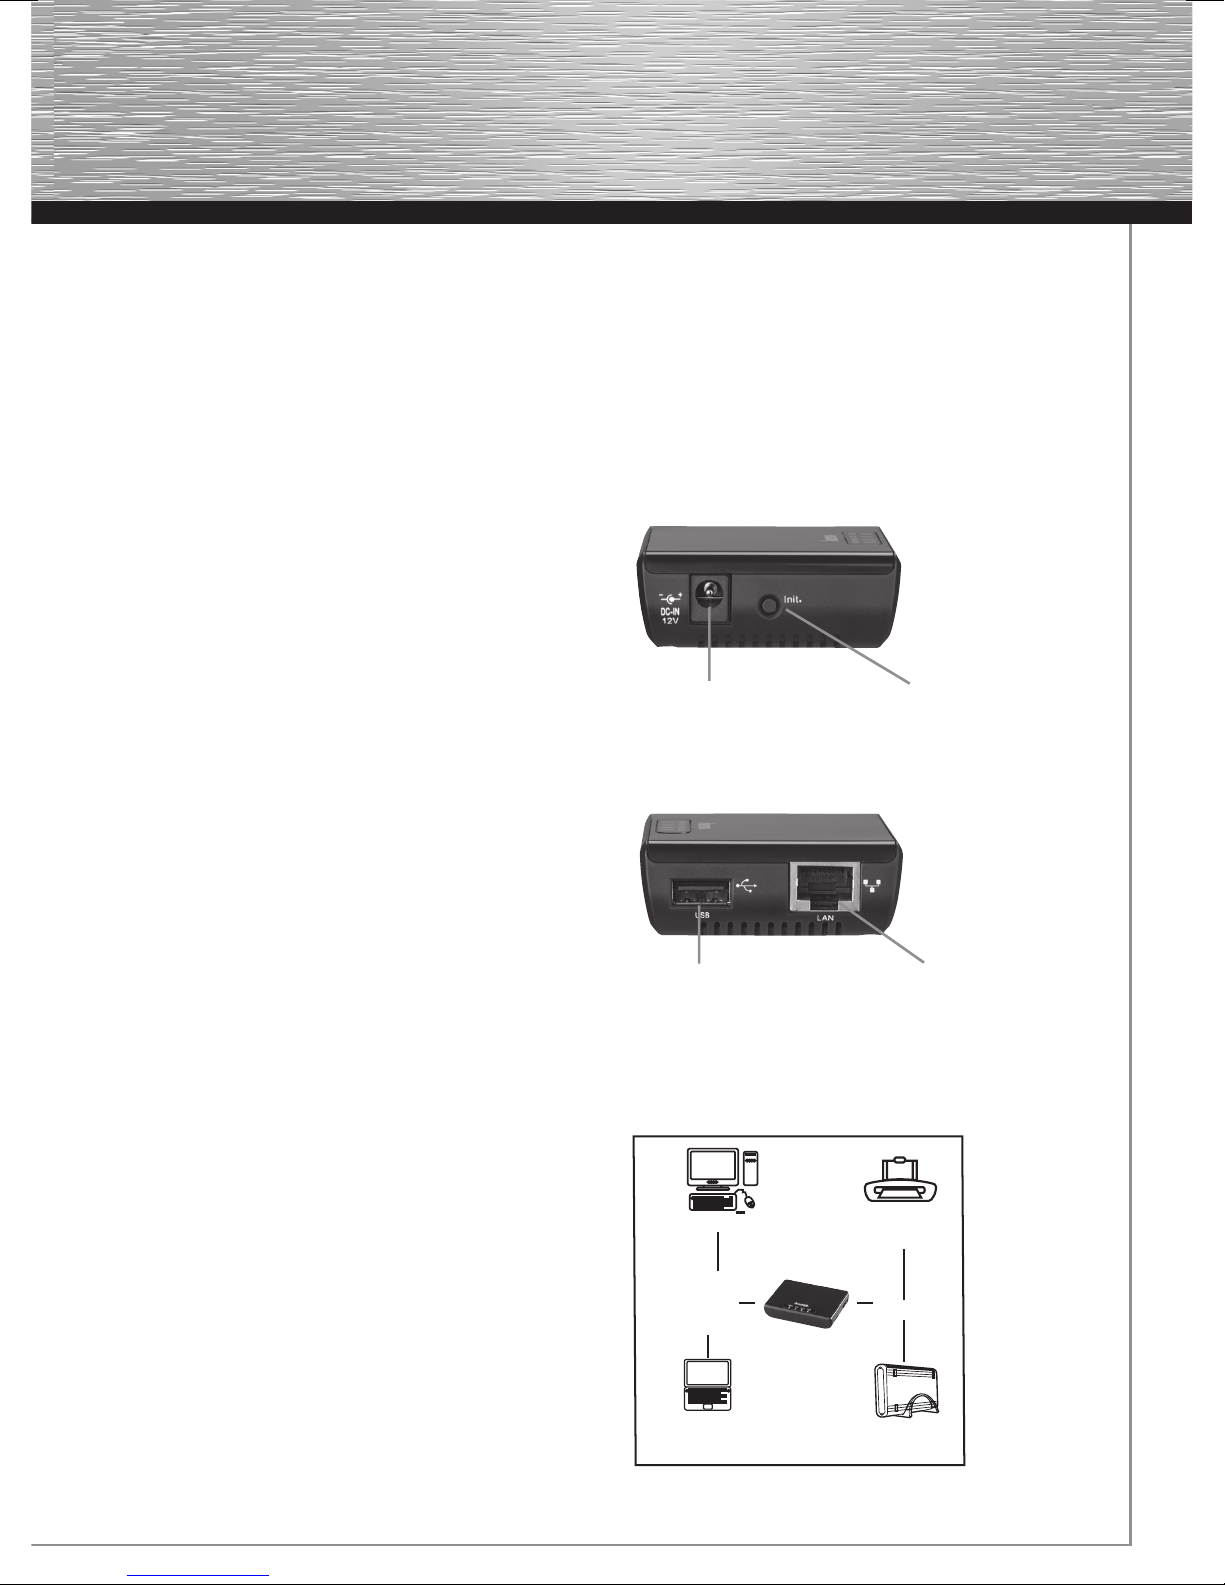
1. Connection
Power supply connection Reset to default
settings (see 4.1.5)
Package contents:
1 x Hama USB Multifunction Server
1 x 12 V power supply unit
1 x Printed operating instructions
Safety notes:
Do not use the device in moist or extremely dusty areas,
on radiators or near heat sources. This device is not
designed for use outdoors. Protect the device from
pressure and impact. The device may not be opened or
moved during operation.
Caution: Use the device with the enclosed power supply
unit only. The use of other power supply units can cause
damage to the device.
Introduction:
The USB Multifunction Server allows you to make USB
devices such as printers, scanners or hard disks
accessible on a network. In other words, every user on
the network can access this device.
Connection to USB device Connection to
e.g. printer/scanner/HDD network
e.g. router/switch/
hub
Computer
Computer
Switch
Router
Acess
point
Notebook
MFS
MFPrinter
Printer
Scanner
USB Hub
USB Storage
USB-
Storage
11
Page 4
1. Connect the LAN port of the MFS to your network,
such as to a switch or hub. Use at least a CAT5 patch
cable (max. 100 m). Or connect your computer to the
MFS directly using a crossover cable.
2. Connect the USB port on the MFS to the USB device
which is to be made accessible on the network.
Switch on the USB device.
3. Plug the included power supply unit into an empty
socket and then connect it to the MFS.
Caution: Unsuitable power supply units can cause
damage.
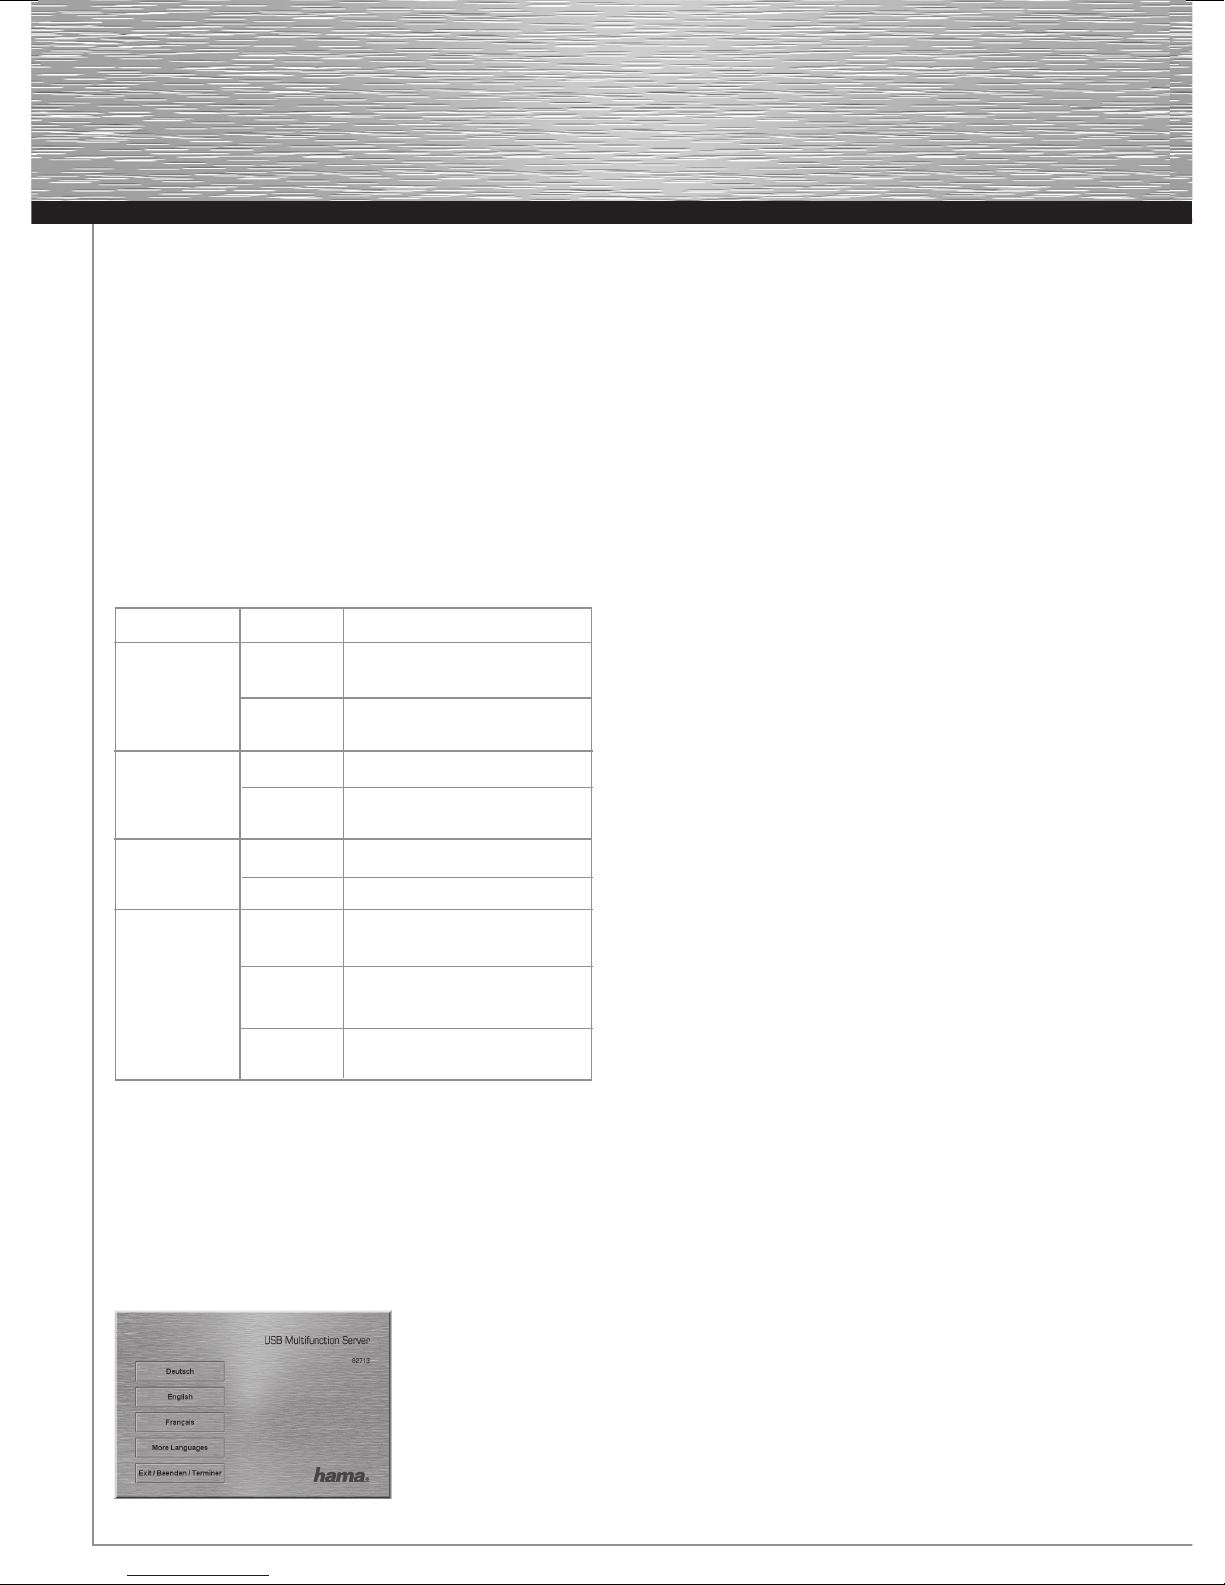
LED statuses
Name State Status
Power On Power supply unit is
connected
Off Power supply unit is not
connected
Link On Connected to network
Off Not connected to network
Active Flashing Data transfer
Off No data transfer
USB On USB device is connected
and operating
Flashing Error with connected USB
device
Off No USB device is
connected
2. Control Center installation
Before installation, please save any open documents
you may be working on. Then close all running programs.
Insert the included CD-ROM. Usually, the CD starts
automatically. If the menu does not start automatically,
double-click the corresponding CD-ROM drive icon in My
Computer/Computer. The following window opens after
the program starts:
Select the required language.
This installation process is applicable for Windows
2000/XP/Vista.
Click Install to continue with the installation.
Click Show instructions to open the operating
instructions. Adobe Reader is required to display the PDF
fi les. If you have not yet installed Adobe Reader, you will
fi nd a free version on the enclosed driver CD.
Click Download driver to download the latest driver
from the Hama website. This allows you to check
whether drivers have now been developed for previously
unsupported systems. Click Back to return to language
selection.
When you select Install, the InstallShield Wizard is
loaded. This can take a few seconds. Please wait until the
InstallShield Wizard starts. Follow the instructions of the
installation program and end the installation by clicking
Finish. You may have to restart the operating system.
3. Network confi guration
Your network must be confi gured properly in order for the
device to function without problems. We recommend that
you use a static IP address for the MFS as using dynamic
IP addresses can cause a different confi guration to be
assigned the next time the device is used. It is possible
that shortcuts to printers and hard disks will then no
longer work. In general, there are three different
scenarios:
A.) You have an existing network with a DHCP server
This means that the IP addresses on your network are
automatically assigned and that the MFS will also
receive an appropriate confi guration.
Please note that with dynamic IP addresses, the MFS
can be assigned a different confi guration the next
time the device is used. It is possible that shortcuts to
printers and hard disks will then no longer work.
B.) You have an existing network and use static IP
addresses
Please assign a static IP address to the MFS that
works for your network. This is entered under Confi
gure server/TCP/IP and then Static IP address.
12
C.) You do not have a network yet
Assign static IP addresses to your computer and
the MFS.
Page 5
Computers:
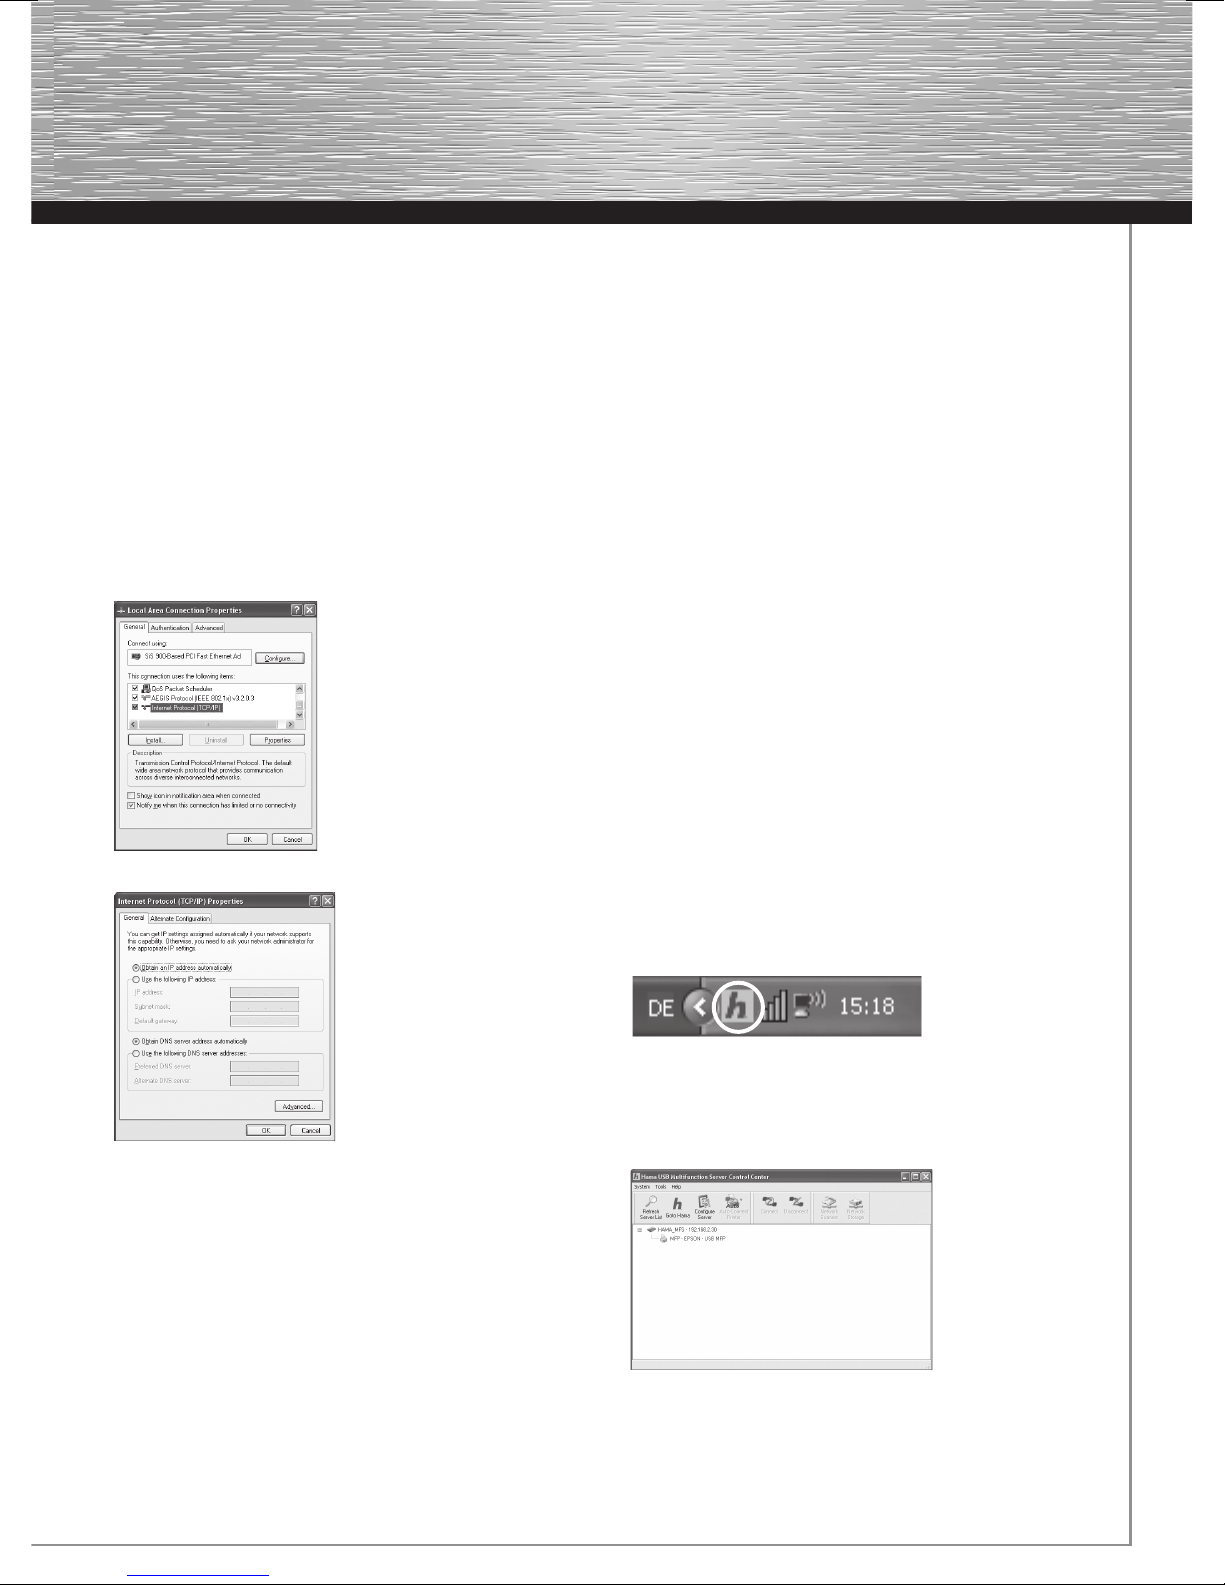
The TCP/IP protocol must be installed on all computers
that are to use the device. Proceed as follows to check
the settings on your PC:
Windows 2000/XP Start -> Settings -> Control Panel ->
Network Connections
Select the connection (network adapter) via which your
PC is connected to the device, e.g. “LAN connection”.
When you right-click the appropriate connection, a
menu is displayed; select Properties. Select the entry
Internet Protocol (TCP/IP) from entry in the list and click
Properties.
Select the connection (network adapter) via which your
PC is connected to the device, e.g. “LAN connection”.
When you right-click the appropriate connection, a menu
is displayed; select Properties. Select the entry Internet
Protocol Version 4 (TCP/IPv4) from the list and click
Properties.
Select Use the following IP address and enter these
addresses:
First PC 192.168.2.101, subnet mask 255.255.255.0
Second PC 192.168.2.102, subnet mask 255.255.255.0,
and so on
Confi rm with OK and Close.
MFS
Please also assign a static IP address to the MFS that
works for your network. This is entered under Confi gure
server/TCP/IP and then Static IP address. An IP address
that would work with the aforementioned addresses
would be 192.168.2.30.
4. Control Center
Open the Control Center from Hama. To do so, click Start
Start -> Programs -> Hama USB Multifunction Server ->
Hama USB Multifunction Server Control Center.
If the program is already running in the background, you
will fi nd it in the task bar at the bottom right of the screen:
Select Use the following IP address and enter these
addresses:
First PC 192.168.2.101, subnet mask 255.255.255.0
Second PC 192.168.2.102, subnet mask 255.255.255.0, and
so on
Confi rm with OK and Close.
Windows Vista
Start -> Network -> Network and Sharing Center ->
Manage network connections
Click the circled icon to open the program from the task
bar. The Control Center starts with the following view:
13
Page 6
First, choose which language you would like to use. In the
upper menu, choose Tools and then Confi guration.
After completion, click OK.
All servers and connected devices are listed in the main
window. If no servers or devices are displayed, click the
button Update server list. If the window still does not
display any devices, check the wiring and network
settings.
4.1 Basic confi guration
Select the MFS in the big window. Then click Confi gure
server. Enter the username and password in the window
that opens.
By default, the following is set for the administrator:
Username: admin
Password: admin
End the confi guration by clicking Close or, if you have
made changes, Apply. The MFS must be restarted after
setting changes. In this case, confi rm the query.
4.1.1 General confi guration
4.1.2 TCP/IP
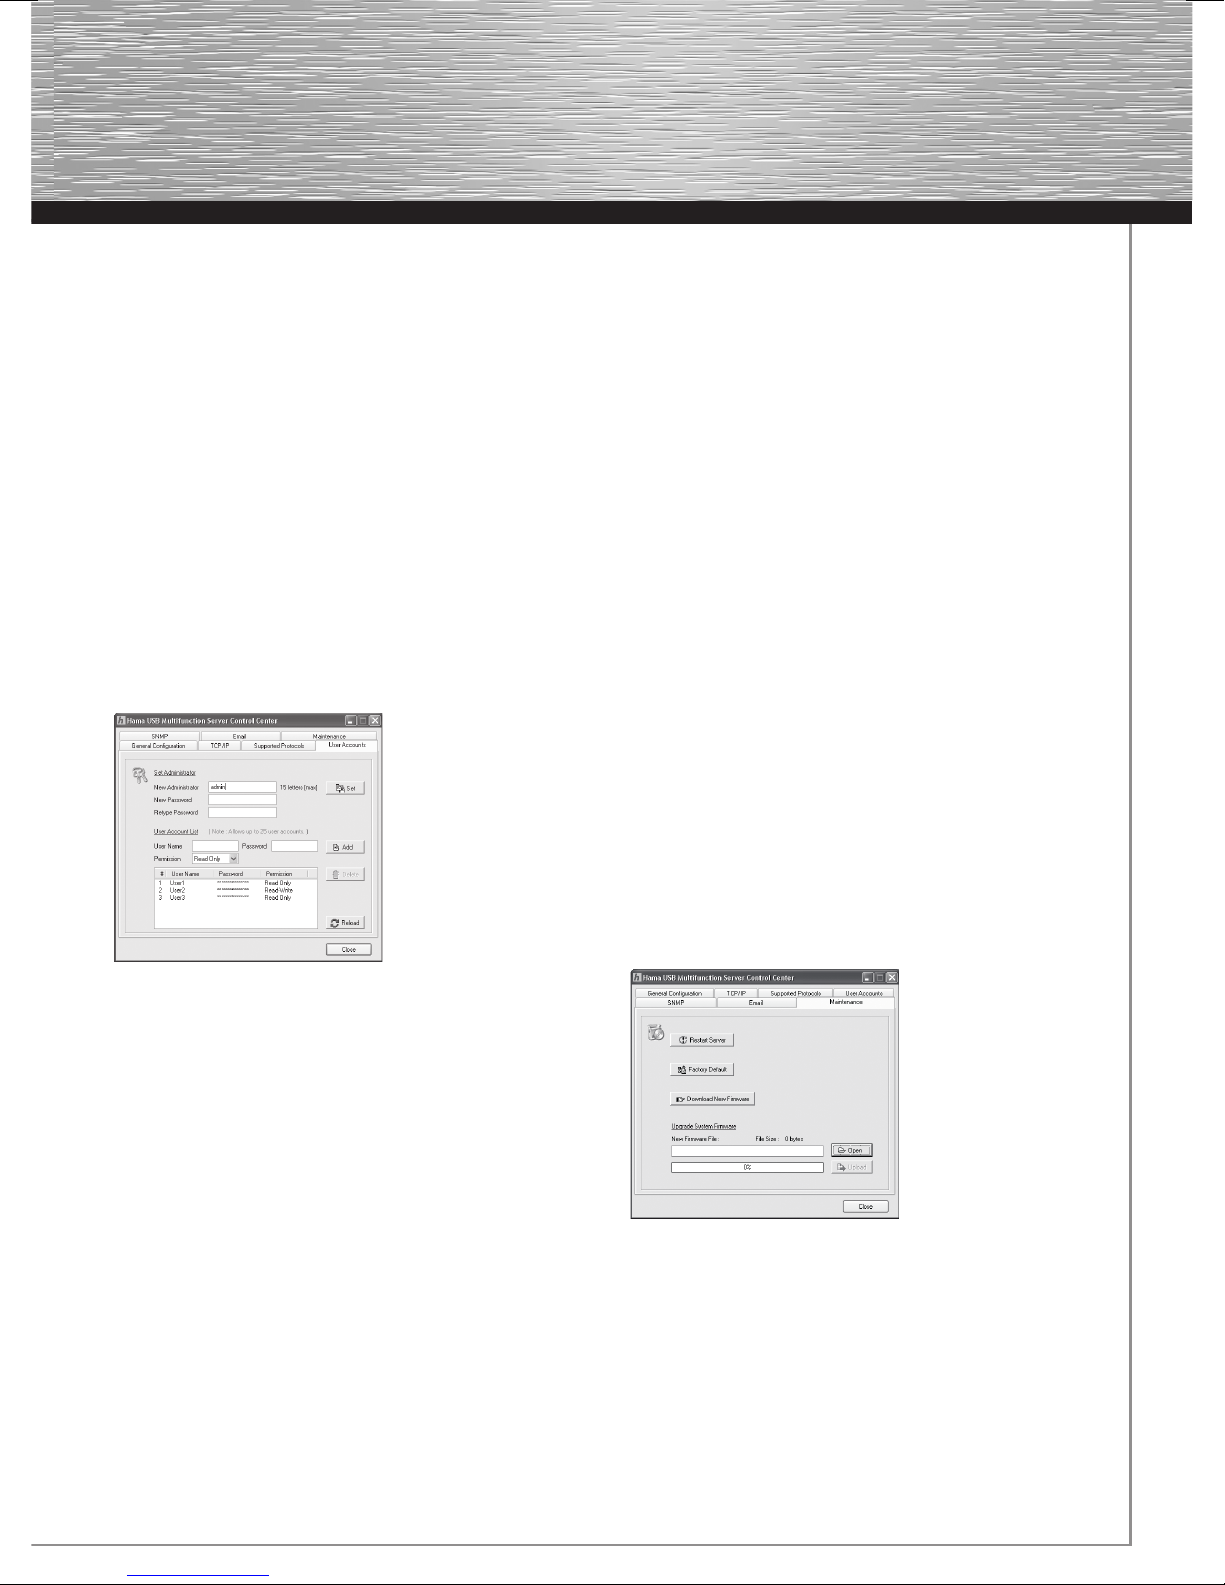
You must now set up your network to be able to use
connected devices.
Obtain IP from DHCP automatically: This option is
selected by default. This means that the USB
Multifunction Server automatically receives an IP
address that works with your network if you are
operating a DHCP server (these are usually integrated in
DSL routers). Please note that with dynamic IP
addresses, the MFS can be assigned a different
confi guration the next time the device is used. It is
possible that shortcuts in the server modes to printers
and hard disks will then no longer work.
Static IP: If you use static IP addresses on your network,
you can confi gure the corresponding network settings
here. For more on this, see item 3 in the operating
instructions.
Switch to the Supported protocols tab.
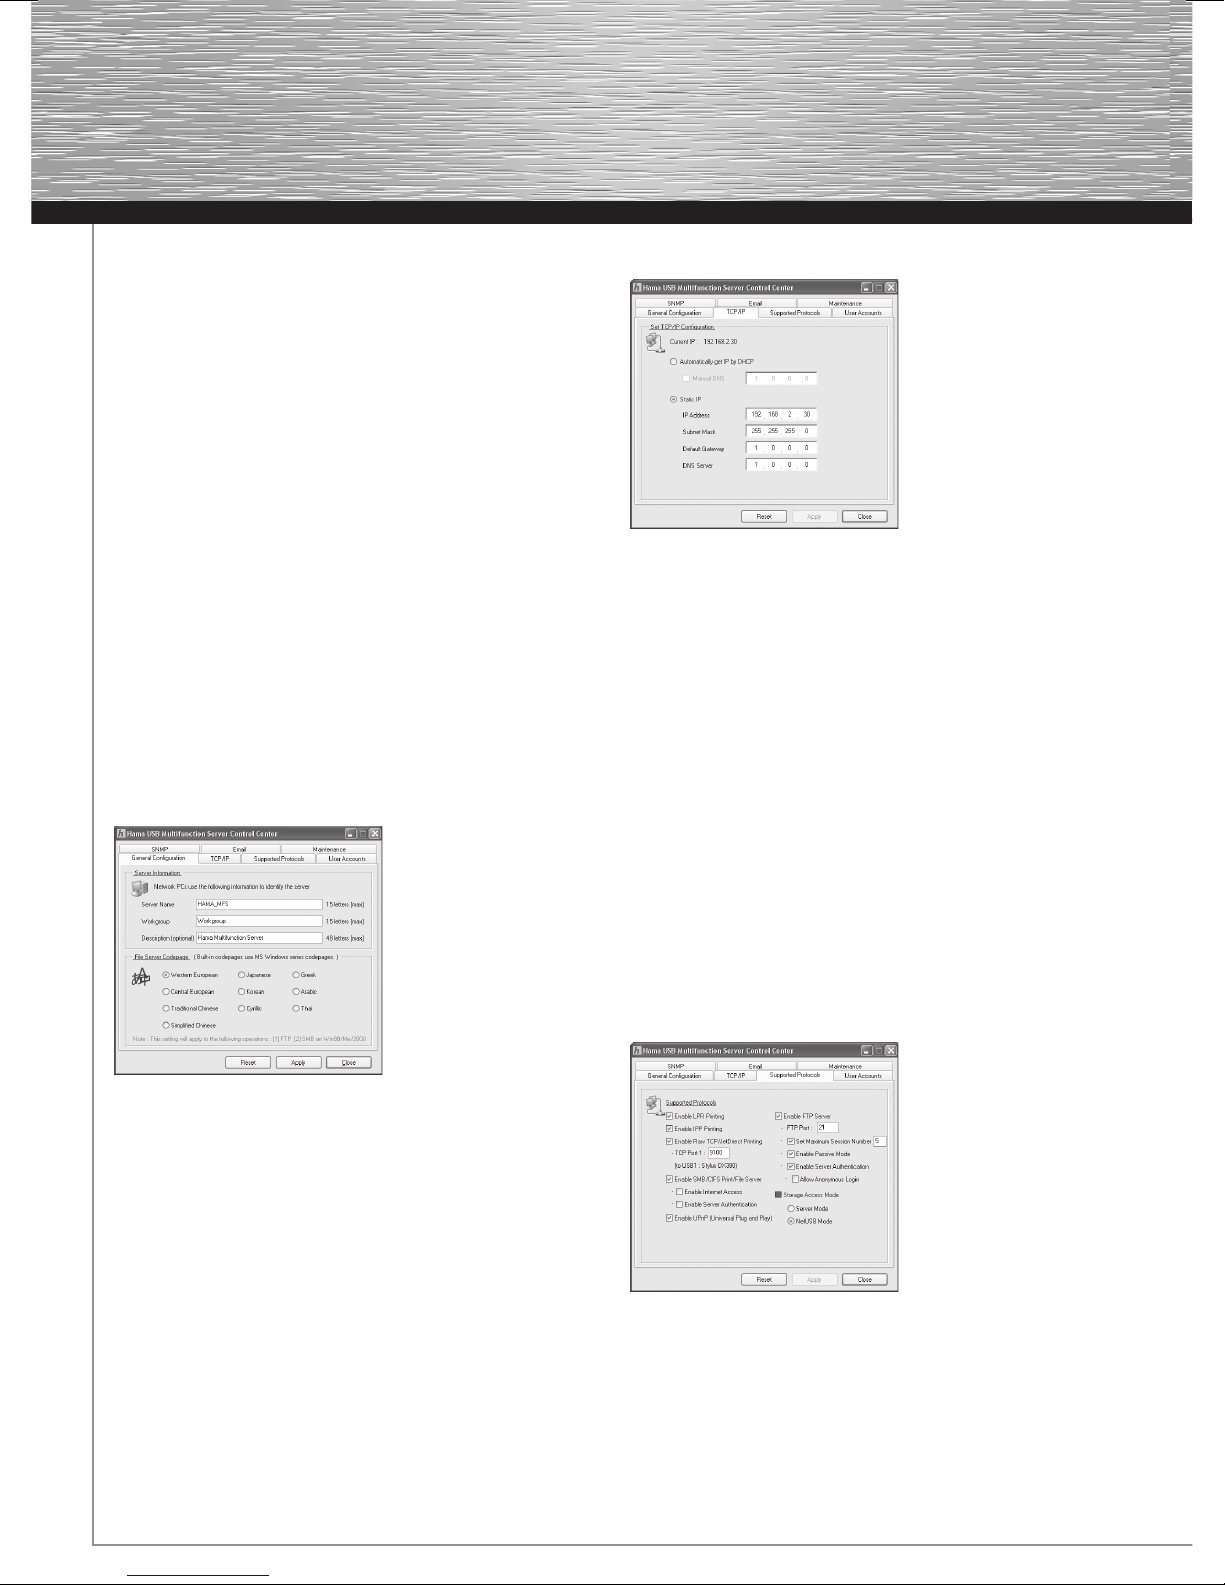
Server name: The server appears with this name in the
overview.
Workgroup: Enter the workgroup name here. Letters,
numbers, spaces and underscores are allowed. If you
don‘t know the workgroup name, go to the desktop.
Right-click My Computer and select Properties from the
menu. The System Properties will now be displayed.
Switch to the Computer Name tab. You can see the
workgroup name here.
Description: The description is optional.
File server codepage: This setting is required for the use
of Microsoft codepages and is matched to regions.
Switch to the TCP/IP tab.
14
4.1.3 Supported protocols
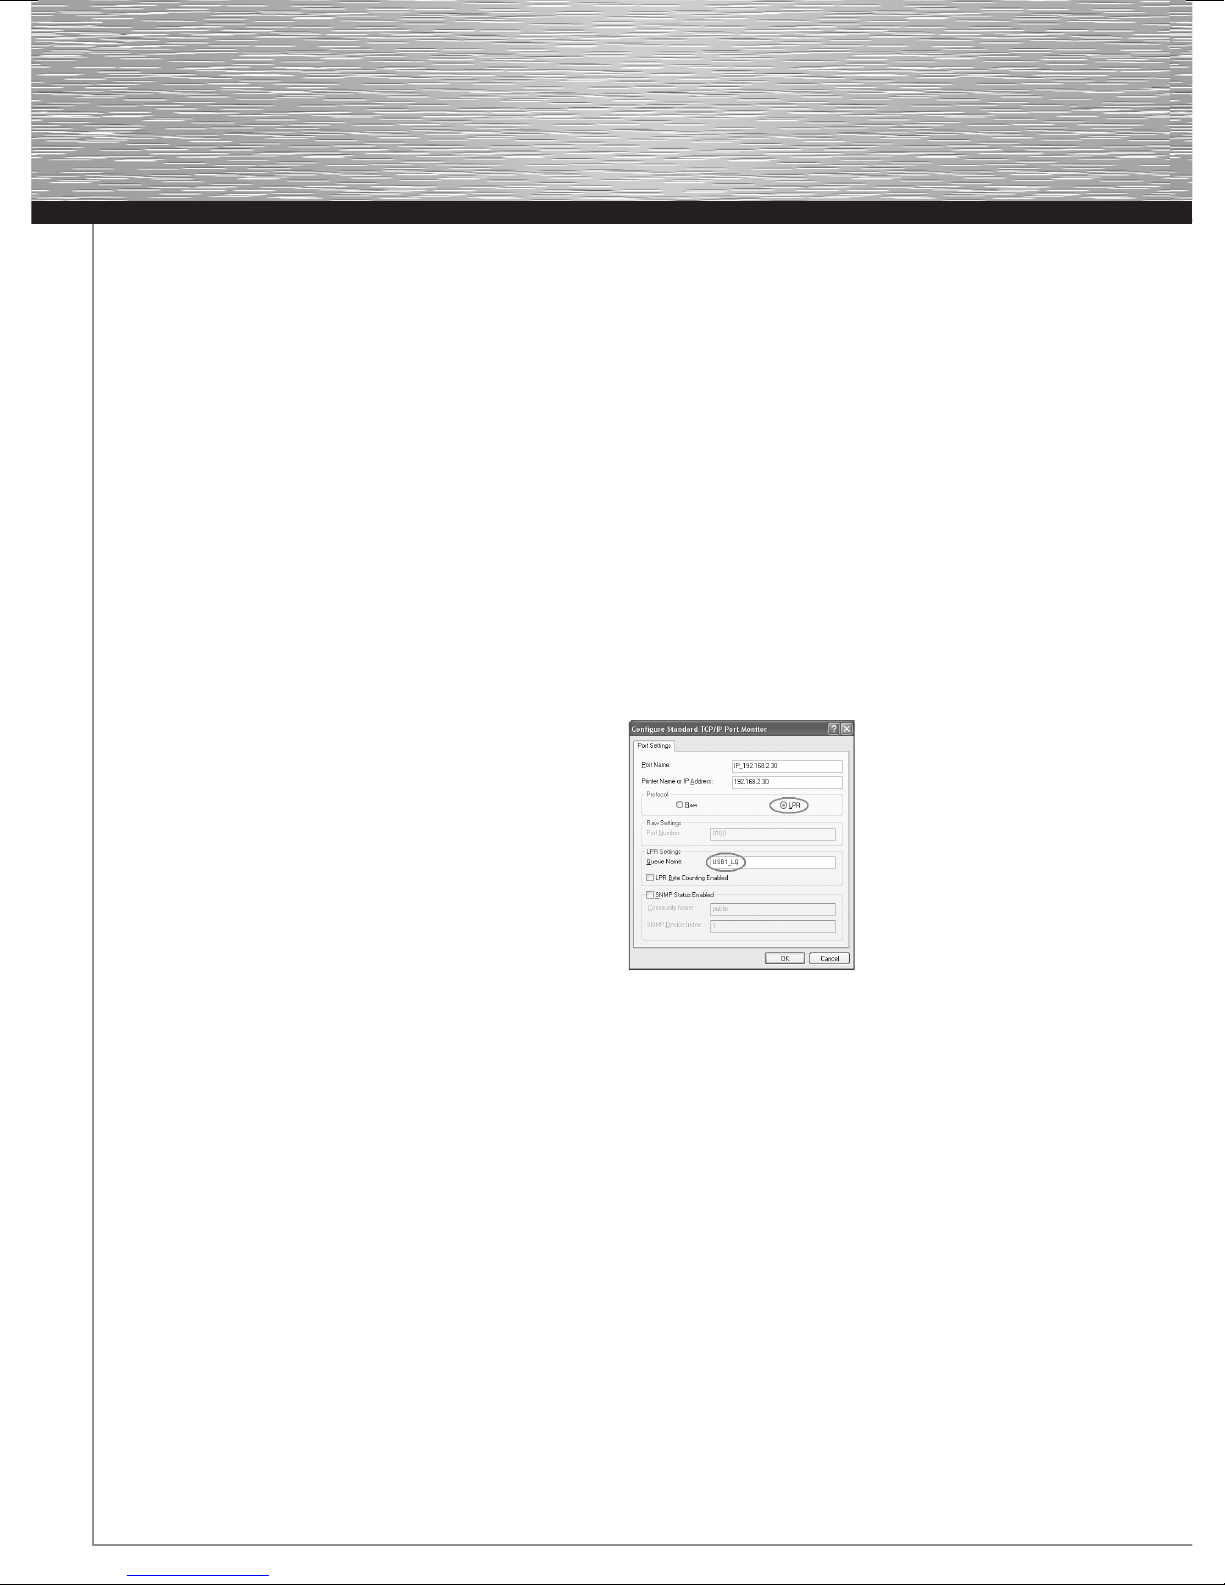
Specify which protocols you want to activate here.
Page 7
LPR/IPP/RAW: Printer protocols, which are required for
use as a printer server.
SMB/FTP: These protocols are required for access to
connected storage media.
If you are unsure, leave the settings as they are.
On this page, you can also specify the mode you want the
device to connect in.
Net USB mode: Connections to the connected USB
device are direct. In other words, while one user is
connected to the device, no other users can access it.
Server mode: In this mode it is possible for multiple users
to access the connected device at the same time, such
as with a connected hard disk.
Switch to the User accounts tab.
4.1.4 User accounts
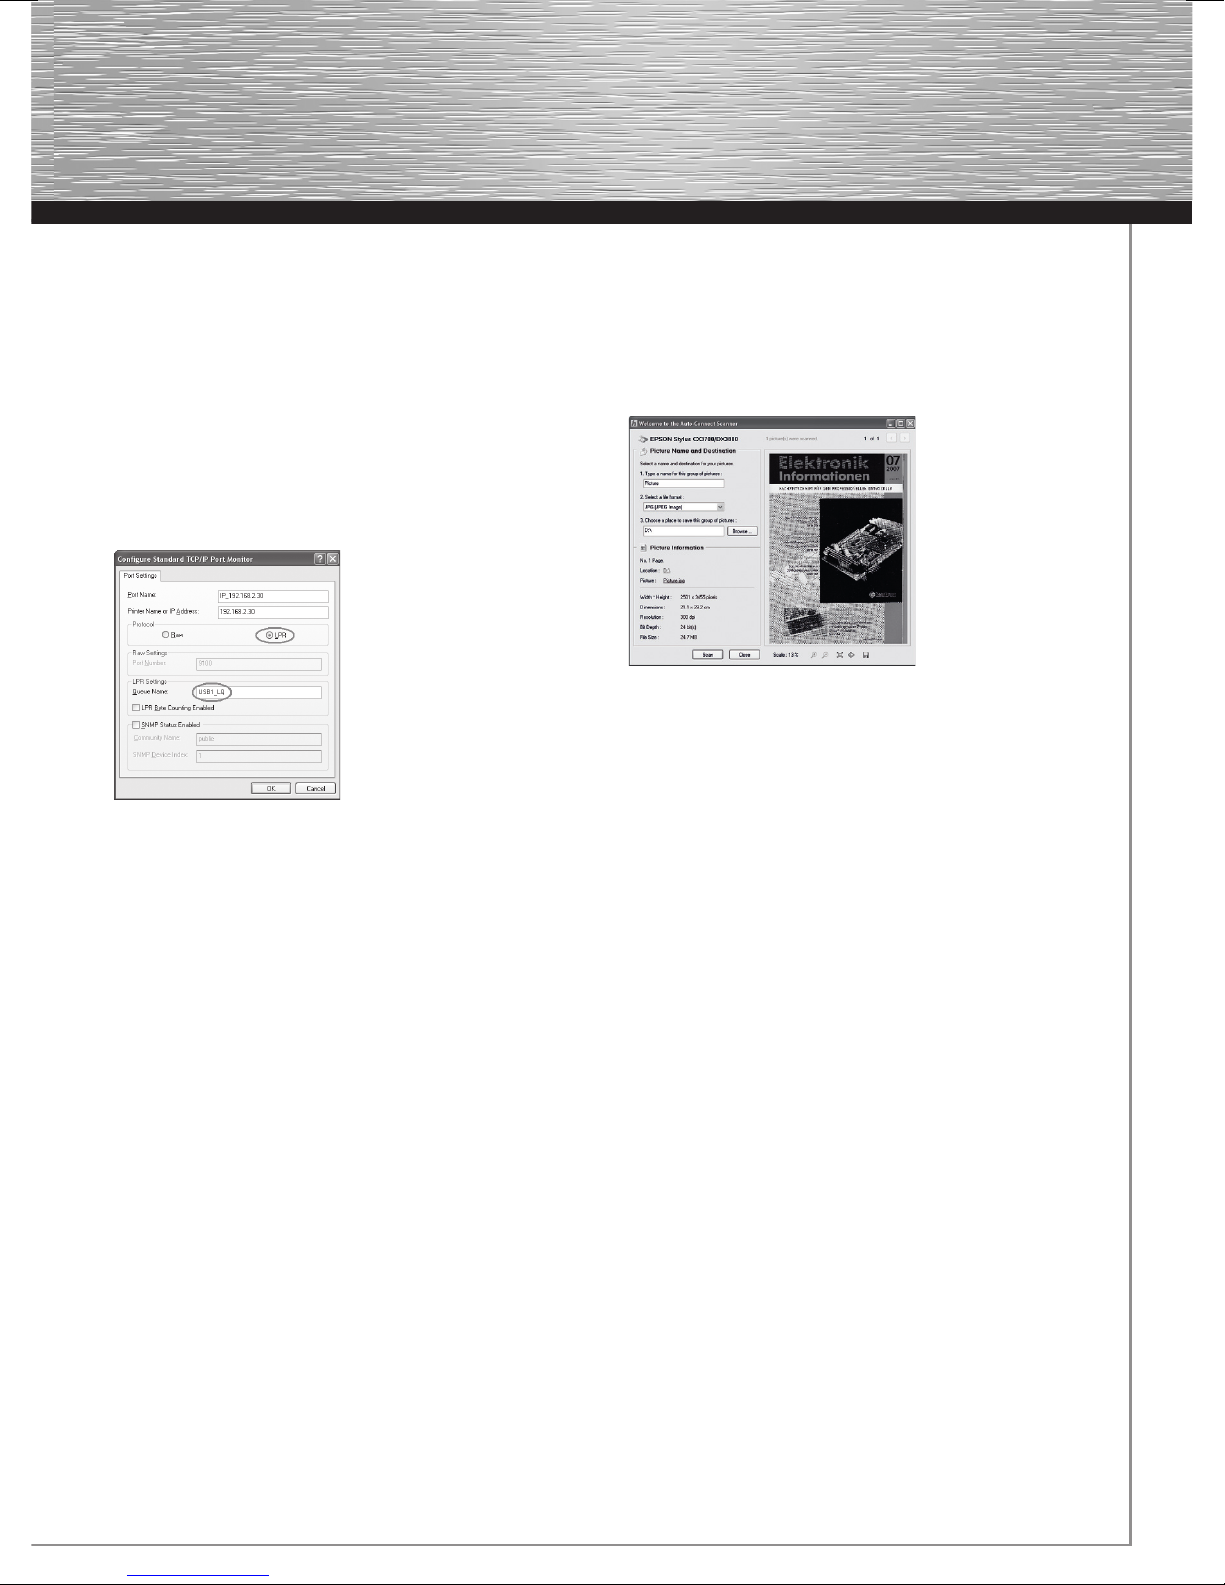
Password: Enter a password of your choosing with
a maximum of 15 characters (letters, numbers, and
punctuation marks are allowed)
Repeat password: Confi rm the password by
repeating it.
After this, click the button Apply. This sets the new
values for the administrator account.
Creating user accounts
You can create up to 25 user accounts. To do so,
proceed as follows:
Fill in the following fi elds under User account list:
Username: Enter a username of your choosing with a
maximum of 15 characters (letters and numbers are
allowed)
Password: Enter a password of your choosing with
a maximum of 15 characters (letters, numbers, and
punctuation marks are allowed)
Permission: This selection decides whether the user
has read only or read and write access.
After this, click the button Add. The user then
appears in the list under the entry fi elds.
You can control access to connected USB storage
via user accounts. Users are prompted for their
username and password when you select the option
Activate server authentication on the Supported
protocols tab.
Administrator account:
The most important account for all settings is the
administrator account. By default, the following is
set for the administrator:
Username: admin
Password: admin
To change the login data for the administrator, fi ll in
the following fi elds under Administrator account:
Username: Enter a username of your choosing with a
maximum of 15 characters (letters and numbers are
allowed)
Switch to the Maintenance tab.
4.1.5 Maintenance
Restart server: Click this button to restart the USB
Multifunction Server.
Default values: To reload the default settings, click this
button. Alternatively, you can press and hold the Init
button (located on the housing). Disconnect the power
supply unit from the power supply and reconnect it after
a few seconds. You can now release the Init button.
Update system fi rmware: Here you can load a fi rmware
update provided by Hama. Please note that loading a new
fi rmware resets your settings.
15
Page 8
4.1.6 E-mail
You can use these settings to be notifi ed of status
messages or errors per e-mail. These settings are not
required for basic operation of the device.
4.1.7 SNMP
SNMP is a protocol for controlling network components
remotely. You can change settings for this protocol on
this page. These settings are not required for basic
operation of the device.
5. Printer server (printer connection)
The integrated printer server allows you to share a USB
printer on the network. A connected printer is
displayed below the USB Multifunction Server, as shown
in the image. If you have already used the printer on your
computer, the drivers are already installed and you can
continue with the next point. Otherwise, fi rst install the
printer driver on each computer that is to use this printer.
Use the instructions and driver CD from the printer
manufacturer. Depending on the manufacturer, you may
need to connect the printer to the computer directly.
After you have completed the installation of the driver,
reconnect the printer to the MFS.
There are two ways of connecting to the printer.
5.2 Network printers wither LPR
To use this function, you must activate the LPR printer
protocol under Confi gure server/Supported protocols.
Windows 2000/XP
Choose Start => Printers and Fax Devices => Add a
printer. Click Next on the initial screen.
On the following screen, select Local printer. Remove the
check for Plug and Play printer. Then click Next.
On the next screen, choose Create a new port and then
Standard TCP/IP Port under Type of port. Then click Next.
This will now open the Add Standard TCP/IP Printer Port
Wizard. Click Next on the initial screen. In the following
window, enter the IP address of the MFS under Printer
Name or IP Address. (To fi nd this, switch to the Control
Center. The IP address (such as 192.168.1.100) is
displayed in the main window after the MFS name.)
Then click Next.
5.1 Direct connection
In this mode, Windows will act the same as it would if
the printer were connected via USB to your computer
directly. The disadvantage is that only one computer can
access the connected device at a time.
Select the printer in the main menu and then click
Connect. The connection to the printer is established and
the driver is linked again. The printer can then be used.
After installation is complete, you can add the printer to
the list of automatic printers. This means that the
connection to the printer must no longer be made
manually. To do this, click Automatic printer in the Control
Center and then Set auto-connect printer. Select the
printer from the list and click Apply.
Please remember to disconnect. As long as you are
connected, no other user can access the printer.
Under Device Type, select Custom and then click
Settings. In the new window, choose LPR. Under LPR
Settings, enter USB1_LQ in the fi eld Queue Name.
Click OK and then Finish to close the wizard.
Installation of the printer port is now complete.
Next, choose the driver (which has already been
installed) for the connected printer. To do this, the
Add Printer Wizard opens once the installation of
the printer port is complete. Follow the instructions
provided by the wizard.
16
Page 9
Windows Vista
Choose Start => Control Panel => Printer => Add a
printer. On the following screen, select Add a local
printer. On the next screen, choose Create a new
port and then Standard TCP/IP Port under Type of
port. Then click Next. In the following window, enter
the IP address of the MFS under Hostname or IP
address. (To fi nd this, switch to the Control Center.
The IP address (such as 192.168.1.100) is displayed in
the main window after the MFS name.)
Then click Next.
Under Device Type, select Custom and then click
Settings. In the new window, choose LPR. Under LPR
Settings, enter USB1_LQ in the fi eld Queue Name.
Click OK and then click Next. Installation of the
printer port is now complete. You must then select
the printer driver. Select the driver (which has
already been installed) for the connected printer
from the list and follow the instructions provided by
the wizard.
Once the installation has been completed
successfully, you will fi nd the printer installed in the
Printers and Faxes window. This installation of the
printer is complete.
6. Network scanners
If you have already used the scanner on your
computer, the driver is already installed and you can
continue with the next point. Otherwise, fi rst install
the scanner driver on each computer that is to use
this scanner. Use the instructions and driver CD
from the scanner manufacturer. Depending on the
manufacturer, you may need to connect the scanner
to the computer directly. After you have completed
the installation of the driver, reconnect the scanner
to the MFS.
Select the scanner or multifunction device in the
Control Center and then click Network scanner.
Select the driver from the list and click OK. If you
are informed that no driver is installed, you must fi rst
install the scanner driver from the manufacturer.
The integrated tool now opens. You can select the
File name, File format and Save location here. After
you have made the selection, click Scan. Depending
on the driver used, the manufacturer’s scanner
tool will open and guide you through the scanning
process. A preview is shown and the fi le is saved to
the specifi ed folder.
7. Addition of USB storage media to the network
This device allows you to make data such as videos,
music, or pictures that are saved to a USB storage
medium available to the entire network.
First, connect the USB data medium to the USB port
on the MFS and turn it on. There are two options for
accessing the data medium.
A) Direct connection: NetUSB mode must be
activated
B) Network access: Server mode must be activated
Please make the appropriate setting under Confi gure
server/Supported protocols.
7.1 Direct connection
In this mode, Windows will act the same as it would
if the hard disk were connected via USB to your
computer directly. The disadvantage is that only
one computer can access the connected device at
a time.
17
Page 10
Select the storage device in the main menu and then
click Connect. Windows now detects a new
hardware component and installs the required
driver. You can then fi nd the storage device as a
drive under My Computer/Computer.
7.2 Network access
Please note that network access requires
communication using various ports and that they
may be blocked by a fi rewall. You must enable these
ports. In addition, some functions are not currently
possible in the Windows Vista operating system.
Example: “\\192.168.1.100\usb_d1p1” where d1
stands for storage medium 1 and p1 for partition 1
If the connected hard disk only has one partition,
you can use that as is.
Formatting the storage medium
Once the storage medium has been connected, it
has to be formatted to the FAT fi le system before it
can be used. Caution: Formatting causes all existing
data on the storage medium to be lost.
Using user accounts
To regulate data access, you can use user accounts
to control who can access which data. Once you
activate server authentication under Settings/
Supported protocols, the connected storage medium
requires users to enter a username and password.
You must create a user account for every person that
should have access. To do so, proceed as described
in point 4.1.4.
7.2.1 Quick access
Select the storage device in the Control Center
and then click Network storage. Open the folder
usb_d1p1, or similar (d1 = storage medium
1 / p1 = partition 1). The contents of the storage
device are now displayed.
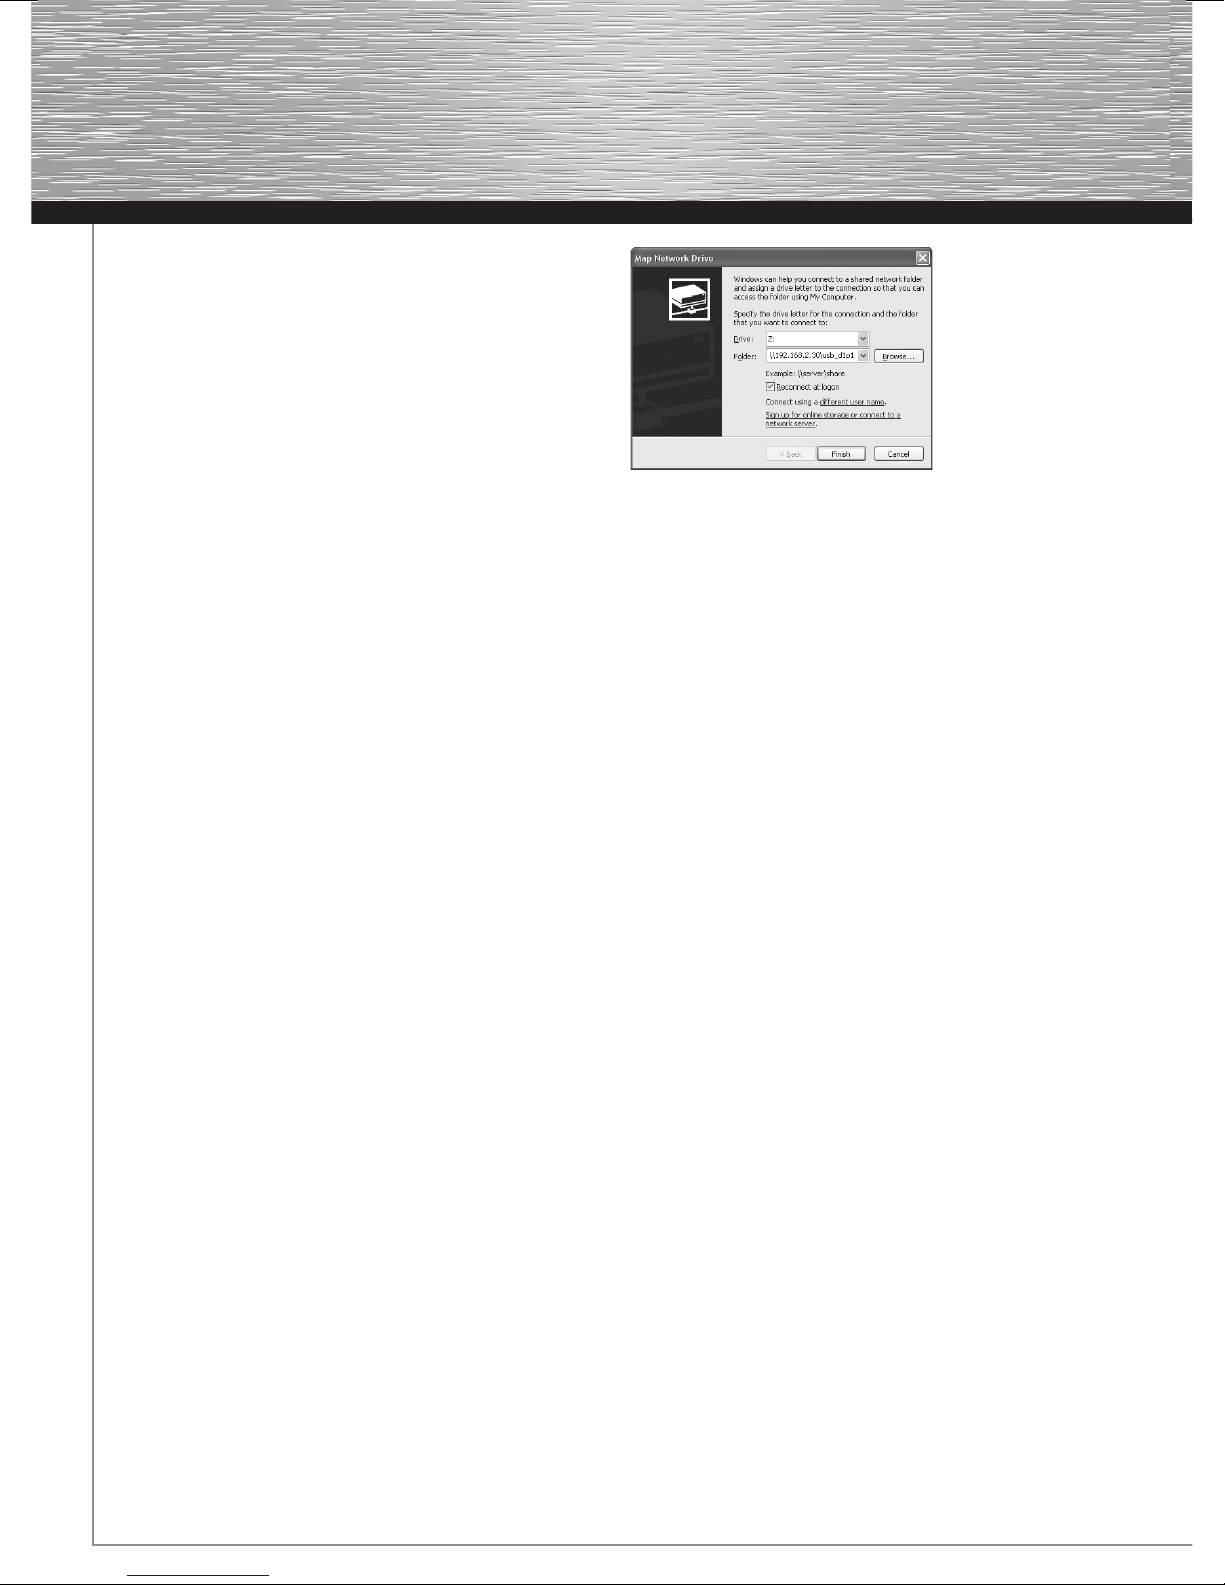
7.2.2 Installation of the SMB share on a PC
You can also choose whether to reconnect the share
after you restart or log on again.
Afterwards, click Finish. You may now be required to
enter a username and password.
If the entry is correct, the selected folder will open
and you can add, copy or delete fi les, depending
on your authorisation.
If you are informed that the folder cannot be found or
that the connection could not be established,
check the specifi ed path, username and password.
Open My Computer/Computer to fi nd the drive again
later. The entry is displayed there under Network
Drives.
7.2.3 FTP folder access
Open the browser and enter the following into the
address bar: “ftp://IP_adresse_of_the_MFS/”.
For example (default): “ftp://192.168.1.100/”
You must now enter your user data in the window
that appears. All existing shares will then be
displayed in the following way:
Folder d1p1 (where d1 stands for storage medium 1
and p1 for partition 1)
Open My Computer/Computer or Windows Explorer
on your PC. From the Tools menu, choose Map
Network Drive.
Drive: Select a drive letter that the network drive
should be mapped to.
Folder: Enter the path to the desired folder,
such as:
“\\IP address of the MFS\name of the folder”
18
You can add, copy or delete fi les, depending on your
authorisation.
If you are informed that the folder cannot be found or
that the connection could not be established, check
the specifi ed path, username and password. In order
to fi nd the folder again later, we recommend you
save it as a favourite in your browser.
Page 11
8. Contact and support information
If the product is defective:
Please contact your dealer or Hama Product
Consulting if you have any product claims.
Internet/World Wide Web
Product support, new drivers or product information
can be found at www.hama.com
Support hotline – Hama product consulting:
Tel. +49 (0) 9091 502 115
Fax +49 (0) 9091 502 272
E-mail: [email protected]
19
 Loading...