

Page 1
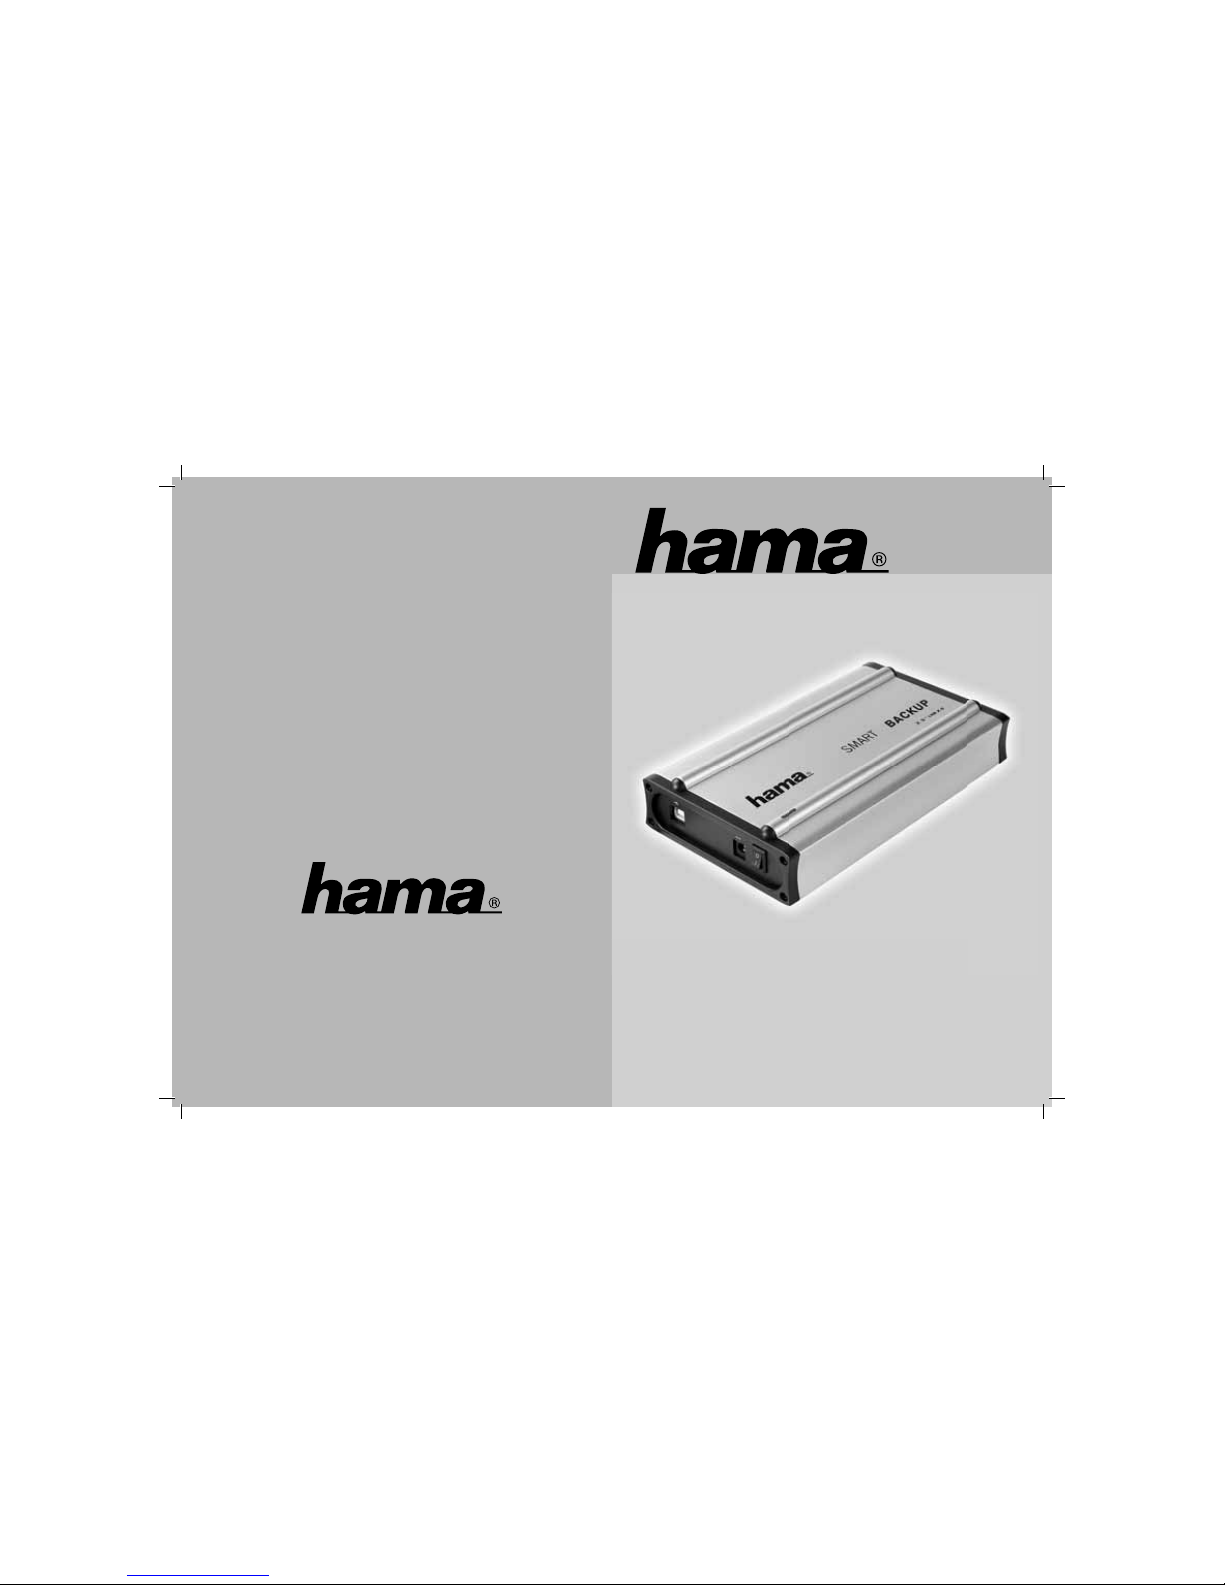
HDD-Enclosure
»Smart Backup«
00062707
Hama GmbH & Co KG
Postfach 80
86651 Monheim/Germany
Tel. +49 (0)9091/502-0
Fax +49 (0)9091/502-274
www.hama.de
00062707-05.06
www.hama.de
Page 2
3
2
l
3
Anleitung Festplattengehäuse, extern 3,5”
Inhalt
1. Verpackungsinhalt
2. Hinweise
3. Festplatteneinbau
4. Treiberinstallation unter Windows 98Se/Me
5. Softwareinstallation
5.1 Windows 98SE/Me
5.2 Windows 2000/XP
6. Sicherung
6.1 Erstellen einer Sicherung
6.2 Wiederherstellen einer Sicherung
7. Sicherheitshinweise
1. Verpackungsinhalt
• 3.5“ Festplattengehäuse
• USB Verbindungskabel
• USB Stromversorgungskabel
• Schutztasche
• Treiber / Software CD
• Installationsanleitung
2. Hinweise
Stecken Sie das Festplattengehäuse an den PC an,
bevor Sie mit der Softwareinstallation beginnen.
Das Festplattengehäuse darf niemals von dem
Computer getrennt werden, solange noch ein Datentransfer stattfi ndet! Ein Datenverlust wäre dann
nicht auszuschließen.
Die Firma Hama GmbH & Co. KG haftet unter keinen
Umständen für den Verlust von Daten, die auf Datenträgern gespeichert wurden!
3. Festplatteneinbau
Im folgenden Abschnitt wird beschrieben, wie eine
Festplatte in das 3.5“ Gehäuse eingesetzt / eingebaut
wird.
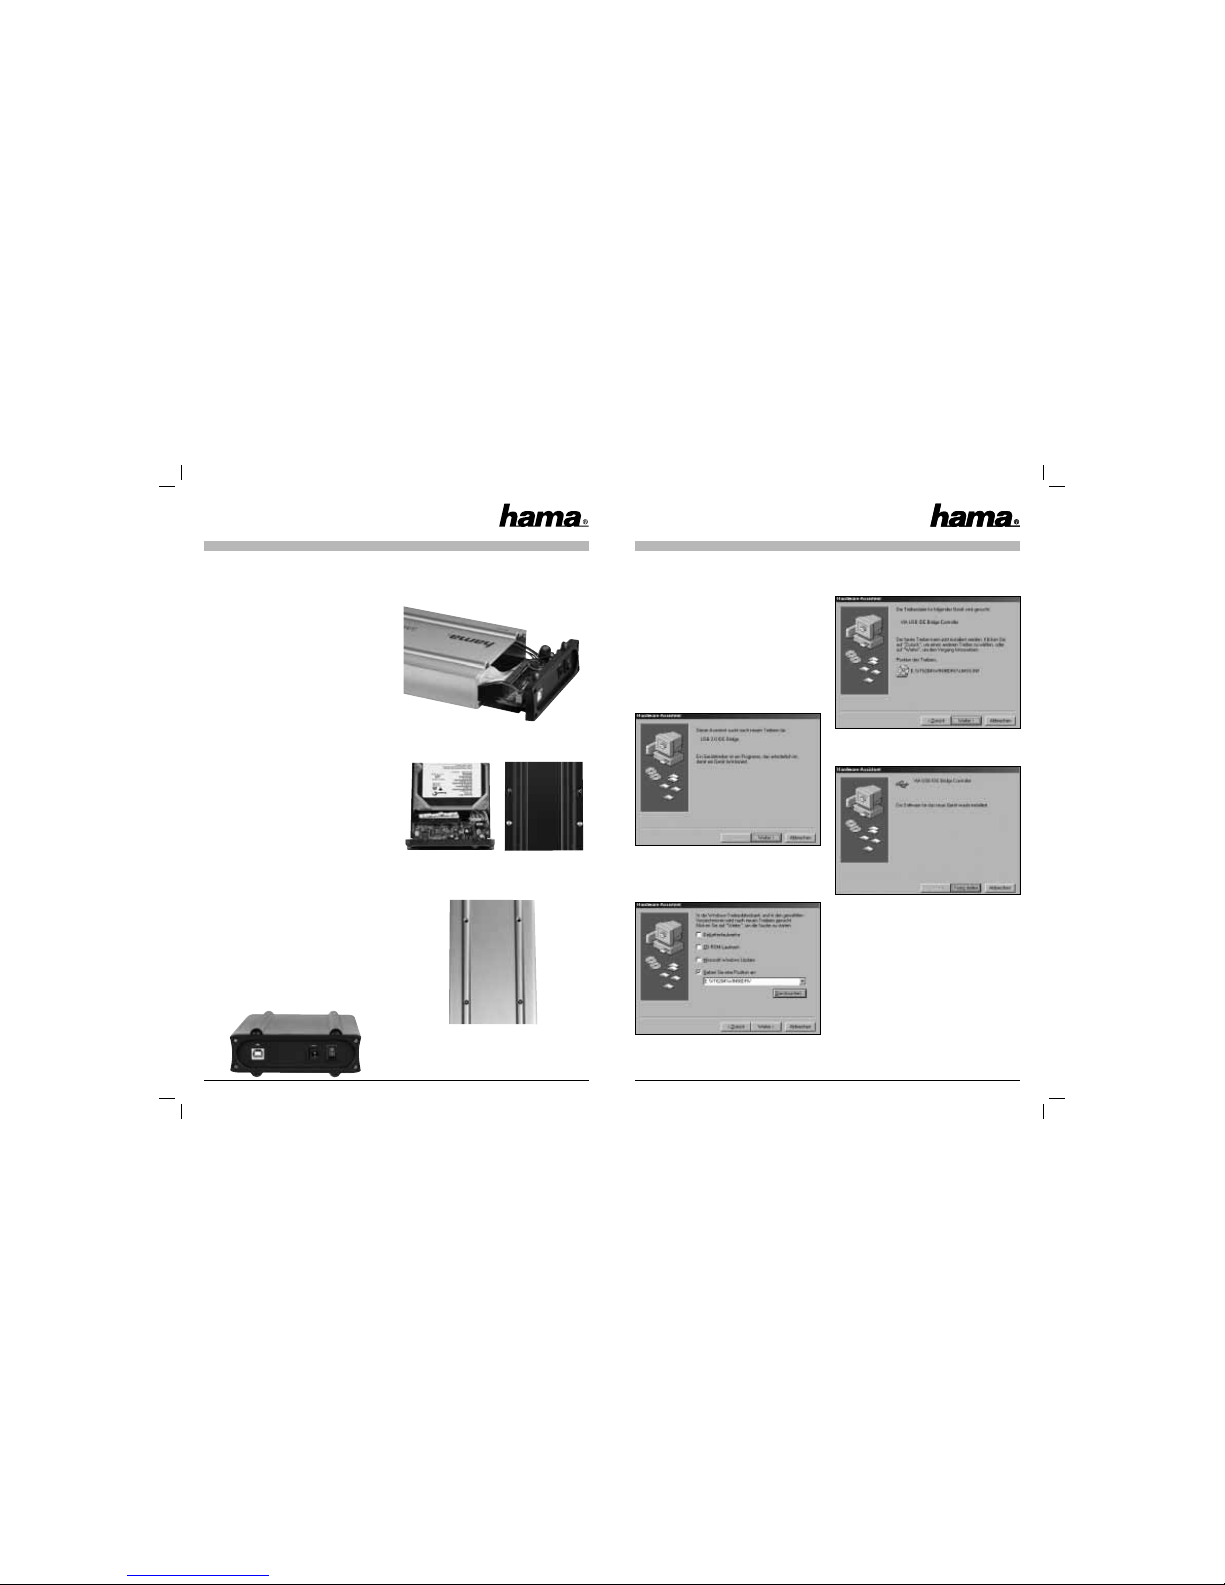
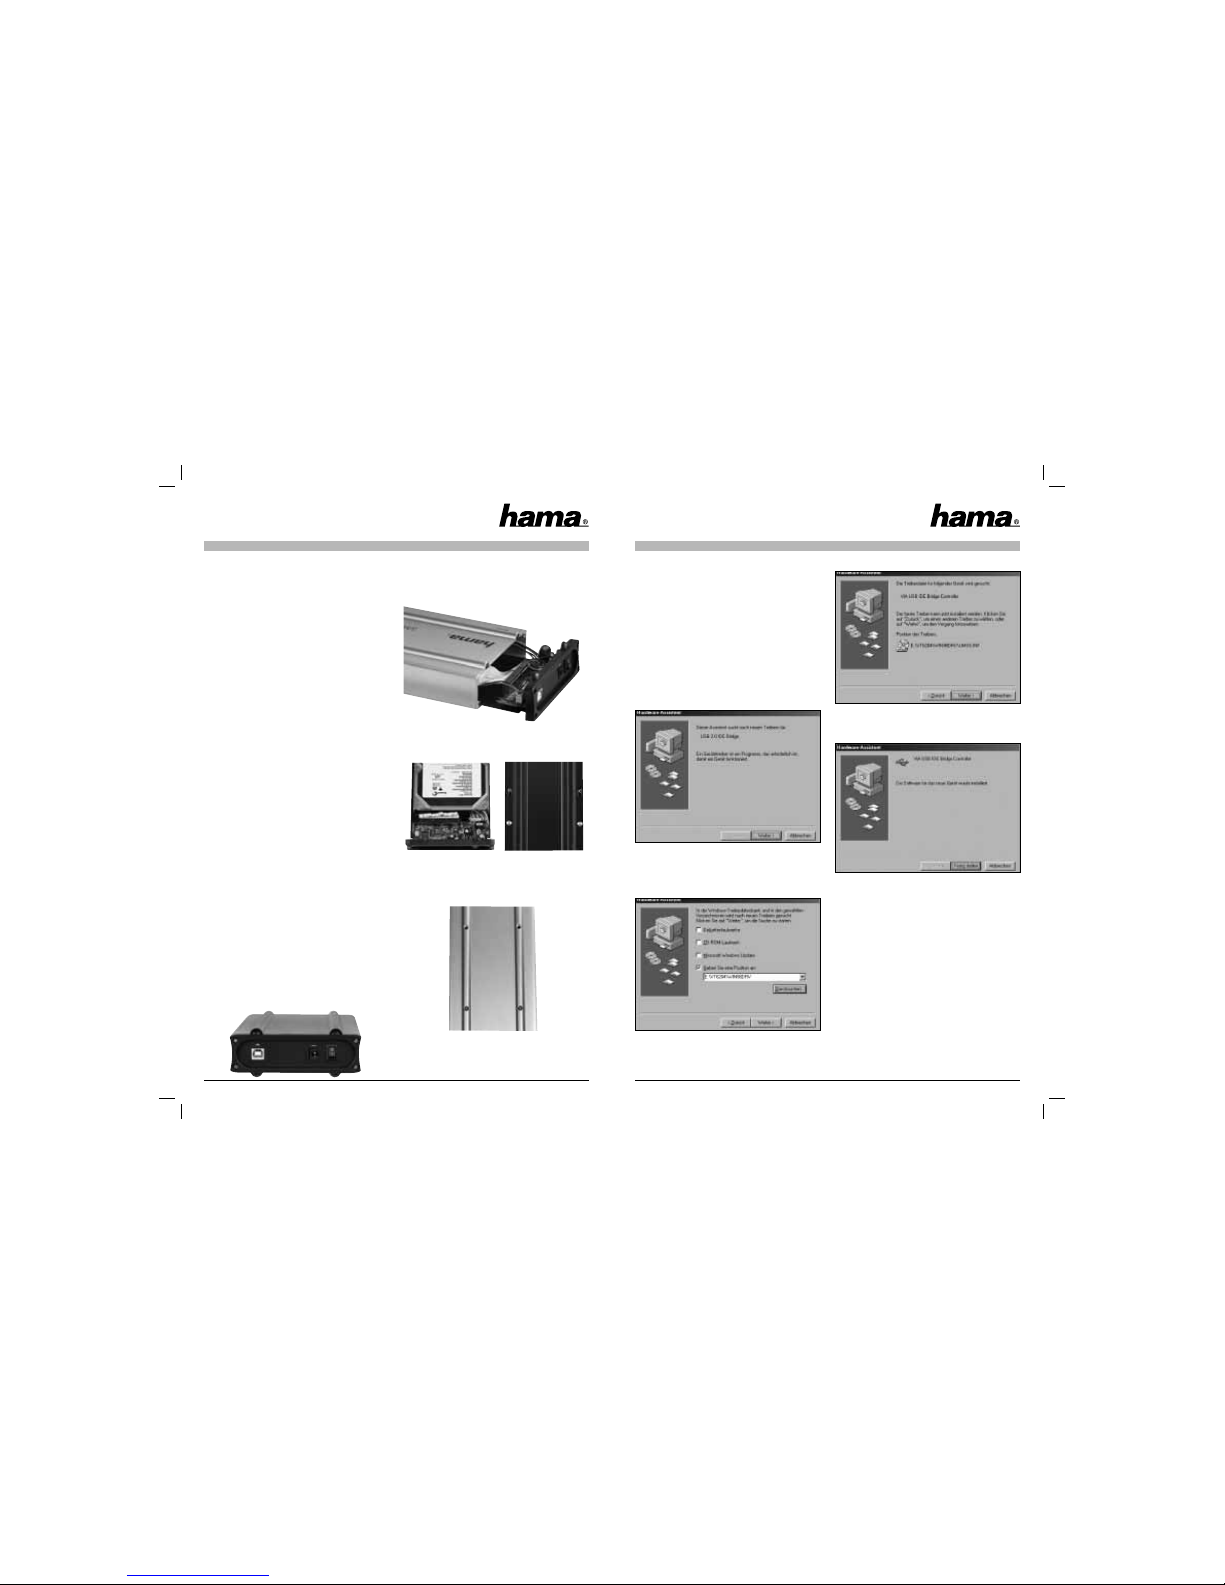
Öffnen Sie die vier Schrauben an der Gehäuserückseite mit einem Kreuzschlitz Schraubenzieher und
nehmen Sie die Gehäuserückseite ab.
Ziehen Sie Platine und den Metalleinschub aus den
Aluminiumgehäuse.
Schließen Sie die Festplatte am Metalleinschub an
und fi xieren Sie die Festplatte mit den beiliegenden
Schrauben wie im obigen Bild gezeigt.
Schieben Sie nun den Metalleinschub und die
Festplatte wieder in das Aluminiumgehäuse und
fi xieren sie den Metalleinschub am
Aluminiumgehäuse wie im Bild beschrieben.
Befestigen Sie danach wieder die Gehäuserückseite
am Aluminiumgehäuse.
4. Treiberinstallation unter Windows
98Se und Me
Stecken Sie das 2.5“ Festplattengehäuse an eine
freie USB- Buchse Ihres PC´s an.
Der Hardwareassistent sucht nach neuen Treibern
für „USB 2.0 ID E Bridge“
Fahren Sie mit „Weiter“ fort.
Wählen Sie „Nach dem besten Treiber für das Gerät
suchen“ und fahren Sie mit „Weiter“ fort.
Wählen Sie nur „Geben Sie eine Po sition an:“ und
klicken Sie auf „Durchsuchen“. Navigieren Sie in
den Unterordner „WIN9 8DRV“ der sich im Ordner
„VT 620 4“ auf der Installations CD befi ndet.
Fahren Sie mit „Weiter“ fort, nachdem obige Meldung erscheint.
Schließen Sie die Treiberinstallation mit einem Klick
auf „Fertig stellen“ ab.
5. Softwareinstallation
5.1 Windows 9 8Se / Me
Legen Sie die beiliegende Installations-CD in das
CD-Rom Laufwerk Ihres PC´s ein.
Öffnen Sie das Verzeichniss „VBTU Copy “ dass
sich im Ordner „VT 620 4“ auf der Installations-CD
befi ndet.
Page 3
4
5
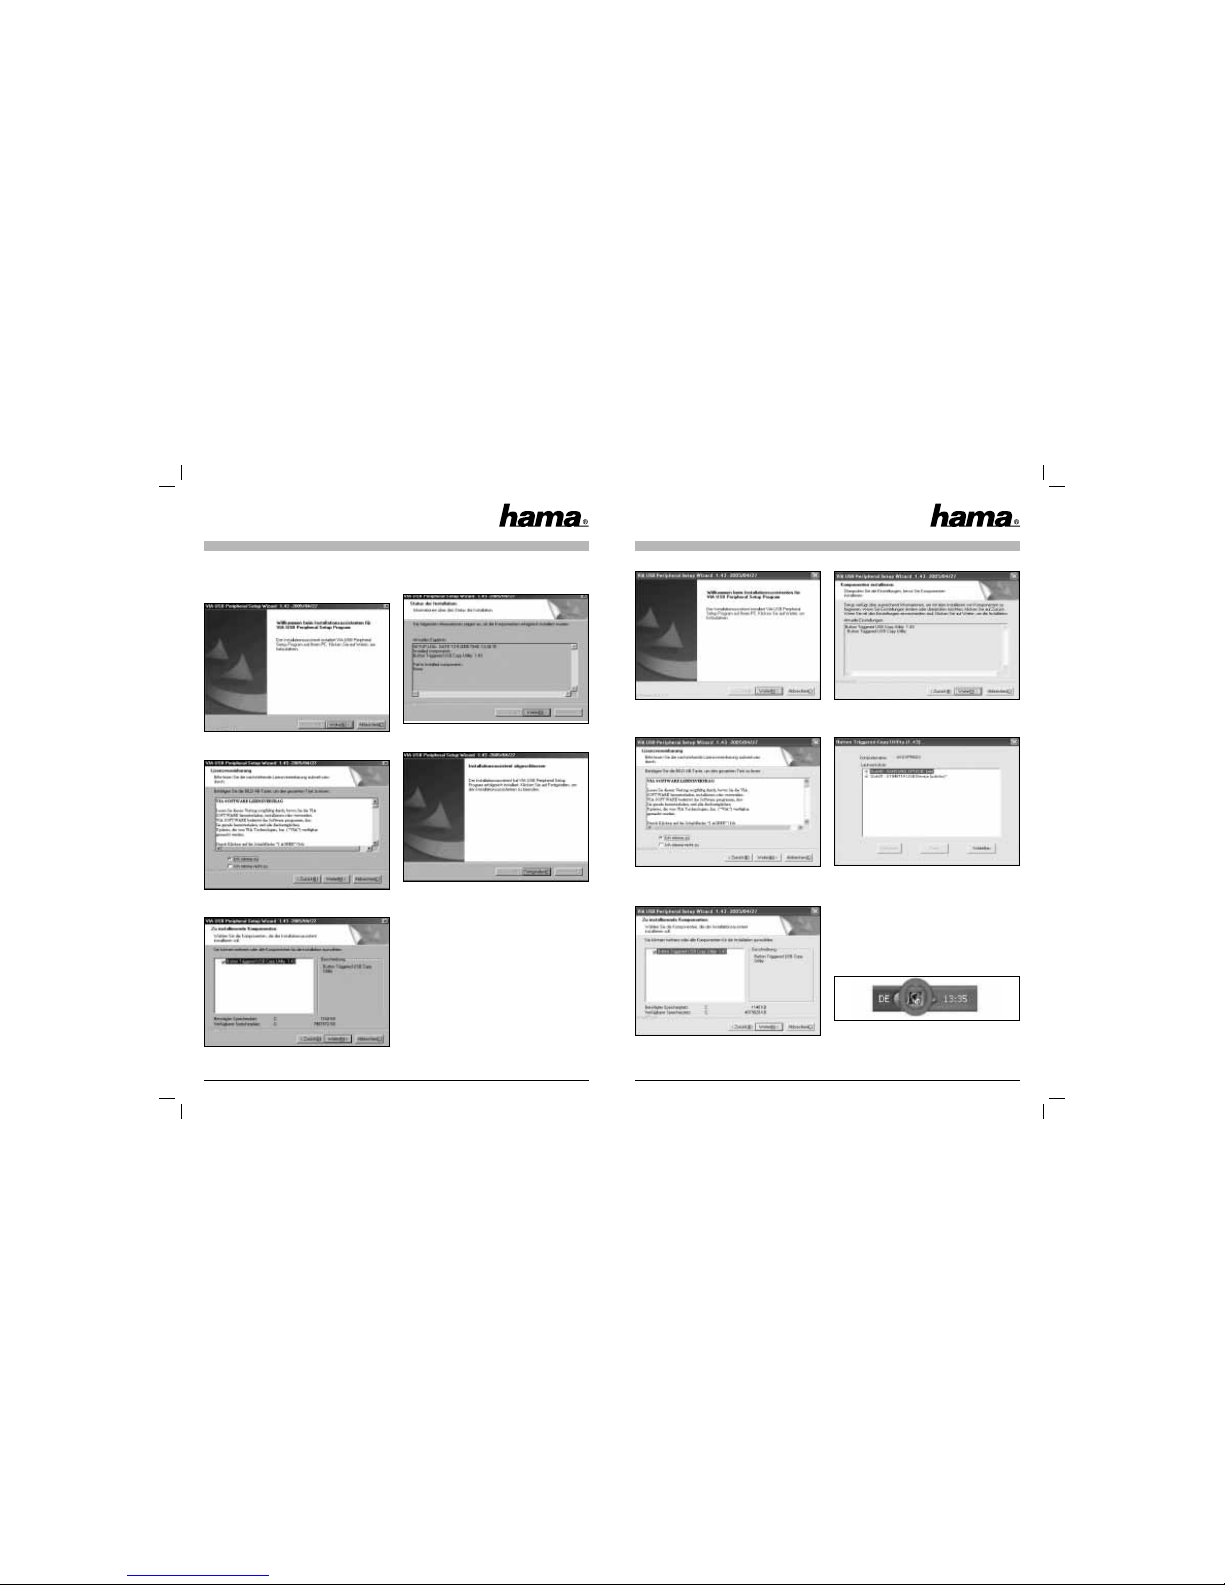
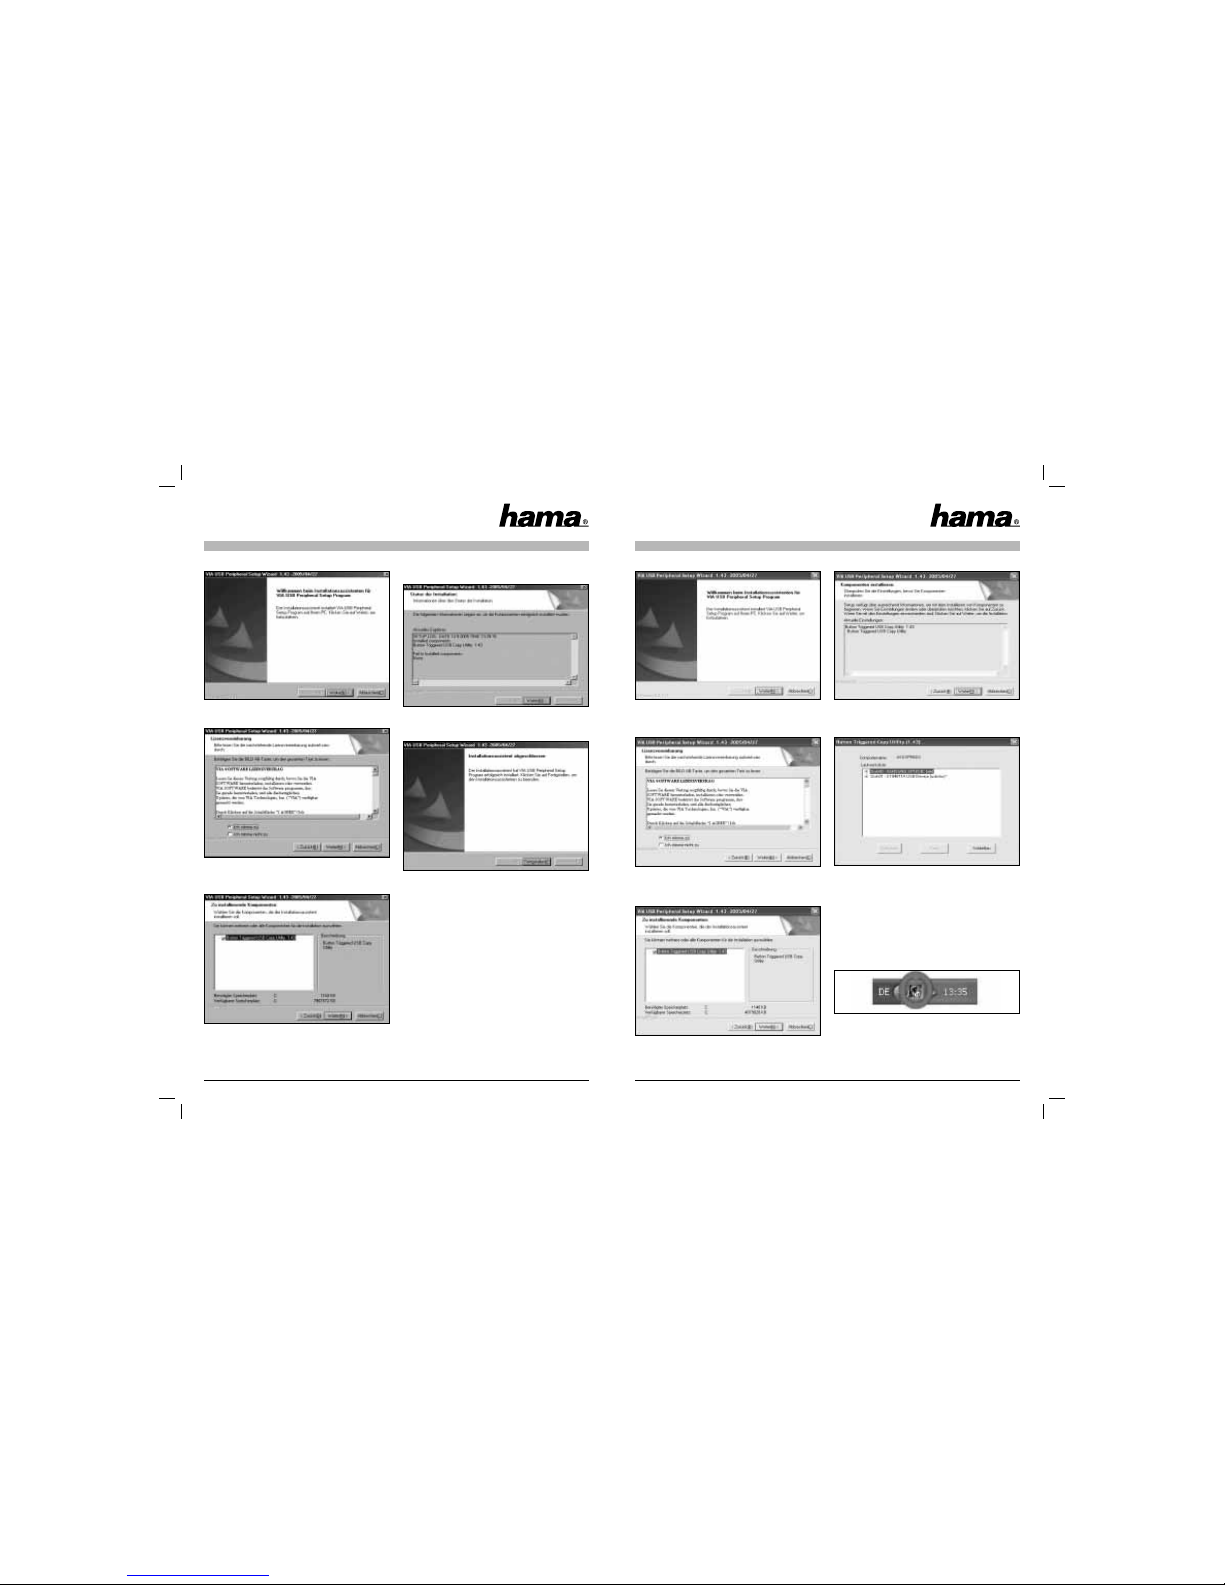
Führen Sie die Datei „Setup.exe“ in diesem Verzeichnis aus. Der Installationsassistent startet nun
automatisch.
Beginnen Sie die Installation mit einem Klick auf
„Weiter“.
Stimmen Sie der Lizenzvereinbarung zu und fahren
Sie mit „Weiter“ fort.
Wählen Sie die zu installierenden Komponenten aus
und klicken Sie auf „Weiter“.
Bestätigen Sie diesen Dialog mit einem Klick auf
„Weiter“.
Bestätigen Sie den Installations Status mit einem
Klick auf „Weiter“.
Beenden Sie den Installationsassistenten mit einem
Klick auf „Fertigstellen“.
5.2 Wind ows 2000 /XP
Legen Sie die beiliegende Installations-CD in das
CD-Rom Laufwerk Ihres PC´s ein.
Öffnen Sie das Verzeichniss „VBTU Copy “ dass
sich im Ordner „VT 620 4“ auf der Installations-CD
befi ndet.
Führen Sie die Datei „Setup.exe“ in diesem Verzeichnis aus.
Der Installationsassistent startet nun automatisch.
Mit einem Klick auf „Weiter“ beginnen Sie mit der
Installation.
Stimmen Sie dem Lizenzvertrag zu und fahren Sie mit
„Weiter“ fort.
Wählen Sie die zu installierenden Komponenten aus
und klicken Sie auf „Weiter“.
Bestätigen Sie diesen Dialog mit einem Klick auf
„Weiter“.
Sobald obiges Menü erscheint, ist der Installtionsvorgang korrekt abgeschlossen. Beenden Sie den
Installtionsassistenten mit einem Klick auf „Schlie-
ßen“.
6. Sicherung
6.1 Erstel len einer Sicherung
Öffnen Sie das Sicherungstool, dass sich im System
Tray am rechten unteren Bildschirmrand befi ndet mit
einem Doppelklick.
Page 4
6
7
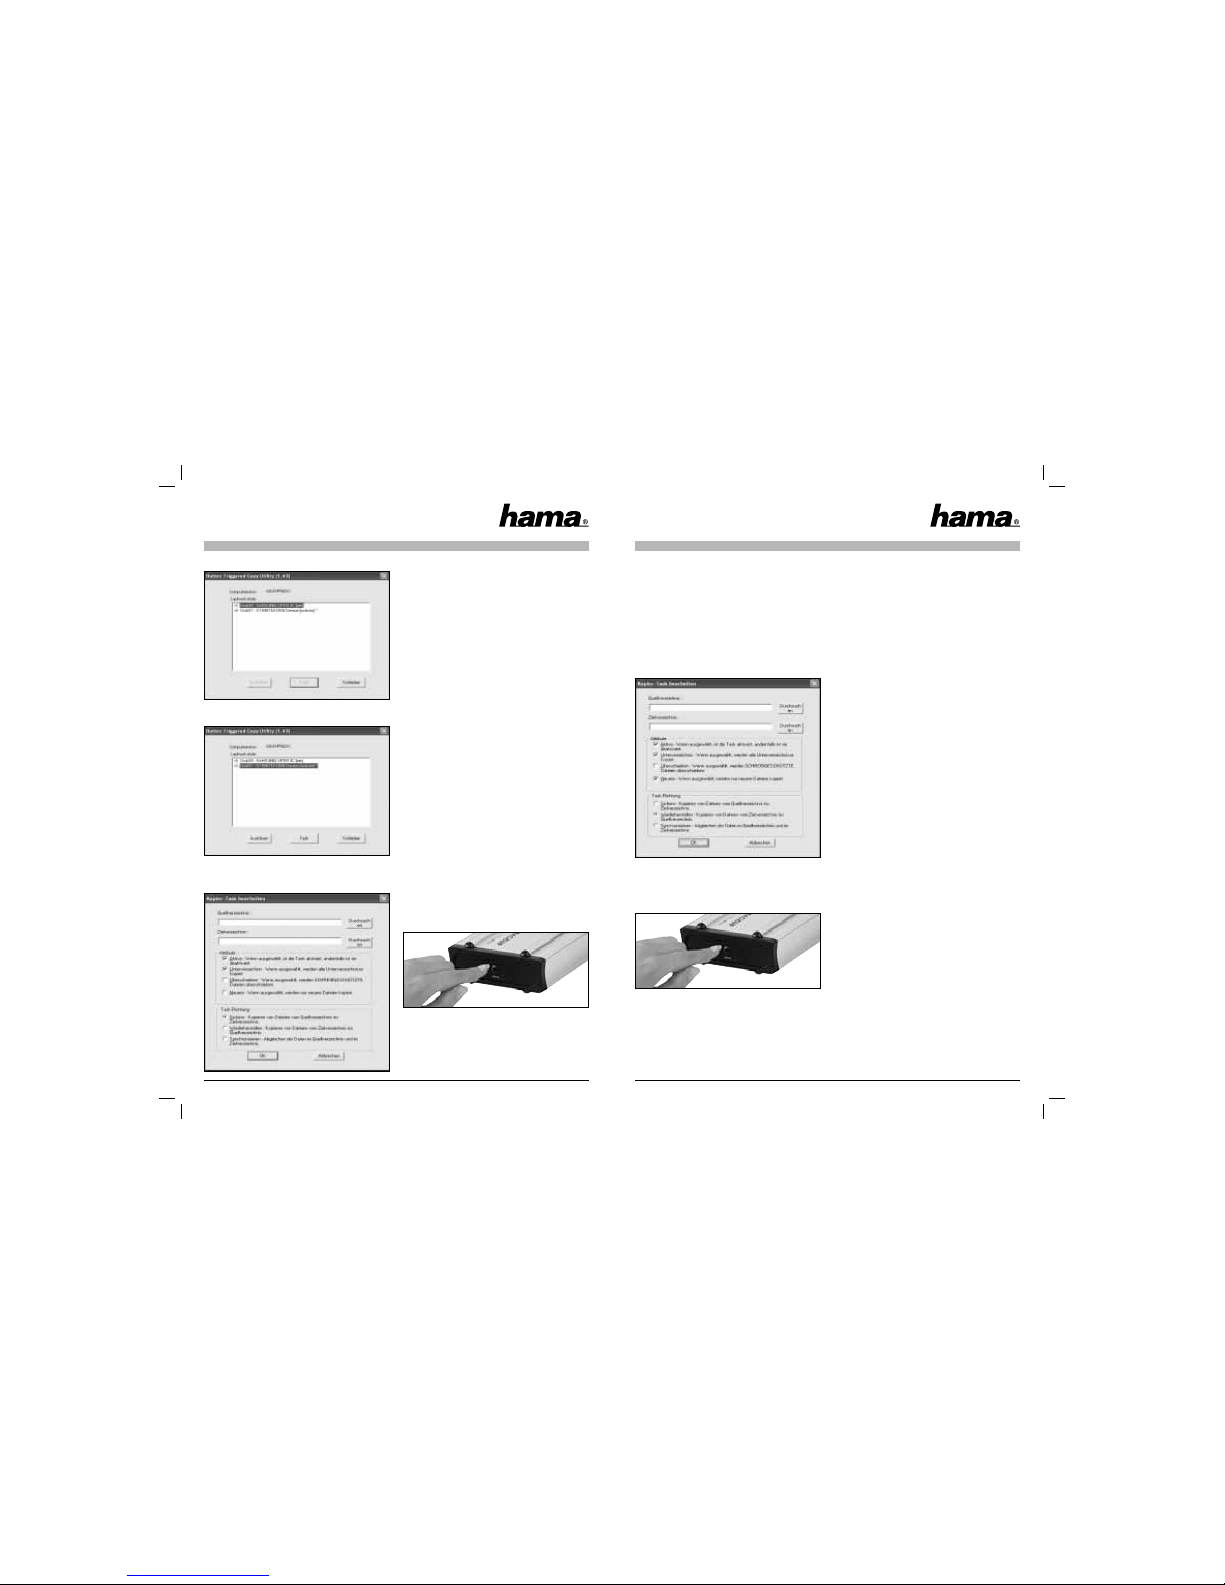
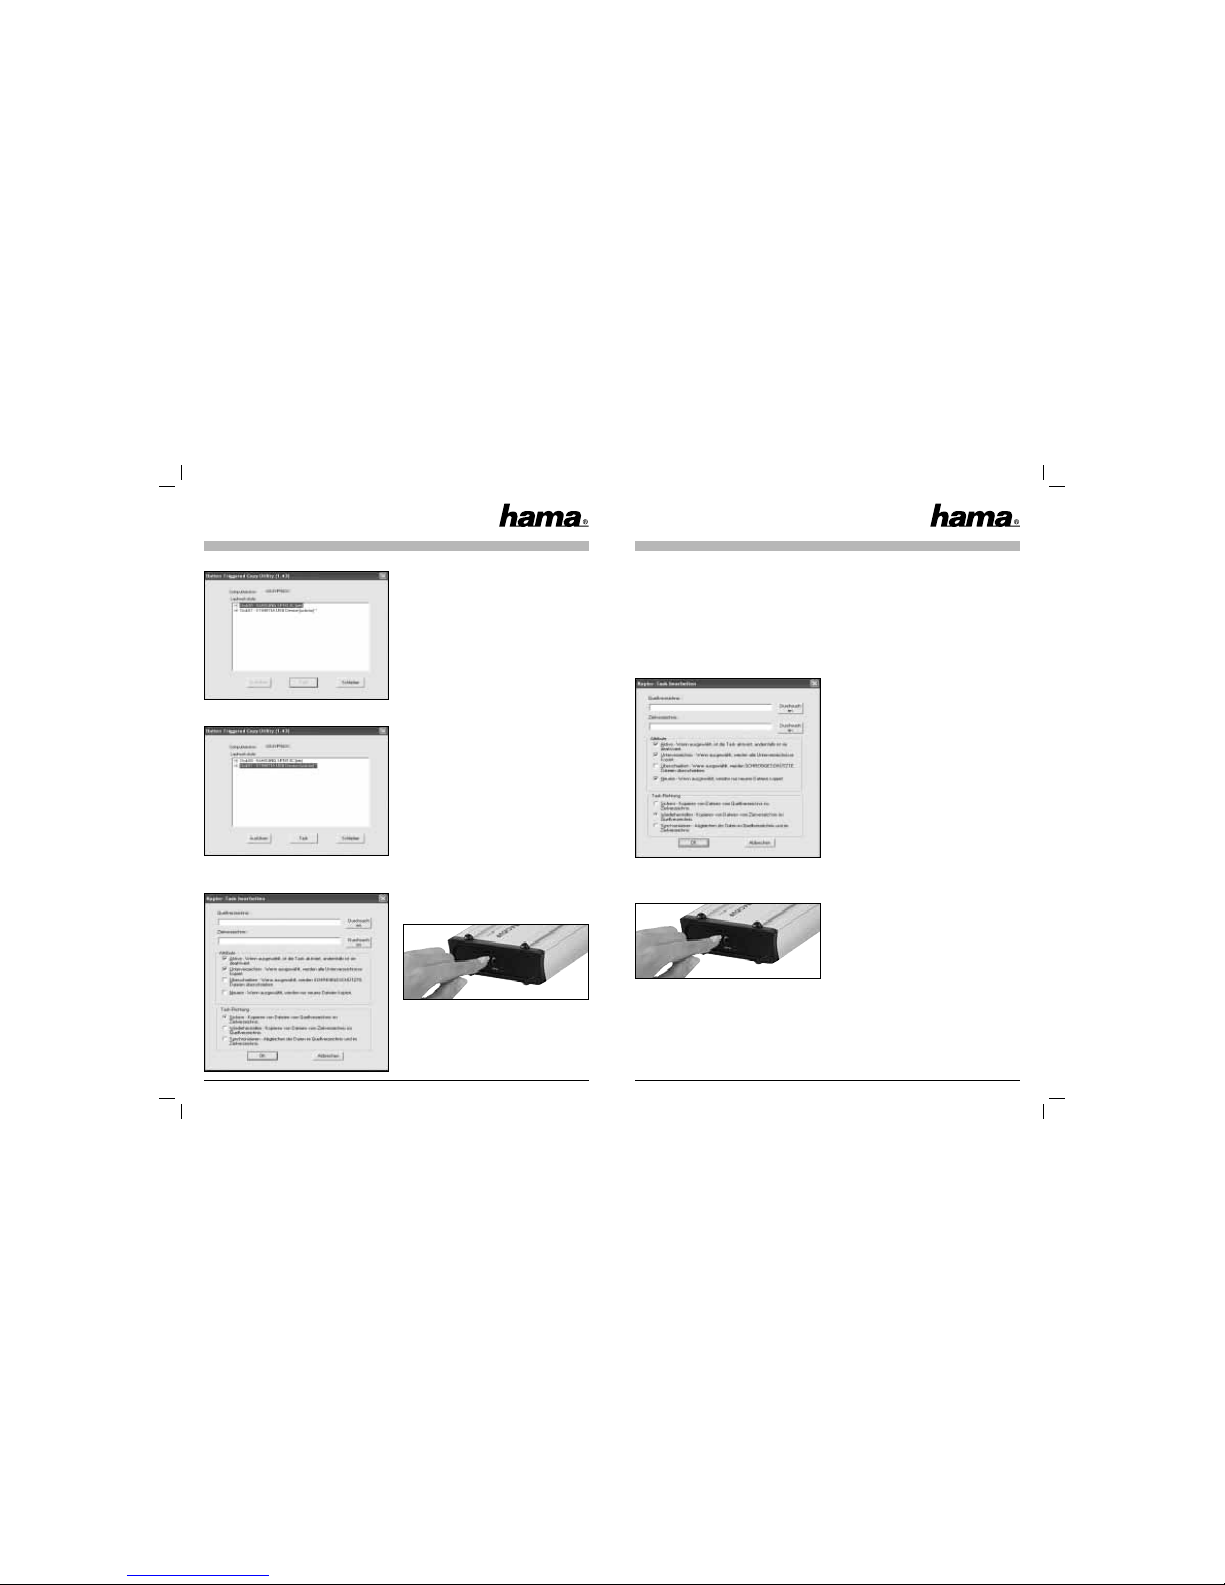
Das Sicherungsprogramm öffnet sich.
Wählen Sie nun die USB-Festplatte aus und klicken
Sie nun auf „Task “.
Nun öffnet sich das Sicherungsmenü, indem Sie
verschiedene Einstellungen vornehmen können.
• Quellverzeichniss: Geben Sie hier den Ordner
bzw. Festplatte an, die Sie sichern wollen
• Zielverzeichniss: Wählen Sie hier die USB Festplatte und ggf. einen Unterordner aus, auf
welche/welchen die Daten gesichert werden
sollen.
Folgende At tribute könn en für die Datensich erung
gesetz t werden:
• Aktiv: Dieser Haken muss gesetzt sein, damit
dieser Sicherungstask bei Knopfdruck ausgeführt
wird.
• Unterverzeichnis: Dieser Haken muss gesetzt
sein, damit auch alle sich im Quellordner
befi ndlichen Unterordner mitgesichert werden.
• Überschreiben: Wenn dieses Attribut gesetzt ist,
werden alle Dateien im Zielordner, die
schreibgeschützt sind, überschrieben.
• Neuere: Falls dieses Attribut gesetzt ist, werden
nur Dateien kopiert, die sich seit der letzten
Sicherung geändert haben oder hinzugefügt
worden sind.
Bestätigen Sie Ihre Angaben mit einem Klick auf
„OK“.
Nachdem der Sicherungstask angelegt ist, kann
die Datensicherung durch einem Klick auf den
Sicherungsknopf an der Gehäuserückseite gestartet
werden.
6.2 Wiederherstellen einer Sicherung
Um eine Datensicherung von der Festplatte wiederherzustellen gibt es zwei Möglichkeiten:
Möglichkeit 1:
Öffen Sie den Sicherungstask in der Software und
wählen Sie unter Task-Richtung: „Wiederhe rstel-
len“ und bestätigen Sie Ihre Änderung mit einem
Klick auf „OK“.
Nachdem der Sicherungstask geändert ist, kann die
Rücksicherung durch einem Klick auf den Sicherungsknopf an der Gehäuserückseite gestartet
werden.
Alternativ können Sie auch über den Windows
Explorer auf die Gesicherten Daten zugreifen (Mög-
lichkeit 2).
7. Sicherheitshinweise:
• Betreiben Sie dieses Gerät weder in feuchter
noch staubiger Umgebung.
• Betreiben Sie dieses Gerät nicht auf Heizkörpern
oder in der nähe von Wärmequellen
• Dieses Gerät ist nur für den Inneneinsatz bestimmt
• Schützen Sie das Gerät während des Betriebes
vor Druck- und Stoßeinwirkungen
• Gerat nicht während des Betriebes öffnen und
bewegen
Page 5
8
9
Contents:
1. Package contents
2. Notes
3. Installing the hard drive
4. Driver Installation on Windows 98SE/ME
5. Installing the Software
5.1 Windows 98SE/ME
5.2 Windows 2000/XP
6. Backup
6.1 Creating a backup
6.2 Restoring a backup
7. Safety instructions
1. Package contents
• 3.5” hard drive casing
• USB connecting cable
• USB power supply cable
• Protective case
• Driver / software CD
• Installation instructions
2. Notes
Connect the hard drive housing to the PC before you
begin installing the software.
The hard drive housing may never be disconnected
from the computer while data is being transferred!
Your data could be lost.
Hama GmbH & Co KG does not under any circumstances accept liability for loss of data stored on
data storage media!
3. Installing the hard drive
The following section describes how to insert /
install a hard drive into the 3.5” housing.
Use a Philips screwdriver to open the four screws
at the rear of the housing and remove the rear of the
housing.
Remove the PCB and the metal tray from the aluminium housing.
Connect the hard drive to the metal tray and secure
the hard drive with the enclosed screws as shown
above.
Insert the metal tray and the hard drive into the
aluminium housing and secure the metal tray to the
aluminium housing as described in the image.
Instructions for Hard Disk Enclosure, external 3,5”
L
Then secure the rear of the housing to the aluminium
housing again.
4. Driver Installation on Windows
98SE/ME
Connect the 3.5” hard drive housing to a free USB
socket on your PC.
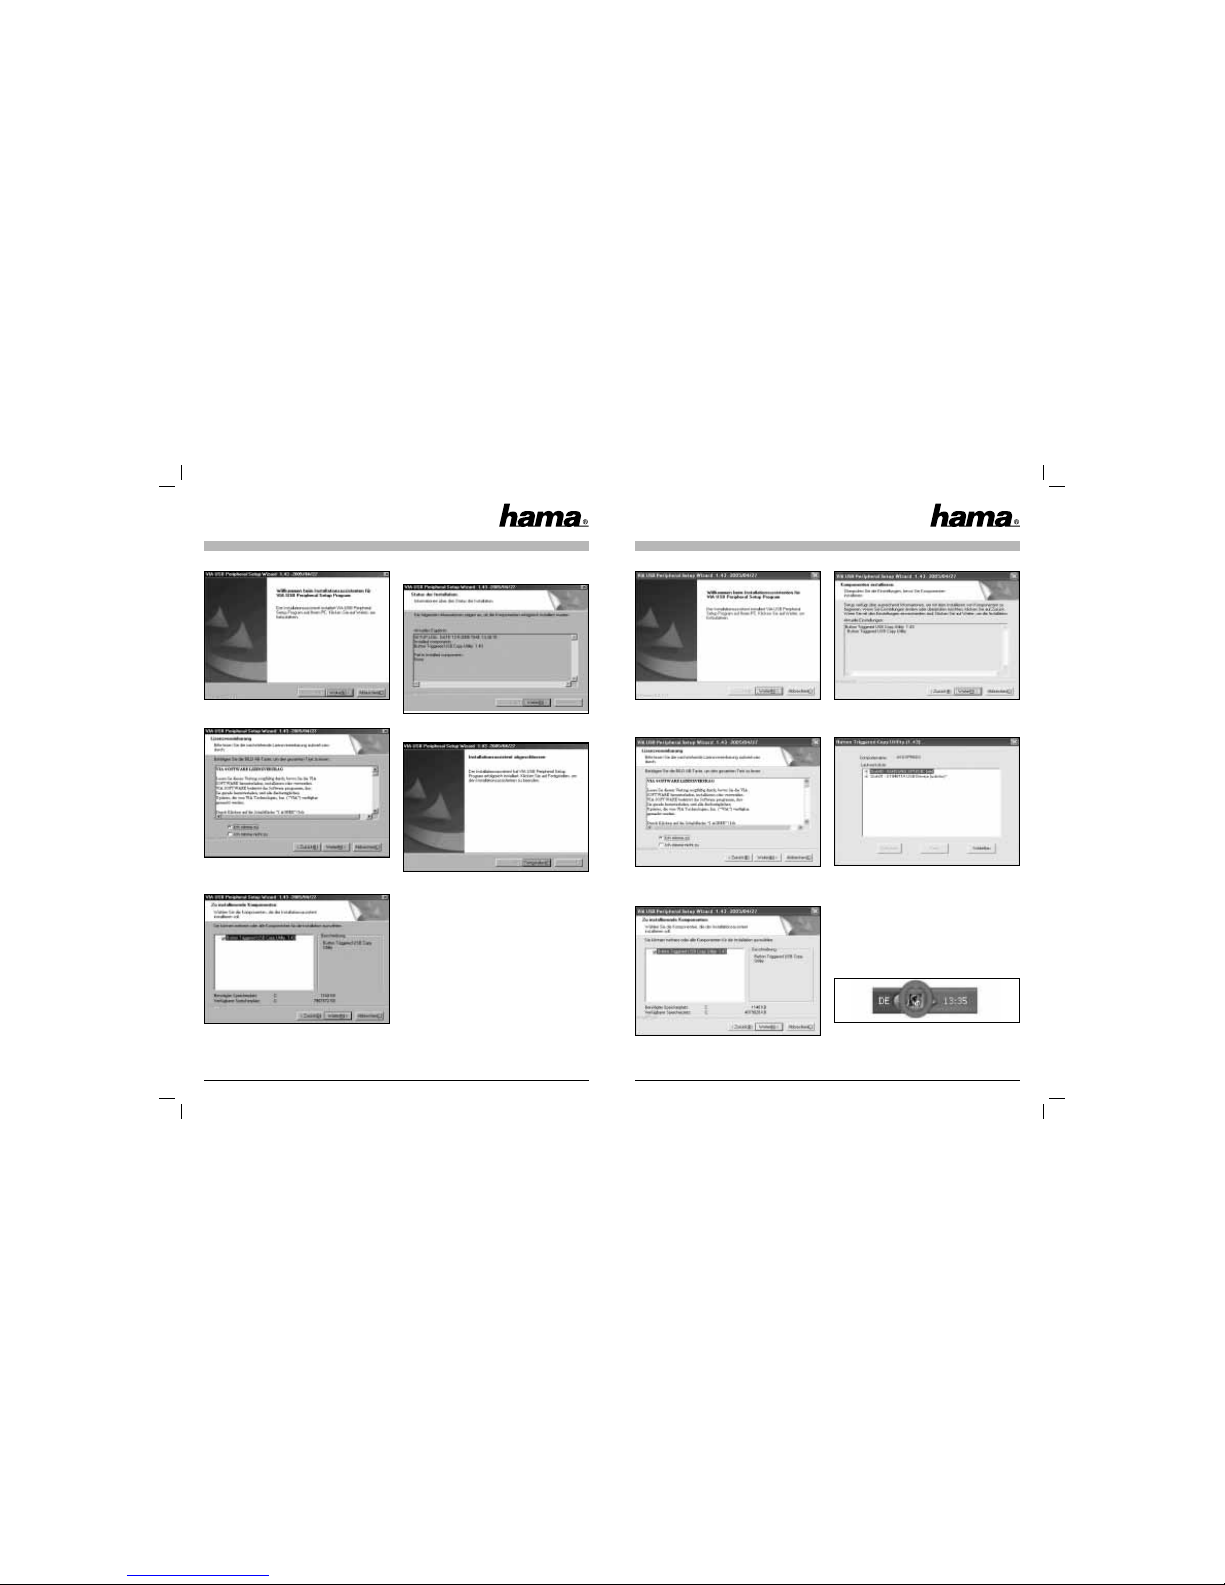
The Hardware Wizard searches for new drivers for
the “USB 2.0 I DE Bridge”.
Click “Next” to continue.
Select “Search fo r best driver for yo ur device” and
click “Next” to continue.
Select “Enter a loc ation:” only and click “Browse”.
Open sub-folder “WIN98DRV” in folder “VT6204”
on the installation CD.
Click “Next” to continue after the above message
has been displayed.
Click “Finish” to complete driver installation.
5. Installing the software
5.1 Windows 9 8SE/M E
Insert the enclosed installation CD into the CD-ROM
drive of your PC.
Open the “VBTUCopy” directory in the “VT6204”
folder on the installation CD.
Run the “Setup.exe” fi le in this directory.
The installation wizard now starts automatically.
Page 6
10
11
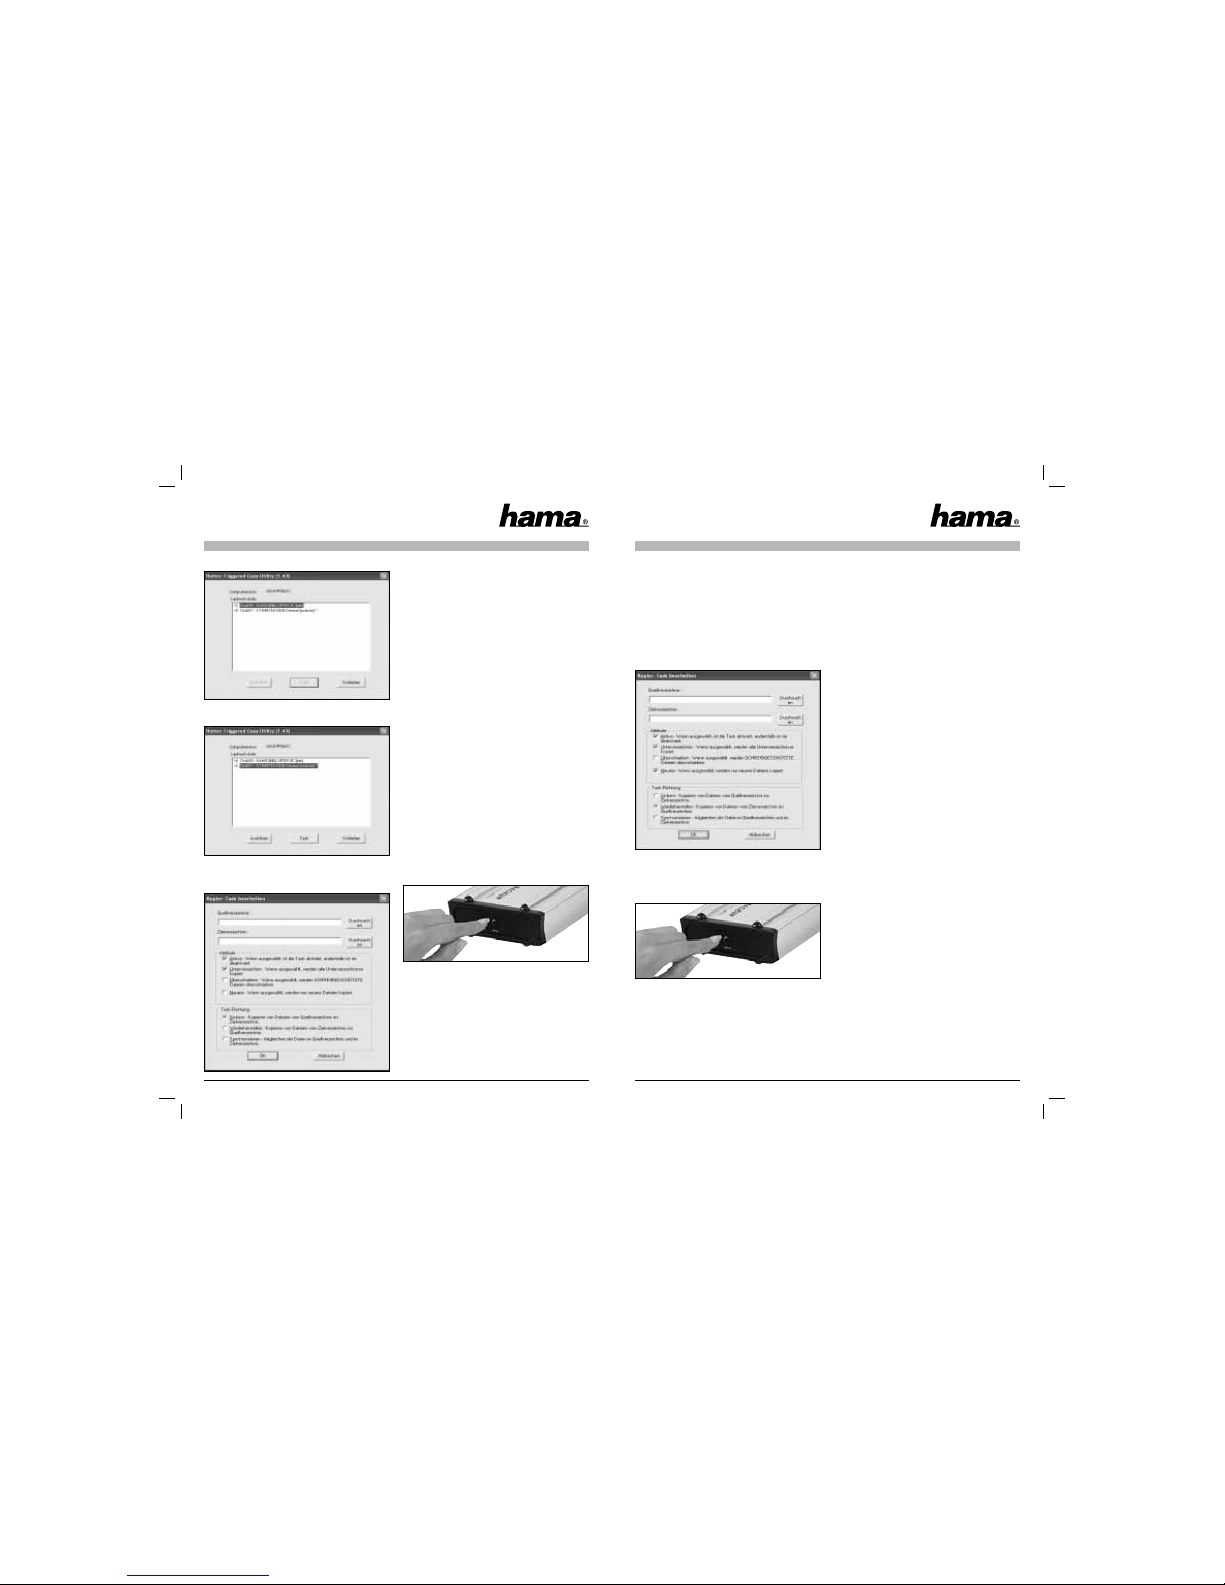
Click “Next” to start installation.
Confi rm the licence agreement and click “Next” to
continue.
Select the components to be installed and click
“Next”.
Click “Next” to confi rm the dialog box.
Click “Next” to confi rm the installation status.
Click “Finish” to close the Installation Wizard.
5.2 Wind ows 2000 /XP
Insert the enclosed installation CD into the CD-ROM
drive of your PC.
Open the “VBTUCopy” directory in the “VT6204”
folder on the installation CD.
Run the “Setup.exe” fi le in this directory.
The Installation Wizard now starts automatically.
Click “Next” to start installation.
Confi rm the licence agreement and click “Next” to
continue.
Select the components to be installed and click
“Next”.
Click “Next” to confi rm the dialog box.
The installation process has been completed
successfully when the above menu appears. Click
“Exit” to close the Installation Wizard.
6. Backup
6.1 Creating a ba ckup
Double-click the symbol for the backup tool in the
System Tray at the bottom right of the screen to open
it.
Page 7
12
13
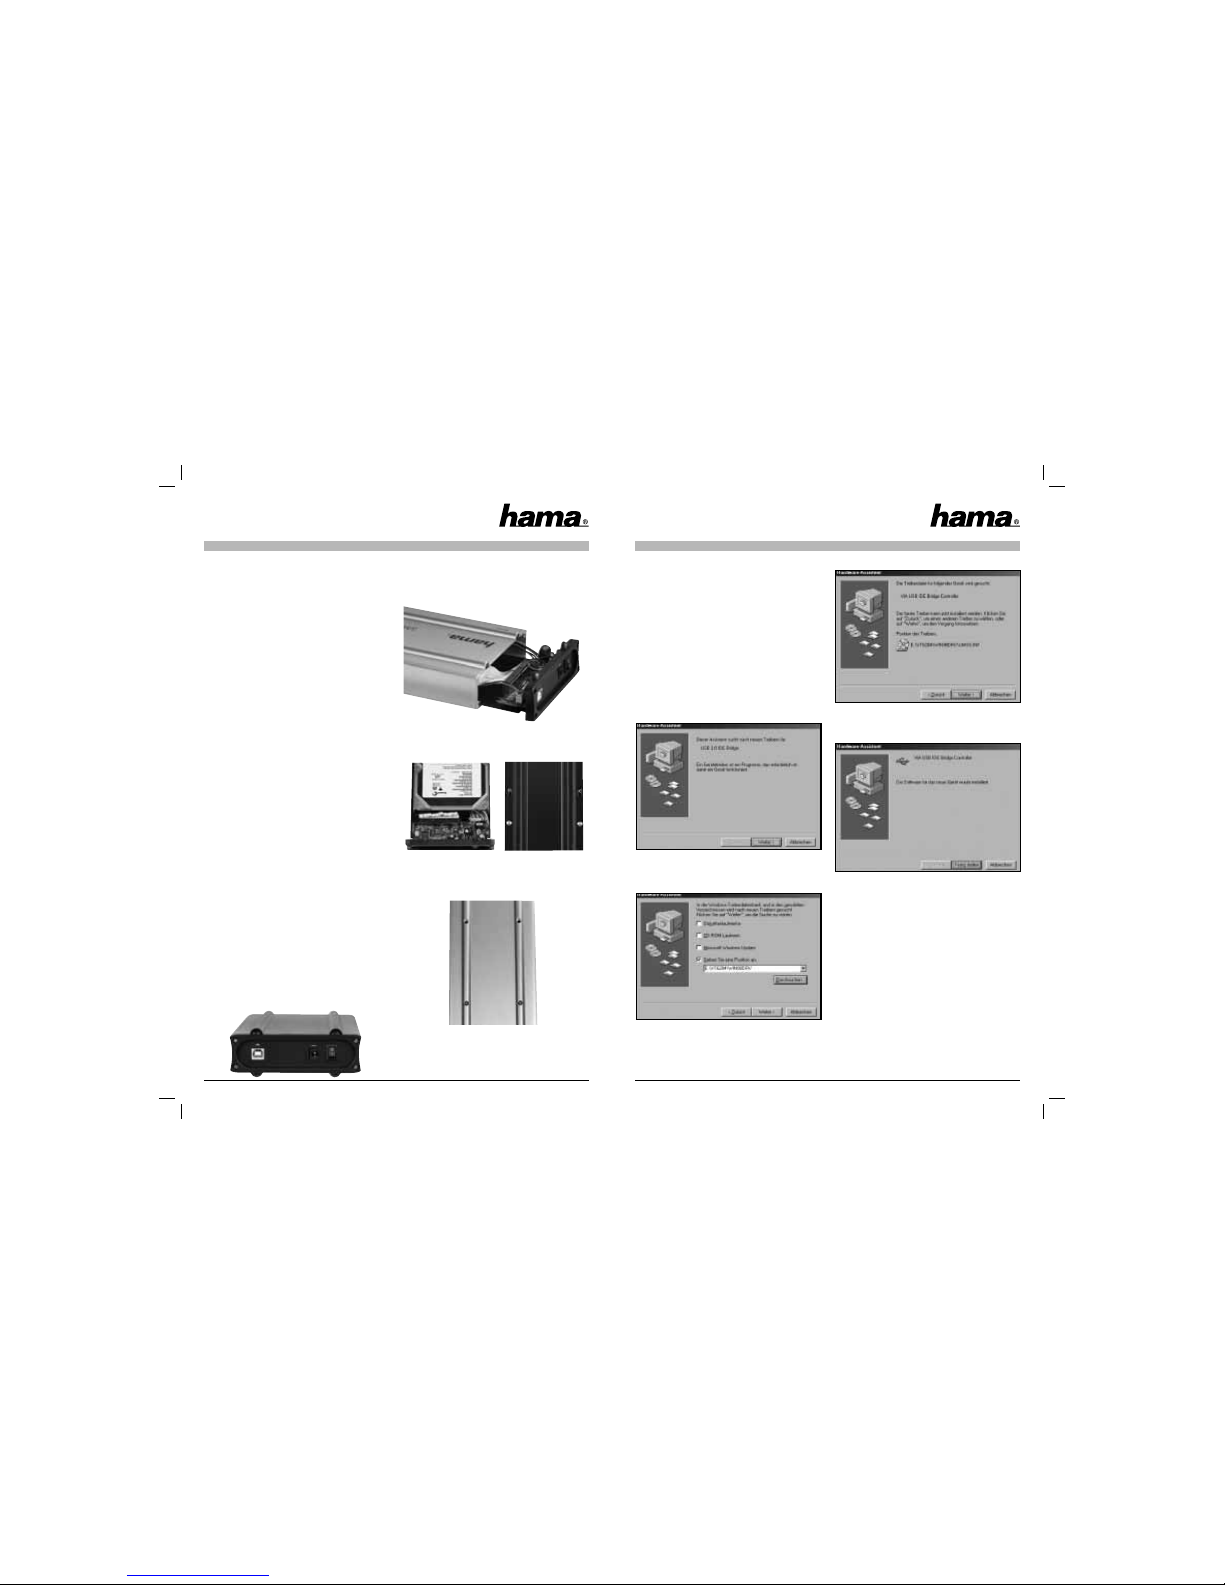
The backup program opens.
Select the USB hard drive and click “Task”.
The backup menu opens to allow you to make
various settings.
• Source directory: Specify the folder or drive you
want to backup.
• Target directory: Select the USB hard drive, and a
sub-folder if required, to which you want to save
the data.
The followin g attribut es can be set for dat a
backup:
• Active: This box must be ticked for the backup
task to be carried out at the push of a button.
• Sub-directory: This box must be ticked so that all
sub-folders in the source directory are also
backed up.
• Overwrite: If this attribute is set, all write protected fi les in the target directory are
overwritten.
• Newer: If this attribute is set, only fi les which
have been changed or added since the last
backup are copied.
Click “OK” to confi rm your entries.
After the backup task has been created, you can
start data backup by pressing the backup button at
the rear of the housing.
6.2 Res toring a backup
There are two ways of restoring a data backup from
the hard drive:
Option 1:
Open the backup task in the software and select
“Restore” under Task – Direction. Click “OK” to
confi rm your change.
After the backup task has been change, you can
start restoring the backup by pressing the backup
button at the rear of the housing.
You can also access the backed up data via Windows Explorer (option 2).
7. Safety instructions:
• Do not operate the device in damp or dusty
environments
• Do not operate this device on radiators or near
heat sources
• This device is designed for indoor use only
• Protect the device from pressure and impact
during operation
• Do not open or move the device during operation
Page 8
14
15
Sommaire
1. Contenu de l‘emballage
2. Remarques
3. Installation du disque dur
4. Installation du pilote sous Windows 98Se/Me
5. Installation du logiciel
5.1 Windows 98SE/Me
5.2 Windows 2000/XP
6. Sauvegarde
6.1 Création d’une sauvegarde
6.2 Restauration d’une sauvegarde
7. Consignes de sécurité
1. Contenu de l’emballage
• Boîtier pour disque dur 3.5”
• Cordon de connexion USB
• Cordon d’alimentation électrique USB
• Etui de protection
• Pilote / logiciel sur CD
• Guide d’installation
2. Remarques
Veuillez insérez votre boîtier pour disque dur dans
votre ordinateur avant de commencer l’installation
du logiciel.
Le boîtier du disque dur ne doit en aucun cas être
débranché de l’ordinateur lorsque des données sont
en train d’être transférées ! Ces données pourraient
être irrémédiablement perdues.
L’entreprise Hama GmbH & Co KG ne peut être tenue
responsable en cas de perte de données sauvegardées sur des supports de données !
3. Installation du disque dur
Le paragraphe suivant vous explique comment
installer le disque dur dans le boîtier 3.5“.
Desserrez les quatre vis situées sur la face arrière
du boîtier à l’aide d’un tournevis cruciforme, puis
déposez le cache.
Extrayez la platine et le coffret métallique hors du
boîtier en aluminium.
Branchez le disque dur au coffret métallique et fi xez
le disque dur à l’aide des vis fournies comme indiqué
dans l’illustration ci-dessus.
Faites glisser le coffret métallique et le disque dur
dans le boîtier en aluminium, puis fi xez le coffret
métallique au boîtier en aluminium comme indiqué
dans l’illustration.
Notice d’ut ilisation du Boî tier de disques dur s, externe 3 ,5”
¬
Fixez enfi n la face arrière du boîtier à nouveau au
boîtier en aluminium.
4. Installation du pilote sous Windows
98Se/Me
Connectez le boîtier pour disque dur 3.5“ à un port
USB libre de votre ordinateur.
L’assistant « Ajout de nouveau ma tériel »
recherche les nouveaux pilotes pour « USB 2.0 ID E
Bridge »
Confi rmez en cliquant sur « Sui vant ».
Cochez « Rechercher le meilleur pilote pour la pé-
riphérie (con seillé) », puis cliquez sur « Suivant ».
Sélectionnez « Parcourir » et cochez « Spécifier
l’emplaceme nt du pilote ». Recherchez le dossier « WIN98 DRV » qui se trouve dans le dossier
« VT6 204 » du CD d’installation.
Continuez en en cliquant sur « Suivant » ; le message suivant apparaît à l’écran.
Cliquez sur « Terminer » afi n de conclure
l’installation.
5. Installation du logiciel
5.1 Windows 9 8Se / Me
Insérez le CD d’installation fourni dans le lecteur de
CD-ROM de votre ordinateur.
Ouvrez le dossier « VBTUC opy » qui se trouve dans
le dossier « VT6 204 » du CD d’installation.
Exécutez le fi chier «Setup.exe». L’assistant
d’installation devrait s’ouvrir automatiquement.
Page 9
16
17
Cliquez sur « Suivant » afi n de démarrer l’installation.
Lisez le contrat de licence, puis cochez « J’accepte
les termes d u contrat de licen ce ».
Sélectionnez les composants que vous désirez
installer, puis cliquez sur « Suivant ».
Confi rmez ce message en cliquant sur « Sui vant ».
Confi rmez l’état d’installation en cliquant sur « Sui -
vant ».
Quittez l’assistant d’installation en cliquant sur
« Terminer ».
5.2 Wind ows 2000 /XP
Insérez le CD d’installation fourni dans le lecteur de
CD-ROM de votre ordinateur.
Ouvrez le dossier « VBTUC opy » qui se trouve dans
le dossier « VT6 204 » du CD d’installation.
Exécutez le fi chier «Setup.exe».
L’assistant d’installation devrait s’ouvrir automatiquement.
Cliquez sur « Suivant » afi n de démarrer
l’installation.
Acceptez les clauses du contrat de licence, puis
cliquez sur « Suivant ».
Sélectionnez les composants que vous désirez
installer, puis cliquez sur « Suivant ».
Confi rmez ce message en cliquant sur « Sui vant ».
La procédure d’installation est terminée dès que
le menu ci-dessus apparaît. Quittez l’assistant
d’installation en cliquant sur « Terminer ».
6. Sauvegarde
6.1 Création d ’une sauvegarde
Ouvrez l’outil de sauvegarde qui se trouve dans la
barre d’icônes Windows (en bas à droite de votre
écran) en double-cliquant sur l’icône.
Page 10
18
19
Le programme de sauvegarde s’ouvre.
Sélectionnez le disque dur USB, puis cliquez sur
« Task ».
Le menu de sauvegarde s’ouvre et vous pouvez alors
confi gurer différents paramètres.
• Réperto ire source : Saisissez ici le dossier ou le
disque dur dont vous désirez effectuer une
sauvegarde.
• Répertoire cible : Sélectionnez ici le disque dur
USB et, le cas échéant, le(s) dossier(s) sur le
quel/lesquels vous désirez sauvegarder les
données.
Les att ributs suivan ts peuvent êt re appliqués lor s
de la sauvegarde :
• Actif : Cochez cette case pour que la tâche de
sauvegarde puisse être effectuée par simple
pression sur le bouton.
• Sous-ré pertoire : Cochez cette case pour que
tous les dossiers se trouvant dans un dossier
source puissent être sauvegardés.
• Ecraseme nt de données : Tous les fi chiers se
trouvant dans le dossier cible seront écrasés
lorsque cet attribut est appliqué.
• Récents : Si vous cochez cet attribut, seuls les
fi chiers modifi és depuis la dernière sauvegarde ou
les fi chiers ajoutés depuis cette dernière
sauvegarde seront copiés.
Confi rmez votre saisie en cliquant sur « OK » .
La sauvegarde peut être démarrée en appuyant sur
le bouton de sauvegarde situé sur la face arrière du
boîtier dès que la tâche de sauvegarde est défi nie.
6.2 Res tauration d’un e sauvegarde
Il existe deux méthodes pour restaurer une sauvegarde de données depuis le disque dur :
Cas de figur e 1 :
Ouvrez la tâche de sauvegarde du logiciel, puis
sélectionnez sous « direction d e la tâche » :
« Restaur er », puis confi rmez les modifi cations en
cliquant sur « OK ».
La restauration peut être démarrée en appuyant sur
le bouton de sauvegarde situé sur la face arrière du
boîtier dès que la tâche de sauvegarde est modifi ée.
La deuxième méthode consiste à accéder aux données sauvegardées à l’aide de Windows Explorer.
7. Consignes de sécurité :
• N’utilisez pas cet appareil dans des
environnements humides ou poussiéreux
• N’utilisez pas cet appareil à proximité de sources
de chaleur et ne le placez pas sur un radiateur.
• L’appareil est conçu exclusivement pour une
utilisation à l’intérieur.
• Protégez l’appareil de pression et des chocs
pendant son fonctionnement.
• Ne tentez pas d’ouvrir l’appareil et ne le déplacez
pas pendant son utilisation.
 Loading...