

Page 1
All listed b rands are tra demarks of the c orrespondin g companies. Errors and omissions excepted,
and subject to technical changes. Our general terms of delivery and payment are applied.
Hama GmbH & Co KG
D-86651 Monheim/Germany
www.hama.com
COMPUTER
00052493/10.07
00052493
Wireless Laser Mouse
»M3010«
Souris laser sans fi l
00052493bda.indd Abs1:2-Abs2:100052493bda.indd Abs1:2-Abs2:1 13.12.2007 8:17:02 Uhr13.12.2007 8:17:02 Uhr
Page 2
2
3
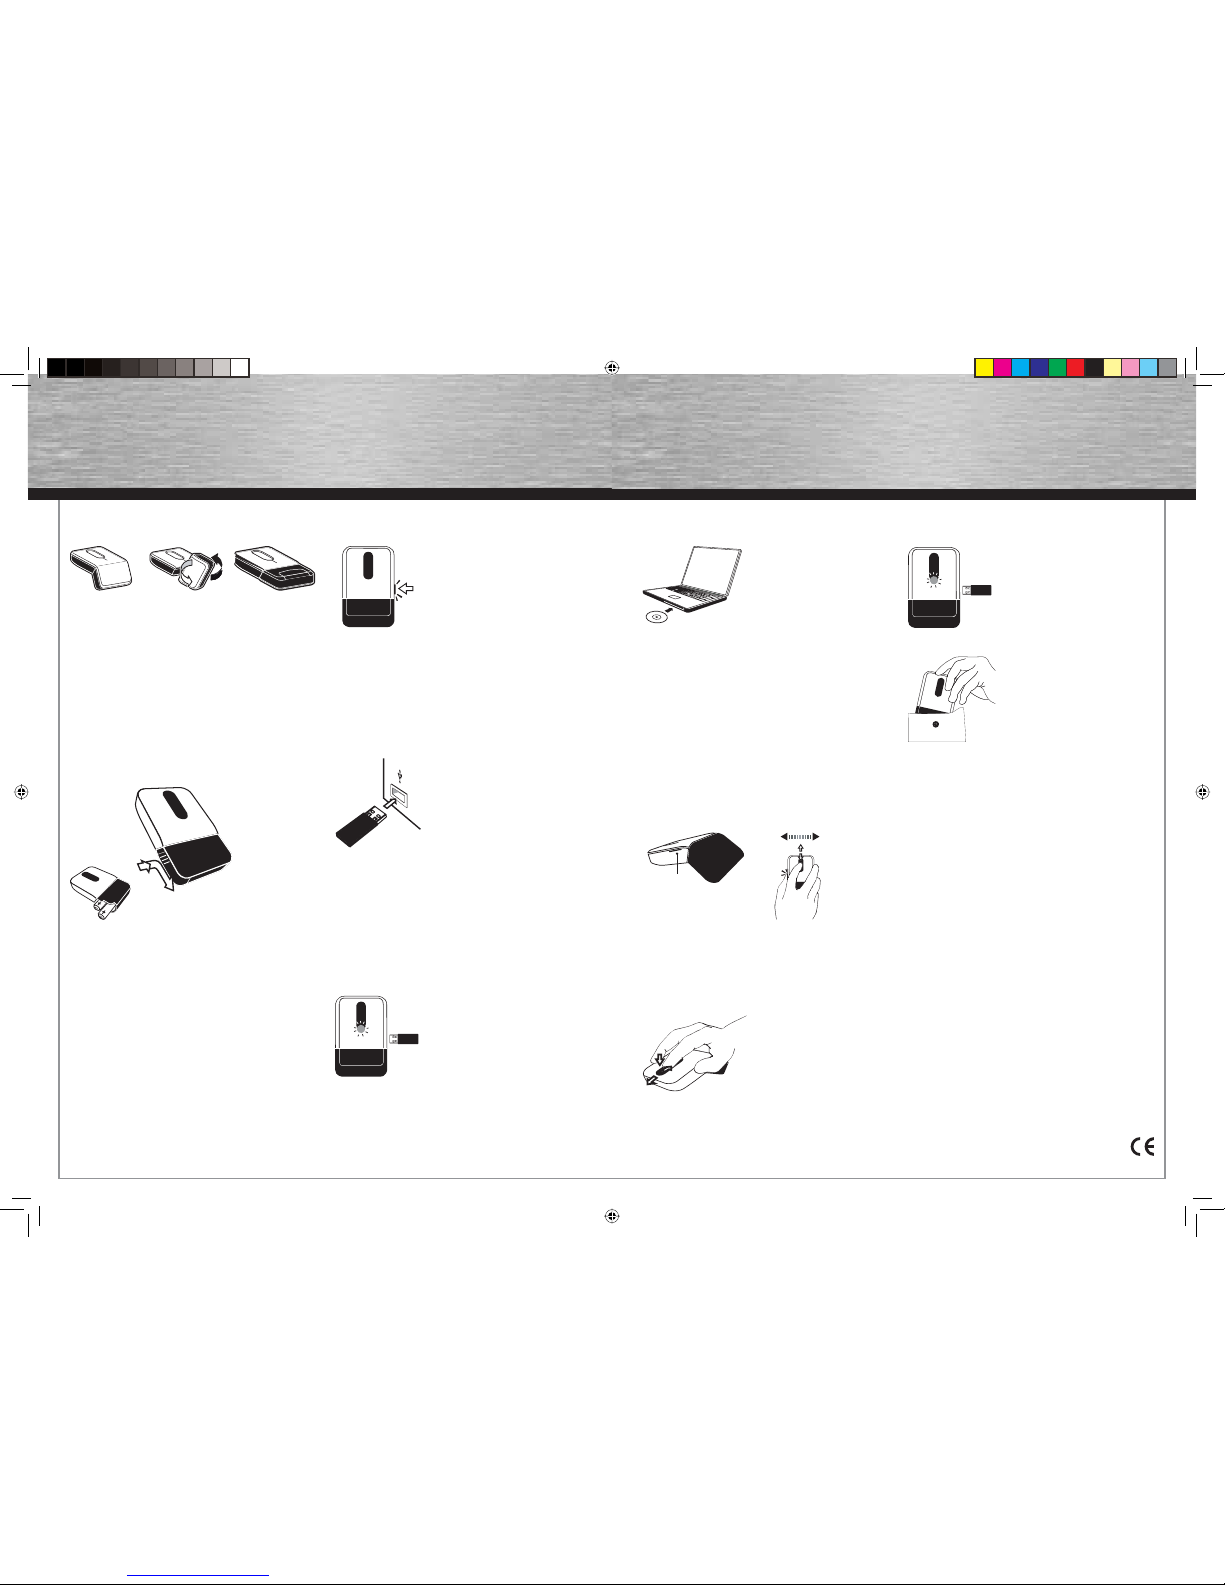
Drücken
Schieben
Seitliche Taste
4. Software
Mithillfe der Software
lassen sich die Tasten
mit verschiedenen
Funktionen belegen.
Legen Sie die beigelegte CD in Ihr CD-ROM oder DVDROM Laufwerk. Warten Sie einen Moment, und die
Installation wird automatisch gestartet. Sollte dies nicht
geschehen, klicken Sie auf Start =>Ausführen, geben
„X:\Setup” ein (wobei „X” für den Laufwerksbuchstaben
Ihres CD-ROM Laufwerks steht) und bestätigen mit
Enter.
4a Horizontales Scrollen
Um einen horizontalen Bildlauf durchzuführen, belegen
Sie eine beliebige Taste mit der Funktion „Horizontal
Scroll” und speichern Sie die Einstellungen. Haben Sie
z.B. die seitliche Taste ausgewählt halten Sie sie an der
Seite gedrückt, und bewegen Sie Ihren Finger auf der
fl achen Bildlauftaste nach oben oder unten.
4b Vertikales Scrollen
Ähnlich dem Trackpad eines Notebooks können Sie mithilfe der fl achen Bildlauftaste einen vertikalen Bildlauf
durchführen. Durch Drücken der Bildlauftaste aktivieren
Sie die mittlere Maustaste.
5. Ein-und Ausschalten der Maus
Maus ausgeschaltet:
Empfänger steckt
Maus eingeschaltet:
Empfänger entnommen
Nun kann‘s losgehen!
6. Funktionsprobleme
Sollte die Maus nicht erwartungsgemäß funktionieren,
stellen Sie sicher, dass Sie folgende Schritte genau
ausgeführt haben:
• Die Batterien sind neu und korrekt eingelegt
• Der Empfänger ist ordnungsgemäß an den
Computer angeschlossen
• Empfänger und Geräte befi nden sich innerhalb ihrer
Funkreichweite
(je nach örtlichen Gegebenheiten max. 10m).
d
Bedienungsanleitung
1. Gebrauch der Maus
1. Betriebsbereit 2. Umwandlung 3. Transport bereit
Hinweis:
Drehbewegung keinesfalls mit Gewalt durchführen
(max. 180° !).
Überdrehen führt zu Beschädigung der Maus.
2. Einlegen der Batterien
Drücken Sie seitlich auf die Batterieabdeckung, und
schieben Sie sie auf, um die AAA-Batterien einzulegen.
3. Installation der Hardware
Der Empfänger befi ndet sich
in der Maus , entnehmen Sie
ihn wie abgebildet durch
kurzen Gegendruck.
Automatische Verbindung
Verbinden Sie den Empfänger mit einem freien USBAnschluss. Nach wenigen Sekunden nimmt die Maus
ihren Betrieb auf (automatische Verbindung zwischen
Maus und Empfänger)
•
LED an Empfänger grün: Mausbewegung
• LED an Empfänger rot: Batterie schwach
Hinweise:
Sofern der Empfänger entnommen ist,
leuchtet die Status-LED an der Maus auf.
• LED GRÜN: Batterie geladen
• LED blinkt langsam ROT: Batterie
schwach
• LED blinkt schnell ROT: Batterie sehr
schwach
00052493bda.indd Abs2:2-Abs2:300052493bda.indd Abs2:2-Abs2:3 13.12.2007 8:17:05 Uhr13.12.2007 8:17:05 Uhr
Page 3
4
5
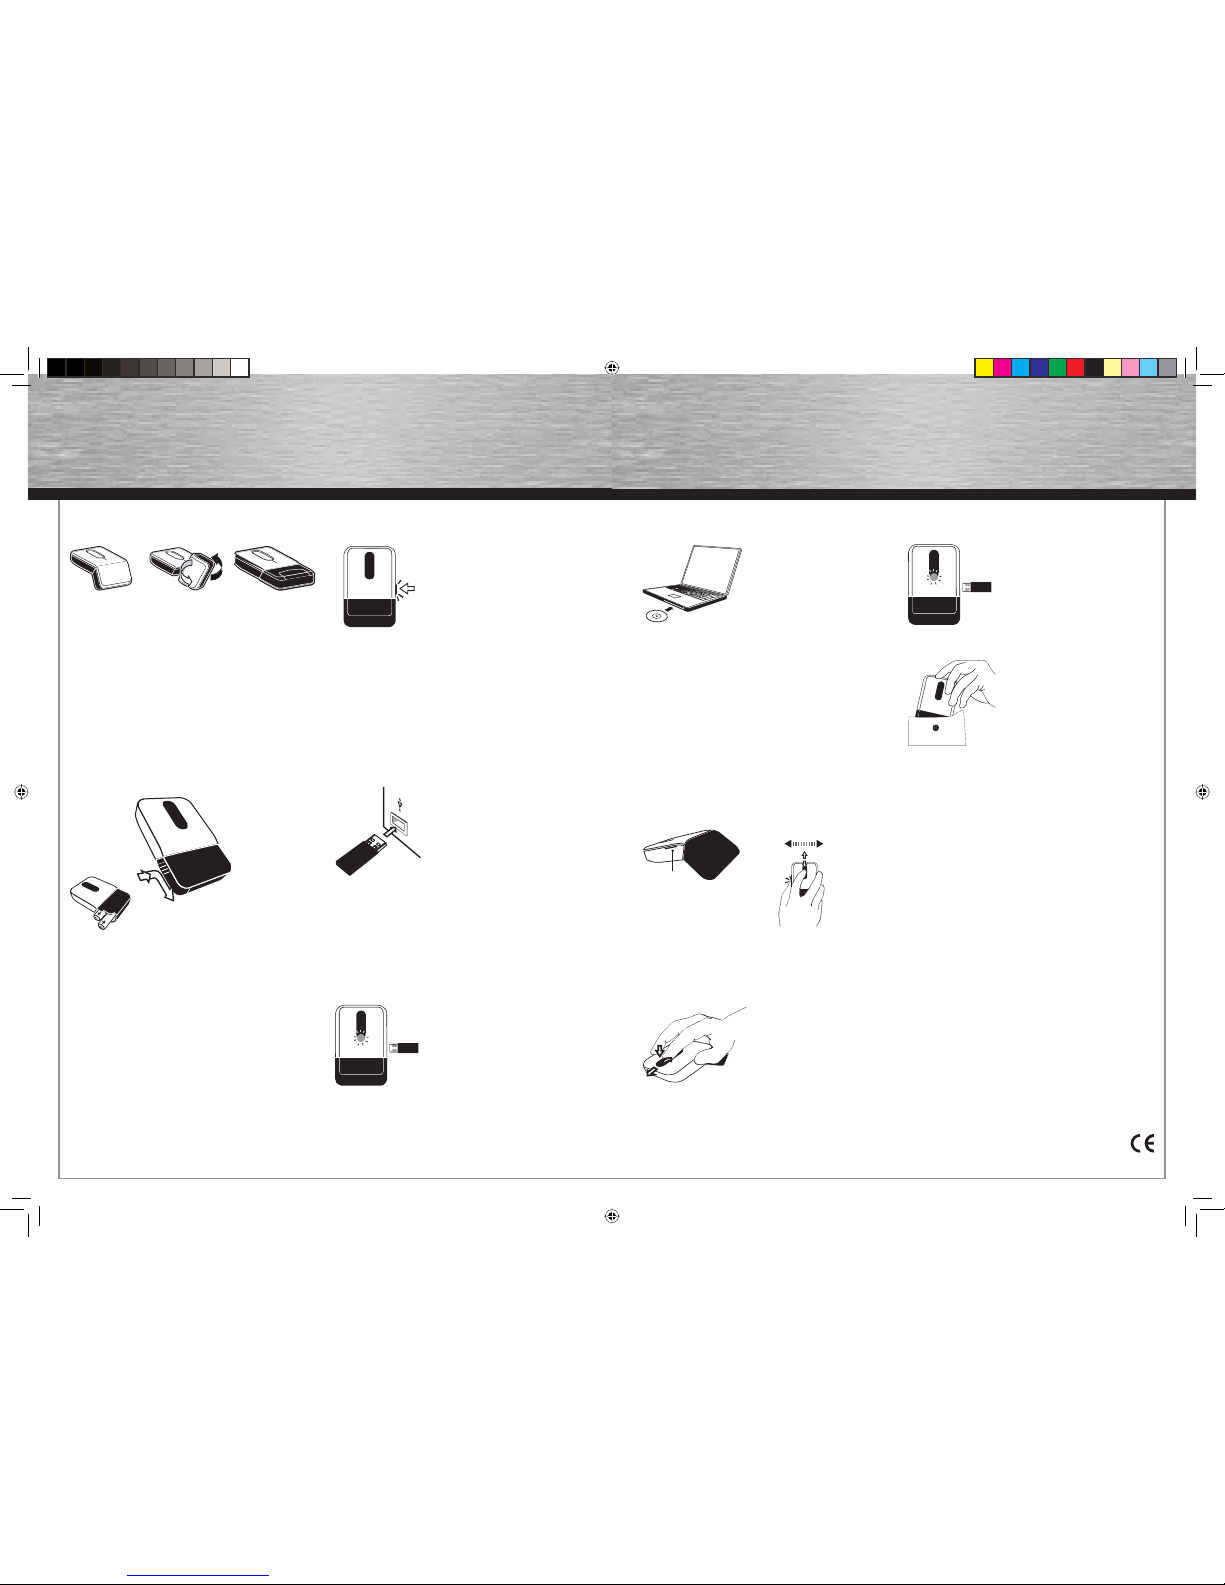
press
slide
side button
1. Using the mouse
1. operatioal 2. conversion 3. ready to
transport
Note:
Do not turn or rotate excessively
(max. 180°).
Over rotating can cause damage to the mouse.
2. INSE RTING THE B ATTERY
Press & slide open the battery door to
insert the AAA batteries.
3. Installing the Hardware
The r eceiver is locat ed in
them ouse. Remove as i s
show n in the diagram w ith a
shor t counterp ressure.
Automatic connection.
Insert the receiver to a free USB-Port.
After a few seconds, the mouse will work
(automatic connection between mouse
and receiver)
• Green Led on Receiver: mouse
movement
• Red Led on Receier: low battery
Once receiver is out, Status-LED on mouse will light up.
• GREEN light: battery good
• RED light blinking slowly: low battery
• RED light blinking rapidly: extremely low
4. Software
The software allows you to
assign various functions
to the buttons.
Place the enclosed CD in your CD-ROM or DVD-ROM
drive. Wait a moment, installation is started automatically. If it does not start automatically, click Start => Run,
enter “X:\Setup” (where „X” is the drive letter of your
CD-ROM drive) and press Enter to confi rm.
4a For horizontal scrolling
Set any bu tton wi th the funct ion “horizon tal scroll”
and sto re the sett ings to carr y out a Horizon tal scroll.
Press an d hold the but ton at the side a nd move your
fi nge r on the fl at scr oll butto n upwards or dow nwards
if you have c hosen e.g. the l ateral but ton.
4b For vertical scrolling
Similar to the trackpad on your notebook,
use the fl at scroll for vertical scrolling
or push it down to activate the middle button.
5. Switching the mouse on and off
Mouse off: Receiver in
Mouse on: Receiver out
Now, you`re ready to go!
6. Functionality problems
If the mouse does not function as expected, ensure that
you have carried out the following steps:
• The batteries are new and inserted correctly
• The receiver is correctly connected to the computer.
• Receiver and devices are within their
communication range (depending on location,
max. 10 m)
g
Operating Instruction
00052493bda.indd Abs2:4-Abs2:500052493bda.indd Abs2:4-Abs2:5 13.12.2007 8:17:06 Uhr13.12.2007 8:17:06 Uhr
Page 4
6
7
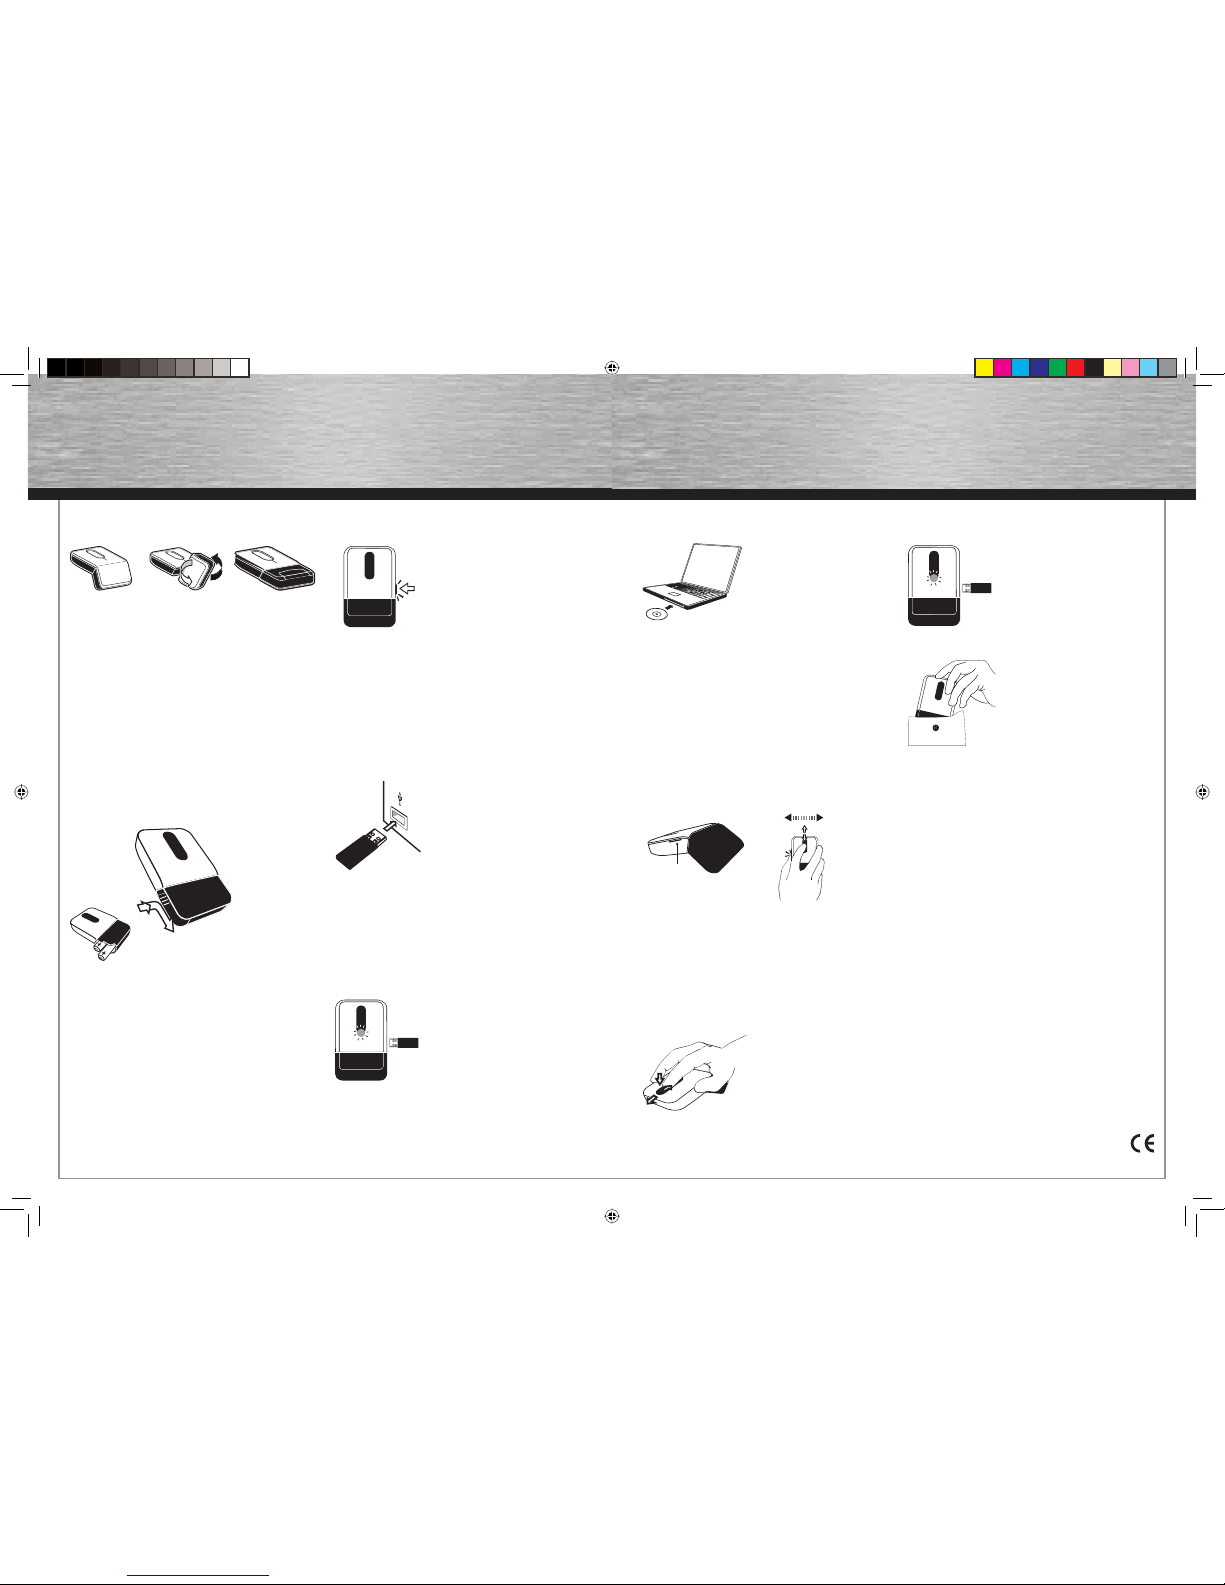
appuyer
faire glisser
touche latérale
1.UTILISATION DE LA SOURIS
1. prêt à l ’emploi 2. transformation 3. prêt au
transport
Remarque :
Ne forcez e n aucun cas les mouveme nts de rota tion
(180 ° maxi !).
Une rot ation exagéré e détériore la s ouris.
2. Mise e n place des piles
Appuyez sur le couvercle du
compartiment à piles et faites-le
coulisser afi n de l‘ouvrir et d‘insérer les
piles LR3 / AAA.
3. Installatio n du matériel
Le réc epteur est placé d ans
la souri s ; extrayez -le
comme i ndiqué dans
l’ illustra tion par un bref
contre-pression.
Connexion automatique :
Insérez le récepteur dans un port USB libre. La souris
est prête à fonctionner quelques secondes plus tard
(connexion
automatique entre la souris et le récepteur)
• DEL verte du récepteur allumée :
mouvement de la souris
• DEL rouge du récepteur allumée :
piles faibles
La DEL de la souris s‘allume dès que le
récepteur est retiré.
•
Témoin VERT allumé : piles bien chargées
• Le témoin ROUGE clignote lentement :
piles faibles
• Le témoin ROUGE clignote rapidement :
piles extrêmement faibles
f
Mode d´emploi
4. logiciel
Le logiciel vous
permet d’assigner
DIFFERENTES fonctions
AUX touches de la souris.
Insérez le CD fourni dans votre lecteur de CD-ROM ou
de DVD-ROM. Patientez jusqu’à ce que le programme
d’installation démarre automatiquement. Si l‘installation
n’est pas lancée, cliquez sur Démarrer => Exécuter,
tapez „X:\Setup” (X étant à remplacer par la lettre de
votre lecteur de CD-ROM) et validez avec Enter.
4a Défi lement horizontal
Assig nez un bouton que lconque avec la fonc tion
« défi lement Horiz ontal » et mémo risez les réglag es
pour ef fectuer un dé fi lement horiz ontal. Main tenez le
bouto n sur le côté appuy é et bougez votr e doigt sur
le bout on plat de défi lement vers le ha ut ou le bas si
vous avez s électionné par e x. le bouton l atéral.
4b Défi lement verticalement
Vous pouvez utiliser la surface plate de défi lement
(comme le pavé tactile de votre ordinateur portable) afi n
de faire défi ler le curseur verticalement ou appuyez sur
cette surface afi n d‘activer le bouton du milieu.
5. Mise en/hors service de la souris
Souris hors tension : ré
cepteur installé
Souris sous tension : ré
cepteur retiré
Votre souris est prête à voyager
!
6. Problèmes de fonctionnement
Dans le cas où la souris ne fonctionne pas
correctement, assurez-vous que vous avez bien
effectué les étapes suivantes :
• Les piles sont neuves et correctement insérées
• Le récepteur est correctement connecté à votre
ordinateur
• Le récepteur et les appareils se trouvent à portée
radio l’un des autres (10 m au maximum en fonction
de la confi guration des lieux)
f
Mode d´emploi
00052493bda.indd Abs2:6-Abs2:700052493bda.indd Abs2:6-Abs2:7 13.12.2007 8:17:07 Uhr13.12.2007 8:17:07 Uhr
 Loading...