

Page 1

00049253/06.07
All listed brands are trademarks of the corresponding companies. Errors and omissions excepted,
and subject to technical changes. Our general terms of delivery and payment are applied.
PO Box 80 · 86651 Monheim/Germany
Phone: +49 9091 502-0
Fax: +49 9091 502-458
http://www.hama.com
00049253bda.indd 200049253bda.indd 2 30.07.2007 10:53:45 Uhr30.07.2007 10:53:45 Uhr
Page 2
COMPUTER
00049253
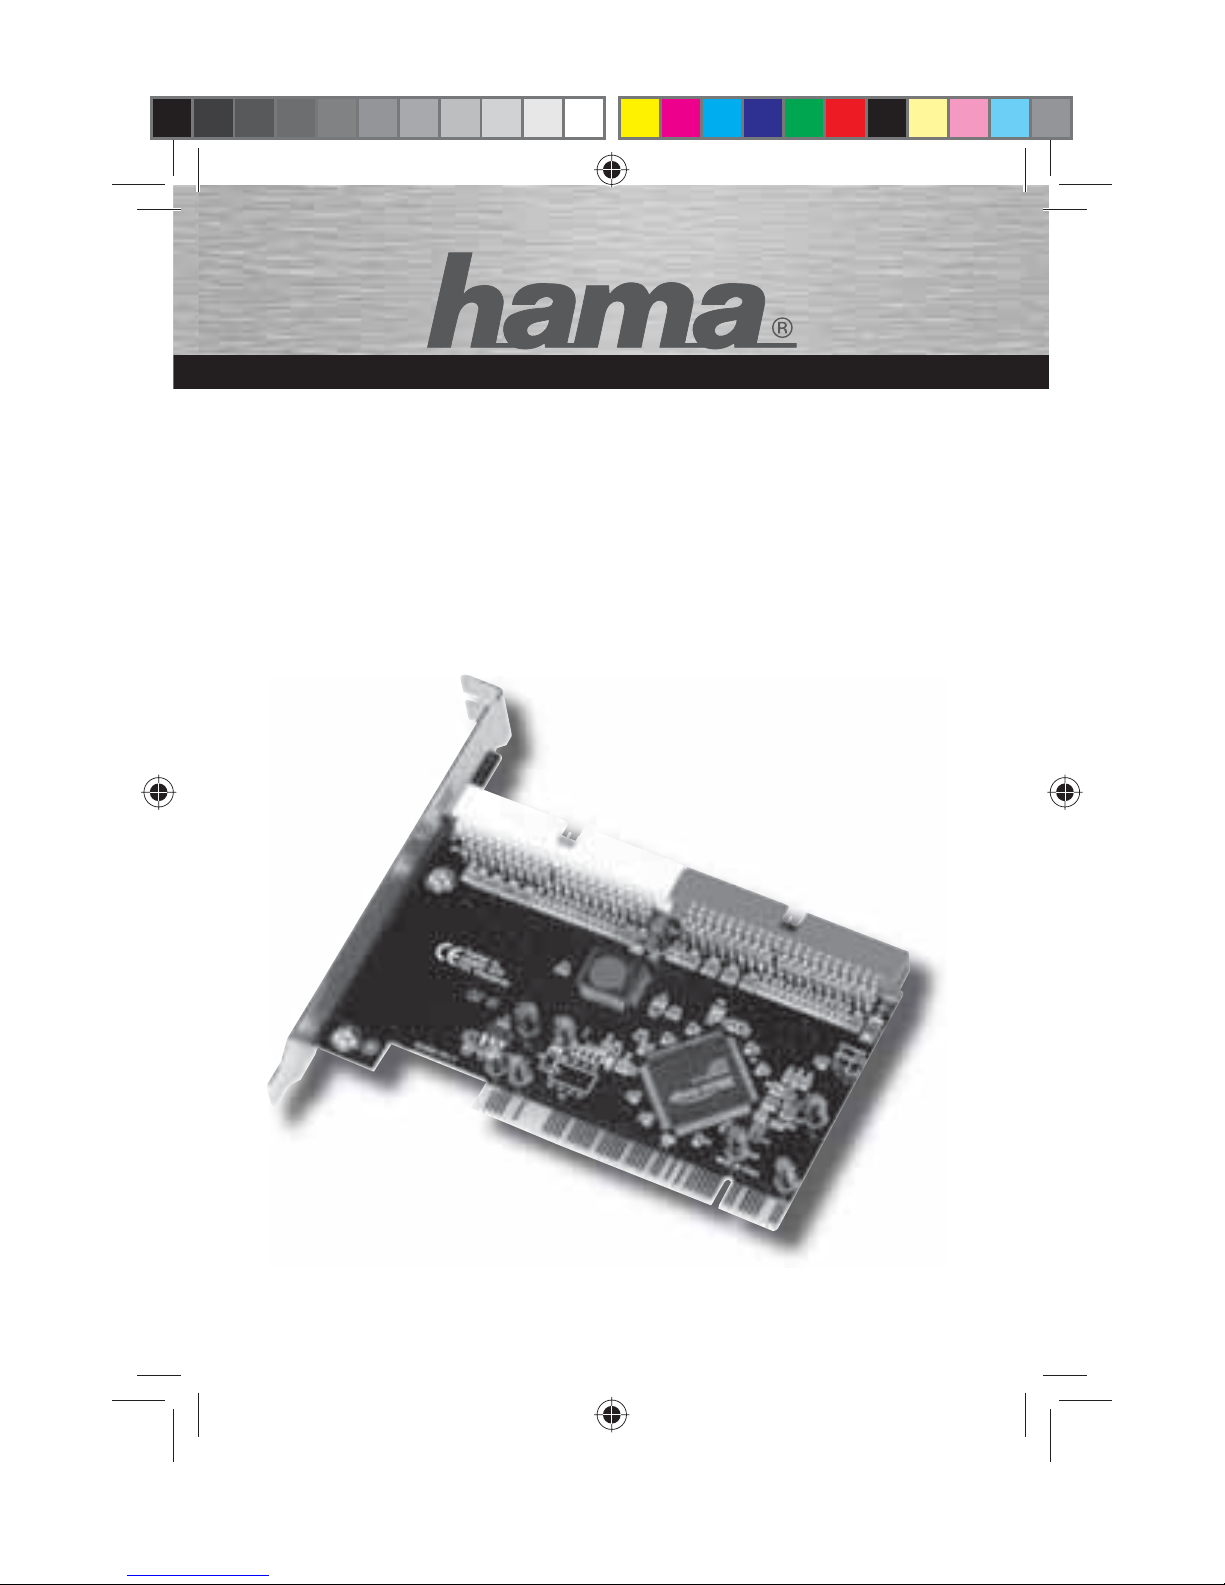
UDMA-133/IDE Raid Controller
PCI-Einsteckkarte + Anschlusskabel
PCI Card + Connecting Cable
Carte PCI + câble de connexion
00049253bda.indd 300049253bda.indd 3 30.07.2007 10:53:46 Uhr30.07.2007 10:53:46 Uhr
Page 3
d
Bedienungsanleitung
2
Packungsinhalt:
• IDE 133 RAID Controller, PCI
• Inkl. 80 pol. IDE Flachbandkabel
• Beipackzettel mit Entsorgungshinweise
Hardware Installation:
Um die Karte zu installieren, müssen Sie
Ihren Computer öffnen. Achten Sie daher
unbedingt darauf, dass Sie Ihren Computer
vorher vom Stromnetz getrennt haben. Sollten
Sie mit dem internen Aufbau Ihres Computers
nicht so sehr vertraut sein, lesen Sie bitte im
Handbuch Ihres Computers nach oder fragen
Sie einen Fachmann.
• Schalten Sie alle angeschlossenen Geräte
und Ihren Computer ab.
• Stecken Sie den PC aus, bevor Sie mit der
Installation beginnen.
•
Öffnen Sie die Abdeckung Ihres Computers.
Hinweis: Achten Sie darauf, dass statische
Elektrizität sowohl die PCI Karte als auch
Ihren Computer beschädigen kann. Entladen
Sie sich durch Berühren eines metallischen
Gegenstandes.
• Suchen Sie einen freien PCI- Einsteck platz.
• Entfernen Sie das Slotblech für diesen
Steckplatz. Bewahren Sie die Schraube
gut auf, Sie benötigen sie später zum
Befestigen der PCI Karte.
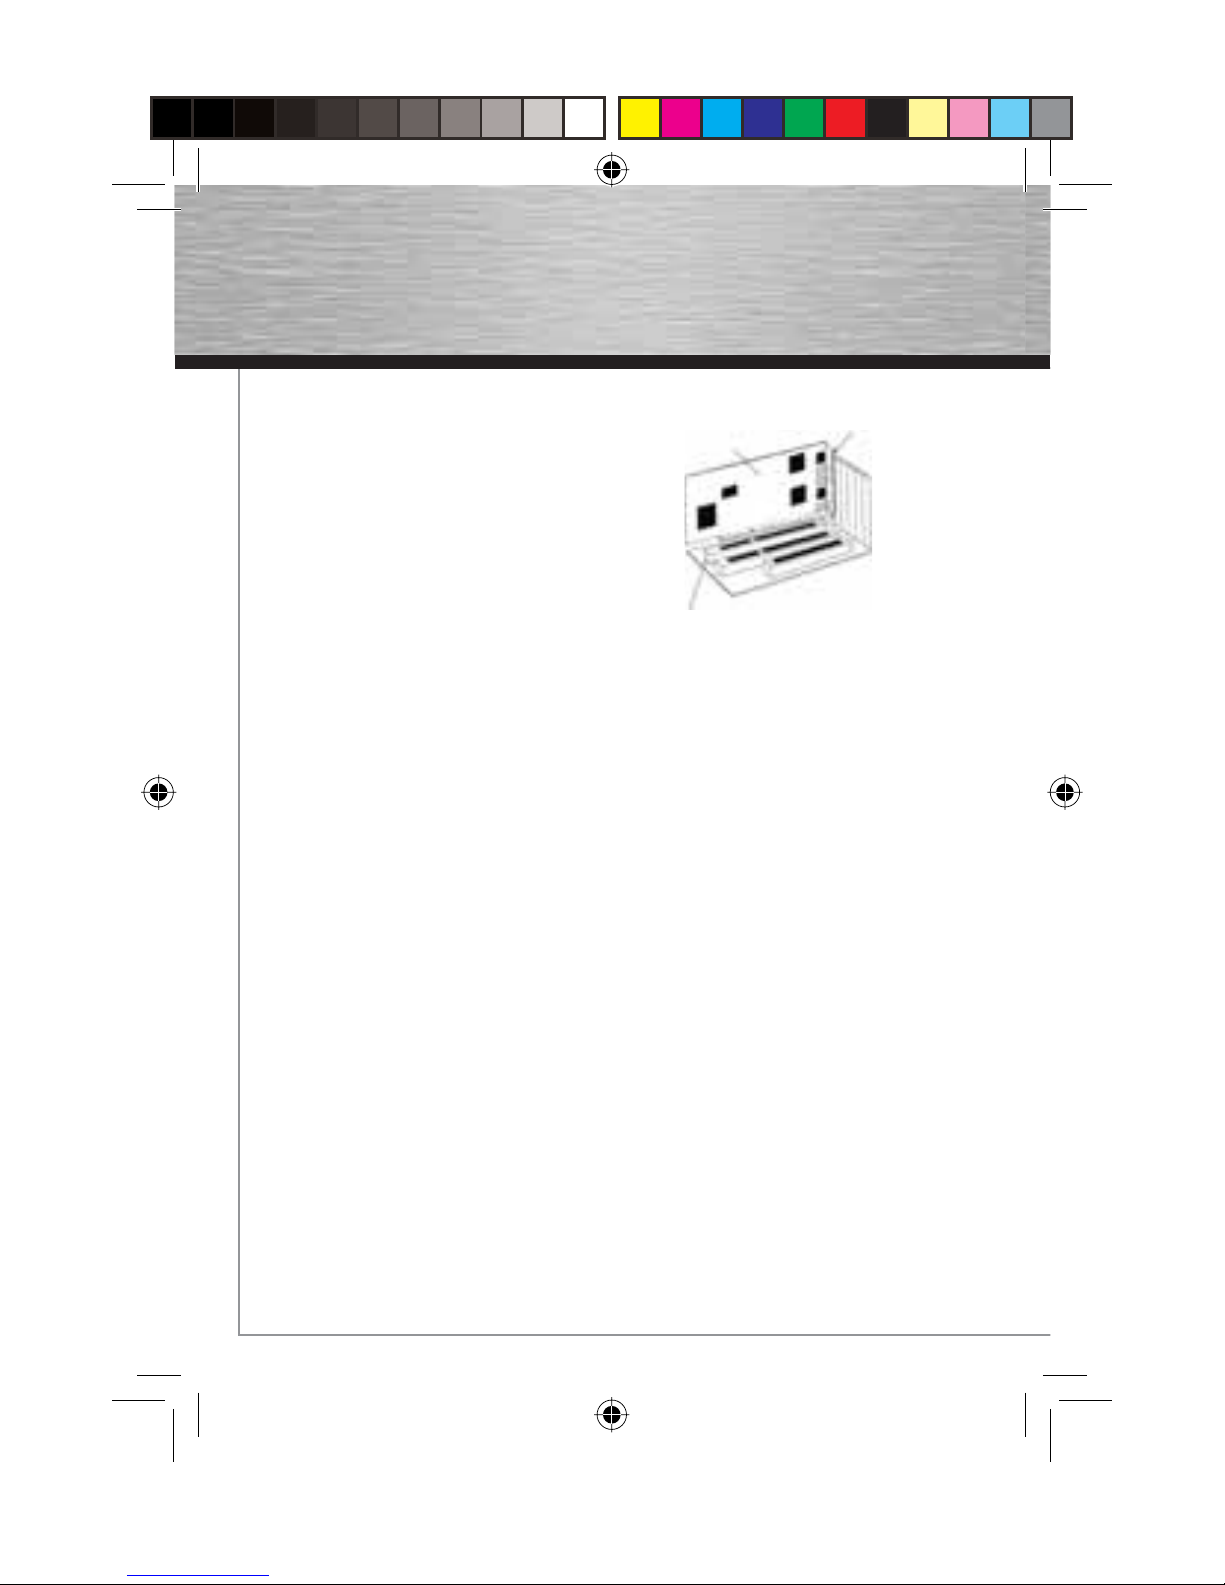
• Halten Sie die PCI Karte an den Ecken der
Platine und stecken Sie diese in den freien
PCI- Einsteckplatz.
• Drücken Sie die Karte nun vorsichtig in
den Einsteckplatz bis der Haltewinkel
aufl iegt und die vergoldeten Steckkontakte
vollständig im Steckplatz verschwunden
sind.
• Befestigen Sie die Karte mit der zuvor
entfernten Slot-, Blechschraube.
• Schließen Sie das Gehäuse Ihres
Computers und verbinden Sie ihn wieder
mit der Spannungsversorgung.
•
Schalten Sie nun Ihren Rechner wieder ein.
Softwareinstallation:
Installation unter Windows Vista 32bit
Editionen
Nachdem Windows Vista komplett hochgefahren ist, erscheint ein Fenster mit der
Bezeichnung „Neue Hardware gefunden“
und schlägt Ihnen drei Optionen vor. Bitte
wählen Sie die erste Option aus Treibersoft-
ware suchen und installieren (empfohlen).
Daraufhin werden Sie von der Benutzerkontensteuerung aufgefordert, Ihre Zustimmung
zur Fortsetzung des Vorgangs zu geben.
Klicken Sie auf die Schaltfl äche -> Fortsetzen.
Windows Vista zeigt Ihnen nach einer Weile
ein Dialogfeld an, indem Sie aufgefordert
werden, ihre Treiber CD-ROM einzulegen.
Kommen Sie der Aufforderung nach und
klicken anschließend auf -> Weiter. Warten
Sie, bis das Dialogfenster „Datenträger wird
nach Software durchsucht“ eingeblendet
wird.
Nach einiger Zeit fi ndet Windows Vista
den Treiber auf der CD und blendet unter
Umständen ein Sicherheitsfenster ein. Dort
werden Sie darauf hingewiesen, das der
Herausgeber nicht überprüft werden konnte
und stellt Ihnen zwei Optionen zur Auswahl
dar. Wählen Sie nun die Option „Diese
Treibersoftware trotzdem installieren..“ aus
und Vista überspielt nun die Treiberdaten von
der CD auf Ihr System.
d
Bedienungsanleitung
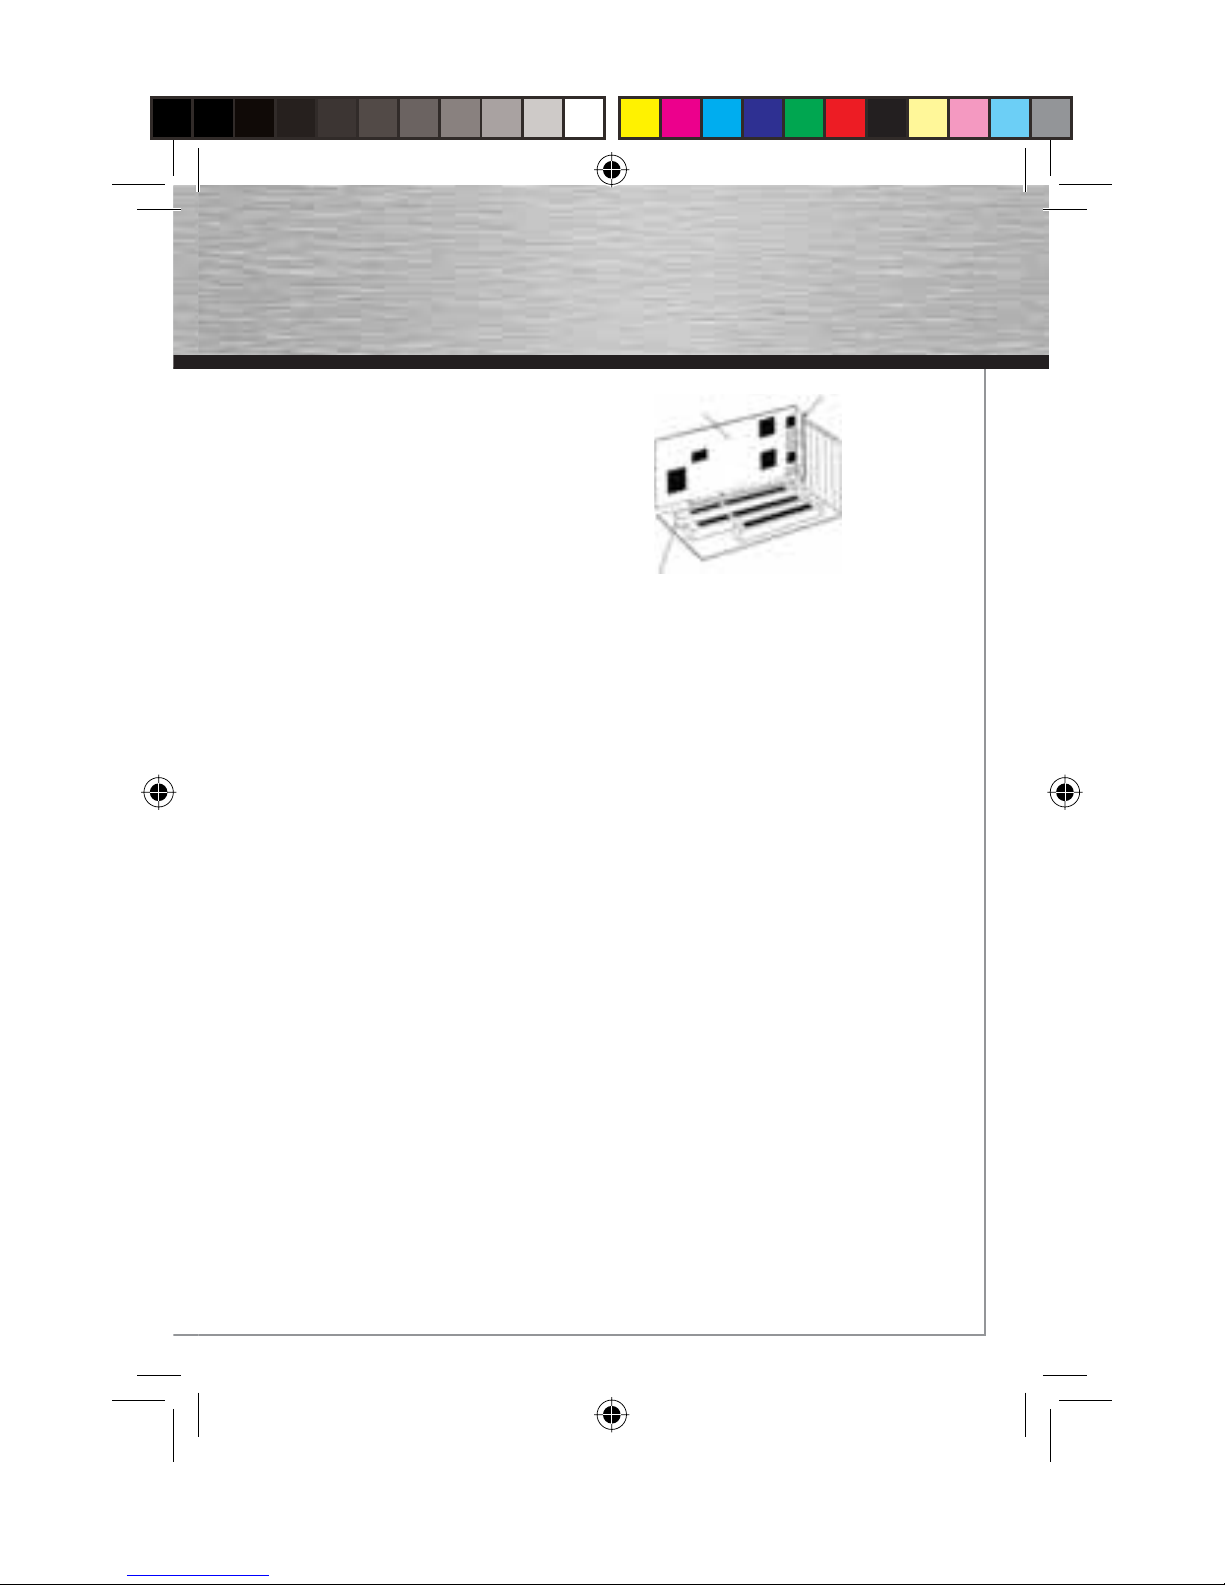
PC
Karte
Slotblech
00049253bda.indd Abs1:200049253bda.indd Abs1:2 30.07.2007 10:53:47 Uhr30.07.2007 10:53:47 Uhr
Page 4
3
g
Operating Instruction
Abschließend weißt Sie Windows Vista
auf die erfolgreiche Treiberinstallation hin,
klicken Sie auf die Schaltfl äche -> Schließen,
um die Installation zu beenden. Entnehmen
Sie bitte die Treiber CD-ROM aus Ihrem
Laufwerk und bewahren Sie diese sorgfältig
auf, um diese bei einer evtl. Neuinstallation
den Treiber griffbereit haben.
Hinweis: Das Sicherheitsfenster soll Sie
lediglich darauf hinweisen, das der Treiber
noch keine gültige Zertifi zierung von Microsoft erhalten hat. Die Stabilität und Funktion
des Treibers wurde vor Auslieferung ausführlich getestet. Die Qualifi zierung der Treiber
durch Hama ermöglicht es, neue Versionen
schon viel früher zu verwenden und nicht auf
die Zertifi zierung durch Microsoft zu warten.
Ob der Controller ordnungsgemäß installiert
wurde, können Sie unter Start (Windows
Logo) -> Systemsteuerung -> System und
Wartung -> Geräte-Manager nachsehen.
Unter Umständen werden Sie von der
Benutzerkontensteuerung aufgefordert diese
Aktion zuzustimmen. Klicken Sie deshalb auf
die Schaltfl äche -> Fortsetzen. Folgender
Eintrag muss ohne gelbes Ausrufezeichen
vorhanden sein.
Speichercontroller:
• Silicon Image SiL 0680 Ultra-133 Medley
ATA Raid Controller
Installation unter Windows Vista 64bit
Editionen
Nachdem Windows Vista komplett hochgefahren ist, erscheint ein Fenster mit der
Bezeichnung „Neue Hardware gefunden“
und schlägt Ihnen drei Optionen vor. Bitte
wählen Sie die erste Option aus Treibersoft-
ware suchen und installieren (empfohlen).
Daraufhin werden Sie von der Benutzerkon-
tensteuerung aufgefordert, Ihre Zustimmung
zur Fortsetzung des Vorgangs zu geben.
Klicken Sie auf die Schaltfl äche -> Fortsetzen
.
Windows Vista zeigt Ihnen nach einer Weile
ein Dialogfeld an, indem Sie aufgefordert
werden, ihre Treiber CD-ROM einzulegen.
Kommen Sie der Aufforderung nach und
klicken anschließend auf -> Weiter. Warten
Sie, bis das Dialogfenster „Datenträger wird
nach Software durchsucht“ eingeblendet
wird.
Nach einiger Zeit fi ndet Windows Vista
den Treiber auf der CD und blendet unter
Umständen ein Sicherheitsfenster ein. Dort
werden Sie darauf hingewiesen, das der
Herausgeber nicht überprüft werden konnte
und stellt Ihnen zwei Optionen zur Auswahl
dar. Wählen Sie nun die Option „Diese
Treibersoftware trotzdem installieren..“ aus
und Vista überspielt nun die Treiberdaten von
der CD auf Ihr System.
Abschließend weißt Sie Windows Vista
auf die erfolgreiche Treiberinstallation hin,
klicken Sie auf die Schaltfl äche -> Schließen,
um die Installation zu beenden. Entnehmen
Sie bitte die Treiber CD-ROM aus Ihrem
Laufwerk und bewahren Sie diese sorgfältig
auf, um diese bei einer evtl. Neuinstallation
den Treiber griffbereit haben.
Hinweis: Das Sicherheitsfenster soll Sie
lediglich darauf hinweisen, das der Treiber
noch keine gültige Zertifi zierung von Microsoft erhalten hat. Die Stabilität und Funktion
des Treibers wurde vor Auslieferung ausführlich getestet. Die Qualifi zierung der Treiber
durch Hama ermöglicht es, neue Versionen
schon viel früher zu verwenden und nicht auf
die Zertifi zierung durch Microsoft zu warten.
00049253bda.indd Abs1:300049253bda.indd Abs1:3 30.07.2007 10:53:47 Uhr30.07.2007 10:53:47 Uhr
Page 5
4
Ob der Controller ordnungsgemäß installiert
wurde, können Sie unter Start (Windows
Logo) -> Systemsteuerung -> System und
Wartung -> Geräte-Manager nachsehen.
Unter Umständen werden Sie von der
Benutzerkontensteuerung aufgefordert diese
Aktion zuzustimmen. Klicken Sie deshalb auf
die Schaltfl äche -> Fortsetzen. Folgender
Eintrag muss ohne gelbes Ausrufezeichen
vorhanden sein.
Speichercontroller
• Silicon Image SiL 0680 ATA/133 RAID
Controller
Installation unter Windows XP
Vorbereitung:
Stellen Sie sicher, das Ihr Benutzerkonto
unter Windows XP über Administratorenrechte verfügt, ansonsten wird die Treiberinstallation fehlschlagen.
Nachdem Windows XP komplett hochgefahren ist, erscheint der „Assistent für das
Suchen neuer Hardware“ und fragt Sie, ob
Windows sich mit dem Internet verbinden
darf, um auf Windows Update nach einem
geeigneten Treiber zu suchen. Beantworten
Sie die Frage mit der Auswahl der Option
-> „Nein, diesmal nicht“ und klicken zum
Fortsetzen der Installation auf -> Weiter. Der
Hardware Installationsassistent identifi ziert den Controller als „RAID-Controller“.
Wählen Sie „Software von einer Liste oder
bestimmten Quelle installieren (für fortgeschrittene Benutzer)“ und klicken Sie auf ->
Weiter. Legen Sie nun die mitgelieferte
Treiber CD ein. Falls jetzt das Fenster
„Welcher Aktion soll durchgeführt werden?“
erscheint, wählen Sie „Keine Aktion durch-
führen“ und klicken Sie auf -> OK.
Markieren Sie nun im Fenster „Such- und
Installationsoptionen“ nur die Option
„Wechselmedien durchsuchen (Diskette,
CD....) -> Weiter. Die Karte wird jetzt als „Si-
licon Image SiL 0680 Ultra-133 Medley ATA
RAID Controller“ erkannt. Falls nun die
Meldung erscheint „Die Software, die für
diese Hardware installiert wird: Silicon
Image SiL 0680 Ultra-133 Medley ATA RAID
Controller hat den Windows-Logo-Test nicht
bestanden, der die Kompatibilität mit Windows XP überprüft...“ klicken Sie auf
„Installation fortsetzen“. Windows kopiert
jetzt die benötigten Dateien von der CD.
Klicken Sie anschließend auf -> Fertig
stellen.
Ob der Controller ordnungsgemäß installiert
wurde, können Sie unter Start -> Systemsteu-
erung -> Leistung und Wartung -> System ->
Hardware -> Geräte-Manager nachsehen.
Dort muss folgender Eintrag ohne gelbes
Ausrufezeichen vorhanden sein.
SCSI- und RAID-Controller
• Silicon Image SiL 0680 Ultra-133 Medley
ATA Raid Controller
Hinweis: Wir empfehlen Ihnen dringendst,
dass Windows XP Benutzer zumindest das
aktuellste Service Pack, wegen den Erweiterungen und Beseitigung von Schwachstellen
installieren.
Installation unter Windows XP x64bit
Vorbereitung:
Stellen Sie sicher, das Ihr Benutzerkonto
unter Windows XP über Administratorenrechte verfügt, ansonsten kann die Treiberinstallation fehlschlagen.
Nachdem Windows XP komplett
hochgefahren ist, erscheint der „Assistent für
das Suchen neuer Hardware“ und fragt Sie,
ob Windows sich mit dem Internet verbinden
darf, um auf Windows Update nach einem
00049253bda.indd Abs1:400049253bda.indd Abs1:4 30.07.2007 10:53:48 Uhr30.07.2007 10:53:48 Uhr
Page 6
5
geeigneten Treiber zu suchen. Beantworten
Sie die Frage mit der Auswahl der Option
-> „Nein, diesmal nicht“ und klicken zum
Fortsetzen der Installation auf -> Weiter. Der
Hardware Installationsassistent identifi ziert den Controller als „RAID Controller“.
Wählen Sie „Software von einer Liste oder
bestimmten Quelle installieren (für fortgeschrittene Benutzer)“ und klicken Sie auf ->
Weiter. Legen Sie nun die mitgelieferte
Treiber CD ein. Falls jetzt das Fenster
„Welcher Aktion soll durchgeführt werden?“
erscheint, wählen Sie „Keine Aktion durch-
führen“ und klicken Sie auf -> OK.
Markieren Sie nun im Fenster „Such- und
Installationsoptionen“ nur die Option
„Wechselmedien durchsuchen (Diskette,
CD....) -> Weiter. Die Karte wird jetzt als
„Silicon Image SiL 0680 ATA/133 RAID
Controller“ erkannt. Falls nun die Meldung
erscheint „Die Software, die für diese
Hardware installiert wird: Silicon Image
SiL 0680 ATA/133 RAID Controller hat den
Windows-Logo-Test nicht bestanden, der die
Kompatibilität mit Windows XP überprüft...“
klicken Sie auf „Installation fortsetzen“.
Windows kopiert jetzt die benötigten Dateien
von der CD. Klicken Sie anschließend auf ->
Fertig stellen.
Ob der Controller ordnungsgemäß installiert
wurde, können Sie unter Start -> Systemsteu-
erung -> Leistung und Wartung -> System ->
Hardware -> Geräte-Manager nachsehen.
Dort muss folgender Eintrag ohne gelbes
Ausrufezeichen vorhanden sein.
SCSI- and RAID Controllers
•
Silicon Image SiL 0680 ATA/133 RAID Controller
Hinweis: Wir empfehlen Ihnen dringendst,
dass Windows XP x64 Benutzer
zumindest das aktuellste Service Pack,
wegen den Erweiterungen und Beseitigung
von Schwachstellen installieren.
Installation unter Windows 2000
Vorbereitung:
Stellen Sie sicher, das Ihr Benutzerkonto
unter Windows 2000 über Administratorenrechte verfügt, ansonsten kann die
Treiberinstallation fehlschlagen.
Nachdem Windows 2000 komplett hochgefahren ist, wird der Assistent für das Suchen
neuer Hardware gestartet. Dieser erkennt die
Karte als „RAID Controller“. Klicken Sie auf
-> Weiter, um fortzusetzen. Im nächsten Dialogfenster werden Sie gefragt „Wie möchten
Sie vorgehen?“ und Ihnen werden zwei Möglichkeiten zur Auswahl angezeigt. Wählen
Sie bitte die Option „Nach einem passenden
Treiber für das Gerät suchen (empfohlen)“
und klicken auf die Schaltfl äche -> Weiter.
Legen Sie nun bitte die beiliegende Treiber
CD-ROM in Ihr Laufwerk ein.
Der Hardwareassistent fragt Sie nun welche
„..Quellen für die Suche..“ Sie auswählen
möchten. Wählen Sie ausschließlich die
Option „CD-ROM-Laufwerke“ aus und
klicken auf -> Weiter. Nun sucht Windows
2000 auf der Treiber CD-ROM selbständig
nach dem passendsten Treiber. Nachdem die
Suche abgeschlossen wurde, bittet Sie der
Hardware Assistent den gefunden Treiber
( D:\driver\x86 raid driver\sil680r.inf) zu
bestätigen. Klicken Sie auf die Schaltfl äche
-> Weiter.
Hinweis: Unter Umständen kann der
Laufwerksbuchstabe je nach Konfi guration
abweichen!
Jetzt überspielt Windows 2000 die benötigten
Treiber auf die Festplatte, nachdem dies
ordnungsgemäß geschehen ist, meldet der
Hardware Assistent das die Treiberinstallation fertiggestellt wurde. Klicken Sie nun zum
Abschluss die Schaltfl äche -> Fertig stellen.
00049253bda.indd Abs1:500049253bda.indd Abs1:5 30.07.2007 10:53:48 Uhr30.07.2007 10:53:48 Uhr
Page 7
6
Ob der Controller ordnungsgemäß installiert
wurde, können Sie unter Start -> Einstel-
lungen -> Systemsteuerung -> System ->
Hardware -> Geräte Manager nachsehen.
Dort muss folgender Eintrag ohne gelbes
Ausrufezeichen vorhanden sein.
SCSI- und RAID-Controller
• Silicon Image SiL 0680 Ultra-133 Medley
ATA Raid Controller
Hinweis: Wir empfehlen Ihnen dringendst,
dass Windows 2000 Benutzer zumindest das
aktuellste Service Pack, wegen den Erweiterungen und Beseitigung von Schwachstellen
installieren.
BIOS-Einstellungen des RAID Controllers:
Achtung: Durch falsche Einstellungen und /
oder Änderungen an vorhandenen Arrays /
Festplattenkonfi guration kann es zu Datenverlust kommen !
Nach dem Einschalten des PCs erscheint
kurz die Meldung „Press F3 to Enter RAID
utility“. Nachdem bereits Festplatten an dem
UDMA/ATA133 RAID Controller angeschlos-
sen sind, können Sie jetzt durch drücken der
Taste „F3“ das Bios des Controllers aufrufen.
Hier können Sie nun die verschiedenen,
unten beschriebenen, Einstellungen
vornehmen.
INFO: Während Sie sich im Bios befi nden sind
die Tasten Z und Y vertauscht(bedingt durch
die Amerikanische Tastaturbelegung).
• Press F1 to delete RAID set: Mit dieser
Option können Sie ein vorhandenes RAID
Array löschen (Achtung: dieses hat einen
unwiederbringlichen Datenverlust auf den
dazu verwendenden Festplatten zur Folge !).
• Press F2 to create RAID set: Mit dieser
Option können Sie ein RAID Array erstellen.
o Press F1 to create Striped set: Mit dieser
Option können Sie ein RAID 0 Array (Striped)
erstellen. Durch drücken der F1 Taste
erscheint folgende Meldung.
„Select the chunk size to be used in RAID
0 set:
A=Auto Confi gure; 0=1k 1=2k 3=8k 4=16k
5=32k 6=64k 7=128k...“
Drücken Sie hier bitte die Taste A
(empfohlen). Bei der nächsten Meldung
„Enter the total number of drives in Striped
set:“ geben Sie die Anzahl der Festplatten
an die Sie für Ihr RAID 0 Array verwenden
wollen. Achtung ! Die gesamte Größe Ihres
Arrays ist abhängig von der Größe der
kleinsten verwendeten Festplatte, z.B. Sie
verwenden eine 20 GB Festplatte und zwei 30
GB Festplatten, dann erhalten Sie ein Array
mit einer Größe von nur 60 GB (die Größe der
kleinsten Festplatte multipliziert mit der Anzahl der verwendeten Festplatten, 20GB x 3 =
60GB). Sollten Sie mehr Festplatten an Ihrem
Controller angeschlossen haben als Sie oben
ausgewählt haben erscheint die Meldung
„Enter the fi rst drive number in Striped set:“.
Wählen Sie nun bitte die erste Festplatte für
Ihr Array aus (z.B. „0“), danach die zweite
(z.B. „1“) und so weiter. Sie erhalten danach
die Meldung „Are you sure ? (Y/N)“. Hier
können Sie noch einmal kontrollieren ob
Ihre Einstellungen korrekt sind. In diesem
Fall drücken Sie bitte die Taste „Z“ (wegen
der amerikanischen Tastaturbelegung sind
im BIOS des Controllers die Tasten Z und Y
vertauscht).
00049253bda.indd Abs1:600049253bda.indd Abs1:6 30.07.2007 10:53:48 Uhr30.07.2007 10:53:48 Uhr
Page 8
7
o Press F2 to create Mirrored set:
Mit dieser Option können Sie ein RAID 1 Array (Mirrored / Spiegelung) erstellen. Durch
drücken der F2 Taste erhalten Sie folgende
Meldung: „Set up Mirrored set Do you want
automatic set up (No copy operation)?
(Y/N)“. Falls Sie wünschen, dass die
Spiegelung automatisch eingestellt wird
(empfohlen) drücken Sie bitte die Taste „Z“
(wegen der amerikanischen Tastaturbelegung sind im BIOS des Controllers die Tasten
Z und Y vertauscht). Achtung ! Die Festplatte
auf die Sie die Daten spiegeln wollen muss
entweder genauso groß (empfohlen) oder
größer sein als die Festplatte die Sie sichern
möchten. Die Daten der zu sichernden
Festplatte werden im Betrieb automatisch
auf die Spiegelung kopiert. Dieses kann
mehrere Stunden dauern. Um dies zu
überprüfen installieren Sie bitte die auf der
CD enthaltene Software (doppelklicken Sie
auf die Datei „InstallSilCfg“ im Verzeichnis
„\Utility\“ und folgen Sie den Installationsanweisungen). Klicken Sie auf das Pluszeichen
neben „PCI-680U-0“ und danach auf das
Pluszeichen neben „Sets“. Klicken Sie nun
auf „Set 0“ und danach auf „Members“. Hier
sehen Sie „Mirror0“ und „Mirror1“, daneben
den aktuellen Status der Spiegelung und evtl.
den Status der Spiegelung in Prozent. Sobald
100% erreicht sind ist die Spiegelung abgeschlossen. Sollte hier die Information stehen,
dass ein „Mirror“ auf Status „dropped“ steht
gehen Sie bitte wie unter dem Punkt „Press
F3 to create spare drive“ beschrieben vor.
• Press F3 to create Mirrored-Striped set:
Hier können Sie ein RAID 0+1 Array
erstellen (Striped + Mirrored).
o Press F3 to create spare drive:
Diese Option erlaubt Ihnen eine Festplatteauszuwechseln falls bei einem RAID1 Array
(Mirroring/Spiegelung) eine Platte durch einen Defekt oder anderen Fehler ausgefallen
ist. Entfernen Sie die defekte Festplatte und
installieren Sie die neue Austausch-Festplatte. Beim Neustart des Rechners erscheint
eine Fehlermeldung mit der Aufforderung
durch drücken der F3 Taste in das Bios
des Controllers zu wechseln. Drücken Sie
im Bios erneut die F3 Taste und wählen
Sie die neue Festplatte als Spare Drive
aus. Nach einem Neustart wird die neue
Festplatte automatisch abgeglichen. Dieses
kann mehrere Stunden dauern. Um dies zu
überprüfen installieren Sie bitte die auf der
CD enthaltene Software (doppelklicken Sie
auf die Datei „InstallSilCfg“ im Verzeichnis
„\Utility\“ und folgen Sie den Installationsanweisungen). Klicken Sie auf das Pluszeichen
neben „PCI-680U-0“ und danach auf das
Pluszeichen neben „Sets“. Klicken Sie nun
auf „Set 0“ und danach auf „Members“. Hier
sehen Sie „Mirror0“ und „Mirror1“, daneben
den aktuellen Status der Spiegelung und
evtl. den Status der Spiegelung in Prozent.
Sobald 100% erreicht sind ist die Spiegelung
abgeschlossen.
o Press F4 to resolve confl icts:
Mit dieser Option können Sie eventuell
notwendige Reparaturen ausführen lassen
welche durch einen Austausch einer Festplatte innerhalb eines Arrays entstanden
sind.
00049253bda.indd Abs1:700049253bda.indd Abs1:7 30.07.2007 10:53:49 Uhr30.07.2007 10:53:49 Uhr
Page 9
8
Bootoptionen:
Um von Geräten booten zu können, die an
der UDMA/ATA133 RAID Controller Karte
angeschlossen sind, müssen Sie im BIOS
bei “Bootsequenz“ “SCSI“ voreinstellen,
da dieser Controller als „SCSI-Controller“
behandelt wird. Fehlt in Ihrem BIOS diese
Möglichkeit (was vor allem bei älteren PCs
der Fall sein kann), hilft evtl. ein BIOS-Update.
Konsultieren Sie dazu Ihren Händler oder Motherboardhersteller. Wollen Sie von Geräten
booten, die an der On-Board IDE-Schnittstelle
angeschlossen sind, können Sie Ihre bisherigen Einstellungen beibehalten.
Geräte anschließen:
Im Gegensatz zu den 40-poligen Ultra-DMA/33
Flachbandkabeln muss bei den 80-poligen
Ultra-DMA66/100/133 Anschlusskabeln eine
Reihenfolge beim Anschließen von Geräten
eingehalten werden: Der blaue Stecker muss
mit der Schnittstelle an der Controllerkarte
verbunden werden. Der schwarze Stecker
muss mit dem ersten Gerät (“Master“) verbunden werden. Wollen Sie ein zweites Gerät
anschließen, muss dieses mit dem grauen
Stecker verbunden und als “Slave“ defi niert
werden. Die gleiche Reihenfolge gilt auch für
die zweite Schnittstelle auf der Karte. Achten
Sie stets darauf, die rot markierte Seite des
Anschlusskabels an der mit einem Pfeil
gekennzeichneten Seite des Controllers bzw.
Geräts anzuschließen. Auf der ControllerKarte fi nden Sie außerdem zwei Kontaktstifte
mit der Bezeichnung „JP2“. Hier können Sie
den Stecker für „HDDLED“ anschließen. Sie
signalisiert Schreib- und Lesezugriffe auf
angeschlossene Geräte.
INFO: Bei manchen Festplatten muss man
u.U. darauf achten, dass der Jumper
„Slave present“ gesetzt ist.
Kurze Einweisung in die Funktionsweise und
das Konzept eines RAID Controllers:
• ARRAY: Ein ARRAY bezeichnet die
Anordnung (engl. „array“) von 2 oder
mehreren Festplatten in einem PC.
• RAID: Als RAID (alt: Redundant Array of
Inexpensive (dtsch. billige) Disks oder
neu Redundant Array of Independent
(dtsch. unabhängig) Disks) bezeichnet
man eine Zusammenführung von 2 oder
mehreren Festplatten. Diese Fest plattengruppe wird dann als eine Fest platte angesprochen. Indem man Fest
platten zusammenführt, kann die Leistung
theoretisch verdoppelt werden, darüber
hinaus kann man zusätzlich ein automa
tisiertes Backup durchführen lassen.
Diese Konzepte sind als RAID 0 (striping
= Aufteilung der Daten auf verschiedene
Festplatten) und RAID 1 (mirroring =
spiegeln der Daten als Backup) bekannt.
• RAID 0 (od. striping: Datenaufteilung):
Hierbei werden die Daten gleichmäßig
auf den Festplatten aufgeteilt und somit
die Transferleistung deutlich erhöht.
Für den Anwender macht sich dieser hohe
Datendurchsatz vor allem bei sehr großen
Dateien (z.B. Videos) bemerkbar.
• RAID 1 ( od. mirroring: Spiegeln): Hierbei
werden Daten vom primären (ersten) Lauf
werk auf ein sekundäres (zweiten)
Laufwerk kopiert. Sämtliche Informationen
befi nden sich somit auf jedem der
Laufwerke (Festplatten). Sollte eine
Festplatte einen technischen Defekt
erleiden, so schaltet der RAID-Controller
automatisch auf die intakte Festplatte
um. Mit dem UDMA/ATA133 RAID Controller lässt sich eine beschädigte
Festplatte schnell austauschen und eine
neue in das Array einbauen.. Während die
Schreibleistung unbeeinfl usst bleibt,
können beide Festplatten gleichzeitig
00049253bda.indd Abs1:800049253bda.indd Abs1:8 30.07.2007 10:53:49 Uhr30.07.2007 10:53:49 Uhr
Page 10
9
Leseaktionen durchführen. Somit
verdoppelt die Spiegelung die Lese leistung eines Laufwerks.
• RAID 0 + 1: Eine Kombination von striping
und mirroring bietet die Geschwindigkeits
vorteile von RAID 0 und die Datensicher
heit von RAID
1. Die Kombination ist durch Verwendung
von vier Festplatten möglich.
Sicherheitshinweise:
Bitte verwenden Sie das Produkt weder in
der Nähe von Heizungen noch in staubiger
oder feuchter Umgebung.
Supportinformationen:
Bei defekten Produkten wenden Sie sich bitte
an Ihren Händler oder der Hama Produktberatung:
Support Hotline – Hama Produktberatung:
Tel. +49 (0) 90 91 / 502 – 115
Fax. +49 (0) 90 91 / 502 – 272
e-mail: mailto:[email protected]
Produktinformationen oder neue Treiber
fi nden Sie im Internet unter
www.hama.com
00049253bda.indd Abs1:900049253bda.indd Abs1:9 30.07.2007 10:53:50 Uhr30.07.2007 10:53:50 Uhr
Page 11
d
Bedienungsanleitung
10
Package contents
• IDE 133 RAID controller, PCI
• Includes 80-pin IDE fl at ribbon cable
• Package slip with disposal instructions
Installing the hardware
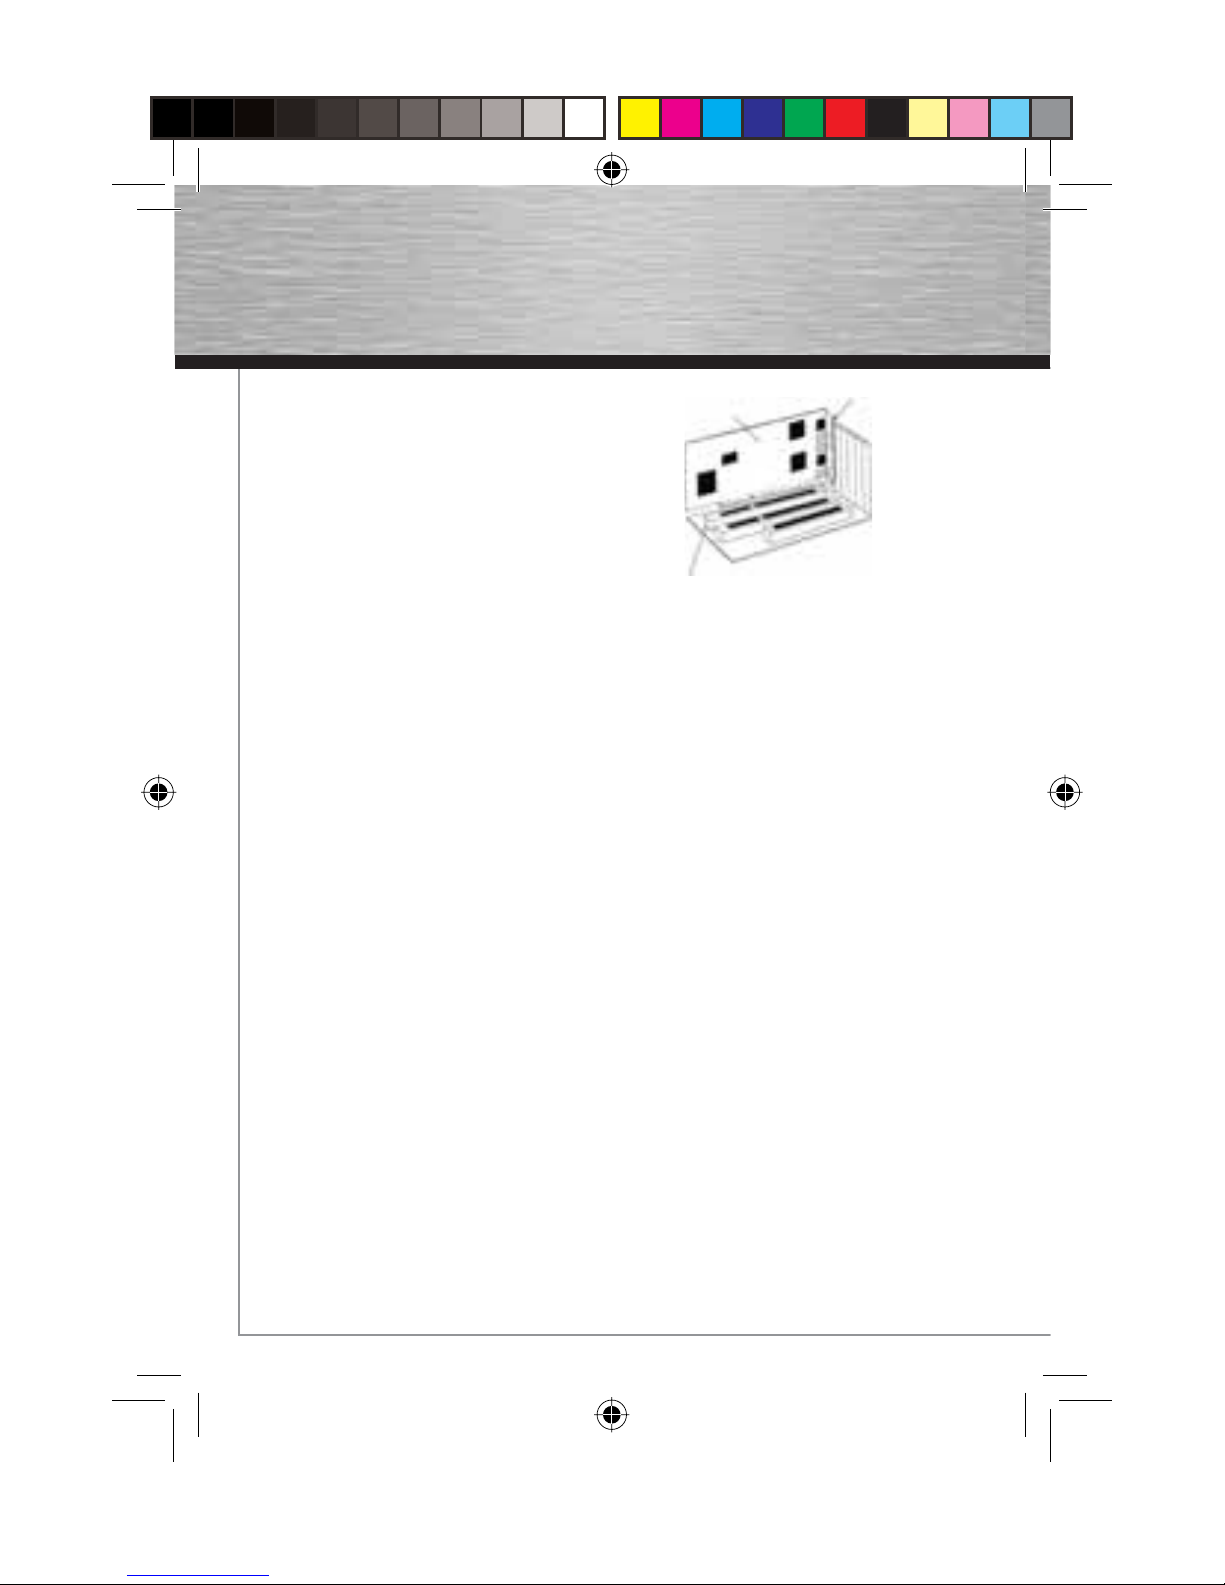
You must open your computer to install the
card. Ensure that you have fi rst disconnected
your computer from the power supply. If you
are not familiar with the internal setup of
your computer, please consult your computer
manual or ask a qualifi ed technician.
• Switch off your computer and all
connected devices.
• Unplug your PC before beginning
installation.
• Open the case of the computer.
Note: Be aware that static electricity
can damage both the PCI card and your
computer. Ground yourself by touching a
metal object.
• Select a free PCI slot.
• Remove the plate for this slot. Keep the
screw – you will need it later to secure
the PCI card.
• Hold the PCI card by the edges of the
board and insert it into the free PCI slot.
• Carefully push the card into the slot
until the holding bracket is lined up with
the casing and the gold-plated contacts
have disappeared into the slot.
• Secure the card using the slot cover plate
screw you removed earlier.
• Close the case of your computer, and
reconnect it to the power supply.
• Restart your computer.
Installing the software
Installation on Windows Vista 32-bit editions
After Windows Vista has fi nished booting, a
window appears with the title „Found New
Hardware“. It offers you three options. Select
the fi rst option (Locate and install driver
software (recommended).
You are now asked by the User Account
Control whether you want to continue the
procedure. Click -> Continue.
After a short wait, Windows Vista displays a
dialogue fi eld in which you are asked to insert
your driver CD-ROM. Insert the CD-ROM and
then click -> Next. Wait until the „Searching
for software on drive“ window is displayed.
After a little while, Windows Vista fi nds the
driver on the CD. In some cases, a security
window may be displayed. This indicates
that the manufacturer could not be verifi ed
and gives you two options to choose from.
Choose the option „Install drivers anyway“.
Vista then copies the driver data from the CD
to your system.
Windows Vista now displays a message
confi rming that the drivers were successfully
installed. Click -> Close to complete installation. Remove the driver CD-ROM from your
drive and keep it in a safe place so that the
driver can be reinstalled if required.
g
Operating instruction
PC
Card
Slot plate
00049253bda.indd Abs1:1000049253bda.indd Abs1:10 30.07.2007 10:53:50 Uhr30.07.2007 10:53:50 Uhr
Page 12
11
g
Operating Instruction
11
g
Operating Instruction
Note: The security window only indicates
that the driver has not yet been certifi ed by
Microsoft. The driver‘s stability and function
were thoroughly tested before delivery. The
qualifi cation of the drivers by Hama means
that new versions can be used far earlier
and do not have to wait for certifi cation by
Microsoft.
You can verify whether the controller has
been successfully installed by checking
under Start (Windows logo) -> Control Panel
-> System and Maintenance -> Device
Manager. In some circumstances, you may
be asked by the User Account Control for
confi rmation. Click -> Continue. The following
entry should appear without a yellow exclamation mark.
Storage controller:
• Silicon Image SiL 0680 Ultra-133 Medley
ATA RAID Controller
Installation on Windows Vista 64-bit editions
After Windows Vista has fi nished booting, a
window appears with the title „Found New
Hardware“. It offers you three options. Select
the fi rst option (Locate and install driver
software (recommended)).
You are now asked by the User Account
Control whether you want to continue the
procedure. Click -> Continue.
After a short wait, Windows Vista displays
a dialogue fi eld in which you are asked to
insert your driver CD-ROM. Comply with the
request and then click -> Next. Wait until the
„Searching for software on drive“ window
is displayed.
After a little while, Windows Vista fi nds the
driver on the CD. In some cases, a security
window may be displayed.
This indicates that the manufacturer could
not be verifi ed and gives you two options
to choose from. Choose the option „Install
drivers anyway“. Vista then copies the driver
data from the CD to your system.
Windows Vista now displays a message
confi rming that the drivers were successfully
installed. Click -> Close to complete installation. Remove the driver CD-ROM from your
drive and keep it in a safe place so that the
driver can be reinstalled if required.
Note: The security window only indicates
that the driver has not yet been certifi ed by
Microsoft. The driver‘s stability and function
were thoroughly tested before delivery. The
qualifi cation of the drivers by Hama means
that new versions can be used far earlier
and do not have to wait for certifi cation by
Microsoft.
You can verify whether the controller has
been successfully installed by checking
under Start (Windows logo) -> Control Panel
-> System and Maintenance -> Device
Manager. In some circumstances, you may
be asked by the User Account Control for
confi rmation. Click -> Continue. The following
entry should appear without a yellow exclamation mark.
Storage controller
• Silicon Image SiL 0680 ATA/133 RAID
Controller
Installation on Windows XP with Service
Pack 2
Preparation:
Ensure that your user account has administration privileges for Windows XP, otherwise
the driver installation will not be successful.
00049253bda.indd Abs1:1100049253bda.indd Abs1:11 30.07.2007 10:53:50 Uhr30.07.2007 10:53:50 Uhr
Page 13
d
Bedienungsanleitung
12
After Windows XP has fi nished booting, the
Found new hardware Wizzard appears and
asks you whether Windows can connect to
the Internet to search for a suitable driver
with Windows Update. Select the option
-> „No, not this time“ and click -> Next
to continue installation. The Hardware
Wizard identifi es the controller as a „RAID
controller“. Select the option Install from a
list or specifi c lacation (Advanced). Click
-> Next. Now insert the supplied driver CD.
Should a window appear with the question
What do wou want the wizard to do? Choose
the option „Do not carry out any action“ and
click -> OK.
In the „Search and installation options“
window, only choose „Search removable
media (diskette, CD....)“ -> Next. The card
is now recognised as a „Silicon Image SiL
0680 Ultra-133 Medley ATA RAID Controller“.
If this message appears – „The software
you are installing for this hardware: Silicon
Image SiL 0680 Ultra-133 Medley ATA RAID
Controller has not passed the Windows logo
test that checks compatibility with Windows
XP“, click on „Continue installation“. Win-
dows now copies the required fi les from the
CD. Click -> Finish.
You can check whether the controller has
been installed successfully under Start ->
Control Panel -> Performance and Maintenance -> System -> Hardware -> Device
Manager. The following entry should appear
without a yellow exclamation mark.
SCSI and RAID controller
• Silicon Image SiL 0680 Ultra-133 Medley
ATA RAID Controller
Note: We strongly recommend that Windows
XP users at least install the latest Service
Pack to benefi t from enhancements and
improved functionality.
Installation on Windows XP x64bit
Preparation:
Ensure that your user account has administration privileges for Windows XP, otherwise
the driver installation may not be successful.
After Windows XP has fi nished booting, the
Found new hardware Wizzard appears and
asks you whether Windows can connect to
the Internet to search for a suitable driver
with Windows Update. Select the option
-> „No, not this time“ and click -> Next to
continue installation. The Hardware Wizard
identifi es the controller as a „RAID con-
troller“. Select the option „Install software
from a list or specifi c location (for advanced
users)“. Click -> Next. Now insert the sup-
plied driver CD. Should a window appear with
the question What do wou want the wizard to
do? Choose the option „Do not carry out any
action“ and click -> OK.
In the „Search and installation options“
window, only choose „Search removable
media (diskette, CD....)“ -> Next. The card is
now recognised as a „Silicon Image SiL 0680
ATA/133 RAID Controller“. If this message
appears – „The software you are installing
for this hardware: Silicon Image SiL 0680
ATA/133 RAID Controller has not passed the
Windows logo test that checks compatibility with Windows XP“, click on „Continue
installation“. Windows now copies the
required fi les from the CD. Click -> Finish.
You can check whether the controller has
been installed successfully under Start ->
Control Panel -> Performance and Maintenance -> System -> Hardware -> Device
Manager. The following entry should appear
without a yellow exclamation mark.
SCSI and RAID controllers
• Silicon Image SiL 0680 ATA/133 RAID
Controller
00049253bda.indd Abs1:1200049253bda.indd Abs1:12 30.07.2007 10:53:51 Uhr30.07.2007 10:53:51 Uhr
Page 14
g
Operating Instruction
13
Note: We strongly recommend that Windows
XP x64 users at least install the latest Service
Pack to benefi t from enhancements and
improved functionality.
Installation on Windows 2000 with Service
Pack 4
Preparation:
Ensure that your user account has
administration privileges for Windows 2000,
otherwise the driver installation may not be
successful.
After Windows 2000 has fi nished booting, the
Found new hardware Wizzard starts. The
card is recognised as a „RAID controller“.
Click -> Next to continue. In the next window
you are asked What do wou want the wizard
to do? and two options are displayed. Select
the option „Search for a suitable driver for
my device (recommended)“. Then click ->
Next to continue. Insert the supplied driver
CD-ROM in your drive.
The Found new hardware Wizzard now asks
you which source location you would like to
choose. Select „CD-ROM drive“ and click ->
Next. Windows 2000 now searches the driver
CD-ROM for the most suitable driver. After
the search is complete, the Hardware Wizard
asks you to confi rm the driver found (D:\dri-
ver\x86 raid driver\sil680r.inf). Click -> Next.
Note: The drive initial may differ according to
the confi guration.
Windows 2000 now copies the required
drivers to the hard drive. After this is successfully completed, the Hardware Wizard
reports that the driver has been installed.
Click -> Finish to complete set-up.
You can check whether the controller has
been installed successfully under Start ->
Settings -> Control Panel -> System ->
Hardware -> Device Manager. The following
entry should appear without a yellow exclamation mark.
SCSI and RAID controller
• Silicon Image SiL 0680 Ultra-133 Medley
ATA RAID Controller
Note: We strongly recommend that Windows
2000 users at least install the latest Service
Pack to benefi t from enhancements and
improved functionality.
BIOS settings for RAID controller
Caution: Incorrect settings and/or changing
existing arrays/hard drive confi gurations can
lead to loss of data.
After the PC has been turned on, the message „Press F3 to enter RAID utility“ appears
briefl y. Once hard drives have been connected to the UDMA/ATA133 RAID controller,
you can call up the Bios for the controller
by pressing „F3“. Here you can make the
various Settings described below.
INFO: In the BIOS menu, the Z and Y keys are
switched around (due to the American keyboard layout.).
• Press F1 to delete RAID set: Use this
option to delete an existing RAID array
(Caution: This results in all data being
erased from the hard drives used for this
purpose).
• Press F2 to create RAID set: Use this
option to create a RAID array.
o Press F1 to create Striped set:
Use this option to create a RAID 0 array
(striped). When you press the F1 key, the
following message appears.
00049253bda.indd Abs1:1300049253bda.indd Abs1:13 30.07.2007 10:53:51 Uhr30.07.2007 10:53:51 Uhr
Page 15
d
Bedienungsanleitung
14
„Select the chunk size to be used in RAID
0 set:
A=Auto Confi gure; 0=1k 1=2k 3=8k 4=16k
5=32k 6=64k 7=128k...“
Press the „A“ key (recommended). For the
next message, „Enter the total number of
drives in Striped set:“, enter the number of
hard drives you wish to use for your RAID 0
array. Caution: The total size of your array is
dependent upon the size of the smallest hard
drive used. For example, when you use one
20GB hard drive and two 30GB hard drives,
you get an array with a size of only 60 GB
(the size of the smallest hard drive multiplied
by the number of hard drives used, or 20GB
x 3 = 60GB). Should you have more hard
drives connected to your controller than you
selected above, the message „Enter the fi rst
drive number in Striped set:“ appears. Then
select the fi rst hard drive for your array (e.g.
„0“), then the second (e.g. „1“), and so forth.
You will then get the message „Are you sure
? (Y/N)“. Here you can check again whether
your settings are correct. In this case, press
the „Z“ key (due to the American keyboard
layout, the Z and Y keys are switched around
in the controller BIOS).
o Press F2 to create Mirrored set:
Use this option to create a RAID 1 array
(mirrored). When you press the F2 key, you
get the following message: „Set up Mirrored
set Do you want automatic set up (No copy
operation)? (Y/N)“. If you want the mirroring
to be set automatically (recommended), press
the „Z“ key (due to the American keyboard
layout, the Z and Y keys are switched around
in the controller BIOS). Caution: The hard
drive on which you want to mirror the data
must be either the same size (recommended)
or larger than the hard drive you want to back
up. During operation, the data on the hard
drive to be backed up is automatically copied
to the mirror. This can take several hours. In
order to check this, install the software contained on the CD (double-click on the „Install-
SilCfg“ fi le in the \Utility\ directory and follow
the installation instructions). Click on the plus
sign next to „PCI-680U-0“ and then click on
the plus sign next to „Sets“. Now click on
„Set 0“ and then on „Members“. Here you
see „Mirror0“ and „Mirror1“, next to that the
current status of the mirroring, and possibly
the status of the mirroring in percent. As
soon as 100% has been reached, mirroring is
completed. If a message appears stating that
a „Mirror“ has „dropped“ status, proceed as
described in the „Press F3 to create spare
drive“ paragraph. - Press F3 to create Mirrored-Striped set: Use this option to create a
RAID 0+1 array (striped + mirrored).
o Press F3 to create spare drive:
This option allows you to replace a hard
drive, in case a drive has dropped out due to
a defect or other error with a RAID 1 array
(mirroring). Remove the defective hard drive
and install the new replacement hard drive.
When you reboot the computer, an error message will appear, prompting you to press the
F3 key to enter the controller BIOS. Press the
F3 key again in the BIOS and select the new
hard drive as spare drive. After rebooting,
the new hard drive is automatically rebuilt.
This can take several hours. In order to check
this, install the software contained on the CD
(double-click on the „InstallSilCfg“ fi le in the
\Utility\ directory and follow the installation
instructions). Click on the plus sign next to
„PCI-680U-0“ and then click on the plus sign
next to „Sets“. Now click on „Set 0“ and then
on „Members“. Here you see „Mirror0“ and
„Mirror1“, next to that the current status of
the mirroring, and possibly the status of the
mirroring in percent. As soon as 100% has
been reached, mirroring is completed.
00049253bda.indd Abs1:1400049253bda.indd Abs1:14 30.07.2007 10:53:51 Uhr30.07.2007 10:53:51 Uhr
Page 16
g
Operating Instruction
15
o Press F4 to resolve confl icts:
Use this option to perform any repairs that
might be needed due to the replacement of a
hard drive within an array.
Boot options:
In order to be able to boot from devices connected to the UDMA/ATA133 RAID controller
card, you must fi rst set the „boot sequence“
in the BIOS to „SCSI“, since this controller
is treated as a SCSI controller. If your BIOS
does not have this option (as is often the
case with older PCs), it may be possible to
solve this problem by updating your BIOS.
Consult your retailer or motherboard manufacturer for further details. If you want to boot
from devices connected to the on-board IDE
interface, you can use the settings already
confi gured.
Connecting devices:
Unlike with 40-pin Ultra DMA/33 fl at ribbon
cables, a certain sequence must be followed
when connecting devices using 80-pin Ultra
DMA66/100/133 connection cables: The
blue connector must be connected with the
interface on the controller card. The black
connector must be connected with the fi rst
or „master“ device. If you want to connect a
second device, it must be connected with the
grey connector and defi ned as the „slave“.
The same sequence also applies to the
second interface on the card. Always make
sure that the red side of the connection cable
is connected to the side of the controller or
device that is marked with an arrow. You will
also fi nd two contact pins on the controller
card labelled „JP2“. Here you can connect
the connector for the „HDDLED“. It indicates
write and read accesses on the connected
devices.
INFO: With some hard drives, the jumper
may have to be set to „Slave present“.
A short briefi ng on the concept of a RAID
controller and how it works:
• ARRAY: An ARRAY is a term for the array
of 2 or more hard drives in a PC.
• RAID: A RAID (old: Redundant Array of
Inexpensive Disks, or new: Redundant
Array of Independent Disks) is a term for
a consolidation of 2 or more hard drives.
This group of drives is then addressed as
one hard drive. By combining drives,
performance can theoretically be doubled,
and data can be backed up
automatically. These concepts are known
as RAID 0 (striping = dividing the data onto
different hard drives) and RAID 1
(mirroring = making identical copies as a
backup).
• RAID 0 (or striping: data division): The data
is divided equally among the hard drives,
thus increasing the transfer performance
signifi cantly. For the user, this high data
throughput is particularly noticeable with
very large fi les (e.g. videos).
• RAID 1 (or mirroring: identical copy): In
this case, the data is copied from the
primary drive to a secondary drive.
All information is therefore contained on
both drives (hard drives). If one hard drive
fails (due to a technical defect), the RAID
controller automatically switches to the
intact hard drive. The UDMA/ATA133 RAID
controller allows damaged hard drives to
be replaced quickly by adding a new one
to the array. While this does not affect the
write performance, both hard drives
can be read simultaneously. Mirroring
thus doubles the read performance of a
drive.
00049253bda.indd Abs1:1500049253bda.indd Abs1:15 30.07.2007 10:53:52 Uhr30.07.2007 10:53:52 Uhr
Page 17
d
Bedienungsanleitung
16
• RAID 0 + 1: A combination of striping and
mirroring provides the performance
advantages of RAID 0 and the data
security of RAID 1.
1. This combination can be achieved by
using four hard drives.
Safety instructions:
Keep this device away from heaters and
radiators, and free of dust or dampness when
being operated.
Support information:
Contact your dealer or Hama Product
Consulting if you have a faulty product:
Support hotline – Hama Product Consulting:
Tel. +49 (0) 90 91 / 502 – 115
Fax. +49 (0) 90 91 / 502 – 272
E-mail: mailto:[email protected]
Product information and new drivers can
found in the internet at
www.hama.com
00049253bda.indd Abs1:1600049253bda.indd Abs1:16 30.07.2007 10:53:52 Uhr30.07.2007 10:53:52 Uhr
Page 18
g
Operating Instruction
17
Contenu de l´emballage :
• 1x Contrôleur RAID IDE 133 PCI
• 1x Câble plat IDE à 80 points
• 1x Notice explicative sur les mesures
d´élimination des déchets
Installation du matériel :
Pour installer la carte, veuillez ouvrir votre
ordinateur. Auparavant, vérifi ez bien que
votre ordinateur ne soit plus branché au réseau. Si vous n´êtes pas trop familiarisé avec
la construction intérieure de votre ordinateur,
veuillez s´il vous plaît lire le manuel de votre
ordinateur ou adressez-vous à un spécialiste.
• Eteignez votre ordinateur et tous les
appareils branchés.
• Avant de commencer l´installation,
débranchez votre PC.
• Ouvrez le châssis de votre ordinateur.
Indication : Veuillez observer que
l´électricité statique peut endommager la
carte PCI ainsi que votre ordinateur.
Avant d´installer la carte, déchargez-vous
en touchant un objet métallique.
• Cherchez un emplacement PCI disponible.
• Enlevez le couvercle de cet emplacement.
Gardez bien la vis car vous en aurez
besoin par la suite pour fi xer la carte PCI.
• Tenez la carte PCI aux coins de la platine
et insérez-la dans le connecteur
d´extension PCI disponible.
• Poussez la carte maintenant avec
précaution dans le connecteur
d´extension jusqu´à ce que l´angle de
support soit enclenché et que les contacts
dorés soient entièrement disparus dans
l´emplacement.
• Fixez la carte avec la vis de
l´emplacement en tôle enlevée
auparavant.
• Veuillez refermer le boîtier de votre
ordinateur et rebranchez-le.
• Allumez à présent votre ordinateur.
Installation du logiciel :
Installation sous Windows Vista Editions
32bits
Une fois que Windows Vista est entièrement
lancé, une fenêtre avec le message Nouveau
matériel détecté apparaît et vous propose
trois options. Veuillez choisir la première
option Rechercher et insteller le pilote
logiciel (recomandé).
Ensuite, le Contrôle de compte d'utilisateur
vous demande votre accord pour continuer
la procédure. Pour cela, cliquez sur ->
Continuer.
Peu de temps après, Windows Vista vous
montre un champ de dialogue dans lequel
on vous demande d´insérer votre pilote CDROM. Faites-le et attendez jusqu‘ à ce que
la fenêtre de dialogue „Des logiciels sont
recherchés dans le support de données“
s´affi che à l´écran
Au bout de quelque temps, Windows Vista va
trouver le pilote sur le CD et une fenêtre de
sûreté va s´affi cher à l´écran. Un message
va vous informer que l´Éditeur ne pouvait pas
être vérifi é et va vous proposer deux options
au choix. Sélectionnez l´option „Installer tout
de même ces logiciels/pilotes..“, Vista copie
à présent les données du pilote du CD sur
votre système.
f
Mode d‘emploi
PC
Carte
Cache
emplacement
00049253bda.indd Abs1:1700049253bda.indd Abs1:17 30.07.2007 10:53:52 Uhr30.07.2007 10:53:52 Uhr
Page 19
d
Bedienungsanleitung
18
Pour fi nir, Windows Vista vous informe que
l´installation du pilote est réussie, cliquez
alors sur le bouton de commande -> Fermer
pour terminer l´installation. Veuillez enlever
le pilote CD-ROM de votre lecteur et conservez-le avec précaution au cas où vous en
auriez besoin pour une éventuelle nouvelle
installation du pilote.
Remarque : La fenêtre de sûreté doit vous
informer que le pilote n´a pas encore reçu de
certifi cation valable de Microsoft. La stabilité
et le fonctionnement du pilote ont été testés
à maintes reprises. La qualifi cation du pilote
par Hama permet d´utiliser les nouvelles
versions bien avant, sans devoir attendre la
certifi cation de Microsoft.
Pour vérifi er si le contrôleur est installé
correctement, cliquez sur Démarrer
(Windows Logo) -> Panneau de confi guration
-> Systéme et maintenance -> Gestionnaire
des périphériques. Le cas échéant, le
Contrôle de compte d'utilisateur va vous
demander d´approuver cette action. Pour
cela, cliquez sur le bouton de commande
-> Continuer. L´enregistrement suivant doit
fi gurer sans point d´exclamation jaune.
Contrôleur de stockage :
• Silicon Image SiL 0680 Ultra-133 Medley
ATA Raid Controller
Installation sous Windows Vista Editions
64bits
Une fois que Windows Vista est entièrement
lancé, une fenêtre avec le message Nouveau
matériel détecté apparaît et vous propose
trois options. Veuillez choisir la première option Rechercher et installer le pilote logiciel
(recommandé).
Ensuite, le Contrôle de compte d'utilisateur
vous demande votre accord pour continuer
la procédure. Pour cela, cliquez sur ->
Continuer.
Peu de temps après, Windows Vista vous
montre un champ de dialogue dans lequel
on vous demande d´insérer votre pilote CDROM. Faites-le et attendez jusqu‘ à ce que
la fenêtre de dialogue „Des logiciels sont
recherchés dans le support de données“
s´affi che à l´écran
Au bout de quelque temps, Windows Vista va
trouver le pilote sur le CD et une fenêtre de
sûreté va s´affi cher à l´écran. Un message
va vous informer que l´Éditeur ne pouvait pas
être vérifi é et va vous proposer deux options
au choix. Sélectionnez l´option „Installer tout
de même ces logiciels/pilotes..“, Vista copie
à présent les données du pilote du CD sur
votre système.
Pour fi nir, Windows Vista vous informe que
l´installation du pilote est réussie, cliquez
alors sur le bouton de commande -> Fermer
pour terminer l´installation. Veuillez enlever
le pilote CD-ROM de votre lecteur et conservez-le avec précaution au cas où vous en
auriez besoin pour une éventuelle nouvelle
installation du pilote.
Remarque : La fenêtre de sûreté doit vous
informer que le pilote n´a pas encore reçu de
certifi cation valable de Microsoft. La stabilité
et le fonctionnement du pilote ont été testés
à maintes reprises. La qualifi cation du pilote
par Hama permet d´utiliser les nouvelles
versions bien avant, sans devoir attendre la
certifi cation de Microsoft.
00049253bda.indd Abs1:1800049253bda.indd Abs1:18 30.07.2007 10:53:53 Uhr30.07.2007 10:53:53 Uhr
Page 20
19
g
Operating Instruction
19
g
Operating Instruction
Pour vérifi er si le contrôleur est installé
correctement, cliquez sur Démarrer
(Windows Logo) -> Panneau de confi guration -> Systéme et maintenance -> Gestionnaire des périphériques. Le cas échéant,
le Contrôle de compte d'utilisateur va vous
demander d´approuver cette action. Pour
cela, cliquez sur le bouton de commande
-> Continuer. L´enregistrement suivant doit
fi gurer sans point d´exclamation jaune.
Contrôleur de stockage :
• Silicon Image SiL 0680 ATA/133 RAID
Controller
Installation sous Windows XP avec Service
Pack 2
Préparation :
Assurez-vous que votre compte d´utilisateur
sous Windows XP dispose des droits
d´administration, l´installation du pilote sinon
ne fonctionnera pas.
Une fois Windows XP entièrement lancé,
apparaît le message Assistant Ajout de
nouveau matériel détecté et vous demande
si Windows peut se connecter à internet
pour rechercher un pilote qui convient dans
Windows Update. Répondez à la question en
choisissant l´option -> Non, pas pour cette
fois et cliquez sur -> Suivant pour continuer
l´installation. L´Assistant d´installation du
matériel identifi e le contrôleur comme „Con-
trôleur RAID“. Sélectionnez Installer à partir
d' une liste ou d'un emplacement spécifi é
(utilisateurs expérimentés) et cliquez sur
-> Suivant. Veuillez maintenant insérer le
pilote CD fourni. Au cas où la fenêtre „Quelle
action doit maintenant être exécutée?“
apparaît, sélectionnez „Exécuter aucune
action“ puis cliquez sur -> OK.
Dans la fenêtre Rechercher le meilleur pilote
dans ces emplacements cliquez seulement
sur l´option Rechercher dans les médias
amovibles (disquette, CD-ROM...)-> Suivant.
La carte est à présent reconnue comme
Silicon Image Sil 0680 Ultra-133 Medley
ATA Raid Controller. Si le message suivant
apparaît „Le logiciel qui a été installé pour
ce matériel : Contrôleur RAID ATA Silicon
Image SiL 0680 Ultra-133 Medley“ n´a pas
réussi le test logo Windows qui examine la
compatibilité avec Windows XP ...“ cliquez
alors sur „Continuer l´installation. Windows
copie maintenant les fi chiers nécessaires du
CD. Cliquez ensuite sur -> Terminer.
Pour vérifi er si le contrôleur est installé
correctement, cliquez sur Démarrer ->
Panneau de confi guration -> Performances
et maintenance -> Système -> Matériel ->
Gestionnaire de périphériques.
L´enregistrement suivant doit fi gurer sans
point d´exclamation jaune.
Contrôleurs SCSI et RAID
• Silicon Image SiL 0680 Ultra-133 Medley
ATA Raid Controller
Remarque : Nous vous recommandons
d´installer de toute urgence le service pack
le plus actuel de Windows XP Utilisateur
pour les extensions et l´élimination des points
faibles.
Installation sous Windows XP x64bits
Préparation :
Assurez-vous que votre compte d´utilisateur
sous Windows XP dispose des droits
d´administration, l´installation du pilote sinon
ne fonctionnera pas.
00049253bda.indd Abs1:1900049253bda.indd Abs1:19 30.07.2007 10:53:53 Uhr30.07.2007 10:53:53 Uhr
Page 21
d
Bedienungsanleitung
20
Une fois Windows XP entièrement lancé,
apparaît le message Assistant Ajout de
nouveau matériel détecté et vous demande
si Windows peut se connecter à internet
pour rechercher un pilote qui convient dans
Windows Update. Répondez à la question
en choisissant l´option -> „Non, pas cette
fois“ et cliquez sur -> Suivant pour continuer
l´installation. L´Assistant d´installation du
matériel identifi e le contrôleur comme RAID
Controller. Sélectionnez Installer à partir
d'une liste ou d'un emplacement spécifi é
(utilisateurs expérimentés) et cliquez sur ->
Suivant. Veuillez maintenant insérer le pilote
CD fourni. Au cas où la fenêtre „Quelle action
doit maintenant être exécutée?“ apparaît,
sélectionnez „Exécuter aucune action“ puis
cliquez sur -> OK. Dans la fenêtre Rechercher
le meilleur pilote dans ces emplacements
cliquez seulement sur l´option Rechercher
dans les médias amovibles Cdisquette, CDROM...) puis cliquez sur -> Suivant. La carte
est à présent reconnue comme
Silicon Image Sil 0680 ATA/133 RAID Controller. Si le message suivant apparaît: „Le logiciel qui a été installé pour ce matériel : Le
contrôleur RAID ATA Silicon Image SiL 0680
ATA/133 Medley n´a pas réussi le test logo
Windows qui examine la compatibilité avec
Windows XP ...“ cliquez alors sur „Continuer
l´installation. Windows copie maintenant les
fi chiers nécessaires du CD. Cliquez ensuite
sur -> Terminer.
Pour vérifi er si le contrôleur est installé correctement, cliquez sur Démarrer -> Panneau
de confi guration -> Performance et maintenance -> Système -> Matériel -> Gestionnaire de périphériques. L´enregistrement
suivant doit fi gurer sans point d´exclamation
jaune.
SCSI and RAID controllers
• Silicon Image SiL 0680 ATA/133 RAID
Controller
Remarque : Nous vous recommandons
d´installer de toute urgence le service pack le
plus actuel de Windows XP x64 Utilisateur pour
les extensions et l´élimination des points faibles.
Installation sous Windows 2000 avec Service
Pack 4
Préparation :
Assurez-vous que votre compte d´utilisateur
sous Windows 2000 dispose des droits
d´administration, l´installation du pilote
sinon ne fonctionnera pas.
Une fois Windows 2000 entièrement lancé, l´
Assistant pour la recherche de nouveaux matériels se met en marche. Celui-ci reconnaît
la carte comme „Contrôleur RAID“. Cliquez
sur -> Suivant pour continuer. Dans la fenêtre
de dialogue suivante, on vous demande
Quelle tâche voulez-vous que I'Assistant
exécute? et vous avez le choix entre deux
possibilités. Choisissez s´il vous plaît l´option
Rechercher un pilote approprié pour mon
périphérique (recommandé) puis cliquez
sur le bouton de commande -> Suivant.
Veuillez maintenant insérer le CD-ROM pilote
ci-joint dans votre lecteur. L´Assistant de
matériels vous demande maintenant quelles
Emplacements de recherche optionnels:
vous souhaitez sélectionner. Choisissez
uniquement l´option „Lecteurs de CD-ROM“
et cliquez sur -> Suivant. A présent, Windows
2000 cherche par lui-même le pilote approprié
sur le CD-ROM pilote. Une fois la recherche
terminée, l´Assistant du matériel vous demande de confi rmer le pilote trouvé (D:\driver\x86
raid driver\sil680r.inf ). Cliquez alors sur le
bouton de commande -> Suivant.
Remarque : La lettre du lecteur peut différer
selon la confi guration!
00049253bda.indd Abs1:2000049253bda.indd Abs1:20 30.07.2007 10:53:54 Uhr30.07.2007 10:53:54 Uhr
Page 22
g
Operating Instruction
21
A présent, Windows 2000 copie les pilotes
nécessaires sur le disque dur; une fois cela
terminé, l´Assistant du matériel informe
que l´installation du pilote est terminée.
Cliquez alors sur le bouton de commande ->
Terminer.
Pour vérifi er si le contrôleur est installé
correctement, cliquez sur Démarrer ->
Paramétres -> Panneau de confi guration ->
Système -> Matériel -> Gestionnaire des
périphériques. L´enregistrement suivant doit
fi gurer sans point d´exclamation jaune.
Contrôleurs SCSI et RAID
• Silicon Image SiL 0680 Ultra-133 Medley
ATA Raid Controller
Remarque : Nous vous recommandons
d´installer de toute urgence Windows 2000
Utilisateur, du moins le service pack le plus
actuel pour les extensions et l´élimination
des points faibles.
Réglages Bios du contrôleur RAID :
Attention : De mauvais réglages et / ou des
modifi cations aux matrices existantes /de la
confi guration du disque dur peuvent provoquer une perte des données!
Une fois le PC allumé, apparaît le court
message Press F3 to Enter RAID utility.
Etant donné que les disques durs sont déjà
branchés au contrôleur RAID UDMA/ATA
133, vous pouvez maintenant appeler le Bios
du contrôleur en appuyant sur la touche F3. A
présent, vous pouvez procéder aux différents
Réglages décrits ci-dessous.
INFO : Quand vous êtes dans Bios, les
touches Z et Y sont permutées (due à
l´affectation américaine des touches).
• Press F1 to delete RAID set
Avec cette option, vous pouvez supprimer
une matrice RAID existante. (Attention : La
conséquence est la perte irrécupérable
des données sur les disques durs
utilisés!!!)
• Press F2 to create RAID set
Cette option vous permet de créer une
matrice RAID.
• Press F1 to create Striped set
Cette option vous
permet de créer une matrice RAID O
(striped). En appuyant sur la touche F1
apparaît le message suivant:
Select the chunk size to be used in RAID
0 set :
A=Auto Confi gure; 0=1k 1=2k 3=8k 4=16k
5=32k 6=64k 7=128k...“
Veuillez appuyer sur la touche A (recommandé). Au message suivant Enter the total
number of drives in Striped set: rentrez la
quantité de disques durs que vous souhaitez
utiliser pour votre matrice RAID 0. Attention!
La taille totale de votre matrice dépend de
la taille du plus petit disque dur utilisé, par
exemple, si vous utilisez un disque dur de
20 GB et deux disques durs de 30 GB, vous
obtenez alors une matrice de la taille de 60
GB seulement (la taille du plus petit disque
dur multipliée par la quantité de disques durs
utilisés, 20GB x 3 = 60GB). Si vous avez connecté plus de disques durs à votre controleur
que vous avez sélectionné en haut, alors un
message apparaît Enter the fi rst drive numb-
er in Striped set: Sélectionnez à présent le
premier disque dur pour votre matrice (par
ex. „0“), ensuite le deuxième (par ex. „1“) et
ainsi de suite. Vous allez
recevoir un message Are you sure? (Y/N). Ici,
vous pourrez encore une fois vérifi er si vos
réglages sont corrects.
00049253bda.indd Abs1:2100049253bda.indd Abs1:21 30.07.2007 10:53:54 Uhr30.07.2007 10:53:54 Uhr
Page 23
d
Bedienungsanleitung
22
Dans ce cas, veuillez s´il vous plaît appuyer
sur la touche „Z“ (les touches Z et Y sont
permutées à cause de l´affectation américaine des touches).
• Press F2 to create Mirrored set :
Cette option vous permet de créer une
matrice RAID 1 (miroitement). En appuyant
sur la touche F2 vous allez recevoir le
message suivant : Set up Mirrored set Do you
want automatic set up (Nocopy operation)?
(Y/N). Si vous souhaitez que le miroitement
soit réglé automatiquement (recommandé),
appuyez sur la touche „Z“ (dans le BIOS du
contrôleur, les touches Z et Y sont permutées
à cause de l´affectation américaine des
touches). Attention! Le disque dur sur lequel
vous souhaitez refl éter les données doit soit
être aussi grand (recommandé), soit être plus
grand que le disque dur que vous souhaitez
sauvegarder. Les données du disque dur à
sauvegarder sont copiées automatiquement
pendant le fonctionnement sur miroir. Cela
peut durer plusieurs heures. Pour le vérifi er,
veuillez installer le logiciel du CD (doublecliquez sur le fi chier „InstallSilCfg“ dans le
répertoire \Utility\ et suivez les instructions
d´installation). Cliquez sur le signe Plus à
côté de „PCI-680U-0“ puis sur le signe Plus
à côté de „Sets“. Cliquez à présent sur „Set
0“ puis sur Members. Ici, vous voyez Mirror
et Mirror1,à côté l´état actuel du miroitement
et éventuellement l´état du miroitement en
pourcentage. Dès que 100% est atteint, le
miroitement est terminé. Si une information
apparaît ici qu´un Mirror est sur le statut
„dropped“, alors procédez comme il est
décrit dans le point Press F3 to create spore
drive. Press F3 to create Mirrored-striped
set: Ici, vous pouvez créer une matrice RAID
0+1 (Striped + Mirrored).
• Press F3 to create spore drive :
Cette option vous permet de changer un
disque dur au cas où dans une matrice RAID1
(Mirroring) un disque dur ne fonctionne plus
à cause d´une défaillance ou d´une autre
raison. Enlevez le disque dur défectueux et
installez le nouveau disque dur de remplacement. En redémarrant le micro-ordinateur, un
message d´erreur apparaît avec la demande
de permuter dans le Bios du contrôleur en
appuyant sur la touche F3. Réappuyez sur
la touche F3 dans Bios et sélectionnez le
nouveau disque dur comme Spare Drive.
Après un redémarrage le nouveau disque dur
va automatiquement être mis au point. Cela
peut durer plusieurs heures. Pour vérifi er
cela, veuillez installer les logiciels contenus
sur le CD (double-cliquez sur le fi chier
„InstallSilCfg“ dans le répertoire \Utility\ et
suivez les instructions d´installation). Cliquez
sur le signe Plus à côté de „PCI-680U-0“
puis sur le signe Plus à côté de „Sets“.
Veuillez à présent cliquer sur „Set 0“ puis sur
„Members“. Ici, vous verrez „Mirror0“ et
„Mirror1“, à côté l´état actuel du miroitement
et éventuellement l´état du miroitement en
pourcentage. Dès que 100% est atteint, le
miroitement est terminé.
• Press F4 to resolve confl icts :
Avec cette option vous pouvez éventuelle
ment exécuter les réparations nécessaires
aux défaillances qui ont été causées en
échangeant un disque dur à l´intérieur
d´une matrice.
00049253bda.indd Abs1:2200049253bda.indd Abs1:22 30.07.2007 10:53:54 Uhr30.07.2007 10:53:54 Uhr
Page 24
g
Operating Instruction
23
Options Boot :
Pour pouvoir démarrer les appareils qui
sont reliés à la carte du controleur RAID
UDMA/ATA133, vous devez prérégler „SCSI“
dans BIOS à la “séquence Boot“, puisque
ce contrôleur est traité comme „contrôleur
SCSI“. Si cette possibilité n´existe pas dans
votre BIOS (ce qui peut être le cas dans des
PC plus anciens), une remise à jour du BIOS
peut aider. Pour cela, veuillez consulter votre
commerçant spécialisé ou fabricant de la
platine de base. Si vous souhaitez démarrer
à partir des appareils qui sont reliés à
l´interface IDE On-Board, vous pouvez
conserver vos réglages effectués jusqu´à
maintenant.
Connexion des appareils :
Contrairement aux câbles plats Ultra-DMA/33
à 40 points, pour les câbles de connexions
Ultra-DMA66/100/133 à 80 points il faut
respecter l´ordre pour brancher les appareils
: La fi che bleue doit être reliée à l´interface
de la carte du contrôleur. La fi che noire
doit être reliée avec le premier appareil
(“Maître“). Si vous souhaitez brancher un
deuxième appareil, celui-ci doit être relié
avec la fi che grise et être défi ni comme
“Esclave“. La même succession est valable
pour le deuxième interface sur la carte.
Veuillez observer que le côté rouge du câble
de liaison soit toujours branché à l´endroit
du contrôleur ou de l´appareil repéré par
une fl èche. Sur la carte du contrôleur vous
trouverez, de plus, deux fi ches de contact
avec la désignation „JP2“. Ici, vous pouvez
brancher la fi che „HDDLED“. Elle signale les
accès d´écriture et de lecture aux appareils
branchés.
INFO: Pour certains disques durs, il faut
observer entre autres que le cavalier est mis
sur „Slave present“ .
Courte instruction sur le fonctionnement et le
concept d´un contrôleur RAID :
• MATRICE (ARRAY) : Une MATRICE désigne
l´ordre (en angl. „array“) de 2 ou plusieurs
disques durs dans un PC.
• RAID : RAID (ancienne désignation :
Redundant Array of Inexpensive (en
francais bon marché) Disks ou nouvelle
désignation Redundant Array of
Independent (en francais indépendants)
Disks) ou Ensemble redondant de disques
indépendants désigne une unité de
stockage à partir de deux ou plusieurs
disques durs. Ce groupe de disques durs
constitue un disque dur. En regroupant
des disques durs, en théorie la puissance
peut être multipliée par deux, ce qui veut
dire aussi que l´on peut faire exécuter
une sauvegarde supplémentaire
automatique. Ces concepts sont connus
sous le nom de RAID 0 (striping =
Répartition des données sur différents
disques durs) et RAID 1 (mirroring =
dupliquer les données comme
sauvegarde).
RAID 0 (ou striping : agrégats par bandes/
répartition des données) : Ici, les données
sont réparties d´un manière égale sur les
disques durs et augmente donc
énormément la puissance de transmissi
on. Pour l´utilisateur, ce transfert de
données élevé se ressent surtout pour de
très grands fi chiers (par ex. vidéos).
00049253bda.indd Abs1:2300049253bda.indd Abs1:23 30.07.2007 10:53:55 Uhr30.07.2007 10:53:55 Uhr
Page 25
d
Bedienungsanleitung
24
• RAID 1 ( ou mirroring : miroitement) :
Ici, les données du disque dur primaire
(premier) sont dupliquées sur un lecteur
secondaire (second). Toutes les
informations se trouvent donc sur chaque
lecteur (les disques durs). Dans le
cas d´une défaillance d´un disque dur, le
contrôleur RAID commute
automatiquement sur le disque dur resté
intact. Le contrôleur RAID UDMA/ATA133
permet d´échanger rapidement un disque
dur endommagé et d´en intégrér un
nouveau dans la matrice. Alors que la
puissance d´écriture reste inchangée,
les deux disques durs peuvent exécuter
des lectures simultanément. Ainsi le
miroitement multiplie par deux la puis
sance de lecture d´un lecteur.
• RAID 0 + 1 : Une combinaison de striping
(agrégats par bandes) et mirroring
(miroitage) offre les avantages de vitesse
du RAID 0 et la sécurité des données du
RAID
1. La combinaison est possibile en utilisant
quatre disques durs.
Mesures de sécurité :
Veuillez utiliser l´appareil ni près d´un
radiateur ni dans un endroit humide ou
poussiéreux.
Informations de support :
En cas de produits défectueux, veuillez vous
adresser à votre revendeur ou au service de
conseil des produits :
Support Hotline (ligne directe) – Service de
conseil des produits Hama :
Tel. 0049 90 91 / 502 – 115
Fax. 0049 90 91 / 502 – 272
e-mail: mailto:[email protected]
Vous trouverez des informations sur les
produits ainsi que de nouveaux pilotes dans
internet à www.hama.com
00049253bda.indd Abs1:2400049253bda.indd Abs1:24 30.07.2007 10:53:55 Uhr30.07.2007 10:53:55 Uhr
Page 26
g
Operating Instruction
25
00049253bda.indd Abs1:2500049253bda.indd Abs1:25 30.07.2007 10:53:55 Uhr30.07.2007 10:53:55 Uhr
 Loading...