

Page 1
I
RUS
D
GB
SK
CZ
Operating Instructions
Bedienungsanleitung
Руководство по эксплуатации
Istruzioni per l‘uso
Návod k použití
Návod na použitie
EWS-890Weather Station
Wetterstation
00
113986
Page 2
A
B
1 4 5 6
10
1112
13 17
14 18
15
21
22
24
23
25
26
19
20
16
2
7
8
9
3
Page 3
2
G Operating instruction
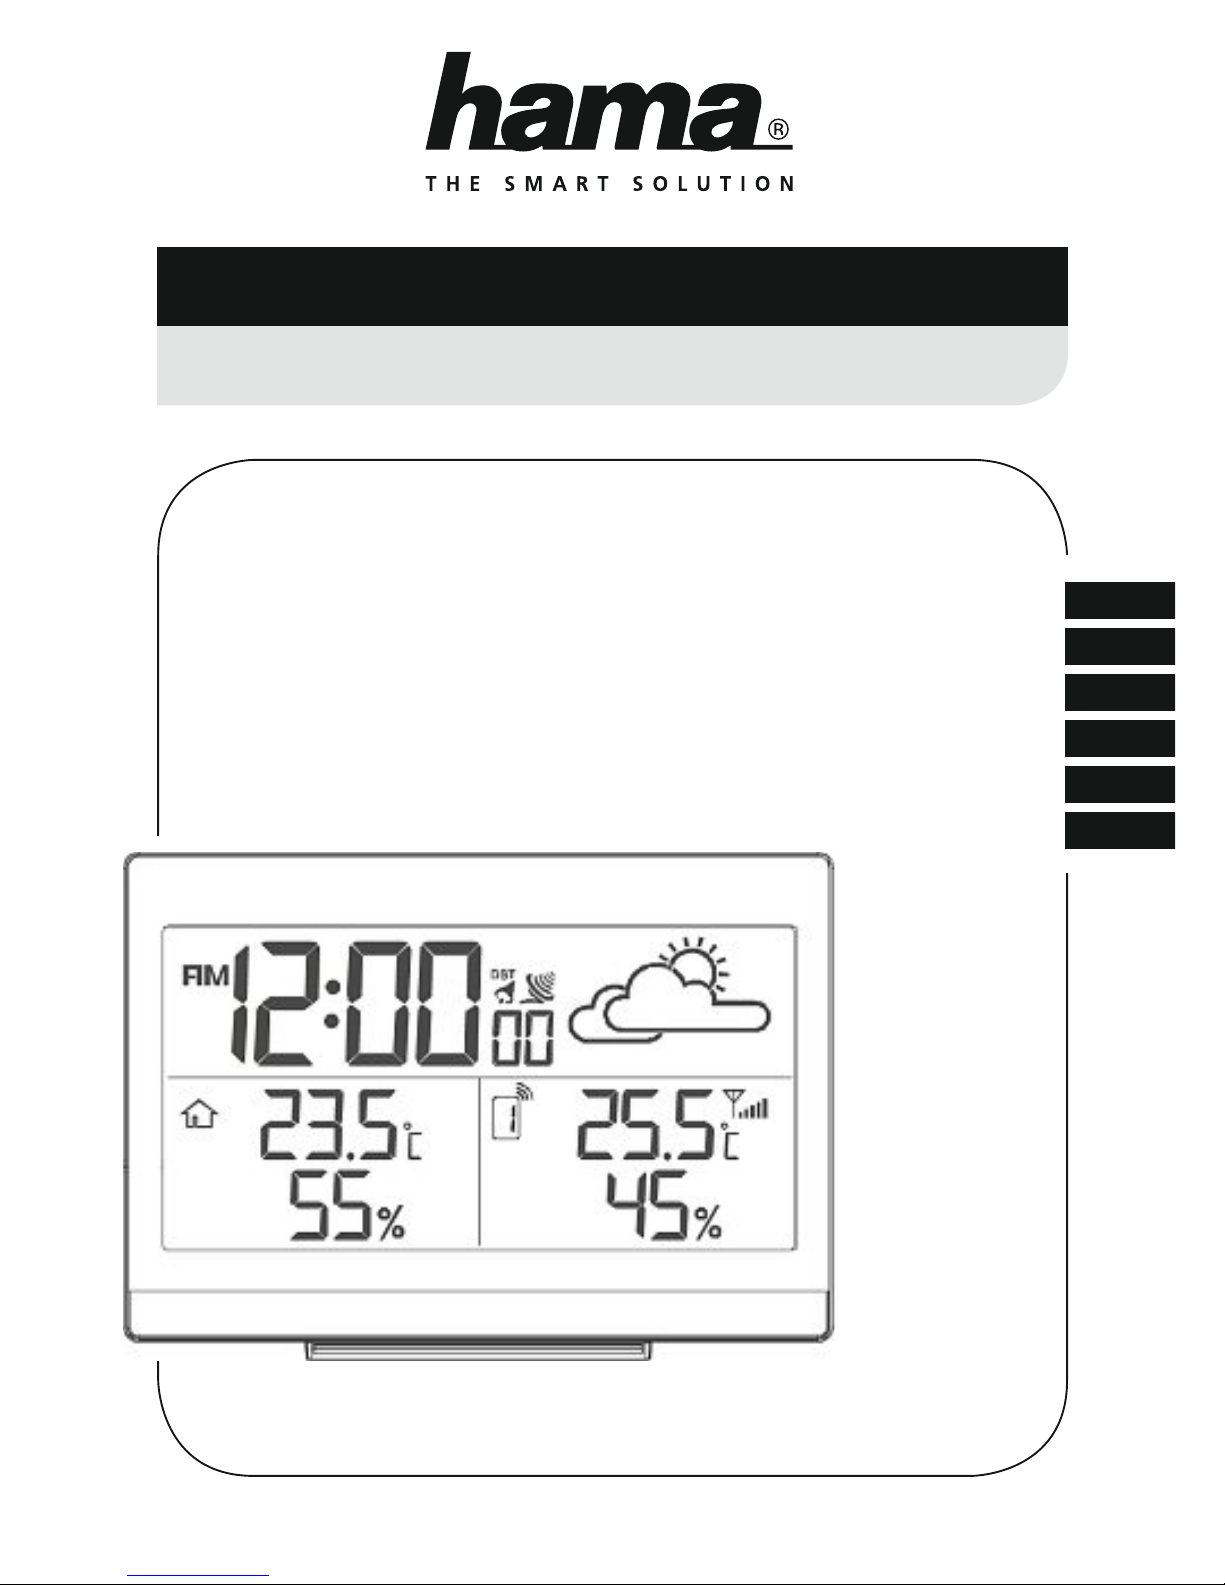
Controls and Displays
A Base station
1. Time
2. Room temperature
3. Room humidity
4. Alarm symbol
5. Radio symbol
6. Weather forecast symbol
7. Measuring station radio symbol
8. Outdoor temperature
9. Outdoor humidity
10. Channel display
11. SNOOZE/LIGHT button
= stops the alarm/activates the backlight (approx. 5 seconds)
12. ALARM SET button
= display/set alarm mode
13. CH+ button
= channel selection/increase the current set value
14. °C/°F selector slide switch
= switches between °C and °F
15. SENSOR button
= manual search for a signal from the measuring station
16. DISPLAY SET button
= settings/conrms the setting
17. MEM– button
= recalls the saved maximum/minimum values / decrease the
current set value
18. RESET button
= restores factory settings
19. RCC button
= activate/deactivate manual radio signal reception
20. Battery compartment
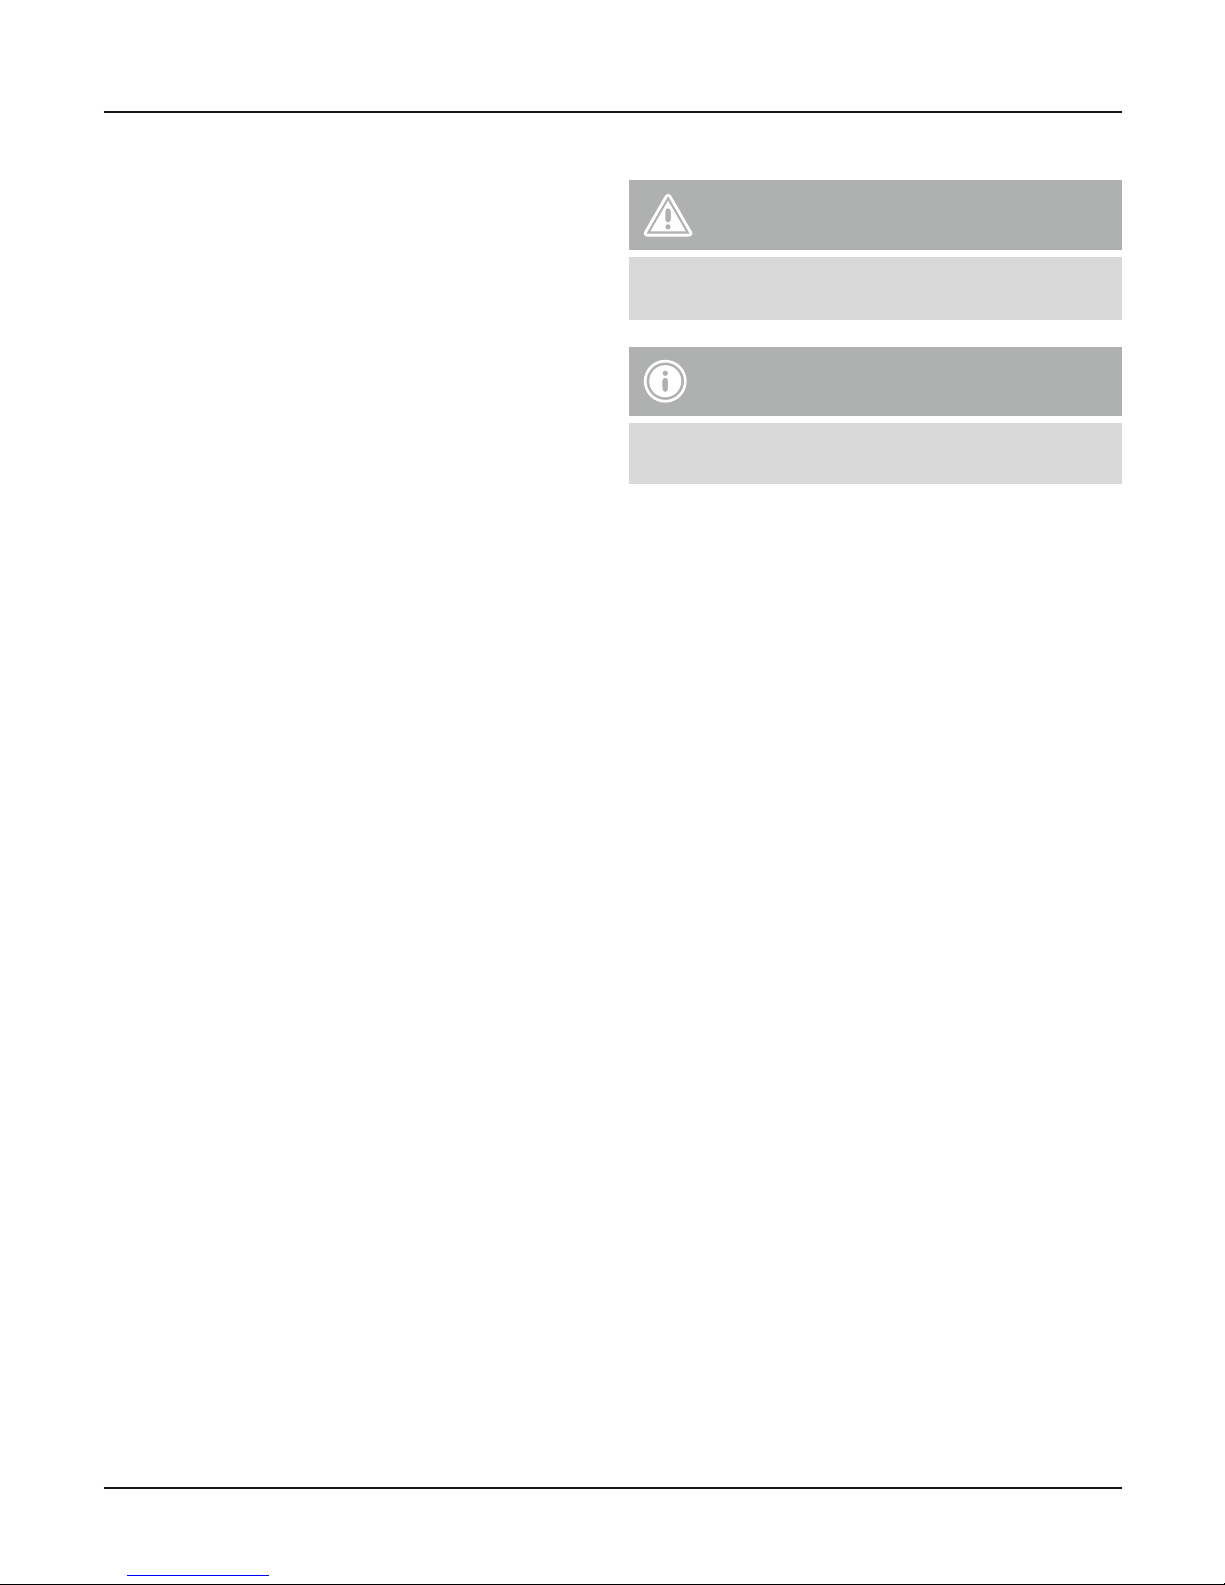
B Measuring station
21. Transmission indicator lamp
22. Display
23. Recess for wall mounting
24. RESET button
= restores factory settings
25. CH slide switch
= channel selection
26. Battery compartment
Thank you for choosing a Hama product.
Take your time and read the following instructions and information
completely. Please keep these instructions in a safe place for
future reference. If you sell the device, please pass these operating
instructions on to the new owner.
1. Explanation of Warning Symbols and Notes
Warning
This symbol is used to indicate safety instructions or to draw
your attention to specic hazards and risks.
Note
This symbol is used to indicate additional information or
important notes.
2. Package Contents
•EWS-890 weather station
(base station for indoors/measuring station for outdoors)
•4AA batteries
•These operating instructions
3. Safety Notes
•The product is intended for private, non-commercial use only.
•Do not operate the product outside the power limits given in
the specications.
•Do not use the product in moist environments and avoid
splashes.
•Do not use the product in the immediate vicinity of heaters or
other heat sources or in direct sunlight.
•Do not use the product in areas where the use of electronic
devices is not permitted.
•Only connect the product to a socket that has been approved
for the device. The socket must be installed close to the product
and easily accessible.
•Do not drop the product and do not expose it to any major
shocks.
•Do not open the device or continue to operate it if it becomes
damaged.
•Do not attempt to service or repair the product yourself. Leave
any and all service work to qualied experts.
•Keep the packaging material out of the reach of children due to
the risk of suffocation.
•Dispose of packaging material immediately according to locally
applicable regulations.
•Do not modify the product in any way. Doing so voids the
warranty.
Page 4
3
Warning – Batteries
•Immediately remove and dispose of dead batteries from
the product.
•Only use batteries (or rechargeable batteries) that match
the specied type.
•Do not mix old and new batteries or batteries of a different
type or make.
•When inserting batteries, note the correct polarity (+ and markings) and insert the batteries accordingly. Failure to do
so could result in the batteries leaking or exploding.
•Do not overcharge batteries.
•Keep batteries out of the reach of children.
•Do not short circuit the batteries/rechargeable batteries and
keep them away from uncoated metal objects.
4. Getting Started
4.1. Measuring station
•Remove the screen protector from the display.
•Open the battery compartment (26) and insert two AA batteries
with the correct polarity.
•Move the CH slide switch (25) to the left or right to select the
channel on which the measuring station transmits. (22) CH1,
CH2 or CH3 is displayed. Once the channel has been assigned
to a transmitter, it can only be changed by removing the
batteries or by resetting the base station (see section 6.9 Reset).
•The measured temperature and humidity values are displayed in
alternating fashion.
•Close the battery compartment cover.
•Close the battery compartment.
Note
Before use, ensure you insert the batteries in the measuring
station rst and then in the base station.
4.2. Base station
•Remove the screen protector from the display.
•Open the battery compartment (20) and insert two AA batteries
with the correct polarity.
•Close the battery compartment.
5. Installation
Note – Installation
•We recommend initially placing the base and measuring
stations in the intended locations without installing them
and making all the settings described in
6. Operation – to do.
•Only install the stations once the appropriate settings have
been made and a stable wireless connection is established.
Note
•The wireless transmission range between the measuring
and base stations is up to 50 m in open spaces.
•Before installation, ensure that wireless transmission will
not be disrupted by interference or obstacles like buildings,
trees, vehicles, high-voltage lines, etc.
•Before the nal installation, ensure that there is sucient
reception between the intended installation locations.
•When installing the measuring station, ensure that it is
protected from direct sunlight and rain.
•The international standard height for measuring air
temperature is 1.25 m (4 ft) above ground.
Warning
•Buy special or suitable installation material from a
specialised dealer for wall-mounting.
•Ensure that no faulty or damaged parts are installed.
•Never apply force during installation. This could damage
the product.
•Before installation, ensure that the chosen wall is suitable
for the weight to be mounted, and make sure that there
are no electrical wires, water, gas or other lines at the
installation site on the wall.
5.1. Base station
•Use the base to position the base station on a level surface.
5.2. Measuring station
•You can also position the measuring station on a level outdoor
surface.
•We recommend installing the measuring station securely on an
outdoor wall using the opening (23).
•Install an anchor, screw, nail, etc. in the wall of your choice.
•Hang the measuring station using the opening intended for this
purpose (23).
Page 5
4
6. Operation
Note – Input
Hold down the CH+ button (13) or the MEM– button (17) to
select the values faster.
6.1. Connection to the measuring station
•After you insert the batteries, the base station automatically
searches for a connection to the measuring station and performs
initial setup.
Note
•Initial setup takes approx. 5 minutes.
•During connection, the wireless symbol on the measuring
station radio symbol will ash (7).
•Do not press any buttons during setup. Otherwise, values
may not be transmitted correctly and there is a risk of value
errors and inaccuracies.
•The setup process is completed when the indoor (2, 3) and
outdoor (8, 9) measurement data is displayed.
•If the base station still does not receive a signal from the
measuring station, press the SENSOR button (15) to start the
manual search for the signal. During the connection attempt, the
measuring station radio symbol (7) will ash.
•During the manual search, press and hold the SENSOR button
(15) for approx. 3 seconds to end the search. The radio symbol
(7) disappears.
6.2. Selecting the channel/other measuring stations
Note
•You can install two more measuring stations in addition to
the included measuring station. Ensure that the base and
measuring stations are set to the same channel.
Visit www.hama.com for suitable measuring stations.
•Press the CH+ button (13) repeatedly to set the channel to that
set on the respective measuring station – see 4.1. Measuring
station. Either 1, 2 or 3 (11) is displayed.
•The base station now shows the data measured (8, 9) on the
selected measuring station (11).
•Press and hold the CH+ button (13) to select the channel scan.
The measurement values of the individual measuring stations/
channels (11) are displayed consecutively for 4 seconds each.
•Press the CH+ button (13) again to return to normal mode.
6.3. Basic and manual settings
Automatic setting using the DCF signal
After the rst time the base station is switched on and successful
transmission is established between the base station and the
measuring station, the clock will automatically search for a DCF
signal. During the search, the wireless symbol (5) will ash.
When the radio signal is received, the date and time are
automatically set.
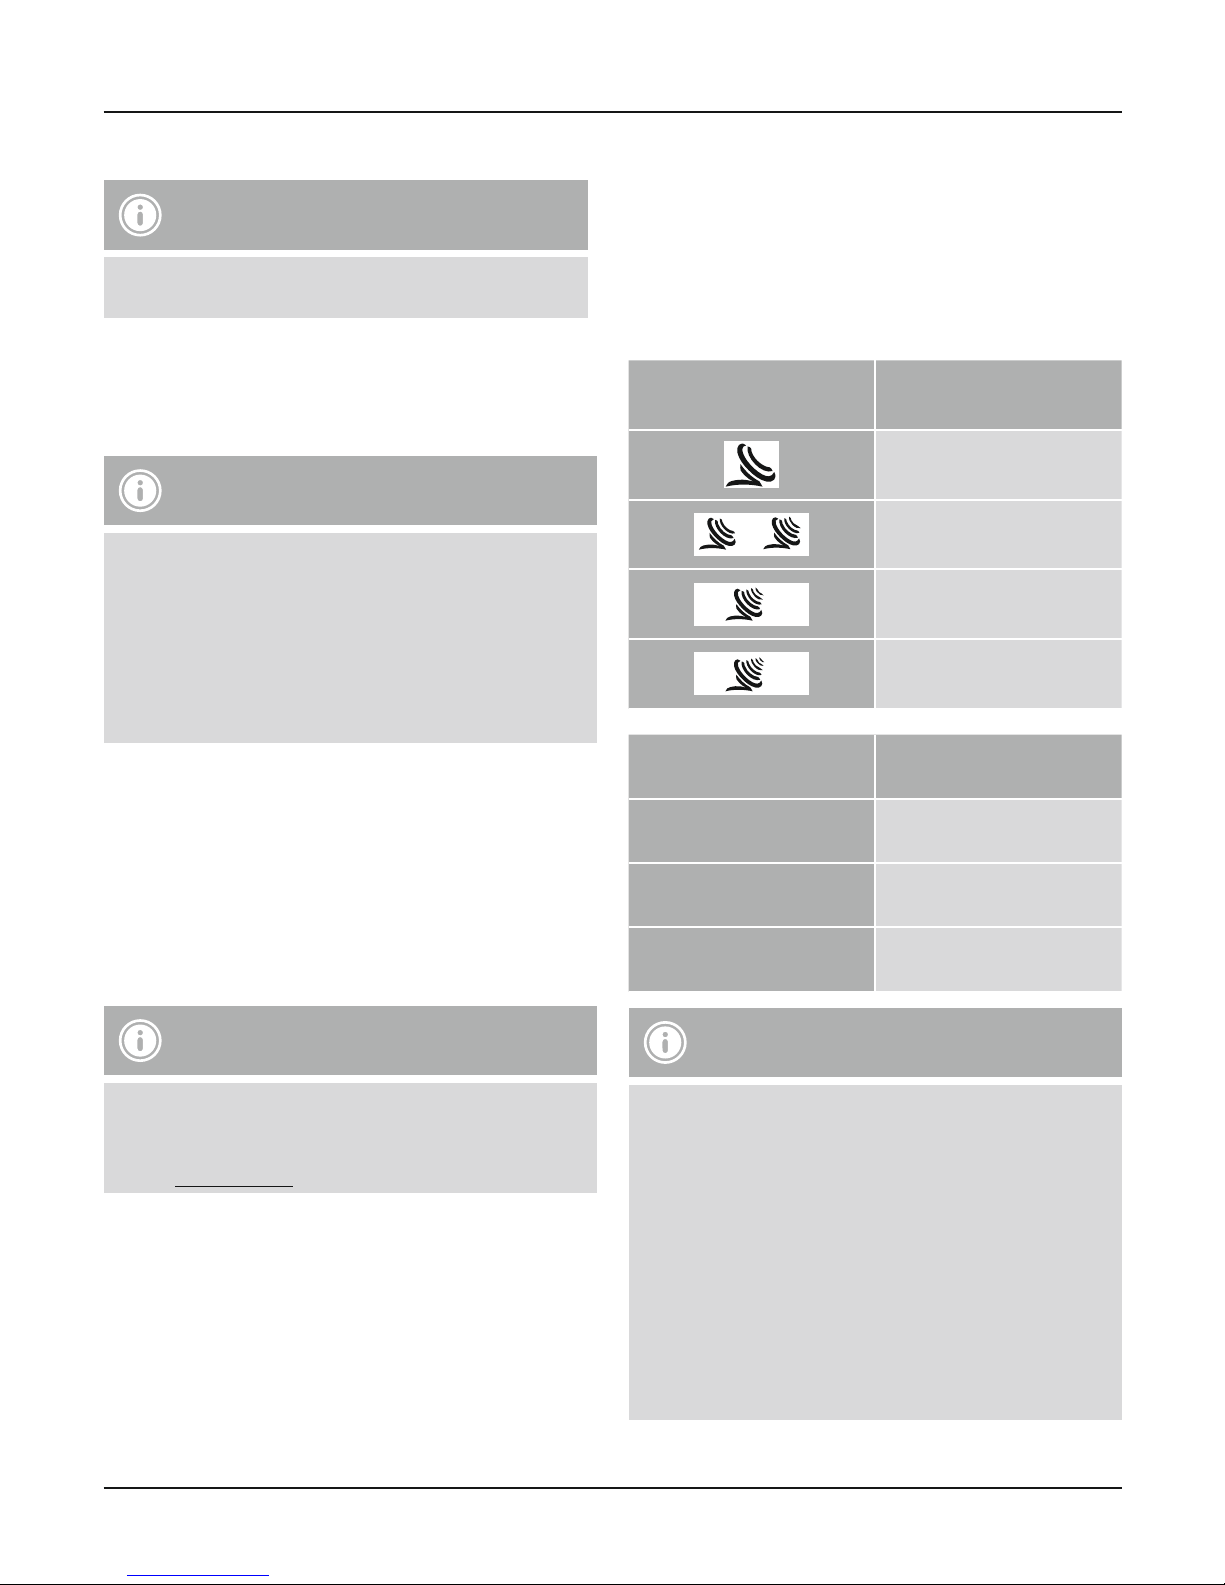
Radio icon Signal strength
No reception
Poor
Fair
Excellent
Radio icon
Searching for the
DCF signal
Flashing display Active
Constant display
Successful – signal is being
received
No display Error – signal search ended
Note – Time settings
•If, during initial setup of the device, a DCF radio signal is not
received within the rst few minutes, the search is aborted.
The radio symbol disappears.
•If there are reception problems, we recommend leaving
the clock to sit overnight, since interference is generally
less at night.
•In the meantime, you can start a manual search for the DCF
radio signal at another location or you can manually set the
time and date.
•The clock automatically continues to search for the DCF
radio signal on a daily basis (2:00 a.m., 8:00 a.m., 2:00
p.m. and 8:00 p.m.). If the signal is received successfully, the
manually set time and date are overwritten.
Page 6
5
•Press the RCC button (19) to start the manual search for the
DCF radio signal.
Note – Manual search
•The manual search is automatically aborted after 6-16
minutes.
•Using the RCC button (19) frequently will drain the battery.
We recommend only using this function to seek out an
optimal location for the device.
Note – Summer time
The clock automatically switches to summer time. DST appears
on the display as long as summer time is activated.
Manually setting
•Press and hold the DISPLAY SET button (16) for approx. 3
seconds
to make the following settings one after the other:
•12/24-hour format (1)
•Hours (1)
•Minutes (1)
•Seconds (only zeros possible) (1)
•Time zone (1)
•To select the individual values, press the CH+ button (13) or the
MEM– button (17) and conrm each selection by pressing the
DISPLAY SET button (16).
•If you do not make an entry for 60 seconds, you automatically
exit the setup mode.
Note – Time zone
•The DCF signal can be received over long distances, but
always transmits the current Central European Time in
Germany. Make sure you account for the time difference in
countries with another time zone.
•If you are in Moscow, the time is 3 hours later than in
Germany. This means that you should set +3 for the time
zone. The clock then automatically sets the time to 3 hours
after the DCF signal received or relative to the manually
set time.
Alarm
•Press and hold the ALARM SET button (12) for approx. 3
seconds to set the time of the alarm displayed. The hours display
begins to ash.
•Press the CH+ button (13) or the MEM– button (17) to select
the hour for the alarm time and conrm your selection by
pressing the ALARM SET button (12). The minutes display
begins to ash.
•Repeat the process to set the minutes for the alarm time.
•If you do not make an entry for 60 seconds, you automatically
exit the setup mode.
•The alarm function is automatically activated when you set the
alarm time.
•Alternatively, you can press the ALARM SET button (12) to
display the alarm time (AL).
•Press the ALARM SET button (12) as needed to activate/
deactivate the alarm.
•The alarm symbol (4) will either be displayed or not displayed
accordingly.
•When the alarm is triggered, the alarm symbol (4) begins to ash
and an alarm sounds.
•Press the ALARM SET button (12) to stop the alarm. Otherwise,
it will stop automatically after 2 minutes.
Note – Snooze function
•While the alarm is sounding, press the SNOOZE/LIGHT
button (11) to activate the snooze function. The alarm
symbol (4) begins to ash on the display. The alarm is
stopped for 5 minutes, after which it will sound again.
•The snooze function can be used over a 24-hour period.
Celsius/Fahrenheit
•Move the °C/°F slide switch (14) to the °C or °F position to
display the temperature (2,8) in the respective unit.
6.4 Weather forecast
Based on changes in the atmospheric pressure and the data saved,
the base station is able to make weather forecasts for the next 12
to 24 hours.
Note – Weather forecast
•The weather forecast function is not available during the
rst few hours of operation because it reuqires data that is
collected during operation.
•The probability of an accurate weather forecast is around
70–75%.
•The weather forecast and the current weather are indicated by
four different symbols (6):
Page 7
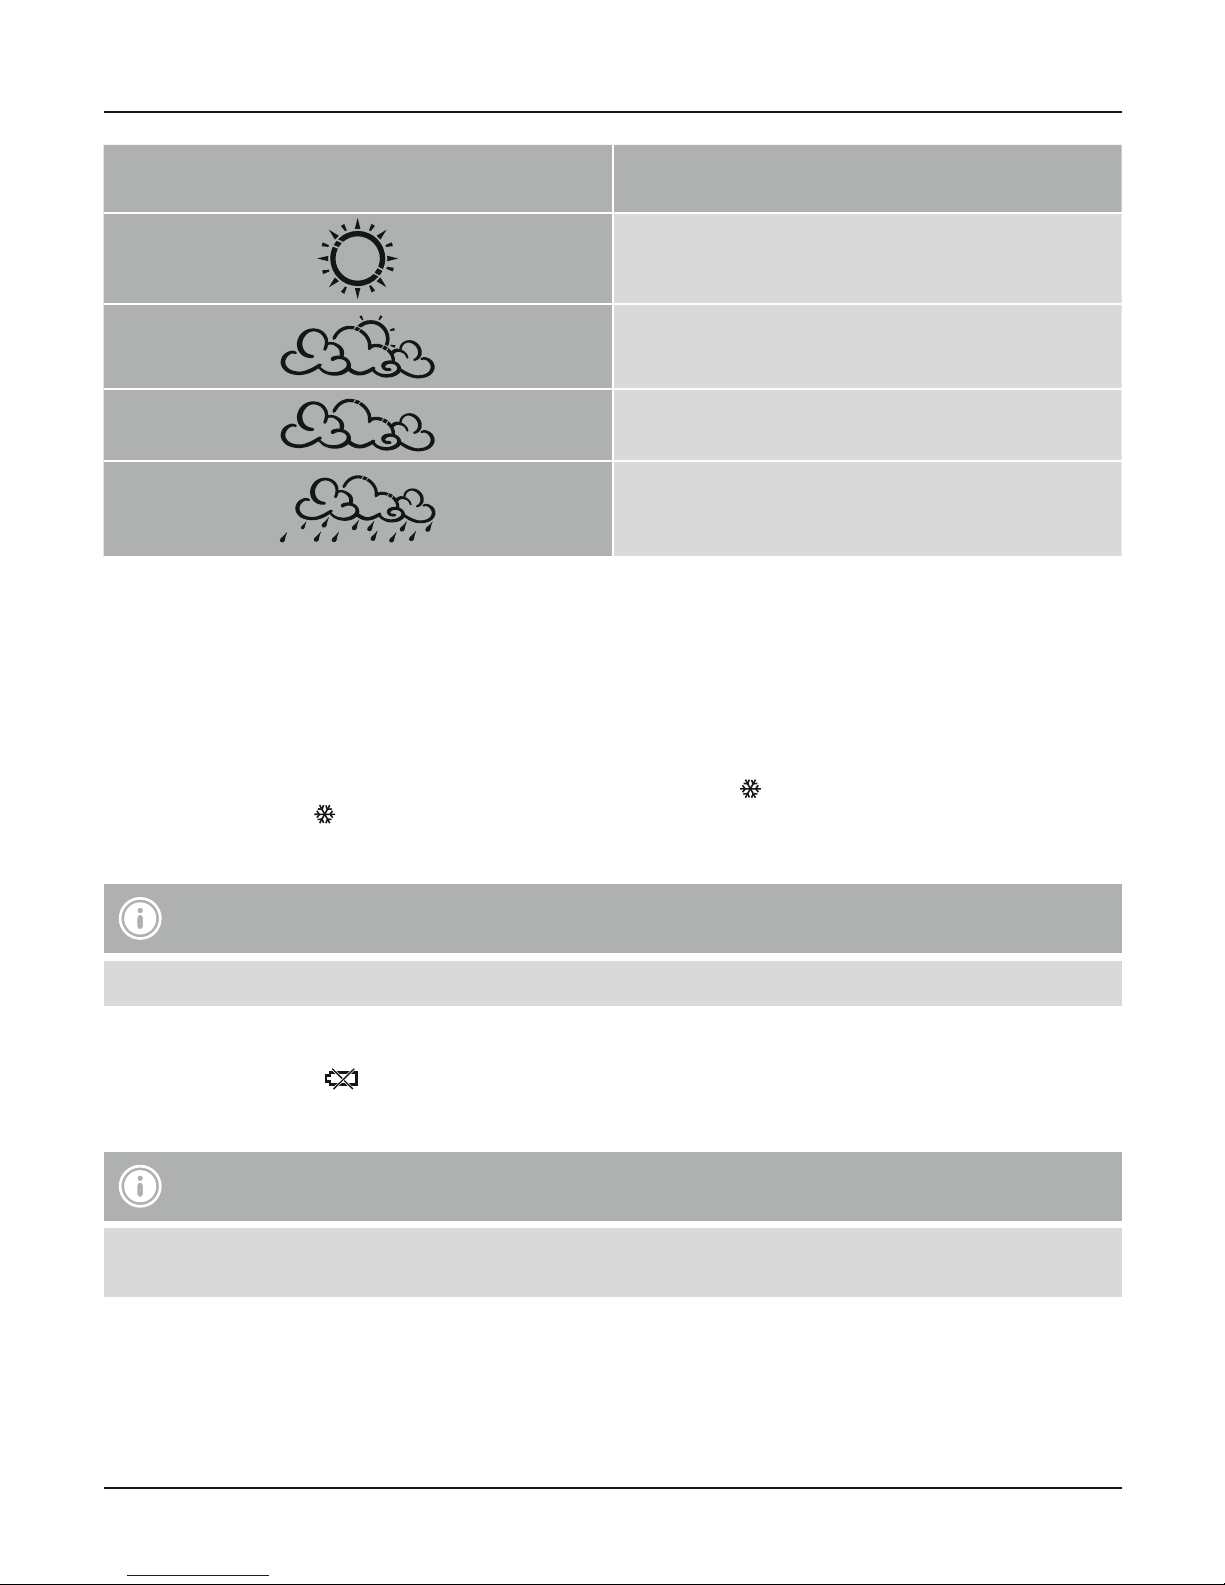
6
Symbol (6) Weather
Sun
Slightly cloudy
Cloudy
Rain
6.5. Maximum and minimum temperature and humidity values
•The base station automatically stores the maximum and minimum indoor/outdoor temperature and humidity values.
•Repeatedly press the MEM– button (17) to switch between the current temperature and humidity, minimum temperature and humidity
(MIN) and maximum temperature and humidity (MAX).
•The maximum and minimum values are displayed for 5 seconds.
•Press and hold the MEM– button (17) to reset the stored maximum and minimum values.
6.6. Frost warning
•If the outdoor temperature (8) is between -2°C and ~ 3°C, the frost warning symbol appears on the LCD and ashes continuously.
•The frost warning symbol disappears once the temperature rises above this range.
6.7. Backlight
Note – Backlight
•If you press the SNOOZE/LIGHT button (11), the display will light up for approx. 5 seconds.
6.8. Low battery charge
As soon as the battery symbol
appears on the display of the base station, the capacity of the batteries in the measuring station is very
low. Replace the batteries immediately.
Note – Replacing the batteries
•Note that the stations have to be resynchronised each time after you change the batteries in the measuring or base station.
•To do this, remove the batteries from the other station and then reinsert them, or change them as required.
6.9. Reset
•If displays/transmissions continually fail to appear or are incorrect, use a pointed object (paper clip, etc.) to press the RESET button (18)
on the base station and the RESET button (24) on the measuring station to carry out a restart.
•The base station returns to the factory settings and all stored information is lost.
Page 8

7
7. Care and Maintenance
Only clean this product with a slightly damp, lint-free cloth and do not use aggressive cleaning agents. Make sure that water does not get
into the product.
8. Warranty Disclaimer
Hama GmbH & Co KG assumes no liability and provides no warranty for damage resulting from improper installation/mounting, improper
use of the product or from failure to observe the operating instructions and/or safety notes.
9. Service and Support
Please contact Hama Product Consulting if you have any questions about this product.
Hotline: +49 9091 502-115 (German/English)
Further support information can be found here:
www.hama.com
10. Technical Data
Base station Measuring station
Power supply
3,0 V
2 x AA batteries
3,0 V
2 x AA batteries
Measuring range
Temperature
-40°C – +70°C/
-40°F – 158°F
-40°C – +70°C/
-40°F – 158°F
Recommended operating
temperature
0°C – +45°C/
32°F – 113°F
-20°C – +55°C/
-4°F – 131°F
Measuring increments
Temperature
0,1°C / °F 0,1°C / °F
Measuring range
Humidity
20% ~ 90% RH 20% ~ 90% RH
Recommended
operating range
20% ~ 90% RH 20% ~ 90% RH
Measuring increments
Humidity
1% RH 1% RH
Temperature
measuring cycle
60 – 64 s60 – 64 s
Radio-controlled
DCF clock
YesNo
Hygrometer YesYes
Thermometer YesYes
Barometer YesNo
Page 9
8
Dimensions (WxHxD) 140 x 100 x 47 mm 65 x 100 x 35 mm
Max. number of
measuring stations
3
Frequency 433 MHz
Range ≤ 50 m
11. Recycling Information
Note on environmental protection:
After the implementation of the European Directive 2012/19/EU and 2006/66/EU in the national legal system, the following
applies: Electric and electronic devices as well as batteries must not be disposed of with household waste. Consumers are
obliged by law to return electrical and electronic devices as well as batteries at the end of their service lives to the public
collecting points set up for this purpose or point of sale. Details to this are dened by the national law of the respective country.
This symbol on the product, the instruction manual or the package indicates that a product is subject to these regulations. By
recycling, reusing the materials or other forms of utilising old devices/batteries, you are making an important contribution to protecting our
environment.
12. Declaration of Conformity
Hereby, Hama GmbH & Co KG declares that the radio equipment type [00113986] is in compliance with Directive 2014/53/EU.
The full text of the EU declaration of conformity is available at the following internet address:
www.hama.com->00113986 ->Downloads.
Frequency band(s) 433 MHz
Maximum radio-frequency power transmitted 6,31mW
Page 10

9
D Bedienungsanleitung
Bedienungselemente und Anzeigen
A Basisstation
1. Uhrzeit
2. Raumtemperatur
3. Raumluftfeuchtigkeit
4. Alarmsymbol
5. Funksymbol
6. Wettervorhersagesymbol
7. Funksymbol Messstation
8. Außentemperatur
9. Außenluftfeuchtigkeit
10. Kanalanzeige
11. SNOOZE / LIGHT-Taste
= Unterbrechung des Wecksignals / Aktivierung der
Hintergrundbeleuchtung (ca. 5 Sekunden)
12. ALARM SET-Taste
= Anzeige/ Einstellung Alarm-Modus
13. CH+-Taste
= Kanalauswahl / Erhöhung des aktuellen Einstellungswertes
14. °C/°F-Schiebeschalter
= Wechsel zwischen °C und °F
15. SENSOR-Taste
= manuelle Suche nach Signal von der Messstation
16. DISPLAY SET-Taste
= Einstellungen / Bestätigung des Einstellungswerts
17. MEM– -Taste
= Abruf der gespeicherten Höchst-/ Tiefstwerte / Verringerung
des aktuellen Einstellungswertes
18. RESET-Knopf ‚
= Zurücksetzung auf Werkseinstellung
19. RCC-Taste
= Aktivierung/ Deaktivierung manueller Funksignal-Empfang
20. Batteriefach
B Messstation
21. Kontrollleuchte Übertragung
22. Display
23. Aussparung für Wandmontage
24. RESET-Knopf
= Zurücksetzung auf Werkseinstellung
25. CH-Schiebeschalter
= Kanalauswahl
26. Batteriefach
Vielen Dank, dass Sie sich für ein Hama Produkt entschieden haben!
Nehmen Sie sich Zeit und lesen Sie die folgenden Anweisungen
und Hinweise zunächst ganz durch. Bewahren Sie diese
Bedienungsanleitung anschließend an einem sicheren Ort auf, um
bei Bedarf darin nachschlagen zu können. Sollten Sie das Gerät
veräußern, geben Sie diese Bedienungsanleitung an den neuen
Eigentümer weiter.
1. Erklärung von Warnsymbolen und Hinweisen
Warnung
Wird verwendet, um Sicherheitshinweise zu kennzeichnen
oder um Aufmerksamkeit auf besondere Gefahren und Risiken
zu lenken.
Hinweis
Wird verwendet, um zusätzlich Informationen oder wichtige
Hinweise zu kennzeichnen.
2. Packungsinhalt
•Wetterstation EWS-890
(Basisstation für den Innenbereich / Messstation für den
Außenbereich)
•4AA Batterien
•diese Bedienungsanleitung
3. Sicherheitshinweise
•Das Produkt ist für den privaten, nicht-gewerblichen
Haushaltsgebrauch vorgesehen.
•Betreiben Sie das Produkt nicht außerhalb seiner in den
technischen Daten angegebenen Leistungsgrenzen.
•Verwenden Sie das Produkt nicht in einer feuchten Umgebung
und vermeiden Sie Spritzwasser.
•Betreiben Sie das Produkt nicht in unmittelbarer Nähe
der Heizung, anderer Hitzequellen oder in direkter
Sonneneinstrahlung.
•Benutzen Sie das Produkt nicht in Bereichen, in denen
elektronische Produkte nicht erlaubt sind.
•Positionieren Sie das Produkt nicht in der Nähe von Störfeldern,
Metallrahmen, Computern und Fernsehern etc. Elektronische
Geräte sowie Fensterrahmen beeinträchtigen die Funktion des
Produktes negativ.
•Lassen Sie das Produkt nicht fallen und setzen Sie es keinen
heftigen Erschütterungen aus.
•Öffnen Sie das Produkt nicht und betreiben Sie es bei
Beschädigungen nicht weiter.
•Versuchen Sie nicht, das Produkt selbst zu warten oder zu
reparieren. Überlassen Sie jegliche Wartungsarbeit dem
zuständigen Fachpersonal.
•Halten Sie Kinder unbedingt von dem Verpackungsmaterial fern,
es besteht Erstickungsgefahr.
•Entsorgen Sie das Verpackungsmaterial sofort gemäß den örtlich
gültigen Entsorgungsvorschriften.
•Nehmen Sie keine Veränderungen am Produkt vor. Dadurch
verlieren sie jegliche Gewährleistungsansprüche.
Page 11
10
Warnung - Batterien
•Entfernen und entsorgen Sie verbrauchte Batterien
unverzüglich aus dem Produkt.
•Verwenden Sie ausschließlich Akkus (oder Batterien), die
dem angegebenen Typ entsprechen.
•Mischen Sie alte und neue Batterien nicht, sowie Batterien
unterschiedlichen Typs oder Herstellers.
•Beachten Sie unbedingt die korrekte Polarität (Beschriftung
+ und -) der Batterien und legen Sie diese entsprechend ein.
Bei Nichtbeachtung besteht die Gefahr des Auslaufens oder
einer Explosion der Batterien.
•Laden Sie Batterien nicht.
•Bewahren Sie Batterien außerhalb der Reichweite von
Kindern auf.
•Schließen Sie Akkus/Batterien nicht kurz und halten Sie sie
von blanken Metallgegenständen fern.
4. Inbetriebnahme
4.1. Messstation
•Entfernen Sie die Schutzfolie auf dem Display.
•Öffnen Sie das Batteriefach (26) und legen Sie zwei AA Batterien
polrichtig ein.
•Schieben Sie den CH-Schiebeschalter (25) nach links oder rechts,
um den Kanal, auf dem die Messstation sendet, auszuwählen.
Auf dem Display (22) wird CH1, CH2 oder CH3 angezeigt.
•Sobald der Kanal einem Sender zugewiesen wurde, kann dieser
nur geändert werden, wenn Sie die Batterien entnehmen oder
das Basisgerät zurücksetzen (6.9. Reset).
•Schließen Sie die Batteriefachabdeckung anschließend.
Hinweis
Beachten Sie, dass Sie bei der Inbetriebnahme immer zuerst
die Batterien in die Messstation, und dann in die Basisstation
einlegen.
4.2. Basisstation
•Entfernen Sie die Schutzfolie auf dem Display.
•Öffnen Sie das Batteriefach (20) und legen Sie zwei AA Batterien
polrichtig ein.
•Schließen Sie die Batteriefachabdeckung anschließend.
5. Montage
Hinweis – Montage
•Es wird empfohlen, die Basis- und Messstation zunächst an
den gewünschten Aufstellorten ohne Montage zu platzieren
und alle Einstellungen - wie in 6. Betrieb beschrieben –
vorzunehmen.
•Montieren Sie erst nach korrekter Einstellung und stabiler
Funkverbindung die Station/en.
Hinweis
•Die Reichweite der Funkübertragung zwischen der Messund Basisstation beträgt im freien Gelände bis zu 50m.
•Achten Sie vor der Montage darauf, dass die
Funkübertragung nicht durch Störsignale oder Hindernisse
wie Gebäude, Bäume, Fahrzeuge, Hochspannungsleitungen,
u.a. beeinusst wird.
•Stellen Sie vor der endgültigen Montage sicher, dass
zwischen den gewünschten Aufstellorten ausreichender
Empfang besteht.
•Achten Sie bei der Montage der Messstation darauf, dass
diese vor direkter Sonne und Regen geschützt positioniert
ist.
•Die internationale Standardhöhe für die Messung der
Lufttemperatur beträgt 1,25 m (4 ft) über Grund.
Warnung
•Besorgen Sie sich spezielles bzw. geeignetes
Montagematerial im Fachhandel für die Montage an der
vorgesehenen Wand.
•Stellen Sie sicher, dass keine fehlerhaften oder beschädigten
Teile montiert werden.
•Wenden Sie bei der Montage niemals Gewalt oder hohe
Kräfte an. Diese können das Produkt beschädigen.
•Prüfen Sie vor Montage die Eignung der vorgesehenen
Wand für das anzubringende Gewicht und vergewissern
Sie sich, dass sich an der Montagestelle in der Wand
keine elektrischen Leitungen, Wasser-, Gas- oder sonstige
Leitungen benden.
5.1. Basisstation
•Stellen Sie die Basisstation mithilfe des Standfußes (31) auf einer
ebenen Fläche auf.
Page 12

11
5.2. Messstation
•Die Messstation können Sie ebenfalls auf einer ebenen Fläche im
Außenbereich aufstellen.
•Es wird empfohlen, die Messstation sicher und fest an einer
Außenwand mithilfe der Aussparung (23) zu montieren.
•Befestigen Sie Dübel, Schraube, Nagel, etc. in der dafür
vorgesehenen Wand.
•Hängen Sie die Messstation mit der dafür vorgesehenen
Aussparung (23) daran ein.
6. Betrieb
Hinweis – Eingabe
Halten Sie die CH+-Taste (13) oder die MEM– -Taste (17)
gedrückt, um die Werte schneller auswählen zu können.
6.1. Verbindung zur Messstation
•Nach dem Einlegen der Batterien sucht die Basisstation
automatisch nach einer Verbindung zur Messstation und führt
die Ersteinrichtung durch.
Hinweis
•Die Ersteinrichtung dauert ca. 5 Minuten.
•Während dem Verbindungsversuch blinkt das Funksymbol
Messstation (7) auf.
•Vermeiden Sie in dieser Zeit jegliche Betätigung der Tasten!
Andernfalls können Fehler und Ungenauigkeiten bei den
Werten und deren Übertragung entstehen.
•Der Vorgang ist beendet, sobald die Messdaten für Innen(2,3) und Außenbereich (8,9) angezeigt werden
•Wird wiederholt kein Signal von der Messstation empfangen,
drücken Sie die SENSOR-Taste (15), um die manuelle Suche
nach dem Signal zu starten. Während dem Verbindungsversuch
blinkt das Funksymbol Messstation (7) auf.
•Drücken und halten Sie während der manuellen Suche die
SENSOR-Taste (15) für ca. 3 Sekunden, um diese zu beenden.
Das Funksymbol (7) erlischt.
6.2. Kanalauswahl/ Weitere Messstationen
Hinweis
Sie können zusätzlich zu der mitgelieferten Messstation
zwei weitere Messstationen installieren. Achten Sie hierbei
auf die identische Kanaleinstellung an Basis- und jeweiliger
Messstation. Passende Messstationen nden Sie unter www.
hama.com
•Drücken Sie wiederholt die CH+-Taste (13), um denselben Kanal
wie an der jeweiligen Messstation – siehe 4.1. Messstation
– einzustellen. Es wird 1, 2 oder 3 (11) angezeigt.
•Die Basisstation zeigt nun die gemessenen Daten (8,9) der
ausgewählten Messstation (11) an.
•Drücken und halten Sie die CH+-Taste (13) gedrückt, um den
Kanaldurchlauf auszuwählen. Die Messwerte der einzelnen
Messstationen/ Kanäle (11) werden nacheinander für jeweils 4
Sekunden angezeigt.
•Drücken Sie die CH+-Taste (13) erneut, um in den normalen
Modus zurückzukehren.
6.3. Grundeinstellungen und manuelle Einstellungen
Automatische Einstellung nach DCF-Signal
•Nach dem ersten Einschalten der Basisstation und erfolgreicher
Übertragung zwischen Basis- und Messstation, beginnt die Uhr
automatisch die Suche nach einem DCF-Signal. Während des
Suchvorgangs blinkt das Funksymbol (5) auf.
•Bei Empfang des Funksignals werden Datum und Uhrzeit
automatisch eingestellt.
Funksymbol Signalstärke
Kein Empfang
Schlecht
Annehmbar
Hervorragend
Page 13
12
Anzeige Funksymbol Suche nach DCF-Funksignal
Blinkende Anzeige Aktiv
Dauerhafte Anzeige
Erfolgreich – Signal wird
empfangen
Keine Anzeige Inaktiv
Hinweis – Uhrzeiteinstellung
•Wird innerhalb der ersten Minuten während der
Ersteinrichtung kein DCF-Funksignal empfangen, wird die
Suche beendet. Das Funksymbol erlischt.
•Bei Empfangsstörungen wird empfohlen, die Uhr über
Nacht stehen zu lassen, da hier die Störsignale in der Regel
geringer sind.
•Sie können währenddessen eine manuelle Suche nach dem
DCF-Funksignal an einem anderen Aufstellungsort starten
oder die manuelle Einstellung von Uhrzeit und Datum
vornehmen.
•Die Uhr sucht automatisch weiterhin täglich (02:00,
08:00, 14:00 und 20:00 Uhr) nach dem DCF-Funksignal.
Bei erfolgreichem Signalempfang werden die manuell
eingestellte Uhrzeit und das Datum überschrieben.
•Drücken Sie die RCC-Taste (19), um die manuelle Suche nach
dem DCF-Funksignal zu starten.
Hinweis – manueller Suchvorgang
•Der manuelle Suchvorgang schaltet sich automatisch nach
6 – 16 Minuten ab.
•Eine häuge Nutzung der RCC-Taste (19) geht zu Lasten der
Batteriekapazität. Es wird empfohlen, diese Funktion nur
zur Ausmachung eines optimalen Aufstellungsorts zu nutzen.
Hinweis – Sommerzeit
Die Uhrzeit stellt sich automatisch auf die Sommerzeit um.
Solange die Sommerzeit aktiv ist, wird auf dem Display DST
angezeigt.
(Manuelle) Einstellungen
•Drücken und halten Sie die DISPLAY SET-Taste (16) für
ca. 3 Sekunden, um folgende Einstellungen nacheinander
vorzunehmen:
•12/24-Stunden-Format (1)
•Stunden (1)
•Minuten (1)
•Sekunden (nur Nullen möglich) (1)
•Zeitzone (1)
•Drücken Sie zum Auswählen der einzelnen Werte die CH+-Taste
(13) oder die MEM– -Taste (17) und bestätigen Sie die jeweilige
Auswahl durch Drücken der DISPLAY SET-Taste (16).
•Erfolgt 60 Sekunden keine Eingabe, wird der Einstellungsmodus
automatisch verlassen.
Hinweis – Zeitzone
•Das DCF-Signal kann weitläug empfangen werden,
entspricht jedoch immer der MEZ, die in Deutschland gilt.
Beachten Sie daher, dass Sie in Ländern mit anderer Zeitzone
die Zeitverschiebung beachten.
•Benden Sie sich in Moskau, ist es dort bereits 3 Stunden
später als in Deutschland. Stellen Sie daher bei der Zeitzone
+3 ein. Die Uhr stellt sich dann immer nach Empfang des
DCF-Signals bzw. in Bezug auf die manuell eingestellte
Uhrzeit automatisch 3 Stunden weiter.
Wecker
•Drücken und halten Sie die ALARM SET-Taste (12) für ca. 3
Sekunden, um die Weckzeit des angezeigten Alarms einzustellen.
Die Stundenanzeige beginnt zu blinken.
•Drücken Sie die CH+-Taste (13) oder die MEM– -Taste (17),
um die Stunden der Weckzeit auszuwählen und bestätigen Sie
die Auswahl durch Drücken der ALARM SET-Taste (12). Die
Minutenanzeige beginnt zu blinken.
•Wiederholen Sie diesen Vorgang für die Minuten der Weckzeit.
•Erfolgt 60 Sekunden keine Eingabe, wird der Einstellungsmodus
automatisch verlassen.
•Die Weckfunktion wird beim Einstellen der Weckzeit automatisch
aktiviert.
•Alternativ drücken Sie die ALARM SET-Taste (12), um sich die
Weckzeit (AL) anzeigen zu lassen.
•Durch wiederholtes Drücken der ALARM SET-Taste (12), wird
der Alarm aktiviert/ deaktiviert.
•Das Alarmsymbol (4) wird angezeigt/ nicht angezeigt.
•Wird der Wecker entsprechend ausgelöst, beginnt das
Alarmsymbol (4) zu blinken und ein Wecksignal ertönt.
•Drücken Sie die ALARM SET-Taste (12), um den Alarm zu
beenden. Andernfalls endet dieser automatisch nach 2 Minuten.
Page 14
13
Hinweis – Schlummerfunktion
•Drücken Sie während des Wecksignals die SNOOZE/LIGHT-Taste (11), um die Schlummerfunktion zu aktivieren. Auf dem Display
beginnt das Alarmsymbol (4) zu blinken. Das Wecksignal wird für 5 Minuten unterbrochen und dann erneut ausgelöst.
•Die Schlummerfunktion kann über einen Zeitraum von 24 Stunden verwendet werden.
Celsius / Fahrenheit
•Stellen Sie den °C/°F-Schiebeschalter (14) auf die Position °C oder °F, um die Temperatur (2,8) in der jeweiligen Einheit anzeigen zu
lassen.
6.4. Wettervorhersage
•Anhand von atmosphärischen Luftdruckveränderungen und der gespeicherten Daten kann die Basisstation Angaben zu der
Wetteraussicht für die kommenden 12 bis 24 Stunden machen.
Hinweis – Wettervorhersage
•In den ersten Stunden des Betriebs ist die Wettervorhersage aufgrund von fehlenden Daten, die erst im Laufe des Betriebs
abgespeichert werden, nicht möglich.
•Die Wahrscheinlichkeit einer akkuraten Wettervorhersage liegt bei etwa 70-75%.
•Die Wettervorhersage und das aktuelle Wetter werden durch vier verschiedene Symbole (6) dargestellt:
Symbol (6) Wetter
Sonnig
Leicht bewölkt
Bewölkt
Regnerisch
6.5. Höchst- und Tiefstwerte der Temperatur und Luftfeuchtigkeit
•Die Basisstation speichert die Höchst- und Tiefstwerte der Temperatur im Außen- und Raumbereich automatisch ab.
•Drücken Sie wiederholt die MEM– -Taste (17), um zwischen der Anzeige von aktueller Temperatur, niedrigster Temperatur (MIN) und
höchster Temperatur (MAX) zu wechseln.
•Die Höchst- und Tiefstwerte werden 5 Sekunden angezeigt.
•Drücken und halten Sie die MEM– -Taste (17), um die abgespeicherten Höchst- und Tiefstwerte zurückzusetzen.
6.6. Eiswarnung
•Wenn die Außentemperatur (8) zwischen -2°C ~ 3°C liegt, wird das Eiswarnsymbol auf dem LCD-Display angezeigt und blinkt
dauerhaft.
•Das Eiswarnsymbol wird nicht weiter angezeigt, sobald die Temperatur über diesem Temperaturbereich liegt.
Page 15
14
6.7. Hintergrundbeleuchtung
Hinweis – Hintergrundbeleuchtung
Drücken Sie die SNOOZE/LIGHT-Taste (11), wird das Display für ca. 5 Sekunden beleuchtet.
6.8. Niedrige Batteriekapazität
Sobald das Batteriesymbol auf dem Display der Basisstation angezeigt wird, ist die Kapazität der Batterien in der Messstation sehr
gering. Wechseln Sie die Batterien umgehend aus.
Hinweis – Batteriewechsel
•Beachten Sie, dass Sie nach jedem Batteriewechsel an Mess- oder Basisstation eine neue Synchronisation der Stationen erfolgen
muss.
•Nehmen Sie dazu die Batterien der anderen Station heraus und setzen Sie erneut ein oder wechseln Sie diese bei Bedarf ebenfalls
aus.
6.9. Reset
•Bei andauernden, fehlerhaften/ ausbleibenden Anzeigen/ Übertragungen drücken Sie mit einem spitzen Gegenstand (Büroklammer, etc.)
zuerst den RESET-Knopf (18) der Basisstation und dann den RESET-Knopf (24) der Messstation, um einen Neustart zu generieren.
7. Wartung und Pflege
Reinigen Sie dieses Produkt nur mit einem fusselfreien, leicht feuchten Tuch und verwenden Sie keine aggressiven Reiniger. Achten Sie
darauf, dass kein Wasser in das Produkt eindringt.
8. Haftungsausschluss
Die Hama GmbH & Co KG übernimmt keinerlei Haftung oder Gewährleistung für Schäden, die aus unsachgemäßer Installation, Montage
und unsachgemäßem Gebrauch des Produktes oder einer Nichtbeachtung der Bedienungsanleitung und/oder der Sicherheitshinweise
resultieren.
9. Service und Support
Bitte wenden Sie sich bei Fragen zum Produkt gerne an die Hama-Produktberatung.
Hotline: +49 9091 502-115 (Deu/Eng)
Weitere Supportinformationen nden sie hier:
www.hama.com
10. Technische Daten
Basisstation Messstation
Stromversorgung
3,0 V
2 x AA Batterie
3,0 V
2 x AA Batterie
Messbereich
Temperatur
-40°C – +70°C/
-40°F – 158°F
-40°C – +70°C/
-40°F – 158°F
Empfohlene
Betriebstemperatur
0°C – +45°C/
32°F – 113°F
-20°C – +55°C/
-4°F – 131°F
Page 16

15
Messschritte
Temperatur
0,1°C / °F 0,1°C / °F
Messbereich
Luftfeuchtigkeit
20% ~ 90% RH 20% ~ 90% RH
Empfohlener
Betriebsbereich
20% ~ 90% RH 20% ~ 90% RH
Messschritte
Luftfeuchtigkeit
1% RH 1% RH
Messzyklus
Temperatur
60 – 64 s60 – 64 s
DCF-Funkuhr Ja Nein
Hygrometer Ja Ja
Thermometer Ja Ja
Barometer Ja Nein
Abmessung (BxHxT) 140 x 100 x 47 mm 65 x 100 x 35 mm
Max. Anzahl
Messstationen
3
Frequenz 433 MHz
Reichweite ≤ 50 m
11. Entsorgungshinweise
Hinweis zum Umweltschutz:
Ab dem Zeitpunkt der Umsetzung der europäischen Richtlinien 2012/19/EU und 2006/66/EG in nationales Recht gilt folgendes:
Elektrische und elektronische Geräte sowie Batterien dürfen nicht mit dem Hausmüll entsorgt werden. Der Verbraucher ist
gesetzlich verpichtet, elektrische und elektronische Geräte sowie Batterien am Ende ihrer Lebensdauer an den dafür
eingerichteten, öffentlichen Sammelstellen oder an die Verkaufsstelle zurückzugeben. Einzelheiten dazu regelt das jeweilige
Landesrecht. Das Symbol auf dem Produkt, der Gebrauchsanleitung oder der Verpackung weist auf diese Bestimmungen hin.
Mit der Wiederverwertung, der stoichen Verwertung oder anderen Formen der Verwertung von Altgeräten/Batterien leisten Sie einen
wichtigen Beitrag zum Schutz unserer Umwelt.
12. Konformitätserklärung
Hiermit erklärt die Hama GmbH & Co KG, dass der Funkanlagentyp [00113986] der Richtlinie 2014/53/EU entspricht. Der
vollständige Text der EU-Konformitätserklärung ist unter der folgenden Internetadresse verfügbar:
www.hama.com->00113986 ->Downloads.
Frequenzband/Frequenzbänder 433 MHz
Abgestrahlte maximale Sendeleistung 6,31mW
Page 17

16
R Руководство по эксплуатации
Органы управления и индикации
A Основной блок
1. Время
2. Температура в помещении
3. Влажность воздуха в помещении
4. Значок будильника
5. Значок радиосигнала
6. Значок прогноза погоды
7. Значок радиосигнала внешнего датчика
8. Наружная температура
9. Влажность воздуха вне помещения
10. Канал
11. Кнопка SNOOZE / LIGHT
= функция автоповтора сигнала будильника; включение
подсветки (ок. 5 секунд)
12. Кнопка ALARM SET
= индикация / настройка будильника
13. Кнопка CH+
= выбор канала / увеличение текущего настраиваемого
значения
14. Переключатель °C/°F
= выбор единицы измерения температуры (°C, °F)
15. Кнопка SENSOR
= поиск радиосигнала внешнего датчика вручную
16. Кнопка DISPLAY SET
= настройки / подтверждение ввода значения параметра
17. Кнопка MEM–
= просмотр сохраненных макс. и мин. значений;
уменьшение текущего настраиваемого значения
18. Кнопка RESET
= восстановление настроек по умолчанию
19. Кнопка RCC
= включение / выключение принудительного приема
радиосигнала
20. Отсек батарей
B Блок внешнего датчика
21. Лампа индикации передачи данных
22. Дисплей
23. Отверстие для настенного монтажа
24. Кнопка RESET
= восстановление настроек по умолчанию
25. Переключатель CH
= выбор канала
26. Отсек батарей
Благодарим за покупку изделия фирмы Hama.
внимательно ознакомьтесь с настоящей инструкцией. Храните
инструкцию в надежном месте для справок в будущем. В
случае передачи изделия другому лицу приложите и эту
инструкцию.
1. Предупредительные пиктограммы и инструкции
Внимание
Данным значком отмечены инструкции, несоблюдение
которых может привести к опасной ситуации.
Примечание
Дополнительная или важная информация.
2. Комплект поставки
•Метеорологический прибор EWS-890
(Основной блок для контроля внутри помещения / блок
внешнего датчика для контроля вне помещения)
•4батареи АА
•Настоящая инструкция
3. Техника безопасности
•Изделие предназначено только для домашнего применения.
•Соблюдать технические характеристики.
•Беречь от влаги и брызг.
•Не эксплуатировать в непосредственной близости с
нагревательными приборами и беречь от прямых солнечных
лучей
•Не применять в запретных зонах.
•Прибор разрешается подключать только к соответствующей
розетке электросети. Розетка электросети должна находиться
рядом с устройством в легко доступном месте.
•Не ронять. Беречь от сильных ударов.
•Изделие не открывать. Запрещается эксплуатировать
неисправное изделие.
•Запрещается самостоятельно ремонтировать
устройство. Ремонт разрешается производить только
квалифицированному персоналу.
•Упаковку не давать детям: опасность асфиксии.
•Утилизировать упаковку в соответствии с местными
нормами.
•Запрещается вносить изменения в конструкцию. В
противном случае гарантийные обязательства аннулируются.
Page 18

17
Внимание – Батареи. Техника безопасности
•Израсходованные батареи немедленно удалять из
прибора и утилизировать.
•Разрешается применять аккумуляторы только указанного
типа.
•Не применять различные типы или новые и старые
батареи вместе.
•Соблюдать полярность батарей (+ и -). Несоблюдение
полярности может стать причиной взрыва батарей.
•Обычные батареи не заряжать.
•Батареи хранить в безопасном месте и не давать детям.
•Не закорачивать контакты батарей. Не хранить рядом с
металлическими объектами.
4. Ввод в эксплуатацию
4.1. Блок внешнего датчика
•Снимите с дисплея защитную пленку.
•Откройте крышку отсека батарей (26) и вставьте две батареи
АА, соблюдая полярность.
•Переведите переключатель CH (25) влево или вправо, чтобы
выбрать канал передачи данных внешним датчиком. На
дисплее (22) отображается индикация CH1, CH2 или CH3.
Если для передатчика назначен канал, то для его изменения
необходимо извлечь батареи или сбросить настройки
основного блока (6.9. Восстановление заводских
настроек).
•Попеременно отображаются измеренные значения
температуры и влажности воздуха.
•Закройте крышку отсека батарей.
Примечание
При вводе в эксплуатацию всегда сначала вставляйте
батареи в блок наружного датчика, а затем в основной
блок.
4.2. Основной блок
•Снимите с дисплея защитную пленку.
•Откройте крышку отсека батарей (20) и вставьте две батареи
АА, соблюдая полярность.
•Закройте крышку отсека батарей.
5. Монтаж
Примечание. Монтаж
•Перед тем как монтировать блоки, рекомендуется
сначала завершить настройки в местах будущей
установки (см. 6). Смотрите описание работы основного
блока.
•Монтаж следует производить после того, как
правильные настройки обеспечат надежную радиосвязь
между блоками.
Примечание
•Максимально допустимое расстояние между блоками
составляет 50 метров.
•Монтируя блоки, следует учесть, что различные
препятствия (стены, деревья, автомобили,
высоковольтные линии и др.) создают помехи
радиосвязи между блоками.
•Перед монтажом убедитесь, что в местах расположения
блоков обеспечивается устойчивая радиосвязь.
•Блок внешнего датчика должен размещаться в месте,
защищенном от воздействия прямых солнечных лучей
и осадков.
•Международный стандарт высоты для измерения
влажности воздуха составляет 1,25 метра (4 фута) над
землей.
Внимание
•Подготовьте монтажный материал (приобретается
отдельно), соответствующий свойствам стены.
•Перед началом эксплуатации убедитесь в отсутствии
дефектных или поврежденных деталей.
•При монтаже не применять чрезмерных усилий. В
противном случае можно повредить устройство.
•Убедитесь, что стена подходит для монтажа. В стене на
месте монтажа не должно быть электрической проводки,
газопровода, водопровода и других трубопроводов.
5.1. Основной блок
•Спомощью подставки установите основной блок на ровную
поверхность.
5.2. Блок внешнего датчика
•Блок внешнего датчика можно разместить на улице с
помощью подставки.
Page 19

18
•Внешний блок рекомендуется монтировать на стене с
помощью
соответствующего паза (23).
•Спомощью дюбеля закрепите шуруп на стене.
•Подвесьте блок за соответствующий паз (23).
6. Эксплуатация
Примечание – Ввод данных
Чтобы ускорить изменение значения во время настройки,
удерживайтекнопку CH+ (13) или кнопку MEM– (17).
6.1. Соединение с блоком внешнего датчика
•После загрузки батарей основной блок начинает
автоматический поиск сигнала внешнего датчика и
выполняет операцию ввода устройства в эксплуатацию.
Примечание
•Автоматическая настройка при вводе в эксплуатацию
длится ок. 5 минут.
•Во время поиска радиосигнала мигает значок
радиосвязи с внешним датчиком (7).
•Втечение этого времени не нажимайте кнопки
устройства! В противном случае может возникнуть сбой
точной настройки значений и передачи сигнала.
•Автоматическая настройка завершена, когда на
дисплее начнут отображаться данные измерения внутри
помещения (2,3) и вне помещения (8,9).
•Если сигнал автоматически принять не удается, нажмите
кнопку SENSOR (15), чтобы принудительно включить поиск
сигнала. Во время поиска радиосигнала мигает значок
радиосвязи с внешним датчиком (7).
•Во время ручного поиска радиосигнала нажмите и ок. 3
секунд удерживайте кнопку SENSOR (15), чтобы отключить
поиск. Значок радиосигнала (7) гаснет.
6.2. Выбор канала / дополнительные внешние датчики
Примечание
•Максимальное количество внешних датчиков: 3. Чтобы
установить соединение основной блок и внешний датчик
должны работать на одном канале. Совместимые блоки
внешних датчиков смотрите по адресу www.hama.com.
•Канал устанавливается кнопкой CH+ (13) (см. 4.1.
Настройка блока внешнего датчика). На дисплее
отображается 1, 2 или 3.
•Основной блок показывает измеренные данные (8,9),
которая измеряется в месте установки внешнего датчика
(11).
•Чтобы выбрать канал, нажмите и удерживайте кнопку
CH+ (13). Каждые 4 секунд на дисплее будут попеременно
меняться измеренные значения каналов с соответствующим
значком (11).
•Нажмите кнопку CH+ (13), чтобы вернуться в нормальный
режим индикации.
6.3 Основные параметры и ручные настройки
Автоматический прием радиосигнала DCF
После первого включения основного блока и установки
радиосвязи с блоком внешнего датчика часы прибора
автоматически начинают поиск радиосигнала точного времени
(DCF). Во время этого процесса на дисплее мигает значок
радиосигнала (5).
Индикация интенсивность сигнала
нет приема
плохо
приемлемый
выдающийся
Индикация Поиск сигнала DCF
мигает активный
горит непрерывно сигнал принят успешно
нет дисплея неактивный
Page 20

19
Примечание – Настройка часов
•Если в течение первых минут радиосигнал DCF принять
не удается, поиск радиосигнала отключается. Значок
радиосигнала точного времени гаснет.
•При наличии помех поиск сигнала рекомендуется
производить ночью, так как, как правило, в это время
уровень помех ниже.
•Имеется также возможность включить принудительный
поиск радиосигнала DCF, перенеся часы в другое
местоположение, или выполнить настройку часов
вручную.
•Режим поиска радиосигнала DCF включается ежедневно
автоматически (в 02:00, 08:00, 14:00 и в 20:00). При
успешном приеме радиосигнала введенные вручную
значения времени и календаря заменяются.
•Нажмите кнопку RCC (19), чтобы принудительно включить
поиск радиосигнала.
Примечание – Принудительный поиск
радиосигнала
•Принудительный поиск радиосигнала выключается
автоматически
через 6 - 16 минут.
•Частое нажатие кнопки RCC (19) приводит к разряду
батареи. Данную функцию рекомендуется применять,
перенеся часы в оптимальное местоположение.
Примечание – Индикация летнего времени
Переключение на летнее время происходит автоматически.
Во время индикации летнего времени на дисплее
отображается
DST
.
Настройка вручную
•Нажмите и около 3 секунд удерживайте кнопку DISPLAY SET
(16), чтобы настроить параметры в следующем порядке:
•Формат 12/24-ч. (1)
•Час (1)
•Минуты (1)
•Секунды (только «00») (1)
•Часовой пояс (1)
•Установите значение кнопкой CH+ (13) или кнопкой MEM–
(17), затем подтвердите выбор кнопкой DISPLAY SET (16).
•Режим настройки выключается автоматически, если нажатий
на кнопки не производилось в течение 60 секунд.
Примечание – Часовой пояс
•Радиосигнал точного времени DCF соответствует
среднеевропейскому времени. Если часы
эксплуатируются в другом часовом поясе, то их
необходимо настроить соответствующим образом.
•Например, разница во времени между Москвой и
Берлином составляет 3 часа. В Москве, таким образом,
необходимо сделать поправку в +3 часа. В этом случае
к показателю времени (установленному автоматически
по радиосигналу DCF или вручную) часы автоматически
будут прибавлять 3 часа.
Будильник
•Нажмите и около 3 секунд удерживайте кнопку ALARM SET
(12), чтобы настроить время срабатывания будильника.
Значение часа мигает.
•Кнопкой CH+ (13) или MEM– (17) установите значение часа,
затем нажмите кнопку ALARM SET (12), чтобы подтвердить
настройку. Значение минут мигает.
•Настройте минуты.
•Режим настройки выключается автоматически, если нажатий
на кнопки не производилось в течение 60 секунд.
•После настройки будильника он активируется
автоматически.
•Нажмите кнопку ALARM SET (12), чтобы отобразить время
срабатывания
будильника (AL).
•Включение/выключение будильника осуществляется кнопкой
ALARM SET (12).
•Значок (4) отображается или не отображается в зависимости
от того, включен или выключен будильник.
•При срабатывании будильника мигает соответствующий
значок (4), и подается звуковой сигнал.
•Чтобы отключить подачу сигнала предупреждения, нажмите
кнопку ALARM SET (12). Если сигнал не был отключен
вручную, то он автоматически отключится через 2 минуты.
Page 21

20
Настройка часового пояса
Примечание – Автоповтор сигнала будильника
•Во время подачи сигнала будильника нажмите кнопку SNOOZE / LIGHT (11), чтобы включить функцию автоповтора
сигнала. На дисплее начнет мигать значок будильника (4). Подача сигнала прерывается на 5 минут, после чего сигнал
подается снова.
•Функцию автоповтора сигнала будильника можно применять в течение 24 часов.
Цельсий / Фаренгейт
•Переключателем °C/°F (14) установите единицу измерения температуры.
6.4. Прогноз погоды
•На основе изменений атмосферного давления и сохраненных данных прибор прогнозирует погоду на период от 12 до 24 часов.
Примечание – Прогноз погоды
В первые часы после ввода в эксплуатацию из-за отсутствия необходимых данных функция прогноза погоды не работает.
•Прогноз погоды отображается с помощью четырех значков (6):
Значок (6) Погода
ясно
переменная облачность
облачность
дождь
6.5. Максимальные и минимальные значения температуры и
влажности воздуха
•Зафиксированные максимальные и минимальные значения наружной и комнатной температуры, а также влажности воздуха
автоматически сохраняются в памяти прибора.
•Нажимайте кнопку MEM– (17), чтобы переключить индикацию текущей температуры и влажности, минимальной температуры и
влажности (MIN), а также максимальной температуры и влажности (MAX).
•Минимальное и максимальное значения отображаются в течение 5 секунд.
•Нажмите и удерживайте кнопку MEM– (17), чтобы удалить сохраненные макс. и миним. значения.
Page 22

21
6.6. Предупреждение о гололеде
•Если наружная температура (8) находится в диапазоне -2°C ~ 3°C, на дисплее будет мигать значок предупреждения о
гололеде.
•Если наружная температура выходит из указанного выше диапазона, значок предупреждения не отображается.
6.7. Подсветка
Примечание – Подсветка
•Нажмите кнопку SNOOZE / LIGHT (11), чтобы на 5 секунд включить дисплей.
6.8. Разряд батарей
Значок показывает малую остаточную емкость батарей основного блока. Замените батареи.
Примечание – Порядок замены батареи
•После замены батарей основного блока и блока внешнего датчика необходимо заново выполнить синхронизацию блоков.
•Для этого необходимо удалить батареи в том числе из другого блока, а затем снова загрузить их в отсек батарей.
6.9. Восстановление заводских настроек
•Вслучае «зависания» устройства с помощью острого предмета (скрепки и т.п.) нажмите кнопку RESET (18) основного устройства,
затем кнопку RESET (24) внешнего датчика.
•При этом восстанавливаются заводские настройки, а все настройки, сделанные вручную, удаляются.
7. Уход и техническое обслуживание
Чистку изделия производить только безворсовой слегка влажной салфеткой. Запрещается применять агрессивные чистящие
средства. Следите за тем, чтобы в устройство не попала вода.
8. Отказ от гарантийных обязательств
Компания Hama GmbH & Co. KG не несет ответственность за ущерб, возникший вследствие неправильного монтажа, подключения и
использования изделия не по назначению, а также вследствие несоблюдения инструкции по эксплуатации и техники безопасности.
9. Отдел техобслуживания
По вопросам ремонта или замены неисправных изделий обращайтесь к продавцу или в сервисную службу компании Hama.
Горячая линия отдела техобслуживания:
+49 9091 502-115 (немецкий, английский)
Подробнее смотрите здесь: www.hama.com
Page 23

22
10. Технические характеристики
Основной блок Блок внешнего датчика
Питание
3,0 В
2 батареи АА
3,0 В
2 батареи АА
Диапазон измерения
Температура
-40°C – +70°C/
-40°F – 158°F
-40°C – +70°C/
-40°F – 158°F
Рекомендуемая рабочая
температура
0°C – +45°C/
32°F – 113°F
-20°C – +55°C/
-4°F – 131°F
Шаг шкалы
Температура
0,1°C / °F 0,1°C / °F
диапазон измерения
влажность
20% ~ 90% RH 20% ~ 90% RH
рекомендуемые
рабочий диапазон
20% ~ 90% RH 20% ~ 90% RH
Измерение шаги
влажность
1% RH 1% RH
Цикл измерения температуры 60 – 64 s60 – 64 s
Часы с коррекцией по
радиосигналу точного времени
Да Нет
гигрометр Да Да
Термометр Да Да
барометр Да Нет
Размеры (ШхВхГ) 140 x 100 x 47 mm 65 x 100 x 35 mm
Макс. кол-во
внешних датчиков
3
Частота:433 MHz
Дальность действия ≤ 50 m
Page 24

23
11. Инструкции по утилизации
Охрана окружающей среды:
С момента перехода национального
законодательства на европейские нормативы
2012/19/EU и 2006/66/EU действительно
следующее: Электрические и электронные
приборы, а также батареи запрещается
утилизировать с обычным мусором. Потребитель, согласно
закону, обязан утилизировать электрические и электронные
приборы, а также батареи и аккумуляторы после их
использования в специально предназначенных для этого
пунктах сбора, либо в пунктах продажи. Детальная
регламентация этих требований осуществляется
соответствующим местным законодательством. Необходимость
соблюдения данных предписаний обозначается особым
значком на изделии, инструкции по эксплуатации или упаковке.
При переработке, повторном использовании материалов или
при другой форме утилизации бывших в употреблении
приборов Вы помогаете охране окружающей среды. В
соответствии с предписаниями по обращению с батареями, в
Германии вышеназванные нормативы действуют для
утилизации батарей и аккумуляторов.
12. Декларация производителя
Настоящим компания Hama GmbH & Co KG
заявляет, что радиооборудование типа [00113986]
отвечает требованиям директивы 2014/53/ЕС. С
полным текстом декларации о соответствии требованиям ЕС
можно ознакомиться здесь: www.hama.
com-> 00113986-> Downloads.
Диапазон/диапазоны частот 433 MHz
Максимальная излучаемая мощность 6,31mW
Page 25

24
I Istruzioni per l‘uso
Elementi di comando e indicazioni
A Stazione base
1. Ora
2. Temperatura ambiente
3. Umidità aria ambiente
4. Simbolo sveglia
5. Simbolo radio
6. Simbolo previsioni del tempo
7. Simbolo radio stazione di misurazione
8. Temperatura esterna
9. Umidità aria esterna
10. Indicazione canale
11. Tasto SNOOZE / LIGHT
= interruzione del segnale di sveglia /attivazione della
retroilluminazione (ca. 5 secondi)
12. Tasto ALARM SET
= indicazione / impostazione della modalità sveglia
13. Tasto CH+
= scelta del canale / aumento dell‘attuale valore
d‘impostazione
14. Interruttore a cursore °C/°F
= commutazione tra gradi °C e °F
15. Tasto SENSOR
= ricerca manuale del segnale dalla stazione di misurazione
16. Tasto DISPLAY SET
= impostazioni / conferma del valore d‘impostazione
17. Tasto MEM–
= richiesta dei valori massimi e minimi memorizzati / riduzione
del valore impostato attuale
18. Pulsante RESET
= ripristino delle impostazioni di fabbrica
19. Tasto RCC
= attivazione/disattivazione manuale della ricezione di
segnale radio
20. Vano batterie
B Stazione di misurazione
21. Spia di controllo trasmissione
22. Display
23. Foro per montaggio a parete
24. Pulsante RESET
= ripristino delle impostazioni di fabbrica
25. Interruttore scorrevole CH
= scelta canale
26. Vano batterie
Grazie per avere acquistato un prodotto Hama!
Prima della messa in esercizio, leggete attentamente le seguenti
istruzioni e avvertenze, quindi conservatele in un luogo sicuro per
una eventuale consultazione. In caso di cessione dell‘apparecchio,
consegnate anche le presenti istruzioni al nuovo proprietario.
1. Spiegazione dei simboli di avvertimento e delle
indicazioni
Attenzione
Viene utilizzato per contrassegnare le indicazioni di sicurezza
oppure per rivolgere l‘attenzione verso particolari rischi e
pericoli.
Avvertenza
Viene utilizzato per contrassegnare informazioni supplementari
o indicazioni importanti.
2. Contenuto della confezione
•Stazione meteo EWS-890
(stazione base per interni / stazione di misurazione per esterni)
•4batterie AA
•Queste istruzioni per l’uso
3. Indicazioni di sicurezza:
•Il prodotto è concepito per l’uso domestico privato, non
commerciale.
•Non mettere in esercizio il prodotto al di fuori dei suoi limiti di
rendimento indicati nei dati tecnici.
•Non usare il prodotto in ambienti umidi ed evitare il contatto
con gli spruzzi.
•Evitare di mettere in esercizio il prodotto in prossimità di
riscaldamento, altre fonti di calore o la luce diretta del sole.
•Non utilizzare il prodotto in zone in cui non sono ammesse le
apparecchiature elettroniche.
•Collegare il prodotto solo a una presa appositamente
omologata. La presa deve trovarsi nei pressi del prodotto ed
essere facilmente accessibile.
•Non fare cadere il prodotto e non sottoporlo a forti scossoni!
•Non aprire il prodotto e non utilizzarlo più se danneggiato
•Non tentare di aggiustare o riparare l’apparecchio da soli. Fare
eseguire qualsiasi lavoro di riparazione al personale specializzato
competente.
•Tenere l’imballo fuori dalla portata dei bambini, pericolo di
soffocamento!
•Smaltire immediatamente il materiale d‘imballaggio attenendosi
alle prescrizioni locali vigenti.
•Non apportare modiche all’apparecchio per evitare di perdere
i diritti di garanzia.
Page 26

25
Avvertenza – Batterie
•Rimuovere e smaltire immediatamente le batterie scariche.
•Utilizzare unicamente accumulatori (o batterie) conformi
al tipo indicato.
•Non utilizzare batterie di tipi o costruttori diversi, né
mischiare batterie vecchie e nuove.
•Attenersi sempre alla corretta polarità (scritte + e -) delle
batterie e inserirle
•di conseguenza. La mancata osservanza comporta la perdita
di potenza o il rischio di esplosione delle batterie.
•Non caricare le batterie.
•Conservare le batterie al di fuori della portata dei bambini
•Non cortocircuitare le batterie e tenerle lontano da oggetti
metallici.
4. Messa in esercizio
4.1. Stazione di misurazione
•Rimuovere la pellicola protettiva sul display.
•Aprire il vano batterie (26) e inserire due batterie AA con la
polarità corretta.
•Spingere l’interruttore a cursore CH (25) a sinistra o a destra per
scegliere il canale su cui trasmette la stazione di misurazione.
Viene visualizzato CH1, CH2 o CH3 (22). Non appena viene
assegnato il canale a un trasmettitore, può essere modicato
solo se si rimuovono le batterie o se si effettua il reset
dell’apparecchio base (6.9 Reset).
•La temperatura misurata e l’umidità dell’aria vengono
visualizzate in alternanza.
•Quindi chiudere il coperchio del vano batterie.
Avvertenza
Per mettere in servizio l‘apparecchio, inserire sempre prima le
batterie nella stazione di misura, quindi nella stazione base.
4.2. Stazione base
•Rimuovere la pellicola protettiva sul display.
•Aprire il vano batterie (20) e inserire due batterie AA con la
polarità corretta.
•Quindi chiudere il coperchio del vano batterie.
5. Montaggio
Nota – Montaggio
•Si consiglia di collocare la stazione base e di misura
nel luogo di montaggio desiderato senza montarla e di
effettuare tutte le impostazioni come descritto al capitolo
6. Esercizio.
•Montare la/le stazioni solo dopo avere effettuato
l‘impostazione corretta e un collegamento radio stabile.
Nota
•La portata della trasmissione radio tra la stazione base e di
misurazione all‘aperto è di max. 50m.
•Prima del montaggio prestare attenzione che la trasmissione
radio non venga impedita da segnali di disturbo o ostacoli
come edici, alberi, veicoli, linee di alta tensione ecc.
•Prima del montaggio denitivo, accertarsi che tra i luoghi di
montaggio desiderati vi sia una ricezione suciente.
•Durante il montaggio della stazione di misurazione,
accertarsi che il luogo d‘installazione sia protetto dalla luce
diretta del sole e dalla pioggia.
•L‘altezza standard internazionale per la misurazione della
temperatura dell‘aria è pari a 1,25 m (4 ft) dal suolo.
Attenzione
•Procurarsi il materiale di installazione idoneo per il
montaggio alla parete prevista presso i rivenditori
specializzati.
•Vericare che non vengano montati pezzi difettosi o
danneggiati.
•Non usare troppa forza, né violenza durante il montaggio
per evitare di danneggiare il prodotto.
•Prima di procedere al montaggio, vericare che la parete
sia idonea per il peso da montare e accertarsi che nel punto
della parete dove si desidera appendere l’apparecchio non vi
siano cavi elettrici, né tubazioni di acqua, gas o altro.
Page 27

26
5.1. Stazione base
•Posizionare la stazione base con il piedino di sostegno su una
supercie piana.
5.2. Stazione di misurazione
•Anche la stazione di misurazione si può posizionare con il
piedino di
sostegno su una supercie piana all‘esterno.
•Si consiglia di montare la stazione di misurazione in modo sicuro
e stabile su
una parete esterna mediante l’apposito foro (23).
•Fissare tasselli, viti, chiodi ecc. alla parete prevista.
•Agganciare la stazione base/di misurazione con il foro previsto
(23).
6. Esercizio
Nota – Immissione
Tenere premuto il tasto CH+ (13) o il tasto MEM– (17) per
selezionare più velocemente i valori.
6.1. Connessione alla stazione di misurazione
•Dopo avere inserito le batterie, la stazione base ricerca
automaticamente la connessione alla stazione di misurazione e
avvia la prima congurazione.
Nota
•La prima congurazione dura ca. 5 minuti.
•Durante il tentativo di connessione, il simbolo della radio
della stazione di misurazione (7) lampeggia.
•Non premere alcun tasto in questo lasso di tempo per evitare
errori e imprecisioni dei valori e della loro trasmissione.
•La procedura è conclusa non appena vengono visualizzati i
dati di misurazione per l‘interno (2,3) e l‘esterno (8,9).
•Se per diverse volte non viene ricevuto alcun segnale, tenere
premuto il tasto SENSOR (15) per ca. 3 secondi, per avviare
la ricerca manuale del segnale. Durante il tentativo di
connessione, il simbolo della radio della stazione di misurazione
(7) lampeggia.
•Durante la ricerca manuale, tenere premuto il tasto SENSOR
(15) per ca. 3 secondi per terminare la ricerca manuale. Il
simbolo radio (7) si spegne.
6.2. Scelta del canale/ altre stazioni di misurazione
Nota
•Oltre alla stazione di misurazione in dotazione, è possibile
installare altre due stazioni di misurazione. Attenzione: è
necessario impostare lo stesso canale per la stazione base e
la stazione di misurazione corrispondente.
Le stazioni di misurazione idonee sono disponibili sul sito
www.hama.com
•Premere ripetutamente il tasto CH+ (13) per selezionare il
canale su cui trasmette la stazione di misurazione – vedi
4.1. Impostazione della stazione di misurazione. Viene
visualizzato 1, 2 o 3 (11).
•La stazione base mostra ora la temperatura misurata (8,9) della
stazione di misurazione selezionata (11).
•Tenere premuto il tasto CH+ (13), per selezionare la sequenza
canale. I valori di misurazione di singoli canali / stazioni di
misurazione (11) vengono visualizzati in sequenza per 4 secondi
ciascuno.
•Premere nuovamente il tasto CH+ (13) per tornare alla modalità
normale.
6.3. Impostazioni di base e manuali
Impostazione automatica secondo il segnale DCF
Dopo la prima accensione della stazione base e la trasmissione tra
stazione base e di misurazione, l‘orologio inizia automaticamente
a cercare un segnale DCF. Durante il processo di ricerca, il simbolo
della radio (5) lampeggia.
Durante la ricezione del segnale radio, la data e l‘ora vengono
impostate automaticamente.
Indicazione Potenza del segnale
Nessuna ricezione
male
accettabile
eccezionale
Page 28

27
Visualizza icona radiofonica Ricerca del segnale DCF
Indicazione lampeggiante Attivo
Indicazione ssa
Ricezione avvenuta – segnale
forte
Nessuna indicazione Inattivo
Nota – Impostazione dell‘ora
•La ricerca viene terminata se non si riceve un segnale radio
DCF entro i primi minuti durante la prima congurazione. Il
simbolo della radio si spegne.
•In caso di disturbi di ricezione, si consiglia di lasciare accesa
la radio tutta la notte, poiché, in linea di massima, i segnali
di disturbo di notte sono minori.
•Nel frattempo è possibile avviare una ricerca manuale
del segnale radio DCF su un altro punto di installazione o
procedere a un’impostazione manuale di ora e data.
•L'orologio continua a ricercare automaticamente ogni
giorno (02:00, 08:00, 14:00 und 20:00 Uhr) il segnale radio
DCF. Se il tentativo di ricezione ha successo, l'ora e la data
impostate manualmente vengono sovrascritte.
•Premere il tasto RCC (19) per avviare la ricerca manuale del
segnale radio.
Nota – Ricerca manuale del segnale
• La ricerca manuale si disattiva automaticamente dopo
6-16 minuti.
•Un utilizzo frequente del tasto RCC (19) va a scapito della
capacità delle batterie. Si consiglia di ricorrere a questa
funzione solo per localizzare un luogo di installazione
ottimale.
Nota – Ora legale
L‘ora si aggiorna automaticamente all‘ora legale. Se è attiva
l‘ora legale, sul display viene visualizzato
DST
.
Impostazioni (manuali)
•Tenere premuto il tasto DISPLAY SET (16) per ca. 3 secondi
per effettuare in
sequenza le seguenti impostazioni.
•Formato 12/24 ore (1)
•Ore (1)
•Minuti (1)
•Secondi (possibili solo gli zeri) (1)
•Fuso orario (1)
•Per selezionare i singoli valori, premere il tasto CH+- (13) o
il tasto MEM– (17) e confermare la selezione corrispondente
premendo il tasto DISPLAY SET (16).
•Se per 60 secondi non si effettua alcuna immissione, si esce
automaticamente dalla modalità d‘impostazione.
Nota – fuso orario
•Il segnale DCF può essere ricevuto in tutto il mondo ma
corrisponde sempre al CET vigente in Germania. Nei paesi con
altri fusi orari deve essere considerata la variazione dell‘ora.
•Se ci si trova a Mosca, dove l‘ora è spostata in avanti di 3 ore
rispetto alla Germania, occorre impostare per il fuso orario +3.
Dopo la ricezione del segnale DCF o dell‘impostazione manuale,
l‘orologio si porta quindi sempre automaticamente 3 ore avanti.
Sveglia
•Tenere premuto il tasto ALARM SET (12) per ca. 3 secondi per
impostare l’orario della sveglia visualizzato. Le cifre delle ore
iniziano a lampeggiare.
•Premere il tasto CH+ (13) oppure il tasto MEM– (17) per
selezionare le ore della sveglia e confermare la selezione
corrispondente premendo il tasto ALARM SET (12). Le cifre dei
minuti iniziano a lampeggiare.
•Ripetere questo procedimento per selezionare i minuti della
sveglia.
•Se per 60 secondi non si effettua alcuna immissione, si esce
automaticamente dalla modalità d‘impostazione.
•La funzione della sveglia si attiva automaticamente impostando
l’orario della sveglia.
•In alternativa premere il tasto ALARM SET (12) per visualizzare
l’orario della sveglia (AL).
•Premendo ripetutamente il tasto ALARM SET (12), la sveglia
viene attivata/disattivata.
•Il simbolo della sveglia (4) viene visualizzato/non viene
visualizzato.
•Se si attiva la sveglia, il simbolo corrispondente (4) inizia a
lampeggiare e viene emesso un segnale di sveglia.
•Premere il tasto ALARM SET (12), per spegnere la sveglia.
Diversamente, la sveglia termina automaticamente dopo 2
minuti.
Page 29

28
Nota – Funzione snooze
•Quando suona la sveglia, premere il tasto SNOOZE / LIGHT (11) per attivare la funzione snooze. Sul display il simbolo della sveglia
(4) inizia a lampeggiare. La sveglia viene disattivata per 5 minuti, quindi suona nuovamente.
•La funzione di snooze può essere utilizzata per un periodo di 24 ore.
Celsius / Fahrenheit
•Impostare l’interruttore scorrevole °C/°F (14) in posizione °C o °F, per visualizzare la temperatura (2,8) nella relativa.
6.4. Previsioni del tempo
•Sulla base delle variazioni della pressione atmosferica e dei dati raccolti, la stazione base può effettuare le previsioni del tempo per le
12-24 ore successive.
Avvertenza – Previsioni del tempo
Nelle prime ore di esercizio non è possibile effettuare previsioni del tempo, a causa della mancanza di dati che vengono memorizzati
solo durante il funzionamento.
•Le previsioni del tempo e il tempo attuale vengono rappresentate mediante quattro simboli diversi (6):
Simbolo (6) Meteo
Sole
Poco nuvoloso
Nuvoloso
Pioggia
6.5. Valori massimi e minimi di temperatura e umidità dell’aria
•La stazione base memorizza automaticamente i valori massimi e minimi della temperatura e dell‘umidità dell‘aria esterna.
•Premere ripetutamente il tasto MEM– (17) per passare tra l’indicazione della temperatura e dell’umidità dell’aria attuale, della
temperatura e dell’umidità dell’aria più bassa (MIN) e più alta (MAX).
•Ivalori massimi e minimi vengono visualizzati per 5 secondi.
•Tenere premuto il tasto MEM– (17) per ca. 3 secondi per ripristinare i valori massimi e minimi memorizzati.
6.6. Allarme ghiaccio
•Se la temperatura esterna (8) è compresa tra -2°C ~ 3°C, sul display LCD viene visualizzato il simbolo di allarme ghiaccio che
lampeggia.
•Il simbolo di allarme ghiaccio
non viene più visualizzato se la temperatura supera questi valori.
Page 30

29
Nota – Allarme temperatura esterna
•Stabilire per ciascun canale o stazione di misurazione collegata un valore limite inferiore o superiore e attivare l’allarme.
•Prestare attenzione che il valore limite inferiore deve essere almeno 1°C/ 1°F al di sotto del valore limite superiore.
6.7. Retroilluminazione
Nota – Retroilluminazione
•Se si preme il tasto SNOOZE/LIGHT (11), il display viene illuminato per ca. 5 secondi.
6.8. Capacità ridotta delle batterie
Quando il simbolo della batteria viene visualizzato sul display della stazione base, la capacità delle batterie nella stazione di misurazione è
molto bassa. Sostituire immediatamente le batterie.
Nota – Sostituzione della batteria
•Accertarsi che dopo ogni sostituzione delle batterie sulla stazione di misurazione o sulla stazione base avvenga una nuova
sincronizzazione delle stazioni.
•Estrarre anche le batterie dall‘altra stazione e inserirle nuovamente o, se necessario, sostituirle.
6.9. Reset
•Nel caso in cui avvengano ripetutamente indicazioni/trasmissioni errate o non vengano visualizzate indicazioni, premere con un oggetto
appuntito (fermaglio ecc.) il pulsante RESET (18) della stazione base, quindi il pulsante RESET (24) della stazione di misura per
effettuare un riavvio.
•La stazione base torna alle impostazioni di fabbrica e perde tutte le informazioni salvate.
7. Cura e manutenzione
Pulire il prodotto unicamente con un panno che non lascia pelucchi e appena inumidito e non ricorrere a detergenti aggressivi. Fare
attenzione a non fare penetrare acqua nel prodotto.
8. Esclusione di garanzia
Hama GmbH & Co KG non si assume alcuna responsabilità per i danni derivati dal montaggio o l‘utilizzo scorretto del prodotto, nonché
dalla mancata osservanza delle istruzioni per l‘uso e/o delle indicazioni di sicurezza.
9. Assistenza e supporto
In caso di domande sul prodotto, rivolgersi alla Consulenza prodotto Hama.
Hotline: +49 9091 502-115 (ted./ing.)
Ulteriori informazioni sul supporto sono disponibili qui: www.hama.com
Page 31

30
10. Dati tecnici
Stazione base Stazione di misurazione
Alimentazione elettrica
3,0 V
2 x AA Batterie
3,0 V
2 x AA Batterie
Campo di misurazione
Temperatura
-40°C – +70°C/
-40°F – 158°F
-40°C – +70°C/
-40°F – 158°F
Temperatura di
funzionamento consigliata
0°C – +45°C/
32°F – 113°F
-20°C – +55°C/
-4°F – 131°F
Passaggi di misura
temperatura
0,1°C / °F 0,1°C / °F
Campo di misura
umidità
20% ~ 90% RH 20% ~ 90% RH
raccomandato
campo di lavoro
20% ~ 90% RH 20% ~ 90% RH
passaggi di misura
umidità
1% RH 1% RH
Ciclo di misura
temperatura
60 – 64 s60 – 64 s
Segnale orario via radio DCF Sì No
IgrometroSìSì
TermometroSìSì
BarometroSìNo
Dimensioni (LxAxP) 140 x 100 x 47 mm 65 x 100 x 35 mm
Max. numero
stazioni di misurazione
3
Frequenza 433 MHz
Portata ≤ 50 m
Page 32

31
11. Indicazioni di smaltimento
Informazioni per protezione ambientale:
Dopo l’implementazione della Direttiva Europea 2012/19/EU e 2006/66/EU nel sistema legale nazionale, ci sono le seguenti
applicazioni: Le apparecchiature elettriche ed elettroniche e le batterie non devono essere smaltite con i riuti domestici. I
consumatori sono obbligati dalla legge a restituire I dispositivi elettrici ed elettronici e le batterie alla ne della loro vita utile ai
punti di raccolta pubblici preposti per questo scopo o nei punti vendita. Dettagli di quanto riportato sono deniti dalle leggi
nazionali di ogni stato. Questo simbolo sul prodotto, sul manuale d’istruzioni o sull’imballo indicano che questo prodotto è
soggetto a queste regole. Riciclando, ri-utilizzando i materiali o utilizzando sotto altra forma i vecchi prodotti/le batterie, darete un
importante contributo alla protezione dell’ambiente.
12. Dichiarazione di conformità
Il fabbricante, Hama GmbH & Co KG, dichiara che il tipo di apparecchiatura radio [00113986] è conforme alla direttiva
2014/53/UE. Il testo completo della dichiarazione di conformità UE è disponibile al seguente indirizzo Internet:
www.hama.com->00113986 ->Downloads.
Bande di frequenza 433 MHz
Massima potenza a radiofrequenza trasmessa 6,31mW
Page 33

32
C Návod k použití
Ovládací prvky a indikace
A Základna
1. Čas
2. Teplota vmístnosti
3. Vlhkost vzduchu v místnosti
4. Symbol alarmu
5. Rádiový symbol spojení
6. Symbol předpovědi počasí
7. Rádiový symbol senzoru
8. Venkovní teplota
9. Vlhkost venkovního vzduchu
10. Zobrazení kanálu
11. Tlačítko SNOOZE / LIGHT
= přerušení signálu buzení / aktivace osvětlení pozadí (cca
5 sekund)
12. Tlačítko ALARM SET
= zobrazení / nastavení režimu buzení
13. Tlačítko CH+
= zvolení kanálu / zvýšení aktuální hodnoty nastavení
14. Posuvný spínač °C/°F
= přepínání mezi °C a °F
15. Tlačítko SENSOR
= manuální vyhledávání signálu senzoru
16. Tlačítko DISPLAY SET
= nastavení / potvrzení hodnoty nastavení
17. Tlačítko MEM–
= vyvolání uložených nejvyšších / nejnižších hodnot / snížení
aktuální hodnoty nastavení
18. Ovladač RESET
= nastavení zpět na výrobní nastavení
19. Tlačítko RCC
= aktivace / deaktivace manuálního příjmu rádiového signálu
20. Přihrádka na baterie
B Bezdrátový senzor
21. Kontrolka přenosu
22. Displej
23. Otvor pro nástěnnou montáž
24. Ovladač RESET
= nastavení zpět na výrobní nastavení
25. CH-posuvný spínač
= výběr kanálu
26. Přihrádka na baterie
Děkujeme, že jste si vybrali výrobek Hama.
Přečtěte si, prosím, všechny následující pokyny a informace.
Uchovejte tento text pro případné budoucí použití. Pokud výrobek
prodáte, předejte tento text novému majiteli.
1. Vysvětlení výstražných symbolů a pokynů
Upozornění
Tento symbol označuje bezpečnostní upozornění, které
poukazuje na určitá rizika a nebezpečí.
Poznámka
Tento symbol označuje dodatečné informace nebo důležité
poznámky.
2. Obsah balení
•Meterologická stanice EWS-890
(základna / bezdrátový senzor)
•4baterie AA
•Tento návod k obsluze
3. Bezpečnostní pokyny
•Výrobek je určen pro použití v soukromých domácnostech.
• Přístroj neprovozujte mimo meze výkonu uvedené v technických
údajích.
• Výrobek nepoužívejte ve vlhkém prostředí a zabraňte působení
stříkající vody.
• Výrobek neprovozujte v bezprostřední blízkosti topení, jiných
zdrojů tepla nebo při působení přímého slunečního záření.
• Výrobek nepoužívejte na místech, kde platí zákaz používání
elektronických přístrojů.
• Výrobek neumisťujte v blízkosti rušivých polí, kovových rámů,
počítačů, televizorů, a pod. Elektronické přístroje a rámy oken
negativně ovlivňují funkci výrobku.
• Zabraňte pádu výrobku a výrobek nevystavujte velkým otřesům.
• Výrobek neotvírejte a v případě poškození již dále nepoužívejte.
• Do výrobku samovolně nezasahujte a neopravujte ho. Veškeré
úkony údržby přenechejte příslušnému odbornému personálu.
• Obalový materiál nepatří do rukou dětí, hrozí nebezpečí udušení.
• Obalový materiál likvidujte ihned podle platných místních
předpisů o likvidaci.
• Na výrobku neprovádějte žádné změny.Tím zanikají veškeré
závazky ze záruky.
Page 34

33
33
Upozornění– baterie
•Použité baterie odstraňte a likvidujte z výrobku ihned.
• Používejte výhradně akumulátory (nebo baterie) odpovídající
udanému typu.
• Staré a nové baterie nemíchejte, stejně tak nepoužívejte
baterie různých typů a výrobců.
• Při vkládání baterií vždy dbejte správné polarity (označení
+ a -) a baterie vkládejte podle uvedené polarity. Při
nedodržení hrozí nebezpečí vytečení baterií nebo exploze.
• Baterie zcela nevybíjejte.
• Baterie uchovávejte mimo dosah dětí.
• Akumulátory/baterie nezkratujte a zabraňte jejich umístění v
blízkosti holých kovových předmětů.
4. Uvedení do provozu
4.1. Bezdrátový senzor
•Odstraňte z displeje ochrannou fólii.
•Otevřete přihrádku na baterie (26) a vložte dvě baterie AA.
Dbejte na správnou polaritu.
•Posuňte CH-posuvný spínač (25) doleva nebo doprava pro
zvolení kanálu, na kterém měřicí stanice vysílá. (22) zobrazí
se CH1, CH2 nebo CH3. Jakmile byl kanál přiřazen jednomu
vysílači, je možné tento měnit jen tehdy, pokud vyjmete baterie
nebo vynulujete základní přístroj (6.9. Reset).
•Střídavě se zobrazuje naměřená teplota a vlhkost vzduchu.
•Poté uzavřete kryt přihrádky na baterie.
Poznámka
Dbejte na to, že při uvádění do provozu musí být vždy nejprve
vloženy baterie do bezdrátového senzoru a potom do základny.
4.2. Základna
•Odstraňte z displeje ochrannou fólii.
•Otevřete přihrádku na baterie (20) a vložte dvě baterie AA.
Dbejte na správnou polaritu.
•Poté uzavřete kryt přihrádky na baterie.
5. Montáž
Poznámka– montáž
•Doporučujeme základnu a bezdrátový senzor nejprve umístit
na požadovaném místě instalace bez montáže a provést
všechna nastavení jak je popsáno v kapitole
6. Provoz .
•Základnu/ bezdrátový senzor instalujte až po správném
nastavení a při stabilním rádiovém spojení.
Poznámka
•Rozsah rádiového přenosu mezi základnou a senzorem je na
volném prostranství až 50m.
•Před montáží dbejte na to, aby nebyl rádiový přenos ovlivněn
rušivými signály nebo překážkami jako jsou budovy, stromy,
vozidla, vysokonapěťová vedení a pod.
•Před konečnou montáží se ujistěte, že je mezi požadovanými
místy instalace dostatečný příjem.
•Při montáži bezdrátového senzoru dbejte na to, aby byl
chráněn před přímým sluncem a deštěm.
•Mezinárodní standardní výška pro měření teploty vzduchu je
1,25 m (4 stopy) nad zemí.
Upozornění
•Instalační a montážní materiál pro instalaci na zeď zakoupíte
v odborné prodejně.
•Neinstalujte vadné nebo poškozené díly.
•Při montáži nikdy nepoužívejte násilí nebo velkou sílu. Mohlo
by dojít k poškození přístroje.
•Před montáží zkontrolujte, zda zeď, na které chcete zařízení
umístit, vykazuje dostatečnou nosnost pro instalovaný
přístroj a ujistěte se, že se na místě montáže ve zdi
nenachází elektrické kabely, vodovodní, plynová nebo
jiná vedení.
5.1. Základna
•Základnu postavte na rovnou plochu.
5.2. Bezdrátový senzor
•Bezdrátový senzor můžete venku umístit na rovnou plochu.
•Doporučujeme bezdrátový senzor bezpečně uchytit na zeď.
•Nainstalujte hmoždinku, šroub, hřebík a pod. do zdi.
•Pro zavěšení slouží otvor na zadní straně senzoru (23).
6. Provoz
Poznámka – zadání hodnot
Pro rychlejší zvolení podržte stisknuté tlačítko CH+ (13) nebo
tlačítko MEM– (17) .
6.1. Spojení s bezdrátovým senzorem
•Po vložení baterií základna automaticky vyhledá spojení s
bezdrátovým senzorem a provede první nastavení.
Page 35

34
Poznámka
•První nastavení trvá cca 5 minut.
•Během vyhledávání spojení bliká symbol rádiového spojení.
(7) .
•Během vyhledávání nepoužívejte žádná tlačítka, aby nedošlo
k chybě přenosu.
•Proces je ukončen, jakmile se na displeji zobrazí vnitřní (2,3)
a venkovní (8,9) hodnoty.
•Pokud není navázáno spojení stiskněte tlačítko SENSOR (15) pro
spuštění manuálního vyhledávání signálu. Během vyhledávání
spojení bliká symbol rádiového spojení. (7).
•Pro ukončení manuálního vyhledávání stiskněte a podržte
tlačítko SENSOR (15) cca. 3 sekundy. Symbol rádiového spojení
(7) zhasne.
6.2. Zvolení kanálu / další bezdrátové senzory
Poznámka
•Kzákladně můžete připojit ještě další dva bezdrátové
senzory. V takovém případě dbejte na stejné nastavení
kanálu na základně a bezdrátovém senzoru. Přídavné
senzory viz www.hama.com
•Opakovaně stiskněte tlačítko CH+ (13) pro nastavení stejného
kanálu jako na senzoru – viz kapitola 4.1. Bezdrátový senzor.
Zobrazí se 1, 2 nebo 3 (11).
•Základna nyní zobrazuje naměřené hodnoty (3) zvoleného
senzoru.
•Pro průběžné zobrazení kanálů stiskněte a podržte tlačítko CH+
(13). Naměřené hodnoty jednotlivých senzorů/kanálů (11) se
postupně zobrazí vždy po dobu 4 sekund.
•Opětovně stiskněte tlačítko CH+ (13) pro návrat do normálního
režimu.
6.3. Základní nastavení a manuální nastavení
Automatické nastavení podle signálu DCF
•Po prvním zapnutí základny a úspěšném přenosu mezi základnou
a senzorem zahájí hodiny automaticky vyhledávání signálu DCF.
Během vyhledávání bliká rádiový symbol (5) .
•Při přijetí rádiového signálu se automaticky nastaví datum a čas.
Symbol příjmu rádiového
signálu
Síla signálu
žádný příjem
špatný
přijatelný
výborný
Symbol rádiového příjmu Vyhledávání signálu DCF
bliká probíhá vyhledávání
trvale svítí úspěšný příjem signálu
nezobrazuje se chyba - vyhledávání ukončeno
Poznámka – nastavení času
•Pokud během prvních minut počátečního nastavení nedojde
k příjmu rádiového signálu DCF, vyhledávání se ukončí.
Rádiový symbol zhasne.
•Pokud nedojde k příjmu DCF signálu, doporučujeme nechat
hodiny přes noc stát, protože v noci jsou rušivé signály
zpravidla slabší.
•Mezitím můžete spustit manuální vyhledávání rádiového
signálu DCF na jiném místě nebo provést manuální nastavení
času a data.
•Meteostanice vyhledává DCF signál každý den (ve 02:00,
08:00, 14:00 a 20:00) a pokud je tento úspěšně přijat,
manuálně nastavené hodnoty času a data se přepíší.
•Pro spuštění manuálního vyhledávání rádiového signálu DCF
stiskněte tlačítko RCC (19).
Page 36

35
Poznámka – manuální vyhledávání
•Manuální vyhledávání se automaticky vypne po 6 – 16
minutách.
•Časté používání tlačítka RCC (19) zatěžuje kapacitu baterie.
Doporučujeme tuto funkci používat jen při zjišťování
optimálního místa instalace.
Poznámka – letní čas
•Hodiny se na letní čas přepnou automaticky. Symbol
DST
bude na displeji zobrazený během trvání letního času.
Manuální nastavení
•Stiskněte a držte tlačítko DISPLAY SET (16) po dobu cca 3
sekund pro nastavení:
•12/24-hodinový formát zobrazení času (1)
•hodiny (1)
•minuty (1)
•sekundy (možné jen nuly) (1)
•časové pásmo (1)
•Jednotlivé hodnoty nastavte tlačítkem CH+ (13) nebo tlačítko
MEM– (17) a potvrďte příslušnou volbu stisknutím tlačítka
DISPLAY SET (16).
•Pokud po dobu 60 sekund neproběhne žádné zadání, režim
nastavení se automaticky ukončí.
Poznámka – časové pásmo
•Signál DCF může být přijímán ve velké vzdálenosti, ale
vždy odpovídá SEČ, který platí v Německu. V zemích, které
se nacházejí v jiném časovém pásmu musíte vždy přičíst/
odečíst časový posun.
•Pokud se nacházíte v Moskvě, pak je tam o 3 hodiny více než
v Německu. Proto u časového pásma nastavte +3. Hodiny se
pak automaticky nastaví s tímto přednastaveným posunem.
Budík
•Pro nastavení budíku stiskněte a držte tlačítko ALARM SET (12)
po dobu cca 3 sekund. Začne blikat zobrazení hodin.
•Stiskněte tlačítko CH+ (13) nebo tlačítko MEM– (17) pro
nastavení hodin doby buzení a volbu potvrďte stisknutím tlačítka
ALARM SET (12). Začne blikat zobrazení minut.
•Tento postup opakujte pro minuty doby buzení.
•Pokud po dobu 60 sekund neproběhne žádné zadání, režim
nastavení se automaticky ukončí.
•Funkce budíku se automaticky aktivuje při nastavení času buzení.
•Pro zobrazení doby buzení (AL) stiskněte tlačítko ALARM
SET (12).
•Opakovaným stisknutím tlačítka ALARM SET (12) se budík
aktivuje / deaktivuje.
•Symbol budíku (4) se zobrazí / nezobrazí.
•Po aktivaci budíku, začne blikat symbol budíku (4) a zazní
signál buzení.
•Pro vypnutí budíku stiskněte tlačítko ALARM SET (12). Jinak se
tento automaticky ukončí po 2 minutách.
Poznámka - SNOOZE - opakované buzení
•Pro aktivaci této funkce stiskněte během znění signálu
buzení tlačítko SNOOZE/LIGHT (11). Na displeji začne
blikat symbol budíku (4). Signál buzení se opakuje po 5
minutách.
•Funkci SNOOZE můžete používat po dobu 24 hodin.
Celsius / Fahrenheit
•Posuvný přepínač °C/°F (14) nastavte do polohy °C nebo °F pro
zobrazení teploty (2,8) v příslušné jednotce .
6.4. Předpověď počasí
•Na základě atmosférických změn tlaku vzduchu a uložených
dat může meteostanice předpovídat počasí na následujících 12
až 24 hodin.
Poznámka – předpověď počasí
•Vprvních hodinách provozu není z důvodu chybějících dat
předpověď počasí možná, tato data jsou ukládána teprve v
průběhu provozu.
•Pravděpodobnost správné předpovědi je asi 70-75%.
•Předpověď počasí a aktuální počasí jsou zobrazeny pomocí čtyř
různých symbolů (6):
Page 37

36
Symbol (6) Počasí
slunečno
oblačno
zataženo
déšť
6.5. Maximální a minimální hodnoty teploty a vlhkosti
vzduchu
•Základna automaticky ukládá maximální a minimální vnitřní /
venkovní teploty a vlhkosti hodnoty.
•Opakovaně stiskněte tlačítko MEM– (17), pro přepnutí mezi
aktuální teplotě a vlhkosti, minimální teplota a vlhkost (MIN) a
maximální teploty a vlhkosti (MAX).
•Maximální a minimální hodnoty jsou zobrazeny po dobu 5
sekund.
•Pro vynulování uložených maximálních a minimálních hodnot
stiskněte a podržte tlačítko MEM– (17).
6.6. Varování při tvorbě ledu
•Pokud je venkovní teplota (8) v rozmezí -2°C ~ 3°C, pak na
displeji bliká symbol varování před tvorbou ledu .
•Symbol varování před tvorbou ledu se již nebude zobrazovat,
jakmile teploty překročí toto teplotní rozmezí.
6.7. Podsvícení displeje
Poznámka - podsvícení displeje
•Při stisknutí tlačítka SNOOZE/LIGHT (11) se displej podsvítí
na cca 5 sekund.
6.8. Nízká kapacita baterie
Jakmile se na displeji základny zobrazí symbol baterie
, jsou
baterie v základně/ bezdrátovém senzoru téměř vybité. Baterie
ihned vyměňte.
Poznámka – výměna baterie
•Po každé výměně baterií u základny nebo bezdrátového
senzoru musí proběhnout nová synchronizace stanic.
•Jestliže měníte baterie v bezdrátovém senzoru je potřeba pro
správnou synchronizaci vyjmout a vložit baterie v základně
a naopak.
6.9. Reset
•Při trvalém, chybném/ neexistujícím zobrazení / přenosu stiskněte
pomocí špičatého předmětu (kancelářská sponka a pod.) nejprve
tlačítko RESET (18) na základně a poté tlačítko RESET (24) na
bezdrátovém senzoru pro restart přístroje.
•Základna se uvede do výrobního nastavení a ztratí všechny
uložené informace.
7. Údržba a čištění
Tento výrobek čistěte pouze mírně navlhčeným hadříkem
nepouštějícím vlákna a nepoužívejte agresivní čisticí prostředky.
Dbejte na to, aby se do výrobku nedostala voda.
8. Vyloučení záruky
Hama GmbH & Co KG nepřebírá žádnou odpovědnost nebo záruku
za škody vzniklé neodbornou instalací, montáží nebo neodborným
použitím výrobku nebo nedodržováním návodu k použití a/nebo
bezpečnostních pokynů.
9. Servis a podpora
Máte otázky k produktu ? Obraťte na na poradenské oddělení
Hama.
Horká linka: +49 9091 502-115 (německy/anglicky)
Další podpůrné informace naleznete na adrese: www.hama.com
Page 38

37
10. Technické údaje
Základna Bezdrátový senzor
Napájení
3,0 V
2 x baterie AA
3,0 V
2 x baterie AA
Rozsah měření
Teplota
-40°C – +70°C/
-40°F – 158°F
-40°C – +70°C/
-40°F – 158°F
Doporučená
provozní teplota
0°C – +45°C/
32°F – 113°F
-20°C – +55°C/
-4°F – 131°F
Měřicí kroky
teplota
0,1°C / °F 0,1°C / °F
Rozsah měření
vlhkost
20% ~ 90% RH 20% ~ 90% RH
Doporučená
Provozní rozsah
20% ~ 90% RH 20% ~ 90% RH
Měřicí kroky
vlhkost
1% RH 1% RH
Měřicí cyklus
teplota
60 – 64 s60 – 64 s
Hodiny řízené DCF ano ne
Vlhkoměr ano ano
Teploměr ano ano
Barometr ano ne
Rozměry (ŠxVxH) 140 x 100 x 47 mm 65 x 100 x 35 mm
Max. počet
bezdrátových senzorů
3
Frekvence 433 MHz
Dosah ≤ 50 m
Page 39

38
11. Pokyny k likvidaci
Ochrana životního prostředí:
Evropská směrnice 2012/19/EU a 2006/66/EU
ustanovujete následující: Elektrická a elektronická
zařízení stejně jako baterie nepatří do domovního
odpadu. Spotřebitel se zavazuje odevzdat všechna
zařízení a baterie po uplynutí jejich životnosti do
příslušných sběren. Podrobnosti stanoví zákon příšlušné země.
Symbol na produktu, návod k obsluze nebo balení na toto
poukazuje. Recyklací a jinými způsoby zužitkování přispíváte k
ochraně životního prostředí.
12. Prohlášení o shodě
Tímto Hama GmbH & Co KG prohlašuje, že typ
rádiového zařízení [00113986] je v souladu se směrnicí
2014/53/EU. Úplné znění EU prohlášení o shodě je k
dispozici na této internetové adrese:
www.hama.com->00113986 ->Downloads.
Kmitočtové pásmo
(kmitočtová pásma)
433 MHz
Maximální radiofrekvenční
výkon vysílaný
6,31mW
Page 40

39
Q Návod na použitie
Ovládacie prvky a indikácie
A Základňa
1. Čas
2. Teplota v miestnosti
3. Vlhkosť vzduchu v miestnosti
4. Symbol alarmu
5. Symbol rádiového spojenia
6. Symbol predpovede počasia
7. Symbol rádiového spojenia senzoru
8. Vonkajšia teplota
9. Vlhkosť vonkajšieho vzduchu
10. Indikácia kanálov
11. Tlačidlo SNOOZE / LIGHT
= Prerušenie signálu budenia / aktivácia podsvietenia (cca
5 sekúnd)
12. Tlačidlo ALARM SET
= Indikácia/ nastavenie režimu budenia
13. Tlačidlo CH+
= Výber kanálov / zvýšenie aktuálnej hodnoty
14. Posuvný spínač °C/°F
= Prepínanie medzi °C a °F
15. Tlačidlo SENSOR
= manuálne vyhľadávanie signálu senzoru
16. Tlačidlo DISPLAY SET
= Nastavenia / potvrdenie nastavenej hodnoty
17. Tlačidlo MEM–
= Vyvolanie uložených maximálnych/minimálnych hodnôt /
zníženie aktuálnej hodnoty
18. Tlačidlo RESET
= Resetovanie na továrenské nastavenie
19. Tlačidlo RCC
= Aktivácia/ deaktivácia manuálneho príjmu rádiového signálu
20. Batériová priehradka
B Bezdrôtový senzor
21. Kontrolka prenosu
22. Displej
23. Otvor pre nástennú montáž
24. Tlačidlo RESET
= Resetovanie na továrenské nastavenie
25. Posuvný spínač CH
= Výber kanálov
26. Batériová priehradka
Ďakujeme, že ste sa rozhodli pre výrobok Hama.
Prečítajte si všetky nasledujúce pokyny a informácie. Uchovajte
tento návod na použitie pre prípadné budúce použitie. Pokiaľ
výrobok predáte, dajte tento návod novému majiteľovi.
1. Vysvetlenie výstražných symbolov a upozornení
Upozornenie
Tento symbol označuje bezpečnostné upozornenie, ktoré
poukazuje na určité riziká a nebezpečenstva.
Poznámka
Tento symbol označuje dodatočné informácie, alebo dôležité
poznámky.
2. Obsah balenia
•Meteo stanica EWS-890
(základňa / bezdrôtový senzor)
•4AA batérie
•tento návod na používanie
3. Bezpečnostné upozornenia
• Výrobok je určený pre súkromné použitie v domácnosti, nie je
určený na komerčné použitie.
• Výrobok neprevádzkujte mimo svojich výkonových medzí
uvedených uvedených v technických údajoch.
• Výrobok nepoužívajte vo vlhkom prostredí a predchádzajte
kontaktu so striekajúcou vodou.
• Výrobok nepoužívajte v bezprostrednej blízkosti kúrenia, iných
zdrojov tepla a nevystavujte ho účinkom priameho slnečného
žiarenia.
• Nepoužívajte výrobok v prostredí, v ktorom nie je používanie
elektronických prístrojov dovolené.
• Neumiestňujte výrobok na miesta, ktoré sa nachádzajú v blízkosti
rušivých polí, kovových rámov, počítačov, televízorov, atď.
Elektronické zariadenia ako aj okenné rámy negatívne ovplyvňujú
funkciu výrobku.
•Výrobok nenechajte spadnúť a nevystavujte ho silným otrasom.
• Výrobok neotvárajte a nepoužívajte ho ďalej, ak je poškodený.
• Nepokúšajte sa prístroj samostatne ošetrovať alebo opravovať.
Prenechajte akékoľvek úkony údržby kompetentnému
odbornému personálu.
• Obalový materiál uchovávajte mimo dosahu detí, hrozí
nebezpečenstvo udusenia.
• Likvidujte obalový materiál okmžite podľa platných miestnych
predpisov na likvidáciu odpadov.
• Na zariadení/prístroji nerobte žiadne zmeny. Má to za následok
stratu akýchkoľvek nárokov na plnenie zo záruky.
Page 41

40
Upozornenie – batérie
• Spotrebované batérie bezodkladne odstráňte z výrobku a
likvidujte ich.
• Používajte výlučne nové akumulátory (alebo batérie)
zodpovedajúce uvedenému typu.
• Použité batérie nemiešajte s novými, nepoužívajte rozličné
typy batérií alebo batérie od rôznych výrobcov.
• Dbajte bezpodmienečne na správnu polaritu batérií
(značenie + a -) a vložte ich príslušne. V prípade
nerešpektovania hrozí nebezpečenstvo vytečenia alebo
výbuchu batérií.
• Batérie nevybíjajte do úplného vybitia.
• Batérie uchovávajte mimo dosahu detí.
• Akumulátory/batérie neskratujte a uchovávajte ich mimo
dosahu holých kovových predmetov.
4. Uvedenie do prevádzky
4.1. Bezdrôtový senzor
•Odstráňte ochrannú fóliu z displeja.
•Otvorte batériovú priehradku (26) a vložte dve AA batérie (dbajte
na správnu polaritu; symboly + a -).
•Posuňte posuvný spínač CH (25) doľava alebo doprava na
zvolenie kanálu, na ktorom rbezdrôtová stanica vysiela. (22) je
zobrazené CH1, CH2 alebo CH3. Hneď ako má kanál priradený
niektorý vysielač, je možné ho zmeniť len vybratím batérií a
resetovaním základne (6.9. Reset).
•Nameraná teplota a vlhkosť vzduchu sa zobrazujú striedavo.
•Zatvorte potom kryt batériovej priehradky
Poznámka
Pri uvádzaní do prevádzky dbajte na to, aby ste vložili batérie
najprv do bezdrôtového senzora a až potom do základne.
4.2. Základňa
•Odstráňte ochrannú fóliu z displeja.
•Otvorte batériovú priehradku (20) a vložte dve AA batérie (dbajte
na správnu polaritu; symboly + a -).
•Zatvorte potom kryt batériovej priehradky.
5. Montáž
Poznámka – montáž
•Odporúča sa umiestniť základňu a senzor najprv na miesta
inštalácie bez montáže a urobiť všetky nastavenia - podľa
opisu v odseku 6. Prevádzka.
•Základňu/senzor namontujte až po správnom nastavení a
dosiahnutí stabilného rádiového spojenia.
Poznámka
•Dosah rádiového prenosu medzi senzorom a základňou je vo
voľnom priestranstve až 50 m.
•Pred montážou dbajte na to, aby rádiový prenos nebol
ovplyvnený rušivými signálmi alebo prekážkami, ako sú
budovy, stromy, vozidlá, vysokonapäťové vedenia atď.
•Pred denitívnou montážou sa ubezpečte, že medzi želanými
miestami inštalácie existuje dostatočný príjem.
•Pri montáži senzoru dbajte na to, aby na tomto mieste nebol
vystavený účinkom priameho slnečného žiarenia a dažďa.
•Medzinárodná štandardná výška merania teploty vzduchu je
1,25 m (4 ft) nad povrchom.
Upozornenie
•Vhodný alebo špeciálny materiál pre montáž na stenu si
kúpte v špecializovanom obchode.
•Nikdy neinštalujte chybné alebo poškodené časti výrobku.
•Pri inštalácii nepoužívajte neprimeranú silu, mohli by ste
poškodiť výrobok..
•Pred inštaláciou sa uistite, že je stena vhodná pre hmotnosť
výrobku, ktorý na ňu budete inštalovať, a že miestom
inštalácie neprechádzajú elektrické drôty, vodovodné a
plynové potrubie ani iné vedenie.
5.1. Základňa
•Postavte základňu na rovnú plochu, použite stojanček.
5.2. Bezdrôtový senzor
•Senzor môžete postaviť na rovnú plochu vonku.
•Odporúča sa však senzor bezpečne a pevne namontovať na
vonkajšiu stenu pomocou otvorov (23).
•Nainštalujte hmoždinku, skrutku, klinec atď. v príslušnej stene.
•Senzor na ňu/neho zaveste pomocou otvoru (23).
Page 42

41
6. Prevádzka
Poznámka – zadávanie
Keď podržíte tlačidlo CH+ (13) alebo tlačidlo MEM– (17)
stlačené, zadávané hodnoty sa budú meniť rýchlejšie.
6.1. Spojenie so senzorom
•Po vložení batérií základňa automaticky začne vyhľadávať signál
zo senzoru a vykoná prvé nastavenie.
Poznámka
•Prvé nastavenie trvá asi 5 minút.
•Počas pokusu o pripojenie bliká symbol rádiového spojenia
so senzorom (7).
•Počas pokusu o pripojenie sa nedotýkajte žiadneho tlačidla!
Mohlo by dôjsť k prerušeniu alebo penosu chybných údajov.
•Proces je ukončený, keď sa na displeji zobrazia vnútorné (2,3)
a vonkajšie hodnoty (8,9).
•Ak základňa opakovane neprijíma žiadny signál, stlačte tlačidlo
SENSOR (15) na spustenie manuálneho vyhľadávania signálu.
Počas pokusu o pripojenie sa bliká symbol rádiového spojenia
so senzorom (7).
•Ak chcete manuálne vyhľadávanie ukončiť, stlačte na cca. 3
sekundy tlačidlo SENSOR (15). Symbol rádiového spojenia
(7) zhasne.
6.2. Voľba kanálu/ Ďalšie senzory
Poznámka
•Okrem dodaného senzoru môžete pripojiť dva ďalšie senzory.
Dbajte pritom na zhodné nastavenie kanálu na základni
a príslušnom senzore. Vhodné senzory nájdete na adrese
www.hama.com
•Stláčajte opakovane tlačidlo CH+ (13) pre nastavenie rovnakého
kanálu ako na príslušnom senzore – pozri 4.1. Bezdrôtový
senzor. Zobrazia sa 1, 2 alebo 3 (11).
•Základňa teraz ukazuje nameranú teplotu (8,9) zvoleného
senzoru (11).
•Stlačte a podržte tlačidlo CH+ (13) stlačené, na zvolenie
prepínania kanálov. Namerané hodnoty jednotlivých senzorov /
kanálov budú postupne zobrazené vždy po dobu 4 sekúnd.
•Stlačte znova tlačidlo CH+ (13) na prechod do normálneho
režimu.
6.3. Základné a manuálne nastavenia
Automatické nastavenie pomocou signálu DCF
Po prvom zapnutí a úspešnom spojení s bezdrôtovým senzorom
spustia hodiny automaticky vyhľadávanie signálu DCF.
Počas hľadania sa bliká symbol rádiového spojenia (5).
Ak je príjem rádiového signálu úspešný, dátum a čas sa nastavia
automaticky.
Symbol rádiového spojenia Intenzita signálu
Žiadny signál
Zlý
Prijateľný
Vynikajúci
Zobrazenie symbolu
rádiového spojenia
Vyhľadávanie rádiového
signálu DCF
Symbol bliká vyhľadávanie prebieha
Symbol trvale svieti úspešné - signál bol prijatý
Symbol nie je zobrazený chyba - vyhľadávanie je ukončené
Poznámka – nastavenie času
•Ak počas prvých minút v priebehu prvého nastavenia
nebude prijatý žiadny signál, ukončí sa vyhľadávanie. Symbol
rádiového spojenia zmizne.
•Pri problémoch s prijatím signálu sa odporúča nechať
zariadenie cez noc, ustáliť. Vo všeobecnosti je v noci menej
rušivých signálov.
•Medzitým môžete spustiť manuálne vyhľadávanie rádiového
signálu DCF na inom mieste alebo nastaviť čas a dátum
manuálne.
•Meteostanica vyhľadáva DCF signál každý deň (o 2:00, 8:00,
14:00 a 20:00) a ak je tento úspešne prijatý, manuálne
nastavené hodnoty času a dátumu sa prepíšu.
•Stlačte tlačidlo RCC (19) na spustenie manuálneho vyhľadávania
rádiového signálu DCF.
Page 43

42
Poznámka – manuálne vyhľadávanie
•Manuálne vyhľadávanie sa vypne automaticky po 6 – 16
minútach.
•Časté používanie tlačidla RCC (19) rýchlo vybije batérie..
Túto funkciu sa odporúča použiť len na zistenie optimálneho
miesta pre umiestnenie zariadenia.
Poznámka – letný čas
•Hodiny sa na letný čas prepnú automaticky. Symbol
DST
bude na displeji zobrazený počas trvania letného času.
Manuálne nastavenie
•Podržte asi 3 sekundy stlačené tlačidlo DISPLAY SET (16) pre
nasledujúce nastavenia:
•12-/24-hodinový formát zobrazenia času (1)
•Hodiny (1)
•Minúty (1)
•Sekundy (možné len nuly) (1)
•Časová zóna (1)
•Jednotlivé hodnoty nastavíte tlačidlami CH+ (13) alebo MEM–
(17) a príslušnú voľbu potvrďte stlačením tlačidla DISPLAY
SET (16).
•Ak v priebehu 60 sekúnd nebudú zadané žiadne hodnoty, režim
nastavenia sa automaticky ukončí.
Poznámka – časová zóna
•DCF signál môže byť prijatý na veľmi veľkú vzdialenosť, ale
prijatý čas vždy zodpovedá centrálnemu európskemu času
v Nemecku. V krajinách v inom časovom pásme musíte vždy
pričítať/odčítať časový rozdiel.
•Ak ste napr. v Moskve, je tam o 3 hodiny viac než
v Nemecku. To znamená, že pri časovej zóne by ste mali
nastaviť +3. Zariadenie si automaticky pripočíta 3 hodiny
k času prijatému pomocou rádiového DCF signálu.
Budík
•Podržte asi 3 sekundy stlačené tlačidlo ALARM SET (12) pre
nastavenie času budenia. Hodnota hodín začne blikať.
•Hodnotu hodín času budenia nastavte tlačidlami CH+ (13) alebo
MEM– (17) a voľbu potvrďte stlačením tlačidla ALARM SET
(12). Začne blikať hodnota minút.
•Minúty času budenia nastavte vyššie uvedeným postupom.
•Ak v priebehu 60 sekúnd nebudú zadané žiadne hodnoty, režim
nastavenia sa automaticky ukončí.
•Funkcia budenia sa aktivuje automaticky pri nastavení času
budenia.
•Stlačením tlačidla ALARM SET (12) môžete zobraziť nastavený
čas budenia (AL).
•Opakovaným stláčaním tlačidla ALARM SET (12) sa budík
aktivuje/ deaktivuje.
•Zobrazí/nezobrazí sa symbol alarmu (budenia) (4).
•Pri príslušnej aktivácii budíka sa rozbliká symbol alarmu (4) a
zaznie signál budenia.
•Na ukončenie zvonenia budíka stlačte tlačidlo ALARM SET (12).
Inak sa ukončí automaticky po 2 minútach.
Poznámka – funkcia (Snooze)
•Pri zaznení signálu budenia stlačte tlačidlo SNOOZE/LIGHT
(11) na aktivovanie funkcie Snooze. Na displeji sa rozbliká
symbol alarmu (4). Signál budenia sa preruší na 5 minút a
potom sa aktivuje znova.
•Funkciu Snooze je možné použiť po dobu 24 hodín.
Celzius / Fahrenheit
•Nastavte posuvný prepínač °C/°F (14) do polohy °C alebo °F na
zobrazenie teploty (2,8) v príslušnej jednotke.
6.4. Predpoveď počasia
•Na základe zmien atmosférického tlaku a uložených údajov je
základňa schopná predpovedať počasie na nasledujúcich 12
až 24 hodín.
Poznámka – predpoveď počasia
•Vpriebehu prvých hodín prevádzky nie je možná predpoveď
počasia, pretože chýbajú údaje, ktoré budú uložené až v
priebehu prevádzky.
•Pravdepodobnosť presnej predpovede počasia je asi
70-75 %.
•Predpoveď počasia a aktuálny stav počasia sa znázorňujú štyrmi
rôznymi symbolmi (6):
Page 44

43
Symbol (6) Počasie
Slnečno
Polooblačno
Oblačno
Daždivo
6.5. Maximálne a minimálne hodnoty teploty a vlhkosti
vzduchu
•Základňa ukladá automaticky maximálne a minimálne hodnoty
teploty a vlhkosti vzduchu v exteriéri a vo vnútornom priestore.
•Stlačte opakovane tlačidlo MEM– (17) na striedanie medzi
zobrazovaním aktuálnej teploty a vlhkosti vzduchu, najnižšou
teplotou a vlhkosťou vzduchu (MIN) a najvyššou teplotou a
vlhkosťou vzduchu (MAX).
Maximálne a minimálne hodnoty sa zobrazujú po dobu 5
sekúnd.
•Podržte stlačené tlačidlo MEM– (17) na resetovanie
maximálnych a minimálnych hodnôt.
6.6. Výstraha pred námrazou
•Pri vonkajšej teplote (8) medzi -2°C ~ 3°C na displeji začne
blikať symbol výstrahy pred námrazou.
•
symbol výstrahy pred námrazou z displeja zmizne, ak teplota
stúpne nad vyššie uvedený rozsah.
6.7. Podsvietenie
Poznámka – podsvietenie
•Ak stlačíte tlačidlo SNOOZE/LIGHT (11), displej sa podsvieti
na cca. 5 sekúnd.
6.8. Nízka kapacita batérie
Ak sa na displeji základne zobrazí symbol batérie , je kapacita
batérií v základni / senzore veľmi nízka. Batérie ihneď vymeňte..
Poznámka – výmena batérií
•Po každej výmene batérií v senzore alebo základni sa tieto
musia opäť synchronizovať.
•Aby sa tak stalo, vytiahnite batérie z druhého zariadenia a
opätovne ich vložte, alebo ich podľa potreby vymeňte.
6.9. Resetovanie
•Ak sa hodnoty pravidelne nezobrazujú alebo sú zobrazené
hodnoty nepresné stlačte špicatým predmetom (kancelárskou
spinkou atď.) najprv tlačidlo RESET (18) na základni a potom
tlačidlo RESET (24) na senzore na vykonanie resetu.
•Základňa sa vráti do továrenského nastavenia a všetky uložené
informácie sú vymazané.
7. Údržba a starostlivosť
Na čistenie tohto výrobku používajte len navlhčenú utierku, ktorá
nepúšťa vlákna a nepoužívajte žiadne agresívne čistiace prostriedky.
Dbajte na to, aby do výrobku nevnikla voda.
8. Vylúčenie záruky
Firma Hama GmbH & Co KG neručí/nezodpovedá za škody
vyplývajúce z neodbornej inštalácie, montáže alebo neodborného
používania výrobku alebo z nerešpektovania návodu na používanie
a/alebo bezpečnostných pokynov.
9. Servis a podpora
S otázkami týkajúcimi sa výrobku sa prosím obráťte na poradenské
oddelenie rmy Hama.
Hotline: +49 9091 502-115 (nem./angl.)
Ďalšie informácie o podpore nájdete tu:
www.hama.com
Page 45

44
10. Technické údaje
Základňa Bezdrôtový senzor
Napájanie
3,0 V
2 x AA batérie
3,0 V
2 x AA batérie
Rozsah merania
Teplomer
-40°C – +70°C/
-40°F – 158°F
-40°C – +70°C/
-40°F – 158°F
Odporúčaná
prevádzková teplota
0°C – +45°C/
32°F – 113°F
-20°C – +55°C/
-4°F – 131°F
Meracie kroky
teplota
0,1°C / °F 0,1°C / °F
Rozsah merania
vlhkosť
20% ~ 90% RH 20% ~ 90% RH
Odporúčaná
prevádzkový rozsah
20% ~ 90% RH 20% ~ 90% RH
Meracie kroky
vlhkosť
1% RH 1% RH
Merací cyklus
teplota
60 – 64 s60 – 64 s
Hodiny riadené rádiovým
signálom DCF
Áno Nie
Vlhkomer Áno Áno
Teplomer Áno Áno
Barometer Áno Nie
Rozmery (ŠxVxH) 140 x 100 x 47 mm 65 x 100 x 35 mm
Max. počet senzorov 3
Frekvencia 433 MHz
Dosah ≤ 50 m
Page 46

45
11. Pokyny pre likvidáciu
Ochrana životného prostredia:
Európska smernica 2012/19/EU a 2006/66/EU stanovuje: Elektrické a elektronické zariadenia, rovnako ako batérie sa nesmú
vyhadzovať do domáceho odpadu. Spotrebiteľ je zo zákona povinný zlikvidovať elektrické a elektronické zariadenia, rovnako ako
batérie na miesta k tomu určené. Symbolizuje to obrázok v návode na použitie, alebo na balení výrobku. Opätovným
zužitkovaním alebo inou formou recyklácie starých zariadení/batérií prispievate k ochrane životného prostredia.
12. Vyhlásenie o zhode
Hama GmbH & Co KG týmto vyhlasuje, že rádiové zariadenie typu [00113986] je v súlade so smernicou 2014/53/EÚ. Úplné EÚ
vyhlásenie o zhode je k dispozícii na tejto internetovej adrese: www.hama.com ->00113986 ->Downloads.
Frekvenčné pásmo resp. pásma 433 MHz
Maximálny vysokofrekvenčný 6,31mW
Page 47

00113986/08.17
All listed brands are trademarks of the corresponding companies. Errors and omissions excepted,
and subject to technical changes. Our general terms of delivery and payment are applied.
Hama GmbH & Co KG
86652 Monheim
/Germany
www.hama.com
 Loading...