

Page 1

uRage SoundZbar 2.1 Unleashed
00
113776
Operating Instructions
Bedienungsanleitung
Manual de utilizare
Mode d‘emploi
Instrucciones de uso
Руководство по эксплуатации
Istruzioni per l‘uso
Gebruiksaanwijzing
Οδηγίες χρήσης
Instrukcja obsługi
Használati útmutató
Návod kpoužití
Návod na použitie
Manual de instruções
Kullanma kılavuzu
Bruksanvisning
Käyttöohje
Работна инструкция
GB
D
RO
F
E
RUS
I
NL
GR
PL
H
CZ
SK
P
TR
S
FIN
BG
Page 2

Page 3

A
3
5
7
2
SOURCE MODE PAIR
8
B
10 11
9
1
6
4
1
13
12
2
3
4
w
C
1
3
2
Page 4

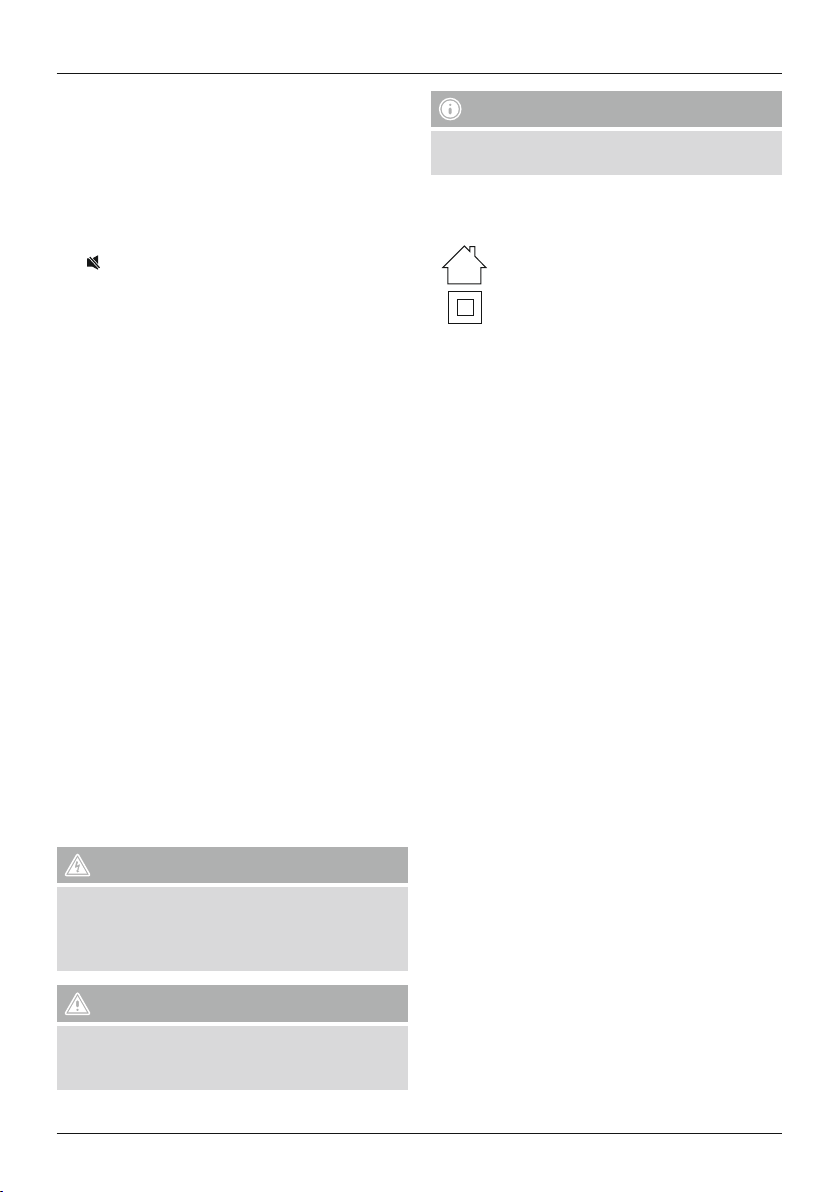
G Operating instruction
Controls and Displays SoundZbar
1. [POWER]
2. [SOURCE] for selecting the input mode
3. [MODE] for selecting the sound mode
4. [PAIR] for interrupting the Bluetooth connection
5. NFC interface
6. [
] Mute switch
7. VOL +/-
8. Optical input status LED
9. AUX status LED
10. Bluetooth status LED
11. Gaming mode status LED
12. Music mode status LED
13. Cinema mode status LED
B. SoundZbar rear
1. Optical In socket
2. AUX In socket
3. Charging status LED
4. Mains lead /DC-IN
C. Subwoofer
1. On/off switch
2. Bass rotary control
3. Status LED for connection between subwoofer and
SoundZbar
Thank you for choosing aHama product.
Take your time and read the following instructions and
information completely.Please keep these instructions
in asafe place for futurereference. If you sell the
device, please pass these operating instructions on to
the new owner.
1. Explanation of Warning Symbols and Notes
Risk of electric shock
This symbol indicates product parts energized with
adangerous voltage of sucient magnitude to
constitute arisk of electric shock.
Warning
This symbol is used to indicate safety instructions or
to draw your attention to specichazards and risks.
Note
2. Explanation of product marking symbols
•
•
3. Package Contents
•SoundZbar
•Subwoofer
•3.5-mm audio cable
•Power supply adapter
•These operating instructions
4. Safety Notes
• The product is intended for private, non-commercial
• Do not use the product in the immediate vicinity of
•Protect the product from dirt, moistureand
•Keep this product, as all electrical products, out of the
• Do not drop the product and do not expose it to any
• Do not operate the product outside the power limits
•Donot use the product in areas wherethe use of
• Be considerate. Loud volumes can have adetrimental
• Do not open the device or continue to operate it if it
• Since the battery is integrated and cannot be
• Keep the packaging material out of the reach of
• Dispose of packaging material immediately according
• Do not modify the product in any way.Doing so voids
• Do not expose the product to dripping or splashing
The product is intended for indoor use only.
Electrical appliance Class II (double insulated).
use only.
heaters or other heat sources or in direct sunlight.
overheating, and only use it in adry environment
reach of children!
major shocks.
given in the specications.
electronic devices is not permitted.
effect on your surroundings.
becomes damaged.
removed, you will need to dispose of the product
as awhole. Do this in compliance with the legal
requirements.
children due to the risk of suffocation.
to locally applicable regulations.
the warranty.
liquids and do not place objects lled with liquids, e.g
vases, on the product.
This symbol is used to indicate additional information
or important notes.
6
Page 5
Risk of electric shock
Note –Turning the radio on for the rst time
• Do not open the device or continue to operate it if
it becomes damaged.
• Do not use the product if the AC adapter,adapter
cable or power cable is damaged.
• Do not attempt to service or repair the product
yourself.Leave any and allservice work to qualied
experts.
5. Startup and Operation
Note
• The product is mains or battery operated. Formains
operation, you merely have to connect the product
to the mains supply (see Section 5). Forbattery
operation, the product must rst be fully charged
(see Section 14).
Warning
• Connect the product only to asocket that has
been approved for the device. The socket must be
installed close to the product and must be easily
accessible.
• Disconnect the product from the network using the
power button –ifthis is not available, unplug the
power cordfromthe socket.
• The electrical socket must always be easily
accessible.
• If you will not be using the product for along
period of time, disconnect it from mains power.
• Connect the power cables of the SoundZbar and the
subwoofer to properly installed power sockets.
• Press [POWER](1) to switch on the SoundZbar.
• Press the on/off switch (1) to switch on the subwoofer.
• The connection status LED (3) on the subwoofer
begins to ash blue.
• The SoundZbar and subwoofer,once switched
on, will automatically connect to one another via
Bluetooth.
• After successful connection, the connection status
LED (3) on the subwoofer is constantly lit blue.
6. Bluetooth pairing
Youcan pair your terminal device with the SoundZbar
via Bluetooth and use the SoundZbar as aplayback
device for audio signals.
Note –
Bluetooth
®
• Check whether your mobile device (smartphone,
tablet PC. etc.) is Bluetooth capable.
• Note that the maximum range for Bluetooth is 10
metres without obstacles such as walls, people,
etc.
• The Bluetooth connection may be disrupted by
other Bluetooth devices/ connections in the vicinity.
• It is only possible to connect the SoundZbar to one
terminal device.
• Note that compatibility depends on the supported
Bluetooth proles as well as the Bluetooth versions
being used. (see Technical Data, operating
instructions of the terminal device in use)
• Make surethat your Bluetooth capable terminal
device is on and Bluetooth is activated.
• Activate the Bluetooth mode by repeatedly pressing
[SOURCE](2) on the SoundZbar.
• The status LED for the Bluetooth connection (10)
begins to ash blue.
• Open the Bluetooth settings on your terminal device
and wait until uRage SoundZbar appears in the list of
Bluetooth devices found.
• Select the uRage SoundZbar in the list of available
devices and wait until the SoundZbar is shown as
connected in the Bluetooth settings on your terminal
device. The status LED for the Bluetooth connection
(10) is now constantly lit blue.
• Start and control audio playback using the controls of
the terminal device.
7
Page 6

Bluetooth®password
Note –
• Some terminal devices requireapasswordinorder
to connect to another Bluetooth device.
• If your terminal device requests apasswordfor
connection to the radio, enter 0000.
7. Bluetooth pairing via NFC
• Make surethat NFC is supported by your smartphone
and activated.
• Activate the Bluetooth mode by repeatedly pressing
[SOURCE](2) on the SoundZbar.
• The status LED for the Bluetooth connection (10)
begins to ash blue.
• Touch the NFC interface (5) on the SoundZbar with
your smartphone.
• The status LED for the Bluetooth connection (10) is
now constantly lit blue.
• Start and control audio playback using the controls of
the terminal device.
8. Terminate Bluetooth connection
• Press and hold [PAIR](4) for about 2seconds to
terminate the Bluetooth connection to your terminal
device.
• The SoundZbar can now be connected to another
terminal device (see Section 5).
9. Connection via Auxiliary Input
Youcan use the AUX analogue audio input to connect
various terminal devices (for example, game console,
smartphone, tablet PC, MP3 player,etc.) as well as
older analogue sources (CD/DVD player etc.) to the
SoundZbar and play their audio signals using the
SoundZbar.
Note
• Switch off the SoundZbar beforeconnecting a
terminal device.
• Do not bend or crush the cable.
• Connect your terminal device to the AUX socket (2)
on the SoundZbar using the included 3.5-mm audio
cable (jack cable).
• Press [POWER](1) to switch on the SoundZbar.
• Activate the AUX mode by repeatedly pressing
[SOURCE](2) on the SoundZbar.
• The status LED for the AUX mode (9) is constantly lit.
• Start and control audio playback using the controls of
the terminal device.
10. Connection via optical audio cable
Youcan use the SoundZbar’sdigital audio input to
connect your terminal device (for example, game
console, TV set, etc.) and play its audio signals using
the SoundZbar.
Note
• Switch off the SoundZbar beforeconnecting a
terminal device.
• Remove the protective caps from both ends of the
optical signal cable beforeconnection.
• Do not bend or crush the cable.
• Connect one end of the optical signal cable to the
optical audio input (1) on the SoundZbar,the other
end to the optical audio output on your terminal
device.
• Press [POWER](1) to switch on the SoundZbar.
• Activate the OPT mode by repeatedly pressing
[SOURCE](2) on the SoundZbar.
• The status LED for the OPT mode (8) is constantly lit.
• Start and control audio playback using the controls of
the terminal device.
11. Sound modes
Youcan choose between three different modes for the
playback of your audio signals:
Gaming mode activates moretreble and bass for a
better gaming experience.
Music mode activates alinear frequency response for
powerful playback of avariety of music tracks.
Cinema mode activates an effect similar to surround
sound, and brings out every sound detail.
• Press [MODE](3) repeatedly to select the various
sound modes.
• The Gaming mode status LED (11) is constantly lit if
Gaming mode was selected.
• The Music mode status LED (12) is constantly lit if
Music mode was selected.
• The Cinema mode status LED (13) is constantly lit if
Cinema mode was selected.
8
Page 7

12. Bass control
• Turn the rotary control (2) on the subwoofer to
increase or reduce the bass.
13. Volume control
• Press [VOLUME]+/- (7) on the SoundZbar to increase
or reduce the volume.
• Press [
14. Using the SoundZbar in battery mode
• The SoundZbar has arechargeable battery.The
• Ensurethat the SoundZbar is switched off before
• Begin charging by connecting the included power
• The Charging status LED (3) is constantly lit green
• It can take up to 4hours to fully charge the battery.
• When the battery is fully charged, the Charging status
• Disconnect all cable and mains connections after use.
](6) to mute the SoundZbar.
Warning –Battery
• Use only the included power supply unit for
charging.
• As arule, do not use charging devices that are
defective and do not try to repair them yourself.
• Avoid storing, charging or using batteries in
extreme temperatures.
• When stored over along period of time, batteries
should be charged regularly (at least every three
months).
battery must be fully charged beforeusing the device
for the rst time.
charging.
supply unit to the mains lead (4) and to apower
socket.
during charging.
LED (3) willgoout.
Hinweis –Charging/battery capacity
• It takes about 3–4 hours to fully charge the battery.
• If the battery charge level is less than 10%, the
Charging status LED (3) ashes redquickly.You will
only receive this information if the SoundZbar is on.
15. Care and Maintenance
Only clean this product with aslightly damp, lint-free
cloth and do not use aggressive cleaning agents.
16. Warranty Disclaimer
Hama GmbH &CoKGassumes no liability and provides
no warranty for damage resulting from improper
installation/mounting, improper use of the product or
from failuretoobserve the operating instructions and/
or safety notes.
17. Service and Support
Please contact Hama Product Consulting if you have
any questions about this product.
Hotline: +49 9091 502-115 (German/English)
Further support information can be found here:
www.hama.com
18. Recycling Information
Note on environmental protection:
After the implementation of the European
Directive 2012/19/EU and 2006/66/EU in the
national legal system, the following applies:
Electric and electronic devices as wellas
batteries must not be disposed of with household
waste. Consumers areobliged by law to return electrical
and electronic devices as wellasbatteries at the end of
their service lives to the public collecting points set up
for this purpose or point of sale. Details to this are
dened by the national law of the respective country.
This symbol on the product, the instruction manual or
the package indicates that aproduct is subject to these
regulations. By recycling, reusing the materials or other
forms of utilising old devices/Batteries, you aremaking
an important contribution to protecting our
environment.
19. Declaration of Conformity
Hereby,Hama GmbH &CoKGdeclares that the
radio equipment type [00113776] is in
compliance with Directive 2014/53/EU.The full
text of the EU declaration of conformity is available at
the following internet address:
www.hama.com->00113776 ->Downloads.
Frequency band(s)
Maximum radio-frequency power
transmitted
2.40GHz ~
2.48HGz
5mW EIRP
9
Page 8
20. Technical Data
Bluetooth®
technology
Bluetooth
®
v2.1 +EDR
Supported proles A2DP,AVRCP
Frequency for Bluetooth® transfers 2.40GHz ~2.48HGz
Bluetooth®
Bluetooth®
transfer power Max. 10 dBm
range 10 m
Maximum number of paired devices 1
Performance
Sound system 2.1
Frequency
SoundZbar frequency range: 160–20000 Hz
Subwoofer frequency range: 20–160 Hz
Total 100 W
Max. music output
SoundZbar 40 W
Subwoofer 60 W
Impedance 6 Ω
Distortion (THD)
≤
0.5% (1K, 1W)
3.5-mm stereo plug AUX input
Connections
Optical input
Power input
Power supply 230 V~50Hz0.4 A
SoundZbar battery
Battery type 7.4 VLi-ion min. 2550 mAh /18.87 Wh
Charging time ~3-4h
Via Bluetooth ~7h
Operating time
Via AUX ~12h
(depending on volume and audio content)
Dimensions (W xDxH)/Weight
Total 5.1 kg
Weight
SoundZbar 1.3kg
Subwoofer 3.8kg
Dimensions
SoundZbar 485 x68x72mm
Subwoofer 250 x270 x250 mm
10
Page 9

D Bedienungsanleitung
A. Bedienungselemente und Anzeigen SoundZbar
1. [POWER]
2. [SOURCE] für Wahl des Eingangsmodus
3. [MODE] für Wahl des Soundmodus
4. [PAIR] für Unterbrechen der Bluetooth Verbindung
5. NFC Schnittstelle
6. [
] Stummschaltung
7. VOL +/-
8. Status-LED Optischer Eingang
9. Status-LED AUX
10. Status-LED Bluetooth
11. Status-LED Gaming Modus
12. Status-LED Musik Modus
13. Status-LED Cinema Modus
B. Rückseite SoundZbar
1. Optical In Buchse
2. AUX In Buchse
3. Status-LED Laden
4. Netzzuleitung/DC- IN
C. Subwoofer
1. Ein-/Ausschalter
2. Drehregler Bass
3. Status-LED Verbindung Subwoofer und SoundZbar
Vielen Dank, dass Sie sich für ein Hama Produkt
entschieden haben!
Nehmen Sie sich Zeit und lesen Sie die folgenden
Anweisungen und Hinweise zunächst ganz durch.
Bewahren Sie diese Bedienungsanleitung anschließend an
einem sicheren Ort auf,umbei Bedarf darin nachschlagen
zu können. Sollten Sie das Gerät veräußern, geben Sie diese
Bedienungsanleitung an den neuen Eigentümer weiter.
1. Erklärung von Warnsymbolen und Hinweisen
Gefahr eines elektrischen Schlages
Dieses Symbol weist auf eine Berührungsgefahr mit nicht
isolierten Teilen des Produktes hin, die möglicherweise
eine gefährliche Spannung von solcher Höhe führen,
dass die Gefahr eines elektrischen Schlags besteht.
Warnung
Wirdverwendet, um Sicherheitshinweise zu
kennzeichnen oder um Aufmerksamkeit auf
besondereGefahren und Risiken zu lenken.
Hinweis
Wirdverwendet, um zusätzlich Informationen oder
wichtige Hinweise zu kennzeichnen.
2. Erklärung von Symbolen der
Produktkennzeichnung
•
•
3. Packungsinhalt
•SoundZbar
•Subwoofer
•3.5 mm Audiokabel
•Netzadapter
•diese Bedienungsanleitung
4. Sicherheitshinweise
•Das Produkt ist für den privaten, nicht-gewerblichen
•Betreiben Sie das Produkt nicht in unmittelbarer Nähe
•Schützen Sie das Produkt vor Schmutz, Feuchtigkeit
•Dieses Produkt gehört, wie alle elektrischen Produkte,
•Lassen Sie das Produkt nicht fallen und setzen Sie es
•Betreiben Sie das Produkt nicht außerhalb
•Benutzen Sie das Produkt nicht in Bereichen, in denen
•Nehmen Sie Rücksicht. Hohe Lautstärken können ihre
•Öffnen Sie das Produkt nicht und betreiben Sie es bei
•Der Akku ist fest eingebaut und kann nicht entfernt
•Halten Sie Kinder unbedingt von dem
•Entsorgen Sie das Verpackungsmaterial sofort gemäß
•Nehmen Sie keine Veränderungen am
•Halten Sie das Produkt von tropfenden oder
Das Produkt ist nur für den Gebrauch
innerhalb von Gebäuden vorgesehen.
Elektrisches Gerät der Schutzklasse II
(doppelt isoliert).
Haushaltsgebrauch vorgesehen.
der Heizung, anderer Hitzequellen oder in direkter
Sonneneinstrahlung.
und Überhitzung und verwenden Sie es nur in
trockenen Umgebungen.
nicht in Kinderhände!
keinen heftigen Erschütterungen aus.
seiner in den technischen Daten angegebenen
Leistungsgrenzen.
elektronische Produkte nicht erlaubt sind.
Umgebung stören oder beeinträchtigen.
Beschädigungen nicht weiter.
werden, entsorgen Sie das Produkt als Ganzes gemäß
den gesetzlichen Bestimmungen.
Verpackungsmaterial fern, es besteht
Erstickungsgefahr.
den örtlich gültigen Entsorgungsvorschriften.
Produkt vor.Dadurch verlieren Sie jegliche
Gewährleistungsansprüche.
spritzenden Flüssigkeiten fern und platzieren Sie keine
mit Flüssigkeiten gefüllten Gegenstände, z.B. Vasen,
auf dem Produkt.
11
Page 10
Gefahr eines elektrischen Schlages
Hinweis –beim ersten Einschalten
• Öffnen Sie das Produkt nicht und betreiben Sie es
bei Beschädigungen nicht weiter.
• Verwenden Sie das Produkt nicht, wenn der ACAdapter,das Adapterkabel oder die Netzzuleitung
beschädigt sind.
• Versuchen Sie nicht, das Produkt selbst zu warten
oder zu reparieren. Überlassen Sie jegliche
Wartungsarbeit dem zuständigen Fachpersonal.
5. Inbetriebnahme und Betrieb
Hinweis
• Sie haben die Möglichkeit, das Produkt im
Netzbetrieb und im Akkubetrieb zu nutzen. Um
das Produkt im Netzbetrieb zu nutzen, muss diese
lediglich an das Stromnetz angeschlossen werden
(siehe Kapitel 5).Um das Produkt im Akkubetrieb zu
nutzen, muss diese vorher vollständig aufgeladen
werden (siehe Kapitel 14).
Warnung
• Betreiben Sie das Produkt nur an einer dafür
zugelassenen Steckdose. Die Steckdose muss in
der Nähe des Produktes angebracht und leicht
zugänglich sein.
• Trennen Sie das Produkt mittels des Ein-/
Ausschalters vom Netz –wenn dieser nicht
vorhanden ist, ziehen Sie die Netzleitung aus der
Steckdose.
• Achten Sie bei Mehrfachsteckdosen darauf,dass
die angeschlossenen Verbraucher die zulässige
Gesamtleistungsaufnahme nicht überschreiten.
• Trennen Sie das Produkt vom Netz, wenn Sie es
längereZeit nicht benutzen.
• Verbinden Sie die Netzkabel der SoundZbar und
des Subwoofers mit ordnungsgemäß installierten
Steckdosen.
• Drücken Sie [POWER](1), um die SoundZbar
einzuschalten.
• Drücken Sie den Ein-/Ausschalter (1), um den
Subwoofer einzuschalten.
• Die Status-LED der Verbindung (3) am Subwoofer
beginnt blau zu blinken.
• Nach dem Einschalten verbinden sich die
SoundZbar und der Subwoofer automatisch über
Bluetooth miteinander.
• Nach erfolgreicher Verbindung leuchtet die StatusLED der Verbindung (3) am Subwoofer dauerhaft
blau.
6. Bluetooth Erstverbindung (Pairing)
Via Bluetooth können Sie IhreEndgeräte mit der
SoundZbar verbinden und diese als Wiedergabegerät
für Audiosignale nutzen.
Hinweis –
Bluetooth
®
• Prüfen Sie, ob Ihr mobiles Endgerät (Smartphone,
Tablet-PC, etc.) Bluetooth-fähig ist.
• Beachten Sie, dass die Reichweite von Bluetooth
max. 10 Meter beträgt, ohne Hindernisse wie
Wände, Personen, etc.
• Es kann vorkommen, dass die Verbindung durch
weitereBluetooth Geräte/ Verbindungen in der
Umgebung gestört wird.
• Die SoundZbar kann immer nur mit einem
Endgerät gekoppelt werden.
• Beachten Sie, dass die Kompatibilität von den
unterstützten Bluetooth Proen sowie der
verwendeten Bluetooth Versionen abhängig ist.
(siehe: Technische Daten, Bedienungsanleitung des
verwendeten Endgeräts)
• Stellen Sie sicher,dass Ihr Bluetooth fähiges Endgerät
eingeschaltet ist und dass Bluetooth aktiviert ist.
• Aktivieren Sie durch wiederholtes Drücken von
[SOURCE](2) auf der SoundZbar den Bluetooth
Modus.
• Die Status-LED der Bluetooth Verbindung (10) beginnt
blau zu blinken.
• Öffnen Sie die Bluetooth Einstellungen auf Ihrem
Endgerät und warten Sie, bis in der Liste der
gefundenen Bluetooth Geräte uRage SoundZbar
angezeigt wird.
• Wählen Sie die SoundZbar uRage SoundZbar in der
Liste der verfügbaren Geräte aus und warten Sie,
bis die SoundZbar als verbunden in den Bluetooth
Einstellungen Ihres Endgerätes angezeigt wird.
• Die Status-LED der Bluetooth Verbindung (10)
leuchtet nun dauerhaft blau.
• Starten und steuern Sie die Audiowiedergabe
entsprechend über das Endgerät.
12
Page 11

Hinweis –
Bluetooth
®
Passwort
•Manche Endgeräte benötigen für die Einrichtung
der Verbindung mit einem anderen Bluetooth
Gerät ein Passwort.
•Geben Sie für die Verbindung mit dem Radio das
Passwort 0000 ein, wenn Sie zur Eingabe von
Ihrem Endgerät aufgefordert werden.
7. Bluetooth Erstverbindung (Pairing) über NFC
• Stellen Sie sicher,dass NFC von Ihrem Smartphone
unterstützt wirdund aktiviert ist.
• Aktivieren Sie durch wiederholtes Drücken von
[SOURCE](2) auf der SoundZbar den Bluetooth
Modus.
• Die Status-LED der Bluetooth Verbindung (10) beginnt
blau zu blinken.
• Berühren Sie mit Ihrem Smartphone die NFC
Schnittstelle (5) an der SoundZbar.
• Die Status-LED der Bluetooth Verbindung (10)
leuchtet nun dauerhaft blau.
• Starten und steuern Sie die Audiowiedergabe
entsprechend über das Endgerät.
8. Bluetooth Verbindung trennen
• Drücken und halten Sie [PAIR](4) für ca. 2Sekunden,
um die Bluetooth Verbindung zu Ihrem Endgerät zu
trennen.
• Die SoundZbar kann nun mit einem anderen Endgerät
verbunden werden. (siehe Kapitel 5)
9. Verbindung über Auxiliary Input
Über den analogen Audioeingang AUX können Sie
zahlreiche Endgeräte (z.B. Spielkonsole, Smartphone,
Tablet PC, MP3-Player,etc.) sowie ältereanaloge
Quellen (CD-/DVD-Player etc.) an die SoundZbar
anschließen und deren Audiosignal über die SoundZbar
wiedergeben.
Hinweis
• Schalten Sie die SoundZbar aus, bevor Sie ein
Endgerät daran anschließen.
• Knicken und quetschen Sie das Kabel nicht.
• Verbinden Sie Ihr Endgerät über die AUX Buchse
(2) mittels des beiliegenden 3,5mm Audiokabels
(Klinkenkabel) mit der SoundZbar.
• Drücken Sie [POWER](1), um die SoundZbar
einzuschalten.
• Aktivieren Sie durch wiederholtes Drücken von
[SOURCE](2) auf der SoundZbar den AUX-Modus.
• Die Status-LED des AUX-Modus (9) leuchtet
dauerhaft.
• Starten und steuern Sie die Audiowiedergabe
entsprechend über das Endgerät.
10. Verbindung über Optisches Audiokabel
Über den digitalen Audioeingang der SoundZbar
können Sie Ihr Endgerät (z.B. Spielkonsole, TV-Gerät
etc.) anschließen und dessen Audiosignal über die
SoundZbar wiedergeben.
Hinweis
• Schalten Sie die SoundZbar aus, bevor Sie ein
Endgerät daran anschließen.
• Entfernen Sie vor dem Anschließen die
Schutzkappen von beiden Enden des optischen
Signalkabels.
• Knicken und quetschen Sie das Kabel nicht.
• Schließen Sie ein optisches Signalkabel am optischen
Audioeingang (1) der SoundZbar und am optischen
Audioausgang Ihres Endgerätes an.
• Drücken Sie [POWER](1), um die SoundZbar
einzuschalten.
• Aktivieren Sie durch wiederholtes Drücken von
[SOURCE](2) auf der SoundZbar den OPT-Modus.
• Die Status-LED des OPT-Modus (8) leuchtet
dauerhaft.
• Starten und steuern Sie die Audiowiedergabe
entsprechend über das Endgerät.
11. Soundmodi
Für die Wiedergabe Ihrer Audiosignale haben Sie die
Wahl zwischen drei verschiedenen Modi:
Der Gaming Modus aktiviert zusätzlich mehr Höhen
und Tiefen für ein besseres Gaming-Erlebnis.
Der Musik Modus aktiviert einen linearen
Frequenzgang, um eine Vielfalt an Musikstilen kraftvoll
abspielen zu können.
Der Cinema Modus aktiviert einen raumklangähnlichen
Effekt, womit sich jedes klangliche Detail wahrnehmen
lässt.
• Drücken Sie wiederholt [MODE](3), um die
verschiedenen Soundmodi zu wählen.
• Die Status-LED (11) des Gaming Modus leuchtet
dauerhaft, wenn der Gaming-Modus gewählt wurde.
• Die Status-LED (12) des Musik Modus leuchtet
dauerhaft, wenn der Musik-Modus gewählt wurde.
• Die Status-LED (13) des Cinema Modus leuchtet
dauerhaft, wenn der Cinema-Modus gewählt wurde.
13
Page 12
12. Regelung Bass
• Drehen Sie den Drehregler (2) am Subwoofer,umden
Bass zu erhöhen bzw.zuverringern.
13. Regelung Lautstärke
• Drücken Sie [VOLUME]+/- (7) an der SoundZbar,um
die Lautstärke zu erhöhen/zu verringern.
• Drücken Sie [
](6), um die SoundZbar stumm zu
schalten.
14. Nutzung der SoundZbar im Akkubetrieb
Warnung –Akku
• Verwenden Sie nur das beiliegende Netzteil zum
Auaden.
• Verwenden Sie defekte Ladegeräte generellnicht
mehr und versuchen Sie nicht, diese zu reparieren.
• Vermeiden Sie Lagerung, Laden und Benutzung bei
extremen Temperaturen.
• Laden Sie bei längerer Lagerung regelmäßig (mind.
vierteljährig) nach.
• Die SoundZbar verfügt über einen wieder auadbaren
Akku. Vorder ersten Anwendung muss der Akku
vollständig aufgeladen werden.
• Stellen Sie sicher,dass die SoundZbar vor dem
Auaden ausgeschaltet ist.
• Starten Sie den Ladevorgang, indem Sie das
beiliegende Netzteil an die Netzzuleitung (4) und an
eine Steckdose anschließen.
• Die Status-LED Laden (3) leuchtet während des
Ladevorgangs dauerhaft grün.
• Es kann bis zu 4Stundendauern, bis der Akku
vollständig geladen ist.
• Ist der Akku vollständig geladen, erlischt die StatusLED Laden (3).
• Trennen Sie anschließend alle Kabel- und
Netzverbindungen.
Hinweis –Ladevorgang/ Akkukapazität
• Ein kompletter Ladevorgang dauert ca. 3-4
Stunden.
• Beträgt die Akkukapazität weniger als 10%,
blinkt die Status-LED Laden (3) schnell rot. Diese
Information erhalten Sie nur bei eingeschalteter
SoundZbar.
15. Wartung und Pflege
Reinigen Sie dieses Produkt nur mit einem fusselfreien,
leicht feuchten Tuch und verwenden Sie keine
aggressiven Reiniger.
16. Haftungsausschluss
Die Hama GmbH &Co. KG übernimmt keinerlei
Haftung oder Gewährleistung für Schäden, die
aus unsachgemäßer Installation, Montage und
unsachgemäßem Gebrauch des Produktes oder einer
Nichtbeachtung der Bedienungsanleitung und/oder der
Sicherheitshinweise resultieren.
17. Service und Support
Bitte wenden Sie sich bei Fragen zum Produkt gerne an
die Hama-Produktberatung.
Hotline: +49 9091 502-115 (Deu/Eng)
WeitereSupportinformationen nden Sie hier:
www.hama.com
18. Entsorgungshinweise
Hinweise zum Umweltschutz:
Ab dem Zeitpunkt der Umsetzung der
europäischen Richtlinien 2012/19/EU und
2006/66/EG in nationales Recht gilt folgendes:
Elektrische und elektronische Geräte sowie
Batterien dürfen nicht mit dem Hausmüll entsorgt
werden. Der Verbraucher ist gesetzlich verpichtet,
elektrische und elektronische Geräte sowie Batterien am
Ende ihrer Lebensdauer an den dafür eingerichteten,
öffentlichen Sammelstellen oder an die Verkaufsstelle
zurückzugeben. Einzelheiten dazu regelt das jeweilige
Landesrecht. Das Symbol auf dem Produkt, der
Gebrauchsanleitung oder der Verpackung weist auf
diese Bestimmungen hin. Mit der Wiederverwertung,
der stoichen Verwertung oder anderen Formen der
Verwertung von Altgeräten/Batterien leisten Sie einen
wichtigen Beitrag zum Schutz unserer Umwelt.
19. Konformitätserklärung
Hiermit erklärt die Hama GmbH &CoKG, dass der
Funkanlagentyp [00113776] der Richtlinie
2014/53/EU entspricht. Der vollständige Text der
EU-Konformitätserklärung ist unter der folgenden
Internetadresse verfügbar:
www.hama.com->00113776->Downloads.
Frequenzband/Frequenzbänder
2.40GHz ~2.48HGz
14
Abgestrahlte maximale
Sendeleistung
5mW EIRP
Page 13
20. Technische Daten
Bluetooth
®
Technologie
Bluetooth
®
v2.1 +EDR
unterstützte Prole A2DP,AVRCP
Frequenz für die
Bluetooth
Bluetooth
Bluetooth
®
-Übertragungen
®
Übertragungsleistung Max. 10 dBm
®
Reichweite 10 m
2.40GHz ~2.48HGz
Max. gekoppelte Geräte 1
Leistung
Sound System 2.1
Frequenz
Frequency range soundZbar :160 -20000 Hz
Frequency range subwoofer: 20 -160 Hz
total 100 W
Max. Musikleistung
soundZbar 40 W
subwoofer 60 W
Impedanz 6 Ω
Verzerrung THD
≤
0.5% (1K, 1W)
3.5 mm stereo plug AUX input
Anschlüsse
Optical input
Power Input
Spannungsversorgung 230 V~50Hz0.4 A
Akku SoundZbar
Akkutyp 7.4V Li-Ion min. 2550mAh /18.87Wh
Auadezeit ~3-4h
via Bluetooth ~7h
Laufzeit
via AUX ~12h
(depending on volume and audio content)
Maße(B xTxH)/Gewicht
total 5.1 kg
Gewicht
SoundZbar 1.3kg
Subwoofer 3.8kg
Maße
SoundZbar 485 x68x72mm
Subwoofer 250 x270 x250 mm
15
Page 14
M Manual de utilizare
A. Elemente de comandășiafișaje SoundZbar
1. [POWER]
2. [SOURCE] pentru alegereregim intrare
3. [MODE] pentru alegereregim sonor
4. [PAIR] pentru întrerupereconexiune Bluetooth
5. Interfață NFC
6. [
] Dezactivaresonor
7. VOL +/-
8. LED statut intrareoptică
9. LED statut AUX
10. LED statut Bluetooth
11. LED statut regim Gaming
12. LED statut regim Muzică
13. LED statut regim Cinema
B. Partea din spate SoundZbar
1. RacordOptical In
2. RacordAUX In
3. LED statut încărcare
4. Branșament rețea /DC-IN
C. Subwoofer
1. Comutator pornit/oprit
2. Regulator rotativ bass
3. LED statut conexiune Subwoofer șiSoundZbar
Vă mulţumim că aţioptat pentru un produs Hama.
Pentru început vă rugămsăvălăsațipuțin timp șisăcitiți
complet următoarele instrucțiuni șiindicații. Vă rugămsă
păstraţimanualul de utilizarelaloc sigur pentru oconsultare
ulterioară în caz de nevoie. În caz de înstrăinareaaparatului
vă rugămsăpredați șiacest manual noului proprietar.
1. Explicarea simbolurilor de avertizare și
indicații
Pericol de electrocutare
Acest simbol semnalizează pericol la atingerea cu
componentele neizolate ale produsului, caredatorită
tensiunii înalte indicate, poate duce la electrocutare.
Avertizare
Se folosește la marcarea instrucțiunilor de siguranță
sau la concentrarea atenției în caz de pericol șiriscuri
mari.
Instrucțiune
2. Explicarea simbolurilor de marcare a
produsului.
•
•
3. Conținutul pachetului
•SoundZbar
•Subwoofer
•Cablu audio 3.5 mm
•Adaptor rețea
•Acest manual de deservire
4. Instrucțiuni de siguranță
• Produsul este conceput numai pentru utilizareprivată
• Evitaţifolosirea produsului în imediata apropierea
•Protejaţiprodusul de impurităţi, umiditate,
• Acest aparat, ca de altfel toată aparaturaelectronică,
• Nu lăsațiprodusul să cadășinuîlsupuneți
• Nu exploataţiprodusul în afaralimitelor de putere
• Nu folosiţiprodusul în zone unde nu sunt admise
• Vă rugămsăținețicont de aceasta. Intensitatea
• Nu deschidețiprodusul șinu-l utilizațiîncontinuareîn
• Acumulatorul este montat x șinupoate demontat,
• Nu lăsațicopiii să se joace cu materialul pachetului,
• Reciclarea materialului pachetului se execută
• Nu executaţimodicări la aparat. În acest fel pierdeţi
• Nu apropiațiprodusul de lichide carepot picurasau
Produsul este conceput numai pentru
utilizarea în interiorul clădirilor.
Aparat electric cu clasa de protecție II (dublu
izolat).
șinuprofesională.
sistemului de încălzire, aaltor surse de căldură sau în
radiația solară directă.
supraîncălzire şiutilizaţi-l numai în mediu uscat.
nu arececăuta în mâinile copiilor!
trepidațiilor puternice.
indicate în datele tehnice.
aparate electronice.
ridicată asonorului poate deranja sau inuența
negativ înprejurimile.
caz de deterioare.
salubrizațiprodusul ca un întreg conform prevederilor
legale.
prezintă pericol de sufocare.
comform normelor locale de salubrizareînvigoare.
orice drept la garanţie.
stropi șinuplasațiobiecte umplute cu lichide, de ex.
vaze, pe produs.
Se folosește pentru marcarea informațiilor și
instrucțiunilor importante.
16
Page 15

Pericol de electrocutare
Indicație -Prima pornire
• Nu deschidețiprodusul șinu-l utilizațiîn
continuareîncaz de deteriorare.
• Nu folosițiprodusul dacă
• adaptorul AC,cablul adaptor sau conductorul
rețelei sunt deteriorate.
• Nu încercațisădepanațisau să reparațiprodusul.
Lucrările de reparații se execută numai de personal
de specialitate.
5. Punere în funcțiune şiutilizare
Instrucțiune
• Avețiposibilitatea să utilizațiprodusul atât cu
alimentaredelarețea cât șidelaacumulator.
Pentru alimentaredelarețea produsul trebuie
conectat la orețea de curent (vezi capitolul 5).
Pentru alimentaredelaacumulator acesta trebuie
în prealabil complet încărcat (vezi capitolul 14).
Avertizare
• Exploataţiaparatul numai la opriză de reţea
aprobată în acest sens. Priza trebuie plasată în
apropierea produsului șisăeușor accesibilă.
• Oprițialimentarea cu curent aprodusului printr-un
comutator pornit/oprit -dacă acesta nu există
scoatețicablul din priză.
• La prizele multiple trebuie sățiatent ca
consumatorii conectațisănu depășească consumul
puterii totale admisibile.
• Dacă nu este folosit timp mai îndelungat produsul
se deconectează de la rețea.
• Conectațicablurile de rețea ale SoundZbar-ului și
Subwoofer-ului cu prize instalate regulamentar.
• Pentru pornirea SoundZbar-ului apăsați[POWER](1).
• Pentru pornirea Subwoofer-ului apăsațicomutatorul
pornit/oprit (1).
• LED-ul de statut al conexiunii (3) la Subwoofer începe
să lumineze albastru intermitent.
• După pornireSoundZbar-ul șiSubwoofer-ul se
conectează reciproc automat prin Bluetooth.
• După conectarea cu succes LED-ul de statut al
conexiunii Subwoofer-ului (3) luminează albastru
continuu.
6. Prima conectare Bluetooth (Pairing)
Via Bluetooth putețisăconectațiaparate nale cu
SoundZbar-ul șiacesta folosit ca aparat de redare
pentru semnale audio.
Instrucțiune –
Bluetooth
®
• Vericațidacă aparatul nal mobil (Smartphone,
tabletă PC, etc.) este compatibil Bluetooth.
• Avețiînvederefaptul că raza de acoperire
Bluetooth este de max. 10 m, fără obstacole
precum pereți, persoane etc.
• Se poate întâmpla ca conexiunea săederanjată
prin alte conexiuni Bluetooth /dealte aparate
Bluetooth .
• SoundZbar-ul poate cuplat întotdeauna numai cu
un aparat nal.
• Compatibilitatea este dependentă de prolele
Bluetooth susținute precum șideversiunile
Bluetooth folosite. (vezi: Date tehnice, Instrucțiuni
de folosireale aparatului utilizat).
• Aparatul nal compatibil Bluetooth trebuie săe
pornit șifuncția Bluetooth activată.
• Pentru activarea regimului Bluetooth la SoundZbar
apăsațirepetat [SOURCE](2).
• LED-ul de statut al conexiunii Bluetooth (10) începe
să lumineze albastru intermitent.
• Deschidețisetările Bluetooth din aparatul nal și
așteptațipână când în lista aparatelor Bluetooth
găsite se așează uRage SoundZbar.
• Selectațidin listă aparatelor disponibile SoundZbar
uRage SoundZbar șiașteptațipână când SoundZbar
este așat în setările Bluetooth ale aparatului nal ca
ind conectat.
• LED-ul de statut al conexiunii Bluetooth (10)
luminează albastru continuu.
• Porniți șicomandațicorespunzător redarea audio prin
aparatul nal.
17
Page 16

Instrucțiune –
•Pentru congurarea conexiunii cu un alt aparat
Bluetooth unele aparate nale au nevoie de o
parolă.
•Dacă pentru conexiunea cu radio aparatul nal vă
solicită oparolă,introduceți0000.
7. Prima conectare Bluetooth (Pairing) prin NFC
• NSC trebuie săesusținut de Smartphone șiactivat.
• Pentru activarea regimului Bluetooth la SoundZbar
apăsațirepetat [SOURCE](2).
• LED-ul de statut al conexiunii Bluetooth (10) începe
să lumineze albastru intermitent.
• AtingețicuSmartphone-ul interfațaNFC la
SoundZbar.
• LED-ul de statut al conexiunii Bluetooth (10)
luminează albastru continuu.
• Porniți șicomandațicorespunzător redarea audio prin
aparatul nal.
8. Întrerupere conectare Bluetooth
• Pentru întreruperea conectării Bluetooth cu aparatul
nal apăsațicca 2secunde [PAIR](4).
• SoundZbar-ul poate conectat acum cu un alt aparat
nal (vezi capitolul 5).
9. Conectare prin Auxiliary Input
Prin intrarea audio analogică AUX putețiconecta
numeroase aparate nale (de ex. consolă de joc,
Smartphone, tabletă PC, etc.) precum șisurse analogice
mai vechi (CD/DVD-Player etc.) la SoundZbar șireda
semnalullor audio.
Instrucțiune
• Înaintea conectării unui aparat nal închideți
SoundZbar-ul.
• Nu îndoiți şinustriviţicablul.
• Cu ajutorul cablului audio de 3,5 mm livrat (cablu cu
Jack) conectațiaparatul nal prin racordul AUX (2) cu
SoundZbar-ul.
• PornițiSoundZbar-ul prin apăsarepe[POWER](1).
• Pentru activarea regimului AUX la SoundZbar apăsați
repetat [SOURCE](2).
• LED-ul de statut al regimului AUX (9) luminează
continuu.
• Porniți șicomandațicorespunzător redarea audio prin
aparatul nal.
Parolă Bluetooth®
10. Conectare prin cablu audio optic
Prin intrarea audio digitală putețiconecta aparatul nal
(de ex. consolă de joc, aparat TV,etc.) la SoundZbar și
reda semnalul lor audio.
Instrucțiune
• Înaintea conectării unui aparat nal închideți
SoundZbar-ul.
• Înaintea conectării îndepărtațicalotele de protecție
de la capetele cablului optic de semnale.
• Nu îndoiți şinustriviţicablul.)
• Conectațiintrarea optică audio (1) de la SoundZbar
cu ieșirea optică audio aaparatului nal cu un cablu
optic de semnale.
• PornițiSoundZbar-ul prin apăsarepe[POWER](1).
• Pentru activarea regimului OPT la SoundZbar apăsați
repetat [SOURCE](2).
• LED-ul de statut al regimului OPT (8) luminează
continuu.
• Porniți șicomandațicorespunzător redarea audio prin
aparatul nal.
11. Regim sonor
Pentru redarea semnalelor audio putețialege întretrei
regimuri diferite.
Pentru otrăiremai intensă ajocului regimul Gaming
activează suplimentar mai multe înalte șijoase.
Pentru redarea mai puternică astilurilor muzicale
regimul Muzică activează ocaracteristică de frecvență
lineară.
Regimul Cinema activează un efect aproape stereofonic
prin caresepoate distinge ecaredetaliu al sunetului.
• Pentru alegerea unui regim de sunet apăsațirepetat
[MODE](3).
• Dacă ațiales regimul Gaming LED-ul de statut (11)
luminează continuu.
• Dacă ațiales regimul Muzică LED-ul de statut (12)
luminează continuu.
• Dacă ațiales regimul Cinema LED-ul de statut (13)
luminează continuu.
18
Page 17
12. Reglare bass
• Pentru mărirea respectiv micșorarea bassului rotiți
regulatorul rotativ (2) la Subwoofer
13. Reglare volum sonor
• Pentru mărirea respectiv micșorarea volumului sonor
apăsați[VOLUME]+/- (7) la SoundZbar.
• Pentru dezactivarea sonorului la SoundZbar apăsați
[
](6).
14. Funcționare SoundZbar cu acumulator
Avertizare–Acumulator
• Pentru încărcaresefolosește exclusiv elementul de
rețea livrat.
• Nu utilizațiîncărcătoaredefecte șinuîncercațisă
le reparați.
• Evitațidepozitarea, încărcarea șiutilizarea la
temperaturi extreme.
• La depozitaremai îndelungată efectuați
reîncărcarea la intervale regulate (cel puțin
trimestrial).
• SoundZbar-ul este dotat cu un acumulator
reîncărcabil. Înaintea primei folosiri acumulatorul
trebuie complet încărcat.
• DeconectațiSoundZbar-ul înaintea încărcării.
• Pornițiîncărcarea prin conectarea elementului de
rețea livrat la racordul (4) șilaodoză de curent.
• Pe parcursul procesului de încărcareLED-ul de statut
al încărcării (3) luminează continuu verde.
• Încărcarea completă poate durapână la 4ore.
• Când acumulatorul este încărcat complet LED-ul de
statut al încărcării (3) se stinge.
• Întrerupețitoate contactele cablurilor șirețelei.
Instrucțiune –Proces încărcare/
Capacitate acumulator
• Un proces de încărcarecomplet durează cca 3-4
ore.
• Dacă capacitatea acumulatorului scade sub
10% LED-ul de statut al încărcării (3) luminează
intermitent rapid roșu. Această informație este
primită numai dacă SoundZbar-ul este pornit.
15. Întreţinere şirevizie
Curățațiacest produs numai cu ocârpă fără scame,
puțin umedășinufolosițidetergențiagresivi. Avețigrijă
să nu intreapăîn produs.
16. Excludere de garanție
Hama GmbH &CoKGnuîşiasumă nici orăspundere
sau garanție pentru pagube cauzate de montarea,
instalarea sau folosirea necorespunzătoareaprodusului
sau nerespectarea instrucțiunilor de folosiresau/șia
instrucțiunilor de siguranță.
17. Service șisuport
Dacă avețiîntrebări adresaţi-vă la Hama consultanță
privind produsul.
Hotline: +49 9091 502-115 (Ger./Ang.)
Alte informații de suport găsițiaici:
www.hama.com
18. Informații pentru reciclare
Instrucţiuni pentru protecţia mediului
înconjurător:
Din momentul aplicării directivelor europene
2012/19/EU şi2006/66/EU în dreptul național
sunt valabile următoarele:
Aparatele electrice şielectronice nu pot
salubrizate cu gunoiul menajer.Consumatorul este obligat
conform legii să predea aparatele electrice șielectronice la
sfârșitul duratei de utilizarelalocurile de colectarepublice
sau înapoi de unde au fost cumpăra
Detaliile sunt reglementate de cătrelegislaţia țării
respective. Simbolul de pe produs, în instrucţiunile de
utilizaresau pe ambalaj indică aceste reglementări. Prin
reciclarea, revaloricarea materialelor sau alte forme de
valoricareaaparatelor scoase din uz aducețiocontribuție
importantă la protecția mediului nostru înconjurător.
te.
19. Declarație de conformitate
Prin prezenta, Hama GmbH &CoKG, declară
că tipul de echipamente radio [00113776] este
în conformitate cu Directiva 2014/53/UE. Textul
integral al declarației UE de conformitate este disponibil
la următoarea adresă internet:
www.hama.com->00113776 ->Downloads.
Banda (benzile) de frecvențe
2.40GHz ~2.48HGz
Puterea maximă 5mW EIRP
19
Page 18

20. Date tehnice
Tehnologie Bluetooth® Bluetooth
®
v2.1 +EDR
Proluri susținute A2DP,AVRCP
Frecvență pentru
transmisia Bluetooth®
Capacitate de transmisie Bluetooth®
Rază de acțiune Bluetooth®
2.40GHz ~2.48HGz
Max. 10 dBm
10 m
Nr max. de aparate cuplate 1
Putere
Sistem de sunet 2.1
Frecvență
Gamă de frecvențeSoundZbar :160 -20000 Hz
Gamă de frecvențeSubwoofer: 20 -160 Hz
Total 100 W
Max. muzicală max.
SoundZbar 40 W
Subwoofer 60 W
Impedanță 6 Ω
Distorsiune THD
≤
0.5% (1K, 1W)
3.5 mm stereo plug AUX input
Racorduri
Alimentarecutensiune
Power Input
Alimentarecutensiune 230 V~50Hz0.4 A
Acumulator SoundZbar
Tipacumulator 7.4V Li-Ion min. 2550mAh /18.87Wh
Timp încărcare~3-4h
via Bluetooth ~7h
Timp funcționare
via AUX ~12h
(în funcție de volum șiconținutul audio)
Dimensiuni (L xLxÎ)/Greutate
Total 5.1 kg
Greutate
SoundZbar 1.3kg
Subwoofer 3.8kg
Dimensiuni
SoundZbar 485 x68x72mm
Subwoofer 250 x270 x250 mm
20
Page 19
F Mode d‘emploi
Éléments de commande et d'affichage SoundZbar
A.
1. [POWER]
2. [SOURCE] pour sélectionner le mode d’entrée
3. [MODE] pour sélectionner le mode sonore
4. [PAIR] pour interromprelaconnexion Bluetooth
5. Interface NFC
6. [
] Mise en sourdine
7. VOL +/-
8. LED d’état de l’entrée optique
9. LED d’état de la prise AUX
10. LED d’état pour Bluetooth
11. LED d’état du mode jeu
12. LED d’état du mode musique
13. LED d’état du mode cinéma
B. Face arrière de la SoundZbar
1. Entrée optique
2. Entrée AUX
3. LED d’état de charge
4. Alimentation/DC- IN
C. Caisson de graves
1. Interrupteur de mise sous/hors tension
2. Bouton rotatif des basses
3. LED d’état de connexion du caisson de graves et de
la SoundZbar
Nous vous remercions d’avoir choisi un produit Hama.
Veuillez prendreletemps de lirel‘ensemble des
remarques et consignes suivantes. Veuillez conserver
ce mode d‘emploi àportée de main andepouvoir le
consulter en cas de besoin. Transmettez-le au nouveau
propriétaireavec l’appareil le cas échéant.
1. Explication des symboles d‘avertissement et
des remarques
Risque d’électrocution
Ce symbole indique un risque de contact avec des parties
non isolées du produit susceptibles de conduireuncourant
électrique capable de provoquer un risque d‘électrocution.
Avertissement
Ce symbole est utilisé pour indiquer des consignes
de sécurité ou pour attirer votreattention sur des
dangers et risques particuliers.
Remarque
Ce symbole est utilisé pour indiquer des informations
supplémentaires ou des remarques importantes.
2. Explication des symboles d’étiquetage
•
•
3. Contenu de l‘emballage
•SoundZbar
•Caisson de graves
•Câble audio de 3,5 mm
•Adaptateur secteur
•Mode d'emploi
4. Consignes de sécurité
• Ce produit est destiné àune installation domestique
• N’utilisez pas le produit àproximité immédiate d‘un
•Protégez le produit de toute saleté, humidité,
• Cet appareil, comme tout appareil électrique, doit être
• Protégez le produit des secousses violentes et évitez
•N‘utilisez pas le produit en dehors des limites
•N‘utilisez pas le produit dans les zones dans
• Montrez-vous respectueux des personnes dans votre
• Ne tentez pas d‘ouvrir le produit en cas de
• La batterie est installée de façon permanente et ne
•Tenez les emballages d‘appareils hors de portée des
• Recyclez les matériaux d’emballage conformément
• N’apportez aucune modication àl’appareil. Des
• Tenez ce produit éloigné de toute goutte ou projection
Ce produit est destiné àune utilisation
exclusivement àl‘intérieur d‘un bâtiment.
Appareil électrique appartenant àlaclasse de
protection II (double isolation).
non commerciale.
chauffage, d’autres sources de chaleur ou exposé aux
rayons directs du soleil.
surchauffe et utilisez-le uniquement dans des locaux
secs.
gardé hors de portée des enfants !
tout choc ou toute chute.
de puissance indiquées dans les caractéristiques
techniques.
lesquelles l‘utilisation d‘appareils électroniques est
interdite.
environnement. Un volume excessif est susceptible de
déranger les personnes de votreenvironnement ou de
leur porter atteinte.
détérioration et cessez de l’utiliser.
peut pas êtreretirée ;recyclezleproduit en bloc
conformément aux directives légales.
enfants, risque d‘étouffement.
aux prescriptions locales en vigueur.
modications vous feraient perdrevos droits de
garantie
de liquide et ne placez aucun objet rempli de liquide
(par ex. vase) sur le produit.
21
Page 20
Risque d’électrocution
Remarque -Premièremise sous tension
• Ne tentez pas d‘ouvrir le produit en cas de
détérioration et cessez de l’utiliser.
• N‘utilisez pas le produit lorsque l‘adaptateur,le
câble de connexion ou le câble d‘alimentation sont
endommagés.
• Ne tentez pas de réparer l’appareil vous-même ni
d’effectuerdes travaux d’entretien. Déléguez tous
travaux d‘entretien àdes techniciens qualiés.
5. Mise en service et fonctionnement
Remarque
• Vous avez la possibilité d’utiliser l‘appareil sur
secteur ou sur batterie. Pour utiliser l‘appareil
sur secteur,celle-ci doit êtrebranchée au réseau
électrique (voir chapitre5). Pour utiliser l‘appareil
sur batterie, la batterie doit êtreentièrement
rechargée au préalable (voir chapitre14).
Avertissement
• Branchez l‘appareil àune prise de courant
appropriée. La prise de courant doit êtresituée
àproximité du produit et doit êtrefacilement
accessible
• Coupez le produit du secteur àl‘aide de
l‘interrupteur -débranchez la prise de courant en
cas d‘absence d‘interrupteur.
• La prise de courant doit êtrefacilement accessible
àtout moment.
• Débranchez l’appareil si vous ne l’utilisez pas sur
une période prolongée.
• Branchez les cordons d’alimentation de la SoundZbar
et du caisson de graves àdes prises correctement
installées.
• Appuyez sur [POWER](1) pour mettrelaSoundZbar
sous tension.
• Appuyez sur l'interrupteur de mise sous/hors tension
(1) pour mettrelecaisson de graves sous tension.
• La LED d’état de connexion (3) du caisson de graves
commence àclignoter en bleu.
• Après leur mise sous tension, la SoundZbar et le
caisson de graves se connectent automatiquement
entreeux via Bluetooth.
• Une fois la connexion réussie, la LED d’état de
connexion (3) du caisson de graves s’allume en
bleu de façon permanente.
6. Première connexion Bluetooth (couplage)
Vous pouvez connecter vos appareils àlaSoundZbar via
Bluetooth et utiliser cette dernièrecomme appareil de
lecturedesignaux audio.
Remarque –
Bluetooth
®
• Veuillez contrôler que votreappareil portable
(téléphone portable, etc.) est bien compatible
Bluetooth.
• Veuillez noter que la portée maximale de la
connexion Bluetooth est de 10 mètres sans
obstacles tels que parois, personnes, etc.
• Il est possible que la connexion soit gênée par
d'autres appareils/ d'autres connexions Bluetooth
dans votreenvironnement.
• La SoundZbar ne peut êtrecouplée qu'à un seul
appareil àlafois.
• Veuillez noter que la compatibilité dépend des
prols Bluetooth supportés et des versions
Bluetooth utilisées. (voir: Caractéristiques
techniques, mode d'emploi de l'appareil utilisé)
• Assurez-vous que votreappareil Bluetooth est bien
sous tension et que sa fonction Bluetooth est bien
activée.
• Activez le mode Bluetooth sur la SoundZbar en
appuyant plusieurs fois sur [SOURCE](2).
• La LED d’état de connexion Bluetooth (10) commence
àclignoter en bleu.
• Ouvrez les paramètres Bluetooth de votreappareil,
puis patientez jusqu'à ce que uRage SoundZbar
apparaisse dans la liste des appareils Bluetooth
détectés.
• Sélectionnez uRage SoundZbar dans la liste des
appareils disponibles, puis patientez jusqu’à ce que
cette SoundZbar apparaisse comme étant connectée
dans les paramètres Bluetooth de votreappareil.
• La LED d’état de connexion Bluetooth (10) s’allume
désormais en bleu de façon permanente.
• Vous pouvez démarrer et commander la lectureaudio
via l'appareil connecté.
22
Page 21

Remarque – Mot de passe
Bluetooth
®
• Certains appareils requièrent un mot de passe pour
l`établissement de la connexion avec un appareil
Bluetooth.
• Saisissez le mot de passe 0000 lors de la connexion
avec des radio dans le cas où l´appareil exige la
saisie d´un mot de passe.
7. Première connexion Bluetooth (couplage) avec
NFC
• Assurez-vous que votresmartphone est compatible
NFC et que ce mode est activé.
• Activez le mode Bluetooth sur la SoundZbar en
appuyant plusieurs fois sur [SOURCE](2).
• La LED d’état de connexion Bluetooth (10) commence
àclignoter en bleu.
• Touchez l’interface NFC (5) de la SoundZbar avec
votresmartphone.
• La LED d’état de connexion Bluetooth (10) s’allume
désormais en bleu de façon permanente.
• Vous pouvez démarrer et commander la lectureaudio
via l'appareil connecté.
8. Désactiver la connexion Bluetooth
• Maintenez le bouton [PAIR](4) enfoncé pendant
env.2secondes pour arrêter la connexion Bluetooth
établie avec votreappareil.
• La SoundZbar peut désormais êtreconnectée àun
autreappareil (voir chapitre5).
9. Connexion avec l’entrée auxiliaire
Vous pouvez connecter de nombreux appareils (par ex.
une console de jeux, un smartphone, une tablette, un
lecteur MP3, etc...) ainsi que des sources analogiques
plus anciennes (lecteur CD/DVD, etc...) àlaSoundZbar,
via l’entrée audio analogique AUX, pour que la
SoundZbar lise leurs signaux audio.
Remarque
• Mettez la SoundZbar hors tension avant d’y
brancher un appareil.
• Faites attention ànepas plier ni coincer le câble.
• Connectez votreappareil àlaprise AUX (2) de la
SoundZbar en vous servant du câble audio de 3,5 mm
fourni (câble jack).
• Appuyez sur [POWER](1) pour mettrelaSoundZbar
sous tension.
• Activez le mode AUX sur la SoundZbar en appuyant
plusieurs fois sur [SOURCE](2).
• La LED d’état du mode AUX (9) s’allume de façon
permanente.
• Vous pouvez démarrer et commander la lectureaudio
via l'appareil connecté.
10. Connexion avec un câble audio optique
Vous pouvez connecter votreappareil (par ex. une
console de jeux, un téléviseur,etc...) àlaSoundZbar,via
l’entrée audio numérique, pour que la SoundZbar lise
leurs signaux audio.
Remarque
• Mettez la SoundZbar hors tension avant d’y
brancher un appareil.
• Avant toute connexion, retirez les capuchons de
protection des deux extrémités du câble de signal
optique.
• Faites attention ànepas plier ni coincer le câble.
• Branchez un câble de signal optique sur l’entrée
audio optique (1) de la SoundZbar et sur la sortie
audio optique de votreappareil.
• Appuyez sur [POWER](1) pour mettrelaSoundZbar
sous tension.
• Activez le mode OPT sur la SoundZbar en appuyant
plusieurs fois sur [SOURCE](2).
• La LED d’état du mode OPT (8) s’allume de façon
permanente.
• Vous pouvez démarrer et commander la lectureaudio
via l'appareil connecté.
11. Modes sonores
Pour la lecturedevos signaux audio, vous avez le choix
entretrois modes différents :
Le mode jeu active encoreplus d’aigus et de graves
pour une meilleureexpérience de jeu.
Le mode musique active une gamme de fréquences
linéaire:les nombreux styles musicaux sont rendus
avec puissance.
Le mode cinéma active un effet de relief acoustique :
chaque détail sonoreest perçu.
• Appuyez plusieurs fois sur [MODE](3) pour
sélectionner les différents modes sonores.
• La LED d’état (11) du mode jeu s’allume de façon
permanente lorsque le mode jeu aété sélectionné.
• La LED d’état (12) du mode musique s’allume de
façon permanente lorsque le mode musique aété
sélectionné.
• La LED d’état (13) du mode cinéma s’allume de
façon permanente lorsque le mode cinéma aété
sélectionné.
23
Page 22
12. Réglage des basses
• Tournez le bouton rotatif (2) du caisson de graves
pour augmenter ou réduireles basses.
13. Réglage du volume
• Appuyez sur le bouton [VOLUME]+/- (7) de la
SoundZbar pour augmenter /réduirelevolume.
• Appuyez sur [
sourdine.
14. Utilisation de la SoundZbar sur batterie
Avertissement –Batterie
• Utilisez uniquement le bloc d’alimentation fourni
pour recharger.
• Cessez d'utiliser tout chargeur défectueux et ne
tentez pas de le réparer.
• Évitez un stockage, une charge ou une utilisation à
des températures extrêmes.
• Rechargez régulièrement le produit (au moins
une fois par trimestre) en cas de longue période
d’entreposage.
• La SoundZbar dispose d’une batterie rechargeable.
La batterie doit êtreentièrement rechargée avant la
premièreutilisation du produit.
• Assurez-vous que la SoundZbar est bien hors tension
avant de commencer la charge de l’appareil.
• Pour recharger l’appareil, branchez le bloc
d’alimentation fourni au câble d’alimentation secteur
(4) et àune prise.
• La LED d’état de charge (3) s’allume en vert de façon
permanente pendant la charge.
• La charge complète de la batterie peut durer jusqu’à
4heures.
• La LED d’état de charge (3) s'éteint automatiquement
dès que la batterie est entièrement chargée.
• Débranchez alors tous les câbles et toutes les
connexions secteur.
Remarque –Cycle de charge /Capacité de
la batterie
• Un cycle de charge complet dureenviron 3-4
heures.
• Lorsque la capacité de la batterie est inférieure
à10%,laLED d’état de charge (3) clignote
rapidement en rouge. Cette information n’est livrée
que lorsque la SoundZbar est sous tension.
](6) pour mettrelaSoundZbar en
15. Soins et entretien
Nettoyez la balance uniquement àl’aide d’un chiffon
non breux légèrement humide ;évitez tout détergent
agressif.
16. Exclusion de garantie
La société Hama GmbH &CoKGdécline toute responsabilité
en cas de dommages provoqués par une installation, un
montage ou une utilisation non conformes du produit ou
encoreprovoqués par un non respect des consignes du
mode d‘emploi et/ou des consignes de sécurité.
17. Service et assistance
En cas de question concernant le produit, veuillez vous
adresser au service de conseil produits de Hama.
Ligne téléphonique directe :+49 9091 502-115
(allemand/anglais)
Vous trouverez ici de plus amples informations concernant
l‘assistance :www.hama.com
18. Consignes de recyclage
Remarques concernant la protection de
l’environnement:
Conformément àladirective européenne
2012/19/EU et 2006/66/CE, et and‘atteindre
un certain nombred‘objectifs en matièrede
protection de l‘environnement, les règles
suivantes doivent êtreappliquées: Les appareils
électriques et électroniques ainsi que les batteries ne
doivent pas êtreéliminés avec les déchets ménagers. Le
pictogramme “picto” présent sur le produit, son manuel
d‘utilisation ou son emballage indique que le produit
est soumis àcette réglementation. Le consommateur
doit retourner le produit/la batterie usager aux points
de collecte prévus àcet effet. Il peut aussi le remettreà
un revendeur.Enpermettant ennlerecyclagedes
produits ainsi que les batteries, le consommateur
contribueraàlaprotection de notreenvironnement.
C‘est un acte écologique.
19. Déclaration de conformité
Le soussigné, Hama GmbH &CoKG, déclare
que l‘équipement radioélectrique du type
[00113776] est conforme àladirective
2014/53/UE. Le texte complet de la déclaration UE de
conformité est disponible àl‘adresse internet suivante:
www.hama.com->00113776 ->Downloads.
Bandes de fréquences
Puissance de radiofréquence
maximale
2.40GHz ~2.48HGz
5mW EIRP
24
Page 23
20. Caractéristiques techniques
Technologie
Bluetooth
®
Bluetooth® v2.1 +EDR
Prols pris en charge A2DP,AVRCP
Fréquence pour les
transmissions
Bluetooth
Puissance de transmission
Portée
Bluetooth
®
®
Bluetooth
®
maxi. Max. 10 dBm
2.40GHz ~2.48HGz
10 m
Nombremaximal d’appareils pouvant êtrecouplés 1
Performance
Système sonore2.1
Fréquence
Plage de fréquence de la SoundZbar :160 –20000 Hz
Plage de fréquence du caisson de graves :20–160 Hz
Total 100 W
Puissance musicale maxi.
SoundZbar 40 W
Caisson de graves 60 W
Impédance 6 Ω
Distorsion THD
≤
0.5% (1K, 1W)
Prise stéréo de 3,5 mm, entrée AUX
Connexions
Entrée optique
Entrée de mise sous tension (Power)
Tension d’alimentation 230 V~50Hz0.4 A
Batterie de la SoundZbar
Type de batterie Li-ion 7,4 Vmin. 2550 mAh /18,87 Wh
Temps de recharge ~3-4h
Via Bluetooth :~7h
Autonomie
Via AUX :~12h
(en fonction du volume et du contenu audio)
Maße(B xTxH) /Gewicht
Total 5.1 kg
Poids
SoundZbar 1.3kg
Subwoofer 3.8kg
Dimensions
SoundZbar 485 x68x72mm
Caisson de graves 250 x270 x250 mm
25
Page 24
E Instrucciones de uso
A. Elementos de manejo eindicadores
SoundZbar
1. [POWER]
2. [SOURCE] paralaselección del modo de entrada
3. [MODE] paralaselección del modo de sonido
4. [PAIR] paralainterrupción de la conexión
Bluetooth
5. Interfaz NFC
6. [
] Silenciamiento
7. VOL +/-
8. LED de estado de la entrada óptica
9. LED de estado AUX
10. LED de estado Bluetooth
11. LED de estado del modo gaming
12. LED de estado del modo música
13. LED de estado del modo cine
B. Parte posterior SoundZbar
1. Conector hembraOptical In
2. Conector hembraAUX In
3. LED de estado de carga
4. Cable de corriente /DC-IN
C. Subwoofer
1. Interruptor on/off
2. Regulador giratorio paragraves
3. LED de estado de la conexión del subwoofer yla
SoundZbar
Le agradecemos que se haya decidido por un producto
de Hama. Tómese tiempo yléase primerolas siguientes
instrucciones eindicaciones. Después, guarde estas
instrucciones de manejo en un lugar seguroparapoder
consultarlas cuando sea necesario. Si vende el aparato,
entregue estas instrucciones de manejo al nuevo
propietario.
1. Explicación de los símbolos de aviso ydelas
indicaciones
Peligrodesufrir una descarga eléctrica
Este símbolo hace referencia al peligrodecontacto
con partes no aisladas del producto que pueden
conducir una tensión peligrosa de una intensidad tal
que puede provocar una descarga eléctrica.
Aviso
Se utiliza paracaracterizar las indicaciones de
seguridad oparallamar la atención sobrepeligros y
riesgos especiales.
Nota
Se utiliza paracaracterizar informaciones adicionales
oindicaciones importantes.
2. Explicación de los símbolos de la identificación
del producto
•
•
3. Contenido del paquete
•SoundZbar
•Subwoofer
•Cable de audio de 3,5 mm
•Adaptador de red
•Estas instrucciones de manejo
4. Instrucciones de seguridad
•Elproducto es paraeluso doméstico privado, no comercial.
• No opereelproducto en las inmediaciones de la
• Proteja el producto de la suciedad, la humedad yel
• Este aparato, como todos los aparatos eléctricos, no debe
• No deje caer el producto ni lo someta asacudidas fuertes.
• No opereelproducto fueradelos límites de potencia
• No utilice el producto en áreas donde no se permitan
• Tenga consideración con los demás. Losvolúmenes altos
• No abraelproducto ynolosiga operando de presentar
• La pila recargable está montada de forma ja ynose
• Mantenga el material de embalaje fueradel alcance de los
•Deseche el material de embalaje en conformidad con las
• No realice cambios en el aparato. Esto conllevaría la
•Mantenga el producto alejado de posibles goteos o
El producto está diseñado sólo paraeluso
dentrodeedicios.
Dispositivo eléctrico de la Clase de protección
II (doble aislamiento)
calefacción, de otras fuentes de calor obajo la radiación
directa del sol.
sobrecalentamiento yutilícelo sólo en recintos secos.
estar en manos de los niños.
indicados en los datos técnicos.
aparatos electrónicos.
pueden molestar oafectar asuentorno.
deterioros.
puede retirar,deseche el producto como una unidad yen
conformidad con los reglamentos locales.
niños, existe peligrodeasxia.
disposiciones locales sobreeldesecho vigentes.
pérdida de todos los derechos de la garantía.
salpicaduras de líquidos ynocoloque ningún objeto que
contenta líquidos (como p. ej. jarrones) sobreelproducto.
26
Page 25

Peligrodesufrir una descarga eléctrica
Nota-Al encender por primeravez
• No abraelproducto ynolosiga operando de
presentar deterioros.
• No utilice el producto si el adaptador de AC,el
adaptador del cable oelcable eléctrico están
dañados.
• No intente mantener oreparar el producto por
cuenta propia. -Encomiende cualquier trabajo
de mantenimiento al personal especializado
competente.
5. Puesta en servicio yfuncionamiento
Nota
• Tiene la posibilidad de emplear el producto en
los modos de funcionamiento con corriente y
de funcionamiento con batería. Para emplear
el producto en el modo de funcionamiento con
corriente, basta con que esta esté conectada
alared de corriente (véase el capítulo 5). Para
emplear el producto en el modo de funcionamiento
con batería, es necesario cargarla por completo
previamente (véase el capítulo 14).
Aviso
• Utilice el producto sólo en una toma de corriente
autorizada. La toma de corriente debe estar
colocada cerca del producto ydeforma accesible
• Desconecte el producto de la redeléctrica
mediante el interruptor on/off –denoexistir
éste, desenchufe el cable eléctrico de la toma de
corriente.
• La toma de corriente debe estar fácilmente
accesible en todo momento.
• Desconecte el producto de la redsinovaa
emplearse durante un tiempo prolongado.
• Conecte el cable de reddelaSoundZbar ydel
subwoofer atomas de corriente correctamente
instaladas.
• Pulse [POWER](1) paraencender la SoundZbar.
• Pulse el interruptor on/off (1) paraencender el
subwoofer.
• El LED de estado de la conexión (3) en el subwoofer
comienza aparpadear de color azul.
• Tras el encendido, la SoundZbar yelsubwoofer se
conectan automáticamente entresívía Bluetooth.
• Si la conexión se ha realizado correctamente, el
LED de estado de la conexión (3) en el subwoofer
se ilumina de forma continua de color azul.
6. Conexión inicial Bluetooth (sincronización)
Puede conectar sus terminales alaSoundZbar vía
Bluetooth yemplearla como dispositivo de reproducción
paraseñales de audio.
Nota –
Bluetooth
®
• Compruebe que su terminal móvil (teléfono móvil,
etc.) sea compatible con Bluetooth.
• Tenga en cuenta que el alcance Bluetooth es de
máx. 10 metros sin obstáculos, como pueden ser
paredes, personas, etc.
• Pueden producirse interferencias en la conexión
debido aotros dispositivos/ conexiones Bluetooth
presentes en el entorno.
• La SoundZbar solo puede sincronizarse con un
único terminal.
• Tenga en cuenta que la compatibilidad depende de
los perles Bluetooth compatibles ydelas versiones
Bluetooth empleadas. (Véase: Datos técnicos,
instrucciones de manejo del terminal empleado)
• Asegúrese de que su terminal compatible con
Bluetooth está encendido ydeque se ha activado
Bluetooth.
• Active el modo Bluetooth pulsando repetidamente
[SOURCE](2) en la SoundZbar.
• El LED de estado de la conexión Bluetooth (10)
comienza aparpadear de color azul.
• Abralaconguración Bluetooth en su terminal y
esperehasta que se muestreuRage SoundZbar en la
lista de los dispositivos Bluetooth encontrados.
• Seleccione la SoundZbar «uRage SoundZbar» en la
lista de los dispositivos disponibles yesperehasta
que la SoundZbar aparezca como conectada en la
conguración de Bluetooth de su terminal.
• El LED de estado de la conexión Bluetooth (10) se
ilumina ahoradeforma continua de color azul.
• Inicie ycontrole la reproducción de audio según
corresponda mediante el terminal.
27
Page 26
Nota –Contraseña
Bluetooth
®
• Algunos terminales requieren una contraseña
paralaconguración de la conexión con otros
dispositivos Bluetooth.
• Introduzca la contraseña 0000 paralaconexión
con el radio si el terminal lo requiriese.
7. Conexión inicial Bluetooth (sincronización)
mediante NFC
• Asegúrese de que su smartphone es compatible con
NFC yque la función se encuentraactiva.
• Active el modo Bluetooth pulsando repetidamente
[SOURCE](2) en la SoundZbar.
• El LED de estado de la conexión Bluetooth (10)
comienza aparpadear de color azul.
• Con su smartphone, toque levemente la interfaz NFC
(5) de la SoundZbar.
• El LED de estado de la conexión Bluetooth (10) se
ilumina ahoradeforma continua de color azul.
• Inicie ycontrole la reproducción de audio según
corresponda mediante el terminal.
8. Desconexión de Bluetooth
• Pulse ymantenga pulsado [PAIR](4) durante aprox. 2
segundos paradesconectar Bluetooth de su terminal.
• Ahora, la SoundZbar puede conectarse con otro
terminal (véase el capítulo 5).
9. Conexión mediante entrada auxiliar
La entrada de audio analógica AUX le permite
conectar alaSoundZbar numerosos terminales (p. ej.
videoconsolas, smartphones, tablets, reproductores de
MP3, etc.) así como otras fuentes analógicas menos
modernas (reproductores de CD/DVD, etc.), además de
permitirle reproducir su señal de audio através de la
SoundZbar.
Nota
• Apague la SoundZbar antes de conectar un
terminal alamisma.
• No doble ni aplaste el cable.
• Conecte su terminal alaSoundZbar con el conector
hembraAUX (2), empleando el cable de audio de 3,5
mm adjunto (cable con jack).
• Pulse [POWER](1) paraencender la SoundZbar.
• Active el modo AUX pulsando repetidamente
[SOURCE](2) en la SoundZbar.
• El LED de estado del modo AUX (9) se ilumina de
forma continua.
• Nicie ycontrole la reproducción de audio según
corresponda mediante el terminal.
10. Conexión mediante cable de audio óptico
La entrada de audio digital de la SoundZbar le permite
conectar su terminal (p. ej. videoconsolas, TV,etc.) y
reproducir su señal de audio mediante la SoundZbar.
Nota
• Apague la SoundZbar antes de conectar un
terminal alamisma.
• Antes de proceder alaconexión, retirelas
caperuzas protectoras que se encuentran en ambos
extremos del cable de señal óptica.
• No doble ni aplaste el cable.
• Conecte un cable de señal óptica alaentrada de
audio óptica (1) de la SoundZbar yalasalida de
audio óptica de su terminal.
• Pulse [POWER](1) paraencender la SoundZbar.
• Active el modo OPT pulsando repetidamente
[SOURCE](2) en la SoundZbar.
• El LED de estado del modo OPT (8) se ilumina de
forma continua.
• Inicie ycontrole la reproducción de audio según
corresponda mediante el terminal.
11. Modos de audio
Para la reproducción de sus señales de audio, puede
elegir entretresmodos diferentes:
El modo gaming activa adicionalmente más agudos y
más graves paramejorar la experiencia de gaming.
El modo música activa una gama de frecuencias lineal
parapoder reproducir con mayor potencia una variedad
de estilos musicales.
El modo cine activa un efecto de sonido envolvente que
permite percibir todos los detalles acústicos.
• Pulse repetidamente [MODE](3) paraseleccionar los
diferentes modos de sonido.
• El LED de estado (11) del modo gaming se ilumina de
forma continua con el modo gaming seleccionado.
• El LED de estado (12) del modo música se ilumina de
forma continua con el modo música seleccionado.
• El LED de estado (13) del modo cine se ilumina de
forma continua con el modo cine seleccionado.
28
Page 27
12. Regulación de los graves
• Gireelregulador giratorio (2) del subwoofer para
aumentar odisminuir el nivel de los graves.
13. Regulación del volumen
• Pulse [VOLUME]+/- (7) en la SoundZbar para
aumentar/disminuir el volumen.
• Pulse [
14. Empleo de la SoundZbar en el modo de
funcionamiento con batería
• La SoundZbar incorporauna batería recargable. La
• Asegúrese de que la SoundZbar está apagada antes
• Inicie el proceso de carga conectando la fuente de
• El LED de estado de carga (3) se ilumina de forma
• Pueden transcurrir hasta 4horas hasta que la batería
• Una vez cargada completamente la batería, el LED de
• Seguidamente, interrumpa todas las conexiones por
](6) parasilenciar la SoundZbar.
Aviso –Batería
• Emplee únicamente la fuente de alimentación
adjunta paralacarga.
• No siga utilizando cargadores defectuosos yno
intente repararlos.
• Evite el almacenamiento, la carga yeluso en
condiciones de temperaturaextrema.
• En caso de almacenamiento prolongado, cargue
regularmente (mín. trimestralmente).
batería debe haberse cargado completamente antes
del primer uso.
de proceder asucarga.
alimentación adjunta al cable de corriente (4) yauna
toma de corriente.
continua de color verde durante el proceso de carga.
esté totalmente cargada.
estado de carga (3) se apaga.
cable ydered.
Nota–Proceso de carga/capacidad de la
batería
• Un proceso de carga completo duraaprox. 3-4
horas.
• Si la capacidad de la batería es inferior al 10%, el
LED de estado de carga (3) parpadea rápidamente
de color rojo. Solo recibirá esta información en
caso de estar encendida la SoundZbar.
15. Mantenimiento ycuidado
Limpie este producto sólo con un paño ligeramente
humedecido que no deje pelusas ynoutilice
detergentes agresivos.
16. Exclusión de responsabilidad
Hama GmbH &CoKGnoseresponsabiliza ni concede
garantía por los daños que surjan por una instalación,
montaje omanejo incorrectos del producto opor la no
observación de las instrucciones de manejo y/o de las
instrucciones de seguridad.
17. Servicio ysoporte
Si tiene que hacer alguna consulta sobreelproducto,
diríjase al asesoramiento de productos Hama.
Línea directa: +49 9091 502-115 (Alemán/Inglés)
Encontrar más información de soporte aquí:
www.hama.com
18. Instrucciones para desecho yreciclaje
Nota sobrelaprotección medioambiental:
Después de la puesta en marcha de la directiva
Europea 2012/19/EU y2006/66/EU en el
sistema legislativo nacional, se aplicaralo
siguiente: Losaparatos eléctricos yelectrónicos,
así como las baterías, no se deben evacuar en la basura
doméstica. El usuario está legalmente obligado allevar
los aparatos eléctricos yelectrónicos, así como pilas y
pilas recargables, al nal de su vida útil alos puntos de
recogida comunales oadevolverlos al lugar donde los
adquirió. Losdetalles quedaran denidos por la ley de
cada país. El símbolo en el producto, en las
instrucciones de uso oenelembalaje hace referencia a
ello. Gracias al reciclaje, al reciclaje del material oa
otras formas de reciclaje de aparatos/pilas usados,
contribuye Usted de forma importante alaprotección
de nuestromedio ambiente.
19. Declaración de conformidad
Porlapresente, Hama GmbH &CoKG, declara
que el tipo de equipo radioeléctrico [00113776]
es conforme con la Directiva 2014/53/UE. El
texto completo de la declaración UE de conformidad
está disponible en la dirección Internet siguiente:
www.hama.com->00113776 ->Downloads.
Banda obandas de frecuencia
2.40GHz ~
2.48HGz
Potencia máxima de radiofrecuencia 5mW EIRP
29
Page 28

20. Datos técnicos
Tecnología
Bluetooth
®
Bluetooth
®
v2.1 +EDR
Perles soportados A2DP,AVRCP
Frecuencia para
transmisiones
Bluetooth
Potencia de transmisión
Alcance
Bluetooth
®
®
Bluetooth
®
2.40GHz ~2.48HGz
Máx. 10 dBm
10 m
Nº. máx. dispositivos acoplables 1
Potencia
Sistema de audio 2.1
Frecuencia
Rango de frecuencias SoundZbar: 160 -20000 Hz
Rango de frecuencias subwoofer: 20 -160 Hz
Total 100 W
Potencia máx. parareproducción de música
SoundZbar 40 W
Subwoofer 60 W
Impedancia 6 Ω
Distorsión THD
≤
0.5% (1K, 1W)
Entrada AUX jack estéreo 3,5 mm
Conexiones
Entrada óptica
Entrada de corriente
Alimentación de tensión 230 V~50Hz0.4 A
Batería SoundZbar
Tipo de batería 7,4 VLi-Ion mín.: 2550 mAh /18,87 Wh
Tiempo de carga ~3-4h
Vía Bluetooth ~7h
Tiempo de funcionamiento
Vía AUX ~12h
(según volumen ycontenido de audio)
Dimensiones (An xPrxAl) /peso
Total 5.1 kg
Peso
SoundZbar 1.3kg
Subwoofer 3.8kg
Dimensiones
SoundZbar 485 x68x72mm
Subwoofer 250 x270 x250 mm
30
Page 29
R Руководство по эксплуатации
A. Органы управления ииндикации SoundZbar
1. [POWER]
2. [SOURCE] Для выбора режима входа
3. [MODE] Для выбора режима воспроизведения
звука
4. [PAIR] Для отключения соединения Bluetooth
5. Интерфейс USB
6. [ ] Звук ВКЛ./ВЫКЛ.
7. VOL +/-
8. Светодиодный индикаторсостояния оптического
входа
9. Светодиодный индикатор
10. Светодиодный индикатор Bluetooth-соединения
11. Светодиодный индикаторигровогорежима
12. Светодиодный индикаторрежима воспроизведения
музыки
13. Светодиодный индикаторрежима кинотеатра
B. Задняя панель SoundZbar
1. Разъем Optical In
2. Разъем AUX-In
3. Светодиодный индикаторзарядки
4. Кабель питания
C. Низкочастотный громкоговоритель
1. Выключатель
2. Поворотный регулятор низких частот
3. Светодиодный индикаторсоединения
низкочастотногогромкоговорителя и SoundZbar
Благодарим за покупку изделия фирмы Hama.
внимательно ознакомьтесь снастоящей инструкцией.
Храните инструкцию внадежном месте для справок
вбудущем. Вслучае передачи изделия другому лицу
приложите иэту инструкцию.
1. Предупредительные пиктограммы и
инструкции
/DC- IN
Опасность поражения электрическим
током
Значок предупреждает об опасности поражения
высоким напряжением вслучае касания
неизолированных токоведущих деталей.
Внимание
Примечание
Дополнительная или важная информация.
2. Значения символов маркировки изделия
•
Запрещается эксплуатировать вне
помещений.
•
Электроприбор класса безопасности II (с
двойной изоляцией).
3. Комплект поставки
•SoundZbar
• низкочастотный громкоговоритель
• аудио-кабель 3,5 мм
• блок питания
• настоящая инструкция
4. Техника безопасности
• Изделие предназначено толькодля домашнего
применения.
• Не эксплуатировать внепосредственной близости
снагревательными приборами, беречь от прямых
солнечных лучей.
• Беречь от грязи, влаги иисточников тепла.
Эксплуатировать тольковсухих условиях.
• Не давать детям!
• Не ронять. Беречь от сильных ударов.
• Соблюдатьтехнические характеристики.
• Не применять взапретных зонах.
• Уважайте окружающих. Громкое прослушивание
музыки можетмешать другим.
• Изделие не открывать. Запрещается эксплуатировать
неисправное изделие.
• Аккумулятор замене не подлежит. Утилизацию
продуктапроизводить целиком согласно
нормативам.
• Упаковку не давать детям: опасность асфиксии.
• Утилизировать упаковку всоответствии сместными
нормами.
• Запрещается вносить изменения вконструкцию.
Впротивном случае гарантийные обязательства
аннулируются.
• Не допускайте попадания капель или брызг жидкости
на устройство инеставьте на изделие заполненные
жидкостью предметы (например, вазы).
Данным значком отмечены инструкции,
несоблюдение которых можетпривести копасной
ситуации.
31
Page 30

Опасность поражения током
• Изделие не открывать. Запрещается
эксплуатировать неисправное изделие.
• Запрещается эксплуатировать изделие
• при неисправном блокепитания,
соединительном кабеле или кабеле питания.
• Запрещается самостоятельно выполнять
техническое обслуживание или ремонт
устройства. Ремонт разрешается производить
толькоквалифицированному персоналу.
5. Ввод вэксплуатацию иработа
Примечание
• Изделие можетработатькак от сети, такиот
аккумулятора. Для работы от сети изделие
необходимо прост
дключить ксе
опо
ти пит
(см. главу 5). Для работы от аккумулятора
последний необходимо сначала полностью
зарядить (см. главу 14).
Внимание
• Разрешается подключать толькок
соответствующей розеткеэлектросети. Розетка
электросети должна находиться рядом с
устройством влегко доступном месте.
• Отключать спомощью выключателя
электросети, апри егоотсутствии вытащить
проводизрозетки.
• При подключении кколодке снесколькими
розетками убедитесь, чтообщая мощность
потребителей не превышает допустимую.
• Если устройство не используется втечение
длительноговремени, отключите егоот
электросети.
• Подключите кабели питания SoundZbar и
низкочастотногогромкоговорителя кнадлежащим
образом смонтированным розеткам.
• Нажмите кнопку [POWER](Питание)(1), чтобы
включить SoundZbar.
• Нажмите кнопку питания (1), чтобы включить
низкочастотный громкоговоритель.
• Светодиодный индикаторсоединения (3)
низкочастотногогромкоговорителя начинает мигать
синим.
ания
Примечание касательно первого
включения
• После включения SoundZbar инизкочастотный
громкоговоритель автоматически
устанавливаютсоединение Bluetooth.
• После успешной установки соединения
светодиодный индикаторсоединения (3) на
низкочастотном громкоговорителе непрерывно
светится синим.
6. Согласование устройств по протоколу
Bluetooth
По технологии Bluetooth можно подключать внешние
устройства к SoundZbar ииспользовать еговкачестве
устройства воспроизведения.
Примечание –
Bluetooth
®
• Убедитесь, чтоваше портативное устройство
(смартфон, планшет итд.) поддерживает
технологию Bluetooth.
• Максимальный радиус действия Bluetooth
составляет макс.10мбез учетапрепятствий
(стен, людей ит.д.).
• Другие устройства споддержкой Bluetooth,
находящиеся поблизости, могут создавать
помехи.
• SoundZbar можно одновременно использовать
толькосодним внешним устройством.
• Обратите внимание, чтосовместимость
зависит от поддерживаемых профилей
Bluetooth ииспользуемых версий Bluetooth (см.
технические характеристики иинструкцию по
эксплуатации устройства).
• Включите устройство воспроизведения иактивируйте
на нем Bluetooth.
• Активируйте режим Bluetooth, несколькораз нажав
кнопку [SOURCE](Источник)(2) на SoundZbar.
• Светодиодный индикаторсоединения Bluetooth (10)
начинает мигатьсиним.
• Откройте настройки Bluetooth на внешнем устройстве
ивспискенайдите устройство uRage SoundZbar.
• Выберите SoundZbar uRage SoundZbar всписке
доступных устройств иподождите, пока SoundZbar
не отобразится как подключенное устройство в
настройках Bluetooth внешнегоустройства.
• Светодиодный индикаторсоединения Bluetooth (10)
непрерывно светится синим.
• Для запуска воспроизведения иуправления
используется внешнее устройство.
32
Page 31

Примечание –
Пароль Bluetooth®
• Для установки соединения снекоторыми
устройствами можетпотребоваться пароль
Bluetooth.
• Если для установки соединения с
радиоприемником потребуется пароль, введите
пароль 0000.
7. Согласование устройств по протоколу
Bluetooth спомощью NFC
• Убедитесь втом, что ваш смартфон поддерживает
функцию NFC иона активирована.
• Активируйте режим Bluetooth, несколькораз нажав
кнопку [SOURCE](Источник)(2) на SoundZbar.
• Светодиодный индикаторсоединения Bluetooth (10)
начинает мигатьсиним.
• Коснитесь смартфоном интерфейса NFC (5) на
SoundZbar.
• Светодиодный индикаторсоединения Bluetooth (10)
непрерывно светится синим.
• Для запуска воспроизведения иуправления
используется внешнее устройство.
8. Отключение соединения Bluetooth
• Нажмите иудерживайте кнопку [PAIR](Сопряжение)
(4) втечение примерно 2 секунд, чтобы отключить
соединение Bluetooth свнешним устройством.
• После этого можно подключить SoundZbar кдругому
внешнему устройству (см. главу 5)
9. Подключение через вспомогательный вход
Через аналоговый аудиовход AUX можно подключить
к SoundZbar множество устройств (например, игровую
консоль, смартфон, планшетный ПК,MP3-плеер и
т. п.), атакжеболее старые источники аналогового
сигнала (CD-/DVD-плееры ит.п.) ивоспроизводить их
сигнал через SoundZbar.
Примечание
• Перед подключением внешнегоустройства
выключите питание SoundZbar.
• Кабель не сгибать инезажимать.
• Подключите внешнее устройство кгнезду AUX
(2) SoundZbar спомощью входящеговкомплект
поставки аудиокабеля со штекером диаметром 3,5
мм (mini-jack).
• Нажмите кнопку [POWER](Питание)(1), чтобы
включить SoundZbar.
• Активируйте режим AUX, несколькораз нажав кнопку
[SOURCE](Источник)(2) на SoundZbar.
• Светодиодный индикаторрежима AUX (9) светится
непрерывно.
• Для запуска воспроизведения иуправления
используется внешнее устройство.
10. Соединение спомощью оптического
аудиокабеля
Через цифровой вход SoundZbar можно подключать
внешние устройства (например, игровую консоль,
телевизор ит.п.) ивоспроизводить их сигнал через
SoundZbar.
Примечание
• Перед подключением внешнегоустройства
выключите питание SoundZbar.
• Перед подключением снимите защитные
колпачки собоих концов оптического
сигнальногокабеля.
• Кабель не сгибать инезажимать.
• Подключите оптический сигнальный кабель
коптическому аудиовходу (1) на SoundZbar и
оптическому аудиовыходунавнешнем устройстве.
• Нажмите кнопку [POWER](Питание)(1), чтобы
включить SoundZbar.
• Активируйте режим OPT, несколькораз нажав кнопку
[SOURCE](Источник)(2) на SoundZbar.
• Светодиодный индикаторрежима OPT (8) светится
непрерывно.
• Для запуска воспроизведения иуправления
используется внешнее устройство.
11. Режимы воспроизведения звука
Для воспроизведенияаудиосигналовпредусмотрено три
режима:
Вигровом режиме для болеекомфортной игры
активируютсядополнительные высокие инизкие частоты.
Врежимевоспроизведения музыки активируетсялинейный
частотныйдиапазон длямощноговоспроизведения музыки
различныхстилей.
Режимкинотеатра активируетпространственныйзвуковой
эффект, позволяющий воспринимать всезвуковые нюансы.
• Для выбора требуемогорежима нажмите кнопку [MODE]
(Режим)(3) несколькораз.
• Если выбранигровой режим, светодиодный индикатор
игровогорежима (11) светитсянепрерывно.
• Если выбран режим воспроизведения музыки,
светодиодныйиндикаторэтого режима (12) светится
непрерывно.
• Если выбран режим кинотеатра, светодиодныйиндикатор
этого режима (13) светится непрерывно.
33
Page 32

12. Регулирование низких частот
• Для усиления или уменьшения низких частот
вращайте поворотный регулятор (2) на
низкочастотном громкоговорителе.
13. Регулирование громкости
• Для увеличения или уменьшения громкости нажмите
кнопку [VOLUME]+/- (Громкость)(7) на SoundZbar.
• Для отключения звука нажмите кнопку [
SoundZbar.
14. Работа SoundZbar от аккумуляторной батареи
](6) на
Внимание
• Для зарядки используйте толькоблокпитания
из комплектапоставки.
• Не используйте инеремонтируйте неисправные
зарядные устройства!
• Не подвергайте аккумулятор воздействию
экстремальных температур при хранении,
зарядкеииспользовании.
• При длительном хранении заряжайте
аккумулятор не режеодногораза втри месяца.
• SoundZbar оснащен перезаряжаемым аккумулятором.
Перед первым использованием необходимо
полностью зарядить аккумулятор.
• Перед началом зарядки выключите SoundZbar.
• Для запуска процесса зарядки подключите кабель
питания (4) кблокупитания из комплектапоставки и
включите блок питания врозетку.
• Во время зарядки светодиодный индикатор (3)
непрерывно светится зеленым.
• Для полной зарядки аккумулятора требуется до 4
часов.
• Когдааккумулятор будет полностью заряжен,
светодиодный индикаторзарядки (3) перестанет
светиться.
• Завершив зарядку, отключите всекабельные и
сетевые соединения.
Примечание –Процессзарядки иемкость
аккумулятора
• Для полной зарядки необходимо около 3–4
часов.
• Если емкость аккумулятора составляет менее
10%, светодиодный индикаторзарядки (3)
быстро мигает красным. Данная функция
работает толькопри включенном SoundZbar.
34
15. Уход итехническое обслуживание
Чистку изделия производить толькобезворсовой
слегка влажной салфеткой. Запрещается применять
агрессивные чистящие средства.
16. Отказ от гарантийных обязательств
Компания Hama GmbH &CoKGне несетответственность
за ущерб, возникший вследствие неправильногомонтажа,
подключения ииспользованияизделиянепоназначению,
атакже вследствиенесоблюдения инструкции по
эксплуатации итехники безопасности.
17. Отдел техобслуживания
По вопросам ремонтаили замены неисправных
изделий обращайтесь кпродавцу или всервисную
службукомпании Hama.
Горячая линия отдела техобслуживания:
+49 9091 502-115 (немецкий, английский)
Подробнее смотрите здесь:www.hama.com
18. Инструкции по утилизации
Охрана окружающей среды:
Смоментапереходанационального
законодательства на европейские нормативы
2012/19/EU и 2006/66/EU действительно
следующее: Электрическиеиэлектронные
приборы, атакжебатареизапрещается утилизировать с
обычным мусором. Потребитель, согласно закону, обязан
утилизировать электрические иэлектронные приборы, а
такжебатареи иаккумуляторы после их использования в
специально предназначенныхдля этого пунктах сбора,
либовпунктахпродажи. Детальная регламентация этих
требований осуществляетсясоответствующимместным
законодательством. Необходимостьсоблюдения данных
предписаний обозначается особымзначком на изделии,
инструкциипоэксплуатации илиупаковке. При
переработке, повторномиспользованииматериаловили
при другой формеутилизации бывших вупотреблении
приборов Вы помогаетеохранеокружающей среды. В
соответствии спредписаниями по обращению с
батареями, вГерманиивышеназванныенормативы
действуютдля утилизации батарей иаккумуляторов.
19. Декларация производителя
Настоящим компания Hama GmbH &CoKG
заявляет, чторадиооборудование типа
[00113776] отвечает требованиям директивы
2014/53/ЕС. Сполным текстом декларации о
соответствии требованиям ЕС можно ознакомиться
здесь:www.hama.com-> 00113776-> Downloads.
Диапазон/диапазоны частот
Максимальная излучаемая
мощность
2.40GHz ~
2.48HGz
5mW EIRP
Page 33

20. Технические характеристики
Технология Bluetooth® Bluetooth
Поддерживаемые протоколы A2DP,AVRCP
Частота
Частота передачи Bluetooth®
Мощность передачи Bluetooth®
Дальность действия Bluetooth®
2,40—2,48 ГГц
Макс.10дБм
10 м
Макс. число подключенных устройств 1
Мощность
Акустическая система 2.1
Диапазон частот soundZbar: 160—20 000 Гц
Частота:
Диапазон частот низкочастотногогромкоговорителя:
20—160 Гц
Bcero
Макс. мощность звука
soundZbar 40 BT
Низкочастотный громкоговорител 60 BT
Сопротивление 6 Ом
Общее гармоническое искажение
≤ 0,5% (1 К,1Вт)
Стереоразъем 3,5 мм, вход AUX
Разъемы
Оптический вход
Вход питания
Spannungsversorgung
230 V~50Hz0.4 A
®
v2.1 +EDR
100 BT
Аккумуляторная батарея SoundZbar
Типаккумуляторов
Литий-ионный аккумулятор 7,4 Вмин.: 2550 мА-ч /
18,87 W-ч
Время зарядки ~3-4 ч
Через Bluetooth: ~7чЧерез AUX: ~12ч
Время работы
(взависимости от громкости исостава звукового
сигнала)
Размеры (Ш x Г x В)/вес
Всего:5,1 кг
Вес
SoundZbar 1,3 кг
Низкочастотный громкоговоритель 3,8 кг
SoundZbar 485 ×68×72 мм
Размеры
Низкочастотный громкоговоритель
250 ×270 ×250 мм
35
Page 34

I Istruzioni per l‘uso
A. Elementi di comando eindicazioni SoundZbar
1. [POWER]
2. [SOURCE] per la selezione della modalità ingresso
3. [MODE] per la selezione della modalità suono
4. [PAIR] per interrompereilcollegamento Bluetooth
5. Interfaccia NFC
6. [
] Mute
7. VOL +/-
8. LED di stato ingresso ottico
9. LED di stato AUX
10. LED di stato Bluetooth
11. LED di stato modalità gioco
12. LED di stato modalità musica
13. LED di stato modalità cinema
B. Lato posteriore SoundZbar
1. Presa con braottica
2. Presa AUX In
3. LED di stato carica
4. Cavo di rete /DC- IN
C. Subwoofer
1. InterruttoreON/ OFF
2. Manopola bassi
3. LED di stato collegamento Subwoofer eSoundZbar
Grazie per avereacquistato un prodotto Hama!
Prima della messa in esercizio, leggete attentamente
le seguenti istruzioni eavvertenze, quindi conservatele
in un luogo sicuroper una eventuale consultazione. In
caso di cessione dell‘apparecchio, consegnate anche le
presenti istruzioni al nuovo proprietario.
1. Spiegazione dei simboli di avvertimento e
delle indicazioni
Pericolo dovuto ascossa elettrica
Questo simbolo indica un pericolo dovuto al contatto
con parti non isolate del prodotto che potrebbero
provocareuna tensione pericolosa di entità tale da
generareilpericolo di una scossa elettrica.
Attenzione
Viene utilizzato per contrassegnareleindicazioni
di sicurezza oppureper rivolgerel‘attenzione verso
particolari rischi epericoli.
2. Spiegazione dei simboli sull’etichetta
•
•
3. Contenuto della confezione
•SoundZbar
•Subwoofer
•Cavo audio 3,5 mm
•Adattatoredirete
•Queste istruzioni per l’uso
4. Indicazioni di sicurezza:
• Il prodotto èconcepito per l’uso domestico privato,
• Evitaredimettereinesercizio il prodotto in prossimità
• Proteggereilprodotto da sporcizia, umidità e
• Tenerequesto apparecchio, come tutte le
• Non farecadereilprodotto enon sottoporlo aforti
• Non mettereinesercizio il prodotto al di fuori dei suoi
• Non utilizzareilprodotto in zone in cui non sono
• Usarecautela. Il volume alto può disturbareo
• Non aprireilprodotto enon utilizzarlo più se
• L‘accumulatoreèsso enon può essererimosso,
• Tenerel’imballo fuori dalla portata dei bambini,
• Smaltireimmediatamente il materiale d‘imballaggio
• Non apportaremodiche all’apparecchio per evitare
• Proteggereilprodotto da liquidi gocciolanti eda
Il prodotto èstato concepito solo per l‘utilizzo
all‘interno degli edici.
Dispositivi elettrici con classe di protezione II
(isolato doppio).
non commerciale.
di riscaldamento, altrefonti di caloreolaluce diretta
del sole.
surriscaldamento eutilizzarlo solo in ambienti asciutti.
apparecchiatureelettriche, fuori dalla portata dei
bambini!
scossoni!
limiti di rendimento indicati nei dati tecnici.
ammesse le apparecchiatureelettroniche.
comprometterel‘ambiente circostante.
danneggiato.
smaltirlo conformemente alle normative locali vigenti.
pericolo di soffocamento!
attenendosi alle prescrizioni locali vigenti.
di perdereidiritti di garanzia.
spruzzi enon appoggiarvi oggetti pieni di liquido,
come ad es. vasi.
Avvertenza
Viene utilizzato per contrassegnareinformazioni
supplementari oindicazioni importanti.
36
Page 35
Pericolo dovuto ascossa elettrica
Nota per la prima accensione
• Non aprireilprodotto enon utilizzarlo più se
danneggiato.
• Non utilizzareilprodotto se l‘adattatore, il cavo di
allacciamento oilcavo di rete sono danneggiati.
• Non tentarediaggiustareoripararel’apparecchio
da soli. Fareeseguirequalsiasi lavorodi
riparazione al personale specializzato competente.
5. Messa in esercizio efunzionamento
Avvertenza
• Èpossibile utilizzareilprodotto collegandolo
alla rete oppurecon batterie. Percollegareil
prodotto alla rete basta semplicemente collegarlo
all’alimentazione di rete (vedi Capitolo 5). Per
utilizzareilprodotto con le batterie, ènecessario
caricarle completamente (vedi Capitolo 14).
Attenzione
• Collegareilprodotto solo auna presa di rete
appositamente omologata. La presa deve trovarsi
nei pressi del prodotto ed esserefacilmente
accessibile.
• Scollegareilprodotto dalla rete mediante
l‘interruttoreon/off; se questo non èpresente,
estrarreilcavo di rete dalla presa.
• La presa di rete deve esseresemprefacilmente
accessibile.
• Scollegarelaradio dalla presa di rete se non la si
utilizza per lungo tempo.
• Collegareilcavo di rete del dispositivo SoundZbar e
del dispositivo Subwoofer aunpresa sicura.
• Peraccendereildispositivo SoundZbar,premere
[POWER](1).
• Perattivareildispositivo Subwoofer,premere
l’interruttoreon/off (1).
• Il LED di stato per il collegamento (3) Subwoofer inizia
alampeggiarecon luce blu.
• Una volta accesi sia il SoundZbar che il Subwoofer
si collegano automaticamente tramite Bluetooth.
• Una volta collegati correttamente il LED di stato (3)
del Subwoofer rimane acceso con luce blu.
6. Prima connessione Bluetooth (pairing)
Il Bluetooth consente di connettereipropri terminali al
dispositivo SoundZbar ediutilizzarlo come riproduttore
per segnali audio.
Avvertenza –
Bluetooth
®
• Vericareche il proprio terminale mobile (telefono
cellulareecc.) sia compatibile Bluetooth.
• Attenzione: la portata del Bluetooth èpari a
max. 10 metri, in assenza di ostacoli come pareti,
persone ecc.
• Può accadereche il collegamento venga disturbato
da altri apparecchi/ connessioni Bluetooth presenti
nell'ambiente.
• Il dispositivo SoundZbar può essereaccoppiato
sempreesoltanto con un unico terminale.
• Attenzione: la compatibilità dipende dai proli
Bluetooth supportati edalle versioni del Bluetooth
utilizzate. (vedi: Dati tecnici, istruzioni per l'uso del
terminale utilizzato)
• Accertarsi che il terminale compatible Bluetooth sia
acceso eche Bluetooth sia attivato.
• per attivarelamodalità Bluetooth premere
ripetutamente [SOURCE](2) sul dispositivo
SoundZbar.
• Il LED di stato per il collegamento (10) inizia a
lampeggiarecon luce blu.
• Aprireleimpostazioni Bluetooth sul terminale
eattendere nché nell'elenco degli apparecchi
Bluetooth trovati non venga visualizzato il dispositivo
uRage SoundZbar.
• Scegliereildispositivo SoundZbar uRage SoundZbar
nell’elenco degli apparecchi trovati eattendereche
il dispositivo SoundZbar appaia come collegato via
Bluetooth nelle impostazioni del terminale.
• Il LED di stato per il collegamento Bluetooth (10) si
accende con luce blu.
• Avviareegestirelariproduzione audio attraverso il
rispettivo terminale collegato.
37
Page 36

Avvertenza –
Password Bluetooth
®
• Perstabilirelaconnessione con un altrodispositivo
Bluetooth alcuni terminali richiedono una
password.
• Perlaconnessione con la radio immetterela
password0000, se viene richiesto dal proprio
terminale.
7. Prima connessione Bluetooth (pairing) tramite
NFC
• Assicurarsi che il NFC sia supportato dallo
Smartphone eaccenderlo.
• per attivarelamodalità Bluetooth premere
ripetutamente [SOURCE](2) sul dispositivo
SoundZbar.
• Il LED di stato per il collegamento (10) inizia a
lampeggiarecon luce blu.
• Toccarecon lo Smartphone l’interfaccia NFC (5) sul
dispositivo SoundZbar.
• Il LED di stato per il collegamento Bluetooth (10) si
accende con luce blu.
• Avviareegestirelariproduzione audio attraverso il
rispettivo terminale collegato.
8. Interrompere la connessione Bluetooth
• Premereetenerepremuto PAIR] (4) per ca. 2secondi
per interrompereilcollegamento Bluetooth con il
terminale.
• Il dispositivo SoundZbar può oraesserecollegato con
un altroterminale (vedi Capitolo 5)
9. Collegamento tramite ingresso ausiliare
Tramite l’uscita analoga AUX èpossibile collegare
diversi terminali (ad es. console per videogiochi,
Smartphone, tablet, MP3- Player ecc.) come anche
fonti analoghe vecchie (lettoreCD/DVD) al dispositivo
SoundZbar eriprodurreilsegnale audio tramite il
dispositivo SoundZbar.
Avvertenza
• Spegnereildispositivo SoundZbar prima di
collegareunterminale.
• Non piegare, né schiacciareilcavo.
• Collegareilterminate tramite la presa AUX (2)
utilizzando il cavo audio da 3.5 mm fornito (cavo
cinch) al dispositivo SoundZbar.
• Peraccendereildispositivo SoundZbar,premere
[POWER](1).
• Perattivarelamodalità AUX premereripetutamente
[SOURCE](2) sul dispositivo SoundZbar.
• Il LED di stato della modalità AUX (9) èilluminato.
• Avviareegestirelariproduzione audio attraverso il
rispettivo terminale collegato.
10. Collegamento tramite cavo audio ottico
Èpossibile collegarel’uscita audio del dispositivo
SoundZbar al terminale (ad es. console per videogiochi,
TV ecc.) eriprodurreilsegnale audio tramite il
dispositivo SoundZbar.
Avvertenza
• Spegnereildispositivo SoundZbar prima di
collegareunterminale.
• Prima del collegamento staccareilcappuccio
protettivo dalle estremità del cavo di segnale ottico.
• Non piegare, né schiacciareilcavo.
• Collegareilcavo di segnale ottico all’uscita audio
ottica (1) del dispositivo SoundZbar eall’uscita audio
ottica del terminale.
• Peraccendereildispositivo SoundZbar,premere
[POWER](1).
• Perattivarelamodalità OPT premereripetutamente
[SOURCE](2) sul dispositivo SoundZbar.
• Il LED di stato della modalità OPT (8) èilluminato.
• Avviareegestirelariproduzione audio attraverso il
rispettivo terminale collegato.
11. Modalità audio
Perlariproduzione dei segnali audio si può sceglieretra
tremodalità diverse:
Con la modalità gioco si attiva inoltrepiù alti ebassi
per una fantastica esperienza di gioco.
Con la modalità musica si attiva una curva di frequenza
lineareper fareinmodo di percepireapieno la varietà
degli stili musicali.
Con la modalità cinema si attiva un effetto stile
surround in cui si percepisce ogni piccolo dettaglio del
suono.
• Persceglierelediverse modalità premere
ripetutamente [MODE](3).
• Una volta selezionata la modalità gioco, il LED di
stato (11) èsempreacceso.
• Una volta selezionata la modalità musica, il LED di
stato (12) èsempreacceso,
• Una volta selezionata la modalità cinema, il LED di
stato (13) èsempreacceso.
38
Page 37

12. Regolazione dei bassi
• Peraumentareediminuireibassi, ruotarela
manopola (2) sul subwoofer.
13. Regolazione del volume
• Peraumentareodiminuireilvolume, premere
[VOLUME]+/- (7) sul dispositivo SoundZbar.
• Perregolareilvolume no aunlivello impercettibile,
premere[
14. Utilizzo del dispositivo SoundZbar con
batterie
• Percaricareutilizzaresolo il cavo di alimentazione
fornito.
• Non utilizzarepiù caricabatterie oattacchi USB
difettosi enon cercarediripararli.
• Evitarediconservare, caricareeutilizzarela
batteria atemperatureestreme.
• In caso di lungo inutilizzo, ricaricareregolarmente
(almeno una volta ogni tremesi).
• Il dispositivo SoundZbar èprovvisto di una batteria
ricaricabile. Prima del primo utilizzo, la batteria deve
esserecaricata completamente.
• Prima di effettuarelacarica, accertarsi che SoundZbar
sia spento.
• Periniziareacaricare, collegareilcavo di
alimentazione fornito alla rete elettrica (4) con una
presa.
• Durante il processo di carica, si accende il LED di
stato (3).
• Ci vorranno no a4ore per caricarecompletamente
la batteria.
• Se la batteria ècompletamente carica, il LED di stato
si spegne (3).
• Dopo l'utilizzo, scollegaretutti icollegamenti dei cavi
edella rete.
Autonomia della batteria
• Un processo di carica completo duraca. 3-4 ore.
• Il LED di stato (3) lampeggia velocemente in rosso
quando l’autonomia della batteria èmeno del
10%. Questa informazione viene ottiene solo se il
dispositivo SoundZbar èacceso.
](6).
Attenzione –Batteria
Avvertenza –Operazione di carica/
15. Cura emanutenzione
Pulireilprodotto unicamente con un panno che non
lascia pelucchi eappena inumidito enon ricorrerea
detergenti aggressivi.
16. Esclusione di garanzia
Hama GmbH &Co.KGnon si assume alcuna
responsabilità per idanni derivati dal montaggio o
l‘utilizzo scorretto del prodotto, nonché dalla mancata
osservanza delle istruzioni per l‘uso e/o delle indicazioni
di sicurezza.
17. Assistenza esupporto
In caso di domande sul prodotto, rivolgersi alla
Consulenza prodotto Hama.
Hotline: +49 9091 502-115 (ted./ing.)
Ulteriori informazioni sul supporto sono disponibili qui:
www.hama.com
18. Indicazioni di smaltimento
Informazioni per protezione ambientale:
Dopo l’implementazione della Direttiva Europea
2012/19/EU e2006/66/EU nel sistema legale
nazionale, ci sono le seguenti applicazioni: Le
apparecchiatureelettriche ed elettroniche ele
batterie non devono esseresmaltite con iriuti
domestici. Iconsumatori sono obbligati dalla legge a
restituireIdispositivi elettrici ed elettronici elebatterie
alla ne della lorovita utile ai punti di raccolta pubblici
preposti per questo scopo onei punti vendita. Dettagli
di quanto riportato sono deniti dalle leggi nazionali di
ogni stato. Questo simbolo sul prodotto, sul manuale
d’istruzioni osull’imballo indicano che questo prodotto
èsoggetto aqueste regole. Riciclando, ri-utilizzando i
materiali outilizzando sotto altraforma ivecchi
prodotti/le batterie, darete un importante contributo
alla protezione dell’ambiente.
19. Dichiarazione di conformità
Il fabbricante, Hama GmbH &CoKG, dichiara
che il tipo di apparecchiaturaradio [00113776]
èconforme alla direttiva 2014/53/UE. Il testo
completo della dichiarazione di conformità UE è
disponibile al seguente indirizzo Internet:
www.hama.com->00113776 ->Downloads.
Bande di frequenza
Massima potenza aradiofrequenza
trasmessa
2.40GHz ~
2.48HGz
5mW EIRP
39
Page 38

20. Dati tecnici
Tecnologia
Bluetooth
®
Bluetooth
®
v2.1 +EDR
Proli supportati A2DP,AVRCP
Frequenza per le
trasmissioni
Bluetooth
Potenza di trasmissione
Portata
Bluetooth
®
®
Bluetooth
®
2.40GHz ~2.48HGz
Max. 10 dBm
10 m
N. max. dispositivi accoppiati 1
Potenza
Sound System 2.1
Gamma di frequenza del dispositivo SoundZbar: 160-
Frequenza
20000 Hz
Gamma di fr
equenza del Subwoofer 20-
Totale 100 W
Max. Potenza musicale
SoundZbar 40 W
Subwoofer 60 W
Impedenza 6 Ω
Distorsione THD
≤
0.5% (1K, 1W)
3,5 mm presa stereo entrata AUX
Attacchi
Ingresso ottico
Ingresso alimentazione
Alimentazione di tensione 230 V~50Hz0.4 A
160 Hz
Batteria SoundZbar
Tipo di batteria 7.4V Li-Ion min. 2550mAh /18.87 Wh
Tempo di carica ~3-4h
Via Bluetooth ~7h
Autonomia
Via AUX: ~12h
(in base al volume ealcontenuto audio)
Dimensioni (LxPxA) /Peso
Totale 5.1 kg
Peso
SoundZbar 1.3kg
Subwoofer 3.8kg
Dimensioni
SoundZbar 485 x68x72mm
Subwoofer 250 x270 x250 mm
40
Page 39

N Gebruiksaanwijzing
Bedieningselementen en weergaven SoundZbar
A.
1. [POWER]
2. [SOURCE] voor selectie van de ingangsmodus
3. [MODE] voor selectie van de soundmodus
4. [PAIR] voor verbreken van de Bluetooth verbinding
5. NFC interface
6. [
] Mute-functie
7. VOL +/-
8. Status-LED optische ingang
9. Status-LED AUX
10. Status-LED Bluetooth
11. Status-LED gaming Modus
12. Status-LED musik Modus
13. Status-LED cinema Modus
B. Achterzijde SoundZbar
1. Optical In poort
2. AUX IN poort
3. Status-LED opladen
4. Voedingskabel /DC-IN
C. Subwoofer
1. Schakelaar In/Uit
2. Draaiknop voor regelen bas
3. Status-LED verbinding subwoofer en SoundZbar
Hartelijk dank dat uvoor een product van Hama heeft
gekozen. Neem de tijd om de volgende aanwijzingen
en instructies volledig door te lezen. Bergdeze
gebruiksaanwijzing vervolgens op een goede plek
op zodat uhem als naslagwerk kunt gebruiken.
Op zodat uhem als naslagwerk kunt gebruiken.
Mocht uhet toestel verkopen, geeft udan ook deze
gebruiksaanwijzing aan de nieuwe eigenaar.
1. Verklaring van waarschuwingssymbolen en
instructies
Gevaar voor een elektrische schok
Dit symbool duidt op gevaar bij aanraking van nietgeïsoleerde onderdelen van het product, welke mogelijk
onder een zodanig gevaarlijke spanning staan, dat het
gevaar voor een elektrische schok aanwezig is.
Waarschuwing
Wordtgebruikt voor veiligheidsinstructies of om de
aandacht te trekken op bijzonderegevaren en risico‘s.
2. Verklaring symbolen van de kenmerken van
het product
•
•
3. Inhoud van de verpakking
•SoundZbar
•subwoofer
•audiokabel 3,5 mm
•voedingsadapter
•deze bedieningsinstructies
4. Veiligheidsinstructies
• Het product is bedoeld voor niet-commercieel
• Gebruik het product niet in de onmiddellijke nabijheid
• Bescherm het product tegen vuil, vocht en oververhitting
• Elektrische apparaten dienen buiten het bereik van
• Laat het product niet vallen en stel het niet bloot aan
• Gebruik het product niet buiten de in de technische
• Gebruik het product niet binnen omgevingen, waarin
• Houd rekening met anderen. Grote geluidsvolumen
• Open het product niet en gebruik het niet meer als het
• De accu is vast ingebouwd en kan niet worden
• Het verpakkingsmateriaal mag absoluut niet in handen
• Het verpakkingsmateriaal direct en overeenkomstig de
• Verander niets aan het toestel. Daardoor vervalt elke
•Houdt uhet product uit de buurt van druppelende of
Het product is uitsluitend bedoeld voor
gebruik binnen gebouwen.
Elektrisch apparaat van de beschermingsklasse
II (dubbel geïsoleerd).
privegebruik in huiselijke kring.
van een verwarming of anderewarmtebronnen en stel
het niet bloot aan directe zonnestralen.
en gebruik het alleen in droge omgevingen.
kinderen gehouden te worden!
zwareschokken of stoten.
gegevens vermelde vermogensgrenzen.
elektronische apparatuur niet is toegestaan.
kunnen uw omgeving storen of benadelen.
beschadigd is.
verwijderd, voer het product derhalve als één geheel af
overeenkomstig de wettelijke voorschriften.
van kinderen komen; verstikkingsgevaar.
lokaal geldende afvoervoorschriften afvoeren.
aanspraak op garantie.
spattende vloeistoffen en plaats geen met vloeistof
gevulde voorwerpen, bijv.een vaas, op het product.
Aanwijzing
Wordtgebruikt voor extrainformatie of belangrijke
informatie.
41
Page 40

Gevaar voor een elektrische schok
Aanwijzing -bij de eerste maal inschakelen
• Open het product niet en gebruik het niet meer bij
beschadigingen.
• Gebruik het product niet indien de AC-adapter,de
adapterkabel of de voedingskabel is beschadigd.
• Probeer het product niet zelf te onderhouden
of te repareren. Laat onderhouds- en
reparatiewerkzaamheden door vakpersoneel
uitvoeren.
5. Ingebruikneming en werking
Aanwijzing
• Uheeft de mogelijkheid om de product op
netvoeding en op accu‘s te laten werken. Teneinde
de product op netvoeding te gebruiken, hoeft deze
slechts op het lichtnet te worden aangesloten (zie
hoofdstuk 5). Teneinde de product op accu‘s te
gebruiken, dienen deze vooraf volledig te worden
opgeladen (zie hoofdstuk 14).
Waarschuwing
• Sluit het product alleen aan op een daarvoor
geschikt en intact stopcontact. Het stopcontact
moet in de buurt van het product zijn aangebracht
en goed bereikbaar zijn.
• Het product met behulp van de aan/uit schakelaar
van het net scheiden –indien deze niet ter
beschikking is, trek dan de netstekker uit het
stopcontact.
• Het stopcontact moet altijd goed toegankelijk
zijn.
• Indien het product gedurende langeretijd niet
wordt gebruikt, dan dient udit van
het spanningsnet te scheiden.
• Sluit de voedingskabels van de SoundZbar en van de
subwoofer op correct geïnstalleerde stopcontacten
aan.
• Druk op [POWER](1) teneinde de SoundZbar in te
schakelen.
• Druk op de schakelaar In/Uit (1) teneinde de
subwoofer in te schakelen.
• De status-LED van de verbinding (3) op de subwoofer
begint blauw te knipperen.
• Na het inschakelen wordt de verbinding tussen
de SoundZbar en de subwoofer automatisch via
Bluetooth tot stand gebracht.
• Na een succesvolle verbinding brandt de status-LED
van de verbinding (3) op de subwoofer constant
blauw.
6. De eerste maal een Bluetooth-verbinding tot
stand brengen (pairing/koppelen)
Via Bluetooth kunt uuweindapparatuur met de
SoundZbar verbinden en deze gebruiken als player voor
audiosignalen.
Aanwijzing –
Bluetooth
®
• Controleer of uw mobiele eindapparaat
(smartphone, tablet, etc.) is uitgerust met
Bluetooth.
• Houd er rekening mee dat het bereik van Bluetooth
max. 10 meter bedraagt, zonder hindernissen zoals
wanden, personen, etc.
• Het kan gebeuren dat de verbinding wordt
verstoorddoor andereBluetooth-apparaten/
verbindingen in de omgeving.
• De SoundZbar kan altijd maar met één eindtoestel
worden verbonden.
• Houd er rekening mee dat de compatibiliteit
afhankelijk is van de ondersteunde Bluetoothproelen en de gebruikte Bluetooth-versies
(zie: Technische gegevens, handleiding van het
gebruikte eindapparaat)
• Controleer of uw eindapparaat met Bluetoothfunctie is ingeschakeld en of de Bluetooth-functie is
geactiveerd.
• Activeer door bij herhaling op [SOURCE](2)te
drukken op de SoundZbar de Bluetooth modus.
• De status-LED van de Bluetooth verbinding (10)
begint blauw te knipperen.
• Open de Bluetooth instellingen op uw eindtoestel
en wacht totdat in de lijst van gevonden Bluetooth
apparatuur de uRage SoundZbar wordt weergegeven.
• Selecteer de uRage SoundZbar in de lijst van
beschikbareapparatuur en wacht totdat de
SoundZbar als zijnde verbonden in de Bluetooth
instellingen van uw eindtoestel wordt weergegeven.
• De status-LED van de Bluetooth verbinding (10)
brandt nu constant blauw.
• Start en regel de audioweergave via het eindtoestel.
42
Page 41

Aanwijzing –
• Sommige toestellen hebben voor het tot stand
brengen van de verbinding met een ander
Bluetooth-toestel een passwordnodig.
• Voer voor de verbinding met de radio het
wachtwoord0000 in als uw eindapparaat daarnaar
vraagt.
7. De eerste maal een Bluetooth-verbinding tot
stand brengen (pairing/koppelen) via NFC
• Controleer dat NFC door uw smartphone wordt
ondersteunt en is geactiveerd.
• Activeer door bij herhaling op [SOURCE](2)te
drukken op de SoundZbar de Bluetooth modus.
• De status-LED van de Bluetooth verbinding (10)
begint blauw te knipperen.
• Raak met uw smartphone de NFC interface (5) op de
soundZbar aan.
• De status-LED van de Bluetooth verbinding (10)
brandt nu constant blauw.
• Start en regel de audioweergave via het eindtoestel.
8. Bluetooth-verbinding verbreken
• Houd [PAIR](4) gedurende ca. 2seconden ingedrukt
teneinde de Bluetooth verbinding met uw eindtoestel
te verbreken.
• De SoundZbar kan nu met een ander eindtoestel
worden verbonden. (zie hoofdstuk 5)
9. Verbinding via AUX-IN
Via de analoge audio-ingang AUX-IN kunt utalrijke
eindtoestellen (bijv.spelconsole, smartphone, tablet-pc,
MP3-player enz.) alsmede oudereanaloge bronnen
(CD-/DVD-player enz.) op de SoundZbar aansluiten en
hun audiosignaal via de SoundZbar weergeven.
Aanwijzing
• Schakel de SoundZbar uit voordat ueen eindtoestel
daarop aansluit.
• De kabel niet knikken of inklemmen.
• Sluit uw eindtoestel via de AUX-IN poort (2) met
behulp van de meegeleverde audiokabel 3,5 mm
(stereokabel) op de SoundZbar aan.
• Druk op [POWER](1) teneinde de SoundZbar in te
schakelen.
• Activeer door bij herhaling op [SOURCE](2)te
drukken op de SoundZbar de AUX-modus.
• De status-LED van de AUX-modus (9) brandt constant.
• Start en regel de audioweergave via het eindtoestel.
Bluetooth®-wachtwoord
10. Verbinding via optische audiokabel
Via de digitale audio-ingang van de SoundZbar
kunt uuweindtoestel (bijv.spelconsole, tv-toestel
enz.) aansluiten en het audiosignaal daarvan via de
SoundZbar weergeven.
Aanwijzing
• Schakel de SoundZbar uit voordat ueen eindtoestel
daarop aansluit.
• Verwijder vóór het aansluiten de beschermkapjes
van beide einden van de optische signaalkabel.
• De kabel niet knikken of inklemmen.
• Sluit ueen optische signaalkabel op de optische
audio-ingang (1) van de SoundZbar en op de optische
audio-uitgang van uw eindtoestel aan.
• Druk op [POWER](1) teneinde de SoundZbar in te
schakelen.
• Activeer door bij herhaling op [SOURCE](2)te
drukken op de SoundZbar de OPT-modus.
• De status-LED van de OPT-modus (8) brandt constant.
• Start en regel de audioweergave via het eindtoestel.
11. Soundmodi
Voor de weergave van uw audiosignalen heeft udekeuze
uit drie verschillende modi:
De gaming modus activeert bovendien meer hoge en lage
tonen voor een beteregaming-belevenis.
De muziek modus activeert een lineairefunctie van de
frequentie teneinde een veelvoud aan muziekstijlen krachtig
te kunnen afspelen.
De cinema modus activeert een stereofonisch effect
waardoor ieder geluidsdetail wordt waargenomen.
• Druk bij herhaling op [MODE](3) teneinde de
verschillende soundmodi te selecteren.
• De status-LED (11) van de gaming modus brandt
constant indien de gaming-modus werdgeselecteerd.
• De status-LED (12) van de muziek modus brandt
constant indien de muziek-modus werdgeselecteerd.
• De status-LED (13) van de cinema modus brandt
constant indien de cinema-modus werdgeselecteerd.
12. Regeling bas
• Draai de draaiknop (2) op de subwoofer teneinde de
bastonen te intensiveren of te reduceren.
13. Regeling geluidsvolume
• Druk op [VOLUME]+/- (7) op de SoundZbar teneinde
het geluidsvolume te verhogen of te verlagen.
• Druk op [
modus te schakelen.
](6) teneinde de SoundZbar in de mute-
43
Page 42

14. De SoundZbar op accu‘s gebruiken
Waarschuwing –Accu
• Gebruik voor het opladen uitsluitend de
meegeleverde voedingsadapter.
• Gebruik defecte laadapparatuur niet meer en
probeer deze niet te repareren.
• Opbergen, opladen en gebruiken bij extreme
temperaturen voorkomen.
• Indien de accu’sgedurende langeretijd worden
opgeborgen, dan dienen ze ten minste elke 3
maanden te worden opgeladen.
• De SoundZbar beschikt over een oplaadbareaccu.
Vóór het eerste gebruik dient de accu volledig te
worden opgeladen.
• Controleer dat de SoundZbar is uitgeschakeld voordat
met het opladen wordt begonnen.
• Start het opladen door de meegeleverde
voedingsadapter op de voedingskabel (4) en op een
stopcontact aan te sluiten.
• De status-LED opladen (3) brandt tijdens het opladen
constant groen.
• Het kan max. 4uur duren totdat de accu volledig is
opgeladen.
• Zodradeaccu volledig is opgeladen gaat de statusLED opladen (3) uit.
• Aansluitend alle kabelverbindingen losnemen.
Aanwijzing –Opladen/ accucapaciteit
• Het volledig opladen duurt ca. 3-4 uur.
• Indien de accucapaciteit minder dan 10%
bedraagt, dan knippert de status-LED opladen (3)
snel rood. Deze informatie ontvangt ualleen bij
een ingeschakelde SoundZbar.
15. Onderhoud en verzorging
Reinig dit product uitsluitend met een pluisvrije, licht
vochtige doek en maak geen gebruik van agressieve
reinigingsmiddelen.
17. Service en support
Neem bij vragen over het product contact op met de
afdeling Productadvies van HAMA.
Hotline: +49 9091 502-115 (Duits/Engels)
Meer support-informatie vindt uhier:
www.hama.com
18. Aanwijzingen over de afvalverwerking
Notitie aangaande de bescherming van het
milieu:
Tengevolge van de invoering van de Europese
Richtlijn 2012/19/EU en 2006/66/EU in het
nationaal juridisch system, is het volgende van
toepassing: Elektrische en elektronische
apparatuur,zoals batterijen mag niet met het huisvuil
weggegooid worden. Consumenten zijn wettelijk
verplicht om electrische en elctronische apparaten zoals
batterijen op het einde van gebruik in te dienen bij
openbareverzamelplaatsen speciaal opgezet voor dit
doeleinde of bij een verkooppunt. Verderespecicaties
aangaande dit onderwerp zijn omschreven door de
nationale wet van het betreffende land. Dit symbool op
het product, de gebruiksaanwijzing of de verpakking
duidt erop dat het product onderworpen is aan deze
richtlijnen. Door te recycleren, hergebruiken van
materialen of anderevormen van hergebruiken van
oude toestellen/batterijen, levert ueen grote bijdrage
aan de bescherming van het mileu.
19. Conformiteitsverklaring
Hierbij verklaar ik, Hama GmbH &CoKG, dat
het type radioapparatuur [00113776] conform
is met Richtlijn 2014/53/EU.Devolledige tekst
van de EU-conformiteitsverklaring kan worden
geraadpleegd op het volgende internetadres:
www.hama.com->00113776 ->Downloads.
Frequentieband(en)
Maximaal radiofrequent vermogen 5mW EIRP
2.40GHz ~
2.48HGz
16. Uitsluiting van garantie en aansprakelijkheid
Hama GmbH &CoKGaanvaardt geen enkele
aansprakelijkheid of garantieclaims voor schade of
gevolgschade, welke door ondeskundige installatie,
montage en ondeskundig gebruik van het product
ontstaan of het resultaat zijn van het niet in acht nemen
van de bedieningsinstructies en/of veiligheidsinstructies.
44
Page 43

20. Technische specificaties
Bluetooth® technologie Bluetooth
®
v2.1 +EDR
ondersteunde proelen A2DP,AVRCP
Frequentie voor de
Bluetooth® -overdracht
Bluetooth® -zendvermogen
Bluetooth® -bereik
2.40GHz ~2.48HGz
Max. 10 dBm
10 m
Max. gekoppelde toestellen 1
Vermogen
Soundsysteem 2.1
Frequentie
Frequentiebereik SoundZbar: 160 -20000 Hz
Frequentiebereik subwoofer: 20 -160 Hz
totaal 100 W
Max. Muziekvermogen
SoundZbar 40 W
Subwoofer 60 W
Impedantie 6 Ω
Vervorming THD
≤
0.5% (1K, 1W)
AUX-IN stereostekker 3,5 mm
Aansluitpunten
Optische ingang
Power ingang
Voedingsspanning 230 V~50Hz0.4 A
Accu SoundZbar
Type accu 7.4V Li-Ion min. 2.550 mAh /18,87 Wh
Oplaadtijd ~3-4h
via Bluetooth® ~7h
Gebruikstijd
via AUX ~12h
(afhankelijk van het geluidsvolume en audio-inhoud
Afmetingen (B xDxH) /gewicht
totaal 5.1 kg
Gewicht
SoundZbar 1.3kg
Subwoofer 3.8kg
Afmetingen
SoundZbar 485 x68x72mm
Subwoofer 250 x270 x250 mm
45
Page 44

J Οδηγίες χρήσης
A. Στοιχεία χειρισμού και ενδείξεις SoundZbar
1. [POWER]
2. [SOURCE] για επιλογή της λειτουργίας εισόδου
3. [MODE] για επιλογή της λειτουργίας ήχου
4. [PAIR] για αποσύνδεση της σύνδεσης Bluetooth
5. Διεπαφή NFC
6. [ ] Λειτουργία σίγασης
7. VOL +/-
8. Λυχνία LED κατάστασης οπτικής εισόδου
9. Λυχνία LED κατάστασης εισόδου AUX
10. Λυχνία LED κατάστασης σύνδεσης Bluetooth
11. Λυχνία LED κατάστασης λειτουργίας παιχνιδιού
12. Λυχνία LED κατάστασης λειτουργίας μουσικής
13. Λυχνία LED κατάστασης αναπαραγωγής ταινιώv
B. Πίσω πλευρά SoundZbar
1. Υποδοχή οπτικής εισόδου
2. Υποδοχή εισόδου AUX
3. Λυχνία LED κατάστασης φόρτισης
4. Υποδοχή καλωδίου ρεύματος
C. Subwoofer
1. Διακόπτης ενεργοποίησης/απενεργοποίησης
2. Περιστρεφόμενος ρυθμιστής μπάσων
3. Λυχνία LED κατάστασης σύνδεσης μεταξύ subwoofer
και SoundZbar
Σας ευχαριστούμε για την αγορά αυτού τουπροϊόντος. της
Hama! Διαβάστε προσεκτικάτις παρακάτω οδηγίες και
υποδείξεις. Στη συνέχεια, φυλάξτε αυτότοεγχειρίδιο σε
ασφαλές μέρος για μελλοντική χρήση. Σε περίπτωση που
πουλήσετε της συσκευή, παραδώστε αυτότοεγχειρίδιο
στον επόμενοαγοραστή.
1. Επεξήγηση συμβόλων προειδοποίησης και
υποδείξεων
/DC- IN
Κίνδυνος ηλεκτροπληξίας
Αυτό το σύμβολο προειδοποιεί για κίνδυνοαπό
επαφή με μη μονωμέναεξαρτήματατου προϊόντος,
τα οποία μπορεί να φέρουν τόση τάση ώστε να
προκληθεί ηλεκτροπληξία.
Προειδοποίηση
Χρησιμοποιείται για τη σήμανση υποδείξεων
ασφαλείας ήγια να επιστήσει την προσοχήσε
ιδιαίτερους κινδύνους.
Υπόδειξη
Χρησιμοποιείται για τη σήμανση επιπλέον
πληροφοριών ήσημαντικών υποδείξεων.
2. Επεξήγηση συμβόλων της ετικέτας προϊόντος
• Το προϊόν προορίζεται για χρήση εντός
κτιρίων.
•
Ηλεκτρική συσκευή κλάσης προστασίας II (με
διπλή μόνωση).
3. Περιεχόμενα συσκευασίας
•SoundZbar
•Subwoofer
• Καλώδιοήχου 3,5 mm
• Προσαρμογέας ρεύματος
• Αυτό τοεγχειρίδιο χρήσης
4. Υποδείξεις ασφαλείας
• Το προϊόν προορίζεται για σκοπούς οικιακής χρήσης.
• Μην χρησιμοποιείτε το προϊόν κοντάσεκαλοριφέρ,
άλλες πηγές θερμότητας ήσεσημεία όπου δέχεται
άμεση ηλιακή ακτινοβολία
• Πρέπει να προστατεύετε το προϊόν από βρομιά,
υγρασία καιυπερθέρμανση καινατοχρησιμοποιείτε
μόνοσεστεγνάπεριβάλλοντα.
• Μην αφήνετε τα παιδιά να αγγίζουν αυτή ή
οποιαδήποτε άλλη ηλεκτρική συσκευή.
• Το προϊόν δεν επιτρέπεται να πέφτει κάτω, ούτε καινα
δέχεται δυνατάχτυπήματα.
• Μην χρησιμοποιείτε τη συσκευή εκτός των
ορίων απόδοσης που περιγράφονται στατεχνικά
χαρακτηριστικά.
• Μην χρησιμοποιείτε το προϊόν σε περιοχέςόπου δεν
επιτρέπονται ηλεκτρονικές συσκευές.
• Προσέξτε. Οι υψηλές εντάσεις μπορεί να ενοχλήσουν
ήναβλάψουν τους γύρω σας.
• Μην ανοίγετε το προϊόν καιμην το χρησιμοποιείτε αν
χαλάσει.
• Ημπαταρία είναι ενσωματωμένη καιδεν μπορεί να
αφαιρεθεί, γι‘ αυτόπρέπει να απορρίψετε ολόκληρο
το προϊόν σύμφωναμετις ισχύουσες νομικές
διατάξεις.
• Τα παιδιά δεν επιτρέπεται να έρχονται σε επαφή με το
υλικότης συσκευασίας, υπάρχεικίνδυνος ασφυξίας.
• Απορρίψτε κατευθείαν το υλικόσυσκευασίας
σύμφωναμετουςισχύοντες τοπικούς κανονισμούς
απόρριψης.
• Μην κάνετε μετατροπές στη συσκευή. Κατ‘ αυτόν τον
τρόπο παύει να ισχύει ηεγγύηση.
• Μην εκθέτετε το προϊόν σε σταγόνες ήπιτσίλισμα υγρών
καιμην τοποθετείτε αντικείμεναγεμάταμευγρά, π.χ.
βάζα, πάνω στοπροϊόν.
46
Page 45

Κίνδυνος ηλεκτροπληξίας
Υπόδειξη – Κατά την πρώτη ενεργοποίηση
• Μην ανοίγετε τη συσκευή καιμην τη
χρησιμοποιείτε αν χαλάσει.
• Μην χρησιμοποιείτε τη συσκευή αν έχουν
υποστεί ζημιά ομετασχηματιστής, το καλώδιο του
μετασχηματιστή ήτοκαλώδιο τουρεύματος.
• Μην επιχειρήσετε να συντηρήσετε ήνα
επισκευάσετε τη συσκευή εσείς οι ίδιοι. Οι
εργασίες συντήρησης πρέπει να γίνονται από
εξειδικευμέναάτομα.
5. Έναρξη χρήσης και λειτουργία
Υπόδειξη
• Μπορείτε να χρησιμοποιήσετε το προϊόν με
τροφοδοσία ρεύματος καιμπαταρίας. Γιανα
χρησιμοποιήσετε το προϊόν με τροφοδοσία
ρεύματος, πρέπει απλώς να το συνδέσετε
στορεύμα (βλέπε κεφάλαιο 5). Γιανατο
χρησιμοποιήσετε με τροφοδοσία μπαταρίας, πρέπει
να το έχετε φορτίσει πλήρως εκ των προτέρων
(βλέπε κεφάλαιο 14).
Προειδοποίηση
• Το προϊόν πρέπει να λειτουργεί μόνοσυνδεδεμένο
σε κατάλληλη πρίζα. Ηπρίζαπρέπει να βρίσκεται
κοντάστο προϊόν καιναείναι εύκολαπροσβάσιμη
• Αποσυνδέστε το προϊόν από το ρεύμα μέσω του
γενικού διακόπτη – αν δεν υπάρχειδιακόπτης
τραβήξτε το καλώδιο από την πρίζα.
• Σταπολύπριζαπροσέξτε ώστε οι συνδεδεμένες
συσκευές να μην ξεπερνούν την επιτρεπόμενη
συνολική κατανάλωση ισχύος.
• Αφαιρέστε το προϊόν από το δίκτυο ρεύματος, εάν
δεν το χρησιμοποιείτε .
• Συνδέστε το καλώδιο ρεύματος του SoundZbar καιτου
subwoofer σε κατάλληλη πρίζαρεύματος.
• Πιέστε το πλήκτρο [POWER](1), για να
ενεργοποιήσετε το SoundZbar.
• Πατήστε το διακόπτη ενεργοποίησης/απενεργοποίησης
(1), για να ενεργοποιήσετε το subwoofer.
• Ηλυχνία LED κατάστασης σύνδεσης (3) στο subwoofer
θα ξεκινήσει να αναβοσβήνει με μπλε χρώμα.
• Μετάτην ενεργοποίηση, το SoundZbar θα συνδεθεί
αυτόματαμετοsubwoofer μέσω Bluetooth.
• Αφού συνδεθούν, ηλυχνία LED κατάστασης
σύνδεσης (3) στο subwoofer θα ανάβει σταθερά με
μπλε χρώμα.
6. Πρώτη σύνδεση Bluetooth (ζεύξη)
Μέσω του Bluetooth μπορείτε να συνδέσετε την
τελική συσκευή σας με το SoundZbar καινατην
χρησιμοποιήσετε ως συσκευή αναπαραγωγής για
σήματαήχου.
Υπόδειξη –
Bluetooth
®
• Ελέγξτε εάν ηκινητή τελική συσκευή σας
(smartphone, tablet PC, κ.λπ.) είναι συμβατή με
την τεχνολογία Bluetooth.
• Λάβετε υπόψη ότι ηεμβέλεια του Bluetooth
δεν ξεπερνάτα10 μέτρα, χωρίς εμπόδια, όπως
τοίχους, άτομα κ.λπ.
• Ησύνδεση μέσω άλλων συσκευών / συνδέσεων
Bluetooth στοχώροενδέχεται να δέχεται
παρεμβολές.
• Το SoundZbar μπορεί να συνδεθεί με μία μόνο
τελική συσκευή.
• Λάβετε υπόψη ότι ησυμβατότηταεξαρτάται από
τα υποστηριζόμεναπροφίλ Bluetooth καιαπό
τις χρησιμοποιούμενες εκδόσεις Bluetooth. (Βλ.:
Τεχνικάχαρακτηριστικά, Οδηγίες χειρισμού της
χρησιμοποιούμενης συσκευής)
• Βεβαιωθείτε ότι ησυσκευή σας που υποστηρίζει
Bluetooth είναι ενεργοποιημένη καιότι το Bluetooth
είναι επίσης ενεργοποιημένο.
• Ενεργοποιήστε τη λειτουργία Bluetooth πατώντας
επανειλημμένατοπλήκτρο [SOURCE](2) στο
SoundZbar.
• Ηλυχνία LED κατάστασης της σύνδεσης Bluetooth
(10) θα ξεκινήσει να αναβοσβήνει με μπλε χρώμα.
• Ανοίξτε τις ρυθμίσεις Βluetooth στην τελική συσκευή
σας καιπεριμένετε μέχρι να προβληθεί το uRage
SoundZbar στη λίστατων συσκευών Bluetooth που
βρέθηκαν.
• Επιλέξτε το uRage SoundZbar από τη λίστατων
διαθέσιμων συσκευών καιπεριμένετε μέχρι το
SoundZbar να εμφανιστεί στις ρυθμίσεις Bluetooth της
συσκευής σας ως συνδεδεμένο.
• Κατόπιν, ηλυχνία LED κατάστασης της σύνδεσης
Bluetooth (10) θα ανάβει σταθερά με μπλε χρώμα.
• Ξεκινήστε την αναπαραγωγή ήχου καιχειριστείτε την
μέσω της τελικής συσκευής.
47
Page 46

Υπόδειξη – Κωδικόςπρόσβασης
Bluetooth
®
• Ορισμένες συσκευές χρειάζονται κωδικό
πρόσβασης για τη δημιουργία σύνδεσης με άλλη
συσκευή Bluetooth.
• Γιατησύνδεση με το ραδιόφωνο, πληκτρολογήστε
τονκωδικό 0000, εφόσον σας ζητηθεί από τη
τελική συσκευή.
7. Πρώτη σύνδεση Bluetooth (ζεύξη) μέσω NFC
• Βεβαιωθείτε ότι ηλειτουργία NFC υποστηρίζεται από
το smartphone καιείναι ενεργοποιημένη.
• Ενεργοποιήστε τη λειτουργία Bluetooth πατώντας
επανειλημμένατοπλήκτρο [SOURCE](2) στο
SoundZbar.
• Ηλυχνία LED κατάστασης της σύνδεσης Bluetooth
(10) θα ξεκινήσει να αναβοσβήνει με μπλε χρώμα.
• Φέρτε σε επαφή το smartphone με τη διεπαφή NFC
(5) του SoundZbar.
• Κατόπιν, ηλυχνία LED κατάστασης της σύνδεσης
Bluetooth (10) θα ανάβει σταθερά με μπλε χρώμα.
• Ξεκινήστε την αναπαραγωγή ήχου καιχειριστείτε την
μέσω της τελικής συσκευής.
8. Αποσύνδεση σύνδεσης Bluetooth
• Πιέστε παρατεταμένατοπλήκτρο [PAIR](4) για 2
δευτερόλεπταπερίπου, για να διακόψετε τη σύνδεση
Bluetooth με την τελική συσκευή σας.
• Κατόπιν, μπορείτε να συνδέσετε το SoundZbar με μια
άλλη συσκευή.(βλέπε κεφάλαιο 5)
9. Σύνδεση μέσω της βοηθητικής εισόδου
Μέσω της αναλογικής εισόδου ήχου AUX μπορείτε
να συνδέσετε διάφορες τελικές συσκευές (π.χ.
κονσόλες παιχνιδιών,smartphone, tablet PC, συσκευές
αναπαραγωγής MP3 κ.λπ.). καθώς καιαναλογικές πηγές
παλαιότερου τύπου (π.χ. συσκευές αναπαραγωγής CD/
DVD κ.λπ.) στο SoundZbar καινααναπαραγάγετε τα
σήματαήχουτους μέσωτου SoundZbar.
Υπόδειξη
• Απενεργοποιήστε το SoundZbar προτού συνδέσετε
μια τελική συσκευή.
• Μην τσακίζετε καιμην συνθλίβετε το καλώδιο.
• Συνδέστε την τελική συσκευή στην υποδοχή AUX
(2) του SoundZbar χρησιμοποιώντας το παρεχόμενο
καλώδιο ήχου 3,5 mm (καλώδιο ίσιου βύσματος).
• Πιέστε το πλήκτρο [POWER](1), για να
ενεργοποιήσετε το SoundZbar.
• Ενεργοποιήστε τη λειτουργία AUX πατώντας
επανειλημμένατοπλήκτρο [SOURCE](2) στο
SoundZbar.
48
• Ηλυχνία LED κατάστασης της λειτουργίας AUX (9) θα
ανάβει σταθερά.
• Ξεκινήστε την αναπαραγωγή ήχου καιχειριστείτε την
μέσω της τελικής συσκευής.
10. Σύνδεση μέσω του οπτικού καλωδίου ήχου
Μέσω της ψηφιακής εισόδου ήχου του SoundZbar,
μπορείτε να συνδέσετε την τελική συσκευή σας
(π.χ. κονσόλαπαιχνιδιών, τηλεόραση κ.λπ.) καινα
αναπαραγάγετε το σήμα ήχου της μέσω του SoundZbar.
Υπόδειξη
• Απενεργοποιήστε το SoundZbar προτού συνδέσετε
μια τελική συσκευή.
• Πριν από τη σύνδεση αφαιρέστε το προστατευτικό
κάλυμμα από τα δύο άκρα τουοπτικού καλωδίου
σήματος.
• Μην τσακίζετε καιμην συνθλίβετε το καλώδιο.
• Συνδέστε έναοπτικόκαλώδιο σήματος στην οπτική
είσοδο ήχου (1) του SoundZbar καιστην οπτική έξοδο
ήχου της τελικής συσκευής σας.
• Πιέστε το πλήκτρο [POWER](1), για να
ενεργοποιήσετε το SoundZbar.
• Ενεργοποιήστε τη λειτουργία OPT πατώντας
επανειλημμένατοπλήκτρο [SOURCE](2) στο
SoundZbar.
• Ηλυχνία LED κατάστασης της λειτουργίας OPT (8) θα
ανάβει σταθερά.
• Ξεκινήστε την αναπαραγωγή ήχου καιχειριστείτε την
μέσω της τελικής συσκευής.
11. Λειτουργίες ήχου
Μπορείτε να επιλέξετε ανάμεσα σε τρεις διαφορετικές
λειτουργίες για την αναπαραγωγή των σημάτων ήχου:
Ηλειτουργία παιχνιδιού ενεργοποιεί περισσότερες
συχνότητες μπάσων καιπρίμων για καλύτερη εμπειρία
παιχνιδιού. Ηλειτουργία μουσικής ενεργοποιεί ένα
γραμμικόεύρος συχνοτήτων, για δυναμική αναπαραγωγή
διάφορων ειδών μουσικής. Ηλειτουργία αναπαραγωγής
ταινιών ενεργοποιεί έναεφέ στερεοφωνικού ήχου, για να
αντιλαμβάνεστε κάθε ηχητική λεπτομέρεια.
• Πιέστε επανειλημμένατοπλήκτρο [MODE](3), για να
επιλέξετε μία από τις λειτουργίες ήχου.
• Ηλυχνία LED κατάστασης (11) της λειτουργίας
παιχνιδιού θα ανάβει σταθερά, αν επιλέξετε τη
λειτουργία παιχνιδιού.
• Ηλυχνία LED κατάστασης (12) της λειτουργίας
μουσικής θα ανάβει σταθερά, αν επιλέξετε τη
λειτουργία μουσικής.
• Ηλυχνία LED κατάστασης (13) της λειτουργίας
αναπαραγωγής ταινιών θα ανάβει σταθερά, αν
επιλέξετε τη λειτουργία αναπαραγωγής ταινιών.
12. Ρύθμιση μπάσων
• Περιστρέψτε τονπεριστρεφόμενορυθμιστή (2) στο
subwoofer, για να αυξήσετε ήναμειώσετε τα μπάσα.
Page 47

13. Ρύθμιση έντασης ήχου
• Πιέστε τα πλήκτρα [VOLUME]+/- (7) στο SoundZbar,
για να αυξήσετε/να μειώσετε την ένταση ήχου.
• Πιέστε το πλήκτρο [
σίγαση του SoundZbar.
14. Χρήση του SoundZbar στη λειτουργία
τροφοδοσίας μέσω μπαταρίας
Προειδοποίηση – Μπαταρία
• Χρησιμοποιήστε μόνοτοπαρεχόμενοτροφοδοτικό
για τη φόρτιση.
• ενικάμην χρησιμοποιείτε ελαττωματικούς φορτιστές
καιμην προσπαθείτε να τους επισκευάσετε.
• Αποφύγετε την αποθήκευση, τη φόρτιση καιτη
χρήση σε ακραίες θερμοκρασίες.
• Όταν το προϊόν αποθηκεύεται για μεγάλοχρονικό
διάστημα, πρέπει να φορτίζεται ανάτακτάχρονικά
διαστήματα (τουλάχιστον κάθε τρίμηνο).
• Το SoundZbar διαθέτει μια επαναφορτιζόμενη
μπαταρία. Πριν από την πρώτη χρήση ημπαταρία
πρέπει να είναι πλήρως φορτισμένη.
• Πριν από τη φόρτιση βεβαιωθείτε ότι το SoundZbar
είναι απενεργοποιημένο.
• Ξεκινήστε τη φόρτιση συνδέοντας το παρεχόμενο
τροφοδοτικόμετην υποδοχή καλωδίου ρεύματος (4)
καιμια πρίζα.
• Ηλυχνία LED κατάστασης φόρτισης (3) ανάβει
σταθερά με πράσινοχρώμα κατά τη διαδικασία
φόρτισης.
• Γιατην πλήρη φόρτιση της μπαταρίας μπορεί να
χρειαστούν έως και 4 ώρες.
• Όταν ημπαταρία φορτιστεί πλήρως, η LED
κατάστασης φόρτισης (3) θα σβήσει.
• Στη συνέχεια, αποσυνδέστε όλατακαλώδια καιτις
συνδέσεις ρεύματο.
Υπόδειξη – Διαδικασία φόρτισης/ Φορτίο
μπαταρίας
• Μια πλήρης φόρτιση διαρκεί περίπου 3-4 ώρες.
• Αν το φορτίο μπαταρίας είναι μικρότερο από
10%, ηλυχνία LED κατάστασης φόρτισης (3) θα
αναβοσβήνει γρήγορα με κόκκινοχρώμα. Αυτή η
ειδοποίηση θα εμφανιστεί μόνοόταντοSoundZbar
είναι ενεργοποιημένο.
15. Συντήρηση και φροντίδα
Καθαρίζετε αυτότοπροϊόν μόνομεέναελαφρώς
βρεγμένοπανί χωρίς χνούδια καιμην χρησιμοποιείτε
επιθετικάκαθαριστικά
](6), για να πραγματοποιήσετε
16. Απώλεια εγγύησης
Ηεταιρεία Hama GmbH &CoKGδεν αναλαμβάνει
καμία ευθύνη ήεγγύηση για ζημιές, οι οποίες
προκύπτουν από λανθασμένη εγκατάσταση και
συναρμολόγηση ήλανθασμένη χρήση τουπροϊόντος
ήμητήρηση των οδηγιών λειτουργίας και/ήτων
υποδείξεων ασφαλείας.
17. Σέρβις και υποστήριξη
Γιαερωτήσεις σχετικάμετοπροϊόν απευθυνθείτε στην
υπηρεσία εξυπηρέτησης πελατών της Hama.
Γραμμή υποστήριξης:+49 9091 502-115 (Γερμανικά/
Αγγλικά)
Περισσότερες πληροφορίες υποστήριξης θα βρείτε στη
διεύθυνση:www.hama.com
18. Υποδείξεις απόρριψης
Υπόδειξη σχετικάμετην προστασία
περιβάλλοντος:
Από τη στιγμή που ηΕυρωπαϊκή Οδηγία
2012/19/EU και 2006/66/EE ενσωματώνεται
στοεθνικόδίκαιο ισχύουν τα εξής: Οι ηλεκτρικές
καιοιηλεκτρονικές συσκευές καθώς καιοι
μπαταρίες δεν επιτρέπεται να πετιούνται σταοικιακά
απορρίμματα. Οι καταναλωτές υποχρεούνται από τον
νόμο να επιστρέφουν τις ηλεκτρικές καιηλεκτρονικές
συσκευές καθώς καιτις μπαταρίες στοτέλος της ζωής
τους σταδημόσια σημεία περισυλλογής που έχουν
δημιουργηθεί γι’ αυτότοσκοπό ήστα σημεία πώλησης.
Οι λεπτομέρειες ρυθμίζονται στη σχετική νομοθεσία. Το
σύμβολο πάνω στοπροϊόν, στοεγχειρίδιο χρήσης ήστη
συσκευασία παραπέμπει σε αυτές τις διατάξεις. Με την
ανακύκλωση, επαναχρησιμοποίηση των υλικών ήμε
άλλες μορφές χρησιμοποίησης παλιών συσκευών /
Μπαταριών συνεισφέρετε σημαντικάστην προστασία
τουπεριβάλλοντος. Στη Γερμανία ισχύουν αντίστοιχαοι
παραπάνω κανόνες απόρριψης σύμφωναμετον
κανονισμό για μπαταρίες καισυσσωρευτές.
19. Δήλωση συμμόρφωσης
Με την παρούσα ο/η Hama GmbH &CoKG,
δηλώνει ότι οραδιοεξοπλισμός [00113776]
πληροί την οδηγία 2014/53/ΕΕ. Το πλήρες
κείμενοτης δήλωσης συμμόρφωσης ΕΕ διατίθεται
στην ακόλουθη ιστοσελίδα στοδιαδίκτυο:
www.hama.com->00113776 ->Downloads.
Ζώνη συχνοτήτων/Ζώνες συχνοτήτων
Μέγιστη εκπεμπόμενη ισχύς 5mW EIRP
2.40GHz ~
2.48HGz
49
Page 48

20. Τεχνικά χαρακτηριστικά
Τεχνολογία Bluetooth® Bluetooth
®
v2.1 +EDR
Υποστηριζόμεναπροφίλ A2DP,AVRCP
Συχνότηταγια τη
μετάδοση μέσω Bluetooth®
Ισχύς μετάδοσης Bluetooth®
Εμβέλεια Bluetooth®
2.40GHz ~2.48HGz
Max. 10 dBm
10 m
Μέγ. αριθμός συνδεδεμένων συσκευών 1
Απόδοση
Ηχοσύστημα 2.1
Συχνότητα
Εύρος συχνοτήτων SoundZbar :160 –20000 Hz
Εύρος συχνοτήτων subwoofer: 20 –160 Hz
Συνολικά: 100 W
Μέγ. ισχύς αναπαραγωγής μουσικής
SoundZbar 40 W
Subwoofer 60 W
Αντίσταση 6 Ω
Παραμόρφωση THD
≤
0.5% (1K, 1W)
Είσοδος στερεοφωνικού βύσματος 3,5 mm AUX
Υποδοχές
Οπτική είσοδος
Είσοδος τροφοδοσίας
Τάση τροφοδοσίας 230 V~50Hz0.4 A
Μπαταρία SoundZbar
Τύπος μπαταρίας Ιόντων λιθίου 7,4V ελάχ.2550mAh /18,87Wh
Χρόνος φόρτισης ~3-4 ώρες
μέσω Bluetooth ~7ώρες
Χρόνος λειτουργίας
μέσω AUX ~12ώρες
(ανάλογα με την ένταση καιτοπεριεχόμενοήχου)
Διαστάσεις (Π x Β x Υ)/Βάρος
Συνολικά:5.1 kg
Βάρος
SoundZbar 1.3kg
Subwoofer 3.8kg
Διαστάσεις
SoundZbar 485 x68x72mm
Subwoofer 250 x270 x250 mm
50
Page 49

P Instrukcja obsługi
A. Elementy obsługi isygnalizacji SoundZbar
1. [POWER]
2. [SOURCE] do wyboru trybu wejścia
3. [MODE] do wyboru trybu dźwięku
4. [PAIR] do przerywania połączenia Bluetooth
5. Port NFC
6. [
] Wyciszanie dźwięku
7. VOL +/-
8. Dioda LED stanu wejścia optycznego
9. Dioda LED stanu AUX
10. Dioda LED stanu Bluetooth
11. Dioda LED stanu trybu Gry komputerowe
12. Dioda LED stanu trybu Muzyka
13. Dioda LED stanu trybu Kino
B. Tylna strona głośnika soundZbar
1. Gniazdo Optical In
2. Gniazdo AUX In
3. Dioda LED stanu ładowania
4. Przewód sieciowy /DC- IN
C. Głośnik subwoofer
1. Włącznik/wyłącznik zasilania
2. Pokrętłoregulacji niskich tonów
3. Dioda LED stanu połączenia głośników subwoofer
isoundZbar
Dziękujemy za zakup naszego produktu!
Przed pierwszym użyciem należydokładnie przeczytać
instrukcję obsługi. Instrukcję należyprzechować,gdyż
możebyćjeszcze potrzebna.
1. Objaśnienie symboli ostrzegawczych i
wskazówek
Ryzyko porażenia prądem
elektrycznym
Symbol ten wskazuje niebezpieczeństwo dotknięcia
nieizolowanych części produktu, którą mogą być
pod napięciem grożącym porażeniem prądem
elektrycznym.
Ostrzeżenie
Używane wcelu zwrócenia uwagi na szczególne
niebezpieczeństwo lub ryzyko.
Wskazówki
Używane wcelu zwrócenia uwagi na szczególnie
przydatne informacje.
2. Objaśnienie symboli występujących w
oznaczeniach produktów
•
•
3. Zawartość opakowania
•soundZbar
•subwoofer
•kabel audio 3,5 mm
•zasilacz sieciowy
•niniejsza instrukcja obsługi
4. Wskazówki bezpieczeństwa
• Produkt jest przeznaczony do prywatnego,
• Nie używać produktu wbezpośredniej bliskości
• Chronić produkt przed zanieczyszczeniem, wilgocią
• Trzymać urządzenie, jak wszystkie urządzenia
• Chronić produkt przed upadkiem isilnymi wstrząsami.
• Nie stosować produktu poza zakresem mocy podanym
• Nie używać produktu wmiejscach, gdzie nie jest
• Miej wzglądnaotoczenie. Wysoki poziom głośności
• Nie otwierać produktu inie używać go, gdy jest
• Akumulator jest zamontowany na stałeinie można
•Materiałyopakowaniowe trzymać koniecznie zdala
• Materiałyopakowaniowe należynatychmiast poddać
• Nie modykować urządzenia. Prowadzi to do utraty
•Trzymać produkt zdala od kapiących bądź
Produkt jest przeznaczony wyłącznie do
użytku wewnątrz budynków.
Urządzenie elektryczne II stopnia ochrony
(podwójnie izolowane)
niekomercyjnego użytku domowego.
ogrzewania, innych źródeł ciepłaani nie wystawiać go
na bezpośrednie promieniowanie słoneczne.
iprzegrzaniem oraz stosować go tylko wsuchym
otoczeniu.
elektryczne, zdala od dzieci!
wdanych technicznych.
dozwolone stosowanie urządzeń elektronicznych.
możezakłócać otoczenie lub wywierać na nie ujemny
wpływ.
uszkodzony.
go usunąć,poddać całyprodukt utylizacji zgodnie z
ustawowymi postanowieniami.
od dzieci, istnieje niebezpieczeństwo uduszenia.
utylizacji zgodnie zobowiązującymi przepisami
miejscowymi.
wszelkich roszczeń ztytuługwarancji.
tryskających cieczy inie umieszczać na produkcie
przedmiotów wypełnionych cieczą,np. akonów.
51
Page 50

Ryzyko porażenia prądem
Wskazówka –pierwsze włączenie
• Nie wolno otwierać urządzenia ani używać go, gdy
jest uszkodzone.
• Nie należyużywać urządzenia, jeżeli zasilacz, kabel
zasilacza lub kabel zasilający jest uszkodzony.
• Nie należyserwisować ani naprawiać urządzenia
samodzielnie. Wszelkie czynności serwisowe należy
pozostawić fachowcom.
5. Uruchamianie iobsługa
Wskazówki
• Istnieje możliwość zasilania głośnika produkt zsieci
lub zakumulatora. Wcelu korzystania zzasilania
głośnika produkt zsieci należypoprostu podłączyć
go do zasilania sieciowego (patrz rozdział 5).
Wcelu korzystania zzasilania głośnika produkt
zakumulatoranależywcześniej całkowicie go
naładować (patrz rozdział 14).
Ostrzeżenie
• Podłączać produkt tylko do odpowiedniego gniazda
wtykowego. Gniazdo wtykowe musi znajdować się
wpobliżupr
oduktu ibyćłatwo dostępne.
• Odłączać produkt od sieci za pomocą wyłącznika
zasilania –jeżeli nie jest on na wyposażeniu,
wyciągnąć przewód sieciowy zgniazda wtykowego.
• Wprzypadku korzystania zlistwy zasilającej należy
koniecznie sprawdzić,czy całkowity pobór mocy
wszystkich podłączonych urządzeń nie przekracza
całkowitej mocy znamionowej listwy.
• Jeśli urządzenie nie będzie używane przez dłuższy
okres, należyodłączyć je od źródłazasilania.
• Podłączyć kable sieciowe głośników soundZbar i
subwoofer do prawidłowo zamontowanych gniazd
sieciowych.
• Wcisnąć przycisk [POWER](1), aby włączyć głośnik
soundZbar.
• Wcisnąć włącznik/wyłącznik (1), aby włączyć głośnik
subwoofer.
• Dioda LED stanu połączenia (3) na głośniku
subwoofer zaczyna migać na niebiesko.
• Po włączeniu głośniki soundZbar isubwoofer łączą
się automatycznie za pomocą Bluetooth.
• Po pomyślnym nawiązaniu połączenia dioda LED
stanu połączenia (3) na głośniku subwoofer świeci
na niebiesko światłem ciągłym.
6. Pierwsze łączenie Bluetooth (pairing)
Poprzez łącze Bluetooth można połączyć urządzenia
końcowe zgłośnikiem soundZbar iużywać go jako
odtwarzacza sygnałuaudio.
Wskazówki –
Bluetooth
®
• Sprawdzić,czy posiadane mobilne urządzenie
końcowe (telefon komórkowy,itp.) jest wyposażone
w łącze Bluetooth.
• Pamiętać, żezasięg łącza Bluetooth wynosi maks.
10 metrów bez przeszkód jak ściany,osoby itp.
• Możesięzdarzyć, żepołączenie zostanie zakłócone
przez inne urządzenia Bluetooth /połączenia w
otoczeniu.
• Głośnik soundZbar można zawsze sparować tylko z
jednym urządzeniem końcowym
• Pamiętać, żekompatybilność zależyod
obsługiwanych proli Bluetooth oraz stosowanych
wersji Bluetooth. (patrz: Dane techniczne,
instrukcja obsługi stosowanego urządzenia
końcowego)
• Urządzenie końcowe Bluetooth musi być włączone i
łącze Bluetooth musi być aktywne.
• Wciskającwielokrotnie przycisk [SOURCE](2) na
głośniku soundZbar,włączyć tryb Bluetooth.
• Dioda LED stanu połączenia Bluetooth (10) zaczyna
migać na niebiesko.
• Otworzyć na urządzeniu końcowym ustawienia
Bluetooth ipoczekać,ażwliście znalezionych
urządzeń Bluetooth wyświetlony zostanie napis uRage
SoundZbar.
• Zlisty dostępnych urządzeń wybrać soundZbar uRage
soundZbar ipoczekać,ażgłośnik soundZbar zostanie
wyświetlony wustawieniach Bluetooth urządzenia
końcowego jako sparowany.
• Dioda LED stanu połączenia Bluetooth (10) świeci
teraz na niebiesko światłem ciągłym.
• Uruchomić iodpowiednio wyregulować odtwarzanie
audio na urządzeniu końcowym.
52
Page 51

Wskazówki –
hasło Bluetooth
®
• Niektóreurządzenia końcowe wymagają podania
hasładokonguracji połączenia zinnym
urządzeniem Bluetooth.
• Jeżeli na urządzeniu końcowym pojawi się
wezwanie do podania hasła, wpisać hasło0000 w
celu połączenia się zradia.
7. Pierwsze łączenie Bluetooth (pairing) poprzez
NFC
• Upewnić się, żesmartfon obsługuje połączenie NFC i
żejest ono włączone.
• Wciskającwielokrotnie przycisk [SOURCE](2) na
głośniku soundZbar,włączyć tryb Bluetooth.
• Dioda LED stanu połączenia Bluetooth (10) zaczyna
migać na niebiesko.
• Dotknąć smartfonem złącza NFC (5) na głośniku
soundZbar (5).
• Dioda LED stanu połączenia Bluetooth (10) świeci
teraz na niebiesko światłem ciągłym.
• Uruchomić iodpowiednio wyregulować odtwarzanie
audio na urządzeniu końcowym.
8. Przerywanie połączenia Bluetooth
• Wcisnąć iprzytrzymać przez ok. 2sekundy przycisk
[PAIR](4), aby rozłączyć połączenie Bluetooth z
urządzeniem końcowym.
• Terazmożna połączyć głośnik soundZbar zinnym
urządzeniem końcowym. (patrz rozdział 5)
9. Połączenie poprzez gniazdo Auxiliary
Za pomocą analogowego gniazda audio AUX można
podłączyć do głośnika soundZbar wiele urządzeń
końcowych (np. konsolę do gry,smartfona, tablet PC,
odtwarzacz mp3 itp.), atakżestarsze, analogowe źródła
dźwięku (odtwarzacz CD/DVD itp.). Sygnałyaudio ztych
urządzeń można odtwarzać poprzez głośnik soundZbar.
Wskazówki
• Przed podłączeniem urządzenia końcowego
wyłączyć głośnik soundZbar.
• Nie zginać ani nie zakleszczać kabla.
• Połączyć urządzenie końcowe zgłośnikiem soundZbar
poprzez gniazdo AUX (2), korzystajączdołączonego
kabla audio 3,5 mm (kabel zwtykiem jack).
• Wcisnąć przycisk [POWER](1), aby włączyć głośnik
soundZbar.
• Wciskającwielokrotnie przycisk [SOURCE](2) na
głośniku soundZbar,włączyć tryb AUX.
• Dioda LED stanu trybu AUX (9) świeci światłem
ciągłym.
• Uruchomić iodpowiednio wyregulować odtwarzanie
audio na urządzeniu końcowym.
10. Połączenie optycznym kablem audio
Poprzez cyfrowe wejście audio głośnika soundZbar
można podłączyć urządzenie końcowe (np. konsolę do
gry,odbiornik TV itp.) iodtwarzać jego sygnał audio
poprzez soundZbar.
Wskazówki
• Przed podłączeniem urządzenia końcowego
wyłączyć głośnik soundZbar.
• Przed podłączeniem usunąć osłony ochronne zobu
końców optycznego kabla sygnałowego.
• Nie zginać ani nie zakleszczać kabla.
• Optyczny kabel sygnałowy podłączyć do optycznego
wejścia audio (1) na głośniku soundZbar ido
optycznego wyjścia audio na urządzeniu końcowym.
• Wcisnąć przycisk [POWER](1), aby włączyć głośnik
soundZbar.
• Wciskającwielokrotnie przycisk [SOURCE](2) na
głośniku soundZbar włączyć tryb OPT.
• Dioda LED stanu trybu OPT (8) świeci światłem
ciągłym.
• Uruchomić iodpowiednio wyregulować odtwarzanie
audio na urządzeniu końcowym.
11. Tryby dźwięku
Do odtwarzania sygnałów audio dostępne są trzy różne
tryby:
Tryb Gry komputerowe włącza dodatkowo włącza
więcej wysokich iniskich tonów,aby zintensykować
wrażenia podczas gry.
Tryb Muzyka włącza liniowy zakres częstotliwości,
aby odtwarzać całespektrum różnorodnych stylów
muzycznych.
Tryb Kino włącza efekt podobny do dźwięku
przestrzennego, dzięki czemu można usłyszeć każdy
dźwiękowy szczegół.
• Wciskać przycisk [MODE](3), aby przełączać
pomiędzy różnymi trybami dźwięku.
• Po wybraniu trybu Gry komputerowe dioda LED stanu
(11) trybu Gry komputerowe świeci światłem ciągłym.
• Po wybraniu trybu Muzyka dioda LED stanu (12) trybu
Muzyka świeci światłem ciągłym.
• Po wybraniu trybu Kino dioda LED stanu (13) trybu
Kino świeci światłem ciągłym.
53
Page 52

12. Regulacja niskich tonów
• Przekręcić pokrętło(2) na głośniku subwoofer wcelu
zwiększenia lub zmniejszenia poziomu niskich tonów.
13. Regulacja głośności
• Wcelu zwiększenia/zmniejszenia poziomu głośności
wcisnąć przycisk [VOLUME]+/- (7) na głośniku
soundZbar.
• Wcisnąć przycisk [
głośnika soundZbar.
14. Korzystanie zgłośnika soundZbar wtrybie
zasilania zakumulatora
Ostrzeżenie –Akumulator
• Do ładowania używać wyłącznie dołączonego
zasilacza.
• Zasadniczo nie stosować uszkodzonych ładowarek
ani nie próbować ich naprawiać.
• Unikać przechowywania, ładowania istosowania
wekstremalnych temperaturach.
• Wprzypadku dłuższego przechowywania
regularnie (przynajmniej co kwartał)doładowywać
akumulatory.
• Głośnik soundZbar jest wyposażony w ładowalny
akumulator.Przed pierwszym użyciem należy
całkowicie naładować akumulator.
• Przed ładowaniem upewnić się, żegłośnik soundZbar
jest wyłączony.
• Uruchomić proces ładowania, podłączającdołączony
zasilacz do gniazda zasilania (4) igniazda sieciowego.
• Podczas ładowania dioda LED stanu ładowania (3)
świeci się na zielono światłem ciągłym.
• Całkowite naładowanie akumulatoramożetrwać do
4godzin.
• Po całkowitym naładowaniu akumulatoradioda LED
stanu ładowania (3) gaśnie.
• Następnie odłączyć wszystkie połączenia kablowe i
sieciowe.
Wskazówki –Proces ładowania /
pojemność akumulatora
• Kompletny proces ładowania trwa ok. 3-4 godziny.
• Jeśli poziom naładowania akumulatoraspadnie
poniżej 10%, dioda LED stanu ładowania (3) miga
na czerwono zdużą częstotliwością.Komunikat
ten jest widoczny tylko przy włączonym głośniku
soundZbar.
](6), wcelu włączenia wyciszenia
15. Czyszczenie
Czyścić produkt tylko przy użyciu niestrzępiącej się,
lekko zwilżonej szmatki inie stosować agresywnych
detergentów.
16. Wyłączenie odpowiedzialności
Hama GmbH &CoKGnie udziela gwarancji ani nie
odpowiada za szkody wskutek niewłaściwej instalacji,
montażuoraznieprawidłowego stosowania produktu
lub nieprzestrzegania instrukcji obsługi i/lub wskazówek
bezpieczeństwa.
17. Serwis ipomoc techniczna
Wrazie pytań dotyczących produktu prosimy zwrócić się
do infolinii Hama.
Gorąca linia: +49 9091 502-115 (niem./ang.)
Dodatkowe informacje są dostępne na stronie:
www.hama.com
18. Informacje dotycząca recyklingu
Wskazówki dotyczące ochrony środowiska:
Od czasu wprowadzenia europejskiej dyrektywy
2012/19/EU i2006/66/EU do prawa
narodowego obowiązują następujące ustalenia:
Urządzeń elektrycznych, elektronicznych oraz
baterii jednorazowych nie należywyrzucać razem z
codziennymi odpadami domowymi! Użytkownik
zobowiązany prawnie do odniesienia zepsutych,
zniszczonych lub niepotrzebnych urządzeń elektrycznych
ielektronicznych do punktu zbiórki lub do sprzedawcy.
Szczegółowe kwestie regulują przepisy prawne danego
kraju. Informuje otym symbol przekreślonego kosza
umieszczony na opakowaniu. Segregującodpady
pomagasz chronićśrodowisko!
19. Deklaracja zgodności
Hama GmbH &CoKGniniejszym oświadcza, że
typ urządzenia radiowego [00113776] jest
zgodny zdyrektywą 2014/53/UE. Pełny tekst
deklaracji zgodności UE jest dostępny pod
następującym adresem internetowym: www.hama.
com-> 00113776-> Downloads.
Częstotliwość transmisji
Maksymalna moc transmisji 5mW EIRP
2.40GHz ~
2.48HGz
54
Page 53

20. Dane techniczne
Technologia Bluetooth® BluMasa
Obsługiwane prole A2DP,AVRCP
Częstotliwość
transmisji Bluetooth®
Wydajność transmisji Bluetooth®
ZasięgBluetooth®
Maks. liczba sparowanych urządzeń 1
Moc
System dźwięku 2.1
Częstotliwość
Maks. moc muzyczna
Impedancja 6 Ω
Zniekształcenia harmoniczne THD
Przyłącza
Zasilanie napięciowe 230 V~50Hz0.4 A
R
2.40GHz ~2.48HGz
Max. 10 dBm
10 m
Zakres częstotliwości głośnika soundZbar: 160 –20000 Hz
Zakres częstotliwości głośnika subwoofer: 20 –160 Hz
łącznie 100 W
soundZbar 40 W
subwoofer 60 W
≤
0.5% (1K, 1W)
wejście 3,5 mm stereo AUX
wejście optyczne
wejście zasilania
Akumulator głośnika soundZbar
Typakumulatoralitowo-jonowy 7,4 Vmin. 2550 mAh /18,87 Wh
Czas ładowania ~3-4h
przez Bluetooth: ok. 7h
Czas pracy
Wymiary (szer.xgł.xwys.) /masa
Masa
Wymiary
przez wejście AUX: ok. 12 h
(w zależności od głośności i ścieżki audio)
łącznie 5.1 kg
soundZbar 1.3kg
Głośnik subwoofer 3.8kg
soundZbar 485 x68x72mm
Głośnik subwoofer 250 x270 x250 mm
55
Page 54

H Használati útmutató
A. Kezelőelemek és kijelzőkSoundZbar
1. [POWER]
2. [SOURCE] abemeneti mód kiválasztásához
3. [MODE] ahangmód kiválasztásához
4. [PAIR] aBluetooth kapcsolat megszakításához
5. NFC interfész
6. [
] Némítás
7. VOL +/-
8. Állapotjelző LED optikai bemenet
9. Állapotjelző LED AUX
10. Állapotjelző LED Bluetooth
11. Állapotjelző LED Játék mód
12. Állapotjelző LED Zene mód
13. Állapotjelző LED Mozi mód
B. SoundZbar hátoldal
1. Optikai aljzat
2. AUX-In aljzat
3. Állapotjelző LED Töltés
4. Hálózati tápkábel /DC- IN
C. Mélysugárzó
1. Be-/kikapcsoló
2. Basszus forgatógomb
3. Állapotjelző LED kapcsolat mélysugárzó és
SoundZbar
Köszönjük, hogy ezt aHama terméket választotta!
Kérjük, hogy felszerelés előtt szánjon rá időtésolvassa
el végig az alábbi útmutatót. Akésőbbiekben tartsa
biztonságos helyen ezt afüzetet, hogy ha szükség van rá,
bármikor megtalálja. Ha eladja ezt aterméket, vele együtt
adja tovább ezt az útmutatót is az új tulajdonosnak.
1. Figyelmeztető szimbólumok és előírások
ismertetése
Áramütés veszélye
Ez aszimbólum atermék azon nem szigetelt részeinek
megérintésérevonatkozó veszélyreutal, amelyek olyan
szintű veszélyes feszültségen lehetnek, ami miatt
áramütés veszélye áll fenn.
Figyelmeztetés
Figyelmeztető jeleket használunk abiztonsági
tényezőkbemutatására, ill. felhívjuk a gyelmet a
különleges veszélyekreéskockázatokra.
2. Acímkén szereplő szimbólumok magyarázata
• Atermék csak épületen belüli használatra
•
3. Acsomag tartalma
•SoundZbar
•mélysugárzó
•3,5 audio kábel
•hálózati adapter
•ezakezelési útmutató
4. Biztonsági előírások:
• Atermék amagánháztartási, nem üzleti célú
• Aterméket ne használja afűtés és egyéb hőforrások
• Óvja meg aterméket szennyeződéstől, nedvességtől
• Ez akészülék, mint minden elektromos készülék, nem
• Ne ejtse le aterméket és ne tegye ki heves
• Ne üzemeltesse aterméket aműszaki adatokban
• Ne használja aterméket olyan helyen, ahol
• Legyen tekintettel környezetére. Anagy hangerő
• Ne nyissa ki aterméket és sérülés esetén ne
• Az akkumulátor állandó beszerelésű és nem
• Feltétlenül tartsa távol agyermekeket a
• Azonnal ártalmatlanítsa acsomagolóanyagot a
• Ne végezzen módosítást akészüléken. Ebben az
•Tartsa távol aterméket csepegő vagy fröccsenő
készül.
II. védelmi osztályú elektromos eszköz (kettős
szigetelésű)
alkalmazásrakészül.
közelében, vagy közvetlen napsütésnek kitéve.
és túlmelegedéstől, és kizárólag zárt környezetben
használja.
gyermekek kezébe való!
rázkódásnak.
megadott teljesítményhatárain túl.
elektronikus készülékek nincsenek megengedve.
zavarhatja vagy károsíthatja környezetét.
üzemeltesse tovább.
távolítható el, ezért aterméket egyben, ajogszabályi
előírások szerint ártalmatlanítsa.
csomagolóanyagtól, mert fulladásveszély állfenn.
helyileg érvényes ártalmatlanítási előírások szerint.
esetben minden garanciaigény megszűnik.
folyadéktól, és ne helyezzen folyadékkal töltött
tárgyakat, pl. vázát atermékre.
Hivatkozás
Az itt látható gyelmeztető jeleket használjuk fel,
ha kiegészítő információkat közlünk vagy fontos
tudnivalókrahívjuk fel a gyelmet.
56
Page 55

Áramütés veszélye
Megjegyzés –Első bekapcsoláskor
• Ne nyissa ki aterméket és sérülés esetén ne
üzemeltesse tovább.
• Ne használja aterméket, ha az adapter,a
csatlakozókábel, vagy ahálózati kábel megsérült.
• Ne kísérelje meg akészülék saját karbantartását
vagy javítását. Bármely karbantartási munkát
bízzon illetékes szakemberre.
5. Üzembevétel és üzemeltetés
Hivatkozás
• Atermék hálózati feszültségrőlésakkumulátorról
egyaránt üzemeltetheti. Atermék hálózati
feszültségen keresztüli használatához csak a
hálózati csatlakozóhoz kellcsatlakoztatni (lásd
5fejezet). Atermék akkumulátorról történő
használatához előbb teljesen fel kell tölteni (lásd
14. fejezet).
Figyelmeztetés
• Aterméket csak az arraacélrajóváhagyott
dugaszaljzatról működtesse. Adugaszoló aljzatnak
atermék közelében kell elhelyezkednie, és könnyen
hozzáférhetőnek kell lennie.
• Aterméket abe-/kikapcsolóval válassza le a
hálózatról –hailyen nincs, húzza ki ahálózati
kábelt adugaszaljzatból.
• Ahálózati dugaszolóaljzatnak bármikor könnyen
elérhetőnek kell lennie.
• Ha hosszabb ideig nem használja aterméket,
válassza le ahálózatról.
• Csatlakoztassa aSoundZbar és amélysugárzó
tápkábeleit amegfelelően telepített hálózati
csatlakozókhoz.
• Nyomja meg a[POWER](1) gombot aSoundZbar
bekapcsolásához.
• Nyomja meg abe-/kikapcsoló gombot (1) a
mélysugárzó bekapcsolásához.
• Akapcsolat állapotjelző LED (3) amélysugárzón
kéken villogni kezd.
• Bekapcsolás után aSoundZbar és amélynyomó
automatikusan csatlakoznak aBluetoothon
keresztül.
• Asikeres csatlakozás után amélysugárzó
csatlakozásának állapotjelző LED-je (3)
folyamatosan kéken világít.
6. Első Bluetooth-kapcsolat (párosítás)
Bluetoothon keresztül csatlakoztathatja eszközeit
aSoundZbarral, amelyet így audio jelek
lejátszóeszközeként használhat.
Hivatkozás –
Bluetooth
®
• Ellenőrizze, hogy amobil eszköz (mobiltelefon stb.)
alkalmas-e Bluetooth kapcsolatra.
• Vegye gyelembe, hogy aBluetooth hatótávolsága
maximum 10 méter akádalyok, például falak,
személyek stb. nélkül.
• Akapcsolatot aközelben lévő más Bluetooth-
készülékek/-kapcsolatok megzavarhatják.
• ASoundZbar egyszerrecsak egy eszközhöz
csatlakoztatható.
• Vegye gyelembe, hogy akompatibilitás a
támogatott Bluetooth-proloktól és ahasznált
Bluetooth-verzióktól függ. (lásd: Műszaki adatok, a
használt eszköz kezelési útmutatója)
• Győződjön meg róla, hogy aBluetooth képes eszköz
be van-e kapcsolva, és hogy aBluetooth aktiválva
van-e.
• Aktiválja aSoundZbaron a[SOURCE](2) gomb
ismételt megnyomásával aBluetooth módot.
• ABluetooth kapcsolat állapotjelző LED-je (10) kéken
villogni kezd.
• Nyissa meg eszközén aBluetooth-beállításokat, és
várjon, míg atalált Bluetooth-készülékek listájában
megjelenik auRage SoundZbar.
• Válassza ki aSoundZbar uRage SoundZbart az
elérhető eszközök listáján és várjon, míg aSoundZbar
eszköze Bluetooth beállításainál csatlakoztatva jelenik
meg.
• ABluetooth kapcsolat állapotjelző LED-je (10) ezután
folyamatosan kéken világít.
• Indítsa el és szabályozza ahanglejátszást megfelelő
módon az eszközön keresztül.
57
Page 56

Hivatkozás –
• Egyes eszközök esetén jelszót kell megadnunk,
amikor az eszközt egy másik Bluetooth eszközhöz
csatlakoztatjuk.
• Arádiónk csatlakoztatásához írja be a0000 jelszót,
amikor az eszköz ajelszó megadásáraszólítja fel.
7. Első Bluetooth-kapcsolat (párosítás) NFC-vel
• Győződjön meg arról, hogy okostelefonja támogatja
az NFC-t, és be van kapcsolva.
• Aktiválja aSoundZbaron a[SOURCE](2) gomb
ismételt megnyomásával aBluetooth módot.
• ABluetooth kapcsolat állapotjelző LED-je (10) kéken
villogni kezd.
• Érintse meg okostelefonjával az NFC interfészt (5) a
SoundZbaron.
• ABluetooth kapcsolat állapotjelző LED-je (10) ezután
folyamatosan kéken világít.
• Indítsa el és szabályozza ahanglejátszást megfelelő
módon az eszközön keresztül.
8. Bluetooth kapcsolatról való leválás
• Kb. 2másodpercig tartsa lenyomva a[PAIR](4)
gombot, hogy készülékén leválassza aBluetoothkapcsolatot.
• ASoundZbar ezután már csatlakoztatható egy másik
eszközhöz. (lásd 5. fejezet)
9. Csatlakozás AUX bemeneten
Az AUX analóg audio bemenettel számos készüléket (pl.
játékkonzolt, okostelefont, tablet PC-t, MP3-lejátszót
stb.), valamint régebbi analóg forrásokat (CD-/DVDlejátszót stb.) csatlakoztathat aSoundZbarhoz, és audio
jelüket lejátszhatja aSoundZbaron keresztül.
Hivatkozás
• Kapcsolja ki aSoundZbart, mielőtt bármilyen
készüléket csatlakoztat hozzá.
• Ne törje meg és ne csíptesse be akábelt.
• Csatlakoztassa készülékét aSoundZbarhoz az AUX
aljzattal (2) amellékelt 3,5 mm-es audiokábellel (jack
kábel)
• Nyomja meg a[POWER](1) gombot aSoundZbar
bekapcsolásához.
• Aktiválja aSoundZbaron a[SOURCE](2) gomb
ismételt megnyomásával az AUX módot.
• Az AUX mód állapotjelző LED-je (9) folyamatosan
világít.
• Indítsa el és szabályozza ahanglejátszást megfelelő
módon az eszközön keresztül.
58
Bluetooth®jelszó
10. Csatlakozás optikai audio kábelen
ASoundZbar digitális audiobemenetén keresztül
csatlakoztathatja készülékét (pl. játékkonzolt, TVkészüléket stb.), és lejátszhatja annak audio jelét a
SoundZbaron keresztül.
Hivatkozás
• Kapcsolja ki aSoundZbart, mielőtt bármilyen
készüléket csatlakoztat hozzá.
• Arögzítés előtt távolítsa el avédősapkát az optikai
jelkábel mindkét végéről.
• Ne törje meg és ne csíptesse be akábelt.
• Csatlakoztasson egy optikai jelkábelt aSoundZbar
optikai audio bemenetéhez (1) és akészülék optikai
audio kimenetéhez.
• Nyomja meg a[POWER](1) gombot aSoundZbar
bekapcsolásához.
• Aktiválja aSoundZbaron a[SOURCE](2) gomb
ismételt megnyomásával az OPT módot.
• Az OPT mód állapotjelző LED-je (8) folyamatosan
világít.
• Indítsa el és szabályozza ahanglejátszást megfelelő
módon az eszközön keresztül.
11. Hang mód
Az audio jelek lejátszásához az alábbi három különböző
mód közül választhat:
Ajáték mód több magas és alacsony hangot aktivál a
jobb játékélmény érdekében.
Azene mód egy lineáris frekvenciamenetet aktivál a
különböző zenei stílusok erőteljes lejátszására.
Amozi mód térbeli hanghatást aktivál, amellyel minden
hangrészletet észlelhetővé válik.
• Nyomja meg ismételten a[MODE](3) gombot a
különböző hangmódok kiválasztásához.
• Ajáték mód állapotjelző LED-je (11) folyamatosan
világít, ha kiválasztja ajáték módot.
• Azene mód állapotjelző LED-je (12) folyamatosan
világít, ha kiválasztja azene módot.
• Amozi mód állapotjelző LED-je (13) folyamatosan
világít, ha kiválasztja amozi módot.
Page 57

12. Basszus szabályozás
• Forgassa el amélysugárzó forgatógombját (2) a
basszus növeléséhez ill. csökkentéséhez.
13. Hangerőszabályozás
• Ahangerő növeléséhez/csökkentéséhez nyomja meg a
[VOLUME]+/- (7) gombot aSoundZbaron.
• Nyomja meg a[
elnémításához.
14. ASoundZbar akkumulátorról történő
használata
Figyelmeztetés –Akkumulátor
• Atöltéshez csak amellékelt hálózati adaptert
használja.
• Ameghibásodott töltőkészülékeket ne használja
tovább, és ne próbálja megjavítani őket.
• Kerülje atárolást, atöltést és ahasználatot extrém
hőmérsékleteken.
• Hosszabb tárolás esetén rendszeresen (min.
negyedévente) töltse aterméket.
• ASoundZbar újratölthető akkumulátorral rendelkezik.
Az első használat előtt az akkumulátort teljesen fel
kelltölteni.
• Ellenőrizze afeltöltés előtt, hogy aSoundZbar ki van-e
kapcsolva.
• Indítsa el atöltést amellékelt hálózati tápegység
hálózati tápkábelre(4) és ahálózati aljzatratörténő
csatlakoztatásával. Az töltés állapotjelző LED-je (3) a
töltés közben folyamatosan zölden világít.
• Az akkumulátor teljes feltöltése akár 4óráig is
eltarthat.
• Ha az akkumulátor teljesen feltöltődött, atöltés
állapotjelző LED-je (3) kialszik.
• Használat után szakítson meg minden kábeles és
hálózati kapcsolatot.
Hivatkozás –Töltés/ akkumulátorkapacitás
• Ateljes feltöltés 3-4 órát vesz igénybe.
• Ha az akkumulátor kapacitása kevesebb mint 10%,
akkor atöltés állapotjelző LED-je (3) gyorsan villog.
Ez az információ csak bekapcsolt SoundZbar mellett
érhető el.
]gombot (6) aSoundZbar
15. Karbantartás és ápolás
Ezt aterméket csak szöszmentes, kissé benedvesített
kendővel tisztítsa, és ne használjon agresszív
tisztítószert.
16. Szavatosság kizárása
AHama GmbH &CoKGsemmilyen felelősséget vagy
szavatosságot nem vállal atermék szakszerűtlen
telepítéséből, szerelésébőlésszakszerűtlen
használatából, vagy akezelési útmutató és/vagy a
biztonsági előírások be nem tartásából eredő károkért.
17. Szerviz és támogatás
Kérjük, hogy atermékkel kapcsolatos kérdéseivel
forduljon aHama terméktanácsadásához.
Közvetlen vonal Közvetlen vonal: +49 9091 502-115
(Deu/Eng)
További támogatási információt itt talál:
www.hama.com
18. Ártalmatlanítási előírások
Környezetvédelmi tudnivalók:
Az európai irányelvek 2012/19/EU és 2006/66/EU
ajánlása szerint, amegjelölt időponttól kezdve,
minden EU-s tagállamban érvényesek a
következők: Az elektromos és elektronikai
készülékeket és az elemeket nem szabad aháztartási
szemétbe dobni! Aleselejtezett elektromos és elektronikus
készülékeket és elemeket, akkumulátorokat nem szabad a
háztartási szemétbe dobni. Az elhasznált és
működésképtelen elektromos és elektronikus készülékek
gyűjtéséretörvényi előírás kötelez mindenkit, ezért azokat
el kell szállítani egy kijelölt gyűjtő helyrevagy visszavinni a
vásárlás helyére. Atermék csomagolásán feltüntetett
szimbólum egyértelmű jelzést ad errevonatkozóan a
felhasználónak. Arégi készülékek begyűjtése, visszaváltása
vagy bármilyen formában történő újrahasznosítása közös
hozzájárulás környezetünk védelméhez.
19. Megfelelőségi nyilatkozat
Hama GmbH &CoKGigazolja, hogy a
[00113776] típusú rádióberendezés megfelel a
2014/53/EU irányelvnek. Az EU-megfelelőségi nyilatkozat
teljes szövege elérhető akövetkező internetes címen: www.
hama.com-> 00113776 ->Downloads.
Az(ok) afrekvenciasáv(ok)
Maximális jelerősség 5mW EIRP
2.40GHz ~2.48HGz
59
Page 58

20. Műszaki adatok
Bluetooth®-technológia Bluetooth
®
v2.1 +EDR
támogatott prolok A2DP,AVRCP
Frekvencia
Bluetooth® átvitelhez
Bluetooth® átviteli teljesítmény
Bluetooth® hatótávolság
2.40GHz ~2.48HGz
Max. 10 dBm
10 m
Párosított eszközök max. száma 1
Teljesítmény
Hangrendszer 2.1
Frekvencia
AsoundZbar frekvenciatartománya: 160 –20000 Hz
Amélysugárzó frekvenciatartománya: 20 –160 Hz
összesen 100 W
Max. Zeneteljesítmény
soundZbar 40 W
Mélysugárzó 60 W
Impedancia 6 Ω
Teljes harmonikus torzítás (THD)
≤
0.5% (1K, 1W)
3,5 mm-es sztereó csatlakozó, AUX bemenet
Csatlakozók
Optikai bemenet
Power input
Energiaellátás 230 V~50Hz0.4 A
Akkumulátor SoundZbar
Akku típusa 7,4 VLi-Ion min. 2550mAh /18,87Wh
Feltöltési idő ~3-4h
Bluetoothon ~7óra
Működési idő
AUX bemeneten ~12óra
(a hangerőtőlésahanganyagtól függően)
Méretek(szé XméXma) /súly
összesen 5.1 kg
Súly
SoundZbar 1.3kg
Mélysugárzó 3.8kg
Méretek
SoundZbar 485 x68x72mm
Mélysugárzó 250 x270 x250 mm
60
Page 59

C Návod kpoužití
A. Ovládací prvky aindikace SoundZbar
1. [POWER]
2. [SOURCE] provýběrvstupního režimu
3. [MODE] provýběrrežimuzvuku
4. [PAIR] propřerušení spojení Bluetooth
5. Rozhraní NFC
6. [
] Vypínání zvuku
7. VOL +/-
8. Stavová LED dioda Optický vstup
9. Stavová LED dioda AUX
10. Stavová LED dioda Bluetooth
11. Stavová LED dioda herní režim
12. Stavová LED dioda režim hudby
13. Stavová LED dioda režim Cinema
B. Zadní strana SoundZbar
1. Zdířka Optical In
2. Zdířka AUX In
3. Stavová LED dioda nabíjení
4. Síťový přívod /DC- IN
C. Subwoofer
1. Vypínač
2. Otočný regulátor basů
3. Stavová LED dioda spojení subwooferu aSoundZbar
Děkujeme, že jste si vybrali výrobek Hama.
Přečtěte si, prosím, všechny následující pokyny a
informace. Uchovejte tento text propřípadné budoucí
použití. Pokud výrobek prodáte, předejte tento text
novému majiteli.
1. Vysvětlení výstražných symbolů apokynů
Nebezpečíporanění elektrickým proudem
Tento symbol upozorňuje na nebezpečípřidotyku
neizolovaných částí produktu, které by mohly vést
nebezpečné napětí otakové síle, že hrozí nebezpečí
poranění elektrickým proudem.
Upozornění
Tento symbol označuje bezpečnostní upozornění,
které poukazuje na určitá rizika anebezpečí.
Poznámka
2. Vysvětlení symbolů charakteristiky produktu
•
•
3. Obsah balení
•SoundZbar
•subwoofer
•3,5 mm audio kabel
•síťový adaptér
•tento návod kobsluze
4. Bezpečnostní pokyny
• Výrobek je určen knekomerčnímu použití v
• Výrobek nepoužívejte vblízkosti zdrojů tepla, ani
•Výrobek chraňte před znečištěním. Nepoužívejte ve
• Výrobek nepatřídorukou dětem, stejně jako ivšechny
• Výrobek chraňte před pádem avelkými otřesy.
• Přístroj nepoužívejte mimo rozsah předepsaných
• Výrobek nepoužívejte na místech, kde je používání
• Berte ohled na své okolí. Vysoká hlasitost může rušit
• Výrobek neotvírejte avpřípadě poškození již dále
• Akumulátor je pevně instalován anelze jej vyjmout.
• Obalový materiál odložte mimo dosahu dětí, hrozí
• Vybité baterie bez odkladu vyměňte azlikvidujte dle
• Výrobek žádným způsobem neupravujte, ztratíte tím
•Chraňte produkt před kapajícími nebo stříkajícími
Výrobek je určen pouze propoužití vinteriéru.
Elektrický přístroj třídy ochrany II (dvojitě
izolovaný).
domácnosti.
nevystavujte působení přímého slunečního záření.
vlhkém prostředí azabraňte styku svodou. Používejte
pouze vsuchých prostorách.
elektrické přístroje.
hodnot vtechnických údajích.
elektronických zařízení zakázáno.
nebo ovlivnit vašeokolí.
nepoužívejte.
Výrobek likvidujte jako celek vsouladu splatnými
předpisy.
riziko udušení.
platných předpisů.
nárok na záruku.
tekutinami aneumisťujte na nějpředměty naplněné
tekutinou, např.vázy.
Tento symbol označuje dodatečné informace nebo
důležité poznámky.
61
Page 60

Nebezpečíporanění elektrickým proudem
Upozornění -připrvním zapnutí
• Výrobek neotvírejte avpřípadě poškození již dále
nepoužívejte.
• Výrobek nepoužívejte, pokud je adaptér,
připojovací kabel nebo síťové vedení poškozeno.
• Do výrobku samovolně nezasahujte aneopravujte
ho. Veškeré úkony údržby přenechejte příslušnému
odbornému personálu.
5. Uvedení do provozu aprovoz
Poznámka
• Máte možnost používat produkt připřipojení do
elektrické sítě isbateriemi. Propoužívání produktu
připřipojení do elektrické sítě je třeba ho připojit
do sítě (viz kapitola 5). Propoužívání produktu
na baterie je třeba baterie nejprve zcela nabít (viz
kapitola 14).
Upozornění
• Výrobek provozujte pouze připojený ke schválené
zásuvce. Zásuvka se musí nacházet vblízkosti
výrobku amusí být snadno přístupná.
• Výrobek odpojte od sítě pomocí spínače/vypínače.
Pokud tento není kdispozici, vytáhněte síťovou
šňůru ze zásuvky.
• Zásuvka musí být vždy lehce dosažitelná.
• Vypojte produkt ze sítě,pokud ho delšídobu
nepoužíváte.
• Připojte síťový kabel SoundZbar asubwooferu do
řádně instalovaných zásuvek.
• Stiskněte [POWER](1) prozapnutí SoundZbar.
• Prospuštění subwooferu stiskněte vypínač (1).
• Stavová LED dioda připojení (3) na subwooferu začne
blikat modře.
• Po zapnutí se SoundZbar asubwoofer automaticky
spojí prostřednictvím Bluetooth.
• Proběhlo-li spojení úspěšně,rozsvítí se stavová LED
dioda připojení (3) na subwooferu modře.
6. První navázání spojení Bluetooth (spárování)
Přes Bluetooth můžete koncová zařízení spojit se
SoundZbar apoužít ho jako zařízení proreprodukci
audio signálů.
Poznámka –
Bluetooth
®
• Zkontrolujte, zda vašemobilní koncové zařízení
(mobilní telefon atd.) disponuje Bluetooth.
• Pozor,dosah Bluetooth je max. 10 metrů,ato bez
překážek, jako např.zdí, osob apod.
• Může dojít ktomu, že bude spojení narušeno v
důsledku dalších připojení zařízení stechnologií
Bluetooth.
• SoundZbar lze připojit vždy pouze kjednomu
koncovému zařízení.
• Dbejte na to, že kompatibilita závisí na
podporovaných prolech apoužitých verzích
Bluetooth. (viz: Technické údaje, návod kpoužití
používaných koncových zařízení)
•Zajistěte, aby bylo koncové zařízení sBluetooth
zapnuté aby byl aktivní Bluetooth.
• Opakovaným stisknutím [SOURCE](2) na SoundZbar
aktivujte režim Bluetooth.
• Stavová LED dioda připojení Bluetooth (10) začne
blikat modře.
• Otevřete nastavení Bluetooth na koncovém zařízení
avyčkejte, dokud se nezobrazí seznam nalezených
přístrojů Bluetooth uRage SoundZbar.
• Vyberte SoundZbar uRage SoundZbar ze seznamu
dostupných zařízení apočkejte, dokud se nezobrazí
SoundZbar jako připojený vnastaveních Bluetooth
koncového zařízení.
• Stavová LED dioda připojení Bluetooth (10) bude svítit
trvale modře.
• Spusťte apodle požadavků ovládejte přehrávání audia
přes koncové zařízení.
Poznámka –
Heslo pro Bluetooth
®
62
• Některá koncová zařízení vyžadují pronavázáni
spojení sjiným zařízením sBluetooth heslo.
• Prospojení srádia zadejte heslo 0000, pokud vás k
tomu vyzve vašekoncové zařízení.
Page 61

7.První navázání spojení Bluetooth (spárování)
přes NFC
• Zajistěte, aby NFC podporoval váš smartphone aaby
bylo aktivní.
• Opakovaným stisknutím [SOURCE](2) na SoundZbar
aktivujte režim Bluetooth.
• Stavová LED dioda připojení Bluetooth (10) začne
blikat modře.
• Dotkněte se smartphonem rozhraní NFC (5) u
SoundZbar.
• Stavová LED dioda připojení Bluetooth (10) bude svítit
trvale modře.
• Spusťte apodle požadavků ovládejte přehrávání audia
přes koncové zařízení.
8. Přerušení spojení Bluetooth
• Stiskněte apřidržte [PAIR](4) asi na 2sekundy,
přerušíte tak spojení Bluetooth skoncovým zařízením.
• SoundZbar lze následně spojit sjiným koncovým
zařízením. (viz kapitola 5)
9. Spojení přes Auxiliary Input
Přes analogový audio vstup AUX lze připojit mnoho
koncových zařízení (např.herní konzolu, smartphone,
tablet, MP3 přehrávač atd.) istaršíanalogové
zdroje (CD/DVD přehrávač apod.) na SoundZbar a
reprodukovat jejich audio signál přes SoundZbar.
Poznámka
• Nejprve vypněte SoundZbar,potom teprve připojte
příslušné koncové zařízení.
• Kabel nelámejte anedeformujte.
• Připojte koncové zařízení přes zdířku AUX (2) pomocí
přiloženého 3,5mm audio kabelu (kabel Jack) do
SoundZbar.
• Stiskněte [POWER](1) prozapnutí SoundZbar.
• Opakovaným stisknutím [SOURCE](2) na SoundZbar
aktivujte režim AUX.
• Stavová LED dioda režimu AUX (9) svítí trvale.
• Spusťte apodle požadavků ovládejte přehrávání audia
přes koncové zařízení.
10. Spojení přes optický audio kabel
Na digitální audio vstup SoundZbar můžete připojit
koncové zařízení (např.herní konzolu, TV atd.) a
reprodukovat jeho audio signál přes SoundZbar.
Poznámka
• Nejprve vypněte SoundZbar,potom teprve připojte
příslušné koncové zařízení.
• Před připojením odstraňte ochranné pojistky zobou
konců optického signálního kabelu.
• Kabel nelámejte anedeformujte.
• Připojte optický signální kabel koptickému audio
vstupu (1) SoundZbar aoptickému audio výstupu
koncového zařízení.
• Stiskněte [POWER](1) prozapnutí SoundZbar.
• Opakovaným stisknutím [SOURCE](2) na SoundZbar
aktivujte režim OPT.
• Stavová LED dioda režimu OPT (8) svítí trvale.
• Spusťte apodle požadavků ovládejte přehrávání audia
přes koncové zařízení.
11. Režimy zvuku
Proreprodukci audio signálu si můžete vybrat ze tří
režimů:
Herní režim aktivuje navíc některé výšky ahloubky pro
lepšíherní zážitek.
Režim hudby aktivuje lineární frekvenční charakteristiku,
která umožní kvalitní přehrávání různých hudebních
stylů.
Režim Cinema aktivuje efekt podobný prostorovému
zvuku, takže je možné vnímat každý zvukový detail.
• Stiskněte opakovaně [MODE](3) provýběr
příslušného režimu.
• Stavová LED dioda (11) herního režimu svítí trvale,
pokud je zvolen herní režim.
• Stavová LED dioda (12) režimu hudby svítí trvale,
pokud je zvolen režim hudby.
• Stavová LED dioda (13) režimu Cinema svítí trvale,
pokud je zvolen režim Cinema.
63
Page 62

12. Nastavení basů
• Otočte otočným regulátorem (2) na subwooferu pro
zvýšení nebo snížení basů.
13. Nastavení hlasitosti
• Stiskněte [VOLUME]+/- (7) na SoundZbar pro
zesílení/zeslabení hlasitosti.
• Stiskněte [
14. Používání SoundZbar na baterie
• Knabíjení používejte pouze přiložený napájecí
zdroj.
• Vadné nabíječky obecně dále nepoužívejte aani je
nezkoušejte opravovat.
• Vyhněte se skladování, nabíjení apoužívání při
extrémních teplotách.
• Vpřípadě delšího skladování výrobek pravidelně
dobíjejte (nejméně každého čtvrt roku).
• Zařízení SoundZbar je vybaveno nabíjecí baterií. Před
prvním použitím baterii zcela nabijte.
• Ujistěte se, že je zařízení SoundZbar před dobíjením
vypnuté.
• Spusťte nabíjení tak, že přiložený napájecí zdroj
připojíte do síťového přívodu (4) adozásuvky.
• Stavová LED dioda nabíjení (3) svítí vprůběhu
nabíjení zeleně.
• Může trvat až 4hodiny,než bude baterie plně nabitá.
• Když je baterie zcela nabitá, LED dioda nabíjení (3)
zhasne.
• Poté odpojte všechna kabelová asíťová připojení.
• Úplné nabití trvá cca 3-4 hodiny.
• Pokud má baterie kapacitu nižšínež 10 %, stavová
LED dioda nabíjení (3) rychle červeně bliká. Tuto
informaci získáte pouze, když je zapnuté zařízení
SoundZbar.
](6) provypnutí zvuku na SoundZbar.
Upozornění –Baterie
Poznámka –Nabíjení /kapacita baterie
15. Údržba a čištění
Tento výrobek čistěte pouze mírně navlhčeným
hadříkem nepouštějícím vlákna anepoužívejte agresivní
čisticí prostředky.
16. Vyloučení záruky
Hama GmbH &CoKGnepřebírá žádnou odpovědnost
nebo záruku za škody vzniklé neodbornou instalací,
montáží nebo neodborným použitím výrobku
nebo nedodržováním návodu kpoužití a/nebo
bezpečnostních pokynů.
17. Servis apodpora
Máte otázky kproduktu ? Obraťte na na poradenské
oddělení Hama.
Horká linka: +49 9091 502-115 (německy/anglicky)
Dalšípodpůrné informace naleznete na adrese:
www.hama.com
18. Pokyny klikvidaci
Ochrana životního prostředí:
Evropská směrnice 2012/19/EU a2006/66/EU
ustanovujete následující: Elektrická a
elektronická zařízení stejně jako baterie nepatří
do domovního odpadu. Spotřebitel se zavazuje
odevzdat všechna zařízení abaterie po uplynutí jejich
životnosti do příslušných sběren. Podrobnosti stanoví
zákon příšlušné země.Symbol na produktu, návod k
obsluze nebo balení na toto poukazuje. Recyklací a
jinými způsoby zužitkování přispíváte kochraně
životního prostředí.
19. Prohlášení oshodě
Tímto Hama GmbH &CoKGprohlašuje, že typ
rádiového zařízení [00113776] je vsouladu se
směrnicí 2014/53/EU. Úplné znění EU prohlášení o
shodě je kdispozici na této internetové adrese: www.
hama.com-> 00113776-> Downloads.
Kmitočtové pásmo (kmitočtová
pásma)
Maximální radiofrekvenční výkon
vysílaný
2.40GHz ~
2.48HGz
5mW EIRP
64
Page 63

20. Technické údaje
Bluetooth® technologie Bluetooth
®
v2.1 +EDR
podporované proly A2DP,AVRCP
Frekvence pro
přenosy Bluetooth®
Přenosový výkon Bluetooth®
Dosah Bluetooth®
2.40GHz ~2.48HGz
Max. 10 dBm
10 m
Max. počet připojených zařízení 1
Výkon
Sound System 2.1
Frekvence
Frekvenční rozsah soundZbar: 160 -20000 Hz
Frekvenční rozsah subwooferu: 20 -160 Hz
celkem 100 W
Max. hudební výkon
soundZbar 40 W
subwoofer 60 W
Impedance 6 Ω
Zkreslení THD
≤
0.5% (1K, 1W)
3,5 mm stereo přípojka AUX input
Přípojky
Optical input
Power Input
Napájení 230 V~50Hz0.4 A
Baterie SoundZbar
Typbaterie 7.4V Li-Ion min. 2550mAh /18.87Wh
Doba do úplného nabití ~3-4h
přes Bluetooth ~7h
Doba chodu
přes AUX ~12h
(závisí na hlasitosti aaudio obsahu)
Rozměry (Š xHxV) /hmotnost
celkem 5.1 kg
Hmotnost
SoundZbar 1.3kg
Subwoofer 3.8kg
Rozměry
SoundZbar 485 x68x72mm
Subwoofer 250 x270 x250 mm
65
Page 64

Q Návod na použitie
A. Ovládacie prvky aindikácie SoundZbar
1. [POWER]
2. [SOURCE] na voľbu vstupného režimu
3. [MODE] na voľbu zvukového režimu
4. [PAIR] na prerušenie Bluetooth spojenia
5. Rozhranie NFC
6. [
] Vypnutie zvuku
7. VOL +/-
8. LED indikátor stavu –optický vstup
9. LED indikátor stavu –AUX
10. LED indikátor stavu –Bluetooth
11. LED indikátor stavu –režim hier
12. LED indikátor stavu –režim hudby
13. LED indikátor stavu –režim kina
B. Zadná strana –reproduktor SoundZbar
1. Zdierka Optical IN
2. Zdierka AUX IN
3. LED indikátor nabíjania
4. Napájacie vedenie /DC- IN
C. Subwoofer
1. Vypínač I/O
2. Otočný regulátor basov
3. LED indikátor stavu –spojenie subwooferaa
reproduktoraSoundZbar
Ďakujeme, že ste sa rozhodli prevýrobok Hama.
Prečítajte si všetky nasledujúce pokyny ainformácie.
Uchovajte tento návod na použitie preprípadné budúce
použitie. Pokiaľ výrobok predáte, dajte tento návod
novému majiteľovi.
1. Vysvetlenie výstražných symbolov a
upozornení
Nebezpečenstvo poranenia elektrickým
prúdom
Tento symbol upozorňuje na nebezpečenstvo dotyku
neizolovaných častí výrobku, ktoré sú eventuálne
pod tak vysokým nebezpečným napätím, že hrozí
nebezpečenstvo poranenia elektrickým prúdom.
Upozornenie
Tento symbol označuje bezpečnostné upozornenie,
ktoré poukazuje na určité riziká anebezpečenstva.
2. Vysvetlenie symbolov označenia výrobkov
•
•
3. Obsah balenia
•reproduktor SoundZbar
•subwoofer
•3,5 mm audio kábel
•sieťový adaptér
•tento návod na používanie
4. Bezpečnostné upozornenia
• Výrobok je určený na nekomerčné použitie v
• Výrobok nepoužívajte vblízkosti zdrojov tepla, ani
• Výrobok chráňte pred znečistením. Nepoužívajte vo
• Výrobok nepatrí do rúk deťom, rovnako ako všetky
• Výrobok chráňte pred pádmi aveľkými otrasmi.
• Prístroj nepoužívajte mimo rozsahu predpísaných
• Výrobok nepoužívajte na miestach, kde je používanie
• Berte ohľad na svoje okolie. Vysoká hlasitosť môže
• Výrobok neotvárajte avprípade poškodenia ho ďalej
• Akumulátor je pevne nainštalovaný anedá sa vybrať.
• Obalový materiál odložte mimo dosahu detí, hrozí
• Obalový materiál zlikvidujte podľaplatných predpisov
• Výrobok žiadnym spôsobom neupravujte, stratíte tým
•Výrobok uchovávajte mimo kvapkajúcich alebo
Výrobok je určený iba prepoužitie vinteriéri.
Elektrické zariadenie triedy ochrany II (dvojitá
izolácia).
domácnosti.
nevystavujte pôsobeniu priameho slnečného žiarenia.
vlhkom prostredí azabráňte styku svodou. Používajte
iba vsuchých priestoroch.
elektrické prístroje.
hodnôt vtechnických údajoch.
elektronických zariadení zakázané.
rušiť alebo ovplyvniť Vašeokolie.
nepoužívajte.
Výrobok likvidujte ako celok vsúlade splatnými
predpismi.
riziko udusenia.
olikvidácii.
nárok na záruku.
striekajúcich kvapalín anavýrobok neumiestňujte
žiadne predmety naplnené kvapalinami, napr.vázy.
Poznámka
Tento symbol označuje dodatočné informácie, alebo
dôležité poznámky.
66
Page 65

Nebezpečenstvo poranenia elektrickým
prúdom
• Výrobok neotvárajte anepoužívajte ho ďalej, ak je
poškodený.
• Výrobok nepoužívajte, ak je poškodený adaptér,
pripojovací kábel alebo sieťové vedenie.
• Nepokúšajte sa prístroj samostatne ošetrovať alebo
opravovať.Prenechajte akékoľvek úkony údržby
kompetentnému odbornému personálu.
5. Uvedenie do prevádzky aprevádzka
Poznámka
• Výrobok môže byť napájaný zo siete alebo z
akumulátora. Aby ste mohli výrobok používať
vrežimenapájania zo siete, musí byť pripojený
len kelektrickej sieti (pozrite kapitolu 5). Aby
ste mohli výrobok používať vrežimenapájania z
akumulátora, musí byť akumulátor vopred úplne
nabitý (pozrite kapitolu 14).
Upozornenie
• Výrobok používajte pripojený iba kschválenej
zásuvke. Zásuvka musí byť umiestnená vblízkosti
výrobku amusí byťľahko prístupná.
• Výrobok odpojte od siete pomocou spínača/
vypínača. Ak tento nie je kdispozícii, vytiahnite
sieťový kábel zo zásuvky.
• Zásuvka musí byť vždy ľahko dostupná.
• Ak výrobok dlhšiu dobu nepoužívate, odpojte ho od
elektrickej siete.
• Pripojte sieťový kábel reproduktoraSoundZbar a
subwooferadosprávne nainštalovaných zásuviek.
• Stlačením tlačidla [POWER](1) zapnite reproduktor
SoundZbar.
• Stlačením vypínačaI/O (1) zapnite subwoofer.
• LED indikátor stavu spojenia (3) na subwooferi začne
blikať namodro.
Upozornenie –pri prvom zapnutí
• Po zapnutí sa reproduktor SoundZbar asubwoofer
automaticky spoja prostredníctvom Bluetooth.
• Po úspešnom spojení svieti LED indikátor stavu
spojenia (3) na subwooferi trvalo namodro.
6. Prvé spojenie Bluetooth (párovanie)
Prostredníctvom funkcie Bluetooth môžete vašekoncové
zariadenia spárovať sreproduktorom SoundZbar a
použiť ho ako prehrávacie zariadenie preaudiosignály.
Poznámka –
Bluetooth
®
• Skontrolujte, čimákoncové mobilné zariadanie
(mobilný telefón atd´.) funkciu Bluetooth.
• Dosah funkcie Bluetooth je max. 10 mbez
prekážok, ako sú steny,osoby,atd´.
• Môže sa stať,žespojenie je rušené ďalšími
zariadeniami/spojeniami Bluetooth vokolí.
• SoundZbar môže byť spárovaný vždy iba sjedným
koncovým zariadením.
• Upozorňujeme, že kompatibilita závisí od
podporovaných prolov Bluetooth, ako aj použitých
verzií Bluetooth. (Pozrite: Technické údaje, Návod
na obsluhu použitého koncového zariadenia)
• Uistite sa, že vašekoncové zariadenie sfunkciou
Bluetooth je zapnuté ažejefunkcia Bluetooth
aktivovaná.
• Opakovaným stláčaním tlačidla [SOURCE](2) na
reproduktoreSoundZbar aktivujte režim Bluetooth.
• LED indikátor spojenia Bluetooth (10) začne blikať
namodro.
• Otvorte na vašom koncovom zariadení nastavenia
Bluetooth apočkajte, kým sa vzozname nájdených
zariadení Bluetooth nezobrazí uRage SoundZbar.
• Vzozname dostupných zariadení zvoľte SoundZbar
uRage SoundZbar apočkajte, kým sa SoundZbar
nezobrazí vnastaveniach Bluetooth vášho koncového
zariadenia ako spárovaný.
• LED indikátor stavu spojenia Bluetooth (10) svieti
teraz trvalo namodro.
• Spustite aovládajte prehrávanie cez koncové
zariadenie.
67
Page 66

Poznámka –
• Niektoré koncové zariadenia potrebujú na
vytvorenie spojenia siným Bluetooth zariadením
heslo.
• Ked' vás vašekoncové zariadenie na spojenie s
rádiá vyzve na zadanie hesla, zadajte 0000.
7. Prvé spojenie Bluetooth (párovanie) cez NFC
• Uistite sa, že váš smartfón podporuje funkciu NFC a
že táto funkcia je aktivovaná.
• Opakovaným stláčaním tlačidla [SOURCE](2) na
reproduktoreSoundZbar aktivujte režim Bluetooth.
• LED indikátor spojenia Bluetooth (10) začne blikať
namodro.
• Dotknite sa svojím smartfónom rozhrania NFC (5) na
reproduktoreSoundZbar.
• LED indikátor stavu spojenia Bluetooth (10) svieti
teraz trvalo namodro.
• Spustite aovládajte prehrávanie cez koncové
zariadenie.
8. Odpojenie Bluetooth spojenia
• Ak chcete prerušiť spojenie Bluetooth svaším
koncovým zariadením, stlačte apodržte tlačidlo
[PAIR](4) asi na 2sekundy.
• Reproduktor SoundZbar sa teraz môže spojiť siným
koncovým zariadením (pozri kapitolu 5).
9. Spojenie cez Auxiliary Input
Cez analógový audio vstup AUX môžete pripojiť k
reproduktoru SoundZbar množstvo koncových zariadení
(napr.hernú konzolu, smartfón, tabletový počítač,MP3
prehrávač atď.), ako aj staršie analógové zdroje (CD/
DVD prehrávač atď.) aprehrávať ich audiosignál cez
reproduktor SoundZbar.
Poznámka
• Pred pripojením koncového zariadenia reproduktor
SoundZbar vypnite.
• Kábel nelámte anedeformujte.
• Spojte koncové zariadenie cez zdierku AUX (2)
pomocou ľubovoľného 3,5 mm audio kábla (kábel s
konektorom typu jack) sreproduktorom SoundZbar.
• Stlačením tlačidla [POWER](1) zapnite reproduktor
SoundZbar.
• Opakovaným stláčaním tlačidla [SOURCE](2) na
reproduktoreSoundZbar aktivujte režim AUX.
• LED indikátor režimu AUX (9) trvalo svieti.
• Spustite aovládajte prehrávanie cez koncové
zariadenie.
68
Bluetooth®heslo
10. Spojenie cez optický audio kábel
Cez digitálny audio vstup reproduktoraSoundZbar
môžete pripojiť vašekoncové zariadenie (napr.hernú
konzolu, televízor atď.) aprehrávať jeho audiosignál cez
reproduktor SoundZbar.
Poznámka
• Pred pripojením koncového zariadenia reproduktor
SoundZbar vypnite.
• Pred pripojením odstráňte ochranné kryty z
obidvoch koncov optického signálového kábla.
• Kábel nelámte anedeformujte.
• Pripojte koptickému audio vstupu (1) reproduktora
SoundZbar aoptickému audio výstupu vášho
koncového zariadenia optický signálový kábel.
• Stlačením tlačidla [POWER](1) zapnite reproduktor
SoundZbar.
• Opakovaným stlačením tlačidla [SOURCE](2) na
reproduktoreSoundZbar aktivujte režim OPT.
• LED indikátor režimu OPT (8) trvalo svieti.
• Spustite aovládajte prehrávanie cez koncové
zariadenie.
11.Zvukové režimy
Na prehrávanie audiosignálov máte možnosť voľby z
troch rozličných režimov:
Režim hier aktivuje dodatočne viac výšok ahĺbok na
dosiahnutie lepšieho zážitku zhry.
Režim hudby aktivuje lineárny frekvenčný rozsah, aby
ste mohli prehrávať rozmanité hudobné štýly so silným
zvukom.
Režim kina aktivuje efekt podobný priestorovému zvuku,
aby ste mohli vnímať každý zvukový detail.
• Na prepínanie medzi jednotlivými zvukovými režimami
opakovane stláčajte tlačidlo [MODE](3).
• Keď je zvolený režim hier,trvalo svieti LED indikátor
stavu (11) režimu hier.
• Keď je zvolený režim hudby,trvalo svieti LED indikátor
stavu (12) režimu hudby.
• Keď je zvolený režim kina, trvalo svieti LED indikátor
stavu (13) režimu kina.
Page 67

12. Regulácia basov
• Na zvýšenie alebo zníženie basov otočte otočný
regulátor (2) na subwooferi doľava alebo doprava.
13. Regulácia hlasitosti
• Na zvýšenie/zníženie hlasitosti stlačte tlačidlo
[VOLUME]+/- (7) na reproduktoreSoundZbar.
• Na vypnutie hlasitosti reproduktoraSoundZbar stlačte
[
](6).
14. Používanie reproduktora SoundZbar pri
napájaní akumulátorom
Upozornenie –Akumulátor
• Na nabíjanie používajte výlučne priložený napájací
zdroj.
• Poškodené nabíjačky ďalej nepoužívajte, ani sa ich
nepokúšajte opraviť.
• Vyhýbajte sa skladovaniu, nabíjaniu apoužívaniu
pri extrémnych teplotách.
• Pri dlhšom uskladnení zariadenie pravidelne
dobíjajte (min. štvrťročne).
• Reproduktor SoundZbar je vybavený opätovne
nabíjateľným akumulátorom. Akumulátor sa musí
pred prvým použitím úplne nabiť.
• Pred nabíjaním sa uistite, že je reproduktor SoundZbar
vypnutý.
• Zariadenie sa začne nabíjať,keďpriložený napájací
zdroj pripojíte jedným koncom knapájaciemu vedeniu
(4) adruhým koncom do zásuvky.
• LED indikátor stavu nabíjania (3) svieti počas
nabíjania trvalo načerveno.
• Môže trvať až 4hodiny,kým sa akumulátor úplne
nabije.
• Keď je akumulátor úplne nabitý, LED indikátor stavu
nabíjania (3) zhasne.
• Následne odpojte všetky káblové asieťové pripojenia.
Poznámka –Nabíjanie/kapacita
akumulátora
• Celé nabíjanie trvá cca 3–4hodiny.
• Ak je kapacita akumulátoranižšia ako 10 %, bliká
LED indikátor stavu nabíjania (3) rýchlo načerveno.
Túto informáciu dostanete iba pri zapnutom
reproduktoreSoundZbar.
15. Údržba astarostlivosť
Na čistenie tohto výrobku používajte len navlhčenú
utierku, ktorá nepúšťavlákna anepoužívajte žiadne
agresívne čistiace prostriedky.
16. Vylúčenie záruky
Hama GmbH &CoKGneručí/nezodpovedá za
škody vyplývajúce zneodbornej inštalácie, montáže
alebo neodborného používania výrobku alebo
znerešpektovania návodu na používanie a/alebo
bezpečnostných pokynov.
17. Servis apodpora
Sotázkami týkajúcimi sa výrobku sa prosím obráťte na
poradenské oddelenie rmy Hama.
Hotline: +49 9091 502-115 (nem./angl.)
Ďalšie informácie opodporenájdete tu:
www.hama.com
18. Pokyny pre likvidáciu
Ochrana životného prostredia:
Európska smernica 2012/19/EU a2006/66/EU
stanovuje: Elektrické aelektronické zariadenia,
rovnako ako batérie sa nesmú vyhadzovať do
domáceho odpadu. Spotrebiteľ je zo zákona
povinný zlikvidovať elektrické aelektronické zariadenia,
rovnako ako batérie na miesta ktomu určené.
Symbolizuje to obrázok vnávode na použitie, alebo na
balení výrobku. Opätovným zužitkovaním alebo inou
formou recyklácie starých zariadení/batérií prispievate k
ochrane životného prostredia.
19. Vyhlásenie ozhode
Hama GmbH &CoKGtýmto vyhlasuje, že
rádiové zariadenie typu [00113776] je vsúlade
so smernicou 2014/53/EÚ. Úplné EÚ vyhlásenie ozhode
je kdispozícii na tejto internetovej adrese: www.hama.
com-> 00113776-> Downloads.
Frekvenčné pásmo resp. pásma
Maximálny vysokofrekvenčný 5mW EIRP
2.40GHz ~
2.48HGz
69
Page 68

20. Technické údaje
Technológia Bluetooth® Bluetooth
®
v2.1 +EDR
Podporované proly A2DP,AVRCP
Frekvencia pre
Prenosy cez Bluetooth®
Prenosový výkon Bluetooth®
Dosah Bluetooth®
2.40GHz ~2.48HGz
Max. 10 dBm
10 m
Max. spojené zariadenia 1
Výkon
Zvukový systém 2.1
Frekvencia
Frekvenčný rozsah –SoundZbar: 160 –20000 Hz
Frekvenčný rozsah –subwoofer: 20 –160 Hz
Celkom 100 W
Max. Výkon hudby
SoundZbar 40 W
Subwoofer 60 W
Impedancia 6 Ω
Skreslenie THD
≤
0.5% (1K, 1W)
3,5 mm stereo plug AUX input
Prípojky
Optical input
Power Input
Napájanie 230 V~50Hz0.4 A
Akumulátor SoundZbar
Typakumulátora7,4 Vlítium-iónový min. 2550 mAh/18,87 Wh
Čas nabíjania ~3-4h
cez Bluetooth ~7h
Prevádzková doba
cez AUX ~12h
(v závislosti od hlasitosti aobsahu audia)
Rozmery (Š xHxV)/hmotnosť
Celkom 5.1 kg
Hmotnosť
Reproduktor SoundZbar 1,3 kg
Subwoofer 3.8kg
Rozmery
Reproduktor SoundZbar 485 x68x72mm
Subwoofer 250 x270 x250 mm
70
Page 69

O Manual de instruções
A. Elementos de comando eindicadores
SoundZbar
1. [POWER]
2. [SOURCE] paraseleçãodomodo de entrada
3. [MODE] paraseleçãodomodo de som
4. [PAIR] parainterrupçãodaligaçãoBluetooth
5. Interface NFC
6. [
] Ativaçãodomodo silencioso
7. VOL +/-
8. LED de estado da entrada óptica
9. LED de estado AUX
10. LED de estado Bluetooth
11. LED de estado do modo Gaming
12. LED de estado do modo de música
13. LED de estado do modo de cinema
B. Parte traseira da SoundZbar
1. Entrada Optical In
2. Entrada AUX IN
3. LED de estado de carregamento
4. Cabo de alimentação/DC-IN
C. Subwoofer
1. Botãodeligar/desligar
2. Regulador rotativo de graves
3. LED de estado da ligaçãodosubwoofer e
SoundZbar
Agradecemos que se tenha decidido por este produto
Hama! Antes de utilizar oproduto, leia completamente
estas indicações einformações. Guarde, depois, estas
informações num local seguroparaconsultas futuras.
Se transmitir oproduto paraumnovo proprietário,
entregue também as instruções de utilização.
1. Descrição dos símbolos de aviso edas notas
Perigo de choque eléctrico
Este símbolo remete paraumperigo de toque de
partes nãoisoladas do produto eventualmente
condutoras de tensãoperigosa que poderão
representar um perigo de choque eléctrico.
Aviso
Éutilizado paraidenticar informações de segurança
ou chamar aatençãoparaperigos eriscos especiais.
Nota
2. Descrição dos símbolos da etiqueta do
produto
•
•
3. Packungsinhalt
•SoundZbar
•Subwoofer
•Cabo de áudio de 3,5 mm
•Transformador
•Estas instruções de utilização
4. Indicações de segurança
• Oproduto está previsto apenas parautilização
• Nãoutilize oproduto perto de aquecedores, outras
• Proteja oproduto contrasujidade, humidade e
• Este aparelho nãopode ser manuseado por crianças,
• Nãodeixe cair oproduto nem osubmeta achoques
• Nãoutilize oproduto forados limites de desempenho
• Nãoutilize oproduto em áreas nas quais nãosão
• Tenha consideraçãopelas outras pessoas. Volumes de
• Nãoabraoproduto nem outilize caso este esteja
• Abateria está instalada de forma xa enãopode ser
• Mantenha aembalagem foradoalcance de crianças.
• Elimine imediatamente omaterial da embalagem em
• Nãoefectue modicações no aparelho. Perdados
•Mantenha oproduto afastado de pingos ou salpicos
Oproduto éadequado apenas para
instalaçãoeminteriores.
Aparelho elétrico da classe de proteçãoII
(isolamento duplo).
doméstica enãocomercial.
fontes de calor ou directamente exposto àluz solar.
sobreaquecimento eutilize-o somente em ambientes
secos.
tal como qualquer aparelho eléctrico!
fortes.
indicados nas especicações técnicas.
permitidos aparelhos electrónicos.
som elevados poderãointerferir no meio ambiente.
danicado.
removida. Elimine oproduto completo de acordo com
alegislaçãoemvigor.
Perigo de asxia.
conformidade com as normas locais aplicáveis.
direitos de garantia.
de líquido enãoposicione objetos com líquidos
como, por exemplo, jarras sobreoproduto.
Éutilizado paraidenticar informações adicionais ou
notas importantes.
71
Page 70

Perigo de choque elétrico
Nota –Primeiraligação
• Nãoabraoproduto, nem ocontinue autilizar em
caso de danos.
• Nãoutilize oproduto se otransformador CA,o
cabo adaptador ou ocabo de alimentaçãoestiver
danicado.
• Nãotente fazer qualquer manutençãoou
reparaçãodoproduto. Qualquer trabalho de
manutençãodeve ser executado por técnicos
especializados.
5. Colocação em funcionamento eoperação
Nota
• Pode utilizar oproduto ligada àrede elétrica ou
funcionando abateria. Para utilizar oproduto
ligada àredeelétrica, basta ligá-la àredeelétrica
(ver capítulo 5). Para utilizar oproduto com
funcionamento abateria, esta tem de ser primeiro
totalmente carregada (ver capítulo 14).
Aviso
• Ligue oproduto apenas auma tomada eléctrica
adequada. Atomada elétrica deve estar localizada
na proximidade do produto edeve ser facilmente
acessível.
• Desligue oproduto da rede eléctrica com obotão
de ligar/desligar –seoproduto nãopossuir este
botão, retireacha da tomada eléctrica.
• Atomada elétrica deve estar semprefacilmente
acessível.
• Desligue oproduto da rede elétrica quando nãoo
utilizar durante um longo período.
• Ligue ocabo de alimentaçãodaSoundZbar edo
subwoofer atomadas instaladas corretamente.
• Prima [POWER](1) paraligar aSoundZbar.
• Prima ointerruptor de ligar/desligar (1) paraligar o
subwoofer.
• OLED de estado da ligação(3) no subwoofer começa
apiscar aazul.
• Após aligação, aSoundZbar eosubwoofer
estabelecem automaticamente aligaçãoentresi
por Bluetooth.
• Depois de aligaçãoter sido estabelecida com
sucesso, oLED de estado da ligação(3) no
subwoofer acende permanentemente aazul.
6. Primeira ligação Bluetooth (emparelhamento)
Pode ligar os seus dispositivos àSoundZbar através de
Bluetooth eusá-la parareproduzir sinais de áudio.
Nota –
Bluetooth
®
• Verique se oseu dispositivo móvel (telemóvel,
etc.) possui afunçãoBluetooth.
• Tenha em atençãoque oalcance máximo do
Bluetooth éde10metros, sem obstáculos como
paredes, pessoas, etc.
• Aligaçãopode sofrer interferências devido aoutros
dispositivos/ligações Bluetooth na área
• ASoundZbar só pode estar emparelhada com um
dispositivo.
• Tenha em conta que acompatibilidade depende
dos persBluetooth suportados, bem como das
versões Bluetooth usadas. (ver: Dados técnicos,
Manual de instruções do dispositivo nal utilizado)
• Cerique-se de que oseu dispositivo Bluetooth está
ligado eque oBluetooth está ativado.
• Ative omodo Bluetooth premindo várias vezes
[SOURCE](2) na SoundZbar.
• OLED de estado da ligaçãoBluetooth (10) começa a
piscar aazul.
• Abraomenu de denições Bluetooth no seu
dispositivo eaguarde até que uRage SoundZbar
seja apresentado na lista de dispositivos Bluetooth
encontrados.
• Selecione aSoundZbar uRage SoundZbar na lista
de dispositivos disponíveis eaguarde até que a
SoundZbar seja apresentada como estando ligada ao
seu dispositivo nas denições Bluetooth.
• OLED de estado da ligaçãoBluetooth (10) ca agora
aceso permanentemente aazul.
• Inicie econtrole areproduçãodeáudio no dispositivo.
72
Page 71

Palavra-passe Bluetooth
Nota –
®
• Alguns dispositivos requerem aintroduçãodeuma
palavra-passe paraestabelecer aligaçãoaoutro
dispositivo Bluetooth.
• Introduza apalavra-passe 0000 paraestabelecer
aligaçãoàrádio se tal lhe for solicitado pelo seu
dispositivo.
7. Primeira ligação Bluetooth (emparelhamento)
através de NFC
• Garanta que oNFC do seu smartphone ésuportado e
está ativado.
• Ative omodo Bluetooth premindo várias vezes
[SOURCE](2) na SoundZbar.
• OLED de estado da ligaçãoBluetooth (10) começa a
piscar aazul.
• Toque com oseu smartphone na interface NFC (5) da
SoundZbar.
• OLED de estado da ligaçãoBluetooth (10) ca agora
aceso permanentemente aazul.
• Inicie econtrole areproduçãodeáudio no dispositivo.
8. Interromper aligação Bluetooth
• Prima emantenha premido [PAIR](4) durante aprox.
2segundos parainterromper aligaçãoBluetooth ao
seu dispositivo.
• ASoundZbar pode agoraser ligada aoutro
dispositivo. (Ver capítulo 5)
9. Ligação através da entrada auxiliar
Através da entrada de áudio analógica AUX épossível
ligar inúmeros dispositivos (por ex. consola de jogos
de vídeo, smartphone, tablet, leitor de MP3, etc.) e
também fontes analógicas mais antigas (leitor de CD/
DVD, etc.) àSoundZbar ereproduzir orespetivo sinal de
áudio através da mesma.
Nota
• Desligue aSoundZbar antes de lhe ligar um
dispositivo.
• Nãodobrenem esmague ocabo.
• Ligue oseu dispositivo através da entrada AUX (2)
por meio do cabo áudio de 3,5 mm incluído (cabo
jack) àSoundZbar.
• Prima [POWER](1) paraligar aSoundZbar.
• Ative omodo AUX premindo várias vezes [SOURCE]
(2) na SoundZbar.
• OLED de estado do modo AUX (9) ca aceso
permanentemente.
• Inicie econtrole areproduçãodeáudio no dispositivo.
10. Ligação através de cabo de áudio óptico
Através da entrada de áudio digital da SoundZbar é
possível ligar oseu dispositivo (por ex. consola de jogos
de vídeo, televisor,etc.) ereproduzir orespetivo sinal de
áudio através da mesma.
Nota
• Desligue aSoundZbar antes de lhe ligar um
dispositivo.
• Antes da ligação, retireastampas de proteçãode
ambas as extremidades do cabo de sinal óptico.
• Nãodobrenem esmague ocabo.
• Ligue um cabo de sinal óptico àentrada de áudio
óptica (1) na SoundZbar eàsaída de áudio óptica do
seu dispositivo.
• Prima [POWER](1) paraligar aSoundZbar.
• Ative omodo OPT premindo várias vezes [SOURCE]
(2) na SoundZbar.
• OLED de estado do modo OPT (8) ca aceso
permanentemente.
• Inicie econtrole areproduçãodeáudio no dispositivo.
11. Modos de som
Para areproduçãodos seus sinais de áudio, pode optar
por três modos diferentes:
Omodo Gaming ativa agudos egraves adicionais para
uma experiência de jogo melhorada.
Omodo de música ativa uma resposta de frequência
linear parareproduzir uma multitude de estilos musicais
de forma potente.
Omodo de cinema ativa um efeito de som espacial
paraque possa aperceber-se de cada detalhe sonoro.
• Prima várias vezes [MODE](3) paraselecionar os
diferentes modos de som.
• OLED de estado (11) do modo Gaming acende
permanentemente se omodo Gaming estiver
selecionado.
• OLED de estado (12) do modo de música acende
permanentemente se omodo de música estiver
selecionado.
• OLED de estado (13) do modo de cinema acende
permanentemente se omodo de cinema estiver
selecionado.
73
Page 72

12. Regulação de graves
• Rode oregulador rotativo (2) no subwoofer para
aumentar ou diminuir os graves.
13. Regulação do volume
• Prima [VOLUME]+/- (7) na SoundZbar para
aumentar/baixar ovolume.
• Prima [
14. Utilização da SoundZbar com funcionamento
abateria
• Utilize apenas otransformador incluído parao
• De modo geral, nãoutilize carregadores que
• Evite guardar,carregar eutilizar abateria sob
• Em caso de um período de armazenamento
• ASoundZbar dispõe de uma bateria recarregável.
• Certique-se que aSoundZbar está desligada antes
• Inicie oprocesso de carregamento ligando o
• OLED de estado de carregamento (3) acende-se
• Pode demorar até 4horas paraque abateria que
• Quando abateria estiver totalmente carregada, oLED
• Desligue entãotodas as ligações de cabos eàrede
carregamento da bateria
• Um processo de carregamento completo demora
• Se acapacidade da bateria for inferior a10%,
](6) parasilenciar aSoundZbar.
Aviso –Bateria
carregamento.
apresentem danos nem tente repará-los.
temperaturas extremas.
prolongado, carregue abateria regularmente (pelo
menos, trimestralmente).
Antes da primeirautilização, abateria tem de ser
totalmente carregada.
do carregamento.
transformador incluído ao cabo de alimentação(4) e
auma tomada.
permanentemente averde durante oprocesso de
carregamento.
totalmente carregada.
de estado de carregamento (3) apaga-se.
elétrica.
Nota –Processo de carregamento/
cerca de 3-4 horas.
oLED de estado de carregamento (3) pisca
rapidamente avermelho. Esta informaçãoapenas é
emitida se aSoundZbar estiver ligada.
15. Manutenção econservação
Limpe oproduto apenas com um pano sem apos
ligeiramente humedecido enãoutilize produtos de
limpeza agressivos.
16. Exclusão de garantia
AHama GmbH &CoKGnãoassume qualquer
responsabilidade ou garantia por danos provocados
pela instalação, montagem ou manuseamento
incorrectos do produto enãoobservaçãododas
instruções de utilizaçãoe/ou das informações de
segurança.
17. Contactos eapoio técnico
Em caso de dúvidas sobreoproduto, contacte oserviço de
assistência ao produto da Hama.
Linha de apoio ao cliente: +49 9091 502-115 (alemão/inglês)
Para mais informações sobreosserviços de apoio ao cliente,
visite: www.hama.com
18. Indicações de eliminação
Nota em Protecção Ambiental:
Após aimplementaçãodadirectiva comunitária
2012/19/EU e2006/66/EU no sistema legal
nacional, oseguinte aplica-se: Os aparelhos
eléctricos eelectrónicos, bem como baterias,
nãopodem ser eliminados juntamente com olixo
doméstico. Consumidores estãoobrigados por lei a
colocar os aparelhos eléctricos eelectrónicos, bem como
baterias, sem uso em locais públicos especícos para
este efeito ou no ponto de venda. Os detalhes paraeste
processo sãodenidos por lei pelos respectivos países.
Este símbolo no produto, omanual de instruções ou a
embalagem indicam que oproduto está sujeito aestes
regulamentos. Reciclando, reutilizando os materiais dos
seus velhos aparelhos/baterias, esta afazer uma enorme
contribuiçãoparaaprotecçãodoambiente.
19. Declaração de conformidade
O(a) abaixo assinado(a) Hama GmbH &CoKG
declaraque opresente tipo de equipamento de
rádio [00113776] está em conformidade com a
Diretiva 2014/53/UE.
Otexto integral da declaraçãodeconformidade está
disponível no seguinte endereço de Internet: www.
hama.com-> 00113776-> Downloads.
Banda(s) de frequências
Potência máxima transmitida 5mW EIRP
2.40GHz ~2.48HGz
74
Page 73

20. Especificações técnicas
Tecnologia Bluetooth® Bluetooth
®
v2.1 +EDR
unterstützte Prole A2DP,AVRCP
Frequência paraas
transmissões Bluetooth®
Potência de transmissãoBluetooth®
Alcance Bluetooth®
2.40GHz ~2.48HGz
Máx. 10 dBm
10 m
N.º máx. de dispositivos emparelhados 1
Potência
Sistema de som 2.1
Frequência
Gama de frequências da SoundZbar: 160 –20000 Hz
Gama de frequências do subwoofer 20 –160 Hz
total 100 W
Máx. Potência musical
SoundZbar 40 W
Subwoofer 60 W
Impedância 6 Ω
DistorçãoTHD
≤
0.5% (1K, 1W)
Entrada AUX estéreo de 3,5 mm
Ligações
Entrada óptica
Entrada de alimentação
Alimentaçãodetensão230 V~50Hz0.4 A
Bateria da SoundZbar
Tipo de bateria 7.4V Li-Ion mín. 2550 mAh /18.87 Wh
Tempo de carregamento ~3-4h
via Bluetooth ~7h
Tempo de autonomia
via AUX ~12h
(conforme ovolume econteúdo áudio)
Dimensões (L xPxA) /Peso
total 5.1 kg
Peso
SoundZbar 1.3kg
Subwoofer 3.8kg
Dimensões
SoundZbar 485 x68x72mm
Subwoofer 250 x270 x250 mm
75
Page 74

T Kullanma kılavuzu
A. Kumanda elemanları ve göstergeler
SoundZbar
1. [POWER]
2. [SOURCE] giriş modunun seçimi için
3. [MODE] ses modunun seçimi için
4. [PAIR]Bluetooth bağlantısını kesmek için
5. NFC arabirimi
6. [
] Sesi kapat tuşu
7. VOL +/-
8. Optik giriş durum LED'i
9. AUX durum LED'i
10. Bluetooth durum LED'i
11. Gaming modu durum LED'i
12. Musik modu durum LED'i
13. Cinema modu durum LED'i
B. SoundZbar arka kısmı
1. Optical In soketi
2. AUX In soketi
3. Şarj durum LED'i
4. Elektrik girişi/DC-IN
C. Subwoofer
1. Açma/kapatma anahtarı
2. Bass için döner düğme
3. Subwoofer ve SoundZbar bağlantısı durum LED'i
Bir Hama ürünü satınaldığınıziçin teşekkür ederiz!
Biraz zaman ayırınveönce aşağıda verilen talimatları
ve bilgileri tümüyle okuyun. Daha sonradabukullanım
kılavuzunu ileride kullanmak üzereemin bir yerde
saklayın. Bu cihazı başkasına verdiğinizde, lütfen bu
kullanımkılavuzunu da yeni sahibine birlikte veriniz.
1. Uyarı sembollerinin ve uyarılarınaçıklaması
Elektrik çarpması tehlikesi
Bu sembol üründeki yalıtılmamış parçalaratemas
etme tehlikesine işaret etmektedir.Buparçalar bir
elektrik çarpması tehlikesi oluşturabilecek yükseklikte
tehlikeli gerilimler taşıyor olabilir.
Uyarı
Güvenlik uyarılarını işaretlemek veya özellikle tehlikeli
durumlaradikkat çekmek için kullanılır.
2. Ürün işareti simgelerinin açıklanması
•
•
3. Paketin içindekiler
•SoundZbar
•Subwoofer
•3.5 mm ses kablosu
• Şebeke adaptörü
•Bukullanımkılavuzu
4. Güvenlik uyarıları
• Bu ürün ticari olmayan özel evsel kullanımiçin
• Ürünü kalorifer veya diğer ısı kaynakları yakınında
•Cihazı pisliklere, neme ve aşırıısınmaya karşı
• Bu cihaz, diğer elektrikli cihazlar gibi çocuklar
• Ürünü yeredüşürmeyin ve çok aşırı sarsıntılaramaruz
• Bu ürünü teknik bilgilerde verilen kapasite sınırları
• Bu ürünü elektronik cihazlarınkullanılmasına izin
• Başkalarına saygı gösterin. Yüksek sesler çevrenizi
• Ürünün içini açmayınvehasarlı ürünleri çalıştırmayın.
• Akü sabit olarak monte edilmiştir ve çıkartılamaz,
• Çocukları ambalaj malzemelerinden uzak tutun,
• Ambalaj malzemelerini yerel olarak geçerli talimatlara
• Cihazda herhangi bir değişiklik yapmayınız. Aksi
•Ürünü damla akıtan veya püskürten sıvılardan uzak
Bu ürün sadece bina içinde kullanmak için
tasarlanmıştır.
Koruma sınıfı II'ye ait elektrikli cihaz (çift
izolasyonlu).
öngörülmüştür.
kullanmayınveya doğrudan güneşışınlarına maruz
bırakmayın.
koruyunuz ve sadece kuru ortamlarda kullanınız.
tarafından kullanılmamalıdır!
bırakmayın.
dışında kullanmayın.
verilmeyen alanlarda kullanmayınız.
rahatsızedebilir veya olumsuz olarak etkileyebilir.
cihazıntamamını yasal direktiereuygun olarak atık
toplamaya kazandırın.
boğulma tehlikesi mevcuttur.
uygun olarak atıktoplamaya veriniz.
takdirde her türlü garanti hakkı kaybolur.
tutun ve ürünün üzerine sıvı dolu cisimleri, örneğin
vazoları koymayınız.
Not
Ek bilgileri veya önemli uyarıları işaretlemek için
kullanılır.
76
Page 75

Elektrik çarpması tehlikesi
Bilgi – İlk kez çalıştırma
• Ürünün içini açmayınvehasarlı ürünleri
çalıştırmayın.
• AC adaptörü, adaptör kablosu veya şebeke kablosu
arızalı olduğunda ürünü kullanmayın.
• Ürünü kendiniz onarmaya veya bakımını yapmaya
çalışmayınız. Tüm bakımçalışmalarını yetkili usta
personele yaptırın.
5. Devreye alma ve çalıştırma
Not
• Ürünü şebekeli çalışmada ve akülü çalışmada
kullanma olanağınızvar.Ürünü şebekeli çalışmada
kullanmak için sadece elektrik şebekesine
bağlanması yeterlidir (bkz. Bölüm 5). Ürünü akülü
çalışmada kullanmak için daha önce tümüyle şarj
edilmesi gerekir (bkz. Bölüm 14).
Uyarı
• Ürünü sadece bu amaç için izin verilen bir prizde
çalıştırınız. Priz ürüne yakınolmalı ve kolayca
erişilebilmelidir
• Bu ürünü şebekeden ayırmak için aç/kapat
anahtarını kullanınız-böyle bir anahtar yoksa,
şebeke kablosunu prizden çekin.
• Çoklu prizlerde bağlı olan tüketicilerin izin
verilebilir toplam güç saryatını aşmamalarına
dikkat edin.
• Ürünü uzun sürekullanmadığınızda şebekeden
ayırın.
• SoundZbar ve Subwoofer'in elektrik kablolarını
düzgün şekilde kurulu prizlerebağlayın.
• SoundZbar'ı açmak için [POWER](1) üzerine basın.
• Subwoofer'i açmak için açma/kapatma anahtarına
(1) basın.
• Subwoofer'deki bağlantının(3) durum LED'i mavi
renkte yanıpsönmeye başlar.
• Açtıktan sonraSoundZbar ve Subwoofer otomatik
olarak Bluetooth üzerinden birbirine bağlanır.
• Bağlantı sağlandıktan sonraSubwoofer'deki
bağlantının(3) durum LED'i sürekli mavi renkte
yanar.
6. Bluetooth ile ilk kez bağlantı (eşleştirme)
Bluetooth yoluyla cihazlarınızı SoundZbar'a
bağlayabilir ve ses sinyalleri için oynatma aygıtı olarak
kullanabilirsiniz.
Not –
Bluetooth
®
• Mobil uç cihazınızın(akıllı telefon, tablet bilgisayar,
vs.) Bluetooth uyumlu olup olmadığını kontrol edin
• Bluetooth menzilinin maks. 10 metreolduğunu,
duvarlar,insanlar vs. gibi engellerin buna dahil
olmadığını dikkate alın.
• Bağlantınınçevredeki başka Bluetooth cihazları/
bağlantıları tarafından engellenmesi mümkün
olabilir.
• SoundZbar her zaman sadece bir uç cihaza
bağlanabilir.
• Uyumluluğun, desteklenen Bluetooth prollerine ve
kullanılan Bluetooth versiyonlarına bağlı olduğunu
dikkate alın. (bkz.: Teknik Özellikler,kullanılan uç
cihazınkullanımkılavuzu)
• Bluetooth uyumlu cihazınızınaçıkveBluetooth
işlevinin etkinleştirilmiş olduğundan emin olun.
• SoundZbar'da tekrarlışekilde [SOURCE](2) üzerine
basarak Bluetooth modunu etkinleştirin.
• Bluetooth bağlantısının(10) durum LED'i mavi renkte
yanıpsönmeye başlar.
• Cihazınızda Bluetooth ayarlarını açınvealgılanan
Bluetooth cihazları listesinde uRage SoundZbar'ın
görüntülenmesini bekleyin.
• Kullanılabilen cihazlar listesinde SoundZbar uRage
SoundZbar'ı seçin ve cihazınızınBluetooth ayarlarında
SoundZbar bağlı olarak görüntülenene kadar bekleyin.
• Bluetooth bağlantısının(10) durum LED'i şimdi sürekli
olarak mavi renkte yanar.
• Ses yayınını uç cihazınızda başlatınvekumanda edin.
77
Page 76

Bluetooth®parolası
Not –
•Bazı uç cihazlar,başka bir Bluetooth cihazıyla
bağlantı kurmak için bir parolaya gerek duyar.
•Uçcihazınıztalep ettiğinde radyoya bağlantı
kurmak için parola olarak 0000 girin.
7. NFC üzerinden Bluetooth ile ilk kez bağlantı
(eşleştirme)
• Akıllı telefonunuz tarafından NFC'nin
desteklendiğinden ve etkinleştirilmiş olduğundan
emin olun.
• SoundZbar'da tekrarlışekilde [SOURCE](2) üzerine
basarak Bluetooth modunu etkinleştirin.
• Bluetooth bağlantısının(10) durum LED'i mavi renkte
yanıpsönmeye başlar.
• Akıllı telefonunuz ile SoundZbar'da NFC arabirimine
(5) dokunun.
• Bluetooth bağlantısının(10) durum LED'i şimdi sürekli
olarak mavi renkte yanar.
• Ses yayınını uç cihazınızda başlatınvekumanda edin.
8. Bluetooth bağlantısınınkesilmesi
• Cihazınızda Bluetooth bağlantısını kesmek için
yaklaşık2saniye boyunca [PAIR](4) üzerine basıp
tutun.
• SoundZbar şimdi başka bir uç cihaza bağlanabilir.
(bkz. Bölüm 5)
9. Auxiliary Input üzerinden bağlantı
Analog ses girişiAUX üzerinden birçok uç cihazı
(örneğin oyun konsolu, akıllı telefon, tablet PC, MP3
çalar,vs.) ve daha eski analog kaynakları (CD/DVD
çalar vs.) SoundZbar'a bağlayabilir ve ses sinyallerini
SoundZbar üzerinden yayınlayabilirsiniz.
Not
• Bir uç cihazı bağlamadan önce SoundZbar'ı
kapatın.
• Kablo bükülmemeli ve herhangi bir yere
sıkıştırılmamalıdır.
• Cihazınızı AUX soketi (2) üzerinden ekteki 3,5 mm'lik
ses kablosu (jak kablosu) aracılığı ile SoundZbar'a
bağlayın.
• SoundZbar'ı açmak için [POWER](1) üzerine basın.
• SoundZbar'da [SOURCE](2) üzerine tekrarlışekilde
basarak AUX modunu etkinleştirin.
• AUX modunun (9) durum LED'i sürekli olarak yanar.
• Ses yayınını uç cihazınızda başlatınvekumanda edin.
10. Optik ses kablosu üzerinden bağlantı
SoundZbar'ındijital ses girişiüzerinden uç cihazınızı
(örneğin oyun konsolu, TV cihazı vs.) bağlayabilir ve ses
sinyalini SoundZbar üzerinden yayınlayabilirsiniz.
Not
• Bir uç cihazı bağlamadan önce SoundZbar'ı
kapatın.
• Bağlamadan önce optik kablonun her iki ucundan
koruyucu kapakları çıkarın.
• Kablo bükülmemeli ve herhangi bir yere
sıkıştırılmamalıdır.
• Bir optik sinyal kablosunu SoundZbar'ınoptik ses
girişinde (1) ve uç cihazınızınoptik ses çıkışında
bağlayın.
• SoundZbar'ı açmak için [POWER](1) üzerine basın.
• SoundZbar'da [SOURCE](2) üzerine tekrarlışekilde
basarak OPT modunu etkinleştirin.
• OPT modunun (8) durum LED'i sürekli yanar.
• Ses yayınını uç cihazınızda başlatınvekumanda edin.
11. Ses modları
Ses sinyallerinizin yayını için üç değişik mod arasında
seçim yapabilirsiniz:
Gaming modu daha iyi bir oyun deneyimi için seslerde
ayrıca daha fazla yükseklik ve derinliğietkinleştirir.
Musik modu çok sayıda müzik stilini canlı bir biçimde
oynatabilmek için doğrusal bir frekans yanıtını
etkinleştirir.
Cinema modu çevresel sese benzer bir etkiyi
etkinleştirerek her ses detayınınalgılanabilmesini sağlar.
• Değişik ses modlarını seçmek için [MODE](3) üzerine
tekrarlışekilde basın.
• Gaming modu seçildiğinde, Gaming modunun durum
LED'i (11) sürekli yanar.
• Musik modu seçildiğinde, Musik modunun durum
LED'i (12) sürekli yanar.
• Cinema modu seçildiğinde, Cinema modunun durum
LED'i (13) sürekli yanar.
78
Page 77

12. Bass ayarı
• Bass'ı yükseltmek veya düşürmek için Subwoofer'deki
döner düğmeyi (2) çevirin.
13. Ses şiddeti ayarı
• Ses şiddetini yükseltmek/düşürmek için SoundZbar'da
[VOLUME]+/- (7) üzerine basın.
• SoundZbar'ınsesini kapatmak için [
](6) üzerine
basın.
14. Akülü çalışmada SoundZbar'ınkullanımı
Uyarı –Akü
• Şarj için yalnızca ekteki şebeke adaptörünü
kullanın.
• Arızalışarj cihazlarını artıkkullanmayınvetamir
etmeyi de denemeyin.
• Aşırı sıcakta depolamayın, şarj etmeyin veya
kullanmayın.
• Uzun bir süredepolandığında düzenli olarak (en az
üç ayda bir) şarj edilmelidir.
• SoundZbar yeniden şarj edilebilir bir aküye sahiptir.
İlk kullanımöncesi akünün tamamen şarj edilmesi
gerekir.
• Şarj etmeden önce SoundZbar'ınkapalı olduğundan
emin olun.
• Ekteki adaptörü elektrik girişine (4) ve bir prize
bağlayarak şarj işlemini başlatın.
• Şarj işlemi sırasında şarj durum LED’i (3) sürekli yeşil
renkte yanar.
• Akünün tam şarj olması en fazla 4saat alır.
• Akü tümüyle şarj olduktan sonra şarj durum LED’i (3)
söner.
• Ardından tüm kablo ve şebeke bağlantılarını ayırın.
Not – Şarj işlemi/ Akü kapasitesi
• Şarj işleminin tamamlanması yaklaşık3-4 saat alır.
• Akü kapasitesi %10'dan daha az ise, şarj durum
LED'i (3) hızlışekilde kırmızı renkte yanıpsöner.Bu
bilgiyi yalnızca SoundZbar açıkken alabilirsiniz.
15. Bakımvetemizlik
Bu ürünü sadece havsız, hafnemli bir bez ile silin ve
agresif temizleyiciler kullanmayın.
16. Sorumsuzluk beyanı
Hama GmbH &Co. KG şirketi yanlış kurulum, montaj
ve ürünün amacına uygun olarak kullanılmaması
durumunda veya kullanımkılavuzu ve/veya güvenlik
uyarılarına uyulmaması sonucu oluşan hasarlar için
sorumluluk kabul etmez ve bu durumda garanti hakkı
kaybolur.
17. Servis ve destek
Ürünle ilgili herhangi bir sorunuz varsa, lütfen HAMA
ürün danışmanlığına başvurunuz.
Destek hattı:+49 9091 502-115 (Alm/İng)
Diğer destek bilgileri için, bkz.:
www.hama.com
18. Atığaayırma notları
Çevre koruması için notlar:
2012/19/AB ve 2006/66/ATsayılı Avrupa
direktierinin ulusal mevzuata geçirildiği
tarihten itibaren aşağıdaki kurallar geçerlidir:
Elektrikli cihazlar,elektronik cihazlar ve piller
normal evsel çöpe atılamaz. Tüketiciler,kullanım
ömürlerinin sonuna gelmiş elektrikli ve elektronik
cihazları ve pilleri, kamuya ait toplama yerlerine veya
satınalındıkları yerlereiade etmekle yükümlüdürler.Bu
konu ile ilgili ayrıntılar ulusal yasalarla
düzenlenmektedir.Ürün üzerinde, kullanımkılavuzunda
veya ambalajda bulunan bu sembol tüketiciyi bu
konuda uyarır. Eski cihazların/pillerin geri kazanımı,
yapıldıkları malzemelerin değerlendirilmesi veya diğer
değerlendirme şekilleri ile, çevrekorumasına önemli bir
katkıda bulunursunuz.
19. Uygunluk beyanı
İş bu belge ile Hama GmbH &CoKG, kablosuz
sistem tipin [00173165, 00113776] 2014/53/AB
sayılı direktife uygun olduğunu beyan eder.AB
Uygunluk Beyanınıntam metni aşağıdaki internet
adresinde incelenebilir:
www.hama.com-> 00113776 -> Downloads.
Frekans bandı/frekans bantları
Işınlanan maksimum
yayıngücü
2.40GHz ~
2.48HGz
5mW EIRP
79
Page 78

20. Teknik bilgiler
Bluetooth® Teknolojisi Bluetooth
®
v2.1 +EDR
Desteklenen proller A2DP,AVRCP
Frekans
Bluetooth® iletimleri için
Bluetooth® iletim gücü
Bluetooth® menzili
2.40GHz ~2.48HGz
Max. 10 dBm
10 m
Maks. bağlı cihazlar 1
Güç
Ses sistemi 2.1
Frekans
SoundZbar frekans aralığı :160 -20000 Hz
Subwoofer frekans aralığı:20-160 Hz
Toplam 100 W
Maks. Müzik gücü
SoundZbar 40 W
Subwoofer 60 W
Empedans 6 Ω
Distorsiyon THD
≤
0.5% (1K, 1W)
3.5 mm stereo ş AUX girişi
Bağlantılar
Optik girişi
Power girişi
Gerilim beslemesi 230 V~50Hz0.4 A
SoundZbar aküsü
Akü tipi 7.4V Li-Ion min. 2550mAh /18.87Wh
Şarj süresi ~3-4 saat
Bluetooth üzerinden ~7saat
Çalışma süresi
AUX üzerinden ~12saat
(ses şiddetine ve içeriğine bağlı)
Boyutlar (G xDxY) /Ağırlık
Toplam 5.1 kg
Ağırlık
SoundZbar 1.3kg
Subwoofer 3.8kg
Boyutlar
SoundZbar 485 x68x72mm
Subwoofer 250 x270 x250 mm
80
Page 79

S Bruksanvisning
A. Manöverelement och indikeringar SoundZbar
1. [POWER]
2. [SOURCE] för val av ingångsläget
3. [MODE] för val av ljudläget
4. [PAIR] för att bryta Bluetooth-förbindelsen
5. NFC-gränssnitt
6. [
] Ljud lös-funktion
7. VOL +/-
8. Statuslysdiod för optisk ingång
9. Statuslysdiod för AUX
10. Statuslysdiod för Bluetooth
11. Statuslysdiod för spelläge
12. Statuslysdiod för uppspelningsläge
13. Statuslysdiod för bioläge
B. SoundZbar-enhetens baksida
1. Optiskt IN-uttag
2. AUX IN-uttag
3. Statuslysdiod för laddning
4. Nätkabel/DC- IN
C. Subwoofer
1. Strömbrytare
2. Vridreglage för bas
3. Statuslysdiod för förbindelsen mellan Subwoofer
och SoundZbar
Tack för att du valde en Hama-produkt!
Ta god tid på dig och börja med att noggrant läsa
igenom följande anvisningar och information. Förvara
sedan bruksanvisningen på en säker plats så att du kan
titta iden vid behov.Överlämna bruksanvisningen till
nästa ägareomdusäljer apparaten.
1. Förklaring av varningssymboler och
hänvisningar
Fara för elektrisk stöt
Denna symbol hänvisar till faravid beröring av
oisolerade produktdelar som kan ha så hög spänning
att det nns risk för elektrisk stöt.
Varning
Används för att markerasäkerhetshänvisningar eller
för att rikta uppmärksamhet mot speciella faror och
risker.
2. Förklaring av symboler iproduktmärkningen
•
•
3. Förpackningens innehåll
•SoundZbar
•Subwoofer
•3,5 mm ljudkabel
•Nätadapter
•Denna bruksanvisning
4. Säkerhetsanvisningar
• Produkten är avsedd för privat hemanvändning, inte
• Använd inte produkten alldeles intillelementet, andra
• Skydda produkten mot smuts, fukt och överhettning
• Precis som alla elektriska apparater ska även denna
• Tappa inte produkten och utsätt den inte för kraftiga
• Använd inte produkten utöver de effektgränser som
• Använd inte produkten inom områden där
• Ta hänsyn. Höga volymer kan störaellerpåverka din
• Öppna inte produkten och använd den inte mer om
• Det uppladdningsbarabatteriet är fast monterat och
•Det är viktigt att barn hållsborta från
• Kasseraförpackningsmaterialet direkt enligt lokalt
• Förändraingenting på produkten. Då förlorar du alla
•Håll produkten borta fråndroppande eller stänkande
Produkten är baraavsedd för
inomhusanvändning.
Elektrisk apparat av skyddsklass II (dubbelt
isolerad).
yrkesmässig användning.
värmekällor eller idirekt solsken.
och använd den baraiinomhusmiljöer.
förvaras utom räckhåll för barn!
vibrationer.
anges iden tekniska datan.
elektroniska apparater inte är tillåtna.
omgivning.
den är skadad.
kan inte tas bort. Kasserahela produkten enligt de
lagstadgade bestämmelserna.
förpackningsmaterialet. Det nns risk för kvävning.
gällande kasseringsregler.
garantianspråk.
vätska och placerainga föremålfyllda med vätska,
t.ex. vaser,påprodukten.
Observera
Används för att markeraytterligareinformation eller
viktiga anvisningar.
81
Page 80

Fara för elektrisk stöt
Information -första gången radion sätts på
• Öppna inte produkten och använd den inte mer om
den är skadad.
• Använd inte produkten om AC-adaptern,
adapterkabeln eller nätkabeln är skadade.
• Försök inte utföraservice på produkten eller
repareraden själv.Överlåtallt servicearbete till
kompetent fackpersonal.
5. Idrifttagning och användning
Observera
• Produkten kan användas med nätkabel eller batteri.
Om man vill använda produkten med nätkabeln
behöver man baraansluta den tillelnätet (se
kapitel 5). Om man vill använda produktens batteri
måste den först varahelt laddad (se kapitel 14).
Varning
• Anslut baraapparaten till ett godkänt uttag.
Eluttaget måste sitta inärheten av produkten och
varalätt att nå.
• Skilj produkten frånelnätet med hjälp av
strömbrytaren –omden saknas drar du ut
elsladden ur eluttaget.
• Eluttaget måste alltid varalätt att nå.
• Koppla bort produkten frånelnätet om den inte ska
användas under en längretid.
• Förbind SoundZbar-enhetens och subwooferns
nätkabel med korrekt installerade uttag.
• Tryck på [POWER](1), för att koppla på SoundZbar.
• Tryck på på-/av-knappen (1) för att koppla på
subwoofern.
• Statuslysdioden för förbindelsen (3) på subwoofern
börjar att blinka blått.
• När du är klar med inkopplingen förbinds
SoundZbar-enheten och subwoofern automatiskt
via Bluetooth.
• När förbindelsen har upprättats lyser
statuslysdioden för förbindelsen (3) på subwoofern
konstant blått.
6. Bluetooth första anslutning (parkoppling)
Via Bluetooth kan du ansluta terminalutrustningar
till SoundZbar-enheten och använda den som
uppspelningsenhet.
Observera–
Bluetooth
®
• Kontrolleraatt den mobila slutapparaten
(mobiltelefon etc.) är Bluetooth kompatibel.
• Observeraatt räckvidden för Bluetooth är max. 10
meter utan hinder som väggar,människor etc.
• Anslutningen kan störas av andraBluetooth
enheter/ anslutningar inärheten.
• SoundZbar-enheten kan baraanslutas till en
terminalutrustning itaget.
• Tänk på att kompatibiliteten beror på stödda
Bluetooth proler och på vilken Bluetooth
version som används. (se: Teknisika data,
användarhandboken för den använda enheten)
• Säkerställ att den Bluetooth kompatibla slutapparaten
är påslagen och att Bluetooth är aktiverat.
• AktiveraBluetooth-läget genom att trycka era
gånger på [SOURCE](2) på SoundZbar.
• Bluetooth-förbindelsens (10) statuslysdiod börjar att
blinka blått.
• Öppna Bluetooth-inställningarna på
terminalutrustningen och vänta tills uRage SoundZbar
visas ilistan med Bluetooth-enheter.
• Välj SoundZbar uRage SoundZbar ilistan över
tillgängliga enheter och vänta tills du ser att
SoundZbar-enheten är ansluten till Bluetoothinställningarna för terminalutrustningen.
• Bluetooth-förbindelsens (10) statuslysdiod lyser nu
med fast blått sken.
• Starta och styr ljuduppspelningen via
terminalutrustningen.
82
Page 81

Observera–
• Vissa slutapparater kräver ett lösenordför att
upprätta anslutningen till en annan Bluetooth
apparat.
• Ange för anslutning till radio lösenordet 0000 om
slutapparaten begär ett lösenord.
7. Bluetooth första anslutning (parkoppling)
• Kontrolleraatt din smartphone har stöd för NFC och
att gränssnittet är på.
• AktiveraBluetooth-läget genom att trycka era
gånger på [SOURCE](2) på SoundZbar.
• Bluetooth-förbindelsens (10) statuslysdiod börjar att
blinka blått.
• Vidrör NFC-gränssnittet (5) på SoundZbar med din
smartphone.
• Bluetooth-förbindelsens (10) statuslysdiod lyser nu
med fast blått sken.
• Starta och styr ljuduppspelningen via
terminalutrustningen.
8. Koppla från bluetooth-anslutningen
• Tryck ned och håll [PAIR](4) nedtryckt ica2
sekunder för att bryta Bluetooth-förbindelsen till
terminalutrustningen.
• Nu kan du förbinda SoundZbar med en annan
terminalutrustning. (se kapitel 5)
9. Förbindelse via auxiliary input
Via den analoga ljudingången AUX kan man ansluta
många olika typer av terminalutrustningar (t.ex.
spelkonsoler,smartphones, surfplattor,MP3-spelare
osv.) liksom äldreanaloga källmodeller (CD-/DVDspelareosv.) till SoundZbar samt återge ljudsignalen via
SoundZbar.
Observera
• Innan du ansluter en terminalutrustning ska du
stänga av SoundZbar.
• Böj och kläm inte kabeln.
• Förbind terminalutrustningen med SoundZbar via
AUX-uttaget (2) med hjälp av den medföljande 3,5
mm-ljudkabeln (teleplugg).
• Tryck på [POWER](1), för att koppla på SoundZbar.
• AktiveraAUX-läget genom att trycka eragånger på
[SOURCE](2) på SoundZbar.
• Statuslysdioden för AUX-läget (9) lyser med fast sken.
• Starta och styr ljuduppspelningen via
terminalutrustningen.
Bluetooth®lösenord
10. Förbindelse via en optisk ljudkabel
Du kan ansluta terminalutrustningen (t.ex. en
spelkonsol, tv-apparat osv.) via SoundZbar-enhetens
digitala ljudingång och återge terminalutrustningens
ljudsignal via SoundZbar.
Observera
• Innan du ansluter en terminalutrustning ska du
stänga av SoundZbar.
• Ta bort skyddskåporna fråndebåda ändarna på
den optiska signalkabeln föreanslutningen.
• Böj och kläm inte kabeln.
• Anslut en optisk signalkabel till SoundZbar-enhetens
optiska ljudingång (1) samt tillljudutgången för
terminalutrustningen.
• Tryck på [POWER](1) för att koppla på SoundZbar.
• AktiveraOPT-läget genom att trycka eragånger på
[SOURCE](2) på SoundZbar.
• Statuslysdioden för OPT-läget (8) lyser med fast sken.
• Starta och styr ljuduppspelningen via
terminalutrustningen.
11. Ljudlägen
Det nns tresätt att återge ljudsignalerna på:
Ispelläget fårman er diskantljud och basljud för
bättrespelupplevelse.
Iuppspelningsläget aktiveras ett linjärt frekvenssvar så
att man kan spela upp en mängd olika musikstilar med
kraftigt ljud.
Ibio-läget aktiverar man ett surround-ljud, vilket gör att
man uppfattar varenda liten ljuddetalj.
• Tryck eragånger på [MODE](3) för att välja bland
de olika ljudlägena.
• Spellägets statuslysdiod (11) lyser med fast sken, om
man har valt spelläget.
• Uppspelningslägets statuslysdiod (12) lyser med fast
sken, om man har valt uppspelningsläget.
• Bio-lägets statuslysdiod (13) lyser med fast sken, om
man har valt bio-läget.
83
Page 82

12. Reglering av basen
• Vrid på vridreglaget (2) på subwoofern för att öka
eller sänka basen.
13. Reglering av volymen
• Tryck på [VOLUME]+/- (7) på SoundZbar-enheten för
att öka/sänka volymen.
• Tryck på [
](6), för att koppla SoundZbar till tyst
läge.
14. Använda SoundZbar med batteri
Varning –Laddningsbart batteri
• Använd endast det medföljande nätaggregatet för
laddningen.
• Använd iprincip aldrig defekta laddareoch försök
inte laga dem.
• Undvik lagring, laddning och användning vid
extrema temperaturer.
• Ladda batteriet regelbundet vid längretids lagring
(minst en gång ikvartalet).
• SoundZbar-enheten är utrustad med ett laddningsbart
batteri. Batteriet måste laddas helt innan det används
för första gången.
• Säkerställatt SoundZbar-enheten är avstängd före
laddningen.
• Börja ladda genom att ansluta det medföljande
nätaggregatet till nätkabeln (4) och ett uttag.
• Statuslysdioden för laddning (3) lyser konstant grönt
under pågående laddning.
• Man kan få vänta iupp till 4timmar innan batteriet
är helt laddat.
• När batteriet är helt laddat slocknar statuslysdioden
för laddning (3).
• Koppla sedan bort alla kablar och nätanslutningar.
Observera–Laddning/batterikapacitet
• Det tar ca 3-4 timmar att ladda färdigt batteriet.
• Om batteriet har mindreän10%kapacitet kvar,
blinkar statuslysdioden för laddning (3) snabbt rött.
Man kan endast få information om laddningen när
SoundZbar-enheten är påslagen.
15. Underhåll och skötsel
Använd baraenluddfri, lätt fuktad trasa för att
rengöraprodukten och använd inga aggressiva
rengöringsmedel.
16. Ansvarsfriskrivning
Hama GmbH &Co. KG tar inget ansvar eller ger ingen
garanti för skador som beror på olämplig installation
eller montering och olämplig produktanvändning
eller på att bruksanvisningen och/eller
säkerhetshänvisningarna inte har följts.
17. Service och support
Kontakta gärna Hamas produktrådgivning om du har
frågor om produkten.
Support: +49 9091 502-115 (ty/eng)
Du hittar mer supportinformation här:
www.hama.com
18. Information om avfallshantering Information
om miljöskydd:
Frånoch med den tidpunkt då EU-direktiven
2012/19/EG och 2006/66/EG började gälla i
den nationella lagstiftningen gäller följande:
Elektriska och elektroniska apparater samt
batterier fårinte kastas ihushållssoporna.
Konsumenten har enligt lag skyldighet att lämna
elektriska och elektroniska apparater samt batterier till
inrättade, allmänna insamlingsställen eller till
inköpsstället när produkterna nårslutet av sin livslängd.
Detaljer regleras irespektivelands lagstiftning.
Symbolen på produkten, bruksanvisningen eller
förpackningen hänvisar till dessa bestämmelser.Med
återanvändningen, materialåtervinningen eller andra
former av återvinning av gamla produkter/batterier,
bidrar du till att skydda miljön..
19. Försäkran om överensstämmelse
Härmed intygar Hama GmbH &CoKGatt denna
typ av radiosystem [00113776] uppfyller kraven i
direktiv 2014/53/EU.Enfullständig försäkran om
överensstämmelse nns på internet på följande adress:
www.hama.com-> 00113776 -> Downloads.
Frekvensband
2.40GHz ~
2.48HGz
84
Max. utstrålad sändareffekt 5mW EIRP
Page 83

20. Tekniska data
Bluetooth®-teknik Bluetooth
®
v2.1 +EDR
Proler som stöds A2DP,AVRCP
Frekvens för
Bluetooth®-överföringar
Bluetooth®-överföringseffekt
Bluetooth® räckvidd
2.40GHz ~2.48HGz
Max. 10 dBm
10 m
Max. antal kopplade enheter 1
Effekt
Ljudsystem 2.1
Frekvens
Frequency range soundZbar :160–20 000 Hz
Frequency range subwoofer: 20–160 Hz
Totalt 100 W
Max. Uppspelningseffekt
soundZbar 40 W
subwoofer 60 W
Impedans 6 Ω
Impedans
≤
0.5% (1K, 1W)
3.5 mm stereo plug AUX input
Anslutningar
Optical input
Power Input
Spänningsförsörjning 230 V~50Hz0.4 A
Batteridriven SoundZbar
Typavbatteri 7,7 VLi-jon min. 2550 mAh /18,87 Wh
Laddningstid ~3-4h
via Bluetooth ~7h
Användningstid
via AUX ~12h
(depending on volume and audio content)
Storlek (B xDxH)/vikt
Totalt 5.1 kg
Vikt
SoundZbar 1,3 kg
Subwoofer 3.8kg
Mått
SoundZbar 485 x68x72mm
Subwoofer 250 x270 x250 mm
85
Page 84

L Käyttöohje
A. Hallintalaitteet ja näytöt SoundZbar
1. [POWER]
2. [SOURCE] tulotilan valintaa varten
3. [MODE] äänitilan valintaa varten
4. [PAIR] Bluetooth-yhteyden keskeyttämistä varten
5. NFC-liitäntä
6. [
] Mykistys
7. VOL +/-
8. Tila-LED optinen tulo
9. Tila-LED AUX
10. Tila-LED Bluetooth
11. Tila-LED Gaming-tila
12. Tila-LED musiikkitila
13. Tila-LED Cinema-tila
B. Taustapuoli SoundZbar
1. Optical In -liitäntä
2. AUX-In-liitäntä
3. Tila-LED lataaminen
4. Verkkojohto /DC-IN
C. Subwoofer
1. Virtakatkaisin
2. Basson kääntövalitsin
3. Tila-LED yhteys Subwoofer ja SoundZbar
Kiitos, että valitsit Hama-tuotteen!
Seuraavat ohjeet on luettava huolellisesti läpi ennen
käytön aloittamista. Käyttöohje tulee säilyttää
huolellisesti, jotta se on tarvittaessa aina kaikkien
käyttäjien saatavilla. Mikäli laite myydään eteenpäin,
käyttöohje on luovutettava laitteen mukana uudelle
omistajalle.
1. Varoitusten ja ohjeiden selitykset
Sähköiskun vaara
Tämä symboli viittaa tuotteen eristämättömien osien
koskettamisesta aiheutuvaan vaaraan, joka saattaa
aiheuttaa niin suuren jännitteen, että on olemassa
sähköiskun vaara.
Varoitus
Käytetään turvaohjeiden merkitsemiseen tai käyttäjän
muistuttamiseen erityisistä vaara- ja riskitekijöistä.
2. Tuotetunnisteen symboleiden selitykset
•
•
3. Pakkauksen sisältö
•SoundZbar
•Subwoofer
•3.5 mm:n audiokaapeli
•Verkkoadapteri
•Tämä käyttöohje
4. Turvallisuusohjeita
• Tuote on tarkoitettu yksityiseen, ei-kaupalliseen
• Älä käytä tuotetta lämmittimien tai muiden
• Suojaa tuote lialta, kosteudelta ja ylikuumenemiselta
• Tämä laite kuten muutkaan sähkölaitteet eivät kuulu
• Älä päästä laitetta putoamaan, äläkä altista sitä
• Älä käytä tuotetta sen teknisissä tiedoissa
• Älä käytä tuotetta alueilla, joilla elektroniikkalaitteet
• Huomioi ympäristösi. Suuret äänenvoimakkuudet
• Älä avaa tuotetta, äläkä käytä sitä enää, jos se on
• Akku on asennettu kiinteästi, eikä sitä voi irrottaa.
• Pidä pakkausmateriaalit poissa lasten ulottuvilta,
•Hävitä pakkausmateriaalit heti paikallisten
• Älä tee muutoksia laitteeseen. Muutosten tekeminen
•Tuote on pidettävä etäällä valuvista tai roiskuvista
Tuote on tarkoitettu ainoastaan sisäkäyttöön.
Suojaluokan II sähköinen laite
(kaksinkertaisesti eristetty).
kotikäyttöön.
lämmönlähteiden välittömässä läheisyydessä tai
suorassa auringonpaisteessa.
ja käytä tuotetta vain kuivassa ympäristössä.
lasten käsiin!
voimakkaalle tärinälle.
ilmoitettujen suorituskykyrajojen ulkopuolella.
eivät ole sallittuja.
voivat häiritä ympäristöä tai aiheuttaa haittoja.
vaurioitunut.
Hävitä tuote kokonaisena voimassa olevien
määräysten mukaisesti.
niistä aiheutuu tukehtumisvaara.
jätehuoltomääräysten mukaisesti.
aiheuttaa takuun raukeamisen.
nesteistä eikä tuotteen päälle saa asettaa
minkäänlaisia nestettä sisältäviä esineitä, kuten esim.
maljakoita.
Ohje
Käytetään lisätietojen tai tärkeiden ohjeiden
merkitsemiseen.
86
Page 85

Sähköiskun vaara
Ohje –ensimmäisen käyttöönoton yhteydessä
• Tuotetta ei saa avata eikä sitä saa käyttää, mikäli
tuote on vaurioitunut.
• Tuotetta ei saa käyttää, mikäli AC-sovitin,
sovittimen johto tai virtajohto on vaurioitunut.
• Tuotetta ei saa huoltaa tai korjata itse.
Kaikki huoltotyöt on annettava valtuutetun
ammattihenkilön suoritettavaksi.
5. Käyttöönotto ja käyttö
Ohje
• Tuotetta voi käyttää verkko- ja akkukäytössä.
Mikäli tuotetta halutaan käyttää verkkokäytössä, se
täytyy vain kytkeä virtaverkkoon (ks. luku 5). Mikäli
tuotetta halutaan käyttää akkukäytössä, se on
ensin ladattava kokonaan (ks. luku 14).
Varoitus
• Ota tuotteeseen virta ainoastaan sallitusta
pistorasiasta. Pistorasian tulee olla asennettu
tuotteen lähelle sekä helposti saavutettavissa
• Erota tuote verkosta virtakatkaisimen avulla –jos
sellaista ei ole, irrota pistoke pistorasiasta.
• Pistorasian tulee olla aina helposti käden
ulottuvilla.
• Erota tuote verkosta, jos et käytä sitä pidempään
aikaan.
• Työnnä SoundZbarin ja Subwooferin verkkokaapelit
asianmukaisesti asennettuihin pistorasioihin.
• Paina [POWER]-painiketta (1) kytkeäksesi
SoundZbarin päälle.
• Paina virtakytkintä (1) Subwooferin kytkemiseksi
päälle.
• Subwooferin yhteyden osoittava tila-LED (3) alkaa
vilkkumaan sinisenä.
• Päälle kytkemisen jälkeen SoundZbar ja Subwoofer
luovat automaattisesti Bluetooth yhteyden toistensa
kanssa.
• Yhteyden luomisen jälkeen Subwooferin yhteyden
tila-LED (3) palaa jatkuvasti sinisenä.
6. Ensimmäinen Bluetooth-yhteys
(parinmuodostus)
Päätelaitteet voi yhdistää SoundZbarin kanssa
Bluetooth-yhteyden avulla, jolloin SoundZbaria voi
käyttää audiosignaalien toistolaitteena.
Ohje –
Bluetooth
®
• Tarkasta, onko mobiililaitteesi (matkapuhelin, tms.)
Bluetooth yhteensopiva.
• Huomioi, että Bluetooth yhteyden toimintasäde
on enintään 10 metriä, ilman esteitä kuten seinät,
henkilöt, tms.
• Yhteys voi häiriytyä muiden lähistöllä olevien
Bluetooth-yhteensopivien laitteiden/yhteyksien
vuoksi.
• SoundZbarin voi yhdistää aina vain yhteen
päätelaitteeseen.
• Huomaa, että yhteensopivuus riippuu tuetuista
Bluetooth-proileista sekä käytetyistä Bluetoothversioista. (ks.: Tekniset tiedot, käytetyn
päätelaitteen käyttöohje)
• Varmista, että Bluetooth yhteensopiva päätelaitteesi
on kytkettynä päälle ja että Bluetooth on aktivoituna.
• Aktivoi Bluetooth-tila painamalla SoundZbarin
[SOURCE]-painiketta (2) toistamiseen.
• Bluetooth-yhteyden osoittava tila-LED (10) alkaa
vilkkumaan sinisenä.
• Avaa päätelaitteen Bluetooth-asetukset ja odota
kunnes löydettyjen Bluetooth-laitteiden listassa
näytetään uRage SoundZbar.
• Valitse SoundZbar uRage SoundZbar saatavilla
olevien laitteiden listasta ja odota, kunnes SoundZbar
näytetään päätelaitteen Bluetooth-asetuksissa
kytkettynä.
• Bluetooth-yhteyden tila-LED (10) palaa nyt jatkuvasti
sinisenä.
• Käynnistä ja ohjaa audiotoistoa liitetyllä
päätelaitteella.
87
Page 86

Bluetooth®salasana
Ohje –
• Tietyt päätelaitteet tarvitsevat salasanan yhteyden
muodostamiseksi toisen Bluetooth laitteen kanssa.
• Syötä radioon yhdistämiseksi salasanaksi 0000, jos
päätelaitteesi pyytää salasanan syöttämistä.
10. Yhteys optisella audiokaapelilla
SoundZbarin digitaalisen audiotulon kautta voi kytkeä
päätelaitteen (esim. pelikonsolin, TV-laitteen jne.) ja
päätelaitteen audiosignaalin voi toistaa SoundZbarin
kautta.
Ohje
7. Ensimmäinen Bluetooth-yhteys
(parinmuodostus) NFC:llä
• Varmista, että älypuhelin tukee NFC:tä ja NFC on
aktivoitu.
• Aktivoi Bluetooth-tila painamalla SoundZbarin
[SOURCE]-painiketta (2) toistamiseen.
• Bluetooth-yhteyden osoittava tila-LED (10) alkaa
vilkkumaan sinisenä.
• Kosketa älypuhelimella SoundZbarin NFC-liitäntää (5).
• Bluetooth-yhteyden tila-LED (10) palaa nyt jatkuvasti
sinisenä.
• Käynnistä ja ohjaa audiotoistoa liitetyllä
päätelaitteella.
8. Bluetooth-yhteyden katkaiseminen
• Paina ja pidä [PAIR]-painiketta (4) painettuna n.
kahden sekunnin ajan katkaistaksesi Bluetoothyhteyden päätelaitteeseen.
• SoundZbarin voi nyt kytkeä toisen päätelaitteen
kanssa. (ks. luku 5)
9. Yhteys Auxiliary Inputin kautta
Analogisen AUX-audiotulon kautta voi kytkeä lukuisia
loppulaitteita (esim. pelikonsolin, älypuhelimen,
tablettitietokoneen, MP3-soittimen jne.) sekä
vanhempia analogisia lähteitä (CD-/DVD-soittimen jne.)
SoundZbariin ja laitteiden audiosignaalin voi toistaa
SoundZbarin kautta.
Ohje
• Kytke SoundZbar pois päältä, ennen kuin kytket
siihen loppulaitteen.
• Älä taita johtoa äläkä aseta sitä puristuksiin.
• Liitä päätelaite AUX-liitännästä (2) toimitukseen
sisältyvällä 3,5 mm:n audiokaapelilla (jakkikaapeli)
SoundZbarin kanssa.
• Paina [POWER]-painiketta (1) SoundZbarin
kytkemiseksi päälle.
• Aktivoi AUX-tila painamalla SoundZbarin [SOURCE]-
painiketta (2) toistamiseen.
• AUX-tilan tila-LED (9) palaa jatkuvasti.
• Käynnistä ja ohjaa audiotoistoa liitetyllä
päätelaitteella.
• Kytke SoundZbar pois päältä, ennen kuin kytket
siihen loppulaitteen.
• Poista suojakannet optisen signaalikaapelin
molemmista päistä ennen kytkentää.
• Älä taita johtoa äläkä aseta sitä puristuksiin.
• Kytke optinen signaalikaapeli SoundZbarin
optiseen audiotuloon (1) ja päätelaitteen optiseen
audiolähtöön.
• Paina [POWER]-painiketta (1) SoundZbarin
kytkemiseksi päälle.
• Aktivoi OPT-tila painamalla SoundZbarin [SOURCE]-
painiketta (2) toistamiseen.
• OPT-tilan tila-LED (8) palaa jatkuvasti.
• Käynnistä ja ohjaa audiotoistoa liitetyllä
päätelaitteella.
11. Äänitila
Audiosignaalien toistossa voi valita kolmesta eri tilasta:
Gaming-tila aktivoi lisäksi enemmän korkeita ja
matalia taajuuksia paremman Gaming-tuloksen
saavuttamiseksi.
Musiikkitila aktivoi lineaarisen taajuuskäytävän useiden
erilaisten musiikkityylien voimakasta äänentoistoa
varten.
Cinema-tila aktivoi todelliselta kuulostavan efektin,
jonka ansiosta jokaisen äänellisen yksityiskohdan
kuulee tarkasti.
• Paina toisen kerran [MODE]-painiketta (3) eri
äänitilojen valitsemiseksi.
• Gaming-tilan tila-LED (11) palaa jatkuvasti, kun
Gaming-tila on valittu.
• Musiikkitilan tila-LED (12) palaa jatkuvasti, kun
musiikkitila on valittu.
• Cinema-tilan tila-LED (13) palaa jatkuvasti, kun
Cinema-tila on valittu.
88
Page 87

12. Basson säätely
• Käännä Subwooferin kääntösäädintä (2) basson
korottamiseksi ja/tai alentamiseksi.
13. Äänenvoimakkuuden säätäminen
• Paina SoundZbarin [VOLUME]-painiketta +/-
(7) äänenvoimakkuuden korottamiseksi ja/tai
alentamiseksi.
• Paina [
](6) SoundZbarin mykistämiseksi.
14. SoundZbarin käyttö akkukäytössä
Varoitus –Akku
• Lataamiseen saa käyttää vain toimitukseen
sisältyvää verkkolaitetta.
• Älä käytä viallisia latureita äläkä yritä korjata niitä.
• Vältä säilytystä, lataamista ja käyttöä
äärimmäisissä lämpötiloissa.
• Jos akkua säilytetään pitkiä aikoja, se tulee
ladata säännöllisin väliajoin (vähintään
neljännesvuosittain).
• SoundZbar on varustettu ladattavalla akulla. Akku
täytyy ladata täyteen ennen ensimmäistä käyttöä.
• Varmista, että SoundZbarista on katkaistu virta ennen
lataamista.
• Käynnistä lataus kytkemällä toimitukseen sisältyvä
verkkolaite verkon tulojohtoon (4) ja pistorasiaan.
• Latauksen tila-LED (3) palaa pysyvästi vihreänä
latauksen aikana.
• Akun latautuminen kokonaan voi kestää neljä tuntia.
• Latauksen tila-LED (3) sammuu, kun akku on ladattu
täyteen.
• Irrota sen jälkeen kaikki johto- ja verkkoliitännät
Ohje –Latausvaihe/akkukapasiteetti
15. Hoito ja huolto
Tuotteen saa puhdistaa ainoastaan nukkaamattomalla,
kevyesti kostutetulla liinalla. Puhdistukseen ei saa
käyttää aggressiivisia puhdistusaineita.
16. Vastuuvapauslauseke
Hama GmbH &Co. KG ei vastaa vahingoista, jotka
johtuvat tuotteen epäasianmukaisesta asennuksesta
tai käytöstä tai käyttöohjeen ja/tai turvaohjeiden
noudattamatta jättämisestä.
17. Huolto ja tuki
Tuotetta koskevissa kysymyksissä pyydämme
kääntymään Hama-tuoteneuvonnan puoleen.
Hotline: +49 9091 502-115 (saksa/englanti)
Lisää tukitietoja on osoitteessa
www.hama.com
18. Hävittämistä ja ympäristönsuojelua koskevia
ohjeita:
Seuraavat määräykset ovat päteneet
kansallisessa lainsäädännössä Euroopan
unionin direktiivien 2012/19/EY ja 2006/66/EY
käyttöönotosta lähtien: Sähkö- ja
elektroniikkalaitteita ja paristoja ei saa hävittää
kotitalousjätteiden mukana. Kuluttajalla on lain
mukaan velvollisuus toimittaa sähkö- ja
elektroniikkalaitteet sekä paristot niiden käyttöiän
päätyttyä niille varattuihin julkisiin keräyspisteisiin tai
palauttaa ne myyntipaikkaan. Yksityiskohdista on
säädetty kansallisessa lainsäädännössä. Määräyksiin
viitataan myös tuotteen symbolissa, käyttöohjeessa tai
pakkauksessa. Kierrättäminen, materiaalien
uudelleenkäyttö tai muut vanhojen laitteiden/akkujen
uudelleenkäyttötavat ovat tärkeitä ympäristön
suojelulle.
• Täydellinen lataus kestää n. 3-4 tuntia.
• Mikäli akkukapasiteetti on alle 10 %, latauksen
tila-LED (3) vilkkuu nopeasti punaisena. Tämän
tiedon saat vain SoundZbarin ollessa kytkettynä
päälle.
19. Vaatimustenmukaisuusvakuutus
Hama GmbH &CoKGvakuuttaa täten, että
radiolaitteistotyyppi [00113776] on direktiivin
2014/53/EU mukainen. EUvaatimustenmukaisuusvakuutuksen voi ladata seuraavasta
osoitteesta:
www.hama.com-> 00113776 -> Downloads.
Taajuusnauha/taajuusnauhat
2.40GHz ~
2.48HGz
Suurin säteilty lähetysteho 5mW EIRP
89
Page 88

20. Tekniset tiedot
Bluetooth®-teknologia Bluetooth
®
v2.1 +EDR
Tuetut proilit A2DP,AVRCP
Taajuus
Bluetooth®-tiedonsiirrolle
Bluetooth®-tiedonsiirtoteho
Bluetooth®-kantama
2.40GHz ~2.48HGz
Max. 10 dBm
10 m
Maks. kytketyt laitteet 1
Teho
Sound System 2.1
Taajuus
Frequency range soundZbar: 160 –20000 Hz
Frequency range subwoofer: 20 –160 Hz
Yhteensä
Maks. musiikkiteho
soundZbar
Subwoofer
Impedanssi
Vääristymä
THD
6
≤
Ω
0.5%
(1K,
1W)
3.5mmstereoplug
Liitännät
Optical
wer Input
Po
input
Jännitesyöttö 230 V~50Hz0.4 A
AUX
100
40
60
W
W
W
input
SoundZbarin akku
Akkutyyppi 7.4V Li-Ion min. 2550mAh /18.87Wh
Latausaika ~3-4h
Bluetooth®-yhteydellä: ~7h
Käyttöaika
AUX-yhteydellä: ~12h
(depending on volume and audio content)
Mitat (L xSxK)/paino
Yhteensä 5.1 kg
Paino
SoundZbar 1.3kg
Subwoofer 3.8kg
Mitat
SoundZbar 485 x68x72mm
Subwoofer 250 x270 x250 mm
90
Page 89

B Работна инструкция индикации
Контролни елементи ииндикации SoundZbar
A.
1. [POWER]
2. [SOURCE] за избор на входящ режим
3. [MODE] за избор на звуков режим
4. [PAIR] за прекъсване на Bluetooth връзката
5. NFC интерфейс
6. [
] Изключване на звука
7. VOL +/-
8. LED статус оптичен вход
9. LED статус AUX
10. LED статус Bluetooth
11. LED статус режим за игра
12. LED статус музикален режим
13. LED статус режим „Кино“
B. Задна страна SoundZbar
1. Входна оптична букса (Optical In)
2. Входна AUX букса (AUX In)
3. LED статус за зареждане
4. Захранване/DC- IN
C. Субуфер
1. Превключвател за вкл./изкл.
2. Копче за регулиране на басовете
3. LED статус за връзка на субуфер и SoundZbar
Многоблагодарим, че избрахте продукт на
фирма Hama! Отделете време ипрочетете изцяло
следващите упътвания иуказания. След това
съхранявайте упътванетозаобслужване на сигурно
място, за да може при необходимост да направите
справка. Акопродавате уреда, предайте упътването
за обслужване на новия собственик.
1. Обяснение на предупредителните символи
иуказания
Опасност от токовудар
Този символпредупреждава за опасност от токов
удар при докосване на неизолирани части на
продукта, коитоевъзможно да се намиратпод
високонапрежение.
Предупреждение
Използватсезаобозначаване на указания за
безопасност или за насочване на вниманиетокъм
особени опасности ирискове.
Забележка
Използватсезадопълнително обозначаване на
информация или важни указания.
2. Обяснение на символите от маркировката
на продукта
•
•
3. Съдържание на опаковката
•SoundZbar
• субуфер
•3,5 мм аудио кабел
• мрежов адаптер
• тази инструкция за употреба
4. Инструкции за безопасност
• Продуктътепредвиден за лична, нестопанска
• Не използвайте продуктавнепосредствена
• Пазете продуктаотзамърсяване, влагаи
• Подобно на всички електрически продукти този
• Не позволявайте на продуктадапада инего
• Не използвайте продуктаизвън неговите граници
• Не използвайте продуктаизвън неговите граници
• Обърнете внимание. Голямата сила на звука може
• Не отваряй продукта ипри повреда не
• Батериятаенеподвижно вградена инеможе да
• Задължително дръжте малките деца далече
• Изхвърлете опаковъчния материал веднага
• Не правете промени вуреда. Така ще загубите
• Дръжте продуктадалеч от капещи или пръскащи
Продуктътепредвиден само за употреба в
сгради.
Електрическоустройство от защитен клас II
(двойна изолация).
битова употреба.
близост до отоплителни уреди, други източници
на топлина или на директна слънчева светлина.
прегряване игоизползвайте само всухи
помещения.
продукт не бива да попада връцете на деца!
излагайте на силни вибрации.
на мощността, посочени втехническите данни.
на мощността, посочени втехническите данни.
да причини смущения или да навреди на Вашата
околна среда.
продължавай да го използваш.
се маха, изхвърлете продуктакатоцяло според
законовите разпоредби.
от опаковъчния материал, има опасност от
задушаване.
съгласно действащите на мясторазпоредби за
изхвърляне на отпадъци.
право на всякакви гаранционни претенции.
течности инепоставяйте предмети, пълни с
течности, напр. вази, върху продукта.
91
Page 90

Опасност от токовудар
• Не разглобявайте продуктаипри повреда не
продължавайте да го използвате.
• Не използвайте уреда, акосаповредени AC
адаптерът, кабелътнаадаптера или мрежовото
захранване.
• Не се опитвайте сами да извършвате поддръжка
или ремонт на уреда. При нужда от техническа
поддръжка се обръщайте към компетентните
специалисти.
5. Въвеждане вексплоатация иработа
Забележка
• Може да използвате продуктасъс захранване
от електрическата мрежа или от акумулаторни
батерии. За да използвате продуктасъс
захранване от електрическата мрежа, трябва
само да го включите към електрическата мрежа
(вж. раздел 5). За да използвате продуктас
акумулаторни батерии, преди това тойтрябва
да бъде напълно зареден (вж. раздел 14).
Предупреждение
• Пускайте продуктадаработи само вразрешен
за целтаконтакт. Контактъттрябва да се намира
вблизост до продуктаидаелесно достъпен
• Разединете продуктаотмрежата посредством
бутонзавключване/изключване - аконяма
такъв, дръпнете мрежовия кабел от контакта.
• При използване на разклонител внимавайте
включените консуматори да не превишават
допустимата обща консумирана мощност.
• Изключвайте продуктаотмрежата, когато не го
използвате по-продължително време.
• Свържете мрежовия кабел на SoundZbar ина
субуфера към правилно монтирани контакти.
• Натиснете [POWER](1), за да включите SoundZbar.
• Натиснете превключвателя за включване/
изключване (1), за да включите субуфера.
• LED статусътнавръзката (3) всубуфера започва да
мигавсиньо.
Забележка – при първоначално
включване
• След включване,SoundZbar исубуферът
се свързватавтоматично един сдруг чрез
Bluetooth.
• След успешна връзка LED статусътнавръзката
(3) всубуфера свети постоянно всиньо.
6. Първоначално Bluetooth свързване
(сдвояване)
Чрез Bluetooth може да свържете Вашите крайни
устройства с SoundZbar идаги ползвате като
възпроизвеждащо устройство за аудиосигнали.
Забележка –
Bluetooth
®
• Проверете дали Вашетомобилно крайно
устройство (смартфон, таблет идр.) поддържа
Bluetooth
• Обърнете внимание, че обсегътнаBluetooth е
макс.10метра без обекти, като стени, хора и
др., коитодавъзпрепятстватсигнала.
• Има вероятност за възникване на смущения
във връзката вследствие на други Bluetooth
устройства/връзки наблизо.
• SoundZbar може да се свързва винаги само с
едно крайно устройство.
• Имайте предвид, че съвместимосттазависи от
поддържаните Bluetooth профили, кактоиот
използваните Bluetooth версии.(вж. Технически
данни, Упътване за обслужване на използваното
крайно устройство)
• Уверете се, че Вашетоподдържащо Bluetooth
крайно устройство евключено ифункцията
Bluetooth еактивирана.
• Активирайте чрез многократно натискане на
[SOURCE](2) в SoundZbar режима Bluetooth.
• LED статусътнаBluetooth връзката (10) започва да
мигавсиньо.
• Отворете Bluetooth настройките във Вашето
крайно устройство иизчакайте, докато всписъка с
намерените Bluetooth устройства се покаже „uRage
SoundZbar“.
• Изберете „uRage SoundZbar“ всписъка сналични
устройства иизчакайте, докато SoundZbar се
покажекатосвързано в Bluetooth настройките на
Вашетокрайно устройство.
• LED статус на Bluetooth връзката (10) сега свети
постоянно всиньо.
• Стартирайте иуправлявайте
аудиовъзпроизвежданетосъответно чрез крайното
устройство.
92
Page 91

Забележка –
• Някои крайни устройства изискватпарола при
настройванетонавръзката сдруго Bluetooth
устройство.
• За свързване срадиото въведете паролата
0000, когато бъдете подканени да явъведете от
Вашетокрайно устройство.
7. Първоначално Bluetooth свързване
(сдвояване) чрез NFC
• Уверете се, че NFC се поддържа от Вашия
смартфон иеактивирано.
• Активирайте чрез многократно натискане на
[SOURCE](2) в SoundZbar режима Bluetooth.
• LED статусътнаBluetooth връзката (10) започва да
мигавсиньо.
• Допрете Вашия смартфон към NFC интерфейса (5)
на SoundZbar.
• LED статус на Bluetooth връзката (10) сега свети
постоянно всиньо.
• Стартирайте иуправлявайте
аудиовъзпроизвежданетосъответно чрез крайното
устройство.
8. Прекъсване на Bluetooth връзката
• Натиснете изадръжте [
секунди, за да прекъснете Bluetooth връзката с
Вашетокрайно устройство.
• Сега SoundZbar може да бъде свързано сдруго
крайно устройство.(вж. раздел 5)
9. Връзка чрез Auxiliary Input
През аналоговия аудио вход AUX може да свържете
редица крайни устройства (напр. игрова конзола,
смартфон, таблет,MP3 плеър ит.н.), кактои
аналогови източници (CD/DVD плеър идр.) към
SoundZbar, след коетодавъзпроизвеждате техния
аудио сигнал през SoundZbar.
Забележка
• Изключете SoundZbar, преди да свържете към
негокрайно устройство.
• Не пречупвайте инепритискайте кабела.
• Свържете Вашетокрайно устройство чрез AUX
буксата (2) посредством прилежащия 3,5 мм
аудио кабел (сжак) със SoundZbar.
• Натиснете [POWER] (1), за да включите SoundZbar.
• Активирайте чрез многократно натискане на
[SOURCE] (2) в SoundZbar режима AUX.
Bluetooth® парола
PAIR
](4) за около 2
• LED статусътнарежима AUX (9) свети постоянно.
• Стартирайте иуправлявайте
аудиовъзпроизвежданетосъответно чрез крайното
устройство
10. Връзка чрез оптичен аудио кабел
Чрез цифровия аудио вход на SoundZbar може
да свържете Вашетокрайно устройство (напр.
игрова конзола, телевизор ит.н.), след което
да възпроизвеждате неговия аудио сигнал през
SoundZbar.
Забележка
• Изключете SoundZbar, преди да свържете към
негокрайно устройство.
• При свързване отстранете двете защитни
капачки от двата края на оптичния сигнален
кабел.
• Не пречупвайте инепритискайте кабела.
• Включете оптичен сигнален кабел към оптичния
аудио вход (1) SoundZbar икъм оптичния аудио
изход на Вашетокрайно устройство.
• Натиснете [POWER](1), за да включите SoundZbar.
• Активирайте чрез многократно натискане на
[SOURCE](2) в SoundZbar режима ОРТ.
• LED статусътнарежима ОРТ (8) свети постоянно.
• Стартирайте иуправлявайте
аудиовъзпроизвежданетосъответно чрез крайното
устройство.
11. Звукови режими
За възпроизвеждане на Вашите аудио сигнали
имате избор между три различни режима:
Режимътзаигра активира допълнително повече
високи иниски звуци за по-добро изживяване по
време на игра.
Музикалният режим активира линеарна честотна
характеристика, за да могат мощно да се
възпроизвеждатразнообразни музикални стилове.
Режимът „Кино“ активира пространствен ефект,
чрез койтосевъзприема всеки звуков детайл.
• Натискайте многократно [MODE] (3), за да
изберете различните звукови режими.
• LED статусът (11) на режима за игра свети
постоянно, когато еизбран режимътзаигра.
• LED статусът (12) на музикалния режим свети
постоянно, когато еизбран музикалният режим.
• LED статусът (13) на режима „Кино“ свети
постоянно, когато еизбран режимът „Кино“.
93
Page 92

12. Регулиране на басовете
• Завъртете копчетозарегулиране (2) на субуфера,
за да увеличите или намалите басовете.
13. Регулиране на силата на звука
• Натиснете [VOLUME]+/- (7) на SoundZbar, за да
увеличите/намалите силата на звука.
• Натиснете тук [ ](6), за да заглушите SoundZbar.
14. Използване на SoundZbar сакумулаторни
батерии
Предупреждение – Акумулаторна
батерия
• За зареждане използвайте само включения в
комплектазахранващ адаптер.
• По принцип не използвайте дефектни зарядни
устройства инесеопитвайте да ги поправяте.
• Избягвайте съхранение, зареждане иупотреба
при екстремни температури.
• При дълготрайно съхранение презареждайте
редовно (поне веднъж на три месеца).
• SoundZbar разполагасакумулаторна батерия,
коятоможе да се зарежда. Преди първоначална
употреба акумулаторната батерия трябва да се
зареди напълно.
• Уверете се, че SoundZbar еизключен, преди да
започне зареждането.
• Стартирайте процеса на зареждане, като свържете
включения вкомплектазахранващ адаптер към
кабел (4) икъм контакт.
• По време на процеса на зареждане LED статусът
(3) свети постоянно взелено.
• Може да отнеме до 4 часа, преди акумулаторната
батерия да се зареди напълно.
• Когато акумулаторната батерия се зареди
напълно,LED статусътзазареждане изгасва (3).
• След това откачете всички кабели имрежови
връзки.
Забележка – Процес на зареждане/
капацитет на акумулаторна батерия
• Един пълен цикъл на зареждане трае около
3–4часа.
• Акокапацитетътнаакумулаторната батерия е
по-малкоот10%, LED статусътзазареждане
(3) мигабързо вчервено. Тази информация ще
получите само при включен SoundZbar.
15. Техническо обслужване иподдръжка
Почиствайте този продукт само слеконавлажнена
кърпа, коятонепуска власинки, инеизползвайте
агресивни почистващи препарати.
16. Изключване на отговорност
Hama GmbH &Co. KG не поема никаква отговорност
или гаранция за повреди врезултат на неправилна
инсталация, монтаж инеправилна употреба
на продуктаили неспазване на упътванетоза
обслужване и/или инструкциите за безопасност.
17. Сервиз иподдръжка
За въпроси във връзка спродуктасеобърнете към
отдела за консултация за продукти на Hama.
Гореща линия:+49 9091 502-115 (нем./англ.)
Допълнителна информация за поддръжка ще
намерите тук:www.hama.com
19. Указания за изхвърляне Указания за
опазване на околната среда:
От моментанаприлаганетонаевропейските
директиви 2012/19/EОи2006/66/EОв
националното право на съответните страни
важи следното: Електрическите иелектронните
уреди ибатериите не бива да се изхвърлят сбитовите
отпадъци. Потребителят едлъжен по закон да върне
електрическите иелектронните уреди ибатериите след
края на техния експлоатационен животнаизградените
за целтаобществени сборни пунктове или на търговския
обект. Подробностите втазивръзка са уредени в
законодателството на съответната страна. Символът
върху продукта, упътванетозаупотреба или опаковката
насочваткъм тези разпоредби. Чрез рециклирането,
преработката на материалите или други форми на
оползотворяване на старите уреди/батерии Вие
допринасяте за защитата на нашата околна среда.
19. Декларация за съответствие
Снастоящото Hama GmbH &CoKGдекларира,
че типътрадиосистема [00113776] съответства
на основните изисквания на Директива
2014/53/ЕО. Пълният текст на ЕС декларациятаза
съответствие енаразположение на следния интернет
адрес:
www.hama.com-> 00113776 -> Downloads.
Радиочестотен диапазон/
Радиочестотни диапазони
Излъчена максимална мощност
на предаване
2.40GHz ~
2.48HGz
5mW EIRP
94
Page 93

20. Технически данни
Bluetooth® технология Bluetooth
®
v2.1 +EDR
поддържани профили A2DP,AVRCP
Честота за
Bluetooth® пренос на данни
Bluetooth
Bluetooth
®
мощност на преноса на данни Макс.10dBm
®
обсег 10 м
2.40GHz ~2.48HGz
Макс. свързани устройства 1
Мощност
Озвучителна система 2.1
Честота
Честотен диапазон SoundZbar: 160 –20000 Hz
Честотен диапазон на субуфера:20–160 Hz
общо 100 W
Макс. Музикална мощност
SoundZbar 40 W
Субуфер 60 W
Импеданс 6 Ω
Изкривяване THD
≤
0.5% (1K, 1W)
3,5 мм стерео AUX вход
Изводи
Оптичен вход
Вход за захранване
Енергийно захранване 230 V~50Hz0.4 A
Акумулаторна батерия SoundZbar
Типакумулаторни батерии 7.4V Li-Ion min. 2550mAh /18.87Wh
Време за зареждане ~3-4h
през Bluetooth ~7ч
Работен цикъл
през AUX ~12ч
(взависимост от силата на звука иаудио
съдържанието)
Размери (ШхДхВ)/тегло
общо 5.1 kg
Тегло
SoundZbar 1.3kg
Субуфер 3.8kg
Размери
SoundZbar 485 x68x72mm
Субуфер 250 x270 x250 mm
95
Page 94

Hama GmbH &CoKG
86652Monheim/Germany
www.hama.com
®
Bluetooth
The
useofsuchmarks by Hama GmbH &CoKGisunder license. Other trademarksand trade namesare
thoseoftheirrespective owners.
Alllistedbrands are trademarks of thecorrespondingcompanies.Errorsand omissionsexcepted,
andsubjec ttotechnical changes. Ourgeneralterms of deliveryand paymentare applied.
wordmarkand logo sare registeredtrademarksowned by BluetoothSIG,Inc. andany
00113776/01.18
 Loading...