

Page 1

Hama GmbH & Co KG
D-86651 Monheim/Germany
www.hama.com
All listed brands are trademarks of the corresponding companies. Errors and omissions excepted,
and subject to technical changes. Our general terms of delivery and payment are applied.
0 0062793/09.07
Page 2
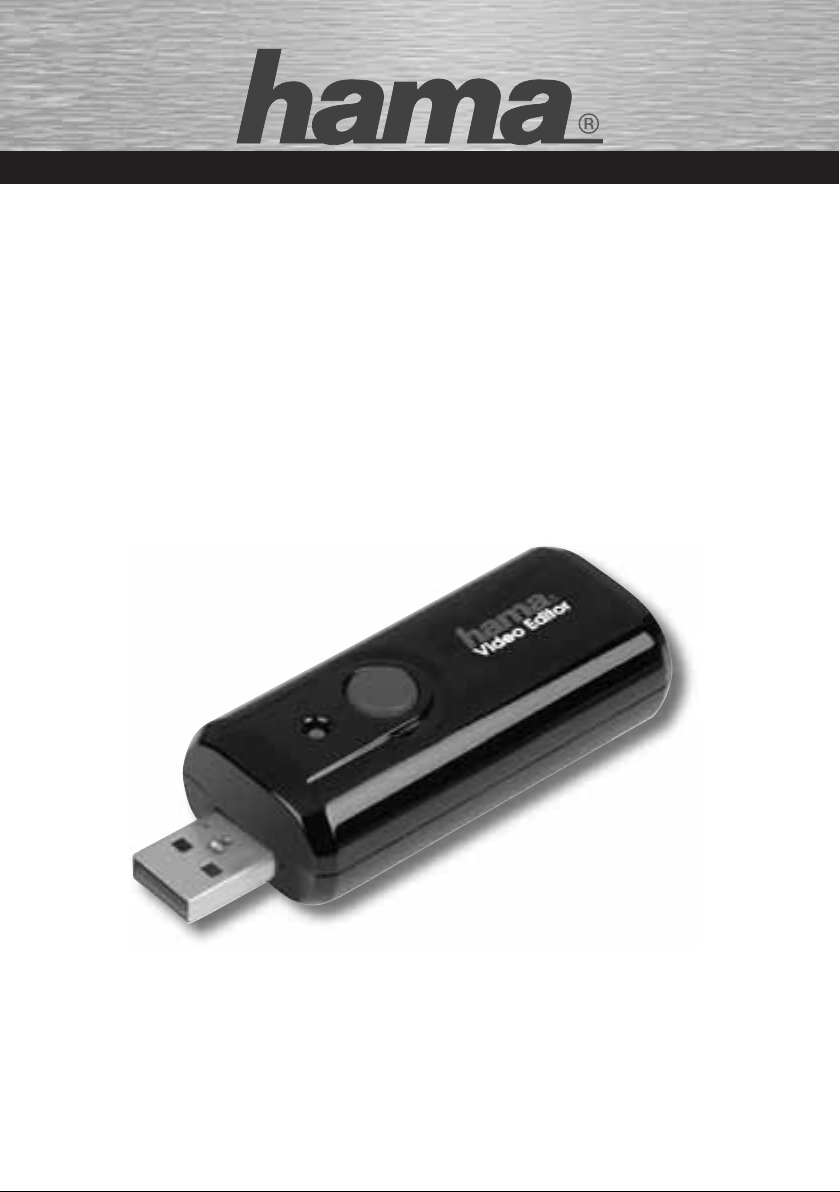
COMPUTER
USB 2.0 Video Editor
USB Video Editor
l‘editeur vidéo USB
00062793
Page 3
d
Bedienungsanleitung
Systemvoraussetzung:
CPU: 1,5 GHz oder höher
Hauptspeicher: mindestens 512 MB RAM
Grafi k: DirectX 9.0 kompatibel mit min. 64 MB lokalen
Speicher
Sound: AC97 kompatibel
Festplatte min. 1 GB freien Speicherplatz
Eine freie USB 2.0 Buchse
Microsoft DirectX 9.0c oder höher
Betriebssystem: Windows 2000 / XP / XP x64 Bit
Edition / Vista 32 und 64 Bit Editionen + aktuellste
Service Packs.
Einleitung:
Herzlichen Glückwunsch zum Kauf des Hama USB
2.0 Video Editors. Mit diesem äußerst vielseitigen
und handlichen Gerät werden Sie viel Freude haben.
Mit diesem Gerät ist es z.B. möglich, Ihre Urlaubsvideos auf DVD oder CD zu archivieren. Weiterhin ist
es möglich die besten Szenen aus einem Spiel Ihrer
Konsole (Xbox, Playstation usw.) mitzuschneiden,
um diese dann später Ihren Freunden zu zeigen.
Installation des USB Video Editors unter Windows
2000 / XP / XP x64 und Vista (alle Editionen):
1. Schalten Sie den Computer ein und loggen Sie
sich als Administrator, oder Benutzer mit
entsprechenden Rechten unter Windows ein.
2. Legen Sie die beiliegende Treiber CD in Ihr
CD- oder DVD- Laufwerk ein. Falls das
Installationsprogramm nicht automatisch startet,
beachten Sie folgende Schritte:
a.) Klicken Sie doppelt auf das Arbeitsplatz Icon
auf Ihrem Desktop mit der linken Maustaste.
b.) Klicken Sie mit der rechten Maustaste auf
Ihr CD- bzw. DVD-Laufwerk, indem Sie gerade
die Treiber CD eingelegt haben, und wählen Sie
Kontextmenu
im
wird das Hama Installationsmenu gestartet.
3. Wählen Sie die gewünschte Sprache aus.
4. Als erstes ist der Treiber zu installieren. Klicken
Sie auf die Schaltfl äche -> Windows Treiber
installieren.
die Option AutoPlay. Daraufhin
Hinweis für Vista Benutzer: Unter Umständen
blendet Windows Vista die Benutzerkontosteuerung
ein und weißt sie darauf hin, dass das der Hersteller
des Setup Programms nicht ermittelt werden konnte,
fahren Sie unbedingt mit der Installation fort, indem
Sie auf die Schaltfl äche -> Fortfahren klicken.
Folgen Sie den Anweisungen des Programms. Am
Ende der Treiberinstallation werden Sie gebeten
Ihr System neu zu starten -> Ja, Computer jetzt neu
starten.
5. Nachdem Sie das Betriebssystem neu gestartet
haben, schließen Sie den Hama USB 2.0 Video
Editor an eine freie USB Buchse an, daraufhin
werden die entsprechenden Treiber automatisch
installiert.
Überprüfung der Treiber-Installation unter Windows
2000:
Ob Windows 2000 den Hama USB 2.0 Video Editor
ordnungsgemäß ins System eingebunden hat, können Sie im Geräte-Manager überprüfen. Klicken Sie
hierzu auf Start -> Einstellungen ->
Systemsteuerung -> System. Im Fenster
Systemeigenschaften fahren Sie fort mit -> Hardware -> Geräte-Manager. In den folgenden Sektion
sollten die unten aufgeführten Einträge ohne gelbes
Ausrufezeichen vorhanden sein.
Audio-, Video- und Gamecontroller
USB 2861 Device
USB EMP Audio Device
Überprüfung der Treiber-Installation unter
Windows XP:
Ob Windows XP den Hama USB 2.0 Video Editor
ordnungsgemäß ins System eingebunden hat,
können Sie im Geräte-Manager überprüfen. Klicken
Sie hierzu auf Start -> Systemsteuerung -> Leistung
und Wartung -> System. Im Fenster Systemeigenschaften fahren Sie fort mit -> Hardware -> GeräteManager. In den folgenden Sektion sollten die unten
aufgeführten Einträge ohne gelbes Ausrufezeichen
vorhanden sein.
Audio-, Video- und Gamecontroller
USB 2861 Device
USB EMP Audio Device
2
Page 4
Überprüfung der Treiber-Installation unter Windows
XP x64bit Edition:
Ob Windows XP x64Bit Edition den Hama USB 2.0
Video Editor ordnungsgemäß ins System eingebunden hat, können Sie im Geräte-Manager überprüfen.
Klicken Sie hierzu auf -> Start -> Systemsteuerung ->
Leistung und Wartung -> System. Im Fenster
Systemeigenschaften fahren Sie fort mit -> Hardware -> Geräte-Manager. Folgende Einträge müssen
ohne gelbes Ausrufezeichen vorhanden sein.
Sound, video and game controllers
USB 2861 Device
USB EMP Audio Device
Überprüfung der Treiber-Installation unter Windows
Vista 32 und 64bit Edition:
Ob Windows Vista den Hama USB 2.0 Video Editor
ordnungsgemäß ins System eingebunden hat, können Sie im Geräte-Manager überprüfen. Klicken
hierzu auf Windows Logo (Start) -> Systemsteuerung ->
System und Wartung -> Geräte Manager. Vista
blendet unter Umständen daraufhin die Benutzerkontensteuerung ein, klicken Sie unbedingt auf ->
Fortsetzen. Folgende Einträge müssen ohne gelbes
Ausrufezeichen vorhanden sein.
Audio-, Video- und Gamecontroller
USB EMP Audio Device
USB 2861 Device
Installation der Software ArcSoft Showbiz DVD 2:
1. Schalten Sie den Computer ein und loggen Sie
sich als Administrator, oder Benutzer mit ent sprechenden Rechten unter Windows XP oder
Windows 2000 ein.
2. Legen Sie die beiliegende Treiber CD in Ihr
CD- oder DVD- Laufwerk ein. Falls das
Installationsprogramm nicht automatisch startet,
beachten Sie folgende Schritte:
a.) Klicken Sie doppelt auf das Arbeitsplatz Icon
auf Ihrem Desktop mit der linken Maustaste.
b.) Klicken Sie mit der rechten Maustaste auf Ihr
CD-bzw. DVD-Laufwerk indem Sie gerade die
Tr eiber CD eingelegt haben, und wählen Sie im
Kontextmenu die Option AutoPlay. Daraufhin
wird das Hama Installationsmenü gestartet.
3. Wählen Sie die gewünschte Sprache aus.
4. Klicken Sie auf die Schaltfl äche Software Installieren.
Sie
Hinweis für Vista Benutzer: Unter Umständen
blendet Windows Vista die Benutzerkontosteuerung
ein und weißt Sie darauf hin, dass der Hersteller des
Setup Programms nicht ermittelt werden konnte,
fahren Sie unbedingt mit der Installation fort, indem
Sie auf die Schaltfl äche -> Fortsetzen klicken.
Folgen Sie den Anweisungen des Programms.
5. Auf der Treiber CD-ROM fi nden Sie außerdem
weitere Hinweise und Hilfen über die Arcsoft
ShowBiz 2 Software. Klicken Sie hierzu auf die
Schaltfl äche Anleitung anzeigen. Bitte beachten
Sie, dass Sie hierzu vorher evtl. den Adobe
Acrobat Reader installieren müssen. Diesen
fi nden Sie ebenfalls auf der Treiber CD-ROM.
Hinweise zum Screen-Shot Knopf auf der Oberseite
des Hama USB Video Editor:
Der Screen-Shot Knopf funktioniert unter dieser
speziellen Version der ArcSoft ShowBiz Software,
sollten Sie den Hama Video Editor mit einer anderen
Software benutzen wollen, hat dieser Knopf keine
Funktion.
Unter der ArcSoft ShowBiz Software können Sie
durch drücken des Knopfes einen ScreenShot des
aktuellen Videoframes oder Videobild erzeugen.
Sicherheitshinweise:
• Halten Sie das Gerät von Flüssigkeiten, wie z.B.
Wasser fern.
Betreiben Sie das Gerät nicht in feuchten Umgebungen.
•
• Diese Gerät ist nicht für den Außeneinsatz gedacht.
• Das Gerät besitzt keine zu wartende Bauteile,
deshalb dürfen Reparaturen nur von autorisiertem
Fachpersonal durchgeführt werden.
Supportinformationen:
Bei defekten Produkten:
Bitte wenden Sie sich bei Produktreklamationen an
Ihren Händler oder an die Hama Produktberatung.
Internet/World Wide Web
Produktunterstützung, neue Treiber oder Produktinformationen bekommen sie unter www.hama.com
Support Hotline – Hama Produktberatung:
Te l. +49 (0) 9091 / 502-115
Fax +49 (0) 9091 / 502-272
e-mail: [email protected]
3
Page 5
g
Operating Instruction
System requirements:
CPU: 1.5 GHz or faster
Main memory: at least 512 MB RAM
Graphics: DirectX 9.0 compatible with min. 64 MB
local memory
Sound: AC97 compatible
Hard drive: min. 1 GB free storage space
An open USB 2.0 port
Microsoft DirectX 9.0c or higher
Operating system: Windows 2000 / XP / XP x64
Edition / Vista 32 and 64-bit editions + latest service
packs
Introduction:
Congratulations on the purchase of your Hama USB
2.0 Video Editor. You will have hours of enjoyment
with this highly versatile and handy device. You can
use your new video editor to archive your holiday
videos on a DVD or CD, for example. You may also to
record the best scenes from a game on your console
(Xbox, PlayStation, etc.) in order to show them to
your friends later on.
Installing the USB Video Editor using Windows 2000
/ XP / XP x64 and Vista (all editions):
1. Start your computer and log on to Windows as
administrator or as a user with administrator
privileges.
2. Insert the enclosed driver CD into your CD or
DVD drive. If the installation program does not
start automatically, do the following:
a.) Double-click the My Computer icon on your
desktop with the left mouse button.
b.) Right click the CD or DVD drive containing the
driver CD and select AutoPlay from the popup
menu. The Hama installation menu then starts
automatically.
3. Select the required language.
4. First, you will need to install the driver. Click ->
Install Windows Driver.
Follow the instructions provided by the program.
After the driver has been installed, you will be asked
whether you want to restart the system. Click -> Yes,
I want to restart my computer now.
5. After you have restarted the operating system,
plug the Hama USB 2.0 Video Editor into an open
USB port and the corresponding driver then
installs automatically.
Checking driver installation in Windows 2000:
You can check whether Windows 2000 properly
installed the Hama USB 2.0 Video Editor successfully
into the system using the Device Manager. To check,
click Start -> Settings -> Control Panel -> System. In
the System Properties window, select ->Hardware
-> Device Manager. In the next section, the following
entries must appear without a yellow exclamation
mark.
Audio, Video and Game Controllers
USB 2861 Device
USB EMP Audio Device
Checking driver installation in Windows XP:
You can check whether Windows XP installed the
Hama USB 2.0 Video Editor into the system
successfully using the Device Manager. To do so,
click -> Start -> Control Panel -> Performance and
Maintenance -> System. In the System Properties
window, select ->Hardware -> Device Manager. In
the next section, the following entries must appear
without a yellow exclamation mark.
Audio, Video and Game Controllers
USB 2861 Device
USB EMP Audio Device
Note for Vista users: Windows Vista may display
User Account Control and inform you that it could
not determine the publisher of the setup program.
Continue with the installation by clicking -> Continue.
4
Page 6
Checking the driver installation in Windows XP x64
Edition:
You can check whether Windows XP x64 Edition
installed the Hama USB 2.0 Video Editor into the
system successfully using the Device Manager. To
do so, click -> Start -> Control Panel -> Performance
and Maintenance -> System. In the System
Properties window, select ->Hardware -> Device
Manager. The following entries must appear without
yellow exclamation marks:
Sound, video and game controllers
USB 2861 Device
USB EMP Audio Device
Checking the driver installation in Windows Vista
32 and 64 bit editions:
You can check whether Vista installed the Hama
USB 2.0 Video Editor into the system successfully
using the Device Manager. To do so, click Start
(Windows Logo) -> Control Panel -> System and
Maintenance -> Device Manager. Vista may then
show User Account Control. Click -> Continue. The
following entries must appear without yellow
exclamation marks:
Audio, Video and Game Controllers
USB EMP Audio Device
USB 2861 Device
Installing the ArcSoft Showbiz DVD 2 software:
1. Start your computer and log on to Windows XP
or Windows 2000 either as an administrator or as
a user with administrator privileges.
2. Insert the enclosed driver CD into your CD or DVD
drive. If the installation menu does not start auto
matically, do the following:
a.) Double-click the My Computer icon on your
desktop with the left mouse button.
b.) Right click the CD or DVD drive containing
the driver CD and select AutoPlay from the
popup menu.
starts automatically.
3. Select the required language.
4. Click the -> Install Software button. Follow the
instructions provided by the program.
The Hama installation menu then
Note for Vista users: Windows Vista may display
User Account Control and inform you that it could
not determine the publisher of the setup program.
Continue with the installation by clicking -> Continue.
Follow the instructions provided by the program.
5. The driver CD-ROM also contains additional
information and tips for the ArcSoft ShowBiz 2
software. Click Display Instructions. Please note
that you must have previously installed Adobe
Acrobat Reader to view the fi le. This is also
included on the driver CD-ROM.
Notes on the screenshot button on the top side of
the Hama USB Video Editor:
The screenshot button works with this specifi c
version of the ArcSoft ShowBiz software. This button
has no use if you want to use the Hama Video Editor
with different software.
When using the ArcSoft ShowBiz software, you can
push this button to generate a screenshot of the
current video frame or picture.
Safety notes:
• Keep the device away from liquids, e.g. water
• Do not use the device in damp environments.
• This device is not designed for use outdoors.
• There are no serviceable components in the
device. Only authorised qualifi ed staff may carry
out repairs on it.
Support information:
If the product is defective:
Please contact your dealer or Hama Product
Consulting if you have any product claims.
Internet/World Wide Web
Product support, new drivers or product information
can be found at www.hama.com
Support Hotline – Hama Product Consulting:
Phone: +49 (0) 9091 / 502-115
Fax +49 (0) 9091 / 502-272
E-mail: [email protected]
5
Page 7
f
Mode d‘emploi
Exigences minimales du système :
Processeur : 1,5 GHz ou supérieur
Mémoire principale : au moins 512 Mo RAM
Carte graphique : compatible avec DirectX 9.0, avec
au moins 64 Mo de mémoire locale
Carte son : compatible avec AC97
Au moins 1 Go disponible sur le disque dur
1 port USB libre
Microsoft DirectX 9.0c ou version ultérieure
Système d‘exploitation: Windows 2000 / XP /
Windows XP édition 64-Bit / Vista 32 et 64 édition
64-Bit + les derniers Service Packs
Introduction:
Nous vous remercions d‘avoir acheté notre éditeur
vidéo USB 2.0 de Hama. Nous espérons que cet
appareil pratique et extrêmement polyvalent vous
apportera pleine satisfaction. L’appareil vous permet,
par exemple, d’archiver vos vidéos de vacances sur
DVD ou CD. Il est également possible de copier les
meilleures scènes d’un jeu de votre console (Xbox,
Playstation etc.) afi n de les montrer plus tard à vos
amis.
Installation de l’éditeur vidéo USB sous Windows
2000 / XP / XP 64 et Vista (toutes les éditions) :
1. Démarrez votre ordinateur, puis
enregistrez-vous dans Windows en tant
qu’administrateur ou en tant qu’utilisateur
possédant les droits d’administrateur.
2. Insérez le CD-ROM pilote fourni dans votre
lecteur. Suivez les étapes ci-dessous dans le cas
où le programme d‘installation ne démarre pas
automatiquement :
a.) Double-cliquez sur votre poste de travail dans
le menu panneau de confi guration à l’aide de la
touche gauche de votre souris.
b.) Cliquez sur votre lecteur de CD-ROM ou de
DVD dans lequel vous avez inséré le CD
pilote à l’aide de la touche droite de votre
souris, puis sélectionnez Exécution automa
tique dans le menu contextuel. Le programme
d’installation démarre automatiquemen.
3. Sélectionnez la langue désirée.
4. Commencez par installer le pilote. Cliquez sur le
bouton -> Installation du pilote Windows.
Remarque pour les utilisateurs de Vista: Il est possible
que Windows Vista affi che le contrôle du compte
utilisateur et vous indique qu’il est impossible de détecter
l’origine du programme d’installation ; cliquez sur le
bouton -> Continuer afi n de poursuivre l’installation.
Suivez les consignes du programme. Vous serez
invité à redémarrer votre ordinateur à la fi n de
l’installation du pilote ; cliquez sur -> Oui, je veux
redémarrer mon ordinateur maintenant.
5. Vous pouvez connecter votre éditeur vidéo USB
2.0 de Hama à un port USB libre de votre
ordinateur dès que vous avez redémarré votre
système ; les pilotes nécessaires sont installés
automatiquement.
Vérifi cation de l’installation du pilote sous
Windows 2000 :
Vous pouvez vérifi er dans le gestionnaire de
périphérique si Windows 2000 a correctement
intégré l’éditeur vidéo USB 2.0 de Hama dans le
système. Pour ce faire, cliquez sur -> Démarrer ->
Paramètres -> Panneau de confi guration ->
Système. Continuez dans la fenêtre Propriétés
système avec -> Matériel -> Gestionnaire de
périphérique. Les entrées indiquées ci-dessous
doivent être affi chées sans point d’exclamation
jaune dans la section suivante :
Contrôleur audio, vidéo et contrôleur de jeux
USB 2861 Device
USB EMP Audio Device
Vérifi cation de l’installation du pilote sous
Windows XP :
Vous pouvez vérifi er si Windows XP a correctement
intégré l’éditeur vidéo USB 2.0 de Hama dans votre
système en consultant le gestionnaire de
périphérique. Pour ce faire, cliquez sur -> Démarrer
-> Panneau de confi guration -> Performances et
entretien -> Système. Continuez dans la fenêtre
Propriétés système avec -> Matériel -> Gestionnaire
de périphérique. Les entrées indiquées ci-dessous
doivent être affi chées sans point d’exclamation
jaune dans la section suivante :
Contrôleur audio, vidéo et contrôleur de jeux
USB 2861 Device
USB EMP Audio Device
6
Page 8
Vérifi cation de l’installation du pilote sous
Windows XP édition 64-Bit:
Vous pouvez vérifi er si Windows XP édition 64-Bit
a correctement intégré l’éditeur vidéo USB 2.0 de
Hama dans votre système en consultant le
gestionnaire de périphérique. Pour ce faire, cliquez
sur -> Démarrer -> Panneau de confi guration ->
Performances et entretien -> Système. Continuez dans
la fenêtre Propriétés système avec -> Matériel ->
Gestionnaire de périphérique. Les entrée suivantes
doivent y être affi chées sans point d’exclamation jaune :
Contrôleurs audio, vidéo et contrôleur de jeux
(Sound, video and game controllers)
USB 2861 Device
USB EMP Audio Device
Vérifi cation de l’installation du pilote sous
Windows Vista édition 32-Bit et 64-Bit:
Vous pouvez vérifi er si Windows Vista a
correctement intégré l’éditeur vidéo USB 2.0 de
Hama dans votre système en consultant le
gestionnaire de périphérique. Pour ce faire, cliquez
sur le logo Windows (Démarrer) -> Panneau de
confi guration -> Performances et entretien ->
Gestionnaire de périphérique. Il est possible
Windows Vista affi che le contrôle du compte
utilisateur ; veuillez cliquer sur -> Continuer. Les
entrée suivantes doivent y être affi chées sans point
d’exclamation jaune:
Contrôleur audio, vidéo et contrôleur de jeux
USB EMP Audio Device
USB 2861 Device
Installation du logiciel ArcSoft Showbiz DVD 2 :
1. Démarrez votre ordinateur, puis
enregistrez-vous dans Windows XP ou
Windows 2000 en tant qu’administrateur
ou en tant qu’utilisateur possédant les droits
d’administrateur.
2. Insérez le CD-ROM pilote fourni dans votre
lecteur. Suivez les étapes ci-dessous dans le
cas où le programme d‘installation ne démarre
pas automatiquement :
a.) Double-cliquez sur votre poste de travail dans
le menu panneau de confi guration à l’aide de la
touche gauche de votre souris.
b.) Cliquez sur votre lecteur de CD-ROM ou de
DVD dans lequel vous avez inséré le CD
pilote à l’aide de la touche droite de votre
souris, puis sélectionnez Exécution automa
tique dans le menu contextuel. Le programme
d’installation démarre automatiquement.
3. Sélectionnez la langue désirée.
4. Cliquez sur le bouton -> Installer le pilote.
Suivez les consignes du programme.
Remarque pour les utilisateurs de Vista: Il est
possible que Windows Vista affi che le contrôle
du compte utilisateur et vous indique qu’il est
impossible de détecter l’origine du programme
d’installation ; cliquez sur le bouton -> Continuer afi n
de poursuivre l’installation.
Suivez les consignes du programme.
5. Vous trouverez des informations supplémentaires
et des fonctions d’aide pour Arcsoft ShowBiz 2
Software sur le pilote. Pour affi cher ces informations,
cliquez sur le bouton Affi cher le mode d’emploi.
Veuillez noter que le programme Adobe Acrobat
Reader doit être installé sur votre ordinateur afi n
de pouvoir consulter les fi chiers. Vous le trouverez
également sur le CD-ROM pilote.
Remarques concernant la touche de capture
d’écran sur la face supérieure de l’éditeur vidéo
USB de Hama :
La touche de capture d’écran (screenshot)
fonctionne dans cette version spéciale de ArcSoft
ShowBiz Software ; cette touche n’a aucune
fonction dans le cas où vous décidez d’utiliser
l’éditeur vidéo USB de Hama avec un autre logiciel.
Sous ArcSoft ShowBiz Software, la touche vous
permet de faire une capture d’écran (screenshot) du
plan ou de l’image vidéo actuel.
7
Page 9
Consignes de sécurité :
• Assurez-vous qu’aucun liquide (eau, etc.) ne
puisse pénétrer dans l’appareil.
• N‘utilisez pas l‘appareil dans des environnements
humides.
Cet appareil n’est pas conçu pour une utilisation
en plein air.
• L’ appareil ne contient aucune partie nécessitant
un entretien ; toute réparation doit être effectuée
par un personnel qualifi é autorisé.
Informations du support technique :
En cas d’appareil défectueux :
En cas de réclamation concernant le produit, veuillez
vous adresser à votre revendeur ou au département
conseil produits de Hama.
Internet / World Wide Web
Notre support technique, les nouveaux pilotes et les
informations produits sont disponibles sous :
www.hama.com
Ligne téléphonique directe d’assistance – Conseil
produits Hama :
Tél. +49 (0) 9091 / 502-115
Fax +49 (0) 9091 / 502-272
E-mail: [email protected]
8
Page 10
9
 Loading...