

Page 1
2
FCC Information
This device complies with Part 15 of the FCC Rules.
Operation is subject to the following two : (1) This
device may not cause harmful interference, and (2)
this device must accept any interference received,
including interference that may cause undesired operation. This equipment has been tested and found to comply
with the limits for a Class B digital device, pursuant to
Part 15 of the FCC Rules. These limits are designed to provide reasonable protection against harmful interference
in a residential installation. This equipment
generates, uses and radiates radio frequency energy
and, if not installed and used in accordance with
the instruction, may cause harmful interference to radio
communications. However, there is no guarantee
that interference will not occur in a particular
installation.
In accordance with FCC requirements, changes or
modifi cations not expressly approved by Thomson
multimedia Inc. could void the user’s authority to
operate this product.
This device generates and uses radio frequency (RF)
energy, and if not installed and used properly, this
equipment may cause interference to radio and
television reception. If this equipment does cause
interference to radio or television reception (which
you can determine by unplugging the unit), try to
correct the interference by one or more of the
following measures:
• Re-orient the receiving antenna (that is, the
antenna for the radio or television that is
“receiving” the interference).
• Move the unit away from the equipment that is
receiving interference.
• Plug the unit into a different wall outlet so that
the unit and the equipment receiving interference
are on different branch circuits.
If these measures do not eliminate the interference,
please consult your dealer or an experienced
radio/television technician for additional
suggestions.
This product complies with DHHS Rules 21 CFR
Subchapter J. Applicable at the date of manufacture.
For Your Safety
The AC power plug is polarized (one blade is wider than
the other) and only fi ts into AC power outlets one way. If
the plug won’t go into the outlet completely, turn the plug
over and try to insert it the other way. If it still won’t fi t,
contact a qualifi ed electrician to change the outlet, or
use a different one. Do not attempt to bypass this safety
feature.
CAUTION: TO PREVENT ELECTRIC SHOCK, MATCH
WIDE BLADE OF PLUG TO WIDE SLOT, FULLY
INSERT.
CAUTION – To reduce the risk of fi re, use only No.
26 AWG or larger telecommunication line cord.
Note:
This DVD player is designed and manufactured to
respond to the Region Management Information. If the
Region number of a DVD disc does not correspond to the
Region number of this DVD player, this player cannot play
the disc. The Region number for this DVD player is Region
No. 1.
SERVICE INFORMATION
This product should be serviced only by those
specially trained in appropriate servicing techniques.
Main plug is used as the disconnect device, it shall
remain operable and should not be obstructed during
intended used. To be completely disconnected the
apparatus from supply mains, the main plug of the
apparatus shall be disconnected from the mains socket
outlet completely.
g
Operating instruction
Page 2
3
CAUTION
THIS PRODUCT UTILIZES A LASER. USE OF
CONTROLS OR ADJUSTMENTS OR
PERFORMANCE OF PROCEDURES OTHER THAN
THOSE SPECIFIED HEREIN MAY RESULT IN
HAZARDOUS RADIATION EXPOSURE. DO NOT
OPEN COVERS AND DO NOT REPAIR YOURSELF.
REFER SERVICING TO QUALIFIED PERSONNEL.
This Class B digital apparatus complies with
Canadian ICES-003.
Cet appareil numérique de la class B est
conforme à la norme du NMB-003 du Canada
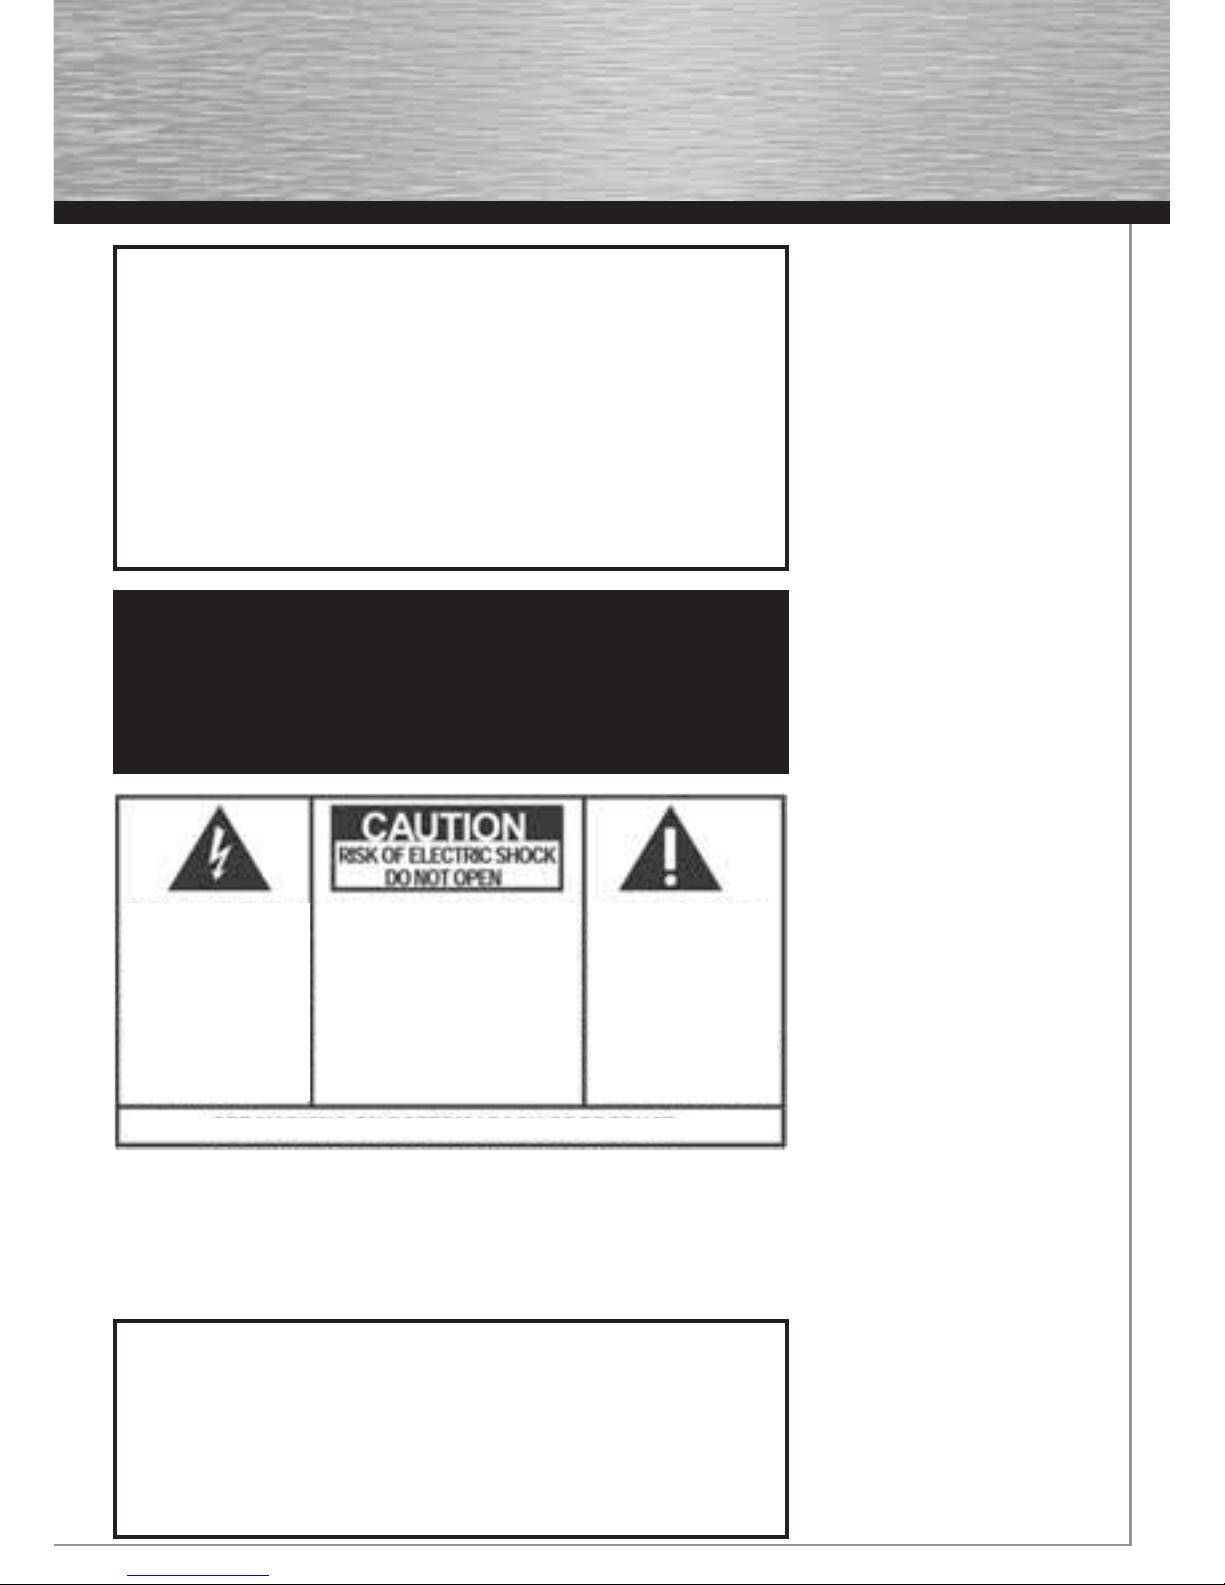
THE LIGHTNING
FLASH AND ARROWHEAD WITHIN THE
TRIANGLE IS A
WARNING SIGN
ALERTING YOU OF
„ D A N G E R O U S
VOLTAGE“ INSIDE
THE PRODUCT.
CAUTION: TO REDUCE THE RISK
OF ELECTRIC SHOCK, DO NOT
REMOVE COVER ( O R B A C K ).
NO USERSERVICEABLE PARTS
INSIDE. REFER SERVICING TO
QUALIFIED SERVICE PERSONNEL.
THE EXCLAMATION
POINT WITHIN THE
T R I A N G L E I S A
WARNING SIGN
ALERTING YOU OF
I M P O R TA N T
I N S T R U C T I O N S
A C C O M PA N Y I N G
T H E P R O D U C T.
SEE MARKING ON BOTTOM / BACK OF PRODUCT
WARNING
To reduce the risk of fi re or electric shock, do not
expose this product to rain or moisture. No
objects fi lled with liquids, such as vases, should
be placed on the apparatus.
WARNING:TO PREV ENT FIRE OR ELECTRICAL
SHOCK HAZARD, DO NOT EXPOSE THIS PRODUCT
TO RAIN OR MOISTURE.
Page 3
4
Table of Contents
Connections and Setup
Things to consider before you connect ....................................................................................................................7
Accessories provided ..................................................................................................................................................7
Front panel controls......................................................................................................................................................8
Connecting to audiovisual equipment .......................................................................................................................9
Connecting the speakers ...........................................................................................................................................10
Positioning speakers ..................................................................................................................................................10
Front speaker placement ...........................................................................................................................................11
Preferred surround placement .................................................................................................................................11
Test tone/Channel balance ........................................................................................................................................12
The Remote Control
Remote control functions in DVD/CD mode ...........................................................................................................13
Remote control functions in TUNER mode .............................................................................................................14
Using the remote to Navigate through On-Screen
Menus ...........................................................................................................................................................................14
Inserting batteries in the remote control ................................................................................................................14
Playing Discs – Basic Functions
Compatible discs .........................................................................................................................................................14
Compatible formats.....................................................................................................................................................14
Regional coding...........................................................................................................................................................14
Operating the DVD receiver ......................................................................................................................................15
Loading discs ...............................................................................................................................................................15
Playing discs ................................................................................................................................................................15
Types of Menus ...........................................................................................................................................................15
Basic Playback Operations .......................................................................................................................................16
Playback .......................................................................................................................................................................16
Accelerated play .........................................................................................................................................................16
Pause ............................................................................................................................................................................16
Frame advance ............................................................................................................................................................16
Variable slow motion ..................................................................................................................................................16
Changing chapter/track .............................................................................................................................................16
Zoom..............................................................................................................................................................................16
The Info Menu
Using the Info menu....................................................................................................................................................17
Title/chapter (DVD)/track (audio CD and VCD) ......................................................................................................18
Time display .................................................................................................................................................................18
Page 4
5
Audio (DVD, VCD) ........................................................................................................................................................18
Subtitles (DVD) ............................................................................................................................................................18
Camera angle (DVD) ...................................................................................................................................................18
Play mode (all discs exceot mp3/WMA/JPEG) ......................................................................................................19
Creating a Program list for Play mode (Audio CDs, DVD and VCD discs) .........................................................19
Creating a Program list for Play mode (mp3 CDs) .................................................................................................19
Bookmark (DVD and audio CD) .................................................................................................................................20
Sleep .............................................................................................................................................................................20
PBC ...............................................................................................................................................................................20
IntroScan ......................................................................................................................................................................20
mp3/WMA Files and JPEG Files
Playing mp3/WMA Files or displaying JPEG fi les .................................................................................................21
Radio
Manual Tuning .............................................................................................................................................................22
Storing radio stations .................................................................................................................................................22
USB and mp3 Player
Connecting/Disconnecting USB devices to the Main Unit ..................................................................................23
Connecting/Disconnecting the mp3 Player to the Main Unit ..............................................................................23
Selecting USB or mp3 Player Mode ........................................................................................................................23
USB Device Playback Features ................................................................................................................................23
CD Ripping
Ripping CD to USB or mp3 Player.............................................................................................................................24
Speed ....................................................................................................................................................................24
Source ..................................................................................................................................................................24
Destination ...........................................................................................................................................................24
Start Ripping CD ..........................................................................................................................................................24
File Names of Ripped Files ........................................................................................................................................25
Deleting Files ...............................................................................................................................................................25
mp3 Player
Insert battery into the Player ....................................................................................................................................26
General Controls .........................................................................................................................................................26
Display Overview ........................................................................................................................................................27
Turn On/Off the mp3 Player .......................................................................................................................................27
Play/Pause./Stop/Skip/Scan Tracks ........................................................................................................................27
Page 5
6
Adjusting the Volume .................................................................................................................................................27
Key Lock .......................................................................................................................................................................27
DSP ...............................................................................................................................................................................28
Play Modes ..................................................................................................................................................................28
The Setup Menu
General Setup ..............................................................................................................................................................29
Password .............................................................................................................................................................29
Rating ....................................................................................................................................................................30
Slide Time .............................................................................................................................................................30
Default ..................................................................................................................................................................30
Display Setup ...............................................................................................................................................................30
Display Type .........................................................................................................................................................30
Dark Level ............................................................................................................................................................30
Video .....................................................................................................................................................................31
Speaker Setup .............................................................................................................................................................31
Night Mode ..........................................................................................................................................................31
Distance ...............................................................................................................................................................31
Test Tone ..............................................................................................................................................................32
Language Setup ..........................................................................................................................................................32
Player
Menu .............................................................................................................................................................................32
Audio .....................................................................................................................................................................32
Subtitles ................................................................................................................................................................32
Disc Menu ............................................................................................................................................................32
Additional Information
Tr oubleshooting ...........................................................................................................................................................33
Precautions ..................................................................................................................................................................35
Disc Formats you can play ........................................................................................................................................36
Sound Enhancement Systems ..................................................................................................................................37
Page 6
7
Things to consider before you connect
• Ensure that the mains supply in your house complies with that indicated on the identifi cation
sticker located on the back of your unit.
• Install your unit horizontally, away from any source of heat (fi replace) or appliances creating
strong magnetic or electromagnetic fi elds. The components of this unit are sensitive to heat. The
maximum ambient temperature should not exceed 35° Celsius/95 Fahrenheit.
• Leave enough space around the unit to allow adequate ventilation: 10 cm/4 inches on either side
and above the top, and 5 cm/2 inches at the rear.
• The humidity of the room should not exceed 75%. If you have to use the unit outdoors, do not
expose it to rain or splashing water. The apparatus should not be exposed to dripping or
splashing and no objects fi lled with liquids, such as vases, should be placed on the apparatus.
• Moving the unit from a cold place to a warm one can cause condensation on some components
inside the unit. Let the condensation disappear on its own before turning the unit on again.
• Before moving the player, make sure the disc tray is empty.
• Where the mains plug or an appliance coupler is used as a disconnect device, the disconnect
device shall remain readily operable.
Other important use and cleaning information at the end of the booklet.
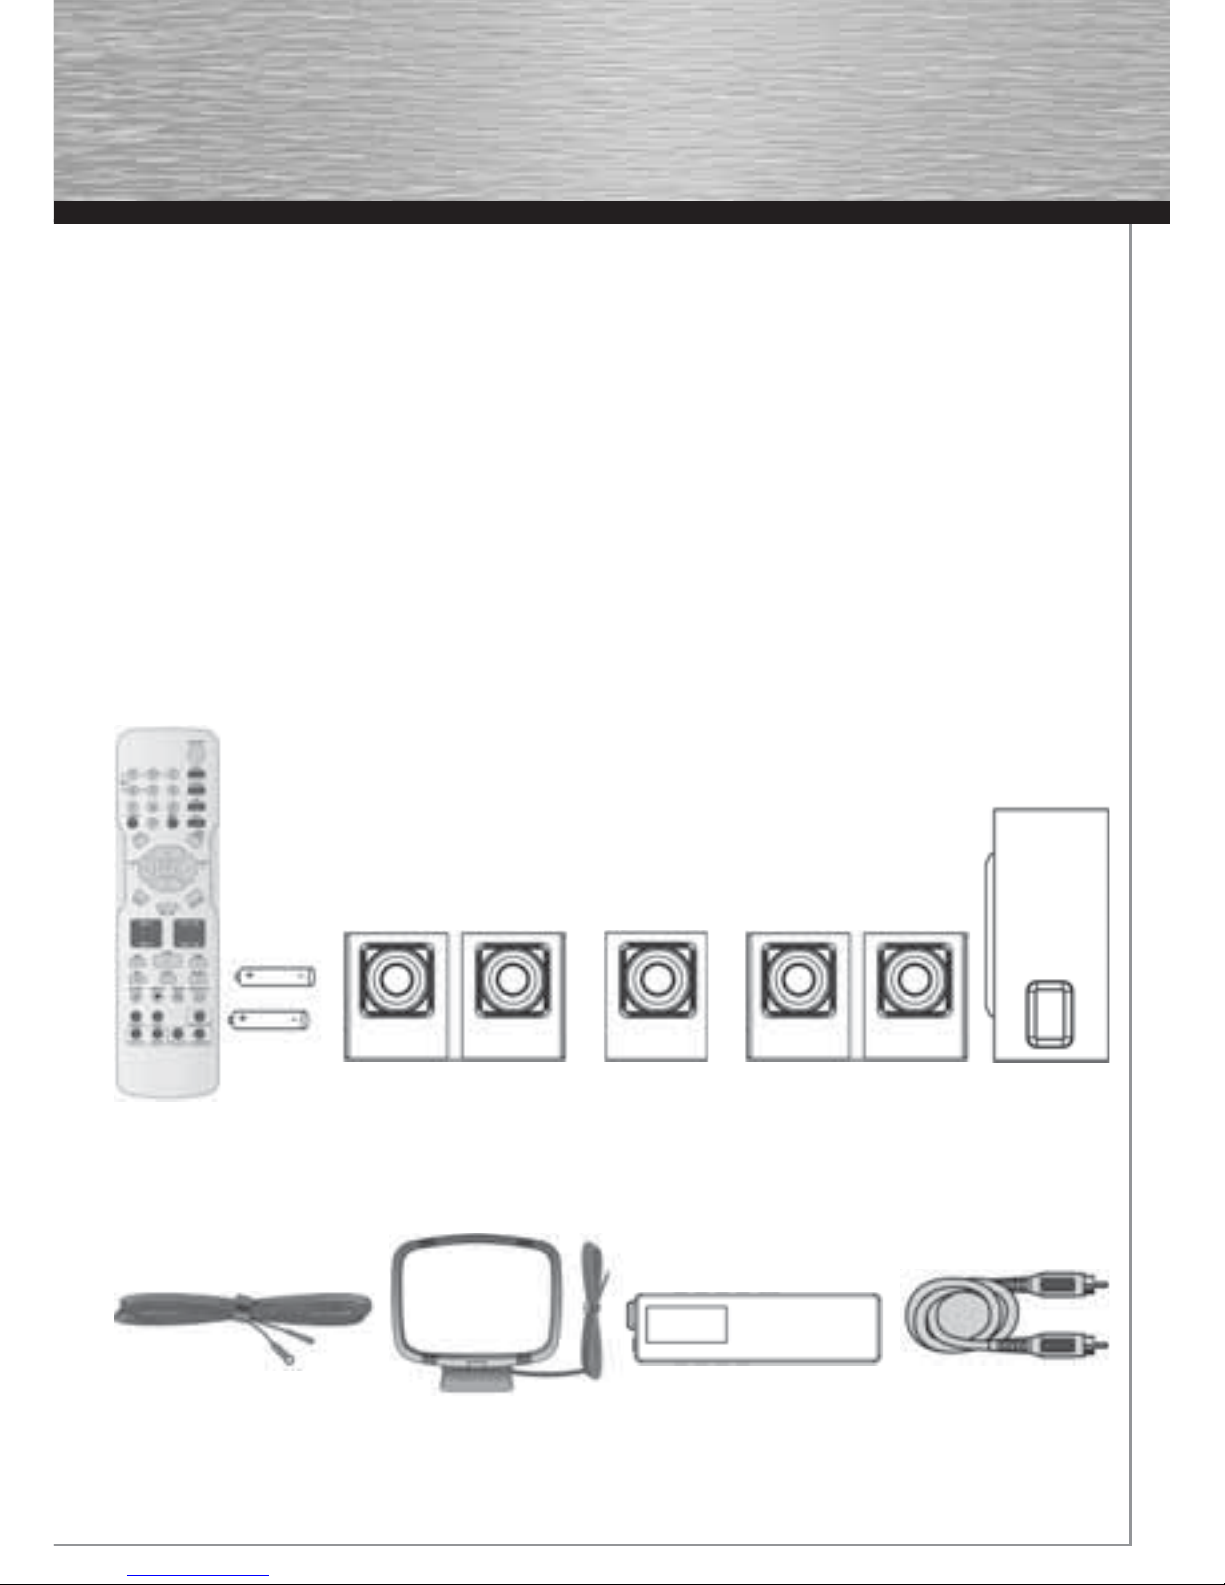
Accessories provided
Remote control and 2
non-rechargeable AAA
batteries
Left and right front speakers Center speaker Left and right rear speakers Subwoofer
One Pig-Tail antenna wire One external AM loop antenna mp3 player Composite video cable
Page 7
8
Caution!
Invisible laser radiation when open. Avoid exposure to beam. Class 1 laser product. This system must be opened only by
qualifi ed technicians to prevent accidents caused by the laser beam.
DVD copy protection
In accordance with the DVD standard, your DVD player is equipped with a Copy Protection system, which can be switched on and off by the DVD disc itself, in order to make any recording of the relevant DVD disc onto a videotape of very
poor picture quality, or even impossible. This product incorporates copyright protection technology that is protected
by method claims of certain U.S. patents and other intellectual property rights owned by Macrovision Corporation and
other rights owners. Use of this copyright protection technology must be authorized by Macrovision Corporation, and is
intended for home use only unless otherwise authorized by Macrovision Corporation. Reverse engineering or
disassembly is prohibited.
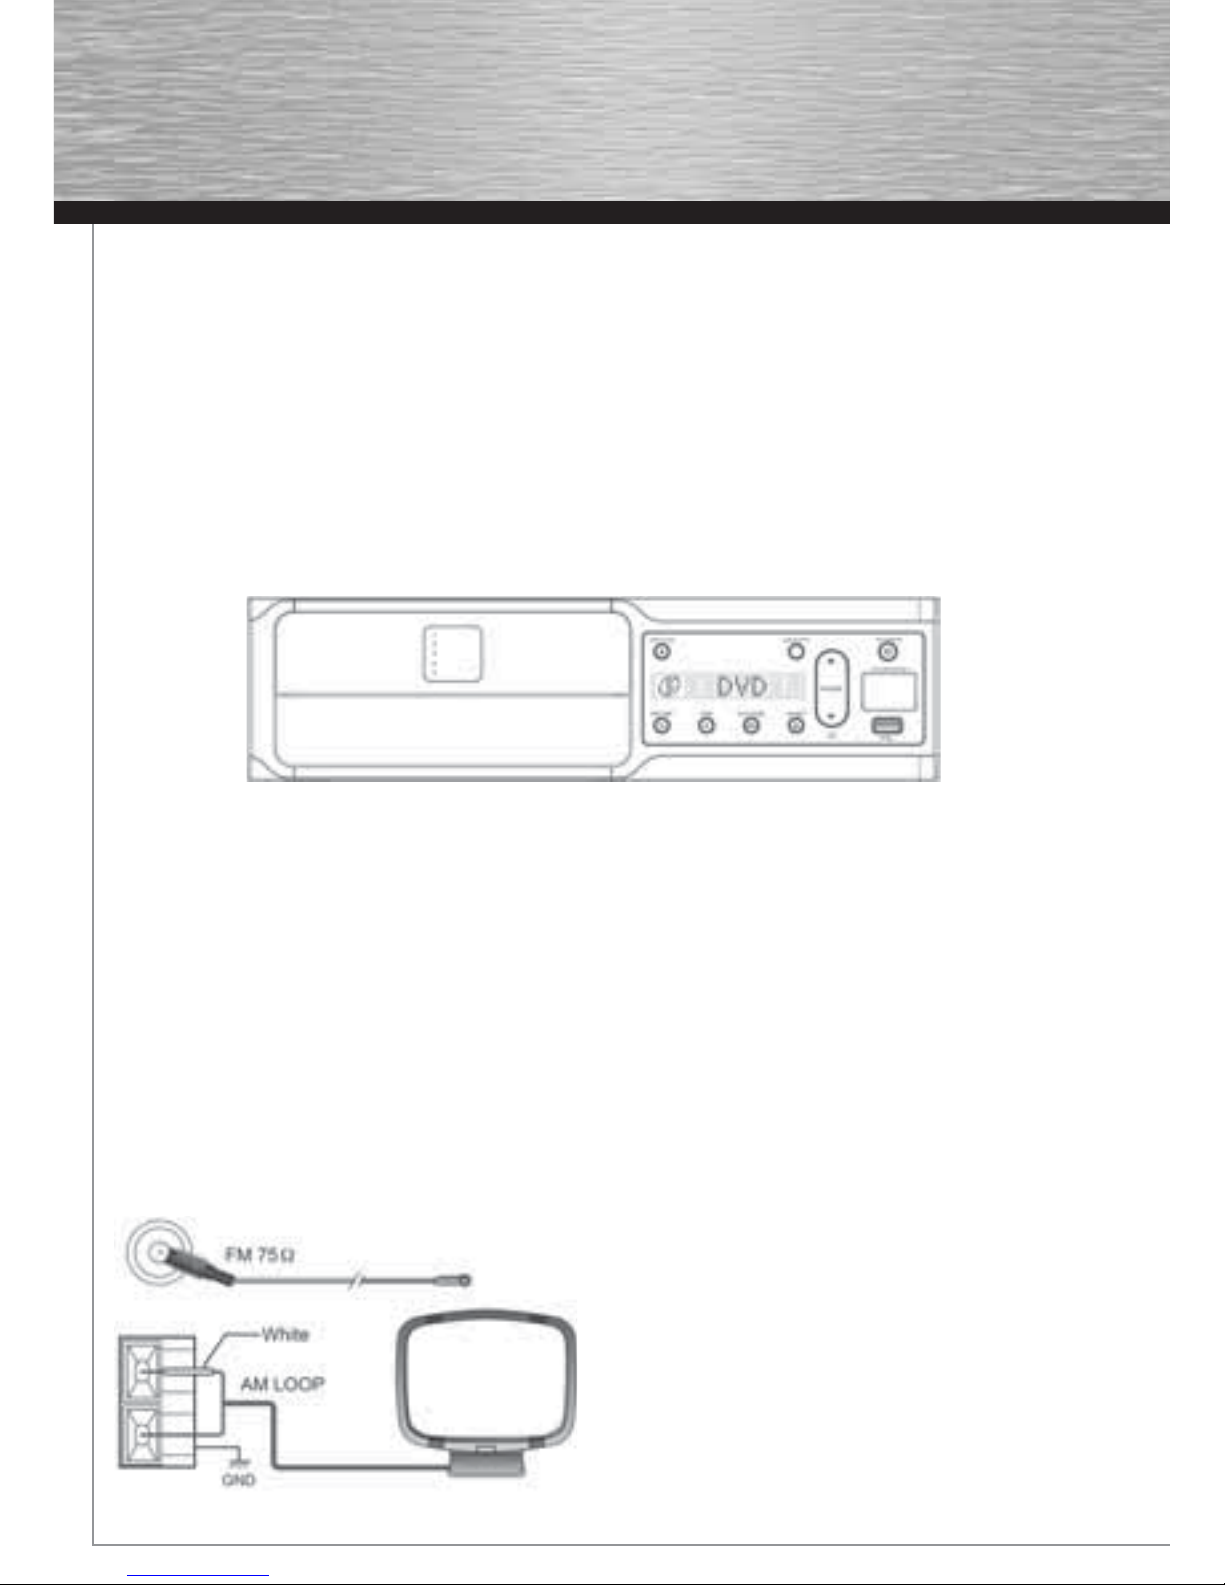
Front panel controls
OPEN/CLOSE - Opens and close the disc tray.
SUBWOOFER - Toggles between different subwoofer output levels.
DISC SKIP – Goes to the next slot in the disc tray.
STOP - Stops disc playback.
PLAY/PAUSE - Starts playing a disc. Pause.
SOURCE - Selects the input source.
VOLUME - Adjusts the volume.
Surround sound light indicator - The LED lights when Surround mode is active.
ON/STANDBY - Switches the unit on and off.
RCA MP3 PLAYER - Connects the included Lyra mp3 player.
USB Socket - Connect USB devices.
Connecting the Antennas
The AM and FM antennas connect to the AM and FM terminals on the system’s back panel.They must be hooked up in
order to receive clear reception.
AM Loop Antenna and FM Indoor Antenna
1. Uncoil the AM Antenna wire.
2. Press down on the Antenna tab to open the terminal
Note: Make sure the white wire on the AM lop antenna
is inserted into the upper AM LOOP terminal.
Page 8
9
Connecting to audiovisual equipment
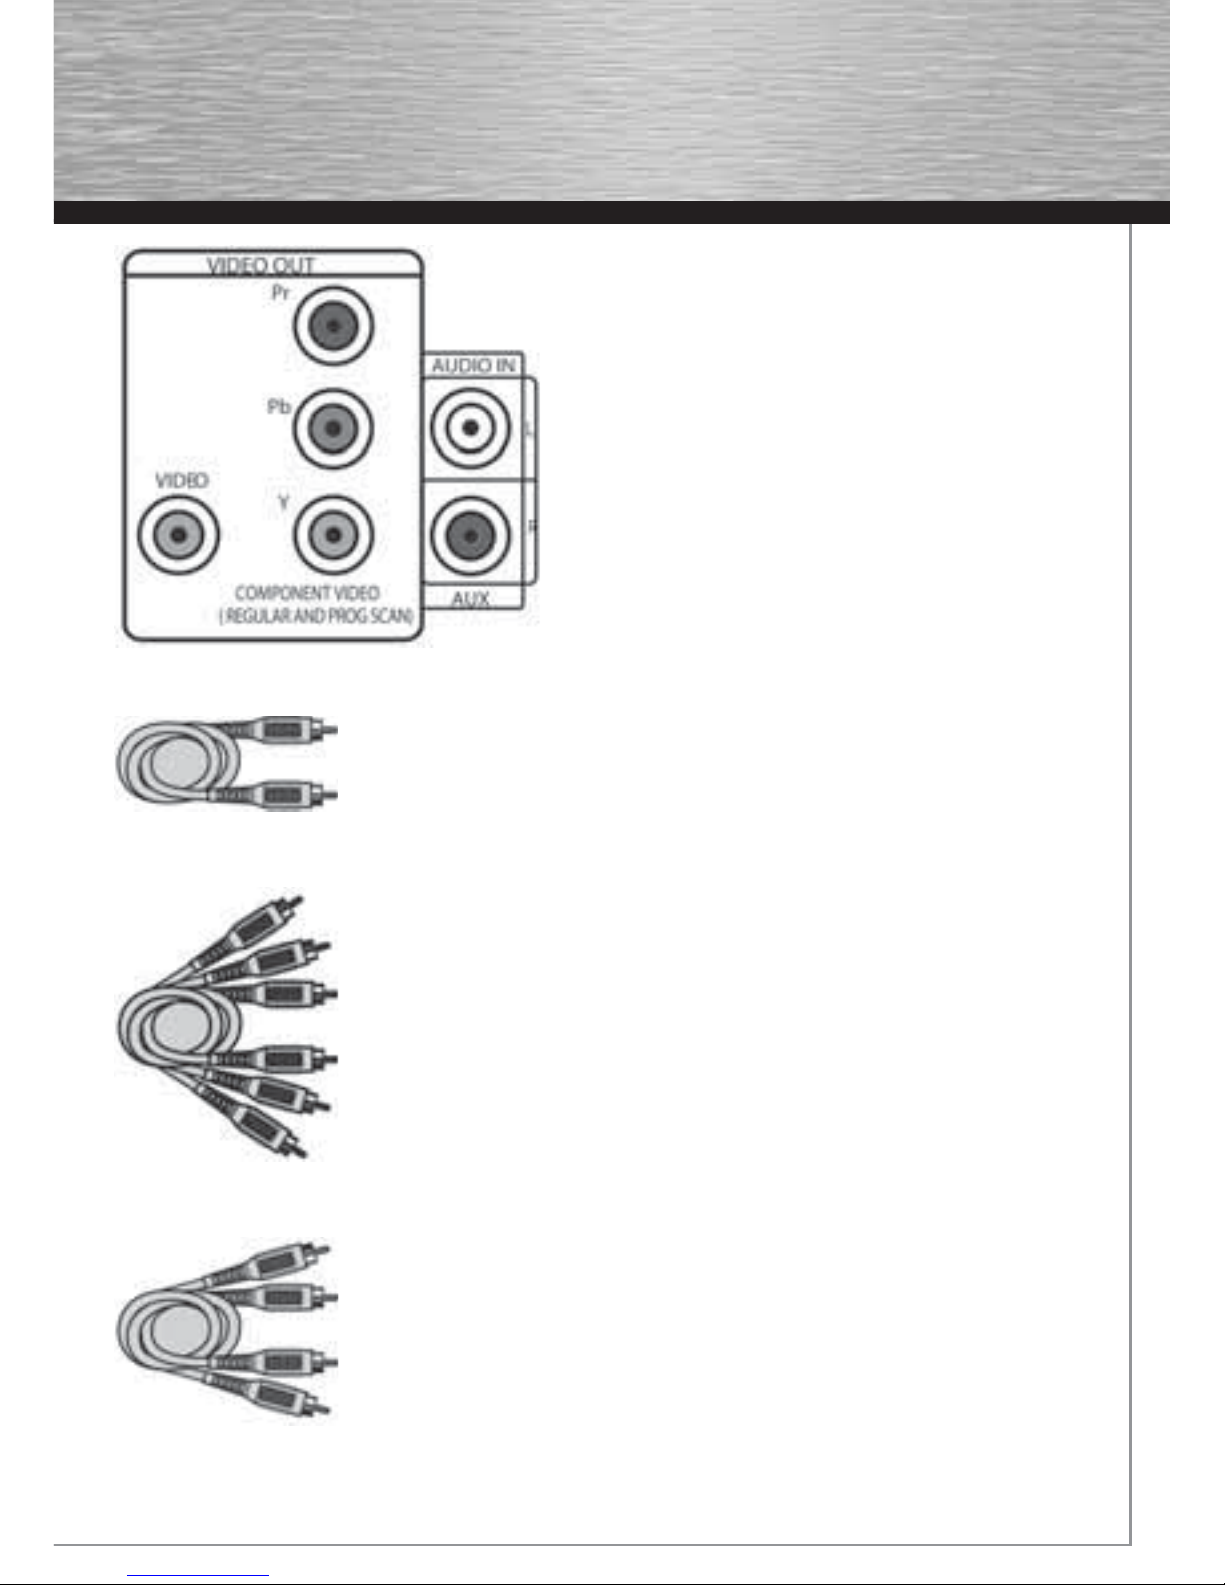
Explanation of jacks and cables
The jacks on the back of your receiver (pictured left) and
the cables shown below are used to connect to other
components.
The video jacks are OUT jacks, which need to be
connected to IN jacks on the TV or monitor you’re
connecting to (so the video content goes from the
receiver to the screen). The audio jacks are IN jacks,
which need to be connected to OUT jacks
on the component you’re connecting to, so the sound
from the component comes into the receiver (and out
through the speakers).
Video cables
Composite video cable (included)
The basic Video jack (usually color-coded yellow) is also referred to as composite
video. Usually the video cable is bundled with the audio cables (white and red).
Component video cables (Pr, Pb, Y) (not included)
The Y, Pb, Pr jacks provide optimum picture quality by separating the video
signal into three parts. To ensure maximum picture quality, use three videograde
cables for the connection. You can also buy bundled component video
cables that are color-coded to match the Y, Pb, Pr inputs (green, blue and red).
Note: If your television is a high defi nition television, use the DVD player’s progressive scan
output to get the highest possible video resolution. Set the Progressive Scan option in the
Display menu to On (see page 26).
Note: If one of the devices is not working, check that all the cables have been inserted
properly into the jacks.
Audio cables (not included)
AUDIO IN L (left) and AUDIO IN R (right)
These jacks and cables are often color-coded (red for right audio, and white for
left audio).
Note: If your component has only one input for audio (mono), connect it to the left (white
L/Mono) audio jack on the TV and don’t connect the right audio part of the cable.
Composite video cable
Component video cable
Audio cables (red and white)
Page 9
10
Connecting the speakers
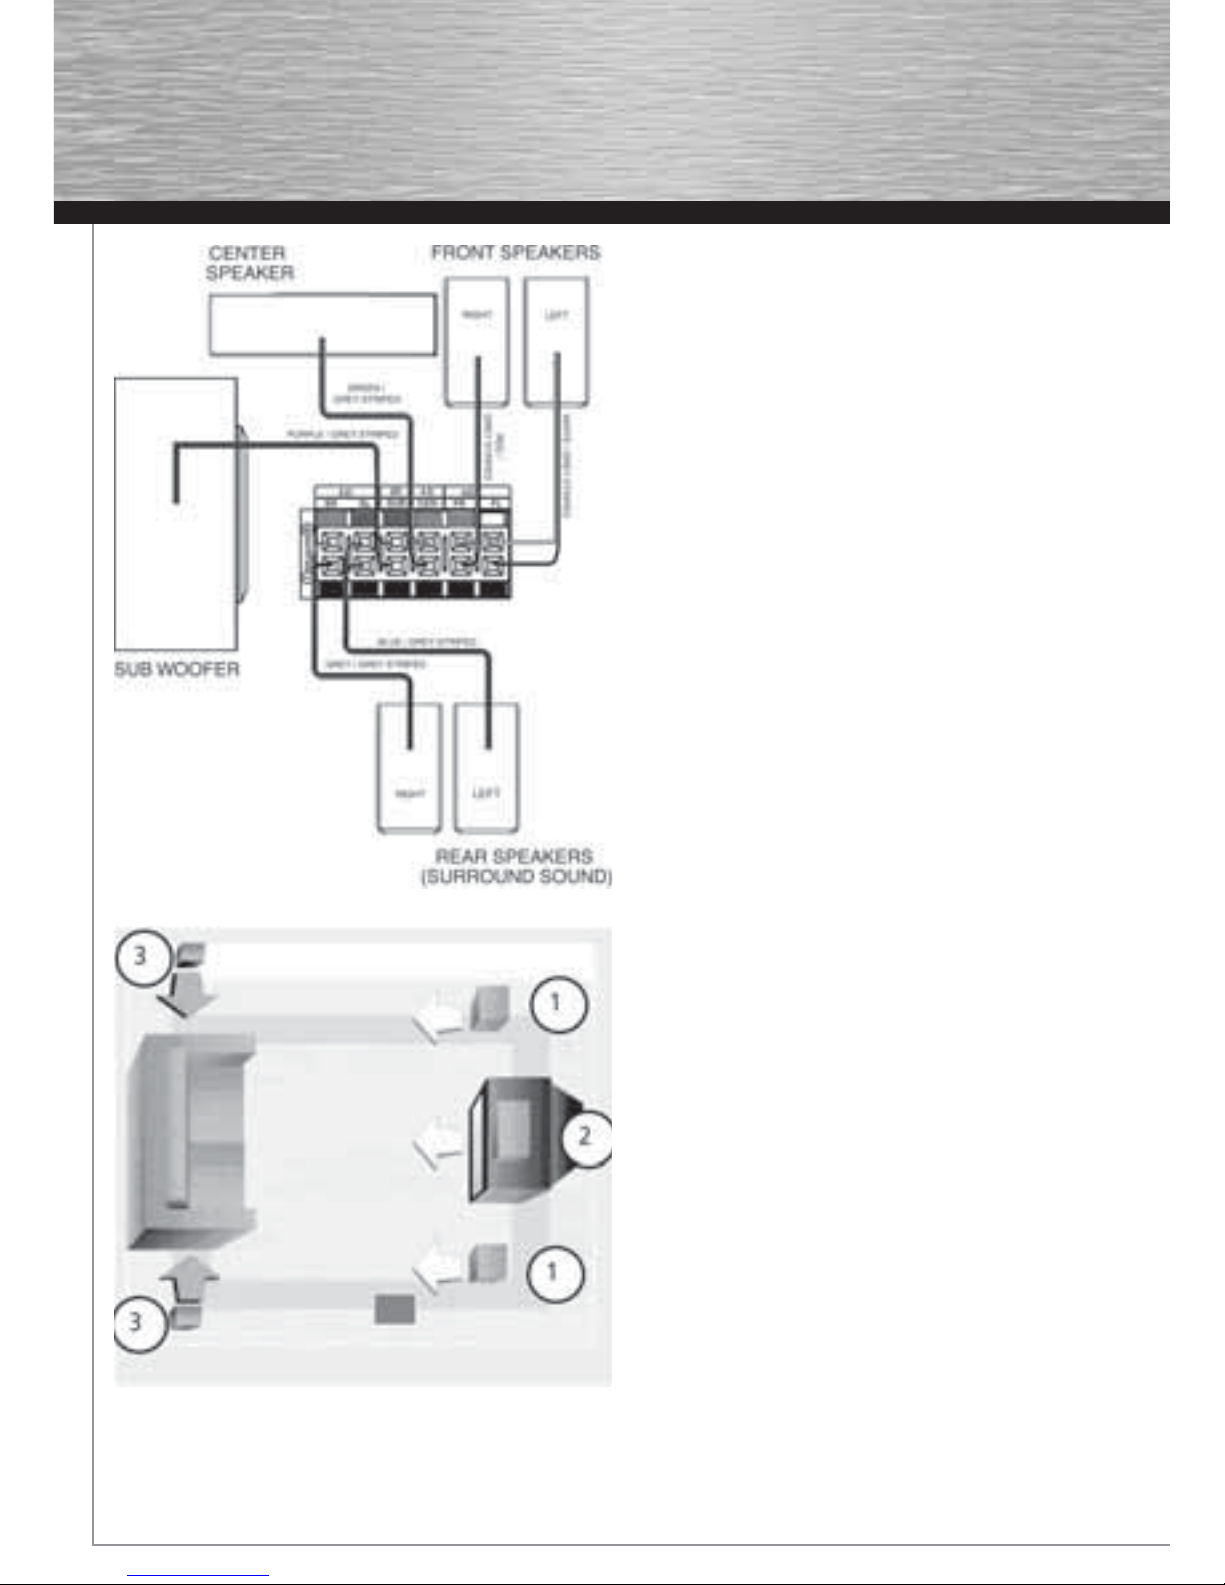
Six speakers are provided with the unit (2 front, 1 center,
2 rear, 1 subwoofer). To achieve good surround effects,
all six speakers need to be connected to the receiver.
One speaker wire is provided with each speaker.
Speaker wires are color-coded to match the terminals.
Connect the speaker wire from the back of each
speaker to the corresponding color terminal at the back
of the unit. Press down the tab to open the terminal and
insert the wire. Release the tab to lock wire in the
terminal. Do the same for center speaker, rear
speakers and the subwoofer.
Note: When connecting the speakers, make sure
the polarities (“+” speaker wire to “+” on the receiver)
of speaker wires and terminals match. If the cords are
reversed, the sound will be distorted. Do not ground the
output line, it will damage the speaker.
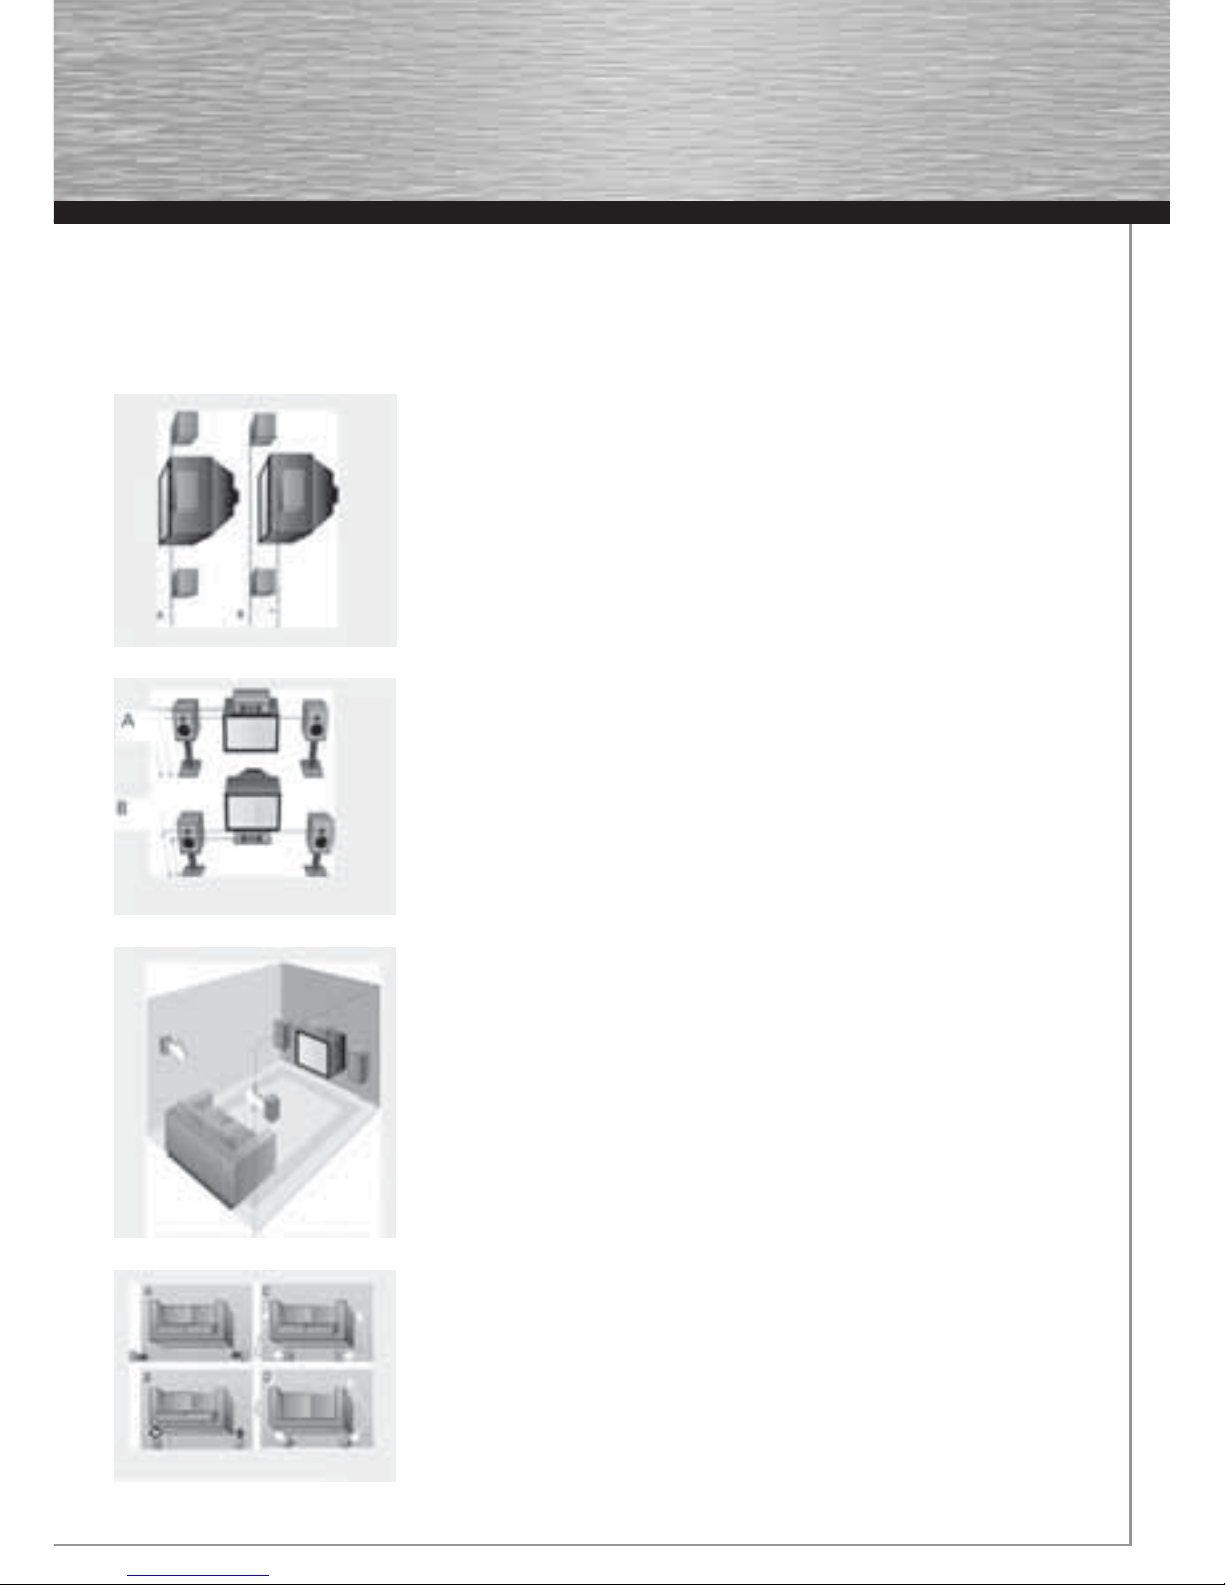
Positioning speakers
" Left, Right (Front Speakers)
Front speakers carry primarily music and sound
effects.
! Center
In surround mode, the center speaker carries
most of the dialog as well as music and effects.
It should be set between the left and right
speakers.
# Surround (Rear Speakers)
The rear speakers’ overall sound balance should
be as close as possible to the front speakers.
Proper placement is vital to establish an evenly
distributed sound fi eld.
Subwoofer
A subwoofer is designed to reproduce powerful
low bass effects (explosions, the rumble of
spaceships, etc.) which dramatically heighten
the action on the screen.
Courtesy Dolby Laboratories
Page 10
11
Magnetic shielding
Speakers placed less than two feet from the TV set must be magnetically shielded in order to prevent picture distortion.
Front and center speakers provided with this unit are magnetically shielded to protect your TV set.
Note: It is not recommended to place the rear speakers and subwoofer near the TV set.
Front speaker placement
Follow the suggestions for speaker placement below to
get the best results.
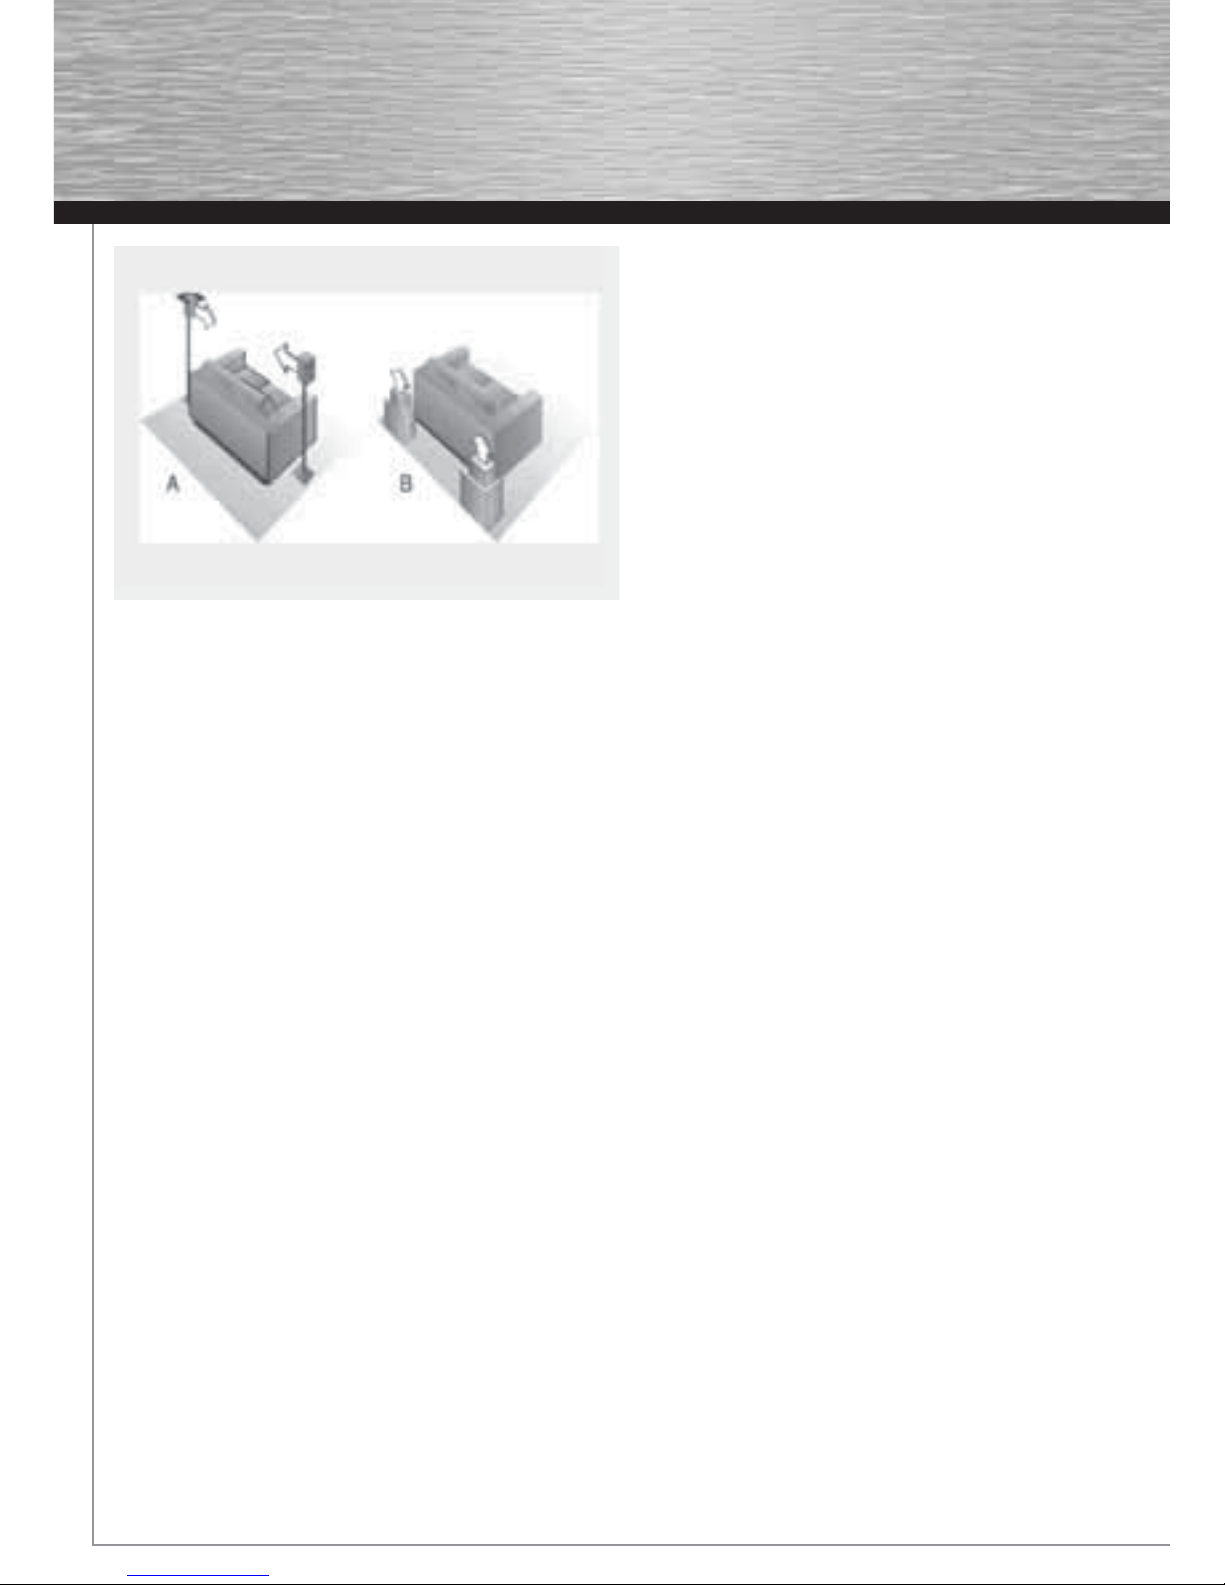
Alignment
Align the center speaker evenly with (A) or slightly
behind (B) (the left and right speakers), but not ahead
of them.
Angle
Place the left and right speakers to form a 45-degree
angle with your favorite viewing position to duplicate
the soundtrack mixer’s perspective.
Height
The mid- and high-frequency drivers of the three front
speakers should be as close as possible to the same
height. This often requires placing the center speaker
directly on top (A) or beneath (B) the TV set.
Preferred surround placement
Location
If possible, place surround speakers to either side of the
listening area, not behind it.
Height
If space permits, install surround speakers 2-3 feet above
viewers. This helps to minimize localization effects.
Aiming
Aim surround speakers straight across the room, not
down at viewers, to help create a more open, spacious
surround sound fi eld.
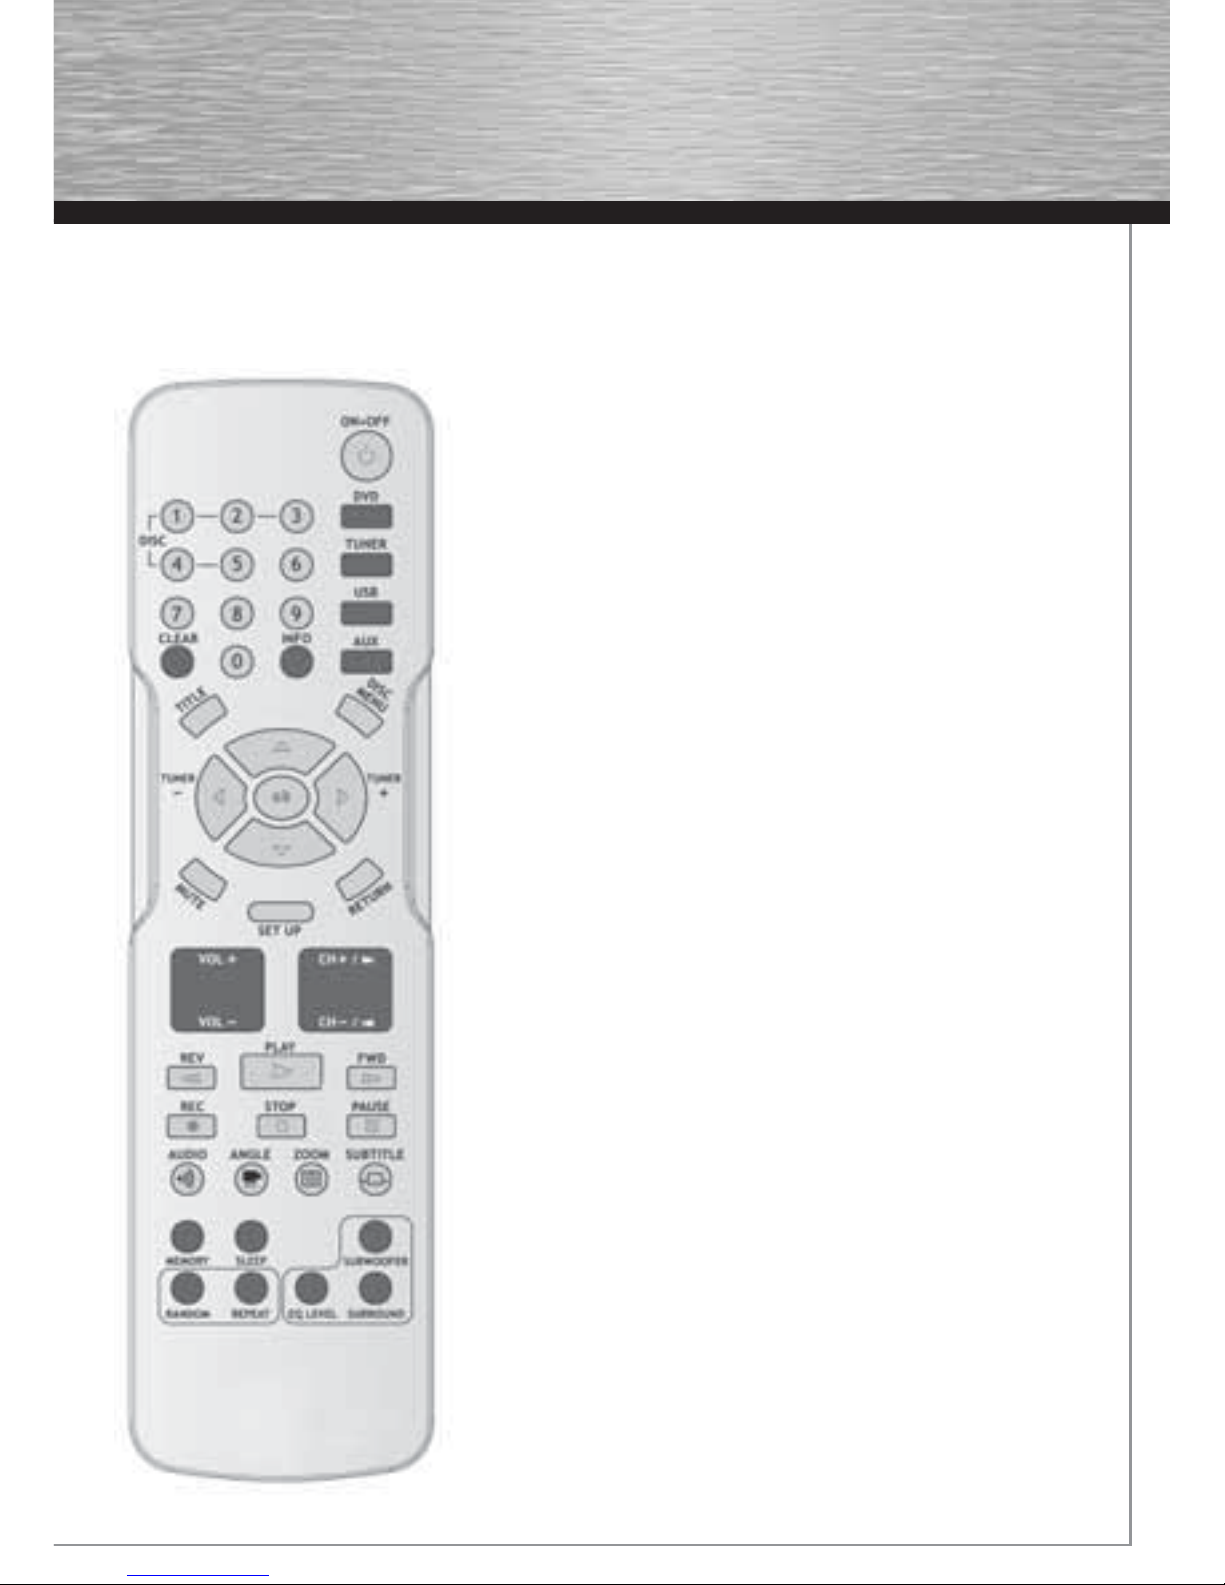
Alternative Surround Placement
Rear wall
If rear wall mounting is the only choice, aim the
speakers at each other (A), towards the front (B) or
towards the sidewalls (C, D). Experiment with placement
until sounds seem to surround you, rather than come
from behind you.
Courtesy Dolby Laboratories
Courtesy Dolby Laboratories
Courtesy Dolby Laboratories
Courtesy Dolby Laboratories
Page 11
12
No adjacent walls
Surround speakers can go on stands facing each
other to approximate sidewall mounting (A), or
to the sides or rear of the viewing area, aimed
upwards; they can go right on the fl oor, or
preferably, a few feet off the fl oor such as on
end tables (B).
Test tone/Channel balance
Channel balance
Your receiver is equipped with a test signal
generator for balancing the channels. As the
signal “travels” from channel to channel, adjust
the level controls until each channel plays at
the same loudness level.
Level adjustment and surround channel
level expectation
Even though you adjust the surround channel
to be as loud as the others on the test signal,
on actual program material the surround
channel is usually much lower than the front.
Don’t re-adjust the surround level; program
producers use surround for subtle atmospherics
and ambience, and only rarely for special
effects.
Courtesy Dolby Laboratories
Page 12
13
The remote control
Navigating through menus
Use the direction buttons to navigate through the menus. Press the OK button on the remote control to confi rm your
selection.
Remote control functions in DVD/CD mode
ON•OFF - Switches the unit on and off.
DVD - Selects the DVD mode.
TUNER - Selects the TUNER and changes between AM/FM mode.
USB - Selects the included Lyra mp3 player or the USB device.
AUX - Selects the AUX.
0-9 - Number entry. Presses 1 through 5 to directly access a disc in the
disc tray.
CLEAR - Quits the current setting manual from the TV screen without
saving change or delete fi les on the included Lyra mp3 player or the USB
device.
INFO - Accesses the Info menu.
TITLE - Accesses the disc menu for DVD disc.
DISC MENU - Accesses the disc menu during playback (if there is one) or
turn on/off PBC for VCD disc.
OK - Confi rms your selection.
MUTE - Mutes and restores the sound.
SETUP - Enters Setup menu.
RETURN - In DVD/CD mode, returns to the previous menu.
VOL +/- - Adjusts the sound volume.
CH +/- - Directly accesses the next or previous chapter (DVD) or track
(CD). Selects programmed stations in TUNER mode.
REV - Starts reverse accelerated play or reverses slow motion when
playback is paused.
PLAY - Starts playing a disc.
FWD - Starts forward accelerated play. Starts forward slow motion when
playback is paused. Moves forward one frame at a time after pressing
PAUSE twice.
REC - Accesses or quits the CD Ripping menu.
STOP - Stops playback.
PAUSE - Freeze frame, frame advance or slow motion.
AUDIO - Accesses the audio function.
ANGLE - Accesses the camera angle function.
ZOOM - Accesses the Zoom function.
SUBTITLE - Selects the subtitle languages or turns subtitle off (if available).
MEMORY - Stores station in tuner mode.
SLEEP - Enters sleep mode and selects sleep time.
(not available in AUX/TUNER mode)
SUBWOOFER - Selects among subwoofer output levels among softe/
balance/strong/powerful. SUb1/SUb2/SUb3/SUb4 will be displayed on the
front display respectively.
RANDOM - Turns on/off random playback.
REPEAT - Accesses the repeat function.
EQ LEVEL - Toggles channels for channel level settings.
SURROUND - Changes the Surround sound setting
Page 13
14
Remote control functions in Tuner mode
TUNER - Selects the TUNER and switches between FM/AM.
VOL+/- - Adjusts the sound volume.
MUTE - Mutes and restores sound output.
TUNER+/- - Tunes up and down the radio frequencies.
MEMORY - Stores a station.
CH+/- - Selects programmed stations.
AUDIO - Toggles between Stereo and Mono in FM mode.
Using the remote to Navigate through On-Screen Menus
No matter what on-screen display you’re using (the DVD player’s menu, the Info Display that appears during playback,
or a disc’s menu), you’ll use the same buttons on the remote control to navigate through the on-screen display; the four
arrow buttons and the OK button.
Use the arrow buttons on the remote to move through on-screen menus in the direction of the arrow button (to move
right, press the right arrow button, etc.). The arrow buttons are used to highlight an option. Once highlighted, press the
OK button to select the option that is highlighted.
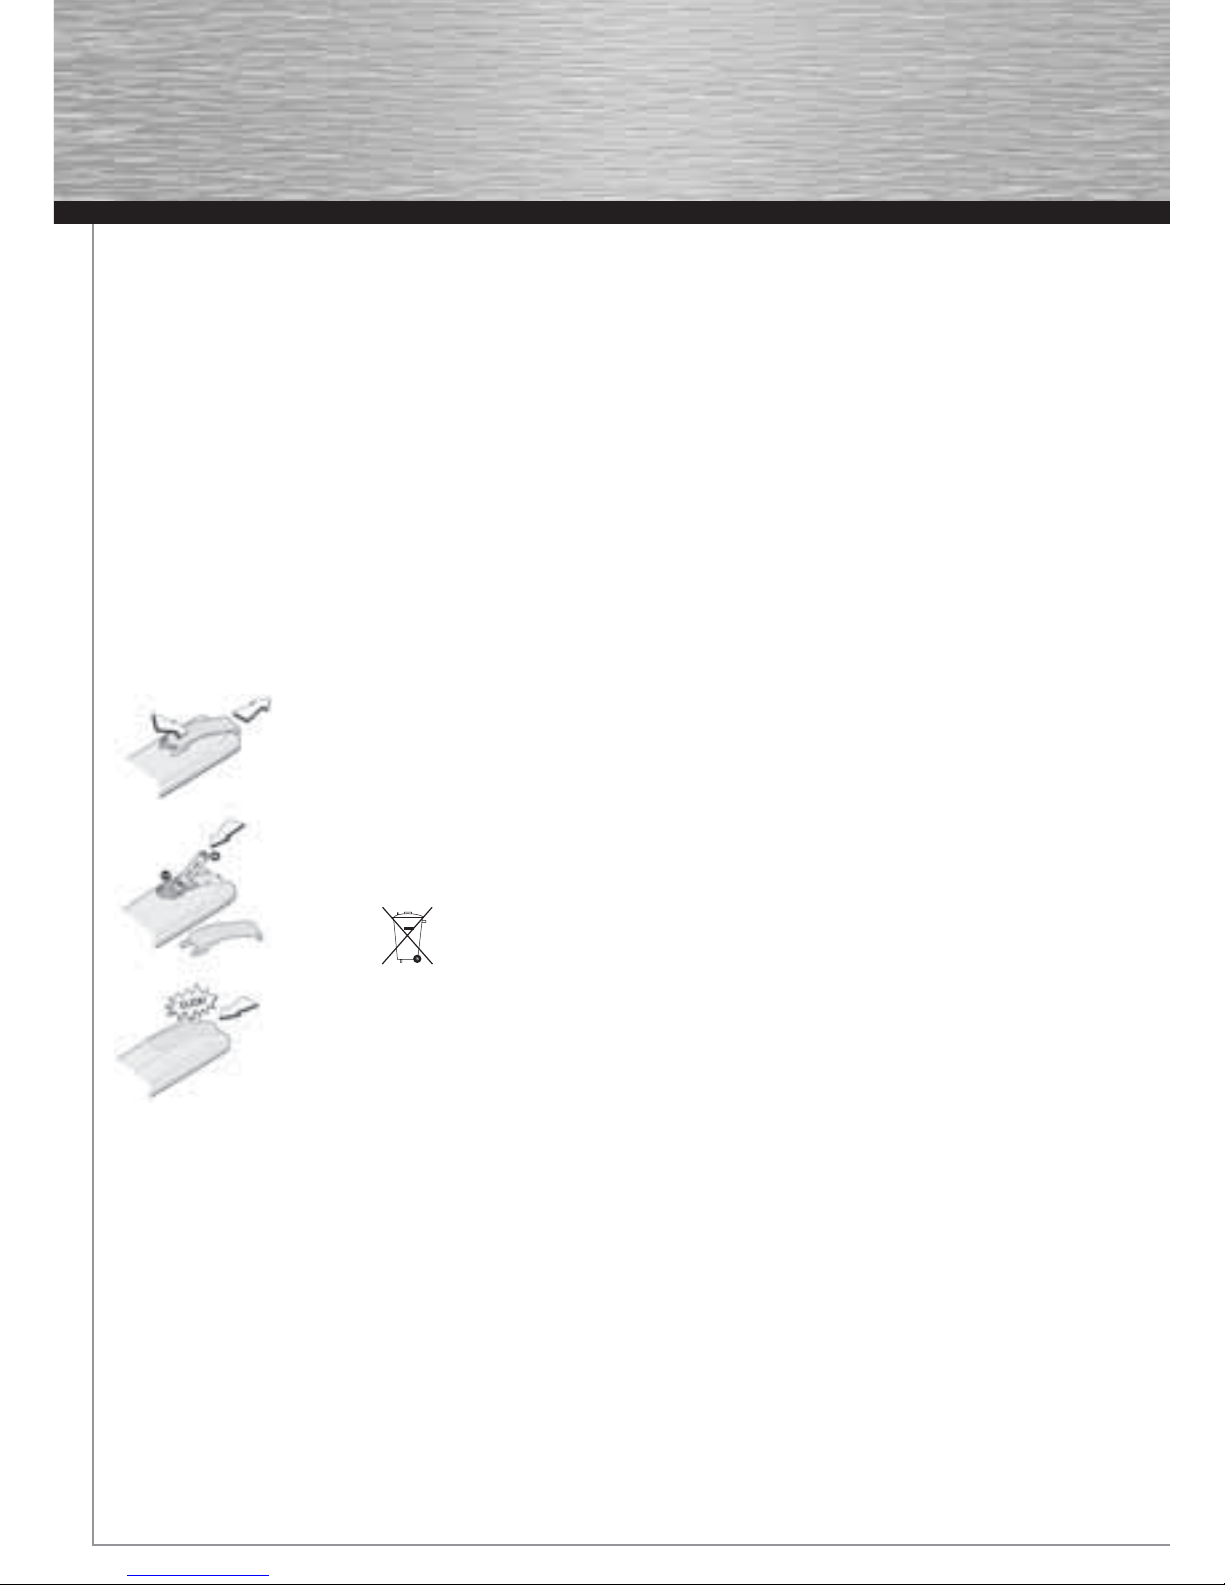
Inserting batteries in the remote control
• Do not mix different types of batteries or new and old batteries. Do not use
rechargeable batteries.
• In order to avoid any risk of explosion, observe the polarities indicated inside
the battery compartment. Replace only with the type of batteries specifi ed. Do
not dispose of them in a fi re or recharge them.
• If you are not using the remote control for a long period of time, remove the
batteries.
Please respect the environment and prevailing regulations. Before you
dispose of batteries or accumulators, ask your dealer whether they are
subject to special recycling and if they will accept them for disposal.
Compatible discs
• DVD
• DVD-R,DVD-RW, DVD+R, DVD+RW
• CD
• CD-R, CD-RW
Compatible formats
• DVD, VCD (Video Compact Disc), SVCD (Super Video Compact Disc), JPEG
• CD, mp3, WMA
See page 31-32 for more information about discs and compatible formats.
Regional coding
Your DVD player has been designed to process regional management information stored on DVD
discs. The regional code for your player is 1. Discs that have a different regional code will not play.
Page 14
15
Operating the DVD receiver
1. Turn on your television set. Set TV video input to correspond with player’s output.
2. Press the ON•OFF button on the remote or the ON/STANDBY button located on the DVD player’s front panel.
3. Press the DVD button on the remote control.
Loading discs
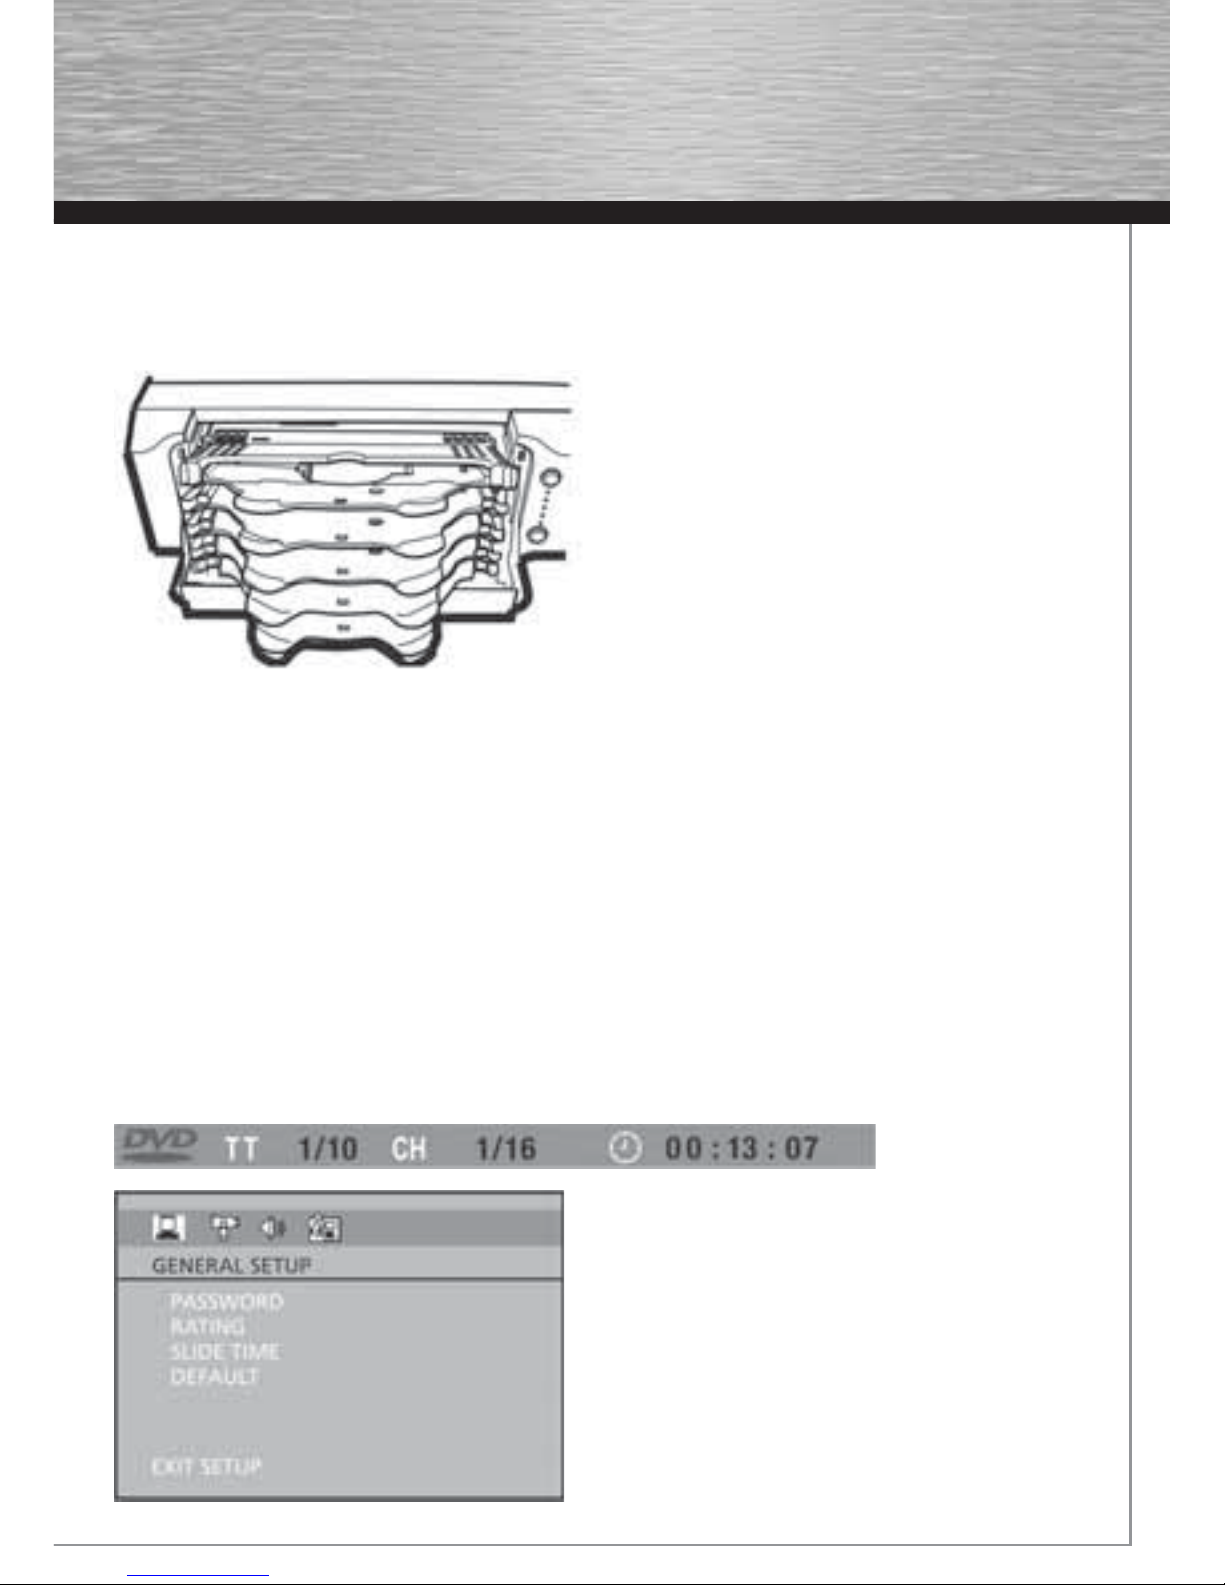
You can load up to 5 discs into your DVD player, but
you do not have to fi ll all the slots in the disc tray for
the player to work. You can load any kind of compatible
disc in any combination (DVDs, CDs, VCDs). The player
will read the data on the disc and play it accordingly.
1. To open the disc tray, press OPEN•CLOSE
(the disc tray opens).
2. Insert a compatible disc into the top disc slot, making
sure it is fully in place.
3. To fi ll the remaining slots, slide a disc into the next
empty slot and make sure it is in place.
4. When you’re fi nished loading discs, press
OPEN•CLOSE (the disc tray closes).
Playing discs
Load a disc or discs as shown above and press the OPEN/CLOSE button. The disc tray closes.
The DVD Player reads the fi rst disc’s table of contents, and then one of three things happens depending on how the disc
was programmed:
• The disc starts playing.
• The disc menu appears (for DVDs and VCDs). One of the options will be to start playing the disc.
Highlight that option and press OK.
• To select which disc you want to play, press the corresponding number key on the remote
(1 through 5).
Ty pes of Menus
• Disc menu – The appearance and contents of this menu varies according to the type of disc you
have inserted. It is separate from the Setup menu.
• Info menu – The player’s Info menu appears as a banner at the top of the screen while the disc is
playing. Press the INFO button on the remote to toggle the Info menu on or off.
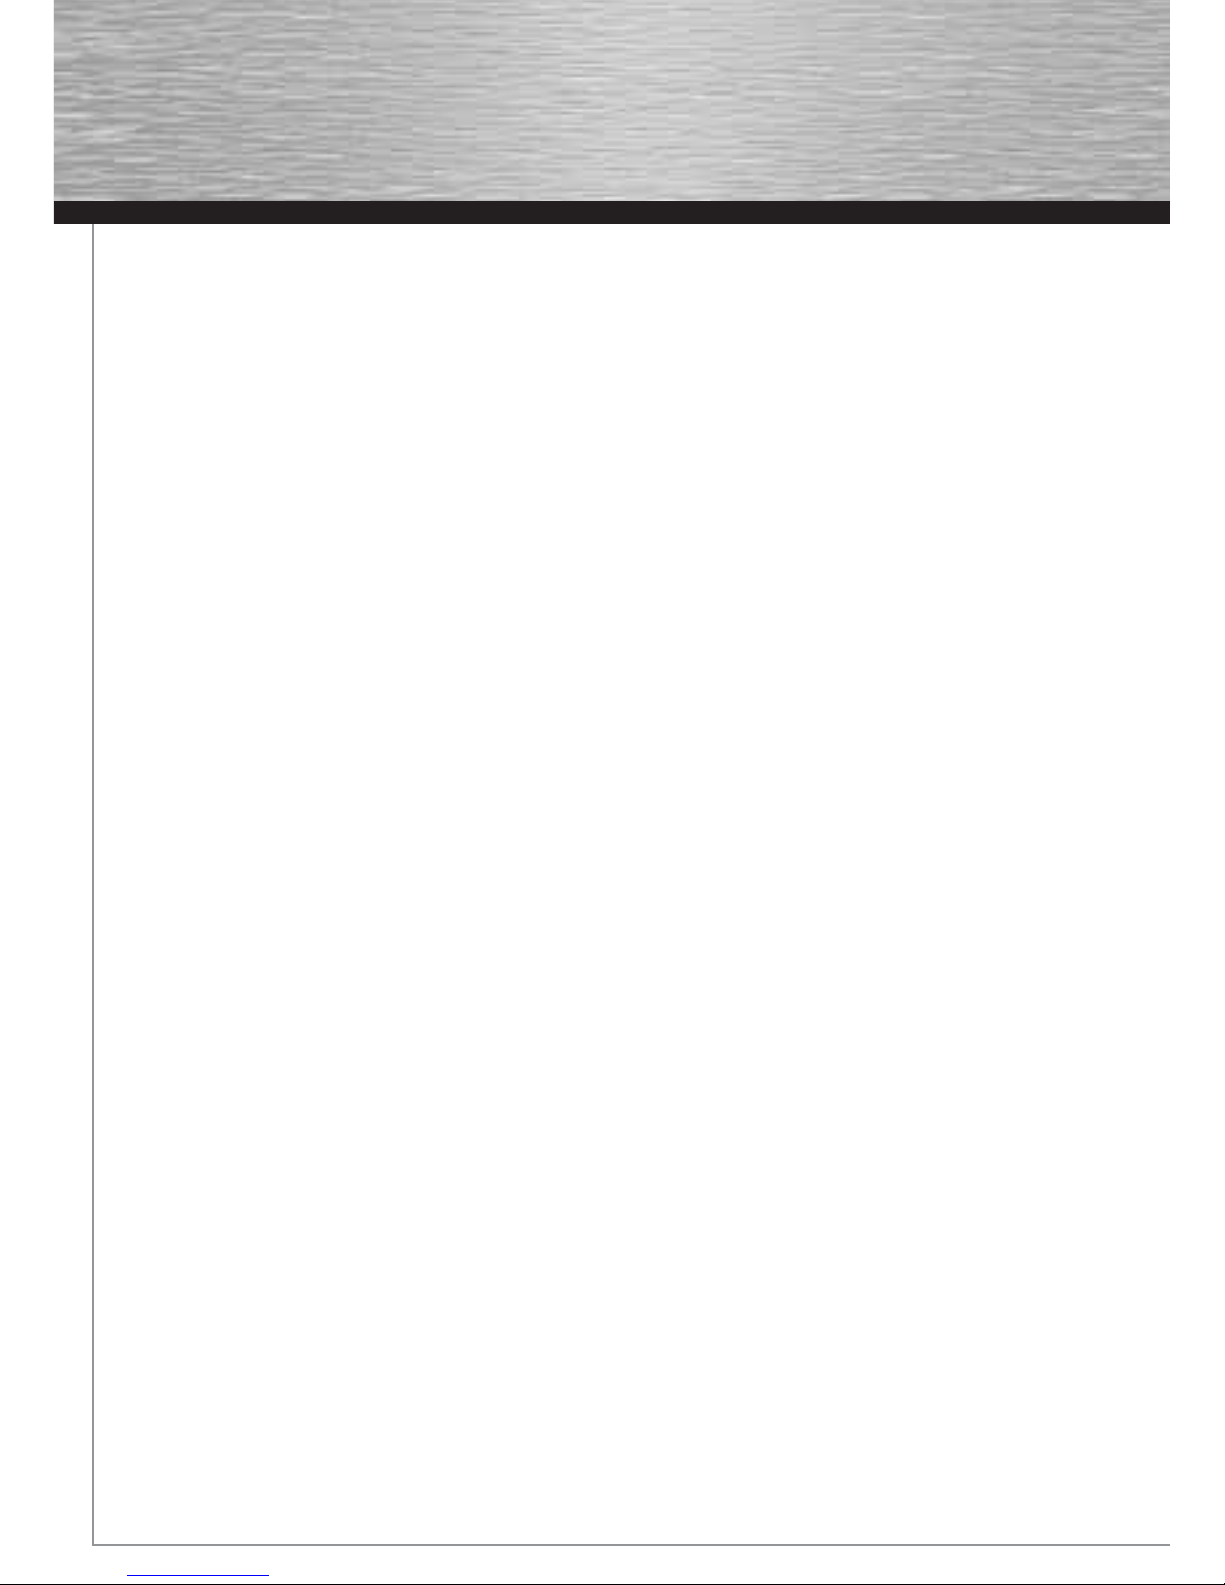
• Setup menu – Press the SETUP button to access this menu.
Page 15
16
Basic Playback Operations
Playback
Switch the DVD player and the TV set on.
1. Press the OPEN/CLOSE button on the front of the player to open the disc tray.
2. Put the disc in with the printed side up (in the case of a single-sided disc).
3. Press again to close the disc tray. Play starts automatically, or the disc menu appears. If the disc
menu appears, select the Play option to begin playback.
4. To skip to the next disc, press DISC SKIP on the front panel. To directly access a disc by number,
press the corresponding number on the remote (for example, to go to disc 3, press 3 on the
remote).
5. Press STOP to stop playback.
Note: When you press STOP, the player stores the point where playback was interrupted. If you press PLAY again,
playback resumes from this point. To stop playback completely or to start again from the beginning, press STOP twice.
If the player is left in STOP mode for more than fi ve minutes without any user interaction, a screen saver is activated. At
the end of 30 minutes without any user interaction, the player switches off automatically.
Accelerated play
While the disc is playing, press the REVERSE or FORWARD button one or more times to vary the
speed and direction of the accelerated play. Press PLAY to resume normal playback.
Pause
While the disc is playing, press PAUSE once for freeze frame. Press PLAY/PAUSE to resume normal playback.
Frame advance
1. Press PAUSE twice. FRAME is displayed.
2. Press FORWARD to move forward one frame at a time.
3. Press PLAY to resume normal playback.
Variable slow motion
1. While the disc is playing, press the PAUSE button once. PAUSE is displayed.
2. Press the REVERSE or FORWARD button to vary the speed and direction of the slow motion.
3. Press PLAY to resume normal playback.
Note: Backward slow motion is not available on VCDs.
Changing chapter/track
While the disc is playing, press the CH+/- button to go immediately to the next or previous
chapter, or to the next or previous track.
Zoom
1. While a disc is playing, press the ZOOM button until you reach the zoom size you want. The ZOOM button toggles
through 2x, 3x and 4x, then zooms out to 1/2x, 1/3x and 1/4 x, then returns to ZOOM OFF or normal playback.
2. Move from one area to another (pan) using the arrow buttons.
3. To turn ZOOM off, press the ZOOM button until you get to the ZOOM OFF option.
Page 16
17
Using the Info menu
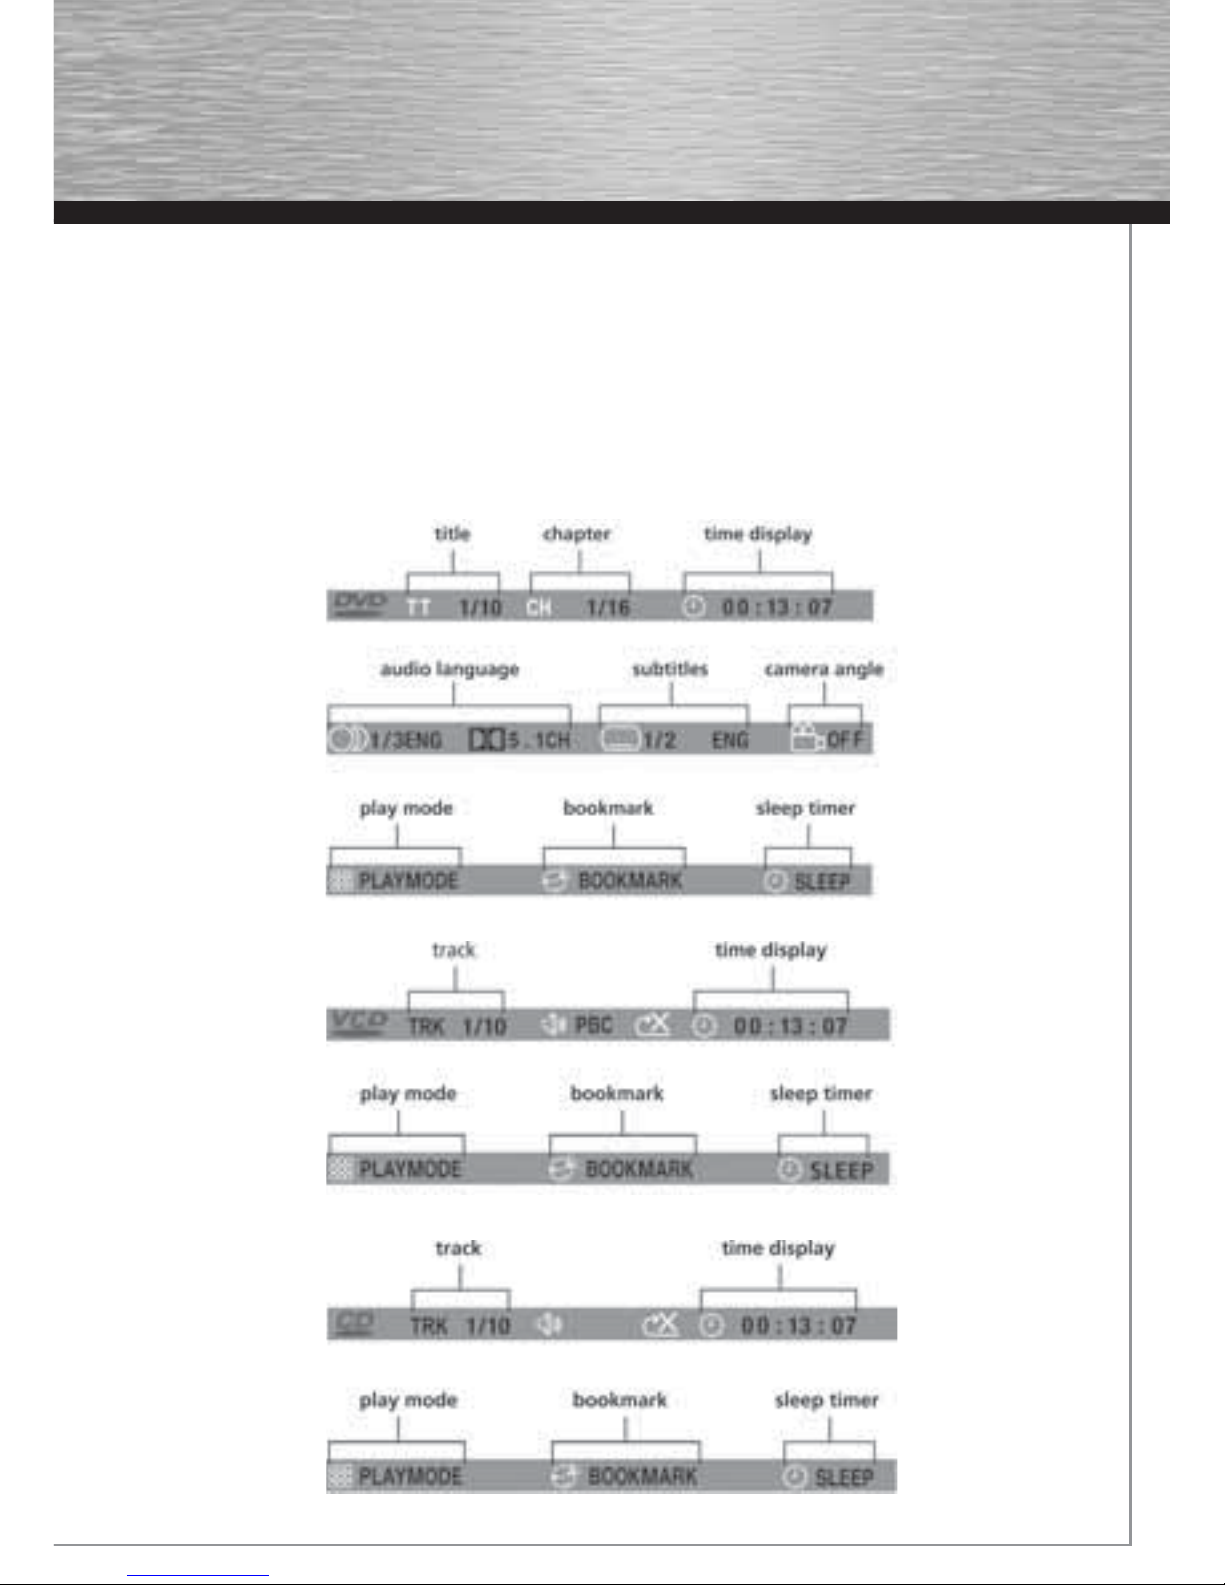
1. Press the INFO button on the remote while a disc is playing to display the Info menu. The fi rst banner
shows title, chapter, and time display information.
2. Press the INFO button again for audio language, subtitles, and camera angle.
3. Press the INFO button a third time for play mode, bookmark and sleep timer.
4. Use the left/right arrow buttons on the remote to select an icon.
5. Use the up/down buttons to scroll through the options.
Notes: Many discs only have one title.
INVALID KEY will be displayed if you select a function that is not available.
DVD Info Display
VCD Info Display
CD Info Display
Page 17
18
Title/chapter (DVD)/track (audio CD and VCD)
To directly access a title, chapter (DVD) or a track (audio CD and VCD), press the INFO button, press OK. Select the
Title(TT), Track(TRK) or Chapter(CH) icon and enter a number directly with the numeric buttons. Press OK again to
confi rm.
Note: Many discs only have one title.
Time display
To access the Time Display, press the INFO button on the remote. Press the up/down buttons repeatedly to display:
DVD: Chapter elapsed time, Chapter remaining time, Title elapsed time and Title remaining time.
VCD and audio CD: Track elapsed time, track remaining time, disc elapsed time, disc remaining time.
To directly access a location on the disc which does not correspond to the start of a title or chapter, highlight the Time
Display icon using the arrow buttons and press OK, then enter a time with the number buttons (hh:mm:ss).
Note: This function may not be available on all discs.
Audio (DVD, VCD)
Some discs have several audio tracks used for different languages or different audio formats.
To change the language or audio format during playback:
1. Press the INFO button twice.
2. Use the left/right arrow buttons to select the Audio icon, or press the AUDIO button on the remote control.
3. Choose a language or an audio format with the up/down arrow buttons.
Notes:
This option is only available if the disc offers dialog languages or audio formats.
When you change the dialog language using the Info menu, it only changes the dialog language of the disc being
played. When you eject the disc or switch off the player, the language will revert to the one you selected in the
Language Setup menu.
Subtitles (DVD)
Subtitles are turned off by default. Turn on Subtitles as follows:
1. While the disc is playing, press the INFO button twice, then select the Subtitles icon using the left/right arrow
buttons.
2. Select a language using the up/down arrow buttons.
3. To turn subtitles off, select the Off option or press the SUBTITLE button on the remote.
Notes:
When you change the language of the subtitles using the Info menu, it only applies to the disc currently being played.
When you eject the disc and switch off the player, the subtitles will default to the subtitle language you selected in the
Languages menu. This function may not be available on all discs.
Camera Angle (DVD)
Some discs offer different camera angles for specifi c scenes.
1. To change the camera angle, press the ANGLE button on the remote or press the INFO button twice and select the
Camera angle icon with the left/right buttons.
2. Choose the angle with the up/down arrow buttons.
Note: If the disc was recorded using a single camera angle, this function is not available.
Page 18
19
Play mode (all discs except mp3/WMA/JPEG)
Note: For mp3 play modes, please refer to page 23.
1. While the disc is playing, press the INFO button twice for CD/VCD and three times for DVD.
2. Select the Play Mode icon using the left/right arrow buttons.
3. Use the up/down arrow buttons to select an option.
• DVD play modes: standard, program, title repeat, chapter repeat, A-B repeat, chapter random.
Notes:
Program play mode is only available if a program list has been created (see below). Repeat mode is only available with
discs that display elapsed time and remaining time. To repeat a sequence between points A and B, choose the A-B
repeat option, and then follow the instructions for entering the two points. If, during a fast forward or reverse, point B
is reached, the player continues playback at normal speed from point A. If, during a fast search, point A is reached, the
player starts playback from point A at normal speed.
• VCD and SVCD play modes: standard, program, disc repeat, track repeat, A-B repeat.
• Audio CD play modes: standard, program, random (one disc), repeat disc, repeat all CDDA discs, repeat track,
A-B repeat, IntroScan.
4. To stop repeat playback, select the Play Mode icon and use the up/down arrow buttons to choose the Standard
option, or press the STOP button twice.
Creating a Program List for Program Play Mode (Audio CDs, DVD and VCD discs)
To use program play mode, you must fi rst create a program list.
1. To create a program list, press the INFO button three times. Highlight the Play Mode option and press the down
arrow to select the Program option.
2. Press OK. The Program screen is displayed.
3. The fi rst spot in the list is highlighted. Use the number buttons on the remote to enter a track number.
Note: As for DVD discs: T stands for Title while C stands for Chapter. As for VCD discs and Audio CDs: T stands for Track.
4. Use the arrow buttons to move to the next spot in th list. Enter the next track number.
5. Continue entering tracks until you have completed your list.
6. Highlight the Play option at the bottom of the screen and press OK or press PLAY to start playback. The program list
will play in the order you programmed it.
To stop program play, press STOP or select Standard from the Play Mode option in the INFO display.
If you want to cancel the list, repeat steps 1 and 2 to select CLEAR and press OK.
Creating a Program List for Program Play Mode (mp3 CDs)
To use program play mode with an mp3 disc, you must fi rst create a program list. You can program up to 16 songs.
1. To create a program list, press the INFO button twice. Highlight the Play Mode option and press the down arrow
to select the Program option.
2. Press OK. The Program screen is displayed.
3. The F stands for Folder, and the T stands for Track. Highlight the space below the Folder indicator (F) and use the
number buttons to enter the desired folder number.
4. Use the arrow buttons to move to the space beneath the Track indicator (T). Use the number buttons to enter the
track number.
5. Repeat steps 3 and 4 until you have completed your list.
Page 19
20
6. Highlight the Play option at the bottom of the screen and press OK or press PLAY to start playback. The program list
will play in the order you programmed it.
To stop program play, press STOP or select Standard from the Play Mode option in the INFO display.
If you want to cancel the list, repeat steps 1 and 2 to select CLEAR and press OK.
Bookmark (DVD and audio CD)
The player can store up to 5 disc locations as long as the disc remains in the player and the unit remains switched on.
Note: This function is only available with discs whose elapsed time or remaining time appears in the Info menu.
1. Press the INFO buttontwice for CD/VCD and three times for DVD. Select the Bookmark icon with the left/right
buttons, and press OK. A menu is displayed with fi ve bookmarks.
2. The fi rst bookmark space is highlighted. Press OK to set the bookmark. The book mark is saved and is indicated
by the number 1. You can set up to fi ve bookmarks on a disc.
3. To start playback from a bookmark, press the PLAY button on the remote.
4. To delete a bookmark, highlight it and press clear.
Sleep
1. Press the INFO button twice for CD/VCD and three times for DVD. Select Sleep icon with the left/right arrow
buttons.
2. Select one of the available options using the OK button or pressing the SLEEP button on the remote: Off, 30, 60,
90 or 120 minutes.
PBC (Playback Control – VCD)
When playing a VCD, PBC gives you access to scenes and information that can be selected through a menu. PBC also
lets you display high-resolution pictures, if the disc contains any.
1. Press the INFO button, then select the PBC icon with the left/right arrow buttons.
2. Press OK.
3. Use the up/down arrow buttons to turn PBC on or off, or press the DISC MENU button on the remote.
IntroScan (CD)
This option plays the fi rst ten seconds of each track on a CD.
1. Press the INFO button twice for CD/VCD, then select the Playmode icon with the left/right arrow buttons.
2. Press the up/down arrow buttons to select the Intro option and press OK to start IntroScan.
3. Press STOP to stop Introscan, and press PLAY to resume normal playback.
Page 20
21
Playing mp3/WMA Files or displaying JPEG Files
Mp3/WMA is an audio fi le format which compresses recorded music. The main advantage of the Mp3/WMA format is
that CD-quality music tracks can be stored on a personal computer in user friendly compressed fi les.
JPEG fi les are image fi les. Make sure that they have a resolution of less than 2 megapixels.
Note: The time taken for the contents of the disc to be displayed varies according to the size and number of JPEG fi les
on the disc. If nothing is displayed after a few minutes, the fi le sizes may be too large. Reduce the fi les’ resolution and
write another disc. Before inserting a disc, make sure it is compatible with the player.
1. Open the disc tray.
2. Place the disc with the printed side facing up and close the disc tray.
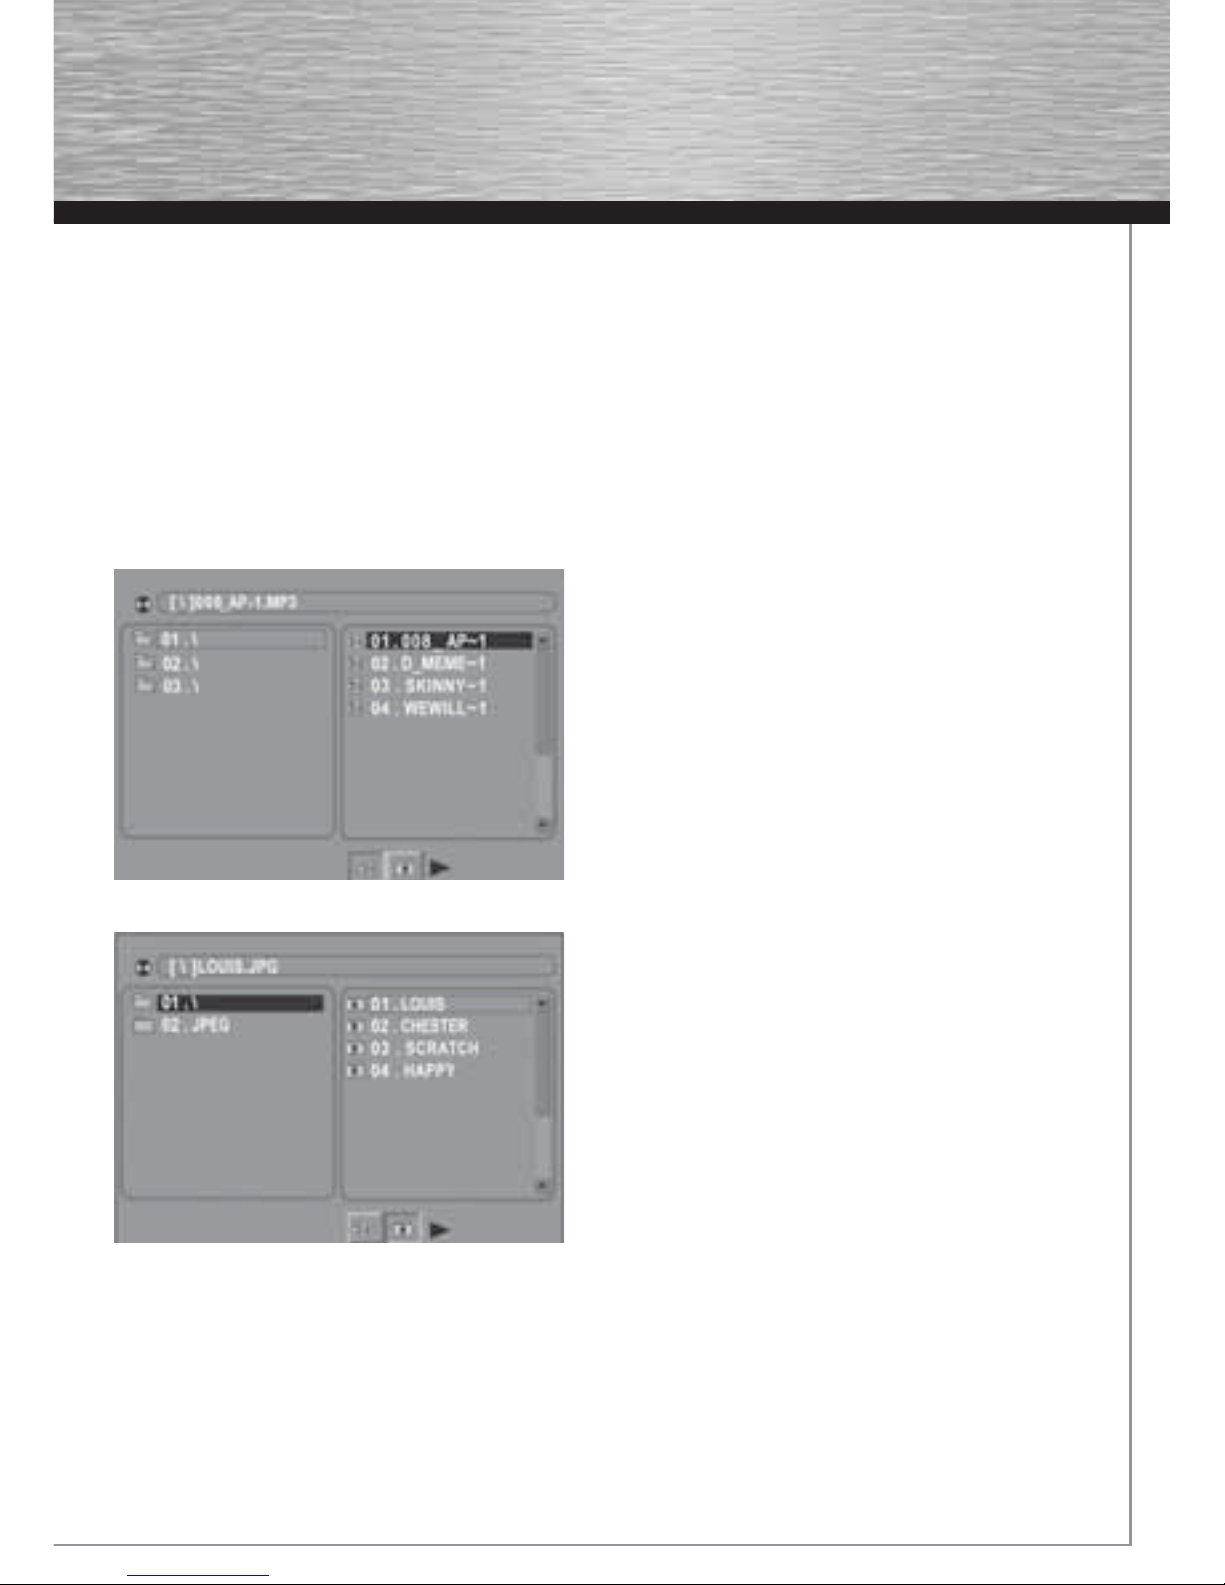
The folders on the disc will be listed in numerical order on the left side of the screen. When you highlight a folder,
the list of songs or pictures in the folder are listed in numerical order on the right side of the screen.
3. Select a folder using the up/down arrow buttons on the
remote, then press the left arrow button to move to the
music/picture icons at the bottom of the screen. Use the
left/right arrow buttons to select either music or picture
mode.
4. Press the up arrow button to move to the fi le list on the right
side of the screen. Use the up/down arrow buttons to select
a fi le. Press OK or PLAY to start playback.
• Mp3/WMA fi le: the player begins playing the selected fi le,
then all the fi les and subfolders contained in the same folder.
The player then plays the contents of the folders at the same
level as the folder containing the fi le selected at the start.
• JPEG fi le: the player starts the slide show with the JPEG fi le
you have selected, then displays all the JPEG fi les in the
same folder, then all the JPEG fi les in the subfolders located
in the same folder. You can set the amount of time a picture
remains on the screen in the General Setup menu.
Note: During the slide show you can use the left/right button to
rotate the picture, the up arrow button to rotate the image
vertically, the down arrow button to rotate the image
horizontally. Use the ZOOM button to magnify the picture.
Use the CH- button to go back to the previous picture or the
CH+ button to go to the next one, and the STOP button to
interrupt the slide show and display the disc’s contents.
5. Press the INFO button to display the Info menu during playback. Mp3/WMA fi le: with the disc playing, press the
INFO button two times and select the Play Mode icon using the left/right arrow buttons. Press the up/down arrow
button to select a play mode (Standard, Random, Program, Repeat Track, Repeat Folder, Repeat Disc), and press
OK.
6. When the player has played all the fi les, the music or slide show stops and the disc’s contents are displayed again.
7. Press STOP to end playback.
Note: Mp3/WMA fi les and JPEG fi les could not playback simultaneously.
Page 21
22
Radio
The player has a built-in tuner that allows for FM radio function. The AM loop antenna allows for
AM radio function.
Manual Tuning
1. Connect the FM aerial and the AM loop antenna at the back of the unit. Rotate the AM loop for better reception.
2. Press TUNER to enter TUNER mode and toggle between FM and AM.
3. When the FM station broadcasts Stereo sound, ST is displayed.
4. Tune a station by pressing repeatedly the TUNER+/- buttons until the desired station is found.
Alternatively, you can press and hold the same buttons down for about one second to activate the automatic search
function. In this mode the player will automatically tune frequencies until it fi nds a station.
5. Repeat step 4 to tune to another radio station.
Note: If there is any interference, change the aerial’s position until ideal sound reception is obtatined. TV and other
electronic devices could be the cause of interference, so try to position the aerial away from them.
Note: When you tune at a weak FM staion manually, press AUDIO on remote to switch from Stereo mode to Mono
mode. This will reduce the background noise.
Storing radio stations
The player can store up to 30 radio stations in its memory. You can enter every single radio station yourself or the player
can store all available radio stations automatically in ascending order.
Automatic preset programming
1. Press TUNER to enter the Tuner mode.
2. Press and hold TUNER down for 3 seconds to start automatic preset programming.
Note: A weak signal can affect the “Automatic preset programming” function’s effi ciency. Adjust the aerial for better
reception and a more effi cient search.
3. Radio frequencies will be browsed and radio stations stored automaitcally. When all the available radio stations
are stored or all 30 memory locations are full, the auto preset programming function will stop.
Manual preset
1. Tune to a radio station (see “Manual tuning” for details).
2. Press MEMORY once to enter fl ashing Preset Loaction number.
3. While the Preset Location number is still fl ashing, input your desired preset number (1-30) using the numeric
buttons or press the CH+/- buttons, then press MEMORY to store it.
Retrieving preset stations
1. Press TUNER to enter the Tuner mode.
2. Press CH+/- to search up or down for the preset stations or directly press the numeric buttons.
Page 22
23
USB and mp3 Player
The playback controls of USB devices and mp3 player are basically the same. Connect the USB
device or mp3 player fi rst before starting playback.
Connecting or Disconnecting USB devices to the Main Unit
1. Insert the USB port of the USB device you want to connect into the USB socket of the unit.
2. Unplug the device to disconnect.
Connecting or Disconnecting the mp3 Player to the Main Unit
1. Press and hold the lock button on the back of the player and push the USB connector out from the player.
2. Insert the USB port of the mp3 player into the RCA MP3 PLAYER of the main unit.
3. Unplug the mp3 player to disconnect.
Selecting USB or the Lyra mp3 Player
Press USB on remote to switch between USB device or the Lyra mp3 Player.
Note: If USB device and the Lyra mp3 Player are inserted simultaneously, press INFO on remote to display the current
playing device on the Info Menu.
USB/mp3 Playback Features
1. Press USB to select USB mode.
2. Press PLAY to start playback or press PAUSE to pause playback.
3. Press STOP to end playback.
4. Press CH+/- arrow buttons to skip to the previous or next fi le.
5. You may also follow the playback instruction steps 3-7 on playing mp3/WMA fi les and JPEG fi les on P.17.
Note: The player does not support DVD audio/Video on USB device or the Lyra mp3 Player.
Page 23
24
CD Ripping
Ripping to the USB device or the mp3 player are basically the same. Connect the USB device or mp3 player fi rst before
ripping.
Note: CD Ripping function only supports CDDA discs.
Ripping CD to USB or mp3 Player
1. During CD playback, press REC on the remote to activate the Ripping Menu.
2. Select one of the menu itmes using the up/down arrow buttons. Press the left/right arrow buttons or OK to change
the setting.
Speed
High speed ripping mode can save time when ripping from CDs. Select 1x(normal speed) or 2x(double speed). Press the
down arrow button to move to the next menu item.
Note: No sound will be heard during ripping if you select 2x.
Source
You can select to rip one track(TRACK), the whole disc(DISC) or programed tracks(PROG TRACK).
Press OK to confi rm selection. Press the down arrow button to move to the next menu item.
Destination
Select the destination of the ripped fi les. You can select to rip the fi les to the mp3 player (the Lyra mp3 Player) or your
USB device (USB). Note: CD Ripping function does not support ripping fi les to Mulit Card Reader via USB port.
Start Ripping CD
Highlight START and press OK to start ripping.
Note: “NO USB DEVICE” will be displayed if no USB device is
connected to the unit.
“NO PROGRAM TRACK” will be displayed if no program list is
created.
“USB DEVICE IS FULL” will be displayed if the USB device is
full.
“USB WRITE PROTECT” will be displayed if the USB device is
writeprotected.
You should switch off the write protection fi rst.
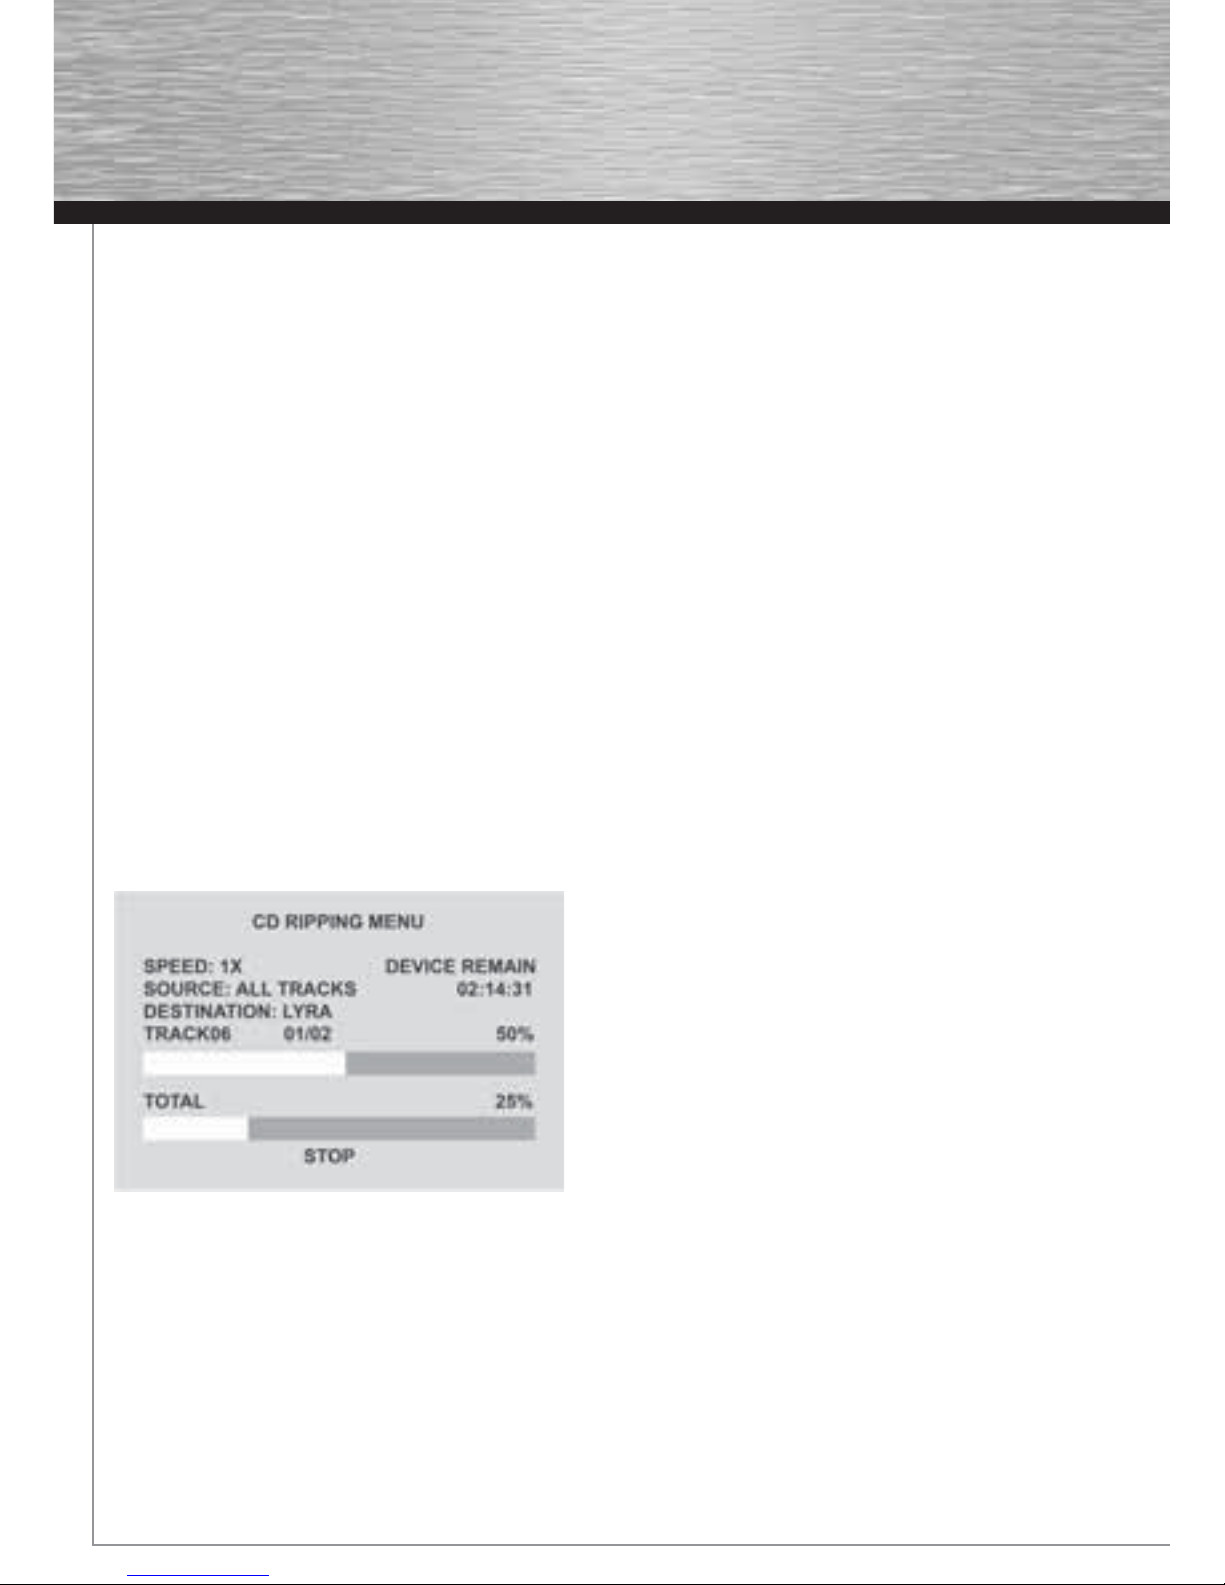
The screen on the right appears when ripping start. The
fi rst progress bar represents the progress percentage of the current ripping track while the second progress bar
represents the total percentage. The percentage of both bars will be identical if there is only one track to rip.
Note: You can select ripping speed even after ripping is started by pressing the left/right arrow buttons.
“DEVICE REMAIN” indicates the total remaining time of the Lyra mp3 Player or the USB device.
To stop ripping during the process, highlight STOP button and press OK.
When ripping has fi nished, press REC to quit the ripping menu.
Page 24
25
File Names of Ripped Files
You can fi nd the ripped fi les saved in a folder named “CDRECORD” with fi le name as “CDTKxx01”, “CDTKxx02”...etc.
Deleting Files
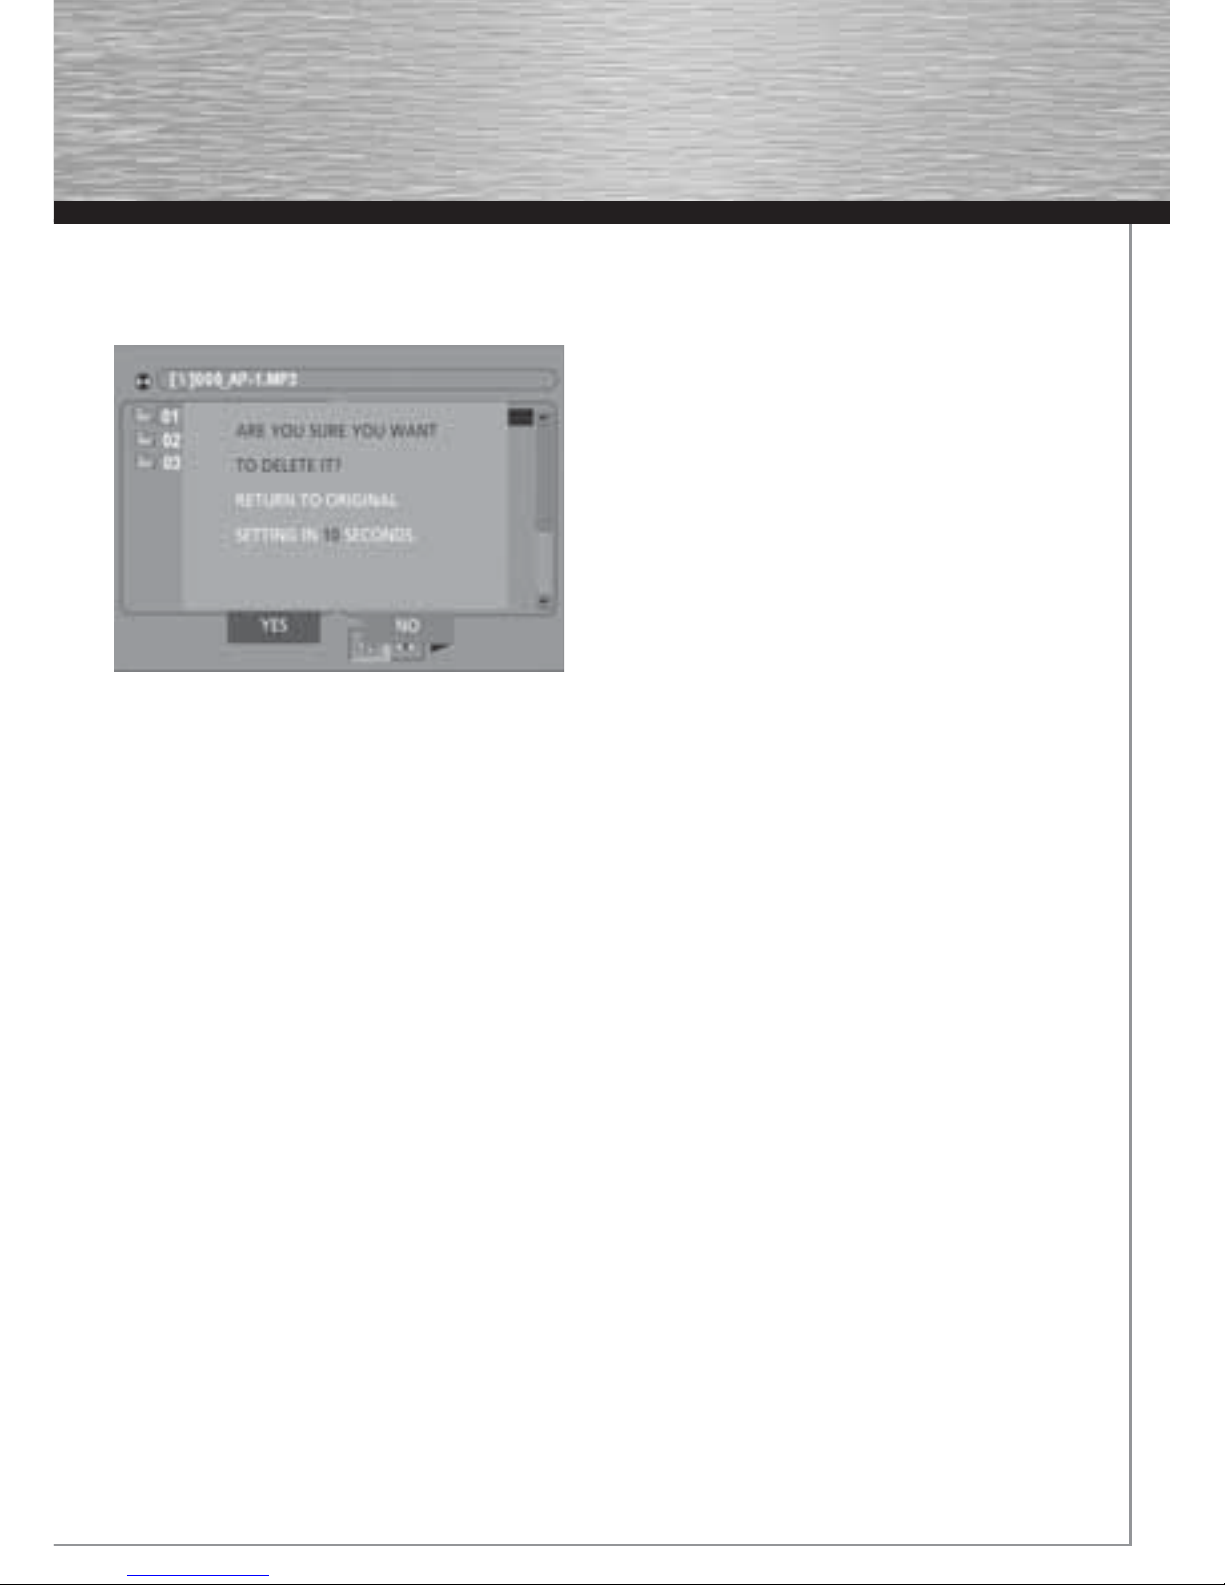
In USB or mp3 player mode, select the unwanted fi les by
pressing the up/down arrow buttons. Press and hold CLEAR on
remote to delete fi les and select YES to confi rm deletion.
Page 25
26
mp3 Player
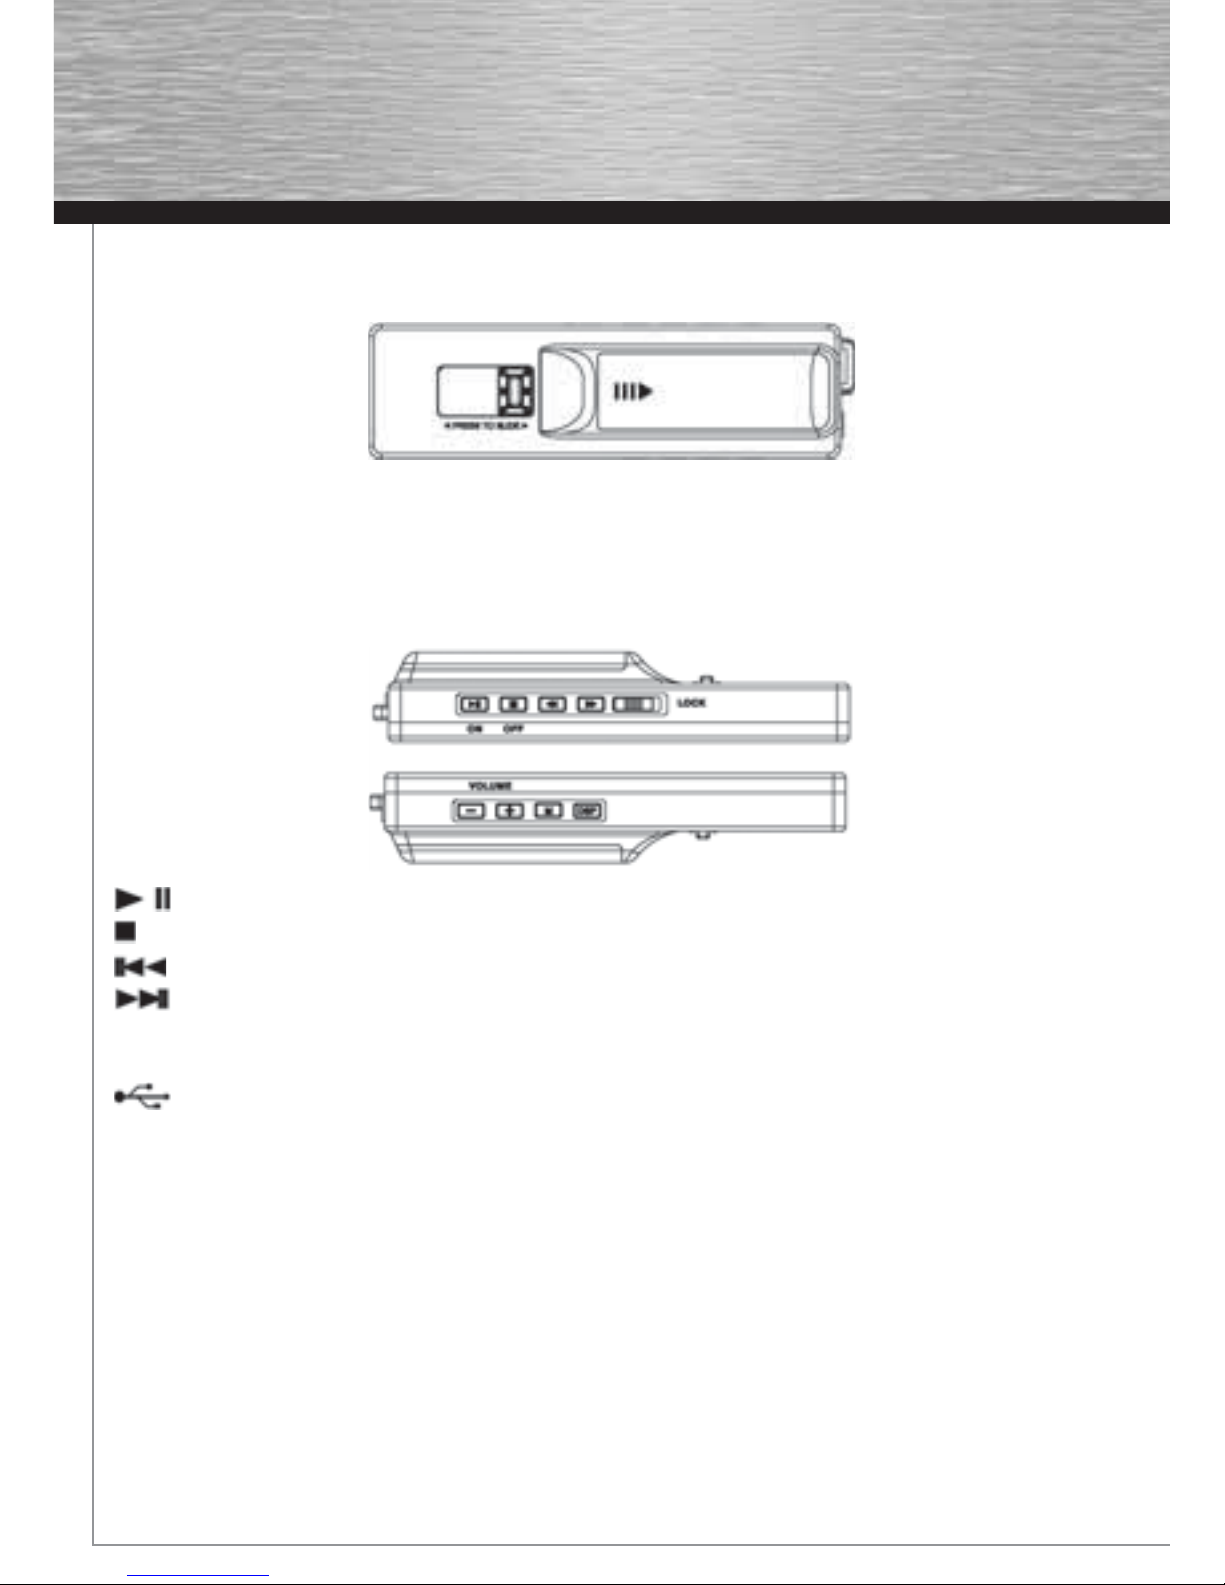
Insert battery into the player
1. Slide the battery door by following the direction of arrow.
2. Insert a “AAA”(UM4) battery with polarities corresponding to the indications in the compartment.
3. Replace the door to the battery compartment.
Note: This unit may temporarily cease to function if subjected to electrostatic disturbance. To resume normal operation,
it may be necessary to cycle the power off and back on or to remove and reinstall the batteries.
General Controls
- Press once to turns the unit on. In play mode, press once to starts and pause music playback.
- In stop mode, press once to turn off the unit. Press once to stop music playback.
- Skips to the previous song or the beginning of the current song. Press and hold to scan backwards.
-Skips to the next song. Press and hold to scan forward.
LOCK - Slide the switch to lock or unlick the keys of the player
Headphones Jack - Insert headphones here.
(USB port) - Use the USB port to connect to the Audio System.
USB lock button - Press and hold and push the USB connector out form the unit.
VOL + / - - Increases and decreases the volume level.
M - Selects among playback options. (repeat one, repeat all, random playback, repeat random playback)
DSP - Selects among DSP modes (Flat, Bass, Pop, Rock, Jazz)
Page 26
27
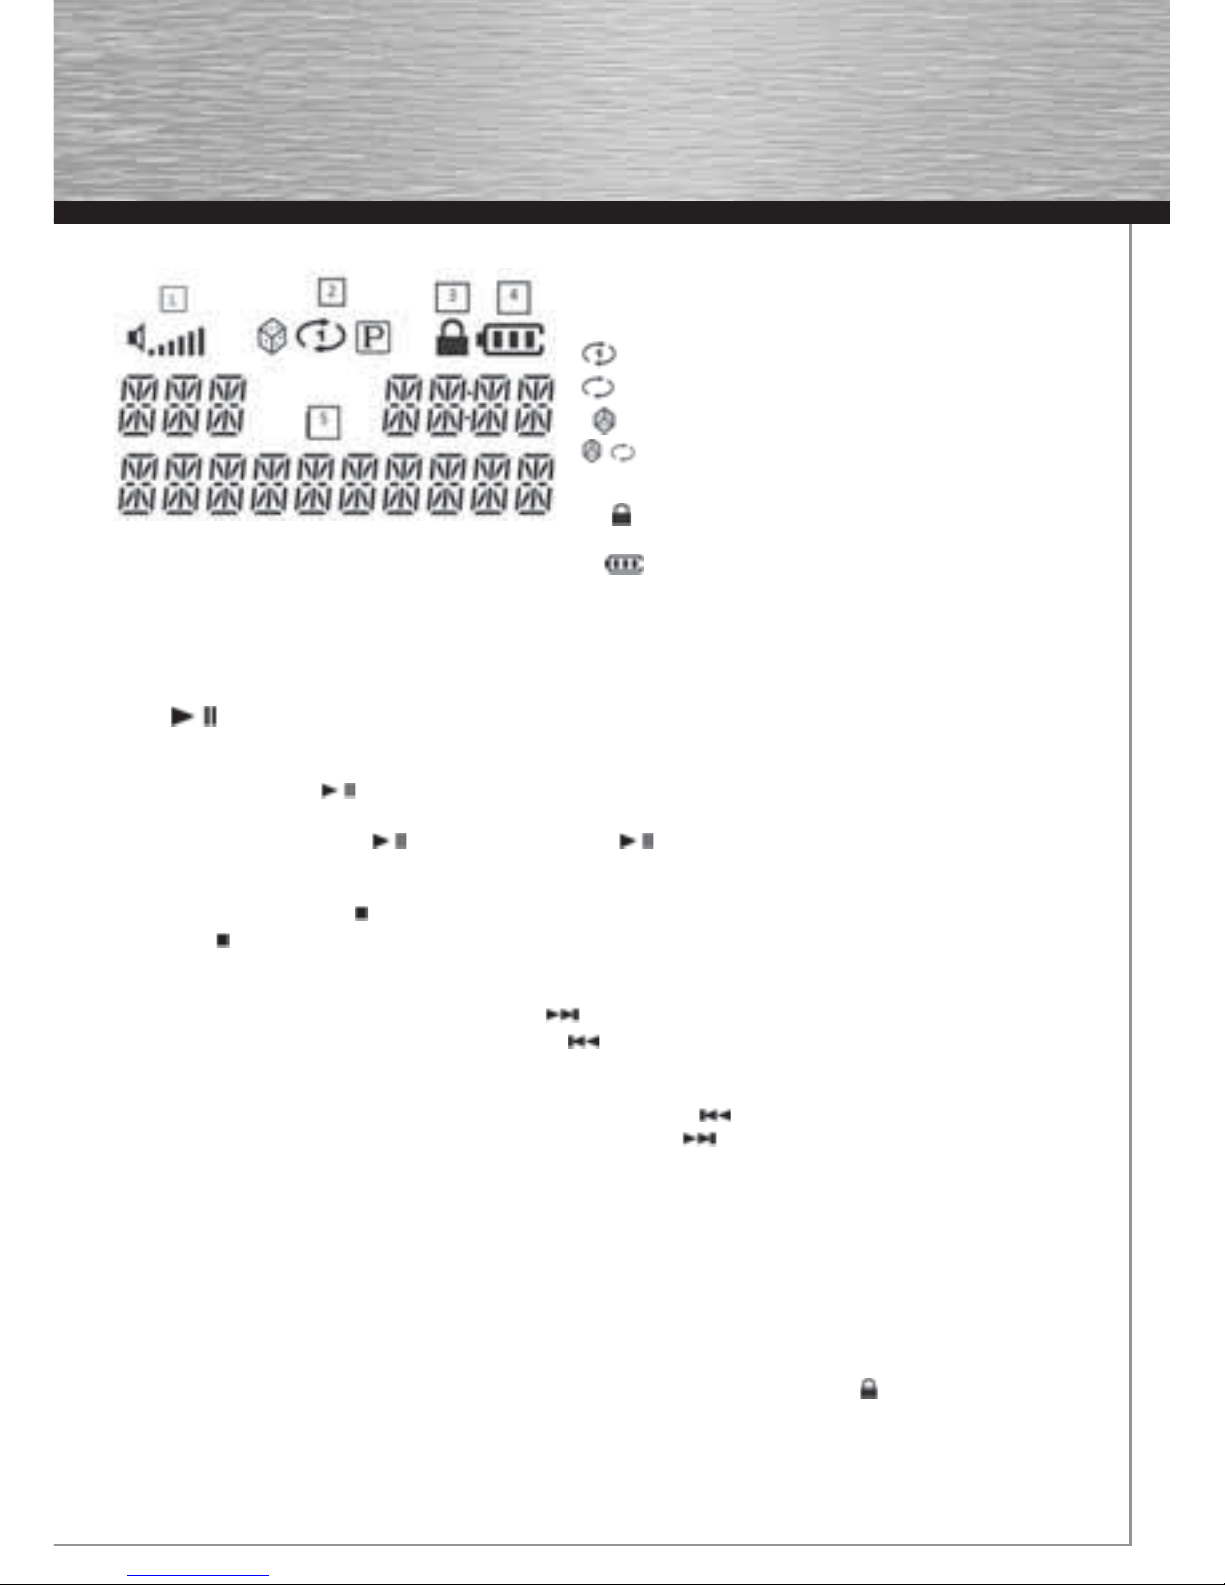
Display Overview
1. Shows current volume level.
2. The relative play mode indicator lights to show
current selection.
- repeat track
- repeat all
- random playback
- repeat random playback
P - program playback mode
3. is displayed when the key lock function is
activated.
4. shows the battery level.
5. This section shows song information.
The information in this section presumes you’ve successfully transferred fi les to the mp3 player, and
you’re ready to play some music.
Turn On/Off the mp3 Player
Press to turn the unit on/off. Playback starts automatically from the fi rst track.
Play / Pause
• In stop mode, press to start playback of selected track. Current track number, elapsed playback time and
track title show on display.
• To pause playback, press during playback. Press again to resume playback.
Stop Playback
• During playback, press to stop playback. The total number of tracks is display.
• Press in stop mode to turn the unit off.
Skipping Tracks
• To skip to the next track, press and release the button.
• To go to the previous track, press and release the button.
Scan Tracks
• To scan backwards in the track that is playing, press and hold the button.
• To scan forwards in the track that is playing, press and hold the button.
Note: If the elapsed time of the playing track is less than 0:04, pressing Skip backward once will return to previous track.
If the elapsed time of the playing track is more than 0:04, pressing Skip backward once will return to the beginning of
the current track.
Adjusting the Volume
Press VOL +/- to adjust the volume.
Key Lock
• To avoid accidental key activation, slide the key lock switch to the left. The Lock icon can be seen on display.
• Slide to the switch to the right to unlock.
Note: When the unit is in off mode and the key lock switch is at the LOCK position, pressing the PLAY / ON key will
cause the display to show the key lock icon for three seconds.
Page 27
28
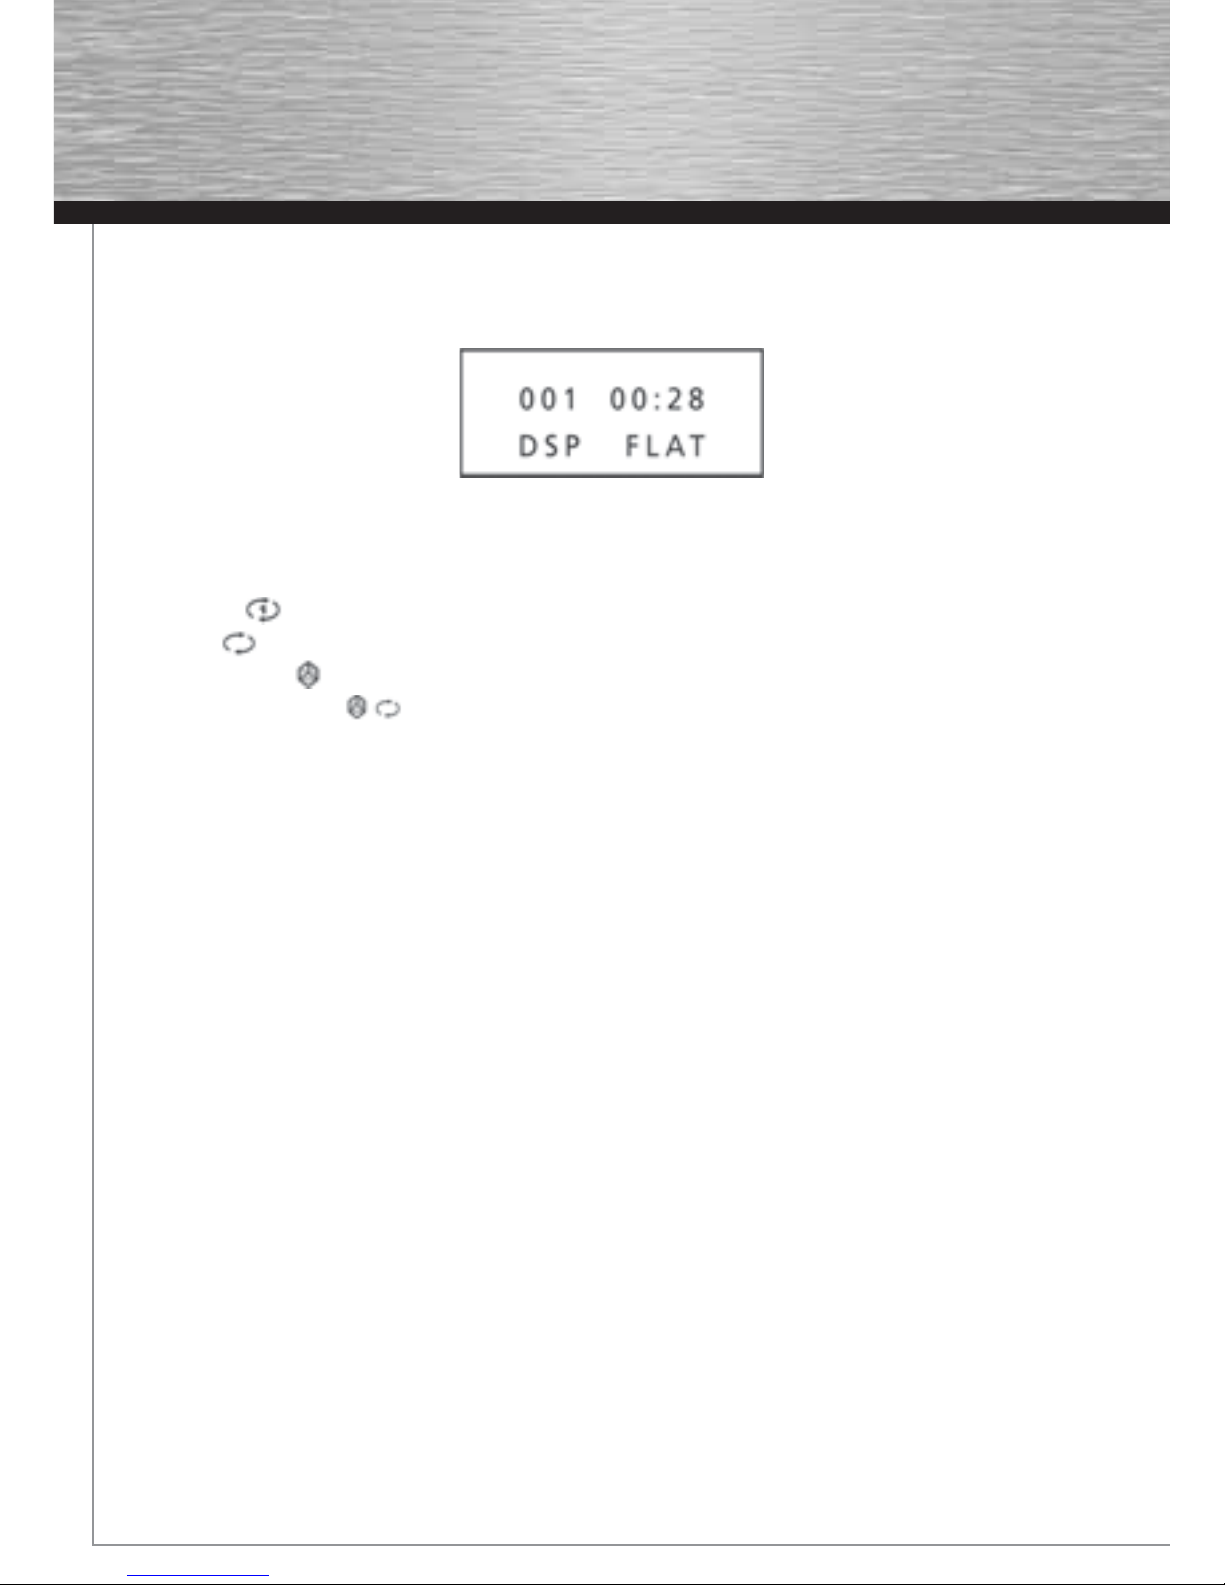
DSP
Press the DSP button repeatedly to select among DSP modes:
FLAT > BASS > POP > ROCK > JAZZ
The current selection shows briefl y on the display.
Play modes
During playback, press M repeatedly to select among the following playback modes:
Normal playback
Repeat Track -
Repeat All -
Random Playback -
Repeat Random Playback -
P - program playback mode
Page 28
29
The Setup Menu
There are four options in the main setup menu: General Setup, Display Setup, Speaker Setup and Language Setup.
Press the SETUP button to bring up the main menu. Select one of the menu icons across the top of the screen using the
left/right arrow buttons. The menu’s options are displayed on the left side of the screen. Press the right arrow button to
move to the option’s choices on the right.
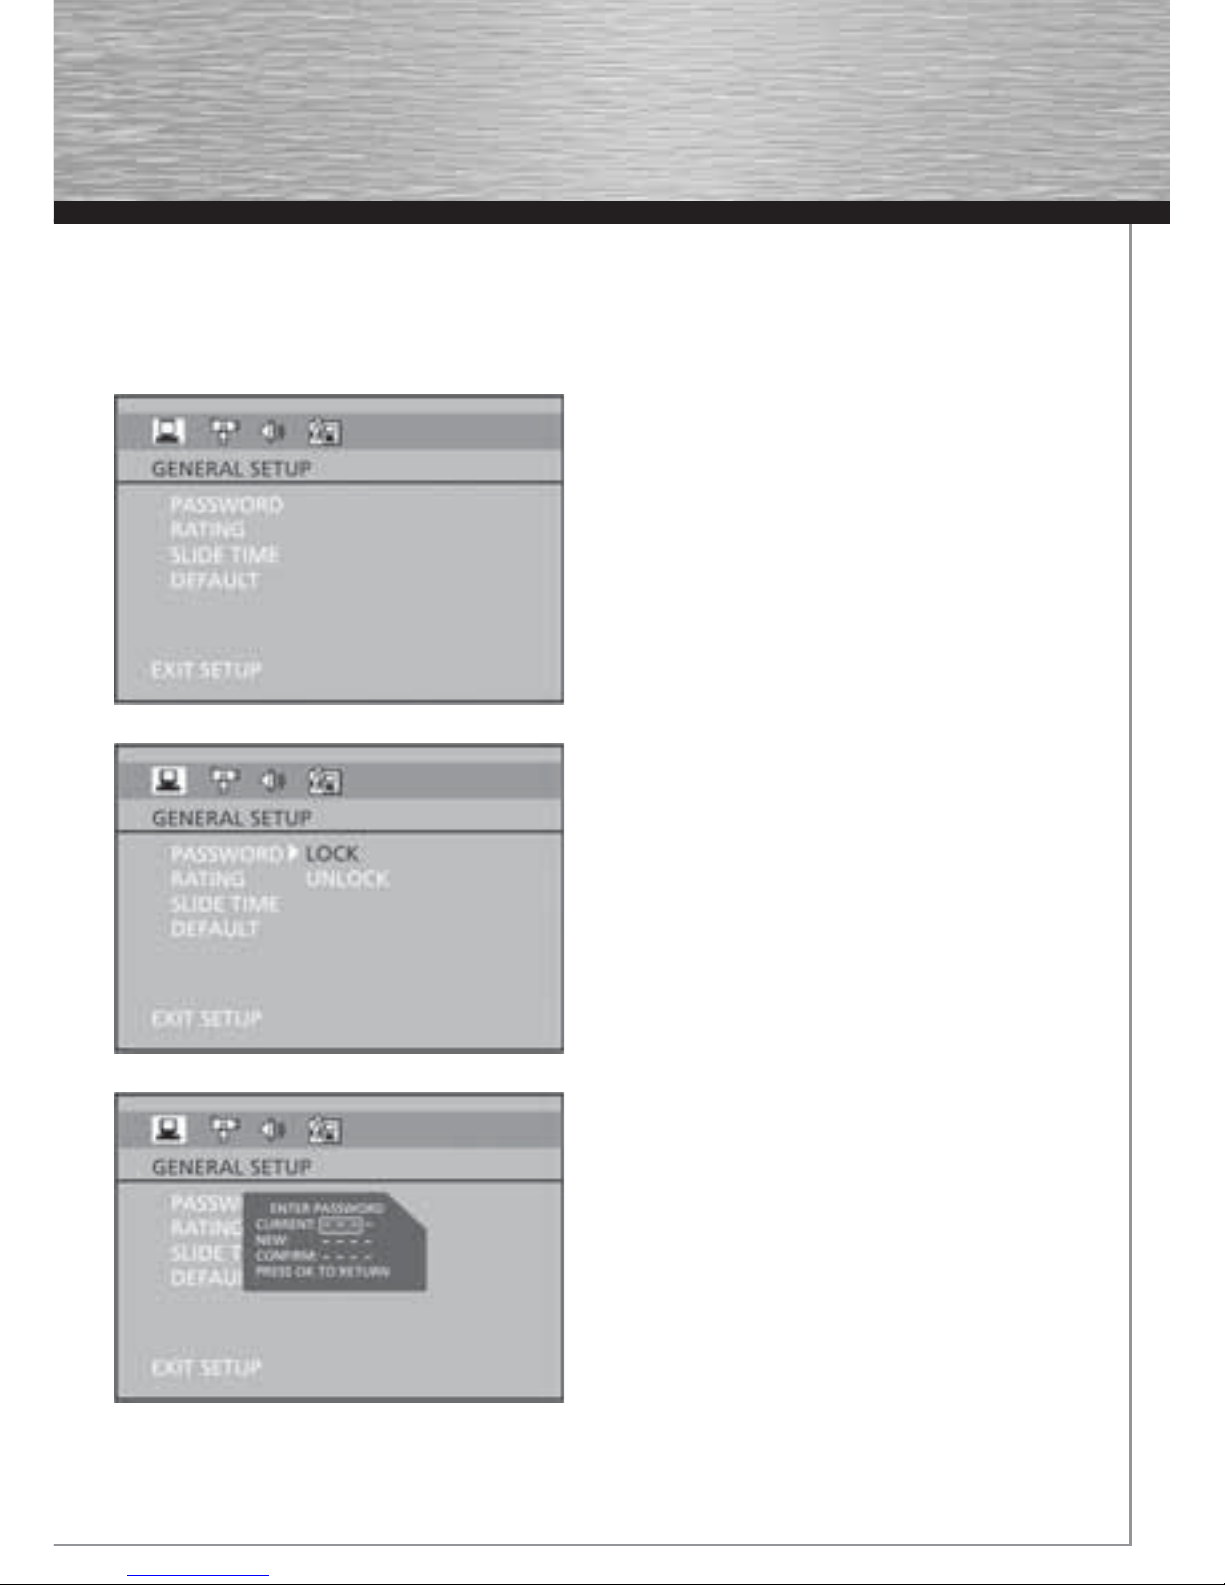
General Setup
You can control access to the player and the type of discs
your family can watch with the lock function. Locking the
player prevents playback of DVDs that may not be suitable
for all audiences by using the rating level encoded on the
disc (not all discs are rated). If the rating level of the disc is
higher than the preset level, playback is prohibited unless a
password is entered.
Password
Locking the Player
1. To activate locking according to your preset rating limits,
highlight the PASSWORD option using the up/down arrow
buttons and select LOCK.
2. You are asked for a new password. Enter four digits using
the number buttons and press OK.
3. You are asked for confi rmation; enter the four digits
again and press OK.
Note: Choose a password that is easy to remember, or write it
down.
Unlocking the Player
1. To unlock the player or set a new password, highlight the
PASSWORD option using the up/down arrow buttons and
select UNLOCK.
2. Enter your password and press OK.
Changing the Password
When you unlock the player, you must assign a new
password the next time you lock the player.
To change the current password, unlock the player as
described above, and then relock it.
Page 29
30
Rating
The disc publisher is responsible for coding scenes according to the rating limits. Below is an explanation of Ratings.
To change the rating limit, highlight the RATING option and press the right arrow button. Select the rating limit using the
up/down arrow buttons and press OK. Rating limits take affect only when the player is locked.
Slide Time
The Slide Time option lets you select the amount of time a picture is displayed in a slide show. The choices are
3 seconds, 5 seconds, or 10 seconds.
Default
This option allows you to return the player’s settings to the original factory settings. Any changes you have made to the
player’s settings will be reverted back to the original settings, except the password.
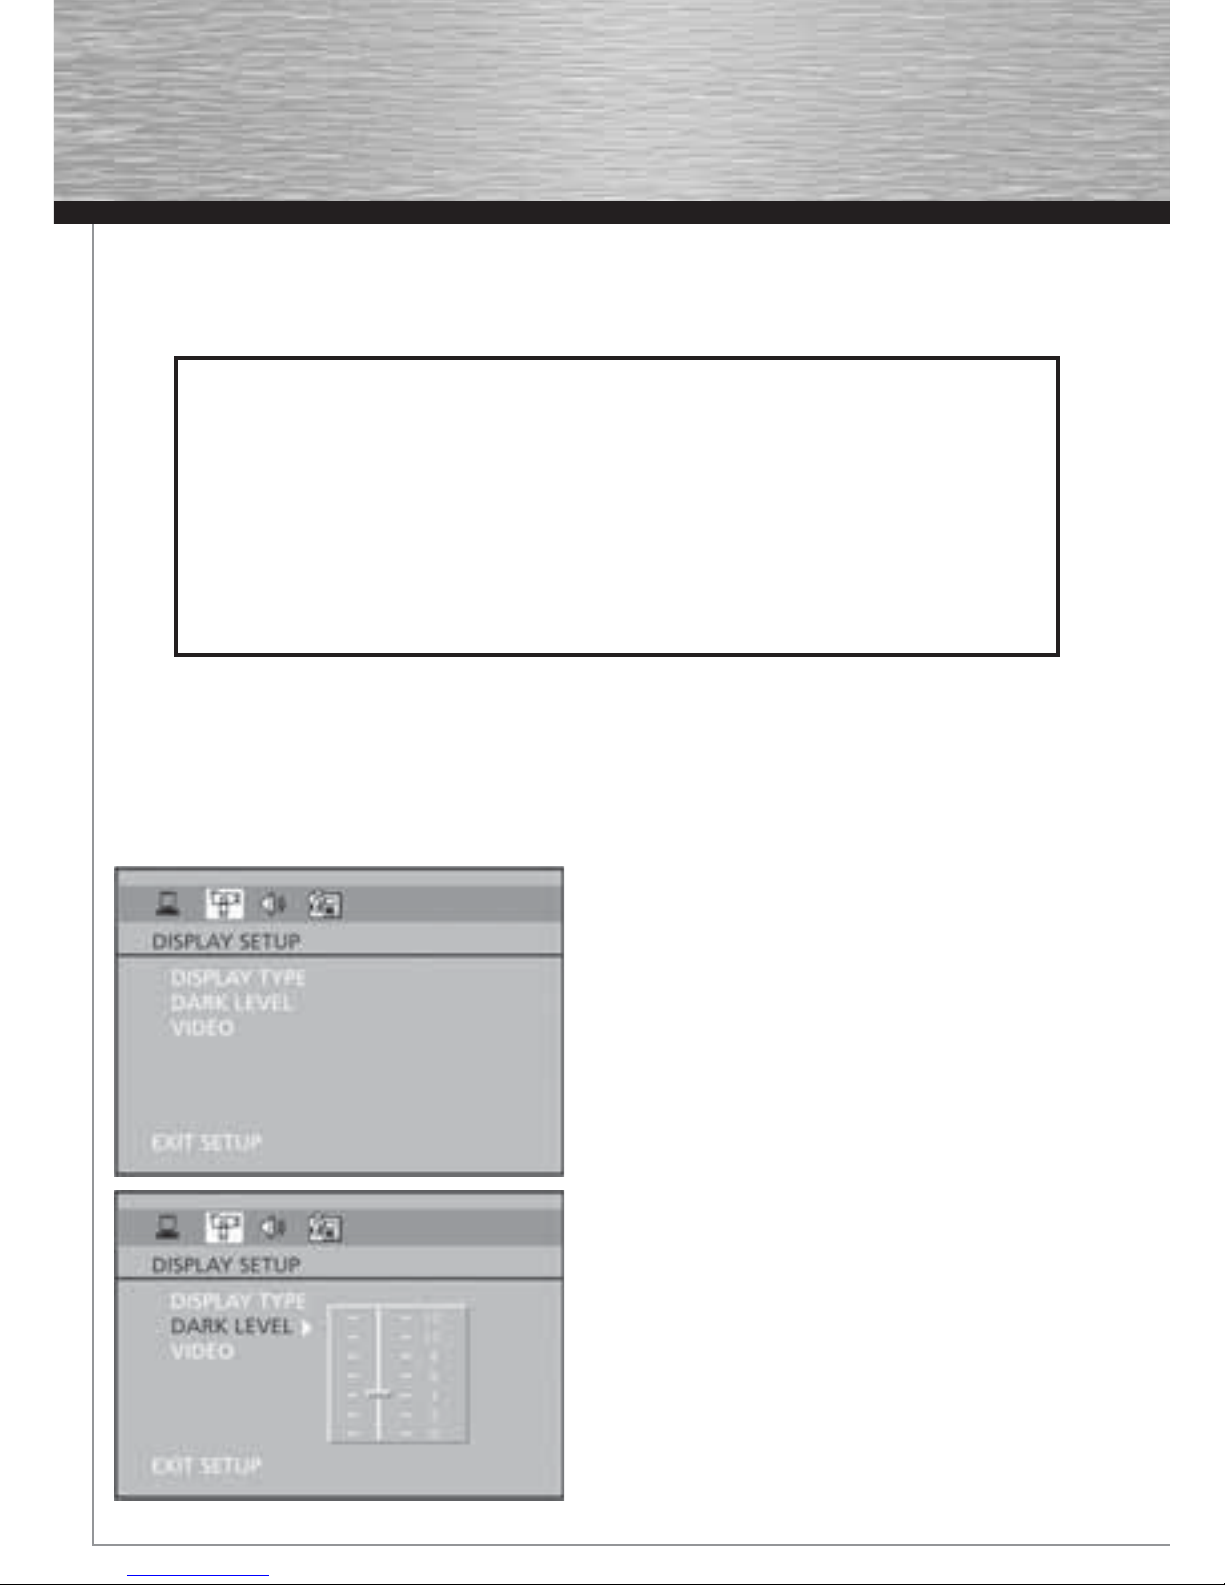
Display Setup
1. Select the Display icon in the main menu using the
left/right arrow buttons.
2. Select a menu option using the up/down arrow buttons
and press OK.
Display Type
Depending on the format of the DVD disc, you can choose
the picture format (aspect ratio) best suited to the format of
your TV screen:
4x3 PS: reproduces a 4x3 picture without distortion.
4x3 LB: gives best reproduction of pictures recorded in this
format (i.e. with horizontal bands at the top and bottom of
the screen) or in 16x9.
16x9 (widescreen): reproduces 16x9 format fi lms in full on a
16x9 screen.
Dark level
This option lets you adjust the video brightness level on a
scale of 0 to 12, with 12 being the brightest.
Rating Explanations
1 KID SAF – Kid safe; it is safe even for kids.
2 G – General Audience; recommended as acceptable for viewers of all ages.
3 PG – Parental Guidance suggested.
4 PG13 – Material is unsuitable for children under age 13.
5 PGR – Parental Guidance-restricted; recommended that parents restrict children under age 17
from viewing or allow children to view only when supervised by a parent or adult guardian.
6 R – Restricted, under 17 requires accompanying parent or adult guardian.
7 NC17 – NO children under age 17; not recommended viewing for children under age 17.
8 ADULT – Mature material; should be viewed only by adults, due to graphic sexual
material, violence, or language.
Page 30
31
Video
Progressive Function provides high quality pictures with less fl ickering. Turn on Progressive Scan if you used the
Component Video jacks of the player to connect a TV or monitor compatible with a progressive scan signal.
Select ON and press OK to activate Progressive Scan.
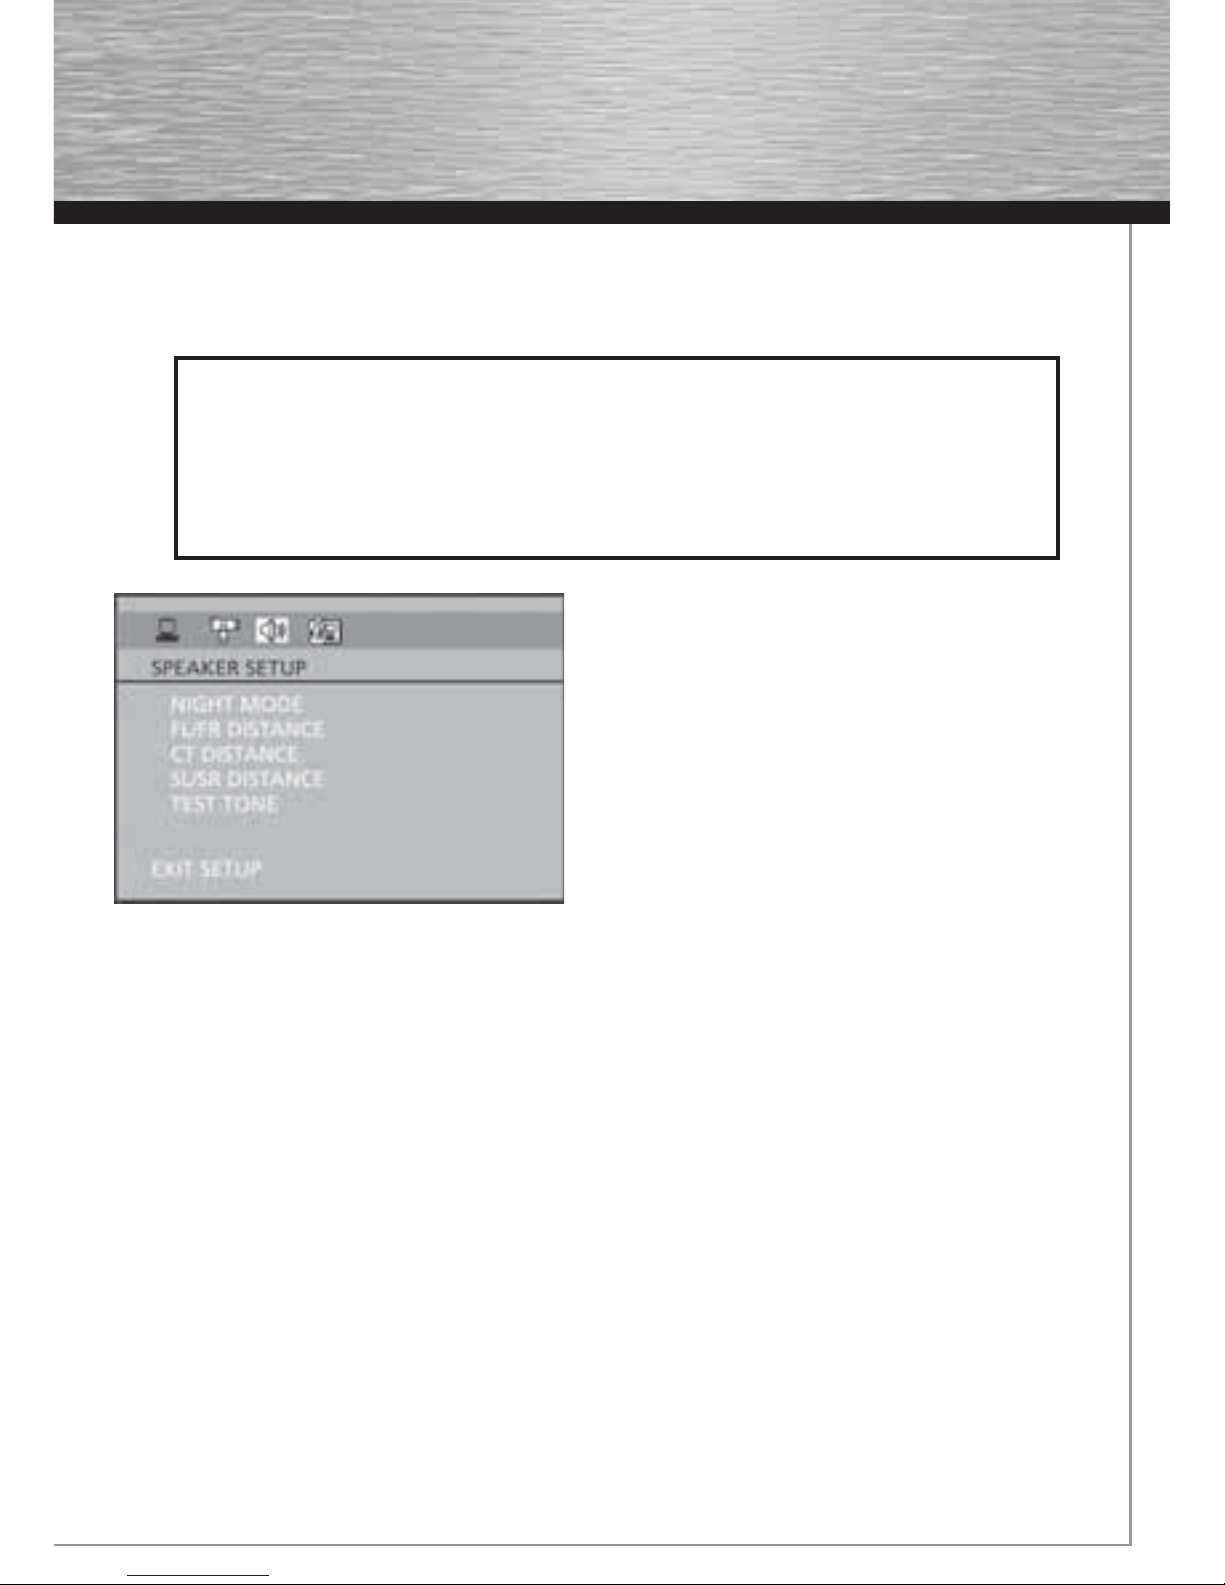
Speaker Setup
You can adapt your player to other equipment and access
specifi c functions with the Speaker
Setup menu.
1. Select the Speaker Setup icon in the main menu using the
left/right arrow buttons.
2. Select an option using the up/down arrow buttons. Press
the right arrow to move to the option’s choices.
Night Mode
You can use this function to control the different sound levels via dynamic compression. It improves the quality of the
sound track at a low volume, and quiets the loudest sounds. You can choose between Quiet, Moderate or Off.
Note: This function is available only on DVD discs recorded in Dolby Digital.
Distance
Basic settings have been preset for the speakers included with your unit. However, to suit the acoustic conditions in
your listening room and to make the sound more effective, you may need to delay the signal coming from some of the
speakers. Channel delay compensates for center or surround speakers that are closer to the listening position than the
front speakers.
1. Highlight a distance option using the up/down arrow buttons.
• Front (FL/FR DISTANCE)
• Center (CT DISTANCE)
• Rear (SL/SR DISTANCE)
2. Press the right arrow button to move to the default distance.
3. Press the up/down arrow buttons to adjust the distance.
Note: The receiver speaker distance default settings are the following:
Front speakers (FL/FR): 15 ft
Center speaker (CT): 15 ft
Rear speaker (SL/SR): 10 ft
IMPORTANT!
Once Progressive Scan has been activated, an image will only be visible on a progressive scan TV
or monitor. If you choose this option and you do not have a progressive scan TV or monitor, you
may get a picture with incorrect color or no color. If you activate Progressive Scan by mistake,
follow the procedure below to reset the unit:
Press and hold the SUBWOOFER button on the front panel. The video output will be restored to
the standard setting and a picture will once again be visible on a conventional analog TV or monitor.
Page 31
32
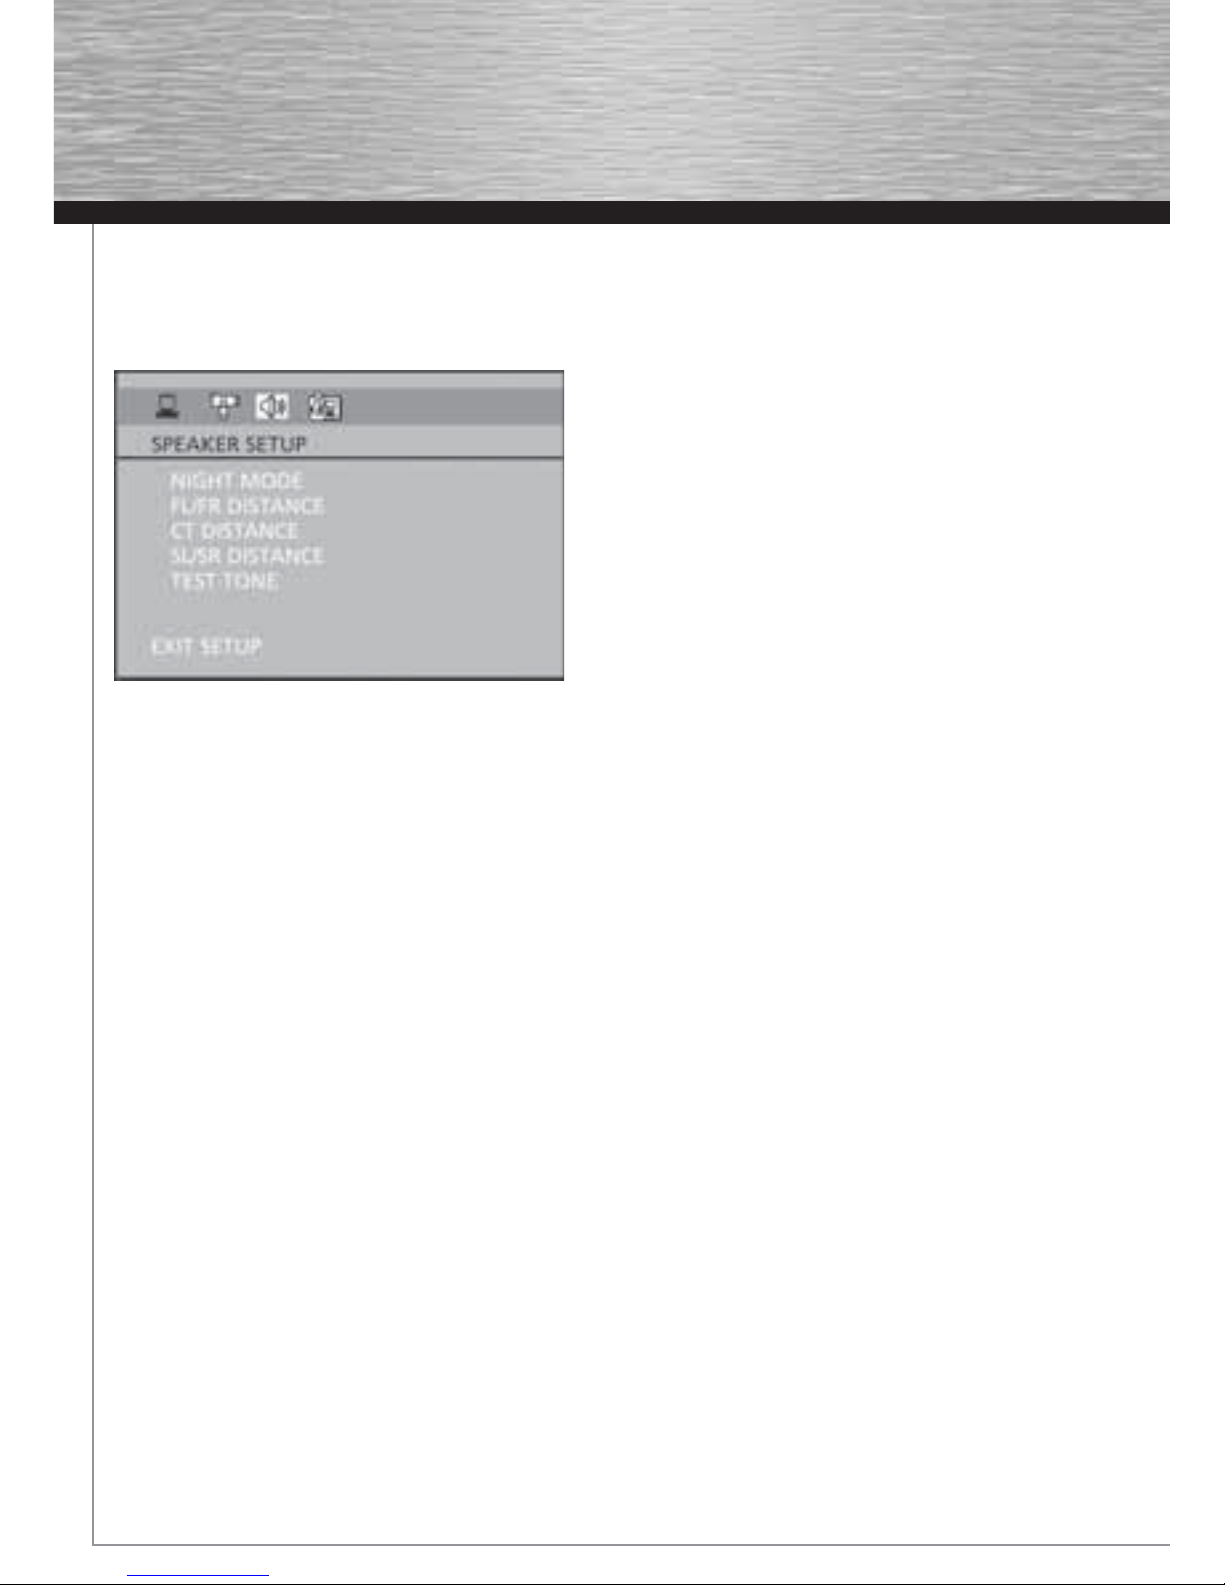
Test Tone
This function is used to test the speaker setting and change the speaker level. A short noise comes successively from
each speaker. Adjust the speaker level using the up/down arrow buttons.
Language Setup
With this menu, you can set the language for player menus,
dialog, subtitles and the disc menus.
If you chose “English” during initial set-up, any menus
generated by the disc are in English, and so is the language of
the dialogs (if this language is available on the disc).
1. Select the Language Setup icon in the main menu using
the left/right arrow buttons.
2. Select one of the options using the up/down arrow buttons.
3. Press the right arrow button to move to the language
choices.
4. Use the up/down arrow buttons to highlight the language of
your choice and press OK.
Player Menu
Select the language of player menus and press OK.
Audio
Select the dialog language using up/down arrow buttons and press OK.
To change the language during playback, display the audio icon by pressing the AUDIO button .
Note: If the selected language is not available on a disc, the disc’s language will be used instead.
Subtitles
Select the subtitle language using up/down arrow buttons and press OK.
To change the language of the subtitles during playback, press the INFO three times for DVD and use the left/right arrow
buttons to highlight the Subtitle icon. Press the up/down arrow buttons or the SUBTITLE button on the remote to select a
subtitle language.
Note: If the language chosen is available, it is automatically selected when you display the subtitles or press SUBTITLE
on the remote control. Otherwise, the subtitle language indicated on the disc is selected.
Disc Menu
To change the language of the disc menus, select the language using the up/down arrow buttons and press OK.
Note: the language you select will only be displayed if the disc is programmed with that language.
Page 32
33
Additional Information
Troubleshooting (Main Unit)
The unit does not switch on.
• Make sure it is plugged in.
• Press the ON/OFF button on the remote control or the ON/STANDBY button on the front of the unit.
The device switches off spontaneously.
• The device switches off automatically when it is in STOP mode for more than 30 minutes without any user
intervention. Switch it on again. It is impossible to read the disc.
• Insert the disc with the printed side facing up.
• Check that the disc can actually be played by this device.
• Check that the disc’s regional code matches the player’s regional code. This player’s regional code is 1.
• Clean the disc.
There is no picture.
• Check you have switched on the TV set.
• Check the connections (see pages 4).
• Select the AV input assigned to the player on the TV.
The video color is wrong.
• Make sure you have the correct video setting selected.
The picture is of poor quality (with snow or lines).
• Check the connections.
There is no sound or the sound is of poor quality.
• Check the connections.
• Make sure the speakers are connected.
• Make sure the MUTE function is not on.
No surround sound.
• Check the speaker confi guration in the Speaker Setup menu.
I can’t fi nd my fi le in the WMA/mp3/JPG listing.
• Make sure the fi lename is valid.
The remote control does not work or works only intermittently.
• Check that batteries are inserted or change them.
• Aim the remote control at the unit. The infrared beam must not be blocked or interrupted.
• Check that the remote control is confi gured to control the device you are trying to operate with it.
The subtitles do not appear.
• Check that the DVD disc provides subtitles.
• Refer to the section on how to display subtitles.
The disc menu language is not the correct one.
• The disc menu language has not been set up.
• The language of your choice is not available on the disc.
You have forgotten your password (Parental control).
• Use the super password: 9688.
Page 33
34
Troubleshooting (mp3 Player)
The player does not turn on when PLAY button pressed.
• Battery may be inserted incorrectly.
• Battery may be empty.
Skipping tracks or bad sound quality?
• Repeat or random function may be activated.
• There may be strong magnetic fi elds (e.g. too close to TV) near the unit.
• Low Battery level. Replace with new one.
Cannot perform playback?
• LOCK function may be activated.
• There may be no mp3 tracks in the card or internal memory.
• Memory Card may be damaged.
Cannot playback tracks on the player
• Make sure audio tracks are encoded in the mp3 or Windows Media formats at supported bitrates.Bitrates support
by the player: mp3 – 32 to 320 kbps
• WMA fi les may be DRM protected and you don’t have the proper rights (license) to play the fi les.
Check the website and/or application help system of the music download service provider from where the content was
purchased from for license acquisition details.
USB display does not appear when connected to computer.
• Check connection between your unit and the computer.
The player does not respond to key operations?
• To reset the unit, turn the player off by removing the battery. Reinsert the battery properly and turn the player on
again to resume normal operations.
The player does not work after reformat.
• Format the player in FAT or FAT32 format. The player does not work in NTFS format.
Note:
This unit may temporarily cease to function if subjected to electrostatic disturbance. To resume normal operation, it may
be necessary to cycle the power off and back on or to remove and reinstall the batteries.
Page 34
35
Precautions
Use
• If your unit has been stored in a cool place for any length of time, during a journey for example, wait for about
2 hours before using it.
• The openings located on the top and bottom are for ventilation and must not be obstructed.
• During thunderstorms, we recommend that you isolate the unit from the electrical supply so that it is not damaged
by electrical or electromagnetic surges.
• This unit is designed for continuous use. Switching off the DVD player to standby mode does not disconnect it from
the mains supply. To completely isolate the equipment, remove the plug from the mains jack as some components
remain connected to the electrical supply.
• If you notice any burning or smoke, disconnect the unit immediately to avoid any risk of electrocution.
• Do not attempt to look inside the unit through the disk tray opening or any other opening. You may be electrocuted
or exposed to laser radiation.
• This unit is for domestic use only and must not be used for industrial purposes.
• To tal or partial copying of recordings protected by copyright legislation, without the explicit permission of the
holder of the rights, contravenes current legislation. Copying or downloading music fi les for sale or any other
business purpose constitutes or could constitute a violation of copyright law.
Cleaning
• Use a soft, dry, clean cloth. Regularly dust the vents at the back or sides.
• Using solvents, abrasive or alcohol-based products risks damaging the unit.
• If an object or liquid enters inside the unit, unplug it immediately and have it checked by an authorized engineer.
Handling and caring for discs
• Handle your discs with care. Hold the disc with your fi ngers at the edges or through the hole.
• Insert the disc with the label facing up (for a single-sided disc).
• Place the disc properly into the tray in the allotted holder.
• Use a soft cloth to clean discs if necessary, always wiping from the centre to the edge.
• Always put discs back in their cases after use and store in a vertical position.
• Do not close the tray with two discs in it or with a disc not sitting correctly in the holder.
• Do not play cracked, chipped or warped discs nor try to repair them with adhesive tape or glue.
• Do not write on a disc.
• Do not move the player when a disc is being played.
• Do not scratch discs or store them in places exposed to direct sunlight, high humidity or high temperatures.
• Do not use aerosol cleaners, benzene, anti-static liquids or any other solvent for cleaning discs.
When cleaning, wipe gently with a soft damp (water only) cloth from the centre to the edge, avoiding circular
motions, which could cause scratches and interference during playback.
Page 35
36
Disc Formats you can play
In order to ensure playback, discs must conform with DVD, CD, VCD or SVCD standards. This unit may not play some
recordings or fi les due to differences in recording formats, software used & Disc types.
DVD-Video
Digital video discs - 12 cm, single or double sided, single
or dual layer. DVDs are highdensity optical discs on
which high quality picture and audio are recorded by
means of digital signals.
DVD-R,DVD-RW, DVD+R, DVD+RW
Most DVD-R and DVD+R (one recording only), DVD-RW
and DVD+RW discs (rewritable), depending on the DVD
writer and discs used. Recordings using DVD-R and
DVD-RW discs must be made in Video DVD mode.
Recordings using DVD+RW discs must be made in
accordance with the specifi cations for DVD+RW discs
with a 4.7 GB capacity.
VCD - Video Compact Disc
CD on which you can record up to 74 min. of VHS quality
video associated with still images, audio tracks and
interactive menus.
SVCD - Super Video Compact Disc
Most SVCDs comply with the IEC62107 standard. SVCDs
can be used to record up to 70 minutes of digital sound
and images in accordance with MPEG-2 standards for
video and MPEG-1 standards for audio.
Audio CDs
Audio CDs (12 cm).
CD-R, CD-RW
Most CD-R (one recording only) and CDRW
discs (rewritable).
CD-Rs written during a multisession recording can be
played, provided that the session has ended before the
disc is played (depending on the write
software). However, depending on the condition of the
CD-writer, computer and the disc used, you may fi nd that
not all discs will play. When playing a CD-R disc, it is
normal for the unit to take up to 20 seconds to recognize
the disc before starting to play.
If the disc is not recognized after a period of 20 seconds,
remove the disc, and insert it again.
• Do not use its full capacity.
• CD-Rs should be preferably used instead of CD-RWs
(rewritable CDs) as, in certain cases, CD-RW playback
may be faulty.
• Use reliable, good-quality CD write software.
• Close all other applications on the computer to ensure
reliable CD-R disc recording.
mp3 fi les
CD-R and CD-RW discs containing audio fi les in mp3
format. For CD-R mp3 discs, please follow all the
recommendations for CD-R, along with the comments
below:
• Your mp3 fi les should be ISO 9660 or JOLIET format.
ISO 9660 format and Joliet mp3 fi les are compatible
with Microsoft’s DOS and Windows, as well as with
Apple Mac.
• mp3 fi lenames should not exceed 8 characters, and
should end with the “.mp3” extension. General name
format: Title.mp3. When composing your title, use
10 characters or less, no spaces, and avoid the use of
special characters including (. , / , \ , = ,+).
• The total number of fi les on a disc should be less
than 400.
• Use a decompression transfer rate of at least
128 kB/sec (kilobytes/second) when recording mp3
fi les. Sound quality with mp3 fi les basically depends on
the rate of compression/ decompression you choose.
Obtaining audio CD quality sound requires an analog/
digital sampling rate, that is conversion to mp3 format,
of at least 128 kB/sec and up to 160 kB/sec. Choosing
higher rates, such as 192 kB/sec or more, only rarely
produces even better sound quality. Conversely, fi les
with sampling rates below 128 kB/sec will not play
properly.
• Do not record copyright-protected mp3 fi les.
“Securized” fi les are encrypted and codeprotected to
prevent illegal copying.
Important: The above recommendations does not
guarantee that the DVD player will play mp3 recordings,
or as an assurance of sound quality. Certain technologies
and methods for mp3 fi le recording on CD-Rs prevent
optimal playback of these fi les on your DVD player (i.e.
degraded sound quality and in some cases, inability of
the player to read the fi le).
Page 36
37
JPEG fi les
CD-R and CD-RW with JPEG fi les. Certain JPEG fi les, including progressive JPEG fi les, cannot be read by this player.
The total number of fi les and folders on the disc should be less than 650. Make sure that fi les have the “.jpg” extension.
Files without the “.jpg” extension will not be able to be read by the player - even though the fi les are shown as JPEG
images on your computer.
WMA fi les
CD-R and CD-RW discs containing audio fi les in WMA (Windows Media Audio) format.
Please follow all the recommendations for CD-R above.
Sound Enhancement Systems
This receiver is equipped with several built-in sound enhancement systems.
Dolby Digital
The Dolby Digital mode lets you enjoy full digital surround from software processed in the Dolby Digital format. Dolby
Digital provides better sound quality and a more powerful presence than conventional Dolby Surround. This unit is
equipped with Dolby Digital 5.1-channel so that you can enjoy enhanced full digital surround sound. Different from Dolby
Pro Logic in that only four channels (Front Left, Front Right, Centre and Rear ) are used, the new system provides stereo
separation of the rear speakers (Rear-Right, Rear-Left ). Adding the to the 5 channels the subwoofer channel for bass
sounds (counted as 0.1 channel) results in 5.1 channels (or 6 Channels) that bring you the most sophisticated Dolby
Digital sound enjoyment.
 Loading...