

Page 1

00049061/06.08
All liste d brands are trade marks of the cor responding com panies. Errors and omissions excepted,
and subject to technical changes. Our general terms of delivery and payment are applied.
Hama GmbH & Co KG
D-86651 Monheim/Germany
www.hama.com
Page 2
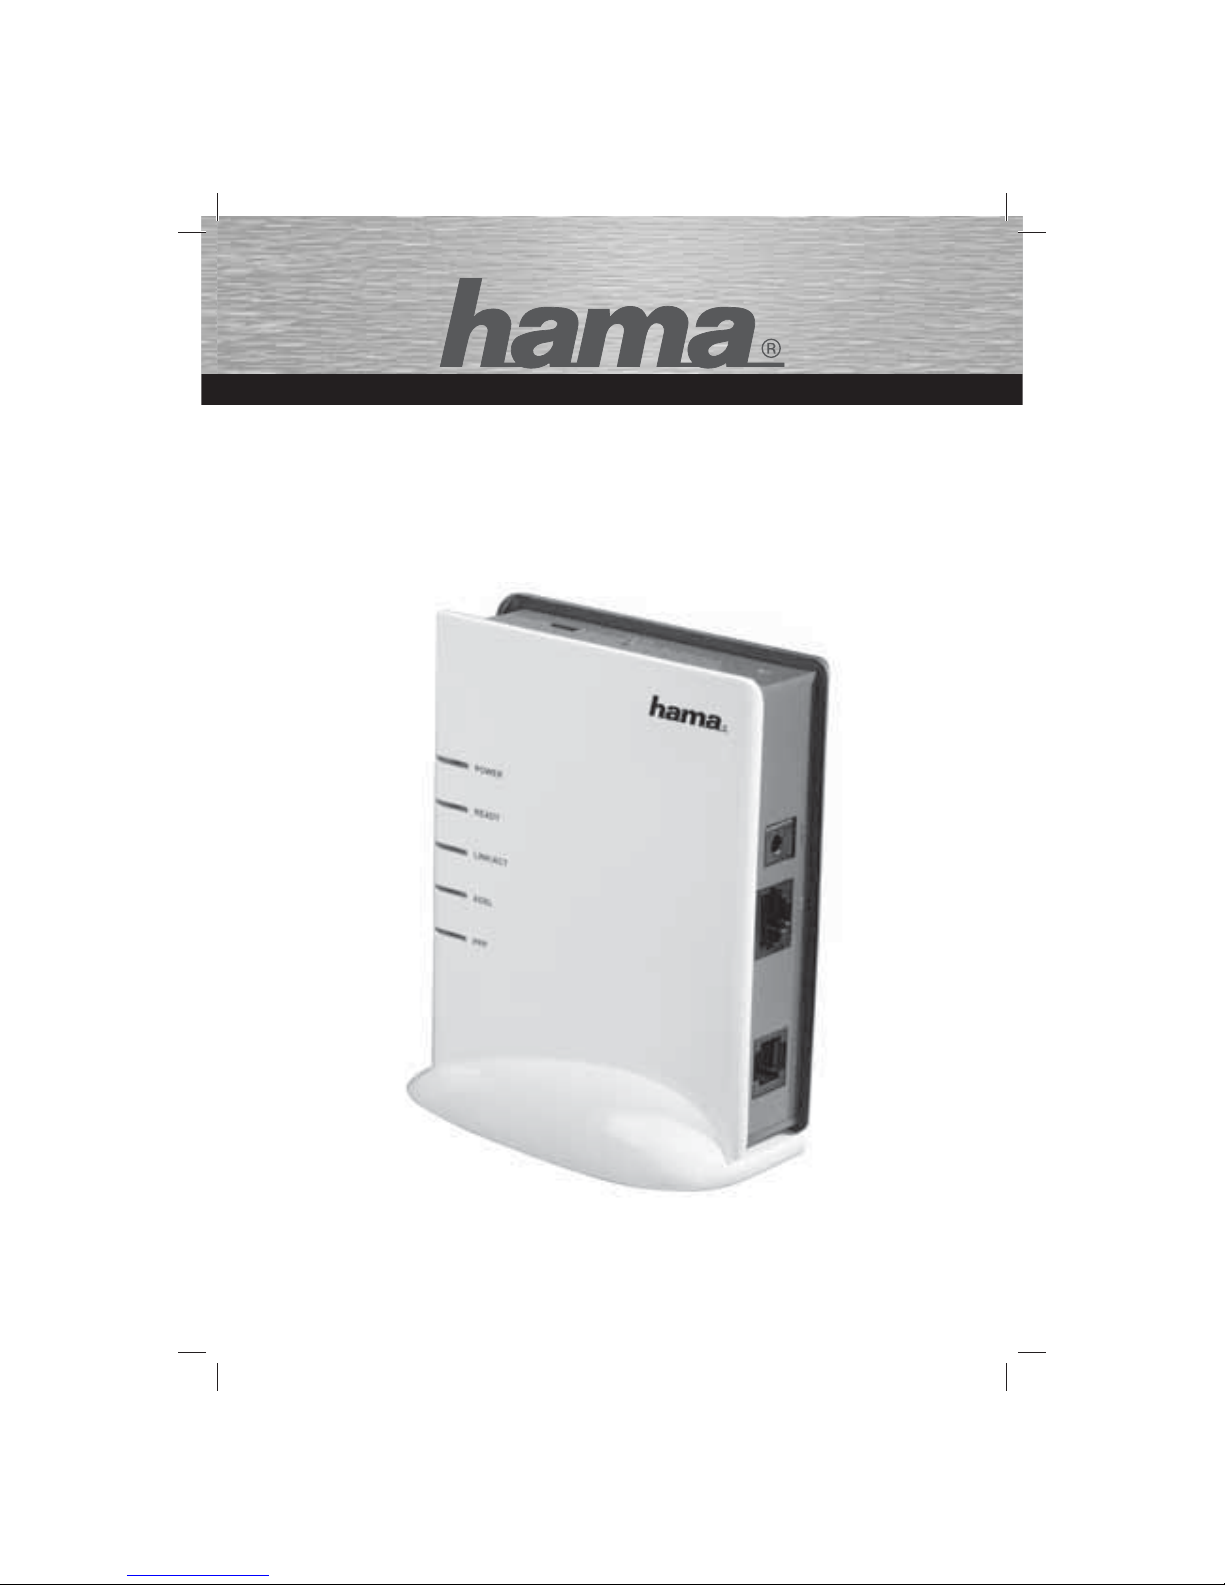
DSL Modem
NETWORK LAN
00049061
Page 3
2
DSL Zugang unter Windows 2000 einrichten:
Wichtiger Hinweis, wenn Sie einen Tarif gewählt haben, der
nach Zeit berechnet wird:
Trennen Sie nach dem Arbeiten im Internet immer die DSLVerbindung, wenn der Rechner danach noch eingeschaltet
bleibt. Wird der Computer nicht heruntergefahren und die
Breitbandverbindung ist noch aktiv, fallen weitere Kosten an.
Wir empfehlen bei längerer Nichtbenutzung das Hama ADSL2+
Modem vom Stromnetz zu trennen.
Im Folgenden wird beschrieben, wie Sie sich per DSL unter
Windows 2000 über Ihren Internet Anbieter ins Internet
einwählen können. Wir gehen davon aus, dass
• Sie Administratorrechte für diesen Computer besitzen,
• eine Netzwerkkarte korrekt auf Ihrem System installiert
haben,
• Ihr DSL-Port frei geschaltet ist,
• eine fehlerfreie Netzwerkverkabelung vorliegt.
• die Zugangsinformationen Ihres Internet Anbieters vorliegen
haben
Vorbereitung:
Windows 2000 unterstützt von sich aus nicht die Möglichkeit,
Internetverbindungen über die Netzwerkkarte aufzubauen.
Dafür gibt es externe Programme, die diesen Dienst (PPPoE)
bereitstellen.
Die folgende Dokumentation arbeitet mit dem Programm
RASPPPoE von Robert Schlabbach. Sie fi nden es unter der
Internetadresse: www.raspppoe.com
Bitte entpacken Sie die Dateien mit einem Packprogramm wie
zum Beispiel WinZIP.
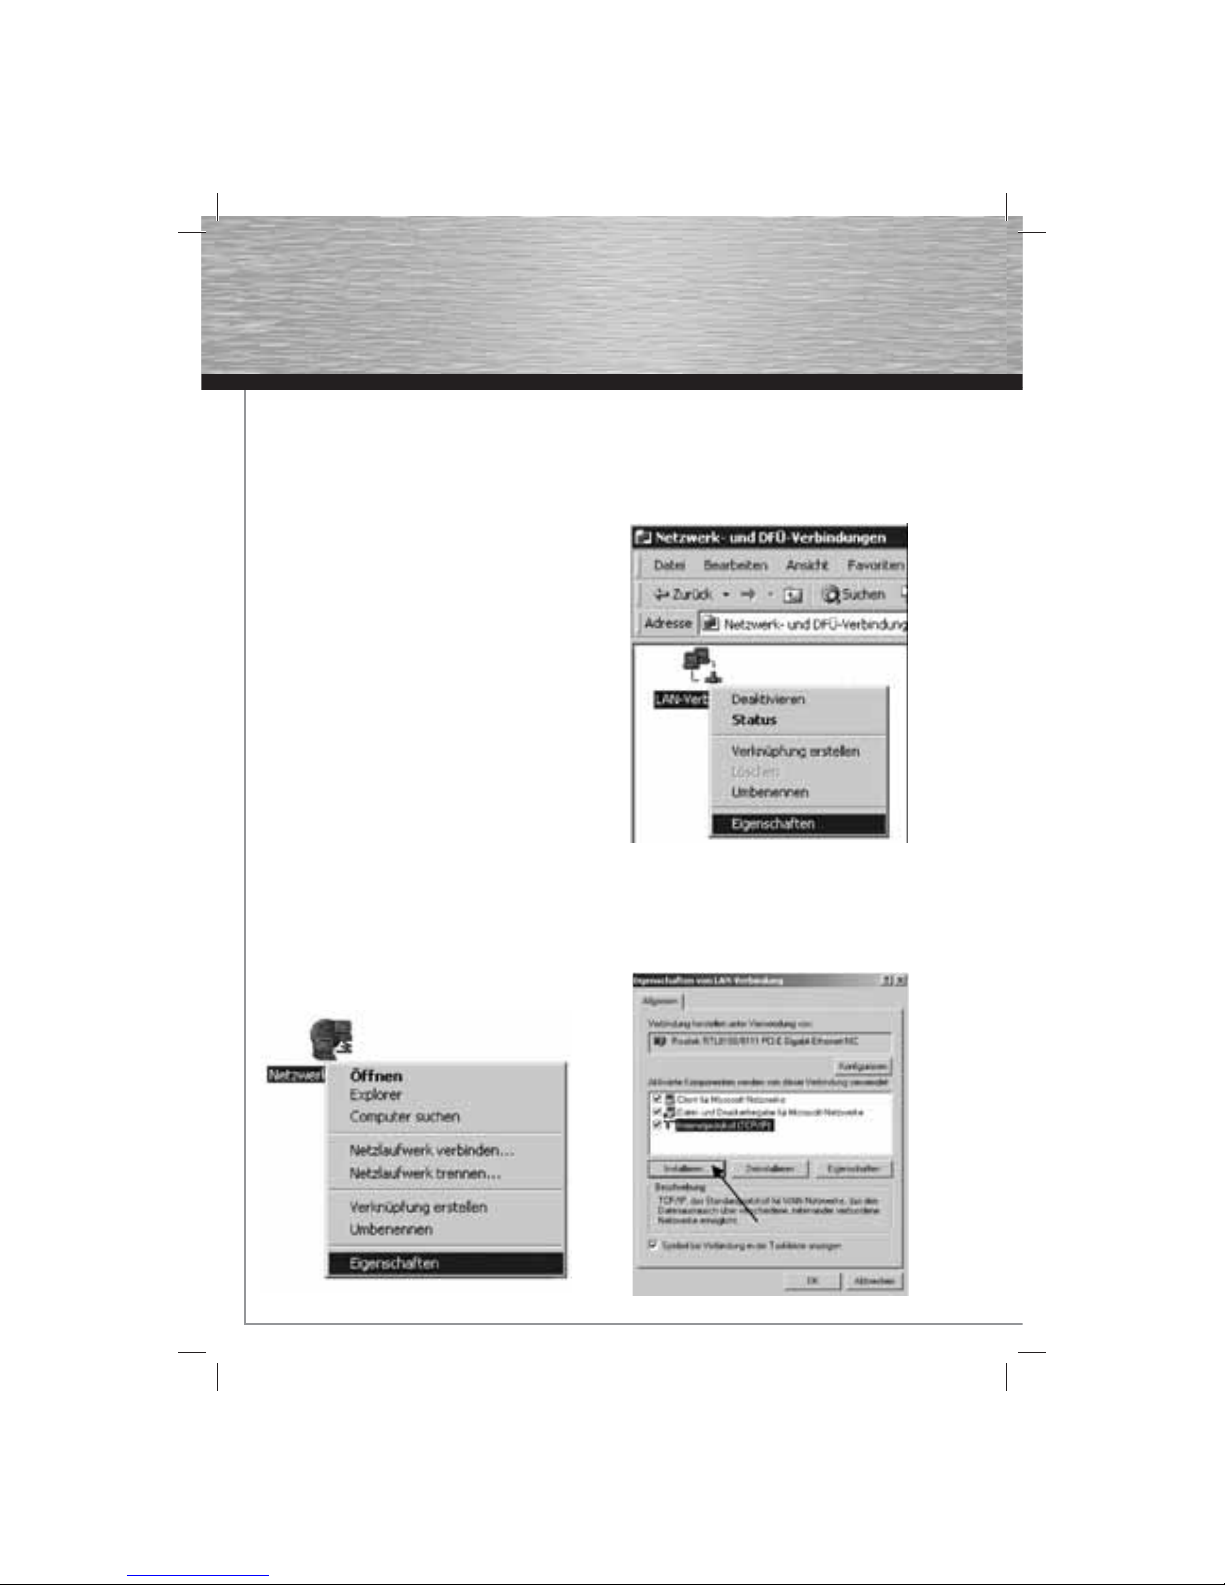
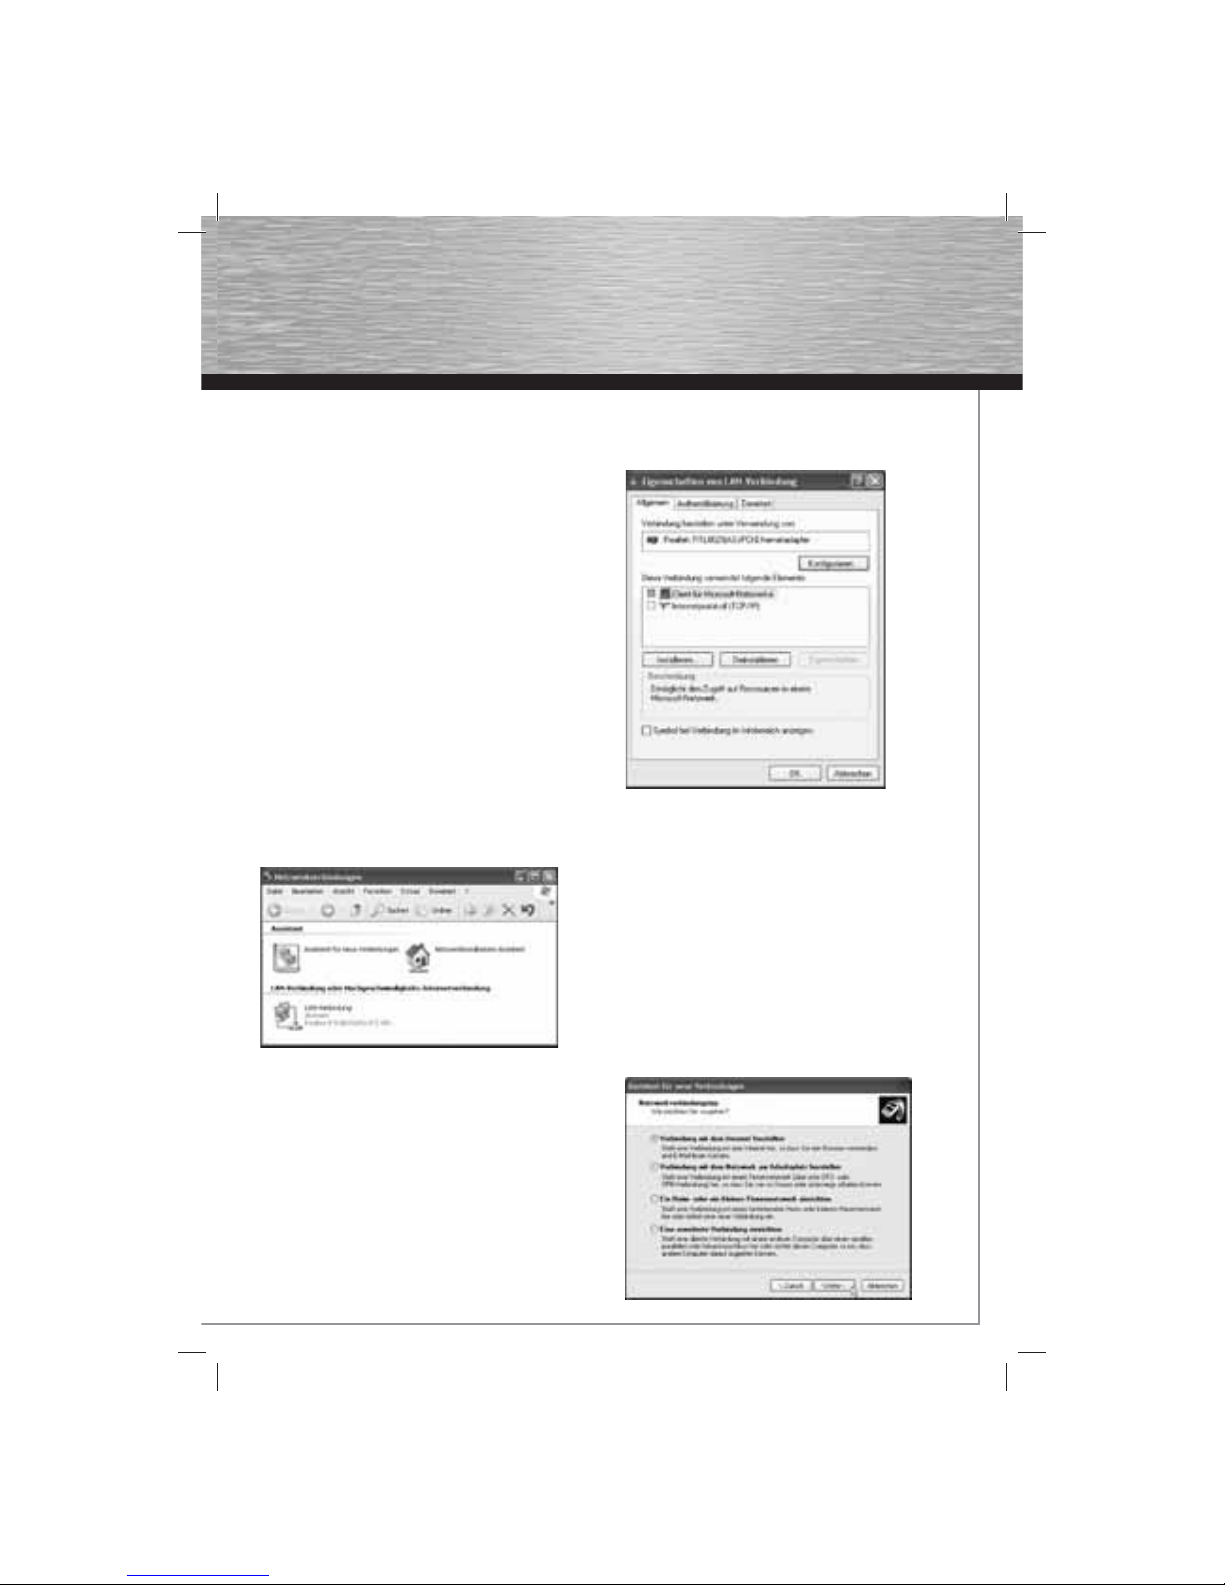
Eigenschaften der Netzwerkumgebung öffnen:
Klicken Sie mit der rechten Maustaste auf die
Netzwerkumgebung. Diese fi nden Sie normalerweise direkt am
Desktop oder Sie erreichen diese über Start -> Einstellungen
-> Netzwerk- und DFÜ-Verbindungen. Im Kontextmenü (siehe
Screenshot) wählen Sie den Punkt Eigenschaften aus.
Eigenschaften der LAN-Verbindung öffnen:
Klicken Sie mit der rechten Maustaste auf LAN-Verbindung.
Diese sollte in den „Netzwerk- und DFÜ-Verbindungen“
angezeigt werden. Ist dies nicht der Fall, ist Ihre Netzwerkkarte nicht korrekt installiert. Überprüfen bzw. wiederholen Sie
die Installation Ihrer Netzwerkkarte. Im Kontextmenü (siehe
Screenshot) wählen Sie abermals den Punkt Eigenschaften aus.
Neues Netzwerkprotokoll installieren:
Sie befi nden sich jetzt in den „Eigenschaften von
LAN-Verbindung“.
Hier können Sie unter anderem Ihre Netzwerkkarte
konfi gurieren und diverse andere Einstellungen am Netzwerk
vornehmen. Wählen Sie, wie aus dem Screenshot entnommen
werden kann, die Schaltfl äche Installieren.
d Bedienungsanleitung
Page 4
3
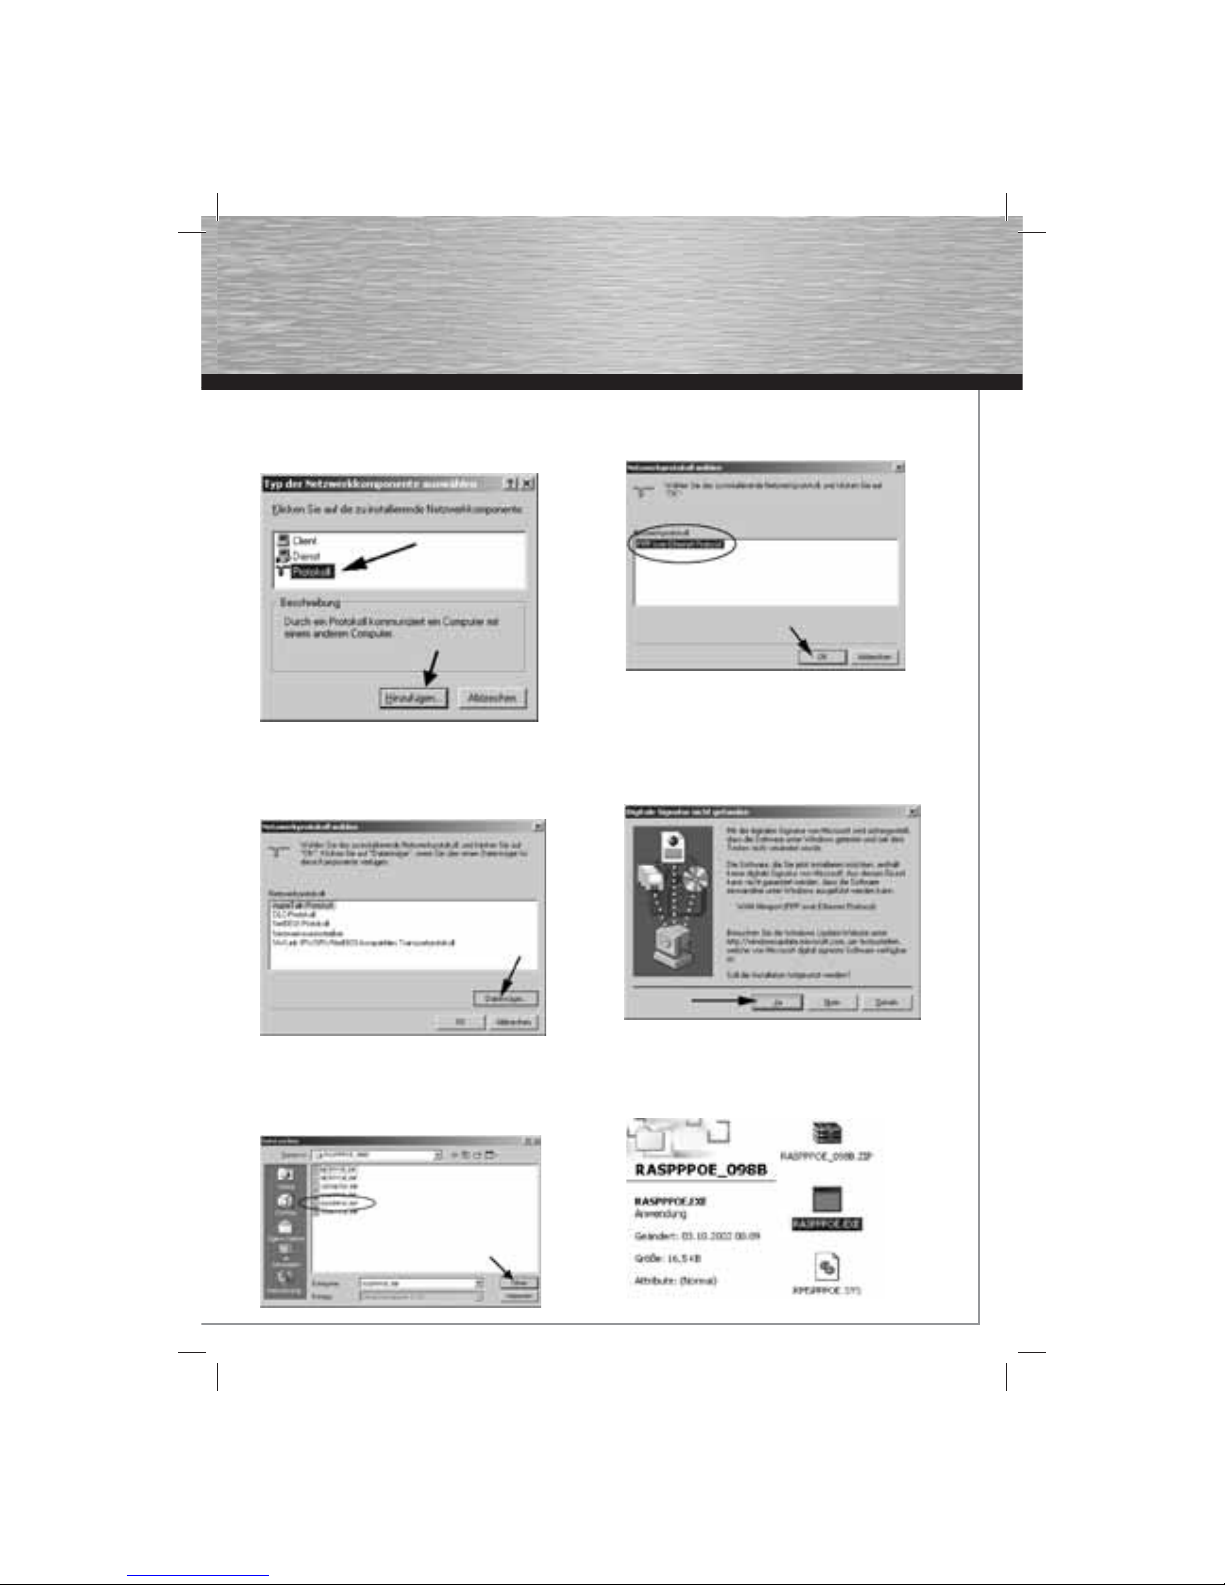
Typ der Netzwerkkomponente auswählen:
Um Ihre Netzwerkkarte „DSL-fähig“ zu machen, muss das
Netzwerk-Protokoll PPPoE installiert werden.
Markieren Sie Protokoll und fahren Sie mit „Hinzufügen“ fort.
Netzwerkprotokoll wählen:
Windows 2000 hat standardmäßig kein Protokoll für DSL im
Lieferumfang.
Betätigen Sie die Schaltfl äche Datenträger um das vorher
heruntergeladene Protokoll RASPPPoE hinzuzufügen.
Zielordner/-datei angeben:
Wählen Sie den Ordner, in den Sie am Anfang die
heruntergeladene *zip-Datei entpackt haben.
Klicken Sie auf Öffnen. Windows wird automatisch die richtige
Datei (RASPPPOE.INF) auswählen.
Netzwerkprotokoll wählen:
Markieren Sie das PPP over Ethernet Protocol und klicken Sie
auf „OK“.
Digitale Signatur bestätigen:
Windows 2000 benutzt eine Digitale Signatur für Treiber,
Protokolle und diverse andere Software.
Da dieses Protokoll nicht digital signiert ist erscheint diese
Meldung. Fahren Sie durch einen Klick auf „Ja“ fort.
Starten Sie nach der Installation des PPP over
Ethernet-Protokolls Ihren Rechner neu.
Datei ausführen:
Nach dem Neustart Ihres Rechners wechseln Sie in den Ordner
in dem Sie vorher die heruntergeladene Datei RASPPPoE.inf
entpackt haben.
Führen Sie die Datei RASPPPoE.exe aus.
Page 5
4
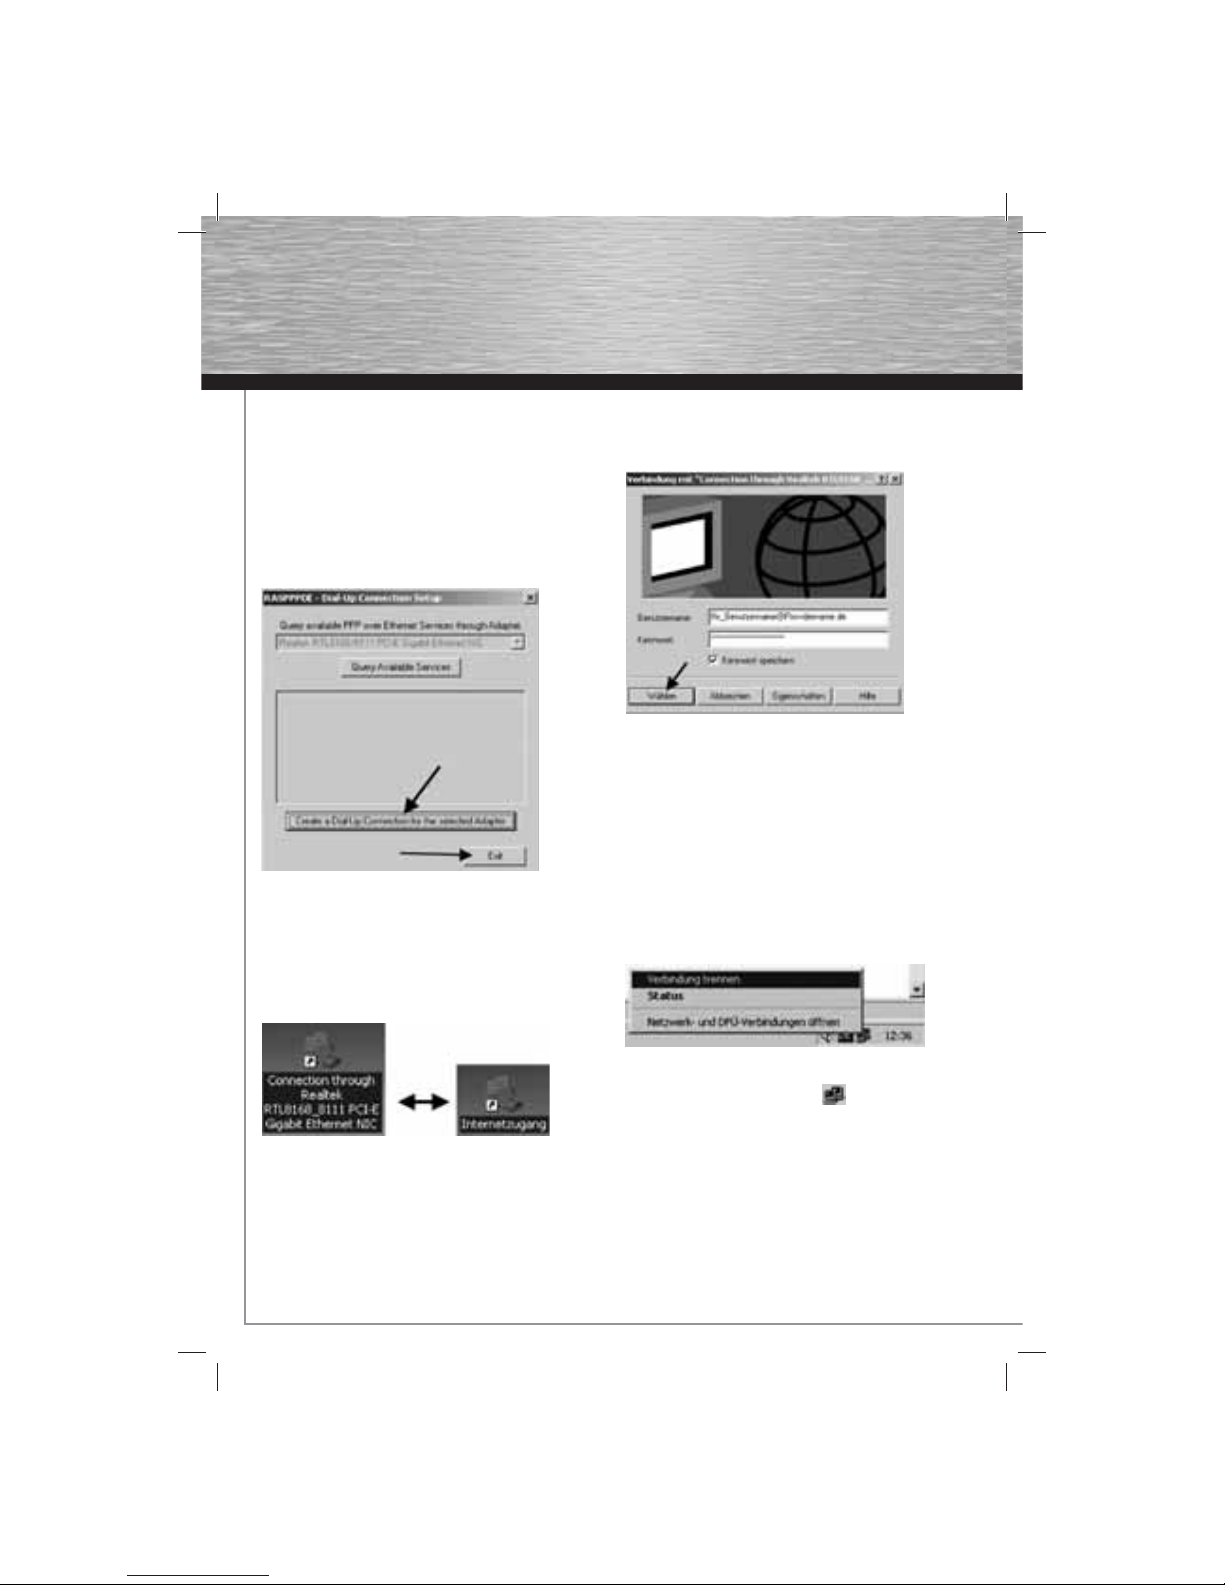
Dial-UP-Verbindung für die Netzwerkkarte erstellen:
Das Programm ist gestartet. Unter der Zeile
„Query available PPP over Ethernet Services through Adapter:“
sollte die Netzwerkkarte stehen, auf welche die Dial-UpVerbindung eingerichtet wird. Ist hier keine Netzwerkkarte vorhanden, liegt ein Problem vor. Installieren Sie die Treiber Ihrer
Netzwerkkarte nochmals und wiederholen Sie die
DSL-Installation.
Wählen Sie anschließend Create a Dial-Up Connection for
the selected Adapter aus und beenden Sie das Programm mit
„Exit“.
Verknüpfung auf dem Desktop anpassen:
War die Installation des Programms erfolgreich, fi nden Sie eine
DSL-Verknüpfung (siehe Screenshot, linker Teil) auf dem
Windows-Desktop. Mit der Taste „F2“ oder einem Rechtsklick
auf die Datei und anschließendem Klick auf „Umbenennen“
ändern Sie den Namen der Datei auf beispielsweise
Internetzugang (siehe Screenshot, rechter Teil). Rufen Sie die
Verbindung durch einen Doppelklick auf.
Verbindung mit dem Internet herstellen:
Geben Sie Ihren Benutzernamen und Ihr Kennwort ein. Diese
Daten haben Sie von Ihrem Internet Provider erhalten.
Hinweis für T-Online Kunden: Der Benutzername besteht
bei diesem Provider aus Ihrer Anschlusskennung, T-Online
Nummer und den Mitbenutzer Suffi x. Diese 3 Zahlenkolonnen
sind nacheinander ohne Leerzeichen in das Feld Benutzername
einzugeben, danach muss noch ein @t-online.de angehängt
werden.
Durch Aktivieren der Option „Kennwort speichern“ ersparen
Sie sich eine Neueingabe Ihres Passwortes vor dem Aufbau
einer jeden Internetverbindung. Starten Sie den Wählvorgang
durch einen Klick auf die Schaltfl äche „Wählen“.
Sobald Sie auf „Wählen“ geklickt haben, wird die DSLVerbindung aufgebaut. Der Verbindungsaufbau sollte nach
wenigen Sekunden abgeschlossen sein. Bleibt das Fenster
längere Zeit unverändert, haben Sie möglicherweise Benutzername oder Passwort falsch eingegeben. Warten Sie bis der
Verbindungsaufbau abbricht, korrigieren Sie Ihre Zugangsdaten
und versuchen Sie erneut einen Verbindungsaufbau.
Treten wider Erwarten Probleme auf, wenden Sie sich an die
Hotline Ihres Providers.
Verbindung erfolgreich hergestellt
Läuft alles nach Plan, erscheinen in der Taskleiste unten rechts
neben der Uhr zwei blinkende Computer, welche die aktive/
bestehende Verbindung ins Internet bestätigen und anzeigen.
Abbau der Verbindung:
Der Abbau der Verbindung erfolgt am einfachsten über das
bereits erwähnte Statusmenü: Klicken Sie mit der rechten
Maustaste auf das Verbindungs-Icon in der Taskleiste und
wählen Sie im Statusmenü Verbindung Trennen. Die Verbindung
wird nun abgebaut; das Verbindungs-Icon verschwindet aus der
Taskleiste.
Page 6
5
g
Operating Instruction
DSL Zugang unter Windows XP/XP x64 einrichten:
Wichtiger Hinweis, wenn Sie einen Tarif gewählt haben, der
nach Zeit berechnet wird:
Trennen Sie nach dem Arbeiten im Internet immer die DSLVerbindung, wenn der Rechner danach noch eingeschaltet
bleibt. Wird der Computer nicht heruntergefahren und die
Breitbandverbindung ist noch aktiv, fallen weitere Kosten an.
Wir empfehlen bei längerer Nichtbenutzung das Hama ADSL2+
Modem vom Stromnetz zu trennen.
Im Folgenden wird beschrieben, wie Sie sich per DSL unter
Windows XP/ XP x64 über ihren Internet Anbieter ins Internet
einwählen können:
Wir gehen davon aus, dass:
• Sie Administrator-Rechte für diesen Computer besitzen,
• eine Netzwerkkarte korrekt auf Ihrem System installiert
haben
• Ihr DSL-Port frei geschaltet ist,
• eine fehlerfreie Netzwerkverkabelung vorliegt.
• die Zugangsinformationen Ihres Internet Anbieters vorliegen
haben
Ändern der Netzwerkverbindung:
Klicken Sie mit der rechten Maustaste auf das Symbol
Netzwerkumgebung auf dem Desktop oder unter Start ->
Systemsteuerung -> Netzwerk- und Internetverbindungen ->
Netzwerkverbindungen
Daraufhin öffnet sich das Fenster Netzwerkverbindungen:
Installation des Netzwerkprotokolls:
Klicken Sie mit der rechten Maustaste auf das Symbol
LAN-Verbindung. Im Kontextmenü wählen Sie anschließend
die Option Eigenschaften aus:
Achten Sie darauf, dass das Internetprotokoll (TCP/IP) installiert
ist. Eine Bindung der Netzwerkkarte an das TCP/IP-Protokoll
sollte nicht existieren:
Keine der Netzwerkkomponenten besitzt ein Häkchen davor !
Das Binden an TCP/IP erzeugt nur Wartezeiten beim Booten
und auch beim Surfen! Ist jedoch für eine Verwendung der
Netzwerkkarte für andere Zwecke z.B. Netzwerk, Verwendung
eines DSL-Routers, etc. notwendig.
Nun ist alles bereit, um eine Verbindung für das Internet
einrichten zu können! Schließen Sie nun das Fenster wieder.
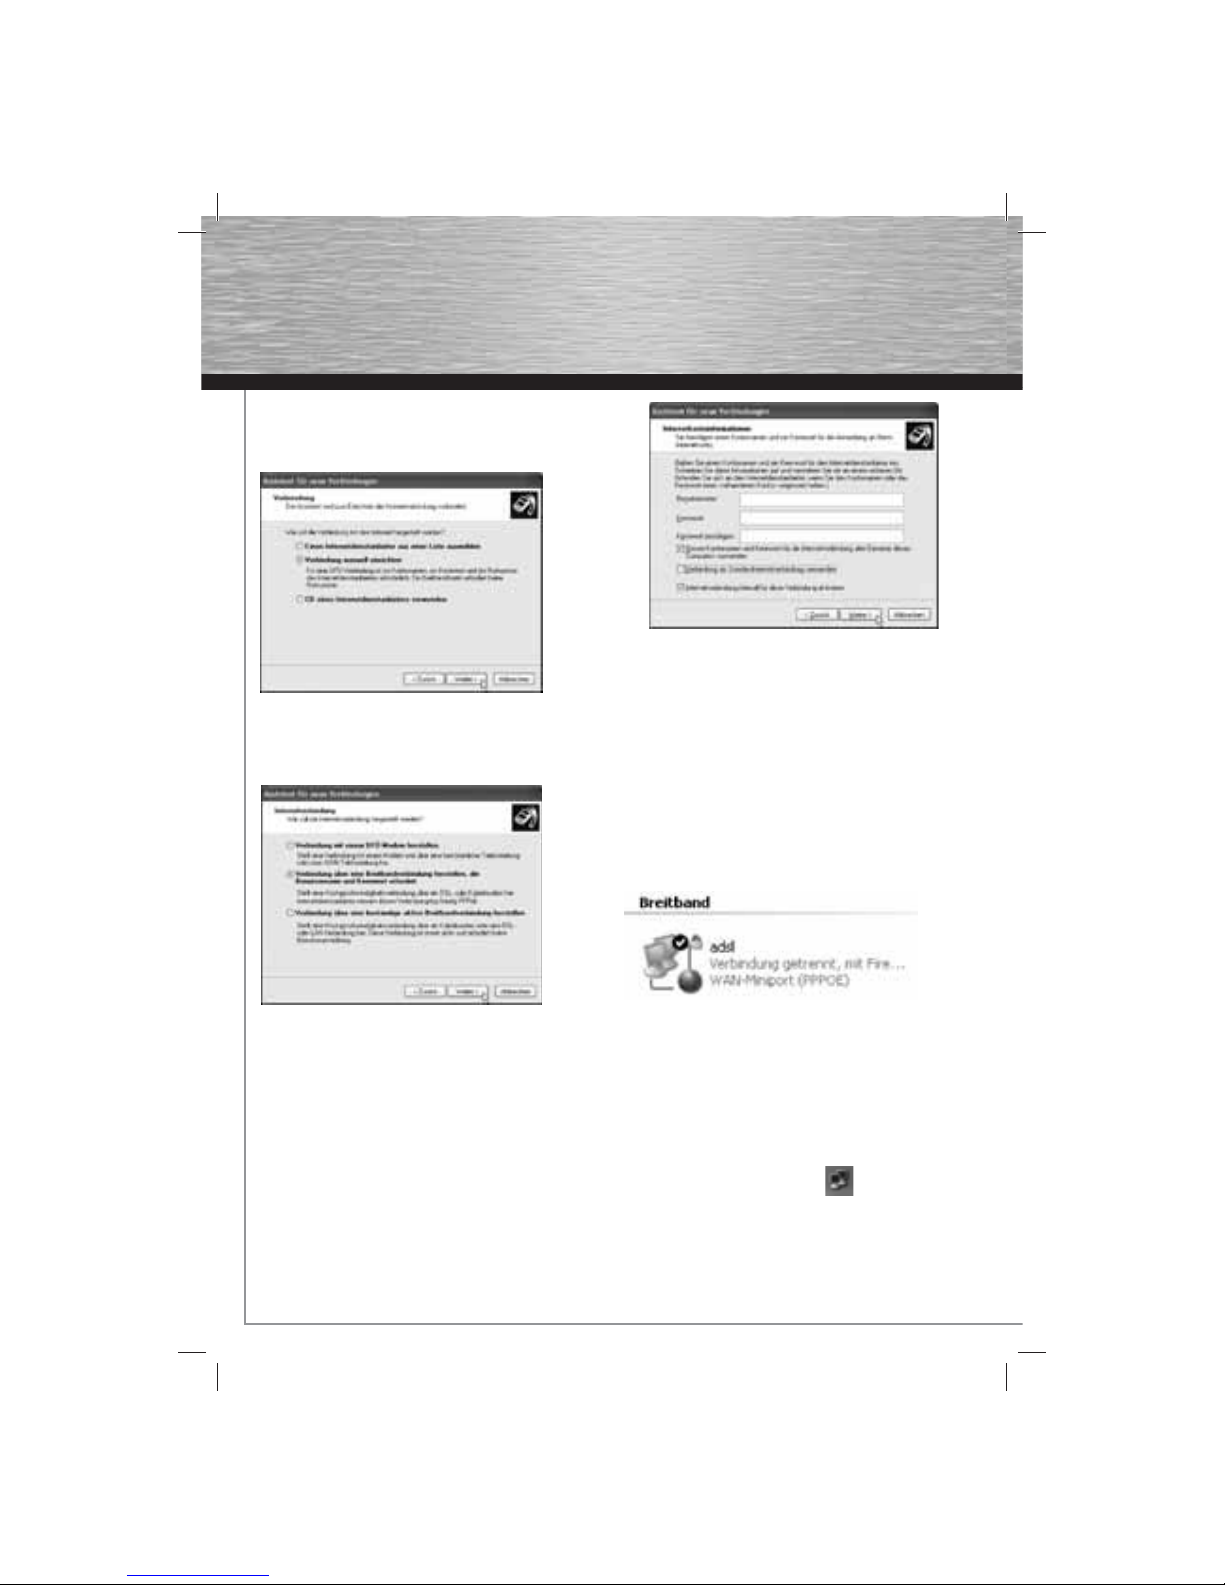
Starten des Assistent für neue Verbindungen:
Starten Sie unter Netzwerkaufgaben im Menu
Netzwerkverbindungen den Assistent „Neue Verbindungen
erstellen“ und wählen Sie „Weiter“.
Bestätigen Sie die Auswahl „Verbindung mit dem Internet
herstellen“, indem Sie auf „Weiter“ klicken.
Page 7
6
d
Bedienungsanleitung
Manuelle Verbindung einrichten:
Im darauf folgenden Dialog entscheiden Sie sich für den Punkt
Verbindung manuell einrichten und klicken anschließend auf
„Weiter“.
Verbindungsart wählen:
Stellen Sie ein, dass Sie eine „Verbindung über eine
Breitbandverbindung herstellen, die Benutzername und
Kennwort erfordert“, einrichten wollen und klicken
anschließend auf die Schaltfl äche „Weiter“.
Benennung der DSL Verbindung:
Im nächsten Schritt werden Sie aufgefordert einen neuen
Namen für die DSL Verbindung anzugeben. Geben Sie hier einen
Namen Ihrer Wahl ein, und klicken danach auf „Weiter“.
Abschluss der Installation und Verbindungsaufbau:
In diesem Dialog geben Sie die Zugangsdaten ein, die Sie von
Ihrem Internet Anbieter erhalten haben.
Hinweis für T-Online Kunden:
Der Benutzername besteht bei diesem Provider aus Ihrer
Anschlusskennung, T-Online Nummer und den Mitbenutzer
Suffi x. Diese 3 Zahlenkolonnen sind nacheinander ohne
Leerzeichen in das Feld Benutzername einzugeben, danach
muss noch ein @t-online.de angehängt werden.
Das Feld Internetverbindungsfi rewall für diese Verbindung
aktivieren können Sie bei Bedarf aktivieren.
Klicken Sie anschließend auf die Schaltfl äche „Weiter“.
Verknüpfung erstellen:
Im nächsten Schritt werden Sie gefragt, ob Sie eine Verknüpfung der DSL-Verbindung auf den Desktop haben möchten,
danach klicken Sie auf die Schaltfl äche „Fertig stellen“.
Diese fi ndet sich auf Ihrem Desktop oder unter Start ->
Verbinden mit wieder. Wenn Sie diese nun Anklicken, öffnet
sich das Verbindungsfenster, in dem Sie über Verbinden eine
Einwahl ins Internet tätigen.
Hiermit ist die Installation und Einrichtung von DSL für
Windows XP zur Einwahl abgeschlossen!
Abbau der Verbindung
Der Abbau der Verbindung erfolgt am einfachsten über das
bereits erwähnte Statusmenü: Klicken Sie mit der rechten
Maustaste auf das Verbindungs-Icon in der Taskleiste
und wählen Sie im Statusmenü
Verbindung Trennen. Die Verbindung wird nun abgebaut; das
Verbindungs-Icon verschwindet aus der Taskleiste.
Page 8
7
g
Operating Instruction
DSL Zugang unter Windows Vista bzw. Windows 7 einrichten:
Wichtiger Hinweis, wenn Sie einen Tarif gewählt haben, der
nach Zeit berechnet wird:
Trennen Sie nach dem Arbeiten im Internet immer die DSLVerbindung, wenn der Rechner danach noch eingeschaltet
bleibt. Wird der Computer nicht heruntergefahren und die
Breitbandverbindung ist noch aktiv, fallen weitere Kosten an.
Wir empfehlen bei längerer Nichtbenutzung das Hama ADSL2+
Modem vom Stromnetz zu trennen.
Die Einrichtung einer Internetverbindung mit Microsoft Vista
können Sie in einigen kurzen Schritten durchführen. Zur
Einrichtung benötigen Sie keine weitere Software oder Treiber
von Ihrem Internet Anbieter. Bitte halten Sie für die Einrichtung
der Verbindung Ihre Verbindungsdaten bereit, die Sie von Ihrem
Internet Anbieter per Brief zugesandt bekommen haben.
Zur Einrichtung führen Sie bitte folgende Schritte durch:
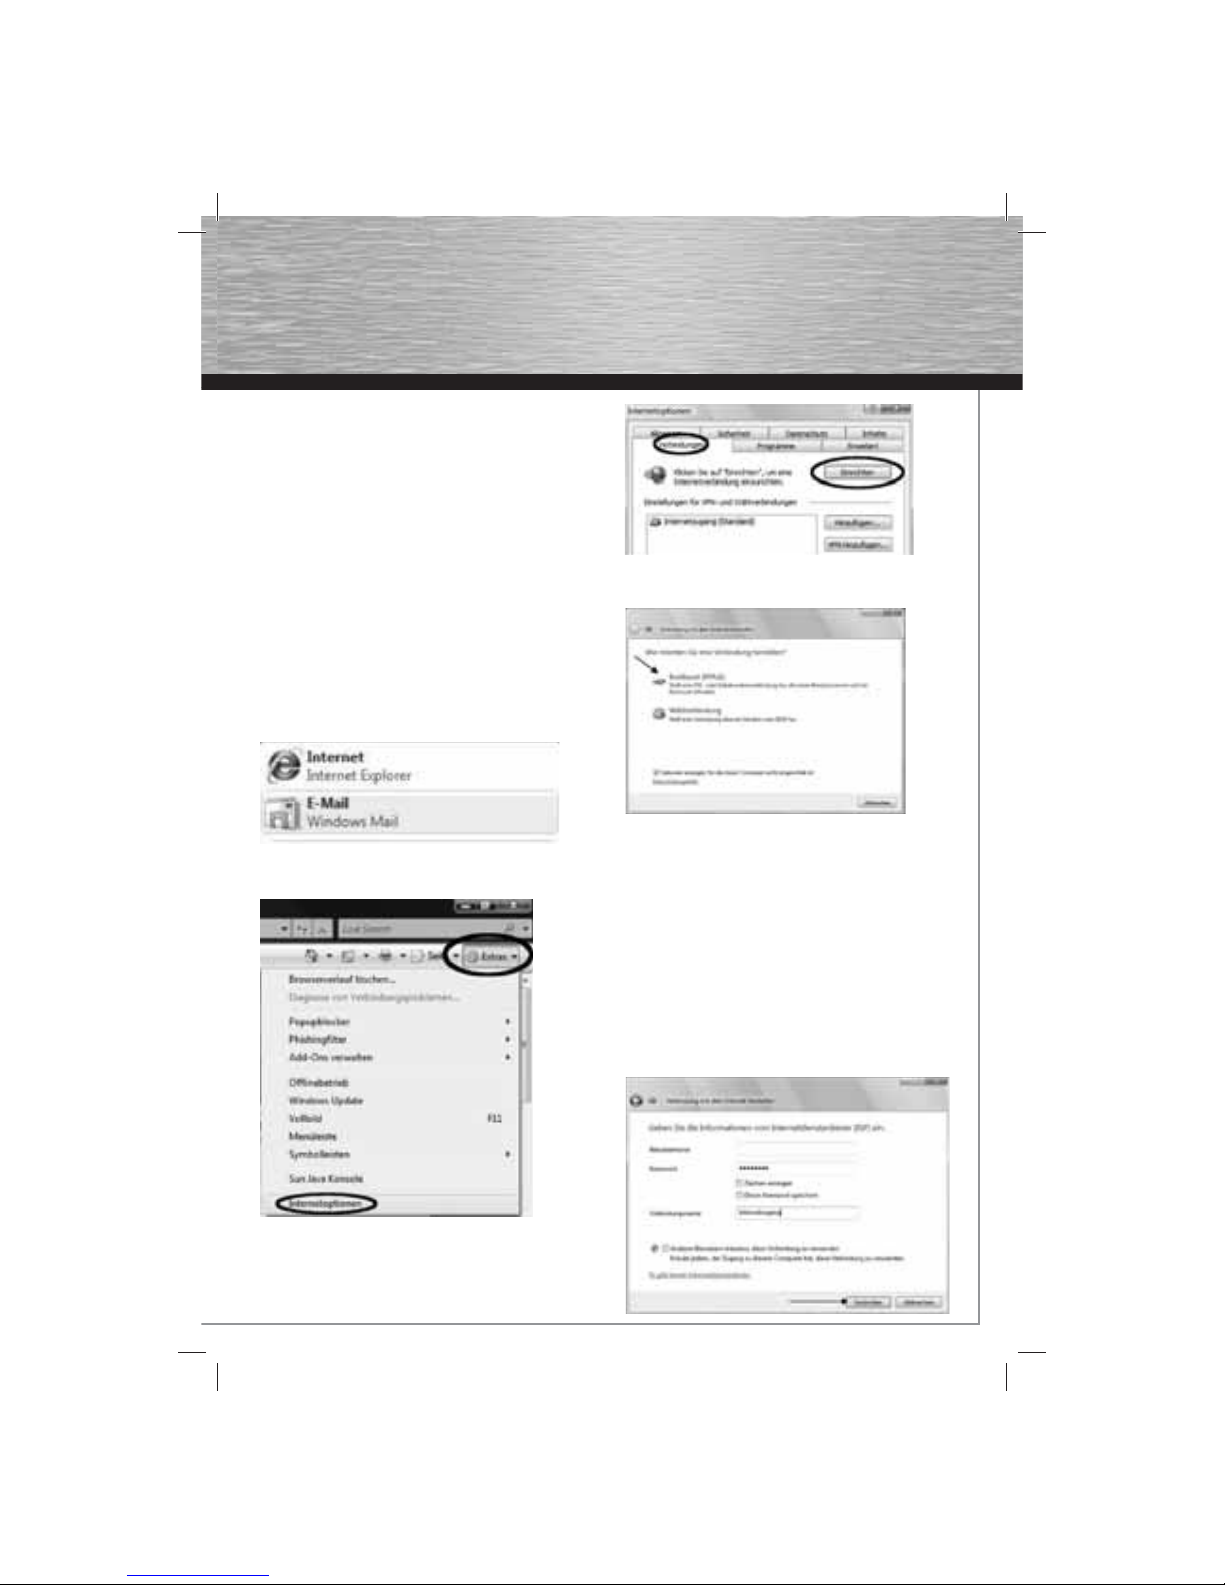
Internet Explorer starten
Starten Sie bitte den Internet Explorer, indem Sie auf Start und
dann auf Internet klicken.
Internetoptionen im Internet Explorer aufrufen
Nach dem Öffnen des Internet Explorers klicken Sie bitte auf
Extras und dann auf Internetoptionen. (Siehe Screenshot)
Verbindungen in Internetoptionen:
Wählen Sie im Fenster „Internetoptionen“ den Reiter
„Verbindungen“ aus und klicken anschließend auf die
Schaltfl äche „Einrichten“.
Verbindung konfi gurieren:
Zur Einrichtung einer DSL-Verbindung klicken Sie bitte auf
Breitband (PPPOE)
Zugangsdaten einrichten:
Tragen Sie bitte den Benutzernamen und das Kennwort für den
Internetzugang ein. Die entsprechenden Daten entnehmen Sie
bitte Ihrem Unterlagen des Internet Providers.
Hinweis für T-Online Kunden:
Der Benutzername besteht bei diesem Provider aus Ihrer
Anschlusskennung, T-Online Nummer und den Mitbenutzer
Suffi x. Diese 3 Zahlenkolonnen sind nacheinander ohne
Leerzeichen in das Feld Benutzername einzugeben, danach
muss noch ein @t-online.de angehängt werden.
Den Verbindungsnamen können Sie beliebig wählen.
Möchten Sie Ihr Kennwort speichern, markieren Sie bitte diese
Option.
Klicken Sie nach Ihren Eintragungen zur ersten Einwahl auf
Verbinden.
Page 9
8
d
Bedienungsanleitung
Mit dem Internet verbinden:
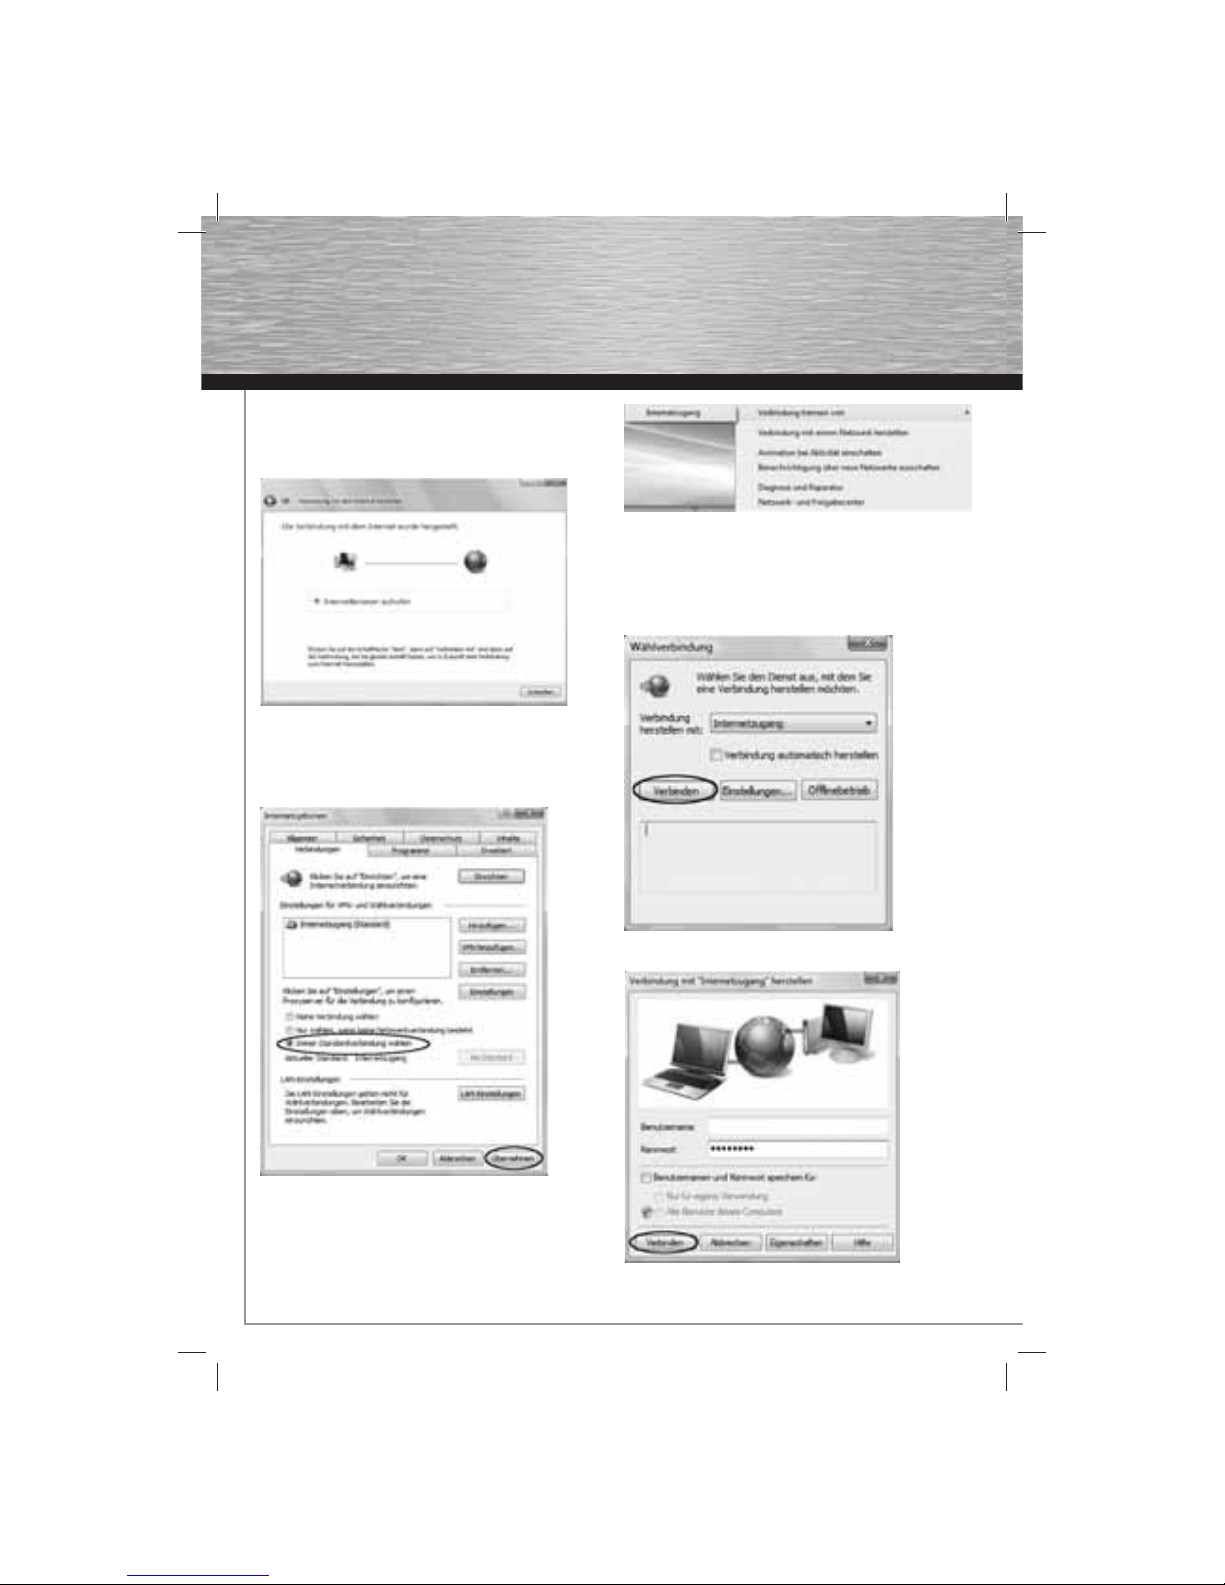
Wenn die erste Verbindung erfolgreich hergestellt wurde,
erhalten Sie diesen Hinweis. Klicken Sie dann zum Abschluss
der Konfi guration auf Schließen.
Einstellungen speichern:
Ihre eben eingerichtete Internetverbindung ist jetzt als
Standardverbindung eingerichtet. Speichern Sie bitte Ihre
Einstellungen abschließend mit Übernehmen und OK und
schließen den Internet Explorer.
Tipp: Die soeben hergestellte Internetverbindung ist jetzt noch
aktiv. Dies erkennen Sie an dem Globus-Symbol mit den beiden
Computerbildschirmen rechts unten in der Taskleiste:
Wenn Sie auf dieses Symbol mit der rechten Maustaste klicken,
können Sie die aktive Verbindung trennen.
Zukünftige Schritte zur Einwahl ins Internet
Wenn Sie die vorherigen Schritte durchgeführt haben, können
Sie Ihre Verbindung zum Internet mit dem Starten des Internet
Explorers herstellen.
Nach dem Start öffnet sich das Wählprogramm.
Klicken Sie bitte auf Verbinden
und in der folgenden Maske zur Einwahl erneut auf Verbinden.
Page 10

9
g
Operating Instruction
Tipp: Das erneute Anklicken von Verbinden können Sie sich
sparen, wenn Sie in dem ersten Fenster die Option Verbindung
automatisch herstellen auswählen.
Möchten Sie die Internet-Verbindung trennen, schließen Sie
einfach alle Internet Explorer Fenster
und Sie werden automatisch gefragt, ob Sie die Verbindung
trennen wollen.
Tipp: Ist die Verbindung getrennt, sehen Sie ein Hinweisschild
neben den beiden Computerbildschirmen rechts unten in der
Taskleiste:
Page 11

10
d
Bedienungsanleitung
Mac OS X 10.4.x Tiger :
Einrichten einer DSL-Verbindung ohne Provider Software unter OS X
Wichtiger Hinweis, wenn Sie einen Tarif gewählt haben, der
nach Zeit berechnet wird:
Trennen Sie nach dem Arbeiten im Internet immer die DSLVerbindung, wenn der Rechner danach noch eingeschaltet
bleibt. Wird der Computer nicht heruntergefahren und die
Breitbandverbindung ist noch aktiv, fallen weitere Kosten an.
Zur Einrichtung benötigen Sie Login und Passwort
(Zugangsdaten), die Sie in dem Unterlagen Ihres Internet
Providers erhalten haben.
Stellen Sie sicher, dass Sie sich in Mac OS X als Administrator angemeldet haben, also über alle notwendigen Rechte
verfügen.
Klicken Sie im Apfel-Menü oder im Dock auf
Systemeinstellungen und klicken Sie auf Netzwerk.
Netzwerkeinstellung:
Klicken Sie auf die Schaltfl äche „Assistent“ um fortzufahren.
Klicken Sie auf die Schaltfl äche „Assistent“ um fortzufahren.
Im nächsten Fenster können Sie einen Namen für die neue
Umgebung eingeben. Nach der Eingabe des Namens bsp. DSL
klicken Sie auf „Fortfahren“.
Wählen Sie im oben abgebildeten Fenster die Einstellung „Ich
verwende ein DSL-Modem“ und klicken anschließend auf
„Fortfahren“.
Page 12

11
g
Operating Instruction
Wählen Sie „Ich habe eine PPPoE-Verbindung“ aus und tragen
folgende Daten ein:
• Benutzername: Ihr Benutzername
• Kennwort: Ihr Passwort
• PPPoE-Dienstname: (optional)
Hinweis für T-Online Kunden:
Der Benutzername besteht bei diesem Provider aus Ihrer Anschlusskennung, T-Online Nummer und den Mitbenutzer Suffi x.
Diese 3 Zahlenkolonnen sind nacheinander ohne Leerzeichen in
das Feld Benutzername einzugeben, danach muss noch ein
@t-online.de angehängt werden.
Klicken Sie nun auf Fortfahren und folgen Sie den weiteren
Anweisungen des Assistenten.
Zur Überprüfung öffnen Sie nochmals die Systemsteuerung und
wählen die Option Netzwerk aus:
Überprüfen Sie im Reiter PPPoE, dass folgende Eigenschaften
aktiviert wurden.
• PPPoE verwenden
• PPPoE-Status in der Menuleiste anzeigen
Klicken Sie auf PPPoE-Optionen und aktivieren Sie bei Bedarf
unter Verbindungsoptionen folgende Optionen:
o Bei Bedarf automatisch verbinden
o Alle ... Minuten nachfragen um die Verbindung aufrecht zu
erhalten. Die Minutenzahl können sie individuell einstellen.
o Verbindung trennen, falls sie ... Minuten nicht verwendet
wurde. Die Minutenzahl können Sie auch hier individuell
einstellen.
o Beim Abmelden des Benutzers die Verbindung automatisch
trennen.
o Unter Weitere Optionen werden beide Kästchen deaktiviert.
Klicken Sie auf Jetzt anwenden, um die Einstellungen zu
speichern.
Internet Verbindung herstellen oder trennen:
Sie können nun die Internet Verbindung über das PPPoE-Symbol
in der Menüleiste oben rechts herstellen und trennen.
(siehe Abbildung)
Page 13

12
d
Bedienungsanleitung
Mac OS X 10.5.x Leopard / 10.6.x Snow Leopard
Einrichten einer DFÜ-Verbindung ohne Provider Software unter
OS X
Wichtiger Hinweis, wenn Sie einen Tarif gewählt haben, der
nach Zeit berechnet wird:
Trennen Sie nach dem Arbeiten im Internet immer die DFÜVerbindung, wenn der Rechner danach noch eingeschaltet
bleibt. Wird der Computer nicht heruntergefahren und die
Breitbandverbindung ist noch aktiv, fallen weitere Kosten an.
Zur Einrichtung benötigen Sie Login und Passwort
(Zugangsdaten), die Sie in dem Unterlagen Ihres Internet
Providers erhalten haben.
Stellen Sie sicher, dass Sie sich in Mac OS X als
Administrator angemeldet haben, also über alle notwendigen
Rechte verfügen.
Klicken Sie im Apfel-Menü oder im Dock auf
Systemeinstellungen und klicken Sie auf Netzwerk.
Klicken Sie auf die Schaltfl äche Assistent, um den Mac OS X
Netzwerkassistenten zu starten.
Im nächsten Fenster werden Sie gefragt, „Benötigen Sie
Hilfe beim Einrichten einer neuen Netzwerkverbindung oder
bei einer Lösung eines Netzwerkproblems?“ und klicken Sie
nochmals auf die Schaltfl äche Assistent.
Geben Sie nun einen neuen Umgebungsnamen ein, z.B. DSL und
klicken auf „Fortfahren“.
Wählen Sie im darauffolgenden Schritt die Option
„Ich verwende ein DSL-Modem“ und klicken auf „Fortfahren“.
Page 14

13
g
Operating Instruction
Stellen Sie sicher, das Sie das Hama ADSL2+ Modem mit Strom
versorgen und eine korrekte Netzwerkverbindung mit Ihrem
Mac besteht. Klicken Sie nun auf „Fortfahren“.
Wählen Sie zuerst die Option „Ich habe eine PPPoE-
Verbindung“ aus. Nehmen Sie nun Ihre Unterlagen Ihres
Internet Providers zur Hand, um die benötigten Eingaben
vorzunehmen:
Benutzername: Geben Sie dort ihren Benutzernamen
an, welchen Sie von Ihren Anbieter
zugewiesen bekommen haben.
Kennwort: Geben Sie hier das Kennwort ein.
Kennwort (Bestätigen): Um Tippfehler zu vermeiden, geben Sie
nochmals das Kennwort ein.
Hinweis für T-Online Kunden:
Der Benutzername besteht bei diesem Provider aus Ihrer
Anschlusskennung, T-Online Nummer und den Mitbenutzer
Suffi x. Diese 3 Zahlenkolonnen sind nacheinander ohne
Leerzeichen in das Feld Benutzername einzugeben, danach
muss noch ein @t-online.de angehängt werden.
Nach Eingabe aller notwendigen Daten klicken Sie auf
„Fortfahren“.
Wurden die Eingaben im vorherigen Menu korrekt eingegeben,
dann erhalten Sie nach kurzer Zeit den oben abgebildeten
Hinweis „Sie wurde erfolgreich mit dem Internet verbunden“.
Klicken Sie danach auf „Fortsetzen“. Das Fenster mit der
Beschriftung Netzwerk können Sie dann auch schließen.
Zu diesem Zeitpunkt besteht bereits eine Verbindung mit dem
Internet.
Trennen der Internetverbindung:
Wollen Sie die Internet Verbindung trennen, klicken Sie auf
Ihrem Desktop (wie oben abgebildet) auf die Option
„Verbindung zu „PPPoE-Dienst“ trennen“.
Herstellen der Internetverbindung:
Zum Herstellern der Internetverbindung klicken Sie auf das
farblich hervorgehobene Icon und anschließend auf die Option
„Mit PPPoE-Dienst verbinden“.
Page 15

14
Setting up DSL Access for Windows 2000:
Important note if, you have selected a time-based payment plan:
When you fi nish using the Internet, always disconnect the DSL
connection if you do not switch off the computer afterwards. If
the computer is not shut down and the broadband connection
remains active, further costs are incurred. If the Hama ADSL2+
Modem is not used for extended periods, we recommend that
you disconnect it from the power.
The following guide describes how to use DSL to connect to
the Internet through your Internet provider under Windows 2000.
We assume that
• You are authorised as the administrator of the computer.
• You have correctly installed a network card in your system.
• Your DSL port is enabled.
• The network wiring is fault-free.
• You have received the access information from your Internet
provider.
Preparation:
Windows 2000 does not natively support Internet connections
via network cards.
There are external programs that provide this service (PPPoE)
This document is based on the program RASPPPoE by Robert
Schlabbach. It is available on the Internet at:
www.raspppoe.com. Please extract the fi les using archiving
software such as WinZIP.
Opening the properties for My Network Places:
Right-click My Network Places.
This is generally displayed on the Desktop or can be accessed
via Start -> Settings -> Network and Dialup Connections.
Select Properties from the context menu (see screenshot).
Opening the properties for Local Area Connection:
Right-click Local Area Connection. It should be shown in
“Network and Dialup Connections”.
If this is not the case, your network card has not been installed
correctly. Check the installation or re-install your network card.
Select Properties again from the context menu (see
screenshot).
Installing a new network protocol:
You are now in “Local Area Connection Properties”.
This allows you to confi gure your network card and various
other network settings, among other things.
Click the Install button as shown in the screenshot below.
g Operating instruction
Page 16

15
g
Operating Instruction
Selecting the type of network component:
In order to make your network card ready for DSL, the PPPoE
network protocol must be installed.
Select Protocol and then click “Add”.
Selecting the network protocol:
Windows 2000 does not contain a protocol for DSL by default.
Click the “Have Disk...” button to add the RASPPPoE protocol
that you downloaded earlier.
Specifying the target folder/fi le:
Select the folder where you extracted the *.zip fi le that you
downloaded at the beginning.
Click Open. Windows automatically selects the correct fi le
(RASPPPOE.INF).
Selecting the network protocol:
Select the PPP over Ethernet Protocol and click “OK”.
Confi rming the digital signature:
Windows 2000 uses a digital signature for drivers, protocols and
various other software.
As this protocol does not have a digital signature, the following
message is displayed. Click “Yes” to continue.
After you install the PPP over Ethernet Protocol, restart your
computer.
Running the fi le:
After you restart your computer, go to the folder where you
previously extracted downloaded fi le RASPPPoE.inf.
Run RASPPPoE.exe.
Page 17

16
d
Bedienungsanleitung
Creating a dialup connection for the network card:
The program has started. The network card for which the dialup
connection is to be set up should be displayed under the line
labelled “Query available PPP over Ethernet Services through
Adapter:”.
If no network card is displayed, there is a problem. Install
the drivers for your network card again and repeat the DSL
installation process.
Next, choose Create a Dial-Up Connection for the selected
Adapter and click “Exit” to close the program.
Customising the shortcut on the desktop:
If the program was installed correctly, there is a DSL shortcut
(see left part of screenshot) on the Windows desktop.
Press F2 or right-click the fi le and choose “Rename” to change
the name of the fi le to Internet Connection, for example
(see right part of the screenshot). Double-click it to open the
connection.
Connecting to the Internet:
Enter your user name and your password. You received this
information from your Internet provider.
Note for T-Online customers: The user name for this provider
consists of your connection ID, T-Online number and the user
suffi x. You must enter these three columns of numbers
consecutively without spaces in the user name fi eld and
add @t-online.de at the end.
Activate the “Save password” option if you do not want to have
to enter your password again every time you connect to the
Internet. Click the “Dial” button to start the dialup process.
The DSL connection process begins as soon as you click “Dial”.
You should be connected within a few seconds.
If the window remains unchanged for an extended period, you
may have entered the user name or password incorrectly. Wait
until the connection attempt is terminated, correct your access
data and try to connect again.
If unexpected problems occur, call your provider’s hotline.
Connection successful
If everything goes according to plan, two fl ashing computers
appear at the bottom right in the taskbar notifi cation area,
which confi rm and indicate an active/existing Internet
connection.
Disconnecting:
The easiest way to disconnect from the Internet is to use the
status menu mentioned above: Right-click the connection icon
in the taskbar and select Disconnect from the status
menu. The connection is now closed. The connection icon
is no longer displayed in the taskbar.
Page 18

17
g
Operating Instruction
Setting up DSL Access for Windows XP/XP x64:
Important note if you have selected a time-based payment plan:
When you fi nish using the Internet, always disconnect the DSL
connection if you do not switch off the computer afterwards. If
the computer is not shut down and the broadband connection
remains active, further costs are incurred. If the Hama ADSL2+
Modem is not used for extended periods, we recommend that
you disconnect it from the power.
The following guide describes how to use DSL to connect to the
Internet through your internet provider under
Windows XP/ XP x64.
We assume that
• You are authorised as the administrator of the computer.
• You have correctly installed a network card in your system.
• Your DSL port is enabled.
• The network wiring is fault-free.
• You have received the access information from your Internet
provider.
Changing the network connection:
Right-click the My Network Places icon on the desktop or under
Start -> Control Panel -> Network and Internet Connection ->
Network Connections.
The Network Connections window is then opened:
Installing the network protocol:
Click the LAN connection symbol with the right mouse button.
Select the properties option in the context menu afterwards:
Ensure that the Internet Protocol (TCP/IP) is installed.
The network card should not be bound to the TCP/IP protocol:
None of the network components is checked.
Binding to TCP/IP only results in wait times when booting and
even surfi ng.
However, it is necessary if the network card is to be used for
other purposes e.g. network, use of a DSL router, etc.
Now everything is ready for connecting to the Internet.
Close the window.
Starting the New Connection Wizard:
Choose “Create a new connection” from under Network Tasks
in the Network Connections window and choose “Next”.
Confi rm the selection “Connect to the Internet” by clicking
“Next”.
Page 19

18
d
Bedienungsanleitung
Setting up the connection manually:
Select Set up my connection manually and then “Next” in the
following dialog box.
Choosing the type of connection:
Select “Connect using a broadband connection that requires a
user name and password” and then click “Next”.
Naming the DSL connection
In the next step, you will be prompted to enter a new name for
the DSL connection. Enter a name of your choice and then click
“Next”.
Completing installation and connecting:
This dialog box is used to enter the access data you received
from your Internet provider.
Note for T-Online customers:
The user name for this provider consists of your connection ID,
T-Online number and the user suffi x. You must enter these three
columns of numbers consecutively without spaces in the user
name fi eld and add @t-online.de at the end.
If required, you can check Turn on Internet Connection Firewall
for this connection.
Then click “Next”.
Creating a shortcut:
In the next step, you are asked whether you want a shortcut to
the DSL connection on the desktop. After this, click the “Finish”
button.
This icon can be found on your desktop or under Start ->
Connect with.
When you click it, the connection window opens, where you
can connect to the Internet by clicking Connect.
This completes the installation and confi guration of dialup DSL
for Windows XP.
Disconnecting
Right-click the connection icon in the taskbar and select
Disconnect from the status menu.The connection is now closed.
The connection icon is no longer displayed in the taskbar.
Page 20

19
g
Operating Instruction
Setting up DSL Access for Windows Vista or Windows 7:
Important note if you have selected a time-based payment plan:
When you fi nish using the Internet, always disconnect the DSL
connection if you do not switch off the computer afterwards. If
the computer is not shut down and the broadband connection
remains active, further costs are incurred. If the Hama ADSL2+
Modem is not used for extended periods, we recommend that
you disconnect it from the power.
You can confi gure an Internet connection with a few short steps
in Microsoft Vista. You do not need additional software or drivers from your Internet provider for confi guration. Please have
the connection data you received by mail from your Internet
provider at hand when confi guring your connection.
To confi gure the connection, please perform the following steps:
Starting Internet Explorer
Click Start and then Internet to start Internet Explorer.
Opening Internet Options in Internet Explorer
After opening Internet Explorer, click Tools and then Internet
Options (see screenshot).
Connections in Internet Options:
In the “Internet Options” window, select the “Connections” tab
and then click the “Setup” button.
Confi guring the connection:
Click Broadband (PPPOE) to confi gure a DSL connection.
Confi guring access data:
Enter the user name and the password for Internet access.
Please see the documents you received from your Internet
provider for the corresponding information.
Note for T-Online customers:
The user name for this provider consists of your connection ID,
T-Online number and the user suffi x. You must enter these three
columns of numbers consecutively without spaces in the user
name fi eld and add @t-online.de at the end.
You can select any connection name you like.
Select the “Remember this password” option if you want to
save your password.
After you make your entries, click Connect to dial up for the fi rst
time.
Page 21

20
d
Bedienungsanleitung
Connecting to the Internet:
When you connect to the Internet successfully for the fi rst time,
the following message is displayed. To fi nish confi guration, click
Close.
Saving settings:
The Internet connection you just confi gured has now been set
up as the default connection. Click Apply and OK to save your
settings and close Internet Explorer.
Tip: The Internet connection you just created is still active.
This is indicated by the globe icon with the two computer
screens at the bottom right in the task bar notifi cation area:
When you right-click this icon, you can close active connection,
by clicking on Disconnect from –> Broadband Conncection
button.
Steps for connecting to the Internet in the future
When you have completed the previous steps, you can connect
to the Internet by starting Internet Explorer.
The dialup program opens after you start Internet Explorer.
Click Connect
and click Connect again on the following screen.
Page 22

21
g
Operating Instruction
Tip: If you select the Connect automatically option in the fi rst
window, you do not have to click Connect.
To close the Internet connection, simply close all Internet
Explorer windows
and you are automatically asked whether you want to close the
connection.
Tip: When the connection has been closed, a message is shown
at the bottom right in the taskbar notifi cation area beside the
two computer screens:
Page 23

22
d
Bedienungsanleitung
Mac OS X 10.4.x Tiger :
Setting up a DSL connection without provider software for OS X
Important note if you have selected a time-based payment plan:
When you fi nish using the Internet, always disconnect the DSL
connection if you do not switch off the computer afterwards. If
the computer is not shut down and the broadband connection
remains active, further costs are incurred.
To confi gure the connection, you need a login and password
(access data) which are stated in the documents you received
from your Internet provider.
Ensure that you are logged in as the administrator in Mac OS X
and have all rights required.
Click System Preferences in the Apple menu or the Dock and
click Network.
Network confi guration:
Click the “Assist me...” button to continue.
Click the “Assistant...” button to continue.
In the next window, you can enter a name for the new location.
After you enter the name, e.g. DSL, click “Continue”.
In the window shown above, select “I use a DSL modem to
connect to the internet” and then click “Continue”.
Page 24

23
g
Operating Instruction
Select “I am connecting via PPPoE” and enter the following
data:
• Account Name: Your username
• Password: Your password
• PPPoE service name: (Optional)
Note for T-Online customers:
The user name for this provider consists of your connection
ID, T-Online number and the user suffi x. You must enter these
three columns of numbers consecutively without spaces in the
Account Name fi eld and add @t-online.de at the end.
Click Continue and follow the remaining instructions of the
assistant.
To check your settings, open System Preferences again and
select the Network option:
Check that the following properties are activated on the PPPoE
tab.
• Use PPPoE
• Show PPPoE status in the menu bar
Click PPPoE Options and activate the following options under
Session Options.
o Connection automatically when stating TCP/IP applications
o Prompt every ... minutes to maintain connection You can set
the number of minutes individually.
o Disconnect if idle for ... minutes. You can set the number of
minutes individually here too.
o Disconnect when user logs out.
o Both boxes can be deactivated under Advanced Options.
Click Apply Now to save the settings.
Connecting to the Internet or disconnecting:
You can connect to and disconnect from the Internet using the
PPPoE icon in the menu bar at the top right. (see screenshot)
Page 25

24
d
Bedienungsanleitung
Mac OS X 10.5.x Leopard / Mac OS X 10.6.x Snow Leopard
Setting up a dialup connection without provider software for
OS X
Important note if you have selected a time-based payment plan:
When you fi nish using the Internet, always disconnect the
dialup connection if you do not switch off the computer
afterwards. If the computer is not shut down and the broadband
connection remains active, further costs are incurred.
To confi gure the connection, you need a login and password
(access data) which are stated in the documents you received
from your Internet provider.
Ensure that you are logged in as the administrator in Mac OS X
and have all rights required.
Click System Preferences in the Apple menu or the Dock and
click Network.
Click the Assist me... button to start the Mac OS X Network
Assistant
In the next window, you are asked. Do you need assistance
setting up a new network connection or solving a network
problem? Click the Assistant button.
Enter a new location name, e.g. DSL and click “Continue”.
In the next step, select the I use a DSL Modem to connect to the
Internet option and click “Continue”.
Page 26

25
g
Operating Instruction
Ensure that the Hama ADSL2+ Modem is connected to the
power and the network connection to your Mac is OK.
Click “Continue”.
First, select “I am connecting via PPPoE”.
Consult the documents you received from your Internet provider
to make the required entries:
User name: Enter the user name you were assigned by your
provider.
Password: Enter the password here.
Password (confi rmation): Enter the password again to avoid
typing errors.
Note for T-Online customers:
The user name for this provider consists of your connection ID,
T-Online number and the user suffi x. You must enter these three
columns of numbers consecutively without spaces in the user
name fi eld and add @t-online.de at the end.
When you have entered all required data, click “Continue”.
If the entries on the previous screen were correct, the message
shown above is displayed: You have successfully connected to
the Internet. Then click “Done”.
You can then close the Network window.
You are now already connected to the Internet.
Disconnecting from the Internet:
To disconnect from the Internet, click the Disconnect PPPoE
service option on your desktop (as shown above)
Connecting to the Internet:
To connect to the Internet, click the icon highlighted in colour
and then click Connect PPPoE service.
Page 27

26
d Hinweis zum Umweltschutz:
Ab dem Zeitpunkt der Umsetzung der europäischen Richtlinien 2002/96/EG und 2006/66/EG in nationales Recht gilt folgendes:
Elektrische und elektronische Geräte sowie Batterien dürfen nicht mit dem Hausmüll entsorgt werden. Der Verbraucher ist gesetzlich verpfl ichtet,
elektrische und elektronische Geräte sowie Batterien am Ende ihrer Lebensdauer an den dafür eingerichteten, öffentlichen Sammelstellen oder an
die Verkaufsstelle zurückzugeben. Einzelheiten dazu regelt das jeweilige Landesrecht. Das Symbol auf dem Produkt, der Gebrauchsanleitung oder
der Verpackung weist auf diese Bestimmungen hin. Mit der Wiederverwertung, der stoffl ichen Verwertung oder anderen Formen der Verwertung von
Altgeräten/Batterien leisten Sie einen wichtigen Beitrag zum Schutz unserer Umwelt.
g Note on environmental protection:
After the implementation of the European Directive 2002/96/EU and 2006/66/EU in the national legal system, the following applies:
Electric and electronic devices as well as batteries must not be disposed of with household waste. Consumers are obliged by law to return electrical and
electronic devices as well as batteries at the end of their service lives to the public collecting points set up for this purpose or point of sale. Details to this
are defi ned by the national law of the respective country.
This symbol on the product, the instruction manual or the package indicates that a product is subject to these regulations.
By recycling, reusing the materials or other forms of utilising old devices/Batteries, you are making an important contribution to protecting our
environment.
f Remarques concernant la protection de l’environnement:
Conformément à la directive européenne 2002/96/CE et 2006/66/CE, et afi n d'atteindre un certain nombre d'objectifs en matière de protection de
l'environnement, les règles suivantes doivent être appliquées:
Les appareils électriques et électroniques ainsi que les batteries ne doivent pas être éliminés avec les déchets ménagers. Le pictogramme “picto”
présent sur le produit, son manuel d'utilisation ou son emballage indique que le produit est soumis à cette réglementation. Le consommateur doit
retourner le produit/la batterie usager aux points de collecte prévus à cet effet. Il peut aussi le remettre à un revendeur. En permettant enfi n le recyclage
des produits ainsi que les batteries, le consommateur contribuera à la protection de notre environnement. C'est un acte écologique.
e Nota sobre la protección medioambiental:
Después de la puesta en marcha de la directiva Europea 2002/96/EU y 2006/66/EU en el sistema legislativo nacional, se aplicara lo siguiente:
Los aparatos eléctricos y electrónicos, así como las baterías, no se deben evacuar en la basura doméstica. El usuario está legalmente obligado a llevar
los aparatos eléctricos y electrónicos, así como pilas y pilas recargables, al fi nal de su vida útil a los puntos de recogida comunales o a devolverlos al
lugar donde los adquirió. Los detalles quedaran defi nidos por la ley de cada país. El símbolo en el producto, en las instrucciones de uso o en el embalaje
hace referencia a ello. Gracias al reciclaje, al reciclaje del material o a otras formas de reciclaje de aparatos/pilas usados, contribuye Usted de forma
importante a la protección de nuestro medio ambiente.
o Notitie aangaande de bescherming van het milieu:
Ten gevolge van de invoering van de Europese Richtlijn 2002/96/EU en 2006/66/EU in het nationaal juridisch system, is het volgende van toepassing:
Elektrische en elektronische apparatuur, zoals batterijen mag niet met het huisvuil weggegooid worden. Consumenten zijn wettelijk verplicht om
electrische en elctronische apparaten zoals batterijen op het einde van gebruik in te dienen bij openbare verzamelplaatsen speciaal opgezet voor dit
doeleinde of bij een verkooppunt. Verdere specifi caties aangaande dit onderwerp zijn omschreven door de nationale wet van het betreffende land. Dit
symbool op het product, de gebruiksaanwijzing of de verpakking duidt erop dat het product onderworpen is aan deze richtlijnen. Door te recycleren,
hergebruiken van materialen of andere vormen van hergebruiken van oude toestellen/batterijen, levert u een grote bijdrage aan de bescherming van het
mileu.
i Informazioni per protezione ambientale:
Dopo l’implementazione della Direttiva Europea 2002/96/EU e 2006/66/EU nel sistema legale nazionale, ci sono le seguenti applicazioni:
Le apparecchiature elettriche ed elettroniche e le batterie non devono essere smaltite con i rifi uti domestici. I consumatori sono obbligati dalla legge
a restituire I dispositivi elettrici ed elettronici e le batterie alla fi ne della loro vita utile ai punti di raccolta pubblici preposti per questo scopo o nei punti
vendita. Dettagli di quanto riportato sono defi niti dalle leggi nazionali di ogni stato. Questo simbolo sul prodotto, sul manuale d’istruzioni o sull’imballo
indicano che questo prodotto è soggetto a queste regole. Riciclando, ri-utilizzando i materiali o utilizzando sotto altra forma i vecchi prodotti/le batterie,
darete un importante contributo alla protezione dell’ambiente.
k
Υπόδειξη σχετικά με την προστασία περιβάλλοντος:
Από τη στιγµή που η Ευρωπαϊκή Οδηγία 2002/96/EΕ και 2006/66/EE ενσωµατώνεται στο εθνικό δίκαιο ισχύουν τα εξής:
Οι ηλεκτρικές και οι ηλεκτρονικές συσκευές καθώς και οι µπαταρίες δεν επιτρέπεται να πετιούνται στα οικιακά απορρίµµατα. Οι καταναλωτές υποχρεούνται από
τον νόµο να επιστρέφουν τις ηλεκτρικές και ηλεκτρονικές συσκευές καθώς και τις µπαταρίες στο τέλος της ζωής τους στα δηµόσια σηµεία περισυλλογής που
έχουν δηµιουργηθεί γι’ αυτό το σκοπό ή στα σηµεία πώλησης. Οι λεπτοµέρειες ρυθµίζονται στη σχετική νοµοθεσία. Το σύµβολο πάνω στο προϊόν, στο εγχειρίδιο
χρήσης ή στη συσκευασία παραπέµπει σε αυτές τις διατάξεις. Με την ανακύκλωση, επαναχρησιµοποίηση των υλικών ή µε άλλες µορφές χρησιµοποίησης
παλιών συσκευών / Μπαταριών συνεισφέρετε σηµαντικά στην προστασία του περιβάλλοντος. Στη Γερµανία ισχύουν αντίστοιχα οι παραπάνω κανόνες απόρριψης
σύµφωνα µε τον κανονισµό για µπαταρίες και συσσωρευτές.
s Not om miljöskydd:
Efter implementeringen av EU direktiv 2002/96/EU och 2006/66/EU i den nationella lagstiftningen, gäller följande:
Elektriska och elektroniska apparater samt batterier får inte kastas i hushållssoporna. Konsumenter är skyldiga att återlämna elektriska och elektroniska
apparater samt batterier vid slutet av dess livslängd till, för detta ändamål, offentliga uppsamlingsplatser. Detaljer för detta defi nieras via den nationella
lagstiftningen i respektive land. Denna symbol på produkten, instruktionsmanualen eller på förpackningen indikerar att produkten innefattas av denna
bestämmelse. Genom återvinning och återanvändning av material/batterier bidrar du till att skydda miljön och din omgivning.
m Ympäristönsuojelua koskeva ohje:
Siitä lähtien, kun Euroopan unionin direktiivi 2002/96/EU ja 2006/66/EU otetaan käyttöön kansallisessa lainsäädännössä, pätevät seuraavat määräykset:
Sähkö- ja elektroniikkalaitteita ja paristoja ei saa hävittää talousjätteen mukana. Kuluttajalla on lain mukaan velvollisuus toimittaa sähkö- ja
elektroniikkalaitteet niiden käyttöiän päätyttyä niille varattuihin julkisiin keräyspisteisiin tai palauttaa ne myyntipaikkaan. Tähän liittyvistä yksityiskohdista
säädetään kulloisenkin osavaltion laissa. Näistä määräyksistä mainitaan myös tuotteen symbolissa, käyttöohjeessa tai pakkauksessa. Uudelleenkäytöllä,
materiaalien/paristoja uudelleenkäytöllä tai muilla vanhojen laitteiden uudelleenkäyttötavoilla on tärkeä vaikutus yhteisen ympäristömme suojelussa.
Page 28

27
q
Wskazówki dotyczące ochrony środowiska:
Od czasu wprowadzenia europejskiej dyrektywy 2002/96/EU i 2006/66/EU do prawa narodowego obowiązują następujące ustalenia:
Urządzeń elektrycznych, elektronicznych oraz baterii jednorazowych nie należy wyrzucać razem z codziennymi odpadami domowymi! Użytkownik
zobowiązany prawnie do odniesienia zepsutych, zniszczonych lub niepotrzebnych urządzeń elektrycznych i elektronicznych do punktu zbiórki lub do
sprzedawcy. Szczegółowe kwestie regulują przepisy prawne danego kraju. Informuje o tym symbol przekreślonego kosza umieszczony na opakowaniu.
Segregując odpady pomagasz chronić środowisko!
h
Környezetvédelmi tudnivalók:
Az európai irányelvek 2002/96/EU és 2006/66/EU ajánlása szerint, a megjelölt időponttól kezdve, minden EU-s tagállamban érvényesek a következők:
Az elektromos és elektronikai készülékeket és az elemeket nem szabad a háztartási szemétbe dobni! A leselejtezett elektromos és elektronikus készülékeket
és elemeket, akkumulátorokat nem szabad a háztartási szemétbe dobni. Az elhasznált és működésképtelen elektromos és elektronikus készülékek gyűjtésére
törvényi előírás kötelez mindenkit, ezért azokat el kell szállítani egy kijelölt gyűjtő helyre vagy visszavinni a vásárlás helyére. A termék csomagolásán
feltüntetett szimbólum egyértelmű jelzést ad erre vonatkozóan a felhasználónak. A régi készülékek begyűjtése, visszaváltása vagy bármilyen formában
történő újra hasznosítása közös hozzájárulás környezetünk védelméhez.
c
Ochrana životního prostředí:
Evropská směrnice 2002/96/EG a 2006/66/EU ustanovujete následující:
Elektrická a elektronická zařízení stejně jako baterie nepatří do domovního odpadu. Spotřebitel se zavazuje odevzdat všechna zařízení a baterie po uplynutí
jejich životnosti do příslušných sběren. Podrobnosti stanoví zákon příšlušné země. Symbol na produktu, návod k obsluze nebo balení na toto poukazuje.
Recyklací a jinými způsoby zužitkování přispíváte k ochraně životního prostředí.
v
Ochrana životného prostredia:
Európska smernica 2002/96/EU a 2006/66/EU stanovuje:
Elektrické a elektronické zariadenia, rovnako ako batérie sa nesmú vyhadzovať do domáceho odpadu. Spotrebiteľ je zo zákona povinný zlikvidovať elektrické
a elektronické zariadenia, rovnako ako batérie na miesta k tomu určené. Symbolizuje to obrázok v návode na použitie, alebo na balení výrobku. Opätovným
zužitkovaním alebo inou formou recyklácie starých zariadení/batérií prispievate k ochrane životného prostredia.
p Nota em Protecção Ambiental:
Após a implementação da directiva comunitária 2002/96/EU e 2006/66/EU no sistema legal nacional, o seguinte aplica-se:
Os aparelhos eléctricos e electrónicos, bem como baterias, não podem ser eliminados juntamente com o lixo doméstico. Consumidores estão obrigados por
lei a colocar os aparelhos eléctricos e electrónicos, bem como baterias, sem uso em locais públicos específi cos para este efeito ou no ponto de venda. Os
detalhes para este processo são defi nidos por lei pelos respectivos países. Este símbolo no produto, o manual de instruções ou a embalagem indicam que o
produto está sujeito a estes regulamentos. Reciclando, reutilizando os materiais dos seus velhos aparelhos/baterias, esta a fazer uma enorme contribuição
para a protecção do ambiente.
u
Охрана окружающей среды:
С момента перехода национального законодательства на европейские нормативы 2002/96/EU и 2006/66/EU действительно следующее:
Электрические и электронные приборы, а также батареи запрещается утилизировать с обычным мусором. Потребитель, согласно закону, обязан
утилизировать электрические и электронные приборы, а также батареи и аккумуляторы после их использования в специально предназначенных
для этого пунктах сбора, либо в пунктах продажи. Детальная регламентация этих требований осуществляется соответствующим местным
законодательством. Необходимость соблюдения данных предписаний обозначается особым значком на изделии, инструкции по эксплуатации или
упаковке. При переработке, повторном использовании материалов или при другой форме утилизации бывших в употреблении приборов Вы помогаете
охране окружающей среды. В соответствии с предписаниями по обращению с батареями, в Германии вышеназванные нормативы действуют для
утилизации батарей и аккумуляторов.
t
Çevre koruma uyarısı:
Avrupa Birliği Direktifi 2002/96/EU ve 2006/66/EU ulusal yasal uygulamalar için de geçerli olduğu tarihten itibaren:
Elektrikli ve elektronik cihazlarla piller normal evsel çöpe atılmamalıdır. Tüketiciler için, artık çalışmayan elektrikli ve elektronik cihazları piller, kamuya ait toplama
yerlerine götürme veya satın alındıkları yerlere geri verme yasal bir zorunluluktur. Bu konu ile ilgili ayrıntılar ulusal yasalarla düzenlenmektedir. Ürün üzerinde,
kullanma kılavuzunda veya ambalajda bulunan bu sembol tüketiciyi bu konuda uyarır. Eski cihazların geri kazanımı, yapıldıkları malzemelerin değerlendirilmesi veya
diğer değerlendirme şekilleri ile, çevre korumasına önemli bir katkıda bulunursunuz. Yukarıda adı geçen atık toplama kuralları Almanya’da piller ve aküler için de
geçerlidir.
r
Instrucţiuni pentru protecţia mediului înconjurător:
Din momentul aplicării directivelor europene 2002/96/UE în dreptul naţional sunt valabile următoarele:
Aparatele electrice şi electronice nu pot fi salubrizate cu gunoiul menajer. Consumatorul este obigat conform legii să predea aparatele electrice și electronice la
sfârșitul duratei de utilizare la locurile de colectare publice sau înapoi de unde au fost cumpărate. Detaliile sunt reglementate de către legislaţia ţării respective.
Simbolul de pe produs, în instrucţiunile de utilizare sau pe ambalaj indică aceste reglementări. Prin reciclarea, revalorificarea materialelor sau alte forme de
valorificare a aparatelor scoase din uz aduceţi o contribuţie importată la protecţia mediului nostru înconjurător.
j Anvisninger til beskyttelse af miljøet:
Fra og med indførelsen af EU-direktiverne 2002/96/EF og 2006/66/EF i national ret gælder følgende:
Elektrisk og elektronisk udstyr samt batterier må ikke bortskaffes sammen med almindeligt husholdningsaffald. Forbrugeren er lovmæssigt forpligtet
til at afl evere udtjent elektrisk og elektronisk udstyr samt batterier til dertil indrettede, offentlige indsamlingssteder eller til forhandleren. De nærmere
bestemmelser vedr. dette fastlægges af lovgivningen i det pågældende land. Symbolet på produktet, brugsvejledningen eller emballagen henviser til disse
bestemmelser. Ved genbrug, genvinding eller andre former for nyttiggørelse af udtjent udstyr/batterier giver du et vigtigt bidrag til beskyttelse af miljøet.
n Informasjon om beskyttelse av miljøet:
Fra tidspunktet for omsetning av de europeiske direktivene 2002/96/EF og 2006/66/EF i nasjonal rett gjelder følgende:
Elektriske og elektroniske apparater og batterier må ikke deponeres sammen med husholdningssøppelet. Forbrukeren er lovmessig forpliktet til å levere
elektriske og elektroniske apparater og batterier til de offentlige samlestedene eller tilbake til stedet hvor produktene ble kjøpt. Detaljer angående dette
reguleres av hvert land. Symbolet på produktet, bruksanvisningen eller emballasjen henviser om disse bestemmelsene. Med resirkulering, gjenbruk av
stoffer eller andre former av gjenbruk av gamle apparater/batterier bidrar du betydelig til å beskytte miljøet vårt.
 Loading...