

PO Box 80 · 86651 Monheim/Germany
Phone: +49 9091 502-0
Fax: +49 9091 502-458
hama@hama.de
http://www.hama.com
PHOTO
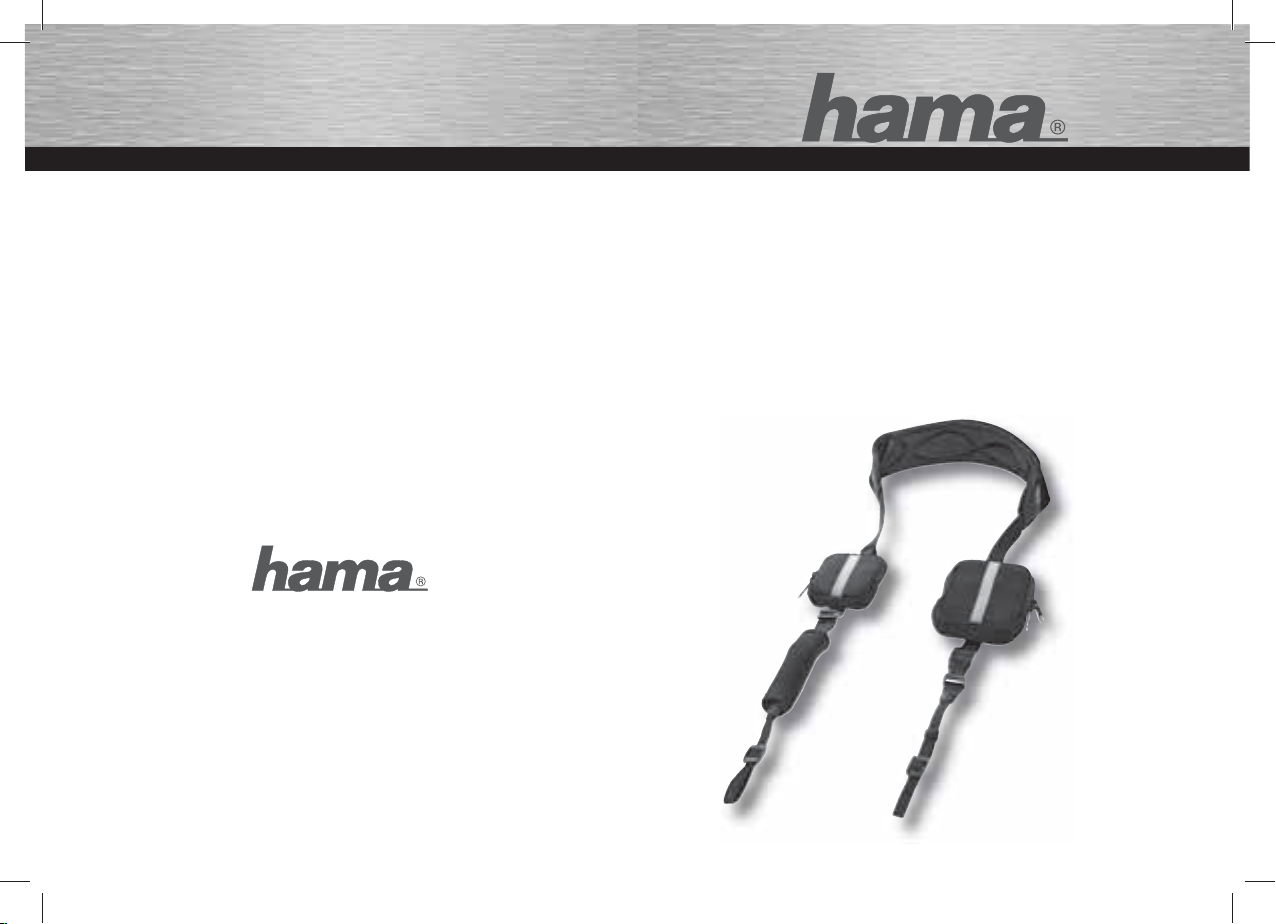
Kameragurt
»Pro I & II«
Camera Strap
Sangle d‘appareil photo
All listed brand s are trademark s of the corresponding compani es. Errors and omissions excepted,
and subject to technical changes. Our general terms of delivery and payment are applied.
00027505_00027506/04.07
00027505/6
d
Bedienungsanleitung
d
Bedienungsanleitung
Kameragurt »Pro I«
Camera Strap
Sangle d‘appareil photo
• Multifunktioneller Neoprengurt mit
abnehmbarer Zubehörtasche
• zur Kamera-Trageschlaufe umrüstbar
• zusätzlicher Karabiner am Gurt zur Sicherung
der Tasche oder für weiteres Zubehör
• Multi-functional neoprene strap with
detachable case for accessories
• Can be converted into a camera carrying loop
• Additional clip on the strap to secure the case
or for more accessories
• Sangle multifonctionnelle en néoprène à étui
d’accessoires amovible
• Adaptable à la dragonne d’appareils photo ;
• Mousquetons supplémentaires sur la sangle
pour sécuriser l’étui ou d’autres accessoires
2
Kameragurt »Pro II«
Camera Strap
Sangle d‘appareil photo
• Multifunktioneller Neoprengurt mit
abnehmbarer Foto und Zubehörtasche
• zur Kamera-Trageschlaufe umrüstbar
• zusätzlicher Karabiner am Gurt zur Sicherung
der Tasche oder für weiteres Zubehör
• Multi-functional neoprene strap with
detachable case for accessories and cameras
• Can be converted into a camera carrying loop
• Additional clip on the strap to secure the case
or for more accessories
• Sangle multifonctionnelle en néoprène à étui
d’accessoires et appareil photographique
amovible
• Adaptable à la dragonne d’appareils photo ;
• Mousquetons supplémentaires sur la sangle
pour sécuriser l’étui ou d’autres accessoires
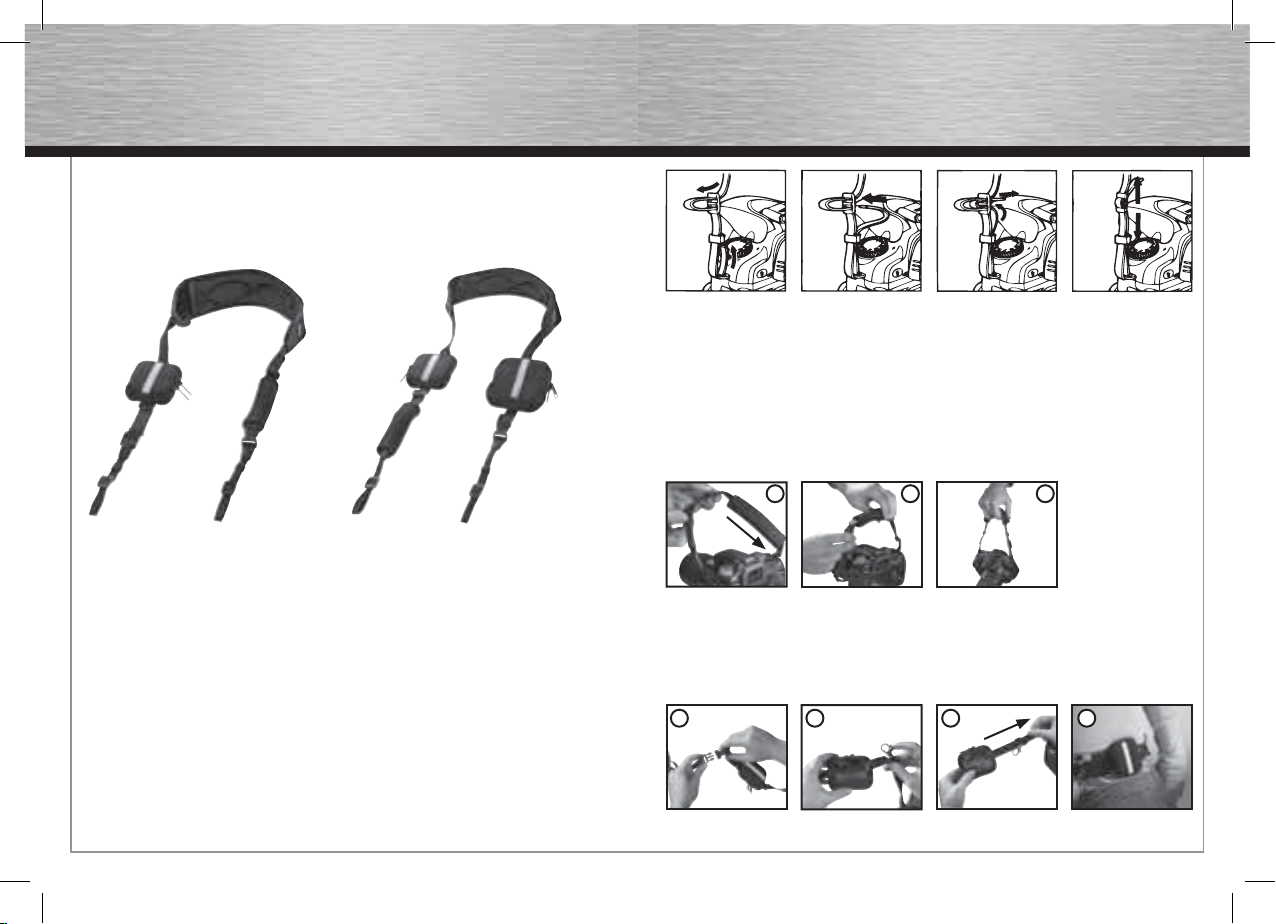
Kameragurt »Pro I & II«
Befestigen sie den Trageriemen wie in den Abbildungen (oben) gezeigt.
Umbau zur Trageschlaufe
• Kamera auf sicheren Untergrund abstellen.
• Tragepolster in Richtung Kameragehäuse positionieren (1)
• Beide Gurtenden am Schnellverschluß abnehmen (1)
• Verbleibende Gurtenden durch den Klickverschluss miteinander verbinden (2)
• Tragepolster mittig an der Trageschlaufe positionieren (2)
• Der Kameragurt kann nun als Trageschlaufe verwendet werden (3)
1 2 3
Umbau der Zubehörtasche(n) zur Gürteltasche
• Kamera auf sicheren Untergrund abstellen.
• Gurtenden am Schnellverschluss abnehmen (1)
• Tasche von Karabiner trennen und entlang des Trageriemens herausziehen (2/3)
• Zubehörtasche kann nun am Gürtel befestigt werden (4)
1 23
4
3

g
Operating Instruction
d
Bedienungsanleitung
f
Mode d‘ emploi
Camera strap »Pro I & II«
Fasten the carrying strap as displayed in the illustrations (above).
Conversion to carrying loop
• Place the camera on a stable base
• Position the carrying padding in the direction of the camera casing (1)
• Detach both strap ends using the quick-release (1)
• Connect the remaining strap ends to each other using the snap lock (2)
• Position the carrying padding in the middle of the carrying loop (2)
• The camera strap can now be used as a carrying loop (3)
1 2 3
Conversion of accessory case(s) to a belt pouch
• Place the camera on a stable base
• Detach the strap ends using the quick-release (1)
• Separate the case from the clip and remove by sliding it along the carrying strap (2/3)
• The accessory case can now be used as a belt pouch (4)
1 23
4
4
Sangle d‘appareil photo »Pro I & II«
Fixez la dragonne conformément aux illustrations (ci-dessus).
Modifi cation de la dragonne
• Posez votre appareil photo sur une surface stable.
• Positionnez le coussin support en direction du boîtier de l’appareil photo (1)
• Retirez les deux extrémités de la sangle sur la fermeture rapide (1)
• Raccordez les extrémités restantes de la sangle à l’aide de la fermeture à clic (2)
• Positionnez le coussin support au milieu de la dragonne (2)
• La sangle de l’appareil photo peut alors être utilisée comme dragonne (3)
1 2 3
Adaptation de l’étui d’accessoires comme poche de ceinture
• Posez votre appareil photo sur une surface stable.
• Retirez les deux extrémités de la sangle sur la fermeture rapide (1)
• Défaites les mousquetons de l’étui et retirez-le le long de la dragonne (2/3)
• L’étui d’accessoires peut alors être fi xé à la ceinture (4)
1 23
4
5
 Loading...