

Page 1
PLATINUM Series
CAN WIDEBAND CONTROLLER
WBC 1 & WBC 2
(HT059970 & HT059980)
QUICK START GUIDE
Page 2

LIMITED WARRANTY
Lockin Pty Ltd trading as Haltech warrants the HaltechTM Programmable Fuel Injection System to be
free from defects in material or workmanship for a period of 12 months from the date of purchase.
Proof of purchase, in the form of a bill of sale or receipted invoice, which indicates that the product is
within the warranty period, must be presented to obtain warranty service. Lockin Pty Ltd trading as
Haltech suggests that the purchaser retain the dealer’s dated bill of sale as evidence of the date of
retail purchase.
If the HaltechTM Programmable Fuel Injection System is found to be defective as mentioned above, it
will be replaced or repaired if returned prepaid along with proof of purchase. This shall constitute the
sole liability of Lockin Pty Ltd trading as Haltech.
To the extent permitted by law, the foregoing is exclusive and in lieu of all other warranties or
representations, either expressed or implied, including any implied warranty of merchantability or
fitness. In no event shall Lockin Pty Ltd trading as Haltech, be liable for special or consequential
damages.
DISCLAIMER
Haltech will not be held responsible for any damage caused by the incorrect installation or tuning of this
product. It is the installers responsibility to ensure the wiring connections and pinouts match that of the
vehicle the unit is being installed into.
Haltech has taken all care to make sure the connections match the specified vehicles listed, but variations
in wiring and connections on vehicles can occur and therefore this should be checked BEFORE the unit
is installed.
Haltech highly recommends installation and tuning of this product is to be carried out by a professional,
with an understanding on installing and tuning engine management systems.
Misuse of this product can destroy your engine.
WARNING
This ECU is designed and sold for Racing use only. Using this product for street / road use may be
prohibited by law. Please check with your local vehicle authority before using this product.
GENERAL INSTALLATION WARN ING
Avoid open sparks, flames or operation of electrical devices near flammable substances.
Always disconnect the battery cables when doing electrical work on your vehicle.
Do not charge the battery with a 24 Volt truck charger or reverse the polarity of the battery
or any charging unit. Do not charge the battery with the engine running as this could
expose the ECU to an unregulated power supply that could destroy the ECU and other
electrical equipment.
All fuel system components and wiring should be mounted away from heat sources,
shielded if necessary and well ventilated. Disconnect the Haltech ECU from the electrical
system whenever doing any arc welding on the vehicle by unplugging the wiring harness
connector from the ECU.
After completing the installation, make sure that there are no fuel leaks, and no wiring
left un-insulated in case a spark or short-circuit occurs and causes a fire. Also make sure
that you follow all proper workshop safety procedures. If you're working underneath
a jacked-up car, always use safety stands!
Page 3

Haltech CAN Wideband Controllers
(WBC 1 & WBC 2)
Quick Start Guide
Congratulations on purchasing a Haltech CAN Wideband Controller.
This Plug and Play product allows the user the ability to increase the functionality
of their Haltech ECU by using the Haltech CAN system which is fitted to all
Platinum Series ECU's.
The Haltech CAN Wideband Controller allows the user to accurately measure air/fuel
ratios over a wide range from rich to lean via the Haltech CAN system for precise
engine tuning.
This quick start guide will walk you through installation of the
Haltech CAN Wideband Controller (WBC1 or WBC2) into a vehicle.
This guide is accompanied by the full service manual located on the software CD
provided with the ECU that you or your tuner will need to refer to before completing
your installation and configuration.
Included in Haltech Single Channel CAN Wideband Kit (HT059976)
• Haltech Single Channel CAN Wideband Controller - WBC1
• Single Channel wiring harness
• CAN Connection Cable (600mm)
• 1 x Wideband Sensor – Bosch LSU 4.2
• 1 x Weldable fitting bung and blanking plug
• Quick Start Guide
Included in Haltech Dual Channel CAN Wideband Kit (HT059986)
• Haltech Dual Channel CAN Wideband Controller - WBC2
• Dual Channel wiring harness
• CAN Connection Cable (600mm)
• 2 x Wideband Sensor – Bosch LSU 4.2
• 2 x Weldable fitting bungs and blanking plugs
• Quick Start Guide
Page 4
Installation
Installing the Haltech CAN Wideband Controller into a vehicle is simple.
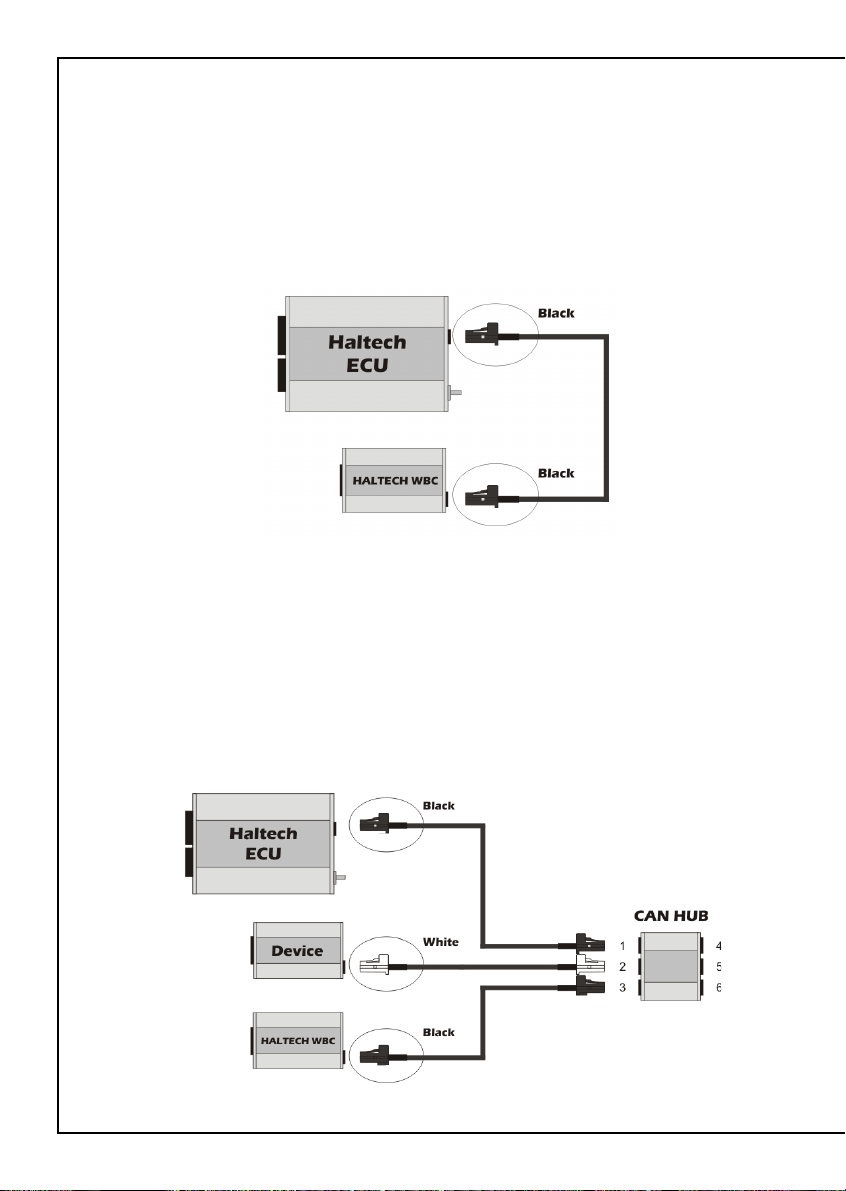
Method 1: Direct Connection to Haltech Platinum Series ECU
Connect the Haltech CAN Wideband Controller directly to a Haltech Platinum Series
ECU via the CAN direct connection cable included with the kit
Figure 1 – Haltech CAN Wideband Controller connected directly to a
Haltech Platinum Series ECU
Method 2 : Connection Via Haltech CAN Hub ( HT059990 )
Connect the Haltech CAN Wideband Controller directly to the CAN Hub attached to a
Haltech Platinum Series ECU ( a Haltech CAN Hub connection cable may need to be
purchased depending on your setup. Please refer to the Haltech CAN Hub quick start
guide for details on connecting multiple devices to your Platinum Series ECU.)
Figure 2 – Haltech CAN Wideband Controller connected via the Haltech Can Hub
Page 5
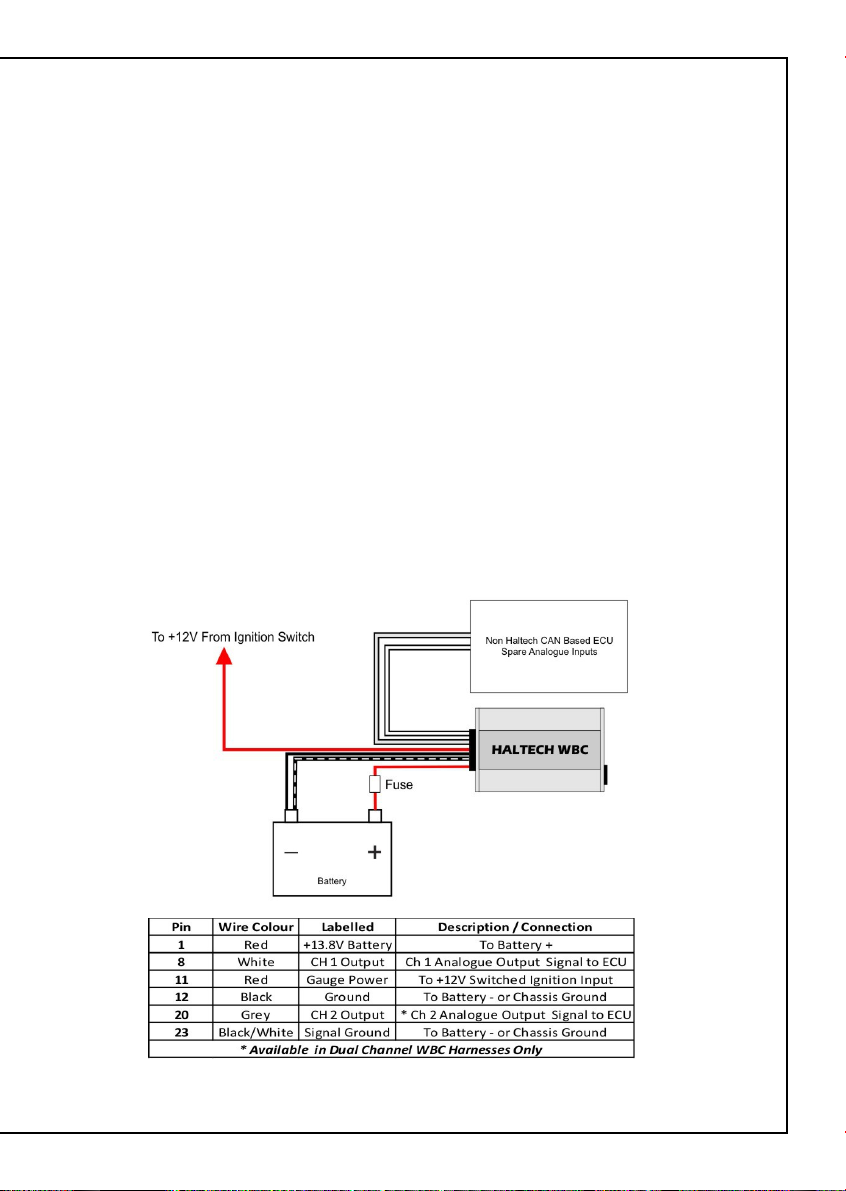
Method 3: Connection Via Analogue output to Non Haltech CAN Supported ECU
The Haltech CAN Wideband Controller is able to be used with ECU's that do not
support the Haltech CAN System.
To enable the Haltech CAN Wideband Controller to function as an analogue device
please connect the harness as described below:
• Connect the Red wire labelled "+13.8V Battery" to a + Battery Fused source (7.5A fuse
minimum) or directly to the Battery + terminal
• Connect the Black wire labelled "Ground" to Battery - or the chassis of the vehicle.
• Connect the Red wire labelled "Gauge Power" to a +12V Switched Ignition
• Connect the Black/White wire labelled “Signal Ground” to Battery - or the chassis of the
vehicle.
• Connect the White wire labelled "CH 1 Output" to any available analogue input on your
NON Haltech CAN supported ECU
• Connect the Grey wire labelled "CH 2 Output" (only available to WBC2) to any available
analogue input on your non Haltech CAN supported ECU
• Calibrate the AVI input in the ECU software as:
• 0V = AFR 10
• 5V = AFR 20
Your Haltech CAN Wideband Controller can now be used with earlier
Haltech NON-CAN based ECU's.
Figure 3 – Haltech CAN Wideband Controller Connected via Analogue Outputs
Page 6

Harness Installation
Ensure the Haltech CAN Wideband Controller is NOT connected to the
wiring harness until installation of the harness has been completed.
The wires labeled “Main Power Input” supply power to the device.
Connect the Red wire to Battery (+) terminal via an inline fuse (7.5A Minimum)
Connect the Black wire to Battery (-) terminal or the chassis of the vehicle.
Figure 4 – Main Power Wiring
Sensor Installation
Location: The best location for the sensor is approx 1 meter from the closest exhaust
valve (measured along the central axis of the exhaust pipe) or 1 meter from
the turbo outlet ( for turbo charged vehicles)
Mounting: The sensor requires the included M18 x 1.5 mild steel bung to be welded
into the vehicles exhaust system.
Weld the bung into the chosen position, install the sensor.
It is recommended that the sensor be orientated in such a way that
minimises any condensation entering the sensor during warm up
and operation.
Wiring: Install the harness through the firewall and into the engine bay.
Connect the wideband sensor via the 6 position connector.
Secure the wiring.
Notes: If removing the pins from the terminated harness O2 Sensor connector
to run through the firewall please ensure the WBC and Main Power are
disconnected.
Ensure all wiring is secured and away from any extreme sources of heat
(ie exhaust manifold).
Use grommets when passing wires through the firewall of the vehicle to
avoid damage to wiring.
Figure 5 – Harness side Wideband sensor termination
Page 7

Free Air Calibration
After installation, a free air calibration is required, preferably with the O2 sensor
removed from the exhaust and in free air.
Calibration Procedure:
Turn the free air calibration trimpots on the Haltech CAN Wideband Controller full
counterclockwise.
Turn ignition on and wait for 60 seconds so the system can fully stabilize.
Slowly turn each free air calibration trimpot clockwise until the corresponding LED
starts flashing at a rapid rate.
Set each trimpot at the point where its LED just starts to flash.
If you cannot get an LED to flash when its trimpot is turned full clockwise, you either
have a damaged sensor or very high hydrocarbon levels in your environment.
A fault indication will cause the status LED to blink at a slow rate.
Fault conditions include less than 11 volts or greater than 16.5 volts of battery voltage,
sensor open circuit, and sensor short circuit conditions.
Your Haltech CAN Wideband Controller is now ready to use.
Figure 6 - Haltech WBC1 LED and calibration trim pot location
Figure 7 - Haltech WBC 2 LED and calibration trim pot locations
Page 8

Optional Digital Display Gauge Installation
Installation of the optional Haltech digital display gauge will allow the user to see the
Air / Fuel Ratio of the engine without the need for a laptop.
Installation is simple as all the necessary wires are bundled together in the included
wiring harness labeled as “Gauge”
If the gauge wiring is not used please ensure all wires are isolated and insulated in the
harness before powering up the device.
Please refer to the diagrams below for correct termination.
Connection of the green wire to the +12V output from the headlight switch will
dim the gauge display brightness to 50% when the headlights are turned on.
Figure 8- Haltech Single Channel Digital Display Gauge # HT012000
Figure 9 - Haltech Dual Channel Digital Display Gauge # HT012006
Page 9

Software Setup
With your new Haltech CAN Wideband Controller installed it's now time to setup the
software.
When powered up and connected to ECU manager your Haltech ECU will automatically
recognize the new device which will be shown in the devices tab (Figure 10)
To enable the device right click on the “Options” tab and select “Enable Device”,
alternatively you can enable the device by accessing the device page within the
Main setup menu.
When the device is enabled you will have access to the “Wideband Devices” tab within
the “Inputs setup page”, this is where you can allocate the wideband sensor input to be
used as wideband 1 or wideband 2.
When you have completed your setup reset the ECU, once reset the device tab should
change from “Device Found” to “Online”. The device is now ready to use.
Figure 10 – Haltech ECU Manager CAN Wideband device tab status indicators
Figure 11 – Haltech ECU Manager CAN Wideband setup page
Page 10

Harness Pinout
Figure 12 – Haltech CAN Wideband Controller harness connector and pinout
Page 11

Wiring Diagrams
Figure 13 – Haltech WBC 1 Installation Diagram (CAN)
Page 12

Figure 14 – Haltech WBC 2 Installation Diagram (CAN)
Page 13

Figure 15 – Haltech WBC 1 Installation Diagram (Analogue Only)
Page 14

Figure 16 – Haltech WBC 2 Installation Diagram (Analogue Only)
Page 15

Page 16

HALTECH HEAD OFFICE: PH: +612 9729 0999
FAX: +612 9729 0900
EMAIL: sales@haltech.com
HALTECH US OFFICE: PH: 760 598 1941
FAX: 760 598 1987
EMAIL: usa@haltech.com
See the Haltech Website for your local authorized dealer.
www.haltech.com
Version 4
 Loading...