

Page 1
© Halstead Boilers Ltd 2008
These instructions should be left with the user
User Instructions
Combination Condensing Boilers
iHeat 24c
iHeat 29c
G.C. NUMBER
iHeat 24c N° 47-260-19
iHeat 29c N° 47-260-20
Page 2

22
22
2
© Halstead Boilers Ltd 2008
Dear Customer
Your boiler has been designed to meet and exceed the very
latest standards in gas central heating technology, and if
cared for, will give years of reliable use and efficiency.
Please therefore take some time to read these instructions
carefully.
Do’s and Don’t’s
●
DoDo
DoDo
Do ensure that the system pressure is periodically
checked
●
DoDo
DoDo
Do ensure that you know how to isolate the appliance in
an emergency
●
DoDo
DoDo
Do ensure that you are familiar with the appliance
controls
●
DoDo
DoDo
Do ensure that your installer has completed the appliance
log book section
●
Do notDo not
Do notDo not
Do not attempt to remove the appliance casing or gain
internal access
●
Do notDo not
Do notDo not
Do not hang clothes etc. over the appliance
●
Do notDo not
Do notDo not
Do not forget to have the appliance serviced annually.
This booklet is an integral part of the appliance. It is
therefore necessary to ensure that the booklet is handed
to the person responsible for the property in which the
appliance is located/installed. A replacement copy can be
obtained from the customer services.
ContentsContents
ContentsContents
Contents
IntroductionIntroduction
IntroductionIntroduction
Introduction
PagePage
PagePage
Page
Dear customer 2
Do’s and don’t’s 2
Things you should knowThings you should know
Things you should knowThings you should know
Things you should know
PagePage
PagePage
Page
1.1 Gas appliances 3
1.2 Electrical supply 3
1.3 Dimensions 3
1.4 Clearances required 3
1.5 Explanation of controls 3
1.6 Explanation of features 3
1.7 Guarantee registration card 4
1.8 Control panel 4
H
ow to...ow to...
ow to...ow to...
ow to...
PagePage
PagePage
Page
2.1 Use the appliance for the first time 5
2.2 Use the mode selector switch 5
2.3 Re-pressuring the system 5
2.4 Shut down the system for short periods 5
2.5 Shut down the system for long periods 5
2.6 Care for the appliance 5
IntroductionIntroduction
IntroductionIntroduction
Introduction
WW
WW
W
haha
haha
ha
tt
tt
t
if if
if if
if
......
......
...
Page Page
Page Page
Page
3.1 I suspect a gas leak 6
3.2 I have to frequently to top-up the system 6
3.3 The fault light is on 6
3.4 The appliance is due its annual service 6
3.5 I need to call an engineer 6
3.6 I need to extend the warranty 6
SettingSetting
SettingSetting
Setting
PagePage
PagePage
Page
4.1 Mechanical clock 6
Page 3
33
33
3
© Halstead Boilers Ltd 2008
1.31.3
1.31.3
1.3
DimensionsDimensions
DimensionsDimensions
Dimensions
1.41.4
1.41.4
1.4
Clearances requiredClearances required
Clearances requiredClearances required
Clearances required
ABOVE
BELOW
LEFT SIDE
RIGHT SIDE
FRONT
150 mm
150 mm
50 mm
12mm
600 mm
iHeat24ciHeat24c
iHeat24ciHeat24c
iHeat24c
HEIGHT 780mm
WIDTH 400mm
DEPTH 332mm
iHeat29ciHeat29c
iHeat29ciHeat29c
iHeat29c
HEIGHT 780mm
WIDTH 450mm
DEPTH 332‘0mm
1.01.0
1.01.0
1.0
Things you should know Things you should know
Things you should know Things you should know
Things you should know
1.11.1
1.11.1
1.1
GAS APPLIANCE GAS APPLIANCE
GAS APPLIANCE GAS APPLIANCE
GAS APPLIANCE
Gas safGas saf
Gas safGas saf
Gas saf
ee
ee
e
ty (Insty (Ins
ty (Insty (Ins
ty (Ins
tt
tt
t
allall
allall
all
aa
aa
a
tion and Use) rtion and Use) r
tion and Use) rtion and Use) r
tion and Use) r
egulegul
egulegul
egul
aa
aa
a
tionstions
tionstions
tions
In the interests of your safety and that of others, it is a legal
requirement that all gas appliances are installed and correctly
maintained by a competent person and in accordance with
the latest regulations.
1.21.2
1.21.2
1.2
ELEL
ELEL
EL
ECTRICAL SUPECTRICAL SUP
ECTRICAL SUPECTRICAL SUP
ECTRICAL SUP
PLPL
PLPL
PL
YY
YY
Y
Please ensure that this appliance has been properly connected
to the electrical supply by means of a double pole isolator or
un-switched socket and that the correct size of fuse - 3 amp
- has been fitted.
Warning: this appliance must be earthed!Warning: this appliance must be earthed!
Warning: this appliance must be earthed!Warning: this appliance must be earthed!
Warning: this appliance must be earthed!
1.51.5
1.51.5
1.5
EE
EE
E
XPLANXPLAN
XPLANXPLAN
XPLAN
AA
AA
A
TION OF CTION OF C
TION OF CTION OF C
TION OF C
ONON
ONON
ON
TRTR
TRTR
TR
OLOL
OLOL
OL
SS
SS
S
The iHeat has been designed for simplicity of use, as a result
there are only two controls - the mode selector switch & the
time clock - that can be accessed by the user.
1.5.1 1.5.1
1.5.1 1.5.1
1.5.1
MODE SELECTOR SWITCH ATMODE SELECTOR SWITCH AT
MODE SELECTOR SWITCH ATMODE SELECTOR SWITCH AT
MODE SELECTOR SWITCH AT
OFF:OFF:
OFF:OFF:
OFF: when the mode selector switch is in the
‘OFF’
position, the appliance will not function for hot water or
heating. However the appliance will still operate in frost
protection mode, and if unused for a period of 24 hours, will
momentarily activate the pump and valve actuator to
prevent seizure due to non-use.
NOTENOTE
NOTENOTE
NOTE
The appliance must have an electrical supply at all times for
the frost protection and anti-seize modes to operate.
1.5.21.5.2
1.5.21.5.2
1.5.2
HOT WATER ONLY “HOT WATER ONLY “
HOT WATER ONLY “HOT WATER ONLY “
HOT WATER ONLY “
””
””
”
When the mode selector switch is in the ‘HOT WATER ONLY’
position, the appliance will operate as above. However when
a hot water outlet is opened the appliance will operate to
provide hot water until the demand for hot water has been
satisfied.
NOTENOTE
NOTENOTE
NOTE
The appliance delivers a fixed maximum flow rate of hot
water, therefore if a hot water outlet is turned on full, it is
most likely that you will be unable to obtain hot water from
another outlet at the same time.
1.5.3 1.5.3
1.5.3 1.5.3
1.5.3
HEATING AND HOT WATER “HEATING AND HOT WATER “
HEATING AND HOT WATER “HEATING AND HOT WATER “
HEATING AND HOT WATER “
””
””
”
When the mode selector switch is in the ‘HEATING AND HOT
WATER’ position the appliance will operate as above. However
should the time clock be switched on automatically or manually, the appliance will operate to provide heat to the central
heating circuit until the demand has been satisfied.
NOTENOTE
NOTENOTE
NOTE
If a room thermostat is fitted it must be calling for heat
before the appliance will operate.
1.5.4 1.5.4
1.5.4 1.5.4
1.5.4
TIMTIM
TIMTIM
TIM
E CLE CL
E CLE CL
E CL
OCKOCK
OCKOCK
OCK
The iHeat is supplied with a built-in, 24-hour, time clock that
can be set to operate the appliance for central heating.
However it may be that your installer has fitted an external
time clock (usually because of the location of the appliance
i.e. loft, basement, outhouse, etc.) if so, please disregard the
following instructions and refer to those supplied with the
external time clock.
1.6 1.6
1.6 1.6
1.6
EXPLANATION OF FEATURES EXPLANATION OF FEATURES
EXPLANATION OF FEATURES EXPLANATION OF FEATURES
EXPLANATION OF FEATURES
Although the iHeat has been designed for simplicity of use,
it utilises the latest in boiler technology, enabling a host of
functions to be carried out simultaneously.
Page 4
44
44
4
© Halstead Boilers Ltd 2008
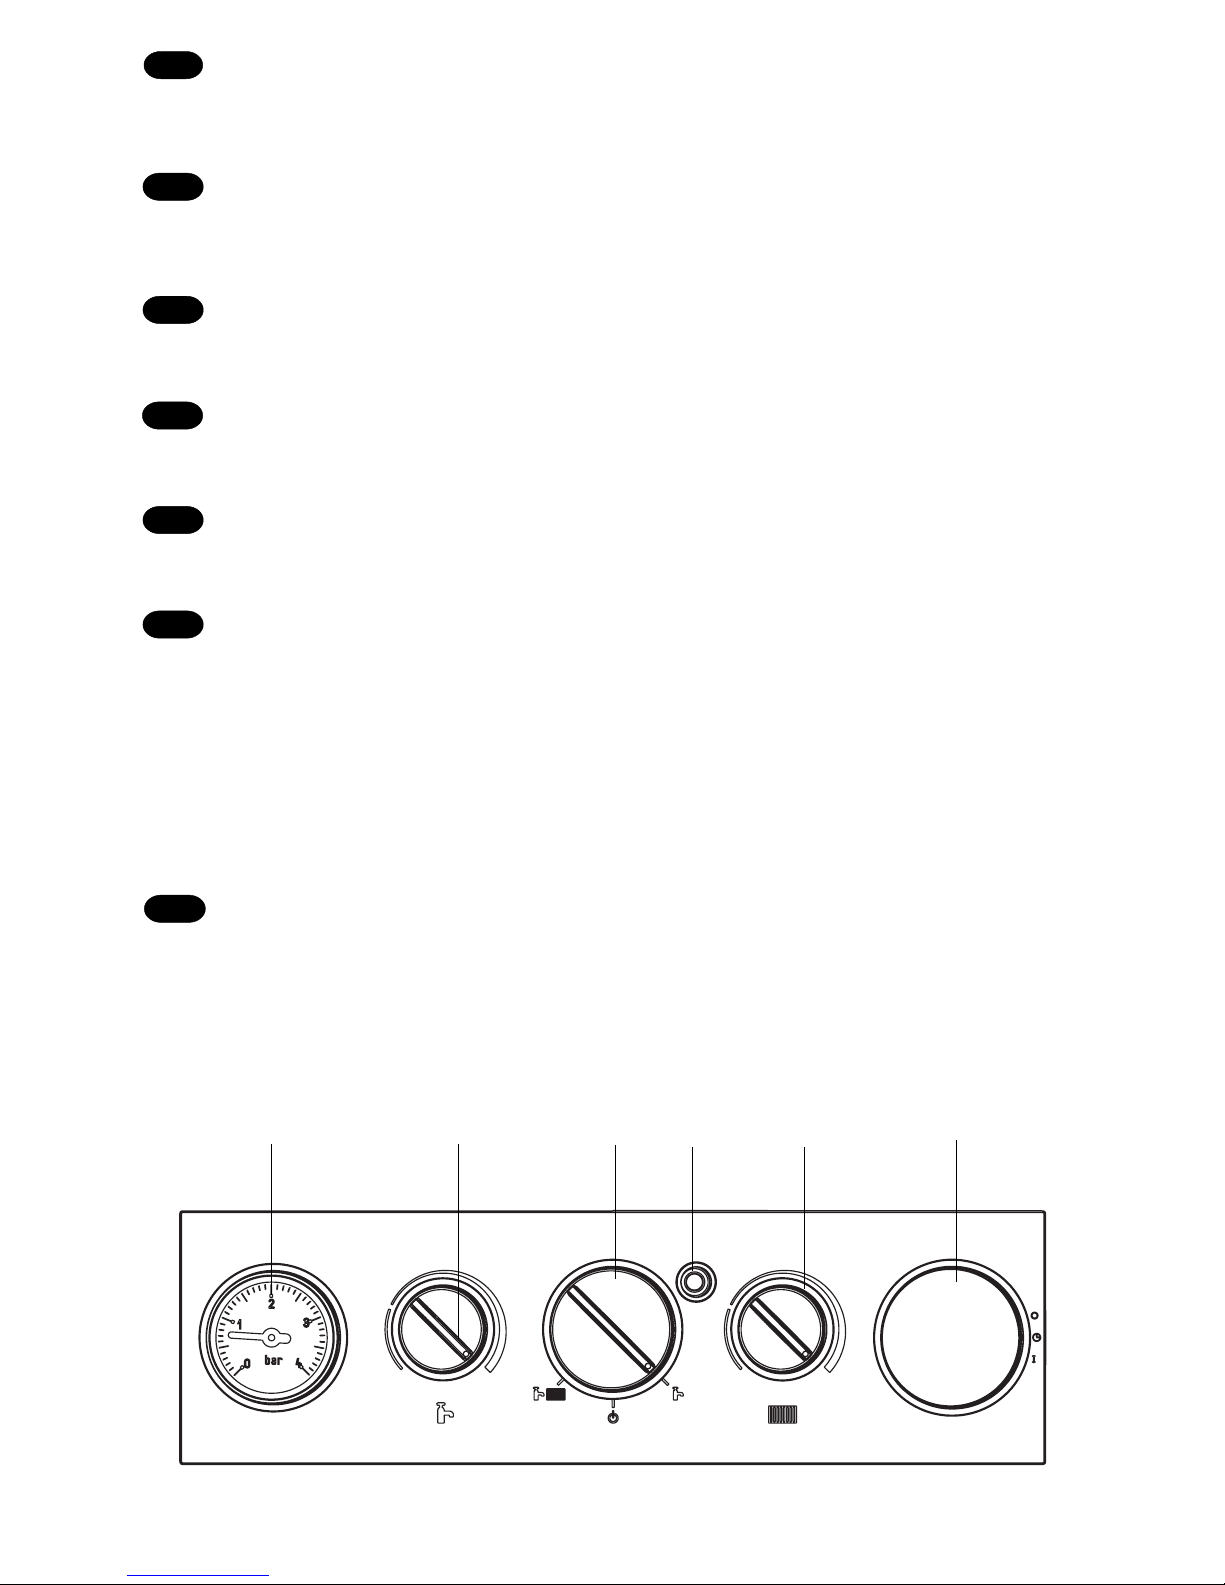
1. Pressure gauge
2. DHW temperature selector 40-65°C
3. Mode selector switch
4. Appliance LED status indicator
5. Heating temperature selector 40-80°C
6. Clock (if fitted)
fig. 1fig. 1
fig. 1fig. 1
fig. 1
1.81.8
1.81.8
1.8
CONCON
CONCON
CON
TRTR
TRTR
TR
OL POL P
OL POL P
OL P
ANELANEL
ANELANEL
ANEL
11
11
1
44
44
4
22
22
2
33
33
3
55
55
5
66
66
6
1.6.1 1.6.1
1.6.1 1.6.1
1.6.1
FRFR
FRFR
FR
OO
OO
O
SS
SS
S
T PRT PR
T PRT PR
T PR
OO
OO
O
TT
TT
T
ECTION MECTION M
ECTION MECTION M
ECTION M
ODEODE
ODEODE
ODE
This function is only active when there are no requests for
heating or HW. When the temperature inside the appliance
drops below 5 °C, the boiler will operate on minimum output
until the temperature - within the appliance - reaches 35 °C.
1.6.2 1.6.2
1.6.2 1.6.2
1.6.2
AA
AA
A
UU
UU
U
TT
TT
T
OO
OO
O
MM
MM
M
AA
AA
A
TIC TTIC T
TIC TTIC T
TIC T
EMPEMP
EMPEMP
EMP
ERER
ERER
ER
AA
AA
A
TT
TT
T
URUR
URUR
UR
E CE C
E CE C
E C
ONON
ONON
ON
TRTR
TRTR
TR
OLOL
OLOL
OL
The automatic temperature control function (SARA), permits the boiler (when the heating temperature selector is set
within the AUTO sector) to automatically adjust (raise) the
heating flow outlet temperature during inclement weather.
1.6.3 1.6.3
1.6.3 1.6.3
1.6.3
ANAN
ANAN
AN
TI-SEIZTI-SEIZ
TI-SEIZTI-SEIZ
TI-SEIZ
E FUNCTIONE FUNCTION
E FUNCTIONE FUNCTION
E FUNCTION
Should the appliance remain inactive for a period of 24
hours, the pump will be activated for a few seconds to
prevent seizure.
1.6.4 1.6.4
1.6.4 1.6.4
1.6.4
AA
AA
A
PP
PP
P
PLIANCPLIANC
PLIANCPLIANC
PLIANC
E SE S
E SE S
E S
TT
TT
T
AA
AA
A
TT
TT
T
UU
UU
U
S INDICAS INDICA
S INDICAS INDICA
S INDICA
TT
TT
T
OROR
OROR
OR
SS
SS
S
The iHeat has status indicators that show if the appliance is
working normally, if it needs ‘topping up’ or re-pressurising,
or if it has a fault (see below).
1.7 1.7
1.7 1.7
1.7
GUARANTEE REGISTRATION CARDGUARANTEE REGISTRATION CARD
GUARANTEE REGISTRATION CARDGUARANTEE REGISTRATION CARD
GUARANTEE REGISTRATION CARD
Please take the time to fill out your guarantee registration
card. The completed warranty card should be posted within
30 days of installation.
1.7.1 1.7.1
1.7.1 1.7.1
1.7.1
BB
BB
B
ENCHMENCHM
ENCHMENCHM
ENCHM
ARKARK
ARKARK
ARK
L L
L L
L
OG BOG B
OG BOG B
OG B
OO
OO
O
OKOK
OKOK
OK
The
BenchmarkBenchmark
BenchmarkBenchmark
Benchmark
Log Book is supplied with your boiler. This
important document must be completed during the
installation/commissioning of your boiler. All CORGI
Registered Installers carry a CORGI ID card, and have a
registration number.
Both should be recorded in your
Benchmark Benchmark
Benchmark Benchmark
Benchmark Log Book. You
can check your installer by calling CORGI direct on 01256
372300.
Failure to install and commission the appliance in accordance
with the manufacturers instructions may invalidate the
warranty. This does not affect your statutory rights .
Page 5
55
55
5
© Halstead Boilers Ltd 2008
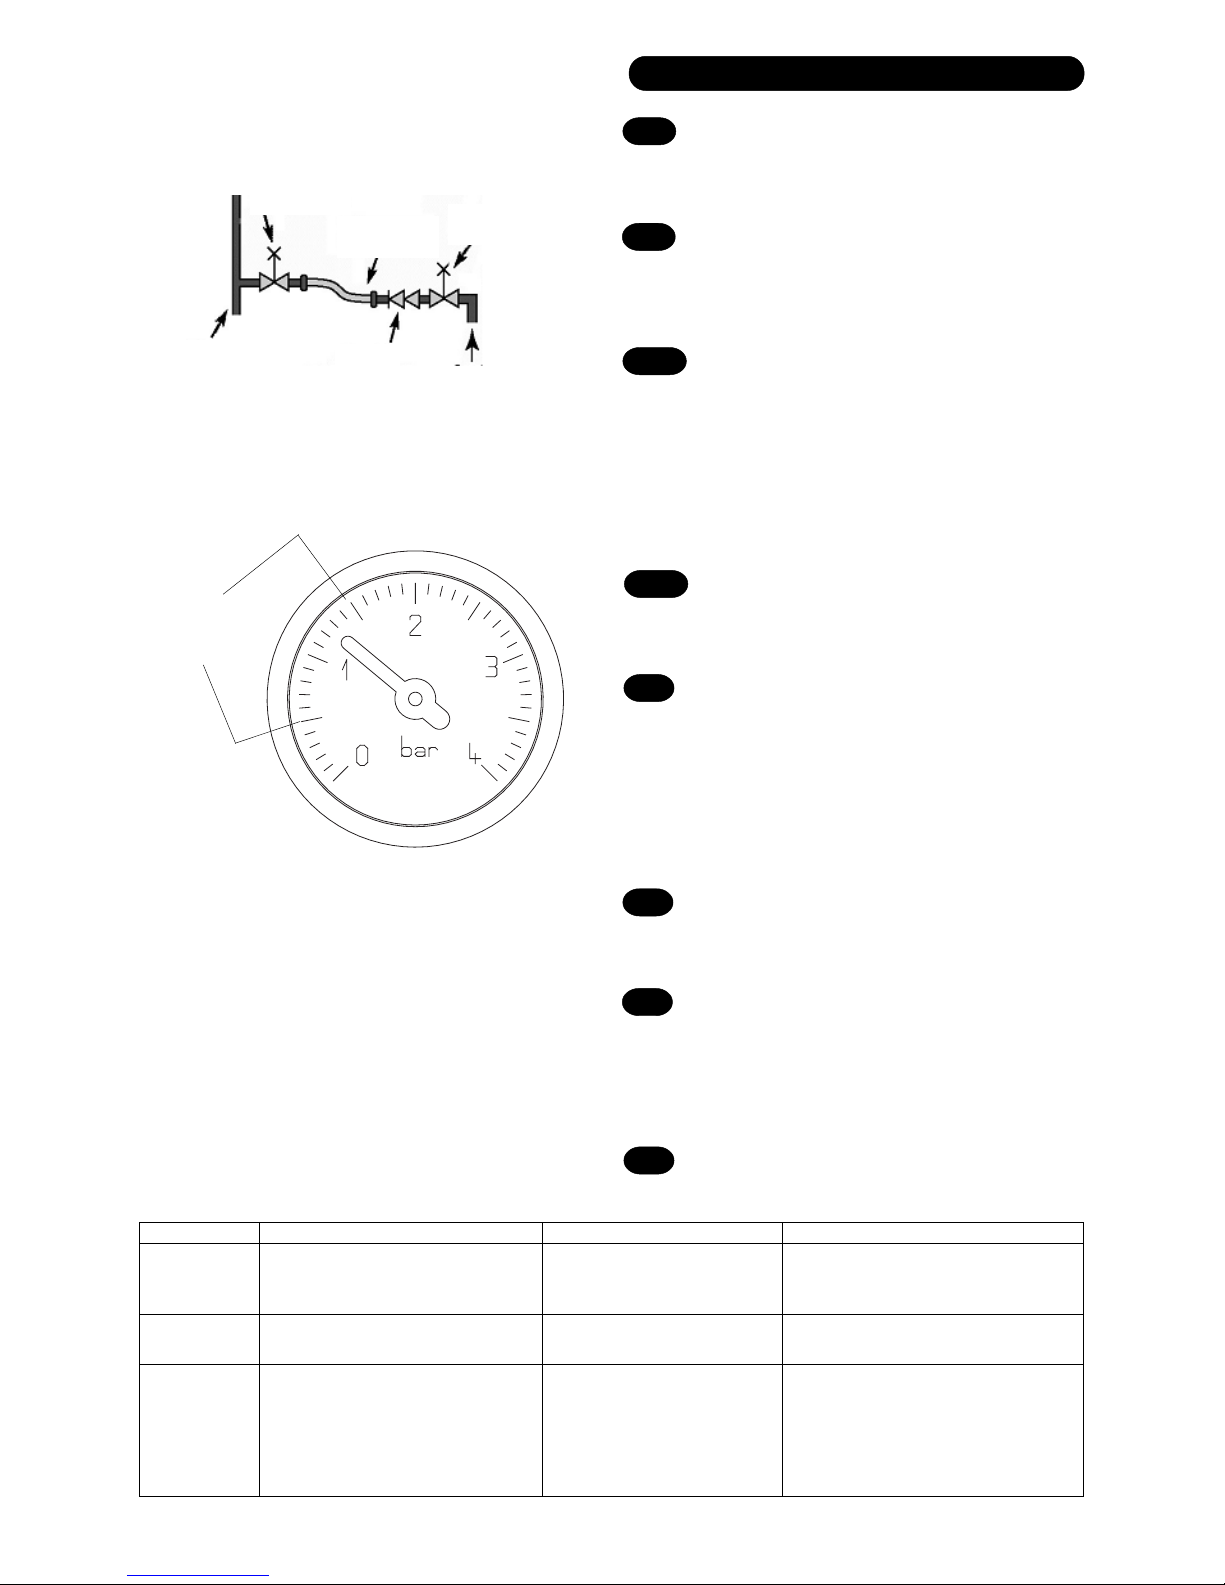
correct
pressure
value
flow/return
pipe
control
valve
temporary
connection
control
valve
supply
pipe
double
check valve
fig. 2fig. 2
fig. 2fig. 2
fig. 2
2.02.0
2.02.0
2.0
How to ...How to ...
How to ...How to ...
How to ...
fig. 3fig. 3
fig. 3fig. 3
fig. 3
COLOURCOLOUR
COLOURCOLOUR
COLOUR
FREQUENCYFREQUENCY
FREQUENCYFREQUENCY
FREQUENCY
FAULTS/STATUSFAULTS/STATUS
FAULTS/STATUSFAULTS/STATUS
FAULTS/STATUS
ACTION REQ’DACTION REQ’D
ACTION REQ’DACTION REQ’D
ACTION REQ’D
GreenGreen
GreenGreen
Green Flashing every 6-seconds At stand-by with no faults None
Flashing 8-times every second SARA function None
On every 0.5 second Temporary fault Wait
YellowYellow
YellowYellow
Yellow On every 0.5 second Service function Contact service centre
On permanently DHW fault Contact service centre
RedRed
RedRed
R ed On every 0.5 second Safety shutdown and/or Check pressure gauge
internal fault Check gas supply
Leave 2-minutes and reset
appliance, if fault continues,
contact service centre
On permanently Appliance overheat Contact service centre
APPLIANCE LED STATUS INDICATORAPPLIANCE LED STATUS INDICATOR
APPLIANCE LED STATUS INDICATORAPPLIANCE LED STATUS INDICATOR
APPLIANCE LED STATUS INDICATOR
2.1 2.1
2.1 2.1
2.1
USE THE APPLIANCE FOR THE FIRST TIMEUSE THE APPLIANCE FOR THE FIRST TIME
USE THE APPLIANCE FOR THE FIRST TIMEUSE THE APPLIANCE FOR THE FIRST TIME
USE THE APPLIANCE FOR THE FIRST TIME
Before switching the appliance on please familiarise yourself
on how to isolate the appliance from the electricity, gas, and
water supplies. If in doubt contact your installer.
2.2 2.2
2.2 2.2
2.2
UU
UU
U
SE TSE T
SE TSE T
SE T
HE MHE M
HE MHE M
HE M
ODE SELODE SEL
ODE SELODE SEL
ODE SEL
ECTECT
ECTECT
ECT
OR SWIOR SWI
OR SWIOR SWI
OR SWI
TT
TT
T
CHCH
CHCH
CH
Turn the mode selector switch to the OFF position, switch
on the electrical supply to the appliance. The green LED
should be flashing, you may now select either HOT WATER
ONLY or HEATING AND HOT WATER.
2.2.1 2.2.1
2.2.1 2.2.1
2.2.1
OBOB
OBOB
OB
TT
TT
T
AIN HOAIN HO
AIN HOAIN HO
AIN HO
T WT W
T WT W
T W
AA
AA
A
TT
TT
T
ERER
ERER
ER
By turning on a hot water outlet (tap) the boiler will fire to
deliver hot water.
The appliance will have been commissioned by your installer
to deliver hot water at both a reasonable temperature and
flow rate, should you wish to alter the temperature of the
hot water, simply change the setting of the DHW temperature
selector and/or change the flow of water as it comes out of
the tap. Please consult your installer for further advice if
required.
2.2.2 2.2.2
2.2.2 2.2.2
2.2.2
OBTAIN CENTRAL HEATINGOBTAIN CENTRAL HEATING
OBTAIN CENTRAL HEATINGOBTAIN CENTRAL HEATING
OBTAIN CENTRAL HEATING
When the time clock is in an ‘on’ position, and the room
thermostat – if fitted – is calling for heat, the boiler will
fire to provide central heating.
2.3 2.3
2.3 2.3
2.3
R R
R R
R
E-PRE-PR
E-PRE-PR
E-PR
ESES
ESES
ES
SURING TSURING T
SURING TSURING T
SURING T
HE SHE S
HE SHE S
HE S
YY
YY
Y
SS
SS
S
TT
TT
T
EMEM
EMEM
EM
The system will need re-pressurising if the red LED is
illuminated and the pressure gauge is reading below 0.4bar.
Locate the filling valve and if necessary connect the loop
(fig. 2) slowly open the valve until you hear the water
entering the appliance. The red LED will go out first. Go on
with re-pressuring until the pressure shown on the
manometer is between 1 & 1.5 bar (fig. 3). The appliance
must not be operated until the system has been repressurised. If in doubt contact your installer.
2.4 2.4
2.4 2.4
2.4
SHU SHU
SHU SHU
SHU
T DOT DO
T DOT DO
T DO
WN TWN T
WN TWN T
WN T
HE SHE S
HE SHE S
HE S
YY
YY
Y
SS
SS
S
TT
TT
T
EM FEM F
EM FEM F
EM F
OR SHOROR SHOR
OR SHOROR SHOR
OR SHOR
T PT P
T PT P
T P
ERIODSERIODS
ERIODSERIODS
ERIODS
The system can be shut down for short periods by simply
turning the mode selector to the OFF position. It is also
advisable to turn off the main water supply to the house.
2.5 2.5
2.5 2.5
2.5
SHU SHU
SHU SHU
SHU
T DOT DO
T DOT DO
T DO
WN TWN T
WN TWN T
WN T
HE SHE S
HE SHE S
HE S
YY
YY
Y
SS
SS
S
TT
TT
T
EM FEM F
EM FEM F
EM F
OR LOR L
OR LOR L
OR L
ONG PONG P
ONG PONG P
ONG P
ERIODSERIODS
ERIODSERIODS
ERIODS
If the house is to be left unoccupied for any length of time
– especially during the winter - the system should be
thoroughly drained of all water. The gas should be turned
off at the meter and the main water supply should be turned
off at the stopcock. If necessary contact your installer for
further advice.
2.6 2.6
2.6 2.6
2.6
CARE FOR THE APPLIANCE CARE FOR THE APPLIANCE
CARE FOR THE APPLIANCE CARE FOR THE APPLIANCE
CARE FOR THE APPLIANCE
To clean the outer casing use only a clean damp cloth. Do
not use any scourers or abrasive cleaners.
Page 6
66
66
6
© Halstead Boilers Ltd 2008
AUTO
ON
OFF
3.1 3.1
3.1 3.1
3.1
I suspect a gas leakI suspect a gas leak
I suspect a gas leakI suspect a gas leak
I suspect a gas leak
If you suspect a gas leak, turn off the gas supply at the gas
meter, and contact your installer or local gas supplier. If
you require further advice please contact your nearest Service & Technical Helpline
(0844 371 1111) (0844 371 1111)
(0844 371 1111) (0844 371 1111)
(0844 371 1111).
3.2 3.2
3.2 3.2
3.2
I frequently “top-up” or “repressurise theI frequently “top-up” or “repressurise the
I frequently “top-up” or “repressurise theI frequently “top-up” or “repressurise the
I frequently “top-up” or “repressurise the
systemsystem
systemsystem
system
If the system regularly requires topping-up or re-pressurising, it may be indicative of a leak. Please contact your
installer and ask him to inspect the system.
3.3 3.3
3.3 3.3
3.3
The fault light is onThe fault light is on
The fault light is onThe fault light is on
The fault light is on
IIf the red LED is illuminated it indicates that the appliance
has ‘locked-out’ or has an internal fault. To reset the
appliance, make sure the gas supply is on to the appliance.
Turn the mode selector switch to the OFF position for a few
seconds and then turn it back to its previous position. If
the red LED stays on or is illuminated after a few seconds
call an engineer.
3.4 3.4
3.4 3.4
3.4
The appliance is due its annual serviceThe appliance is due its annual service
The appliance is due its annual serviceThe appliance is due its annual service
The appliance is due its annual service
Please contact the Service & Technical Helpline
(0844 371 (0844 371
(0844 371 (0844 371
(0844 371
1111) 1111)
1111) 1111)
1111) if you would prefer an authorised engineer or agent
to service your appliance. Alternatively your local CORGI
registered engineer may be able to service the appliance for
you. If you are a tenant your landlord will arrange for
servicing.
3.53.5
3.53.5
3.5
I need to call an engineerI need to call an engineer
I need to call an engineerI need to call an engineer
I need to call an engineer
If you think your boiler may have developed a fault, please
contact your installer or the Service & Technical Helpline
(0844 371 1111)(0844 371 1111)
(0844 371 1111)(0844 371 1111)
(0844 371 1111). Have all your details to hand including
full address and postcode, relevant contact numbers and
your appliance logbook.
3.63.6
3.63.6
3.6
I wanI wan
I wanI wan
I wan
tt
tt
t
t t
t t
t
o eo e
o eo e
o e
xtxt
xtxt
xt
end the warend the war
end the warend the war
end the war
rr
rr
r
anan
anan
an
tyty
tyty
ty
You can if you wish, extend the warranty on your
iHeiHe
iHeiHe
iHe
aa
aa
a
tt
tt
t
boiler. Simply contact our Service & Technical Helpline
(0844 (0844
(0844 (0844
(0844
371 1111)371 1111)
371 1111)371 1111)
371 1111) for further information.
3.03.0
3.03.0
3.0
What ifWhat if
What ifWhat if
What if
4.04.0
4.04.0
4.0
Setting the mechanical clockSetting the mechanical clock
Setting the mechanical clockSetting the mechanical clock
Setting the mechanical clock
4.14.1
4.14.1
4.1
Setting the mechanical clockSetting the mechanical clock
Setting the mechanical clockSetting the mechanical clock
Setting the mechanical clock
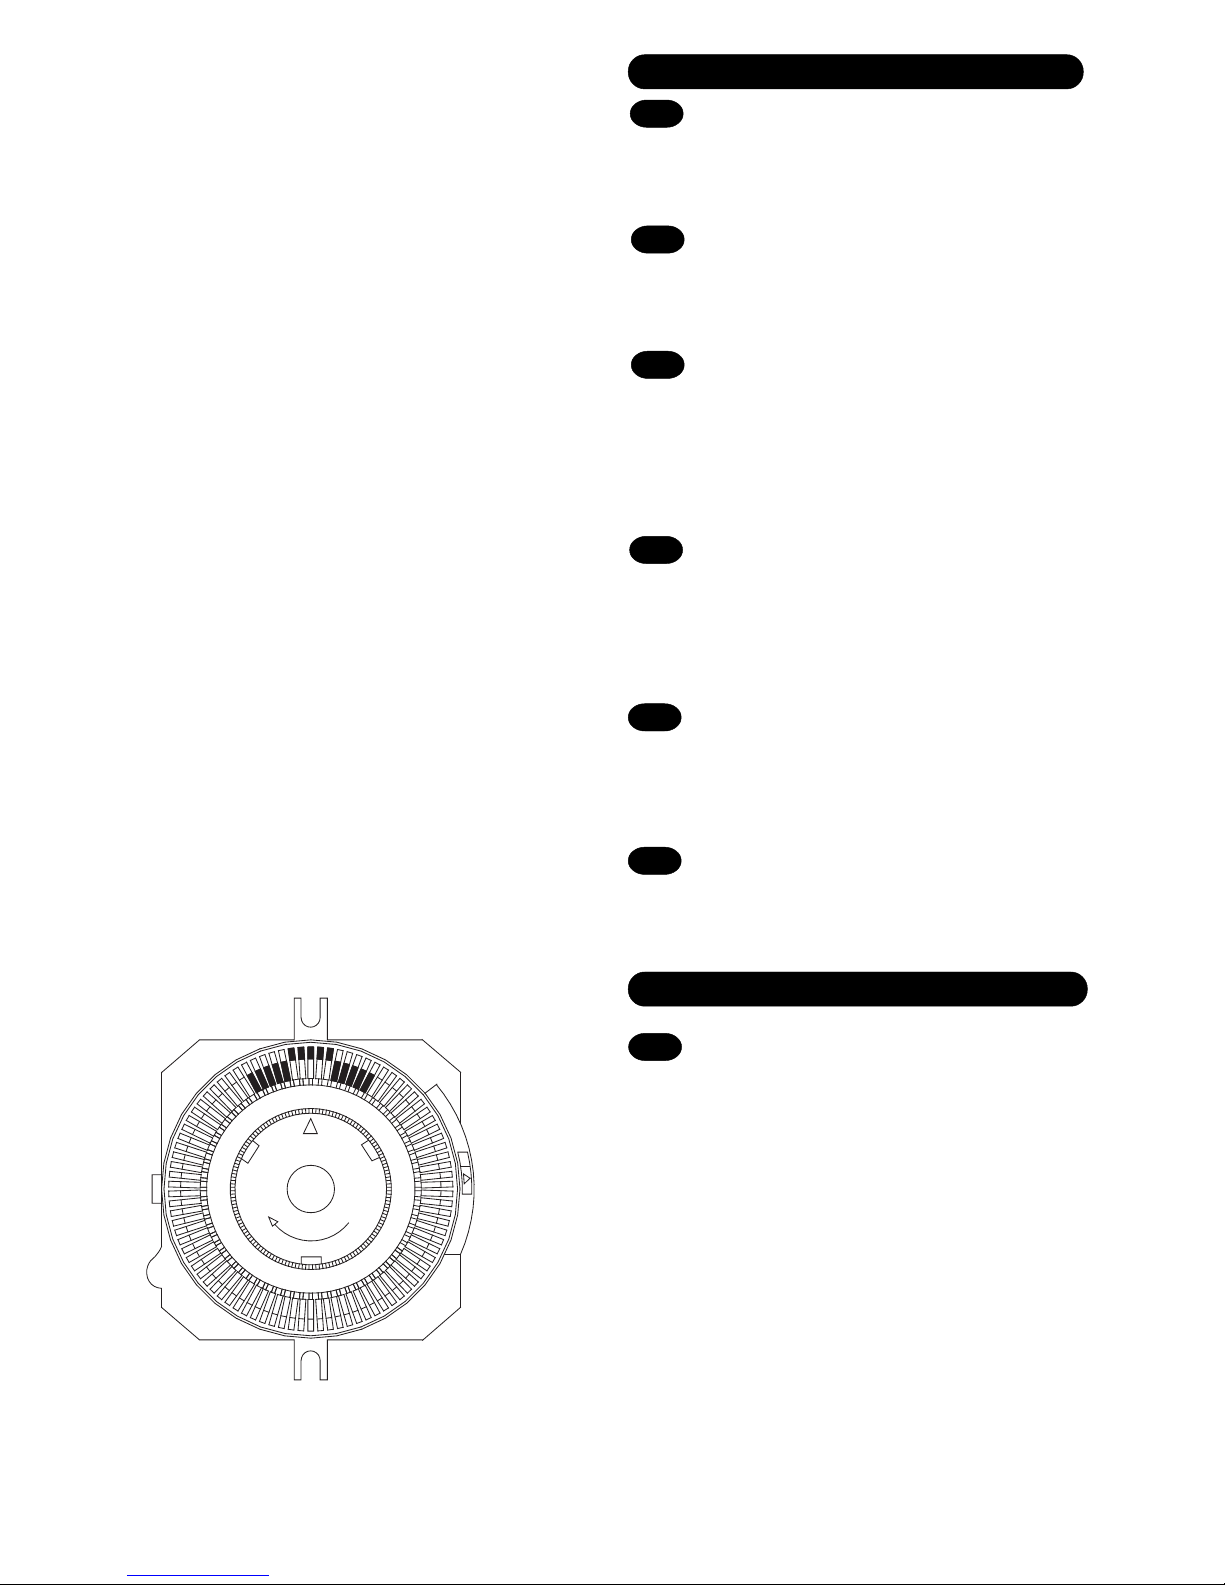
If your boiler has been installed with the mechanical clock,
it can be used and adjusted as follows:
Setting the timeSetting the time
Setting the timeSetting the time
Setting the time
The time of day can be set by grasping the outer edge of
the black dial and turning it in a clockwise direction until
the correct time is in line with the white pointer.
Setting the “switching times”Setting the “switching times”
Setting the “switching times”Setting the “switching times”
Setting the “switching times”
The
“ON” periods“ON” periods
“ON” periods“ON” periods
“ON” periods are set by sliding the black tappets,
adjacent to the time periods required, to the outer edge of
the dial.
The tappets that remain at the centre of the dial will be the
“OFF” periods“OFF” periods
“OFF” periods“OFF” periods
“OFF” periods.
The smallest switching time (ON or OFF) is 15 minutes.
To select
“A“A
“A“A
“A
UU
UU
U
TT
TT
T
O”O”
O”O”
O” mode move the selector switch in central
position.
To select
“ON”“ON”
“ON”“ON”
“ON” mode move the selector switch in the bottom
position.
To select
“OF“OF
“OF“OF
“OF
F”F”
F”F”
F” mode move the selector switch in the upper
position.
Page 7

Page 8
WARRANTY TERMS & CONDITIONS + 5 YEAR WARRANTYWARRANTY TERMS & CONDITIONS + 5 YEAR WARRANTY
WARRANTY TERMS & CONDITIONS + 5 YEAR WARRANTYWARRANTY TERMS & CONDITIONS + 5 YEAR WARRANTY
WARRANTY TERMS & CONDITIONS + 5 YEAR WARRANTY
1. Registration must be completed within 30 days of installation. Failure to return within 30 days will invalidate your warranty. Registration
if effected by returning the enclosed registration card to the commercial center of Halstead Glen Dimplex at 5 Spartan Close, Tachbrook Park,
Leamington Spa, CV34 6RR. Proof of postage should be obtained.
2. The Benchmark document must be completed by installer/householder at the time of installation and must be presented to our engineer at
subsequent visits.
3. The boiler must be serviced annually, at the householders expenses in accordance with manufacturer’s instructions, and this service must
be booked through Halstead Glen-Dimplex by calling 0844 371 1111.
4. The service must be carried out by a Halstead approved central heating engineer. Any work carried out by a non-Halstead approved engineer
will invalidate this warranty.
5. Appropriate system cleaning (e.g. power flush) and the correct use of additives must be carried out at the time of installation. Failure to
cleanse the system will invalidate this warranty. Evidence of cleansing should be presented to our engineer upon request.
6. This warranty applies only to manufacturing problems with the boiler; damage caused through misuse, incorrect operation, foreign bodies
in the heating system, system faults and failures are not covered.
7. This warranty applies only if the boiler is installed and used in accordance with the manufacturer’s instructions, in normal domestic
applications.
8. Providing all the above Terms and Conditions are met, this warranty covers functional parts and labour. Functional parts are detailed in the
attached appendix, together with specific exclusions.
9. Halstead Glen Dimplex offer the opportunity for a system audit and commissioning check within 30 days of registration. This is chargeable
at the same rate as an annual service and if taken up then the first annual service will be provided free of charge. Failure to take up this offer
may invalidate the full warranty which will revert to a standard 1 year warranty
10. Failure to meet any of the above Terms and Conditions will invalidate this warranty.
APPENDIXAPPENDIX
APPENDIXAPPENDIX
APPENDIX
Problem attributable to failure of:Problem attributable to failure of:
Problem attributable to failure of:Problem attributable to failure of:
Problem attributable to failure of:
ExclusionsExclusions
ExclusionsExclusions
Exclusions
Main heat exchanger Premature corrosion caused by pollutants and chemicals in the gas and air
Plate heat exchanger Problems attributable to scaling
Fan Problems caused by pollutants or incorrect wiring (e.g by installer), failure caused
by water spillages
Gas Valve Problems caused by pollutants and chemicals in the air and gas
Pump Problems attributable to dry-firing, limescale and magnetite
PCB Failure attributable to incorrect wiring (e.g. by installer), failure caused by water spillages
Expansion vessel Problems attributable to chemicals in the water
Any part of hydroblock Problems attributable to incorrect components positioning (e.g by installer)
Electrodes Premature corrosion caused by pollutants and chemicals in the gas and air
cod. 20005464 - ed. 1 - 09/08
TECHNICAL SERVICES, TRAINING AND MARKETING
Halstead Boilers Limited, 5 Titan Business Centre, Spartan Close, Tachbrook Park, Leamington Spa,
Warwickshire CV34 6RR - Telephone: 0844 371 1111 Fax: 01926 834888
MANUFACTURING, ACCOUNTS AND SALES
Halstead Boilers Limited, 20/22 First Avenue, Bluebridge Industrial Estate, Halstead, Essex C09 2EX
Telephone: 0844 371 1111 Fax: 01787 474588
Part of the Glen Dimplex Group
Website:www.halsteadboilers.co.uk
Halstead Boilers is continuously improving its products and may therefore change specifications without prior notice.
The statutory rights of the consumer are not affected.
SERSER
SERSER
SER
VV
VV
V
ICIC
ICIC
IC
E HELE HEL
E HELE HEL
E HEL
PLINE & TRPLINE & TR
PLINE & TRPLINE & TR
PLINE & TR
AINING: 0844 371 1111AINING: 0844 371 1111
AINING: 0844 371 1111AINING: 0844 371 1111
AINING: 0844 371 1111
0694
51BQ3030
 Loading...