

StarLight 3000
OPERATING INSTRUCTIONS
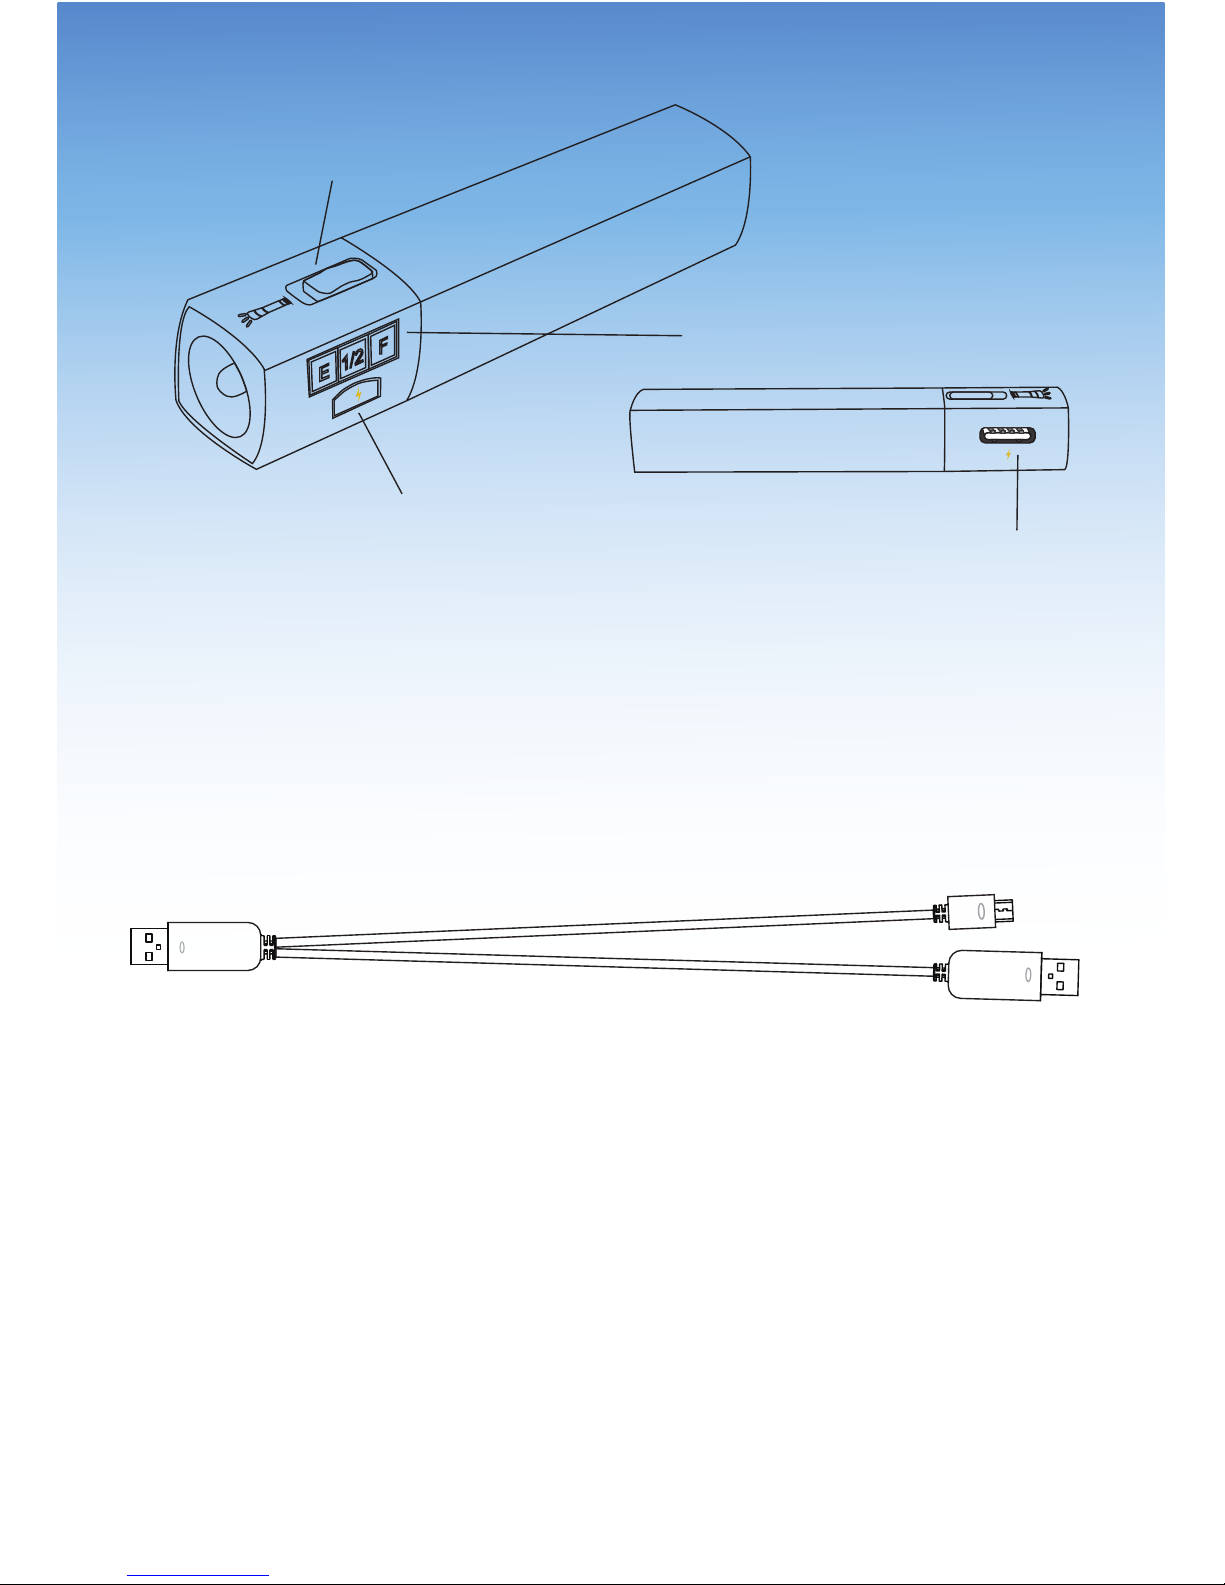
1. Quick Start Power Button
2. SOS/Flashlight Power Switch
3. USB Out/In
4. Fuel Gauge (Battery Status Indicator)
1
4
3
2
Included items:
- 1 HALO Pocket Power StarLight 3000
- 1 split cable (standard USB split on one end and
standard USB and micro USB on the other ends)
- 1 AC wall charger
- 1 30-pin connector tip
- 1 carrying pouch
- Operating Instructions/Warranty
h
h
h
Figure 1
A
B

Getting Started
Charge the HALO Pocket Power StarLight 3000 until the
LED displays a solid green light (no lights should be
ashing). This will take up to six hours and will uctuate
depending on the charging power source.
IMPORTANT: Charge your HALO charger for a full
six hours before regular use. Subsequent charging
will take ve - six hours.
Charging the HALO Pocket Power StarLight 3000
Using the supplied HALO Charge It Charge Me cable,
plug one USB connector into the HALO charger and
plug the other USB connector into a computer or an
AC power source with a USB 5V input.
While charging the HALO charger, the LED will ash
one of the following colors, indicating the charge level.
Red (1%-33%), orange (34%-66%), and green
(67%-99%). When the HALO charger is 100% fully
charged the green LED will become illuminated and
no longer ash. When the charger is not in use, slide
the power switch to the OFF (lower) position to
conserve the battery.
The charging cable works in either direction (see
Figure 1 for reference). Connect A to the power source

and B to the HALO charger, or connect B to the power
source and A to the HALO charger.
Charging Your Personal Electronic Device
Using the supplied split cable, plug one USB
connector into the HALO charger and insert the
provided appropriate tip into your device. The HALO
charger will automatically begin charging. You may
also use your own USB cable that was supplied with
your personal electronic device. While charging your
device the LED color (red, orange or green) on the fuel
gauge of the HALO charger will change over time,
indicating the remaining capacity of the HALO
chargers battery. The red LED will start ashing when
the HALO charger is out of power before shutting
down.
Using the supplied split cable, you can charge both
the HALO charger and your electronic device at the
same time. To do this you must rst plug either the
USB connector into a computer (or another 5V input
USB charging source), and then connect the HALO
charger and your electronic device.
After removing your device from the supplied 30-pin
connector tip, the HALO charger will remain on for 30
seconds before powering o. If you wish to charge

SOS and Flashlight Operation
To enter into SOS mode slide the power switch
forward once into the middle position (labeled “SOS”
on the HALO charger). To enter into ashlight mode
slide the power switch forward into the “ON” position.
The HALO charger will charge your personal electronic
device in all three modes (OFF, SOS and ON mode).
When charging your personal electronic devices it is
recommended to leave the HALO charger in the “OFF”
position.
To Turn On/O the HALO Pocket Power StarLight
3000
The HALO charger will automatically turn on and
begin charging as soon as it is plugged into your
personal electronic device. To preserve the battery, the
HALO charger will automatically turn o if the
electronic device is fully charged and no longer
drawing power. When the HALO charger is manually
unplugged from your device it will automatically turn
o after 30 seconds. The unit may also be turned
your device again after the HALO charger has timed
o you must manually power on the HALO charger.
You can do this by holding down the button
underneath the fuel gauge for three seconds.

on/o by manually pressing the power button down
for three seconds.
Power Indicator/Battery Status
When charging/discharging, the LED will ash one of
the following colors indicating the amount of battery
level remaining: red (1%–33%), orange (34%–66%) or
green (67%–99%). The power status can also be
checked by pressing and releasing the power button
when the unit is not in use. When the HALO charger is
100% charged, the green LED will stop blinking and
turn solid green.
Storing/Handling/Cleaning the HALO Pocket Power
StarLight 3000
- Do not get wet or store in extreme temperature
conditions.
- Do not disassemble the HALO charger or attempt to
repair it.
- Use a soft cloth with soap to clean the exterior of
your HALO charger. Do not use liquid detergent or
chemicals of any kind.

Safety Precautions
- This HALO charger has been designed and manufactured to ensure personal safety. Please read the
following carefully before using. Incorrect operation
or incompatibility with your personal electronic
device may result in reduced battery performance or
damage.
- Carefully read the operating instructions, and use the
HALO charger correctly.
- Caution: The lithium-ion rechargeable battery used
in this charging device may present a risk of re or
chemical burn if mistreated. Do not disassemble,
expose to heat above 212°F (100°C) or incinerate.
- Misusing or incorrectly connecting the HALO charger
may cause electric shock to users and damage
equipment. The HALO charger may become warm
under extended high power operation. During
operation, keep the HALO charger away from
materials that may be aected by these temperatures.
- When used correctly, lithium-ion rechargeable
batteries provide a safe and dependable source of
portable power. However, if they are misused or
abused, this may result in leakage, burns, re or
explosion, causing personal injury or damage to other
devices.
- Do not disassemble the HALO charger. There are no
user-serviceable parts inside. Incorrect reassembly

may result in shock or re hazard.
- Do not drop or subject to strong impacts. Do not
operate the HALO charger if it has received a sharp
blow, or otherwise been damaged in any way.
- Do not expose the HALO charger to moisture, water,
rain, or snow.
- Do not insert any object into the ports or openings
of the HALO charger.
- Never charge the HALO charger unattended.
- There is a risk of the batteries exploding, overheating, or igniting. Do not disassemble, modify, heat or
short-circuit the batteries. Do not place in re or leave
in hot places. Do not expose to direct sunlight.
- Only charge the HALO charger by the specied
method with the specied USB cable.
- In the unlikely event of leakage or explosion use
sand or a chemical re extinguisher.
- Batteries should be recycled or disposed of as per
state and local guidelines.
Specications
Battery: Rechargeable Lithium Polymer
Power Capacity: 3000mAh
Output Volt: DC 5V
Rated AC Input: 110V~240V
Rated DC Input: 12V~24V
Output Voltage (DC): 1000mA

FCC Compliance Statement
This device complies with Part 15 of the FCC Rules.
Operation is subject to the following two conditions:
- This device may not cause harmful interference, and
- This device must accept any interference received,
including interference that may cause undesired
operation.
15.21
You are cautioned that changes or modications not
expressly approved by the party responsible for
compliance could void the user’s authority to operate
the equipment.
15.105(b)
This equipment has been tested and found to comply
with the limits for Class B digital devices, pursuant to
Part 15 of the FCC rules. These limits are designed to
provide reasonable protection against harmful
interference in a residential installation. This
equipment generates, uses, and can radiate radio
frequency energy and, if not installed and used in
accordance with the instructions, may cause harmful
interference to radio communications. However, there
is no guarantee that interference will not occur in a
particular installation. If this equipment does cause
harmful interference to radio or television reception,
which can be determined by turning the equipment
o and on, the user is encouraged to try to correct the

interference by one or more of the following
measures:
- Reorient or relocate the receiving antenna.
- Increase the separation between the equipment and
receiver.
- Connect the equipment into an outlet on a circuit
dierent from that to which the receiver is connected.
- Consult the dealer or an experienced radio/TV
technician for help.
Limited Warranty
HALO2CLOUD, LLC warrants its products to be free
from defects in material and workmanship under
normal use. Conditions are as follows:
- During the rst one year from date of purchase,
HALO2CLOUD, LLC will repair or replace the defective
product.
- HALO2CLOUD, LLC will, subject to inspection, repair
the defective product or replace it with a new or
reconditioned unit. The return must be accompanied
by a Return Materials Authorization (RMA) number to
be issued upon request, and must be shipped
prepaid. A shipping rebate will only be extended to
the customer in the event that a defect in material or
workmanship is conrmed.
- Warranty is void if the product has been improperly
handled or misused in any way, or if the label and/or

bar-coded warranty label has been removed or
tampered with.
- Warranty returns require a check for $14.95 for
processing and handling made payable to
HALO2CLOUD, LLC.
- Where applicable, all requests for warranty returns
must be accompanied by a proof of purchase and be
sent to HALO2CLOUD, LLC (www.halo2cloud.com).
- The warranty does not extend to the electronic
equipment that is used or which incorporates with
any of our products and accessories. HALO2CLOUD,
LLC shall not be held responsible for the improper use
of its products.
To contact us, email us at
support@halo2cloud.com
or call 888-907-6274
The HALO cloud logo and HALO2CLOUD, LLC
HALO Pocket Power StarLight 148 Eastern Boulevard, Suite 210
are registered trademarks of Glastonbury, CT 06033
HALO2CLOUD, LLC www.halo2cloud.com
Designed in USA
Patent Pending
Made in China
 Loading...