

Page 1

pyrig
Genesis™ Series *
16x16 and 8x8 VGA/HDTV Video Matrix Switch with
Front Panel, RS232, and Optional Audio & IP Control
WWiitthh SSttaannddaarrdd OOuuttppuuttss
* This user’s manual pertains to a variety of the Hall
Research Genesis™ Line of 16x16 and 8x8 matrix switches that
are constructed in a compact 2 RU chassis
WWiitthh RRJJ4455 OOuuttppuutts
s
UMA1137 Rev. F
© Co
1163 Warner Ave Tustin, CA 92780 Ph: (714)641-6607
ht 2010. Hall Research Technologies, Inc. All rights reserved.
Fax: (714)641-6698
Page 2

Page 3

Genesis™ Matrix Switches
Table of Contents
ABOUT THIS MANUAL ....................................................................................................... 4
1.0 GENERAL ...................................................................................................................... 5
1.1 FEATURES.................................................................................................................... 5
2.0 INSTALLATION ............................................................................................................. 6
2.1 INPUT AUDIO & VIDEO CONNECTIONS ............................................................................ 6
2.1.1 AV inputs on standard unit.................................................................................. 6
2.1.1.1 Video inputs ................................................................................................................ 6
2.1.1.2 Audio inputs ................................................................................................................ 7
2.1.2 AV inputs on units with RJ45 .............................................................................. 8
2.1.2.1 RJ45 input with Video and Power ............................................................................... 8
2.1.2.2 RJ45 input with Video and Audio ................................................................................ 9
2.2 OUTPUT AUDIO & VIDEO CONNECTIONS....................................................................... 10
2.2.1 AV outputs on standard unit.............................................................................. 11
2.2.2 AV outputs on units with RJ45.......................................................................... 11
2.2.2.1 RJ45 output with Video and Power (JP) ................................................................... 12
2.2.2.2 RJ45 output with Video and Audio (JA) .................................................................... 12
2.2.2.3 J45 output with Video and RS232 Serial (JR)........................................................... 13
2.3 POWER INPUT CONNECTION......................................................................................... 13
2.4 CONTROL INPUTS ....................................................................................................... 14
2.4.1 Basic Unit with RS-232 Control (no IP)............................................................. 14
2.4.1.1 Primary RS-232 Control Port .................................................................................... 15
2.4.1.2 Auxiliary RS-232 Control Port ................................................................................... 15
2.4.2 Units with IP control .......................................................................................... 16
3.0 OPERATION ................................................................................................................ 16
3.1 FRONT-PANEL BUTTONS AND INDICATORS ................................................................... 16
3.1.1 Viewing Audio and Video Routings or “Ties” .................................................... 17
3.1.1.1 Viewing ties by Video and Audio............................................................................... 17
3.1.1.2 Viewing ties by Video only ........................................................................................ 18
3.1.1.3 Viewing ties by Audio only ........................................................................................ 19
1
Page 4

Hall Research Technologies, Inc.
3.1.2 Making Audio and Video Routings or “Ties” ..................................................... 19
3.1.2.1 Making a tie by Input................................................................................................. 20
Video and Audio to follow each other.................................................................................... 20
Video only or Audio only ....................................................................................................... 20
3.1.2.2 Making a tie by Output .............................................................................................. 20
Video and Audio to follow each other.................................................................................... 20
Video only or Audio only ....................................................................................................... 21
3.1.3 Recalling Presets (routing patterns).................................................................. 21
3.1.4 Saving Presets (routing patterns) ..................................................................... 21
3.1.5 Disconnecting all AV outputs (blank preset) ..................................................... 21
3.1.6 To reset system to factory defaults................................................................... 21
3.1.7 To set the audio output level to high (+4dBu) ................................................... 22
3.1.8 To adjust audio input gain and attenuation....................................................... 22
3.1.8.1 Using the Front Panel VU meter ............................................................................... 23
3.1.8.2 Adjusting the input audio Gain or attenuation ........................................................... 24
3.2 CONTROL COMMANDS (RS-232 AND IP) ...................................................................... 25
3.2.1 Naming Functions............................................................................................. 26
3.2.2 Routing Functions............................................................................................. 26
3.2.2.1 To make a video tie:.................................................................................................. 26
3.2.2.2 To make an audio tie:................................................................................................ 27
3.2.2.3 To make a synchronized audio/video tie:.................................................................. 27
3.2.3 Preset Pattern Saving and Routing Functions.................................................. 27
3.2.3.1 To recall a saved preset Video routing pattern: ........................................................ 27
3.2.3.2 To save the current Audio & Video routing pattern to a preset: ................................ 27
3.2.4 Restoring Factory Defaults ............................................................................... 27
3.2.5 Rebooting the System....................................................................................... 28
3.2.6 Setting Outputs to PRO Audio Line Levels....................................................... 28
3.2.7 To Adjust Audio Input Gain and Attenuation..................................................... 28
3.2.8 To Read Volume Units (VU sound level) of output #1 ...................................... 29
3.2.9 To Read Temperature inside the Matrix ........................................................... 29
3.2.10 To Read the Firmware Version....................................................................... 29
3.2.11 To Read Supply Voltages ............................................................................... 29
3.2.12 Real Time Clock Functions............................................................................. 30
2
Page 5

Genesis™ Matrix Switches
3.2.12.1 To read or set date & time:...................................................................................... 30
3.2.12.2 Scheduling Auto recall of Preset Patterns .............................................................. 30
3.2.12.3 To read or set a schedule ....................................................................................... 31
3.2.13 Routing RS-232 Communication through the Matrix ...................................... 32
3.2.13.1 Basics of Serial Communication with the Outputs ..................................................32
3.2.13.2 Commands for Serial Communication with each Output ........................................ 33
3.2.14 IP Control Basics ............................................................................................ 34
3.2.14.1 IP Setup Commands using the RS-232 Serial Port ................................................35
3.2.14.2 IP Configuration through port 23............................................................................. 37
4.0 MAINTENANCE AND TROUBLESHOOTING............................................................. 40
4.1 MAINTENANCE ............................................................................................................ 40
4.2 TROUBLESHOOTING .................................................................................................... 40
5.0 SPECIFICATIONS ....................................................................................................... 41
APPENDIX 1 – FRONT PANEL QUICK REFERENCE GUIDE ........................................ 42
APPENDIX 2 – COMMAND SUMMARY ........................................................................... 43
3
Page 6

Hall Research Technologies, Inc.
About This Manual
This user’s manual covers several variations of the Hall Research Genesis™ 8x8
and 16x16 VGA/HD matrix switches. The Video matrix comes in various
configurations specified by a part number defined as follows. Since this is an allencompassing user’s manual, portions of this guide may not pertain to any
specific unit. Not all combinations in the following list are valid or available check with the factory.
Control Audio Input Type Input Qty Output Type Output Qty
VSM - __A__ - __B__ - __C__ __D__ - __E__ __F__
Control (Option A) Blank = Serial Interface (2ea. RS232 ports)
I = IP (Internet Protocol) & 1 ea. Serial
Audio (Option B) Blank = No Audio
A = Standard audio with no adjustments
AP = Pro audio with per chan. adjustments
Input Type (Option C) Blank = HD15 (VGA RGBHV or HDTV YPbPr)
JP = RJ45 (UTP) with power to senders
JA = RJ45 (UTP) with Audio
# of Inputs (Option D) 16 = 16 Inputs
8 = 8 Inputs
Output Type (Option E) Blank = HD15 (VGA RGBHV or HDTV YPbPr))
JP = RJ45 (UTP) with Power to receivers
JA = RJ45 (UTP) with Audio
JR = RJ45 (UTP) with RS232
JAR = RJ45 (UTP) with Audio & RS232
# of Outputs (Option F) 16 = 16 Outputs
8 = 8 Outputs
For Example:
VSM-16-16 Specifies a switch matrix with serial control interface, 16
HD15 VGA inputs and 16 HD15 VGA outputs
VSM-I-A-16-16 Specifies a switch matrix with serial & IP Interface, audio
switching , 16 HD15 VGA inputs and 16 HD15 VGA outputs
VSM-I-AP-16-JP16 Specifies a switch matrix with serial & IP interface,
professional audio (input volume adjustment), 16 HD15 VGA
inputs and 16 RJ45 outputs (video + power on twisted pair)
***Upon power-up, the switch outputs its part number on the RS-232 control
port. There is also a command (RI) for reading the identity of the switch.
4
Page 7

Genesis™ Matrix Switches
1.0 General
The Genesis™ series refers to compact, high-end matrix switches for video and
audio. The matrices are used for cross-point switching of video and audio signals.
The switch provides 8 or 16 video (and audio) outputs, each capable of
independently displaying any of 8 or 16 inputs in any combination. Additionally,
the outputs can be blanked out and/or muted. Genesis™ matrices can be used in
TV broadcasting environments, multi-media conference halls, public facilities,
large display projects, schools, courtrooms, and command & control centers.
The units are compatible with PC video from 640x480 to 1920x1600 or analog
SD/HDTV Component Video (YPbPr) from 480i to 1080p.
The Matrix can be controlled in 3 ways: manually using the buttons on the front
panel, through one or two serial RS232 control ports, or remotely via IP port.
1.1 Features
9 Allows cross-point switching of PC or HD video and audio signals
9 Multiple control methods including front panel, serial and IP ports
9 Switched output can be blanked or muted
9 Wide bandwidth to support PC resolutions to 1920x1200 or HD to 1080p
9 Balanced stereo audio outputs allow interference free connections
9 Pro Audio allows level adjustment of each audio input channel
9 VU meter (sound level) bar graph display on the front panel
9 Battery-backed Real-time clock on all models with scheduling capability
9 Monitors system voltage levels and temperature
9 Alerts user with a blinking CHECK light if system faults are detected
9 Built-in universal power supply
9 Inputs and/or outputs can be on RJ45 connectors for using CAT5 cables
9 Embed audio, power, or RS-232 along with the video on UTP
9 Compact, Rugged, Reliable, and Economical
9 Made in USA
5
Page 8
Hall Research Technologies, Inc.
2.0 Installation
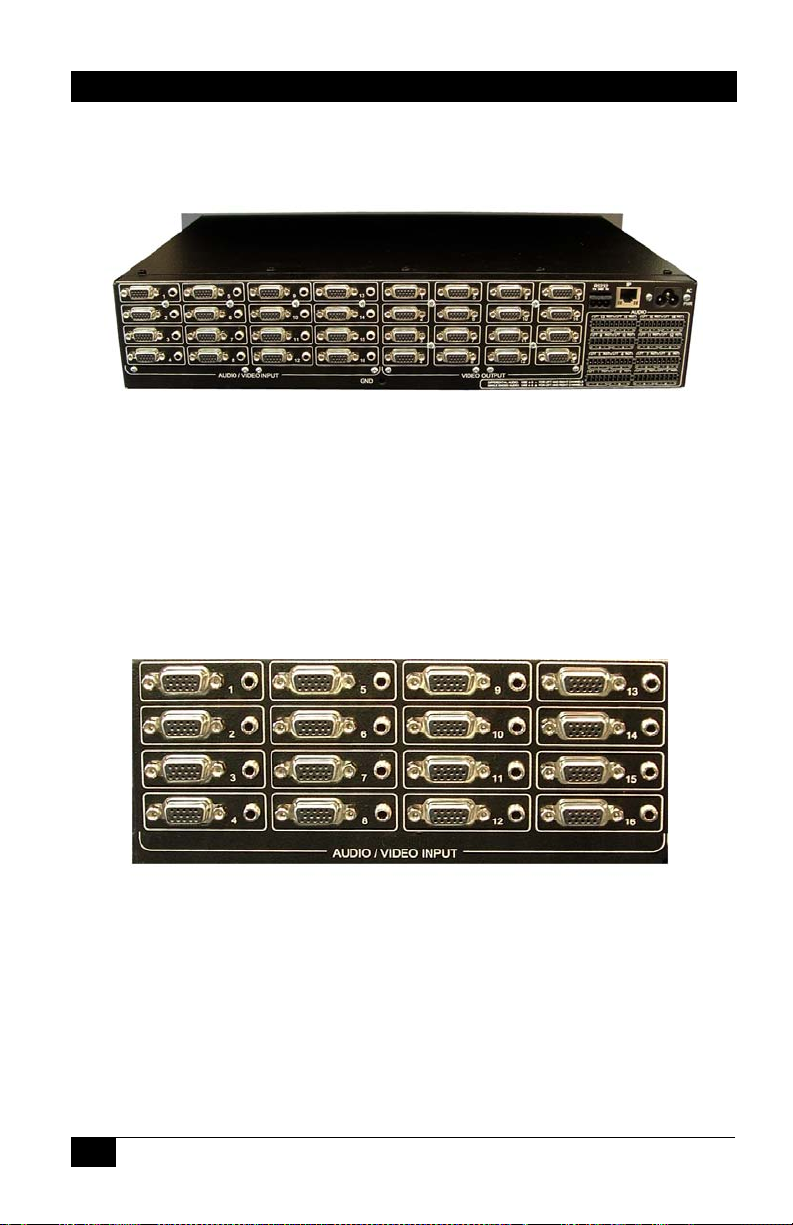
The matrix is housed in a 2RU 19” wide rack mountable enclosure. All of I/O,
control, and the power connections are on the rear of the unit.
Figure 1 – Rear panel of the standard matrix showing all the connections
2.1 Input Audio & Video Connections
Below the input connections are described first for standard units (those with
HD15 connectors) and then for units having RJ45 inputs. Please keep in mind that
some of the following information may not apply to every matrix switch.
2.1.1 AV inputs on standard unit
Figure 2 - Audio and video inputs on Standard 16x16 unit
2.1.1.1 Video inputs
The video connectors on the basic unit are HD15 female. These are compatible
with PC’s VGA video signal (RGBHV). The Matrix is also compatible with
analog SD or HDTV video (YPbPr) with resolutions from 480i to 1080p. To
connect these types of signals to the matrix, HD15 to 3-RCA cables may be
required.
6
Page 9
Genesis™ Matrix Switches
Technical Note about the Video Inputs
The HD15 inputs of the matrix handle only the color and sync signals.
EDID (extended display identification data) is absent. EDID is normally
used by the source PC to read pertinent information from the
connected display. This information includes a list of the resolutions
that are supported by the LCD. If EDID is not implemented, the source
PC is unaware of the specific LCD connected to it. Generally this is not
a problem since in the absence of EDID; most PC’s allow the user to
select from a set of default resolutions for output. Some PC’s may not
output any video signal, or only allow limited resolution settings with
the absence of EDID. One way to resolve this is to change the display
settings of the PC to show all modes and not detect Plug and Play
LCD. The procedure for doing this varies depending on the operating
system and the video card in the PC. It is generally found under:
Control Panel > Display Settings > Advanced > Monitor tab.
An alternative method is a hardware solution which does not require
any changes to the PC’s display settings. Hall Research manufactures
EDID Emulators that are constructed as simple HD15 pass-through
adapters. Inside, they emulate an LCD’s EDID supporting a wide range
of 4x3 and 16x9 PC resolutions.
Figure 3 – Pass-Thru EDID
You would simply plug one of these at your video source or input to the
matrix.
2.1.1.2 Audio inputs
The audio input on the basic unit uses standard 3.5mm mini-stereo connectors. To
use these with PC audio, standard male-to-male audio extension cables would be
required. To connect from typical TV sources with separate right and left
connectors, 3.5mm male to 2 RCA cables would be needed.
For mono audio, then the tip of the 3.5mm connector (tip = left channel) should
be used.
Emulator
Model: EM-EDID-HD15
7
Page 10

Hall Research Technologies, Inc.
Technical Note about the Audio Inputs
Since the audio inputs are unbalanced (single ended), the ground
reference of the source has to be the same as the matrix. Of course
the cable connecting the two is tying the grounds across but if there
are currents flowing in the ground it can create potential differences
that would manifest as noise. The quality of grounding at the audio
source and the matrix are important. For example if the input source is
a desktop PC, as long as the PC is properly grounded and the audio
cable length is not excessive, you can expect good results. On the
other hand if the input is a notebook PC running on battery, there is no
ground reference at the source so it gets its reference through the
audio (and video) cable connection to the matrix. This should also be
okay. However if it is plugged in through its external power brick, noise
can be induced. This is because most notebook power supplies do not
properly provide an AC ground path to the system ground (some only
have only 2 prong AC cords). The switching power supply circuit will
inject noise into the audio lines. In this case the solution may be to
attach a low resistance ground strap to the notebook. The other option
for eliminating the noise is to use a stereo audio Balun (or isolator).
The Balun essentially couples the audio through a transformer so the
audio grounds are isolated. Baluns can also cure noise pickup in long
cable runs.
2.1.2 AV inputs on units with RJ45
Two types of RJ45 input configurations may be possible. Please contact Hall
Research sales for availability and delivery information. The model number
designates the input either as:
JP (RJ45 with power) or
JA (RJ45 with Audio).
2.1.2.1 RJ45 input with Video and Power
The JP units are compatible with Hall Research’s Mini-Cat® series of senders.
The Matrix can also send power to one channel senders via the CAT5 cable so
that no external power supply would be needed. This is applicable to senders
with only 1 RJ45 output as listed in the following table.
8
Page 11

Genesis™ Matrix Switches
PART NUMBER
UV1-S
Mini-Cat, VGA over CAT5 Sender
Includes Power Supply. Can also be powered via Cat5
from Receiver or Matrix Switch
UV1-S-WP
Mini-Cat, VGA over CAT5 Sender (local) in a Single
gang Wall Plate. Includes Power Supply. Can also be
powered via Cat5 from Receiver or Matrix Switch
UV1-SL
Mini-Cat, VGA over CAT5 Sender (local) with LoopThru VGA Port for Local Monitor Connection. Includes
Power Supply. Can also be powered via Cat5 from
Receiver or Matrix Switch
UVB1-CP-S Active Balun with Ground Loop Isolation
Component Video (YPbPr) Active Balun Sender for
SD/HDTV for up to 1000 ft and resolutions up to 1080p.
Compatible with UVB1-CP-R and UV1-R-WP wallplate
receivers. Includes Power Supply. Can also be powered
via Cat5 from Receiver or Matrix Switch
2.1.2.2 RJ45 input with Video and Audio
The JA units are compatible with Hall Research’s UVA series of senders. These
senders transmit VGA video and audio to the matrix. The audio is received as a
balanced signal and is immune to noise pickup or ground noise.
The matrix with JA input option is compatible with the following UVA senders
9
Page 12
Hall Research Technologies, Inc.
PART NUMBER
UVA-WP
VGA + Audio Sender on a single-gang Wallplate.
Has one RJ45 output. Comes with Power supply. If
source has 5v on pin 9 per VESA standard, unit can be
port powered without attaching the supply.
UVA-2
2-Channel VGA + Audio to UTP (CAT5) Video Splitter
Sender.
UVA-4
4-Channel VGA + Audio to UTP (CAT5) Video Splitter
Sender. Supports 1600x1200. Local ports
UVA-8
8-Channel VGA + Audio to UTP (CAT5) Video Splitter
Sender. Supports 1600x1200. Local ports
2.2 Output Audio & Video Connections
The output connections are described below first for standard units (with HD15)
and then for those with RJ45 outputs.
Figure 4 – Standard matrix audio and video outputs
10
Page 13

Genesis™ Matrix Switches
2.2.1 AV outputs on standard unit
The video output connectors on the basic unit are HD15 female. These are
compatible with PC’s VGA video signal (RGBHV). The Matrix is also
compatible with YPbPr HDTV signals with the use of HD15 to 3 RCA adapter
cables.
The audio outputs of the matrix are balanced. So a + and a – are provided for each
side. There is also a ground connection available. If you are going to connect the
matrix output to a single-ended audio device (one with RCA or phono
connectors); then use the + of the left, + of the right, and ground. On the other
hand, if you will be connecting the output to professional audio gear it is best to
use the differential + and – (balanced) outputs of each side that offer immunity to
noise.
Figure 5 – Typical balanced audio output connector
The balanced audio outputs are provided on detachable screw-terminals. Mating
connectors for all outputs are also provided.
Technical Note about Professional Audio Output
Matrices with Pro Audio option can individually adjust the audio levels
at each input. Additionally they can set all the outputs to “pro line-level”
of +4bBu. This is a global setting which boosts all the outputs to a high
line level.
2.2.2 AV outputs on units with RJ45
Currently there are three types of RJ45 output configurations possible. Please
contact Hall Research sales for availability and delivery information. The model
number designates the outputs either as:
JP (video on RJ45 with power)
JA (video on RJ45 with Audio)
JR (video on RJ45 with RS-232 Serial)
Other RJ45 output configurations will be forthcoming (such as JRA video, audio,
and serial).
11
Page 14
Hall Research Technologies, Inc.
Figure 6 – Matrix Switch with UTP outputs
2.2.2.1 RJ45 output with Video and Power (JP)
Matrices with JP output feature are compatible with Hall Research’s Mini-Cat®
series of receivers. The Matrix can also send power to the remote receivers via the
Cat5 cable so that no external power supply would be needed there. Compatible
receivers are listed in the following table.
PART NUMBER
UV1-R
Mini-Cat, VGA-on-UTP Receiver
UV1-R-WP
Mini-Cat, VGA-on-UTP Receiver, Single gang Wall Plate
UVB1-CP-R
Component Video (YPbPr) Active Balun Receiver for
SD/HDTV for up to 1000 ft and resolutions up to 1080p.
2.2.2.2 RJ45 output with Video and Audio (JA)
The JA units are compatible with Hall Research’s URA series of receivers. The
audio is sent as balanced signal and is immune to noise pickup or ground noise.
Compatible receivers are listed in the following table.
12
Page 15

Genesis™ Matrix Switches
PART NUMBER
URA
UTP (CAT5) VGA + Audio Receiver. Cable compensation
to 1000 ft
URA-X2
UTP (CAT5) VGA + Audio Receiver with 2 identical VGA
and Audio outputs
Acts as a combination URA & 2-channel A/V splitter.
Note about Screw-Terminal Audio Outputs on units with RJ45
If the matrix has the audio switching feature, then the balanced audio
outputs are always active even if the RJ45 outputs have audio (JA
output option). It is important to note that the channel number for the
audio output is the same. So RJ45 output #1 has the same audio as
screw-terminal audio output #1.
2.2.2.3 J45 output with Video and RS232 Serial (JR)
The JR units are compatible with Hall Research’s UR232 series of receivers for
unidirectional (send only) RS-232 communications. For bidirectional
communications, please contact Hall Research sales for the compatible receiver.
Currently available compatible receivers are listed in the following table.
Technical Note about Video + RS232 Outputs
The matrices with JR output option are capable of sending and
receiving RS232 data independently at each of the RJ45 outputs with
the video on the same Cat5 cable. The output channel number and
baud rate are dynamically set by the user (via serial or IP control port).
The matrix then sends user’s command at the specified baud rate to
the designated output and buffers any response from the selected endpoint for the user to read back. This is described in further detail later in
this manual.
2.3 Power input connection
The matrix has a built-in universal power supply. The AC input connector on the
rear of the matrix is an IEC320/C6 and is always shipped with a North American
power cord (shown below). Users in countries with different plug type should
13
Page 16

Hall Research Technologies, Inc.
purchase a compatible power cord or use an adapter. The Matrix supports both
110 V, 60 Hz and 220 V, 50 Hz power systems. There is a power on indicator
light on the front panel
Figure 7 –IEC320 / C6 power cord
2.4 Control Inputs
The matrix can be controlled from either RS-232 or through IP.
2.4.1 Basic Unit with RS-232 Control (no IP)
The basic system without IP feature actually has 2 separate and independent RS232 control ports.
The main RS-232 port is on a screw terminal and the auxiliary port is on an RJ45.
Caution on RJ45 Control Input
Both matrices with IP control and those without have an RJ45
connector next to the RS-232 screw terminal.
This RJ45 connector is a 10/100 Base-T Ethernet for the matrix with
IP, or a secondary RS-232 Serial control port for those matrices
without IP feature. It is easy to confuse their function.
A sure way to tell if the RJ45 control input is LAN or Serial is by the
presence of little LED indicators to the sides of the connector. If the
connector has these lights, then it is a LAN connection, otherwise it is
an RS-232 serial connection.
Figure 8 – IP input versus Auxiliary RS-232
14
Page 17

Genesis™ Matrix Switches
2.4.1.1 Primary RS-232 Control Port
This is a 3-terminal captive screw input. A detachable mating connector is
provided. The function of each pin is designated on the panel above the
connector. Below is a diagram for connection this port to a PC’s DB9 serial port.
Figure 9 – Primary RS-232 to PC cable
2.4.1.2 Auxiliary RS-232 Control Port
The matrix switches without IP control have a secondary serial port that can work
independently of the primary port. The user can control the matrix from either or
both ports.
The auxiliary RS-232 connector is an RJ45. Make sure to not connect this to any
LAN devices. The pinout for the auxiliary RS-232 follows the basic EIA-561 for
TX RX and Ground. Optional current limited 12v DC may also be provided (max
rated output current of 50 maDC) that can be used to power external keypads or
control devices, please contact Hall Research if you need to draw power from this
connector.
Never open the unit’s cover. Lethal voltages exists inside the unit
Opening the unit also voids the warranty on the unit.
The pinout is shown below.
Figure 10 – Aux RS-232 port pinout
Caution High-Voltage
15
Page 18

Hall Research Technologies, Inc.
2.4.2 Units with IP control
Matrices with the letter ‘I’ in the control block of the part number are equipped
with 10/100 base-T Ethernet connection and can be controlled via IP. They also
have the primary RS-232 serial control port on the screw terminal input. The
command set for controlling the matrix via the IP port is exactly the same as the
RS-232 port. The basic method of control is via Telnet. Please see section entitled
“IP Control Basics” for further details.
3.0 Operation
The Genesis™ Matrices can be operated using the front panel buttons, by serial
commands via RS232, or through the IP port.
3.1 Front-Panel Buttons and Indicators
An image of the front panel for the 16x16 matrix is shown below. The 8x8 units
have fewer INPUT and OUTPUT buttons than shown in this picture.
Figure 11 –VSM-16-16 front panel controls & indicators
The front panel can be used for the following purposes:
• Monitor Power On/Off status
• View current routings (ties) either from input or from output
• Make new ties either from input or from output
• Blank or mute a particular or all outputs
• Recall preset patterns
• Save preset patterns
• Disconnect all ties
• Adjust volume (gain level) of each input’s audio for Pro versions
• Display current sound level as a digital light bar VU meter
• Set the output audio to high line level (of +4dBu) on Pro units
• Recall factory presets
16
Page 19

Genesis™ Matrix Switches
All of the front panel switches have built-in LEDs that help in the operation. The
functions of front panel are carefully designed for intuitiveness. With just a little
practice, one can learn to quickly monitor and control the matrix.
3.1.1 Viewing Audio and Video Routings or “Ties”
There are three different ways to view a tie: Video & Audio, Video only, or
Audio only. The point of view can also be either from input side (where the
selected input is routed to), or from the output side (see which input is feeding the
selected output). You can also use the ▲ and ▼ buttons to quickly go through
and check status of all channels. Furthermore, during viewing of ties you can
make new ties.
3.1.1.1 Viewing ties by Video and Audio
Press and release both VID and AUD buttons so that the LEDs of the VID and
AUD buttons are lit, which indicates that you are going to view both together.
At this point you have to decide if you want to view from the point of view of the
input or the output side.
… To View from input side
Press and release any Input button, the backlit LED of that button will light, and
all the backlit LEDs for the outputs whose video and audio are both
to this input will also light up solid.
currently tied
Note
If there is audio breakaway, the output LED will not be lit. An example
may be that output #2 video is tied to input #7 while output #2 audio is
tied to input 12. In this case if you start the viewing from input #7,
output #2 will not be lit even though input 7 video is routed to it. To see
video ties independently from audio ties, only the Video or the Audio
LED on the front panel should be lit, not both.
You can now use the ▲ and ▼ buttons to quickly go through all inputs.
You can also make new ties by hitting output buttons. New ties will not take
effect unless ENTER is hit (see next section).
When you are done viewing ties, to exit you can hit ENTER. If you don’t hit any
buttons, then after 8 sec the view function times out and all the input and output
LEDs will go out.
17
Page 20

Hall Research Technologies, Inc.
… To View from output side
Press and release any output button, the backlit LED of that button will light, and
if that output’s video and audio are tied to one particular input, that input LED
will also light.
Note: If there is audio breakaway, the input LED will not be lit
You can now use the ▲ and ▼ buttons to quickly go through all outputs.
You can also make new ties by hitting another input button. New ties will not take
effect unless ENTER is hit (see next section).
When you are done viewing ties, to exit you can hit ENTER. If you don’t hit any
buttons, then after 8 sec the view function times out and all the input and output
LEDs will go out.
3.1.1.2 Viewing ties by Video only
Press and release the AUD and/or VID buttons so that the backlit LED of the VID
button is lit and the AUD button is off
At this point you have to decide if you want to view from the point of view of the
input side or the output side.
… To View from input side
Press and release any Input button, the backlit LED of that button will light, and
all the backlit LEDs for the outputs whose video is currently tied to this input will
also light up solid.
You can now use the ▲ and ▼ buttons to quickly go through all inputs.
You can also make new ties by hitting output buttons. New ties will not take
effect unless ENTER is hit (see next section).
When you are done viewing ties, to exit you can hit ENTER. If you don’t hit any
buttons, then after 8 sec the view function times out and all the input and output
LEDs will go out.
… To View from output side
Press and release any output button, the backlit LED of that button will light, and
if that output’s video is tied to any input that input LED will also light.
You can now use the ▲ and ▼ buttons to quickly go through all outputs.
You can also make new ties by hitting another input button. New ties will not take
effect unless ENTER is hit (see next section).
18
Page 21

When you are done viewing ties, to exit you can hit ENTER. If you don’t hit any
buttons, then after 8 sec the view function times out and all the input and output
LEDs will go out.
3.1.1.3 Viewing ties by Audio only
Press and release the AUD and/or VID buttons so that the backlit LED of the
AUD button is lit and the VID button is off
At this point you have to decide if you want to view from the point of view of the
input side or the output side.
Genesis™ Matrix Switches
… To View from input side
Press and release any Input button, the backlit LED of that button will light, and
all the backlit LEDs for the outputs whose audio is currently tied to this input will
also light up solid.
You can now use the ▲ and ▼ buttons to quickly go through all inputs.
You can also make new ties by hitting output buttons. New ties will not take
effect unless ENTER is hit (see next section).
When you are done viewing ties, to exit you can hit ENTER. If you don’t hit any
buttons, then after 8 sec the view function times out and all the input and output
LEDs will go out.
… To View from output side
Press and release any output button, the backlit LED of that button will light, and
if that output’s audio is tied to any input that input LED will also light.
You can now use the ▲ and ▼ buttons to quickly go through all outputs.
You can also make new ties by hitting another input button. New ties will not take
effect unless ENTER is hit (see next section).
When you are done viewing ties, to exit you can hit ENTER. If you don’t hit any
buttons, then after 8 sec the view function times out and all the input and output
LEDs will go out.
3.1.2 Making Audio and Video Routings or “Ties”
This procedure is an extension of “Viewing Ties” described in above paragraphs.
19
Page 22

Hall Research Technologies, Inc.
3.1.2.1 Making a tie by Input
Video and Audio to follow each other
Make sure both VID and AUD LEDs are lit, indicating that your changes will be
synchronized (audio and video are together). Video and audio will be routed to
the same input channel.
Press and release any Input button, the backlit LED of that button will light, and
all the backlit LEDs for the outputs tied to it will light up solid. At this point,
pressing any output buttons will be breaking or making connections.
To disconnect a tie, press the lit output button once. To make new ties, press any
of the unlit output buttons. The output LED will be blinking to indicate a pending
change of state. If you change your mind simply press the blinking output LED
again and it will go back to its previous state.
When you are done, press ENTER to save new changes. If you wait too long (8
seconds of inactivity) your changes will be lost and all the input and output LEDs
will go out.
Video only or Audio only
Press and release the AUD and/or VID buttons so that the backlit LED of the
desired button is lit and the other one is off.
Follow the same procedure as described above
3.1.2.2 Making a tie by Output
Video and Audio to follow each other
Make sure both VID and AUD LEDs are lit, indicating that your changes will be
synchronized (i.e. audio and video are from the same input).
Press and release any Output button, the backlit LED of that button will light,
and all the backlit LEDs for the input tied to it will light up solid. At this point,
pressing any output buttons will be breaking or making connections.
To disconnect a tie, press the lit input button once. To make a new tie, press any
of the unlit input buttons. The new input LED will be blinking to indicate a
pending change of state. If you change your mind simply press the blinking input
LED again and it will go back to its previous state.
When you are done, press ENTER to execute and save the changed route. If you
wait too long (8 seconds of inactivity) your changes will be lost and all the input
and output LEDs will go out.
20
Page 23

Video only or Audio only
Press and release the AUD and/or VID buttons so that the backlit LED of the
desired button is lit and the other one is off. Follow the same procedure as
described above.
Genesis™ Matrix Switches
3.1.3 Recalling Presets (routing patterns)
The number of presets accessible from front panel is the same as # of inputs
(however through the IP or Serial port, the unit can store and recall up to 16
presets even for an 8 input Model)
Press and release the Preset button. The button will light up solid. Then press and
release the input button (it will light up) and hit ENTER. You have 8 seconds to
hit ENTER or the action will be cancelled. This will recall the desired preset tie
pattern.
Note that a recalled preset replaces the current tie configuration, which will be
lost unless it has been stored as another preset.
3.1.4 Saving Presets (routing patterns)
The current tie configuration can be saved as a preset to be called up later on.
To save the current AV routing pattern, press and hold the PRESET button for 3
sec, the backlit LED will start flashing (this means that save preset function has
been activated). Press the desired input button to save the preset (the button with
light up). Then hit the ENTER button to complete the operation. Again, you have
8 seconds to complete this sequence.
3.1.5 Disconnecting all AV outputs (blank preset)
There is a hidden blank preset (think of it as Preset #0) in the system that can be
very useful in clearing all ties. A blank preset is a preset without any ties selected
in it. To Recall a blank preset, press and release the Preset button, press and hold
the ARROW UP (▲) button, and simultaneously press the ARROW DOWN (▼)
button. This will clear all ties. From here, the user can make new ties or save the
blank tie over a preset that had ties in it which effectively erases that preset.
3.1.6 To reset system to factory defaults
Disconnect the AC power from the unit. Press and hold the ENTER button on the
front panel while plugging in AC power. Continue to hold the ENTER button
until all LEDs on the front panel flash on. System reset clears all ties, presets,
schedule settings, and unit name.
21
Page 24

Hall Research Technologies, Inc.
3.1.7 To set the audio output level to high (+4dBu)
This function is applicable to units with Pro Audio option only. The matrix’s
Audio outputs can be globally set for high pro-audio line levels of (+4dBu).
Setting the pro output affects all the outputs simultaneously.
Press and hold the AUD button for approximately 3 seconds until the backlit LED
starts to blink. Either the ▲ (for high output) or the ▼ (for low output) button
LED should be lit indicating a Pro-audio level (of +4dBu) or a standard-audio
level setting (of -10dBV).
If you select an input channel in this mode, the Output level setting
mode will be terminated and the unit will enter input gain attenuation
setting. To go back to the audio-level changing mode again, unselect
the current input channel by pressing it once
3.1.8 To adjust audio input gain and attenuation
This function is applicable to units with Pro Audio option only. It is very useful
for ensuring no noticeable volume difference among the audio sources, and
compatibility with a mixture of consumer and pro line levels at the inputs.
Press and hold the AUD button for approximately 3 seconds until the backlit LED
starts to blink. Press and release an input button whose audio you want to adjust.
The associated input LED lights up, the matrix will temporarily route the audio
input from the selected channel to audio output #1 and monitor its level on the
front panel. Any other outputs tied to this selected input channel stay connected
during this adjustment procedure.
The installer can connect an external VU meter to output #1 or rely on the front
panel (bottom row of lights) that would act as a digital VU meter.
In this mode both rows of 16 LED’s on the front panel serve a function.
The top row not only shows the channel for which you are adjusting the audio
(solid lit), but it also shows audio volume setting blinking position. The bottom
row (output LED’s) acts as a VU meter.
Note about VU Meter Function
The front panel VU meter function is available on both the 16x16 and the
8x8 units with standard (A) or Pro (AP) audio versions. However on the
Note
standard version the
The user can do that at the source and use the matrix to monitor the level.
▲ and ▼ buttons do not change the volume level.
22
Page 25

Genesis™ Matrix Switches
3.1.8.1 Using the Front Panel VU meter
All units with audio option have this feature. Enter the audio adjustment mode as
described above. The bottom row of LEDs (output channel row) indicates the
sound level. The indicated gain/attenuation is based on the matrix’s internal
reference level of -10dBV (standard line-level).
On a 16x16 matrix LED position 10 corresponds to 0 VU (desired peak level).
Position 1 corresponds to -20 VU and position 16 corresponds to +6 VU.
Figure 12 –Comparison with Analog VU meter on a 16x16 Matrix
Figure 13 – Graph of VU dB level versus LED bar length
23
Page 26

Hall Research Technologies, Inc.
3.1.8.2 Adjusting the input audio Gain or attenuation
Enter the audio adjustment mode as described above.
Initially the audio gain level at the input is set to 0 db (gain of 1). Press and
release the ▲ or ▼ button to change the gain settings. Each push is about 1dB
change (see graph below). Press and hold the UP or DOWN button for more than
1 second, the gain will keep changing at the rate of 3dB per second. As you
increase or decrease the volume, besides the LED on the top row that is showing
the input channel you are adjusting, another blinking LED indicates the audio
gain setting. Again, position #10 indicates 0 db (or gain of 1). The range of
adjustment is about -24 dB to +6 dB (position 1 to position 16).
Figure 14 – Graph of Audio Gain level versus Volume setting LED position
In adjusting the volume you want to keep the sound level as read on the VU meter
at or below Position 10 (0 VU) for the loudest level at the input.
When finished, press the ENTER button to save any changes or exit the audio
adjustment mode. When you exit this mode, the last audio input that was routed to
output #1 prior to entering the setting mode will be restored!
Audio Setup mode times out if no activity is detected for 1 minute, the last input
gain settings will be saved.
24
Page 27

Genesis™ Matrix Switches
3.2 Control Commands (RS-232 and IP)
The Genesis™ Matrices can be controlled via an external control system by using
either the standard RS-232 or the optional IP port. Any program capable of
standard serial communication in ASCII format is capable of working with the
matrix. Most PCs with Windows™ OS have HyperTerminal™ or equivalent.
There are also many free Terminal Emulator and Telnet software available for
download on the internet.
Note on RS-232 port availability on your PC
Most PCs and notebooks do not have a serial port. So to program the
Matrix Switch you may need a USB to RS-232 Serial converter. These
are available from Hall Research (Model USB-RS232-1).
Figure 15 – USB to RS-232 Adapter
Use Figure 8 to connect the unit to the PC’s serial port. Use 9600 Baud, 8 bits, No
Parity, 1 Stop bit, No flow control.
Upon power up, the Matrix will output a screen similar to the figure below
through its serial port(s).
© Hall Research
Version 2.4
Build # 17
VSM-16-16
When the front panel is in use (for example to make new ties or recall
presets, etc), only status request commands are accepted. Any other
command will be prompted with the following response:
Front panel is in use<cr>
All front panel operations have a timeout function so even if a user
started to use the panel but forgot to finish the process, it will time out
in a few seconds and full serial port functionality will be restored.
Figure 16 – Power on screen
Note on RS-232 commands
25
Page 28

Hall Research Technologies, Inc.
3.2.1 Naming Functions
The matrix unit can be named. Its name can be up to 10 characters long.
To assign or retrieve a unit name:
Command: NU<cr> stands for Name Unit
Response:
xxxxxxxxxx (current name up to 10 characters)
Rename unit:
No change<cr>
If you hit <cr> or wait 5 seconds (command times out) the unit will respond with:
Cancelled<cr>
Otherwise you have 5 seconds to change the name by entering up to 10 ASCII
characters followed by <cr>. If you just send a <cr> then the stored name will not
be changed. If you enter more than 10 characters, then the 1
st
10 characters will
be saved as the name and the rest discarded.
3.2.2 Routing Functions
Wildcard character
Video routing commands are specified from the point of view of the output.
The wildcard character ‘*’ is acceptable for output (but not input). This
means that any place a ‘*’ is used as a valid command, it means ALL
OUTPUTS. For example, CV*,1 means to connect all outputs to input #1.
Blanking Video or Muting Audio
When a ‘0’ is used as an input channel number, it means that the intent is to
either blank (when used with a video command), mute (when used with an
audio command) or both. For example, CV*,0 means to blank all video
outputs. CA*,0 means to mute all audio outputs.
In addition, these commands can be used to monitor or query the status of system
ties. Omitting the input channel will result in a response of the current routing for
that output. In entering channel numbers leading zeros are acceptable hence you
can specify channel 7 as 07 or just 7.
3.2.2.1 To make a video tie:
Command: CVn,m<cr> stands for Connect Video n = output, m= input
Note: Unit accepts leading zeros in the numbers. Spaces are ignored. To check the
source of a particular output, omit the input channel and just enter CVn<cr>.
Response: CVn,m<cr>
If you enter CVn<cr> then you will get the response as above for the n output
26
Page 29

Genesis™ Matrix Switches
3.2.2.2 To make an audio tie:
Command: CAn,m<cr> stands for Connect Audio n = output, m= input
Note: Unit accepts leading zeros in the numbers. Spaces are ignored. To check the
source of a particular output, omit the input channel and just enter CAn<cr>.
Response: CAn,m<cr>
3.2.2.3 To make a synchronized audio/video tie:
Command: COn,m<cr> stands for Connect Output n = output, m= input
Note: Unit accepts leading zeros in the numbers. Spaces are ignored. To check the
source of a particular output, omit the input channel and just enter COn<cr>.
Response:
CAn,m<cr>
CVn,m<cr>
Note: If the system does not have audio, it will still accept this command but
response will be missing audio tie line.
3.2.3 Preset Pattern Saving and Routing Functions
3.2.3.1 To recall a saved preset Video routing pattern:
Command: PRx<cr> stands for Preset Recall. x = preset # can be 1 to 16
Response:
PRx<cr>
CVn
CVn
1,m1
2,m2
<cr>
<cr>
3.2.3.2 To save the current Audio & Video routing pattern to a preset:
Command: PSx<cr> stands for Preset Save, x = preset # can be 1 to 16
Response:
PSx<cr>
3.2.4 Restoring Factory Defaults
To restore factory defaults:
Command: FR<cr> stands for Factory Restore
Response: Are you sure (Y,N)?<cr>
Note: You have 5 seconds to press Y, or the command is cancelled.
Factory defaults restored<cr> if the “Y” was entered.
Cancelled<cr> if other key was entered or command times out.
27
Page 30

Hall Research Technologies, Inc.
Note: Restore Factory command will clear all ties, presets, schedule settings, and
unit name. -AP units with input volume adjustment will set input volume to 0 dB
(gain of 1) on all channels. Upon completion of this command, all LEDs on the
front panel will flash on and off.
3.2.5 Rebooting the System
To perform a system reset/reboot (same effect as cycling AC power):
Command: FB<cr> stands for Firmware Boot
Response:
Are you sure (Y,N)?<cr>
Note: You have 5 seconds to press Y, or the command is cancelled.
3.2.6 Setting Outputs to PRO Audio Line Levels
The matrix’s outputs can be set for Pro-audio line levels of (+4dBu). Setting the
pro output affects all the outputs simultaneously and has no bearing on the audio
input volume adjustment procedure.
To set audio output line-level mode:
Command: LPn<cr> stands for Line level Pro n = 0,1 (0 consumer, 1 pro)
If the parameter n is missing, then the unit will respond with the current setting.
esponse: LPn<cr>
R
3.2.7 To Adjust Audio Input Gain and Attenuation
This command is valid for units with Pro Audio (-AP). The wildcard character ‘*’
is acceptable for input audio channel. In addition, this command can be used to
monitor or query the audio input gain. Omitting the gain value will result in a
response of the current setting for that output
To set the audio gain (default value is 10 that corresponds to a gain of 0 db):
Command: AGn, g<cr> stands for Audio Gain n = input channel (could be *), g=
value (0 to 16 where 0 is mute & 16 is +6dB see figure 14 X-axis 0 to 16)-
Response: AGn, g<cr>
Note: if you enter AGn<cr> then you will get the response as above for the n
input
28
Page 31

Genesis™ Matrix Switches
3.2.8 To Read Volume Units (VU sound level) of output #1
This command returns the height of hypothetical bar LED indicator having a
height of 16 segments. It will return a number from 0 to 16 with 10 being 0 db
levels. So if the output #1 is at 0 dB (900 mV p-p Sine wave) it returns 10. This
value is 0-16 regardless of the type of matrix.
Command: RB<cr> stands for Read Bar
Response: 0 ~ 16<cr> 10 would be 0 dB on a VU meter
3.2.9 To Read Temperature inside the Matrix
Command: RT<cr> stands for Read Temperature
Response:
Temperature in degrees C = 32.500000<cr>
Temperature in degrees F = 90.500000<cr>
3.2.10 To Read the Firmware Version
Command: RI<cr> stands for Read Identity
Response:
Unit's name: ← User defined name of the unit
Version 2.4 ← Firmware Version
Build # 7 ← Build number (for mfg purposes only)
VSM-I-A-8-8 ← Model #/Characteristics of the unit
3.2.11 To Read Supply Voltages
The supply voltages consist of clock battery voltage, 5V supply, and 12V supply.
Command: RV<cr> stands for Read Voltages
Response:
RTC Battery Voltage = 2.9876704
+5V Supply = 4.9473252
+12V Supply = 12.4646893
29
Page 32

Hall Research Technologies, Inc.
3.2.12 Real Time Clock Functions
3.2.12.1 To read or set date & time:
Command: DS<cr> stands for Date Set
Response:
Friday 09/18/08 12:27:15pm
Enter the year (00-99): Hit Enter if you want to keep previous value; hit Esc to exit
Enter the month (01-12):
Enter the date (01-31):
Enter the day of the week (1=Sun – 7=Sat):
Enter the hour (1-12):
Enter the minute (00-59):
Enter the second (00-59):
Enter AM/PM (0-1):
Notes: You have 16 seconds to make your selection, or the command is automatically
cancelled. To skip the current prompt without making a change, press ENTER.
Cancelled <cr> (if ESC or an invalid value was entered)
3.2.12.2 Scheduling Auto recall of Preset Patterns
The matrix provides up to 4 specific times throughout the day where any preset
patterns (0 to 16) can be recalled. You can set a schedule that is the same every
day (daily) or is different for weekdays and weekends. Presets 1 to 16 are those
saved by the user, and preset 0 disconnects all video and audio outputs
When defining a schedule, to skip the current prompt without making a change,
Notes on Scheduling Presets
press ENTER. Press ESC to exit the schedule setting at any time. Timer values
should be entered in the proper order meaning that Timer1 should occur prior to
Timer2, Timer2 should occur prior to Timer3, and etc. Timers will be disabled if
hour, minute, and AM/PM are set to 0. So if for example, your schedule only has
to set the pattern once in the morning, leave the data for timers 2 through 4 at
zero and only enter values for timer 1. If Timer values are not set properly (in
ascending order), an error message will be prompted
30
Page 33

Genesis™ Matrix Switches
3.2.12.3 To read or set a schedule
Command: SS<cr> stands for Schedule Set (current schedule is displayed)
Response:
------------------ Weekday ------------------ (on/off)
Timer1 = 06:00am Preset Pattern = 1
Timer2 = 12:05pm Preset Pattern = 3
Timer3 = 05:30pm Preset Pattern = 7
Timer4 = 09:00pm Preset Pattern = 12
------------------ Weekend ------------------ (on/off).
Timer1 = 02:00am Preset Pattern = 1
Timer2 = 06:00am Preset Pattern = 5
Timer3 = 12:00pm Preset Pattern = 13
Timer4 = 06:00pm Preset Pattern = 16
Select Schedule Setting
1 = Weekday
(on/off) indicates if the
Schedule is in-effect or
not.
Weekday and weekend
are both on or both off.
If the 4 timers are not in
ascending order, the unit
does not let you turn the
schedule on; fix any
inconsistencies before
turning on.
00:00am is not a valid
time setting and is used to
turn off a timer
2 = Weekend
3 = Daily
4 = Schedule On
5 = Schedule Off
ESC = Quit
Note: You have 16 seconds to make your selection, or the command is cancelled.
Response: if “1”, “2” or “3” were entered
Enter weekday Timer1 hour (00-12): Hit Enter if you want to keep previous value
Enter weekday Timer1 minute (00-59):
Enter weekday Timer1 AM/PM (0-1):
Enter weekday Timer1 preset pattern (0-16):
.
Remember Preset 0 disconnects outputs
…… (Data for timers 2 & 3, hit Esc if you are done at any time)
.
Enter weekday Timer4 hour (00-12):
Enter weekday Timer4 minute (00-59):
Enter weekday Timer4 AM/PM (0-1):
Enter weekday Timer4 preset pattern (0-16):
Response: if “4” was entered (schedule on).
Schedule setting is ON<cr>
- - - - - Alternate Response: In case of an inconsistency or error in
entry
Schedule setting cannot be ON because weekday (weekend) TimerX is less than or equal
to TimerY<cr>
31
Page 34

Hall Research Technologies, Inc.
Response: if “5” was entered (schedule off).
Schedule setting is OFF<cr>.
Response:
if “ESC” was entered (Quit).
Quit schedule setting<cr>.
3.2.13 Routing RS-232 Communication through the Matrix
The Matrices with the -JR Option are capable of sending serial commands to each
of the outputs.
3.2.13.1 Basics of Serial Communication with the Outputs
The Matrices with the -JR Option are capable of sending serial commands to each
of the outputs.
Primary
RS-232 Control
IP or Secondary
RS-232 Control
Processor
UART
Out Buffer
In Buffer
Out 1
Out 3
Figure 17 – RS-232 Communication Methodology
The block diagram above depicts the way a user can communicate serially with a
remote devices connected to the matrix’s outputs. Matrix units with JR output
option can send video and serial through the same RJ45 output connector. A
compatible receiver must be used at the remote end (such as UR-232 for transmit
only).
Referring to the above diagram, two control ports are shown on the left. The user
communicates with the matrix’s internal processor through either of these ports.
As seen on the right side of the block-diagram, the matrix must first establish
UART (RS-232 engine) connection to one of the matrix’s output ports. There is a
specific command for doing this which makes the connection and also clears both
the input and output buffers of the internal UART.
Once the UART is pointed to the desired output, then any data received from the
remote device (1~16), is stored in the “IN BUFFER”. There is a command to read
this buffer. Upon receiving this command the matrix will send the entire contents
of the input buffer to the user and erase the buffer.
32
Page 35

Genesis™ Matrix Switches
To send commands out to the remote device (1~16), the user can issue a transmit
command followed by a string of characters (ASCII or Hex), these characters are
stored in the UART’s output buffer. The user’s string must end with a special
“Terminal Character” followed by a Carriage Return. At that point the UART will
empty the output buffer to the selected remote device at the specified baud rate
(Terminal Character and subsequent CR will not be sent).
3.2.13.2 Commands for Serial Communication with each Output
All serial communication commands start with the letter X
1. Command: XC,n <cr> Stands for X Connect
Connects the UART an output (n) if n not specified, then it reports which
output the UART is pointed to.
Response: XC, n <cr> This indicates that the command completed successfully
2. Command: XT <cr> Stands for X Transmit
After this the matrix will wait for a max of 5 seconds to get the string of bytes
that are to be sent out. The number of bytes cannot exceed 64. If you have more
than 64 characters to send then you have to use multiple commands.
The unit stores all characters in a buffer and then sends all characters at the
specified baud rate to the desired output channel.
The unit does not care what data or characters are sent and they can range from
hex 0 to hex FF. What designates the end of the string are two specific bytes:
17h 0Dh -- 17 hex (^W) followed by 0D hex (Carriage Return)
17hex is considered to be a special Terminal Character. When the unit receives
17h then it looks for a CR to follow it. If CR does not follow the 17h, then the
17h is assumed to be part of the user’s string.
On the surface there appears to be a restriction in that the user’s string cannot
contain 17h 0Dh back-to-back. However, the matrix has a special provision for
the rare case when the user’s data is to contain 17h 0Dh back-to-back. Inserting
17h 17h 0Dh results in the transmission of 17h 0Dh and is not interpreted as a
termination of the stream.
After the 17h 0Dh the system initiates transmition of the sring received to the
target at the specified baud rate. The user must wait for this process to finish
prior to issuing another command.
Response: OK <cr>
3. Command: XR <cr> Stands for X Receive
33
Page 36

Hall Research Technologies, Inc.
p
t
The matrix stores the last 64 bytes received from the target in a receive FIFO,
then upon receipt of this command it sends whatever it has (as binary) out to the
user. Nothing if the buffer is empty.
Response: Any characters in the receive FIFO buffer.
4. Command: XB,n <cr> Stands for X Baud
If n is not specified it reports the current baud rate (1-8).
n = 1, 2, 3, 4, 5, 6, 7, 8
Baud = 1200, 2400, 4800, 9600, 19.2k, 38.4k, 57.6k, 115.2k respectively
Response: XB,n <cr>
5. Command: XP,n <cr> Stands for X Parity
n = 0 1 2
Tranmit Parity to target = None, Odd, Even respectively
Response: XP,n <cr>
3.2.14 IP Control Basics
Serial
Control
Control
IP
As shown in the figure above, the matrix can be controlled via RS232 Serial port
or through an IP (Ethernet) port if equipped. If the unit is missing the IP port, then
in its place, there is an auxiliary 2
The IP port of the matrix can be accessed via Telnet (interactive TCP connection).
Two ports are available, one for controlling the matrix and the other to configure
the IP parameters.
Though not recommended, using port 23 you can change the Ethernet interface’s
IP parameters such as IP address, gateway, port number, etc. The IP settings can
also be accessed through the unit’s primary RS232 serial port (recommended).
34
RS-232
Por
Matrix
Command
Processing
Port 1001
Port 23
IP Setu
Figure 18 – Control Block Diagram
nd
serial control port (see section 2.4.1.2).
Page 37

Genesis™ Matrix Switches
Port 1001 by default is used to control the matrix (this port number can be
changed as part of the IP Settings). The commands used to control the matrix are
the same as those through the RS-232 Serial port.
3.2.14.1 IP Setup Commands using the RS-232 Serial Port
IP interface on the matrix has a unique MAC-address, and it must be assigned a
valid IP-address to function properly on the network. As shipped from factory this
IP is 192.168.123.180
1. To get into the IP setting mode:
Note: Inactivity period of 16 seconds causes the system to exit this mode. You can also hit
ESC to end the IP setting mode.
Command: IP <cr> stands for IP setting mode
Response:
Enter IP commands:
This is the normal response meaning that IP setting through the RS-232 port is
allowed
- - - - - Alternate Response - - - - -
IP commands not enabled. Please refer to the manual
This message indicates that IP setting through the RS-232 port is disabled on
your unit for some reason. Please refer to section 3.2.12.2 below to enable this
mode
2. To get the current IP address of the matrix box:
Command: GIP <cr> stands for Get IP address.
Response:
192.168.123.180
3. To set a new IP address:
Command: SIP192.168.123.179 <cr> stands for Set IP address.
Response:
OK .................................................. if command completed successfully.
Error........................................................................... if command failed.
4. To get the current gateway IP address:
Command: GGI <cr> stands for Get Gateway IP address.
Response:
192.168.123.122
5. To set a new gateway IP address:
Command: SGI192.168.123.125 <cr> stands for Set Gateway IP address.
Response:
35
Page 38

Hall Research Technologies, Inc.
OK .................................................. if command completed successfully.
Error........................................................................... if command failed.
6. To get the current subnet mask:
Command: GNM <cr> stands for Get Net Mask.
Response:
255.255.255.0
7. To set a subnet mask:
Command: SNM255.255.255.0 <cr> stands for Set Net Mask.
Response:
OK .................................................. if command completed successfully.
Error........................................................................... if command failed.
8. To get the current port number (this is the port to access the matrix):
Command: GPN <cr> stands for Get Port Number.
Response:
1001
9. To set a port number (IP port that controls the Matrix):
Command: SPN1000 <cr> stands for Set Port Number.
Response:
OK .................................................. if command completed successfully.
Error........................................................................... if command failed.
10. To get a device/host name:
Command: GDN <cr> stands for Get Device Name.
Response:
xxxxxxxxxx
Note on Device Name
This is the host name assigned to the IP port; it is independent of the
name assigned to the matrix (NU command), though you can use the
same name if you wish!
11. To set a device name:
Command: SDNnew_name <cr> stands for Set Device Name.
Response:
OK .................................................. if command completed successfully.
Error........................................................................... if command failed.
12. To reboot the system for the changes to take effect:
36
Page 39

Genesis™ Matrix Switches
If you change the IP address, Subnet mask, etc., the changes do not take effect
unless you reboot the unit. You can do this by unplugging the AC from the unit
and reconnecting it in a few seconds, or by using the FB command discussed
earlier. However you must first exit the IP setup mode by hitting Esc,
3.2.14.2 IP Configuration through port 23
If you were unable to enter the IP setting mode through the serial command, a
Telnet TCP programming method can be used to turn on RS-232 serial mode
programming, or even to configure the network settings directly through port 23.
To open a Telnet section, a command prompt (Run: CMD) or a HyperTerminal
window can be used:
For example, to run a HyperTerminal window, set it up for TCP/IP connection on
PORT 23 along with the Matrix’s default IP address as the host address.
Telnet commands and replies have the following format:
STX Command/reply CR
• STX character (ASCII code 2 or CTRL-B from the keyboard)
The unit will respond with <CTRL-B> A for most valid commands.
1. To use the IP configuration Telnet commands, you must first log in using the
(L) command.
Command: <CTRL-B> L <CR> stands for Log in
2. To enable a serial IP setting (serial programming) mode, type the following
commands:
Command: <CTRL-B> SSE2 <CR> Stands for Set Serial Enable
Command: <CTRL-B> SEC6 <CR> Stands for Serial Enable Char
Command: <CTRL-B> O <CR> stands for log out
Reboot the system by cycling power. Now you should be able to configure IP
parameters through the IP port.
Alternatively instead of rebooting the system you could use <CTRL-B> <E>
<CR> to reboot the IP port, this may cause a momentary loss of Telnet
connection.
3. To get the current IP address:
Command: <CTRL-B> GIP <CR>
Response: <CTRL-B> A 192.168.123.180 <CR>
4. To set a new IP address:
Command: <CTRL-B> SIP192.168.123.179 <CR>
37
Page 40

Hall Research Technologies, Inc.
5. To get the current gateway IP address:
Command: <CTRL-B> GGI <CR>
Response: <CTRL-B> A 192.168.123.122 <CR>
6. To set a new gateway IP address:
Command: <CTRL-B> GGI192.168.123.125 <CR>
7. To get the current subnet mask:
Command: <CTRL-B> GNM <CR>
Response: <CTRL-B> A 255.255.255.0 <CR>
8. To set a subnet mask:
Command: <CTRL-B> SNM255.255.255.0 <CR>
9. To get a port number:
Command: <CTRL-B> GPN <CR>
Response: <CTRL-B> A 1001 <CR>
10. To set a port number:
Command: <CTRL-B> SPN1000 <CR>
11. To get the current device name:
Command: <CTRL-B> GDN <CR>
Response: <CTRL-B> A BB1123-A <CR>
12. To set a new device name:
Command: <CTRL-B> SDNconcert_hall <CR>
13. To Reboot device for the new parameters to take effect:
Command: <CTRL-B> E <CR>
Response: none! May lose connection
14. To log out :
Command: <CTRL-B> O <CR>
Response: <CTRL-B> <CR>
38
Page 41

Genesis™ Matrix Switches
Note on IP Settings through port 23
If you are unable to access the unit’s
port 23 from your PC using the
matrix’s default or last known IP
address, it could be that the IP
address of the matrix is not
compatible on your LAN. One way
around this is to connect your PC
directly to the Matrix’s IP port using a
cross over cable, or use a switch or
router not connected to anything else
but your PC and the Matrix, and then
configure your PC for a static IP
compatible with the current address
of the matrix. If the matrix has the
factory default of 192.168.123.180, a
PC address of 192.168.123.nnn may
be entered where nnn is any number
except 180.
Note on Accessing the Matrix via the Internet
It is best to contact your IT or network administrator for assistance. As
mentioned earlier you can control the matrix through its IP via port
1001 (default). Most likely the unit will be on a local network connected
to an Ethernet Switch or Router with a WAN connection. To access the
matrix from outside your local network, you should configure the
Ethernet Switch or Router to treat the IP and port assigned to the
matrix as a virtual server this is a setting of your switch or router. Then
you can access the matrix from anywhere on the internet via your WAN
address and assigned port. It is advised to set the matrix’s Gateway
address the same as your Ethernet switch or router’s Gateway IP
address. In case of trouble please contact your IT administrator for
assistance.
39
Page 42

Hall Research Technologies, Inc.
4.0 Maintenance and Troubleshooting
4.1 Maintenance
The matrix will flash the CHECK button LED constantly if one of the following
conditions occurs:
• RTC Battery Voltage is below 2.4V
• +5V Supply is outside of normal operating range 4.5V – 5.5V
• +12V Supply is outside of normal operating range 10.8V – 13.2V
• System temperature is exceeding 122° F (50° C)
If the battery needs changing, please contact Hall Research (during the warranty
period).
Caution High-Voltage
Never open the unit’s cover. Lethal voltages exists inside the unit
Opening the unit also voids your warranty.
If there is a problem with the 12 or 5v supplies, you need to return the unit for
repair. Please see next section. If the temperature is excessive in the unit, you
must make sure that there is adequate air flow around the unit.
4.2 Troubleshooting
Make sure that all your connections are solid, and check the state of the LED’s on
the front of the unit. Do not open or try to repair the unit yourself. There is no
customer repairable item in the unit and you will void your warranty.
Contact Hall Research Technical Support at 714-641-6607 or via email or web. If
you need to ship your matrix switch for repair, make sure to get a Return Material
Authorization (RMA) number first.
40
Page 43

Genesis™ Matrix Switches
5.0 Specifications
Video Inputs 8 or 16 HD15 female connectors
Video Outputs 8 or 16 HD15 female connectors
Resolutions Supported PC resolutions up to 1900x1200 @ 60 Hz & HDTV to
1080p
Video Levels -0.3v to 0.7v (1 V p-p) on RGB, 0 to 5v DC on Sync
Audio Inputs Unbalanced Stereo
Audio Input Levels 0 to +4dBu (0.78 to 1.23Vrms) line level
Audio Outputs Balanced Stereo on screw terminals
Audio Bandwidth 10 Hz to > 10 MHz (could pass through analog or
digital S/PDIF audio sources)
Temperature Operating: 32 to 122°F (0 to 50°C);
Storage: –40 to +185°F (–40 to +85°C)
Enclosure Steel with Aluminum front panel
Battery Type CR2032 (3v Lithium)
MTBF 90,000 hours (calculated estimate)
Power 100VAC-240VAC 50/60Hz
Size 3.5" High x 19" Wide 12.78” Deep
Weight 9.4 pounds
41
Page 44

Hall Research Technologies, Inc.
Appendix 1 – Front Panel Quick Reference Guide
Figure 18 – Control buttons on the front panel
Function Procedure
View ties or Make ties Hit VID and/or AUD buttons to light desired
Hit any of the INPUT or OUTPUT Buttons
To change ties, hit any INPUT or OUTPUT then
hit ENTR
Use ▲ and ▼ buttons to quickly scroll
Recall Presets Hit PRE (button lights up)
Hit any of the 16 INPUT buttons
Hit ENTR
Save Presets Hold PRE until it starts blinking
Hit any of the 16 INPUT buttons
Hit ENTR
Disconnect all outputs Hit PRE (button lights up)
Hold ▲
While holding the ▲, hit ▼ button
Reset to Factory Defaults Disconnect power
Hold ENTR
While holding ENTR, plug power
Set output audio line
levels to Pro +4dBu
Set gain for each audio
input, or view sound
level on f/p VU meter
Hold AUD until it starts blinking
Hit either ▲ or ▼ buttons
Hold AUD until it starts blinking
Hit any of the INPUT buttons
Use ▲ or ▼ buttons to adjust gain
42
Page 45

Genesis™ Matrix Switches
Appendix 2 – Command Summary
Command Function
COn,m Connect Output (both A&V). n = output, m= input
Omitting ,m will show current connections
Substitute * for n to tie all outputs
Substitute 0 for m to blank and mute that output
CVn,m Connect Video output. n = output, m= input
Omitting ,m will show current connection
Substitute * for n to tie all outputs
Substitute 0 for m to blank the output
CAn,m Connect Audio output. n = output, m= input
Omitting ,m will show current connection
Substitute * for n to tie all outputs
Substitute 0 for m to mute the output
PRx Preset Recall... x = preset # can be 1 to 16
PSx Preset Save... x = preset # can be 1 to 16
NU Name Unit
FR Factory Restore (back to default settings)
FB Firmware Boot (Resets the entire system)
RT Read Temperature
RI Read Identity (firmware version, & characteristics)
RV Read Voltage levels (battery, power supply)
RB Read Bar (reads VU level of output #1 Left Chan)
DS Date and Time Read/Set
SS Schedule Read/Set
LPn Line level Pro. n = 0 or 1 (0 consumer, 1 pro)
AGn,g Audio Gain
n = input channel (could be *) , g= value 0 to 16
Omitting ,g will show current value
IP Access or change IP settings of Matrix
GIP (get IP) SIP (set IP)
GGI (get Gateway) SGI (set Gateway)
GNM (get Net Mask) SNM (set Net Mask)
GPN (get Port No.) SPN (get Port No.)
GDN (get Dev Name) SPN (set Dev Name)
43
Page 46

Hall Research Technologies, Inc.
44
Page 47

Page 48

Product Designed and Made in the USA
 Loading...