

Page 1
Hall Research
Technologies, Inc
1163 Warner Ave
Tustin, CA 92780
Phone: (714) 641-6607
Fax: (714) 641-6698
Oppeerraattiioonn IInnssttrruuccttiioonnss
O
Projector Controller
Programmable Serial
Device
Page 2

Page 3

Projector Controller Programmable Serial Device
Table of Contents
DESCRIPTION ............................................................................................................. 4
FEATURES .................................................................................................................... 4
OPERATION ................................................................................................................. 5
HOW TO CREATE COMMAND STRINGS .......................................................... 6
UPLOADING COMMANDS TO THE URA-RS232.............................................. 7
CONNECTING THE URA-RS232 TO THE SERIAL DEVICE ......................... 8
SPECIAL CONNECTION INFORMATION:......................................................... 8
FRONT PANEL STATUS INDICATOR.................................................................. 9
FEDERAL COMMUNICATIONS COMMISSION STATEMENT................. 10
WARRANTY ...............................................................................................................10
LIMITED LIABILITY............................................................................................... 10
3
Page 4
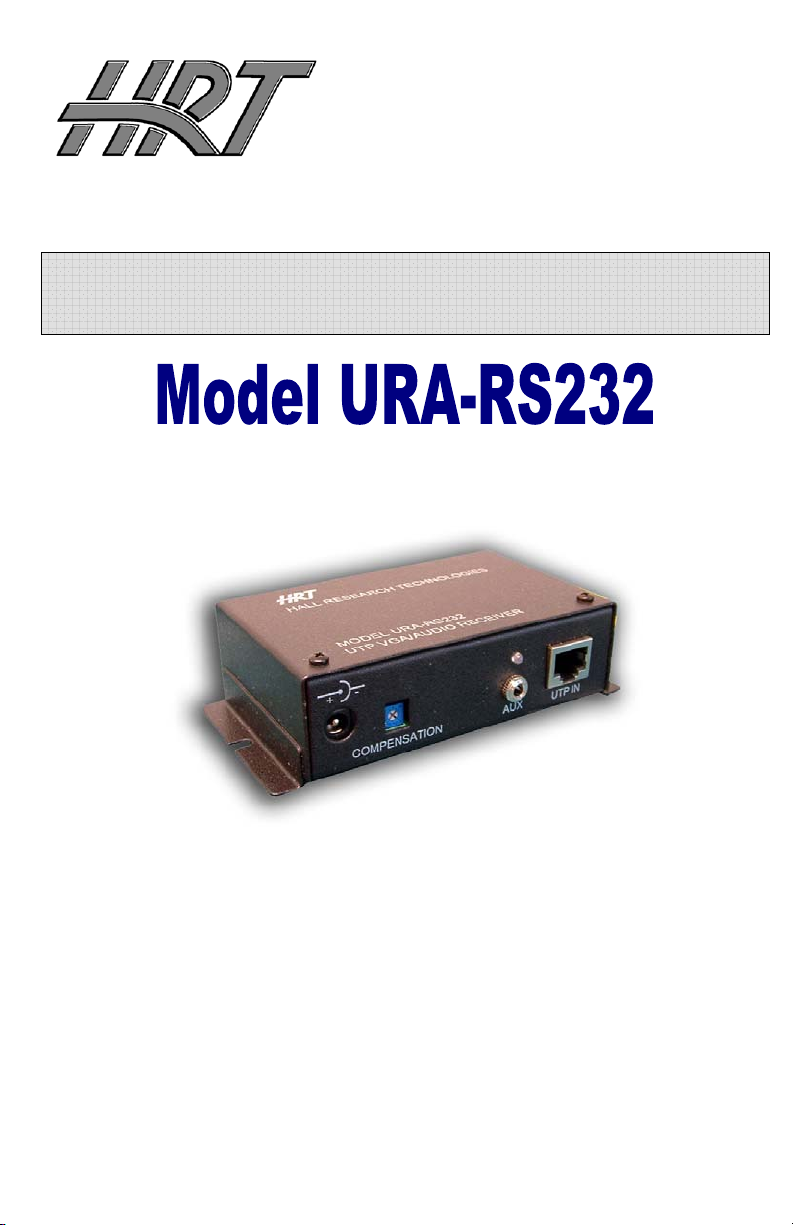
Model URA-RS232
Description
The Model URA-RS232 is a standard VGA-plus-Audio over Cat5
Receiver with the added feature of having a programmable RS-232
serial device port for the control & automation of a Projector, LCD,
or any other device with serial port.
The URA-RS232 has a discrete input that senses a dry contact
closure (or Voltage Level)
“High-To-Low” transitions of the ‘EXT CTRL’ input and issues
corresponding commands out the serial port of the URA-RS232 to
the serial device (projector).
The commands can be any ASCII (or non-ASCII) data with
programmable delays embedded in the string. The commands can
also be complex multi-part strings typical of many modern
projectors.
Hall Research provides a powerful Windows® based application
(available on-line) that is used to create the data files and upload it
to the URA-RS232, via a supplied cable.
. It detects both “Low-To-High” and
Features
9 Compact, Reliable, and Economical
9 2 user-programmable Command Strings
9 Allows multiple instances of user-defined delays within
each string
9 Intuitive Operation
9 Windows™ software for programming available on-line
9 Made in USA
9 Dual color front panel LED status indicator
4
Page 5
Projector Controller Programmable Serial Device
Operation
The URA-RS232 is designed to send a
string of commands to a serial device
(projector) via the serial interface, when
the discrete input transitions. When the
‘EXT CTRL’ input transitions “High-ToLow”, the dry contact is opened, the
URA-RS232 will send the “OFF” string
to the serial device (projector) and
when the ‘EXT CTRL’ input transitions
“Low-To-High”, the dry contact is
closed, the URA-RS232 will send the
“ON” string to the serial device
(projector).
The URA-RS232 will communicate with
the serial device (projector) at some baud rate specified in the user’s manual
of the serial device (projector). The URA-RS232 programming software will
allow the user to select that baud rate for the serial device (projector). The
URA-RS232 programming software will also allow the user to upload two
strings to the URA-RS232. This will consist of the ON string and the OFF
string. These strings are limited to 100 characters in length each. These two
strings can be constructed directly in the URA-RS232 programming software.
The user will then be able to upload the baud rate and the two strings to the
URA-RS232. The URA-RS232 will, in turn, send out these strings to the
serial device (projector) when the ‘EXT CTRL’ input changes state.
The user also has the ability to include a number of waits in the string of
commands. For example the user may send out the commands ‘CCB’ and
then wish to wait for 3 seconds and then send out additional commands.
This will be explained in further detail below.
5
Page 6

Model URA-RS232
How to Create Command Strings
First, select the comm. port you will use to
connect the URA-RS232 to the PC.
After you select the comm. port, you will be asked if you
wish to use an existing file or create a new file. Until you
have saved a file, choose “Create New” and give your
new file a name.
To build the “ON” and “OFF” strings
URA-RS232 programming software,
start typing the ASCII commands in
the “ON String” or “OFF String”
windows. If you wish to insert a Wait
Time in between codes, just specify
the Wait Time in the Hours, Minutes,
and Seconds fields and click “Insert
Wait”. The maximum Wait Time is 16
hrs. 59 min. 59 sec. If you need a Wait
Time longer than that, just insert
repeated wait commands back to
back. If you need to insert a Hexadecimal byte, you must type the
Hexadecimal byte into the Hex Byte window and click Insert Hex Byte. The
Hexadecimal bytes can occupy the hexadecimal range of 0x00 to 0xFF.
Note!
There are a few restrictions you need to be aware of when you are building
your string. The Backspace key is the only way to correct/delete characters in
your string. You can only Backspace from the end of the string. The Windows
“Paste” function has been disabled. You may only insert a character at the
end of the string. The maximum length of the ON or OFF string is 100
characters. A Wait will occupy 3 character spaces in the string. Any ASCII
character input from the keyboard will increment the string length by 1. All
Hexadecimal bytes will increment the string length by 1 character with the
exception of the Hexadecimal byte x1B. This hexadecimal byte will occupy 2
bytes
.
6
Page 7

Projector Controller Programmable Serial Device
Uploading commands to the URA-RS232
After you have loaded a configuration file
containing your “ON” string and “OFF” string or you
have created your “ON” string and “OFF” string you
are now ready to upload the “ON” and “OFF”
strings to the URA-RS232.
Connect the URA-RS232 to the PC’s comm. port
you selected earlier via the supplied programming
cable. The supplied programming cable is a 6’
cable that has a female DB-9 connector that
connects to the PC and the other end is a male mini-stereo connector that
plugs into the URA-RS232
.
Important!
You may need to use a crossover
serial cable (also know as a NULLmodem cable) to connect the URARS232 to the device you want to
control.
There are 2 types of serial devices:
1. DTE (Data Terminal Equipment) ex. Computer/ PC
2. DCE (Data Communication Equipment) e.g. Serial controlled
projector, modem, or the URA-RS232.
DTE devices talk directly to DCE devices. If you have 2 DTE devices trying to
talk, they need a crossover serial cable connecting them. In the same way if
you have 2 DCE devices trying to talk, they will need a crossover serial cable
connecting them as well. Generally DTE devices will have a male DB9
connector and DCE devices will have a female DB9 connector. You will
notice that the serial cable included with the URA-RS232 has a female DB9
connector. This indicates that the URA-RS232 is a DCE device, which is why
it will connect directly to a computer/PC serial port. When you are done
uploading the “ON” and “OFF” strings to the URA-RS232, you will need to
use a crossover or straight through serial cable to connect the URA-RS232 to
your serial device depending on what type of serial device you are trying to
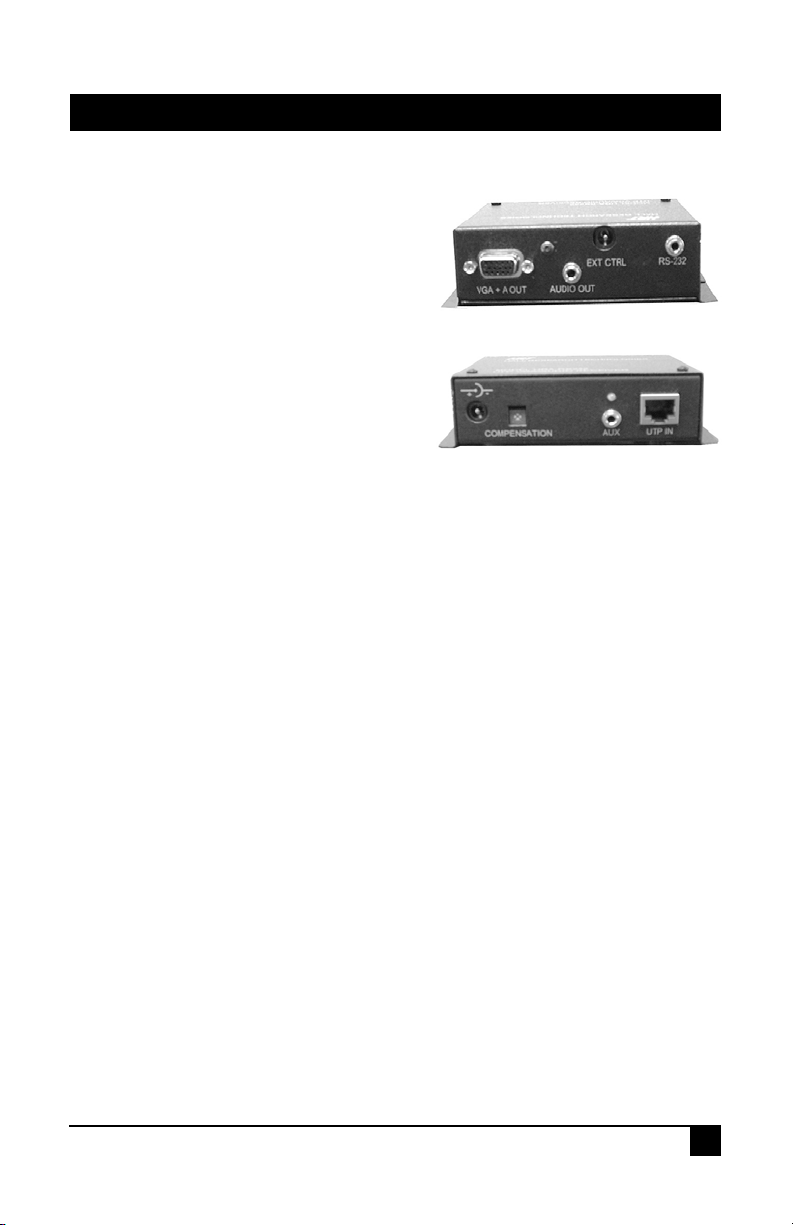
control. Here is the pinout for the URA-RS232.
Power on the URA-RS232 and click the “Upload” button.
A message box will tell you when the upload has completed
.
7
Page 8

Model URA-RS232
Connecting the URA-RS232 to the serial device
• Connect the URA-RS232 to the serial device (projector) via the serial
interface using the supplied programming cable.
• When connecting the URA-RS232 to the serial device (projector)
you must use a crossover serial cable in addition to the supplied
programming cable.
• This will connect the TX line of the serial interface on the URA-
RS232 to the RX line on the serial interface of the serial device
(projector).
• Without a crossover serial cable between the supplied
programming cable and the serial device (projector), the serial
device (projector) will not receive any commands from the URARS232.
• Connect the dry contact closure wiring to the EXT CTRL input to the
URA-RS232
.
SPECIAL CONNECTION INFORMATION:
• By default the URA-RS232 is configured to detect a CONTACT or a
NON-ISOLATED VOLTAGE. By special request at the time of the
order, the unit can be configured to detect an OPTICALLY
ISOLATED VOLTAGE.
• Both the CONTACT/NON-ISOLATED
configurations use the EXT CTL jack for detection of the signal.
o For Contact/Non-Isolated Voltage configurations
unit, ALWAYS ensure that if you supply a voltage to the
EXT-CTL jack, it is applied as CENTER POSITIVE in the
range of 3-24 vDC. The device will not
unplugging the EXT CTL jack. The sensing circuit is
normally ‘pulled’ high. This means that in order to detect the
‘No-Voltage applied’ condition, your circuit must represent a
low resistance.
o For OPTICALLY ISOLATED configurations
ensure that the voltage is applied as a CENTER POSITIVE
in the range of 3-9 vDC. This voltage should be isolated
from the units Supply Voltage.
• Failure to observe these warnings may result in damage to the unit
and void your warranty
Connect the supplied Power Supply (6 vDC) to the URA-RS232 and you are
done
.
and OPTICALLY ISOLATED
of the
sense 0 volts by
, ALWAYS
8
Page 9

Projector Controller Programmable Serial Device
Front Panel Status Indicator
The front panel has a convenient dual color LED that is used to indicate
which of the two command strings has been issued last from the URARS232. If the last command sent to the device was an “ON” string then the
LED will be solid Green. If the last command sent to the device was an “OFF”
string then the LED will be Red.
Anytime the unit is powered on, the LED will blink Red and Green until a
string is sent out.
While the “ON” string is being sent out, the LED will blink Green.
When the “ON” string is done being sent out, the LED will be a solid Green.
While the “OFF” string is being sent out, the LED will blink Red.
When the OFF string is done being sent out, the LED will be a solid Red.
After uploading commands to the URA-RS232 via the URA-RS232
programming software, the front panel LED will blink Red and Green until a
string is sent out the serial port
.
9
Page 10

Model URA-RS232
Federal Communications Commission Statement
This equipment generates; uses and radiates radio frequency energy and, if
not installed and used in accordance with the instructions, may cause harmful
interference to radio communications. This equipment has been designed to
comply with the limits for a Class A computing device, pursuant to Part 15 of
the FCC rules. Harmful interference when operated in a commercial
environment. Operation of this equipment in a residential area is likely to
cause interference, in which case the user, at his own expense, will be
required to take whatever measures are necessary to correct the
interference.
If necessary, you should consult the place of purchase or and experienced
radio/television technician for additional suggestions.
Warranty
HRT warrants that the supplied equipment is free from defective
workmanship and material. Subject to the agreements set forth, will repair or
replace, at its option, the defective components for a period of 2 years after
purchase. The following conditions apply to the Warranty:
Warranty void if item subject to improper use, negligence, or unauthorized
modification
Instructions must be followed in obtaining RMA number as explained below
Any defective part should be returned, insured and freight prepaid, to Hall
Research, with the following:
• Return Material Authorization Number (RMA#)
• Description of failure, as detailed as possible
• Shipping address and contact name and phone number
Limited Liability
IN NO EVENT SHALL THE DIRECT VENDOR'S LIABILITY EXCEED THE
PRICE PAID FOR THE PRODUCT FROM DIRECT, INDIRECT, SPECIAL
INCIDENTAL OR CONSEQUENTIAL DAMAGES RESULTING FROM THE
USE OF THE PRODUCT OR ITS DOCUMENTATION
10
Page 11

Page 12

Products Designed and Made in the USA
© Copyright 2008. Hall Research Technologies, Inc.
All rights reserved.
1163 Warner Ave Tustin, CA 92780
Ph: (714)641-6607, Fax: (714)641-6698
 Loading...